Brian Meert's Blog, page 65
September 21, 2020
9 Facebook Retargeting Strategies for Better Ad Conversions

SEPT. 21, 2020
 NESA by Makers / Unsplash
Advertising works best when shown to a targeted audience, which you can define by demographics, education levels, professions, and much more.
Other than these criteria, there is one more step to successful targeting: There is retargeting, the best performing audience filtering technique. Retargeting gives you another chance to close the sale.
What Is Retargeting?
Retargeting is showing your Facebook ads only to those who engaged with your website or products, made recent purchases from you, or browsed through your catalogue. It guarantees a better ROI because your ads will only be shown to an audience most likely to be interested in your products or services.
How Does Facebook Retargeting Work?
Facebook’s retargeting system is highly effective, all thanks to the Facebook Pixel, a tool that tracks visitors’ activity on your website after clicking on your ad. The data the Facebook Pixel provides answer the three who’s:
Who visited your website
Who purchased from you
Who looked at specific pages of your website
When you know who is doing what, it’s easy to target them.
Before you can retarget your Facebook ads, you must first set up the Facebook Pixel. Get the tracking code, add it to your website, define your audience, and go on with your campaigns.
9 Facebook Retargeting Strategies
Here are the nine Facebook retargeting strategies you can’t afford to miss.
1. Retarget users who visited a specific page.
It’s the simplest retargeting option, which shows your ads to people who visited specific pages that contain the Facebook Pixel retargeting code.
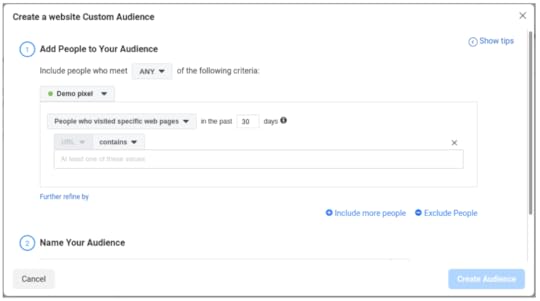
Setting this up is easy. Simply get the pixel code from Facebook Ads Manager and place it inside the header ( ) of your pages.
2. Retarget people searching for your products.
Facebook gives an option to show your ads to people who searched for specific products on your website. This means, for example, you can show your ad for elegant shirts to people who searched for them on your product catalog. You can do this by using Dynamic Product Ads.
To set up Dynamic Product Ads, you need to upload your catalog to Ads Manager then create an audience that has viewed specific products on your website. Make sure to exclude people who visited your order confirmation page because they already bought that product from you, and you want to show the ad to people who are looking for the product but haven’t bought yet.
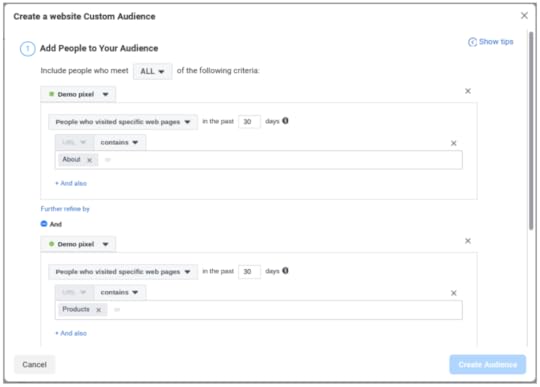
3. Retarget people who want to learn more about you.
Customers like to know more about you before buying your products or services. You can retarget these customers and push them to purchase when creating your Custom Audience.
To set up this audience, filter according to those who visited your company’s “About Us” page. By doing this, you can show your ads to people who want to learn more about you. Remember to also include those who visited your products or services page because they are most likely your true prospects.
4. Retarget people who were about to sign up.
The Facebook Pixel is strong enough to detect any event on your website, and one of those events detects people who started filling out your lead form. You can filter according to those who started filling the form but didn’t complete the process.
Filter according to people who started filling the signup form then exclude people who completed the signup process. The remaining audience to retarget is those who wanted to sign up but didn’t sign up yet.
If you’re not successful in gathering leads from your signup form, you need to A/B test your landing page, copy, call to action, and other elements of your landing page. You can use landing page and marketing automation tools like Kartra to further optimize and improve landing page experience and conversion.
5. Retarget people who inquired about your pricing.
Anyone who wants to do business with you will surely look for your pricing. You can retarget people who visited your pricing page then show them ads to close the deal.
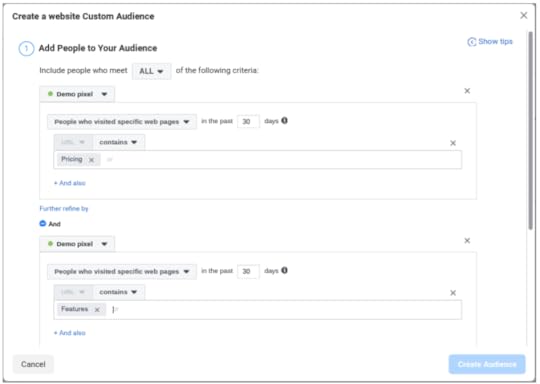
To set up this audience, filter people who visited your pricing page. To get better results, also include those who looked for the features, services, or products you’re offering. These are the true customers looking to do business with you.
6. Retarget people who need to know the next step.
Sometimes, people leave a website when they’re not sure what to do next. By using Facebook remarketing, you can show people the next steps.
Setting up this audience is easy. All you have to do is install different pixel codes at every step on your website. People who reached a specific step will be targeted with ads created for that audience.
7. Retarget people who visited at specific time frames.
If you want to show ads to people who visited your website in the last 10 days but not in the last 5 days, you can do so by setting time constraints.
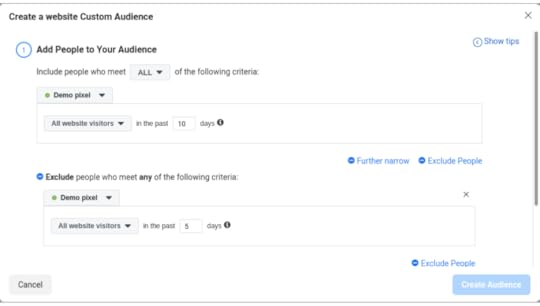
Filter people by their actions within a time frame. For example, you can target people who visited your website 10 days ago. You can also filter more by excluding people who visited your website 5 days ago. Your final audience is people who visited your website 5 to 10 days ago.
8. Retarget existing customers.
Retaining existing customers is always more cost-friendly than attracting new ones. You can use retargeting to retain and even upsell to your existing customers.
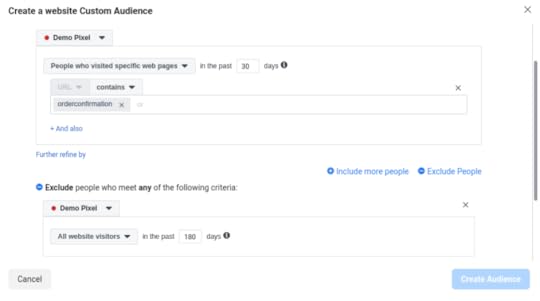
Filter according to people who visited your order confirmation page. This option is only available when an order is complete. Also, filter according to people who haven’t visited your website in the last 90 or 180 days. This will help you target your lost customers, too.
9. Exclude people not in your funnel.
Not all website visitors can be your customers; for example, job seekers and students who are looking for internships with you are likely not interested in buying your products or services. You can easily exclude those people from your funnel if you have a dedicated career page on your website.
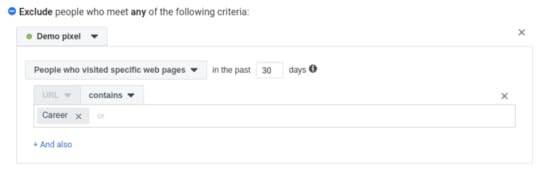
In your audiences, exclude people who visited your Career page. This will save you money by not displaying your ads to these people.
Conclusion
Avoid wasting your money on irrelevant people. Retarget your ads to improve overall campaign ROI.
By Bhargav Bavarva


September 18, 2020
Top 5 Proven and Effective Amazon Marketing Strategies That Turn Listings to Sales

SEPT. 18, 2020

Stokkete / Envato Elements
Let’s go straight to the facts:
55 percent of consumers go directly to Amazon to search for items instead of a search engine.
More than 200 million people visit Amazon every month.
Amazon sold $173 million worth of products on Amazon Prime Day 2019 alone.
These three facts are enough to prove Amazon’s powerful presence in the e-commerce industry.
With the opportunity brought by the e-commerce site for sellers, converting listings to sales is almost as good as a guarantee, but along with millions of people wanting to take advantage of this opportunity, how do you make sure your products stay ahead of the competition? Below are five proven and effective Amazon online marketing strategies that you should know.
1. Pay-Per-Click Campaigns
What is it?
Pay-per-click (PPC) is Amazon’s internal marketing system, which allows you to promote your products and brand within a limited budget. As the term states, sellers will only have to pay the amount equivalent to each click’s worth that each advertisement received.
PPCs come in three types:
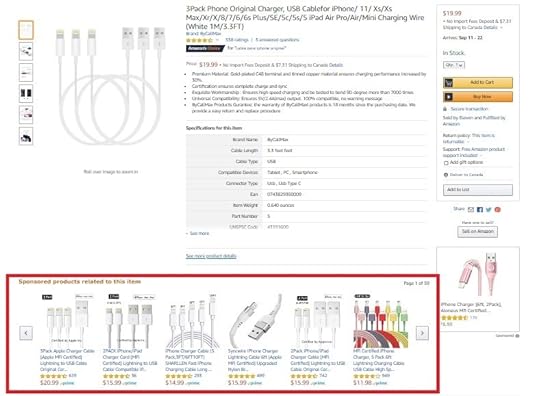
Sponsored Products are for individual items, which can be found below the search results or below the product descriptions.
Sponsored Brands are also known as Headline Search Ads. These allow you to feature your brand’s logo, along with three of your top products. Each click to these ads leads to the brand’s landing page.
Sponsored Display allows you to advertise on websites outside of Amazon.
How this works.
To start your PPC campaign, you must have at least one product listed under Amazon’s Brand Registry and be eligible for the Buy Box; meaning, you must be subscribed to FBA. Creating a PPC campaign comes in two steps: adjusting the campaign settings then creating an ad group.
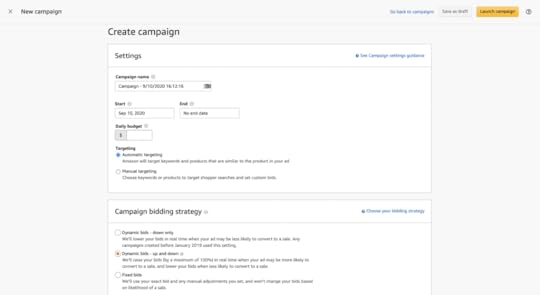
For the first step, you must enter the campaign name, duration, and daily budget. The second step requires you to input the ad group name (if advertising more than one product), the specific products to be advertised, and your bid per keyword.
PPC is a bidding process. You determine the keywords you want to rank for and bid an amount that you’re willing to pay for each click that you get. Of course, the highest bidder will get the slot but will only have to pay the amount worth $0.01 more than the second-highest bidder’s bid.
How this can help you.
PPC helps your products get the most exposure. It guarantees that your products only appear on searches that use relevant keywords. This does not only increase the conversion rate of each click, but it is also relatively low cost, as you will only pay the amount worth the number of clicks.
2. Deals
What are deals?
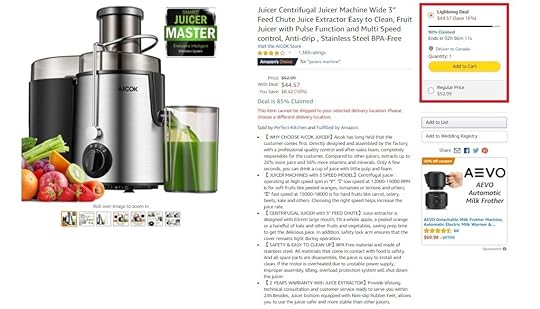
Deals are limited-time promotions where products are offered at discounted prices. This method is usually used to increase sales or reduce inventory. Amazon has an in-house deals system called Lightning Deals, but Amazon deals can also be offered in other deal sites.
How it works.
Through your seller account’s Deals Dashboard, create a lightning deal by providing the following information: deal name, eligible products with variation and quantity, deal price, and deal duration.
Note that Lightning Deals is only available for professional seller accounts. Deals also only last for 4 to 12 hours and can only be featured once every seven days. This is to ensure that buyers get fresh new deals every day.
How this can help you.
The Lightning Deals page is one of the most frequently visited pages on Amazon. Although it will require you to cut down your profit margin by offering discounted rates, this can increase your traffic and sales. This can be the most helpful for newly launched products. It can also assist you when it comes to brand recognition.
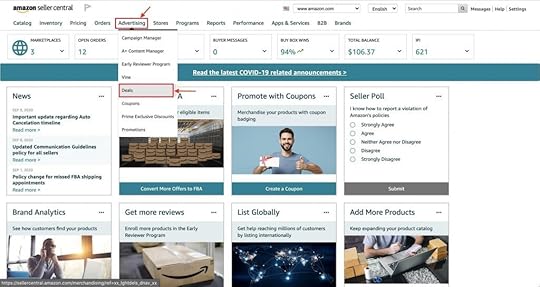
3. Amazon A+ Content
What this is.
Amazon A+ Content, a feature exclusive to registered brand owners, allows sellers to upload enhanced media for their listings. This includes introductory videos, HD photos, brand stories, and more.
How this works.
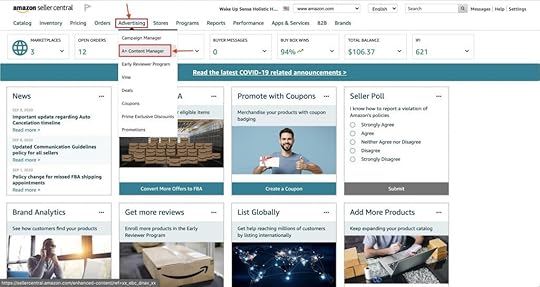
In your Seller Central homepage, click “A+ Content” under the “Advertising” tab. You can let Amazon do the building for you, or you can do the designing yourself. If you choose self-service, however, you still have to select from the existing modules. These modules are template layouts of the product page.
How this can help you.
Amazon A+ content makes it easier for sellers to offer premium-priced products because they have more opportunities to communicate the product’s value. With the help of enhanced content and the power of combined media and text, buyers are given a better user experience and a better understanding of how the product offers the best value for the buyer’s money.
4. SEO Optimization

What is it?
Aside from being an e-commerce site, Amazon also functions as a search engine. Buyers input keywords into the search bar, and Amazon generates the most relevant products based on the keywords and filters used. SEO optimization is simply making sure that your listings are visible and on top of search results.
How this works.
Amazon uses an algorithm called A9 to filter listings and provide a list of relevant results for each keyword search. The goal is to make your listings rank on the most relevant keywords or words that buyers will search for when looking for a product. To do this, listings must be optimized for both the Amazon algorithm and the buyers’ human eyes.
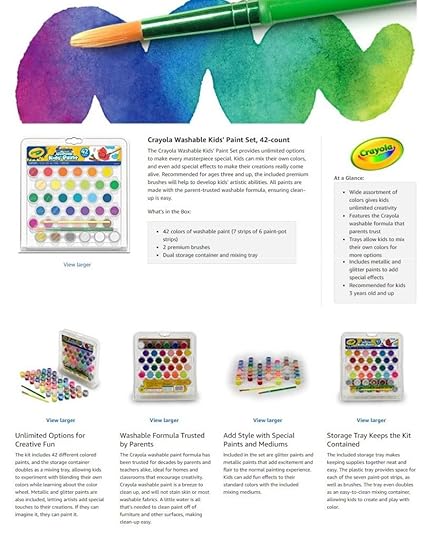
The Amazon algorithm changes from time to time, which can often be unannounced. For reference, here are the golden numbers from a 2018 study conducted by e-commerce solutions provider Skubana:
60 to 80 characters for the title
5 bullet points
6 to 8 images
400 characters for the description
How this can help you.
A huge chunk of Amazon sales come from the first page of search results. The farther your product is in search results ranking, the lower your its chances of being clicked and making sales. To secure consistent sales, sellers must keep listings relevant enough to at least be on the first page of search results, if not on the top three.
5. Off-site Advertisements
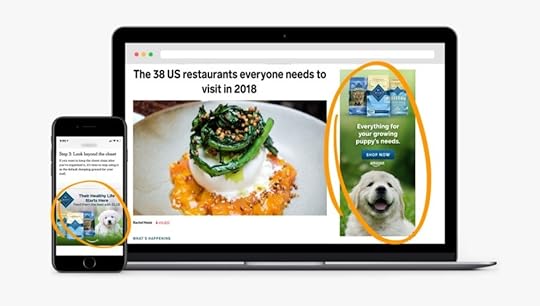
What is it?
Amazon DSP (demand-side platform) is another form of Amazon’s internal advertising features that allow sellers to use display, audio, and video ads on and off Amazon’s website. You can choose to let Amazon generate the advertisements or run things on your own. Nevertheless, DSP generates insights to help measure campaign effectiveness and to help sellers better strategize their campaign.
How this works.
Sellers will have to design the product placement itself (photo, audio, or video) according to the creative guidelines and suggested size. These advertisements contain links that direct to whichever page you want to land (website, brand page, or product page).
How this can help you.
Off-site advertisements improve conversion rates and lower cart abandonment rates. With product placement all over the internet, buyers have higher chances of brand recall. Off-site advertisements expand your reach while still making sure that you are targeting the right audience.
Key Takeaways
With the rise of opportunities online also comes the rise of competitors. Although being on the market is an excellent first step, it is essential to make the most out of the given opportunity. Even though these marketing tools are widely available, there is still a strategy that works better for each specific situation. Consult your trusted solutions provider today to make sure you get the best tools for your business.
September 17, 2020
The Benefits and Drawbacks of Influencer Marketing

SEPT. 16, 2020

Mateus Campos Felipe / Unsplash
Influencer marketing has tremendously grown in the recent past. From big to small businesses, entrepreneurs are opening up to this form of marketing tactic. This could be because it leverages the ready audience of an influencer to drive quick results in brand awareness and business growth.
However, this seemingly very effective marketing strategy also has some downsides. That’s why it’s important to weigh both the pros and cons before plunging into it.
If you’re thinking of using an influencer to market your products, this article will help you make an informed decision.
Pros of Influencer Marketing
1. It centers on a relevant audience.
If you partner with an influencer who works in the same niche as you, you can reach a more relevant audience because the influencer’s followers are already interested in what he or she has to share. By working with an influencer, your message reaches people who are likely to be interested in your products or services without you lifting a hand to find them.
2. It builds trust quickly.
Building trust between an organization and its customers takes time and effort. However, the process is quicker when you use an influencer. You see, an influencer is an individual who is trusted in his or her niche by followers. The same people are bound to trust your message when you pass it through a person they trust.
3. It reaches a huge audience.
As said earlier, influencers command a large following in social media platforms. Take Kim Kardashian West, for example. At the time of writing, she has 188 million followers. Another influencer, Baby Ariel, although not as well known, has 9.7 million followers. When an influencer talks about your brand, she’s reaching a large audience, even to millions of people. Because this increases your reach, you are able to tap into new and larger markets that you could have otherwise not done on your own.
4. It doesn’t appear pushy.
It’s easy for people to ignore or even distrust a product if a marketing tactic appears pushy to them. A majority of internet users mostly use ad blockers to stop seeing annoying ads online and on social media. However, people following an influencer do so out of their own will. That’s why a post from an influencer can never be annoying or pushy to them. Plus, influencers usually promote brands in a very organic way. Here’s one example from influencer Toshi Shek, who casually promotes a brand of pots to her followers.

Cons of Influencer Marketing
1. Mistakes can be costly.
If you are expanding your products to international markets, one of the best ways to reach people is to localize your marketing strategy. This might mean using an influencer from those countries. However, this calls for understanding the laws and regulations of those countries, including tax and labor laws. A single mistake can be very costly for your business.
To avoid making mistakes with the logistics, it’s better to use a partner from those countries. For instance, if you want to hire an influencer in China, consider using a China Employer of Record, such as NH Global Partners, to deal with influencers, and all your Chinese hires for that matter, on your behalf.
2. It’s not easy to find the right influencer.
As said earlier, for an influencer marketing strategy to drive results, you need to match with an influencer relevant to your niche. This is not an easy thing to do, and you might take months before you land one. The results of influencer marketing might be instant, but it takes a lot of time and effort before launching the campaign.
3. You risk your reputation.
Influencer marketing is relatively new in the market, so it’s more of a trial and error for most brands. If you land the wrong influencer, your time, effort, and resources are highly likely to go to waste without any results to show for it.
In addition, the success of campaigns largely depends on how the audience perceives the collaboration. If the audience doesn’t resonate with it, it can badly damage your brand’s reputation and that of the influencer. Unfortunately, restoring a brand’s reputation with the public takes time and money.
Conclusion
In a nutshell, there lies a thin line between a successful influencer marketing strategy and one that is a failure. The secret, however, lies in landing a relevant influencer who is credible, who is trusted by his or her followers. It’s not an easy feat to do so. You might need to have a team in place to help you do the vetting. You also need to have a team monitoring the results and tracking progress.
September 14, 2020
Twitter Marketing Tips and Strategies for 2020


Moran / Unsplash
Companies across the globe market on Twitter to engage with their followers, all while building brand awareness, boosting leads and conversions, and so much more. Twitter is known to be an easy platform on which you can distribute your content, what with it having more than 330 million average monthly users globally.
With every social media network, there are different strategies involved. Although your Facebook strategy might be giving you exceptional leads, the same strategy might not work for Twitter. How can you make sure Twitter users interact with your content? Here are some helpful tips and strategies, so you can take Twitter by storm in 2020.
Customize Your Profile
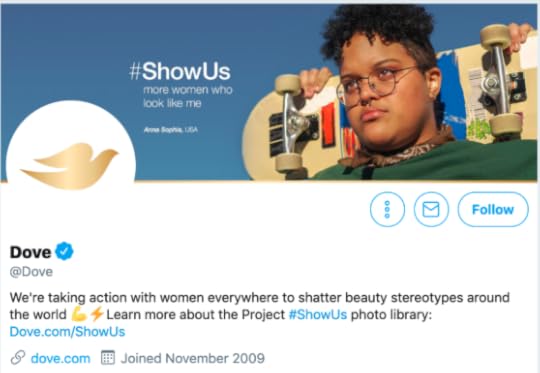
Customize your Twitter profile to match your brand identity. You need to make sure that when people come across your profile, they’ll be able to identify your brand immediately. Make use of your company colors and logo when choosing a display photo. If your company has a slogan, you can place it in the bio, too.
For example, Dove uses its logo for its default photo and features its slogan on the cover image. When users come across this profile, they’ll know it’s representing Dove.
Your Twitter handle should resemble your brand name. If you can’t fit the full name into your handle, try to abbreviate, but make sure it’s still recognizable. Your customers and fans need to be able to find you easily when searching for you on the platform. If your handle is abbreviated in any way, make sure your display name matches the brand’s full name. And of course, don’t forget to provide a link to your website in your bio.
Run Twitter Ads
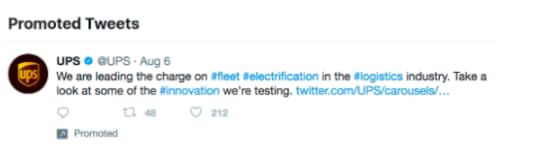
In recent years, more brands are opening up to the idea of promoting on Twitter as part of their social media marketing campaigns. Paid advertising on Twitter is a great way to reach your target audience. It makes your Tweets easy to be discovered by hundreds of people who aren’t already aware of your brand, and it allows you to increase your followers and customers. There are two ways to do this: promoted Tweets and Twitter ads.
Promoted Tweets, which are organic Tweets you pay to show to your target audience, appear in Twitter streams and in search results. They are perfect for companies looking to get users on one specific web page. To run promoted Tweets, you must pay a monthly fee.
Twitter ads are advertisements you create to reach specific goals. This method is ideal if you’re looking to build brand awareness or your follower base. With Twitter ads, you can choose between different objectives, including website conversions, video views, or app installs.
Use Keyword Targeting in Twitter Ads
Keyword targeting allows you to engage users through different words or phrases that they searched for and that you may have included in your Tweets. Doing this enables you to reach a target audience that may be highly interested in your products or services. The two types of keyword targeting are search keyword targeting and timeline keyword targeting.
Search keyword targeting places your Tweets on the timelines of users who are searching for topics or discussions that are related to your business. If you sell energy drinks, you can target users who are searching for Tweets about going to the gym, staying fit, and exercising.
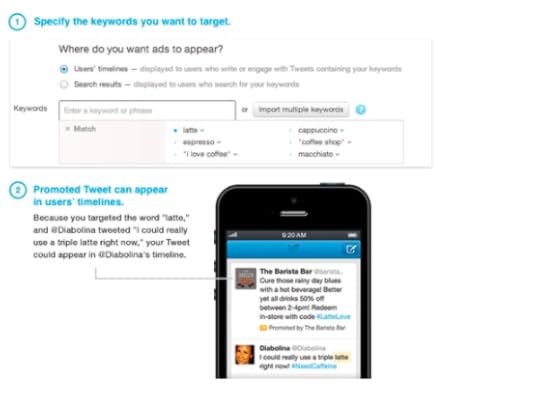
With timeline keyword targeting, you can act on users’ specific feelings or actions that they’ve tweeted about. For example, if you run a baking equipment store, you can target keywords such as “stand mixers,” “spatulas,” or “piping bags.”
Include Hashtags
Adding hashtags to your Tweets expands your reach. In fact, Tweets with hashtags are known to receive two times more engagement than Tweets without them. Although hashtags are extremely important on social media platforms, you also need to be aware of how many hashtags are too many. Twitter recommends using no more than two hashtags per tweet.
Make sure that you’re using hashtags that are unique to your brand so that your followers and your target audience can easily find you on the platform and engage with your content. Your hashtags need to be unique, relevant, and memorable. They must also be related to specific campaigns that you choose to run. If your hashtags are memorable enough, your followers might start using them, too! In the example below, Nike creates a unique hashtag, #YouCantStopUs, for its brand campaign.

Keep Content Light and Personalized
Twitter users look for personal replies on the platform. They don’t want to see you replying to followers with the same templates. When engaging with users, don’t stick to one standard templated response. Do your best to make every reply a personal one so that you can better connect with your audience — this reassures them that you’re listening to their opinions or concerns.
Don’t be afraid to use humor in Tweets! Brands make it big on Twitter when their Tweets are on the funny side because this makes them more relatable and approachable: Users aren’t afraid to engage with them because they don’t feel intimidated. McDonald’s funny Tweet below is a perfect example of incorporating humor.

Twitter is a great platform to connect with your target audience, but you won’t reap the benefits if you don’t do it right. Follow these tips and succeed in Twitter marketing for 2020.
By Umer Bilal
September 10, 2020
How to Use Stock Photos for Facebook Ads

SEPT. 10, 2020
Panos Sakalakis / Unsplash
Yes, many of you may have cringed at the words “stock photos,” but truthfully they are a blessing in disguise for many marketers. When used correctly, they can bring your ads to life.
What Are Stock Photos?
Stock photos refer to a collection of images supplied for public use. Rather than hiring a photographer for customized shoots, marketers use these readily available images for various commercial projects.
Stock photographs are priced differently, depending on the resource you use. Fortunately, plenty of sites, such as Unsplash and Pexels, offer free stock photos that help you if you’re running low on your budget. There are also paid services that sell photos on a per picture and per bundle basis.
Are Stock Photos Legal to Use?
Avoid legal issues by checking the license of each image you download. Stock photos come with varying licenses that allow for commercial use and modification. If you’re looking for stock photographs to use in your Facebook ads, you will likely find yourself dealing with these three licenses:
Royalty-Free License – The most common and popularly used is the royalty-free license. With this license, you only have to pay a one-time flat fee, which will allow you to download the photo as many times as you want for a project of your choice. On the downside, royalty-free licenses are non-exclusive. This means you may find other marketers using the same image for their ad campaigns.
Rights Managed – The rights managed agreement is a one-time charge for the use of a photo. This license can be negotiated according to the project’s time frame. For example, you pay a specific rate to use the image for your Facebook ad. However, you will have to pay additional royalties if you want to expand its usage to other digital marketing platforms.
Extended Licenses – Similar to the rights managed license, the extended agreement allows commercial use by paying a specified fee. It also enables you to use the images for resale products, such as printing on mugs or t-shirts.
When using stock photos, you must carefully read the terms and conditions of each license. Ignoring them can often result in the termination of your Facebook ad and even a costly lawsuit. Moreover, be aware that specific sites require attribution to the photographer, so make sure to carefully adhere to them.
Are Stock Photos Effective for Marketing?
Facebook advertising is tough, and it keeps getting tougher with each passing day, as more marketers realize its potential. The stock photo industry, too, is competitive, flooded with generic- and unrealistic-looking photographs. There is no shortage of cliché images, and using them to target a growing user base on Facebook may not be a profitable solution. In fact, a study shows 63% of consumers find repeated and generic brand messages a nuisance. Since Facebook’s ad guidelines include the 20% text rule (text must not take up more than 20% of the image), you must make the photo do most of the talking.
The good news: Authentic-looking stock photos are there and can be as effective as you want them to be. The key is to carefully select images that resonate well with your audience.
How to Choose the Best Stock Photos for Facebook Ads
Keep in mind the tips below when choosing stock photos for your Facebook ads.
Look for Candid Images
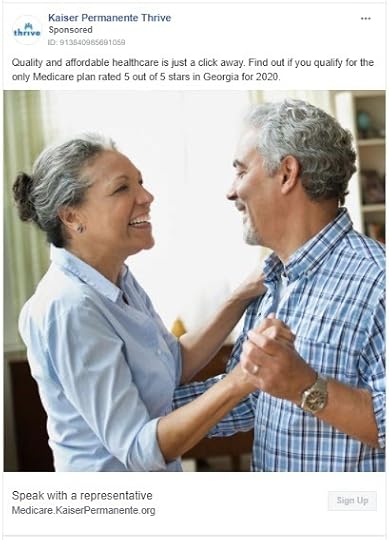
Kaiser Permanente Thrive / Facebook Ad Library
If you’ve scoured a stock photo website, you’ve probably seen pictures of a woman laughing alone with a salad bowl or a family (with kids) posing for the camera during dinner. As mentioned earlier, the biggest problem with stock photos is the inauthentic portrayal of people. When searching for stock photos, look for those that don’t appear staged. Remember, humans relate well with other humans, and images with genuine emotions will help your brand get the message across more effectively.
Aim for Relevance
This should go without saying, but look for pictures relevant to your ad’s marketing message — not just something that looks pretty. For example, adding a picture of a milkshake for your accounting ad or displaying a dog’s image to market a finance software is not the best move. Adding pictures that are not relevant to your product or service will confuse your audience. Ultimately, this will reduce their trust in your brand and negatively impact their purchase decision.
Here is a great example of a relevant image. Domino’s uses a close-up of pizza to promote its $5.99 deal.
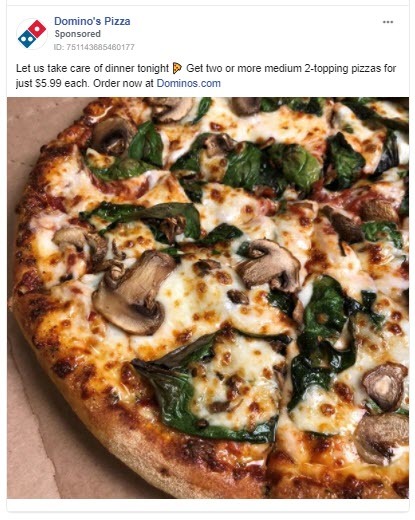
Domino’s Pizza / Facebook Ad Library
Focus on the Audience
Is your product catered toward millennials? Then showing an image of a middle-age person will not resonate with your target audience. Don’t just use the first image you see. Instead, thoroughly think about your audience to target them effectively and to make your marketing campaign successful.
Princess Polly does a great job of featuring its target audience. In this ad, the millennial- and women-focused clothing retailer features a young model in her 20s — exactly the type of person the brand’s target audience relates to.
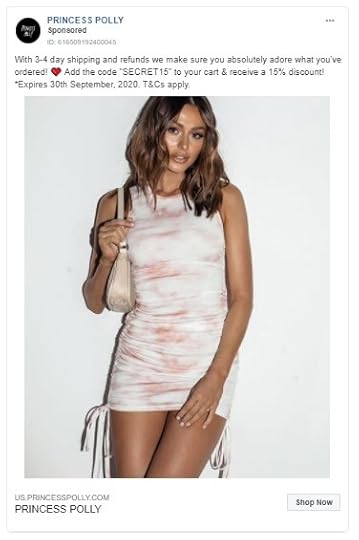
Princess Polly / Facebook Ad Library
Choose High-Quality Images
Some stock photos are bad. Blurry subjects, dark lightning, or colors that don’t transition well with the overall layout are just examples of images that lack quality. Even if you’re low on your budget, don’t choose an image of a lower caliber. Numerous stock photo sites offer images ranging from free to a couple of dollars per piece. Depending on your budget, dig a little deeper into those sites for high-resolution and high-quality pictures. Anything less can harm your advertising campaign.
Use Fresh Images
Instead of the most popular ones, go for images that are fresh and the least-used. Most stock photo sites give you the option to filter search results with keywords. Do an in-depth search to find images that are most suitable for your content. You can also check how many times an image has been used by dragging it into the Google Image Search taskbar. This will show you if other sites are using the same image or not.
Look for Photos to “Un-Stock”
Most stock photos allow modification. This means you can crop, resize, add texts or overlays, and even change the contrast of the pictures to adapt to your ad. There are several great tools available to help you with your images, such as Snagit and Photoshop. Don’t forget to check with the stock photo site to ensure editing is allowed.
Test Your Ads
Stock photo sites usually leave you spoiled for choices with their endless database of images. Because of their wide availability, you don’t have to limit yourself to one image per ad. Experiment with your pictures and use two to three visual variations for one ad. Keep the text the same for all ads and run them simultaneously. Track results to see how one ad performs against the other.
Final Thoughts
The best way to make stock photos work is to make them not look like stock photos. With the help of these tips and a little effort, you can easily customize your stock photos and use them in your Facebook ads without hesitation.
September 9, 2020
Facebook Will Pay You to Deactivate Your Account Before Election Day

SEPT. 9, 2020

Igal Ness /Unsplash
As part of its research efforts, Facebook is paying users to deactivate their Facebook and Instagram accounts before the U.S. election.
In a screenshot posted by Washington Post’s Elizabeth Dwoskin, the social media company is sending select users a survey that asks how much they would want to be compensated for deactivating their accounts. The amount ranges from $10 to $120.
So Facebook is now going to pay people to deactivate their IG and FB accounts before Election Day. It’s part of the research experiment announced Monday but WOW. This notice went out this week. pic.twitter.com/tV7DAw8F5I
— Elizabeth Dwoskin (@lizzadwoskin) September 3, 2020
Participants will either have to deactivate their accounts for one week or six weeks. Facebook’s pay structure depends on how long they are willing to go without social media. These are the options offered in the survey:
$10 for 1 week or $60 for 6 weeks
$15 for 1 week or $90 for 6 weeks
$20 for 1 week or $120 for 6 weeks
The study begins in late September, when participants will be required to deactivate their accounts. Users will not have the ability to choose which time frame they will participate in — Facebook will decide whether they will deactivate for a week or longer.
A spokesperson for Facebook confirmed that the social media company will compensate users for their participation in the study.
“Anyone who chooses to opt in – whether it’s completing surveys or deactivating FB or IG for a period of time – will be compensated. This is fairly standard for this type of academic research,” says Liz Bourgeois in a Tweet.
Anyone who chooses to opt in – whether it’s completing surveys or deactivating FB or IG for a period of time – will be compensated. This is fairly standard for this type of academic research. More here: https://t.co/uw4B8XhsYY
— Liz Bourgeois (@Liz_Shepherd) September 3, 2020
The study is part of Facebook’s research into the effects of social media on elections.
“To continue to amplify all that is good for democracy on social media, and mitigate against that which is not, we need more objective, dispassionate, empirically grounded research,” Facebook says in the blog post announcing the study. “That’s why today we are announcing a new research partnership to better understand the impact of Facebook and Instagram on key political attitudes and behaviors during the US 2020 elections.”
Back in 2016, Facebook was criticized for allowing fake ads and politically divisive content from Russia to proliferate on its platform. Intelligence agencies believe these fake ads and content interfered with the U.S. election.
By Anne Felicitas, editor
September 2, 2020
What to Post on Instagram: 6 Content Ideas for Brands

SEP. 2, 2020

Charles Deluvio / Unsplash
With more than 500 million users visiting Instagram daily, it’s no surprise that many brands leverage the platform to promote their businesses. But what if all the ideas have been exhausted, and you don’t know what to post? This article provides six options for Instagram content that will generate interest around your brand.
Failure Stories
We all have flaws, and projecting an image of perpetual perfection is no longer a trend, especially in the celebrity and influencer industry. Tell followers about your failures: It reminds them that no one is perfect, that we make mistakes. This, consequently, humanizes your brand.
However, be careful with the type of failure stories you share. This does not mean talking about angry customer calls. Rather, share a minor mistake. For example, if you’re an advertising specialist, share your experience of creating unsuccessful ad campaigns and the lessons you learned that improved performance.
When sharing failure stories, it is important to demonstrate the solution. At the end of the story, focus on how you got out of the situation. This will build confidence in your brand and deliver value to followers. By pointing out a failure without solving it, you run the risk of appearing incompetent.
Remember, there should be no errors in your copy. Avoid typos, and if necessary, use writing tools such as Pro Essay Writer or ProWritinGaid, so you can correct errors that undermine your message.
Influencer Posts
According to the data, companies earn $5.20 for every $1 spent on marketing influence. Whenever public figures use your product, encourage them to share a post on their pages. This is a great way to gain audience recognition. After all, influencer marketing is a powerful tool for building brand awareness, social proof, and customer trust. Find reliable influencers known among your audience and work with them periodically.
In this example, KitKat works with Monika Pundziute to promote its green tea matcha flavor.
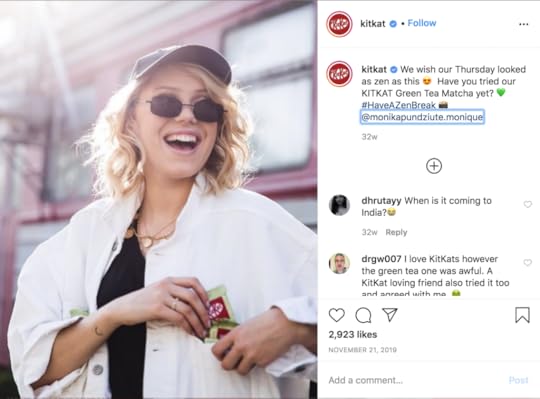
KitKat / Instagram
If you want to increase brand awareness, then you need to take care of your company’s corporate identity. If you don’t have a memorable logo, it’s time to fix that. The bottom line is the more users see your brand, the more trust it builds. Therefore, it is so important to create a logo as soon as possible and work on recognition.
Live Streams
Live streaming is the best way to get closer to your subscribers. Share something useful to generate engagement. For example, if you manage a cosmetics brand, show how to apply your product correctly or show unconventional uses. To get the best effect from this type of content, it is necessary to conduct such broadcasts periodically, so you can win the attention and love of your followers, who will look forward to your next broadcast.
In this example, Converse goes live on Instagram. After the broadcast, Converse posted the video on its feed, where it will remain permanently for all followers — even those who missed the live stream — to see.
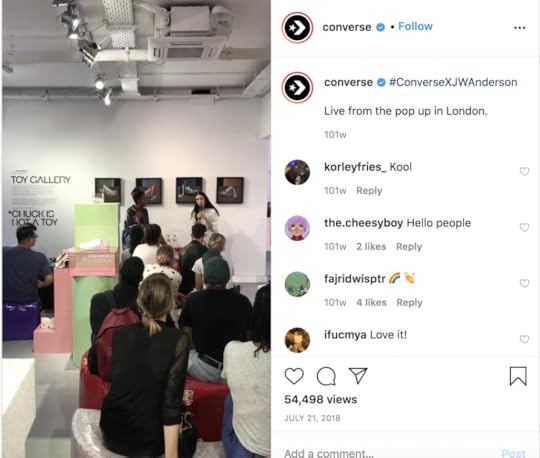
Converse / Instagram
UGC Reposts
This is a technique that should be in the sleeve of every brand manager who wants to increase reach: user-generated content. UGC presents two benefits. First, people whose photos you publish will be pleased, and they will be more likely to tell their friends about it. This may result in a chain reaction: Your followers’ friends and family may want to create their own content. Second, using UGC builds trust around your brand. It acts as material confirmation. According to research, 82% of buyers are more positive about a company after seeing user-generated content.
The easiest way to get people to share photos with your product is to give an incentive. For example, offer a discount on their next purchase. In this example from Nyx, the cosmetics brand reposts content from a customer who is showcasing her makeup skills.
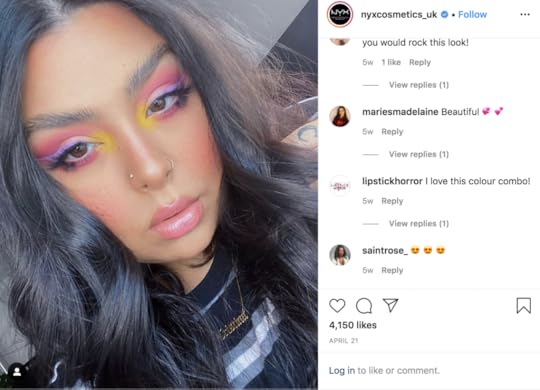
Nyx Cosmetics / Instagram
Customer Feedback
Are you constantly receiving feedback from your customers? Make it an additional tool for building trust. It can be photos, videos, or screenshots of messages. Any option is suitable. The main thing is to demonstrate the benefits of using your product. According to studies, 63% of users more often make purchases from a brand that has reviews from other customers. Add significance to your words and let your customers feel safe and relaxed, having received confirmation that you can be trusted.
Here, Hana Cure Effect features before-and-after posts from customers on its Instagram account:

Hana Cure Effect / Instagram
Guides
Share useful content that will simplify the life of your audience. Product usage guides are something that they will definitely be interested in. For example, if your brand released a new cream, show followers how to apply it correctly: what movements, on which areas of the skin, at what time, how often, and with which products can be combined. This will not only potentially attract new followers but also increase sales.
In this example, MaxiGlide provides a how-to guide for curling hair on its Instagram post.
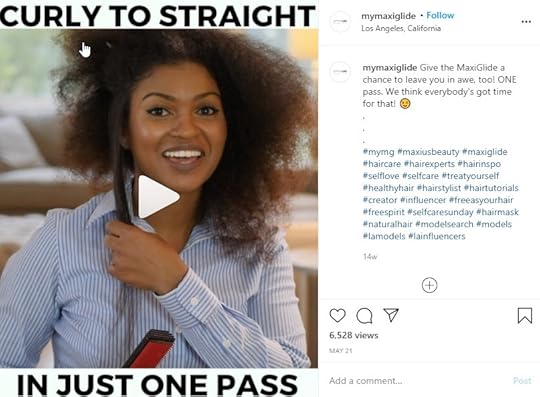
MaxiGlide / Instagram
Conclusion
The ideas outlined here will diversify your Instagram feed. To generate new posts while maintaining a steady publishing rhythm, plan ahead and schedule content by managing a content calendar. The more value you give, the more followers you receive. In fact, you might just end up doubling your Instagram followers if you implement the right strategy.
August 31, 2020
How to Edit Instagram Photos for a Better-Looking Feed

AUG. 31, 2020
Photos and videos are posted on Instagram each day. You’ll need a beautiful feed and striking photos to stand out from everyone else.
Fortunately, you don’t need an expensive camera or a professional photo editor to capture great Instagram photos. You have what you need in the small yet powerful machine in your hands — your smartphone. Remember, an engaging Instagram post comprises a quality photo and smart editing.
Learn how to edit photos on Instagram with our easy-to-follow guide below, providing tips for both in app and third-party photo editor, Instasize.
How to Edit Photos on Instagram
Step 1: Start with a high-quality photo
A great Instagram post begins with a great shot. No amount of editing can save a badly taken photo. You don’t need a DSLR. Simply use the camera built into your smartphone.
Taking good photos requires the basic principles of composition and lighting. Here are three easy tips to take great photos on your phone:
Avoid using flash and make use of natural light for brighter and richer photos.
For scenic photographs, shoot at the right time of the day or during what photographers call the golden hour. This is the time shortly before sunrise or after sunset when there is warm natural light.
Follow the rule of thirds for a well-balanced image. Divide your image into a three-by-three grid and align the subject in the photo with the grid lines to capture the eye of the audience.

You can add an automatic grid to your camera by turning on the Grid feature in your camera settings.

Step 2: Upload your photo to Instagram
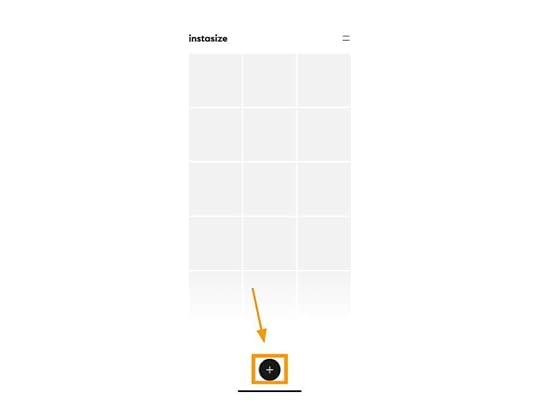
Once you have a great photograph to work with, open your Instagram app and upload the photo.
Click on the plus sign on the bottom of your screen, and you will be redirected to the “All Photos” album of your camera roll. You can switch to your “Favorites” or other curated albums by clicking on the drop-down arrow at the top of the screen to easily locate photos.
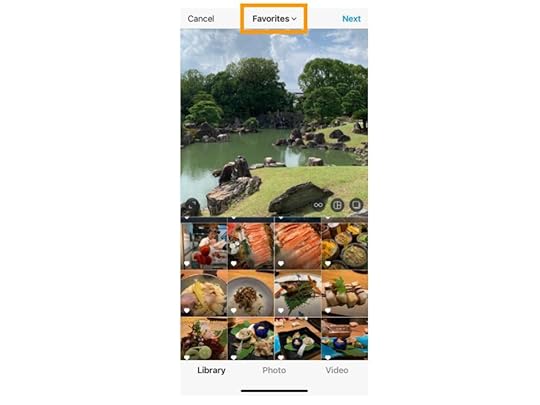
Instagram automatically resizes your photo into a square. If you want to post the photo in its original width, click on the expand button on the bottom-left corner of the photo.
Step 3: Select a filter
Now, the editing begins! Filters are like condiments: They each have a unique flavor that adds something new to the dish. Take a methodical approach when selecting filters. Try out each and note which catches your eye and works best with your photo.
Do note that each filter has its own personality and changes the look and feel of your photograph. To give you a head start, check out the five most popular Instagram filters based on a global study of 40 million Instagram users.

Clarendon adds light to lighter areas and dark to dark areas. This makes the color in your photo stand out and pop off the screen. It’s an all-purpose filter that works on both selfies and landscape pictures.

Juno intensifies the red and yellow hues of your photo with a rich, deep tone. Use Juno to add contrast to city photographs.

Gingham sends your photos down a nostalgia trip. This filter washes out darker shots and adds more exposure to brighter shots for a vintage effect.

Lark increases exposure and warmth while desaturating the reds and purples of your photograph. The result is a brighter and cooler photograph that is easy on the eyes. Lark is a good option for outdoor and landscape photos.

Valencia brings out the intensity of even dull photography by adding warmth to the colors of your photo. It’s the ideal filter for nature shots.
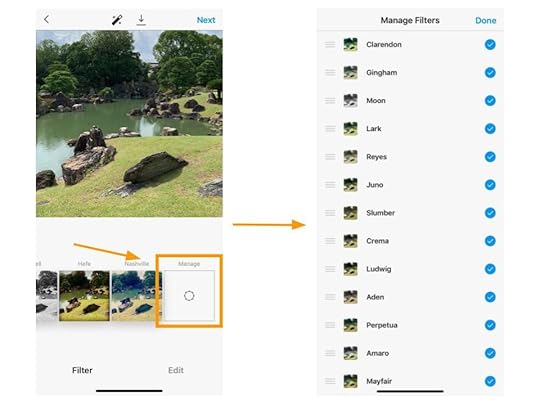
Instead of scrolling through every filter available, reorder your Instagram filters by selecting the “Manage” options. Put your favorite filters on top.
Step 4: Adjust the Lux

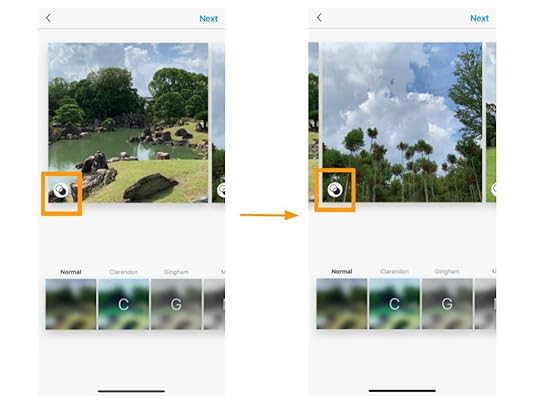
What is Lux? If you’ve edited a photo on Instagram before, you’ve most likely played around with Lux. This feature tempers the contrast and exposure of your photos to make them vibrant and burst off the screen. Once you’ve added a filter, adjust the Lux setting by clicking the wand icon at the top of your screen.

Adjust intensity of the Lux from 0 to 100 by moving the scale from left to right. You can see the effect of Lux in the photo above.
Step 5: Use Instagram’s simple editing tools
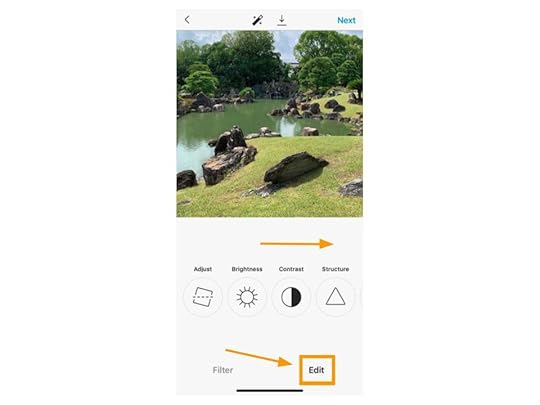
Next, open Instagram’s editing tools by clicking the “edit” button on the lower right side of the screen. From here, you can modify settings including brightness, contrast, structure, warmth, saturation, highlights, shadow, and sharpness.

A comprehensive strategy is to go through each setting and adjust the photo to your liking. To adjust, simply slide the scale from left to right to increase the effect of each setting until it hits the sweet spot.
Step 6: Edit an album of photos
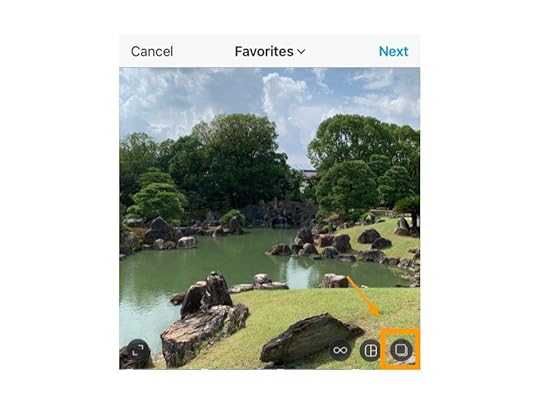
Instagram allows you to upload up to 10 photos in a single post. To do this, tap on the album icon when selecting the photos you want to edit to add more than one.
Then, tap on the Venn diagram icon in order to edit each photo individually. If you don’t, the edits you make on your first photo will be applied to the whole album
Step 7: Post to Instagram or save it for later

If your photo is good to go, write your caption, include hashtags, and tag relevant accounts. Click “share” on the upper right hand corner to send this to the feed of your Instagram followers.

You can also download the photo after editing by clicking the “download” button on the editing screen if you’re just looking to get a head start on your photos.
How to Edit Instagram Photos Using a Specialized Photo Editor
Now that you know how to edit on the Instagram app, use a specialized photo editor, such as Instasize, to generate a picture-perfect post.
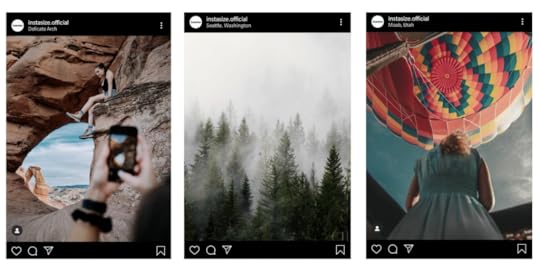
Instasize is a photo- and video-editing toolkit with an arsenal of features. Develop a signature look for your brand or create artwork for a follow-worthy Instagram. Find out how easy it is to use Instasize in the demo below.
Step 1: Choose a great photo
First things first, always start with a well-shot photo, using the tips mentioned at the beginning of the article. Upload your photo by tapping the plus sign button at the bottom of the screen.
Step 2: Crop your photo
Once your photo is uploaded to Instasize editor, you can crop it. Simply pinch the screen with your fingers to increase and decrease the size of the photo.

Instasize has automatic crop options for different social media sizes, which include Instagram Stories, Landscape, Portrait and even for Facebook and Twitter photos. This saves time and ensures your photo is the perfect size for each social media channel.
Step 3: Pick a filter
A great filter is critical to your photo’s success. Instasize has more than 130 premium filters to change the style and tone of your image. Based on your picture, Instasize even recommends which filters will work best.
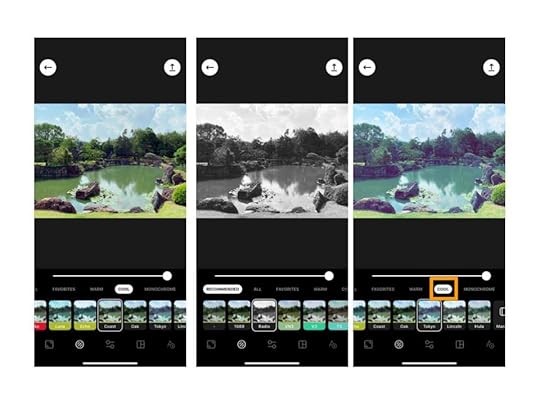
Instead of rifling through each and every filter, you can select whether you want your photos to be warm, cool, or black and white. Instasize has a plethora of options to choose from! To organize filters, click on the “manage” option to select your favorites.

Simply tick the “heart” button to select the filters you use most often and “hide” those you don’t plan to use. You can even reorder their position by dragging them to your preferred placement.
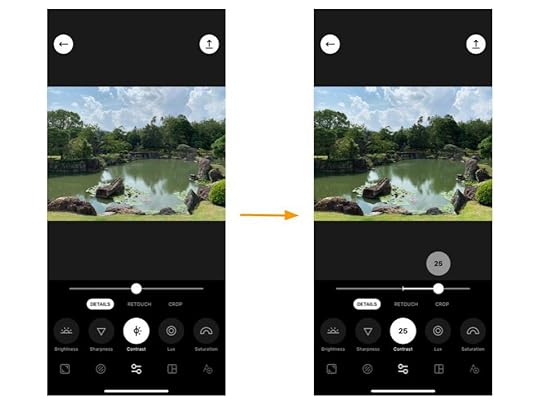
Step 4: Adjust photo settings

Similar to Instagram’s editor, you can play around with the photo’s brightness, contrast, saturation, and other settings.
Instasize takes editing to a whole new level, particularly for selfies and groufies, with its “retouch” feature, which can smooth skin and whiten teeth.
Step 5: Add texts and borders
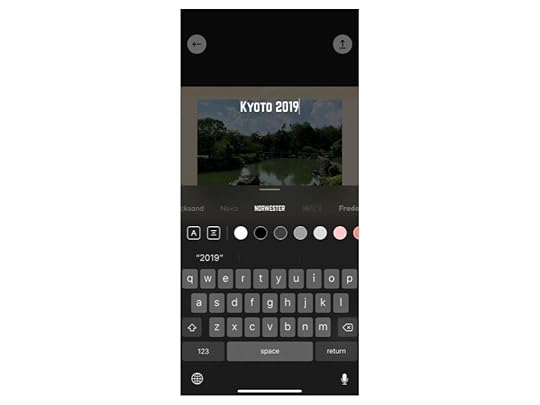
To finish off your photo, add text by clicking the “A” button to communicate a message or place a title. You can customize text with more than 25 popular font options and play with the variety of colors.
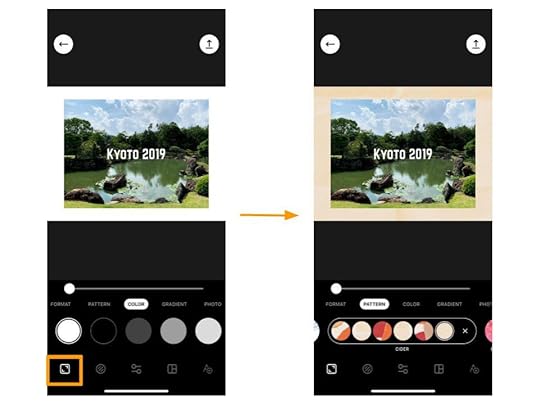
Let your photo pop off the screen by adding a border. Click on the square icon and open Instasize’s gallery of more than 80 borders. Select from ready-made patterns, bold colors, or even create your own design by uploading photos. We recommend selecting a pattern that contrasts with your photo to further highlight your image. You can select the collage option to post multiple pictures in one go.
Step 6: Post your photo to Instagram
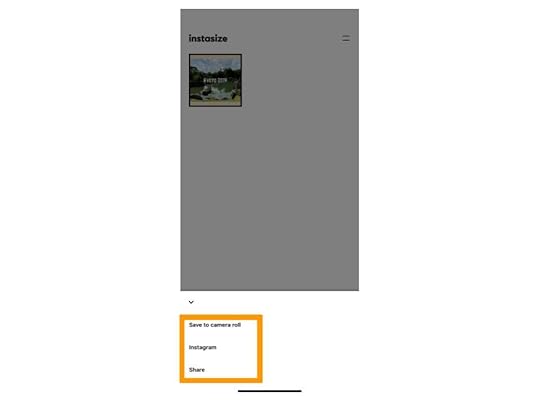
Once you’ve created an Instagram-worthy photo, tap the “Instagram” button to post it directly on your feed. You can even share your artwork directly to Facebook or Twitter by clicking the “share” button. If you simply want to store the photo and post it at another time, click “save to camera roll.”
These are just the basics of what you can achieve with Instasize. You can download Instasize on the App Store or Google Play Store. The Standard version is free to use and the Premium version is $4.99/month.
Go Forth and Edit Your Photos
Instagram’s in-app editing tools and Instasize are just two of the many photo-editing apps you can use. The trick is to try out different tools online and experiment with settings and filters to discover your signature style. From there, build an eye-catching Instagram presence and grow your following.
August 28, 2020
Apple’s iOS 14 Update Will Affect Facebook Ad Targeting: Here’s What to Do

AUG. 28, 2020

Tobias Dziuba / Pexels
Back in June, Apple announced a slew of updates with the roll out of iOS 14. Among the changes include stronger privacy settings, which require apps to ask permission before collecting and sharing data.
This update will affect Facebook advertisers’ ad campaigns, in particular, ads placed on the Audience Network. According to an announcement by Facebook, iOS 14 will impact advertisers’ ability to accurately target and measure Audience Network ads, which will result in decreased monetization.
Anticipating Apple’s new software, Facebook is working on a few tweaks to the advertising platform, which includes no longer collecting identifier for advertisers (IDFA) for its family of apps on iOS14. Although, this decision may change once the social media company receives more guidance from Apple.
Facebook will also release an updated version of the SDK that supports iOS 14 and may no longer offer Audience Network ads to iOS 14 devices, depending on how things go.
To prepare for this change, Facebook recommends the following actions:
Update to the latest version of the SDK that supports Apple’s SKAdNetwork API, which limits the data available to businesses for running and measuring campaigns.
Use non-IDFA match methods, such as adopting Facebook Login or using Advanced Matching to share hashed customer contact information.
Create a new ad account using a new account creation experience that will launch in early September.
By Anne Felicitas
How to Use Google Alerts to Grow Your Business

AUG. 28, 2020
Morning Brew /Unsplash
Google Alerts is a notification system that informs you when certain keywords are being searched for or mentioned on various sites. An extremely popular tool among businesses, it helps you monitor the presence of your brand on the internet, collect backlinks, and find the best content ideas. It is absolutely free and easy to set up. Here’s how to do it.
How to Set Up Google Alerts
Click this link: google.com/alerts.
Choose the term that you want to track, for example, “content marketing.”

Click “Show options” underneath and choose how often you get notifications. The following options are available: as it happens, once a day, or once a week.

Choose a source. You can leave it “automatic” if you don’t know what sources to list.

Choose the target language and region that you are interested in.

State your preference on how many results you want to get.

Enter the email that you want your alerts to be delivered to.

Click on “Create Alert,” and that’s it.

As you can see, Google Alerts does not require a deep knowledge of IT. The system is quite intuitive, perfect for beginners.
However, Google Alerts can be completely useless if you don’t know the benefits you can get from it. Here are four ways you can use this tool to grow your business.
4 Ways Google Alerts Helps Grow Your Business
1. Monitor Brand Mentions
Brand monitoring is critical when it comes to analyzing your brand image. You may think that you create this image by putting a certain idea of what your brand is about: You use a specific tone of voice on all communication channels and promote ideas that you want customers to associate with your brand.
Sure, you’re part of creating the brand image, however, customers create your brand image, too. They talk about your business on social media or with friends and family and write tons of reviews on different sites. If you try to create an image of trustworthiness but your customers claim that they never got their products, your brand image is already flawed.
In order to see and fix the bad things people say about your brand, set up Google Alerts. As soon as your brand is mentioned somewhere, you will get a notification. Read what people have to say, and if they are not satisfied, try to find out what went wrong, solve the issue with an angry reviewer, and get your brand image back to what you want it to be. It’s very important that you answer the dissatisfaction of your customer as politely as possible. People will definitely judge the way you respond to criticism.
Experts from Ivory Research reported that brand monitoring has also helped the company gain valuable feedback to better understand the needs of its audience. You start to realize what you should change or modify in your product so that people will not talk badly about your brand again.
2. Watch Out for Your Competitors
Businesses often think about their competitors as an enemy, someone that they should be completely different from in order to be the best. There is logic in it, indeed. A competitor can take over your customers. However, there is a better approach than trying to be completely different from the rival.
If your competitors are successful in a certain niche, it means they are doing something right. You might want to find out what they are doing in order to implement their strategy to your existing ones and get the best profit possible. If you see that your competitors suddenly start to grow rapidly, maybe it’s the new tactics they are using. Google Alerts can help you to find out which ones.
Google Alerts is a great tool to learn whether or not your competitors are investing in guest posting or other types of links. If they do a guest post, take a look at which sites. If their content is relevant to these sites, yours can be relevant, too.
However, remember that it’s acceptable to learn new ways of growing, but it’s completely unethical to copy their content, brand slogan, or design for ads and social media campaigns.
3. Measure Content Quality
Content quality is crucial for SEO. After the new Google update rolled out, it’s clear that keywords and backlinks are nothing compared to high-quality content. Google states that the main focus is on creating the best content, which has the following characteristics:
original information, research, report, or analysis
original point of view and valuable insights
Descriptive and helpful headlines
Shareable, can be referenced in a book or magazine
Google Alerts will help you find out whether Google’s algorithm values your content. While setting up alerts and choosing how many results you want to get, you have two options: only the best results and all results. You should set it to high-quality content only or a mix of everything. If your content appears as the best results, congrats, you’re doing great!
4. Catch Spam Comments
You expect readers to share their thoughts on your article or get involved in a heated discussion that will give you valuable insights into their understanding of your content. You open the comments section, and there they are — spam comments.
There are many bots that automatically share off-topic and hideously written comments under your blog posts. Usually, they are trying to promote another website or service, adding links to third-party sources. Spam is not only irritating, but it also harms your business.
Unsuspecting visitors will follow the link and end up on a trashy website that steals their information or shows inappropriate content. Consequently, they don’t only think about this site badly but about yours, as well. If you don’t control spam and let your visitors be tricked, you either don’t care about your audience or your brand is not yet developed enough to be in charge of spam comments.
Search engines may also mark you as unsafe because of the comments linking to websites that distribute malware and viruses. Thus, you may rank very poorly in search results.
In order to avoid such bad scenarios, use Google Alerts. There are words that hackers tend to use often: online dating, gambling, viagra, betting, porn. Put those words into the system and get an immediate notification if these words appear on your website. Clean the comments section as soon as possible.
Google Alerts is a helpful tool that can grow your business — if used correctly. The advice outlined here will help you improve your brand image, scout the competition, and increase revenue.