
Ray DelVecchio's Blog, page 3
August 31, 2021
How to Make a WordPress Website (Divi Tutorial)
We are going to create the website you want step-by-step with WordPress and Divi by Elegant Themes.
Divi is one of the most popular website drag-and-drop builders on WordPress these days. The platform allows novices to create desktop and mobile-friendly layouts, with the full ability to customize without knowing any code!
[image error]Divi Visual BuilderThe #1 WordPress theme on the entire internet to design your website with drag-and-drop!
Buy NowWe earn a commission if you purchase using the link above which helps support this website.
Divi is an all-around great option to create your first website, and I want to show you step-by-step on how to build a business website with WordPress + Divi visual builder.
By the end of this tutorial, it’s going to be much easier for you to create an elegant website regardless of whether you have any previous experience with web design or coding.
Finish at Your Own PaceGet this tutorial sent to your inbox with more WordPress basics.
Let’s begin!
Setup Domain & Web Hosting[image error]HostGator Web HostingLaunch your WordPress website or blog today up to 60% OFF using code WPC1
Buy NowWe earn a commission if you purchase using the link above which helps support this website.
HostGator is an excellent platform for beginners to set up your website with a custom domain and web hosting. I’ve been a HostGator customer for almost a decade, and have partnered with them to give you a special 45% discount off your first year (click here to automatically apply)!

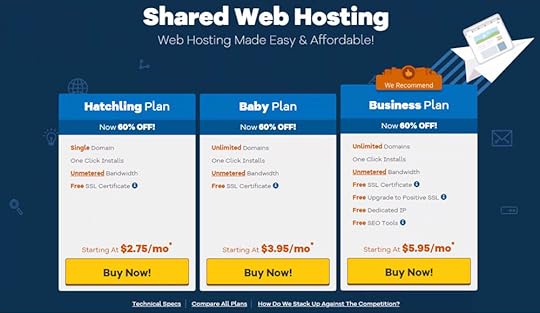
On the HostGator homepage, select “Get Started” to view the plan breakdown. You can also select the “Web Hosting” navigation menu item to reach the same page.
Select the Hatchling Plan if you are a beginner who only needs 1 domain/website.
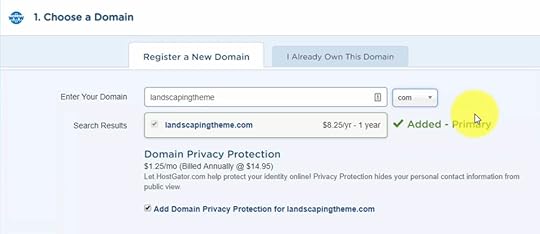
Select your domain name to check availability.
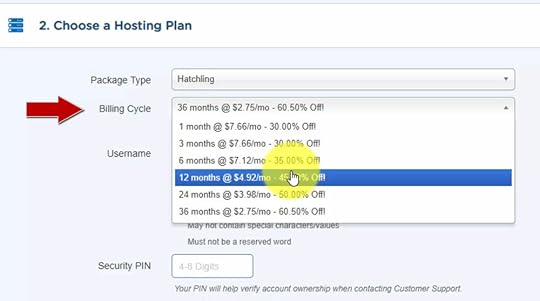
Select the longest term you can afford to get the best deal for the Hatchling plan. I recommend a 12-month billing cycle to get the right mix of affordability while also giving yourself enough time to build your website the right way.
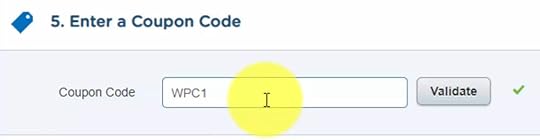
Use coupon code WPC1 at checkout to unlock your 45% discount.
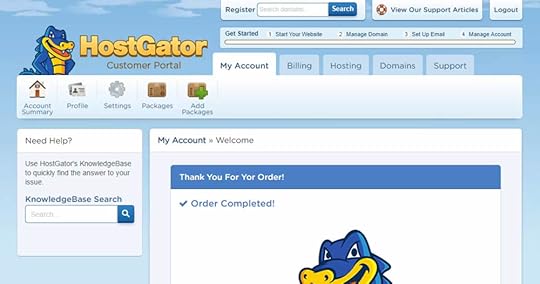
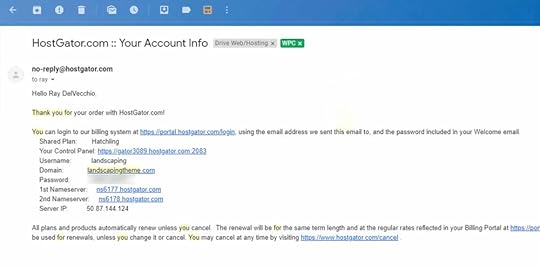
After checkout, you will redirect to your HostGator Customer Portal and receive login information via email for both your Customer Portal and your hosting control panel.
The customer portal is for managing your billing, the control panel is for building/development.
Open up the email titled “Your Account Info” and click on the “Your Control Panel” Link.
** NOTE: It may take up to 24-hrs for your control panel account to work!
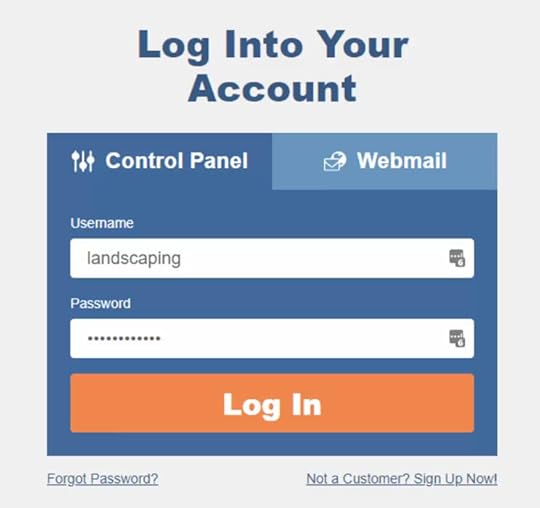
Copy and paste your login info into the fields.
 Install WordPress
Once in your control panel (cPanel), click on “Build a New WordPress Site” from the “Software and Services” menu to install WordPress in seconds.
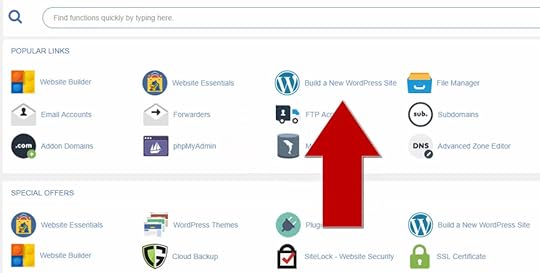
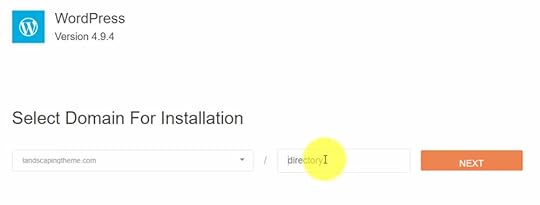
Choose your domain from the drop-down menu to install WordPress directly on the root path (no sub-directory) then click “Next.”
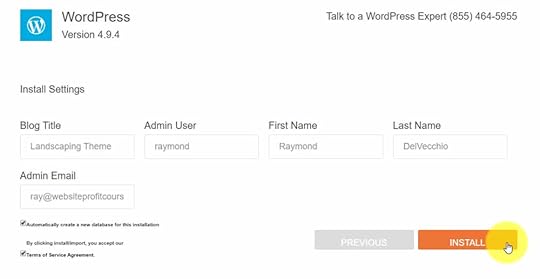
Create your WordPress administrator account by choosing your blog name, username, first/last name, and email address.
Check the box that says “Automatically create a new database for this installation” then click the Install button.
HostGator will install WordPress and generate a secure password that you can use to login to your new WordPress website.

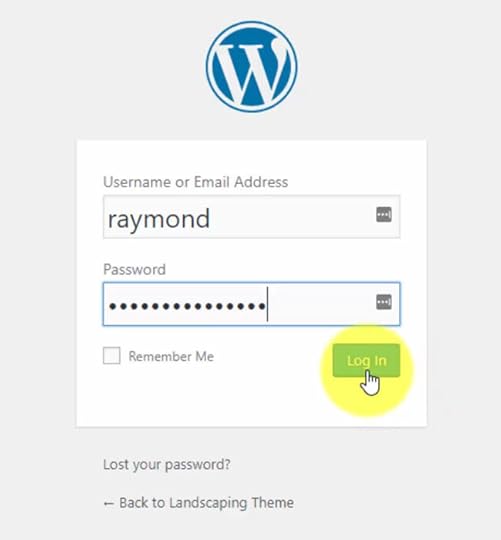
Click “Login” or alternatively, you can use the following URL structure to access the WordPress login page anytime:
https://yourdomain.com/wp-admin
Log into your WordPress Dashboard with the provided username & password.
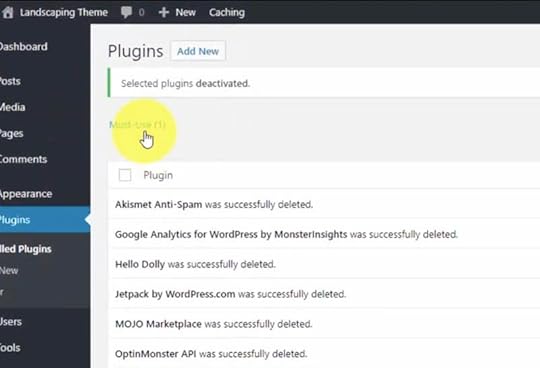
 Delete Plugins
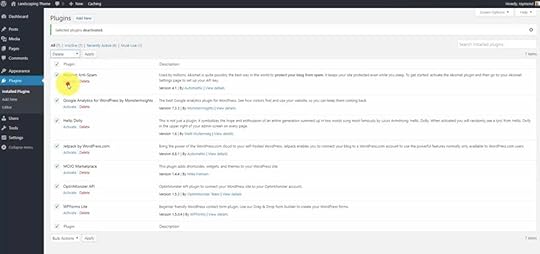
WordPress often comes with pre-installed plugins. We will start our design by deleting all of them and only add back those which are essential.
Click “Plugins > Installed Plugins.” You must deactivate before you can delete.
Select all then click on “Bulk Actions.” In the drop-down menu select “Deactivate” then Apply to save your settings.

Once the plugins are deactivated, select them all again. From the bulk actions drop-down menu select “Delete” then Apply.
 Endurance Page Cache “Must-Use”
Once you delete all the plugins, there will be a remaining plugin called Endurance Page Cache. Click the “Must-use” link on the plugins page to reveal.
This plugin is added by HostGator to help save bandwidth, which is normally good for both you and them to achieve a faster website.
The problem is when you are designing your website it may prevent updates from showing on the front-end. This is because “caching” stores versions of your website pages instead of loading everything from the database in real-time each time a user visits.
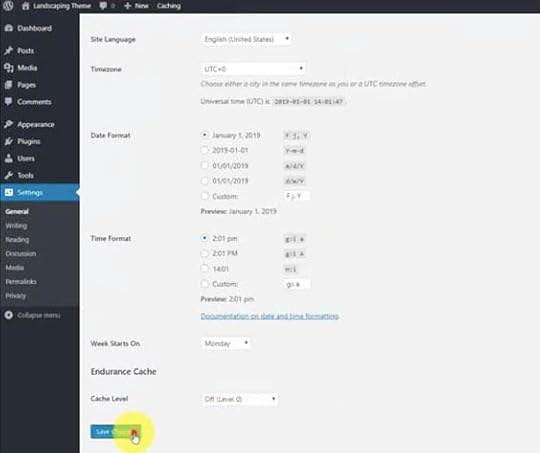
First, we must turn off Endurance Page Cache to ensure this doesn’t occur before we delete it!
On the plugins page, click the “Purge Cache” button.

Then go to the sidebar and select “Settings > General.”
Scroll down to the bottom of the page to the Endurance Cache section, and set the “Cache Level” to “Off (Level 0)”, then Save.
 Delete Endurance Page Cache via FTP
 Once you turn off and purge the cache, you will need to delete the plugin via a File Transfer Protocol (FTP) program.
An FTP program gives you access to the raw files on your web server. Download my favorite FTP program, FileZilla client for Windows & Mac, and use your control panel user/pass to add your account to FileZilla Site Manager.
When you log in with your HostGator control panel account, you’ll notice the left pane is your PC, and the right pane is the web server. You can easily transfer between the two using FTP.
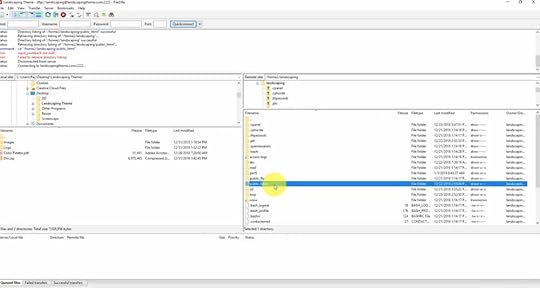
On the web server side (right panel), navigate to “public_html > wp-content > mu-plugins.”
Delete the Endurance Page Cache plugin (one PHP file), then refresh your WP plugins page in the browser. You will notice the plugin is now gone.
Install PluginsNow we have a clean slate to build our website. On the plugins page, let’s install two essential plugins you will need to start:
Child Theme ConfiguratorChild Theme Configurator allows you to create a “child theme” for Divi. Child themes ensure any customizations you make to your website will not be lost when you update the parent theme (Divi).
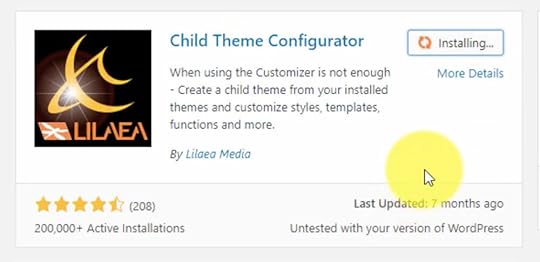
Click Install and then Activate.
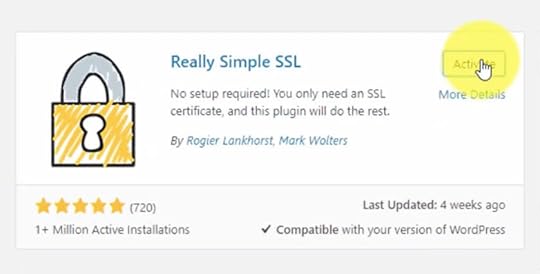
Really Simple SSLReally Simple SSL redirects any non-HTTPS website requests to the secure version. Nowadays, almost all website hosts (including HostGator) offer free SSL certificates which give you the ability to use HTTPS.
Unless you purchase SSL separately, your hosting account should be ready to operate with HTTPS without any setup on your end.
 Create Pages
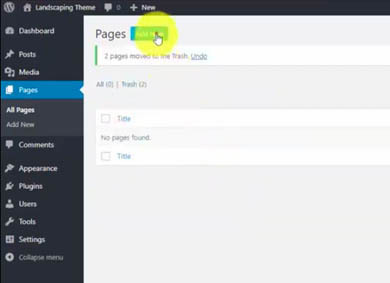
After you install your plugins, the next step is to set up the basic pages you will need for a successful site.
When you open, you will see that WordPress comes with some existing pages. Delete the existing pages by “Select All > Bulk Actions > Move to Trash.”
HomeBy default, WordPress displays blog posts on the home page.
For a business site, you want a dedicated home page separate from your blog.
Go to “Pages > Add New.”
You will see the new Gutenberg Editor layout. You will NOT be using the Gutenberg Editor (you will instead be using the Divi visual builder), so all you need to do is add the titles of the pages to create the URLs.
Create a new page with the title “Home” and then click the “Publish” button.

Repeat this process to create the following pages just like you did the home page:
Blog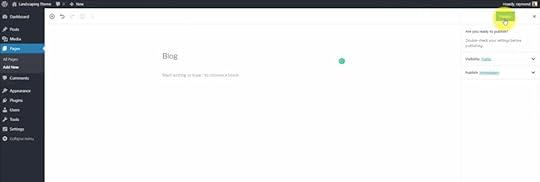 About
About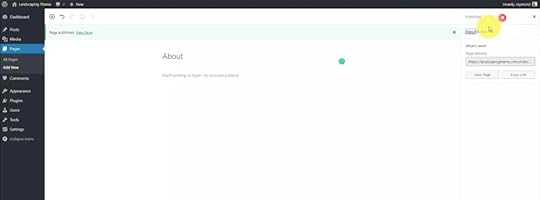 Services
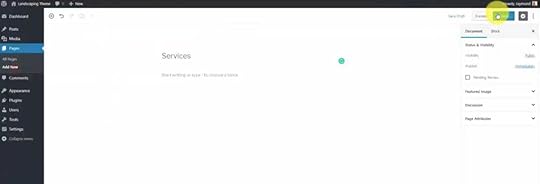 Gallery
 WordPress Settings
After creating your pages, you will adjust some of the settings of your website.
Go to “Settings > General” if you want to update your website title and tagline (optional).
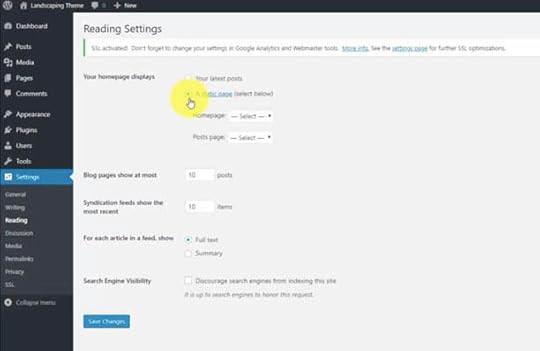
ReadingUnder the “Settings > Reading” tab, go to “Your homepage displays” and change to “A static page.”
Then select the “Home” page we just created from the “Homepage” drop-down menu and select the “Blog” page from the “Posts page” drop-down menu.
 Permalinks
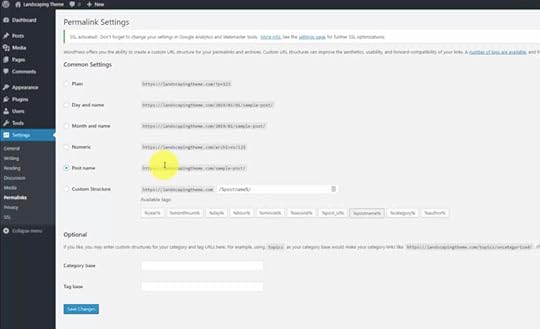
Under the “Settings > Permalinks” tab change the URL settings to “Post Name” to make your URL structure simple and clean.
 Install Divi
You are now ready to install Divi!
Download the ZIP file after you purchase Divi. Buy Divi today from the Elegant Themes website.
[image error]Divi Visual BuilderThe #1 WordPress theme on the entire internet to design your website with drag-and-drop!
Buy NowWe earn a commission if you purchase using the link above which helps support this website.
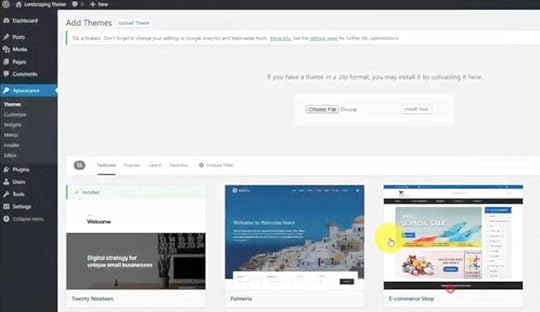
Go to “Appearances > Themes” then click “Add New”. From here you can upload the theme ZIP file.
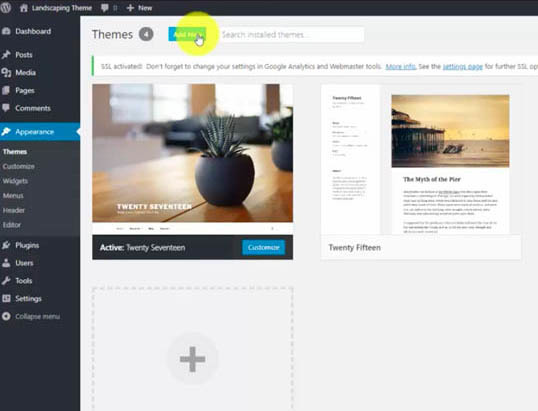
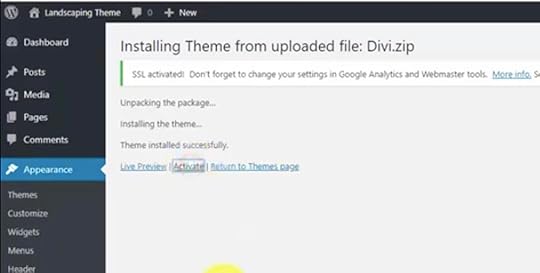
Select “Choose File” and then click the “Install Now” button.
Once successfully installed, click the “Activate” button.
NOTE: If you already have Divi, you need v3.18+ to work with WordPress 5.0 & Gutenberg.
Create a Child ThemeAfter Divi is successfully installed into WordPress, create a Divi child theme in order to keep your customizations safe when you update Divi in the future.
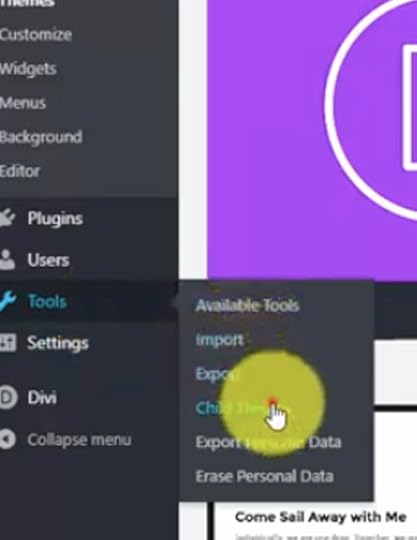
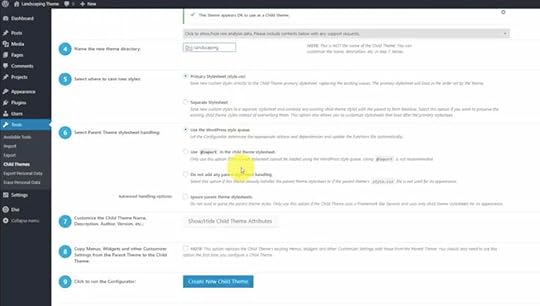
Child Theme Configurator WizardGo to the “Tools > Child Themes” page. From here you can create your first child theme using a step-by-step wizard.
For Step #2 “Select a Parent Theme” pick “Divi” from the drop-down menu.
Click the “Analyze” button to make sure everything passes the test.
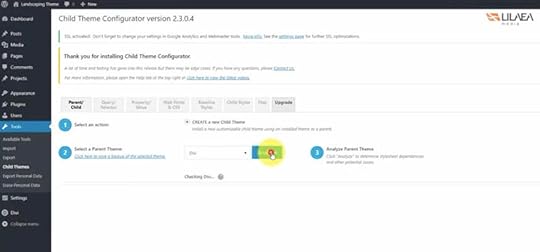
You can optionally rename the new child theme directory within Step #4 (I went with Divi-landscaping), then leave the remaining options at their default values and click “Create New Child Theme.”
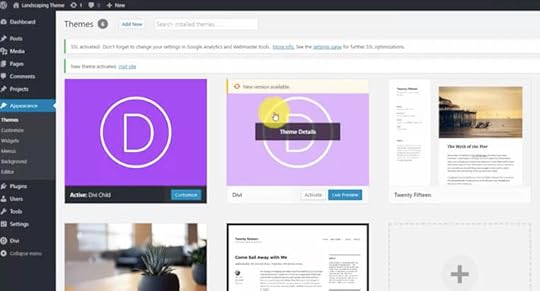
 Activate Child Theme
Navigate back to “Appearance > Themes” and click the “Activate” button for your newly created child theme to switch from the Divi parent theme.
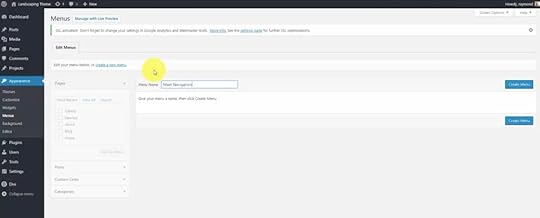
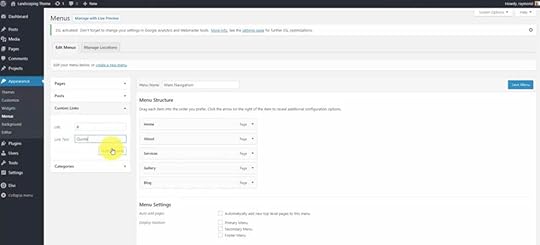
 Create Main Navigation Menu
Next, set up your basic navigation bar for your website.
Go to “Appearance > Menu”, name your menu “Main Navigation” and click the “Create Menu” button.
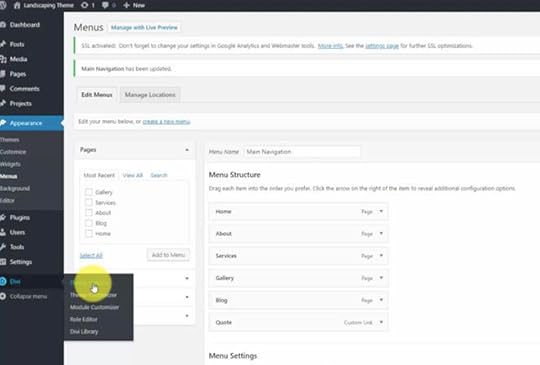
Manually select the pages you would like to be on your menu. In “Menu Structure”, you can drag and drop to put the menu in the order you would like, along with indent to create sub-menus.
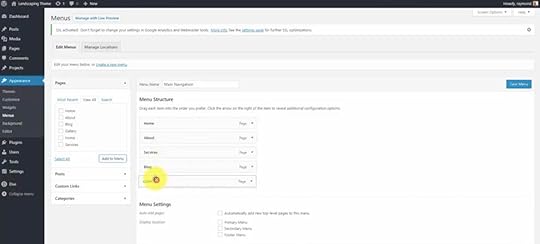
Create a custom link which will be an on-page link to the contact form. For now, just put a place holder “#” in the URL and “Quote” in the link text.
In menu settings, if you automatically would like to add pages to the menu when you create them, select the checkbox “Automatically add new top-level pages to this menu.”
Then under “Display location”, select “Primary menu” which will attach this menu to your main navigation bar.
When you are done, click the “Save Menu” button.
Update Your Divi SettingsUpdate your Divi Settings to reflect your website’s brand. Go to the sidebar “Divi > Theme Options” section.
 Add Your API Key
Before you change any of your theme options, you want to make sure you are receiving all updates from Elegant Themes.
To do this, you’ll need an API key from your paid account. Go to the “Updates” tab and copy/paste in your API Key from your Elegant Themes members area as shown below.

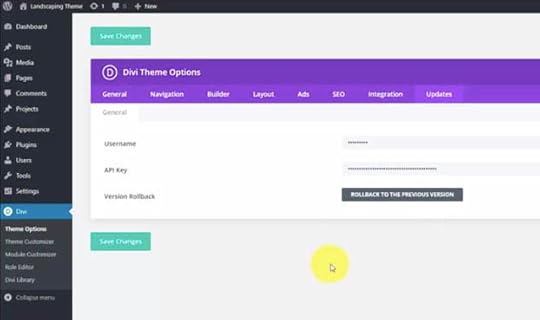
You’re now ready to start customizing and designing your Divi website!
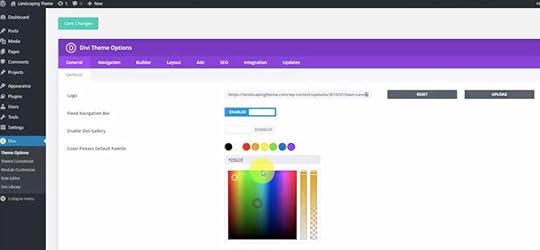
Change Your LogoIf you have an image logo for your site, upload it within the Divi Theme Options page.
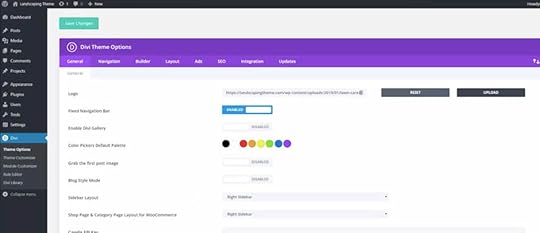 Change Your Color Palette
Divi allows you to set a default color palette, that way when you are customizing any parts of your website you don’t have to enter in hex codes or do it on the fly.
To change your color palette click on the colors and enter in your color hex codes.
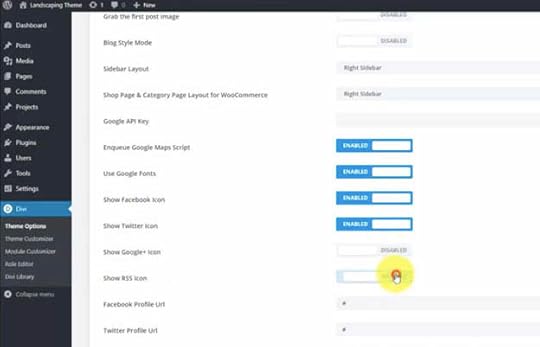
 Activate Your Social Media Icons
Activate the social media icons you would like displayed on your site by “enabling” or “disable” the social media sliders.
 Customize Your Divi Theme
 To begin customizing your website go to “Divi >Theme Customizer.”
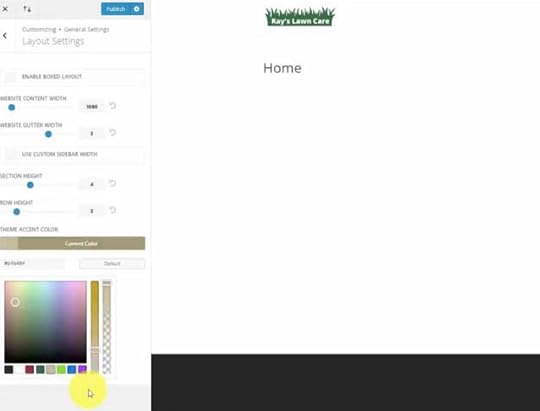
General SettingsTo set your default values for color, spacing, and fonts go to “General settings > Layout Settings.”
Layout SettingsClick “General Settings > Layout Settings” and set the Theme Accent Color to tan from our custom color palette.
 Typography
In typography, you can change the style of fonts, sizes, boldness, line heights, and link color. We will adjust the line height and link color here.
Click “General Settings > Typography” and adjust your Header Line Height to 1.5 to give your header text plenty of room when it flows to a second line.
Change your Body Link Color to dark red from your custom color palette.
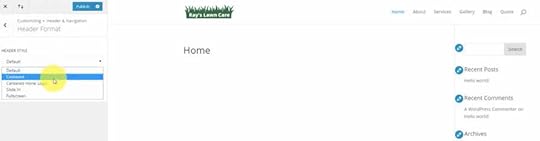
Header & NavigationIn the header and navigation tab, you can adjust the alignment, font, colors, and elements at the top of the website.
Click “Header & Navigation > Header Format”.
Header FormatThe header format can be centered, centered in-line, slide, in or full screen.
Adjust your header format to be “Centered.”
 Primary Menu Bar
In the primary menu, you can adjust the style of your main menu including text size, height, fonts, and color. We will change the font and color.
Click “Header & Navigation > Primary Menu Bar” and change the Font Style to Uppercase by clicking the block.
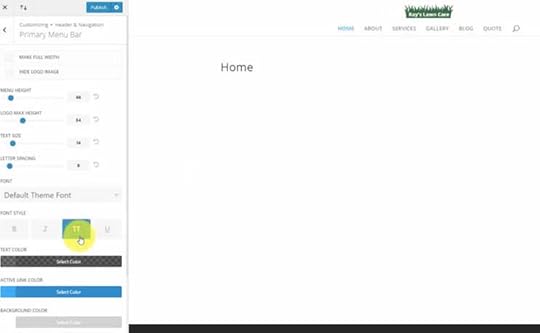
Then set the Active Link Color to dark red from our custom color palette.
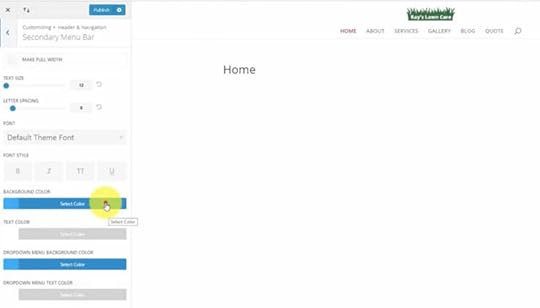
Secondary Menu BarA second menu will appear above your logo to display contact information. We will adjust the background color of your secondary menu.
Click “Header & Navigation > Secondary Menu Bar” and change the Background Color to black from our custom color palette.
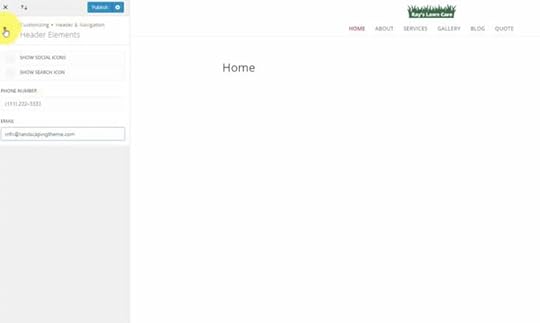
 Header Elements
Next, we need to add your business contact info to show on the secondary menu.
Click “Header & Navigation > Header Elements” and add in the phone number and email you would like displayed on your site.
You can also deselect the Show Search Icon option if you don’t have a content-oriented website. I do not provide a search bar for most small business websites since it’s unnecessary.
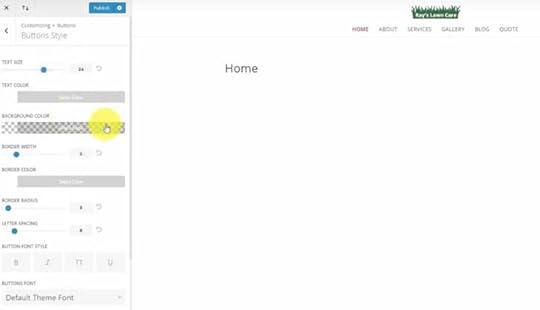
 Buttons
In the buttons menu, you can set your default style for buttons such as their color, size, shape, hover effects, and text. We are going to change the font type and size, button color, and border.
Go to “Buttons > Buttons Style”.
Buttons StyleAdjust the Text Size with the slider at the top to 24px.
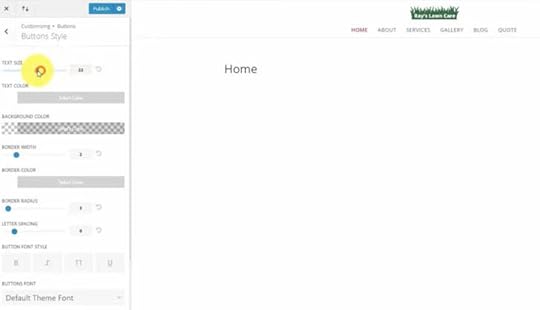
In the same menu, you can change the button color to an accent color in your palette. Select Background Color to change. In our case, we will select our dark red.
Button Border & Radius
Change the Border Radius of the buttons. To keep the buttons square slide the slider down to 0.
Just below the border-radius slider, you can change the Button Font Style to uppercase to match the menu and contract regular paragraph text.
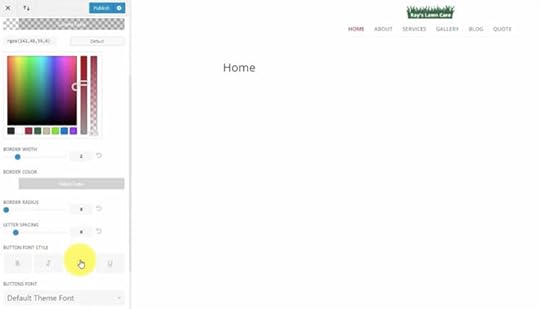
When you have completed customizing, click the “Publish” button.
Build Homepage LayoutWith our default values now set, we can begin building our page layouts using the Divi visual builder.
Navigate to the WordPress Pages, hover over the “Home – Front Page” and click the “Edit With Divi” link to launch the Divi builder.
For these updates, I’ll share the settings used within the video tutorial.
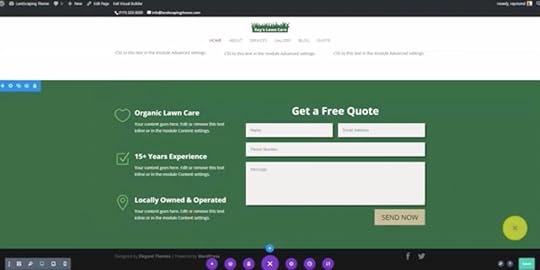
Call-to-Action (CTA) Image BannerAdd a new Section with 1-row and 1-column, and include a Text Module for the headline, a Text Module for the description, and a Button Module for our “Free Quote” CTA.
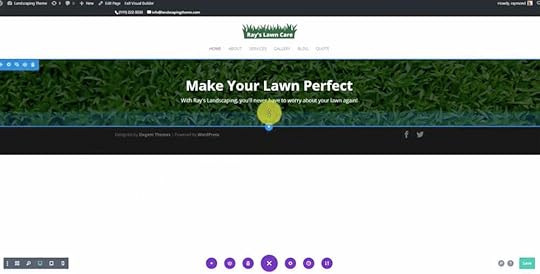
NOTE: Be sure to click the green checkmark and “Save” button frequently to ensure you don’t lose your progress!
Section SettingsBackground Color – Black Background Image – Grass CloseupBackground Image Blend – OverlayPadding Top – 30pxPadding Bottom – 50pxBottom DividerText Module – HeadlineText Orientation – CenterText Color – LightFont Weight – BoldFont Size – 48pxLine Height – 1.2emText Module – DescriptionFont Weight – NormalFont Size – 18pxLine Height – 1.7emButton Module – Free QuoteEnable “Use Custom Styles for Button”Font Color – WhiteBackground Color – RedButton Border Width – 0Hover Icon – Check MarkLink – Contact Form IDOur Services WidgetsAdd a new Section with 1-row and 3-columns (equally spaced), and include three Blurb Modules. Create the first Blurb, customize, and then duplicate for the remaining two columns.
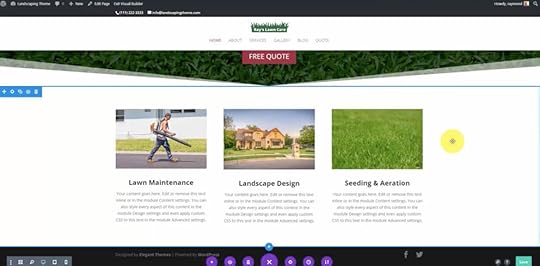 Section SettingsThree-ColumnsBackground – WhiteBlurb Module – ImageUpload Size – Medium Blurb Module – TitleText Orientation – CenteredFont Weight – BoldFont Size – 24pxFree Quote Contact Form
Add a new Section with 1-row and 2-columns (right column wider), and include three Blurb Modules within the left column and a Contact Form within the second column. Create the first Blurb, customize, and then duplicate for the remaining two.
 Section SettingsTwo-Columns – 1/3 first column, 2/3 second columnBackground Color– GreenBlurb Module – ImageEnable “Use Icon” and Insert Heart Icon Icon Placement – LeftIcon Font Size – 54pxIcon Color – Light GreenBlurb Module – TextFont Color – WhiteFont Weight – BoldFont Size – 24pxPadding – 15pxContact Form ModuleAdd New Field – Phone NumberMinimum & Maximum Length – 10 CharactersRemove CaptchaTitle Font Color – WhiteTitle Font Weight – BoldTitle Font Size – 36pxLine Height – 1.5emForm Field – Add Box Shadow (5px)Button Font Color – BlackButton Color – TanCustomer Testimonials
Add a new Global Section with 1-row and 3-columns, and include three Blurb Modules. Include a Text Module for the headline above the blurbs. Create the first Blurb, customize, and then duplicate for the remaining two.
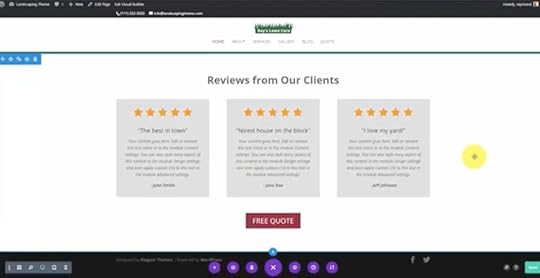 Section SettingsThree Columns (equally spaced)Background – White Save Section as Global to Library (show on all pages)Text Module – HeadlineText Orientation – CenteredFont Size – 36pxFont Weight – BoldBlurb Module – ImageUpload Size – MediumBackground Color – Light GreyBlurb Module – TextFont Size (Title) – 20pxFont Style – Bold, ItalicizedText Orientation – CenteredPadding – 30pxButton Module – Free QuoteFont Color – WhiteBackground Color – RedHover Icon – ArrowLink – Contact Form IDBuild Default Layout
 The next page layout that we’ll create will be used for all the remaining pages other than the homepage.
Page With Sidebar Contact Form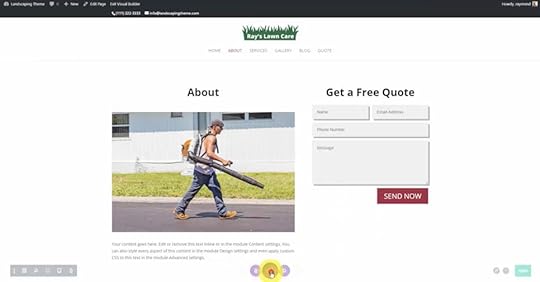 Section SettingsTwo Columns – 2/3 Left, 1/3 RightPost Title ModuleDisable “Show Meta”Text Orientation – CenteredFont Size – 36pxFont Weight – BoldImage ModuleText Module – DescriptionContact Form ModuleButton Color – RedButton Text Color – WhiteTitle Font Color – BlackCall to Action
Add a Fullwidth Section with a Fullwidth Slider Module.
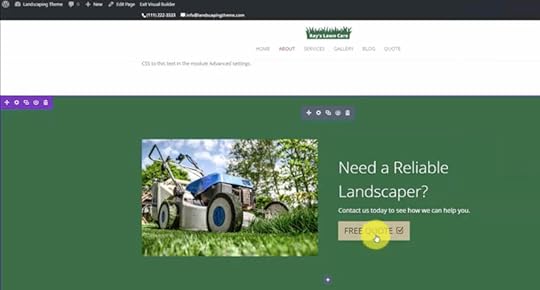 Fullwidth Slider ModuleBackground Color – Green Image Upload Size – LargeButton Color – TanButton Text Color – DarkButton Border Width – 0Button Hover Icon – CheckmarkCustomer Testimonials
We will finish our design by including the Global Section that we previously built on the Homepage. Select “Add From Library” to find out saved Global Section called “Client Reviews”.
We are done with our final page layout!
Click the “Save to Library” button on the Divi bottom dock, and save as “Default Sidebar Layout”.
You can now apply this pre-made layout to all of the inner pages, and customize the content modules on each of them.
To do this, open a new page and click “Load from Library” on the Divi bottom dock, navigate to the “Your Saved Layouts” tab, and select it.
Additional WordPress PluginsSEO by Yoast – Helps your pages rank within Google with good titles & descriptions.Pretty Links – Create easy to remember links that forward anywhere, i.e. yourdomain.com/facebookDuplicator – Create backups of your website and migrate to new web hostingAutoptimize – Combine website files and add lazy-loading for faster speedW3 Total Cache – Save versions of your website pages to optimizeInstall Google AnalyticsGoogle Analytics is a free software offered by Google to give you all the important data on your website traffic to help you improve and make better marketing decisions.
To install Google Analytics, you must have a Google account.
Select the “Admin” Gears icon and click “Account > Create New Account.”
Fill out the required fields including Account Name, Website Name, Website URL, and Time Zone.
Next, you must inject code into your website so Google can track your data on every page. To do this click “Property > Tracking Info > Tracking Code” and copy/paste the Global Site Tag into your website header.
There is a WordPress plugin to make this easy. Go to “Plugins > Add New” and search for “Insert Headers and Footers” then install the plugin.
Go to “Settings > Insert Headers and Footers” and paste the tracking code into the “Scripts in Header” text box. Check your Google Analytics reports in 1-2 days to confirm your website traffic is being logged.
Verify Google Search Console
Google Search Console is another free service offered by Google to help website owners maintain their website performance.
The Search Console tool shows you how often your website is appearing within Google search results, where it’s ranking, and how many clicks you’re getting. The application also gives you tons of essential data on keywords and search queries that drive traffic to your site.
You can leverage this data by optimizing existing pages/posts or creating new content around these search phrases.
To Install Google Search Console, click the “Start Now” button.
Add your website or property by entering your website URL, then click “Continue.”
NOTE: You’ll want to verify all four variations of your domain including HTTP/HTTPS & WWW/Non-WWW
Verify your website ownership using one of several methods. If you have Google Analytics installed, you should be able to simply use that as verification.
You can also upload an HTML file to your site. To do this click “Download This HTML Verification File” and use your FTP program to transfer to your web server.
After uploading the file, go back to Google Search Console to verify.
Your Website is CompleteThis is where the fun really begins! I’m so glad you’ve made it this far, and you will continue to learn how all of these tools work together as you gain experience.
Sign-up for the WordPress 101 video series to learn even more and get this tutorial sent directly to your inbox:
The post How to Make a WordPress Website (Divi Tutorial) appeared first on Website Profit Course.


August 27, 2021
How to Speed Up Your WordPress Website & 10X Performance
I went through my client’s WordPress websites because some of them got bloated over the years. So I just wanted to optimize and speed them up, and in doing so I came up with a really good process that I want to share with you today.
Those websites were loading between three and six seconds, and I got them down to about one second. A few of them loaded within 900 milliseconds on some of these tests.
The best news is that this WordPress speed optimization procedure doesn’t require that you switch to expensive hosting (though that will also help). I did all of this with basic, affordable shared hosting!
Let’s first dig into good rules of thumb for building WordPress websites to make sure that you don’t get in the same situation as me, where things aren’t running as smoothly because you overlooked how to speed up your site from the start.
Then we’ll go into the step-by-step tutorial that you can use to speed up your WordPress website.
Want all the steps on a single page? 
Download the FREE cheat sheet!
How to Speed Up WordPressBenefits of a Fast Website4 Speed Optimization Rules of ThumbReduce Image File SizeLimit WordPress PluginsLimit 3rd-Party Embedded ContentUpgrade Web HostingTest Your Website SpeedUpload Web-Ready Images to WordPressInstall & Setup W3 Total CacheGeneral SettingsPage CacheBrowser CacheCDN (Content Delivery Network)Install & Setup AutoptimizeCompare Website PerformanceBenefits of a Fast WebsiteSpeed matters, and the biggest reason is that it helps with SEO (search engine optimization). That means Google prefers fast websites and they’re more likely to send traffic your way because they always focus on the user experience.
This is especially important today since many users are visiting your website from a mobile phone, sometimes not having the luxury of a speedy WiFi connection.
If you have a slow-loading website, more people “bounce” off the website before it loads completely which equates to reduced conversions and less profit if you’re running a business.
Your website load time is far more significant if you operate an e-commerce website since the transaction happens online.
4 Speed Optimization Rules of ThumbReduce Image File SizeThe biggest thing that you have control over that is not too technical is optimizing your images. For example, you don’t want to embed the highest resolution photos that get downsized on a smaller screen. I’ll go into more detail on that when we jump into the WordPress tutorial.
Limit WordPress PluginsKeep every WordPress site that you have under 10 plugins installed. If you can get by with less than that, do it. Many of mine have only three or four.
It’s a beginner’s mindset to want to add all these nifty features and bells and whistles to your website.
Over the years, I’ve become a minimalist. Take away everything until you’re left with the bare essentials of what you need.
Limit 3rd-Party Embedded ContentAn excellent example of this is YouTube videos. I’ve had a couple of pages on my client websites where we’ve embedded four or five videos on one page, and you can noticeably tell the difference when you refresh that page compared to the more basic ones.
There are ways to get around this suggestion, such as “lazy loading,” but once again, let’s start by not cramming everything we can onto a single page!
Upgrade Web HostingYes, I said you don’t need to do this. And it’s true. However, this is primarily a business where you get your money’s worth.
To maximize your speed performance, you will need to go on higher-level hosting, which improves your server response time and download speeds. In addition, many upgraded hosting packages give you access to a CDN (content delivery network) which helps serve files more closely to the website visitor. I’m going to show you how to do that for free using Amazon AWS.
The thing is, it’s not usually necessary unless your traffic numbers increase or you see spikes of traffic that crash your site. For most small businesses and beginner blogs, you want to go through the tutorial below to improve your speed on a shared hosting package before pulling out your wallet.
Test Your Website SpeedHere’s the website that we’re going to optimize in this tutorial.
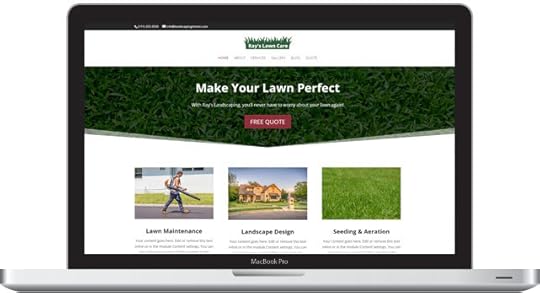
It’s using one of the most popular WordPress themes called Divi by Elegant Themes. They have a drag-and-drop system that makes it easy to create a professional layout like this without knowing much about code or design.
[image error]Divi Visual BuilderThe #1 WordPress theme on the entire internet to design your website with drag-and-drop!
Buy NowWe earn a commission if you purchase using the link above which helps support this website.
If there is one downside to that flexibility, it’s the performance compared to a hand-coded website where an experienced web developer optimizes every aspect.
There are two services I recommend to test speed – Google PageSpeed Insights and Pingdom.
You want to log your numbers first to see how much we improved it.
If we look at the score below, you can see it’s not that great. Google breaks it down into mobile and desktop, and we scored 15/100 on mobile and 61/100 on desktop!
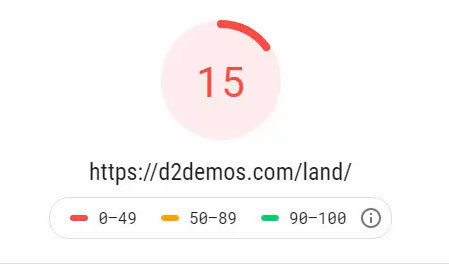

They provide you technical suggestions on how you can improve along with what you’ve done well.
You don’t need to be a web guru to implement their advice. We’re going to install WordPress plugins to help out with this process.
Let’s move onto the next service, Pingdom.
You can run this from a few locations, and since I’m in the US, I chose San Francisco.
Our performance grade here is 75, and they additionally show you the page size, which is 2.5 MB, and our load time was 10.54 seconds.
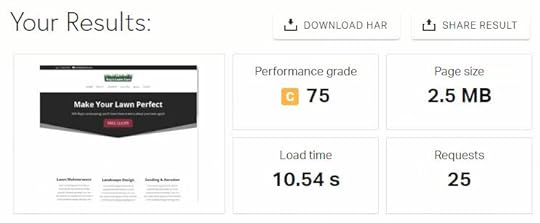
The other cool thing I like is they give you all the file requests that happen when you load this URL in a waterfall style, which highlights if it’s large files that are the issue or the server itself (i.e., wait time).
Upload Web-Ready Images to WordPressLet’s go into the media library and show you the images here.
Before you upload photos, look at the file dimensions. Free stock photos websites like Unsplash & Pexels are phenomenal for filling your pages. However, they give you high-resolution downloads. They might be up to 6,000 pixels wide or more!
One thing I always do before I upload a photo to WordPress is resizing it to the maximum size needed depending on the widest display of that image on my website. You probably don’t need to exceed 1,000 pixels, and in most cases, something like 700 pixels may be ideal.
You can view your image file dimensions from within the media library, as shown below.
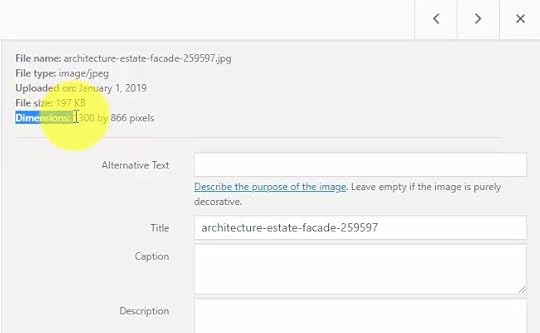
Full-size large photos can both eat up your hosting space (making your WordPress backup size obscenely large) and your bandwidth when people download them by visiting your website.
I use a nifty tool within Photoshop called the Image Processor to resize a large batch of photos automatically.
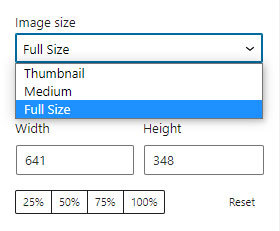
Another WordPress feature worth noting is that they generate multiple files when uploading a photo, including a large, medium, and thumbnail-sized image. So when you’re inserting these images into a page or blog post, you can select those sizes instead of the full-sized photo.
 Install & Setup W3 Total Cache
The first plugin we’ll install is W3 Total Cache.
If you don’t know anything about how caching works, click the link to watch my video on the topic.
The quick one-line definition is that caching saves static versions and files of your website, so it loads faster. This happens on multiple levels, including your browser (files get stored on your computer) and server (pages are saved as HTML, so you don’t access the WordPress database often).
If you’re visiting a webpage frequently, there’s a good chance you see the “cached” version, not downloading every file from the website upon each refresh. This is especially true with design files (i.e., your WP theme’s CSS).
Let’s go through the settings that I use on W3 Total Cache for shared hosting without getting too technical. Depending on your hosting environment, you may have to play around with these.
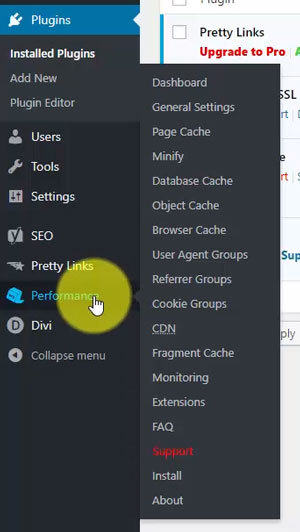
Once activated, we get a new menu option called “Performance.”
 General Settings
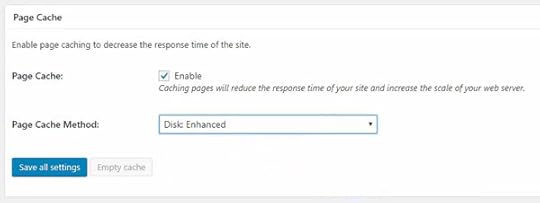
Let’s go through the General Settings. The first thing you want to do is enable the Page Cache.
From the drop-down menu, they recommend “Disk: Enhanced,” so that’s what we’ll choose.
In the CDN section, we’ll use Amazon’s free-to-paid service called CloudFront to host our static website files. As mentioned previously, this step is entirely optional, or you can integrate with another CDN if you’re already set up with the other available services.
You just need to set up an Amazon Web Services account, and they bill you based on usage. However, it’s free up to a certain level, and if you’re just starting, you’re not likely to reach that paid level until you get considerable traffic.
Let’s enable it. Then from the drop-down, select Amazon CloudFront under the “Origin Pull / Mirror” service options.
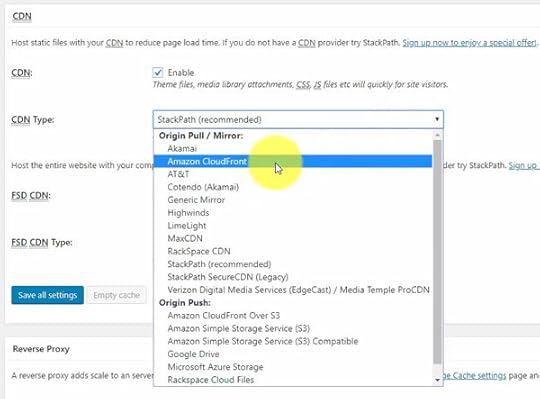
Right now, we’ll leave this as is to finish the General Settings and complete the steps to integrate with CloudFront once we’re onto the “Performance > CDN” page within the WordPress admin (skip to the CDN section below if you’d like to do that now).
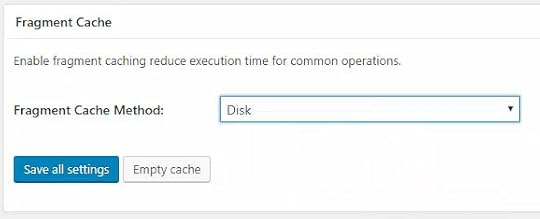
The last thing we want to enable is the Fragment Cache. Set this to “Shared Server: Disk,” and we’ll save all these settings.
Note that you will see a warning because we haven’t set up the CDN yet. But, don’t worry, we’ll get to that soon!
Page CacheNavigate to the “Performance > Page Cache” menu.
Select the checkbox “Don’t cache pages for the following user roles” and pick which logged-in users should always see the live website, not the saved cached version. This ensures you don’t get fooled when you’re tinkering with settings or design!
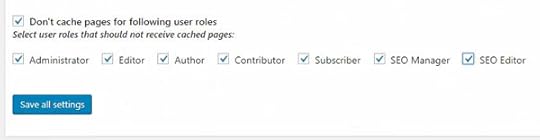
The first five are default WordPress roles, and you may see more if a plugin creates new user roles, such as Yoast SEO, as shown below.
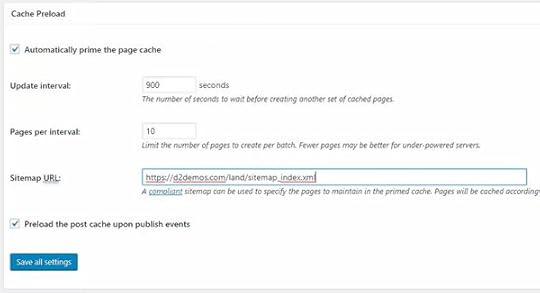
Under the “Cache Preload” section, enable “Automatically prime the page cache” and “Preload the post cache upon publish events.”
They ask for a sitemap, and a plugin like Yoast SEO automatically creates one for your website. If you got that available, copy/paste the URL, which ends with an XML file extension. A sitemap is just a list of your published pages and posts on your WordPress website.
Scroll down to the “Advanced” section and enable “Compatibility mode.” It says that it decreases your performance by ~20% in exchange for increasing interoperability with more hosting environments and WordPress idiosyncrasies. Translation – there’s less of a chance W3 Total Cache will cause an error.

Save the settings for this page, and we’ll move on.
Browser CacheNavigate to “Performance > Browser Cache,” which will be the last section we’ll adjust before setting up the CDN.
In the General section, enable the first six options from “Set Last-Modified header” to “Enable HTTP (gzip) compression.”
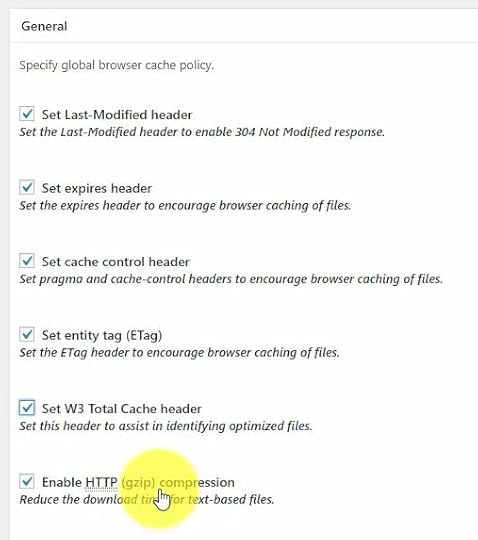
Then a few options later, enable “Remove query strings from static resources.”

A query string is when you see a question mark in the URL, which in PHP passes variables to a page, making it dynamically loaded. You’ll see this sometimes with versions appended to CSS files. Usually, dynamic requests bypass the cache, but we don’t want that to happen with static (i.e., not frequently changed) files.
Let’s save all settings.
CDN (Content Delivery Network)Lastly, we’ll complete the steps to set up our CDN.
In a new tab, go to your Amazon AWS console and navigate to CloudFront.

We’re going to create everything through the WordPress admin, but you’ll be able to refresh the CloudFront console to see your domain that’s associated with the CDN appear here once we’re done.
Amazon AWS offers a suite of tools for web developers, and one thing I’ve noticed is their sales pages are super technical. As a beginner or even an experienced WordPress guy like myself, you’ll likely scratch your head at what each service does. It took me a while to figure out how to integrate something simple like a CDN, and this tutorial is merged from several that I found which were slightly different than what I needed.
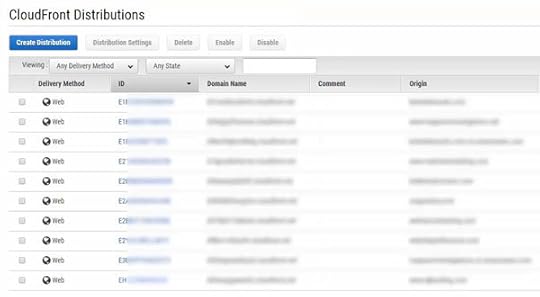
On the CloudFront distributions page, you’ll see all your websites. Just keep this page open.
The only thing you’ll need to grab is your AWS secret key and public key, which you’ll get when you create an AWS account. Keep these stored locally on your computer or in a safe place because that’s how you integrate WordPress + CloudFront.
Within WordPress, navigate to “Performance > CDN” and scroll down to the “Configuration: Objects” section.
Enter your “Access key ID” (public) and secret key and public key so that WordPress and Amazon can talk to each other.
All you have to do is click the “Create distribution” button, and it’s automatically going to do it for you. You’ll see the “Created successfully” message, and you’ll be able to verify that it worked when you check the AWS CloudFront console.
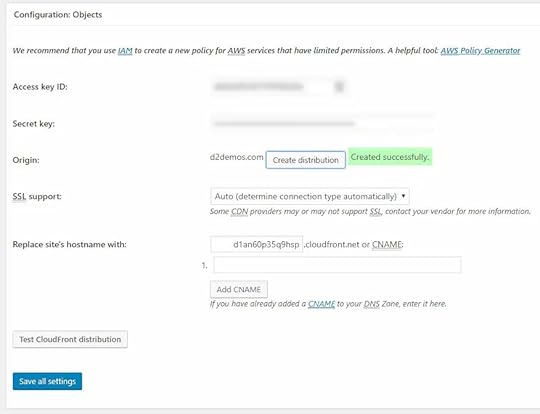
You’ll also notice that under the “Replace site’s hostname with” section, you get a CloudFront subdomain to access files on the CDN.
What happens is that any time you upload a file to WordPress, like adding a photo, it will automatically sync with the CDN. Then when people download the website, the CDN will serve your web files instead of your web hosting space, which is faster.
Go over to your Amazon CloudFront console and refresh the page to see your new distribution.

It has the comment showing “Created by W3 Total Cache,” confirming that your integration is working. Under the “Status” column, it’ll inform you whether the distribution is still in progress or completed.
Go back to WordPress, and click the “Test CloudFront distribution” button. You’ll get an error if it’s in progress, but it only takes a few minutes until it’s ready. So just give it time until that happens.
Install & Setup AutoptimizeWe got one final task here, and that’s installing the WordPress plugin, Autoptimize.
Autoptimize will “minify” (remove unnecessary code like comments) and combine our design files to reduce requests.
It also lets you “lazy load” images which means that photos currently off-screen won’t be loaded until the user scrolls down the page. Then, as the user navigates the page, they fade in as needed.
Some WordPress themes may have these features built-in, but most do not.
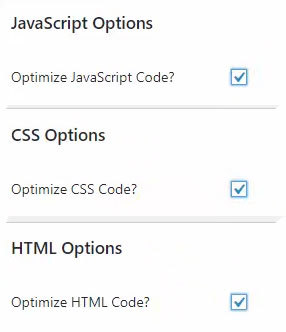
Let’s install and activate, then navigate to “Settings > Autoptimize.”
From the “JS, CSS & HTML” tab, enable “Optimize JS Code,” “Optimize CSS Code,” and “Optimize HTML Code.”
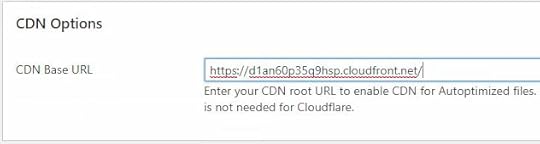
To serve these files from your CDN, you need to copy/paste the CloudFront CDN URL to the “CDN options” section. Then click the “Save Changes” button.
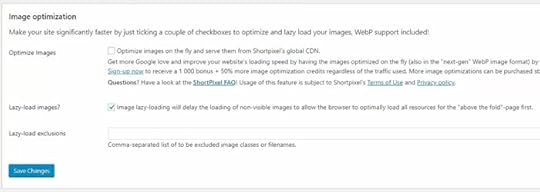
Next, navigate the “Images” tab, enable the “Lazy load images” option, and save.
That’s all we’re going to update!
Compare Website PerformanceIt’s important to know that the order of CSS files matters for your design to load correctly. Sometimes with caching or minification plugins, CSS files get mixed up during optimization, breaking your layout.
In these rare cases, you will need to manually debug and fix by excluding specific files from being optimized.
Hopefully, that doesn’t happen to you, and we can test our WordPress website speed now that it should be noticeably faster.
First, refresh your pages a few times to help build the cache. Loading the pages will generate the optimized files that subsequent users will load instead of your raw theme files.
Then go back to the testing tools we used before optimization and see what scores you get. If you see the same score, run it a couple of times to ensure the testing tools also utilize the cache features.
Right out of the box with Google PageSpeed Insights, we’re looking good!
Our test website got a 71/100 on mobile and 87/100 on desktop.
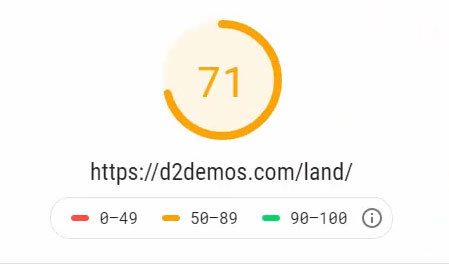

That’s up from 15 and 61!
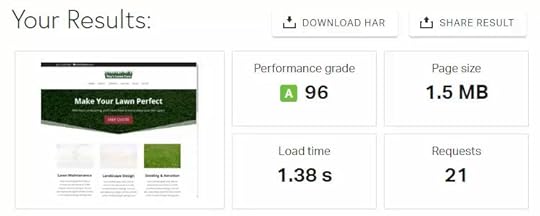
Next, return to Pingdom and make sure you’re testing from the same location you did previously.
Look, we got up to a 96/100, and we’re loading in 1.4 seconds. That’s almost a 10X improvement on what was admittedly a bloated, slow-loading website!
That’s all there is to speed up a WordPress website on shared hosting before you require a hosting upgrade.
Make sure to grab the speed optimization cheat sheet below!
Download the FREE cheat sheet!
The post How to Speed Up Your WordPress Website & 10X Performance appeared first on Website Profit Course.
August 24, 2021
The Time I Met with a $25 Million Company

I like working with small business owners for web design. My best clients either work for themselves or have less than 5 full-time employees.
However, when I first started building websites for others back in 2010, a multi-million dollar company approached me to talk about a project they had in mind.
Upon the initial phone call to set up the meeting, I didn’t realize how big they were.
I arrived at the business park which was a 20 minute drive from my house, and I got a sense they did pretty well after walking into their office.
We went into a conference room and they provided me a handout about their company.
They had $25 million in revenue and 60+ employees, providing cleaning services to stores and office buildings. Their most well-known client was Barnes & Noble.
How They Found Me
You would think this opportunity fell into my lap, but it actually came from a bit of effort.
When I decided to make money from web design, I realized tons of people were not going to come to me with a checkbook in hand. I had to learn some type of marketing and outreach.
With an introverted personality, I decided that cold calling was the last option for me. It would drain my energy so fast that I couldn’t consider it unless times got rough.
Like everyone who hates the thought of sales calls all day, I didn’t want others cursing at me because they viewed it as a spammy tactic.
My strategy to find clients was to use Google to find local businesses that had an old website in need of an update. I searched in almost every industry – dentists, lawyers, contractors, chiropractors, personal trainers, etc.
I sent one specific e-mail to a man with an accounting website.
He had a ton of plain text info on his website but it was completely devoid of images or visual appeal.
I never heard back from him.
But he read it, because the $25 million company contacted me about a month later, and they specifically indicated they were referred to me by him.
In the internet age, local trust still goes a long way!
 Their Project Details
Given the company’s financial success, they overcame common industry problems and wanted to share their knowledge. These were the issues they faced and solved while growing the business over a span of 15 years.
They wanted to offer a bundle of services to small and mid-sized cleaning companies to reduce their time spent on administrative tasks. They were still developing the idea, but it was going to consist of accounting, marketing, and sales resources.
It wasn’t quite franchising, but close. The term they liked to use was “business in a box”.
In a nutshell, they had systematized how they became successful. From that system, they wanted to create a monthly service package which would help the struggling cleaning business owner who wore too many hats. It would provide the back-end support, allowing them to focus on strategy and growing their business.
The vision was to include a website for every customer they would acquire as part of this monthly service.
As Randy Moss would say, “straight cash, homie”.
Our Meeting
I brought my MacBook to the meeting, which was mostly informal, and sat down with the Vice President and the Business Director.
They had a website and it needed revamping.
To kick things off, we went through their current website and I pointed out the aspects I liked and what I’d do differently. The redesign would be their first project to test the skills of the web designer.
After that, we discussed their project details, and they let me know they would be getting pricing from 3-4 different website designers.
Code-wise, I totally understood what they needed. They wanted to build cleaning website templates, and their customers would select one. Then each new customer would schedule a 1-hour consultation with me to customize their website.
On the flip side, I had a hard time grasping how much to charge for such a wide-ranging project.
I was still a complete beginner with client work, so I took notes during the meeting and told them I would review and provide an estimate that evening via e-mail.
My offer to them was $500 to redesign their current website, $500 to create each website template, and $150 for each new customer consultation. Plus $120/year for web hosting on each website.
At the time, it seemed like a fair deal to me.
If you do a little math, assuming they would acquire 1 new cleaning company each month, here’s my slice of the pie over the course of a year:
$500 Main Company Website Redesign$2,000 Website Templates (4x $500 for each)$1,800 Setup Charge (12x $150 for each new client)$1,440 Web Hosting Recurring (12x $120 for yearly hosting)$5,740 TOTALThis is a conservative estimate because I could tell those guys were experienced salesmen. Over the next year, this would build with new clients and recurring income from web hosting.
It was intimidating and it would have been a challenge, yet I wanted the opportunity. And the payday, of course.
Unfortunately, I didn’t get it. They told me I was on the low end for the price compared to the other web design companies.
They did like and respect my enthusiasm, though. That was evident throughout the process.
FREE Download: 15 Tools To Start Your Web Design Business Your information will not be shared or sold, period.
Any time you go through an experience like this, you want to take away key lessons that you can apply. For me, those were the following:
Service Over ProductsService businesses are the best to start for three reasons: fast money, high value, and low expenses.
Your largest expense is time and you are making a profit on your expertise. The higher the value, the more you can charge. You don’t have to spend money building a product or renting space for inventory.
Over time, you can productize your services and outsource, but start off by solving one client’s problem. Go above and beyond their expectations and they will be a raving customer (or business ally) for life.
The Riches are in the NichesAt this time, I was offering websites to any type of business I could find. This isn’t the right approach.
Become an expert in a really specific area. There are a ton of niche businesses that make serious money and you’ve never heard of them.
For me, I’ve come to realize that I like working for residential contractors the most. I deal with the owner directly, making communication easy. The website layouts I create can be reused. I understand how people search on Google for these types of businesses. I know which ad campaigns work better than others.
You can’t get this type of deep knowledge if you are creating a doctor’s website, then an e-commerce website, then a restaurant website. All of them have unique goals.
Results Correlate with EffortYou get out what you put in. I didn’t want to cold call but I made the effort to research a lot of local businesses, find e-mail addresses, add them to a spreadsheet and contact all of them with a personal e-mail.
The vast majority didn’t respond. But this opportunity was born out of this outreach.
Throw a lot of stones, the ripples will propagate beyond your expectations.
Also don’t be afraid to change your approach if something isn’t working. Just keep moving forward.
Understand Your Value, Price AccordinglyI underpriced the work and undervalued my own time. I could have charged considerably more. Instead, I came off like a freelancer who didn’t know exactly what he was doing.
I’m not too hard on myself, though, I didn’t have a reference point.
Always know who is on the other side of the table and how much money they are generating. That is the best way to determine how much you should price your services, because the more they make, the higher your value.
Make an ImpressionAs I stated above, I know they liked me even though I didn’t get the contract offer.
How you ask?
Because their Business Director referred me to two small business owners he was friends with during the next 6 months.
Even though I rambled during the meeting, I displayed enough passion to leave an impression with them. And I was courteous after they informed me they wouldn’t be choosing me for their project.
Being a genuine person actually does work out if you give it enough time!
Stay CurrentI was still cutting my teeth with web design business.
So I learned the newest techniques. Then I went a step beyond web design to learn SEO since they are intertwined so deeply with online marketing.
Was I a world-class expert? Of course not. I built long-term momentum by doing something every day.
Subscribe to the best industry blogs. Test out tools. Try new services. If something breaks, no big deal. You’ll learn more when you need to fix it. And you’ll be better equipped to prevent it next time.
If you can adapt with the problems a client faces, especially with technology, the more stable your business becomes.
Show Your ProcessDuring the meeting, they got to see exactly how I evaluated their website. I showed them the features I liked. I told them what I would change. I explained the thought process behind my advice. I referenced reliable sources for my SEO recommendations.
The more you let people in on your process, the more you create a sense of mutual understanding. This immediately builds trust.
We all know it by now, people do business with those they know, like and trust.
Don’t be afraid to tell people your secrets, they make you stand out from the crowd. And no one will steal them, they have their own priorities and time obligations.
Instead, when they decide to invest, they will choose you to implement your ideas to help their business.
 Start freelancing today, join the Web Design Business Pro Membership!
The post The Time I Met with a $25 Million Company appeared first on Website Profit Course.
August 20, 2021
How to Sell Websites: 4 Ways to Add Value for Local Web Design Clients
Here are four ways to add value for local clients when your goal is to sell websites as a freelancer. Each will help you stand out from the crowd and get a leg up, even if you’re a complete beginner with business.
I learned these the hard way, so you don’t have to!
Blog TitleTarget Specific Business NicheStart with One OfferBuild Trust by ListeningGo the Extra MileRealistic Expectations1) Target Specific Business Niche
The thing about websites is that every business on earth (and person) should have a website. So there’s no excuse not to have a website in 2021 and beyond.
When you go down to the local level, there are way more bad websites than good ones. At least 50% of small businesses don’t have a website or have an old site needing an update.
Business websites won’t take off unless you learn about online marketing and how to drive traffic.
The best thing you can do is focus on one business type and get an in-depth understanding of how successful players operate.
Most of my local clients are home service contractors, and you can even niche down further if you want to go into one craft – i.e., roofing or kitchen remodeling.
When you reach out to local businesses and only work with companies like them, you’re immediately separating yourself from the do-it-all freelancer.
You’ll start to understand how customers interact with the website and get to know the manufacturers, organizations, and associations within the industry. These help sales conversations with a business owner when you understand what they do every day to make their living.
2) Start with One Offer
Target one business type and offer them one service that you think they need.
Everybody has seen the freelancer that says, “I can do websites, social media, SEO, graphic design, whatever you need.” And when you come off like that, you don’t appear to have expertise in any of them.
That’s what every canned outreach template looks like when sending out cold emails.
The opening line usually starts with your skills, and that’s the WRONG approach.
Business owners don’t care about your skills. Instead, they care about how you can help their business do better online.
I recommend starting with web design to get a local client set up with a good brand website. One common trend is that almost all offline companies with brand recognition will get people searching for their business name. So you want a great website to be the first result, not a 3rd-party page that might have negative reviews you cannot control.
That’s a considerable benefit undervalued by those still skeptical of the online world and worth pushing in your initial sales conversation.
The best way to increase your profit after landing a web design client is by upselling your current ones with your other services when they need them.
3) Build Trust by Listening
When you’re prospecting with those you don’t know (cold outreach), the most important thing is building trust. Unfortunately, too many people go for an immediate sale.
Instead, you want to help this person genuinely. Even if they aren’t a great match, 10-15 minutes on a phone call answering a few questions goes a long way. You never know when a good first impression leads to a potential client or referral down the road.
I always recommend that you send cold emails to set up a phone conversation or an in-person meeting.
You’re probably thinking you need a well-written sales script and follow it like an actor or telemarketer.
Scripts are just guides.
The best script is a list of questions. Ask them questions, let them answer, then you sit back and listen. You’ll begin to understand where they’ve had issues in the past, whether it be with a past designer or a big company.
Download my exact web design client questionnaire!
I always print the questionnaire and write down the answers. You can guide the conversation based on their answers because every person has a particular sticking point that holds them back. It could be tech knowledge, a lack of trust from previous bad experiences, or financial stinginess.
In the world we live in, they must adapt, or their local business might die!
Let them do more of the talking, and you’re listening and taking notes.
4) Go the Extra Mile
Maybe you have a demo website, and you can quickly throw in a potential client’s logo and send them a link, which gives them an idea of how their website will look before you add finishing touches.
Or you can go through one of their competitor websites. I love this strategy because everybody successful in business knows their top two or three competitors. So there’s a good chance this will get their ears perked more than telling them how you’re going to help their business get more sales. That’s the competitive juices of operating your own business.
Put together a brief case study of a successful and well-known company in their business niche.
Another idea is when you get a client, don’t send a boring monthly report. I prefer making short screencast videos, where I review the client’s Google Analytics website traffic and offer insights while explaining things in clear English. I’ll touch on two or three talking points that I’m monitoring throughout the month.
Business is about relationships ultimately, so if you do something well and it takes you five or ten minutes while giving them incredible value, go ahead and do it without billing for every single minute like a lawyer.
If you invest upfront in building a relationship by doing stuff like this, the potential rewards are that you have a customer for the rest of your life.
Realistic Expectations
You don’t have to be an expert to expand your income potential with new skills. However, you need to be willing to grow with a web design client who prefers someone local they trust over a gamble with remote work.
Most people hate failure, and they give up before scratching the surface of their potential as a freelancer.
The best analogy is baseball because when you have a .300 batting average. That’s an elite hitter. But, meanwhile, they’re getting out 7 out of 10 times.
Well, sales are even more challenging than that!
Out of 100 cold emails, you might only get two or three positive responses. They come in chunks, one batch may lead to 10 people interested, and the next 100 doesn’t get a single reply.
So many people ask, “what am I doing wrong?”
The answer is likely nothing. You need to continue to test over a long period with various templates, offers, targeting, etc.
The real secret is you have to dedicate time for sales outreach on your calendar, so it becomes a regular part of your routine. It’s not easy for the average person to build a thriving business in less than 1-year, and you shouldn’t feel like a failure if progress is slower than you imagined.
Remember, if you gain clients that stick with you for multiple years, it’s worth it to go through that haystack to find the needle!
FREE Download: 15 Tools To Start Your Web Design Business Your information will not be shared or sold, period.
The post How to Sell Websites: 4 Ways to Add Value for Local Web Design Clients appeared first on Website Profit Course.
April 15, 2021
Time Management Tips: How to Use Google Calendar to Plan Your Day
Let’s dive deep into time management tips and how to use Google Calendar to plan out your day. This topic has been a huge focus of mine for the last 2+ years since it was a significant weakness.
As you can see from the screenshot of my calendar below, I have a much more elaborate system after taking time management tips from pretty much every source that I could get my hands on, from CEO interviews to books and podcasts.

It’s so important to plan your days out because otherwise, it’s easy to just drift through life. I always used a written planner in high school and college, and I attribute that to why I excelled and graduated at the top of my class.
When I decided to start freelancing after college, it became apparent that the most challenging part of creating a schedule is figuring out what to put on there when you have an infinite number of options.
As a student or an employee at a job, someone gives you the tasks or curriculum, so it’s not hard to figure out what you must accomplish.
If you’re an entrepreneur or just looking to improve yourself, you have to selectively choose what to spend your time on any given day, and trying to figure out what to put on your calendar becomes a much more complex process.
How to Use Google Calendar for Time ManagementCommon Time Management MistakesMistake #1: Scheduling Too Many TasksMistake #2: Underestimating Task LengthBest Strategies to Master Your Schedule30-Minute Increment MinimumTime Block 8 AM – 12 PM for One Big TaskUtilize Google Calendar Recurring EventsPlan Fun Things FirstCreate a Daily Calendar ThemeHow to Title Your Calendar EventsHow to Color Code Your CalendarStay Organized Outside of Google CalendarWhat Are Your Goals?Your TasksYour ProcessesYour HabitsAlign Your Calendar with Your PersonalitySchedule Weekly Event to Manage Your CalendarHow to Divide Your Time Between ProjectsProcrastinate ProductivelyBe Honest & Accurate with Your CalendarCommon Time Management MistakesLet’s start with common time management mistakes, i.e. things I repeatedly messed up in the first few months of a using a calendar!
Mistake #1: Scheduling Too Many Tasks
It makes me cringe when somebody shares their calendar, and they have every hour scheduled from 7 AM to 11 PM with no empty time blocks.
That’s the absolute wrong way to go about it, and you bet I fell into this trap of productivity. I was often scheduling 6-7 straight hours of work with no breaks in between. After a few hours of work, you’re not motivated and desperately want to unwind, either by taking a walk or simply stepping away from your computer.
Not to mention that as humans, sometimes we need to use the restroom or want to cook some food 

The other reason you want breaks and free time included on your calendar is that you only have a rough estimate of how long it’ll take to complete new tasks. You want to leave a little bit of wiggle room if an hour-long task bleeds over to 1.5 or 2 hours.
You can see I have a lot of empty time on my schedule, so I can shuffle things around if needed.
You probably notice that I use acronyms at the beginning of each event title. I’ll discuss my system for that a little later in this post, so keep reading!
Now let’s go deeper on time management strategies that act as guard rails, so you don’t overcomplicate your calendar.
Best Strategies to Master Your Schedule30-Minute Increment Minimum
I don’t schedule anything that’s less than 15 minutes. If I have one task that takes me 5-10 minutes, it’s not going on my calendar. I’m either going to knock it out immediately if I have free time or write it down to batch several smaller tasks into one 30-60 minute time block.
I like scheduling most tasks at an hour for simplicity, with 30 minutes as my absolute minimum.
When a task takes me 45 minutes or 1 hour and 15 minutes, I simply alternate between rounding up/down to 30-minute increments.
These estimates will converge to accurately represent how much time I’ve spent in total over weeks and months.
Time Block 8 AM – 12 PM for One Big Task
A good concept that I read about in a book called The One Thing, written by the founder of Keller Williams Realty, is to schedule one big task every morning from 8 AM to 12 PM in a four-hour time block. It’s essential to make progress on a big idea, especially at the beginning stages that require lots of uninterrupted thought.
I recommend that you follow that tip if you’re just getting started with launching a blog or a freelancing business like web design, and guard that time like your life depends on it!
I’ve found that it often takes 30-45 minutes just to get into the flow of something, and there is a high cost to task switching between ideas when you’re in brainstorming mode.
Utilize Google Calendar Recurring Events
Another great tip is to take advantage of Google Calendar’s recurring events feature.
I have so many calendar events that are recurring to the point where most of my schedule is planned, and I just need to fill in a few specifics.
Take a look here on Sunday of this week, and you’ll see my recurring financial events.
I have time set aside to keep up with accounting, pay estimated taxes, file my state sales tax report, and submit an annual report for my company.
Then I have personal events geared toward self-improvement to log my time and health metrics into a spreadsheet.
I’m a Google Sheets junkie, so anything important in my life goes into a spreadsheet so I can track progress long-term.
For instance, I chart my body weight, walking distance, and workouts.
For time management, I keep a chart logging all my calendar events focused on business productivity to ensure I’m making progress. Plus, I can quickly look back and review weeks that I didn’t accomplish much and figure out why.
I’ll share this free Google Sheet template with you below.

I also built an advanced version that automatically pulls your time from your Google Calendar events, so you don’t have to do the manual input each week.
If you’re serious about time management and want access to this fantastic time tracker tool, click here to learn more.
Plan Fun Things First
One recurring event for me every Saturday afternoon is an activity or DIY project.
The tip here is to schedule out things you want to do that you look forward to, which helps you focus during the necessary and tedious tasks.
My most common fun tasks are golf, tennis, and gardening. I also do this with exercise, where I have daily recurring events for workouts that I shift around to fit between the productive tasks and give myself a mental break.
Keep in mind, I was overweight and dreaded this when I first started making daily workouts a habit. Nowadays, I look forward to them!
The takeaway between all of these strategies is to be accurate with your time. If you initially schedule something for the morning but don’t start working on it until the afternoon, drag-and-drop until the calendar shows an accurate picture of your day.
Create a Daily Calendar Theme
Here’s an interesting concept that I think I first heard about from an interview with one of the Twitter founders. He had a theme for each day of the week, which is more important if you’re running a business where you must juggle many different tasks.
I ran with that idea to create the graphic above. Now any new task that I’d like to do gets placed onto my calendar by which day of the week it most appropriately fits.
Monday: Clients, Management, Outsourcing, Running Company
Tuesday: Product Development, Profit Ideas, Finances, Accounting
Wednesday: Marketing, Advertising, Outreach, Growth, Partnerships
Thursday: Overall Strategy, Detach & Assess, Planning, Eliminating
Friday: Social Media, YouTube Videos, Writing, Email Lists
Saturday: Outdoor Activities, Sports, Day Trips, DIY Projects
Sunday: No Technology, Household Tasks, Cleaning, Organizing
Despite having a scheduled day without computers, I often break this rule because I like working every day. The thing is, I rarely push the limits of how much I can get done in a single day. Instead, I prefer to get up early and do a few hours of work by about 10 AM. After that, I can shut off to enjoy the rest of the morning and afternoon.
I usually avoid rush hour traffic seven days a week and take trips to the store when everyone else is stuck in the office.
When the weather’s nice, I’ll go outside during the day. I never want to be stuck inside from 9-5 every single day. The entire point of working for yourself is to find the balance between flexibility and disciplined productivity.
The bottom left of the image above shows many of the same calendar principles that we’ve already discussed. That includes scheduling vacations first, building your boring tasks around fun things that motivate you, scheduling daily time off, and prioritizing one major task each morning.
The afternoons are for shorter tasks that last 30-60 minutes.
Here’s a great article by startup investor Paul Graham on the difference between a manager versus a maker schedule, which goes in-depth on the concept of creative work vs. guiding other people to get things done through outsourcing.
You have much more creative energy in the morning, and it’s imperative to be distraction-free while you’re in creation mode. Then you can schedule meetings or phone calls in the afternoon to tie up loose ends and touch base with your clients or employees.
The whole point of spending time maintaining a calendar is to be proactive instead of reactive. Don’t keep your inbox open and respond to every incoming message within minutes. Check your emails 2-3x per day and communicate with people to not expect an immediate reply.
If you are at a 9-5 job, it’s a bit more challenging to operate in this way. However, if you can document and prove it helps your productivity, it’s worth pitching to your boss.
How to Title Your Calendar EventsMy first recommendation is to use a command language structure, starting with a verb to describe the action you’re taking. As shown in the image above, this event shows when I recorded the video accompanying this blog post, and the event name is WPC Record Use GCal.
The general format that I’ll use is:
TAG + Verb + Thing to Do + (notes)
I keep titles concise, which flows over into how I name files or folders on my computer. You don’t need a full sentence for a calendar event. Boil it down into one or two words.
You notice that the tag part of the calendar event name is an acronym (WPC). I specifically use this to identify the event as one to track on my productivity spreadsheet. Any tagged events are automatically imported each week, the total hours are summed up, and it is logged into a new row to visualize how I’m spending my time.
WPC is just an acronym for my domain, websiteprofitcourse.com, and I use that for any tasks that I want to be tracked, which contributes to promoting and building this website.
Of course, many calendar events aren’t tracked in such a meticulous manner, such as walks, hobbies, or even administrative business tasks like accounting.
How to Color Code Your CalendarLet’s get into a couple of advanced techniques, such as color-coding your calendar events.
I’ll describe my color system below. Because I like to visualize my week, doing everything in one color doesn’t take advantage of event colors with Google Calendar.
Light Green – Default Tasks
Example: Writing a blog post
Yellow – Membership Community
Example: New course for membership
Gray – Client Work
Example: Adding photos to WordPress website
Blue – Big Bets (we’ll discuss this later)
Example: Creating a new blog
Orange – Social Events & Meetings
Example: Dinner with family or hanging with friends
Red – Exercise
Example: Morning workout or walks
Dark Green – Hobbies
Example: Golfing or gardening
Purple – Household tasks
Example: Mow lawn
As previously mentioned, I utilize recurring events for many of these buckets. Workouts are a daily thing.
On Sunday afternoons, I have an event, “Clean House.” Each week, I manually adjust that event to whatever specific household duty is most pressing. Last week it was vacuuming. Next week it might be to clean the bathroom or mop floors.
During football season, I make sure it’s between 1 PM and 4 PM to watch a football game and take care of the cleaning during commercials and halftime!
Stay Organized Outside of Google CalendarThe tasks you’re doing should fit into a bigger strategy with what you want to accomplish in life.
Within my Google Drive, I have three primary files that help keep me moving forward in the right direction.
What Are Your Goals?The first is a document with your goals. In December and January, write down your yearly targets for projects that you want to make progress on, along with checkpoints that confirm you’re getting closer. A one-page bullet list is good enough here.
All your tasks and events should tie back to your goals in some way.
Your TasksFor each of my business projects, I have a document entitled “Tasks,” which is nothing more than a list of ideas for things I can work on that haven’t yet made it onto my calendar.
Usually, I start by writing down ideas or capturing them on my phone, like an annotated screenshot.
Then I make sure to move this over to the master task list, where I sift through them to figure out the highest priority.
Many of my blog posts start as a title for a subject that I’d like to expand upon. Then I’ll brainstorm bullet points. When I’m ready to write, I’ll move those over to a separate Google doc or WordPress draft to outline and complete.
Your ProcessesWhen you go through any task, especially one that repeats, it’s essential to write down the steps you’ve taken to complete it.
I capture these steps in a Google spreadsheet entitled “SOP” for standard operating procedures.
Having well-defined processes makes performing tasks so much easier each subsequent time because you can open the SOP document and knock out each step without remembering how you did it the last time. It becomes brainless for you as you go faster and more efficiently, plus it’ll be easier to hand off to someone else if you decide to outsource it.
Your HabitsOne of the best things I’ve done in the last few years is write down both my good and bad habits, along with those I want to add to my life.
Many of the ideas have come from a list of mentors who embody the simple behaviors that I know would benefit my long-term growth. These are not people I know personally. Instead, they are all online mentors through books, podcasts, and people who’ve built a business that I appreciate.
Follow entrepreneurs that you’d like to model your life after and don’t solely focus on their income.
The two best examples are Tim Ferriss and Jocko Willink.
Tim is someone I’ve followed for quite a while, and he’s the best example of working smarter to earn more with less effort, so you can spend time doing the things you love. As someone who has no shortage of ideas and enjoys bouncing between topics, I appreciate how Tim focuses on learning from people in all disciplines and extracting their commonalities.
However, having lots of ideas is a blessing and a curse. You will not make progress if you split your time working on five projects at once.
Listening to Jocko’s podcast taught me the importance of prioritizing and executing to ensure you’re moving forward in life instead of spinning your wheels jumping from idea to idea.
Both of their podcasts have been highly influential and shaped how I think today.
Align Your Calendar with Your Personality
I took a personality test to understand my strengths and weaknesses better.
Being organized is one of my best skills which shows by scoring in the 93rd percentile for Conscientiousness: Orderliness. I have trouble working when my environment around me is messy, whether that’s my physical space or computer.
The same goes for self-improvement. It wasn’t going to happen on a whim. I need a system for managing my own time, as discussed throughout this entire post, to look back and analyze myself.
That’s why I focused on using a calendar religiously when I felt my time management skills deteriorated after college.
A few other interesting takeaways from my personality test are that I rank much higher in Agreeableness (82nd percentile) than the average male. The contrast is that I am in the 2nd percentile for Extraversion, which means I’m a huge introvert.
Because of this, I know that any in-person meetings or group gatherings will drain my energy. At the same time, it’s hard to make progress building your own business if you’re not willing to connect with others. So that’s a balance I always need to strike. I do this by not overscheduling tasks on days where there’s lots of human interaction – I require time off by myself to recharge!
Schedule Weekly Event to Manage Your Calendar
Every week, I have two events on my calendar to review my calendar. Isn’t that meta?
This means I take a look at my next 3-4 days along with my goals and task list. If I need to reschedule anything, this is the time to do it. It’s also a great way to confirm that what you’re working on daily moves you towards your highest level goals. It’s so easy to get sidetracked by not stepping back and zooming out at a regular frequency. Once a year is not enough.
I do this on Sunday and Wednesday, and occasionally I’ll skip one if I have my entire week planned out.
The biggest time suck is urgent but not important tasks, often sent to you by other people who have their agenda in mind. This reactive work is why you must use a calendar to manage your time and treat your scheduled events as though they were non-negotiable (because they are).
On top of this weekly review, I also do a monthly review on the first day of each month with all the key metrics that measure my business’s health.
Then around December or January, I’ll do a yearly review browsing my calendar and time tracking spreadsheet to see exactly how I spent my days and weeks.
Were they productive?
Did certain events produce anxiety with little benefit?
What were the critical tasks I initially feared that weren’t that bad?
That’s the high-level overview that makes using a calendar and scheduling everything worthwhile. While you can use a calendar as a simple checklist, it’s these periods of looking back that give you the perspective you need to move forward in life confidently. The whole point is to analyze yourself and figure out if you’re spending your time wisely.
That’s why I like the color-coding system to visualize how I’m dividing my time week-to-week.
With my time tracker spreadsheet, I can calculate my exact hourly rate per client and side project. By doing so, you’ll see trends pop out that you wouldn’t otherwise intuitively understand.
For instance, I’m most productive early in the morning when I have creative energy. Yet, it took me an absurd amount of time before I realized this and decided to stop scheduling essential tasks in the afternoon. When noon rolls around, I want to complete crucial productive work, and if it’s nice outside, I don’t want to be stuck on my computer.
In the first few months of using a calendar, I routinely scheduled things from 8 AM to 3 PM and constantly pushed back those afternoon events to the next day. Now I leave that period empty.
How to Divide Your Time Between ProjectsI learned this through an interview on the Tim Ferriss podcast with the former CEO of Google, Eric Schmidt.
The best way is to pick three main projects and divide your time 70/20/10.
A common mistake is to split your time up in thirds if you’re working on three projects, or even worse, spending less time because you’re tackling more than three.
The 70% time bucket is your primary business objective, and that’s where you must spend the majority of your productive hours.
The 20% time bucket is an adjacent goal that is a complementary add-on to your primary business object.
The 10% time bucket is a “big bet” where you feel a much higher potential return down the line.
It’s a great investment strategy for your time.
Just as you wouldn’t want to put your entire life savings into a single stock, you don’t want to shoot for the moon with no safety net.
The time tracker spreadsheet that I use is made with this in mind. It calculates both total hours and the percentages of how I’m dividing my time monthly and yearly.
Download that free template or get the automated version that pulls events directly from your Google Calendar.
I follow many aspiring entrepreneurs on Twitter, and I can’t tell you how many people get caught up with all the fancy tools to boost productivity. They’re always looking for the hot new app.
I am the complete opposite. You don’t need more than a few documents, spreadsheets, and a calendar. What will move you forward is better habits, plain and simple. Habits take time. You can’t outsource productivity to technology.
Focus your effort on the things that last forever, such as timeless principles that push you forward and make your life better without software that is sure to be obsolete in 5-10 years.
Procrastinate ProductivelyYou are not always motivated to do creative or productive work. We’re human, and we need breaks.
One thing I recommend is you procrastinate productively.
As I previously mentioned, I’m a highly organized person, and cleaning my house is oddly therapeutic. So if I am sick of sitting at my desk, I’ll do that. Or if I just feel like doing mindless computer work, I’ll consolidate and organize my folders.
Your productivity is linked to your health. When your brain is fried, go for a walk or do a quick workout.
Spend your downtime by doing things that are self-evidently beneficial to your life. Don’t rely on scrolling social media or binging Netflix during your downtime. It’s occasionally good to tune out like this, but there’s a fine line between it becoming an addictive habit.
Be Honest & Accurate with Your CalendarI genuinely hope this blog post has given you plenty of time management tips along with systems to organize your day using Google Calendar. It took me years to learn and apply them.
Ensure your calendar is front and center daily, and keep it accurate to reflect how you spend your days. You don’t have to be down to the minute (stay with those 30-minute increments), but you want to be able to look back and know what you accomplished on any given day.
I usually spend five minutes each morning reflecting on my calendar from the previous day and make any adjustments as necessary, even if they are the best estimates.
If you’re not honest and accurate with yourself, then you’ll never improve.
Be kind to yourself because if you’ve lost time management skills like I did post-college, you’re not going to be good in the beginning. It’s a habit that you have to work your way into. Best of luck, and know that your future self will thank you!
The post Time Management Tips: How to Use Google Calendar to Plan Your Day appeared first on Website Profit Course.
March 31, 2021
What I Learned Making $100/Hour on My First Project

The web is a crazy place.
Even though we’re past the infancy stage of the internet, there is still a ton of confusion (and even worse, misinformation) when it comes to online business.
This has never been more apparent to me than with small business owners that know they need to get online. Problem is, they don’t have a clue how to do it, what it costs or a strategy to make it work long-term.
Why do I need a website? Should I be on Facebook? Do I need to create a LinkedIn profile? How about Pinterest? What the heck is Pinterest?
These are all questions I’ve been asked in some form or another. On top of that, there is no shortage of DIY website services like Wix, Weebly, VistaPrint, GoDaddy, Squarespace, Shopify for e-commerce… the list goes on.
As millennials and/or internet lovers, we tend to miss the fact that millions of people ages 30-60 are immensely successful and barely use a computer. They use the phone and face-to-face communication to network and sell. Weird concept!
FREE Download: 15 Tools To Start Your Web Design Business Your information will not be shared or sold, period.
My first paid project was a website for a local roofer who fit that description to a tee. It was 6-pages, created with HTML/CSS in Notepad++ and took me one long night to finish. I got this job because my dad did business with him in the past and he mentioned how much of a hassle it was to update their current website.
They were using Microsoft FrontPage to build the website. If you’re new on the scene, you probably have no idea what I’m talking about so click this link to read about that ish on Wikipedia.
I can confidently say a 9-yr old child could operate a computer better than the roofer and his partner, so it’s fair to assume they were struggling with all things internet related.
We setup a 30-minute meeting shortly after the introduction, and I built the website in advance to show him during that meeting.
He paid me $500 that day, and I learned many invaluable lessons:
 My hourly rate for this project was about $100/hour.I KNEW I could do things faster and charge more with experience.My decision to bypass an engineering job felt vindicated.There are an insane number of business owners with money, but no time or desire to learn new marketing and advertising platforms.Those business owners can be hard to find online. Or if you spot a website, it can look like it’s been sitting there since 1997.To uncover these people, you need to tap into your personal network and establish connections in your local neighborhood or city.Once they trust you, they will pay you to save their time, if you create enough value for them.Being an “expert” doesn’t mean you have to be the best. You just need to know more than your customer.
As you can tell, light bulbs were firing in my head that day. And it was an extremely powerful and quick mindset shift for me.
It proved that I was more than capable of providing a valuable service and that creating a web design business to match your lifestyle is 100% possible.
Hopefully, you can experience that same motivation with a small win today. You don’t need to get a paying client, just do something to get one step closer to your end-goal.
Content Management with WordPress
I started building websites with HTML/PHP/CSS only and slowly learned WordPress over time.
Today, I think WordPress is your best choice to create small business websites.
With a pro theme and customizing you can create a 10+ page website that looks amazing a lot easier than from scratch. Not to mention it provides the framework to add content and grow your traffic over time. So easier to build, easier to use, easier to manage, and better looking for them. Wins all around.
Most of my clients are small but profitable businesses, mainly one-person business owners with a handful of employees. Most don’t have any design sense or tech skills, they just want things done.
My first two clients, including the roofer, now pay me monthly to manage their websites and online marketing campaigns.
Expand into Marketing or Other Paid ServicesBut I don’t limit myself to WordPress. I’ve done writing, graphics, computer setup, advertising (Facebook Ads and Google Ads), and other random tasks for them. You learn to become a jack of all trades even if you don’t know much when you start. No need to turn down money if you are capable of providing the service!

This is especially true if you have a genuine interest in the business or person you are working with.
Instead of going into a cubicle, I work from home. Every so often I will meet with my better clients to give them a rundown and gather ideas. Partially so I can see some of my dog buddies like this guy!
Some of you are reluctant to work for yourself and instead aim for a job at a web design agency, but I advise against this unless you want to work on major creative or custom projects. I’d guess that 80-90% of that decision is based on fear of going out on your own, and we need to crush that
The beauty of building websites as a service-based business is that the expenses are low and you don’t need to do it full-time to get a couple of clients for side-income.
Working for myself has been much more enlightening because I’ve seen several different business models and learned about how those guys/girls grew their businesses. Plus I get to see their web traffic and in some instances, e-commerce sales reports.
To give you an idea, I’ve worked with:
 A dance company
A private investigator
A pro athlete
An energy drink company
A custom home builder
Remodeling contractors
A local cover band
A gourmet coffee company
Over time I realized that residential contractors are my ideal niche. But most of these came through personal referrals, not some advanced sales or marketing strategies, hence the variety of industries.
That said, I do think that the most valuable asset is not having one skill but a variety. That makes you indispensable, builds immense trust with your client, and gives you the opportunity to charge monthly in a consulting/managing role instead of one project at a time.
My best advice for those just starting is DO NOT charge hourly.
While it’s difficult to avoid in some cases, it’s not a good long-term strategy. Over time you will become more efficient and effective, so you shouldn’t be compensated less for doing things quicker!
So what was one thing you learned on your first project? Leave a comment below!
The post What I Learned Making $100/Hour on My First Project appeared first on Website Profit Course.
March 30, 2021
Best WordPress Hosting for Website Beginners
Let’s talk about hosting companies that are perfect for starting your first WordPress website, or maybe you want to transfer your website to a new hosting company.
We’ll discuss four reliable choices that you can feel good about when you launch your website, and I’ll also share stories on two other hosting companies where I haven’t had the best experience.
First, all the information within this post is for one domain and one website, which means you’re going to opt for a lower-level starter package.
If your goal is to create many websites, you can upgrade to an unlimited domain option.
The pricing that we’ll compare is per month based on a three-year max term. Almost all hosting companies offer anywhere between monthly terms, one-year, two-year, or three-years. Not surprisingly, the longer the term, the more you’ll drive down your monthly cost, especially with introductory discounts.
Then your selected package renews at a slightly higher retail price. The longer-term not only gives you the best discount, but you lock it in for the longest period.
Best WordPress HostingTips for Website BeginnersHostGator Web HostingBluehost Web HostingSiteGround Web HostingKinsta Managed WordPress HostingWeb Hosts to AvoidLaunch Your Website or Blog Now!Tips for Website BeginnersIf you’re a beginner, you must be ready and willing to learn. WordPress is the most flexible and powerful option to launch a professional blog or website, but that comes with a learning curve.
The same thing goes for web hosting. It takes a little bit of time to get comfortable with the web hosting tools and terminology. Don’t worry. By getting in the trenches with your website, you’ll figure it out faster than trying to do days or weeks of research.
Website beginners always love blaming the computers and the companies, but they don’t like pointing the finger at themselves and admit it’s their lack of knowledge. You have to put your ego aside and realize that the answers to any issue you face are online. When you encounter a problem, search Google or YouTube to find solutions. If you’re genuinely stuck, open up a support chat with your web hosting company, and they should be able to help you.
Please, do not overthink the tech part. Your web hosting choice will never make or break your first website. If you spend days debating which to choose, it’s a waste of time, in my opinion. You don’t need to upgrade to the best hosting until you have content and substantial traffic.
If you’re a beginner, start publishing content because nothing else matters until people connect with your message and your ideas otherwise.
Just pick one of these companies and go with it! With WordPress, you can easily move your website between web hosts if you make that decision.
HostGator Web HostingThe first company here is HostGator. In my early days online, I went with a couple of smaller “no-name” companies for hosting. One of them shut down without even informing their customers, and I completely lost access to the website I had been building! Luckily, I didn’t have any clients. It was just a small personal project that I was using to learn WordPress.
So when that happened, I decided to move over to one of the more prominent companies because reliability was my priority. Nowadays, HostGator gives you the best of both worlds. Among these four choices, they’re the most affordable way to start your website.
The price here for a 36-month term is $2.75/month, and they give you unmetered space and bandwidth. That means unless you’re a power user (most beginners aren’t), you don’t have to worry about either of those things.
I highly recommend HostGator, and they still host several of my local client websites.
An easy way to support my free tutorials is to use my coupon code WPC3 at checkout.
Check out the tutorial below for a step-by-step walkthrough of how to signup for their Hatchling plan package and install WordPress.
How to Install WordPress on HostGator (Step-by-Step Tutorial)
Here is the speed of a client website. We initially launched a simple HTML website about a decade ago and then converted to WordPress a few years later, making it easier to manage.

As a local small business selling a high-end home service, it doesn’t get high traffic. On average, it’s anywhere between 20-40 visitors a day. The chart shows you the time in milliseconds, and his average time to download a page is ~990 milliseconds. The high here is 1.5 seconds.
If you’d like to get set up with HostGator, click the link below to start!
 HostGator Web Hosting
Launch your WordPress website or blog today up to 60% OFF using code WPC1
Buy NowWe earn a commission if you purchase using the link above which helps support this website.
Bluehost Web HostingThe next company is Bluehost. Here’s a fun fact – WordPress powers around 30% of the internet. If you translate that into a number, it’s roughly 450 million websites.
So when WordPress recommends a company, that should perk up your ears. The first one that they recommend is Bluehost!
They’re a bit more expensive than HostGator, yet still highly affordable at $3.95/month, and they have a slight upgrade on HostGator by giving you a solid-state hard drive for storage. Bluehost’s space limit is 50 GB, and they give you unlimited bandwidth.
I set up a Bluehost website for my friend. Click the link below to see me create a Bluehost account and install WordPress from scratch.
How to Install WordPress on Bluehost (Step-by-Step Tutorial)
One cool thing about Bluehost is they link your account login information with your WordPress account, so you don’t need to log in separately to WordPress. From your Bluehost dashboard, you have a one-click button to go right to your WordPress admin.
You usually have two separate accounts for your hosting company account and your WordPress installation.
If you’d like to get set up with Bluehost, click the link below to start!
 Bluehost Web Hosting
Launch your website or blog today on Bluehost, the hosting company recommended by WordPress!
Buy NowWe earn a commission if you purchase using the link above which helps support this website.
SiteGround Web HostingSiteGround could be the most loved around the internet. I’ve never seen so many raving reviews both through my research along with personal stories from my YouTube and website subscribers.
They’re also one of three companies to get recommended by WordPress (along with Bluehost and Dreamhost – I’ll share a few words on them later).
SiteGround is slightly more expensive than HostGator or Bluehost at $6.99/month. Still, they have a few more WordPress features built-in, like the SG Migrator plugin to transfer your existing WordPress website and SG Optimizer plugin to ensure your site loads fast.
Their technology is built on the Google Cloud platform, and they offer 10 GB of web space and ~10,000 visits monthly, which is more than enough for 95% of websites. As a website beginner, it’s a dream to get to that number!
Click the link below to see me create a SiteGround account and install WordPress from scratch.
How to Install WordPress on SiteGround (Step-by-Step Tutorial)
With SiteGround, you’ll get the best performance for the price out of all these companies.
If you’d like to get set up with SiteGround, click the link below to start!
 SiteGround Web Hosting
Launch your website or blog today on SiteGround, the hosting company recommended by WordPress!
Buy NowWe earn a commission if you purchase using the link above which helps support this website.
Kinsta Managed WordPress HostingKinsta is one of the newer players on the block, and they’re hosting this blog that you’re reading right now!
While cheaper shared hosting is excellent for starter and local small business websites, I moved my two blogs over from HostGator to Kinsta because the traffic numbers were creeping up on my blogs (since those have a global audience). It was driving down the performance across my client websites.
At that point, I knew the best idea was to separate them, and I did research on companies whose focus is performance and speed. During that research, Kinsta and SiteGround both came up.
I opted to pay more for Kinsta since they are 100% focused on WordPress optimization.
With most other hosting companies, you can create many web apps or install software other than WordPress. Kinsta’s hosting environment is designed specifically to run your WordPress site as fast as possible.
Their starter package is $25/month paid yearly, with a max one-year term. If you go month-to-month, it’s $30/month.
They give you 10GB of solid-state storage built with the Google Cloud platform, with a higher bandwidth limit of 25,000 visits monthly.
Here is the speed of my website on Kinsta hosting, with the average being 340 milliseconds.

The other great thing about them being WordPress-focused is their technical support is superior to the other hosting companies. Most of the “do-it-all” hosting companies only support issues with their platform but don’t provide advice on WordPress issues. This makes sense because of how flexible WordPress is, and it’s hard to diagnose a problem without giving them access to your WordPress admin account.
Kinsta, on the other hand, can more easily look into these WordPress-specific issues, and their support team has been phenomenal for a few questions I had both during the website transfer process along with minor problems since migrating.
One important note for Kinsta – since they’re so focused on performance, they don’t provide email hosting!
With all the other three companies, you can easily set up an email address using your domain name. With Kinsta, you’ll need something like Google Suite or 3rd-party transactional email services.
So if your main objective is to increase your website’s speed, I think Kinsta is the best company. To get set up with Kinsta, click the link below to start!
 Kinsta Managed WordPress Hosting
Launch your website or blog today on Kinsta, the hosting company optimized for WordPress!
Buy NowWe earn a commission if you purchase using the link above which helps support this website.
Web Hosts to AvoidI want to share two other hosting companies that I’ve had experience with through managing client websites.
The first one is DreamHost. They are the third company that WordPress recommends, and so even though I’m sure they are a great company, I can only go off of what I’ve encountered.
The one website I managed on Dreamhost had an average speed of 1.5 seconds which is not bad, but not as good as we got with HostGator. There were also much higher spikes up to 3-4 seconds.

The last one is by far the worst company I’ve dealt with, and I would NEVER recommend anybody use them. If you are, switch as fast as you can. That’s Network Solutions.
Their speed was roughly on par with Dreamhost. But the problems extended far beyond performance.

One of my clients had three websites on their service, and I dealt with 10x the amount of issues with them compared to the dozens of websites I created with all the other hosts combined. It was everything from their default settings, speed, security, and even how they charge for essential services like domain forwarding.
Right now, they are owned by Web.com – so do yourself a favor and avoid these companies like the plague!
Launch Your Website or Blog Now!The most important thing is to start as soon as possible. As previously mentioned, you must get your ideas and content online because that drives growth, not saving a millisecond here or there.
You can trust all of these companies, pick one and start!
If you want to take your website skills to the next level, you need to learn WordPress.
Click the link below for a complete overview of the WordPress admin area and how you will manage your website.
FREE WordPress 101 Training Your information will not be shared or sold, period.
The post Best WordPress Hosting for Website Beginners appeared first on Website Profit Course.
Two Categories of Successful Web Design Clients (& Where They’re Weak)

The biggest misconception I had to overcome was that business success required a brilliant mind.
What you need is a good idea with speed of action.
Focusing your effort inward on learning advanced code/design turns into time-wasting if you cannot find people who need your service.
My successful local clients fall into two categories:
1) Provide a time-consuming service and charge much more than competitors
2) Provide an intellectually simple service (i.e., construction) at a faster pace than competitors
I believe the 2nd category has a higher financial ceiling. Doing simple work means a well-defined process that becomes easy to repeat.
The real eye-opener for me is that NO ONE has it all put together.
Every single client I’ve worked with has some glaring weakness:
 Doesn’t manage people well
Works crazy hours
Looking for “easy button” with marketing
Doesn’t have an interest in learning new things
Afraid to take basic risks
Inflated self-confidence
The common thread is they know their customers, have a sales pitch for their #1 service, and understand the urgency of getting new leads.
You can be successful beyond what you currently believe if you are moderately competent.
The sad reality is 99% of the population won’t attempt to take control of their income. I hope that isn’t you.
To freelance either locally or online, you must do these fundamentals well to convert your skills into real money.
FREE Download: 15 Tools To Start Your Web Design Business Your information will not be shared or sold, period.
The post Two Categories of Successful Web Design Clients (& Where They’re Weak) appeared first on Website Profit Course.
March 21, 2021
How to Manage a Client WordPress Website
WordPress is the ideal platform to build and manage a web design client website.
It provides a solid framework so you don’t need to manually piece together every feature with code. Plus there are an endless amount of plugins to perfect the customization.
But I want you to think not only about how to manage WordPress for clients, but how to become more involved with their non-WordPress business decisions.
Don’t provide one standalone service, limiting your knowledge and potential income. Become a sponge and absorb wisdom from your clients that are successful, then expand beyond WordPress.
WordPress Client ManagementEffective Client CommunicationBest WordPress PluginsAdd to Your WordPress ToolboxCreate Processes to Stay OrganizedUnderstand Traffic & Lead GenerationEffective Client Communication
Having dealt with many clients who switched from big website builder companies, I can’t emphasize enough how much they value direct communication.
They got sick of calling customer service centers halfway across the globe, speaking with a different representative each time. Minor issues would drag on for weeks or months at a time. They didn’t have access to the people who were actually coding their website.
This goes back to a common theme with the web design and WordPress industry – it’s non-standard. It ranges from your cousin building a website for free, to a $99/month package with a setup fee, to $50,000 agency level projects – and everything in between.
Small business owners often don’t know the criteria to selecting a “website manager”, and therefore use 2-3 service providers before finding the right match for their needs.
I’ve said it many times, the right clients will give you full control of their online properties once they trust you.
You can offer the best packages with WordPress, but if you aren’t learning more about your client with every interaction, you aren’t building a lasting business relationship.
Put a focus on communication and responsiveness to stand out from cheap alternatives.
FREE Download: 15 Tools To Start Your Web Design Business Your information will not be shared or sold, period.
I can think of at least two occasions where I accepted a project, not understanding exactly how to implement it.
WordPress plugins saved me from hours of mental labor in both of those cases.
This is why I recommend specializing with websites for one business type only. The more projects you work on, the deeper your knowledge becomes in a narrow area. Then you can use your curated library of plugins and ignore the ones that don’t matter for that business type.
Because of the wide-range of plugins available, I can only recommend the ones I use consistently for my ideal niche, which is home service and residential contractors:
WordPress SEO by Yoast – Give every page a boost in the search engines Contact Form 7 – Allows my clients to receive leads via e-mail Duplicator – Easy way to backup and migrate a WP website Sumo – Social sharing and list building toolsAs a general rule of thumb, don’t install more than 10 plugins on your WordPress website. As you get into the double-digits, your website may slow down and issues can arise from conflicting plugins.
Keep them to a minimum, add only what is absolutely necessary to benefit your client’s website and make management easier for you.
Add to Your WordPress Toolbox
You cannot expect to master one skill only, and build a career out of it.
If you are learning about building websites, WordPress is the best software to start with in my eyes. And while you can make a living, you probably won’t get rich with one-off freelance work.
The predictable money comes when you are a “swiss-army knife” for your clients. If you can handle more and more small projects in several areas, then you can transition into a consulting role where you are paid a monthly retainer.
I strongly advise anyone learning about websites to delve into two areas at some point:
Marketing & AdvertisingHTML/CSS CodeYou will add a tremendous amount of value if you can have a firm grasp on each of these in addition to being a master with WordPress.
Remember that having a beautiful website does nothing if no one sees it.
When you know how to drive traffic to a website after it is launched, you’ll open up a new realm of opportunity.
You could become enamored with advertising on Facebook and turn to that as your new speciality. It’s impossible to know until you dip your toe into the water.
Create Processes to Stay OrganizedI operate with two mindsets.
Mindset #1 is treating work like a test lab. I’m always reading about and using new tools. I want the edge that comes with being the first to adapt to current trends.
This is how I transitioned from hand-coded HTML/CSS websites to WordPress. Then to responsive WP themes. Then driving traffic with Google AdWords and Facebook ads. There are plenty of tools I use on a daily basis outside of the scope of websites, too.
By nature, I enjoy testing out all the “cool stuff” I can get my hands on. I definitely believe this mentality was instilled in me through engineering.
Mindset #2 is understanding when it’s time to organize the clutter. When I sense that overwhelm, I know it’s time to bring structure to my world.
That’s when I take the things that are working, and create a process or system for them. It can be a simple as a list of steps, or more complex by tying in automated services.
But either way, when you arrive at a desirable outcome, document how you got there so you don’t need to reinvent the wheel to do it again.
In terms of managing gigabytes of data for multiple clients, organize all projects into a hierarchical folder structure, and use cloud services so you can access it from anywhere.
My favorites are Dropbox and Google Drive – 90% of what I do ends up on one of these platforms!
Understand Traffic & Lead GenerationAs I touched on within the “Develop Your Toolbox” section, expand your skills outside of WordPress. That’s where all the magic happens when it comes to business.
In order to properly plan your off-site approach, think about one question only – who is the ideal website visitor for my client?
Be as specific as you can.
For instance, one of my clients offers roofing and siding services. This means their ideal customer is a homeowner in our target cities/counties with an older home or storm damage that needs immediate attention.
People that fit this description hit these check points:
They first look for a trusted referral from a friend/family memberIf they don’t get one, they will search GoogleThey read reviews, testimonials, and look for other trust factorsThey fill out a contact form or call to schedule an estimate if you are professionalThat list tells me my focus managing this roofing website is:
Build a mobile responsive websiteInclude quality photos, testimonials from happy customers, certifications, etc.Tell their story as a company and highlight their experienceMake it easy for people browsing to contact them via e-mail or phoneSetup a profile on Yelp, Angie’s List, Google+, Facebook, HouzzEncourage my client to ask their satisfied customers to leave reviews onlineAdd content each month and optimize SEO to rank for local keyword searchesTest Google AdWords cost-per-click to drive qualified search trafficThis example should indicate how building a website and driving traffic involves a completely unique set of tasks based upon the business niche. If you are building an e-commerce website for a boutique dress shop, it’s a wildly different project.
Once you specify your ideal niche, you’ll understand more than WordPress alone. You can become the decision-maker and voice of reason with your clients’ online real estate because you know their industry.
The post How to Manage a Client WordPress Website appeared first on Website Profit Course.
February 4, 2021
How Much to Charge for a Website: Web Design Pricing Guide
This story is typical – you learn web design by building your first few WordPress websites. A friend, family member, or co-worker becomes intrigued by your new skills, and they ask you to make a website for them. Your first thought is – how much should I charge for a website?
If they don’t expect you to work for free (which is common), their first thought is similar – what is the average cost for web design?
Once you have the confidence to deliver a website, it’s natural to go one step further and wonder how much money can I make by selling websites to local businesses? Is web design freelancing something I should pursue more seriously to generate a side-income?
The answer is YES – but what you charge to build a website depends on many factors!
You can launch a website for free on a subdomain of a bigger platform like WordPress.com, or find a digital agency to create a major brand redesign for $10,000 and everything in between.
Right off the bat, here are two recommendations for freelance pricing:
DO NOT Charge Per Hour
DO NOT List Your Prices
Let’s dig into the details, and I’ll explain why.
How Much To Charge For A WebsiteWeb Design Pricing StructuresHourly RatesProject-Based PricingProductized ServicesMonthly ManagementWhat to Charge for a Client WebsiteHow Much Does a Website Cost?Domain RegistrationWeb HostingWeb Design Tools & TrainingProject ManagementWebsite Cost CalculatorWordPress vs. SquarespacePortabilityFlexibilityExtensibilityDocumentationTypes of Web Design ClientsNightmare ClientsDream ClientsDesigner or Entrepreneur?Business HustlersHyper-CreativesFind Your BalanceHow to Accept PaymentsPayment ScheduleWeb Design ContractExpand Your ServicesWeb Design Pricing StructuresJust like you, a potential web design client is going to wonder immediately what the end price will cost them for the website they envision. It’s the first question they’ll ask 95% of the time before giving you any details on what they want.
These are the main ways that web designers charge for their services.
Hourly RatesAverage Price: $50 – $100/hour
You want to track your time to calculate what you make per hour after your website project is complete.
However, do everything you can to avoid pricing per hour to your client.
The reason for that is simple. Every other pricing structure provides a known cost for your client to understand what they’re paying in advance. It gives them a reference point of the final bill.
With an hourly rate, you may do the work upfront and then send an unexpected invoice. If it wasn’t clear how long the work would take, your web design client might have “sticker shock.”
If you can estimate the timeline, then there is no need to charge by the hour. Just sum it up and price by the project instead.
As your web design skills improve, you’re going to get better and more efficient, so you shouldn’t get compensated less when you get more work done in an hour.
It’s just the opposite. To create a sustainable web design business, you must increase the income you make per hour of effort with every website!
Project-Based PricingAverage Price: Custom Quote
The website your client wants could be a one-page landing page or a 20-page business website with a WordPress blog they plan on publishing weekly.
You might need to set up an email signup form and write an automation sequence that welcomes new subscribers.
You might need to set up and test e-commerce purchases.
The bottom line, it’s best to have a conversation with your potential client to work out these specifics before giving them a price range or web design quote.
By taking notes, you can better estimate what work needs to be completed before launching the website and calculate your cost accordingly.
Productized ServicesAverage Price: $500 – $5,000 (one-time)
Creating set packages is a great option when you work with one business industry. The projects become similar enough that you can take out the core essentials that work for any business in your chosen niche.
Yes, you can always add-on to these packages with custom work, but 90% of the time, you’ll find a business owner will opt for one of your 3 options instead of hassling you to add things they don’t even know if they’ll need.
This pricing style means standardizing your work, which requires less creativity or design skills while also allowing you to outsource more easily.
An added selling point is it’s much easier for your potential client when they can see everything that’ll be included at a glance without requiring a deep dive and custom quote.
As an example, you can create a business website starter package for $2,000 – $3,000 that includes:
Up to 10 pages
Domain registration
Web hosting
Facebook page setup
Logo design
Business cards
This is a really unique all-in-one package that will set them up online, and you can customize it however you like depending on the business niche and your best skills.
Plus, if they don’t want to manage the website or social media accounts, guess who can do that for a monthly charge?
The great thing about the web is even though there’s a million services that allow a business owner to DIY, most of them want no parts of learning new software or getting in the trenches.
You’re the one that’s going to hand-select the tools that best fit your clients and manage them so it’s one less thing your client needs to worry about.
As you get experience, you’ll learn which methods are working best and which clients get the most value from your efforts. Then you can double-down on those to see better results.
Monthly ManagementAverage Price: $50 – $500/month
In my opinion, recurring revenue is the best method to make money that will turn a hit-or-miss freelancing business into a predictable income generator that grows over the years.
It takes a little experience until you feel comfortable turning down one-time clients who want to take control after the website is launched, for those who want to pay you monthly.
Right now, it’s the only way that I charge for web design. This website pricing strategy includes a setup fee for the cost of building the website, then you give your client the ability to send you content updates to keep the website fresh and in good standing with Google.
Several of my one-time clients are still with me after 10+ years after shifting to full monthly management. We have such a good relationship that I don’t see that changing anytime soon.
High-end clients realize the potential of a website to bring them customers and keep it up to date with new information. They also understand that monitoring the performance is crucial to getting the most out of it.
If you launch a website but have no idea how people are finding it, or whether it’s getting consistent traffic, then it’s not going to bring the same benefit compared to the person who stays on top of this data.
As part of my monthly fee, I provide my web design clients a Google Analytics report, either as a 1-page PDF or a quick video screencast where I explain the numbers along with suggestions for how to improve.
In these cases, you partner with local business owners long-term and amplify their vision with your expertise. You are deciphering the web jargon they don’t care to learn into actionable advice they can handle.
It doesn’t take world-class work on your end, so get perfection out of your head!
In my experience, paying attention to the simple details and staying active over a long period are the most significant influences to drive more traffic to a small business website.
FREE Download: 15 Tools To Start Your Web Design Business Your information will not be shared or sold, period.
For gathering the right information to provide an accurate quote, use a web design client questionnaire ← see the questions I ask, and download a copy from this link!
This is what you will send to customers, or even better, give them a call and go through each question over the phone. Be sure to write down their answers, and feel free to ask spontaneous questions if they pop into your mind. Having a conversation with them will build more trust than doing this via email only.
When you have an idea of what the project entails, present your proposal with the price, make sure you give them a bullet list with everything that’s going to come with the website.
If you don’t, they may push you to do more, or say, “Oh, I thought that feature was included with the price.”
Be clear about what needs to be accomplished, so you both fully understand the project scope.
This includes a list of things they may need to provide you.
EXAMPLE:
The website will be 10-pages
One layout for the homepage with an image slider
Another layout for all the inner pages
1 company e-mail address (something@theirdomain.com)
1 contact form to capture leads
They must provide all the photos and wording for the website
Simple, yet provides a solid structure for what you need to accomplish and what isn’t within the scope of the web design contract or “handshake” agreement.
Pricing is really determined by two things – the value you bring to the client and how you value your time.
Notice how neither of these relate to the actual details of the website.
Let’s start with your time…
I want you to think about how long it’s going to take you to complete the project. List out the high-level steps that you need to accomplish, i.e. register domain, setup website hosting, install WordPress, find a professional theme, customize with their logo and colors, etc.
Once you come up with the estimated hours it will take, double it.
Or at least tack on a few extra hours, because more often than not, in the beginning, you will underestimate the effort and communication required. I find this to be true with myself, even to this day.
Once you become comfortable with the process, you tend to have the approach that you can do anything quickly. And you might be able to do a lot, but there are always technical challenges that arise mid-project or a new idea from the client that you need to implement. So be careful of being overly ambitious and underpricing yourself.
So now that you have an idea of how long it’s going to take, how much do you want to make per hour? What is going to pay for your expenses and your lifestyle?
This isn’t about being a baller and charging $150/hour from Day 1.
It’s about knowing you have a valuable skill to offer, and in order to use that skill for someone else’s business, they need to compensate you to live comfortably.
That may be $25/hour now, but it can change at any time or for every new potential client – it’s completely up to you. That’s also why I recommended keeping your prices guarded and also pricing for each project that involves some type of customization or effort on your part.
Multiply your rate by the estimated hours: $100/hr x 10 hrs = $1,000
Obviously, over time as you get better at what you do, you will increase your hourly rate and also find ways to become more efficient throughout the creation process. This may involve creating a systematic process that you go through for each project, or it could simply be outsourcing the repetitive tasks.
I had already built multiple websites before I took on paid work, and here’s what I learned making $100/hour on my first project.
Now that we discussed your own time value, what is the value to the client?
As a real-world example, a website for a newly created yoga studio will not be as valuable as one for an established divorce lawyer. The lawyer may get clients paying them $10,000 – $20,000 each, so getting leads to them through their website is extremely valuable.
You want to focus on the businesses that already have money coming in offline, and would greatly benefit from adding a website to their marketing arsenal. Those are the businesses that have the willingness to pay you and that get more value out of your services.
The nice thing is those small business owners are often much less of a hassle.
They don’t have elaborate technical ideas that will be over your head, they don’t need to have a meeting to make a decision, they don’t micromanage what you do. They will simply let you do your thing and even fund your ability to learn and test online marketing strategies!
How Much Does a Website Cost?When compared to most other business types, freelancing with web design is a fairly inexpensive way to start a business while working from home.
The main expenses that you’ll spend money on are:
Domain RegistrationAverage Cost: $10 – $20/year per domain
I’ve always used GoDaddy for domain registration only, although you can go with any service provided they are easy-to-use with great support.
Web HostingAverage Cost: $300 – $500/year (unlimited)
This part of your freelancing business is flexible because you can invest in hosting that allows you to create unlimited websites or get individual plans each time you add a new web design client.
I currently use HostGator for many of my local small business website clients.
HostGator Web HostingLaunch your WordPress website or blog today up to 60% OFF using code WPC1
Buy NowWe earn a commission if you purchase using the link above which helps support this website.
RELATED: Beginners Guide to Web Hosting & DNS
Web Design Tools & TrainingAverage Cost: $200 – $300/year
This might include premium WordPress themes/plugins, templates, tutorials, or other useful tools that help you launch a website faster.
One of the best WordPress themes for beginners is Divi by Elegant Themes. They give you a drag-and-drop solution to build your own page layouts and customize every section.
Check out the tutorial below to see how to create a business website from scratch with Divi!
How to Build a WordPress Website with Divi
 Divi Visual Builder
The #1 WordPress theme on the entire internet to design your website with drag-and-drop!
Buy NowWe earn a commission if you purchase using the link above which helps support this website.
Project ManagementAverage Cost: $500 – $1,000/year
My current favorites include:
This is where you can pick and chose the right ones that help you perfect your business processes. Most of these are freemium services where you can start at no cost and decide to upgrade when the time is right in your web design business.
Stack them together one-by-one as you earn more money as a freelancer.
Website Cost CalculatorFill out the fields below for an estimate of the web design costs for a client project.
# of Pages:Layout:
TemplateCustomLogo Design:
NoYesCopywriting:
NoYesSEO Optimization:
NoYesE-Commerce:
NoYesExpert Management:
NoYesCost Estimate
Setup:
$500Recurring:
$20/monthWordPress vs. Squarespace
Nowadays, the two most popular website builder platforms are WordPress and Squarespace,
A few other options that beginners often use are Wix and Weebly. And nowadays, almost all hosting companies offer an in-house web buider version of their own, starting with drag-and-drop design templates.
For quickly launching a website, there is nothing wrong with using these easy-to-use services.
However, if you are professionally building websites for other people or even an individual power user, WordPress is my preferred platform for many reasons.
PortabilityWith all website builders, you become locked into them as your hosting company and cannot transfer your design to another service.
However, WordPress is open-source, and your website is under your total control where you can change the domain or hosting providers anytime you want.
You can move your WordPress website website to a new host if you decide it’s time to upgrade or try a new company.
FlexibilityIf you are coming into WordPress from web development or even graphic design, you probably have perfectionist tendencies. You are likely going to be limited to what you can customize by using web builder templates.
On the other hand, with WordPress, you can “hack” into the PHP/HTML/CSS code and customize any WordPress theme.
You truly can solve any problem with enough knowledge and elbow grease.
ExtensibilityOne of the best parts of WordPress is its plugin directory.
Software developers worldwide let you implement their customizations and take an already excellent product to the next level.
WordPress plugins add functions to your website, whether for performance, marketing, social, or otherwise.
It’s one area that basic website builders fall completely short.
Or if they charge you way too much to achieve the same features you get with WordPress at a fraction of the cost.
DocumentationPerhaps most important to me is the ability to figure things out on your own. Because WordPress has been around for years with millions of users, there are forums across the internet answering questions that you’ll likely have as you create your first websites on WordPress.
Types of Web Design ClientsMost web design clients fall somewhere between good or bad, but it’s useful to consider the two extremes as your reference point.
If you’re a web designer for long enough, you know these two personalities exist.
Nightmare Clients
The less you charge, the more your client will attempt to take advantage of you. Psychologically it is weird because the more you pay for something, the more you value it and the less you complain.
So if your website pricing is too low, the bad clients are going to see how much they can squeeze out of you. They’ll also expect absurd results for a tiny fee.
If you price yourself at a premium level, you’ll have more leeway to over-deliver and provide the “wow” factor to please your client.
Another underrated time suck is the communication required to get things done. When you charge correctly, you’ll have no problem jumping on a call. If you’re on the low-end of cost, every interaction eats away at your profit, reducing your hourly rate.
Just remember…
Low Prices = Cheap CustomersThis can be a hard concept to let sink in, and even harder to implement. You may need to tap into your network for the first jobs to build your portfolio before you feel comfortable charging more.
But one way or another, you need to get to that premium level because if you’re the lowest-cost, you are a commodity and therefore replaceable.
The perfect examples of this are big service companies offering the lowest level website creation packages like Squarespace, Wix, Weebly, Vistaprint, and GoDaddy.
They start around $10 – $20/month, and I can only imagine the type of people who contact their customer service department when they hit snags building a DIY website!
However, they have such a high volume that there’s enough of the hassle-free website clients to counteract the terrible ones.
Dream Clients
You want business owners who don’t want to deal with managing it themselves.
There’s plenty of them in the real world, and they are the people you want to become an asset for and develop an on-going relationship with. That is what builds trust along the way, and they are the ones that will value what you do because they see the benefit of having a website as a lead generation method in their marketing toolbox.
Dream clients are hands-off most of the time, and yet care much more deeply about their company image than the ones who think they’re going to get a 100x ROI on a small monthly fee within 6 months.
It’s usually not black and white when it comes to figuring out whether a person is going to be a good client or a bad one, however, these are the top signs of a great web design client:
They care about all aspects of their brand image
They are obsessed with improving their business
They take an interest in how the online world works
Perhaps these seem apparent, however, I’ve talked with my fair share of business owners who have an end-goal of doing nothing and reaping all of the rewards.
Great clients aren’t afraid to spend and fail to make something work in the long run.
Handling a client’s expectations is a big part of working for yourself.
The best clients are no doubt more clear-headed and realistic with the results you can bring to their business. They understand that the best outcome depends on work from both of you.
They also have worked with mediocre or below-average web designers who’ve made their life more complicated by not returning phone calls or fixing problems in a timely manner.
The cheap website clients pay less and still believe they deserve an “easy button” solution with no effort on their end. Even if you explain this on multiple occasions, they’ll always blame you when things don’t improve.
The earlier you can spot a bad client and keep them from hoarding your time, the better.
If you enjoy working with a client, hold onto them.
 Are You a Designer or an Entrepreneur?
I’ve found that web designers will fall into one of three categories:
Business HustlersEntrepreneur-types don’t care about getting in the trenches with design. They want to make money. They’re the ones using professional WordPress templates, adding text/photos, but not doing any customizing. Honestly, with some of the pro themes available, you don’t have to because they are beautiful. They sell websites to businesses that need them. And for a nice profit.
Hyper-CreativesOn the other end of the spectrum, you have more creative folks that come up with an idea and design it from scratch. They then create an HTML website or WordPress theme from their design. Entirely custom = expensive and time intensive.
Find Your BalanceI believe I’m somewhere in the middle, and I recommend you find your spot there too. You want to start with a clean looking WordPress theme for the vast majority of small business web sites. But more than design, I’m looking for layout. If I find an OK design with the layout I want, I can then spend a couple of hours making relatively easy customizations to make sure the website looks unique. I don’t like a website that mirrors the WordPress theme demo.
As someone with no design background and perfectionist tendencies, I have to catch myself spending an absurd amount of time on extremely minor details like picking between shades of blue. I’ve been working hard to just pick something and go with it… fast is better than perfect!
If there is one takeaway, it’s that you want to focus on efficiency. I recommend tracking your time on the first projects so you have a concrete idea of how long it takes, and work to improve from there. That is how you make more money with less effort.
How to Accept Payments as a Freelancer
Lastly (but some would say most importantly), how do you get your money?!
Payment ScheduleFor a project-based fee, you should charge at least 50% upfront before doing any web design work, and the remaining 50% is due on or before launch day.
Other than exchanging information and ideas, I won’t invest hours of time without money deposited into my account. There are too many flaky people to do a ton of work without knowing the cash is coming. Not to say you should never do this – there are ALWAYS exceptions to any rule – but it’s more important when dealing with an individual that you don’t know or fully trust vs. an established company.
As a personal warning, I’ve had multiple business owners that have paid me the initial 50%, I finished about 80-90% of the project work, and they wouldn’t get in touch with me to put the final touches on the website. It was always, “Let’s review it soon” or “I’ll have those pictures over to you next week”.
It became a long game of back and forth where nothing was accomplished.
But I wasn’t empty-handed, I still made an OK hourly rate despite never launching those websites.
Web Design ContractMoney is more powerful than a contract.
People often fret when it comes to doing a website without a contract or they spend weeks overthinking what should be in a contract instead of meeting business owners who need a website.
Let me say this with the caveat that a contract of some sort (it can simply be an e-mail) is GREAT when it comes to turning a client down for work that wasn’t included with the original price. You can point to it and say, hey I told you XYZ would be in there and doing this is more work than we agreed to.
But think about a situation where someone stiffs you, like my situation above. Are you really going to get a lawyer involved because they didn’t follow the contract (which stipulates the project must be completed/paid in 90 days)?
Unless we are talking in the multiple thousands or higher, the answer is no.
So it’s best to meet these people in person if possible to build a level of trust. Or if that’s not possible, make sure they give you those Benjamins before you get your butt to work!
My first two customers went from one-time project work to a paid monthly retainer where I work on essentially whatever I see fit. That’s a much better situation than trying to be a master of litigation, let me tell you.
When you get a handful of raving clients, people will start coming to you because they will refer you.
Expand Your ServicesYour ability to charge monthly increases when you diversify your skills.
Websites are the entry point to learning so many useful adjacent skills like:
Search engine optimization (SEO)
Custom code & web development
Graphic design
Copywriting
Marketing
Advertising
Once you have a bit of knowledge in a few of these areas, the value you bring becomes a no-brainer to the right clients.
Ultimately, the best part of working for yourself as a web designer is the learning experience you have. You work directly with business owners and you should be asking a lot of questions about their business and services.
Not only will this give you more insight into how you can improve their website for their customers, but you’ll also be able to take their strategies and stories and use them for your own business.
Plus, people enjoy talking about themselves, so they’ll like you that much more when you show interest in how they’ve built their business!
Go from a web designer to a local marketing expert.Don’t pigeonhole yourself or think you don’t have what it takes to add new services to increase your income. I felt the same way at times, but I can assure you that you’ll learn a ton from your first handful of websites.
Have a question on this topic of what to charge for a website or a personal experience with web design pricing you’d like to share? Leave your comment below!
The post How Much to Charge for a Website: Web Design Pricing Guide appeared first on Website Profit Course.


