
Ray DelVecchio's Blog, page 2
October 29, 2023
How to Create a Custom WordPress Plugin (PHP, HTML, CSS, & JS Tutorial)
Ever wonder how WordPress plugins work? Today, I’ll show you how to create a custom WordPress plugin from scratch!
This plugin won’t be within the directory that requires approval from WordPress. Instead, you’ll build your own in a code editor and upload it to your website.
I drew inspiration and built upon the work of Bill Erickson, a developer who outlined the basic plugin creation process in his blog post. He provides his code example on GitHub.
You can grab my skeleton code below as a starting point for your custom plugin and follow along!
👉 Get Custom Plugin CodeWant this helpful free giveaway or training?
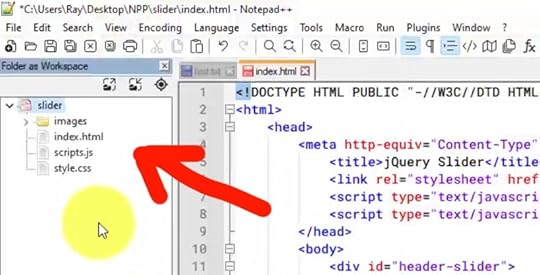
Plugin Code FrameworkOpen the files in your favorite code editor — my preferred option is Notepad++. It’s a lightweight code editor with a feature to save your “session” of open files. Clicking this session file (session.npp) will open all the associated plugin files in their own tabs.
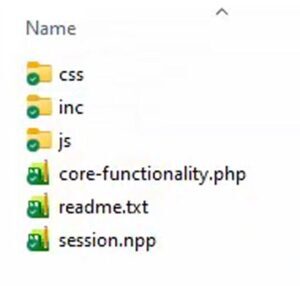
In the top-level folder, we have only two main files:
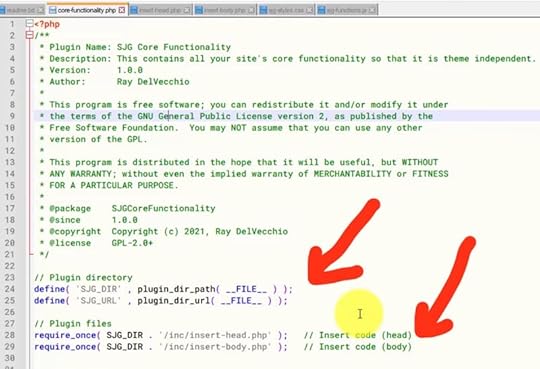
readme.txt – This file provides information about the plugin.core-functionality.php – This file is what WordPress pulls from to show your plugin in the admin area.The latter PHP file includes all the other sub-folder files to perform our desired functions. We define the plugin directory and URL path here, which we’ll reference in the function files.
We include two main files within core-functionality.php:
insert-head.phpinsert-body.phpThis setup will allow you to custom code things into the website HTML head or footer. You can find these files in the “inc” sub-folder.
There are two more files, each in their extension sub-folder:
your-style.css – This file is responsible for the custom styles.your-script.js – This file handles Javascript interactivity.Of course, you can replace “your” with anything you want. I like using a unique acronym for the website.
This infrastructure provides a solid framework for building your plugin with PHP, HTML, CSS, Javascript, and jQuery.
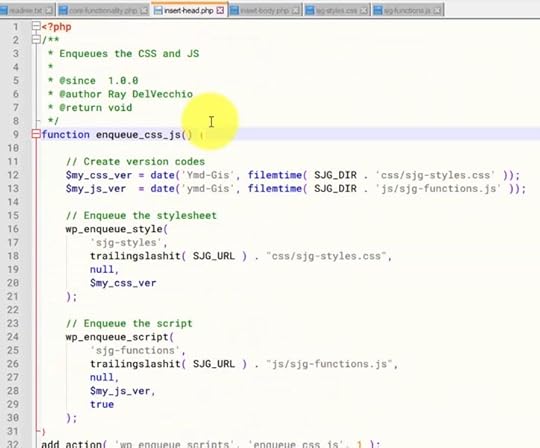
Add Code to HTML HeadNow, let’s take a look at insert-head.php. Here, you’ll find WordPress developer functions typically added to your functions.php file, which is part of most themes.
This core functionality plugin is much like your functions.php file, just in a different location.
The primary reason to use a plugin instead is when you don’t have a child theme or if you want to keep customizations during a theme switch. A child theme is necessary when customizing your functions.php because, without it, you risk losing your customizations when the parent theme is updated.
Placing the code in a plugin like this makes your functions theme-independent.
In insert-head.php, we’re taking advantage of two built-in WordPress functions:
wp_enqueue_style() – To include our CSS file. wp_enqueue_script() – To include our JS file.📝 NOTE: WordPress has an extensive developer reference on their website to view & search for available functions and get the technical specifications on how they work.
Our custom enqueue_css_js() function adds our two files and appends version numbers based on the date of the last edit. This version is especially useful for bypassing cache issues, i.e., you make a change on the backend that doesn’t appear on the live website.
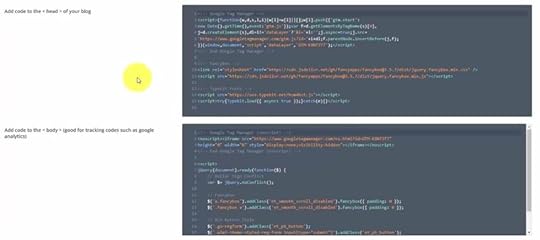
The next custom function is add_integration_code_head(), which — you guessed it — allows you to copy/paste HTML code from 3rd-party services to the of the HTML document using the wp_head WordPress hook.
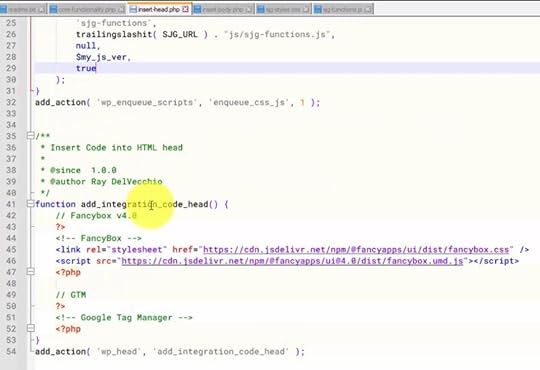
The starting code above inserts FancyBox, a JS library that provides a modal popup for photo galleries. There’s also an empty comment as a placeholder to paste in Google Analytics or Tag Manager code.
Add Code to HTML BodyNow open insert-body.php, and the add_integration_code_body() function inserts this code to the end of the HTML document using the WordPress wp_footer hook.

Utilizing WordPress hooks like wp_head and wp_footer grants you the power to modify almost any part of your website.
The starting code includes a place for Google Tag Manager (GTM), which requires code in both the HTML head and body.
Website Integration Code ExampleMost of my websites are powered with Divi by Elegant Themes, and before understanding how to create a custom plugin like this, I was simply adding HTML code within Divi’s theme options on the integration tab.
The functions within the plugin mirror what you do in Divi’s theme options – they add code to your website’s HTML head or body.
[image error]Divi Visual BuilderThe #1 WordPress theme on the entire internet to design your website with drag-and-drop!
Buy NowWe earn a commission if you purchase using the link above which helps support this website.
This plugin project is a classic example of how WordPress offers multiple ways to accomplish the same task, and there’s rarely a single correct or best way to do it. Choose whatever method makes you most comfortable!
I’ll paste what I have from the Divi section. Let’s examine the code for a moment.
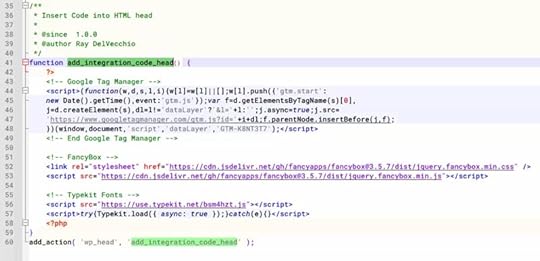
We’re using a mixed PHP/HTML format by adding the closing PHP tag (?>) followed by the copied HTML code from Divi’s settings, which includes GTM, FancyBox, and Typekit Fonts.
It’s worth mentioning that you should add comments like I do to articulate what’s happening in the code. You’ll forget if you don’t touch this for a few days!
We can use either PHP or HTML comments here. A PHP comment starts with two forward slashes (single line) or forward slash asterisk (multi-line, ended by those characters in reverse), while an HTML comment is enclosed by at the end.
// This is a one-line PHP comment/* This is a multi-line......PHP comment */Now, we’ll move on to what I have published in the Divi code section.
That includes GTM code, which I’ll copy into add_integration_code_body(), and the Javascript code to enable FancyBox on the HTML elements we want. We’ll adapt the latter to work with FancyBox v4 and add it to our Javascript plugin file, your-script.js.
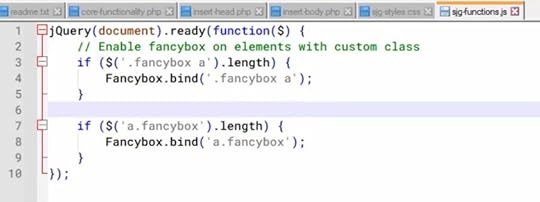
In the code above, we’re using the Fancybox.bind() method to target anchor links with the class “fancybox” or within a parent element containing that class. Make sure to modify your code accordingly based on your specific use case.
For more information, refer to the WordPress developer reference.
Additionally, WordPress Stack Exchange and Stack Overflow are valuable forums for code questions and specific implementations.
Customize CSS StylesCSS (Cascading Style Sheet) provides the flexibility to customize your site’s appearance effortlessly and override any UI bugs inherited from your WordPress template or a plugin.
I usually start with CSS that applies to the theme or plugins I frequently use, like Divi or Contact Form 7, to override the default styles. Then, I’ll add a few sitewide features.
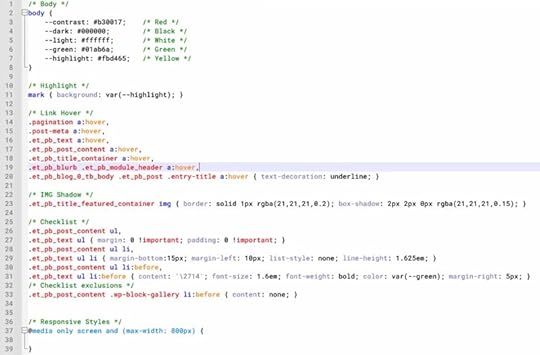
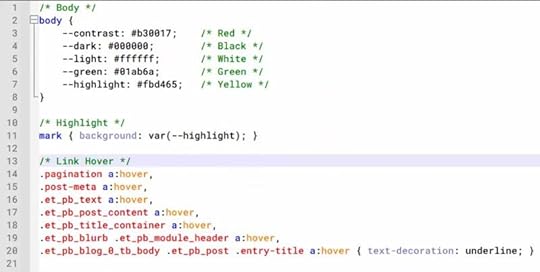
For example, we set CSS variables at the top level element to allow you to adjust your site’s colors easily. Each variable below represents a specific color, defined by its hexadecimal code or name.
body { --contrast: red; --dark: black; --light: #ffffff; --highlight: yellow;}With these color variables established, you can now use them throughout your stylesheet. The code below adds the –highlight variable as the background color for an HTML element.
.mark { background: var(--highlight); }Lastly, consider responsive styling to maintain a consistent design across different screen sizes. We can do that in CSS using the media queries shown below.
@media screen and (max-width: 800px) {/* Styles for screens up to 800px wide */
}@media screen and (max-width: 500px) {
/* Mobile-specific styles for screens up to 500px wide */
}
Get granular with CSS by targeting HTML elements, classes, IDs, and combinations of each, applying any properties you’d like to get the exact look you want.
Upload & activate custom plugin via FTPNow that you’ve set up your plugin files, it’s time to upload them to your web server with an FTP program such as FileZilla.
Using FileZilla, copy your plugin folder and its contents into your WordPress “wp-content/plugins” directory.
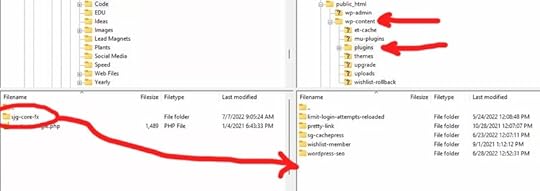
Return to your WordPress admin area and head to the “Plugins” page. You should see your new plugin listed. The name, description, version, and author you see come from the comments section within core-functionality.php.
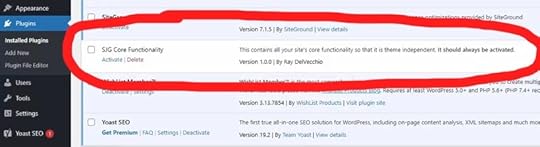
Hopefully, no errors will occur after you activate it!
Now, you can test its functionality to ensure everything is working as expected or debug any errors in your code if things go awry.
To do that, check your web hosting error logs, where you’ll find helpful messages informing which PHP function caused the problem. Plus, you can test live Javascript and CSS updates.
Don’t forget to grab the WordPress plugin starter code to try out this theme-independent method to customize your website!
👉 Get Custom Plugin CodeWant this helpful free giveaway or training?
The post How to Create a Custom WordPress Plugin (PHP, HTML, CSS, & JS Tutorial) appeared first on Website Profit Course.


October 23, 2023
How to Add Custom CSS to Any WordPress Theme
Do you have a WordPress website and need help finding where to add CSS code?
You can do this simple task in multiple ways. But it has been complicated with the introduction of block themes like Twenty Twenty-Three, where you build your templates visually vs. the old-fashioned approach of using code.
Today, I’ll show three methods to add custom CSS code to your WordPress website!
Method #1: Appearance > Customize MenuIf you’re using an older theme (installed before 2022-ish) that doesn’t support full site editing, you will have a “Customize” submenu under the Appearance menu, and that’s where you’ll find the “Additional CSS” textbox.
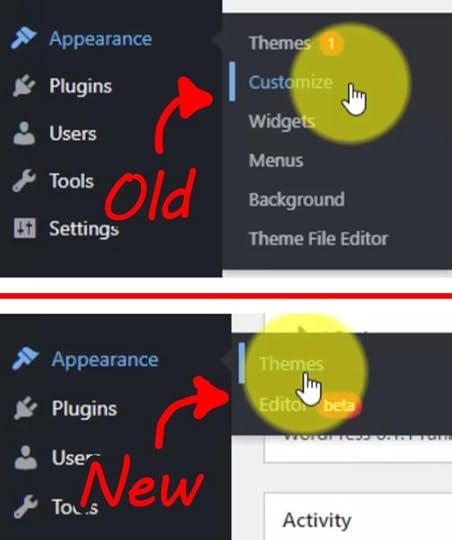
If you’re using a block theme, this “Customize” submenu is missing.
However, it’s still there in your WordPress installation. You just need to reach it by typing in the URL.
Your WordPress install location always has a “wp-admin” folder. The files within are what control your login screen and administrator web interface!
Access the Customize page directly using the link format below.
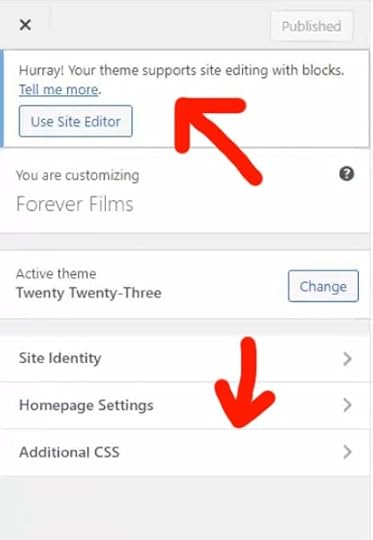
yourdomain.com/wp-admin/customize.phpWhen you load that page, you’ll probably see a warning message informing you that your theme supports editing with blocks.
 Method #2: Block Theme Styles
If you have a block theme installed, there’s a new location to add CSS.
Open up your template editor window, then navigate to the theme “Styles” icon (◐) in the top-right.
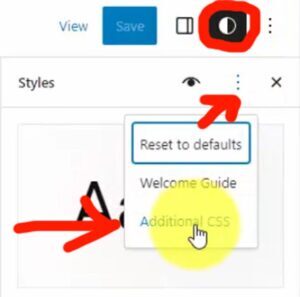
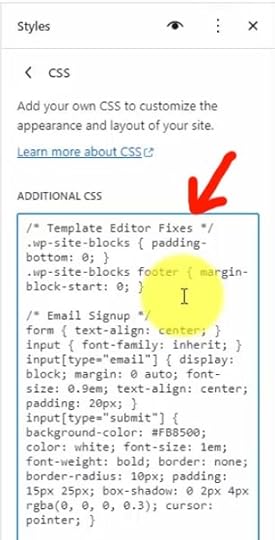
With the Styles menu on the right panel, click the three-dot icon (⋮) and select “Additional CSS” from the drop-down (or locate the link at the bottom).
 Method #3: WordPress Plugin
I used to add custom CSS code directly into my child theme style.css file (before block themes existed).
Then I discovered a better way to add theme-independent CSS & PHP customizations, and that’s a plugin you code by hand.
I initially found this idea from another WordPress blogger and now create a “core functionality” plugin on pretty much every website I create nowadays.
Learn how to create a custom WordPress plugin and see my skeleton code.
With this method, you can write CSS code using any desktop editor you’d like (my choice is Notepad++) and upload it via FTP to your web server.
Now, I’m curious about your experience with full-site editing.
Let me know your thoughts, whether you’re new to WordPress and just getting the hang of it or a seasoned WordPress coder adapting to this new system
The post How to Add Custom CSS to Any WordPress Theme appeared first on Website Profit Course.
How to Add Custom CSS in WordPress
Do you have a WordPress website and need help finding where to add CSS code?
You can do this simple task in multiple ways. But it has been complicated with the introduction of block themes like Twenty Twenty-Three, where you build your templates visually vs. the old-fashioned approach of using code.
Today, I’ll show three methods to add custom CSS code to your WordPress website!
Method #1: Appearance > Customize MenuIf you’re using an older theme (installed before 2022-ish) that doesn’t support full site editing, you will have a “Customize” submenu under the Appearance menu, and that’s where you’ll find the “Additional CSS” textbox.
If you’re using a block theme, this “Customize” submenu is missing.
However, it’s still there in your WordPress installation. You just need to reach it by typing in the URL.
Your WordPress install location always has a “wp-admin” folder. The files within are what control your login screen and administrator web interface!
Access the Customize page directly using the link format below.
yourdomain.com/wp-admin/customize.phpWhen you load that page, you’ll probably see a warning message informing you that your theme supports editing with blocks.
Method #2: Block Theme StylesIf you have a block theme installed, there’s a new location to add CSS.
Open up your template editor window, then navigate to the theme “Styles” icon (◐) in the top-right.
With the Styles menu on the right panel, click the three-dot icon (⋮) and select “Additional CSS” from the drop-down (or locate the link at the bottom).
Method #3: WordPress PluginI used to add custom CSS code directly into my child theme style.css file (before block themes existed).
Then I discovered a better way to add theme-independent CSS & PHP customizations, and that’s a plugin you code by hand.
I initially found this idea through Bill Erickson’s blog and now create a “core functionality” plugin on pretty much every website I create nowadays.
Learn how to create a custom WordPress plugin and see my skeleton code.
With this method, you can write CSS code using any desktop editor you’d like (my choice is Notepad++) and upload it via FTP to your web server.
Now, I’m curious about your experience with full-site editing.
Let me know your thoughts, whether you’re new to WordPress and just getting the hang of it or a seasoned WordPress coder adapting to this new system
The post How to Add Custom CSS in WordPress appeared first on Website Profit Course.
October 20, 2023
Notepad++ Tutorial for Beginners: Learn How to Use a Simple & Powerful Code Editor
Today, I’ll introduce you to Notepad++, one of my favorite Windows programs, which I use more than any other, except for Google Chrome.
I’ll guide you through a quick tutorial about what I like most about it and how it’s a versatile tool for tasks ranging from code editing to data formatting.
Let’s dive in.
15 Tools to Start Your Web Design BusinessWant this helpful free giveaway or training?
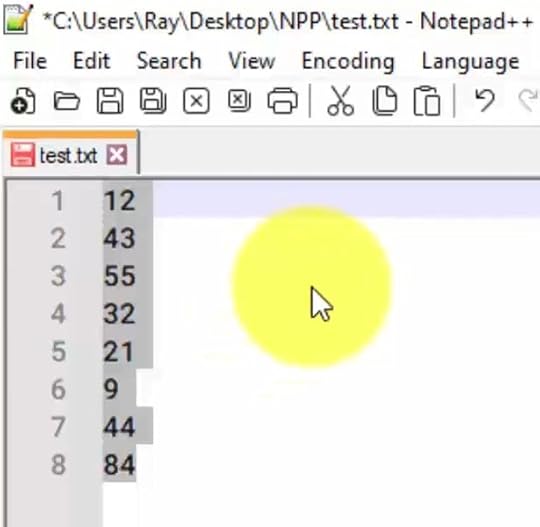
How to Format DataI copied a series of numbers from a spreadsheet, separated by a tab on a single line (as shown below). I’ll show you how to utilize the advanced features in Notepad++ search.
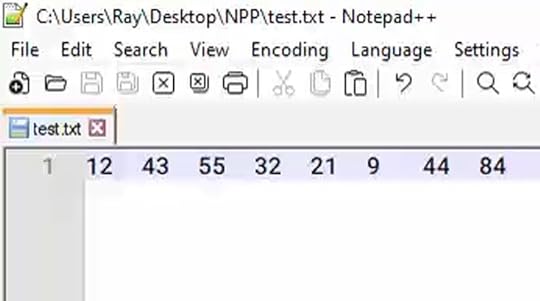
First, you have your basic search and replace function when Search Mode is set to “Normal.” Then, there’s “Extended” mode, giving you access to special characters like new line, return, and tab. Finally, there’s “Regular expression,” a feature I’ve used to search for patterns within text, although I’m not competent enough to explain how it works! 😆
In this example, we’ll use the extended mode.
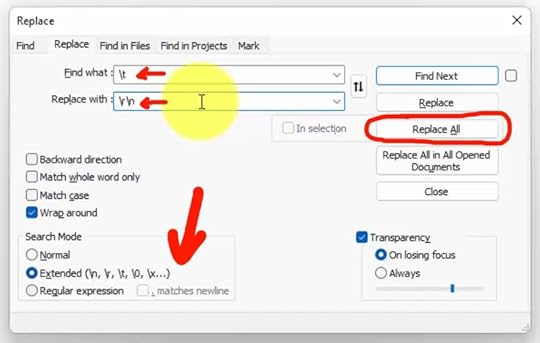
Moving to the “Replace” tab, we find the tab character (denoted as \t) and swap it out with a new line and carriage return (\r\n). After hitting “Replace All,” you can see that all those numbers are now on separate lines.
I frequently use Notepad++ as an intermediary program when I need to format data from various sources before I copy/paste it into the program of my choice (usually a spreadsheet).
Search Within FilesI discovered this feature while researching for this tutorial. Notepad++ allows you to search within an entire directory, a task I had just tried to figure out via the command line a week prior. Little did I know that Notepad++ had this capability all along!
In this example, I’ve downloaded the Yoast SEO WordPress plugin to show you exactly what I was looking for within the directory.
I simply want to find a specific function called “add_menu_page” within any file of these folders.
You can perform this search within all the subfolders by selecting that checkbox.
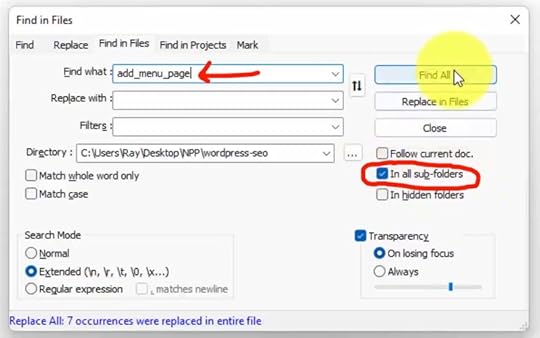
Hit “Find All,” and it will scan through all your files, revealing every instance of that function.
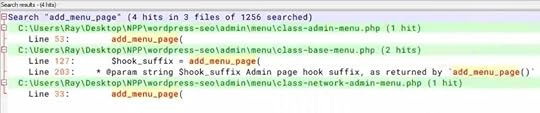
By right-clicking, you can select “Open All,” which will open all the files containing this function in their own tabs.
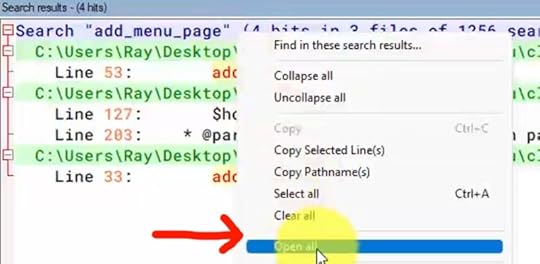
Double-clicking on the line number from the results will take you directly to the corresponding line in that file.
Code EditingAs we examine this WordPress plugin file, you can appreciate how Notepad++ styles code for nearly 80 languages, as mentioned on their help page.
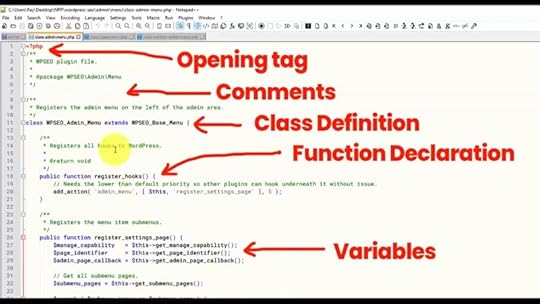
This feature is valuable when working on code in various languages like HTML, PHP, CSS, and JavaScript. These are the ones I most frequently use in web design and WordPress.
The beauty of WordPress is its open-source nature that gives you the perfect avenue to learn code. When you download plugins, you can delve into the source files, gaining insight into precisely how they function.
This transparency can be quite enlightening for those looking to understand the inner workings of WordPress and its ecosystem.
Helpful Code Styling FeaturesHere are a few nifty features that I enjoy in Notepad++.
When you double-click on a word like “function,” it highlights every instance of that word throughout the entire file.
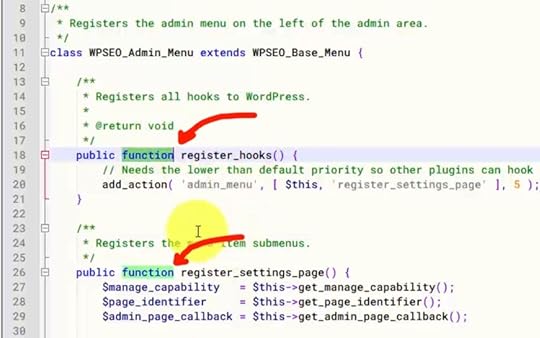
Highlighting makes it super handy for quickly locating variables or function references. You can easily see where a function is declared and where it’s used.
Additionally, you can easily indent text. By selecting an area of text, you can use the tab key to indent it or shift-tab to remove the indentation. This feature comes in quite handy for code formatting and organization.
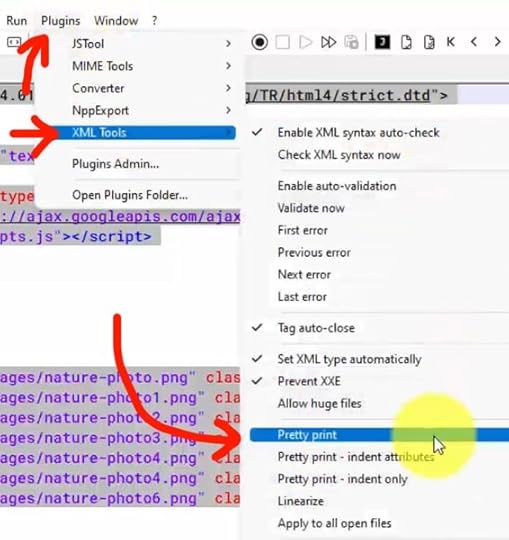
Notepad++ also supports plugins, similar to WordPress.
There’s a plugin called XML Tools, which includes a “Pretty print” feature. It automatically adds appropriate tabs and formatting to make your code more readable.
Whether you’re using Notepad++ for coding, text editing, or any other purpose, you’ll find that it offers various built-in features and additional functionalities through plugins, making it an extremely versatile and user-friendly tool.
Folder as a WorkspaceNotepad++ provides a few ways to manage your code base.
The first method is called “Folder as a Workspace.” You can select this feature from the “View” menu to access it. This is handy for quick access to your project files, making it easy to open and edit them whenever needed.
 Save Your Session
Another way to organize your project is by saving a session.
This is especially handy as it preserves your open tabs. You can do this by going to the “File” menu and selecting “Save Session…” The session will be saved as an NPP file.
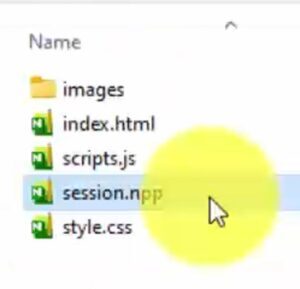
I typically save it in the top-level folder, which is the same folder assigned to the workspace, and I usually name it “session.npp.”
When you open the session file, all your files will be restored.
If you’re syncing your web code on your desktop to a hosting platform, consider excluding the session file since it serves no purpose on a server. For example, using an FTP tool like FileZilla, you can exclude NPP files from showing on their UI when you drag-and-drop transfer.
Mac AlternativesUnfortunately, Notepad++ is not available for Mac. However, there are a couple of alternative programs that offer similar functionality.
One is BBEdit, which provides a free option for a trial period of 30 days. After that, you may need to upgrade to access all the features.
Another good option that I recently found is CotEditor.
Go check them out and take them for a test run.
As you can tell, Notepad++ has been a powerful tool for me. It’s incredibly versatile as a web designer, and it’s like Photoshop in the sense that you will use a tiny fraction of its full capabilities — while still benefiting greatly from increased productivity.
If you’re accustomed to using plain old Notepad, I highly recommend upgrading to Notepad++ today!
15 Tools to Start Your Web Design BusinessWant this helpful free giveaway or training?
The post Notepad++ Tutorial for Beginners: Learn How to Use a Simple & Powerful Code Editor appeared first on Website Profit Course.
July 3, 2023
WordPress 101 Beginner Tutorial: Learn the Basics of Website Management
Today’s tutorial is for WordPress beginners or intermediate users who want a refresh on the current features.
We will cover all the basics, starting with acquiring your domain name and hosting, while providing a comprehensive tour of your WordPress admin area for how to manage, edit, and customize your website.
By the end, you’ll understand how to use WordPress to manage your website!
Do you prefer to get this tutorial, along with many more, sent directly to your inbox?
WordPress 101 Video TrainingWant this helpful free giveaway or training?
How to Use WordPress 101WordPress.COM vs. WordPress.ORGWordPress Admin OverviewCore Software, Themes & PluginsHow to Pick a WordPress ThemeCreate Posts & PagesAdd Content Blocks & PatternsPost Settings & PublishingWordPress Media LibraryWeb Server File HierarchyConfiguring WordPress SettingsAdditional WordPress ToolsWordPress User AccountsPick Plugins to Add FunctionalityExpanding with eCommerceWordPress.COM vs. WordPress.ORGThere is one really big point of confusion for beginners and that is the difference between WordPress.com and WordPress.org.
WordPress is open-source software, and you can download the full WordPress framework for free, you simply need to install it on your own hosting account.
WordPress.com offers hosting services, but I don’t recommend using it because you won’t have access to the full version of WordPress unless you opt for their “Business” plan, which costs $300/year. That’s the level you need to use plugins, which are essential for customizing your WordPress site.

Instead, I recommend self-hosting, which involves choosing a 3rd-party website hosting company that fits your exact performance needs and budget. That gives you every built-in WordPress feature regardless of what you pay.
Most web hosts offer one-click WordPress installation, and you can also download it from WordPress.org as a ZIP file to install it manually.
If you’re looking for an affordable plan to start with, I recommend HostGator, which costs around $100 per year (a fraction of WordPress.com). Even better, their introductory rate is closer to $70/year, and you have the option to extend it for up to three years.
If you are ready to get setup in minutes, use the link below to learn more!
[image error]HostGator Web HostingLaunch your WordPress website or blog today up to 62% OFF using code WPC1
Buy NowWe earn a commission if you purchase using the link above which helps support this website.
WordPress Admin Overview
Once you’re set up with HostGator (or any other host) and have installed WordPress, you can access your WordPress Admin area by logging in.
You can get to the login page by going to:
yourdomain.com/wp-adminThis will take you to your WordPress dashboard, which provides an overview of your entire website. They also highlight WordPress events near you if you want to join the local community to learn in person.
You can navigate through the WordPress admin area using the left menu.
Core Software, Themes & PluginsWordPress can be broken down into three primary categories: the core WordPress software, themes, and plugins.
In the “At a Glance” section on the dashboard, you can see the version of WordPress you are running (currently 6.1.1). That is the core software, built with PHP.

Themes allow you to choose the design you want for your website, and you can easily swap them out while keeping your content. Your active theme is the one that generates the layout of your website.
Any web developer can create a theme and have it published in the WordPress theme directory or sell it on their own website.

Currently, we are running the “Twenty Twenty-Three” theme, which is free and developed by the WordPress team. Each year, they release a new theme with this naming convention to coincide with a big WordPress core software update.

Plugins enable you to add various functions such as SEO, e-commerce, security, and social media integration. Like themes, these are created by independent developers who decide whether to make their software free or paid.
Updates for the core software, themes, and plugins can be found in the “Update” section, indicated by the red notification when one becomes available.
 How to Pick a WordPress Theme
Let’s dive deeper into selecting the best theme for your website.
In the past year, WordPress released one of its biggest updates, introducing full site editing into the core software. This means that you can now design your theme 100% visually, eliminating the requirement of coding knowledge.
To access your themes, go to “Appearance > Themes.” The main difference with a full site editing theme, a.k.a. a block theme, is that you will see the “Editor” submenu.
If you’re running an older theme that doesn’t include full site editing, you’ll see more options available under the Appearance sub-menu. The “Customize” section is where the theme developer would put their settings for you to customize.
Now, with full site editing, customization is done in the visual template builder. The same goes for the other options like Widgets and Menus.
Browse thousands of themes by clicking “Add New”. If you prefer full site editing, you can use the “Block Themes” filter.

Starting with the theme that WordPress developed, such as “Twenty Twenty-Three”, is a good idea for beginners since it incorporates newer features. And it’s free!
However, you always have the option to test out niche-specific designs or upgrade to a premium theme if you are seeking more capabilities along with professional support.
The theme that runs all of my personal and client websites is Divi by Elegant Themes. They solved full site editing before WordPress, and have many more advanced features for web designers and creative website owners.
Learn more below…
[image error]Divi Visual BuilderThe #1 WordPress theme on the entire internet to design your website with drag-and-drop!
Buy NowWe earn a commission if you purchase using the link above which helps support this website.
If you’re just learning WordPress, it’s wise to start affordably and familiarize yourself with how WordPress works before making a decision.
Create Posts & PagesThe Posts & Pages are where you publish content on your website.
Blog posts are chronological and will appear on the live website in the order they’re published. They also have categories/tags associated with them.
Pages are timeless and are used for pages like About, Contact, and Testimonials.
Let’s jump into a post and view it.
Add Content Blocks & PatternsWith the Gutenberg editor, you create your posts with blocks and patterns.

If you’re returning to WordPress after a hiatus of a couple of years, you might remember the classic editor that resembled Microsoft Word. Now, everything is done with blocks.
To add a block, you can either click the plus (+) button or type a slash (/) to bring up the quick-use block menu. Then select “Browse All” to view every content block from the left menu, such as paragraph, heading, list, quote, images, gallery, audio, etc. They even have a “Classic” block for those who prefer the old functionality with the classic editor.
However, I recommend starting with the block editor for everything. Better to dive in with new features instead of using the old method that may not be supported in the future.
Create your layout and organize your blocks with columns, groups, rows, stacks, separators, and spacers for design.
The block editor makes it much easier to design your content. Each block has its own settings, which you can edit from the right-hand side. Simply select the block and you’ll be able to modify the text, background, link color, and more for that particular block.

There might be additional settings that aren’t showing, so in that case, you want to click the three-dot icon (⋮). For instance, in the typography settings, all we see right now is the size.

However, if you jump into the settings, you can change the font family, appearance, line height, letter spacing, etc.
Post Settings & PublishingIn the post settings, you can edit the post or page status, URL, author, categories, tags, and featured image.

Once you’ve created a blog post or page, you can save it as a draft, publish it immediately, or schedule it to go live on a future date.
You have the option to preview the post right in the editor window on different device sizes, or to get a better perspective, you can open the preview in a new tab.

By visiting the live website, you can see exactly how the customizations made to posts and pages are reflected.
That’s a little intro on how to build your content.
WordPress Media LibraryWhen you add photos, videos, or other attachments (i.e., PDFs) to your pages and posts, they are uploaded to your Media Library. You can view all uploads by navigating to the Media option from the left admin menu.

You can either upload your media directly within pages and posts or if you want to bulk upload, you can do it from this section and then insert them into your pages and posts after.
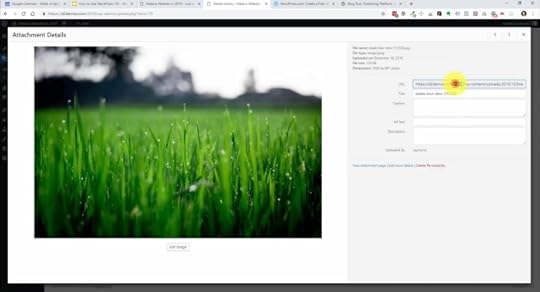
Once you upload, click on an image to see its details, such as the direct image URL.

I recommend making sure your dimensions are appropriate for a website. You don’t need to upload something that is 5,000 pixels wide. That will just eat up your web hosting resources and make your site slower. I resize all images to <1,000 pixels. WordPress also generates medium and thumbnail sizes that you can insert instead to optimize even more.
Web Server File HierarchyYou might be wondering where these files go within your web hosting account.
For that, I have another tutorial diving into the more technical side of how WordPress operates, where you can see the PHP files that run everything. It’ll teach you about the File Transfer Protocol (FTP) and show you exactly what a WordPress installation looks like on your web server.
Configuring WordPress SettingsWe’ll start with the general WordPress settings.

This is where you can set your title and tagline, and then you can insert those snippets into your template with blocks.
It’s also where you set your admin email address, along with the default time zone and format.
Reading — Custom HomepageNext up is the reading section. This is where you set either a static home page (my preference) or, by default, WordPress shows your newest blog posts on the home page.
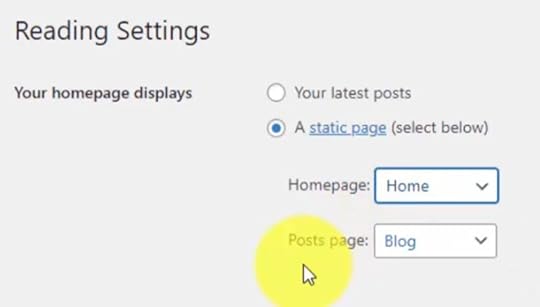
You can select the “Your homepage displays” option and set it to a static page. It’ll have a drop-down of all your published pages, and you can select which one to set as the homepage.
In the “Post page” section, you can choose the page where your blog posts will be displayed.
Discussion — Manage CommentsThe discussion section is where you have all your commenting settings.
I recommend that you require a user to log in to comment because WordPress websites are known for attracting spam bots that submit comment forms looking to insert their links on your website!
Media — Upload DefaultsThe media section is where you can set your default sizes on media uploads. WordPress organizes your media into folders on the web server based on the year and the month, unless you uncheck this option.
 Permalinks — URL Structure
Arguably the most important setting is the permalinks. This is your URL structure across the entire website, and this is what Google logs when adding your website to their index.

I always recommend that you set it to “Post name” as you’re setting up your website. Don’t change this after you start publishing content, otherwise, you might have links that don’t work anymore (and that will hurt your SEO).
Additional WordPress ToolsNext, we have the tools section, which is useful for importing and exporting.
It allows you to import blog posts if you have them on another platform or another WordPress site. That will require you to install an importer plugin.

If you export your current site, it generates an XML file. Please note that this is not a full export of your entire website, including the design and layout. It only exports your post/page content.

There are plugins available that allow you to do full site backups (like Duplicator), which essentially clone your entire website, including the design, media, and WordPress database (that’s where posts, pages and settings are stored).
Another great feature in this section is the Site Health option.
It shows you the details of your web server and highlights any issues. For example, it may recommend removing inactive themes like you see below.

In the “Info” tab, you can see specific details of your installation, such as the time zone, home URL, and permalink structure, which we discussed earlier. Plus you can view the PHP information, including the PHP version, memory limit, and upload max file size.

These technical details are essential if you encounter errors, so you can debug the problem. Sometimes more complex themes require more powerful default PHP settings, or else they could crash.
If that occurs or you see messages in this Site Health section, please reach out to your web hosting support with the error and they should help to resolve it.
WordPress User AccountsOne of the great features of WordPress is the ability to create users at different access levels.
This means you can assign different roles and permissions to new users. For instance, you may have someone who can create blog posts but doesn’t have access to certain admin features.

WordPress is also popular for membership websites because there are plugins that integrate membership features and levels into WordPress user accounts.
This provides flexibility and customization options that make WordPress a preferred platform compared to others with limited built-in features.
Pick Plugins to Add FunctionalityPlugins play a vital role in extending the functionality of your WordPress website. If you encounter limitations while customizing your theme, chances are there’s a plugin that can fulfill your specific requirements.
One example of a plugin is Contact Form 7, which is a popular one for creating, you guessed it, contact forms.

It adds a new menu item under the “Contact” section, allowing you to customize the plugin settings.
Now, let’s return to the Plugins page and click on “Add New” to explore the available plugins.
When selecting a plugin, it’s important to consider two key factors.
Firstly, ensure that the plugin is popular and widely used, as indicated by a high number of active installations.
Additionally, check the plugin’s rating to gauge its quality and reliability.

Take the time to browse through the plugins available. You can explore different tabs, such as “Popular,” where you’ll find plugins like Contact Form 7 and Yoast SEO, which I typically install on every website. The latter allows you to optimize posts and pages, improve their ranking on Google, and drive more traffic to your site.
Expanding with eCommerceAnother highly popular plugin worth exploring is WooCommerce. It empowers you to transform your WordPress website into a fully functional eCommerce platform, selling physical or digital products.

This is precisely what sets WordPress apart and makes it an exceptional choice. You don’t have to pay $30-50/month like other website builders and platforms to start with these powerful plugins.
By using the self-hosting method, you have the freedom to utilize the power of WordPress to customize your site according to your specific needs and preferences.
If you feel more confident in your WordPress skills after this tutorial, I encourage you to take action and dive right into creating your website today. The best way to learn is by actively engaging with the platform and experiencing it firsthand.
If you’re eager to get started immediately, visit HostGator using the link provided below or watch my step-by-step tutorial on launching WordPress with HostGator.
[image error]HostGator Web HostingLaunch your WordPress website or blog today up to 62% OFF using code WPC1
Buy NowWe earn a commission if you purchase using the link above which helps support this website.
The post WordPress 101 Beginner Tutorial: Learn the Basics of Website Management appeared first on Website Profit Course.
February 16, 2023
How to Use WordPress 101: Beginner Tutorial to Learn the Basics of Managing a Blog or Website
This is a high-level WordPress 101 tutorial for beginners or people looking to learn how to build websites on the foundation of WordPress as a content management system.
Let’s touch on all of the essentials, including:
✅ An explanation of WordPress
✅ A tour of the WordPress “admin” dashboard
✅ How it works to make your site
By the end, you’ll understand how to use WordPress to manage your website!
Don’t have a website yet?I recommend you sign-up for my website beginner’s training below where you’ll get this video and many more to take you through each step at your own pace.
It’ll give you a much better understanding of the entire web ecosystem, whether it’s how web hosting works or setting up WordPress from scratch.
Launch a Website in 24 Hours!Want this helpful free giveaway or training?
5 Types of People Who Learn WordPress
There are five profiles who are using WordPress more frequently than the average person.
BloggersWordPress started as a blogging platform and so it has and will be the number one blogging tool for years to come. It has since grown to be a great framework for any type of website, not just blogs.
Web DevelopersA lot of web developers who are good with code or maybe they have a job at a bigger company are learning WordPress. It is a pretty adjacent skill to what they’re doing and it’s a good way to get into freelancing if they want to branch out and do their own thing.
Computer and Tech GeeksAnother big group of people that I find that become interested in websites are just computer geeks and I would classify myself as this!
I have a coding background from college, but I wouldn’t consider myself a web developer – though I can get up to speed with how a piece of code works quickly.
The next level are the computer geeks who love gadgets and games, but their not into development. They can gravitate towards building websites to scratch that technology itch without needing to know code.
Business Owners (DIY)This next group of people are those that absolutely need a website to advertise their goods or services. Maybe to save some money, they decided to go the DIY route and started using WordPress to build their site. WordPress is that easy to learn and scalable enough for entrepreneurs to build on.
Job-Escapers (Work From Home)Probably the biggest group of people, these are simply those that are in jobs they don’t like and want to find a way to escape. Maybe they want to freelance, maybe they want to create their own website and make money through affiliate marketing. It really has less to do about what type of job they’re in right now and more that they want to find some type of work online that’s fulfilling
Why Use WordPress vs. Other Options
Let’s break down why you would use WordPress over other options out there. This is broken down into experience levels.
Zero ExperiencePeople who have zero experience, are probably not going to jump right into WordPress. It is a step above the most basic web builders out there that all the hosting companies offer, or even the big ones like Wix, Squarespace, or Weebly. They’re the big services that allow you to create free websites or low cost websites and they have their own drag and drop builders. Their settings are kept to a minimum so it’s really easy for the user.
The main downside to those services is that you’re going to be locked into whatever service you select. You can’t migrate a Squarespace website to new hosting because it’s using their framework and their design.
Some ExperienceIf you have some experience, you’re probably going to select some type of framework. The key here is that you want to select an open source framework, which means that the company that creates that framework releases all the code and most of these are free.
WordPress is actually free software. It is known as a content management system and used for websites that have a lot of content because if you were doing that manually with code, it would probably be a lot to handle.
There are other frameworks out there that use HTML or JavaScript. If you want to get into the code side of it and not use a system like WordPress, you can still do that but not have to start from scratch.
Expert UsersIf you are an expert, you have plenty of experience with code and development. However, you still might want to use WordPress and take it to the next level with some custom design or code. It is possible to create your own themes and frameworks within WordPress using code. The possibilities are endless!
WordPress is my number one choice for control and flexibility. You can build your WordPress website, learn WordPress, and have a Swiss army knife at your disposal to do so many things that you couldn’t do with lower end services. If you ever need to transfer a domain or go to a different web host, you can take your website, move it from host to host, and not get locked into one company.
WordPress.COM vs. WordPress.ORG
There is one really big point of confusion for beginners and that is the difference between WordPress.COM and WordPress.ORG.
The image above shows the homepage for the .COM version of WordPress. This is where they offer to host your website on their servers. If you want WordPress to host your website, you want to go to WordPress.COM.
The thing is, they don’t give you the full version of WordPress unless you’re on one of the higher-level packages. You will be limited in what you can and cannot do.
That’s when you need WordPress.ORG!
WordPress is open-source software, and you can download the full WordPress framework for free, you simply need to install it on your own hosting account.
Check out this video on the best WordPress hosting companies:
Many hosts give you the option to have WordPress installed at the click of a button.
Using WordPress on your own hosting account gives you the ultimate freedom in how you can build your website. You’re only limited by your imagination and knowledge.
I always use WordPress in this way, and the hosting company I’ve been a customer of the longest is HostGator, click the link below to start now!
[image error]HostGator Web HostingLaunch your WordPress website or blog today up to 62% OFF using code WPC1
Buy NowWe earn a commission if you purchase using the link above which helps support this website.
WordPress Admin Overview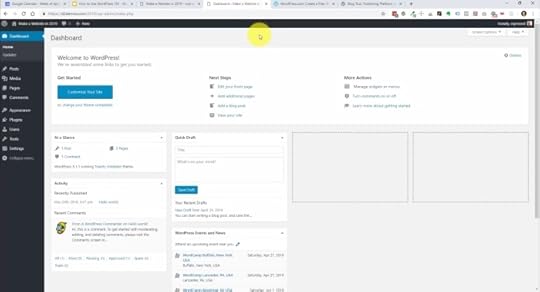
Here is the backend of a WordPress website also known as the admin area or dashboard.

Before diving into the admin dashboard further, here is a look at the frontend of the website. This is a very, very basic design and it’s geared toward blogging. You could see here we have comments, categories, posts, and archives. If you were going to start blogging, this will be a great way to do it and just get started. Over time, you can refine the design. You don’t have to start with a great design, in fact the content is probably more important to get traffic. You can get an idea of how to design it around the content instead of the other way around.

Returning to the admin backend, when you first log in, you’re going to see the dashboard and this is really just a one page overview of your entire site. You can see how many posts and pages you have, how many comments there are, what version of WordPress you’re running, and what theme you have. If you want to quickly type out a blog post, you can do that right from the dashboard. They also show you local events that you could potentially go to to learn more and meet other people that are involved with WordPress.
Let’s do a quick overview of the Admin Menu.
Dashboard and Updates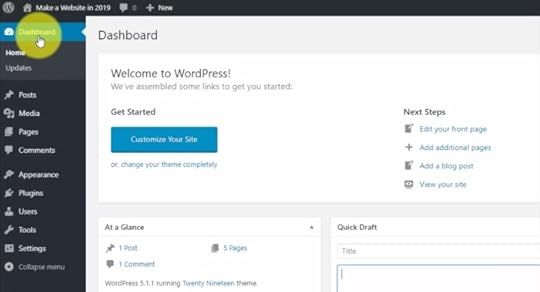
On the left hand side, you’re going to navigate the admin area using this menu. The dashboard, which is the first page you see when you sign in, is the top link. Just below that is the updates section which is going to show us our updates of the WordPress core software and other software that we have installed with WordPress, otherwise known as plugins.
PostsNext, we have Posts. These are typically used for creating blog content. This is where you go to view existing posts, create new ones, and organize them by categories.
MediaFollowing, the media section organizes the media that you upload, such as, images, audio files, or PDFs that you add to a blog post or page. The media section let’s you review all the attachments that you have with your WordPress website.
PagesNext, we have pages which are similar to blog posts, but instead of them being dated, they’re really static and evergreen. Pages are basically the web pages of a website like an about page, a services page, a testimonials page, or a contact page. Content might change on the page, but the page itself won’t change and it’s not based on a specific date or event.
CommentsMoving down, the comments section is where you can control the comments you might receive on blog posts. If you allow comments, they can be approved and monitored. Sometimes you can get someone spamming some product or not contributing to the conversation and this is where you can allow or delete them.
AppearanceThe appearance section is the big one because this is where you’re going to get your design. With WordPress, your website design can be changed by installing themes. There are thousands of themes out there that you can choose from, plenty of free ones and paid options. You’ll also find niche specific themes and you might find a theme for a particular business industry or even geared towards e-commerce. The main difference between free and paid is that when you buy a paid theme, you’re getting probably a better design and consistent updates. If they update the code in the future for the theme, you’ll get access to that. Of course you’ll get better support if you run into any problems when you’re using a paid theme and with free themes, you’ve got to do all the support yourself.
PluginsThen we have the plugins section and where we add functionality. Similar to themes where anybody can develop a theme, you also have software developers that make WordPress plugins. Plugins add a specific function, whether it’s for social media, SEO, or contact forms. There are backup plugins, optimization plugins, calendar and booking solutions, membership framework plugins, and really just about anything. You know the saying, there’s an app for that? With WordPress, there’s a plugin for that. Themes and plugins are what make WordPress so awesome because you can grab other people’s designs, other people’s code, other people’s work and build off of that without having to start from scratch.
UsersNext, we have the user section. This is where your admin account will be listed and if you want to create new users and give them access to your site, you can do that with various levels of access. You can create another administrator, or you can create an editor and they’ll have access to all your blog posts and pages. You can also create an author, who can write new blog posts, but not have access to older posts or other areas of your website. That way you can protect your website from somebody making a change and breaking the website.
ToolsFurther down, we find the tools section. I don’t use this that often, but you can see they have import and export along with erasing your personal data. Import and export come in handy if you want to move your WordPress website to another WordPress install. You’ll be able to export you posts and pages and then import them into the new install.
SettingsFinally, we have our WordPress settings. Here, you can control the time zone, how dates and times are displayed, or edit your website’s title. You can also control how the page and post links appear in the URL bar or edit whether people are even allowed to comment on your posts.
Next, we’ll dive in deeper and go over the important aspects of pages and posts.
Posts vs. Pages with Content Blocks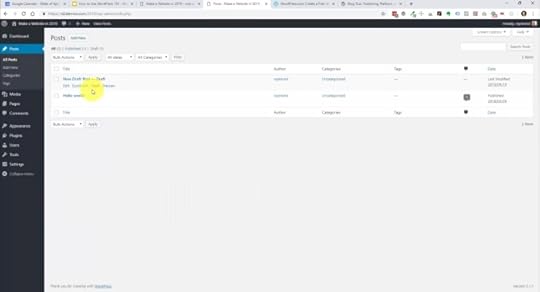 Posts
PostsThe Posts area is where you create new posts or edit existing ones. I have one published post and then I have one post which is in draft mode. You’ll notice up above the list of posts, they show that you can filter out every post published posts or only draft posts. You can search for specific posts or filter specific dates or categories. If you trash one of these, then you’ll also see a trash link. You can also see specific tags if you use those or even the number of comments there are on a post.
Let’s jump into one of these posts and take a deeper look.
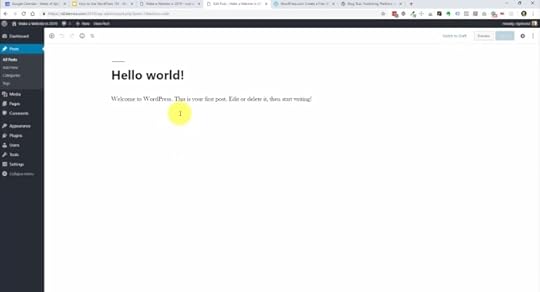
When you install WordPress, it automatically comes with this Hello World post. It is an example blog post created just to show you what a post looks like. With the new version of WordPress, they made a really big change to how you edit your posts and pages with the Gutenberg block system. It allows you to essentially build your content using editable blocks. Right now, you’re looking at the title of the post and this is a paragraph block.
They have blocks for various types of content for your posts and pages. We can add paragraphs, short codes, HTML buttons, and we can embed links. We can even add images from our media library or upload them here in the post. They even have blocks for YouTube and other services to allow you to quickly share content from those sources.
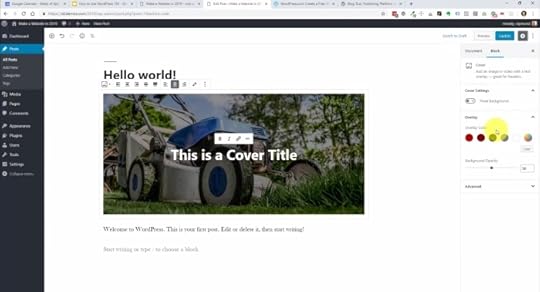
Here, you can see the post now has an image block with a title overlay. On the right hand side, we have document settings. If we click on a block, you’ll get the settings for the individual block you’re clicking on. We also have paragraph settings and they give you ways to customize and style these various blocks. I think it’s important for you to just play around with this within your own website and get a feel for how you’re going to use it.
Pages
The pages editing experience is pretty much the same as posts. There are just a couple of differences:
You don’t have categories and tags. Pages are where the content, like posts, live.In our example, the blog page is assigned as our posts page. When a post is created and published, it will automatically go on the blog page In chronological order. The Welcome To My Website page is set as our Front Page, or homepage and can be edited to include the content we would like displayed front and center.
If we go into one of the pages, you can see the editing environment is virtually the same as the posts. We can build out the page using blocks just like on the posts.
If we click the plus to add a block, you can view all of the different kinds of blocks you can add. It’ll start with the Most Used blocks that will change with the blocks you most use over time. If you scroll through the menu, you can see all of the different blocks you can add with the different drop downs. Let’s go over that menu and cover the blocks you’ll use most as it is pretty extensive:
Common BlocksParagraph – This is what you’re going to use for most of your content. It includes formatting options just like in a word processor.ImageHeadingListGalleryFormattingMost of the blocks here you most likely won’t use like custom HTML code. However, you’ll probably use Table at some point to portray data or information in an organized table.
Layout ElementsThis one might also be rarely used, however there are a few here to mention:
Button – This adds a clickable button that can have a link to another page or website.Columns – This will allow you to organize areas of your page into two, or three columns.Media & Text – This is a cool one which will allow you to add an image or video with supporting text next to it.WidgetsThese are handy bits that can control information and create functionality on the page. Widgets allow you to add a calendar, show a list of your latest posts, show the latest comments, or even add a search bar to your page.
EmbedsThere are a lot of options here, but essentially these allow you to include content from other websites or social media sources. For instance, you can add a YouTube video, your Facebook page link, your Twitter profile, or your Instagram images.
The Gutenberg system has made building posts and pages a lot more fun and efficient. There are a lot of blocks and I encourage you to explore as you build your pages.
Media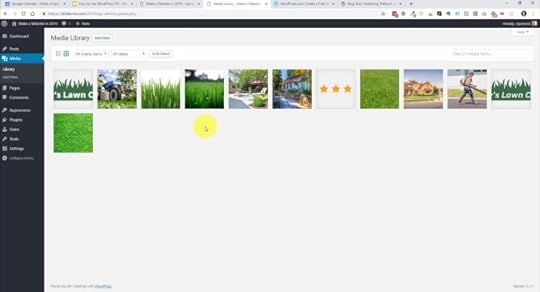
Jumping into the media section, let’s take a quick look at how the images and graphics are organized. WordPress puts all your uploads in this grid format which can be keyword searched or filtered to find specific media.
You can click into them and they’ll give you the URL if you need to copy and paste that. You can also edit the image’s information like it’s title and you can give it a caption if needed here, but you can also do that later within the block editor.
One thing to mention here in your website planning is that WordPress will take any size of image dimension and resize it to fit the content. This is great, however, images with large dimensions tend to be very large in megabytes and will take up a lot of server space. They can also take a long time to load in the browser. If you have an image heavy website, take the time to resize and optimize before uploading.
Themes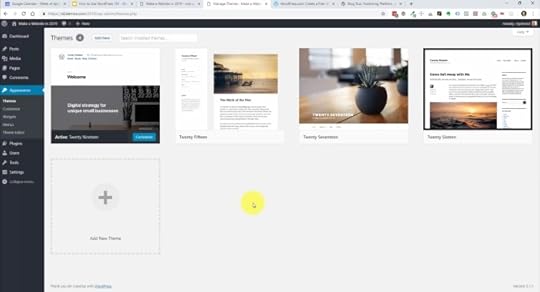
This is going to be arguably the biggest decision that you’ll make with your WordPress website. What theme will you use? Themes set the stage for your content, brand, or personality and there are plenty to choose from. You want to pick your theme based on the type of website you’re building. Is it a portfolio website, is it a blog website, is it a business website, is it eCommerce? The choice is yours.
On the themes page, you’ll see in our example there are four themes installed. All of these are created by WordPress and a great default themes to get started with. Over time, you can test new themes and make a switch by clicking the add new button. This will take you to the WordPress themes repository. Most of these are going to be free and some have paid upgrades.
Another option that is great for beginners is to use a theme and framework that offers a drag and drop builder. One that has set the standard for page builders is Divi by Elegant Themes, who I am an affiliate of. It essentially let’s you create your own design all the way, instead of letting the theme fo it for you. I have a full tutorial and if you signed up for my beginner sequence, you’ll get that in a future email as well.
[image error]Divi Visual BuilderThe #1 WordPress theme on the entire internet to design your website with drag-and-drop!
Buy NowWe earn a commission if you purchase using the link above which helps support this website.
Customize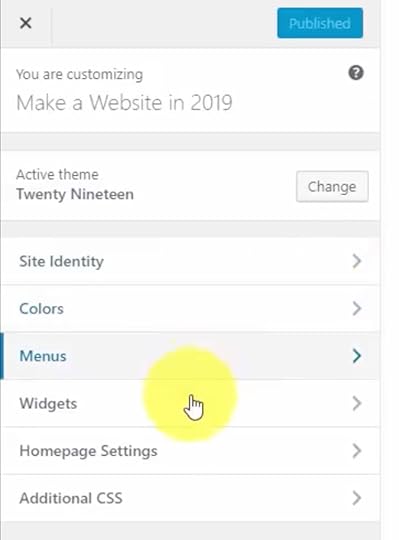
Next, we’re going to take a look at Customize which is a submenu item under Appearance. These settings are going to be dependent on whatever theme you have installed. There are a few overarching settings that are on every WordPress website, but theme developers choose what parts of the theme that you can customize and every theme does it differently.
I recommend that you go through the settings and figure out the various things that you can customize on here. Typically, you can change font colors, font styles, and control the menu items for your navigation. You can even edit your website name in Site Identity and control which pages show as your homepage and blog pages in the Homepage Settings.
Menus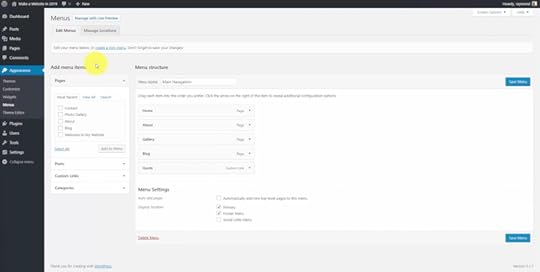
In Menu, this is where we create the navigation for our site. Usually one of the first things I do when I create a website is create a main navigation menu. You can create a new menu by clicking the create a new menu button. When created, you can give it a name to help you organize your menus should you have more than one. You add links to the menu by adding your published pages or your posts from the left side of the screen. Then once they’re on the menu section, you can drag and drop them to change the order. You can drag them inward if you want to do a sub menu or sub item for a nested, expandable menu.
Widgets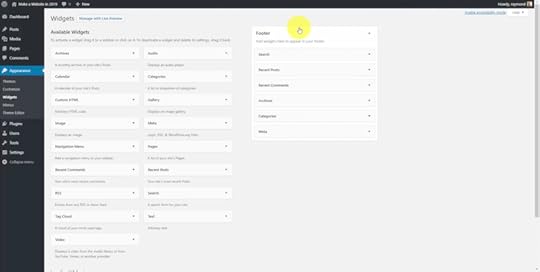
Widgets are like little bits of reusable content that can be placed in different areas of the website. This is another thing that’s theme dependent. Developers are going to create areas of your website where you can use these. Some of these widgets allow you to display a search bar, navigation in the footer, show recent posts, comments, archives, and a list of categories. I you want to add in this type of content, the widget system allows you to drag and drop them where you need them on the them. Typically, you’ll find you can add widgets to your theme’s footer and/or a sidebar area.
Plugins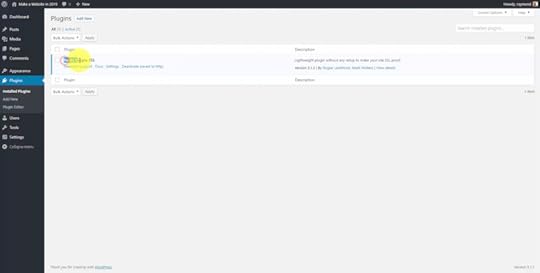
These are really the meat and potatoes of a WordPress website. Plugins add functionality to WordPress and can do anything from displaying an interactive calendar to full fledged membership systems. The first screen is going to list your currently installed plugins. It is going to list them in order and show whether they are active or deactivated and will give you extra information like version number and the developer. If you need to remove a plugin, this is where you go to delete them.
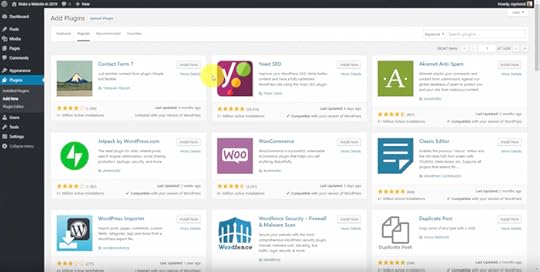
Browsing and adding new plugins is a lot like looking for a theme. You can search for plugins in the WordPress repository and filter them by popular or recommended. When looking for a new plugin, it’s important to note the ratings as well as how often the plugin is being updated and maintained by the developer. You don’t really want a plugin that has a poor rating or hasn’t been updated in 3 years because it could actually put your website at risk. Just make sure to click on the plugin you’re interested in and and look at it’s details to make sure it is something you really need. Try to limit the amount of plugins you have installed by 10 or less. Too many plugins can cause conflicts and slow down your website.
Users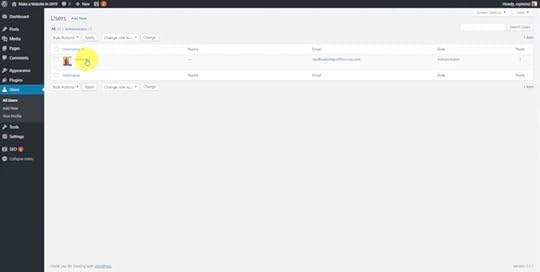
This is where you can find a list of user accounts. Unless you plan on inviting others to collaborate on your website, this will really only list your own account. You can see that your account role is an Administrator. This is the top level user role and gives complete access to the website. The other user roles change the access level and what each user can and cannot do on your website. The other possible user roles are:
EditorAuthorContributorSubscriberIf you click Add New, you can see where the user information is added as well as where a role is given. That’s the way that you can divide up access to your site to make sure that somebody that doesn’t know that much about WordPress can’t break your website or access areas that they shouldn’t have access to.
SettingsGeneral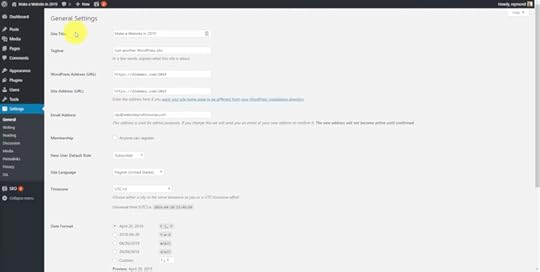
This is where our site title and tagline are listed as well as:
URLWordPress addressThe admin email addressDate and time formatTime zoneWriting settingsDefault blog settings, default post category and post formatMost of these default settings will be just fine for your needs, however you might want to change the time zone and your date and time settings to match what you use locally.
Reading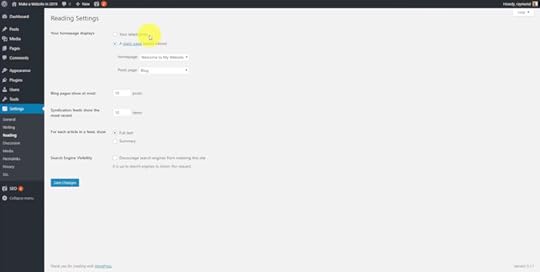
By default when you install WordPress, it’s going to show your latest blog posts on the homepage. Now that’s okay for a blog, but if you have a business type website, you probably want to build out a homepage separate from a blog page. Normally when I’m dealing with business websites, I always create a homepage and a blog page as my first two pages in the pages section. I’ll then go into the reading settings here and assign them to make sure that my website is showing a static page for the homepage and all the blog posts go to a predefined blog page that we set and name whatever you want.
Another setting to take note here is the Search Engine Visibility option. If you check the box, it will discourage search engines from indexing your site. In other words, you won’t be visible on Google. Unless this is a personal website that you don’t really care about anyone finding, it’s important to leave this box unchecked especially if you have a business website or blog that you want people to find through search.
Permalinks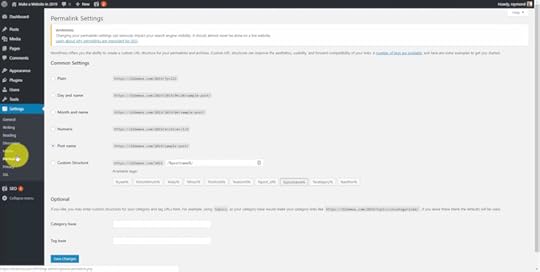
When you first setup your website, you’ll want to come here and setup your link structure. WordPress can set up these elaborate URL structures to put the month or the name of the post or page. I always pick the post name permalink setting so that the actual name of the post or page is included in the URL instead of a number. This can really help with the user experience on your website. When I first install WordPress, I go in here and set that from day one before I create any posts or pages.
In ClosingI hope this has helped you out and I know I could’ve went on a lot longer. However, I wanted to keep this as short and useful as possible so that you can get your WordPress website up and running as quickly as possible.
Would you prefer to learn in chunks?
Get training sent directly to your inbox!
Launch a Website in 24 Hours!Want this helpful free giveaway or training?
The post How to Use WordPress 101: Beginner Tutorial to Learn the Basics of Managing a Blog or Website appeared first on Website Profit Course.
December 24, 2022
WordPress Twenty Twenty-Three Theme Tutorial: How to Make a Website with Full Site Editing
WordPress recently launched the new Twenty Twenty-Three theme alongside version 6.1 of the core content management software.
Like all the yearly themes developed by the WordPress team, it’s bare-bones when first installed and activated. We will use the “full site editing” (FSE) feature in today’s tutorial to transform this basic website into an urban photography portfolio!
Before we start, download the Twenty Twenty-Three tutorial guide to follow along at your own pace.
Twenty Twenty-Three TutorialDomain & Web HostingInstall Twenty Twenty-ThreePublish Pages & PostsWordPress SettingsWordPress Full Site EditingSet Default Theme StylesHow to Customize Your TemplatesFront Page TemplatePage TemplateContact Form 7Home TemplateArchive TemplateSingle TemplateFuture of Full-Site EditingRegister Domain & Get Web HostingTo get WordPress up and running, you’ll need to register your domain and get website hosting.
If you haven’t done that step already, I recommend HostGator as one of the most affordable options.
[image error]HostGator Web HostingLaunch your WordPress website or blog today up to 62% OFF using code WPC1
Buy NowWe earn a commission if you purchase using the link above which helps support this website.
Install & Activate Twenty Twenty-ThreeGo to the Appearance > Themes section, and it should be installed if you’ve upgraded your WordPress version. Otherwise, you can click “Add New” and search it out, then activate it.
 Publish Pages & Posts with Test Content
I will first add all my photos to the media library. You can choose free stock photos from Pexels.com, which has an excellent selection.
Go to Media from the WordPress admin sidebar, and click “Add New” to upload your pictures.

Next, create a few pages and posts so that we have some content built out. This infrastructure will make designing our theme layout easier since you’ll see that content within the editor window and on the live website.
I’ll include four standard pages – Home, About, Blog, and Contact.
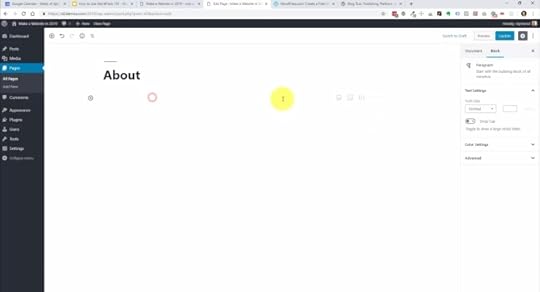
Since we already have a sample page, I’ll update the title to make it our “About” page.

Once you publish a page/post, it sets the URL, which doesn’t get switched after changing an already published title (to avoid broken links). However, we can reset this URL manually by navigating to the “Page” tab in the right sidebar.
Look for the URL option under the Summary section that shows us the page permalink (currently “sample-page”), and we’ll change that to “about.”

Then scroll down to set the featured image. Of course, you can always upload new ones, but we’ll jump to the “Media Library” tab to select our one headshot photo.
Create 3-4 new pages and posts with featured images.
Let’s take a look at our site without any theme customizations.
 WordPress Settings
Let’s walk through some basic settings. Then we’ll start creating with Twenty Twenty-Three.
Navigate to the Settings > General menu to change your site title and tagline, then save.
We will build a custom homepage layout instead of the default setting, which shows our blog posts on the homepage.
To change this, go to Settings > Reading, and change “Your homepage displays” to “A static page.” You can manually set your Home and Posts page to any published pages on your site and save.

You should look at two other sections: Discussion (commenting settings) and Permalinks (default URL structure). For the latter, you mustn’t change this after your site’s been around a while. I always recommend setting it to “Post Name” from day one.
WordPress Full Site EditingGo to Appearance > Editor, and that’s where we’re going to implement all our template customizations. It will automatically show one of your templates, which you can identify from the top-center drop-down.

In the top-left, you’ll see a three-line icon that toggles list view (☰), showing the hierarchy of blocks making up the template.

When you click on a block in the visual editor window, look at the bottom-left of the screen. You’ll see where that block is within the template hierarchy.
 Set Default Theme Styles
To make quick design changes, select the two-color circle icon (◐).

A new feature of the Twenty Twenty-Three theme is pre-defined styles. Click on the “Browse styles” option to view 11 options that completely customize your template without requiring manual customizations.

We’ll select Marigold and save. When you hit the Save button, the right sidebar confirms what parts of your theme you’re updating. In this instance, we’re only updating the Custom Styles.
If you’re an experienced WordPress user like me, you had to know HTML & CSS code to customize like this with older themes. And even with full-site editing, there are styles you can’t control with the visual designer and little bugs you may encounter.
So, if you ever need to override something with CSS, navigate to the Customizer, which WordPress removes from the Appearance sub-menu. You just have to access it directly from the URL:
yourdomain.com/wp-admin/customize.phpThat’s where you can paste code within the “Additional CSS” section.
How to Customize Your Theme TemplatesSelect the top-center drop-down from your template editor window and click “Browse all the templates.”
These are all the templates that generate every page/post on your website.

We were looking at the “Page” template, which displays your pages.
The “Single” template displays individual blog posts.
The “Home” template is confusing. It displays your most recent blog posts, but if you have a static homepage set (we do), it shows on your “Posts page” selected within the WordPress settings. So this Home template runs your blog, whether on the homepage or elsewhere.
Hopefully, that doesn’t twist your brain into a pretzel!
Create Front Page TemplateWe’ll create a new template specifically for our homepage.
Click “Add New,” and you’ll see pre-built template types. Let’s go with a “Front Page” template that’ll override the Page template.

I like to select blocks through the list view (☰).
Go into the Header template part and expand the nested hierarchy. The current Navigation menu lists all the published pages on our site. I’d like to create a menu manually.

Select the Navigation block, and in the right-sidebar Block options, click “Create new menu,” and it’s called header navigation.

We must add items to it by searching for published pages or posts. Within the list view, there are now individual blocks that you can re-order.
Then I want to replace the current heading with the Site Tagline block.

Adjust the Typography size setting to “XX-large” so it matches closely. To see more options, select the three-dot icon (⋮) next to Typography. Let’s choose Appearance to make our text Bold Italic and then center it.
The following section will be a photo gallery, but instead of creating it directly within the template, we can do it from the WordPress page. To get that page content to display, you need to insert the “Post Content” block.

Then change the Align option to Wide width (max 1200 px), so there’s more area for our gallery.

Since we’re not showing blog posts here, you can remove the Query Loop block.
At the bottom, we got this two-column layout, but the right column has nothing except for a little divider. So we’ll move this button into the single-column flow.
This button is an excellent example of why using list view is handy. If you drag-and-drop the “Button” block, it won’t work. Instead, you have to select the higher-level “Buttons” block!
Once you move this button up, you can “Justify items center” and link it to the contact page, changing the text to “Contact Me.”

There’s a spacer below the button, and we’ll move it up by selecting the directional arrow. Then delete the “Columns” block.
When you hover over the plus icon (+), sometimes it says “Add pattern,” but if we’re within a section, it’s “Add block.” Patterns are a done-for-you template of blocks, so let’s utilize one of them!

Click “Add pattern” and then “Browse all.” Next, choose “Media and text with image…” which we’ll turn into a small biography section.

I want to make this 1200 pixels like the post content area, but you don’t see that option. So we must nest our pattern within a Group block to enable that function.
Add a “Group” block, then drag-and-drop the “Media & Text” block into it.
Now that we have it within a group, there’s a new “Align” option to set it to Wide width. We can swap the photo from left to right using the “Show media…” option, then update the Media Width to 62%.
Replace the image with our headshot from the media library. Then change the background to our theme template contrast color, the text to our base color, and the links to our secondary yellow.
If any existing blocks don’t update to these new colors, just go into those blocks and manually switch them.
You can update the text, center it, and update the link to your “About” page.

Below the biography pattern, let’s add social icons within the same Group block.
Add a “Social icons” block, then hit the plus button to add your icons and links. Note that the social media icon won’t show on your live website if you don’t add a link.
Here’s where we may have spotted a bug with the editor. You can see that these icons are circular, but when you hover, they become square. That doesn’t happen on the live website, however.

Change the justification to center within the block settings, enable “Open links in new tab,” and adjust the block spacing. Then jump to the “Size” option to make them bigger or smaller.

Lastly, we’ll duplicate the social icons block and move it to the footer so it shows on every page. You could create a new template part or reusable block, but I will make these icons smaller in the footer. So we’ll copy this “Social Icons” block, paste it into the footer, change its size to Normal, and delete the existing paragraph text.
Let’s save these changes, and you’ll see how we’re updating all these various parts of the design, including our “Front Page” template, “Header” & “Footer” template parts, and our “Header navigation” menu.

The final step is to add our photo gallery to the homepage so the “Post Content” block within our “Front Page” template shows something!
We’ll go to the home page right now to add our gallery. Let’s jump back to our dashboard, go into the Pages menu, and click on the “Home” page, which should also indicate that it’s set as the “Front Page.”
Add a “Gallery” block, select your uploaded images or add new ones, and click Create a new gallery. Then edit the Block Spacing to 0, so the photos touch each other. You can also update where each image links to when clicked.

Update the page, and now we can view our finished home page with the custom template!
 Edit the Page Template
Go back to Appearance > Editor > Browse all templates and select the “Page” template displaying our single pages. This template will go quicker than the Front Page since we’re only making minor updates.
Click the “Post Featured Image” block, click the three-dot icon next to Color, then select “Reset all” to get rid of the black overlay.

From the editor window, select the Align option on the featured image and change to None (Max 650px width) since that’s the inner width of our post content.
Then, center the post title and remove the “Comments” block since we don’t want visitors commenting on pages.
That’s all we’re going to do, so let’s save and refresh our “About” page.
 Contact Form 7
Our “Contact” page uses the “Page” template, and one thing you may want to add is a contact form.
Go to Plugins > Add New and search for “Contact Form 7.” I’ve used CF7 since I began with WordPress over a decade ago, and it’s still one of the most popular plugins on WordPress, with 5+ million active installations.

Install and activate Contact Form 7. That will add a new WordPress menu option, “Contact,” to the admin sidebar, with a pre-made form ready to go.
Insert your custom contact form through the shortcode, which you can copy/paste to a post, page, or template.
To edit, click on that form, and build your custom fields from the “Form” tab.

To create the form response, go to the “Mail” tab. You can send one email to yourself with the form details or a second email confirmation to the form user.
I’ll let you fuss with these settings. But, for now, let’s insert it into our contact page!
Go back to Pages > Contact and paste your shortcode or use the CF7 block with a drop-down menu to select, then publish.

Go ahead and test it out.
Edit the Home Template (Shows All Blog Posts)The next template is the one that shows our blog posts — once again, confusingly called the “Home” template. For the most part, I like the look of this layout with featured images, but we’ll make a few minor changes.

We need to change the title to “Blog” and center it.
Within the blog post, center the title and set the margin to 1. You’ll see that it applies to all posts since they come from the “Query Loop” block. Then remove the “Post Excerpt” block since we don’t need it.
Jump into the list view now. I want to add a calendar emoji to the beginning of the date, so we’ll put the “Post Date” block into a new row. To do that, click the three-dot icon and “Insert before,” then search out the “Row” block. Drag-and-drop the post date into that row and add a new paragraph block to paste the emoji.
Select the row, set the justification to center, and set both the padding and block spacing to 1.
The final addition will be showing the blog categories. Add a new “Row” block after the date with center justification, and insert the “Categories” block within it. This block has the option to add a prefix and suffix, so we’ll paste in a folder emoji before the list of post categories.

Look at the website, and the icons are different. I think that’s because WordPress has its method of rendering emojis.
Another weird observation is the bottom two-column section on the live website that doesn’t show on the editor.

However, if you go into the list view, there is a blank “Pattern” block. Removing it (along with the spacer below) should fix the problem.
Lastly, I’ll save this “Query Loop” block as a template part so you can use it within other templates (next section). Select the three-dot icon and click “Create template part,” then name this whatever you want — I went with “Query loop with Icons.”

Oddly enough, when you create it, the alignment reverts to None (Max 650px), so reset it to Wide width (Max 1200px).
Edit the Archive TemplateThe “Archive” template displays the categories, tags, and other archives (which include your author links).
Center the title and replace the default “Query Loop” block with our custom template part. To add this, search for the “Template Part” block and choose the one we just created for the blog page.

Once again, we have to update this alignment to Wide width (Max 1200px)… must be another little bug. Remember, the software is never perfect!
Edit the Single Template (Shows Individual Posts)We got one more template to go, and that’s the “Single” template which is for individual blog posts.
We’ll start with the same changes we made on the Page template.
First, reset the “Post Featured Image” block color settings, make the alignment “None (Max 650px),” and then center the post title.
The categories and tags are under the post content, but I want to move them to the top and make it look similar to our Home Template (a.k.a. Blog posts page).
Jump into the list view to drag-and-drop the “Post Meta” block under the title, then expand this block to see how it’s organized. Delete the spacer and separator, and then you’re left with a “Group” block that has two columns with rows and a stack.

We won’t be showing the tags, so it’s unnecessarily complicated.
We’ll simplify all this by only keeping the row that contains the “Post Date” and “Categories” block by drag-and-dropping this to the first level under the “Post Meta” block. Now you can delete the “Group” block.
Make your row center justified center, change the first paragraph to the calendar emoji and the second paragraph to the folder emoji, then set the block spacing and padding to 1.

Congratulations, we’re done, and you have a custom WordPress website design that you can edit/tweak in the future!
The Future of WordPress Full-Site EditingGet the one-page tutorial guide if you want to recreate what we went through today.
Even though this is a photography portfolio example, think about how you can apply this template customization to any website.
As you learned throughout this WordPress tutorial, full site editing unlocks a lot of capabilities. However, recognize that it’s still in its infancy, which comes with a few bugs and limitations.
I’m sure they’ll continue to add features as new WordPress versions are released.
While I love the step towards complete visual design control with zero code, I still prefer a more powerful drag-and-drop theme for professional use — Divi by Elegant Themes.
Divi solved the WordPress full site editing problem years ago, and they have more features than what WordPress currently offers in their core software.
I recently switched over most client and personal websites (including this one) to Divi.
Check them out below, or watch me build a professional website with Divi from scratch!
Divi by Elegant Themes — The #1 Most Popular WordPress Theme
[image error]Divi Visual BuilderThe #1 WordPress theme on the entire internet to design your website with drag-and-drop!
Buy NowWe earn a commission if you purchase using the link above which helps support this website.
The post WordPress Twenty Twenty-Three Theme Tutorial: How to Make a Website with Full Site Editing appeared first on Website Profit Course.
August 29, 2022
WordPress Database Tutorial: Overview of MySQL Structure & phpMyAdmin
If you’re a beginner or intermediate WordPress user, it helps to have a look behind-the-scenes at the WordPress database. That’s what hooks into the admin area you’re probably familiar with to customize and generate your website.
A good starting point is reviewing the WordPress Codex database description, which includes a nice diagram with a complete description of each database table and its application on the WordPress UI.

If you have no idea of the WordPress database, that’s likely because you don’t need to understand the details to get up and running. Most of the time, hosting companies have a one-click WP installation that creates a database for you.
WP Database TutorialHow to View WordPress DatabaseWordPress Users TableWordPress User Meta TableWordPress Terms TableWordPress Comments TableWordPress Posts TableWordPress Options TablePutting it All TogetherHow to View WordPress DatabaseYou’ll need to log in to your web hosting control panel to find that database. Many affordable hosting companies have cPanel, while some higher-end ones build a custom user interface.
In this example, you see my “Site Tools” from SiteGround. If you expand the Site section from the left menu and select MySQL (the database language), you can view any databases you’ve created, including one for WordPress.
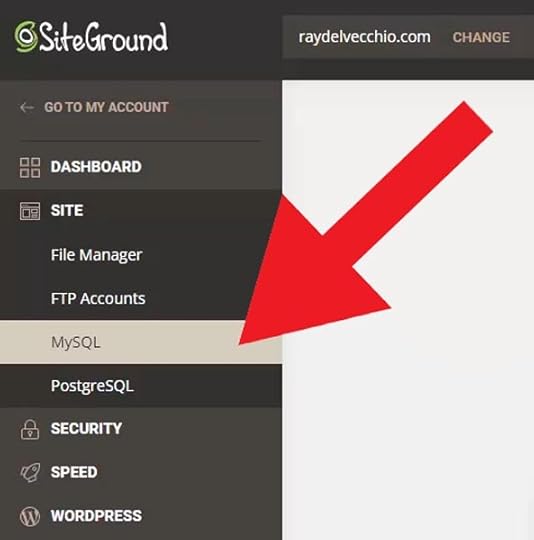
If you’d like to see the contents of your database, you need to access phpMyAdmin. Here’s a look at phpMyAdmin.
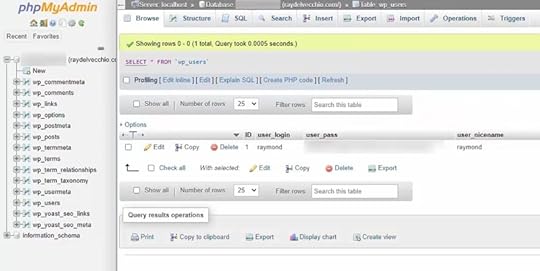
The left panel shows the WordPress database hierarchy, including the tables from the database description page.
Let’s review a few database tables to get a high-level overview of how things work. Then if you need to find something more specific, you can use the WP codex help or debug it yourself!
WARNING: Editing the database can break your website. Proceed with caution, and make sure you have a backup!
WordPress 101 Video TrainingWant this helpful free giveaway or training?
WordPress Users Table (wp_users)
The wp_users table is where your WP admin account info is stored — user login, password (a hash value), email address, display name, plus a few other fields.
Every row within these tables will have a unique ID.
My first experience with the WordPress database was changing my password. Unfortunately, I lost the password and couldn’t log in. That meant I had to do it directly from the database! If you search for “WordPress hash password generator,” you should find many websites that do the trick. Then you copy and paste that value into the “user_pass” field.
Can you see why it’s crucial to get a background on this boring tech stuff?
WordPress User Meta Table (wp_usermeta)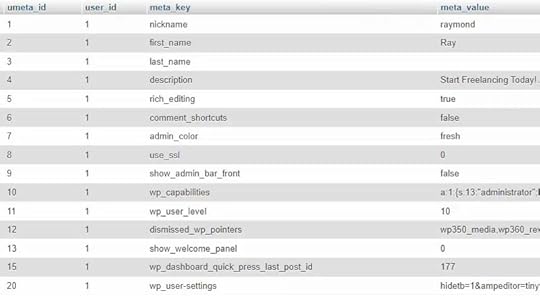
If we jump into the user meta table, this is where more information on each user is stored, and it’s linked back to the wp_users table by the user_id field.
So if I go to our WordPress admin dashboard, navigate to the Users page, and select my account, some of these settings are what you see in that user meta table.
One example is the admin color scheme. Again, let’s go back into the table, and the admin_color meta key controls this setting.

Another vital aspect of WordPress is extending it with themes and plugins — both store details in the database.
For instance, we have a meta key value called wpseo_ignore_tour. The Yoast SEO plugin created this, and it’s a simple boolean value (0 or 1) that determines whether you see a Yoast tour upon logging into your account.
WordPress Terms Table (wp_terms)
The next table we’ll look at is the terms table which contains all the categories and tags associated with your blog posts.
In the example below, our two categories are “Uncategorized” (default upon installation) and “Web Design.” If we go to the Posts > Categories section from the admin area and add a new category called “Graphic Design,” you’ll see it’s there when we refresh this wp_terms table.
We also have two related tables — wp_termmeta, wp_term_taxonomy, and wp_term_relationships. I won’t go in-depth into these since their contents aren’t that descriptive
As mentioned previously, one cool thing about the WP database description page is that if you hover over a table, it’ll show you the associated areas within your admin panel connected to that part of the database.
 WordPress Comments Table (wp_comments)
If someone leaves a comment on a blog post, this is where it’s stored, including the author’s name, email, IP address, and date.
FYI, blog comments are a significant source of spam, so I recommend you control how people can communicate with you from the Settings > Discussion page.
WordPress Posts Table (wp_posts)
The wp_posts table is arguably the most noteworthy since it includes all your posts, pages, menu items, media library attachments, and more, depending on your installed theme.
From the WP admin area, it’s helpful to note the post/page ID when you hover over an entry. At the bottom left of your browser window, you’ll see the ID embedded within the URL as shown here:
You can access these posts by ID, too.
If we go into Settings > Permalinks, I always recommend setting your permalink structure to “Post name” so you don’t have this funky-looking ?p=ID. However, if you copy/paste this plain structure, it will still load the correct page when you replace the ID with a real page/post ID.
Check out that post/page ID within the wp_posts table to see how the post_content column looks compared to what you see in the visual editor.
Below is the format of WordPress Gutenberg blocks within the post content table as an HTML comment.
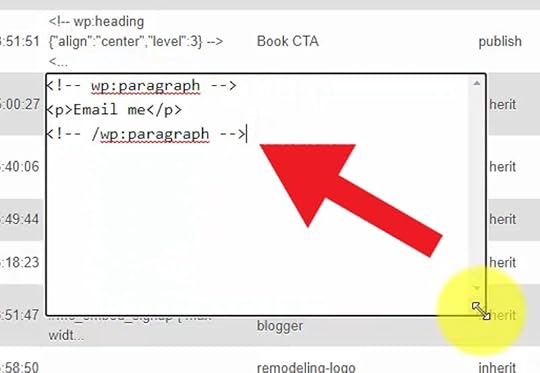
Knowing the syntax within the database can be a lifesaver.
One example for me was a client website where we had many manual instances of a call-to-action. I wanted to replace them all with one single reusable block. So I did a database search/replace using the info I gathered from this table.
WordPress Options Table (wp_options)
The final table we’ll review is the wp_options table, probably the second most important one after the wp_posts table because this is where most of your WordPress settings are stored.
You can see above from the option_name column our site URL, blog name (Site Title), blog description (Tagline), etc.
In our example, this table stores 283 values, so I won’t go through them all, but if you scroll, you’ll see where the parent (template) and child theme (stylesheet) are defined.
 Putting it All Together
If we break it down to basics, WordPress is a bunch of files on your server (mainly PHP) that tap into a database (MySQL) to read/save information from the admin area (i.e., you create a new page) or browser (i.e., the visitor leaves a comment).
I hope this gives you a solid foundation for how the WP database works at the most technical level.
Check out my other tutorial on how WordPress works. This video explores your WordPress installation’s folder structure and the template hierarchy for your active theme.
Or use the free training below to get WordPress help sent directly to you!
I’ll end with a similar warning to how we began. You have far more power when you access the WordPress database — but with that power comes responsibility. If you’re not careful, you can crash your website and render it unusable if you didn’t create a backup or document your edits. Best of luck, my fellow WP hacker!
WordPress 101 Video TrainingWant this helpful free giveaway or training?
The post WordPress Database Tutorial: Overview of MySQL Structure & phpMyAdmin appeared first on Website Profit Course.
July 30, 2022
WordPress Full Site Editing Tutorial: How to Customize Twenty Twenty-Two Theme from Header to Footer
One of the biggest complaints about WordPress is that it’s hard to customize all areas of your site, from the header to the footer. Well, now, with the latest version of WordPress, you have more control than ever with full-site editing that works with “block-enabled” themes such as Twenty Twenty-Two!
WordPress released its most significant update since introducing blocks, and that’s visual template editing built directly into the core. Moving forward, you’ll see more and more themes adopt this technology.
Right now, you can give it a test run with the yearly theme released by the WordPress team, and that’s Twenty Twenty-Two.
If we look at the demo, this is a blank website using the Twenty Twenty-Two theme.
And here’s how we’ll customize it with the full-site editor in this tutorial.
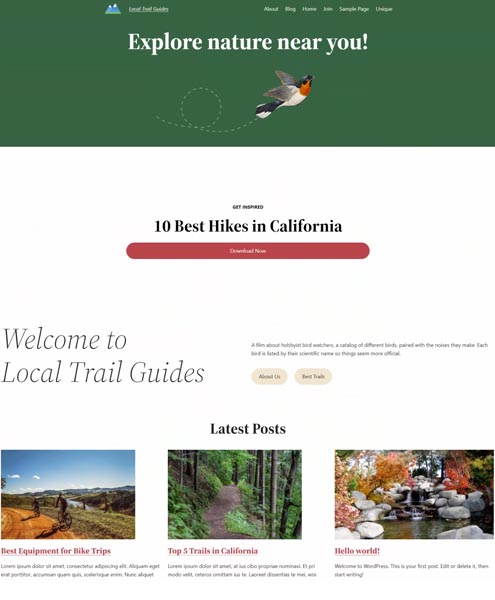
By the end, you’ll be able to create a blog that stands out among the boring templates!
First, download the tutorial assets below to make it easy to recreate what we’re doing today.
WordPress Full Site Editing Tutorial ResourcesWant this helpful free giveaway or training?
Create Your Primary PagesTo create a unique homepage layout, go to the Pages section within your WordPress admin area to publish a “Home” and “Blog” page.
Then go to Settings > Reading and for the “Your homepage displays” option, select “A static page,” then choose your newly created Home and Blog pages, and save your changes.
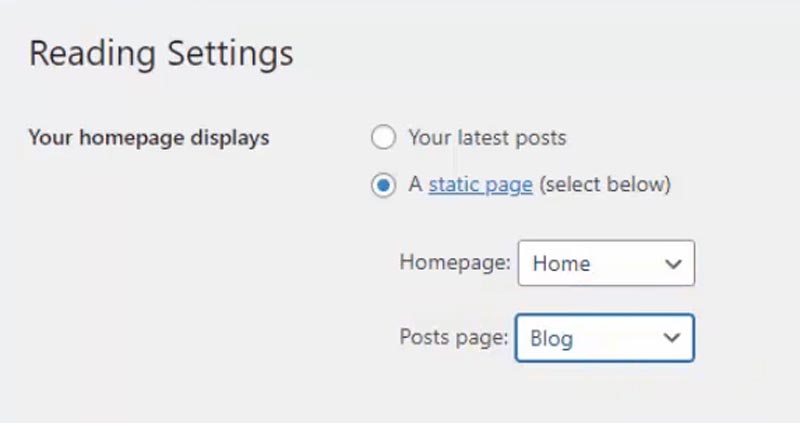
Now we can dig into full site editing!
Full-Site Editor OverviewGo to Appearance > Editor to view your new capabilities. If you aren’t a WordPress beginner, you’ll notice no Customize or Menus submenu is showing under Appearance. This is because it’s all built into the new visual editor.

The basic gist is you’re building your entire website with blocks, from the header down to the footer.
On the top-center of the page, you’ll find the drop-down showing you what template you’re seeing on the visual editor. In our case, we see the Page template. There are also template parts such as the Header and the Footer.

Just click the Browse all templates button to view all your theme templates.
These templates used to be available in your theme folder as PHP files that only developers would edit and customize. Finally, the full-site editor brings this capability to the average website owner who doesn’t know code!
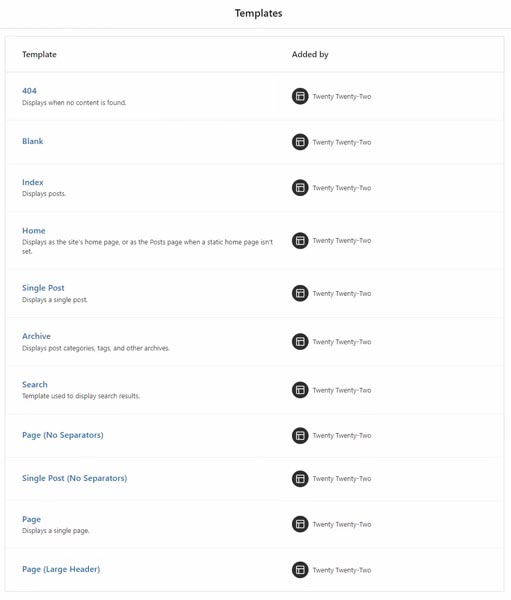
For instance, if you want to customize the look of your blog posts, you will use the Single Post template.
From the left menu, select Template Parts to view variations of your Header and Footer that you can insert into your templates.
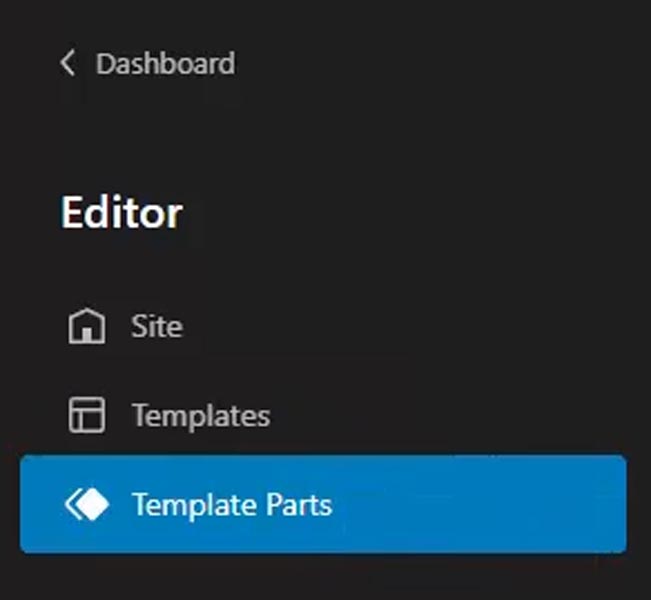
One confusing point goes back to the static homepage setting.
This home template shows our posts page, a.k.a. the blog. If we were showing our posts on the homepage instead, that’s where this Home template would apply.
To edit our static homepage, we can manually assign the template. Go back to the Pages section and select your home page. In the right sidebar, there’s a Template drop-down currently using the default one — the Page template — and we can assign that the Page (Large Header) template instead.
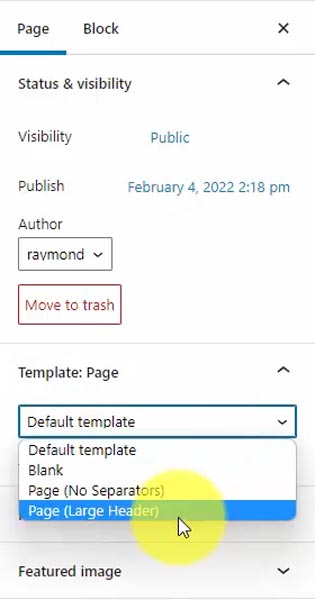
Look at your home page — you should see the new template layout!
Let’s go back to the editor, where I want to point out a few critical notes.
You’ll select a block element when you click anything, but there can be many nested layers. The hierarchy shows at the bottom if you’re unsure what block you’ve selected.
For example, if we click the Site Title, you see it’s nested within Groups, Rows, and two template parts (Header & Header Dark Large). You can click on any of these levels to view each block’s settings.

In the top-left, click the three horizontal line icon to toggle the List view, showing you the block hierarchy within that template. That makes them easier to select instead of clicking on the block and not knowing which level you’ve selected!
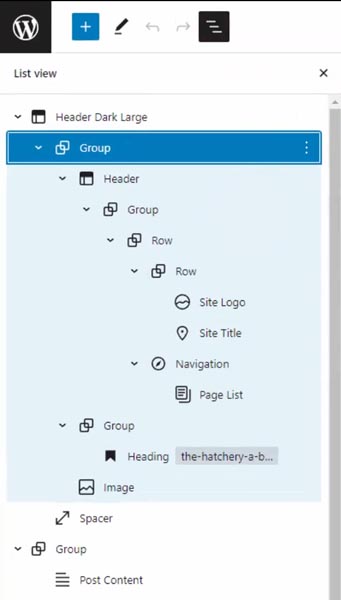
The last thing is the Styles button with the ◐ icon in the top-right of the editor window. Select this to set your theme styles, such as typography, color palette, and default block design.

I like Coolors.co to generate and browse high-quality color schemes instead of creating them from scratch.
Make any changes to your theme styles. Then when you insert blocks, it’s easy to transform them to match your desired look.
Editing the TemplatesLet’s begin with the Page (Large Header) template. We’ll change the first headline, making it bold and center.
Then, I’ll change the background to our theme’s green. To do that, I’ll exit the Styles menu, bring up our Settings (gear icon), and then select the Group block within the Header Dark Large template part. That’s where we choose our Background color.

We’ll also upload a logo. Let’s open up the List view and select the Site Logo block. Then click the upload icon to add to your WordPress media library.
Adjust the settings such as image size, linking to the homepage, and using the logo as your site icon, which appears in the browser tab.
Let’s save, and WordPress will tell you exactly what parts of the template you’re changing. In our case, it’s the icon, logo, two header template parts, and the theme styles.
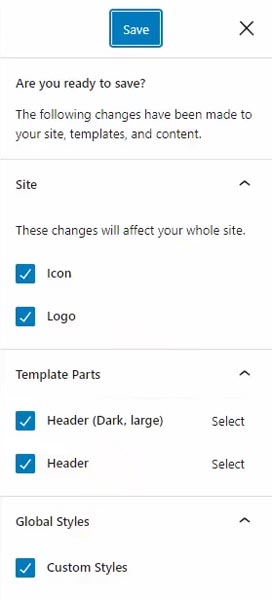 Adjusting Spacing Between Elements
The padding on our header is significant, and I’d like to tighten that up a bit. Situations like this are where the hierarchy comes into play.
To further complicate things, with CSS (the final code output of your custom styles), there are two ways to add space using margin or padding.
For a deeper dive into what I’m talking about, look at this excellent explanation of the CSS box model.
You can set this margin/padding at multiple levels. Sometimes it’s the Group block. Other times, it’s applied to the row, or it could simply be a Spacer block.
In this case, we’ll edit the padding on the first Row block within the Header template part. Then, after selecting from either list view or the hierarchy shown at the bottom of the page, it will outline your selection with a blue border.
Let’s set the bottom and top padding to 10 pixels.
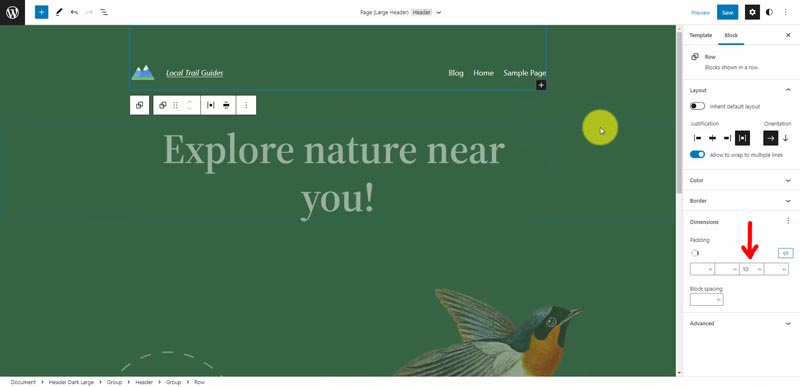 WordPress Block Patterns
Like WordPress has themes and plugins, they’re taking that one step further with block patterns.
To add a pattern, click the plus button on your template and select Browse all. Then, from the left menu, click the Patterns tab for pre-built layouts that you can easily add to your website with one click.
Scroll down to view, and select “Simple call to action.” This gives you a line of small text with a headline and button.
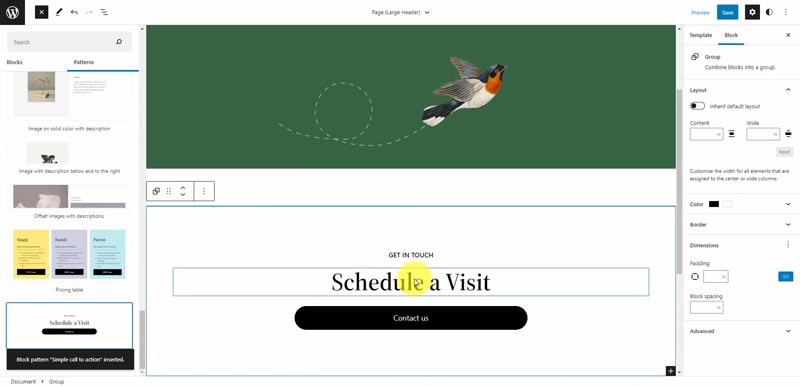
The patterns work nicely with the Twenty Twenty-Two theme, and we’ll test a few in this tutorial.
We’ll customize the button color to our theme’s red contrast and change the wording.
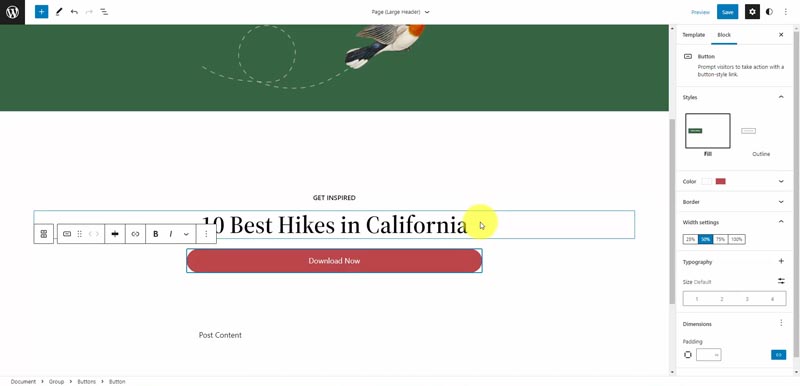
If you’re using a call-to-action (CTA) for an email form, I recommend Mailchimp as your provider since they have a free option for up to 2,000 subscribers.
The next pattern we’ll try is “Wide image with introduction and buttons,” but I’ll remove the image (since it’s the same one used at the top) and change the text to a welcome message. You can style the buttons to match your theme or use a new style for contrast.
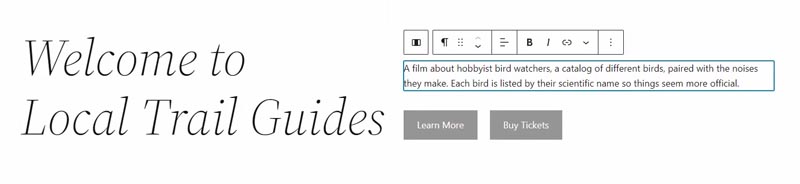
Our last block pattern to add is “Featured posts.” If you haven’t published posts yet, the preview window won’t show anything, so I recommend adding some filler blog content if that’s your case.
We’ll make a few minor customizations. First, let’s make the “Latest Posts” title bigger, and we’ll center it, too. You can transform the paragraph block into a heading to do this.
We’ll also make the post title bold, and any changes you make should update all of these post elements after editing one of them since they’re linked. For the post title, the bold option isn’t located in the block popup menu. Instead, it’s on the right-panel menu under the Appearance dropdown button.
I’m not going to show the post date on the homepage, so I can just delete this block, but we will show it on the blog and single post pages.
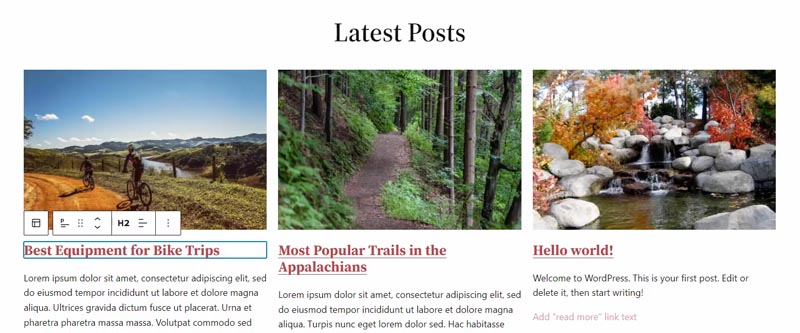
Next up, let’s add social media icons to the footer with reusable blocks, a cool WordPress feature. The benefit is if you insert these social icons into another template or part (i.e., the sidebar), you add the reusable block. Then when you edit it, the updates are synced across all instances of that block.
Let’s click into our footer. The footer template part consists of two group blocks, then a row with two columns, each containing a paragraph block.
We’ll insert our links into the higher-level group with the Social Icons block. Click the plus button to add the networks where you’re active. Choose the icon styles, layout, and link settings from the right menu. I set external links to open in a new tab, and internal links (my domain) stay within the same browser window/tab.
Click the three-dot icon from the social icon block menu, select “Add to Reusable blocks,” then give it a name and save both the block and your template.
Let’s add one more reusable block for a call-to-action on the templates that display single pages (other than the homepage) and blog posts.
In the top-center of the editor window, click the dropdown to select “Browse all templates.” We’ll start with the Page template and add a custom header that includes the green background with the page title.
Right now, this is the plain Header template part, and I don’t want to edit this. So instead, we can click the three-dot icon and select “Detach blocks from template part.”
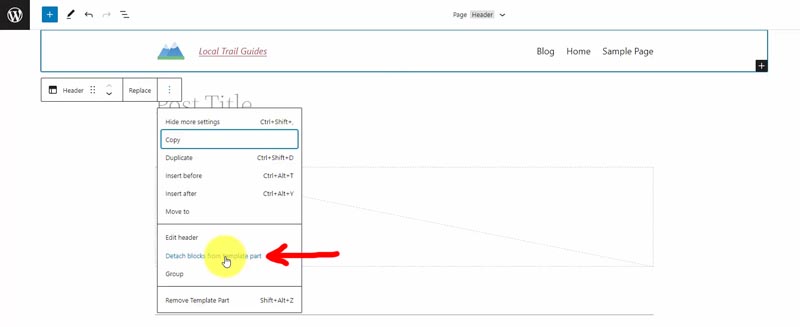
This option allows us to start with an existing header to build our custom template but save it as a new template part (instead of overwriting the Header template).
Go into the header group and change the background color to green, plus the text and links to white.
Then you can drag the Post Title block from the body area right up into the header under the logo and menu. It should automatically adjust the color to white for better contrast, and you can make it center and bold.
We’re ready to save this template part, so select the group, click the three-dot icon, select “Make template part,” and name it Header (Page) while defining it as a Header area from the options.
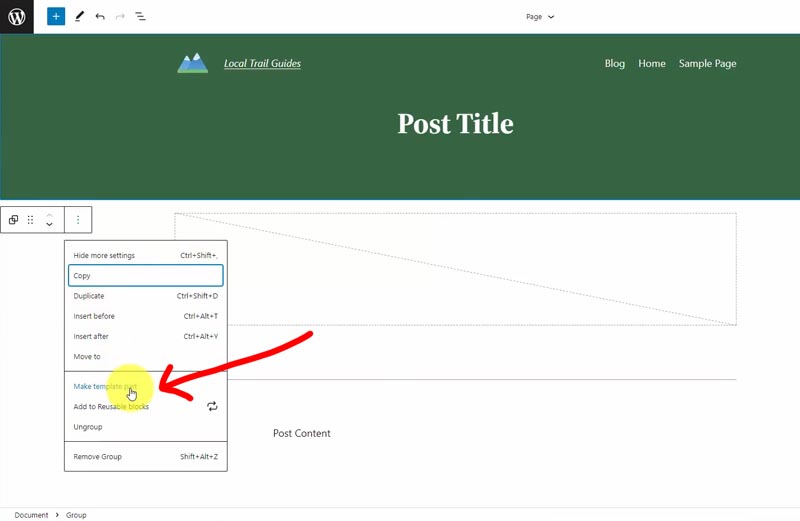

Click create and then save your Page template, too.
Editing Page ContentLet’s make an About page and add content to see how our customized template looks.
I’m starting with the Sample Page generated when you install WordPress and changing the title & permalink to “About.” If you don’t have one, just create a new page.
Set the Featured Image by uploading one to your media library.
Then to the bottom of our page content, we’ll add the Cover block, which is an image overlay. Upload a new photo or select an existing one from your media library.
You can change the alignment to make the Cover block full-width, and let’s transform the paragraph block into a column block with two columns that stack on mobile.
Then fill the columns with some content like headings and paragraphs.
Add a spacer block below the image overlay section to give it a little room, then another centered heading and paragraph.
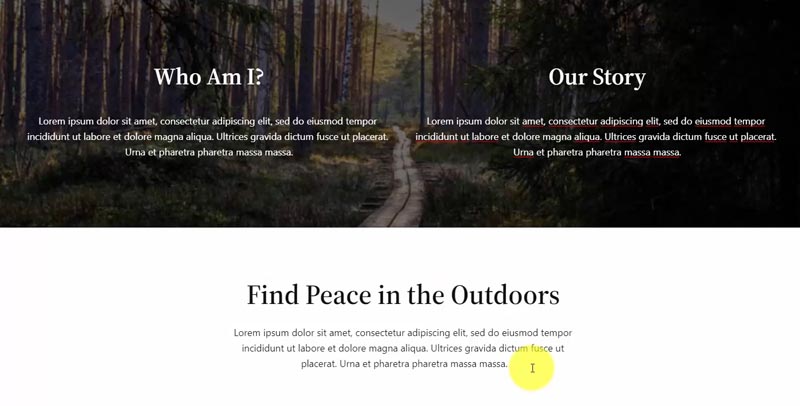 Call-to-Action on Every Page & Post
The last section will be a reusable block for a call-to-action to join your email list. We’ll put that at the end of each post and page.
Let’s go back to the Editor and select the Page template. Scroll down to the bottom, and we’ll add a pattern for this email signup.
Click Browse all, go to the Patterns tab, and choose Subscribe callout.
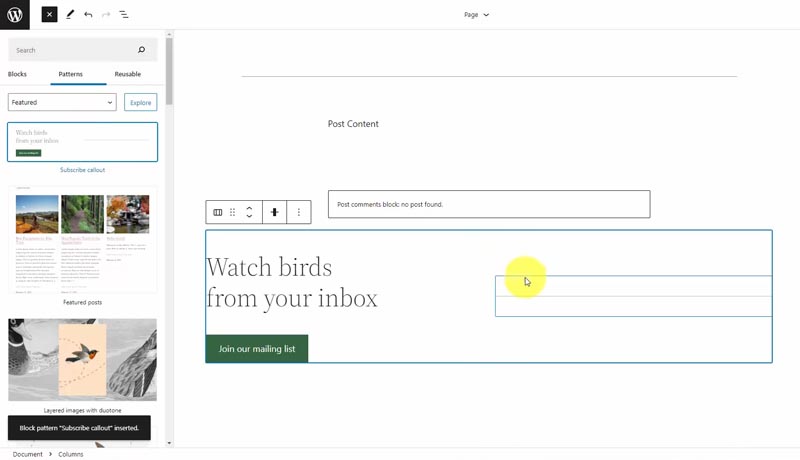
Remove the separator and replace it with an image.
Then change your title and button text to your call-to-action and update the button to a contrasting color in your color scheme.
You can then change the background color on the columns element to a secondary color, so your call-to-action stands out more.

All you have to do to get it working is link up the button to your email marketing provider — Mailchimp is my preferred choice to start for free.
The final step is to make this a reusable block.
Click the three-dot icon, then “Add to Reusable blocks,” name it something like “End Content CTA” and save.
Then save your Page template, and we’ll add this reusable block to our Single Post template.
Updating the Single Post TemplateGo back to the template editor and go into your Single Post template.
Select the current header, and click the Replace button to find the custom Header (Page) template part. That’ll make our blog posts match the look of our pages.
Then delete the existing post title under the header.
Scroll to the bottom and add your CTA reusable block.
Once you start building custom blocks and using patterns, your design speed becomes much faster!
Let’s save it and review a few blog posts to see if everything looks good.
Home Template (a.k.a. The Blog Posts Page)As mentioned before, this template name is a bit deceiving.
If you don’t change any settings, your homepage will show your blog posts. In this default case, the Home template makes perfect sense.
However, if you have a custom page design for your homepage, this template will run your Posts page.
90% of the time, I create two pages — Home & Blog — and assign those to the Home page and Posts page within the WordPress settings.
Let’s jump into the Home template.
Once again, we’ll replace the existing Header Dark Small template part with our custom Header (Page).
There’s one minor issue, and that’s the Post Title block. The live page shows the first blog title. So I’m going to manually change this to “Blog” using a heading element.
Before doing so, I must select the header, click the three-dot icon, and “Detach blocks from template part.”
If I missed this step, we’d save our template, and every page & post would incorrectly show “Blog” as the title!
We can add a heading block, set the Appearance to extra bold, and then delete the existing post title block.
Finally, navigate to the top-level Group block within your header, and set the bottom padding to 50px, which closely matches the Header (Page) template part.
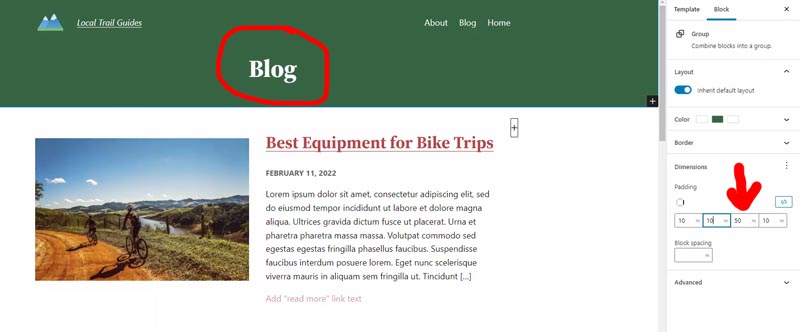
If you click on the posts, you’ll see the Query Loop block generates them.
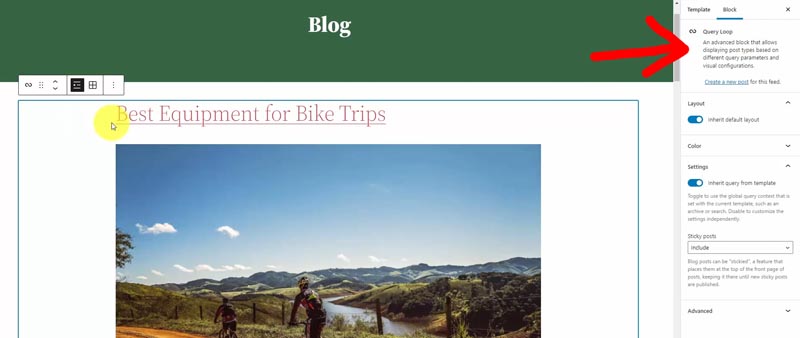
The blog posts now show full-width feature images, and I want to switch that to smaller images with the title and text aligned to the right.
Go into the Post Featured Image, which right now is max 1000px. Change that to Align left, set the width to 450px, and add right padding of 35px.
Drag and drop the heading above the text, change the Appearance to bold, and set the Size to extra large (4).
Then move the date from the bottom to below the title. You can disable the Link to post option, and we’ll make some style changes.
Within the Typography section (use the three-dot icon to see all options), change the Appearance to bold and the Letter-case to uppercase. Then update the color to a gray like hex code #666666.
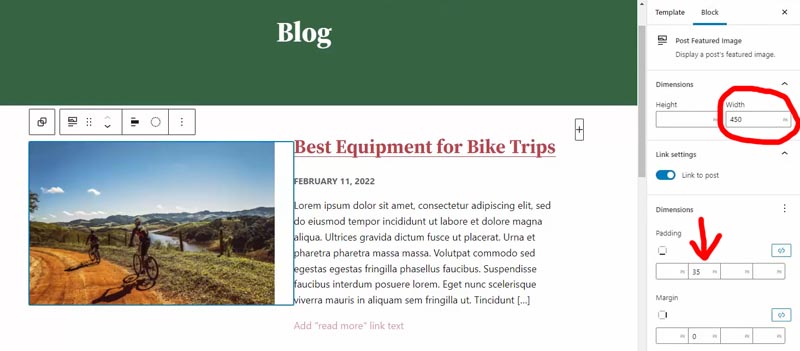
Let’s add our call-to-action reusable block to the bottom of our blog like the other posts and pages.
Save this template and admire your web design work!
Over time, I’m sure many more themes will adopt this new technology, and WordPress will continue to improve performance, features, and ease of use.
I hope you have a good grasp of how to use WordPress full site editing by now. So take this tutorial, and now use your imagination to create a unique blog or website!
WordPress Full Site Editing Tutorial ResourcesWant this helpful free giveaway or training?
The post WordPress Full Site Editing Tutorial: How to Customize Twenty Twenty-Two Theme from Header to Footer appeared first on Website Profit Course.
July 12, 2022
HTML vs. WordPress: Which is Better to Make a Website?
If you’re building one of your first websites, your head might spin while deciding what platform to use. The two most affordable options are plain HTML or WordPress, the most popular content management system on the web.
WordPress is free, open-source software that runs your website. All you need is a domain + website hosting plan with nearly any provider or price level, depending on your needs.
Let’s dig into HTML vs. WordPress with the pros and cons of each!
WordPress 101 Video TrainingWant this helpful free giveaway or training?
Why Choose HTML for Your Website?There are many reasons to go with HTML, and the #1 argument is that it’s the raw source code of all web pages. If you truly want to understand how websites function, you need to understand basic HTML, CSS, and a sprinkle of Javascript.

Regardless of whatever platform is generating the website, the output will always be an HTML document. The CSS (Cascading Style Sheets) provides the design, and the Javascript gives you interactivity once the page is loaded. So it’s powerful to understand how everything operates.
My favorite site (by far) to learn HTML, CSS, and JS is W3 Schools. They provide all the syntax you’ll need to copy/paste along with live examples to test things in a “sandbox” area before implementing them on your website.
If you’re a tech geek or a computer person like me, spend a few days learning for a solid background in HTML basics.
Going HTML means uploading completed files to your web server, which is much faster than any DIY website builder, WordPress included.
The quick rule of thumb is HTML is best for simple, informational websites. If you’re just building a one-page website, such as a resume or company brochure, any platform like WordPress, Wix, or Webflow is probably overkill.
I dug into my projects folder (with files dating back to 2012) and found an HTML framework that provides done-for-you styles called “HTML Kickstart.”
With a framework like this, they’ve created designs and animation with CSS/JS, and all you need to do is use their documentation to write HTML according to their standards.
This example shows the web’s beauty and the hard part — there are thousands of these frameworks, platforms, and libraries to build your website. It’s overwhelming to me, so I can only imagine how it feels to a complete beginner.
Why Choose WordPress for Your Website?
At some point along the way, I realized that any website with several pages (i.e., a blog) is a pain to manage with a code editor. WordPress solves that problem by providing an administration system to create pages, posts, themes, accounts, and more.
It is a breeze to control an established website with hundreds or thousands of pages.
That’s where the WordPress database comes in.
One common question I get is some version of this…
“If I create an About page on WordPress, where is that HTML file on the web server?”
It doesn’t work that way.
With WordPress, you install “themes,” the templates that generate a wide array of pages. Then, all of the page content goes into the database.
In the “About” page example, there’s a database entry for that page, with a template generating the front-end display. That template can run many pages.
A theme hierarchy determines which template file takes precedence to output specific pages. The template files are what render the finished HTML on the front end.
Separating the actual page/post content from the design is a beautiful feature because you have a lot more design flexibility with WordPress. You simply switch out your themes to test a completely different design. All of your content is unchanged within the database.
WordPress is nothing more than PHP scripting language on your web server, which interacts with the database to pull and save information.
Remember how we said WordPress is open-source? That means you can inspect every line of code that makes up your themes and plugins. It’s a great way to learn PHP, HTML, CSS, and Javascript.
WordPress 101 Video TrainingWant this helpful free giveaway or training?
Final Verdict — HTML or WordPressNowadays, I always vote for WordPress unless it’s a super simple 1-page website.
Even though I love to code, you must make this trade-off between optimization and ease of use. WordPress makes editing easier with all its tools, especially if you manage multiple websites.
And it doesn’t have to be an either/or situation. Because WordPress is open-source, learn and apply your customizations with code. You’re not limited to your theme’s options.
But the entire point of WordPress is to enable any beginner to make a website without requiring web development skills. You don’t need to know any code to run a WordPress website.
WordPress version 6 and beyond allows non-coders to customize templates with the new “full site editor” feature. This only works with block-enabled themes.
Right now, 3rd-party template companies such as Divi by Elegant Themes or Elementor have solved the problem of drag-and-drop customization. You have the same power as a seasoned website designer or a digital marketing agency with page builders such as these.
Or choose a minimal, free theme. That keeps your website lightweight, both in performance and on your wallet.
Only you can choose the best option for the website vision in your head.
If you select WordPress, here’s a little help to jump-start your progress!
WordPress 101 Video TrainingWant this helpful free giveaway or training?
The post HTML vs. WordPress: Which is Better to Make a Website? appeared first on Website Profit Course.


