
Tim McGiven's Blog, page 7
March 25, 2025
46 Parts of a Website: From Header to Footer and Everything in Between
Ready to build your first website but confused by the technical lingo?
In this post, we’ll provide a glossary of terms you might encounter as you build a website. We recommend bookmarking this page for easy reference—like a pocket dictionary you can return to whenever you encounter an unfamiliar term.
We’ll focus on WordPress websites throughout, but most of the principles and definitions apply to websites built on any platform.
Technical parts of a websiteWebsite hostingDomainsURLs, permalinks, and slugs CDNXML sitemapContent management systems (CMS)Website codeHTMLCSSJavaScriptPHPWebsite metadataTitle tagsMeta descriptionsSchema markup Navigational elementsMenuLinksBreadcrumbsButtonsSharing buttonsHeaderFooterWebsite contentText and copyImagesVideoPage elementsHeadlineTaglineBody contentCommon website pagesHomepageProduct and service pagesAbout pageContact page404 error pageBlogPostsCategoriesTagsContact and content sharingContact formsNewsletter signup formsSocial media integrationsEcommerceCheckout cartsPayment processorsWordPress-specific website partsThemesPluginsPatternsBlocksBackupSecurityReaderBuild your website: Easy as ABCTechnical parts of a websiteEvery website requires a few key technical components. Understanding what each does can help you choose the right location for your site and evaluate different providers.
Website hostingYour site must be stored on physical servers through a website host. Hosting is essentially your site’s place of residence on the internet.
Managed hosting (like the hosting plans we have on WordPress.com!) is often an ideal choice for website owners because they take on an active role in running your website. In the case of WordPress.com, we take care of your server setup and the day-to-day management of your website, including security, uptime, and software updates, all for one flat price.
Get managed hostingDomainsA is a website’s address, like mygroovywebsite.com. Like physical addresses, every website must have a unique domain name.
Domain prices vary depending on the web extension (like .com, .net, .org) and which domain provider you choose, and you can use a domain lookup tool to see what domains are currently available.
WordPress.com offers affordable domains with over 350 different domain extensions and averaging just $13/year!
Buy a domainURLs, permalinks, and slugsSimilar to domains, URLs are the specific page addresses for your web pages. URLs are a version of your domain with added information that tells your computer which page to load.
So if a website’s homepage is mygroovywebsite.com, subpages have additional path information, like mygroovywebsite.com/about, which would load the website’s about page.
Permalinks are permanent URLs that point to a specific piece of content (you can update your default permalink structure on a WordPress site with just a few clicks), while slugs are part of the URL that identifies a specific page (like “about” in our example above).
CDNA content delivery network, or CDN, hosts your website on a system of distributed servers instead of one individual server. By utilizing location-specific servers, a CDN improves site speed by delivering content from a server that’s geographically closer to your visitors. Multiple servers also create redundancy, ensuring your site works even when you have a lot of visitors or if a server goes down.
All WordPress.com plans have a CDN, powered by 28+ data centers across 6 continents, that puts your content as close to your visitors as possible.
XML sitemapAn XML sitemap is a list of all of the crawlable URLs on your website so that search engines (like Google) can index and show them in search results. A sitemap helps search engines better understand your site’s structure and how your content is related.
Content management systems (CMS)A CMS is a tool that helps you build and manage a website without needing to code it from scratch. It provides a user-friendly interface to make it easy to build pages, write posts, and share other content.
What is the most popular CMS in the world? WordPress!
Website code“Code” is a computer-readable direction written in programming languages. Even if you use a CMS like WordPress to build your site, there’s still a bunch of code running behind the scenes to make everything work and run smoothly. There are many programming languages, but some that you’ll most commonly see when working with WordPress are HTML, CSS, JavaScript, and PHP.
HTMLHTML (HyperText Markup Language) defines the content structure of your website. Think of this as a computer-readable version of your website that includes all the page’s core content, including titles, text, lists, buttons, and images.
HTML uses “tags” to define each of these building blocks of your website, like for top-level headings and
for paragraphs.CSSCSS (Cascading Style Sheets) defines the style of your website. It is a design reference glossary for the browser, indicating what fonts, colors, sizes, and other elements to use when displaying your website. The cool thing about CSS is that your site updates automatically everywhere when you change a style in your glossary.
For example, if you have an primary header tag in your HTML, the computer will look to the CSS to see what headers should look like. The CSS might define an as Arial font, bolded, and 36 pixels. Anywhere that the computer sees the on your website, it will show that text in Arial font, bolded, and 36 pixels.
JavaScriptJavaScript controls the interactive elements of your website that move or change on your otherwise static web pages. JavaScript runs on the user’s side to create animations, popups, banners, alerts, and more.
For example, you might use JavaScript to alert users if they didn’t properly fill out a form or to change the screen once they submit it to show them that their response has been received.
PHPPHP (Hypertext Preprocessor) is similar to JavaScript in that it “makes things happen” in real-time on your website. One big difference with PHP is that it runs “server-side,” meaning it changes data or dynamically updates a page’s content before it loads for visitors.
PHP is an open source programming language and the language that powers the WordPress software.
Website metadataMetadata helps search engines identify what kind of content is on your website. This allows search engines to know when your website is relevant to someone searching the web for specific information.
Title tagsA title tag is an HTML element used by both search engines and visitors to understand what your webpage is about. Usually, this is the same as the post or page’s headline or title.
Meta descriptionsMeta descriptions are short paragraphs (ideally 120 to 160 characters) that offer additional information to engines about your content. These often include important keywords and phrases.
These descriptions may appear in search engine results, so it’s important to write strong, clear descriptions to make your website shine.
 Schema markup
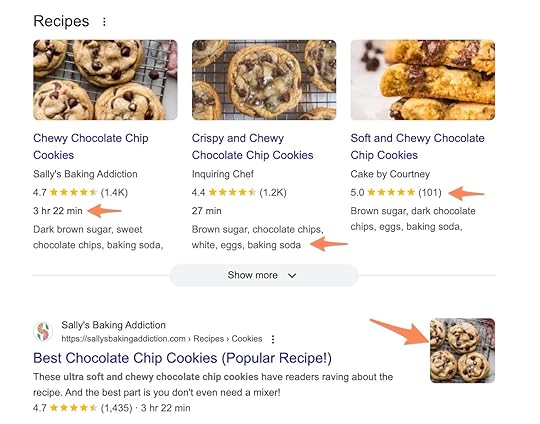
 Schema markup is computer-readable information added to your site’s code to identify different types of content on your webpage. This helps search engines better understand your site’s purpose. Schema markup improves site SEO, contributing important information for search engine snippets and AI-powered search results.
For example, recipe plugins provide search engines with this kind of markup, enabling them to showcase recipes in search results with extra details such as images, ingredients, and cook times.
 Navigational elements
Your website’s navigation elements define how site visitors move across your website. You will likely use a variety of navigation elements across your site to meet the specific goals of each page.
MenuYour menu is the primary navigation tool for your website, linking to its high-level sections. Menu options may vary depending on your template, including primary navigation menus in your header and footer, sidebar menus from specific pages, and dropdown submenus.
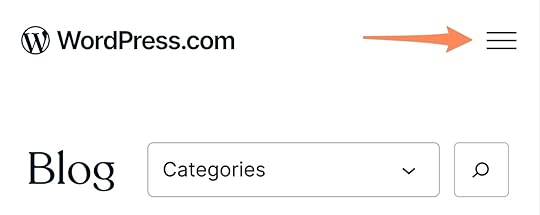
“Hamburger menus” are common on mobile views, where detailed headers can take up too much space. These menus are hidden inside a button instead of always being visible in the header.
 Links
LinksLinks are clickable text that take the site visitor to another page. They may direct users to another page on your site (internal links) or an external website (external links).
They also help search engines better understand the importance of your site pages—when a page has many relevant links that allow users to navigate to it, search engines will understand that it is a valuable page on your site.
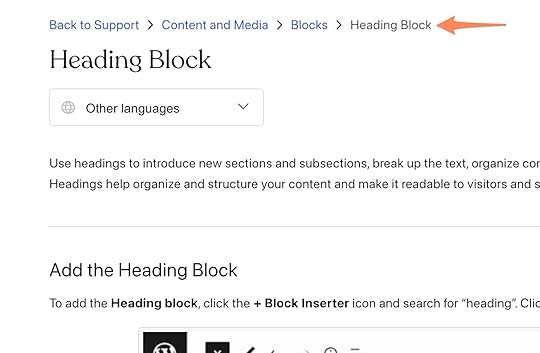
BreadcrumbsSite breadcrumbs show users the “path” they took to reach their current page. For example, on a blog, a user may go from Home > Category > Blog Post.
Breadcrumbs are useful on sites with many layers of interconnected pages like stores, forums, or Wikis.
 Buttons
Buttons are clickable visual elements that encourage users to take a specific action or navigate to a specific page. A site usually has three “levels” of buttons, with the primary buttons being the biggest and brightest, followed by secondary and tertiary buttons for less important navigation items.
Buttons should be strategically placed on your pages to nudge visitors to the most important content or action, such as your storefront or blog.
Sharing buttonsSharing buttons enable site visitors to easily share content from your website on other platforms, such as Facebook, Instagram, or Pinterest. They are a great way to promote your content cross-platform and build your following organically.
Sharing buttons are included for free on WordPress.com with Jetpack.
HeaderThe website header is the content at the top of every page. This section usually includes your logo, site name, tagline, and top-level site navigation (your menu!).
FooterThe footer is the bottom section of your site, visible below your content on every page. It can contain additional information such as website copyright, contact forms, newsletter subscription boxes, physical addresses, social media links, or lower-priority navigation items like your privacy policy or refund policy.
 Website content
Your website content is what makes your website unique. Whether you are a blogger or a virtual store, your content helps you to create a personalized presence on the web.
Text and copyYour website’s text or copy is anything you write or customize, from menu labels to page titles, blog posts, about pages, and more.
Want to learn how to write truly excellent blog copy? Use this blueprint.
ImagesHigh-quality and relevant images are an essential part of any website. You can use your own high-quality images, license images through a stock image company, get free unlicensed imagery from sites like Pexels, or generate images with tools like Jetpack AI.
Check out our WordPress image size guide to ensure your images are optimized for the web.
VideoVideos are widely used on websites because they’re often more engaging than static images. If you have a WordPress site, you can use the YouTube block to easily embed YouTube-hosted videos on your posts or pages.
You can also upload your videos directly onto your site. WordPress.com offers 4K video hosting with VideoPress on the Premium plan and above.
Page elementsSandwiched between your header and footer is your main page. Regardless of the page content or layout, many pages have a few standard parts.
HeadlineYour headline, known in HTML lingo as the , describes what your page is about; this could be something short like “About” or more specific, like the title of your blog post.
You should only ever have one on a webpage.
TaglineA website tagline, similar to a brand tagline, is a short, memorable phrase that explains your site’s purpose. Site taglines are usually displayed in the site header next to or under the site title or logo, in search engine results, and in social media blocks.
Body contentThe body content is the meat of your webpage, located between the header and footer. It is specific to each page and includes all of its content elements, such as text, images, and videos.
WordPress makes it incredibly easy to add different kinds of content to your posts or pages with its block editor. There are many different blocks that come standard with any WordPress site, allowing you to customize your content exactly how you want.
Common website pagesWebsite pages can vary depending on your site’s purpose, but we recommend a few standard page types for every site.
HomepageYour homepage is the first page people will visit on your site, so it’s key that it is visually appealing, explains who you are and what you do, and directs visitors to other important pages across your site.
Product and service pagesBusinesses use product or service pages to explain their products and provide pricing. These pages vary in complexity, from simple text lists to full ecommerce stores.
Some product and service pages are purely informational; others are interactive, allowing users to purchase products directly from the page.
About pageAn about page tells your site’s story, whether you’re an individual or a business. This should cover who, what, and why—that is who you are, what you do, and why you do it.
You may include your personal or company history, awards or accolades, brand values, and individual or team biographies.
Contact pageYour contact page is where site visitors can find information on how to reach you, whether they want to schedule a meeting, contact you via email, or visit a physical location. This can be a simple text page or include forms, maps, and scheduling tools.
404 error pageA 404 error page alerts visitors if they are trying to visit a web URL that won’t load because the page they’re trying to access doesn’t exist. Users may see a 404 if they mistype a URL or try to access a page that you haven’t created on your site. For example, they may try to go to example.com/about-me when your about page URL is actually example.com/about.
You may want to optimize your 404 page to provide assistance to anyone who accidentally sees it with a search bar and links to helpful pages on your site.
 Blog
BlogFor many personal and professional websites, the blog is the heart of your site: this is where you will regularly create and post new content. Unlike standard web pages, a blog is designed for easy, ongoing publishing, engagement, and sharing.
Need to start a blog? Check out our 12-step guide.
PostsA post is a piece of content on your blog. Posts can include text, photos, and videos, but they also have unique elements like status, publish date, author, tags, and categories. These elements enable better navigation, search, and sorting.
Posts can be structured in many different ways, but there are a few common types of posts, including lists, how-tos, personal stories, case studies, features, interviews, product reviews, and news articles.
CategoriesCategories help you catalog and sort your blog posts. Categories split your content into a few high-level buckets. Categories should be broad enough to organize all of your posts but specific enough to be meaningful to your readers.
Category pages serve as an archive for all content grouped together under a specific category.
 Tags
TagsSimilarly, tags group posts together, but they’re more specific ways to describe your content. For example, you may have a “Movies” category and “Adventure,” “Rom-Com,” “Horror,” and “Sci-Fi” tags.
You can use multiple tags on a single post, but to avoid clutter and to ensure your tags are useful for finding relevant content, you should only add tags for keywords that recur frequently across your website.
 Contact and content sharing
There are a variety of reasons people may want to reach out to you through your website. Contact information—whether it’s a public email address, physical address, or form—is an important aspect of any website.
You’ll also want to ensure that you have ways for visitors to stay in the loop with what you’re up to. Whether you’re sending out a regular newsletter to your subscribers or sharing your content on social media, content sharing is a key component of a sustainable brand.
Contact formsContact forms allow website owners to receive messages—like questions, service requests, or feedback—without sharing their email addresses publicly. Visitors put their contact information and requests into a contact form, and the submitted form information is securely forwarded to an email address of your choosing.
There are many contact form plugins available, and the Form block is free to use for WordPress.com users with Jetpack.
Newsletter signup formsNewsletter signup forms allow site visitors to sign up for your newsletter. These forms have inputs for a visitor’s email address and sometimes their name, and then this information is added to your mailing list.
Subscribe blocks are available out-of-the-box for sites hosted on WordPress.com. Plugins are also available for third-party newsletter providers.
Social media integrationsSocial media integrations allow you to connect your blog to your social media platforms. Once these integrations are in place, you can easily pass content back and forth between your website and your social media platforms, posting directly from your blog to your social media sites or embedding your social media feeds directly on your website.
EcommerceAn ecommerce website sells goods or services online. WooCommerce, an open source plugin, is a sister company to WordPress.com. This plugin adds key ecommerce features like product pages, shopping carts, and payment processing to your site.
Checkout cartsCheckout carts are virtual shopping carts that allow visitors to select or save products they want to buy in one place. Checkout carts enable users to keep track of their items and buy multiple products in one transaction.
Payment processorsIn order for site visitors to be able to make a payment online, you need to use a payment processing software to securely accept credit card information and finalize payments.
For sites hosted on WordPress.com, you can easily collect payments through Stripe, the Paid Content block, and PayPal.
WordPress-specific website partsWordPress websites have their own internal language for different aspects of your site. If you use WordPress as your CMS or WordPress.com for hosting, these terms will help you better understand the tool and all that’s possible with it.
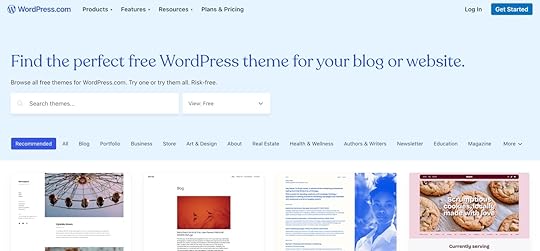
ThemesWordPress themes are professionally designed templates that you can install and customize. Themes make it simple to start with a base design you really love to then make your own with fonts, colors, images, text, and layouts.
WordPress.com has many different themes available to suit every website’s needs and visual style, including free themes and paid third-party themes. You can also install your own third-party themes on the Business plan and above.
 Plugins
Plugins are like apps for your website—they extend your site’s functionality and features. The WordPress plugin library offers free and paid plugins for security, SEO, marketing, forms, and more.

All WordPress.com users receive free essential functionality through the Jetpack plugin, with additional Jetpack features available at higher tiers. Third-party plugins can be added to sites on the Business plan and above.
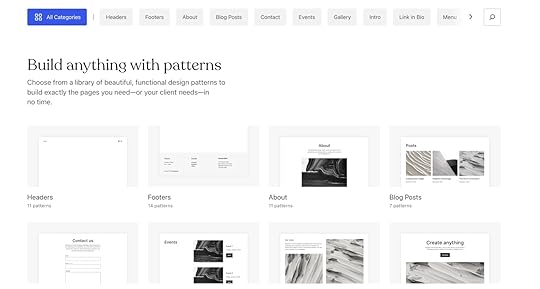
PatternsPatterns are professionally designed page layouts for commonly used web pages, like about pages, photo galleries, storefronts, and contact pages. Patterns use a series of WordPress blocks to build eye-catching layouts that are easy to customize.
 Blocks
Blocks (aptly named) are the building blocks of your WordPress website. Blocks are drag-and-drop elements that you can add to any post or page. There are around a hundred unique block types available for text, media, formatting, embedded content, theme-specific designs, forms, and more, with new block types added regularly.
With WordPress.com, you get even more with Jetpack-enabled block types.
BackupSite backups save previous versions of your website so that you can easily revert your site if something breaks. This can be useful when adding or updating plugins or updating your WordPress version or theme. WordPress.com offers backups with VaultPress on the Business plan and above.
SecurityWeb security is essential to ensure that both your data and your visitors’ data are protected. Security features include general site security to verify your website and block phishing or spam attacks, user-based permissions, and domain privacy to protect your personal data.
One benefit of using a managed hosting provider like WordPress.com is that many core security features—like automatic updates, SSL certificates, firewall protection, brute force attack prevention, downtime monitoring, and vulnerability scanning—come included, providing peace of mind for non-technical professionals.
ReaderThe Reader is an aggregator from WordPress.com that compiles content from Jetpack-enabled WordPress sites. Your Reader feed will show every post from the blogs you follow in one place. You can also explore new blogs or be discovered by other readers in searches that utilize categories and tags.
Build your website: Easy as ABCIf you’ve read through this entire post, congratulations! You’re essentially a web development linguist. If you’re still looking to get oriented, WordPress.com has tons of additional resources for website builders on our blog, guides, and forums.
WordPress.com is built to support website owners of all levels, so you can feel confident that we’ve got your back as you dive into the exciting world of building your own website. Get started with WordPress.com today:
Build your site on WordPress.com

March 21, 2025
What is a Domain Name? A Beginner’s Guide to Website Domains
A domain name is what you type into your browser address bar to access a website. It usually consists of the name of the website or business and a domain extension like .com or .net.
Domains make the internet as we know it possible and are an important piece of your website’s overall branding. But you may be asking yourself:
How do domain names actually work? Why do they matter?How do I get one?We’ll answer all of that (and more) in this beginner’s guide to website domains.
What is a domain name?A domain name (or simply “domain”) is your website’s address on the web. google.com, wikipedia.com, and wordpress.com are all domains.
A domain can have many pages and URLs—such as https://wordpress.com/blog/—but the domain name itself is only the name plus its ending.

Besides hosting, domains are the second-most important element to make a website available online.
But did you know that domains are only placeholders? They are stand-ins for IP addresses, which look something like this: 192.0.2.1.
IP addresses are like home addresses for devices on a network, helping them find and communicate with each other. On the internet, this usually means a server—a computer that stores and shares websites so people can visit them.
In theory, you can also access a website if you know its server’s IP address, but those numbers are much harder to remember, and the IP address can also change over time. That’s why we use domain names—they’re a more human-friendly way to access information across the internet.
Domains work because of the Domain Name System or DNS—a network of specialized servers that function as the internet’s phone directory.
So when you type a domain name into your browser, here’s what’s actually happening:
Your browser asks a DNS service to find the website’s IP address.The DNS service looks it up and sends the IP address back.Your browser connects to that server and requests the website files.The server sends the files, and your browser displays the website.All of that happens automatically in the background and makes the web so much easier to use and explore.
What are domain names used for?While domains mostly exist to allow visitors to reach your site, they also fulfill other roles.
For one, a domain name gives you ownership. With your own domain, you can stake a claim on your part of the World Wide Web and display whatever you want at that location.
A domain name is also part of your site’s and company’s branding. It makes your website more recognizable and memorable. Your domain is what people will know you by and what differentiates you from the competition.
If the domain aligns with your business name and purpose, it provides consistency and reassures visitors that they are in the right place when they’re looking for information about you, your company, or your products.
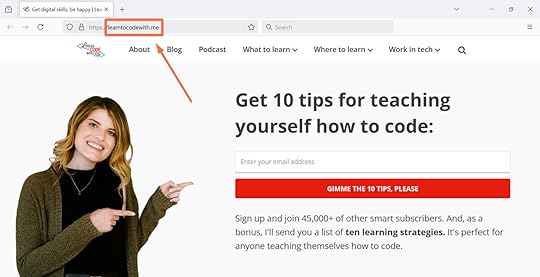
Besides that, a domain name often describes what your website is offering, what it is about, and where it’s located. For example, if you see a domain name like gluten-free-gutenberg.com, you can safely guess that its content will have something to do with gluten free foods, cooking, or recipes. The website learntocodewith.me is another example where the domain name sets clear expectations for the intended audience.
Finally, having your own domain name is an important sign of credibility. Customers take a business with its own domain more seriously than one using a subdomain of another service. This establishes trust and makes it more likely that visitors will use your site and do business with you.
It’s like the difference between using a Gmail address as your corporate email address and one with your business name in it—one simply appears more legitimate.
Plus, once you have your own domain name, you can use it in your email address and send branded messages.
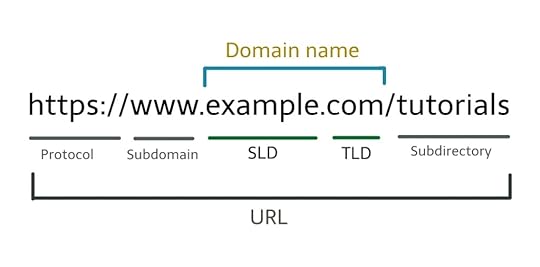
What’s the difference between a domain name and a URL?A URL or “Uniform Resource Locator” often includes a domain but can have many more elements. Have a look at this example:
https://wordpress.com/blog/2025/01/29...
Let’s break down each element, the domain being only a small part of the full URL:
Let’s break down each element, the domain being only a small part of the full URL:
Protocol: https://Domain: wordpress.comPath: /blog/2025/01/29/how-to-make-a-websiteHTML anchor: #give-your-website-a-voiceURLs can contain even more components, and you can read Mozilla’s guide to URLs for details.
What are the parts of a domain name?So you understand parts of a URL, but how about parts of a domain?
Domains consist of several components, typically separated by periods. They range from general to more specific identifiers.
Let’s discuss each part in detail:
Top-level domainThe top-level domain (TLD) is commonly referred to as the domain name extension. In the case of wordpress.com, the TLD is .com.
It’s one of the most important parts of a site’s domain because it can tell a lot about a website. For example, .com points to commercial sites, and .org points to sites belonging to an organization.
Common domain endings are called “generic top-level domains” or gTLDs, but there are now hundreds to choose from. Some are industry-specific, like .agency, .pizza, .club, .design, .blog, or .business. They even exist for brands (e.g., .google), types of businesses (e.g., .realestate), and geographic locations (e.g., .nyc or .paris).
That said, .com is by far the most popular gTLD:
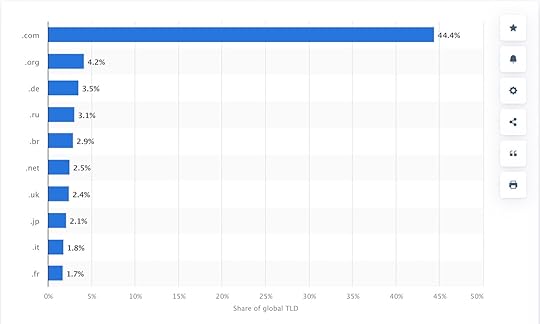 The popularity of TLDs from Statista.
There are also country code top-level domains (ccTLDs), such as .de for Germany, .mx for Mexico, or .se for Sweden. They signify which country a business or organization serves or resides in. Global brands also use ccTLD for a country-specific web presence.

Combinations of general and country-code top-level domains also exist, such as .co.uk and .com.au. Some TLDs have requirements for use, like requiring a specific language on the site.
Finally, some top-level domains are reserved for institutions like US government agencies (.gov), schools (.edu), or military organizations (.mil).
Tip: We offer over 350 top-level domains on WordPress.com! Find your new domain name here.
Second-level domainThe word or phrase to the left of the TLD is called a second-level domain (or SLD). The SLD usually contains your brand name and is the first point of association potential visitors have with your brand or blog’s name.
For example, if your domain name is open-sauce.store, visitors will probably expect to be able to buy sauces from an online or brick-and-mortar storefront.
Your SLD can have anywhere from one to sixty-three characters and can contain only the letters A through Z, digits 0 through 9, and the - character (which may not be first or last).
Picking a good name for your website is a science in itself, which is why we have a separate article on you can refer to for help.
Third-level domainAs you can probably guess, you have to go one step further to the left to find a third-level domain. Most of the time, if there is one, it will be a subdomain, the most common being www. You also frequently see third-level domains like developer.wordpress.com.
Tip: If you sign up for a free WordPress.com plan, your website will be located on a domain like example.wordpress.com.
There are also third-level domains, such as ftp or mail, that let you reach an FTP or email server. Some websites also use subdomains for different language versions of their site, like es.wikipedia.org.
All of that being said: You don’t have to have a third level to have a functional domain.
You could theoretically continue like this, and it is possible to create a 45th-level domain—but it’s very hard to imagine a use case for a domain name like that.
Who manages domain name registrations?Several organizations are in charge of organizing how domains are used.
At the top are the Internet Assigned Numbers Authority (IANA) and the Internet Corporation for Assigned Names and Numbers (ICANN). They are non-profit organizations that create and implement domain name policies.
Their job is to decide what domain endings are available and to maintain the technical infrastructure that makes the domain system possible.
That said, these organizations are not who you interact with when you want to get a domain name for yourself; you’d turn to a domain registrar instead.
Where can you get a domain name?Domain registrars are businesses that have contracts with ICANN and IANA and are allowed to register domains on their behalf. They also handle records and renewals, provide customer support, and transfer domains to other registrars.
There are many domain registrars, and WordPress.com is one of them! You can use our services to register your desired domain, even if you don’t host your website with us.
Here’s how to find your perfect domain name on WordPress.com:
Start by using our domain finder tool. Type in your desired domain name to check its availability and price.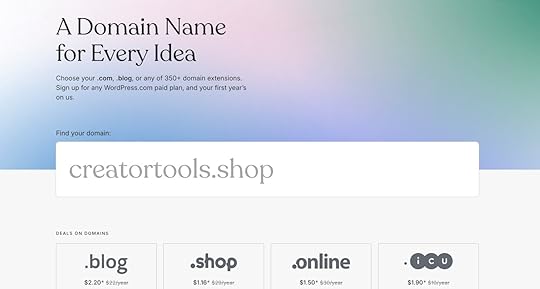 If the name you typed is already registered to someone else, the tool will make recommendations for alternative options.
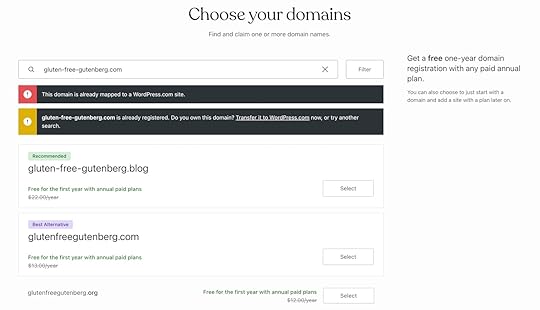 Once you choose a domain, simply add it to your shopping cart and go through the buying process.
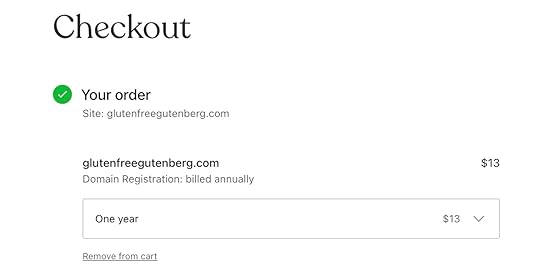
If you sign up for an annual hosting plan on WordPress.com, most domains are free for the first year.
Regardless of which WordPress.com hosting plan you choose to go along with your domain, you’ll love that everything—security, backups, performance, and support—is included for one price. There are no hidden fees or visitor limits; it’s just WordPress hosting done right.
How much do domains cost?Most domains cost less than $30 per year, and your domain payment will renew each year unless you cancel. The most commonly used extensions—like .com, .net, and .org—average just $13 per year on WordPress.com.
How can you keep your domain name secure?Since a domain name carries a lot of business value, keeping it secure is an absolute priority. Ensure you’re setting yourself up for success as you choose your new domain by:
Selecting a reputable registrar, such as WordPress.com.Keeping your contact information and personal details for the registered domain as private as possible. At WordPress.com, your domain comes with free privacy protection.Never sharing your domain registration login information.Watching out for phishing emails requesting login credentials. Most domain registrars never ask for this information.Enabling two-factor authentication, ensuring that a code is sent to you via phone or email for additional login protection.One final thing to remember is that if your domain payment doesn’t renew, your access to it will expire.
You can’t own a domain forever (but you can buy one for the next 100 years). When you purchase a domain, you acquire the exclusive usage rights to use it for a certain period of time. Extending your registration is possible as long as you want, but if you ever let it expire, your domain will go back on the market.
To prevent that from happening by accident:
Set your domain to renew automatically.Ensure your payment information is up to date.Keep your current email address on file so you don’t miss email notices from your domain registrar about expiring domains.If you accidentally let your domain expire, registrars are obliged to offer a grace period of at least 30 days to allow you to recover it before it is offered for sale to a new owner.
Final thoughts on domainsA domain is a core part of owning a website. It represents your site and business and gives you a slice of the internet where others can find and interact with you.
For that reason, take your time to decide on your domain name. Once you are ready to claim it, make sure you go with a domain registrar you trust. We’d be happy to help you register your domain name today.
Register a domainMarch 20, 2025
What Is Headless WordPress (And How Do You Use It)?
Headless WordPress is transforming how developers and businesses use WordPress by decoupling content management from front-end development.
In a Headless setup, WordPress acts purely as a CMS that exposes content via an API, allowing you to choose any front-end technology to power the user-facing site or app.
That means you can build a fully static frontend, use server-side rendering, or take a hybrid approach—all using a Headless setup. You can also use any framework or library that can fetch data from an external API, including React, Vue, Astro, Next.js, or a static site generator.
More advanced use cases of Headless WordPress include ecommerce sites, SaaS applications, and mobile apps powered by WordPress. An example you might be familiar with is the Jetpack mobile app.
So how do you know if your project would benefit from a Headless WordPress setup? And how exactly do you connect all the pieces? Read on:
Decoupled, but not disconnected: What is Headless WordPress?Before we dig deeper, let’s look at how WordPress typically handles a request from a user:
In a traditional environment, WordPress handles the entire stack—content management and the presentation layer.
At a high level, a typical request from a user may look like this:
A user requests a page on your website.The request goes to WordPress via NGINX, where we load wp-config, settings, plugins, and the active theme.The requested page/post is determined, and data is queried from the database.From a template hierarchy, the specific templates are determined (page.php, single.php, etc.).The template loads the header, content, footer, and other necessary parts.WordPress outputs the HTML and sends it to the browser, where it is rendered for the user to see and interact with.There are many similarities between a Headless site and a regular site. However, for a Headless site, your frontend needs to relay requests to WordPress’s REST API (or GraphQL) endpoint, and it is up to the frontend to assemble and serve the generated HTML.
For a Headless site, a request would look more like this:
A user requests a page on your website.The front-end application (e.g., Next.js, Astro, or another framework) may relay this request to WordPress via the REST API or the GraphQL endpoint. This may be unnecessary because the HTML could already be generated if we’re doing a fully static build or if the response is already cached.The request would go to WordPress, which is similar to a more traditional setup.WordPress will invoke the REST API Router (for REST), or WPGraphQL will parse the query.The database is queried.JSON is generated and returned to the front-end application, which handles the JSON return data (e.g., updating the local state, re-rendering the DOM, etc.).Headless refers to any WordPress build in which WordPress acts as the content layer while the frontend is served separately. There are many ways of doing this, and it will work differently across different applications.
Some frontend applications will use server-side rendering (SSR), where the markup is generated via a node server (and cached). Many frameworks have “adapters” for this, such as Astro’s Cloudflare adapter, which abstracts the SSR logic away from you.
Some Headless sites are fully static, leveraging static site generation (SSG), where the WordPress backend is only used to generate the site’s HTML files. Once the site is built, the WordPress API is no longer needed until the next update (like when you publish a new blog post or edit an existing page) triggers a rebuild. That means every time you change your website or content, the site will have to be rebuilt (either entirely or partially via “partial SSG”).
When the site is live, all the HTML/markup is already built, and users are being served those static HTML files.
The build method you choose depends on the project and what is most efficient for your use case. For example, can you pre-render this page ahead of a user’s request? If so, SSG is likely the best fit.
This is also a good time to research the host where you plan to host your front-end application, review their documentation, and see what adapters or workflows exist.
For example, WordPress.com provides a managed, scalable, and secure WordPress environment for sites of any size. This eliminates many of the infrastructure headaches associated with a self-hosted WordPress setup. You have all the features needed for custom WordPress builds, knowing everything is handled.
Using the Business plan, you have a perfect starting point for your Headless build with full access to developer features like GitHub deployments, real-time backups, and SSH.
Using GraphQL or the WordPress core REST API?WordPress includes a built-in REST API, which is widely supported by third-party and community plugins. The API is also used in WordPress core code and in Gutenberg.
The REST API allows users (logged in and logged out) to perform common CRUD operations on posts, pages, media, and other entities, depending on their access level.
In your front-end code base, you can opt to use the REST API, or if you prefer, you can use the WPGraphQL plugin, which allows you to perform the same operations via GraphQL queries.
Many developers building Headless WordPress sites use GraphQL alongside modern frameworks like Astro, Next.js, or Nuxt.
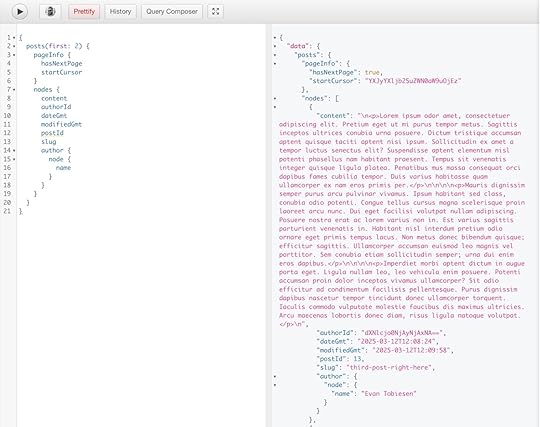
With GraphQL, we can request only the fields we need and retrieve related data via nested queries. For example, we can use one query to fetch a post and its author with the name and avatar image URL:

A similar call to /wp-json/wp/v2/posts?slug=hello-world will give us many more fields. As you can see below, while the REST API does give us the author ID, we cannot get the avatar URL by default from the same request.

On the other hand, the WordPress REST API is supported out of the box, with no configuration needed. This has led to a larger ecosystem where plugins provide their endpoints via the WordPress REST API (one example is WooCommerce).
I encourage you to check out both and see which will work better for your project.
Who thrives with Headless WordPress?Headless WordPress is often adopted by agencies and developers who want complete control over a site’s frontend. It uses the time-tested and securely managed backend of a managed WordPress host like WordPress.com.
Some other use cases include:
Enterprises and high-traffic websites: Headless WordPress is best for organizations that need a scalable content management system without the hassle of server management.Media and content-heavy platforms: Publishers who need fast, API-driven content delivery across multiple channels may opt for a Headless WordPress setup.Ecommerce and SaaS applications: Businesses integrating WordPress content with custom storefronts, web apps, or mobile apps may find a Headless setup more suited to their needs.You can gradually adopt a Headless setup or integrate it into your WordPress site by interacting with the WordPress REST API from within your theme.
Are there any drawbacks to choosing a Headless setup?After reading the above, it may seem that Headless WordPress is always the best option. However, like anything else, a Headless WordPress setup has benefits and drawbacks.
For many projects, especially if you’re not a developer, relying on WordPress for the whole stack makes more sense. With this more traditional WordPress setup, you still have a lot of ways of adding interactivity via the block editor and the Interactivity API. Plus, everything just works using a traditional WordPress setup because the software is so powerful as-is.
A Headless setup comes with some potential drawbacks, including:
More maintenance work: Two separate codebases and technologies powering the front-end and back-end create complexities that you don’t have to deal with when using a traditional WordPress setup.The wide selection of themes, patterns, and design functionality WordPress is known for will be largely unavailable: You will be responsible for implementing much of this from scratch with code. How will you handle blog comments? How about contact forms? This functionality is built into the WordPress software to make it easier for end-users to implement.Not all plugins support Headless setups: You may have to extend plugins or manually expose plugin data to the REST API or GraphQL. Managing two hosting environments: You’ll need one environment for the WordPress backend and one for the frontend. For many sites, the frontend can be hosted as static files on the edge using technologies like GitHub, AWS Cloudfront, Cloudflare, or several other static file hosts.Things to keep in mind before opting for a Headless siteStill not sure if a Headless WordPress setup is right for you? Consider the following:
Custom code and experiences: A Headless build requires developer time and technical decisions tailored to your project. You should ask yourself if the flexibility of Headless architecture is really necessary for your project.Technology familiarity: Are you or your team more used to working with PHP or JavaScript?Your project’s goals: While Headless sites offer more flexibility and may increase performance (plus they’re unique, challenging, and fun sites for developers to build), these projects often require increased complexity and more time spent on development.WordPress’ under-the-hood tech: Without WordPress’ built-in caching and optimization features, you’ll need to implement these yourself using a caching layer or service.Cache strategies: With an optimized caching strategy that integrates CDN edge servers with server-side caching—such as Varnish, NGINX FastCGI cache, or a WordPress caching plugin—a WordPress site may achieve performance levels comparable to a static site.WordPress is SEO-friendly out of the box: With a Headless strategy, you must ensure that the front-end handles SEO properly. This would involve SSR or SSG, which is already supported in common front-end frameworks. You would also need to fetch SEO data from WordPress (such as whether a page should be indexed, its SEO title, and its metadata). Redirects must also be appropriately handled, as you’ll lose the built-in WordPress permalink handling with a Headless setup.RSS feeds and sitemaps: With a Headless setup, this functionality may need to be coded and served from the frontend; it is already provided in WordPress core (and Jetpack if you’re hosting on WordPress.com).Your Headless WordPress roadmap: Getting startedSo Headless WordPress is right for your project? Here’s a quick getting started guide to help you out.
Preparing the backend: Plugins and site setupThe first thing you need is a WordPress site.
Tip: WordPress.com’s Business plan or above provides a managed, scalable, and secure WordPress environment for sites of any size.
WordPress.com eliminates many of the infrastructure headaches associated with a self-hosted setup. You have all the features needed for custom WordPress builds, knowing everything behind the scenes is handled. Using WordPress.com, you have a perfect starting point for your Headless build with full access to developer features like GitHub deployments, real-time backups, and SSH.
If you want to just test a few things and follow along with this tutorial, you can also use WordPress.com’s free and open source local development environment, Studio, to spin up a local WordPress installation.
WordPress ships with a REST API, but as mentioned above, many developers opt for the WPGraphQL plugin when building Headless sites, which allows us to add a GraphQL endpoint to your WordPress site.
If you opt to use the REST API instead, you can start without installing any plugins.
Creating a content structure for API consumptionLet’s consider a WordPress post or page. We have a title, an ID, a slug, a featured image, and a few more fields. However, most posts have rich content added via the editor, which makes up most of the post content.
For this reason, the post content from the block editor may vary significantly between posts.
On the other hand, content like WooCommerce products or a custom post type with custom fields (for example, a post type defined with Secure Custom Fields) may have many more meta fields and little or no content from the block editor.
Why does this matter? The structured meta fields, such as the post title, are easier to handle when pulling content from WordPress. We have a pretty good idea of how it will look and what data we’ll find there.
The block editor content, on the other hand, is a large string of text containing blocks and nested blocks. We have less control over this content and can make fewer assumptions about its shape.
The simple way to handle block content is to set it directly as HTML in a div on the frontend. This will give you the same CSS classes and markup as the WordPress post, and you can style these in your front-end app or import the block styles as part of your build process.
Another approach is to fetch the Gutenberg block markup, recursively parse the content, and map the blocks to corresponding components on your frontend. For example, a Gutenberg block, like an image, can be parsed to an equivalent .tsx or .astro component in your front-end code.
While it gives you more flexibility, it also means you must write a new component for every block you plan to use.
This is also where you should consider what data you need from WordPress. Some use cases may only require fetching posts, while others need menus, SEO data, and user information.
Contact forms or comment submissions may also need to be returned to WordPress via REST requests unless you plan to handle them differently.
Fetching dataOn your WordPress site’s dashboard, head to the WPGraphQL area. You’ll see the GraphQL IDE, which is where you can start interfacing with WordPress via GraphQL.
Tip: If you’re unfamiliar with GraphQL, check out the WPGraphQL docs.
It’s easy to build complex queries with clauses, pagination handling, and nested data while seeing the output instantly in the admin using the IDE.
 Building the frontend
Once we can fetch data from the backend, either via REST or GraphQL, we can start translating this logic to our frontend.
Astro is a good option, and I added some notes on the integration below.
Due to the variety of sites, use cases, and frameworks, this is by no means a complete tutorial on how to build a WordPress-powered Astro site. Still, the steps are general enough that they will apply to most similar frontend frameworks and give you an idea of how to get started.
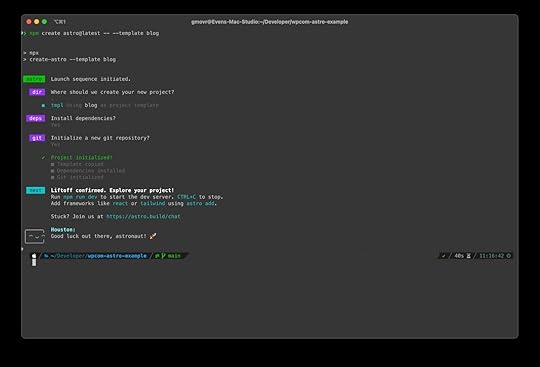
You can start a new Astro project by running the following in your terminal:
npm create astro@latest -- --template blogThis will give you the latest version of Astro with prebuilt blog templates. By default, this blog is powered by Astro’s content collections and will render markdown (and MDX) from .md and .mdx files stored in the frontend repository.
In addition, we’ll need a few dependencies for interfacing with WordPress via GraphQL:
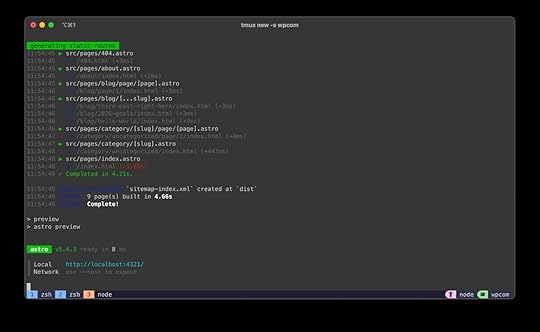
npm install graphql-request graphqlLet’s start our project to see what we’re working with by running npm run dev. From the terminal output, we can see that the site runs on localhost:4321.

Our current Astro site renders content from files in the src/pages directory, where the [...slug].astro is dynamic and responsible for parsing and rendering the markdown files inside the src/content/blog directory.
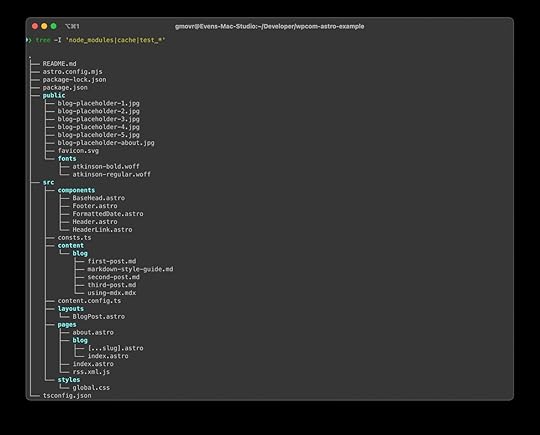
Since we’ll get our content from WordPress, we can remove the src/content directory and the content.config.ts file.
In src/consts.ts, define a new constant for your site’s WPGraphQL endpoint. Reminder: This can be a live site or a local Studio site.
// Place any global data in this file.// You can import this data from anywhere in your site by using the `import` keyword.export const SITE_TITLE = 'Astro Blog';export const SITE_DESCRIPTION = 'Welcome to my website!';export const WORDPRESS_API_URL = 'https://astroheadlessbuild.wpcomstagi...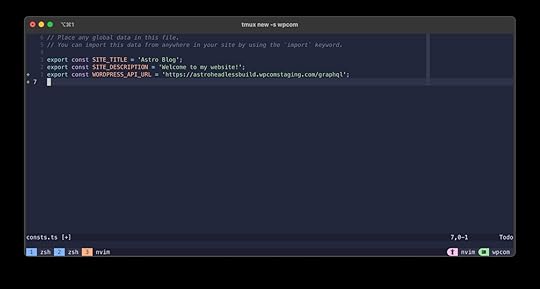
We already know we need to get all posts, the slugs, and a single post given a slug. As we progress, more queries will likely be required. Category, tag, and author pages already come to mind.
We can create a new file at src/lib/graphql.ts.
Any query you need can be added and exported from this file. The IDE inside the WPGraphQL admin page is a great place to experiment and write new queries. Let’s add one to fetch all our posts for now:
import { GraphQLClient } from 'graphql-request';import { WORDPRESS_API_URL } from '../consts';// Create a GraphQL client instanceexport const graphQLClient = new GraphQLClient(WORDPRESS_API_URL);// Query to get a list of postsexport const GET_POSTS = ` query GetPosts($first: Int, $after: String) { posts(first: $first, after: $after) { pageInfo { hasNextPage endCursor } nodes { id slug title date excerpt featuredImage { node { sourceUrl altText } } } } }`;Using the fetched data in our frontendIn Astro, we’re opting for a static build. Because of this, we must tell it which pages to build for us.
We can modify the [...slug].astro file with getStaticPaths, allowing Astro to know all the possible URLs/paths at build time.
It also allows us to use the data directly in the template:
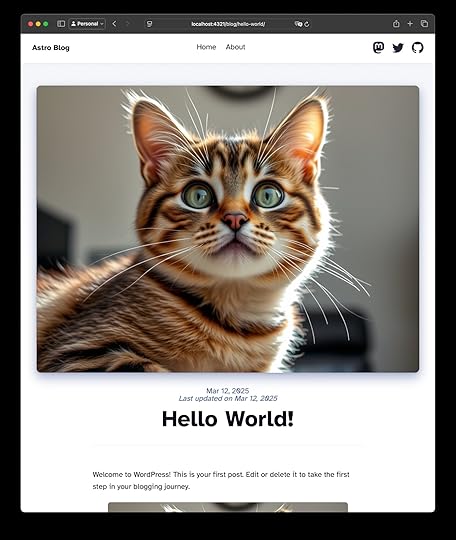
import { graphQLClient, GET_POSTS } from '../../lib/graphql';import type { WordPressPostsResponse, WordPressTerm } from '../../lib/types';import BlogPost from '../../layouts/BlogPost.astro';import { formatDate } from '../../lib/utils';export async function getStaticPaths() { const allPaths = []; let afterCursor = null; let hasNextPage = true; while (hasNextPage) { const response: WordPressPostsResponse = await graphQLClient.request(GET_POSTS, { first: 10, // Fetch in batches of 10 after: afterCursor, }); allPaths.push( ...response.posts.nodes.map(post => ({ params: { slug: post.slug }, props: { post }, })) ); hasNextPage = response.posts.pageInfo.hasNextPage; afterCursor = response.posts.pageInfo.endCursor; } return allPaths; // Return an array as required by Astro}const { post } = Astro.props;if (!post) { return Astro.redirect('/404');}// Format the post data to match the BlogPost component propsconst postData = { title: post.title, description: post.excerpt.replace(/]*>/g, ''), // Strip HTML tags pubDate: formatDate(post.date), updatedDate: formatDate(post.date), heroImage: post.featuredImage?.node.sourceUrl || undefined,};// Get the post contentconst content = post.content || '';// Get additional post metadataconst author = post.author?.node;const categories = post.categories?.nodes || [];const tags = post.tags?.nodes || [];We can now run npm run build && npm run preview, which will convert all our static paths (e.g., blog posts) into HTML files and serve the static files from a local dev server:
 Final thoughts: Going Headless with WordPress
In this post, we’ve covered the pros and cons of Headless WordPress, how to fetch data from our WordPress.com backend, and how you can quickly get started with a new Headless frontend in Astro.
Although my example is a very simple site, WordPress.com offers a robust, low-maintenance backend for Headless sites of any size, whether it is an ecommerce site, an app, or a content-heavy site.
Our managed infrastructure, security, and API-first capabilities make WordPress.com an excellent choice for businesses and developers looking to scale.
Go Headless with WordPress.comMarch 19, 2025
Local WordPress Development Workflows Using Studio
A reliable local WordPress environment is essential for any developer, whether you’re building themes, plugins, or entire sites. While many tools for local WordPress development exist, Studio by WordPress.com has quickly become my go-to. It’s particularly popular among developers with websites hosted on WordPress.com.
In this post, I’ll cover Studio’s key features, share common workflows I use when developing WordPress projects, and look ahead at new features coming in 2025. Whether you’re new to Studio or looking to optimize your workflows, there’s plenty to explore.
What is Studio?Studio architecture: A closer lookDevelopment workflowsThe ideal local development workflowPlugin and theme developmentDeploying plugins and themesFull site developmentPreviewing and deploying a full siteWhat’s next for Studio?What is Studio?Studio is a free tool designed to streamline local WordPress development, no matter what you’re building. It integrates seamlessly with sites hosted on WordPress.com but is available to any WordPress developer, regardless of hosting provider. As an active open source project on GitHub, Studio continues to evolve with contributions from the WordPress community.
 Studio architecture: A closer look
Launched in April 2024, Studio is a relatively new addition to the local development ecosystem. Unlike more traditional setups, it runs on WordPress Playground and uses an SQLite database by default, rather than MySQL, making it lightweight and simple to use. While tools like wp-env offer a flexible, command-line-based approach, Studio provides a more user-friendly experience, similar to how GitHub Desktop simplifies Git workflows. Studio also doesn’t require any external dependencies, unlike wp-env, which requires Docker.
Under the hood, Studio is an Electron app that leverages WordPress components and Tailwind CSS, ensuring a modern and intuitive graphical user interface (GUI). For a deeper look into its development, check out these posts from the Studio team:
Maintaining High Performance in Our Local Development App for Enhanced UXUsing WordPress Components and Tailwind CSS in StudioHow Open Source Collaboration Enhances StudioStudio is compatible with macOS and Windows, and there is an open request for Linux support. While you don’t need a WordPress.com account to use Studio, logging in grants access to advanced features such as the AI Assistant, Preview Sites, and Studio Sync (the last two will be covered later in this post).
Development workflowsIf you’ve used other local development tools with a GUI, Studio will feel familiar. You can create and manage multiple WordPress sites within the app. New sites are stored in a dedicated ~/Studio folder inside the user directory on your machine, and you can customize the local path of each site to fit your workflow.
I recommend creating a new Studio site when starting a WordPress project. Having separate local sites makes it easier to test themes, plugins, or site configurations.
To set up a Studio site:
Open the Studio app and click “Add site.”Choose a name for your site.(Optional) Toggle “Advanced settings” to select a custom local path, WordPress version, or PHP version and choose a custom domain.Click “Add site.“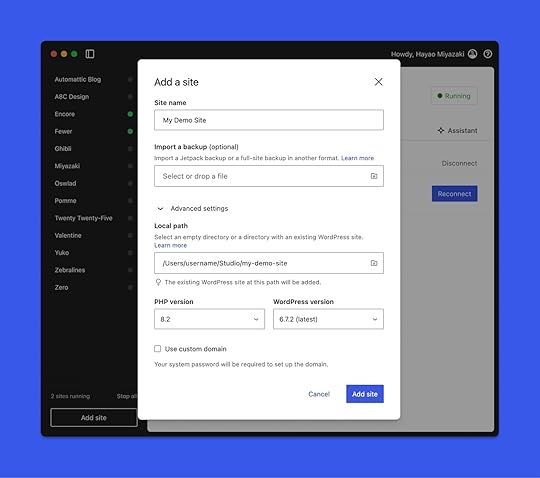
Tip: Refer to Studio’s official documentation for a more in-depth overview of its functionality.
The ideal local development workflowThe ideal workflow depends on what you’re building and how you prefer to work.
Plugins and theme development often require a different approach than building an entire site, especially when using Studio’s built-in features like Preview Sites and Studio Sync, or leveraging additional WordPress.com developer tools.
Therefore, I’ve outlined two common approaches below:
Plugin and theme development: I’ll share best practices for building and testing within Studio, using Git for version control, and deploying to a WordPress.com site using GitHub Deployments.Full site development: I’ll cover how to structure a complete website build, share a preview with clients and colleagues, and sync to a live site on WordPress.com.These workflows are not one-size-fits-all, and I encourage you to adapt them to suit your needs.
Without further ado, let’s dive in:
Plugin and theme developmentOne reason you might need a local WordPress environment is to develop plugins and themes. To begin building, you’ll first need access to the site’s themes or plugins folder.
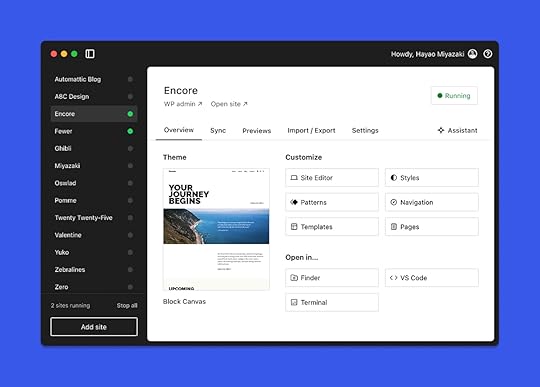
Open the Studio app if you haven’t already done so. Navigate to the Overview tab of your Studio site, then under “Open in…,” click Finder (macOS) or File Explorer (Windows). This will open the site folder on your computer.
Inside the site’s wp-content folder, locate either the themes or plugins folder, depending on what you’re building.
Create a new folder for your project in the appropriate location and open it in your preferred code editor. Visual Studio Code (VS Code) is a popular choice, but Cursor and Windsurf are worth exploring if you’re looking for AI-powered assistance.
Tip: Want to see what building with one of these AI-powered code editors can look like? See how my colleague built a content calendar for WordPress.com.
Some developers prefer opening the entire site folder in their editor, while others work solely within their project directory. I prefer the latter, but either approach works.
Here’s the file structure for an example plugin inside a Studio site:
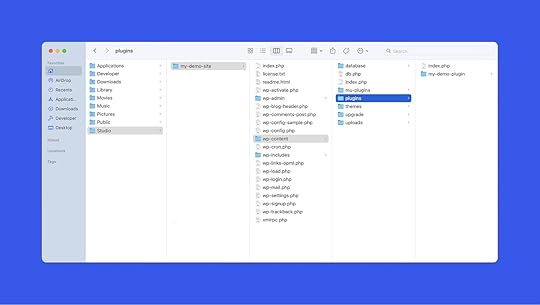
At this point, you’re ready to start coding. While this post doesn’t cover the full process of plugin or theme development, here are some useful resources:
Learn WordPress : These are free courses on WordPress development. Build your first block : This is a complete tutorial on how to build a WordPress plugin that initializes a custom block. Block Editor Handbook : The official documentation for building plugins that adds functionality or extends the Editor in WordPress is a great resource to keep bookmarked while you develop. Theme Handbook : This handbook serves as the official documentation for developing WordPress themes.Once your project files are set up, your theme or plugin will automatically appear in the Appearance or Plugins section of your Studio site’s admin dashboard. Activate it, test your work, and iterate as needed.
Deploying plugins and themesWith your WordPress plugin or theme complete, the next step is deploying it to a live site.
There are many ways to do this, depending on the project’s purpose. If you’re releasing a public plugin or theme, hosting it on WordPress.org is an option. However, many projects are built for specific use cases, such as client work or private sites. In these cases, the code is often stored and managed in GitHub, Bitbucket, or other online version control services.
Version control is a core part of modern development, providing a structured way to track changes, collaborate, and roll back to previous versions when needed. Whether working solo or with a team, maintaining a Git repository ensures a reliable and scalable workflow.
Beyond organization and collaboration, version control also simplifies deployment. Many WordPress hosts support Git-based deployments, eliminating the need for manual file uploads via SSH.
On WordPress.com, this is handled through GitHub Deployments, which works with any repository hosted on GitHub.com. It’s one of my favorite developer tools, and to use it, you must first turn your project into a GitHub repository.
Git comes preinstalled on macOS and is available to install on Windows. You can confirm Git is installed on your computer by opening the terminal (also known as the command line or shell) and running this command:
git --versionIf Git is installed, you’ll see a version number. If it’s not installed, you’ll see an error message that says command not found.
After confirming Git is installed on your machine, initialize Git in your project folder by opening the terminal, navigating to the project folder, and running the following command:
git initWhile you can continue to use the command line to create a GitHub repository, GitHub Desktop provides an intuitive GUI alternative, much like Studio provides for local development. With Git initialized:
Open GitHub Desktop.Click File, and choose “Add Local Repository…” Select your project folder.Commit your changes and publish the repository to GitHub.Once your project is live on GitHub, connect it to GitHub Deployments to push updates directly to a WordPress.com-hosted site on a Business or Commerce plan.
With automatic deployments enabled, every commit pushed to your remote repository’s default branch (typically main) will instantly update all connected sites, including staging environments. Alternatively, you can manually trigger deployments as needed.
Regardless of which deployment method you use, you’ll need to manually trigger your first deployment to your WordPress.com-hosted site.
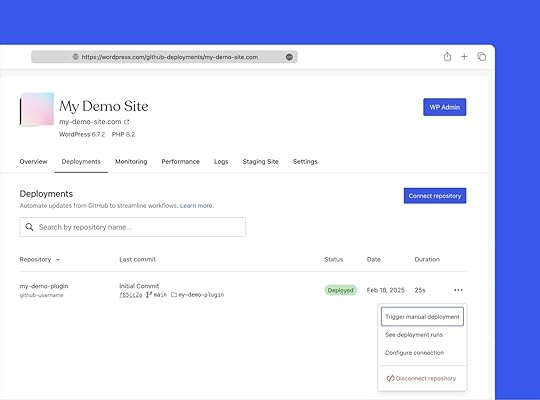
While this workflow focuses on deploying individual plugins and themes, you can use GitHub Deployments with a site’s entire wp-content folder. Many developers use this approach to track changes across themes, plugins, and other site assets in a single repository, making it easier to manage updates and maintain consistency across environments.
Tip: Refer to the GitHub Deployments documentation for more information on enabling this feature on your WordPress.com sites.
As Studio evolves, expect even more features and improvements to streamline how you build and deploy WordPress plugins and themes. Now, let’s take a look at creating a complete site locally.
Full site developmentStudio is not just for plugin and theme development; it’s also great for building full WordPress sites. While some projects require custom development, many site builds just involve selecting a theme, installing plugins, adding content, and customizing the design in the Editor, all of which can be done easily in Studio.
To get started, follow the steps outlined above to create a new site in Studio. Then you can start building using the WordPress interface, just like you would on a live site.
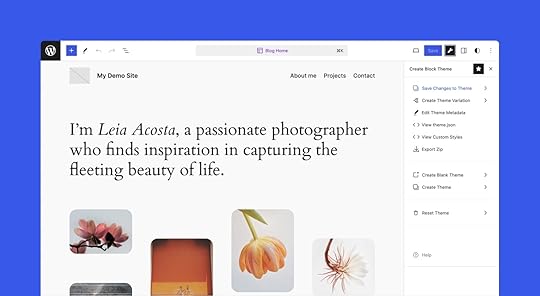
If you are working with a block theme, I always recommend the Create Block Theme plugin. It makes customization easier by allowing you to:
Save template and Global Styles changes directly to the current theme.Export them as a new theme without writing any code.This tutorial provides a step-by-step guide on how to use it.
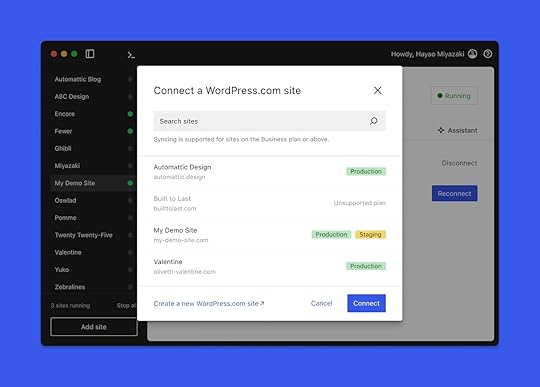
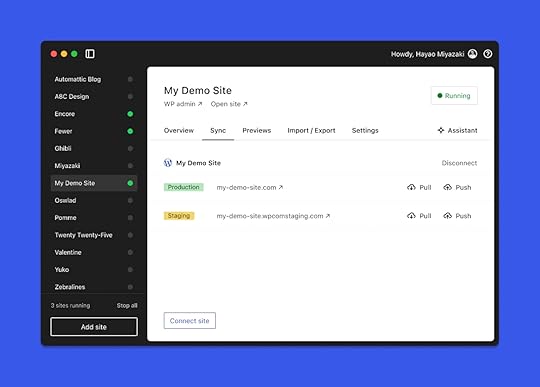
Studio also supports syncing an existing WordPress.com Business or Commerce site to a local environment. This is particularly useful when you’ve already started working on a site or want to use a premium theme from WordPress.com. Premium themes cannot be directly downloaded or installed outside that environment.
To sync a site:
Create a Business or Commerce site on WordPress.com if you haven’t already.Optionally, apply the premium theme you want to use.Open the Studio app, click “Add site,” and complete the site setup steps.Navigate to the Sync tab of the newly created site.Click “Log in to WordPress.com” if you have not already logged in.Click “Connect site” to see available sites.Select the site you want to connect and confirm by clicking “Connect.”Click Pull to synchronize from your Production or Staging environment.Once synced, you can continue working on the site in Studio. Refer to the Studio Sync documentation for more information. We’ll explore the sync feature further in the deployment section below.
Building a site locally offers the same benefits as developing custom plugins and themes. It provides a safe environment to experiment and test changes without affecting the live site.
While staging environments serve a similar purpose, developing with Studio offers added flexibility by allowing offline development and a more focused workspace without the delays of working on a remote server.
A full guide to building a custom WordPress site is beyond the scope of this post, but here are some additional resources to help you get started:
Design Your Site : Check out this documentation on designing your website or blog with different theme options and customizations. Learn WordPress : These are free courses on WordPress site design from the WordPress.org team. Quick Start Guide : Get started building your site with the official WordPress Theme Handbook.Previewing and deploying a full siteOnce your site is complete or near completion, it’s time to test and deploy. Studio includes two key features that simplify this process: Preview Sites and Studio Sync.
Preview Sites allow you to generate a temporary hosted version of your local Studio site, making it easy to test functionality in a real server environment. Instead of setting up a separate staging site, you can generate a preview in Studio with one click, and then share it with clients, team members, or stakeholders for feedback. This is especially useful for full-site builds, where content, design, and functionality need to be reviewed together before launch.
Preview Sites are available to all Studio users but require a WordPress.com account, free or paid. To create a new preview:
Navigate to the Previews tab of your Studio site.Click “Log in to WordPress.com” if you have not already logged in.Click on the “Create preview site” button.Once complete, navigate to the generated URL to view the live preview.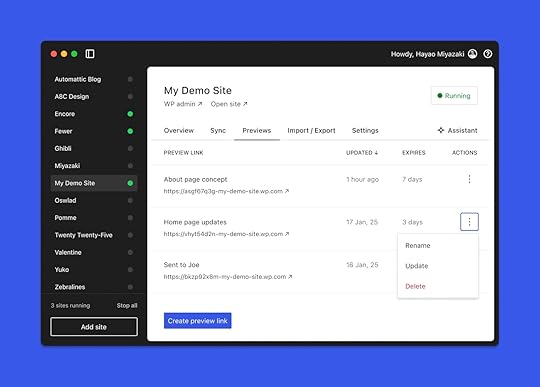
Each preview site remains active for seven days after the last update. Up to 10 live preview sites can be hosted simultaneously, allowing you to test different projects or compare versions.
For more information, check out the Preview Sites documentation.
If you are hosting on WordPress.com, Studio Sync provides a direct connection between your local Studio site and a WordPress.com Business or Commerce site. Instead of manually migrating files and databases, you can push updates from your local environment to production with a single click. You can also use Sync to deploy a brand-new site to WordPress.com.
To push a site to WordPress.com using Studio Sync:
Navigate to the Sync tab of your Studio site.Click “Log in to WordPress.com” if you have not already logged in.Click “Connect site” to see available sites.Select the site you want to connect to and confirm by clicking “Connect.”Click Push to synchronize your local Studio site with the connected WordPress.com site.The screenshot below shows both a production and staging site successfully connected using Studio Sync.
Sync is bidirectional, meaning you can also pull updates from a live WordPress.com site into Studio, as shown in the previous section. This is useful when multiple developers are working on the same project or when making changes to an active site. Sync also supports staging sites, allowing you to test updates in a controlled environment before pushing them to production.
The Studio Sync documentation provides additional information.
When you push or pull a site, the entire site is transferred, including all files and the database. Currently, Studio Sync is best suited for full-site synchronization, not for deploying specific plugins or themes. There is an open issue to expand this functionality, giving developers more control over what gets synced. Expect to see enhancements in future releases of the Studio app.
What’s next for Studio?This post provided an overview of Studio’s current capabilities and the common workflows available to developers. While the app is already a powerful local WordPress development tool, the Studio team is actively working on new features with exciting updates coming soon.
Two key enhancements I’m particularly looking forward to are:
SSL support: This enhancement will make local sites feel more like production environments.Expanded PHP support: This update will include Xdebug support, symlink compatibility, and other improvements.Since Studio leverages WordPress Playground, the WebAssembly-powered PHP binary, it currently has a few PHP limitations that other local development tools don’t. Efforts are underway to address these gaps, expanding what’s possible and giving developers like you more flexibility.
If you have ideas for additional improvements, this is a great time to share them. You can submit feature requests or report issues directly on GitHub, or leave a comment here with your thoughts. Your feedback helps shape the future of the app.
Not a Studio user yet? Download it for free below and see how it fits into your workflow. With frequent feature releases and an active open-source community, the app is improving rapidly.
Download StudioAfter installing, be sure to connect Studio to your WordPress.com account (free or paid) to unlock features like Sync and Preview Sites.
March 17, 2025
Change Your Local Site WordPress and PHP Versions with Studio
One of the biggest challenges WordPress developers face is ensuring their themes and plugins work across different WordPress and PHP versions. Since we launched Studio, our free and open source local development app, last year, you’ve asked for more flexibility in version selection—and now you have it.
As of today, WordPress and PHP version selection is now available in Studio, giving you even more control over your local development environment and testing processes.
How to Select WordPress and PHP Versions in StudioWith this update, you can now select your preferred WordPress and PHP versions at two key moments:
When creating a new site: Previously, you had to create a site with default settings and change versions later. Now you can select the exact versions you need when you create a Studio site.For existing sites: Do you need to test your site against an older WordPress version or with a different PHP environment? Go to your Studio site settings to select your preferred versions. Expanded Version Support
Local sites built with Studio now support:
WordPress versions: 5.9 and up (including beta versions).PHP versions: 7.4 through 8.4.This range of support lets you test your projects in environments that match your production requirements or validate compatibility across different versions. You may want to use it for:
Plugin and theme testing: Ensure your code works across multiple WordPress environments.Legacy support: Work on sites that aren’t yet ready for the latest WordPress or PHP versions.Backward compatibility: Test your work against older versions for broader user support.Early adoption: Test beta versions of WordPress and prepare for upcoming releases.The new version selection feature is available today for all Studio users on Studio 1.3.8 or higher.
What’s Next for StudioAt WordPress.com, we’re constantly fielding your feedback and iterating to make Studio the best local development environment for WordPress sites. Version selection is just one of many features we’re adding based on your needs and feedback.
Have more feedback to share with us? Open up an issue in GitHub.
Download Studio today to start developing locally, and subscribe to our developer newsletter, Dev & Deploy, to stay in the loop on all-things Studio.
Build with StudioMarch 14, 2025
WordPress SEO: Your Essential Guide for Better Rankings and More Traffic
Did you know that 96.55% of webpages receive no traffic from Google? Don’t let your site suffer this fate. Here’s how to give your WordPress site search superpowers (no matter your level of technical knowledge—we’ll make you an expert).
Tools You’ll NeedBefore we get started, there are a few things you’ll need to succeed with SEO on your WordPress site:
Quality hosting: Slow hosting makes applying all other SEO strategies more challenging. At WordPress.com, we pride ourselves on providing lightning-fast hosting for WordPress websites (more on that below). That said, even if you’re using another hosting provider, you can still use the tips in this post. The right plugins: WordPress SEO plugins are available for almost every SEO task you need to execute. We’ll mention several throughout this post. WordPress.com users on the Business plan or higher can install plugins.Time and patience: Good site SEO takes effort, but the rewards are worth it.What Makes WordPress.com Awesome for SEO?Some people say WordPress.com is limited. We disagree. Here are five features that make WordPress.com SEO-friendly right out of the box:
Fast and secure hosting performance means your site always loads quickly (which search engines and users love).Automatic version updates keep your site running on WordPress’s latest and best-performing version.Built-in Jetpack CDN (and the option to use Cloudflare) improves your site speed and performance by caching content closer to users, optimizing file delivery, and reducing server load.XML sitemaps are automatically generated and added to your site, providing search engines like Google with a structured, computer-readable list of your crawlable and indexable content.The ability to add plugins on the Business plan and above gives you even more flexibility in the tools you add to optimize your site.Not sure what all of this means yet? Don’t worry. Throughout this post, we’ll explain everything you need to know.
Start By Installing an SEO PluginMake Sure You’re Using the Latest Version of WordPressResearch the Keywords People Use to Find Your SiteKeep Your Site Structure OrganizedAvoid Duplicate Categories and TagsMake Your Top-Level Menu Easy to NavigateMake Sure Your Footer is OrganizedAdd Internal Links Between Related Pages and PostsFix Broken Links and Close Navigational Dead-endsConsolidate Duplicate ContentUse a Good Permalink StructureAdd an XML SitemapOptimize MetadataWrite Title Tags That People Want to Click OnAdd Descriptive Meta Descriptions to Pages and PostsMake Images Search Engine-FriendlyUse Descriptive Alt TextIndulge Your Site’s Need for SpeedChoose a Fast Hosting ProviderUse a Content Delivery Network (CDN)Choose a Well-Designed WordPress ThemeCompress Images for Faster Loading SpeedSEO Tips for Blog PostsWrite Unique ContentInclude Keywords NaturallyChoose Header Tags CarefullyUse Concise Sentences and ParagraphsDisplay Excerpts Instead of Full PostsMeasuring ResultsNow Get More TrafficStart By Installing an SEO PluginA good SEO plugin is essential to good site SEO. SEO plugins make it easy to execute various tasks that will ensure your site is search engine-friendly.
Here are three SEO plugins that we recommend (along with a tutorial from each brand on how to use them):
Yoast (tutorial)All-In-One SEO (tutorial)Rank Math (tutorial)These plugins unlock tons of functionality that we’ll reference throughout this tutorial. That’s why we recommend installing one of these plugins first (if you haven’t already).
Make Sure You’re Using the Latest Version of WordPressWhen WordPress websites encounter technical issues, using an outdated version of the WordPress software is a common cause. This is because newer software versions typically ship with performance and optimization updates.
WordPress.com automatically updates your site to the latest version of WordPress, so if you’re hosting your WordPress website with us, you can rest easy. If you’re using another hosting provider, check to see whether they handle updates for you, or if you’re responsible for keeping your site up to date.
Research the Keywords People Use to Find Your SiteKeywords are the terms people use to find content on search engines, so keyword research is the process of identifying the terms and phrases you should include in your posts and pages so users can find your content in search results.
You can see where this is going: including relevant keywords makes finding your content easier.
There are many free and paid tools you can use. We recommend these three free options:
Google Keyword Planner : This tool can show you how often keywords are searched each month. KeywordTool.io : You can figure out keyword ideas based on Google Autocomplete results using this free tool. Answer The Public : You can enter a topic in the search and quickly generate tons of related keywords to help you build a well-rounded piece of content around the main topic.These tools are only as good as your ability to use them. Fortunately, the fine folks at Ahrefs (a paid and robust keyword research tool) have assembled an excellent beginner’s guide to keyword research. Throughout the rest of this post, we’ll tell you when, where, and how to apply keywords too.
Tip: Your site should have only one page or one post per keyword. If you have two or more pages whose content is too similar, it can confuse search engines and cause them not to rank either page. It can confuse users too, making it unclear which page best addresses what they’re looking for.
Keep Your Site Structure OrganizedSearch engines reward well-structured sites that help users find key pages easily. That means it’s important to organize your site’s structure and navigation.
Avoid Duplicate Categories and TagsWordPress uses categories and tags to organize blog posts. Let’s define their roles:
Categories organize all posts within a topical area: For example, a cooking blog might have categories for Recipes, Restaurant Reviews, and Cooking Utensils.Tags organize specific groups of posts: For example, the same cooking blog might have tags for restaurant reviews in specific cities (i.e., Chicago and New York City) or reviews of specific utensil brands (i.e., Le Creuset and KitchenAid).Categories and tags are both useful for organizing content. However, avoiding duplication in the names of your categories and tags is important. There are two reasons for this:
They confuse users: If two things look the same, a reader might waste time thinking there’s a difference and have trouble telling which one will contain the content they’re trying to find.They confuse search engines: When you have an identical category and tag, WordPress will create duplicate archive pages for both. This makes it harder for search engines to understand your site, leading to lower rankings (and less traffic).Fortunately, these issues are easy to avoid when you follow these tips:
Use categories for primary navigation: This ensures every post is organized.Be disciplined with tag usage: Avoid using tags that exactly match any category. Consider setting tag archive pages to nofollow: This means telling search engines to ignore (and not rank) your tag pages. This makes absolutely certain that tag archive pages will not conflict with category archive pages in search results. Only do this if you’re comfortable with losing your tag pages in search results (your category pages will still be eligible to rank). You can apply this setting with Yoast, AIOSEO, or Rank Math.Tip: Be careful using SEO plugins to nofollow or noindex portions of your site. It’s easy to accidentally block pages you want search engines to find.
Make Your Top-Level Menu Easy to NavigateMenus are essential for helping users navigate your site. They’re also helpful for search engines to understand how your site is structured (and to determine whether your site offers a good user experience).
When designing your menu, group relevant pages together. For example, if your site sells products, you might have a menu item labeled Products, with links to each category of products underneath.
 In this example from MailPoet, each feature type is organized into clear, user-friendly columns under Features.Make Sure Your Footer is Organized
Add links to your important pages in your site’s footer as well. Organize them so child pages (subpages) are listed underneath parent pages (top-level). This will keep your footer links clearly structured to match your page hierarchy, making it easy for users and search engines to navigate your site structure.
 Like the header example you saw before, this footer groups related pages together.Add Internal Links Between Related Pages and Posts
Search engines use internal links, links between your content, to understand how pages are related to one another. When a page has many relevant links that help users navigate to the page, search engines recognize its importance
Add links between related pages: Ideally, all pages grouped together in the same columns in your menu should also be internally linked within their content.Add links between related blog posts: This helps readers find more interesting content to read on your site while helping search engines understand what your posts are about.Add links from your blog to your landing pages: It’s especially important to add links back to pages where a user might sign up for your service or make a purchase.
Tip: As a best practice, set internal links to open in the same window—external links should open in a new tab.
Fix Broken Links and Close Navigational Dead-endsBroken links between pages frustrate users and make it difficult for search engine bots to crawl through your site. Fortunately, it’s easy to find and fix broken links by using a broken link detection plugin. Then, update the links so they point to relevant posts or pages. That’s it!
Consolidate Duplicate ContentDo you have two or more pages that serve the same purpose? Consider consolidating them into one authoritative page to reduce confusion for search engines and users.
Use a redirection plugin to re-route the duplicative pages to the one you want to keep. This prevents bots and readers from getting confused about which page to rank and read.
Use a Good Permalink StructurePermalinks control how URLs are formatted on your site. It’s important to structure them so search engines can easily crawl them. We recommend including the following items in your permalink structure for blog posts:
Dates: Include date information if you value accurate historical preservation. Otherwise, remove them. This makes it easier to update content in the future without confusing search engines.Post category: Categories help search engines understand the relevance of the page.Post name: By default, this will include the page headline.The post name field controls your URL slugs. No, we’re not talking about slimy gastropods. On every post and page you publish, edit the slug to include your primary keyword, and remove all extra words. This helps bots understand what the page is about (and rank it accordingly).
As a reminder, this applies to permalinks for blog posts. For pages other than your homepage, WordPress.com will create a slug that matches the page title (which you can edit, of course).
Tip: WordPress.com users need the Business plan or higher to change the permalink structure.
Add an XML SitemapXML sitemaps are files in your site’s code that list all the important pages on your site to help search engines crawl and understand your content. WordPress.com automatically generates one for you, so if you’re a WordPress.com user, your homework here is done.
If you’re using WordPress with another hosting service, never fear. You can add an XML sitemap with an SEO plugin like Yoast, AIOSEO, or Rank Math.
Optimize MetadataWhen it comes to websites, you’ll sometimes hear people refer to “metadata.” This term could mean several different things depending on the context, but in general, it refers to data about a webpage that helps search engines and readers understand its context.
Here are ways you can optimize your post or page metadata:
Write Title Tags That People Want to Click OnTitle tags are short lines of text that tell search engines and users what a page is about. They appear in the top line of text in search engine result pages (SERPs).
 Search engines use title tags to generate clickable links in search results, like this one.
Here are some tips for writing effective title tags:
Keep them under 60 characters: If they’re too long, search engines will truncate them. Use a free SERP preview tool to see how they will look before you publish them.Include your primary keyword: This is what your page is all about, so be sure to include it in the title tag.Make sure they read well: Try reading your title tags out loud. If they sound clunky or don’t make sense, try writing them again. They should sound natural, as searchers will largely decide whether to click on your content in search results because of your title tags.Add Descriptive Meta Descriptions to Pages and PostsMeta descriptions are short summaries of a page’s content. They appear underneath clickable links on SERPs.
 The text below the blue link is a meta description.
Here’s how to write meta descriptions that make users want to click:
Keep them concise: 120 to 150 characters is a good length for meta descriptions. If they’re too short, search engines may not use them. If they’re too long, they’ll get cut off.Use persuasive language: Tell the reader what makes your page or post valuable and interesting.End with a call to action: Encourage the reader to click through to your site.Make Images Search Engine-FriendlyThey say a picture is worth 1,000 words. Since search engines can’t “see” images, they need help understanding their relevance to your content.
Here are some ways to make your images search-ready:
Include Keywords in Image File NamesBefore you upload images to your posts and pages, give them a clear file name that includes relevant keywords. Follow this structure using dashes (rather than underscores): a-good-keyword-that-describes-this-image.jpg.
Use Descriptive Alt TextSearch engines use alt text to better understand what images are about, and screen readers also use them to help users with visual impairments understand your images through words.
Alt text should accurately describe the elements in your images—think number of people, activities depicted, colors, and textures.
For example, take this picture:
[image error]Pexels.com" data-medium-file="https://en-blog.files.wordpress.com/2..." data-large-file="https://en-blog.files.wordpress.com/2..." loading="lazy" width="1733" height="1300" src="https://en-blog.files.wordpress.com/2..." alt="" class="wp-image-78175" srcset="https://en-blog.files.wordpress.com/2... 1733w, https://en-blog.files.wordpress.com/2... 150w, https://en-blog.files.wordpress.com/2... 300w, https://en-blog.files.wordpress.com/2... 768w, https://en-blog.files.wordpress.com/2... 1024w" sizes="(max-width: 1733px) 100vw, 1733px" />Photo by Chevanon Photography on Pexels.comGood alt text for this image might look something like this: Two small golden retriever puppies sitting in the grass with orange flowers around their paws.
Our support guide will show you where you can edit image alt text on WordPress.com sites.
Indulge Your Site’s Need for SpeedEveryone loves fast-loading websites (including search engines). Give your site a tune-up to make sure it’s as quick as possible using these strategies:
Choose a Fast Hosting ProviderSlow loading speeds are often caused by slow hosting, which negatively impacts user experience.
Want to know how fast your site loads? Use our free WordPress Page Speed Test tool to find out:
 Use a Content Delivery Network (CDN)
Content delivery networks (CDNs) use remote servers worldwide to cache and serve website files from locations close to your users. This helps your pages and media load faster.
All WordPress.com sites come with an excellent CDN from Jetpack. You can also choose Cloudflare, another popular option, as an alternative on the Premium plan and above.
Choose a Well-Designed WordPress ThemeOutdated themes are a common cause of WordPress performance problems. Fortunately, all WordPress.com websites have access to tens of thousands of high-quality themes that will load quickly. If you choose a theme from a third-party store or developer, buy one from a reputable vendor by reading reviews and ensuring you’ll get top-tier support.
Tip: WordPress.com users can upload third-party themes on the Business plan and above.
Compress Images for Faster Loading SpeedImage files can be large and hard for web browsers to load. Compressing images helps them load faster.
You can compress images manually using an image editing tool. An image compression plugin that reduces file sizes without reducing quality is a more convenient option. Here are a few options to check out:
ShortPixelSmush Image OptimizationTinyPNGImage OptimizerSEO Tips for Blog PostsBlog posts have some specific considerations to keep in mind for SEO. Let’s look at a short list of additional tips that can help your posts rank better and get more traffic.
Write Unique ContentDon’t copy content from other sites. If you want your content to rank, don’t write it all with AI either. Publish original content that serves user needs, and search engines will reward you.
This advice applies to other pages on your website too. All of your content should be original.
Include Keywords NaturallyKeywords help search engines understand your page’s topic and ensure it matches what users are searching for. They’re also crucial for users, as they should align with their intent and needs.
Just don’t go overboard trying to fit keywords everywhere you can. Keep your writing natural and focused on human readers. The folks at Copyblogger have an excellent guide on how to do this well.
Choose Header Tags CarefullyHeader tags impact readability and SEO by making pages and posts easier to read and understand. When writing posts and structuring content on pages, follow this header hierarchy:
H1: The page title or headlineH2: Major subpoints on the page or postH3: Supporting sections for each H2 subsectionH4: Use sparingly, if at allYour header tags should also be nested—don’t jump from an H1 directly to an H4.
Use Concise Sentences and ParagraphsThe classic best practice of writing for the web says to keep sentences under 25 words long and paragraphs under three sentences. These aren’t hard and fast rules, but this guidance can make your writing easier for readers to digest and find the answers they’re looking for.
You can also use the Jetpack AI Assistant to catch issues with your writing and make your content clearer and easier to read.
Display Excerpts Instead of Full PostsWordPress allows you to display entire posts or post excerpts on blog archive pages. Showing excerpts only improves rankings and makes these pages easier to navigate.
From My Home, click Settings → Reading. Then, next to “For each post in a feed, include,” click Excerpt:
 Measuring Results
You’ve learned tons of WordPress SEO tips to bring more people to your site in this post. How will you know whether your work was worthwhile?
Use these analytics tools to measure performance:
Jetpack Stats : This plugin is easy to use and included on every WordPress.com website. It’s also available for all WordPress sites on other hosts via Jetpack. Google Search Console : Use this free tool to find data about how users find your site, straight from Google. Learn how to connect it to your WordPress.com site, then learn how to use it. Google Analytics : This tool is free and easy to connect to WordPress.com websites. It can contain a lot of website data, but it’s worth learning how to use it. Fortunately, Google offers an excellent (and free) beginner’s guide to Google Analytics.Now Get More TrafficThere’s always more to learn about SEO, but by this point, you have the essential knowledge to help your WordPress site rank and gain traffic. Do the right things consistently, and eventually you’ll join your favorite sites at the top of the SERPs.
WordPress SEO success starts with fast and dependable hosting. Get started with WordPress.com or move your existing WordPress site today.
March 13, 2025
How to Start a Food Blog: Your Recipe for Success
Do you consider yourself a “foodie”? Are you passionate about sharing your culinary creations and becoming the next celebrity chef or baking addict? If you’ve been thinking about starting a food blog but don’t know where to start, WordPress.com is here to help.
This post will cover all the ingredients you need to get started and set yourself up for long-term food blogging success.
What is a Food Blog?A food blog is a broad category of websites focused on sharing food-related content. Some food blogs focus on creating original recipe content and offering their cooking know-how, others celebrate food aesthetics through high-quality food photography or catalog their food experiences by providing restaurant reviews or sharing culinary discoveries abroad.
Choosing a Food Blog NicheThe first step in creating a successful food blog is choosing a niche within the food blogging space. Choosing a clear niche ensures your content stands out and attracts website visitors who share your interests. By keeping your blog laser-focused, you can become a trusted expert and go-to resource on the web.
When it comes to finding the right niche, the menu is limitless. We’ve compiled a few ideas below to get you started.
Cuisine: Focusing on your culture’s cuisine or cuisine you particularly love and have experience making can allow you to become an authoritative resource for culture-specific recipes and advice on sourcing specialty ingredients or brands.Lifestyle: Lifestyle choices can significantly impact how you cook and eat. Whether you are a van life enthusiast, an elite athlete, or a homesteader with kids, you can use the core elements of your lifestyle to build a unique brand that explains the how and why behind your food content.Geographic location: Whether you are writing local restaurant reviews or highlighting popular recipes from your region, a location focus provides specificity to your content, photography, and branding. With more than half of Google searches being locally focused, it may be easier to build a strong but dedicated local following.Dietary restrictions: Online recipes have become an important resource for people with food allergies or food sensitivities. Focusing on common food sensitivities like nuts, dairy, gluten, or sugar can help you build a large audience while digging into less-common food allergies can attract a smaller but highly dedicated community.Lifestyle diets: Unique diets often call for ingredient swaps or tracking specific metrics that may not be included in standard recipes. If you follow a diet like paleo or keto, you can serve a similar niche of people who cook often and seek specialized recipes and advice. Kitchen setup: Do you have a tiny kitchen, hot plate, outdoor kitchen, or other unconventional kitchen setup? Writing about cooking within unique constraints can provide practical advice for others navigating similar situations.You can also combine several niches—like a blog focusing on recipes from a specific culture that have been altered to be entirely gluten-free—to create a truly original brand.
Whatever niche you choose, it should be something you are passionate about and can continue to write about over time. Readers and search engines love content rooted in experience, expertise, authoritativeness, and trustworthiness, so use your experiences with food as your guiding force.
Setting a Goal for Your Food BlogWhen starting a food blog, you must have a clear goal so that you can focus your time and resources accordingly. A clear goal will also help you determine what success looks like for your blog, helping you stay motivated and organized as you get it up and running.
Here are some common goals food bloggers have for their websites:
Sharing Your Passion For FoodIf you’re writing your blog simply to share your love for food but don’t care about monetizing, you might focus on building a strong narrative voice and an engaging community space. Your blog posts should focus on sharing your personality and story and leaving room for readers to comment or engage directly.
Some goals might be making new connections with your followers, publishing a certain number of monthly posts, or creating a digital archive of your top-loved recipes.
Food Blogging as a Side HustleIf you hope to make money from your food blog but don’t plan on making blogging your full-time job, you probably want a site that can grow over time. Be clear about what monetization strategies you may want to pursue: do you plan to make money through affiliate links or via an online store? Or maybe you want to run ads on your site or accept donations from your readers.
Even if you start with a simple website, make sure that your platform can support these features down the line.
It takes time and consistency to build a following, especially if you have another full-time gig. Set reasonable, time-based goals for launching your site, creating content at regular intervals, and sustainably growing your audience.
Food Blogging as a Full-Time BusinessIf you plan to run your blog as a full-time business, you may want to invest more in it upfront so you can monetize your site immediately. You will likely need higher-level website features, such as a store, contact forms, advanced analytics, and an optimized theme to support your content creation, marketing, and sales.
You may have marketing and monetary goals for your blog, like getting a certain number of monthly page views, growing your followers cross-platform, or having a certain number of sales or partnerships in place each week or month.
Food Blogging as a Portfolio-BuilderIf you’re a chef, food photographer, or other food-focused professional, you may create a food blog to find new work opportunities. In this case, your portfolio or work product would be at the center of the site, and your website might have a stronger focus on personal branding.
Your goals might include having a clean online presence to share with potential employers or keeping a regularly updated catalog of your best work.
Choosing a Blogging Platform and HostingOnce you have a clear picture of your blog and your goals, it’s time to choose your blogging platform. We recognize this can be daunting, especially if you’ve never built a website. However, WordPress.com is here to support you every step of the way.
Website Building BlocksTo start creating your blog, you’ll need three things:
A website host: Your website is stored on a server via a website host. Most new website owners choose managed hosting, which handles both server setup and the day-to-day management of your website, including security, uptime, and regular updates.A Content Management System (CMS): CMS software allows you to create, edit, and publish content online without code. We (obviously) love and recommend WordPress for this—more on that in a second.A domain name: Your domain is your website’s address on the internet. For example, “yourgroovydomain.com.”These are the essentials for all food blogs, and luckily, you can get them all at WordPress.com!
Why Choose WordPress for Your CMS?WordPress is a publishing software that doesn’t compromise on flexibility, customization, or long-term growth.
The WordPress Editor offers drag-and-drop tools that enable anyone to build a website on the platform without needing to write code. There are also tons of pre-designed WordPress themes for food blogs, allowing you to find a brand-worthy professional design and quickly customize it to your needs.
 This is the RecipeBook theme—check it out here!
Unlike CMS competitors like Squarespace or Wix, WordPress is an open-source software that enables flexibility and content ownership. In addition to themes, you can access a massive library of free and paid plugins, which help expand your website’s functionality to meet your needs as your blog grows. Plus, with WordPress, you fully own your content and can take all of your content with you if you change hosting providers.
Why Choose WordPress.com For Your Hosting?WordPress.com is for bloggers like you: our comprehensive WordPress hosting offers everything new (and veteran!) bloggers need out-of-the-box to quickly and confidently launch their blogs and takes care of the technical website management for you so that you can focus on creating content.
With managed features like security, no traffic caps, ample storage capacity, enhanced performance, automatic updates, support, domain names, themes, plugins, and more, we’re a one-stop shop to get you started on your food blogging journey.
With WordPress.com, you’re joining a huge community of active bloggers and site owners. You can find support and advice on our forums and take advantage of our step-by-step guides and articles (like the one you’re reading right now!) that will help you make the most out of your blog from day one. We also have an excellent support team.
Our hosting plans scale with your needs, supporting everything from free personal bloggers to large food blogging businesses.
Start your food blog with WordPress.comChoosing a Name for Your Food BlogYour blog name should be short, memorable, and most likely food-related. Make sure it’s both easy to spell and pronounce—this increases the odds that your followers will remember your blog and spread the word with their friends and families.
Stick with straightforward spellings for your blog name, as unusual spellings can create confusion and require verbal explanations like “it sounds like food, but with an e at the end!”
Another important factor in choosing your name is checking whether your domain name is available. Domains with a .com ending are the most popular (as they’re the most memorable) but can be more expensive or difficult to acquire.
If your desired domain isn’t available, you can use other options like .net and .blog. You can also consider a different or more specific name to avoid creating confusion or driving traffic to a competitor’s website.
Use our domain search tool to find an available domain, or select a domain during your WordPress.com registration process (most domain names are free for the first year when you buy a paid hosting plan with WordPress.com!).
Find a domainSelecting a WordPress Theme for Your Food BlogWordPress offers a wide range of free and paid website templates (called themes) to suit every visual style. WordPress.com releases fresh themes every month for all types of bloggers, including specialized designs for food-themed blogs.
When choosing a theme for your food blog, look out for ones that are:
Responsive: Responsive theme elements change size to adapt to your readers’ screen width, ensuring that your content is always legible and nothing gets cut off at smaller screen sizes. All themes on WordPress.com are responsive, and you can check by clicking the Preview button on a theme page and using the dropdown menu to view the theme at different aspect ratios.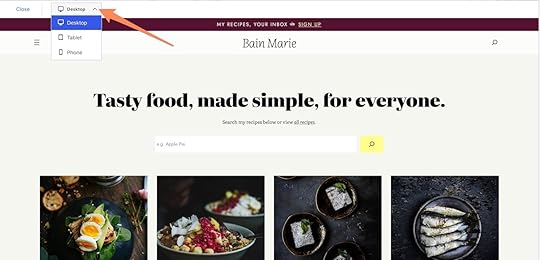 Love this theme? It’s called Bain Marie!Mobile-friendly: More than half of web traffic comes from mobile devices, so ensure your site is optimized for mobile. Your site should also load quickly when accessing it with mobile data, so keep these factors in mind to ensure your site loads quickly for your readers.Food blog specific: Some themes are designed specifically for food blogs. These themes may include pre-built recipe pages and food-blog-focused navigation. While all themes are fully customizable, getting your blog up and running may be easier if you choose one with elements that suit your blog’s specific needs.
Premium WordPress.com themes are included in our Personal plan and above.
Browse WordPress.com themesEssential WordPress Plugins for Food BloggersWordPress provides an excellent base for your food blog, and plugins can spice things up by adding additional features to your website. While there are many plugins available, we recommend starting with those that support growth, speed, and recipe creation.
When choosing plugins, look for options with good reviews and a large number of active downloads. It’s also helpful to check when the plugin was last updated, as that can indicate whether it’s being actively maintained to be compatible with the most recent versions of WordPress.
With WordPress.com, you can use plugins on the Business plan and above.
SEO PluginsSearch Engine Optimization (SEO) tools help make your website more easily readable to search engines like Google. Since most users don’t look beyond the first few search results on a search engine, it’s essential to consider how search engines parse your blog’s content so that it will rank higher in relevant search results.
Many SEO plugins take the guesswork out of SEO by providing step-by-step walkthroughs and automatically updating your site schema behind the scenes to meet evolving SEO best practices. Some popular options include Yoast SEO, All in One SEO, and Rank Math.
WordPress.com also has built-in SEO capabilities with Jetpack for WordPress on the Business plan and above.
Recipe PluginsRecipe plugins give you an easy-to-use recipe template for your blog posts, your readers a visually consistent and organized recipe format for each of your recipes, and search engines the structured data they need to display your recipes accurately in search results.
You can learn more about the wonderful world of recipe plugins here, but some good options are WP Recipe Maker, Tasty Recipes, and Create by Mediavine.
 Image Compression Plugins
Oversized images can slow down your website’s loading time, causing impatient users to abandon your site before it fully loads and ultimately reducing trust in your content. Image compression plugins automatically optimize your food glamour shots and process photos for faster loading speeds. ShortPixel and Smush Image Optimization are two popular image compression plugins.
You will also want to manually optimize your images for quicker loading using our guide on image optimization.
Social Sharing PluginsSocial sharing plugins help you easily share your content on social media sites like Instagram and Pinterest, encouraging readers to subscribe to your content on every platform. Building a cross-platform brand can grow your base and drive long-term engagement.
Some popular social plugins to simplify sharing across your accounts include AddToAny and Blog2Social.
With WordPress.com, you get built-in social features for auto-sharing your posts to your social media channels and allowing your readers to share your content on social media with just one click. Plus, with tags, you can add your posts to WordPress.com’s relevant Reader channels to give your content added visibility.
Writing a Blog Post: Planning Your First PostsOnce you’ve defined your niche and goals, start by creating a few core recipes or food-related articles that represent your blog’s style—this is your opportunity to hone in on your blog’s unique voice and tone.
Weaving personal stories and practical cooking tips into your recipes creates a distinctive voice that sets your blog apart from generic recipe websites. You’ll develop a stronger connection with your audience and a memorable brand by leaning into something uniquely you.
Research suggests that blog posts around 2,000 words rank better in Google Search. But quantity doesn’t always equal quality. There’s a food-worthy SEO acronym to remember as you whip up new posts: E-E-A-T, or experience, expertise, authoritativeness, and trustworthiness.
Keeping these aspects in mind while creating your content will ensure that your blog posts are highly relevant and helpful to your audience.
Starting with your first post, you’ll also want to establish some structure for your content. Consider using categories (like dessert, breakfast, dinner) to create sorting and filtering options that are relevant to your specific content. As your blog grows, this will help readers quickly find the content they want.
Making Your Blog Stand Out: Visuals and Food PhotographySince digital readers are very visual and associate good photography with quality content, having high-quality images in your posts is important. Consider getting a good camera, like a DSLR, mirrorless camera, or high-end smartphone to improve your photo quality.
[image error]Pexels.com" data-medium-file="https://en-blog.files.wordpress.com/2..." data-large-file="https://en-blog.files.wordpress.com/2..." loading="lazy" width="867" height="1300" src="https://en-blog.files.wordpress.com/2..." alt="a hand holding a phone taking a photo of a breakfast spread with coffee and bread" class="wp-image-78144" srcset="https://en-blog.files.wordpress.com/2... 867w, https://en-blog.files.wordpress.com/2... 100w, https://en-blog.files.wordpress.com/2... 200w, https://en-blog.files.wordpress.com/2... 768w" sizes="(max-width: 867px) 100vw, 867px" />Photo by Jonathan Borba on Pexels.comFor food photography, diffused, natural light works best. To create ideal lighting conditions, shoot by a window away from direct light. Hanging a sheer white curtain in your window will also help create a diffused look. If shooting your photos during daylight hours isn’t an option, you may want to consider investing in an artificial lighting setup.
You’ll also want to reduce visual clutter and keep the focus on the food: use neutral backdrops and simple props for a professional look. Most importantly, the food should look appetizing, so focus on presentation, texture, and color. Start photographing just your dish and add one prop at a time.
It’s important to be thoughtful with staging, framing, and lighting your images, but tweaking in post-production tools like Lightroom, Snapseed, or built-in WordPress tools can help take your photos to the next level.
Five Tips for Running a Successful Food BlogThere’s a lot to consider when starting a food blog, so if you’re feeling overwhelmed, consider these quick tips:
Focus on quality and unique content: Thoroughly test your recipes and products before publishing, and don’t forget about E-E-A-T! Sharing original recipes, personal insights, and valuable tips will help you build connections with your readers.Know your audience: The culinary interests of a single adult will be much different than those of a large family feeding young kids. Busy people want quick recipes that require little cleanup, while gourmands want recipes that help them build new skills. Establishing a core audience will provide a compass for your content creation.Post consistently: Set a content schedule that works for you, whether daily, weekly, or bi-weekly, and stick to it! It can take time to build a following, but consistency ensures you’re laying the groundwork for your long-term success.Promote your content: Share your content on sites like Pinterest, Instagram, and Facebook to bring new readers to your site. Use SEO best practices to attract organic traffic from search engines, and engage in existing online communities related to your food niche to build your personal brand and provide the content the community needs.Be patient: It takes time to build a flourishing blog and to discover what works best for you. Know that you have time and space to grow into your brand, so give yourself grace as you get up and running.Ready to Get Cooking?With a little help from WordPress.com, anyone can create a high-quality food blog. From technical expertise to design and writing tips, we’ll be your sous chef on your food blogging journey. If you’re looking for even more resources, check out our companion post on how to start a successful blog.
If you’re feeling ready to dip your spoon in, create your food blog with WordPress.com today.
Start my food blogMarch 11, 2025
How I Used AI to Build the WordPress.com Content Calendar (Without Writing Code) + Thoughts on Using AI for Web Development
Sometimes, a problem you didn’t know existed meets a solution you didn’t set out to build. That’s precisely what happened when a routine conversation about our developer docs turned into an AI-powered tool for our content team.
Here’s how it all came together:
How It StartedAt the start of 2025, my team at Automattic (WordPress.com’s parent company) had taken over responsibility for updates and maintenance of the WordPress.com Developer Docs.
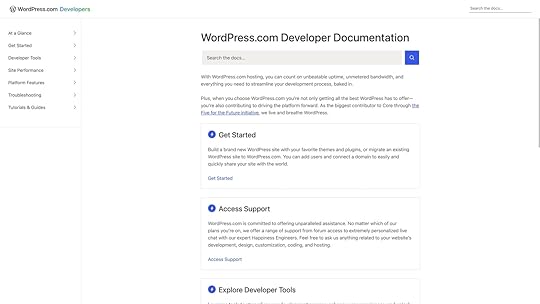
As part of this process, we met with Alexa, a content marketing manager for WordPress.com, to chat about processes and guidelines around this handover.
Toward the end of the meeting, Justin Tadlock, my team lead, asked a simple question, “Is there anything else we can help you with?” Alexa replied, “I have a question, but it’s unrelated to the docs. Do any of you know if a calendar view of GitHub Issues is possible?”
The ProblemAlexa explained that her team uses GitHub Issues and Projects to manage content publishing, a common practice in software companies.
The process generally worked well but was missing one critical piece for visibility into scheduled content and content gaps: a calendar view. Their team couldn’t view these content issues in a monthly calendar to get a quick snapshot of what was planned for the month ahead, as the GitHub Projects view only offers a roadmap-style view—helpful for developing software but not ideal for content planning. Nick Diego was in that meeting. You probably know Nick from his Revolutionize Your WordPress Development with Cursor AI video.
Since leadership at Automattic encouraged us to explore AI tools like Cursor, Nick and I had spent the past few months experimenting and had some fantastic successes, building everything from WordPress plugins to a desktop app for viewing a local WordPress debug log.
If you’ve never heard of Cursor, it’s an AI-powered code editor. Forked from the popular Visual Studio Code editor, Cursor takes the idea of AI-assisted coding to the next level by adding a ChatGPT-like agent to the mix. This AI-powered chatbot interprets your written prompts into working code. This concept has become so popular it even has its term—vibe coding, or using a large language model for coding.
We were both inspired by an Automattic Town Hall in December, where one of our engineering leads used Cursor to automatically generate a pull request for a project he was working on.
Now, I can’t say this for sure because it was across the digital divide of Google Meet, but I’m almost sure Nick and I looked directly at each other and had the same thought at the same moment.
“This is not that hard to solve with AI.” Nick was the first to express this idea, so we spent the next few minutes chatting about it. We both agreed that the only challenging part would be figuring out the right way to query the data we would need to fetch the relevant GitHub Issues from the project view; building the actual calendar app would be pretty easy.
Fortunately for us, our colleague Birgit Pauli-Haack was also on that call. She mentioned that, yes, GitHub Projects have a publicly queryable API. However, it was not a REST API but a GraphQL API. She had explored querying GitHub Project data with some success, but she hadn’t dived into something like this before.
Sitting on that call and listening to all this information, I felt like generating a calendar view for these GitHub Issues would be doable and relatively straightforward. I just had to:
Figure out the GraphQL query.Use Cursor to build a web app around it.How hard could it be?
Perplexity to the RescueThe first thing I had to do was figure out the GraphQL query, and I’ll be the first to admit that my knowledge of GraphQL is limited.
I have written tutorials on using GraphQL to build static frontends for WordPress websites, also known as “Headless” or “Decoupled” WordPress sites. In that process, I used the WP GraphQL plugin that our colleague Jason Bahl developed; however, I’ve never used it in a production environment or used it to build a web app.
So I wondered if I could take a shortcut in this learning curve with AI and craft the GraphQL query without understanding it deeply and completely.
Then I remembered that WordPress.com had partnered with Perplexity. Perplexity is similar in many ways to ChatGPT, but it describes itself as an AI-powered answer engine that lets you research the web.
What I like about Perplexity is that when it outputs the generated AI response, it also includes all the sources of information it has used. If the answer you get from Perplexity isn’t quite what you were looking for, you can open the source links to do further manual research.I also needed a way to test and validate the GraphQL query that Perplexity would provide. Fortunately, GitHub has a GraphQL API Explorer, which allows you to authenticate with your GitHub account and run valid GraphQL queries on any private or public GitHub repositories you can access.
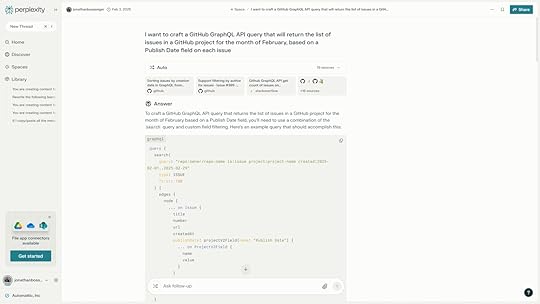
It took me a total of two Perplexity Threads (back-and-forth conversations with Perplexity) to figure out the GraphQL query. The first Thread was me asking it to build basic versions of the query, running them in the explorer, and then I fine-tuned the query based on the data from the explorer. After three rounds of fine-tuning, I started a new Thread and created a more specific prompt, using all the lessons I’d learned from the previous Thread. Testing that query in the Explorer returned the exact data set I’d need for the web app.
The Cursor BuildThe next step was to begin app development with Cursor. One of the things that I discovered early on (both through Nick’s video and this Twitter thread) was the idea of using Cursor to generate an instructions file. The idea is to have a “conversation” with the Cursor agent and share the basic requirements of the application.
You then instruct the agent to write out those requirements to a requirements.md markdown file. Next, you ask the agent to go through the requirements file itself and ask you any clarifying questions about the requirements. As you answer the clarifying questions, you instruct the agent to update the requirements file.
Once you have the requirements file, you instruct the agent to create the instructions.md file based on the requirements file, which outlines the steps needed to build the application.
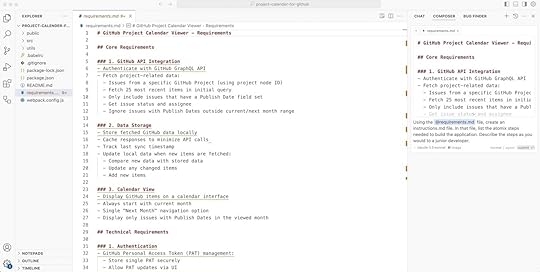
Because I already had the GraphQL query, I also added it to a file in the project directory. Armed with my requirements.md file, instructions.md file, and the file containing the query, I instructed the Cursor agent to start building the app step by step, following the instructions.
In about two hours, I had a working prototype. I returned to Perplexity once or twice to help me solve something that Cursor couldn’t do on its own. I wrote no other code beyond running one or two terminal commands to set up the project directory and its dependencies or running the development server to serve the app for testing.
It took me maybe another hour to polish the app the following Monday morning (mostly adding colors and making GitHub Issues clickable). By midday, I felt I had something very close to what Alexa’s team needed.
All that remained was to find an internal location to host it, which ironically took longer than the app build because this was so new.
By Wednesday, I shared the link with Alexa and my team in an internal post.
 We hid the names and authors for upcoming blog posts—you’ll see them soon!
Everyone was really happy with the outcome. Alexa and a few of her teammates tested it out and picked up one or two small issues.
One of those bugs was interesting; it seems that Alexa saw all the items in the calendar one day before they were due to be published. I fed this info back to the Cursor agent, and it confirmed this was due to some timezone-related bug, which it promptly fixed.
One week later, we had a working GitHub Projects Content Calendar.
Final ThoughtsWith all of the AI tools available today, software development is at an inflection point.
I felt the same way when Google introduced its search engine and Gmail. This is probably how people felt in 1886 when the first practical modern automobile was invented.
LLMs and AI agents will definitely change how we develop software, from speeding up how we learn new things to assisting us in our actual development.
I don’t believe they will replace the need for human developers because if we don’t use them responsibly, we’ll end up with mountains of inefficient code. But it’s certainly possible today to build things with a higher success rate than it used to be. Based on my experience creating the content calendar app, I made another GitHub-related web app that lets you view any GitHub issues assigned to you across all your GitHub repositories.
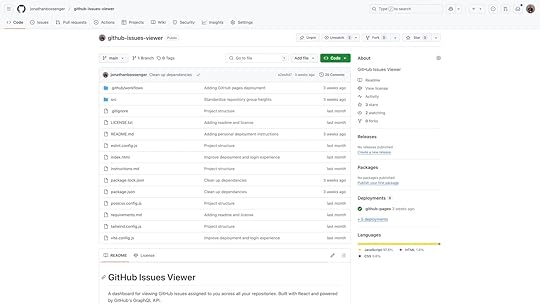
As someone who works across multiple repositories, I’ve wanted a dashboard like this for years—and I was able to build it myself!
Getting used to how these tools work also has other benefits. For example, you may have noticed that this blog post includes links to my colleagues’ online accounts or products’ websites. I added all these links simply by exporting the content to a markdown file and asking Cursor to “look for all proper nouns in the text, find the online URL for each one, and add the link to the proper noun.”
I needed to spot-check the links, but finding and linking them myself would have taken me half an hour. I did it in minutes with Cursor.
If you’re a developer, I encourage you to experiment with these tools. Your next great product idea may be easier to build than you think!
March 6, 2025
10 Reasons Why Small Businesses Should Choose WordPress
In today’s digital landscape, every small business needs a website to stay competitive (even if you aren’t selling anything online!). Whether you run a brick-and-mortar store, restaurant, or local service, getting your brand online is an important way to attract new business.
But even if you understand why you need a business website, choosing which platform you’ll use to build it can be overwhelming.
In this post, we’ll explain why WordPress, the world’s largest open-source website software, is the best option for small businesses that want to establish a sustainable digital presence that can grow with their brand.
10 Reasons to Use WordPress for Your Small Business SiteWordPress is an open-source publishing platform that powers over 43% of the internet. There’s a reason that WordPress has endured as the most popular website-building software:
1. No Coding RequiredCreating a professional WordPress website requires zero coding skills. With block-based themes, anyone can build a website using intuitive drag-and-drop tools and a visual interface showing how your website will appear to visitors.
WordPress’s large library of drag-and-drop elements offers a ton of flexibility without compromising on web best practices: blocks are responsive, automatically adjusting to look good on any screen, and follow the WordPress Accessibility Coding Standards.
Need help getting started? You can find tons of tutorials and guides online—including guides and tutorials created by WordPress.com.
Prefer to work with an expert? You can hire a WordPress.com professional to build you a site for as little as $499 + hosting or work with a qualified WordPress partner agency to build you a one-of-a-kind website.
2. Thousands of Customizable Themes Make Design EasyWordPress themes are ready-made website designs that instantly give your site a professional look. Each theme contains a comprehensive design package—including color schemes, typography, and pre-designed page layouts—to give your website a cohesive look and feel. There are thousands of WordPress themes, ranging from free to premium, so it’s easy to find a design that suits your brand’s visual identity.
With 97% of people researching local businesses online before visiting, a well-designed and professional website significantly increases the chances that potential customers will walk through your door
WordPress.com offers users even more options, with additional themes created by our in-house developers, including many themes designed specifically for online businesses.
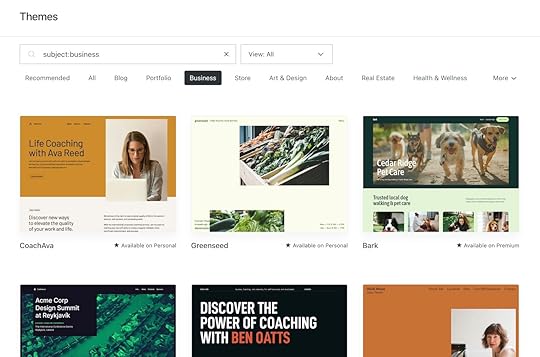
If you still can’t find what you’re looking for, anyone on a Business plan or above can buy and install third-party themes, offering endless options for customization and design.
3. Plugins Make It Simple to Extend Your Site’s FunctionalityIf you need a feature or tool that isn’t available out of the box with other visual website builders, your only choice is to hire a developer to build you a custom solution.
WordPress offers a better option: plugins. Since WordPress is an open-source platform, any developer can build plugins you can download to extend your site’s functionality—think of them as apps for your website. With thousands of free and paid plugins available, endless opportunities exist to customize your website’s functionality to meet your personalized needs.
Popular plugins give small business websites additional functionality like:
Contact forms: Enable customers to complete and submit digital forms on your site.SEO: Increase your search rankings by optimizing your content.Ecommerce: Sell products directly on your website.Booking and scheduling: Allow clients to book appointments or consultations online.CRMs: Manage customer data directly through WordPress.Email, social, and marketing: Streamline your communications across every platform.Payment processing: Accept online payments or donations.The Jetpack plugin automatically includes a suite of added functionality—such as spam filtering, analytics, and marketing—for all WordPress.com users. Additional plugins are available on the Business plan and above.
 4. It’s SEO-Friendly
Search engine optimization (SEO) is a set of strategies and best practices designed to help your website and content rank higher in search results, making it easier for potential customers to find you. While SEO can be complex, WordPress is built to support strong SEO, supporting optimization necessities like sitemaps and meta tags.
Businesses can also utilize powerful free and paid SEO plugins to help their site rise above the competition. WordPress.com customers on the Business plan and above can rely on Jetpack’s built-in SEO features for optimizing meta descriptions and title structure (or can download an SEO plugin of your choice).
 5. You Fully Own Your Site and Content
One of the biggest advantages of WordPress is that it is completely open-source, meaning you have complete ownership of your website and everything on it. Unlike proprietary platforms that may claim rights to content and designs you create on their platforms, WordPress sites can be easily backed up, exported, and ported from one host to another without limitations. With WordPress, your content is yours—period.
For small businesses building their digital footprint, this ownership provides long-term security. You’re investing in building a digital brand that is entirely under your control rather than renting an online space on someone else’s platform.
6. It’s Secure and Keeps Your Information SafeDepending on where you host your business’ WordPress site, robust security features should protect your site. For example, every WordPress.com site has built-in security features like SSL, DDoS protection and mitigation, and barriers against brute force attacks.
WordPress.com users get even more security features out-of-the-box with Jetpack for WordPress.com. Even businesses with Free plans get great benefits with Jetpack, including built-in spam protection and site activity logs, with additional security features included at higher tiers.
7. It’s Simple to Set Up Access for Multiple UsersRunning a business means delegating responsibilities, and WordPress makes creating multiple logins easy for managing different aspects of your site. The platform’s robust user management system allows you to create multiple users with varying permission levels, from Administrators who can make site-wide changes and handle site billing, to Contributors who can only draft content.
This means your marketing team can update your blog, your sales team can manage product pages, and your customer support team can respond to inquiries—all without compromising the security of your site. As your business grows, this flexibility becomes increasingly valuable, ensuring that everyone on your team has everything they need and nothing they shouldn’t.
8. You Can Move Your WordPress Site Between HostsUnlike websites built on proprietary software like Wix and Squarespace, WordPress websites can be easily moved between hosts without having to be rebuilt. This flexibility means you can always move your website to a new hosting provider.
Already have a WordPress site? Consider switching to WordPress.com for top-of-the-line performance and support. Our site migration service makes the transition smooth and hassle-free, ensuring your business website stays online throughout the entire process.
9. There’s a Massive Community to Support YouWhen you choose WordPress, you’re joining the largest website community in the world. That means there are endless opportunities to learn, troubleshoot, grow your skills, and build community with like-minded users.
WordPress offers public forums where developers and users alike come together to answer questions, and WordPress.com also provides its own dedicated forums where our active community is always on-hand to help. These communities can be invaluable resources for small businesses without dedicated IT staff to answer urgent questions about their websites.
Want to take things offline? WordPress also hosts in-person events and gatherings all around the world.
 A snapshot from WordCamp Asia 2025—a gathering of nearly 2,000 WordPress community members!10. Why WordPress is a Smart Investment
Building and maintaining a professional business website doesn’t have to break the bank. WordPress is maintained by a huge community of dedicated designers, developers, and community builders, so the software itself is free, meaning you get a ton of value for just the price of hosting and your domain name.
Many small businesses choose a managed hosting provider like WordPress.com that will maintain your website for you. WordPress.com offers high-value plans for every budget, starting with Free plans and scaling up to support businesses of every size.
Why Choose WordPress.com for Your Small Business Website?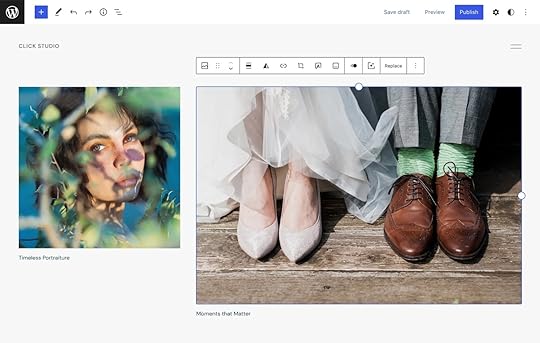
While WordPress itself is a powerful platform, WordPress.com offers specific advantages that make it an exceptional hosting choice for small businesses:
WordPress.com is Lightning FastWhen choosing a hosting provider, you need to consider how fast your website loads for users. Slow-loading sites create a poor experience for visitors and can hurt your search engine rankings. WordPress.com consistently ranks among the fastest providers in third-party speed benchmarks, outperforming many competitors in load time.
This means your customers will always enjoy a fast experience on your site, reducing bounce rates and improving conversions. Our infrastructure is optimized specifically for WordPress, ensuring your website will experience peak performance without requiring any technical knowledge on your part.
Maintenance Done For YouOne of the biggest challenges for small business owners is finding time to maintain their website. Because WordPress.com is managed hosting, you don’t need to perform routine maintenance yourself.
We automatically run all the necessary updates, including security patches, WordPress core updates, and plugin updates. WordPress.com also has 99.999% uptime, so you don’t have to worry about your site going down.
This hands-off approach means you can focus on what you do best—running your business—while we ensure your website stays current, secure, and professional.
Unlimited BandwidthGrowing businesses shouldn’t be penalized for success. While some hosts charge you more money when your web traffic grows, WordPress.com will keep you online for one price, no matter how much traffic you receive.
This predictable pricing is crucial for businesses that may suddenly experience a surge in visitors, whether because you’re running a promotion, experiencing seasonal traffic spikes, or receiving an unexpected shout-out from a publication or influencer. You can rest easy knowing that you’ll never face surprise charges or experience declining site performance at the moments when your website matters most.
Customer SupportEven with the most user-friendly platforms, questions will inevitably arise. Our comprehensive support platform is there for you, offering tons of step-by-step guides, AI-powered answers, and for paid plans, live customer support. We’re here to ensure you can successfully build, launch, and grow your new website.
From technical issues to guidance on best practices, our experienced support staff can help you overcome obstacles and make the most of your WordPress.com website.
Get Your Business Online with WordPress.comIn today’s digital world, having a strong online presence isn’t just an option for small businesses—it’s necessary. WordPress offers the perfect balance of power, flexibility, and ease of use, making it the ideal platform for businesses of all sizes.
With WordPress.com, you get the benefits of managed hosting, top-tier performance, and expert support. And because WordPress is so flexible, you can start small and add features as your business grows, ensuring you’re never paying for more than you need.
Ready to take your business online? Build your site with WordPress.com today and join the millions of successful businesses that trust WordPress for their online presence.
Get WordPress.com for your businessMarch 4, 2025
How to Write a Blog Post: A 14-Step Blueprint for Excellent Content
Imagine you just checked your favorite blogger’s website and they did it again. Their latest post is flawless—engaging, well-written, and full of value. If only you knew how to write a blog post like that.
How do others do it? How do they write post after post, and it always comes out right? Why can’t you seem to do the same?
Here’s the secret: all successful bloggers have a process. They follow repeatable steps that result in a polished, high-quality post, almost like it’s on autopilot.
Here’s our step-by-step guide to writing blog posts that will wow readers, please search engines, and help you grow your blog.
1. Choose a Topic That Stands OutThe first question is what you’re going to write. You want to cover topics that meet the interests of your audience. Otherwise, why would they frequent your blog or find your posts in their search results?
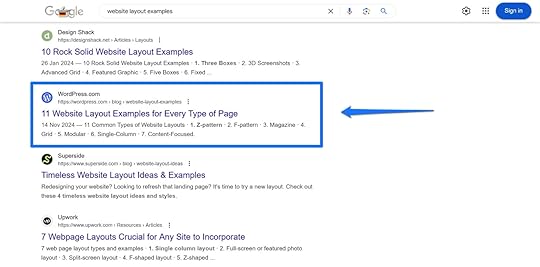
There are several ways to uncover topics:
Do keyword research: Find phrases your audience types into search engines to learn what they are interested in. You can use tools like Keywordtool.io, Ubersuggest, Semrush, or Ahrefs for that.Look at trending topics: What’s something everyone in your industry is talking about right now? Providing a resource about that topic may be timely and helpful for your readers. Check your competitors: Look at existing blogs and blog content. What are others writing about? Are there any gaps? Is there anything you can add to the conversation?Lean on your interests and experiences: Choose a topic that excites you and that you know a lot about. When you talk about something personal, your enthusiasm will shine through and help you be authentic. Read forums: Check Reddit, Quora, and other online communities to see what people in your area of expertise want to know more about.Look on social media: Keep your ear on conversations happening on social platforms to find topic ideas.Cover reader comments and questions: Gather ideas from comments or emails from your existing audience.When deciding on a topic, try to find a fresh angle and include your unique insights to add value beyond basic information.
By the way, if you come up with more than one topic, feel free to add the others to your editorial calendar so you can come back to the others later.
2. Adopt a Reader-First MindsetBlogging is all about your audience. Who you write for should always be at the forefront of your mind when writing a blog post because it’s their questions you need to answer.
To be able to do that, you need to get to know your readers. Writing a blog post is like buying a birthday present; it’s much easier when you know the person you want to give it to well.
Ask yourself questions like:
Who is this content intended for? Who will benefit from this post?How do they feel about the topic and why?What are they most interested in?What questions do they have?Which problems are they trying to solve?What have they tried before, and why hasn’t it worked?By clarifying these questions, you can put yourself in your readers’ shoes and deliver what they need.
3. Determine the Type of Blog Post You Will WriteYou can cover a given topic in many different ways, but the right approach depends on the topic, audience, and outcome you are trying to achieve. Are you trying to educate, entertain, persuade, engage, inform, or something else entirely?
There are a ton of different blog post styles, but here are a few common ways to structure a blog post:
List posts: A blogging classic, and for good reason. These types of posts are easily digestible by your readers because the topics are naturally divided into numbered sections. This article is a good example of that!How-to guides: These provide your readers with step-by-step instructions for how to achieve a desired outcome.Personal stories: You can share personal experiences and lessons learned through these types of posts.Case studies: Report on a product or service and how it helped produce a certain outcome, usually for a customer.Feature articles: Provide an in-depth analysis of a singular topic, like our post about PHP.Interviews: Talk to someone who knows more about a topic than you, or interview several people for an expert roundup.Product reviews and comparisons: Evaluate a product or service, or compare several with one another.News articles: Provide time-sensitive updates on your industry or your company.This list isn’t exhaustive, and you can also combine post types. For example, how-to articles are also often list posts.
If you’re not quite sure which post type best suits your topic, check out which formats are already ranking for that keyword.
For example, when you google “bread baking,” most of the results are recipes. If you want to appear in search results for this keyword, you will likely also want to post a recipe with your own spin.
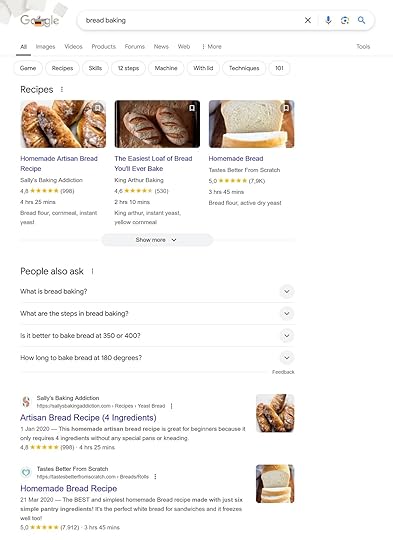 4. Craft a Compelling Headline
In Ogilvy on Advertising, legendary advertiser David Ogilvy wrote that five times more people read a headline than the body copy.
That means, your headline is the main element that decides whether someone clicks on your post in search results or on social media.
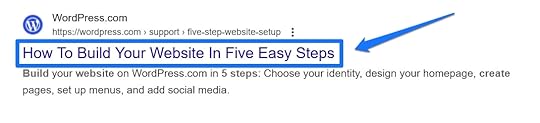
For that reason, you should spend plenty of time crafting it, writing several iterations and trying different angles, formats, and wording.
Here are some tips for writing an effective headline:
Be descriptive, as readers should be able to clearly understand what your post is about from that headline alone (or intrigue them enough to click through to read the whole post)Use emotional, curiosity-driven, or benefit-focused wording to hook readersKeep it concise, ideally under 60 characters, so your headline doesn’t get shortened in search resultsInclude numbers in your headline. They set clear expectations and make information appear more easily digestible.Use brackets and parentheses to provide additional information and context as well as make your headline stand out visuallyMention your main keyword/topic, preferably toward the beginning, so anyone skimming search results can easily tell what your post is aboutHere are examples from our blog that use these principles:
11 Website Layout Examples for Every Type of PageHow to Get Web Design Clients: 12 Practical Tactics That WorkHow to Create a Website Mockup in 5 Easy Steps (+ Examples!)A good way to get started is to familiarize yourself with common headline formulas. You can also consider using a headline analysis tool like those by CoSchedule or Sharethrough.
Finally, if you’re struggling with writing an intriguing headline, you can revisit it after you finish writing the blog post. Sometimes that’s easier because you’ll have a better sense of the main message, key takeaways, and tone. With that clarity, you can craft a headline that grabs attention and accurately reflects the value in your post.
5. Outline Before You WriteCreating an outline means laying out a roadmap for your work; you can draft its overall structure and evaluate your main points.
An outline makes your blog post writing much easier because it’s a lot more comfortable to work alongside a roadmap than it is to try creating a ready-to-publish blog post out of thin air.
To set up your outline, first plan your main sections, like the introduction, main points, and conclusion. If you’re blogging on WordPress, you can easily do that with headings directly inside the editor.
Use H2 for main sections, then break them down further with H3 and H4s. Switch on the Outline feature in Document Overview in the top-left corner for an overview.
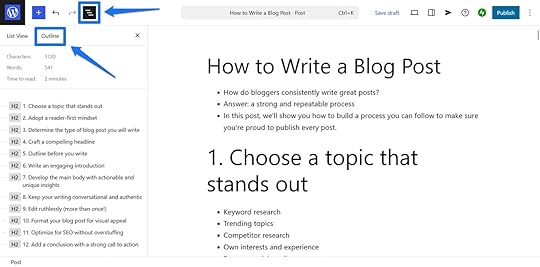
Then you can brainstorm the content in each section. Jot down important items as bullet points or lines of text. Make sure you cover every important aspect of your topic, adding your unique experiences or perspectives to each point. Optionally, include links to sources or examples you are going to use to support your ideas.
Finally, examine your outline for logical flow—each section should naturally lead into the next.
6. Write an Engaging Blog Post IntroductionThe best way to draw readers into reading your blog post is to start with a hook. Hooks can come in the form of an interesting idea, a bold statement, a question, a story, or a relatable scenario.
Jon Morrow, who is one of the most prolific bloggers out there, definitely manages to do that with his introductions.

Once you have hooked readers, convince them to keep reading by clearly stating what they’ll gain from your post. This makes it much easier to move them on to the main event.
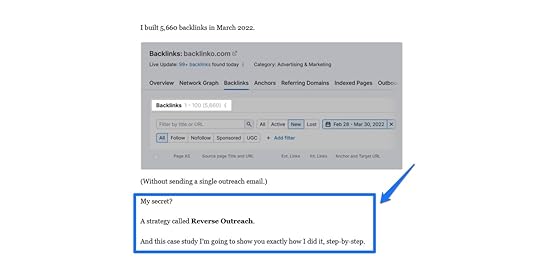
Be aware that readers are busy, so keep your introductions concise and free of fluff.
Sometimes it’s helpful to write your introduction last; having the main body of your post ready can help you have a better understanding of what to say in the beginning.
7. Develop the Main Body with Actionable and Unique InsightsThe body of your post is why readers came to your site in the first place. It’s where you address what’s most important to your audience—their problems, questions, objections, and fears.
Your first job is to simply fill in your outline. Build out the points you noted with examples, resources, and additional information.
It’s not just about what you say but also how you say it. To make the main body most effective:
Strive for clarity and a logical order.Explain concepts and jargon not everyone may be familiar with.Link to trusted sources to support your arguments.Include links for additional resources where readers can go to learn more about the topic.Provide examples and personal anecdotes to clarify and amplify.Plan space to use visuals to further enhance your message.8. Keep Your Writing Conversational and AuthenticA blog post should feel like a conversation with a friend—write the way you talk. Write your blog posts the way you talk, and let your tone, humor, and quirks shine through. This introduction for a post on Pinch of Yum is a great example.

Bringing warmth and humanity into your writing helps readers connect with the real you instead of a fake blogger persona. In contrast, stiff and formal language makes your writing dull, lifeless, and hard to read.
A great way to make writing relatable is to tell personal stories. Make points by sharing anecdotes about yourself and your friends or family. Communicate your own struggles or what event made you want to look into this particular blog topic. Discuss how you were feeling and take readers on an emotional journey.
Finally, keep it simple. Simple writing is clear writing. Avoid the urge to use long paragraphs and complicated words.
You will find that writing simply is its own challenge that takes plenty of practice, but it makes your blog post more accessible and personable.
9. Edit Ruthlessly (More Than Once!)The essence of writing a high-quality blog post is editing and rewriting. That also means you shouldn’t despair if the words don’t come out right the first time around. The first draft doesn’t matter; it’s only supposed to give you a starting point, not a finished product.
When editing, be sure to:
Correct spelling and grammar mistakes.Cut unnecessary words and fluff.Strengthen clarity, logic, and flow.Ensure everything is factually correct.Add links and other important elements.Reading your blog post out loud mirrors how readers process it in their minds. It helps you get a better sense of how the text sounds, if it flows well, and if it’s clear.
In addition, because editing is so important, it’s best if you do it more than once. Each additional pass strengthens your blog post.
For best results, put some space between writing and editing. Come back to your article the next day with a fresh mind and some distance. In addition, you can use tools like Grammarly or Hemingway for some automated help or ask someone you trust for their input.
10. Format Your Blog Post for Visual AppealThe presentation of your content matters as much as what you say in it. If you write your blog post in a way that it’s overwhelming to look at, it turns readers away before they have time to give it a chance.
One part of the presentation piece is formatting your post for readability by:
Using short sentences and paragraphs.Including bullet points, lists, and tables.Using enough headings and subheadings.Bolding or italicizing text for emphasis.Healthline does this very well—shorter paragraphs encourage readability and bold text draws your eye to important text.
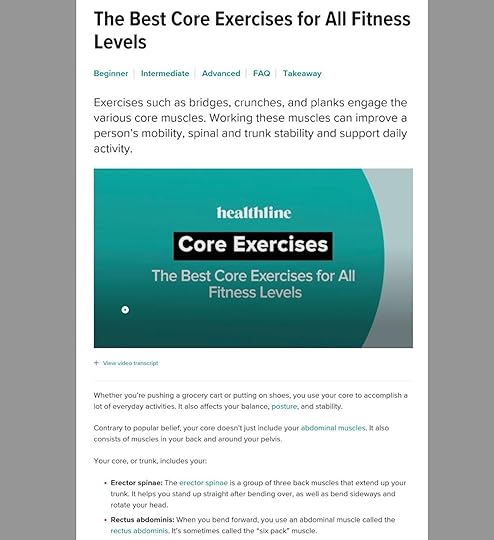
In addition, your blog post shouldn’t be a text-only experience. Enhance it with relevant visuals to help break up the text, make your post more engaging, and clarify key points.
Consider adding some of the following visual elements to your blog posts:
ScreenshotsPhotosStats and graphsQuotesInfographicsEmbedded social updatesGIFs and video embedsWhen you’ve finished formatting your post, scroll through and see how it makes you feel. And don’t just do this for the desktop version—also check how it looks on mobile, as many readers will visit your site on their mobile devices. In fact, the majority of internet traffic now comes from smartphones so your blog post also needs to be readable and appealing on small screens.
11. Optimize for SEO Without OverstuffingPolishing your blog post for search engines helps readers find your content when they search for specific topics or keywords.
Good SEO means mentioning your main keyword naturally and including variations, synonyms, and secondary keywords. Additionally, include links to relevant posts and pages on your blog, as well as to credible external sources. It helps you establish your expertise and gives readers natural next steps if they want to learn more.
After that, it’s important to optimize the parts of your post that appear in search engines:
Post URL: Make the URL short and descriptive, divide words with hyphens, and include your main keyword (e.g., yourgroovydomain.com/chocolate-chip-c...). Title : Your title tag could be your headline, or you could further optimize it for search results. If you’re on WordPress.com, you can easily optimize your post’s title tag with the Jetpack plugin.Meta description: This is text that may appear beneath the post title in search results. Use it to accurately summarize the post content and include the main keyword to encourage readers to click through to read your full blog post. Image alt text : You can use this to describe image content for search engines and accessibility. But don’t overdo it. Over-optimizing will do more harm than good. Write your blog post for people first, meeting their needs and search intent.
12. Add a Conclusion With a Strong Call to Action (CTA)You have multiple ways to finish your article:
Give a summary: Sum up the key points you covered in your post.Provide a takeaway: Leave readers with one main idea, often an angle you established at the beginning of the article.Redirect readers: Link to another article on your blog so readers can dig even deeper into the topic or a related topic.Leave a bonus tip: Offer one final tip to readers as they apply the knowledge in your post.In addition, you should leave your audience with a call to action. After all, the goal of a blog post isn’t to just attract traffic—you’re usually trying to achieve an additional outcome, like building leads, growing your newsletter, or selling a product.

But to do that, you need to clearly and explicitly tell readers what you want them to do. This is known as a “call to action” and might prompt readers to:
Leave a comment.Share the article.Sign up for your email newsletter.Download a free resource.Read more blog posts.Check out your shop.You can also have more than one CTA that may take one of these forms:
A headingSimple textA button (for example, using social sharing plugins and the Sharing Buttons block)A formAn image13. Publish and Promote Your Blog Post StrategicallyAt this point, your blog post should be ready to go live and be published.

Publishing content is just one half of running a successful blog—the other half is promoting your content. Without a plan to spread the word, your blog post is less likely to get the traffic it deserves.
We have 21 different ways to increase blog traffic listed here, but here are a few ideas to get you started:
Share on social media: Post key insights on social networks with a link to the original post. Use appropriate hashtags, attractive visuals, and other ways to increase reach and attention. Automating social sharing makes this a lot easier.Send your new post in a newsletter: If you already have an email list, be sure to let subscribers know about your latest post.Share it in relevant communities: There are many places where members of your audience congregate, including Discord, Reddit, Slack, Quora, and Facebook groups.Repurpose your article: Turn your blog post into other pieces of content to increase reach. This could be a LinkedIn post, Bluesky thread, script for a video, slide deck, infographic, or Medium article.Part of content promotion is also keeping existing blog posts up to date. You spent all this time getting each article ready for search engines—it would be a shame to just let it slide into obscurity over time.
Therefore, regularly revisit older posts and update them with the latest information, improve the writing, and use newer visuals. This keeps them fresh and relevant as well as helps you retain search engine positions.
14. Track Performance and Improve The final step in writing a blog post is tracking its performance and iterating on it. For this purpose, you can use analytics tools like:
Jetpack StatsGoogle Search ConsoleGoogle AnalyticsThey allow you to track search engine performance, views, reader engagement, conversions, comments, shares, backlinks, and more. This helps you understand what kind of content resonates most with your audience and what doesn’t.
This is invaluable information because you can use it to grow your blog. Figure out what makes existing posts work and apply that knowledge to refine your content strategy and blog writing process.
What Kind of Blog Post Will You Write?Writing a gripping and informative blog post is neither an accident nor raw talent. Most of it simply comes down to knowing what your readers need and applying that knowledge. The rest is just practice.
Use the blueprint above as a basis to step up your blog post game. Add to your own blueprint as you continue to write blog content by integrating your own insights and findings to make it your own.
We want to hear from you! Leave a comment below—what’s the top tip you’ll apply to your next blog post, and what will you write about?
Tim McGiven's Blog

- Tim McGiven's profile
- 1 follower

