
Ruth Soukup's Blog, page 66
February 17, 2016
Easy Overnight Oatmeal

I don’t know how things are in your house, but in our house weekday mornings are the WORST. Trying to get my kids up and out the door on time five days a week is just about enough to drive me insane.
This means that anything that can help our mornings run just a little tiny bit smoother is a huge win in my book. Bonus points for being healthy and delicious (and cute!)
My kids love these little oatmeal cups, and I love them because they literally take seconds to throw together in the evening, while saving us at least 20 precious minutes of frustration in the morning. You can use whatever fruit or berries you have on hand, or use flavored yogurt to mix it up even more.
Any way you throw it together, it is the breakfast sanity saver that might just change your life!
And now to actually make it to school on time….

Here is what you need:
2 cups old fashioned oatmeal
1 cup vanilla yogurt
1 cup milk or almond milk
honey
fresh blueberries, strawberries, or peaches
6 half pint canning jars
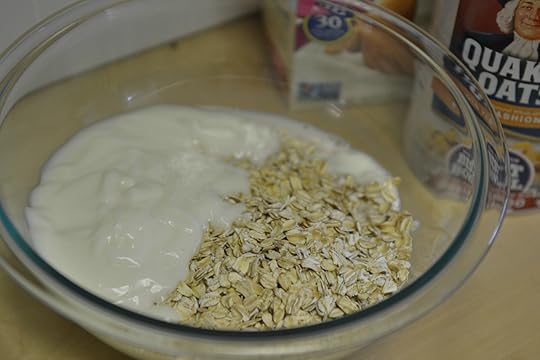
Step 1: In medium bowl, mix together oatmeal, yogurt, and milk.

Step 2: Spoon into 6 half pint canning jars. Cover with metal lids & screw on bands, then shake each jar until combined. Chill overnight.

Step 3: Chop fruit, then top each jar with 1 teaspoon honey and desired fruit and enjoy!

Print This!
Recipe: Easy Overnight Oatmeal
Summary: This make ahead oatmeal is the perfect solution for busy mornings!
Ingredients
2 cups old fashioned oatmeal
1 cup vanilla yogurt
1 cup milk or almond milk
honey
fresh blueberries, strawberries, or peaches
Instructions
In medium bowl, mix together oatmeal, yogurt, and milk.
Spoon into 6 1 pint canning jars. Cover with metal lids & screw on bands, then shake each jar until combined. Chill overnight.
Chop fruit, then top each jar with 1 teaspoon honey and desired fruit and enjoy!
Preparation time: 5-7 minutes
Chill overnight
Number of servings (yield): 6

The post Easy Overnight Oatmeal appeared first on Living Well Spending Less®.


February 15, 2016
How to Get More Use Out of Your Freezer

For most of my adult life, I never fully appreciated my freezer.
But then, a few years ago, after struggling to get dinner on the table while trying to juggle all the other pieces of a busy life, I discovered freezer cooking. If you’ve been reading this blog for a while, you already know ho much I love my freezer meals—and truly, I do. They are convenient, simple, easy, fast, and virtually waste-free. They save you time and money. They even look pretty all stacked up in your freezer. (Because let’s face it–that counts!)
And while we fortunate to have a large upright freezer that makes storing all of our Sunday prep-work a breeze. I realize not everyone is working with ample freezer space. If you’re ready to get serious about freezer meals, you may want to keep your eye out for sales on freezer chests or even watch Craigslist for local options. Having enough freezer space will really help you maximize your freezer usage.
If you have a small space, don’t fret. You can still use some smart storage strategies to really make the most of the space you have. Here’s how:

Freezer Supplies
To make the most of your freezer, you’ll definitely need freezer bags. Regular baggies won’t prevent freezer burn. Plus, Ziploc bags are easy to label, see through and organize. I recommend the gallon size, but you may also want to get some larger and smaller bags, depending on your family size and needs.
You will also need black permanent Sharpie markers. Some people like to make cute labels for their freezer items, but I find they fall off…and then you’re left trying to use your psychic powers to determine if the bag contains Grandma’s Sloppy Joes, Corn and Black Bean Chili, or Taco Soup (all delicious, of course, but still…).
Some readers have told us they like to use disposable aluminum casserole trays to store certain freezer meals, but I’ve found they often don’t cook very evenly, and they’re thin and difficult to work with, so I wouldn’t recommend them. They’re also hard to cover. When your meal is in a freezer bag, you can thaw it by running it under cold water or putting it in the fridge in the morning. You’ll be able to slide it out into a nice glass casserole dish by dinner. (However, many of our freezer meals at LWSL are slow-cooker friendly anyway.)
I’m also not a huge fan of plastic containers. Even if they claim to be BPA free, I’m a little leery of using them for hot foods or in the microwave. While they do stack nicely for some items, I find if you freeze smart (more on that in a minute), you can make your bags work just as well.

What Can You Freeze?
I’m passionate about freezer meals, so of course I can’t get through this post without discussing them in depth, BUT there are so many other things you can freeze as well!
Protein
Stock up on sales on chicken, ground beef, and other protein your family likes, and freeze away! Always, always watch the label (especially with fish) to ensure it wasn’t previously frozen. If it was, do NOT refreeze; it should be eaten immediately. Most meats and fish can be easily frozen, and it’s a great way to really stretch your dollar and stock up on those sale items.
For ground beef, consider browning it first and breaking it up into smaller portions, so it’s ready to go for your spaghetti sauce, tacos or other meals. If you purchase cooked chicken, shred it and store it in sauce to keep it from getting dry. Raw chicken can be cut into portions and divided up into individual bags. If you like to marinate your meat, go ahead and freeze it right in the marinade. It will be flavorful and delicious when you’re ready to cook.

Vegetables
The amazing thing about veggies is that when you freeze them, they maintain their freshness and nutrition much better than if they sat around in your fridge wilting for a week or two. With most vegetables, you can just freeze them as is (broccoli, Brussels sprouts, carrots, etc.). However, I find it’s easier to do a little prep work up front. Cut your veggies into bite-sized pieces and divide them into portions.
You can freeze hot peppers whole, as well as most root veggies. (Potatoes don’t freeze so well raw, but most other vegetables do.) Stew tomatoes and wilt greens such as spinach, kale and mustard greens, then bag them to add to recipes all winter long.
Herbs
How many of us purchase fresh herbs or get a bumper crop out of the garden, then end up tossing out half of them because they wilt and go brown too quickly? Save your herbs by chopping them up, then freezing them in ice cube trays, using just enough olive oil to cover. Once they’re frozen, you can pop them out and store them in freezer bags, ready to add flavor to every dish.
You can also freeze whole ginger quite well. Flavored pastes (like curries and chili paste) can also be frozen, as can leftover stocks and broths. I like to use the ice cube tray method for these items as well: a little cube of broth adds a lot of flavor to rice and other dishes later on.
Fruits
Just like veggies, most fruit can also be frozen for later use in smoothies or incorporated into recipes. Berries are great for muffins, breads, and to add to your oatmeal. They WILL be a tad mushier when they thaw, so I prefer to use them for filling and baked goods rather than standalone dishes.
Melon freezes well. Frozen grapes are fun, cool treats in the summer, as are frozen pineapple chunks, mango and tropical fruits. Kiwis also freeze really well. Avocados can be halved and frozen. (Wrap them tightly.) Peel bananas before they turn brown and toss them in a bag in the freezer. You’ll be able to use them in recipes, whip them into “ice cream,” or add them to smoothies for great texture.

Breads & Bakery
Make cookie dough, roll it into balls and freeze it for easy single-serve, toaster-oven cookies. You can also freeze cookies after they’ve been made. I promise frozen chocolate chip cookies actually taste just as good as fresh ones!
You can freeze uncooked piecrust, pizza dough, and even bread dough. (Take it out to rise.) You can also freeze pre-sliced bread to use for toast or French toast later on. Artisan breads like challah, French, and Italian loaves (think crusty-on-the-outside breads) can be wrapped and frozen whole. Simply heat them up in the oven when you’re ready to serve, and they’ll taste delicious and fresh-baked.
Dairy
Milk freezes just fine. Leave a little room on the top for expansion. Hard cheeses such as cheddar also freeze particularly well. I like to pre-shred cheese so it’s ready to go. That way, I can take out just what I need.
Did you also know you can freeze egg whites? Egg yolks and whole eggs are not as freezer-friendly, but egg whites can also be frozen individually using ice cube trays, or simply place several in a bag.

Leftovers & (of course) Freezer Meals
Freezers work great for nearly every “saucy” meal, soup or dinner you can think of. I’ve even had some success freezing pasta meals. (I leave the pasta quite “al dente” before freezing, and heat it in casseroles and oven bakes.) Lasagna freezes beautifully. Soups of all kinds come out fresh and ready to eat.
Here are a few of my favorite go-to freezer meals to get you started:

DIY Uncrustables (My kids love these, and bonus: you end up with bread trimmings for breakfast casseroles or seasoned crumbs!)

Slow Cooker Bacon & Beans– It doesn’t get any easier than this simple but classic combo of bacon and beans!

Easy Slow Cooker Buffalo Chicken Soup (My husband and oldest LOVE this one.)

“PF Chang’s” Slow Cooker Lettuce Wraps– The whole family gave these a 10!
10 Meals in an Hour Series
All the recipes in these plans have been family-approved, are easy to cook, and use everyday budget-friendly ingredients. This is an ongoing feature to help you really maximize your freezer meals in just one hour!
Part 1- The First 10 Meals in an Hour Recipes
Part 2- No Oven Required Recipes
Part 3- Comfort Food Series
Part 4- Winter Classics Series
Part 5- Flavorful Favorites Series
Part 6- Global Flavors Series
Part 7- Fresh Flavors Series

Freezer Pitfalls
One BIG key to freezer success? LABEL EVERYTHING! Most freezer items start to lose flavor and freshness between 3 and 6 months. So, always include a date on everything so you can keep track of when it went in and when it needs to come out.
When I first started on freezer meals, I can tell you my husband wasn’t exactly “thrilled’ with the idea. I think many of us were traumatized in our youth by grey, lifeless casseroles burned with ice crystals. Freezer-to-crockpot meals just don’t seem so appealing when those are your memories. To get my picky guy on board, I knew we were one lifeless off-tasting meal away from giving up on the idea of freezer meals altogether. Freeze carefully.
Be sure to wrap and seal freezer items very tightly. I like to really squeeze the air out of them, or even use a drinking straw to suck all the air out of the bag before I freeze it. If you aren’t using a freezer bag, wrap, wrap and then wrap again.
To maximize your freezer space (and frankly, to keep things looking nice), freeze everything flat. Lay your bags down on a cookie sheet and use cardboard to separate each bag. Once they’re frozen, they can be easily stacked upright. They’ll look much neater and your freezer will be much easier to navigate.
I go through my freezer meals constantly so I’m aware of what’s going in and what needs to come out. While it may sound a tad daunting, I can assure you it’s much easier than coming home after a long day, rummaging through ingredients, and then trying to throw something together at the last minute. I just do a little inventory on Sundays when I put my new items in the freezer. It’s that simple.
A full freezer stays colder and retains temperatures longer. It also uses less energy. Keeping your freezer stocked will keep everything at an optimum state for re-use. Be sure to freeze items in ways that make them easy to use. A gallon of sauce, for example, won’t be very practical for a dinner for two. Freeze items in smaller containers and pop them out and into bags, so you can use just what you need.
I truly believe that our freezers are one of the greatest and most underrated kitchen tools we have available. It’s amazing how long things can last. You can save both time and money by really getting smart about maximizing your freezer!

Pin It
The post How to Get More Use Out of Your Freezer appeared first on Living Well Spending Less®.
February 12, 2016
15 Things to Buy at Trader Joe’s (and 5 to Avoid)

If there isn’t a Trader Joe’s in your nearest metropolitan area, there’ll likely be one near you soon. Though half of their 400 stores are located in their home state, the California-based chain is now opening in Florida, Texas and throughout the Midwest.
Trader Joe’s founder, Joe Coulombe, started the business in 1967 with the hope of collecting and sharing dishes and food items from other countries and selling branded Trader Joe versions here in the United States. He’d found that as international travel increased, so did people’s taste for foreign and imported foods. He took it as an opportunity to meet this growing shopping need and opened his first deli-style store with the same fun “specialty market” vibe you find in the stores today.
The moment you walk into a Trader Joe’s you notice the atmosphere is a little more casual and approachable. Employees, referred to as Crew Members, sport Hawaiian shirts and are often on the floor and available for customer questions. Even their policies are a little more relaxed than your average grocery store—they have a pretty easy to navigate return process and it’s store policy that you can sample anything you want to; simply ask a Crew Member and they’ll be happy to open the package and give you a taste! The environment is also very family friendly—the store offers kid-friendly shopping carts and in each store there’s a hidden stuffed animal or toy for kids to seek out during the trip with prizes at the register for children who find it.
Not all of these shopping tips are well known and that sometimes means shopping at Trader Joe’s feels a bit like being a member of a secret club. In fact, there are even entire websites devoted to Trader Joe product reviews with very specific lists to personal tastes and experiences.
Realizing that many of you hail from many corners of the country and may or may not share my tastes and my family’s, I’ve tried to keep my list somewhat general. There are some universal items that are good buys for all at any Trader Joe’s (check out this post with one of those lists!) and that’ll probably meet the tastes of many of your family members.

What to Buy
1. Cookie Butter
One of Trader Joe’s most famous items, their Speculoos Cookie Butter is a dreamy concoction that tastes like peanut butter, Nutella, and cookie dough all wrapped into one delicious jar. It’s based on the Belgium Speculoos cookie, a caramel gingersnap cookie. In addition to the regular version, Trader Joe’s also has a Chunky Speculoos version with actual crumbs of ginger snaps. If you’re feeling even more decadent, you can purchase a batch of cocoa swirl, which is exactly what it sounds like.
Cookie butter is good on apples and fruit, toast, pancakes, waffles, and well, pretty much everything. You can use it as a dip for pretzels, fruit or small cookies and watch party guests devour it.
2. Kale Sprouts
After delving into the indulgence that is cookie butter, you probably should try a little something healthy. Kale sprouts are a very cute cross between kale and Brussels sprouts, but even better than either one. They’re a little bit sweeter than Brussels sprouts and more tender than kale (think baby kale).
Try these little guys sautéed in some olive oil with just salt and pepper or oven-roast them for a real treat. Kids love them so they’re a great way to introduce your family to a new green vegetable.

3. Nuts and Nut Butters
Trader Joe’s has a great selection of nuts and nut butters (salted, flavored or plain) and they’re often a few dollars cheaper than grocery store or big-box prices. They have fun flavors like Thai Lime and Chili Almonds, which require no more effort for entertaining than opening a bag. These are a great option if you’re throwing a party and looking for “munchies,” although Trader Joe’s is full of options for snacks in general.
They also have a large selection of nut butters, including variations of peanut butter with added extras like flax and chia seeds. Plus, they offer alternative butters like almond, soy, and sunflower. These are particularly great if your kid’s school is peanut-free.
4. Vegetarian Freezer Meals
One of the most amazing things about Trader Joe’s is that they offer tons of healthy options and NONE of their products contain high fructose corn syrup or artificial colors or flavors. In addition to those healthy factors, they’re also a vegetarian’s dream in term of selection. Depending on your particular preference, there are Indian, Thai, Chinese, Japanese, Mexican and European specialties that are very often meat-free.
In particular, their frozen Indian dinners, frozen bagged rice mixes, and frozen burritos are great. While many of us try to avoid processed foods, these are actually pretty healthy and offer an easy, quick option for lunch on the go.

5. Cheese (Particularly Cheddar)
The cheese selection at Trader Joe’s rivals that of many higher end and specialty shops, but the prices are on par with grocery store, or better. You’ll find unusual options and plenty of choices to stock your next cheese tray. (Pick up some of their Fig and Olive Crisps too while you’re at it.)
The Unexpected Cheddar is one of the most highly rated products by many reviewers, and it’s truly delicious. Its aged taste with hints of Parmesan will make any wine and cheese enthusiast rave. At $3.99, it’s one of the best bargains in the cheese section and really unbeatable.
6. Wine & Beer (but Not the Famous Two Buck Chuck)
Most everyone has heard of Trader Joe’s famous Two Buck Chuck, but there are actually quite a few better values in the liquor section at Trader Joe’s. Many of their prices rival a liquor store or even Costco (without the super-size quantities). If you’re not a wine fan, their liquor section boasts some microbrews that are worth a try and they carry seasonal options that are really great bargains.
7. Cookies, Cookies, Cookies
Trader Joe’s offers cookie options that put the Keebler Elves to shame. The Joe Joe’s are a sandwich cookie that rivals (if not beats) the Oreo in terms of flavor and creaminess. Some of their best offers include ginger snaps, Trader Jacques Macarons, and Trader Giotto’s Amaretti cookies.
It might be the absence of corn syrup or maybe just the fact that there are always such exotic and different options, but their cookies stand out from other store-bought brands. All of their cookies have less of a processed taste; they’re not exactly homemade, but definitely better than your average packaged cookie.

8. Pumpkin Bread & Pumpkin Butter
Though they offer quite a few baking mixes, the pumpkin bread is the best I’ve tried. It’s more seasonally appropriate for fall, but really, any time is a good time for pumpkin bread. Their mixes, again, manage to pull off homemade or at least a better-than-your-average-store-mix taste.
The pumpkin butter is one of my favorites. It’s similar to an apple butter and it can be spread on breads, toast, or served as a fruit dip. There’s a comforting spicy taste to it I just love. Add a spoonful to coffee for an at-home pumpkin spice latte.
9. Oils
Trader Giotto’s olive oil is one of the best bargains around. They have a selection of oils that also includes grapeseed and everyone’s current darling, organic coconut oil. Their prices on oils are better than Costco and grocery store prices, and the California Estate Extra Virgin Olive Oil is good enough to use for dipping bread.
10. Almond Milk
The almond milk prices are $2.99, which is pretty darn good (without a coupon). Their regular milk does not contain rBGH and while not always priced as low as other places, it’s not a bad deal either if you happen to need milk while you’re there.

11. Appetizers
As I said before, party food is where Trader Joe’s really shines. If you’re entertaining you can purchase a few of their Spinach & Cheese Stuffed Mushrooms, Camembert Cheese and Cranberry Stuffed Bites, or Corn Chili Salsa and chips. Add some cheeses, a few nuts, and you’re set for a crowd.
The great thing about many of their frozen items is that they look fancy enough to pass for “I’ve worked all day in the kitchen” and with a little garnish (chopped parsley, a pretty platter) you can easily make them appropriate for any soiree. Being freezer-friendly, you can tuck them away and when the neighbors come over for an impromptu card game or when you need something quick to take to your book club, you have an easy answer.
12. Soaps, Toothpastes and Beauty Products
Trader Joe’s offers a selection of specialty beauty items that are pretty enough to give as gifts, organic, and luxurious enough to skip the trip to Whole Foods or your natural food store. Their Trader Joe’s brand toothpaste comes in Fennel, Propolis and Myrrh flavor and is strangely similar to the Tom’s of Maine version of the same flavor, but at a better price.
They also have Trader Jacques Orange Blossom Honey liquid soap that smells just lovely and a honey oatmeal bar soap that is gift-worthy (at 2 bars for under $2). Now, most of their health and beauty products won’t beat out rock bottom prices at Walgreens, but they make a nice trade for luxury purchases.

13. Chocolate!
This store always has the most unique selection of candy. From Jumbles (pecans, quinoa and caramel) to salted caramel truffles to chocolate covered almonds….they have whatever you need to satisfy the biggest chocolate craving. I recommend the chocolate-covered mini pretzels (but be warned, they’re highly addicting)! The fun thing is that you can try a fun, exotic chocolate treat that beats the prices of Godiva, but is richer and more artisanal than your average Hershey bar.
Go ahead—indulge!
14. Yogurt
Trader Joe’s Nonfat Greek yogurt is creamy, delicious and comes at 32 ounces for $4.99 which (again, without a coupon) is a good bargain. Greek yogurt is incredibly versatile; it can be used as a non-fat replacement for sour cream or as a salad dressing, or you can spruce it up with fresh fruit and maple syrup.
For the kiddos there’s Organic Lowfat Yogurt Squishers. These yogurt-in-a-tube packs are healthier than Go-Gurt with no artificial flavors or preservatives, but they’re still fun enough for any little one to get excited about. They’re a convenient and easy way to ensure your little ones have a healthy protein-friendly snack.
15. Frozen Fruit
Another bargain at Trader Joe’s? Frozen fruit. They have blends at $2.99 that are perfect for smoothies and using in recipes. The fruit is frozen whole and really beautiful—I almost felt bad putting it in the blender—unlike some frozen fruit that just looks like a blob. One of the nice things about shopping at Trader Joe’s is that the atmosphere is conducive to healthy choices—I always end up trying something new and fresh. They don’t use GMOs, offer many organic options, and use very few artificial ingredients. That’s really something you can get behind.

What to Avoid
Now, not everything at Trader Joe’s is a bargain or even worthwhile. Grocery stores and bulk warehouse shopping can save you quite a bit on these items that aren’t worth the price at Trader Joe’s, especially if you use coupons.
1. Seafood
The frozen seafood at Trader Joe’s has received mixed reviews at best. They were chastised a few years ago for not using sustainably harvested seafood, and while they’ve worked to remedy that problem, the reviews on their seafood haven’t improved enough to make considering the purchase worth it.
One of the exceptions is their bagged tilapia, which comes in flavored varieties, and their canned albacore tuna. Their tuna is a good product and is available at an okay price if you don’t have a coupon for a mainstream brand like Sunkist.
2. Organic Meats
Most grocery stores sell organic chicken and beef, including Costco and of course Whole Foods. With all of the competition, the small, prepackaged cuts of meat at Trader Joe’s just can’t compete in terms of price or quality.

3. Produce
As a rule of thumb, skip the produce here. They pre-package their produce, so overlooking the environmental impact of over-packaging, you don’t even have the ability to select items yourself. Also, their produce items are priced by unit, not by the pound, and it’s just not competitive selection or price-wise. You’re better off saving your money for the farmers market or shopping your local store’s sales.
4. Flowers
Based on the research we did, Trader Joe’s flowers on the West Coast are better than those in the East and Midwest. Based on our own experience, while their flowers are often priced well, they don’t hold up as long as other flowers and the selection is pretty limited. If you’re picking up a hostess gift, try some chocolates or a pretty bar of soap instead.
5. That Famous Wine
As I said above, Two Buck Chuck might have been the wine that made Trader Joe’s famous, but it’s no longer the biggest draw. There are many flavors and varieties of Charles Shaw brand wine (priced between $2.99 and $3.79 depending on the region), but well….it’s just not that good. In fact, it’s actually pretty bad (though it does make some tasty sangria!)
For a few dollars more you can check out the many, many other decent bottles for under $10 in their wine department and go home with something you won’t have to mask in a sangria or punch. Even if you’re only buying wine for cooking, just a few dollars more will get you something that will add depth and fullness to your meal. Believe me—it’s worth it!

Pin It
The post 15 Things to Buy at Trader Joe’s (and 5 to Avoid) appeared first on Living Well Spending Less®.
February 10, 2016
Simple Chocolate Tart

Oh friends, I cannot even begin to tell you how excited I am about this recipe! Healthy, it is not, (let’s just get that right out of the way), but what this beautifully simple chocolate tart lacks in nutrients, it more than makes up for in flavor!
With just four basic ingredients, this ridiculously easy, decadently rich, and breathtakingly delicious tart comes together in minutes. It has already become our go-to dessert for every gathering, and after just one bite I’m pretty sure you’ll see why!

Here is what you need:
1 pre-made graham cracker or chocolate graham crust
2 cups heavy cream
1 bag (at least 15oz) high quality semisweet chocolate chunks (preferably Ghiradelli)
1 teaspoon vanilla extract
whole strawberries for garnish (optional)
whipped cream for garnish (optional)

Step 1: Carefully bring heavy cream to a boil in a heavy sauce pan over medium high heat; add vanilla and set aside.

Step 2: Process chocolate chunks in food processor until ground into a fine powder. With processor running, slowly pour hot cream and vanilla in a slow steady stream until fully blended. (Stop to scrape sides if necessary.

Step 3: Pour mixture into crust and chill for at least 3 hours or overnight. Garnish with strawberries and/or whipped cream, if desired.

Print This!
Recipe: Simple Chocolate Tart
Summary: This deliciously sinful chocolate tart requires only a few ingredients and is an impressive way to end any meal.
Ingredients
1 pre-made graham cracker or chocolate graham crust
2 cups heavy cream
1 bag (at least 15oz) high quality semisweet chocolate chunks (preferably Ghiradelli)
1 teaspoon vanilla extract
whole strawberries for garnish (optional)
whipped cream for garnish (optional)
Instructions
Carefully bring heavy cream to a boil in a heavy sauce pan over medium high heat; add vanilla and set aside.
Process chocolate chunks in food processor until ground into a fine powder. With processor running, slowly pour hot cream and vanilla in a slow steady stream until fully blended. (Stop to scrape sides if necessary.
Pour mixture into crust and chill for at least 3 hours or overnight. Garnish with strawberries and/or whipped cream, if desired.
Preparation time: 5-7 minutes
Cooling time: 3 hours or overnight
Number of servings (yield): 8
* * *

Pin It
The post Simple Chocolate Tart appeared first on Living Well Spending Less®.
February 9, 2016
Want to Learn More About Blogging? Join This Free Training!

I have been writing this blog, Living Well Spending Less, for a while now, since July 2010. If you’ve been reading for that long, you’ve certainly seen this site go through its fair share of changes. From it’s humble beginnings on Blogspot, where I mostly shared snippets from my day-to-day life and my coupon shopping adventures, to what it has since grown into—an extensive resource site offering practical solutions to everyday overwhelm.

When I started LWSL, I was a stay-at-home mom to two toddlers, trying to find a way to fill my very long days with something other than filling my cart at Target. My husband and I had been fighting a lot about money, and I figured blogging about this adventure of trying to live well on a budget would give me something to do.
Little did I know!
But almost immediately, I knew I had stumbled upon something special, this whole other world of blogs and blogging and bloggers that I wanted to be a part of. Within just few weeks of starting this blog I told my husband that my goal was to make enough money blogging that he could quit his job.
He told me that was quite possibly the dumbest thing he had ever heard.
“You can’t make money on a blog,” he said, “it’s just not possible!”
I can’t really explain what made me keep going, even in the midst of my husband’s complete and utter disbelief, but I just somehow knew that this was the path I was supposed to be on.
And so I set out to learn everything I could about blogging—how to be a better writer, how to grow my traffic, and how to actually get paid for all the time I was putting in. I’m not going to lie—it was hard sometimes. I got very frustrated. I made a lot of mistakes. Often I felt like giving up.
Eventually, though, it started to get a little easier. Though I made my share of missteps, I learned a lot of valuable lessons along the way too, and things started to come together. My traffic started growing, as did my income. My husband gladly ate his words (and even apologized!), and in April 2013, he left his job as an aerospace engineer to be a stay-at-home dad.
Living Well Spending Less continued to grow too, to a thriving community of more than one million monthly readers, and into a business that supports not just my own family, but the families of my team members as well.
But more importantly, the resources that I share here are helping people live better lives. Every day I receive emails from readers whose lives have been impacted by words I’ve shared, who feel more organized, more balanced, more motivated, and more financially free. So while I’m thrilled that I am able to make a living doing what I love, what I’m most excited about is the opportunity to truly make a difference in the lives of the community here.
But this story doesn’t stop with me.
You see, I’m sharing this today, even though I very rarely talk about the business side of blogging here at LWSL, because I know there are some of you out there who have a message you want to share with the world as well. Maybe it is a struggle that you’ve managed to overcome, or a passion for something that you know others would relate to. Maybe you have an idea for a small business that you would like to promote, or maybe you feel called to ministry but aren’t sure how to best reach people where they are.
Maybe you’ve thought about blogging but aren’t sure where to begin, or whether it is even right for you. Or maybe you already have a blog, but you feel stuck spinning your wheels, and don’t really now how to gain the traction to get it going.
If that’s the case, I’d like to invite you to join the free video training series that I am hosting next week called Blogging Made Simple. It is sponsored by my blogging course, Elite Blog Academy, and it offers some very practical tips that you can implement right away for creating content that gets noticed and shared, and for building a successful blog.

The training is absolutely FREE to join, and it will give you a great idea of whether blogging might be the right path for you, and what to focus on first if you do think it is something you want to try.
The first video in the series will be sent out on February 16th, so be sure to get signed up before then! To join, simply click the button below!
Pin It
The post Want to Learn More About Blogging? Join This Free Training! appeared first on Living Well Spending Less®.
February 8, 2016
How to Cut the Cost of Having a Baby

This is a Guest Post from Brittany at Equipping Godly Women
It’s no surprise that having a baby can be incredibly expensive. Between the doctor’s bills, the hospital bills and all of the things a new baby needs, the costs can really add up quickly. In fact, according to this article on Parenting.com, parents pay an average of $8,802 per child in prenatal, delivery-related and postpartum healthcare charges alone.
Thankfully, just because other parents are paying this much (and more!) to birth their babies does not mean that you have to do the same. It is possible to slash these costs dramatically, saving yourself thousands of dollars in the process, and it probably won’t even take you long at all. You just have to know how.
Whether you’re pregnant currently or you hope to be soon, now is the time to start thinking about how to cut the cost of having a baby. Don’t blindly accept over-inflated hospital bills, thinking that you don’t have a choice. Use these seven tips to save big.

1. Check Your Insurance Coverage Before You Get Pregnant
Just because you have insurance doesn’t mean that your pregnancy is covered. The insurance I had with my second child didn’t cover pregnancy-related expenses at all, and the insurance I had with my third child did cover pregnancy–but not at the hospital I wanted to deliver at.
Take the time to thoroughly look over your insurance coverage before you get pregnant to make sure it covers everything you think it does. Then, call your insurance company and talk to a representative to make sure you are understanding your policy correctly and not forgetting any important details.
Don’t just consider the uncomplicated birth you hope to have either. Make sure you are covered in case the unthinkable happens. Will your insurance cover you if you have a medical emergency and need to stay in the hospital for an extended period of time? What if your baby has complications? Will your baby automatically be covered from birth or does he or she need to be added ahead of time?
While calling the insurance company is rarely fun, this is one phone call you won’t want to put off. The sooner you check your coverage, the more time you’ll have to shop around for different insurance or to investigate other options, if needed.

2. Call Around to Compare Rates
Even with insurance, the price you’ll pay for prenatal care and labor and delivery can vary widely depending on where you go and who you see. Don’t choose your doctor or hospital without doing a little research first. Consider location, credentials, and recommendations from friends, but be sure to look into the price differences as well.
Call around to various doctor’s offices and ask questions such as:
How much does it cost to have a baby through one of your doctors?
Does this cost include both prenatal care and delivery charges?
Does it include a six week check-up for me or the baby’s first well-baby visit?
Do I need to pay as I go or am I billed after baby is born?
What medical tests am I likely to have done that I will also need to budget for? (Ultrasounds, blood work, etc.)

3. Ask About Available Discounts
Don’t have insurance? The cost may not be as bad as you think. Call the hospital and doctor’s office ahead of time and ask if they have any available discounts, such as a “no insurance” discount, a “cash” discount or a “pay in full” discount. If they say they do, be sure to get as much information as you can. Write it down so you don’t forget and so you can hold them to it later.
As someone who often hasn’t had good insurance coverage, I can tell you most places are willing to work with you! Every time I’ve called and asked about discounts, the other party was happy to provide one, and the cost was always comparable to what it would have been if I had had insurance. Hospitals and doctor’s offices don’t typically advertise these discounts, however, so you’ll never know unless you ask.
4. Ask About Payment Plans
Unless you are 100 percent certain that you’ll be able to save up enough money to cover all of your pregnancy-related medical expenses before baby arrives (in which case, good for you!), you’ll also want to ask the hospital and doctor’s office if they offer any sort of payment plans. Again, most places won’t advertise these; you’ll have to ask.
If they do, ask questions such as:
When will my first payment be due?
How many payments will I make?
What will my payments be?
How often will my payments be due–monthly, weekly, or as I can afford to make them?
How long will I have to pay the entire balance?
Will I pay interest on my balance while I’m paying it off?
Is my payment plan based on my credit?
Does the price or interest rate change depending on the number of payments I make?
What happens if I miss a payment or cannot pay the full amount I’m supposed to?

5. Skip Unnecessary Tests and Procedures
When sitting in the doctor’s office, especially as a first-time mom, it can be very tempting to simply go along with everything the doctor says without question. After all, she has a medical license; you don’t. The problem with this, however, is that after seeing hundreds of patients over several years, many doctors begin running on routine–making decisions based on habit, rather than what you personally need.
Your doctor may routinely recommend three ultrasounds, but you really only need one. He may offer additional vaccines or genetic screenings, which you may want to opt out of. Personally, when I mentioned to my doctor that I was feeling unusually tired, he automatically wanted to do blood tests for anemia and thyroid issues, even though my symptoms didn’t fit. I politely declined. You can too, if you feel the tests are unnecessary.
While you would never want to skip necessary tests in an effort to save a few bucks, there may be times when your doctor recommends certain tests more out of routine or as a precaution than because you really need them to keep yourself or your baby healthy. Don’t be afraid to talk to the doctor to find out what’s really necessary and what’s not.
6. Opt for a Natural Birth
While a natural, drug-free birth may not be right for everyone, it can save you thousands of dollars if you’re up for the challenge. I didn’t have an epidural with any of my children, and my first two were well over nine pounds!
With the cost of epidurals typically ranging from $1,000 to $2,000, opting to go without one can save you a significant amount of money. Plus, did you know that women who do have epidurals are more likely to have C-sections? Or that women who don’t have epidurals often have quicker, easier recoveries after birth? A quicker, easier recovery means a shorter, cheaper hospital stay and less money spent on pain medications after the fact.

7. Know How the Hospital Bills
Does your hospital consider a one-day stay to be 24 hours from the time you check in, 24 hours from the time your baby is born, or when the date on the calendar is one number different? This is one question most mothers never think to ask, and yet it could potentially save you thousands, especially if you pull up to the hospital at 11:30 p.m. like we did!
The more questions you ask, the less likely you’ll be to end up paying for something you didn’t need to. Call the hospital ahead of time and ask questions such as:
Assuming I have no complications, how long will be I required to stay?
Are my meals included in the price? What about my husband’s?
Are diapers, pads and pain medication included in the price, or will I be charged extra?
Will my child’s newborn screenings be included in the price, or will I receive a separate bill?
How soon after my baby is born should I expect the bill?
Just because babies are completely adorable and worth every penny does not mean that you should pay more to have one than you need to. Use these seven tips to save thousands on your pregnancy-related medical expenses and put those extra funds aside for later. Trust me, you’re going to need them!
Brittany is a devoted Christian, wife and mother, who loves helping other women
grow in these roles as well. When she isn’t busy taking care of her growing family, you can find her at Equipping Godly Women, where she regularly shares tips, tricks and encouragement to help you be the amazing woman God created you to be.
* * *

Pin It
The post How to Cut the Cost of Having a Baby appeared first on Living Well Spending Less®.
February 5, 2016
Common Billing Errors & How to Spot Them

So you’ve cut your grocery bill in half, tried a spending freeze, and maybe you even have an emergency fund stashed away. Yet, every month, when those bills come due, they still feel like quite a bite. You aren’t alone.
Even though we’ve journeyed much closer to financial peace these days, and we largely have both our spending under control and our savings in a good place, I still cringe when those monthly bills come. During my most difficult times, I would simply not open them and just let them pile up, because I couldn’t face it. It isn’t easy.
Bills can feel more manageable when you become budget savvy and sit down with a plan to get yourself on track. Part of the plan needs to include a careful review of each bill before you pay it. This includes medical bills, utilities, cable, phone and other services, as well as your credit card bills. You may be amazed at what you find in terms of billing errors and mistakes!
It’s pretty scary to think you might be paying extra for things you don’t even use or services you never received. Many common billing errors occur not because of malicious intent by the company, but due to simple human error and miscalculations. Even our trips to the store can include mischarges, sale prices that don’t ring up, and other extras we didn’t expect (or need) to pay for.
Doing your due diligence to review all charges is smart money management. It can help you save in the long run—and we all like to do more of that! Here are some common billing errors to watch for:
Medical Bills
Anyone who’s had a baby or spent time in the hospital for even a minor procedure knows how quickly those charges add up. There used to be a joke about $5 aspirin and $3 tissue charges on hospital bills. Even regular trips to the doctor’s office can seem shockingly priced.
Duplicate Services
One of the more common medical bill mistakes is for duplicate services. Each action a doctor, nurse, or assistant performs at the office has a code. Occasionally, a doctor will mark down a code and a nurse will charge for the same procedure using a different code. Many services are “bundled” now (as in tissues and aspirins are covered under one “hospital stay” code) but there’s still plenty of room for duplicate charges.
Ask for an itemized bill at the dentist, doctor and any time you have a medical procedure. When you receive your bill, scan it for anything performed once, but billed twice.
Charges for Extras
Similar to duplicate charges, extra items can appear on a medical bill as an oversight. I’ve found this to be particularly true at the dentist office, where the hygienist might suggest something to the dentist, who deems it unnecessary, but fails to take it off the computer…then, low and behold, it appears on your bill.
Always scan your bill to ensure you weren’t charged for something that didn’t end up happening—sutures when a butterfly bandage took care of the solution, extra pain medication not administered, etc. If you’ve had a hospital stay, it can be particularly confusing, with so many shifts and different technicians in and out. Carefully read everything listed to be certain you weren’t miss-billed.
Incorrect Diagnosis
Insurance companies and doctors commonly belong to networks, and they store diagnostic information and history in computerized systems. While this means your “chart” isn’t full of paper and clogging up important medical information sharing, it also means something like a misdiagnosis can follow you everywhere.
Not only does this affect your billing because you might be forced to opt for more costly treatments or medication, but it can also result in higher insurance premiums and coverage problems. It can even be life-threatening. For example, if you have an allergy to a particular medication and it’s not noted in your file, you could be provided or prescribed a drug that could cause a very adverse reaction. Alternatively, if you’re listed as having an allergy and it’s not really the case, you may have to opt for a more expensive alternative or you could be given a less effective treatment.
Doctors’ offices usually check any medical allergies and ask for updates on health changes, but if you aren’t asked, never assume it’s shared. Similarly, you can request a periodic review of your chart and diagnoses to ensure you aren’t listed as having a condition such as high blood pressure or elevated cholesterol, if it has resolved itself with diet or was a gestational issue.
In-Network Over-Charges
Another common billing error is when you’re charged beyond the cap set by your insurance company. When a doctor or hospital joins insurance “networks,” they agree to accept the reimbursement payment for procedures designated by the insurance company. They’re only allowed to charge you for your copay and for procedures not covered in your insurance plan. If they’re out-of-network, you may be charged up to the full amount (though most doctors will work with patients who are out-of-network or uninsured to find a scale they can afford).
Always compare your E.O.B. (Explanation of Benefits) from your insurance company with the bill from your doctor’s office to make sure you haven’t been charged above the agreed upon amount. If you have an annual deductable, the healthcare provider may charge you for the appointment, but they should still follow the cost outlined by your insurance provider.
“Rejection” Due to Error or Benefits Issues
Many medical claims get denied, simply because there’s an error on the form. Claims are submitted and reviewed, and something as simple as a missing digit in a social security number or an error in a diagnosis code can cause the claim to be rejected. If this happens to you, don’t panic. Healthcare provider staff members are highly trained to detect and resolve these issues.
Most of the time it’s as simple as resolving the error and resubmitting the claim. It can feel overwhelming and confusing because you may get a notice from both your insurance company saying the claim was rejected and a bill from your provider’s office. Always call to see if there was a billing error—perhaps the claim was submitted twice or there was a coding issue on a procedure.
Also, check with your provider and your insurance company before a procedure, if you can, to ensure it will be covered. Some insurers require a referral to specialists or a certain diagnosis to match a procedure or medication. For example, some antidepressants can also act as smoking cessation medication. Smoking cessation can be seen as “elective” diagnosis and may not be covered, but the same medication might be covered if depression is the primary diagnosis (rather than the secondary).

Phone Bills
We hear a lot about the great offers phone companies are running: special deals to customers who switch, special services, unlimited talk, text, data….and yet, when we get our phone bill each month, it never seems to be the price advertised. Here’s how to be smart about your phone bill and save big.
Cramming
Cramming is what happens when an outside company charges small fees through your phone bill. This might include items like text messages, games or ringtones you never agreed to or signed up for. According to the Federal Trade Commission, consumers should watch for things like, “Member Fee,” “Min Use,” or “Subscription” on their monthly statement.
If you think you’ve been a victim of cramming, contact your phone service provider and ask them to research the charge. You can also report the charges to the FTC (who’s actively cracking down on theses fraudulent scammers).
Data Use and Fees
While data usage, roaming and overage charges might not be “billing errors” per se, they can often be disputed, particularly if you didn’t know you were being charged and/or if it’s an uncommon situation for you. With the latest iPhone update, some users found a data “enhancement” was activated on their phone, resulting in extra data charges from their carriers. (Talk about an un-fun surprise on your phone bill!)
Always review your minute usage, your data and texting. If you’re coming in low each month, you may want to switch to a cheaper, pay-per-use plan (500 texts per month or a set amount of data). Some of us end up paying for data and usage we just don’t need.
Phone Insurance
Phone companies may talk you into an insurance/replacement plan if anything happens to your phone. Be sure to read the fine print before you sign up for these plans. They often include a monthly charge for the life of the phone and only cover it under certain circumstances.
Also check the phone manufacturer’s warranty to see if you’re already covered for damage. You may have paid for insurance when you purchased your device and you’re now paying a redundant charge for the same coverage.
Contract Charges
Paying less for your phone (or even getting a free phone) to be part of a two-year contract can seem like a great deal. However, once you’re locked into a contract, your rate will probably never go down. Instead, paying for the phone in a monthly installment plan and paying less for line access means you have the option of switching carriers, should a better deal come your way. It also means when your phone is paid off, you could see your monthly bill drop significantly.
A Note on Small Carriers
Going for a big provider (T-Mobile, Verizon, AT&T, Sprint) can seem frustrating. Maybe you won’t get the individualized service you like or maybe you aren’t thrilled to be supporting the “big guys.”
Unfortunately, supporting the big guys means you’ll often get better deals on your service. You can always call and renegotiate for the latest deal or ask them how you can lower your monthly payments. It also means you’ll get much better coverage and you won’t risk paying roaming or data-access fees.

Cable & Internet Bills
We’ve discussed the many ways you can lower your cable bill and it’s true—by cutting out cable or cutting back, you can save significantly. However, there are still some billing errors you should watch for on your cable and ISP bills, so you can help ensure you’re maximizing your savings.
Annual Deals
Most cable and ISP companies run annual deals like, “$29.99 for high speed data for ONE YEAR.” Well, after a year passes, how many of us forget to check our bill to see what happened when the deal ran out? Unfortunately, cable and ISPs bank on this forgetfulness. Suddenly, several months have passed and you’ve paid $50 per month for the same service.
If you signed up for your current service on an annual deal, check your bill to see if you’re still receiving the same rate. If you find your bill has increased, call the provider to see if they can lower your rate (most of the time they can). If they say no, it’s probably time to switch.
Bundling
If you bundled services to save money, keep an eye out for continued savings on your monthly bill as well. Bundled services can suddenly be listed individually and you won’t be saving nearly as much as you were when you signed up.
This is again, time to call your provider and point out the increased fee to see what they can do to get things moving in a downward direction. After all, if you kept a service, such as a landline, simply because it was a better deal to “bundle,” you don’t want to pay extra for the service once the deal has run out.
Service Fees
If you’ve switched services or changed to a different speed, you could be looking at a whole new slew of service fees. There’s an installation fee, a technician fee, an annual service charge—the list goes on. Put your foot down on these fees right from the get-go by letting the provider know you’d like to switch or upgrade only if they will wave the installation fees.
Generally speaking, tax and some regulatory fees will appear on your Internet and cable bill, but they should be nominal. With the market as competitive as it is these days, ISP and cable companies are usually willing to waive fees to keep customers.
“Rental” Agreements
A modem rental fee can add up ridiculously fast. Most are $8-10 per month, yet you can purchase a modem for about $50. (But first, be sure to do some research to learn which types of modems your ISP supports.) Paying a modem rental fee isn’t necessarily a billing “error,” but it’s definitely a commonplace item on your bill, so figuring out ways to take it off will certainly save you money.
If you aren’t so tech savvy and you don’t want to be responsible for purchasing your own modem, call your ISP to see if they can do anything to minimize the rental fee—or see if you can upgrade to a faster modem for the same rate. Modems last a few years, so if yours is past its prime, there’s no reason you should continue to be unhappy with it while paying a monthly rental fee.

Utility Bills
There are many smart ways to save on utilities, from turning your use down and being more energy aware and efficient to regular maintenance. Most of us aren’t ready to live off the grid and give up electricity and access to water, so these bills are just part of life. We put them on our automatic pay pile and sort of forget that errors can show up. It’s time to revisit those utility bills!
Overlapping Charges
Just like other bills, utilities are subject to human error. One of the most common errors is overlapping charges from one month to the next. Make sure the date range reflected on your bill coincides with the range on the previous invoice.
Similarly, make sure your invoice reflects your last payment and it was processed and credited correctly. Late fees and other charges can inadvertently occur and if they’re small, they can be overlooked.
Charges from a Previous Owner
If you’ve recently moved, be absolutely sure you’re only paying for charges you accrued. Something as minor as a one-off digit in an address or a missing middle initial can mean you’re getting charged for someone else’s utility usage.
If you rent, this is especially an issue. Billing should always be linked to the person, not the residence. You don’t want to have your credit damaged or pay extra because a previous resident didn’t pay their bill on time. Call the utility company to work it out with them directly, rather than expecting your landlord to make the call. While it’s in their best interest to keep the water running and heat working, they won’t be as diligent about saving you money.
Miscalculations and Misreads
Keep your calculator handy and keep an eye on your previous meter reading. If it’s winter and you just turned on your furnace, or summer and your air conditioning’s running and kids are using more electronics while they’re off school—you can expect to see an increase. If it seems extreme or if it jumps in an unusual way from one month to the next, take a closer look.
Keep your calculator on hand so you can make sure your calculations match the billing (even computers can make errors and rates can be keyed in with an extra zero). If you notice anything that doesn’t make sense, contact the company and ask them to investigate. Similarly, if you’re wondering about a powerline that seems to run from your neighbor’s house or if you see a lot of usage during times you’re away, don’t be afraid to ask. You may be paying for a crossed line or someone else’s power!
Budget Billing that’s Not Rolled Forward
Budget billing makes paying utilities much easier. You’re facing a set amount each month and it’s recalculated annually or bi-annually based on your usage. If you’re up for a recalculation, always check the math to ensure it’s correct and that the right amount is rolled over and applied. So often we trust anything printed on paper must be correct, so we don’t even look unless it’s very unusual.
Your budget-billing rate sets your utility costs for the whole year. So $5 or $10 per month may not seem like a big deal, but it can add up quickly.

Credit Card Bills
Credit cards aren’t “bad,” per se. Of course, we all know they can quickly send our credit and spending spiraling out of control. However, they can also be tools to help us save, gain mileage, and protect us from having our checking account drained in the event of credit theft. We’ve talked before about ways to avoid common credit traps and the best ways to save on your credit bills. There are also a few common billing errors to watch out for.
Unauthorized Charges
This is the biggie. Always carefully check your credit card statement for unauthorized purchases, charges you don’t remember making, and other signs of fraud. Some thieves and scammers use very small amounts so their fraud isn’t readily detected or it’s easily overlooked. Months can go by before you realize you’ve been paying a monthly charge to someone you didn’t authorize.
If you notice anything unusual, don’t hesitate to call your credit card company. Many companies can change your card number and get you a new card in a matter of a day or two. It’s always worth reporting fraud to prevent it from escalating.
Annual & Late Fees
While they may not exactly be “errors,” these extra charges can appear on your bill without warning and should always be addressed. If you’ve received a late fee and your payment was under 30 days behind schedule, most companies will be willing to reverse it. There are times when it literally crosses in the mail, so perhaps the company received your payment just a day or two late.
Similarly, always call to see if you can have your annual fee waived or if you can switch to a card offering no annual fee. While not every card offers this, the market is competitive and most companies strive to keep your business.
Interest Rates
Another thing to watch on your credit card statement is an increase in interest rates. Many credit card companies offer no interest for 6 months or one year, or a very low introductory rate. When the rate runs out, you may see a sudden jump on your credit card statement.
Call your credit card company to see if you can lower your interest rate. If they’re unable to do so, talk to your bank or credit union to see if they can assist you with a lower-interest loan or line of credit to consolidate and pay off your balance.

Other Billing Errors
Billing errors can occur in many other places as well. Any time someone sends you a bill for a service, repair or purchase, carefully read and review the paperwork you’re given. The best time to address a discrepancy or suspected billing error is right away.
Areas to keep a close eye on are:
Hourly rates
Service fees
Interest rates and late charges
Misapplied payments
Mismarked sale items
Unapplied coupons
Prices not as marked
Typically, by the time we get to the checkout counter, or we’re ready to pick up our car, or we’re paying the repairman or hairstylist, we’re focused on getting out the door. This is one of the most common times for errors to occur. We’re in a rush and we don’t feel it’s a comfortable time to ask about a charge. Or we simply don’t remember what price was marked or what we agreed to pay in the first place.
For these moments, I recommend keeping a little notebook, calculator or even jotting down a note in your phone. While saving ten cents on bananas at the grocery story isn’t going to make a world of difference, we all know every little thing adds up.
Carefully check your receipt after a transaction, and don’t be afraid to go to the service counter and point out a discrepancy. Watch the price of items as they’re scanned in and mention to the cashier anything that doesn’t seem right. Check to see your coupons are applied and never be afraid to return something if you get home and it’s broken or defective.
We’re all human and bound to make mistakes. Just make sure other people’s mistakes aren’t costing you extra on your bills!

Pin It
The post Common Billing Errors & How to Spot Them appeared first on Living Well Spending Less®.
February 3, 2016
Vanilla Almond Granola

This is a guest post from Gina of Kleinworth & Co.
I love making things from scratch for my family. Any time I can find a way to recreate something we love I’m all for it. I like knowing that I’m eliminating unneeded ingredients & additives where I can. Because of this I have been making homemade breakfast items for my family for a couple years now. It’s actually easier to do than it sounds & I feel so much better about the things they are eating. I find that for most things, making it homemade isn’t difficult & I usually pay much less for the finished product than I would if I were buy it in the store. Things like this homemade granola can be expensive in the store. But making it at home takes about an hour & gives me enough cereal for several days.
I love the versatility of this recipe too. The kids love to eat it with milk & maybe a sprinkle of fresh berries on top. But I like to add it to a yogurt parfait in the morning or on my ice cream in the evening. You can also adjust the ingredients to your liking by adding in ¼ cup of milled flax seed before baking or maybe some dried fruit once it’s cooled. It’s really easy to get creative with it. But for today I thought I would share my basic recipe I start with. It’s absolutely delicious.
Here is what you need:
4 cups quick oats
½ cup slivered almonds
⅔ cup chopped walnuts
¾ cup shredded coconut
½ cup brown sugar
1 tsp salt
2 tsp cinnamon
⅓ cup coconut oil
4 tbsp raw honey
½ cup water (not pictured)
¼ tsp vanilla bean paste

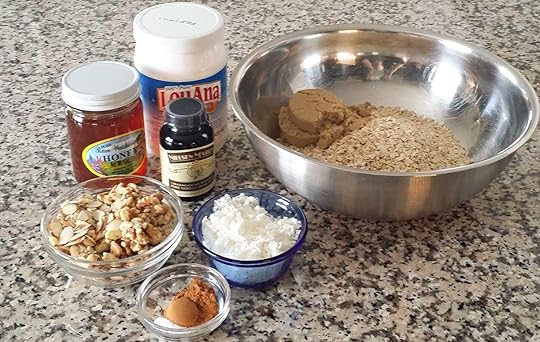
Step 1: Start by preheating the oven & combining all your ingredients in a large bowl. Toss well to evenly distribute ingredients.

Step 2: Transfer to a parchment lined baking sheet & spread in an even layer. This is a ¾ sheet pan- if you don’t have this extra large size you will want to distribute between a couple baking trays. Bake for about 50-55 minutes stirring every 15 minutes or so to keep from over cooking in spots.

I just love that great vanilla & almond combination. If you don’t have vanilla bean paste you can substitute with 1 tsp of vanilla extract. I prefer the paste as I think it gives a deeper flavor, but it’s still delicious with the extract too.
Once cooled you can add in other mix-in’s like dried fruit or mini chocolate chips. The kids love this with some cinnamon/sugar sprinkled on top in the morning. Oh it’s so yummy! The perfect way to start or end your day.
Print This!
Recipe: Vanilla Almond Granola
Summary: This super simple and delicious granola is perfect for breakfast time, snack time or even atop your favorite ice cream!
Ingredients
4 cups quick oats
½ cup slivered almonds
⅔ cup chopped walnuts
¾ cup shredded coconut
½ cup brown sugar
1 tsp salt
2 tsp cinnamon
⅓ cup coconut oil
4 tbsp raw honey
½ cup water
¼ tsp vanilla bean paste
Instructions
Preheat your oven to 350 degrees & line your baking sheet with parchment. Combine all ingredients in a large bowl & mix well.
Spread out on baking sheet & bake 50-55 minutes, stirring every 15 minutes.
Allow to cool completely before transferring to an airtight container for storage.
Preparation time: 3-5 minutes
Cooking time: 50-55 minute(s)
Number of servings (yield):4-6
Gina, author of Kleinworth & Co, is a busy homeschooling
mom to 3 great kids ages 11-17. She likes to find new ways to make life simple & streamlined on a budget. She loves to share easy DIY projects, fun crafts with the kids & a whole lot of recipes, with a few photography tips sprinkled in occasionally too.

Pin It
The post Vanilla Almond Granola appeared first on Living Well Spending Less®.
February 2, 2016
Easy Homemade Condensed Soup

This is a guest post from Melissa K. Norris
In an effort to keep our grocery bill low and also feed my family healthy foods, we’ve learned the easiest way to do this is to make it at home. Not only does it save us time and money, but by cutting out common ingredients in processed foods, it’s allowed my stomach to heal.
I don’t know about you, but I don’t have a lot of extra time in my day. Preparing foods that tastes good (because even if it’s healthy if my kids and hubby hate it, it’s wasted) and are healthy are high on my priority. When I find a from scratch homemade version of something that tastes amazing, only contains real food ingredients, and can be made in just 5 minutes, I’m in!
When I first started reading ingredient labels and investigating the things in the foods I was purchasing and cooking with, I wasn’t very happy with what I found. I embarked on a journey to replace the processed foods we’d come to see as common on grocery stores with homemade versions.
I used to buy cans of condensed cream of chicken and mushroom soup almost every time I went to the store. They went into so many of the casseroles and meals I was preparing. However, those babies can add up and if you start to look at the ingredients… let’s just say they were one of the first things we tossed.
Even if you’re not looking to improve your health, you can make the at home equivalent for less than a dollar, in less than 5 minutes, and that’s with organic ingredients and no preservatives, woot, woot! (I get a little excited about this kind of stuff, if ya can’t tell)
Imagine never having to worry if you have a can of that on hand when you go to prepare a meal and never having to purchase it from the store again. Amazing, right?

Here is what you need:
3 Tablespoons butter (or coconut oil)
3 Tablespoons flour (or cornstarch)
1 cup milk or chicken broth
salt and pepper to taste
1/2 teaspoon garlic or onion powder (optional)

Step 1: Melt 3 tablespoons of butter or coconut oil over medium heat.

Step 2: Stir in 3 tablespoons of flour (cornstarch if you’re gluten free will work, too) and create a thick paste.

Step 3: Pour in 1 cup of liquid. You can use chicken broth, milk, or a mixture of the two. For dairy free use all chicken broth or your favorite non-dairy milk of choice.

Step 4: Stir until liquid is absorbed into paste. Cook over low medium heat for a minute until mixture thickens up. Add in salt and pepper to taste. Add 1/2 teaspoon garlic and onion powder if desired. If mixture is too thick, add in 1/4 cup liquid at a time until desired consistency.
*For cream of mushroom soup, dice up a handful of mushrooms and saute in the butter for 2 minutes before adding in flour. You may also dice up garlic and onion and saute if you don’t have any garlic or onion powder.

Print This!
Recipe: Homemade Condensed Soup
Summary: This easy to make homemade version is healthier and tastes so much better than the canned stuff.
Ingredients
3 Tablespoons butter (or coconut oil)
3 Tablespoons flour (or cornstarch)
1 cup milk or chicken broth
salt and pepper to taste
1/2 teaspoon garlic or onion powder (optional)
Instructions
Melt 3 tablespoons of butter or coconut oil over medium heat.
Stir in 3 tablespoons of flour (cornstarch if you’re gluten free will work, too) and create a thick paste.
Pour in 1 cup of liquid. You can use chicken broth, milk, or a mixture of the two. For dairy free use all chicken broth or your favorite non-dairy milk of choice.
Stir until liquid is absorbed into paste. Cook over low medium heat for a minute until mixture thickens up.Add in salt and pepper to taste. Add 1/2 teaspoon garlic and onion powder if desired. If mixture is too thick, add in 1/4 cup liquid at a time until desired consistency.
*For cream of mushroom soup, dice up a handful of mushrooms and saute in the butter for 2 minutes before adding in flour. You may also dice up garlic and onion and saute if you don’t have any garlic or onion powder.
Preparation time: 2 minutes
Cooking time: 3-5 minute(s)
Number of servings (yield): 1 mason jar
Want more fast and frugal homemade from scratch versions?
Join us for a FREE 5 Day Pantry Makeover: Jumpstart a Year of Healthy Living with Easy, From-Scratch Replacements made in 15 minutes or less.
Be sure to pre-order The Made-From-Scratch Life now to get exclusive access to over $30 in FREE digital bonuses, including exclusive access to The Made-From-Scratch Life Workbook (filled with charts, worksheets, and printables), our 30 Days to Preparedness: Old-Fashioned Skills to Increase Self-Sufficiency, and our 5 Day Bonus Fast Track e-course!
Get all 3 bonuses FREE when you purchase The Made-From-Scratch Life: expires Feb. 8, 2016
Here’s how to claim your bonuses:
Preorder your copy of The Made-From-Scratch Life on Amazon here
Enter your receipt # and name in this form
Check your email for your access to your exclusive bonus download links. (Be sure to check “spam” and promotional tabs, especially if you’re using gmail)
Melissa K. Norris believes that the simple things in life are truly
the best and that everything just looks better in a Mason jar. Her mission is to inspire people’s faith and pioneer roots. Through her popular blog and podcast, Pioneering Today, she reaches hundreds of thousands of people, inspiring them to live their dreams, while sharing easy tips and ways to live frugal, grow it yourself, and make it at home pioneer style. Her advice has been featured in The New Pioneer Magazine, Self-Sufficiency Magazine, and Molly Green Magazine.
Pin It
The post Easy Homemade Condensed Soup appeared first on Living Well Spending Less®.
February 1, 2016
How to Get a Better Night’s Sleep

Chances are, you could use more sleep. We all could. In fact, while I was researching this topic for my upcoming book, Unstuffed: Decluttering Your Home Mind and Soul, I discovered that according to a recent survey by the Better Sleep Council, 53 percent of adult women regularly don’t allow themselves to get the recommended seven to eight hours of sleep per night. In fact, according to a recent Gallup poll, the average amount of sleep for American adults as a whole is only 6.8 hours per night.
Lack of sleep and chronic exhaustion, like excess stress, is related to a whole host of problems, ranging from poor work performance and driving accidents to relationship issues and mood disorders like excessive anger or depression. It also contributes to health risks, including heart disease, diabetes, and obesity. Chronic sleep loss has even been linked to early death. Yikes.
Luckily there are several simple sleep routines and practices we can turn into habits to ensure we’re waking up bright-eyed and ready to face the world. Even if you aren’t a morning person, waking up earlier can help you get more done and getting better sleep makes it a heck of a lot easier.
As an aside, I am a huge fan of the Sleep Cycle App for tracking my sleep. Not only does it make a wonderful, gentle alarm clock, waking me when I am in my lightest sleep cycle, it also rates my sleep quality, which inspires me to get better sleep. I encourage you to check it out and begin using it as you put some of the following ideas into practice!

Stick to a Schedule
Just as you set your alarm to get up in the morning, try setting a regular bedtime. It sounds silly, but we do it with our kids all the time. We know the importance of getting a full night’s sleep—plus we’ve all seen the aftermath of a too-late bedtime. It’s time to apply those parenting skills to your own sleep practices and learn to tell yourself to “Go to bed!”
Make it the same time every night, even on weekends. Aim for something realistic you can hold to. If you’re guilty of burning the midnight oil on a regular basis, consider scaling back in 10-15 minute increments until you’re hitting your goal bedtime regularly.
Keep Your Room Cool…But Not Freezing
Optimal sleep temperature can vary for everyone. Sleep experts say it’s on the cool side, but not so cold you have to pile on the blankets (or you get that dreaded, sweaty/freezing pattern—a total sleep killer). Somewhere around 65 degrees seems about right for most people.
If you’re a flamingo and your spouse is a polar bear, it can be a challenge to find a compromise. Use a breathable comforter made with natural materials and try keeping your feet covered with socks or an extra blanket, which can help your body stay warmer.

Put Down the Electronics Before Bed
This is a tough one, especially for those of us who do some Pinterest browsing before bed or read books on our phone or e-reader. Studies show the light emitted by electronic devices can disrupt our circadian rhythm or natural biological sleep patterns. Try to turn off your electronics for a good half-hour before you attempt sleep. You’ll get a better, more restful sleep.
Watch out for hidden sleep interrupters—digital clocks, lights on televisions, and lights from your phone. Even these small amounts of electronic light can send our brain the signal it’s time to be up and awake.
Avoid Stimulants—Caffeine, Exercise
Personally, I can’t have caffeine after mid-afternoon or I’ll wake up mid-sleep with my mind racing. Each person’s tolerance is different. That said, energy drinks, caffeine and even getting your body geared up with exercise interfere with restfulness. Smokers are especially susceptible to sleep disruption due to nicotine (as if you needed one more reason to quit).
Try to avoid anything that makes you feel stimulated and awake for a few hours before bed. Ease into sleepy time.
Avoid Heavy, Spicy Foods and Alcohol
A nice glass of wine can help you wind down in the evening and relax before you hit the hay. Two or three glasses? You won’t be getting quality or restful sleep. Same thing goes for heavy, spicy or greasy foods.
Every woman who’s been pregnant knows the horrible woes of heartburn at night. It’s awful and impossible to sleep. Heavy, rich foods can have the same effect, which often worsens when you lie down. Avoid the whole issue by steering clear of a pre-bed trip to the freezer for ice cream or a snack of chips and pepper jack cheese.

Make a Bedtime Ritual
Just like creating a morning routine helps you get your day off to the right start, creating a nighttime routine helps you have a great night. Every night before bed, do similar things—this might be doing a sweep around the house to make sure things are turned off and put away, and locking the doors. Wash your face, brush your teeth, and put your clothes out for tomorrow. Turn down your bed, put lotion on your hands…
It’s about doing the same thing each night. Routine helps signal our brain that we’re about to do something familiar. It slows down our mind and creates a pattern. Your body will know when you’ve “put the day away” and it’s time to go to sleep.
Get a Humidifier
If you live in an arid climate, you may want to invest in a humidifier. Your skin will feel moisturized when you wake up, you’ll breathe easier, and you’ll be less likely to snore because the mucus membranes in your nose and throat won’t dry out overnight. Temperature is also easier to regulate in a properly humid room.
Use White Noise
It’s important to have a quiet room to sleep in. Anyone who has ever stayed at an airport hotel knows noise can be absolutely brutal when it comes to disrupting sleep. Using a white noise machine (or an air purifier, fan, humidifier or other soft noise maker) can create a soothing buzz, helping ease you to sleep. (Plus it masks any other distracting noises.)
White noise shouldn’t sound like a wind tunnel or be distracting. I’ve heard hysterical “sleep sound apps” where it sounds like an entire jungle has just invaded your bedroom. If you don’t find birds or running water particularly relaxing, it might not be the right route for you. (If you do use an app, be sure you place your phone somewhere to hide the light so you aren’t disrupted.)
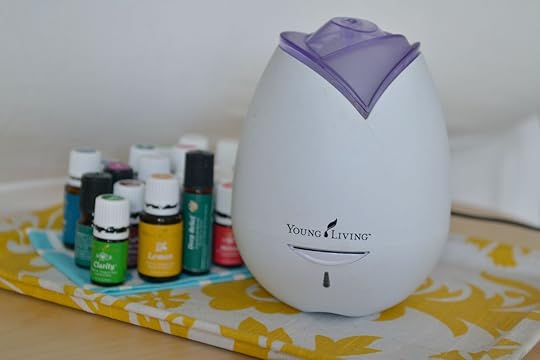
Try Aromatherapy
It sounds a little hokey at first—and believe me—I used to be skeptical, but using essential oils before bed can help soothe, relax and calm. Just like smelling a yummy sugar cookie candle makes you hungry, smelling calming lavender oil (or a calming blend) can help evoke feelings of peace and relaxation.
My husband, who’s very grounded and analytical, was skeptical at first as well, but he now sleeps with a few bottles of essential oil right by the bed. Try defusing lavender,chamomile, and a blend called Peace & Calming for a soothing night’s sleep.
Let Fido and Fluffy Have Their Own Bed
This is a tough one for many of us, especially if we’ve created a precedent of letting pets snooze in our bed. I’m not saying you should kick your little friends out of the bedroom completely, but consider getting them a nice heated bed right by yours or a comfy pillow on the floor….just consider it. (However, if your cat likes to step on your head at 3am, you should really consider leaving him outside the bedroom!)
For allergy sufferers especially, having pets in the bedroom can be tough. Once habits are set in, it’s hard to undo, but it can alleviate nighttime breathing issues and make for a much more comfortable sleep.

Make Your Bed “Sleep Only”
Beds are meant for sleeping, not hanging out, doing work, watching television, bringing the kids in for Saturday morning cartoons, or building a fort. I know those things can be a lot of fun, but again, it’s about tricking your brain into thinking, “This is where I sleep.”
Making your bed comfortable, clean and inviting can really help as well. So can committing to making your bed every morning—helping you avoid the desire to crawl back in. There’s nothing quite as comforting as a turning back a perfectly made bed and crawling in. It turns it into a routine or ritual, like we talked about in number 6.
Limit Your Daytime Naps
I’m not a big napper, but I have friends who swear by an afternoon nap. If you are a fan of catching a few winks mid-afternoon, limit yourself to 20 minutes and nap somewhere other than your bedroom.
Once you finish napping, get up and resume your normal activity. One of the biggest drawbacks of napping at random is slowing down your momentum through the day. If you have a nap routine, make it a practice to get right up afterward and continue with your daytime activities.

Get Moving
Studies show that regular exercise can gradually improve your sleep patterns. It’s a slow process and sometimes sleep (or lack of) effects exercise performance more than exercise performance directly effects sleep. That said, after months of regular exercise, study participants showed improved sleep patterns as well. Think of it as a way to keep your body functioning properly in all faculties. Sleep, exercise and nutrition go hand in hand with being healthy. Are we all perfectly healthy all the time? No, of course not, but getting regular exercise helps get you into a healthy pattern.
Write It Out
Allow yourself to write out your feelings before bed or for a little while before you retire for the evening. If something’s really bothering you or weighing on your mind, journaling can help you expel it or at least put it on the table where you can revisit it with more clarity tomorrow (as opposed to endlessly ruminating on it at 2am). It can also be a good time to write down positive accomplishments and practice gratitude. This positive mind frame gets you to a great place mentally and emotionally to end the day.
If you’re having real sleep problems, keeping a “sleep journal” can also help. While it’s not the same as writing out your feelings, tracking your patterns and roadblocks can help you examine them and detect anything regularly interfering with sleep. You may want to write down things you ate, the temperature of your room, if you did your nighttime routine, and your mood. After a while you might get some clues to why your sleep hasn’t been up to snuff.
Schedule Time to Stress
It may sound a little silly, but sometimes when we play patterns over and over in our head, one of the best ways to cope is to promise ourselves we can revisit the issue and “stress out” as much as we want at a specified time. There are very few problems that can be solved in the middle of the night. Instead of thinking of ways to deal with them, pencil something in on your calendar (or promise yourself to spend your morning commute or lunchbreak tomorrow) to work out the nuances and examine all sides of your problem. Say, “I’m going to put this to bed tonight, so I can sleep, but I will worry about it tomorrow.”
Often by the time you’re ready to visit the problem at the scheduled time, it will have passed or it won’t seem nearly as dire as it does at bedtime.

Avoid Too Much Water Before Bed
Sometimes a soothing cup of herbal tea can become part of our nighttime ritual and help us feel ready for bed. Drinking a glass of water or keeping water on the nightstand can also help us feel hydrated and avoid that “Oh my gosh, I’m parched” feeling in the middle of the night. Needless to say, it’s a no brainer: if you drink too much water before bed, you’re going to have to get up in the night. Try to limit liquids for an hour or two before you hit the hay, especially if you find yourself regularly running to the bathroom in a dire state in the middle of the night.
Meditate or Pray Before Bed
Just like journaling about things you’re grateful for can help you get into a positive mindset, taking a few moments before bed to pray and connect with God can help bring about peace. Read a few verses of scripture that help put you in a positive frame or give you comfort. Take a few moments to do some deep breathing or try some meditation to help you decompress and enter a state of reverence and rest. Reflect on the grace of God and the wonderful blessings you experience each day. Take time to appreciate all He has given us and you’ll feel calm the moment your head hits the pillow.
When You Can’t Sleep
Get up! It sounds a little bit counterintuitive to get out of bed in the middle of the night, but if you’ve been lying there for more than 20 minutes, it might be time to get up and take care of what’s bothering you, lest your body start to associate bed with a state of wakefulness and worry. Get up, go into another room and do a quiet activity to clear your mind. Try reading something interesting, but not such a page-turner you can’t put it down or try doing something like Sudoku—repetitive numbers and patterns. The idea is to get your mind off what’s troubling you (which can sometimes just be the fact you can’t sleep) and reset.
Avoid bright light, electronics and activities that “ramp you up.” Instead, keep the lights low and do the activity for a short time until you feel a little sleepier and are ready to give it another go.
If you still can’t sleep or if insomnia is a reoccurring pattern, it’s time to schedule an appointment with your doctor. Conditions like sleep apnea can also make sleep feel interrupted and leave you tired the next day. If you use a Fitbit or fitness tracker and it reflects a lot of tossing and turning or if your spouse complains you’re a chronic snorer, tooth grinder or a very restless sleeper, a doctor can help determine the underlying cause. Many medications can affect sleep patterns, as can allergies, asthma and other issues.
Practice good sleep hygiene and you’ll be forgetting all about counting sheep and sawing logs in no time!

Pin It
The post How to Get a Better Night’s Sleep appeared first on Living Well Spending Less®.


)
%20Simple%20Chocolate%20Tart%20comes%20together%20in%20minutes.%20It%20has%20already%20become%20our%20go-to%20dessert%20for%20every%20gathering,%20and%20after%20just%20one%20bite%20I%27m%20pretty%20sure%20you%27ll%20see%20why!)
)
)