
Ruth Soukup's Blog, page 65
March 11, 2016
How to Get the Best Possible Price When Selling Your Home

This is a Guest Post from Kathleen at The Blogger’s Lifestyle
The process of selling a house can be quite overwhelming. Then add to this the pressure of needing to obtain the best possible price to fund your next move.
I will show you how everyone can increase the value of their property and minimize stress by implementing three core steps.
But first, there is a mindset issue that should be addressed.
You see, most homeowners have an emotional attachment to their home. Love and care have gone into making it a safe haven for their family. You have created very special memories there. While these are good emotions, they can obscure objective judgment and hinder the marketing process.
Remember home is where the heart is, regardless of location.
You are selling a house, not your home.

Following these three core steps–making property improvements, using preferred tools, and refining your property presentation–can make the selling process happen more quickly.
1. Make Property Improvements
To prepare for the sale, start thinking objectively like a buyer. Imagine you are an interested buyer seeing both good and negative aspects of your premises.
Make a list of potential upgrades. If necessary, seek professional advice as to which improvements will add value. To add value, the cost of each project should generate a profit above the original outlay. For example, fresh paint can have a magical effect. Using safe colors (a color with wide acceptance) will always add value.
Other updates to your property may not increase the selling price, but may improve its appeal or sell-ability. For example, a large garden shed won’t increase the monetary value, but buyers may be excited to see a storage problem solved.
With beneficial changes in place, you are on your way to achieving the best possible price selling your house.

2. Use Preferred Tools
The Internet
Modern sellers and buyers use technology including the Internet to their advantage.
The Internet presentation of your house should be a combination of high-quality professional photos, and agents marketing text that draws potential buyers to a house inspection.
For the house buyer, their search usually starts on the Internet. They search and find a number of houses that meet their criteria and put them on a short-list. They read the text and peruse the photos of each one.
These visual images and text stir the potential buyer’s emotions and imagination as to the suitability of this house for them. They decide to either contact the agent to inspect the house, or move on to their next selection.
Professional real estate photographer
Internet images are likely to be the buyers first connection to your house. The photos are a key player in the buyer deciding to contact the agent or to move their attention on to another property.
For this reason, a professional real estate photographer will produce the best photos for all forms of advertising.
Real estate photography is a genre of its own. A wedding photographer takes awesome wedding photos but most likely wouldn’t know the right angles and areas to photograph a house to show its selling points.
The right real estate agent
You might consider an agent from someone’s recommendation or an agent’s advertisement. Now look online at houses these agents are selling. Take into account the appeal of the agent’s presentation. Is the text convincing? Have they used professional photos?
You may show your house to several agents for a price estimate. Again use the Internet to evaluate the agent’s appraisal. Are they padding the price to gain your business? Ask them to show evidence of previous similar sales in your area.
Some realtors may suggest cutting costs by using amateur photographers. An approach like this could indicate that this agent does not understand real estate marketing and he is unlikely to get you the best price.

3.Refine Your Property Presentation
When a potential buyer is inspecting the house, the presentation can influence the outcome. A few buyers will be visionaries, seeing alternatives beyond what is currently visible. Most prospective purchasers only see what is in front of them.
Walking through your rooms stimulates their emotions and senses. They are being influenced by the natural light filtering in, the smell, the floor space and feel of the house. Help them to see the full potential of your house by having it at its best.
Things that will kill the sensory process for the buyer:
• The living areas being dark and depressing.
• A musty, dusty smell.
• Cluttered floor space.
• Having too many personal items showing. For example, toothbrushes, deodorant bottles, and shampoo containers in the bathroom.
• Wedding photos on the bedside table are a real put off. The buyer will be uncomfortable, feeling like they are intruding on your privacy.
• Cats or dogs running around their feet will interrupt their feel for the house.
How to solve these problems:
Remember you are taking active steps to achieve the best possible price.
• In each room, remove as much clutter as possible. Hide it, store it or get rid of it. Tidy or hide all electrical cords.
• Think floor space; consider removing any unnecessary chairs and other furniture.
• Dust and vacuum, paying attention to light fittings, curtains, and window sills.
• In winter, have the home warm. In summer, have the house cool and airy with natural light.
• Some people have cookies or bread in the oven to give a welcoming aroma. Others use essential oils to give a pleasant effect.
• One or two happy family pictures in the living area do give a favorable impression that this is a comfortable house. Consider removing excess personal photos and replacing them with artworks, especially in the bedroom.
• All pets should be out of the house.

Next, look at each room through the eyes of a buyer
Kitchen/Dining/Living area:
Have appliances shiny and cupboard fronts clean. Remove anything that does not need to be on the bench tops. No clutter around the sink. Give a clean and spacious feel.
Make the area look inviting with a bowl of fruit or a vase of fresh flowers.
Keep thinking of floor space, clean, tidy and relaxed.
Bedrooms:
An attractive bed cover will look neat. Remove any personal items. If you have hidden things under the bed, make sure they cannot be seen. Look in mirrors and from the doorway to check that none of them is showing.
Bathrooms:
Buyers love beautiful bathrooms. Look in magazines or on Pinterest for economical ways to make your bathroom sparkle. Simple decorations can be very attractive, like a hanging pot in the corner with a graceful flow of green leaves. Don’t forget to hide all personal items.
Laundry:
Clean and tidy, hide any dirty clothes and other clutter.
Exterior:
As the potential buyer arrives, they get their first impression of the real thing. They are wondering if this is their future home.
Consider the worth of hiring a landscaper to improve the curb appeal.
Shrubs and bushes should be trimmed and not growing over the windows blocking light. Neat and manicured lawns and edgings, have the garden beds looking fresh and tidy. No buyer will be impressed if it looks like there is a heap of yard work to do.
Paths always look better after a pressure clean to remove dirt and mold.

Everyone wants a great outdoor living area, make it look inviting and ready to entertain. Pools can be a selling point, so have them sparkling clean. Hoses and cleaning instruments should be put away out of site. The fencing and gates to the pool should be in good repair and meet local safety requirements.
The property is now prepared to receive agents, the photographer, and potential buyers.
Extra tips
Have your house presentation ready to impress when real estate agents come to inspect it. First impressions last, the agent is the one who is in the position to convince a buyer that your house is good value.
Leave the house during buyer inspections. The potential buyers will be more at ease if the owners are absent. They will want to comment to each other or ask the agent questions without thinking the owner can hear. Your agent will give you feedback later.
Use the Internet to learn more about the real estate market in your area. The more informed you are, the more confidence you will have as a seller.
You can’t sell a secret. Your Realtor will discuss other options for advertising your house sale. Good advertising costs money. The broader the advertising net is cast for buyers, the greater potential for achieving a top price.
These are the things you can control to get the best possible price when selling your house: You control the presentation of your property, you can choose the agent and you can choose to have a professional real estate photographer.
With this excellent preparation of your house, you are in a position to realize the best possible price.
Kathleen blogs at The Blogger’s Lifestyle.
She has experience as a Real Estate photographer, also assisting her husband, a Sales Consultant. Download her 2 free specials for LWSL users. How to Make Big Money While Waiting to Sell Your House (e-book) and A Seller’s comprehensive checklist.

The post How to Get the Best Possible Price When Selling Your Home appeared first on Living Well Spending Less®.


March 9, 2016
Caramelized Onion Flatbread

I’m not afraid to admit it–I’m an onion girl. The more the better.
And the only thing better than regular onions? Caramelized onions. Oh yum.
Which is why this super simple and easy-to-make five ingredient flatbread is so stinkin’ delicious–it’s caramelized onion perfection. Oh sure, you can fancy it up with a little rosemary and feta if you want to, but the humble onion is the main attraction. The star of the show.
And perfect for onion girls like me.

Here is what you need:
2 sweet onions
2 tablespoons olive oil more to brush on dough
2 tablespoons butter
1 canned refrigerated pizza crust (Pillsbury)
salt or sea salt to taste
fresh rosemary, chopped (optional)
crumbled feta (optional)

Step 1: Remove outer layers from onions; cut in half then into thin slices.

Step 2: Preheat oven to 425 degrees. Heat 2 tablespoons olive oil and butter in a large frying pan over medium high heat. Saute onion until golden brown and caramelized, approximately 20 minutes. Reduce heat if necessary.

Step 3: Press dough into parchment-lined cookie sheet, with excess hanging over edge of pan.

Step 4: Spread caramelized onion over dough. Sprinkle with salt and fresh rosemary, then fold edges over top of onion.

Step 5: Bake at 425 for 15-20 minutes until lightly browned. Cut into pieces and serve immediately.
Print This!
Recipe: Caramelized Onion Flatbread
Summary: This super simple flatbread is the perfect accompaniment to any soup, stew or salad!
Ingredients
2 sweet onions
2 tablespoons olive oil more to brush on dough
2 tablespoons butter
1 canned refrigerated pizza crust (Pillsbury)
salt or sea salt to taste
fresh rosemary, chopped (optional)
crumbled feta (optional)
Instructions
Remove outer layers from onions; cut in half then into thin slices.
Preheat oven to 425 degrees. Heat 2 tablespoons olive oil and butter in a large frying pan over medium high heat. Saute onion until golden brown and caramelized, approximately 20 minutes. Reduce heat if necessary.
Press dough into parchment-lined cookie sheet, with excess hanging over edge of pan.
Spread caramelized onion over dough. Sprinkle with salt and fresh rosemary, then fold edges over top of onion.
Bake at 425 for 11 minutes until lightly browned. Cut into pieces and serve immediately.
Preparation time: 5-7 minutes
Cooking time: 11 minute(s)
Number of servings (yield): 8

The post Caramelized Onion Flatbread appeared first on Living Well Spending Less®.
March 7, 2016
12 Simple Ways to Reduce Stress Now

Stress. It’s all around us. Sometimes it can feel like we’re being crushed by the weight of a giant, stressful life-boulder. You can’t breathe, you can’t think, and there’s a horrible sense of impending doom.
Or maybe that’s just me?
But I’m guessing not. In fact, I’m pretty we’ve all felt stressed and overwhelmed at some point. Most of us probably feel stressed out at least once a week. Between obligations at work and at home, with our kids and our spouse, at church and at school, there’s a lot on our plates. Sometimes it can be hard to cope. We feel inadequate and strive for perfection. And we put a LOT of pressure on ourselves!
There are physical signs your stress level is approaching overload. Maybe you’ve had a series of colds and flu bugs you just can’t seem to shake. Perhaps you’ve lost or gained weight, aren’t sleeping well, or you feel like a fountain of emotions all the time. Unfortunately, some of us react to stress by getting snippy with our kids, our spouse, and those around us, saying things we later regret, and thus adding MORE stress to our load.
If any of these things sound like you, then it’s time to get your stress under control! If you’re so overwhelmed you’re displaying signs of depression or anxiety, then it might be time to talk to a professional. If it’s just your garden-variety stress most of us experience frequently, then there are a few coping techniques you can adopt to reduce stress now.

1. Assess Your Stress
First of all, explore what seems to be making you feel “stressed out.” Is there an event on the horizon you’re dreading? Is there an underlying issue in your marriage or in your relationship with your kids you need to address?
Stress can be caused by issues of any size or type. Maybe there’s a big family wedding coming up, maybe you’re the “Cookie Mom” this year and it’s more work than you expected, maybe you’re worried about tax season on the horizon, or perhaps there are other financial worries you need to take care of. Any of these events or issues can be triggers for a stretched-too-thin feeling. Sometimes stress can be the “canary in the coalmine,” indicating we have life concerns we need to address now.
Simply articulating the problem and acknowledging it can lessen its power. You can even allow yourself to spin a ridiculous what-if/worst-case scenario like, “I’m not going to do well at the PTO fundraiser. The other parents will judge me harshly. My child’s school won’t have enough money for their events in the future. Everyone will hate us, they’ll kick us out of the school, my kids will end up never getting into a good college, and their lives will be ruined!”
This exercise allows us to realize that most things aren’t a matter of life or death. It can help you gain perspective (and even laugh), making your immediate situation seem much less dire.

2. Make a List
One of the ways I deal with stress is by making lists. When I feel like I can’t get a handle on all the things I need to do, I often worry I’m going to miss something. Making a list helps me feel in control and ensures I won’t forget anything.
You can make lists using your phone, on your computer, or just by grabbing an old fashioned pen and paper. Simply jot down what you need to do or remember, then take a look at it. Sometimes when you see it in black and white, it seems much less daunting.
Planning ahead helps ease stressful events and times of year, like the holidays. Not only does an organized list help you feel more in control, but it can also help you prioritize and enjoy the satisfaction and feelings of accomplishment by crossing those little tasks off!
3. Take Five
When my kids were going through their fighting and tantrum phase, I realized sometimes you just need time to cool off. We’ve applied this rule to our family discussions and arguments as well, and it can definitely be used in those moments when it all feels like too much.
Set a timer or look at the clock, and allow yourself to simply take a five-minute break. It can seem counterintuitive at first—why take five minutes to sit and chill out, when you could be getting something done? But in truth, taking those five minutes to calm down and regroup can help you clear your head, get your emotions in check, and be ready to tackle issues with a better frame of mind.

4. Breathe
Deep breathing doesn’t have to be dramatic—and you don’t have to take yoga or meditation lessons to do it. Simply close your eyes and take a deep breath in through your nose to the count of four. Hold it to the count of five and let it out to the count of six. Repeat this a few times.
Quality oxygen has a calming effect on our brains and bodies. Deep breathing will help you relax, slow your heart rate, and allow you to focus on the tasks at hand. If you’re ready to take it to the next level, try aromatherapy with essential oils. The calming effects of oils can do amazing things for your mood.
5. Drink
Wine. No, no, I’m kidding!! Drinking a glass of cold water or sipping hot water or tea is a proven way to quell anxiety. As you take a drink, really concentrate on the sensory elements involved: think about the cool sensation of the water filling your mouth, or the feeling of the warm liquid going down your throat.
When you can refocus your senses from “fight or flight mode” to something more soothing, whether it’s the feelings of drinking hot and cold liquid or a soothing scent (like lavender), your brain stops panicking.
The other important thing about drinking water is it helps you stay hydrated. Dehydration can exacerbate feelings of hunger, exhaustion—and yes, being stressed out. Water is truly nature’s miracle elixir, so allow it to help you keep your body healthy and balanced.

6. Compliment Yourself
Using positive self-talk seems a little, well, hokey at first. However, positive self-talk has a hugely positive effect on your mood. Plus, it boosts your coping skills. Telling yourself you can handle this, you’re in control, and you’re doing great are all great ways to help yourself deal.
Reciting positive mantras and messages is a technique advised by self-help gurus and in meditation practices. We’ve all heard of putting a sticky note with a positive message on our mirror or doing the “Stuart Smalley: I’m good enough, I’m smart enough…” exercise. Hey, while it’s the fodder of SNL sketches, there’s a lot of truth to the effects of positive self-talk.
7. Be Grateful/Reframe Your Thinking
When the furnace goes out, or when you’re late for dropping off at soccer practice because the car won’t start, it can be hard to feel grateful. It can be hard to feel anything but ticked off and frustrated. This is when you have to take a moment and let Grace take over.
If you truly believe everything happens for a reason, you can reframe your thinking to help you extract the positive out of any situation. What are you supposed to learn from this challenge? Remember: God won’t give you anything you can’t handle. If you feel overwhelmed, then it’s time to give it over to God and ask for understanding.
In the Bible, it always says, “And then it came to pass…” It never says, “And it came to stay…” Just remember all things are temporary, and you will get through this. Give God thanks for sending you a challenge He knew you could handle and have faith you can do it!

8. Savor
Just like taking that long drink of water or tea, savoring a bit of chocolate, fruit, cheese or something else you find delicious can reset your stress. It’s not about eating to forget your feelings or using food as an escape. It’s about taking the time to enjoy something that brings you pleasure and joy.
If chocolate’s your favorite thing, then take a single cookie or a piece of good quality chocolate, slowly unwrap it and allow yourself to experience the scent, look at the texture, and really focus on the treat. Next, pop it in your mouth or take a small bite, and slowly chew and savor the experience.
9. Move
I’m not telling you to pack up your house and run away! Simply get up from your chair and take a little walk. If you’re in a stressful situation, getting some fresh air and getting your blood pumping will help you feel calmer. Similarly, if you’re working away and stressing out, you probably could use a little time to refocus. Go for a quick walk around the block or even just around your office.
Exercise is one of the best mood regulators. It can help beat feelings of depression and anxiety. It releases endorphins and helps you feel calmer and happier. You don’t have to be a gym-rat, either. Even 10-minute exercise sessions a couple times a day can help you get the effects without taking over your schedule. Move more to beat stress.

10. Cancel an Obligation
You can’t run away from stress and procrastination won’t make things better. But if there’s something you can get off your plate for the time being, give yourself permission to cancel guilt-free.
So many times we say yes to things: volunteer meetings, taking a meal to a neighbor, leading the food drive, the coat drive, the Girl Scout cookie sales, and taking up the extra slack at work. Give yourself some leeway to keep your hand down the next time there’s a call to action. No one can do it all and it’s okay to say no sometimes.
Practice the art of the graceful decline: “I’d love to help, but right now is just not a good time.” Put the phrase into use. It’s amazing how freeing it is to forgo making up excuses, and simply just say no.
11. Sleep
Sleep can play a huge factor in our coping mechanisms. Getting rest is vital to our health and well-being. If you’re getting eight hours a night, you’ll feel more prepared to deal with the curve balls life throws your way. Even missing an hour or two of rest can leave you feeling nervous, raw, and on edge—and caffeine only enhances those feelings, rather than counteracting them.
Instead, put away your phone or your iPad, and turn off the television. If your brain is running through all of the stressors of the day, grab a notepad and jot them down. Once they’re on paper, tell yourself you’ll revisit them in the morning, and catch some ZZZs. You’ll wake up refreshed and more able to cope with the problems at hand.

12. Laugh
Laughter really is the best medicine. When you feel stressed out, give yourself the gift of joy. Enjoy a funny YouTube video or a joke, or simply text a friend. Smiling and laughing can help put things in perspective, even if things are very serious. Humor is a great way to cope and find contentment, even (and especially) in times of darkness.
Life goes on. No matter what you’re facing and what’s stressing you out, keep in mind all the amazing ways you’ve overcome issues in the past and the way time softens things. No matter how bad things might seem, or no matter how stressed you might feel right now, this season that you’re in won’t last forever. Make an effort to smile (even when you don’t feel like it), to enjoy the small moments, and remind yourself it’s not the end of the world.

Pin It
The post 12 Simple Ways to Reduce Stress Now appeared first on Living Well Spending Less®.
March 4, 2016
10 Smart Ways to Save on Housing

There’s no way around it—housing expenses are just a part of life. Whether you rent or own, you’re probably paying something towards housing each month, and yes, it’s probably a large portion of your budget and your take home pay.
Whether to rent or buy can be a big decision. Consider your current debt situation, if you built up an emergency fund for home repairs and upkeep, and your current life circumstances. Never feel like you should buy just because you’re “at that age” or because the market is really great. Instead, ponder the stability of your family’s income and look to buy a home at or even below the line of what you can afford.
Check out these great ways to save on housing (whether you rent or buy)!
1. Keep Up on Local Tax Breaks and Laws
Many states (including Florida, Wisconsin, Georgia, Michigan and Maryland) offer “homestead tax” breaks or exemptions for renters and/or homeowners facing increased housing costs and lower incomes. Many states offer big time tax credits if you bought your home during that tax year.
If you’ve changed residences or you’re planning to purchase a home—or if you’ve been filing your own taxes for a while—consider hiring a professional accountant or consulting a financial advisor this year. While paying someone to do your taxes can seem like an added expense, an experienced tax professional will be up on the latest laws and credits available, so you can really save money in the long run. (Tip: A reputable, local independent tax professional may cost a little more than the big-name franchise tax preparation outlets, but trust me, you’ll benefit much more from their advanced level of expertise.)

2. Learn Basic Repairs
One of the nice things about renting is that you’re typically not responsible for the care and upkeep of the property. However, even renters should familiarize themselves with basic plumbing repairs (like how to plunge a toilet, fix a leaky tap, or turn off the water in case of an emergency). It may seem like a no-brainer, but many a college student or young renter has faced a flooded apartment because they didn’t know how to perform very basic repairs, and in the meantime, couldn’t get in touch with their landlord. Understanding how to caulk, patch pinholes in a wall, and perform minor touchups can also help you get your full security deposit back when you’re ready to move out.
For homeowners, DIY becomes a whole ‘nother ball of wax. Take a trip to your local Home Depot or Lowe’s on a Saturday and you’ll be amazed at the number of weekend warriors who undertake home repairs and updates. There’s so much you can do yourself with basic training and tools.
A word to the wise—only take on projects that you really understand. I’ve seen some SCARY DIY household projects! DIY mistakes can lower the value of your home, plus they’re often much more costly to fix in the long run (plastering over a drop ceiling, for example). Before you take the sledgehammer to the wall, first take time to take a class, read up on the repair, and be honest with yourself when and if you get in over your head.
Major plumbing, AC and ductwork, renovations and electricity should probably be left to the professionals. If you’re ready to take your DIY skills to the next level, start small. (For example, before you rewire your house, try rewiring that thrift-store lamp and see how you do.)
3. Renters: Learn New Skills and Save
If you’re renting and you’re experienced in home maintenance and upkeep, see if you can work out some discounts with your landlord. Perhaps your hubby or teenager doesn’t mind snow removal or cleaning gutters and mowing the lawn. Maybe you love painting and don’t want to wait for someone else to put on a fresh coat for you.
Many landlords are happy when their renters want to maintain and even update the property (within reason), so they’ll often provide a small discount on your rent for your services. If you have an itch to garden or landscape, see if your landlord will let you deduct the purchase of plants from your monthly rent. You may be surprised how many landlords know the value of a helpful renter and are happy to support your endeavors.

4. Use a Realtor
If you’re ready to buy or sell your home, it can be tempting to serve as your own agent. However, a professional real estate agent and/or buying agent can save you time, negotiate the best price and help to ensure you get through the process without pulling out too many hairs.
Typically the seller should pay for a buyer’s agent’s commission. So if you’re a first-time home buyer, a buyers’ agent won’t cost you anything extra. You may hear that being your own buyers’ agent (or hiring a non-exclusive buyers’ agent acting as the agent for both parties) will result in trickle-down savings for you, so you’ll get a better price. Oftentimes, this is not the case! Having your own exclusive buyers’ agent helps ensure you have someone in your corner during the purchase.
5. Look at Foreclosures
There’s a lot of buzz about foreclosures and ways you can save by purchasing a home in foreclosure. First, be sure you’ve researched the process thoroughly because foreclosures can have some legal red tape that other homes do not. Some states allow homeowners to reclaim or buy-back the property, so it’s imperative you protect yourself and your family from headaches down the road.
Homes in foreclosure can typically go for 80% of the actual value, so they’re definitely a good deal. BUT, don’t believe anything that seems too good to be true (unfortunately, it probably is) and be sure you’re in a position to buy and comfortable with the expenses and process before you jump in.

6. Keep Up on your Credit Score
Before you buy or even if you’re moving to a new rental property, keeping up on your credit score can ensure you get the best deal, located in a safe neighborhood complete with a thorough and attentive landlord. Many landlords will examine your credit and ask for references and proof of credit scores, so even if you aren’t in the market to purchase, don’t think that ignoring a bad credit score or ugly debt will make it go away.
If you bank through a credit union, many offer one free credit report pull each year. They’ll even review it with you and suggest ways to improve. Each of the three agencies—TransUnion, Experian and Equifax will also allow you to review your report one time per year for free. Go to https://www.annualcreditreport.com to get your free annual credit report from the only free credit report authorized by federal law. (There are thousands of “free credit score” offers online, but don’t be fooled!)
Credit scores can do strange things when ignored. You may find a black mark on your report that you knew nothing about, or you may find you’ve experienced identity theft or perhaps forgotten past debts that now come back to haunt you. Looking at your credit report, then making a few calls to creditors to update their records can help ensure you have the healthiest score possible, which will help you immensely whether you buy OR rent.
7. Don’t Forget about Property Taxes
If you’re looking to buy, always consider property tax in your decision. You may be looking in a lovely neighborhood with astronomical taxes, when there’s another lovely neighborhood a few miles out that can save you a bundle.
If you already own, you receive your property tax assessment each year. Always, always, review your yearly assessment. Check the math on your property tax card for errors and note any mentions of items that no longer apply to your home, such as torn down fences or patios. Also be sure to compare your taxes to your neighbor’s. Don’t worry, there’s no need for forcing an awkward conversation—their property tax is public information and can be found on Zillow.
If you suspect you’re getting the short-end of the stick on property taxes, and you’re paying more than your neighbors with similar property values, consider an appeal to your tax assessor’s office. Be sure to make note of any value-lowering characteristics that aren’t easily noticeable (like hail damage or foundation issues).
Why do all of this? The savings you can get on your property taxes should help to make the necessary repairs!

8. Get a Reputable Inspection
When you’re buying, skimping on a home inspection with a $500 price tag can seem like a viable way to save money. However, a reputable home inspection can help keep you safe from issues like radon and carbon monoxide leaks, plus, your inspection will reveal any need for future repairs, giving you an out and/or a powerful negotiating tool when you make your offer.
Decide beforehand what your “deal breaker” items are—foundational repairs, roof issues, insulation problems, heating and ductwork, as well as wiring can be huge and costly issues down the road. This is especially important if you’re buying a foreclosure. Any issues that arise in the first year can be appealed through your realtor, but it can be a pretty arduous process. You’re better off able to communicate the required repairs to the current owner, who may even have them taken care of before you buy.
Even if you’re renting, a thorough inspection before you move in can help you detect any issues down the road. Ask questions and test everything. Find out about previous renters if you can, and don’t be afraid to point out things like mildew around the windows, pet smells, questionable carpeting, repairs and other issues. You can negotiate the price of your rent, and at the very least, ensure your landlord will take care of the issues BEFORE you sign a lease. (Plus, you don’t want to get stuck paying for a previous tenant’s damages when you’re ready to move out!)
9. Get Excellent Insurance
Homeowners and renters insurance policies are worth their weight in gold. Most homeowners must have insurance throughout the life of their mortgage—and for good reason. When you need insurance, you really NEED insurance.
Be sure your premiums are set at a reasonable rate. Consider raising your deductible to save on your monthly premiums, but do the math first. Be sure you have enough tucked away to offset the deductible, and that you’re saving by lowering your premiums. Check out my post: 12 Smart Ways to Save on Home Insurance.
Renters insurance is often overlooked or forgone, but consider the value of your family’s possessions. If you were faced with a flood, smoke damage or another issue and you had to replace everything, from electronics to beds to furniture to appliances and more, could you really do it without insurance? It’s not worth the risk, and even in uncertain times, you really can’t afford to skip insurance.
Most insurance providers offer online renters insurance calculators, so it’s easy to shop around. Most plans are super affordable, costing from around $12 to $25 per month.

10. Take Care of Your Home, Be Happy and Live Simply
Living simply is really the key to being happier with less. You might not have the biggest house in town or even on your block, but if you take time for property upkeep and keep your house clean and tidy, you’ll be surprised at how it will hold value. Repurposing items and decorating with things you already have, and arranging your space so it’s more livable and functional can help you make the most of what you’ve got.
There are many small things you can do as a renter or homeowner to save money and maintain a healthy, happy and valuable home. Keeping up on your flooring and cleaning carpeting, for example, can extend the life of your floor coverings and thus keep up the value of your home long term.
When you get a redecorating bug, DIY home décor is so much fun! Change paint colors or touch up trim, rearrange your furniture or try an inexpensive change rather than a total renovation. Keeping things clean and simple can help your family turn any house into a home—and put a little savings back in your pocket!

Pin It
The post 10 Smart Ways to Save on Housing appeared first on Living Well Spending Less®.
March 2, 2016
No Bake M&M Cookie Balls

This is a guest post from Gina of Kleinworth & Co.
I love recipes that are simple, take just a handful of ingredients & can be ready to enjoy in a short period of time. With pressing schedules & everyone in the family going in a different direction most days, it’s hard to have more than a few moments to put in to something like homemade treats. But I love making desserts whenever possible instead of stopping at the store. This means I often come up with new & creative ways to make recipes that cut my time in the kitchen. This gives me more time to spend with the family, which is absolutely cherished. I’m sure you can relate.
My favorite recipes are often of the no-bake variety because of their ease. My top picks usually contain things like peanut butter & honey & oats – which all pack their nutritional value. I mean, if I can make a treat that also has a little bit of goodness in there then I’m a happy mama. These No Bake M&M Cookie Balls definitely fit within that & they are so delicious too. Just a couple will definitely satisfy a chocolate or peanut butter craving. They are absolutely scrumptious. I just love the colors of the M&M’s. They make me happy.

Here is what you need:
5 cups quick cook oats
2 cups creamy peanut butter
1 cup raw honey
2 tsp pure vanilla extract
3/4 cup mini chocolate chips or 3/4 cup mini M&M’s (or both!)
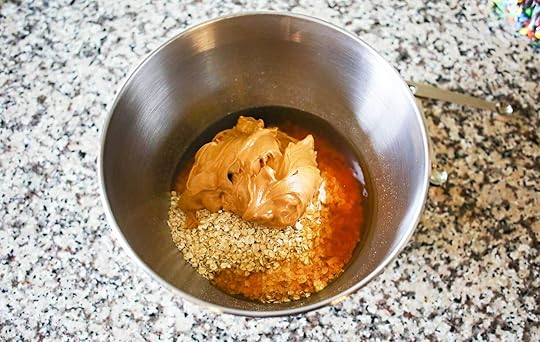
Step 1: Combine oats, peanut butter, honey & vanilla in a large mixer bowl & stir to combine. I find that using my stand mixer on the lowest setting works great. If you don’t have one- no worries, you can do this with a spatula & give your arms a mini workout getting that peanut butter mixed in there.

Step 2: Fold in the mini chocolate chips & M&M’s.

Step 3: Scoop out tablespoon sized portions and roll between hands to form a ball like you would cookie dough. Place on a parchment lined baking sheet & chill in the refrigerator for 30 minutes to firm.

NOTE: Store in the refrigerator for up to 3 days. My son has found that they travel well too. He loves to pack several in a small airtight container with his lunch for work. When he’s short on time he can just snack on a couple & they keep him satisfied until his next break. I love that. It’s all the yummy, protein packed, peanut butter in there.
Print This!
Recipe: No Bake M&M Cookie Balls
Summary: Just a couple will definitely satisfy your chocolate or peanut butter craving. They are absolutely scrumptious and so easy to make.
Ingredients
5 cups quick cook oats
2 cups creamy peanut butter
1 cup raw honey
2 tsp pure vanilla extract
3/4 cup mini chocolate chips
3/4 cup mini M&M’s
Instructions
Combine oats, peanut butter, honey & vanilla in a large mixer bowl & stir to combine.
Fold in the mini chocolate chips & M&M’s.
Scoop out tablespoon sized portions and roll between hands to form a ball.
Place on parchment lined baking sheet,chill in refrigerator for 30 minutes to firm.
Cooling time: 30 minute(s)
Number of servings (yield): 35-40
Gina, author of Kleinworth & Co, is a busy homeschooling
mom to 3 great kids ages 12-18. She likes to find new ways to make life simple & streamlined on a budget. She loves to share easy DIY projects, fun crafts with the kids & a whole lot of recipes, with a few photography tips sprinkled in occasionally too.
* * *

Pin It
The post No Bake M&M Cookie Balls appeared first on Living Well Spending Less®.
February 29, 2016
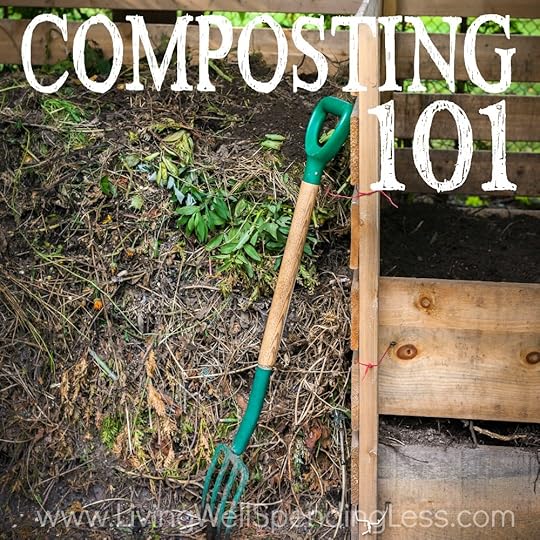
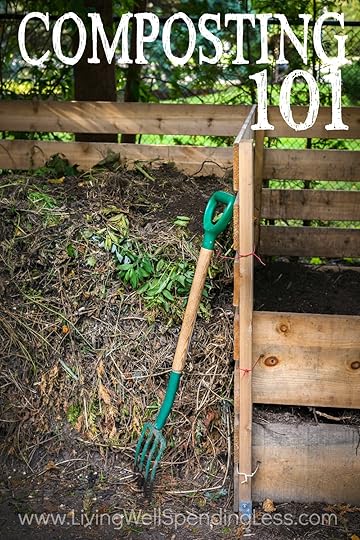
Composting 101
After many years of painful failure, last year my husband and I finally managed to grow a REAL vegetable garden! It was so fun (and pretty amazing) to plant, care for, grow and eat our own food. And while it took a while to get to the point where we had a successful garden, and while we’ve pretty much made every mistake in the book, when it comes to gardening, we have also learned a lot about what works.
One thing that we know for sure really works well is composting! You see, the secret to any successful garden is the soil–the richer and more fertile, the better. Even so, to many, composting can seem kind of daunting…and even gross. I mean, you essentially have a pail of rotting garbage (sometimes with worms) somewhere, so yes, it seems a bit odd. But truthfully, compost is made of all organic matter and it’s a great example of ecology and the lifecycle of living things. We grow new food using the scraps of our discarded food. There’s no waste and the cycle continues. It’s actually quite beautiful. Almost half of what we put in landfills is comprised of organic matter. So composting is good for your garden AND good for the earth!
About Your Composting Equipment
You don’t need a whole lot of fancy contraptions to get started composting. If you’re diligent about taking your food scraps out to the compost bin each time you have waste, you can get by with a very simple outdoor compost bin.
Compost bins can be made from a variety of materials. Organic matter needs oxygen as it breaks down, so your bin must have ventilation. Homemade bins can be constructed from chicken wire, or as a box out of old pallets and scrap lumber.
If your bin doesn’t turn on its own, you will need to use a shovel and “stir” or fold in the organic matter to keep things moving along and operating safely.
You can create a simple bin by drilling holes in a garbage can as well. Drill holes every five inches or so, so the bin is very well ventilated. For this kind of compost bin, you can just pick it up and give it a good shake every week or so (or use a shovel to turn it over, if you’d like to be more thorough).
We purchased this compost tumbler which really makes things easy. You just drop in your waste and give it an occasional turn. It’s safe for children (and animals can’t get in and tip it over or dig around). It’s also great because you can run two batches of compost at once. It collects the “compost tea” (the nutrient-rich runoff) in the lower chamber for a little extra boost for your plants.
Whatever bin you decide on, place it in a sunny or mostly-sunny spot. Heat will help things break down. In the fall and winter, it can take compost quite a while to break down. In the heat of the summer, it can turn over in just a few weeks.
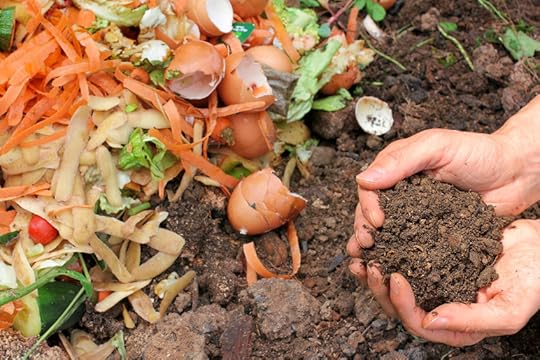
Getting Started—What Can I Put In My Compost?
Once you have your compost bin, you’re ready to rock. Everything in your compost should be plant-based. Some guidelines say you can add eggs, processed foods, and even some animal products (hair and manure, for example). I would save those types of items for large compost piles and more advanced attempts. Anything not completely plant-based can cause rotting and bad smells, plus it can attract scavengers and other creatures you don’t want rummaging around in your pile.
Get started with your compost by using a good mix of what they call “browns and greens.” Generally, you want one part green to two parts brown. I like to think of browns as “tree matter” and greens as “plants.” Although not exactly a perfect description, it gives you a general guideline.
Examples of “brown” matter: paper (newspaper, cardboard, paper towels), dry leaves and grass, chipped wood and sawdust, hay, twigs and branches from trees.
Examples of “green” matter: fruit and vegetable scraps, coffee and tea grounds, pruning from trees and fresh grass.
Some books recommend “layering” compost with browns and greens, but I’ve found it really doesn’t matter if you layer. It seems to work just as well with everything tossed together.
When you first begin, it may be helpful to start with some twigs, branches, hay or dried grass, just to create a good base for everything to go on top of. Oxygen needs to get into the organic matter so it can start to break down. The microbes, worms and other compost-makers need to do their job by eating through the compost and breaking it down into soil. Having smaller pieces in your compost can help it break down faster.
Your compost should be fluffy and moist but not soaking wet. If you live in a dry climate, you may need to water your compost often. If you’re in an area with regular rain and humidity, you might not have to water it at all. Generally speaking, it should feel like a washcloth that’s been rung out.
Once you’ve got a good texture going, you just add to your compost as you have organic matter to throw away—yard waste, food scraps, newspaper shreds, wood chips or coffee grounds.

On a side note: Did you know Starbucks and other coffee shops often have coffee grounds available for gardeners to take for FREE? Check with your local coffee shop to see if you can pick them up to give your compost a little boost. There are many other uses for coffee grounds in your garden as well, as my friend Melissa K. Norris outlines on her blog. Melissa did our feature on container gardening awhile back and you can certainly use your compost to boost your container garden, as well as your veggies!
What Can I Do to Become a Super Composter?
There are many ways to take your compost to the next level. You can purchase soil testers to check the pH levels in your soil and adjust your compost accordingly. You can use an aerator to ensure you’re mixing oxygen into the compost pile properly. You can also try a compost starter with microbes to boost your decomposition and get things off to a racing start.
There are composters who religiously test the temperature of their piles. It IS actually quite fascinating: big piles can reach temperatures of 160 degrees when they’re breaking down. That’s hot enough to burn your skin! Most smaller piles, especially if they’re regularly turned won’t get nearly that hot, and will stay somewhere around 100 degrees.

You can also purchase a countertop composter. Before you go “Yuck!” check out some of the very attractive bins available. Most contain a filter and you’ve probably seen them around on countertops not even realizing they’re composters! They literally look like an attractive crock or canister and there’s no smell at all. It’s definitely more convenient than running orange peels or an apple core out to the compost bin at ten o’clock at night.
Shredding items before they go in the bin will help them break down faster. There are leaf shredders available you can use to break down small items. Composting is also an excellent way to get rid of your paper shredding waste. I simply make sure we break down our items into small pieces as much as possible, but even when I threw in a wilted Jack-o’-lantern, it broke down quickly.
A word of caution: keep in mind, seeds will often survive composting. If you throw weeds in your compost bin, you might end up with weeds in your vegetable garden later on. The same goes for other good seeds as well. We use Seeds Now to get our GMO-free, organic seeds, which can be saved and used again. If you compost these heirloom variety veggies, you might be surprised when something unexpected sprouts up in your garden. Not every seed will survive the compost and you may already plan to remove your seeds to save and plant again, but just be aware you may see some surprises when you use these great seeds.
When You’re Ready to Plant…
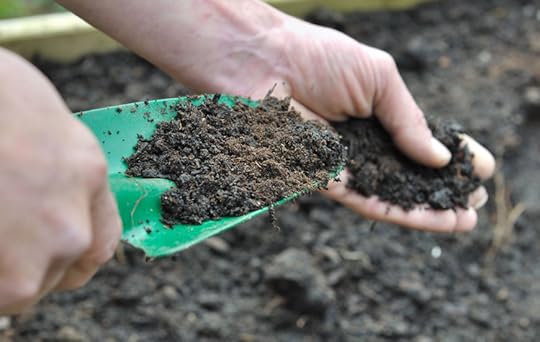
When you’re ready to plant (or when you want to spread a little compost love around your existing plants), simply check your compost to see that it’s completely broken down. Ready-to-go compost should have an earthy, dirt-like smell and should have no identifiable pieces remaining. It will be dark brown to black.
If you aren’t certain your compost is ready, you can take a spoonful of compost and add it to a jar of water. Give it a few days, then smell the jar. Does it smell like rotting food, sour or otherwise offensive? Let your compost keep cooking for another week or two. Does it just smell like dirt? You’re ready to go!
Compost can be used in any garden (not just veggies, fruits and herbs) and can greatly enhance soil. Simply till the compost into your existing soil, turning it in and working it around the plants. If you have a limited amount of compost, keep it worked into the soil surrounding the base of your seedlings—where it will do the most good and provide your growing plants with the most nutrients.
Don’t be alarmed if you see a little mold (not a lot) or some worms in your compost. If you notice a swarm of bugs or rampant mold, let your compost dry out a little and add more brown matter. Chances are you have too much green matter going on and it’s drawing in unwanted “friends.”
Composting is very easy and fun. It shouldn’t seem intimidating and it’s definitely not messy. It’s a great way to get in touch with the amazing cycle of life you can watch throughout the year in your vegetable garden. It reduces your waste and carbon footprint, and it’s a key contribution to organic gardening. If you plan to have a garden this year, give composting a try!
Pin It
The post Composting 101 appeared first on Living Well Spending Less®.
February 26, 2016
How to Stop Fighting About Money

I am always happy to welcome back my friend Cherie Lowe from the Queen of Free, who has graciously joined us here at LWSL as a regular monthly contributor. Cherie is the author of the amazing book, Slaying the Debt Dragon, which she wrote after paying off more than $127,000 in debt! As always, I am so excited to have her bringing her wealth of knowledge & experience on this subject to LWSL–please join me in making her feel right at home!
* * *
This is a Guest Post from Cherie at Queen of Free
I can still remember the very first fight my husband and I had after we were married. Ironically I don’t remember why we were fighting, but I can remember specific phrases we exchanged and the overwhelming feeling that my life. was. officially. over. *Insert double dramatic sigh.*
We had been married maybe two months and I was a twenty-two year old expert on marital wisdom. I was certain we were headed straight for Divorce Court to have a TV judge help us sort out who would get the towels and who would be so lucky to get the Pfaltzgraff dishes I had labored over choosing when we registered less than a year prior.
I’m happy to announce that sixteen and a half years later we weathered that storm plus a few more and are still very much married and fulfilled. But conflict is still a regular part of our marriage. In fact, I firmly believe that conflict is necessary for healthy relationships. No two people are exactly alike. And if they are, let’s face it: they’re a little boring as a pair.
No change or growth occurs without conflict. A seed must be buried. Eggs, flour, butter, and sugar must be vigorously mixed and then put through the fire to become a cake. Building muscle requires tearing it first. Achieving a degree, raising a child, setting and obtaining an awesome goal – all require sacrifice and in some degree conflict.
Studies show that the average couple fights about money three times a month. So many of us make the unhealthy assumption that any conflict at all in our marriage is bad and should be avoided at all costs. Avoidance when it came to money and marriage landed our family in over $127K in debt. Yet, as Dr. Greg Smalley says, “In marriage conflict is not the problem. Combat is the problem.” How you disagree about money (or anything else) in your marriage is more important than the conflict itself.
And while some disagreements will always inevitable, there are a few things you can do to alleviate the tension. Here are four strategies to employ when you are trying to figure out how to stop fighting about money.

Put Love First
Don’t misunderstand me. I did not just give you carte blanche to pick a fight with your significant other. This is not your permission slip to dole out a mile long list of grievances and nitpick your spouse to death. Rather, I want you to know that there’s nothing wrong with being different than your spouse or holding different opinions. Even better, it may not necessarily mean you’re headed for a courtroom reality show anytime soon.
When you do disagree about money with your husband or wife (because you will), you need to keep a few guiding principles in mind. First and foremost, no matter how deep the offense or differing the opinion, keep love at the center of your relationship.
Take a stroll down memory lane with me. Remember walking down the aisle together? Remember first dates and love letters and sweet nothings? You chose your partner and he or she chose you. And love is worth more than money or conflict or even being right. I have to remind myself of all of the above on a regular basis every single day.
Don’t elevate winning an argument over the humanity of your husband or wife. At the end of our lives, I think we’d all rather be remembered as being loving than having all the answers or prevailing in every tiff.

Discover How You Disagree
Speaking of fighting, take note of what you do when conflict arises. Do you shout? Do you shut down? Do you murmur or call names? Do you present the facts or talk about emotions?
We all process disagreement in distinct ways. You have to know your own default approach to disputes and observe what behaviors your spouse employs, too. Note: it’s best to explore this at a time when you are not in the middle of a fight and your judgment is clouded.
Much of what we’ve learned about fighting comes from how we observed our own parents engaging in conflict, so recalling their methods of “debate” might also be helpful. When you’re fully aware of your personal habits and those your partner, the way you disagree can become more productive.

Fight Fair
Most of us struggle to leave the past behind after an argument concludes. In our household, we call rehashing old squabbles, “Kool-Aid Bickering.” It’s like we go old school on our issues, listing out everything the other person ever did to tick us off. The oft read at weddings passage 1 Corinthians 13 says Love “keeps no record of wrongs.” We begin our marriages knowing we shouldn’t, but the temptation to keep score often overwhelms my soul.
Leave the past in the past and begin to make a new path.

Get Help
If you glean nothing else from this post, know this. There is no shame in getting outside help when it comes to healthy methods of communication in marriage. Whether you consult the wisdom of a couple further down the path, speak to your pastor, or find a counselor to help you in your relationship, if you need help, get it. Don’t hesitate or hem or haw. While the investment of counseling might be steep, I can promise you in the long run it will cost less both financially and emotionally than a divorce.
To quote a favorite philosopher and all time great thinker of our generation Lecrae, “If it wasn’t hard work, they probably cheatin’.” Never look at someone else’s marriage and automatically assume everyone else has a dream relationship or that they never fight. There’s no magic pill or secret sauce when it comes to managing quarrels over money. There’s only consistent practice of loving one another, evaluating our methods, learning to fight fair, and getting help on a regular basis. You have what it takes to go the distance. There’s no need to begin parsing the kitchen cabinets or gearing up for courtroom drama. Conflict is difficult but necessary for growth.
Cherie Lowe is an author, speaker and hope bringer.
Her book Slaying the Debt Dragon details her family’s quest to eliminate over $127K in debt in just under four years. As her alter ego the Queen of Free, Cherie provides offbeat money saving tips and debt slaying inspiration on a daily basis.

Pin It
The post How to Stop Fighting About Money appeared first on Living Well Spending Less®.
February 24, 2016
10 Meals in an Hour™: Part 8

Here at Living Well Spending Less we are 100% committed to bringing you easy recipes that taste great and don’t take a lot of time, effort, or expensive ingredients to throw together. As a busy mom, I also want meals that can be made and frozen ahead of time to save time on hectic weeknights, especially as part of a Sunday Prep plan. My goal is to spend less time in the kitchen, not more, but I still want to be able to provide tasty meals that my family loves (and avoid eating out when we can!)
Over the past year and a half we have shared seven different 10 Meals in an Hour™ plans, which have each included 5 great freezer recipes that can be prepared together in about sixty minutes. (You can find the previous plans here: Part 1 , Part 2, Part 3 , Part 4 , Part 5 , Part 6 and Part 7. They have been a huge hit, not only with our own families, but with many of your families as well, and we’ve absolutely loved hearing how much you all are enjoying these tasty recipes!
Today I am s0 excited to share with you another NEW series of super simple recipes.
As usual, in order to make the cut, each recipe must meet ALL of the following criteria:
Deemed delicious by both my kids and husband
No pre-cooking required (aside from cooking bacon)
Freezer friendly
Easy to cook
Uses budget-friendly ingredients and pantry staples
In this one post you will find everything you need to prep 10 awesome freezer meals in about an hour of hands-on time (not including grocery shopping.) Just think, in just one quick weekend session you could have almost two weeks worth of absolutely delicious, family-friendly meals all ready to go!
Before you begin, you will need to gather your tools & supplies and also make sure that you have all your groceries on hand. I find it is easiest to go grocery shopping the day before I do my cooking. To save time unloading, only put away the items that need to be refrigerated. Finally, make sure your kitchen counters are cleared of clutter and sanitized and empty your dishwasher and sink of any dishes. (Check out this post for more tips on freezer cooking like a pro!)
 Here are the five recipes we will be making:
Big Easy Cajun Bean Soup
Creamy Ranch Chicken
5 Ingredient Pot Roast
Portobello Chicken
Slow Cooker Bacon and Beans
Here are the supplies you will need:
10 gallon size zipper freezer bags
labels or permanent marker
large mixing bowl
cutting board
sharp knife
garlic press
can opener
dry measuring cups
liquid measuring cups
dry measuring spoons
liquid measuring spoons
colander

Here are the ingredients you will need:
Produce
1 medium white onion
3 sweet onions
1 8oz. package baby Portobello mushrooms
1 green bell pepper
2 8oz. bags baby carrots (optional: for cooking day only)
2-4 potatoes (optional: for cooking day only)
16-20 cloves garlic
1 bunch celery
Pantry Staples
Dried Parsley
4 cups red wine
Black pepper
Salt
Canned/Dry Goods
1 bag Hurst’s HamBeens Slow Cooker Bacon & Beans ®
1 bag HamBeen® Cajun 15 Bean Soup
2 cans cream of mushroom soup
2 cans cream of chicken soup
2 packets ranch dressing
1 bag egg noodles (optional: for cooking day only)
1 box rice pilaf (optional: for cooking day only)
1 can diced tomatoes (optional; for cooking day only)
2 32oz. carton chicken stock
2 32oz. carton beef stock
Dairy
2 16oz. container sour cream
Meat
6-8 pounds boneless, skinless chicken thighs or breasts
1 lb. bacon strips, cut into 1/4 pieces
2 3-4 lb chuck roast
1 lb smoked sausage (optional; for cooking day only)

Be sure to print the following pages before getting started:
Printable labels (designed to work with Avery 8163 shipping labels)
Printable Shopping List
Printable Prep & Prepare Instructions
Be sure to also print the following recipes:
Big Easy Cajun Bean Soup
Creamy Ranch Chicken
5 Ingredient Pot Roast
Portobello Chicken
Slow Cooker Bacon and Beans
PREP
Prep your bags—either print labels using these ready-made printable labels or use a permanent marker to label each bag with the name of the recipe, date prepared, and cooking instructions. DO NOT SKIP THIS STEP! While you might think that you’ll remember what is in every bag, I promise you will forget!
Rinse and drain beans
Cook bacon and set aside
Chop onion and set aside
Chop green pepper and set aside
Peel and mince garlic and set aside
Open up all the cans needed for prep day and set aside.
Prep raw chicken
PREPARE
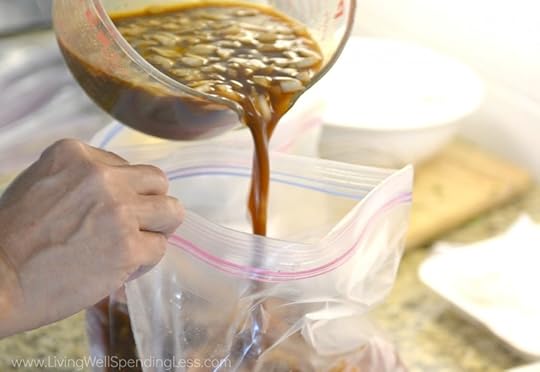
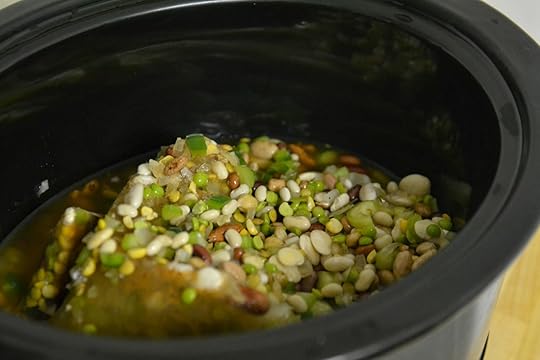
Prep Slow Cooker Bacon and Beans using instructions found here . Divide mixture into 2 freezer bags, press out excess air, and seal well. Place bags in refrigerator.
Prep Portobello Chicken using instructions found here . Place chicken into 2 freezer bags and cover with soup mixture, press out excess air, and seal well. Place bags in refrigerator.
Prep 5 Ingredient Pot Roast using instructions found here . Place roast into 2 freezer bags, divide onion and garlic into two bags with chuck roast, then divide broth mixture over meat, press out excess air and seal well. Place bags in refrigerator.
Prep Creamy Ranch Chicken using instructions found here . Place chicken into 2 freezer bags and cover with soup mixture, then press out excess air and seal well. Place bags in refrigerator.
Prep Big Easy Cajun Bean Soup using instructions found here . Place bean mixture into 2 freezer bags, then press out excess air and seal well. Place bags in refrigerator.
Once all prep is complete, place all bags in freezer until needed. After you’ve made your meal plan for the coming week, consider setting an alert on your phone to remind you to take your bag out to thaw the day before you plan to make it.
* * *
Have you tried making 10 meals in an hour yet? What tricks or tips can you share?

Pin It
The post 10 Meals in an Hour™: Part 8 appeared first on Living Well Spending Less®.
February 22, 2016
How to Cook with Dry Beans

While beans sometimes get a bad rap, there is definitely a case to be made for cooking with beans. First of all, they’re extremely nutritious: full of protein and fiber. They make a great meat substitute for vegetarians and a great compliment to meat dishes as well. They can be prepared as a side dish or a main course.
Not only are they nutritional powerhouses but they’re extremely inexpensive. You can purchase canned beans for under a dollar or you can purchase four times the amount in dried beans for the same price!
Beans also store very well. Stock your pantry with beans and you’ll have an emergency food supply to take you through several months of meals (without taking up a lot of space). They can last for years, though the nutritional value of dried beans does go down after a few years, so don’t store more than your family can go through during that time.
Did I mention they’re inexpensive? I know I did, but it’s worth saying again.
Plus, beans are super versatile. They can fit almost any style of cooking: Italian (cannellini, white beans), Southern (black eyed peas, lima beans), Indian (chickpeas, lentils), Mexican (black and pinto), and Asian (adzuki and edamame). They pair great with grains such as rice, whole grain pastas, and so much more. You can literally eat around the globe for under a dollar or two a meal!
And while the virtues of beans are many, of the most common things holding us back is unfamiliarity and/or what I like to call “food trauma.” Maybe you had a bad bean experience in the past. Maybe you just don’t know how to cook beans. Maybe you’ve had a sad bag of dried beans on your pantry shelf for an embarrassingly long time.
Let’s get started and get over the fear of beans!

Dried Beans vs. Canned Beans
Canned beans are cheap and ready to go. They’re a convenience and store well. But guess what? Dried beans are pretty much all of those things, too, at a fraction of the price. Not only are they easy but you also don’t have to worry about BPA in can linings or preservatives, additives, and other concerns with canned foods. With dry beans, you also don’t have to worry about all the sodium.
Nutritionally, aside from the sodium found in canned beans, they’re about the same. Dried beans can have a few stronger nutrients than canned because some get lost in the canning process, but it’s pretty nominal. We are big fans of the Ham-Beens brand beans, as they include a flavor packet that helps season your beans. They can be found at most major grocery stores (including Publix!)
Dried beans have great texture. They’re creamier on the inside and have a more toothsome feel on the outside. They make a super creamy hummus and delicious bean dip. If you’ve been reluctant to make the switch (like I was for a long time), it’s time to give dried beans a chance!

Sorting Your Beans
When it comes to dry beans, “sorting” doesn’t mean divvying up your mixed beans by bean type. What you’re actually looking for when you sort dry beans falls into two categories: Bad Beans and Non-Beans.
You don’t need to deeply inspect every bean. You’re looking for Bad Beans that are shriveled, have insect bites, or those that look much darker or much different than your other beans of the same type. Depending upon the type and brand of dry beans you buy, you may encounter some Non-Beans. Non-Beans are typically small rocks or dirt clumps that can come with your beans.
Don’t let the sorting process prevent you from using dry beans! Typically there are very few Non-Beans present, if any! Eliminating Non-Beans and Bad Beans from your dry beans before cooking simply ensures you get the most flavor out of your beans.

Soaking Your Beans
What always gets people about beans is the soaking. It seems a little daunting and requires some planning. Here’s the deal: if your family eats beans often, then they won’t cause as much gastrointestinal effects (aka gas). If your family is newer to beans, soaking can help alleviate some of the gas-causing sugars. Soaking softens the beans and shortens the cooking time.
The other thing about soaking? It’s SO easy. Really. Simply put the beans in a pot or bowl and cover with four times the amount of water. So for one cup of beans, you’ll need four cups of water. Let them sit overnight in the fridge (or cover them in the morning and they’ll be ready to go by dinner).
Drain the water when they’re done soaking (6 to 8 hours) and you’re ready to go. But here’s the thing–if you don’t want to soak (or forget to soak), you CAN simply cook the beans in your soup. They need an extra 45 minutes to an hour of cooking time, but the flavor will be excellent. The one thing you will want to watch out for is adding any acidic ingredients, such as tomatoes, to your soup before the beans have had a chance to rehydrate. Simply wait to add the tomatoes until the end and you’ll be good.
Cooking Your Beans
One of the biggest timesavers? Soak a whole bunch of beans, throw them in a slow cooker with water or broth on low for 4 to 6 hours (or on high for 2 to 4 hours) and then freeze to use in recipes later. Beans freeze really well and there’s no reason not to make a bunch if you’re going to go through the process. Using beans from the freezer is as simple as opening a can and adding them to the recipe. You can either use the liquid they were cooked in or drain them and add them in (depending on the recipe).
If you aren’t a fan of the slow cooker, you can also cook them in an oven crock for an hour and a half on 325 degrees. If you choose not to soak the beans, simply put them in with the same 4:1 water-to-bean ratio and go for 2 hours and 15 minutes (check for doneness).
When I cook beans I like to use some flavorful add-ins to give the beans an extra little boost. You can add garlic, carrots, celery and spices to the water. If you want to use your beans in several different applications, stick with more neutral aromatics which apply to all forms of cooking (Mexican, Indian, Southern, etc.)—onions, bay leaf and thyme are always good choices. Smokey ham bones and bacon can add a lot of flavor, or you can choose to soak your beans in broth.
When it comes to salting beans, hold off! This can be counterintuitive, but beans will soak up salt like crazy. Wait until they’re incorporated into the final dish or until you’re almost at the end of cooking and season to taste.
There’s really no need to stir beans and it actually can break them up and make them mushy. Just keep your hands off and let your beans do their thing. Check regularly for doneness. They should be soft and taste flavorful (not bland, gritty or crunchy). If they aren’t ready, let them cook for a bit more time.
If you want to use beans for a salad or in hummus or bean dip, let them cool in their cooking water in the fridge for a few hours. You can even put them in marinade with lemon, olive oil, salt and pepper and let them soak up the flavors while they rest. If you drain them, the skins can shrivel up and crack, so let your beans cool completely in liquid. If you’re using them in another dish, just dump them right in like you would do with canned beans.

Recipes:
I love to use beans in my cooking. Until recently, I was a regular canned-bean user, but now I’ve discovered how easy dried beans are, so I’m started expanding my repertoire. With any of these bean recipes, you can sub out the canned beans for dried. You can even use them in freezer meals—they work great!
Our most recent bean soup, the Big Easy Cajun Bean Soup, is definitely one of my family’s new favorites. It’s packed with flavor and comes together in minutes, then goes straight from the freezer to the crockpot, no soaking required.
Likewise, this Easy Slow Cooker Buffalo Chicken Soup uses 15 Bean Soup Mix to provide tons of flavor on a tiny budget. Its a great way to feed a hungry crowd for just pennies a serving!

Kale & White Bean Soup is great with crusty bread, and you can add vegetables from your garden like we did. It’s a great dollar-stretcher and it comes together so fast. It’s very flavorful and nutritious. You can try the vegetarian version or go extra hearty with smoked sausage.
If you’ve soaked white beans for the Kale & White Bean Soup, you might as well double the batch and use them to make Easy White Bean Chili. This recipe is another freezer-friendly one and it comes together super-fast. The great thing is it has a completely different flavor profile, so you definitely won’t feel like you’re eating the same beans meal after meal.
I love black beans. They have such a rich flavor and they’re so pretty in dishes. This Black Bean Coconut Rice is a dish that can please vegetarians and meat lovers alike. It’s a wonderful accompaniment for skewers on the grill and it can taste fresh and delicious with fish or chicken, or even as a main course.
My favorite chili is the 30-Minute Corn & Black Bean Chili and yet again—here’s a dish where you can easily use dried beans instead of canned. Chili is a year-round favorite around here and this one is particularly popular due to its fresh flavors of corn and salsa verde.

In a similar spin, you can use your black beans in Quick & Easy Taco Soup as well. This is a freezer-friendly soup that’s very easy to throw together on a busy night. It literally tastes like a restaurant dish. My kids and husband love this one, so it’s one of my go-to recipes.
Slow Cooker Bacon & Beans are the real deal. This is the ultra comfort dish—satisfying, warm, hearty, and ready to be enjoyed. You can take this dish to parties as a great side everyone enjoys. I find this is a really good starter recipe for dry bean newbies. It’s a crowd-pleaser and it’s very straightforward.
Split peas are still in the legume family, so they come dried, too. The great thing is you don’t even have to soak them first! They cook quickly and they’re so easy to use. Simply rinse and toss in the recipe. This Easy Slow Cooker Split Pea Soup is another family favorite and it’s one of the easiest recipes ever to put together.

Gifts:
You can give beans as a gift—for real. Soup mixes are thoughtful and an easy way to make edible gifts for friends and neighbors.
One of my favorite gifts is this cute 15 Bean Soup Jar. It literally comes together in minutes and couldn’t be easier or more flavorful. It’s also super inexpensive, plus, it’s a slow-cooker recipe, so you don’t have to explain pre-soaking on the recipe tag. The recipient just throws them in a crockpot, then enjoys a great meal. It’s such a convenient gift for people—it’s a whole meal in a jar!
Coffee comes from a bean as well. (Okay, maybe it’s not quite the same, but still.) You can incorporate coffee beans into this great soap, which is a lovely gift. The coffee beans are great for your skin, and whether you’re big coffee fan or not, the mild smell and exfoliating benefits are great for everyone.
So now you’re ready to go forth and spread the love of beans! Really, though, these underappreciated legumes are flavorful, cheap and delicious. Stretch your dollar and give beans a try!

* * *
This post was underwritten by Hurst Beans. All opinions are mine. Established in 1938, the N.K. Hurst Co. is a 4th generation family business based in Indianapolis, IN. Hurst’s HamBeens® are the nations #1 selling dry bean brand and can be found in grocery stores nationwide. For more info, please visit www.hurstbeans.com.

Pin It
The post How to Cook with Dry Beans appeared first on Living Well Spending Less®.
February 19, 2016
Smart New Uses for Old Things

Have you ever heard of upcycling?
In a nutshell, “upcycling” simply means finding new uses for old things, rather than just tossing them out. For those of us who enjoy being thrifty and crafty, upcycling can be tons of fun, super inspiring, and a great way to decorate or make gifts for others. Not only does upcycling stretch your dollars a little further, but you can feel good about giving new life to items you might have otherwise thrown out.
As much as I love to declutter and simplify, there are times when reusing and repurposing can really come in handy. The idea is that we should not spend money on more, when something on-hand will do.
Next time you find yourself annoyed or wrestling with something around the house, take a moment to ponder (or Google) a new way to address the issue. Before you run to the store, look at what you have on hand.
This can be a great life lesson exercise for the kids too—whether it applies to dress up, pet toys or just household chores and duties. Try searching for terms like “Upcycle,” “DIY,” and “Life Hack.” You’ll be amazed at all the tips and tricks you find…it seems there’s a new or better way to do nearly everything!
All this resourcefulness isn’t new, or limited to the internet, for that matter. Challenge yourself to get creative and think like your grandmother did during the Depression. Don’t go to extremes, but within reason, many little items can easily be reused. My grandparent used to save everything—from cereal boxes to yarn scraps to rubber bands (which can open any stuck lid including nail polish!)—but everything that came into that house was reused…even food and meat containers. Yikes!
While saving too much can make for a disorganized (and scary) problem, trying to repurpose packaging and other items can keep them out of the landfill and help stretch your budget. I’m always amazed at how easy it is (most of the time) to bring new life to ordinary and old things.
Here are a few ideas to get you started
From Empty Jar to Layered Candle
I love a scented candle. (Who doesn’t?) While some can be a little strong or perfumy, there are some lovely single note candles out there that really make your house smell great. They can be pricy though and once a candle is burned down, you end up with a bunch of jars with black rims, and about half an inch of unused wax in the bottom. Rather than just throwing out the candle, try reusing the wax and jar to make a beautiful and fragrant layered candle! Wicks are very inexpensive ($2-$3 for 10) and can be purchased at a craft store. Gather all of your candles and try to group them by similar scents (cinnamon, vanilla, spice or strawberry, pineapple, cherry).
Here is an excellent tutorial on making beautiful layered candles. To reuse your jar, simply wipe clean with a paper towel dipped in orange oil, Goo Gone or baby oil to remove residual wax, labels and carbon staining around the top—and/or try running your candle jar through the dishwasher.
From Lotion Bottle to Cell Phone Charging Center
As much as we try to cut back on product packaging that comes into our house, it seems we still generate a fair amount of trash. When thinking of upcycled crafts, I like to try to repurpose used containers and items, rather than simply throwing them in the garbage. Plastic bottles can be recycled, if offered by your city, but there are other fun uses for plastic bottles in pretty colors. Method brand cleaning bottles look like colored glass when cleaned and spruced up. They can make pretty vases and holders for pencils and other little items.
One of my favorite ideas for plastic bottles is as a charging station for your cell phone. There are several internet tutorials on how to do this, but the best I’ve found is this one on Make It & Love It. Sketch out the shape and, using scissors or an X-ACTO knife, simply cut the container into a holder that fits right over the outlet! This keeps cords up and out of the way for little ones and prolongs the life of your charger, since you won’t be tripping over it and ripping it out of the socket.
I also love the idea of using Mod Podge and fabric to dress up the container a little bit. Pick a print that nicely fits your décor or that will blend in to any room. It’s a perfect resting place for your phone to safely sit while it charges and a perfect way to easily locate your phone when it’s done!
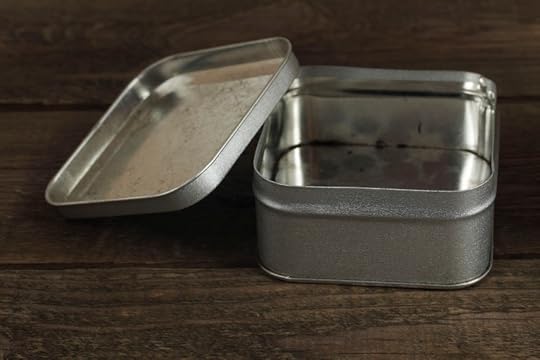
From Mint Container to Tiny House
Pill bottles and mint containers can also make great upcycle items. Tiny tins are generally a great way to store little items in your bag and purse. Use clean, recycled pill bottles in your car to store tokens or quarters for tolls and meters, a few emergency essentials (matches, Band-Aids, needle and thread), or even extra grocery bags and/or doggie clean-up bags. Altoids and other candy tins are especially coveted around our house because they offer so many options.
One of the cutest mint tin uses I’ve seen is to create a “tiny house.” If you have girls you KNOW the fascination with all things tiny—Polly Pocket, Littlest Pet Shop…anything small that can be carried in a bag or purse can make for hours of play. Rather than dropping $5-$20 on a “tiny toy” at the store, get creative and make your own little menagerie.
There are several tutorials online, and I love the versatility—from animals, to dollies, to mini-monsters, there’s a mini-house for everything. This tutorial on Tea Rose Home shows how to build and decorate a tin to create a little bedroom. Felt scraps, pretty papers and even clay like Sculpey can be used to decorate and accessorize your tiny house.
The next time you have a rainy afternoon, or you just need a project that the kids can get into for a few hours, a tiny-tin home is your new go-to.
From Clips to Organizing Tools
Many household items can be repurposed to help with your organizing. Binder clips can help organize cords, as well as serve as great chip clips, razor covers, and more. Paper clips are great for cleaning out small crevices and can also be used to hang necklaces with outfits, hang multiple hangers together while ironing, act as pull tabs for zippers, and much more.
Those little bread tags that always end up on the floor can be reused again to organize cords (it’s a continuous quest, really), or as wine glass markers. Bread and garbage bag twist ties also come in very handy when something needs to be repaired quickly—from a key ring, to a zipper pull, to trellising up some tomato plants—any time a short piece of coated wire is needed.

From Soda Pop to Substance
Pull tabs from your soda cans (something we often toss without a second thought) can be used as picture hangers, made into bracelets, purses and even dresses, or given to Ronald McDonald House Charities.
Not everyone has a surplus of cans, of course, but even if your family members aren’t big soda (or beer) drinkers, it seems that, at every party and get together, cans abound. Of course crushing them down and hauling them to the recycling center is the preferred option to trashing them and watching them add to our landfills. Aluminum, however, is also very easy to work with and fun to sculpt. You can make jewelry, bracelets and decorations. (Just be careful, because the raw edges can be very sharp!)
My girls love butterflies, so when I saw these soda-can garden butterflies, I couldn’t wait to try them. Using just scissors and wire (or a die cut machine, if you’re brave about cutting metal with yours), you can make beautiful decorations that are suitable for the yard, the Christmas tree, or to enhance a gift package. Try turning them into a pretty mobile, and use twigs and string for a natural effect. I love the contrast of the natural with the commercial printing on the cans. If you prefer, you can also create leaves like these beautiful from Little House in the Suburbs. They catch the sunlight and sparkle when hung from windows.

From CDs to Coasters
One of the most challenging upcycles is electronic items. First, there were cassettes and VHS tapes—and now with MP3s, there are CDs, DVDs, old iPods and more.
First things first: be aware that many larger electronics and items such as ink cartridges and even cellular phones can contain harmful chemicals from the manufacturing process. These should be properly disposed of, rather than made into cute crafts (of course). Many schools and other non-profits offer recycling programs for ink and small electronics, which can sometimes earn you some extra money. Check with your child’s school to see if they offer such a program. The Apple Store will recycle iPods and iPhones and may even offer you credit towards your next purchase for the exchange.
For all the other little electronic items (cords, cassettes, discs and more), start thinking outside the box. One of the biggest challenges I’ve found when repurposing electronics is that frankly, they just aren’t that attractive to begin with, and they only fit a certain aesthetic. Still, with a little research, there are lots of ideas that can work for anyone. If you’re feeling extra ambitious you can also get really creative with CD cases and make a little greenhouse just like they did at “So You Think You’re Crafty.”
For old CDs, one of the more attractive solutions I’ve found are these cute coasters. Using a decoupage medium like Mod Podge, fabric, scrapbooking paper or other cute patterns—it’s actually really simple. Trace the CD, cover in the medium, and then seal with a polyurethane sealant. (Mod Podge will leave the surface slightly sticky, especially when holding glasses with condensation.) These coasters last for a good while, but many of us have so many old CDs and DVDs around, we could probably make a set to go with every season.
From T-Shirt to Shopping Bag
Plastic bags are really terrible. They’re bad for the environment from the manufacturing process right up until they end up in the oceans or in landfills. As we’ve tried to simplify in our house and become conscious consumers, we’ve cut back on our use of bags as much as possible. I fervently try to bring shopping bags with me wherever I go, so I keep them in my car, purse and stashed other places, lest I forget them.
There are always reusable shopping bags available for purchase at the store and they’re of course, highly preferred to plastic, but why not simply make your own? I’ve found several tutorials that require minimal sewing skills and just an old t-shirt or pillowcase—it doesn’t get any simpler than that!
To make a shopping bag from an old tee, simply stitch along the bottom of the shirt to hold it together, cut off the arms and neck and you have a bag with handles. If you prefer something that looks a bit more polished, try making a “mesh” bag. These fold up really small, so you can stash them in your car, diaper bag, gym bag or desk.
When it comes to repurposing and upcycling, get creative and challenge yourself to find new uses rather than just buying something new at the store. Clothing, furniture, toys—all of these items can be donated, sold or made into something that will bring joy and a sense of purpose to your family. Giving new life to old things can be incredibly satisfying. You may even find you have a real flair for recycled crafts!

Pin It
The post Smart New Uses for Old Things appeared first on Living Well Spending Less®.


%20ingredients!%20Bursting%20with%20flavor,%20it%20is%20perfect%20as%20a%20side%20but%20hearty%20enough%20to%20stand%20on%20its%20own.%20)
%20healthy%20ingredients!%20The%20perfect%20solution%20for%20when%20you%20realize%20at%20the%20last%20minute%20it%20was%20YOUR%20turn%20to%20bring%20the%20treat!)