
Ruth Soukup's Blog, page 54
November 4, 2016
Our Top 10 Favorite Family Games (Ages 7 & Up)

We are a game loving family!
In a world of constant technology and near-continual screen time, sitting down together as a family to play a few rounds of our latest favorite game is our favorite way to unwind. Unlike video games, board and card games offer face-to-face human interaction. Plus, they really allow you to stretch your brain. They’re fun, creative and intellectually stimulating.
We aren’t a hugely competitive family, but my girls enjoy giggling over who wins or who misses a turn. Games foster teamwork and individual growth. They help build skills like counting, literacy, logic and more. Not only that, but they also increase family togetherness and bonding.

Game Time
Whether we have a full day of games or just an hour or two to play, our family always finds ways to make the experience special and exciting.
First of all, having some snacks on hand can be great, but aim for items that aren’t sticky or greasy so you don’t mark up your cards or spill on the boards. While playing, we usually stick with water to drink and munchies like pretzels, grapes, almonds or plain cereal—all foods that keep your hands clean and don’t require much maintenance to eat.
Playing games on the table can be great, but consider spreading things out on a rug on the floor or setting up various stations and rotating games throughout the house. For a group of friends, oversized game pieces, dice, or giant Jenga can be a great outside adventure. You can even spray paint Twister spots on the grass and play outdoor rounds.
Many board games travel well to a beach or picnic and some even work great in the car. If you’re concerned about little pieces getting lost, card games are a great option. We’ve found that taking a few games on our road trips gives our kids some much needed quiet and downtime, and helps us find something to do if there’s a wait due to weather or a pool-free hotel.
A few years ago, I worked on a list of our family’s top ten board games. These were the best games we found for our kids (ages 4 and 6) at the time. We chose games we played at home, with friends, and simply just as a family. These games had to be easy to play, interactive and fun. Bonus points for games that could be played on their own without help from mom and dad!
Since it’s been a few years and our kids are a little older, their interests and abilities have grown and changed. There are some games from our old list they still love, like Spot it! and I Spy Go Fish. However, they’ve simply outgrown some of the games. Candy Land, for example, has lost a little luster, especially with my older daughter. Plus, now they enjoy navigating a few harder games that require reading, math and logic skills.
Our Top 10 Family Games (Ages 7 & Up)
Blink: Hailed as the “World’s Fastest Game,” this two-player card game is all 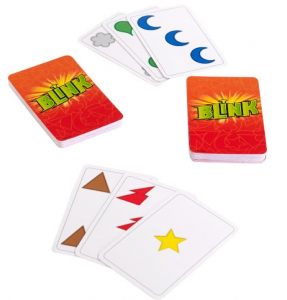 about matching patterns by shape, color or number. Blink is highly portable and can be played by a pretty wide range of ages and abilities. It’s inexpensive and simple, but really great!
This quick game of hand-eye coordination helps boost your child’s ability to recognize patterns. It also causes some serious giggle fits and it’s highly addicting! In fact, mom and dad have been known to play this game just for our own entertainment.
Kid Score: A
Parent Score: A
Independent Play? Yes
Reverse Charades: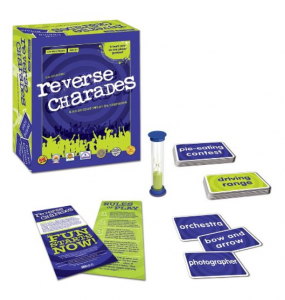 In traditional Charades, one person acts out a word or phrase while someone else guesses. In this hilarious version, everyone acts out the phrase while one person is the guesser. Somehow, when everyone in the group is acting it out at the same time, the game becomes that much more funny and interactive.
This is one of our top party games and go-to games for a crowd. It’s easy enough to understand (most people have played some version of Charades at some point) and it is seriously hilarious. This game is for six or more players, ages 6 and up, so it’s definitely a group or party game. Reverse Charades is a great team-builder and it helps kids learn to work together and communicate in different ways. It’s certainly not a “quiet time” game, but if you’re looking for a wild time for everyone, this game is IT.
Kid Score: A
Parent Score: A-
Independent Play? Not unless there’s a large group.
Suspend: This game requires a steady hand and the utmost concentration. 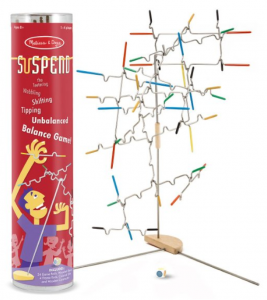 If you have any engineers or builders in your household, they’ll love Suspend! While it’s similar to Jenga, the nice thing about this game is you can play it on a table without fear of denting your furniture or waking the neighbors with a loud crash. Not only that, but Suspend is great for developing hand-eye coordination and cognitive reasoning skills as you attempt to carefully balance each rod on the growing, teeter-tottering structure.
One of the best parts of this game? It’s almost as much fun to play alone as it is to play as a team! It’s recommended for ages 8 and up, but a 6 or 7-year-old can catch on pretty easily if they have a steady hand.
Kid Score: A-
Parent Score: B
Independent Play? Yes
Head’s Up: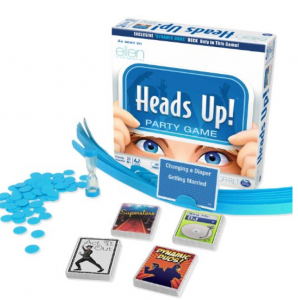 This game was a popular app that originally appeared on the Ellen DeGeneres Show. To play, you put on a headband loaded with cards. Then, the other players act out, hum or mime each phrase, celebrity or song they see, without using words. The results are absolutely hysterical!
This game works best in groups of 4-6 but can be played with just two players. It’s targeted for ages 8 and up, which seems to be appropriate, as younger kids struggle with some of the references.
Kids Score: B
Parent Score: B
Independent Play? No
Skip-Bo: We just love this classic card game!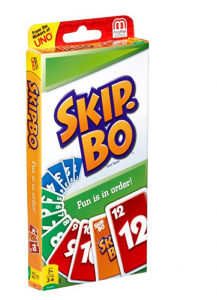 Skip-Bo is a card-sequencing game that helps kids learn about counting and strategy. Given a series of numbers, players build piles of ascending cards. Wildcards are also thrown in to mix things up.
This game is targeted to ages 7 and up and can be played with 2-6 players. This is one of our go-to travel games, as it’s small enough to throw in your bag, car, or backpack and take along.
Kid Score: B
Parent Score: A-
Independent Play? Yes
Uno: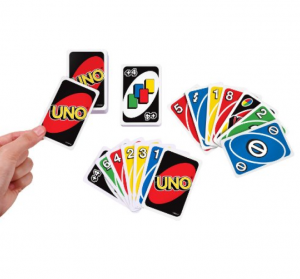 Similar to Skip-Bo, Uno is played by sequencing numbers and colors, using red, blue, green and yellow cards numbered 0-9, plus wildcards to add to the fun and strategy. Uno is fast-paced and fun because there’s always the opportunity to hijack a win by using action cards. At the last minute, an action card forcing a player to reverse direction, skip a turn, or even swap cards with another player keeps everyone on their toes. Customizable wildcards add even more to the family fun. Uno is a classic, and can be played with 2-10 players, ages 7 and up. (Although some savvy 5 and 6-year-olds can catch on, too.) It’s a lot of fun, it travels and packs well, and it’s simple and interactive. Everyone will be racing to get to yell “Uno”!
Kids Score: A
Parent Score: A
Independent Play? Yes
Bananagrams: Bananagrams is similar to Scrabble, minus the board,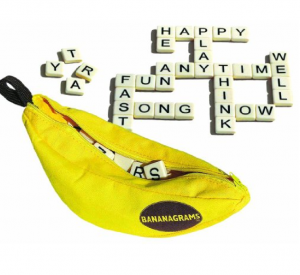 pencil and paper. Essentially, you build crosswords using small lettered tiles. This game travels easily, helps young readers and spellers learn literacy skills, and is totally addictive and engaging.
We love this game because it’s easy to play anywhere and can be played with 1-8 players. It’s appropriate for any child who can read (ages 7 and up), and it really helps reinforce language and vocabulary skills—yet your kids won’t even know they’re learning! Plus, it comes in a cute banana pouch that zips up and goes right along with you!
Kids Score: A-
Parent Score: A
Independent Play? Yes, depending on reading skill level.
Guesstures: Looking for a game that’s fast, frantic and fun? You got it! To play Guesstures, place four cards into the timer, then use charades and gestures to get your team to guess what you’re acting out before the card disappears!
This is a great game for four or more players (it’s a wonderful party game) and it’s appropriate for ages 8 and up. This game seems to evoke everyone’s goofy/silly side. Your whole family will be in stitches as you try to guess what on earth your team members are doing!
Kids Score: A
Parent Score: A
Independent Play? No, this is more of a party game.
Catan Junior: The award-winning Settlers of Catan is hailed as 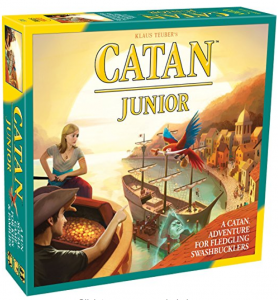 one of the greatest board games ever—so if you’ve enjoyed the original, the Junior version won’t disappoint. It’s a highly engaging interactive experience, as you build a village, trade resources, and try to capture seven pirate hideouts as you work toward creating an island.
The original game is for ages 10 , but Catan Junior offers a similar experience for kids as young as 5 years old. While it’s quite involved, it’s one of those games where you become so into playing you hardly notice how much time has passed! This game is for 2-4 players.
Kids Score: A-
Parent Score: B
Independent Play? Once your kids learn the rules they can play without assistance.
Qwirkle: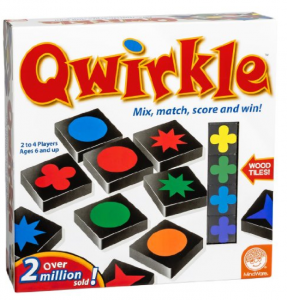 Qwirkle is like a combination of Scrabble, Blink and other matching games. You build chains of color-coded symbols to create different patterns and strategize to maximize points. This game builds on logic skills, deduction and reasoning. It was the winner of the Parents’ Choice Foundation Gold Award, as well as the Mensa Select National Competition Winner.
That said, it’s quite simple to learn and involved enough to hold kids’ interest for long gameplay. It’s for 2-4 players, ages 6 and up. Strategy keeps growing as players learn the ropes through play.
Kids Score: A
Parents Score: A
Independent Play? Yes

Games bring families together in a way so many other activities can’t. They give us opportunities to laugh and be silly together, to learn together, and to grow together, both independently and as a family. Family game night will always be a part of the way our family has fun!
I’d love to hear your list of family-favorite games! What does your family just LOVE to play? Did your favorites make our list or are there others you recommend? Let us know your favorite games and why your family loves them so much!

Pin It
The post Our Top 10 Favorite Family Games (Ages 7 & Up) appeared first on Living Well Spending Less®.


November 2, 2016
Sweet Potato Pie with Maple Whipped Cream

I don’t know how things are in your house, but around here, come Thanksgiving, PIE becomes a hot topic of conversation. We take our Thanksgiving menu very seriously, and nothing is more important to the success of the meal than the finale! Our choices are usually the classics–Pumpkin, Apple and Pecan.
But this year, I wanted to try my hand at sweet potato. Maybe I’m just missing the South! But the reality is that this deliciously flavor-packed pie is the perfect way to mix things up just a little, but still keep all the flavor of fall. Give it a try and see!
Here is what you need:
1/3 cup butter, soft
1/2 cup brown sugar
2 large eggs
1 TBS real Maple syrup
1 tsp vanilla extract
2 large sweet potatoes cooked and mashed (2 cups)
3/4 cup evaporated milk
1/4 tsp salt
1/4 tsp ground cinnamon
1/8 tsp ground nutmeg
1 9 inch refrigerated pie crust
Maple Whipped Cream
1 cup heavy cream
2 TBS Maple syrup
1 TBS sugar
1/2 tsp vanilla
1/4 tsp cinnamon

Step 1: Pierce each sweet potato several times with a fork. Then wrap potatoes in foil and place in cooking sheet. Cook in 400 degree oven for 50-75 minutes.

Step 2: Once sweet potatoes are cooked, allow to cool then remove from foil. Scoop out potato flesh and mash.

Step 3: Take pie crust out of freezer and place on baking sheet and set aside. In a large bowl, mix together sweet potatoes, butter, sugar, evaporated milk, vanilla, cinnamon, nutmeg, maple syrup and salt.

Step 4: In a small bowl, lightly beat eggs. Then add beaten eggs to pie mixture and mix well.

Step 5: Pour mixture into pie shell and bake at 425 degrees for 15 minutes. Reduce heat and bake at 350 degrees for 35-45 minutes or until pie is set and knife comes out clean.

Step 6: Allow to cool for 2 hours.

Step 7: To make maple whipped cream: Add all ingredients to large cold bowl and beat the cream on high speed until it begins to thicken and get slightly stiff. Add the maple syrup, sugar, vanilla extract, and cinnamon to the cream. Continue whipping the cream until it forms stiff peaks.

Step 6: Slice pie and serve with maple whipped cream and enjoy!
Print This!
Recipe: Sweet Potato Pie with Maple Whipped Cream
Summary: This amazing pie is so simple and easy and the perfect alternative if you don’t care for traditional pumpkin.
1/3 cup butter, soft
1/2 cup brown sugar
2 large eggs
1 TBS real Maple syrup
1 tsp vanilla extract
2 large sweet potatoes cooked and mashed (2 cups)
3/4 cup evaporated milk
1/4 tsp salt
1/4 tsp ground cinnamon
1/8 tsp ground nutmeg
1 9 inch refrigerated pie crust
Maple Whipped Cream
1 cup heavy cream
2 TBS Maple syrup
1 TBS sugar
1/2 tsp vanilla
1/4 tsp cinnamon
Instructions
Pierce each sweet potato several times with a fork. Then wrap potaoes in foil and place in cooking sheet. Cook in 400 degree oven for 50-60 minutes.
Once sweet potatoes are cooked, allow to cool then remove from foil. Scoop out potato flesh and mash.
Take pie crust out of freezer and place on baking sheet and set aside. In a large bowl, mix together sweet potatoes, butter, sugar, evaporated milk, vanilla, cinnamon, nutmeg, maple syrup and salt.
In a small bowl, lightly beat eggs. Then add beaten eggs to pie mixture and mix well
Pour mixture into pie shell and bake at 425 degrees for 15 minutes. Reduce heat and bake at 350 degrees for 35-40 minutes or until pie is set and knife comes out clean.
Allow to cool on wire rack for 2 hours.
To make maple whipped cream: Beat the cream on high speed until it begins to thicken and get slightly stiff. Add the maple syrup, sugar, vanilla extract, and cinnamon to the cream. Continue whipping the cream until it forms stiff peaks. *Tip- Use a cold bowl and beaters.
Slice pie and serve with maple whipped cream and enjoy!
Preparation time: 1-2 hours (includes baking of Sweet potatoes)
Cooking time for pie: 35-45 minute(s)
Number of servings (yield): 6-8

Pin It
The post Sweet Potato Pie with Maple Whipped Cream appeared first on Living Well Spending Less®.
October 31, 2016
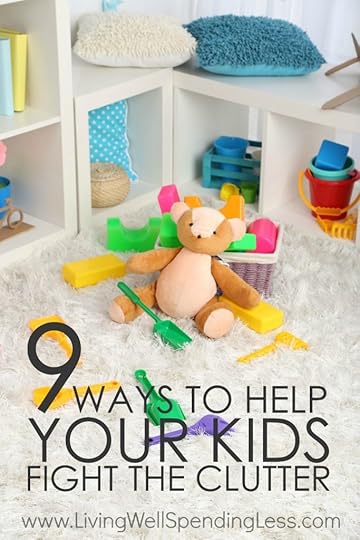
9 Ways to Help Your Kids Fight Clutter

My kids have a superpower. Do you want to know what it is?
They are somehow able to generate STUFF out of nothing! No matter how much we get rid of or how diligent we are about clearing the clutter, somehow the stuff just keeps coming back, almost like magic.
Do you ever feel this way? No matter how many papers we throw away, there are always more. No matter how many toys go in the donation bin, there are always new ones to take their place. As a mom, it is enough to make you lose your mind sometimes!
In 2012 I wrote about the day I took my kids’ toys away, a decision that has continued to be the source of much controversy. That post has received hundreds of comments–both good and bad–and even inspired its own Tumblr page dedicated to telling people what a bad mom I am.
For the most part, I’ve simply learned to tune it out, because the truth is that that moment was one very dramatic blip in the history of our family, and we have long since moved on.
Did we learn some big lessons about how much stuff we really need? Absolutely! Have my kids lived without toys or stuff in the nearly five years since? Not a chance. They are kids! They are stuff magnets! They’ve got a super power, remember?
The reality is that we live in a world where we are inundated with messages about what to buy at every turn. Every holiday, every birthday, every special moment is an excuse to add more to the pile. Our kids can’t help but be swept up by this culture of consumerism, because it is everywhere.
But as parents it is our job to fight back daily against the marketers who are vying for the hearts and minds of our kids, and to protect them from being continually inundated with propaganda about what to buy. It is our job to have open and honest conversations about wants versus needs, and to say enough is enough, because our kids will certainly not do it themselves. They don’t yet have the wisdom to discern what is hype from what is reality. They need us to do it for them. And as parents, it is our job to know that it is okay to say no.
And in a very practical sense, that means helping our kids learn how to fight the clutter in their own life. Here are 9 ways you can do just that:

1. Teach How To Ruthlessly Purge
Teach your children how to clean out clutter and how to organize. It can be hard to suppress the urge to just purge all their toys and stuff for them, but it’s a greater learning experience if you can get your kids to do it themselves.
It actually becomes a learning experience for both of you, and I can attest my daughters have been great teachers when it comes to letting go of my own stranglehold on stuff. Kids have a surprisingly easy time adjusting to new ideas and even embracing them enthusiastically. My daughters see cleaning out and organizing as an adventure, and it almost becomes a game.
When kids learn to keep their items organized and pare down what they don’t need, they build skills to carry them through life. Teach your child how to let go of items. For each item, ask them to really consider if they love it, if they find it useful, or if it brings value to their life. If it doesn’t, help them understand why it’s not important to hang onto it.
Show the benefits of purging and give them examples as you go, like how it will help them clean their room faster and how they can donate items to other kids who might need them. Have your kids help sell their items at a garage or yard sale and decide something special they can do with their earnings. Showing tangible results for their actions will help them build positive associations with cleaning out and staying organized.
2. Set Limits
It’s very difficult to set limits before we go into a situation—but it’s a million times harder to set limits after the fact. Before your child goes to the store, to the fair, or to a movie or party, have them decide with you what they can or cannot buy. What is the spending limit for candy? Discuss the plan beforehand.
When you’re setting limits, also set appropriate limits with family. Talk to grandma, grandpa, aunts, uncles, and anyone who may want to give your children extra gifts or privileges that don’t mesh with your parenting style. This saves you from offending people later on or having a big argument with your children when you get home. Simply let people know you’re working on setting some limits on stuff as a family, and if they really want to give your child a gift, encourage them to give the gift of an experience or activity instead of another toy.
If the discussion seems too daunting, consider asking close relatives for something useful, like, “John could really use new cleats for soccer this year.” This ensures the gift will satisfy a need rather than simply just a want.

3. Explain Money & Budgeting
Help your child learn about budgeting and money at an early age. Children who start a savings program, understand the concept of giving money to charity, and actively practice budgeting have a much easier time later in life. It’s never too early to start a discussion about cost, budgeting and setting goals to “earn” a coveted prize.
While a six-year-old might not be ready to earn money for new school clothes, they will appreciate and value a new Lego toy more deeply if they work towards earning it or if they pay for half of it on their own. Kids should be kids, and I’m not advocating challenging job lists they need to slave away on all day long, but teaching them goal setting can be rewarding and it definitely builds character.
Encourage children to consider giving tithing or a donation to charity out of their earnings as well. Compassion and generosity towards others comes very naturally to most kids, and you might be surprised at how readily and excitedly they accept the idea.
4. Practice Gratitude
It’s amazing how gratitude can reshape a whole conversation or day. When my kids are arguing or just having an “off” day, talking about everything we’re grateful for can help reframe the whole conversation and attitude. Have your children discuss three things they’re grateful for around the dinner table or before bed each night. Encourage them to give thanks in their prayers.
When your child receives a gift, help them compose a thank you note and teach them the way to properly express gratitude and appreciation (even if the gift isn’t something they wanted, something they already have, or “more clothes”). When kids learn to appreciate rather than expect gifts, they learn empathy and compassion.
Gratitude can have such a profound affect on all of us. Share this amazing practice with your kids and watch the transformation and shift in your entire household.

5. Delay Gratification
Teach your kids how to delay gratification. This goes right along with pre-planning before you get to the store or to a party. This also goes along with earning items and saving up for them, rather than just demanding something while you’re at the store. If your child sees something they really want, help them learn how to write it down, think about it, and work toward a goal to earn it.
So often, we give our kids the iPad or phone, or we cave when they’re flipping out for candy or a treat, because we just don’t want to deal with the tantrum. Instead of teaching children how to delay gratification, we’re teaching them how to have their demands met. They aren’t learning patience or the value of dedication and work ethic. Instead, they’re learning your limits as a parent and how far they can push to get what they want.
Instead of engaging in a war of the wills, discuss your child’s options with them, and help them figure out what they can do to get the treat or reward.
6. Teach “With Ownership Comes Responsibility”
So how many times have you given into a demand, only to see the doll, clothes, toy, etc, broken on the floor or lying there, useless after only ten minutes or so of excitement? It happens countless times. As parents, we have to teach our kids what ownership means. Owning toys we want means we need to pick them up and keep our room clean. Getting clothing we want means it needs to be hung up and put away properly. Having a bike means it needs to be put in the garage safely at night, and well taken care of.
Teaching children responsibility can be challenging, but the longer you wait, the more difficult it will become. Explain how moms and dads have to take care of the things they own, like your home, your car, your clothing, and more. Explain how kids have responsibilities, too, and they must keep their own things picked up, in order, clean and well cared for. It’s about teaching your kids how to value each item rather than tossing it by the wayside when they obtain something bigger, shinier or more exciting.

7. Show How Actions Have Consequences
Similar to the ownership lesson, teach your child that when they don’t take care of their things, there are consequences. A bike left out in the driveway might get stolen or run over. Toys left out might get stepped on or chewed up by the dog, which might also cause injury to someone in your family.
It can be hard to enforce consequences and sometimes you might feel like a big “meanie” when you throw out Barbie because she’s on the floor, or when you take away Play-Doh privileges because it was ground into the carpet. When we backslide on consequences though, these lessons don’t become concrete. It only takes a few times and the message will be received.
8. Live to Give: It’s Not All About You
Not long ago, I was stopped in my tracks by one simple but life changing question: What are you doing with God’s money? As a Christian, I believe that what I have is not my own. Instead, I’m called to be a good steward of the resources I’ve been given, and just as importantly, I am called to teach my children to do the same.
Children are surprisingly unselfish. As adults, I think we learn to focus on what we have and to hold onto it. Teach your children to consider giving and donating to charity. Help them learn the joy of sharing things with their friends and to recognize when others are in need.
The holidays offer many opportunities for charitable giving, but in reality, we can give all year long. Choose a Secret Santa family and give a little extra at Christmas, but also consider donating items when you do your spring cleaning. In the summertime, recognize those in need and have your children participate in a fundraising walk or church activity. During back-to-school time, ask your kids to consider what they can give to school supply drives and show how they can share items with those in their class who might not have as much.
Make giving a year-round and life-long focus, and you’ll help your kids think outside of themselves more often.

9. Choose Contentment
One of the most powerful lessons we can teach our kids is how to be satisfied with what we have. It’s difficult. Many of us aren’t even good at being content with what we have ourselves, let alone passing that on to our kids. That said, being at peace with what we have and practicing gratitude and appreciation for our blessings can help us truly recognize and feel happiness.
Remind children to appreciate experiences as they’re having them, and bring notice to little joys in life. Model this for them and teach by example as well. This means you might occasionally have to remind yourself to be appreciative as well.
A wise person once said, “There are two ways to be rich—to have everything you want, or to be satisfied with what you have.” Choosing to focus on everything you have versus the things you still want isn’t always easy, but it will always make a huge impact. An attitude of gratitude
Pin It
The post 9 Ways to Help Your Kids Fight Clutter appeared first on Living Well Spending Less®.
October 28, 2016
7 Smart Ways to Save on Holiday Parties

This is a Guest Post from Cherie at Queen of Free
It’s crazy to think that our December calendar is already beginning to fill up. There don’t seem to be enough days in the month to attend each program, host fun gatherings with friends and family, and of course squeeze in a party or two with colleagues from work. Christmas, a season packed with unexpected expenses and unanticipated extras, can kill even the tightest of budgets. Luckily these tried and true money saving strategies ensure you can entertain during a merry and bright season while keeping your checking account the color of Santa’s boots instead of his suit. And bonus – these party planning tips work any time of the year, no matter what sort of soiree you throw.

Begin With a Budget
The worst thing any reveler could do is shop blindly. You must have a target amount in mind of how much you want to spend whether you’re attending or hosting a holiday party. This requires planning in advance and considering each potential expense. Answer these questions as you begin to budget:
What will you wear?
Are you hosting the engagement in your home or in need of renting a larger space?
Will you serve food?
Do you need to purchase a host gift?
What paper goods or consumables will be required?
Are you sending invitations?
Will there be entertainment?
Do you need to decorate your home or another venue?
While these questions may not encompass every area of your budget, thinking through each query will engage your thinking as you choose how much you’d like to spend. If budgeting is a weak spot for you, ask a friend or coworker to help you with the process. He or she brings a unique lens to your planning.

Exercise Portion Control
Overspending and overeating seem to go hand-in-hand during the holiday season. If possible, plan a party that doesn’t require a full meal. Your guests are unlikely to starve thanks to the abundance of the season. Try out some of these ideas for minimizing spending without compromising flavor.
Have an appetizer party. Prepare an assortment of traditional crowd favorites like mozzarella sticks, crock pot dips, meatballs, and bread sticks. Bonus points if you line up a menu that doesn’t require flatware.
If you’re hosting a more laid back celebration, order pizza. Instead of having the traditional triangle shaped slice, request that your pie be cut “party style.” This will create more square shaped pieces from one pizza. Plus guests are less likely to fall victim to the “eyes bigger than stomach” syndrome where they pick up slices that end up in the trash can.
Instead of serving full portions of desserts, feature several mini-dessert options. Bite-sized cheesecake, layered parfait styled deliciousness in small cups, or maybe even a milk and cookies bar with a variety of each holiday classic all will delight your guests but remain more cost effective.
If your fete is immediately following work and requires dinner, consider hosting a potluck and ask your friends or family to bring their best dish. You could theme the night’s food or divide the alphabet having A-M bring a salty dish to share and N-Z bring a sweet dish.
Serving food buffet style? Place the most economical items (think bread or rolls, chips, veggies) at the head of the line. Guests will fill up their plates with these items first, allowing you to stretch more costly foods like meat and desserts further.

Limit Beverage Options
Open bar? Cash bar? No alcohol at all? Tea, lemonade, cider, hot cocoa, soda, water? Bottled beverages or cups and ice? Merely considering what drinks you’ll serve at a party can make your budget dwindle down to nothing in the time it takes to pour a glass of wine. If at all possible, limit the beverages to 2 or 3 choices. If your event is less formal, you might even consider asking your guests to bring their own favorite beverage. Dress up water by adding fresh fruit. Put cider or hot cocoa in a crockpot for a hot offering that doesn’t require tending. Invest in a thermal dispenser (I snagged one at Sam’s Club for $18) that you can use time and time again.

Take Your Invites Digital
Your guests don’t require a trumpeter and seven swans swimming to announce your shindig. Skip traditional paper invitations and opt for an online evite instead. Not only do you save money on printing and postage, you also have a handy platform to send guests organizational information and last minute details, too. If you require a paper format, consider printing postcards which require less preparation (no envelope stuffing for you) and offer significant postage savings.

Limit the Guest List
When it comes to family or work events, you can’t really pick and choose who you’re inviting to a holiday party. However, other gatherings do have more leeway to let you trim down the number of guests you’ll be inviting. Concerned about hurt feelings? Instruct those on the invite list to keep the affair Social Media “dark.” Collect phones at the beginning of the party so no one is tempted to flood their feed with photos. Help invited guests feel special and remind them what it feels like to left out.

Keep the Main Thing the Main Thing
Celebration is a beautiful part of life. But party planning becomes an easy distraction for excess. It comes from a really good place – wanting our guests to be honored and have a great time – but easily slips into a dangerous pattern of overspending if we are not mindful. Remember that the purpose of a holiday party is to share time together. It’s not about flashy decor or pricey foods. It has nothing to do with DJs or paid entertainment. Spending time together always trumps spending money. People remain more important than things, throughout the holidays and every other day of the year.

Refocus Your Fun
Use your holiday get-together this year as an opportunity to assist your community or the world around you. You just might discover that your prefer a party with a purpose. Check out the following simple ideas, great for serving while celebrating.
Go Christmas caroling at a local nursing home. Call ahead and schedule a time best for residents and staff. Many of the men and women who live in the nursing home or assisted living facility are on restricted diets, so avoid bringing outside foods. Have your kids color pictures or make cards to hand out.
Crash someone’s Christmas. Know a friend or family member out of work? Divide a list of non-perishable food and practical household goods. Maybe even wrap a gift or two for their children. Show up on their doorstep with an armful of kindness and give hugs.
Choose a charity to support and ask your guests to bring any coins they have at home to donate. You can literally “change” the world together.
Volunteer at a food pantry or relief agency.
You’ll never regret focusing your efforts on others.
Each holiday presents the opportunity to make memories and show others just how much you care. Don’t let the trappings of the season divert you from the true meaning of bringing friends and family together, marking yet another year with one another.
Cherie Lowe is an author, speaker and hope bringer.
Her book Slaying the Debt Dragon details her family’s quest to eliminate over $127K in debt in just under four years. As her alter ego the Queen of Free, Cherie provides offbeat money saving tips and debt slaying inspiration on a daily basis.

Pin It
The post 7 Smart Ways to Save on Holiday Parties appeared first on Living Well Spending Less®.
October 26, 2016
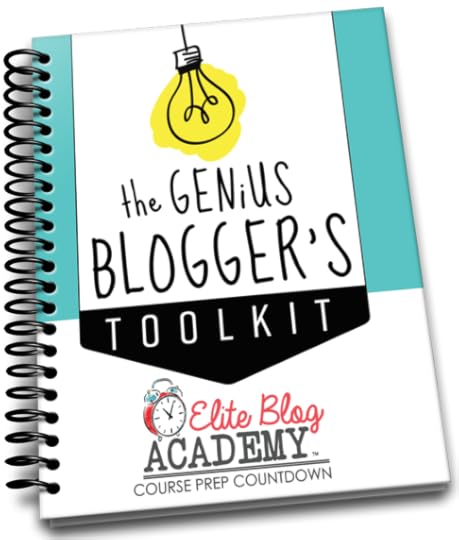
The Genius Blogger’s Tool Kit is HERE (But Only for 7 Days!)

I don’t usually write about the business side of blogging here at Living Well Spending Less. My main focus and passion is helping my readers discover simple ways to live better, spend less, and have more time for the things that matter most.
That said, as someone who earns a full-time income through blogging, the topic of how to start a blog and how to make money blogging is something I get asked about all the time! The truth is that I am incredibly passionate about helping other bloggers—or those who aspire to be—gain the knowledge to do the same. Don’t get me wrong, blogging is by no means “easy money”, but it is very possible to earn a full-time living writing about what you love and care about.
I know because I’ve done it.
You see, when I first started blogging, I set a goal to make enough money from my blog that my husband—an aerospace engineer—could quit his job and become a stay-at-home dad. At the time, it was a completely crazy goal that seemed utterly impossible, and my husband told me as much, insisting that I would never be able to make money from a blog.
But I wanted it so bad, I could almost taste it, and I was determined to do whatever it took to make that crazy dream a reality.
And so, with two toddlers at home, I started getting up at 3am every morning—and sometimes even earlier—in order to work on my blog before anyone else was up. I took advantage of every naptime, every weekend, and every spare moment. And when I wasn’t working on the blog itself, I was learning everything I could about blogging, from SEO to social media to how to monetize.
I’m not going to lie, it was a pretty exhausting time. There were lots of downsides. My husband couldn’t understand why on earth I was spending all my time on a blog that he was sure would never amount to anything. My real life friends made fun of me and talked about me behind my back. My kids watched way too much Dora the Explorer. I didn’t get nearly enough sleep. I had almost no life.
But to me, it was all worth it, because I could see the vision, even if no one else could.
And eventually, that vision paid off because in 2013, 2 ½ years after starting my blog, my husband was able to quit his job, and we’ve never looked back. The blog—and the business that has grown out of it—has continued to grow and flourish.
And so today, because I know some of you have been toying with the idea of blogging but don’t quite know where to start, and that others of you have already started but aren’t sure how to grow, I wanted to let you know about an amazing opportunity for bloggers (or those who aspire to be) that is available this week only called the Genius Blogger’s Tool Kit.
It is a digital bundle of 62 different eBooks, eCourses, printables, and bonuses valued at more than $5,000 for just $97.00. (You guys. Seriously. That is 98% off!!!)

There has never been any sort of resource for bloggers like this before, at least not one that I’ve seen, and certainly not one of this caliber for this price. It has an insane amount of valuable information, including resources for creating amazing content, expanding your reach on social media, growing your email list, creating products, monetizing your platform, and maximizing your productivity.
Even if you’ve only dabbled in the blogging world and are still just getting your feet wet, this bundle is an incredible, once-in-a-lifetime opportunity to get thousands of dollars of incredibly valuable information for less than a hundred bucks. And if you are serious about blogging, well, then the Genius Blogger’s Tool Kit is a no-brainer. It’s that simple.
But it’s not for everyone.
If you are just starting out, you might think it is still way too early to start thinking about this type of opportunity. I promise you that it is not. On the other hand, if you’ve been blogging for a while and have been earning a respectable income through ad networks, affiliate advertising, or working directly with brands, you might think you are already doing pretty well. Why take the risk?
This is a lot of information.
I will be totally honest and tell you that there is one small thing I don’t love about this bundle—it is almost too much of a good thing! There is so much information that without a good plan, it could easily become totally overwhelming because you won’t know where to start or what to focus on first.
 Luckily, I created a solution for that problem! It’s a personalized EBA Prep Guide that will help you focus on the very best resources that this incredible Tool Kit has to offer so that you can hit the ground running, get ready to rock EBA 3.0 in the Spring, and find massive success that much sooner. This prep guide will tell you what to do in what order, and what you might want to skip altogether—at least right now! It’s your road map to making the most of the tool kit without being overwhelmed.
The truth is that there will always be things in our lives that feel really hard sometimes, and blogging is no exception. Even so, the fact that it is challenging is also what makes it worthwhile. The best things in life are the ones you have to work for.
You see, when you want something, I mean really want it, you can feel it in every bone in your body, that drive, that hunger, that internal pressure to achieve. You don’t need anyone else to push you—you’re more than willing to do whatever it takes. And it doesn’t feel like work, either. Oh sure, there might be hard days and annoying moments, but they are worth it because every step you take is getting you closer to that goal.
And if you don’t feel that? Then maybe your goal isn’t big enough.
So. If you’ve been dreaming of starting your own blog, this is an amazing opportunity to get a huge amount of resources for an insanely small price. But you can’t be on the fence with this because it’s only available until November 1st.
Here’s what to do to get your Tool Kit & EBA Prep Guide Bonus:
Purchase your Genius Blogger’s Tool Kit HERE
Fill in the form to get your bonuses HERE
Check your inbox for your bundle and bonuses!

Pin It
The post The Genius Blogger’s Tool Kit is HERE (But Only for 7 Days!) appeared first on Living Well Spending Less®.
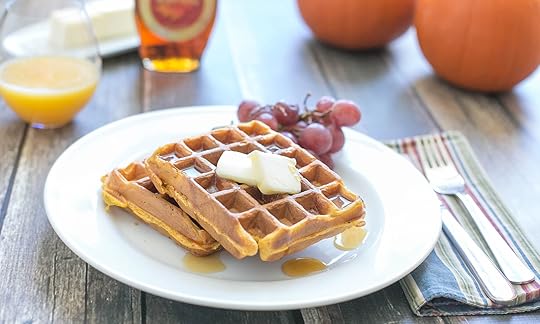
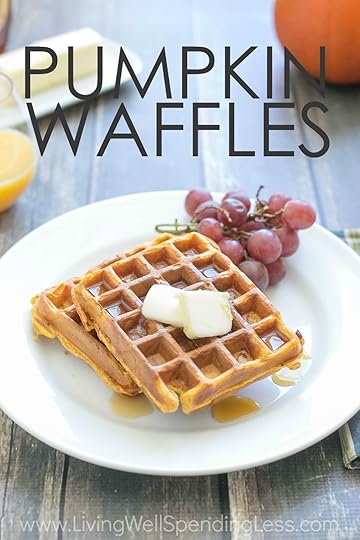
Pumpkin Waffles
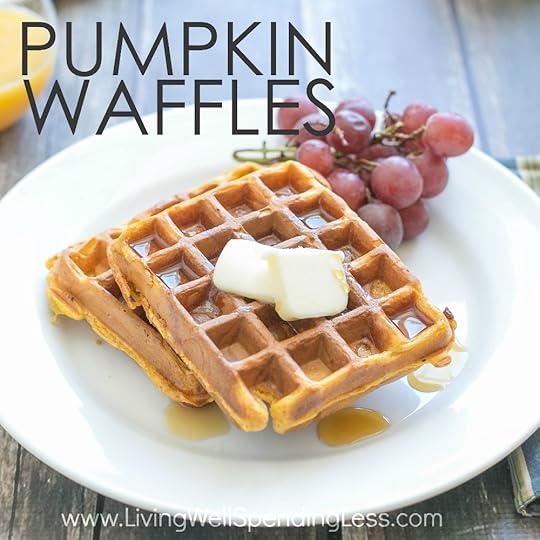
There is just something about fall.
I am ready for boots and sweaters and a whole lot of coziness. I crave maple syrup and hot apple cider and soup of all kinds.
And pumpkin. Oh, how I crave pumpkin!
And nothing says fall like pumpkin waffles! They sort-of scream for relaxed and cozy weekends, but you can also freeze your cooked waffles to make for easier mornings. Why not double the recipe and achieve both all at once?
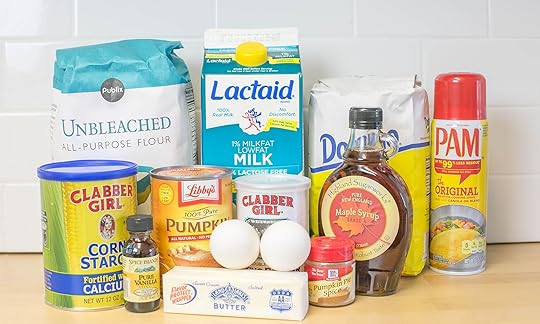
Here is what you need:
2 1/2 cups flour
1/4 cup cornstarch
1/4 cup sugar
2 tablespoons baking powder
2 large eggs
2 tablespoons butter, melted
2 cups milk
1 teaspoon vanilla extract
1 teaspoon pumpkin pie spice
1 cup pumpkin puree
cooking spray
favorite syrup

Step 1: In a large bowl mix together flour, cornstarch,sugar, pumpkin pie spice and baking powder.

Step 2: In a separate bowl, beat eggs, melted butter, milk, vanilla extract and pumpkin puree until well blended.
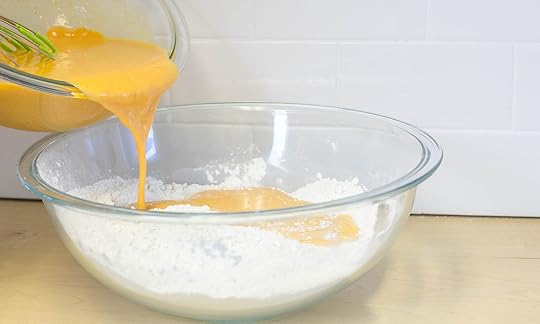
Step 3: Add liquid mixture to dry ingredients, stirring lightly with wire whisk until batter is combined.

Step 4: Pre-heat your waffle iron, spray with non-stick cooking spray and then add one ladle full of batter and cook till lightly brown and crisp.

Step 5: If you would like to freeze- cool waffles and then place in labeled freezer bag. You can reheat in your toaster oven or conventional oven at 350 for 3-4 minutes.
Print This!
Recipe: Pumpkin Waffles
Summary: These super tasty and simple waffles can be made ahead of time and frozen for an easy week day breakfast.
Ingredients
2 1/2 cups flour
1/4 cup cornstarch
1/4 cup sugar
2 tablespoons baking powder
2 large eggs
2 tablespoons butter, melted
2 cups milk
1 teaspoon vanilla extract
1 teaspoon pumpkin pie spice
1 cup pumpkin puree
cooking spray
favorite syrup
Instructions
In a large bowl mix together flour, cornstarch,sugar, pumpkin pie spice and baking powder.
In a separate bowl, beat eggs, melted butter, milk, vanilla extract and pumpkin puree until well blended.
Add liquid mixture to dry ingredients, stirring lightly with wire whisk until batter is combined.
Pre-heat your waffle iron, spray with non-stick cooking spray and then add one ladle full of batter and cook till lightly brown and crisp.
If you would like to freeze- cool waffles and then place in labeled freezer bag. You can reheat in your toaster oven or conventional oven at 350 for 3-4 minutes.
Preparation time: 5-7 minutes
Cooking time: Depends on your waffle iron
Number of servings (yield): Depends on the size of your waffle iron (we made 16 4 inch waffles)
Pin It
The post Pumpkin Waffles appeared first on Living Well Spending Less®.
October 24, 2016
5 Steps to Take When Someone Dies

Death and dying are never easy things to talk about. The emotional impact of losing someone we love can make it feel almost impossible to deal with the logistics of what that means on a practical level. It can feel like every part of us has shut down, and just the simple idea of putting one step in front of the other feels like a foreign concept.
Once the funeral or memorial service is over, it can even seem like the world expects you to simply “get back to normal.” The only problem is that you’re not sure what normal really is anymore, and you’ve still got a lifetime of memories–and stuff–to sort through. It’s a daunting prospect.
Believe me, I get it. Over the past few years, my husband and I have faced the loss of two very close family members, and I understand all these feelings I just described all too well. And yet, the reality of the situation is that there are logistics that must be dealt with. There is a house full of furniture and clothing and pictures and knick knacks to sort through. There are bank accounts and insurance policies to figure out. There are things to do that can’t be ignored, whether we wish we could or not.
And so, you have stumbled upon this page because you recently lost someone you love, please let me be the first to say I’m so sorry for your loss. The goal of this post is to provide a simple roadmap for you to follow at a time when life feels like it has turned upside down. My hope is that it will help make knowing what step to take next just a little bit easier.

1. Get Support
Grieving can be a long process, longer than most of our friends and family members can know how to deal with. It can also be incredibly complicated and it can drudge up a lot of feelings that need to be addressed. While friends can be wonderful, consider also seeking out a support group or a grief counselor who can help you work through the specific emotions you are experiencing.
Once you’ve decided to start sorting through all of items left behind, enlist a friend, spouse or sibling to help you. It can be overwhelming to deal with the flood of emotions you’ll experience, and it may feel impossible to remain objective about what you would like to keep and what you can let go. Keep someone close who can help you stay on track and stay reasonable.
2. Don’t Feel Like You Have to Address Everything at Once
The truth is that most of the time our deadlines are self-imposed, and there is no rule that says you have to figure out what to do with a lifetime of someone else’s stuff within days of the funeral. While some people might feel better dealing with everything right away–almost as if keeping busy will keep the pain away–others need time to grieve first before they can dive in.
Both approaches are just fine. We all have different methods of coping and healing from grief. For some, action might give control to a situation that feels vulnerable and out of control. For others, it might be too painful or too much.
Give yourself permission to set your own timeline and allow yourself to grieve and feel. It’s okay to go through a myriad of emotions. But do keep in mind that when all this “stuff” that you’ve inherited “stuff” begins taking over your space or interfering with your life, that’s when you need to find a way to start addressing it and working through it.

3. Organize Your Plan
Schedule time on the calendar to sort through items. Be realistic and kind to yourself about what you can do in a set amount of time. Dealing with an estate, memories, and a flood of emotions is quite a departure from organizing your pantry or storage closet.
Assemble the things you’ll need beforehand: boxes, bins, trash bags, markers, tape and labels. Schedule time to deal with each area or room one at a time. Figure out your plan of action before you go into the situation. Not only will this help you stay focused and calm, but it will also help when you have to make tough choices.
4. Separate Your Memories from the Stuff
Keep in mind that you don’t have to keep everything. Photos, writings and items that were unique to your loved one are good items to keep. Remind yourself: even if your loved one collected something, it doesn’t mean you have to keep their whole collection. If they loved cats, thimbles, decorative broaches…any item they kept in multiples, limit yourself to one really special knickknack or item meaningful to you.
This can be especially challenging when faced with a whole house of useful stuff. It can seem wasteful and even disrespectful of the person’s memory, but in truth, you would be holding them more dear and close by keeping something very special than “dealing with” a cupboard of saltshakers or old postcards from someone else’s vacations.
After my sister-in-law died, and we began sorting through her things, my husband said, “it feels like I’m throwing her life away.” It was excruciating, and he struggled with so much guilt. Eventually though, we had to come to accept the fundamental truth that people and things are not one and the same.
Consider this:
Memories take up space in our hearts; stuff takes up space in our homes.
Memories last forever; stuff breaks, gets lost, and fades away.
Memories bring joy; stuff brings stress.
Memories are honoring; stuff is diminishing.
Memories bring peace; stuff brings chaos.
Memories actually matter; stuff really doesn’t matter at all.
When facing the loss of a loved one, it’s amazing how our memories become intertwined with the belongings of that person. The smell of our grandmother’s perfume on a box of old handkerchiefs can bring us to tears; small porcelain figurines become priceless mementos. Items that don’t fit our style, our taste, or even our within our homes become the things we cling to.
When my mother-in-law passed away, we were left with a lifetime of items to clean out—a house full of stuff. Her memories, her paperwork, her furniture and clothes were all our responsibility. Needless to say, when we were both racked with sadness and grief, sorting through her belongings was an impossible task.
My husband and I packed everything up and moved it to our home in Florida, so we could get a better handle on what we wanted to keep, once the tears had settled. It seemed so callous and difficult to simply discard her possessions, as though we were disregarding her memory. So we held on.
Then, not even two years later, my sister-in-law passed away after a battle with cancer. We were her only surviving family members. Again, we were faced with mourning a loss and trying to sort through a lifetime of stuff at the same time. Once again, we found it nearly impossible to simply “get rid” of her stuff.
But we were one small family in an even smaller house. We didn’t have the room or the need for many of the items that surrounded us. We clung to their stuff because we were terrified of losing the memories, but eventually we realized all this “stuff” wasn’t making us happy. It wasn’t helping us through the loss or bringing us comfort. It only brought chaos and stress. We had to let go.
What you decide to keep may be different than what I or other people might, but that’s okay too. There are no right or wrong answers here. The important thing is that you are able to give yourself permission to keep those items that are meaningful, and to let go of the rest…without any guilt.

5. Let Go of the Stuff
Once you’ve narrowed it down to a few key items you’d like to hold on to, it’s time to figure out the best method for sorting through, discarding, selling or donating the rest of the items.
There are several resources to help you through the process and you certainly don’t have to deal with it alone. If you’re working with several family members, the will and testament may offer some answers.
Depending on the value of their estate and the amount of their possessions, you may have different options open to you. I’ve known people who marked many of their belongings with names of family members or kept lists of who should get what. It’s always best to first respect the wishes of the deceased in these cases.
Time and time again, I’ve heard of families torn apart in feuds over the possessions of a loved one. Oftentimes, the process can spark hidden emotions not related to the actual “stuff” they’re fighting over, which can very much damage relationships.
If you’re going head-to-head with a cousin over grandma’s candlesticks, try to remain objective. If the item is very valuable and was not outlined in a will, you may need to seek the advice of a lawyer or mediator to assist. If the item is valuable only for sentimental reasons, try to take a step back. Would grandma really want your relationship ruined over such an item? Very few possessions are worth destroying a relationship over. It’s far better to let it go.
When you’re ready to part with items and things have been sorted amongst family members, you still don’t have to go it alone. There are professionals out there who can help you sort through the situation.
Estate Sale Companies
Estate sale companies are the most experienced and quite possibly the easiest option. You simply give them a percentage of the sales (usually between 10-30%) and they come in, sort, and take care of everything. Not only are you spared the stress of pricing and appraising items, but you also don’t have to feel a twinge of pain and guilt every time you sell an item. You can be assured the items are wanted and headed to a good home where they’ll be used and appreciated.
People who run estate sales are experienced at dealing with all aspects of the process. Despite the heavy price tag, this is certainly the easiest and most convenient option.

eBay and Consignment
If you have a collection of items and you’re concerned about getting a fair price or reaching the best audience, you may be better to go with a professional eBay company or consignment service. This can be helpful if your loved one had a large collection of sports memorabilia, handbags, figurines, or other items that might not hit their target audience in a local estate sale.
eBay services are not as expensive as estate companies and you can often bargain or set up a minimum price you’d like for the items. Consignment shops will take items and then set a price point depending on the length it takes to sell the item. This can be especially helpful for furniture, jewelry and clothing.
Hold a Sale of Your Own
If you’re feeling up for it and you’re experienced at rummage and garage sales (and have help), then holding a sale on your own might be an option. Depending on the amount of items you have and the neighborhood you’re selling in, you could find surprising success. This option is not, however, for the faint of heart. It can really stir up emotions when someone wants to bargain over the belongings of a loved one and it’s difficult to see each item being carried off and walked away.
If you’re living in an area with lots of young families or college students and you have some furniture or household items, you might be hitting your target audience with a rummage sale.

Donation Services and Pick Up Services
Goodwill, the Salvation Army, and other organizations will often pick up donations at no cost to you, especially if the items are gently used and of good value. Be sure to contact them to find out guidelines and limits. For example, some services prefer not to pick up clothing and some services have a weight limit on furniture and other items.
Remember, it’s perfectly natural to go through a spectrum of emotions when you experience a loss. You can feel sadness and anger, frustration and depression. Don’t expect too much of yourself when it comes to dealing with your loved one’s estate. When you’re ready, ask others for help and seek comfort in knowing you’re honoring your loved one’s memory by not taking on their stuff and resenting it. Instead, you’re sending it to a good home and keeping their memories alive, not the stuff that surrounded them.

Pin It
The post 5 Steps to Take When Someone Dies appeared first on Living Well Spending Less®.
October 21, 2016
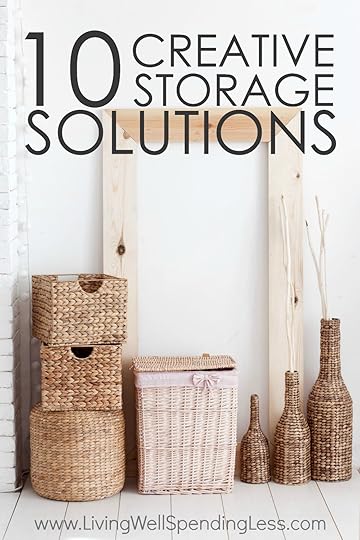
10 Creative Storage Solutions

I don’t know about you, but I love me some organization! There’s nothing that gets my heart to flutter like a trip to IKEA or the Container Store or the cute bin aisle at Target. It’s heaven.
Unfortunately I’ve also learned the hard way that more bins and boxes are not really the solution to a clutter and organization problem. Instead, the problem is most frequently too much STUFF! We’re drowning in it. We’re trying to make sense of it. We’re trying to find a spot for all of it, but we know we should pare down instead.
And so your very first storage solution, before you buy a single new bin, basket, or container, should be to unstuff. Get rid of as much as you can–anything that is not currently useful, despite who gave it to you, and despite how much it cost.
Of course even if you’ve decluttered as much as possible, chances are you’ll be left with quite a few things that still need a proper place. While storage is vital to organization, it can be challenging, especially in older homes, apartments and small spaces. And so, my team and I have pulled together these storage tips and tricks to turn to when you need to get a handle on your remaining scattered items (after you’ve decluttered).
1. Think Outside the Shoebox
As much as I love Crate & Barrel, The Container Store, IKEA and all those other places that offer darling storage solutions, many storage solutions beyond the shoebox are already in your home—so you won’t need to spend a penny!
Start thinking of new storage uses for unconventional items. A paper sorter can become a lid organizer for your pots and pans or Tupperware. A spice rack can be repainted, then used to hold nail polish, craft supplies or other small items. A fishing tackle box or old toolbox can be a great storage option for small items like jewelry or beading supplies.
Use baskets to hold all sorts of items. Hanging baskets originally created for fruit can be a great solution for toys or oddly shaped items. Binder clips can hold your cellphone cords or keep your chips closed. Look for “storage hacks” or “repurpose” ideas on Pinterest to find all sorts of new uses for items you probably already have on hand.
2. Get the Most Use Out of Your Space
Many of us have plenty of empty space, but it’s hidden in the tops of closets, underneath beds and furniture, and inside our cupboards. Hang baskets under shelves to use up some of that extra space in your cupboard. Put items on a lazy Susan so they don’t get lost in the back of the cupboard.
When you organize your pantry, always follow the example set by grocery stores and face food packaging toward you, with the closest expiration date first. This makes things easier to find and allows you to stack cans and boxes and still see what you have.
Put the top of your closet to use by strapping bungie cords along the top to hold wrapping paper, stuffed animals or bulky items that seem like they never have a home. Tension rods can work wonders mounted under sinks, in closets, and even in the shower. Hang sprayer bottle handles from a tension rod to free up space below.

3. Make Your Storage Solutions Work Harder
When you do purchase storage solutions (bins, hangers, etc.), be sure you’re buying high quality items and maximizing their use. For example, inserting dowels in your bins offers a spot to hang Christmas ornaments or decorations. Purchasing hangers that “unhook” or allow for stacking ensures each hanger can hold multiple items, maximizing your closet space.
Invest in quality items like nice hangers and space bags, if you’re in need. When I transitioned to my 40 Hanger Closet, the beautiful huggable hangers I’d purchased for the job inspired me. Since I could only afford 40 hangers, it set a nice benchmark for the number of items I could keep in my closet. Similarly, if you use bins or storage bags, invest in nice solutions, but hold yourself to a limited number and maximize their use. Once you’ve filled your set number of space bags, it’s time to get rid of the remaining blankets or winter coats.
4. Hang Items to Stretch Space
Use a pegboard to create hanging space in your pantry and garage. Hanging items like measuring spoons or yard tools means they have an easy go-to home, so they’ll stay out drawers and off the floor. Plus, you’ll always be able to find them. Pegboards are cheap, and with a quick coat of paint they look really nice.
Use screw hooks or 3M hooks to hang small items under cupboards and inside cabinets, freeing space below. Try a few ceiling hooks and hooks inside your closets to hang items that might otherwise end up on the floor.

5. Designate a “Home” for Everything
Follow the mantra, “A place for everything and everything in its place.” Each item in your house should have its own home. Teach your kids this mantra and request that all family members put things back where they go once they’re done using them. If everyone knows there’s a spot for DVDs and a shelf for books, it can help you keep everything under control (and make things easier to find later).
If you end up with items that consistently seem “homeless” (sunglasses that always end up on the counter, incoming mail tossed on the buffet), make a home for these items near the location they end up anyway. Adding a paper sorter on your buffet might not be the place you’d love it, but it’s practical and it’ll at least keep the mess contained.
6. Apply Labels to Stay Organized
Label everything! One of the best ways to ensure items end up back in their respective homes is to stick a label where the item belongs. If you have cute boxes or baskets on a shelf, affix a label on the inside. Labeling pantry jars can keep even different sized and shaped containers looking uniform and chic.
Labeling also helps you make tough choices about what will and won’t fit in your space. If you have a box for batteries or sewing supplies, then you know you’re limited to what will fit within the container. Plus, labeling helps you quickly locate things without shuffling through bins and rummaging around for hours looking for a certain phone charger or tool.

7. Find New Uses for Magnets
Magnets are great organizational tools. Of course you can use a magnet strip to organize kitchen gadgets, knives and other metal tools. But also consider affixing magnets to office supply containers and hanging them above your desk or control center.
Use magnets to organize jewelry, pins, paperclips, and all those small metal objects that get lost and misplaced. Magnets are also great for keeping keys on the ready, instead of thrown wherever or lost between the cushions. Put a magnet on a pen and keep it on the side of your fridge so you can always find something to jot down notes or make a list.
8. Paint and Paper to Transform Jars and Boxes
Recycling is always a great idea! If you need containers of different shapes and sizes, try a coat of paint in a single color or use a pretty pattern of paper or fabric to cover boxes, jars, cans, and other organizational items. This quick fix can make a world of difference when it comes to the look of your storage items.
Magazine organizers, paper organizers, penholders and other office items are very easy to cover yourself and they look so phenomenal when they’re done in matching or contrasting patterns and colors. Try mixing florals with stripes, polka dots with a chevron print, or complimentary colors. A coat of blackboard paint and chalk can be a really fun way to keep your storage cute and easily labeled as well.
In areas like your pantry, bathroom and linen closet, using uniform containers can help keep things looking really neat and tidy. Try to find recyclable storage that’s a consistent color, shape or texture, even if the containers are in various sizes.
Using all clear or all white jars, pottery or containers adds an element of similarity that makes your organizing seem purposeful, deliberate, and pretty. It keeps things clean and fresh looking—even when interspersed with other decorative items—so your storage appears to be part of your décor.

9. Maximize Your Doors
Don’t forget the insides of doors on cabinets and in your closet—and you can even go beyond hooks. You’ll be amazed at what you can fit in a shoe holder or over-the-door organizer inside your closet. Hanging coats, dog leashes and even keys on the back of the closet door or behind the back door of your home can keep them right at hand when you need them.
Affix a small rack to the inside of your pantry or cupboard and use it to hold spices, small jars or other little items that don’t quite have a regular home (or fall behind other items in the cupboard).
So, are you ready to get unstuffed and really, truly organized? Try these tips to get creative with your storage solutions and minimize the amount of storage you need to maximize the use of your space. Declutter and organize as you go—and please: don’t hold onto something simply because you have a spot to store it! Keep in mind that you don’t need to fill every corner of your cupboards or every inch of your closets just because it’s available. Use smart organizational strategies and planning to keep your home looking and feeling great.
10. Upcycle Your Solutions
Sometimes great storage solutions come from items that would have otherwise ended up in the trash bin or have outlived their purpose. An antique chest or toolbox can make a great storage container for tiny items that have no home. Pottery, jars and old dishes can be reused to hold desk supplies and keep items in a drawer corralled.
Remove the wax from candle jars after they’re used up, then repurpose the jars to hold Q-tips or cotton squares in your bathroom. If you need an alternative toy box, consider a steamer trunk or suitcase. It can be filled and stored under the bed or even look attractive in a corner.
You can bring new life to so many different items! If something’s shabby or dilapidated, adding a quick coat of paint or furniture polish can really help it look refreshed. Watch yard sales and Craigslist for items you can repurpose and use as storage containers. Turn an old file cabinet into a cool storage rack for rakes and shovels in the garage. Find another old metal cabinet? Try using it to hold your fabric and keep your sewing room organized.
Just because you don’t love the look of a piece of furniture, a box or a storage bin doesn’t mean you have to throw it out. If it can serve a purpose, spruce it up with a little creativity and flair and it can become a beautiful storage piece.
* * *
In the end, a little creativity can go a very long way when it comes to storage solutions. Don’t be afraid to stretch your imagination–you might just be amazed at what you come up with!
Pin It
The post 10 Creative Storage Solutions appeared first on Living Well Spending Less®.
October 19, 2016
Simple Stuffed Mushrooms
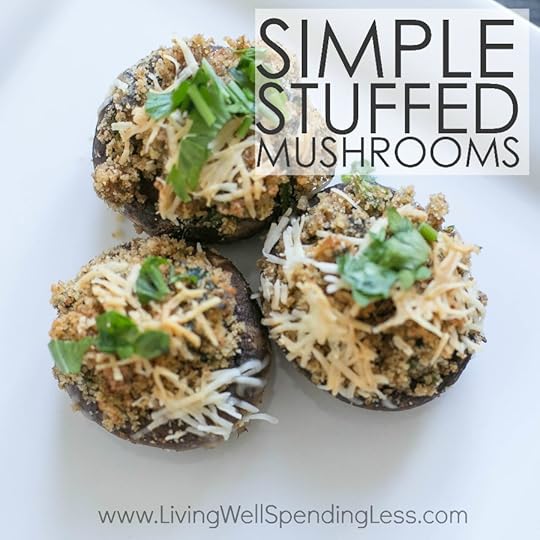
We all have our own holiday must-haves, but for me it is just doesn’t feel like Thanksgiving without stuffed mushrooms! My absolute favorite way to prepare these is baking them with a super simple and delicious stuffing that is just bursting with flavor!
It makes a great side dish or a terrific appetizer, and thankfully this must-have recipe is so quick & easy to make that there’s really no reason to wait for a special occasion–use it to make any day feel like a holiday!
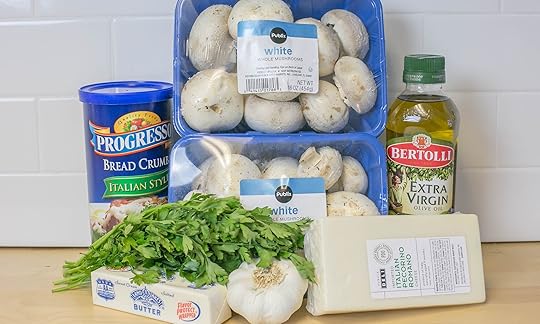
Here is what you need:
2 large packages white button mushrooms
3-4 cloves garlic, chopped
1/2 cup Pecorino Romano, grated
2-4 TBS butter
1 1/2 cups bread crumb, Italian seasoned
fresh parsley
Olive oil
cooking spray

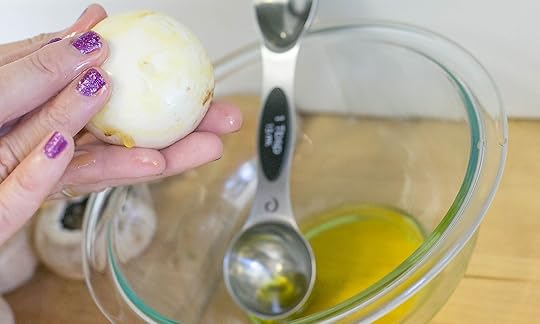
Step 1: Preheat oven to 375 degrees; clean mushrooms, remove stems and chop. Chop garlic and parsley then set aside.

Step 2: In large pan, melt butter, add chopped garlic, parsley, and chopped mushroom stems. Saute until mushrooms are soft. Remove from pan and set aside.
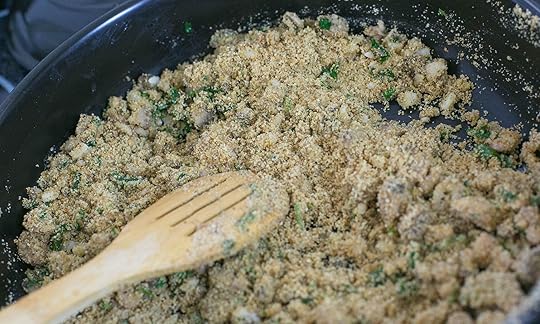
Step 3: Add 2 tablespoons of olive oil to pan, then add bread crumb and stir. Once bread crumb is golden brown add mushroom mixture to breadcrumb mixture until all combined. Remove from heat.
Step 4: Rub each mushroom cap with olive oil and place on prepared baking tray.

Step 5: Add stuffing mixture to mushroom caps.

Step 6: Sprinkle with cheese and bake for 20-25 minutes on 375.

Step 7: Once cooked, sprinkle with a little more fresh parsley and serve.
Print This!
Recipe: Easy Stuffed Mushrooms
Summary: This simple recipe is perfect as an appetizer or side dish to any holiday or week day meal.
Ingredients
2 large packages white button mushrooms
3-4 cloves garlic, chopped
1/2 cup Pecorino Romano, grated
2-4 TBS butter
1-1/2 cups bread crumb, Italian seasoned
fresh parsley
Olive oil
Instructions
Preheat oven to 375 degrees; clean mushrooms, remove stems and chop. Chop garlic and parsley then set aside.
In large pan, melt butter, add chopped garlic, parsley, and chopped mushroom stems. Saute until mushrooms are soft. Remove from pan and set aside.
Add 2 tablespoons of olive oil to pan,then add bread crumb and stir. Once bread crumb is golden brown add mushroom mixture to breadcrumb mixture until all combined. Remove from heat.
Rub each mushroom cap with olive oil and place on prepared baking tray.
Add stuffing mixture to mushroom caps, sprinkle with more cheese and bake for 20-25 minutes on 375.
Once cooked, sprinkle with a little more fresh parsley and serve.
Preparation time: 5-7 minutes
Cooking time: 20-25 minute(s)
Number of servings (yield): 16

Pin It
The post Simple Stuffed Mushrooms appeared first on Living Well Spending Less®.
October 17, 2016
11 Things You Can Do Right Now to Improve Your Marriage

Let’s face it–marriage is hard work!
Don’t get me wrong, I love my husband. He is my partner and my confidante. He’s been endlessly patient and and supportive and understanding. He’s a wonderful father, an amazing brother and uncle and son, and my biggest champion. He’s my best friend.
But that doesn’t mean our life together is all sunshine and roses all the time. There are times when he rubs me the wrong way or doesn’t do things the way I would do them (or think they need to be done). There are times where I spend too much money at Target or fill up our schedule far more than he would like. There are times where we just don’t understand where each other is coming from.
And while we love our kids to death, there are definitely times when they also add strain to our relationship. Sometimes we’re so focused on the needs of our children, the challenges of running a household, and dealing with day-to-day stress, it seems we don’t have time to just enjoy being a couple.
There’s nothing sadder than watching a marriage fall apart, but the reality is that marriage takes work and dedication. Whether we intend to or not, our spouses tend to bear the brunt of our stress, and all too often get our leftovers, rather than our best.
Luckily there are a lot of things we can do right now–as in TODAY–to make things better, even if you happen to be spinning right in the middle of a crazy cycle. Here are 11 ideas to get you started:

1. Go on a Date
It might feel a little forced sometimes, or even like the last thing in the world you have time for, but the happiest couples I know go out together on a regular basis. Date night can be going out to dinner or to a movie, or going on a walk or a drive—really anything you both enjoy. I know babysitting can get expensive, but your date night activity can be free—try simply watching a movie together or going to the park. It’s really about spending one-on-one time with your spouse and enjoying each other’s company.

2. Say, “I Love You”
It seems obvious, but many times we go through our days either automatically saying “love you” when we hang up the phone or run out the door, without really thinking about it. Look into your spouse’s eyes and think of all the things you love about them—the way they care for your kids, the way they take care of you, your family, the way they make you laugh. Whatever it is that really connects the two of you, focus on it and say it with real honesty and meaning: “I love you.” Love is the foundation of a strong marriage and we all need to hear it from our spouse.
Tell your partner the reasons you love them. The why. “I love you because you’re always there for me. I love you because you make me laugh. I love you because you got up in the middle of the night to clean up barf, because you know I can’t do it. I love you because you eat everything I make for dinner without ever complaining. I love you because you’re principled.” Whatever it is, identify it and say it.
3. Be Intimate
No, I’m not just talking about S-E-X, although, to be fair, that’s pretty very important too! But intimacy is all about touch and closeness, and while I can’t speak for all men, I do know that my guy thrives on it, and most other men do too.
This means we have to be purposeful about being intimate, even when–especially when–we are short on time. It means remembering to hold hands or kiss for longer than just a peck. It could even mean hopping into the shower, giving him a quick unexpected back rub, or playing with his hair.
And believe me, I know sometimes it can seem like one more thing you have to take care of, and I also know all too well that when we’re feeling stressed or not feeling particularly “sexy” it can be a challenge to flip the switch and suddenly be all hot and bothered. Those are the times that you have to trust that the action will create the feeling. Make time for intimacy and you might just be surprised at how much closer–and sexy–you feel.

4. Say I’m Sorry
No one likes to lose face. It’s hard to say I’m sorry for things, especially when you might not feel 100% apologetic. Sometimes though, the words, “I’m sorry,” are exactly what your partner needs to hear, and a little humility when you know you’ve done something wrong will go a long way. Even if you were right or if you feel like your actions or words were justified, if you hurt your spouse, then apologize for causing that hurt. It might just make all the difference in the world.
5. Forgive
Of course the flip side of saying, “I’m sorry,” is saying “I forgive you.” It’s painful when someone lets us down or says something hurtful or disappoints us in some way. And when that person is our spouse? Well then all the anger and bitterness feels that much worse! We might feel resentful and sometimes the words, “I’m sorry,” just don’t seem like enough for us to let go of what happened.
Unfortunately, when we refuse to forgive others and move past hurts, we’re only continuing to hurt ourselves. If your spouse has done something that stung, try to forgive them. Empathize with where they’re coming from, let go of the need to take it personally, and if they’ve asked for forgiveness, give it to them and move forward.

6. Let Go of “The List”
How many of us keep a tally when we fight with our spouse? I know I’ve been guilty of letting out a litany of complaints and a laundry list of wrongs I’ve saved up and held on to. Make a resolution to let go of “the list.” Marriage isn’t a competition and it’s not about one-upping each other or doing something to “get back” at the other person. If you’re holding out on things that bother you, it’s time to address them or let them go.
7. Play a Game
When was the last time you played a board game with your spouse, tried to shoot some hoops, or even let them talk you through a video game (if that’s their thing)?
Playing board games with your spouse keeps your marriage fun and alive. Laughing and having fun together helps you feel young, reminds you of the person you fell in love with, and gives you energy. Bring playfulness into your marriage. Find something that holds interest for the two of you, whether it’s tennis, golf, running, or rock climbing. Pick an activity or hobby that’s fun and keeps the two of you engaged in a little healthy competition and laughter.

8. Surprise Him
Some people feel loved and acknowledged through gifts or actions, and almost everyone enjoys a surprise or thoughtful gesture. It doesn’t mean you need to go out and purchase lavish gifts for your spouse, but if you’re out and you see your honey’s favorite beverage, pick one up and bring it home for him. Make his favorite dinner or cookies “just because.” Get him something funny or text him a funny photo or joke you heard. The idea is to simply let your spouse know you’re thinking of them throughout the day.
9. Give Him a Compliment
We all like to hear we’re attractive to our significant other or that they think we’re really smart, funny, nice or unique. Your spouse feels the exact same way. When you first started dating, chances are you complimented each other all the time. As the years go on, we start to mention the little things less and less. Part of keeping the fires burning is letting our sweetheart know we still think they’re just as handsome, smart and funny as they were the day we met.

10. Be Honest about Money
There’s no single issue that can cause more stress within a marriage than money. Often, we might be on a different page than our spouse when it comes to finances and the way we save and spend. Tempers can flare and things can get heated.
Believe me–I’ve been there! In the past, things in my own marriage came to a head because of financial differences . It took a lot of effort–and a lot of help from Dave Ramsey–to get us back on track! We learned that we had totally different mindsets when it came to money and spending, and we also learned that we had to be honest with each other about what we were spending, where our priorities were, and how we planned to save. Once we got on the same page and were able to work together towards our common goal of becoming debt free, things improved greatly.
While the money conversation can be tough, talk to each other about finances. Be open and honest with your spouse.
11. Show Appreciation
When your spouse does something for you, do you always say thank you? So often we forget (or we come to expect) that our spouse will do their regular chores and duties around the house, but isn’t it nice to occasionally be thanked? Not only that, but our children will learn appreciation by modeling our behavior. Let them know how grateful we are that Daddy “fixes our bikes for us,” or, “painted the garage,” or, “works so hard.” Acknowledging and thanking your spouse will go a long way toward helping them feel appreciated and keeping your bond strong.
There are many conversations couples should have, as communication is vital to your marriage—but so is action. Often, we start to talk about all the things we feel and what our needs are, but then forget to put these thoughts and feelings into action.
Marriage is amazing and fun and wonderful. Keep yours strong and healthy by doing little things every day to keep the love flowing and your spouse happy. It’s not about being perfect or getting along ALL the time, but it’s about the little gestures that connect you and keep you bonded together as husband and wife.

Pin It
The post 11 Things You Can Do Right Now to Improve Your Marriage appeared first on Living Well Spending Less®.


%20AND%20adults.%20Includes%20details%20on%20each%20games%20with%20ratings%20by%20both%20kids%20&%20parents.%20It%27s%20a%20must-read%20for%20every%20parent,%20grandparent%20and%20babysitter!)
,%20don%27t%20miss%20these%205%20practical%20steps%20to%20take%20after%20someone%20dies%20to%20deal%20with%20the%20stuff%20they%27ve%20left%20behind.)
%20all%20your%20stuff?%20Don%27t%20miss%20these%2010%20creative%20storage%20solutions%20for%20making%20more%20room%20and%20getting%20more%20organized%20in%20every%20area%20of%20your%20home!)