
Ruth Soukup's Blog, page 119
February 17, 2014
DIY Office on a Budget


I’ve been promising to share pictures of my new office for what seems like forever now, so I am pretty excited to finally be able to say my little space is finally finished! This is where the magic happens, folks! 
All joking aside, I can’t even begin tell you how great it feels to finally have a space of my own to work in. Our three bedroom house didn’t have any extra space for a separate office, so my previous workspace was smack dab in the middle of our living room. This worked for awhile, but after my husband left his job last April to be the stay-at-home dad, we discovered that a little space is necessary sometimes.
After a few months of frustration, Chuck gently suggested it might be time to find some sort of office space, and in August I found an affordable little space for rent in a downtown building about a mile from our house.
I was excited at the prospect of making a space totally my own, but also overwhelmed by the cost of purchasing a whole room full of furniture. The first thing I did was create an inspiration board of ideas for how I wanted my space to look:

I didn’t have time to search endlessly on Craigslist, so I did the next best thing: I took a little trip to IKEA! Because the space was fairly small (and since the closest IKEA is almost 2 hours away) I first made a floor plan to scale (okay, Chuck made me a little floor plan to scale–sometimes it is nice being married to an engineer), then made templates for the furniture I was thinking of getting. (The measurements are listed online) Once I was sure it would all fit, I made a list and headed to IKEA. It was pretty daunting to manage 2 flatbed carts full of furniture all by myself, but with a little help from a few very nice employees, I managed to get everything I needed loaded into my trusty Tahoe. All in all, I think spent about $750 at IKEA on 2 desks, a printer cart, a supply cart, a bookcase, 3 bookshelves, a desk chair, curtain rods, a file cabinet, a wall clock, and some picture frames.
Of course the main reason all that furniture is so affordable is that you have to assemble it yourself! Yikes! It was quite the project and another reason I am grateful to have such a handy husband! My assistant Kalyn’s awesome husband pitched in to help with the assembly as well, which made it go a lot faster!

With the furniture in place I was ready to accessorize, and truthfully that is the part that took me awhile. I fell in love with this Robert Allen Kiki Piñata fabric after seeing it on Pinterest and knew I wanted it for my curtains. I whipped up one set in no time flat, but the second set took me almost 5 months to finish! The gorgeous rug I got from Overstock.com was one of the most expensive parts of the whole project at just over $200 (no longer available in the 5×8 size), but it covers up most of the ugly brown carpet and makes the room such a bright and happy space that it was worth the splurge.


Other DIY projects for the space included sewing a cozy chevron minty throw, (which has gotten a lot of use on cold mornings), and making a fabric covered tray to accent the ottoman. I also painted the fronts of my file cabinet with chalkboard paint, which turned out really cute! For the bulletin board, I simply used spray adhesive to attach fabric to an old cork board, then covered the whole thing in Mod Podge and painted the frame.


My girls each colored me a picture for my new office using oil pastels and I loved them so much I ended up framing them in my IKEA frame. I also found a space to hang my chevron chalkboard wall art!


To jazz up the second desk space I created some cute motivational printables, then clipped them to inexpensive clipboards for some very cheap and easy wall art. And, since I never met a free printable I didn’t love, you can get them for your own space here!


The lamp and desk calendar were both found on clearance at Target, the orange and green boxes were purchased (on sale) at the Container Store, and the other accessories & furniture were gathered from around my house. Overall, I spent about $1200 on furniture, fabric, and office supplies.
* * *
What are your best budget decorating tips?
Pin It
The post DIY Office on a Budget appeared first on Living Well Spending Less™.


February 16, 2014
Weekend Wandering


Happy Sunday! I hope you have all had a wonderful Valentine’s Day weekend. We spent our Friday evening snuggled in our cozy pajamas watching Barbie Fairytopia on DVD with our girls. And then yesterday my husband gave me the best Valentine’s Day gift of all when he started ripping apart our GIANT non-functioning 70″ rear projection TV so that we can finally get rid of it! I have hated that thing–a purchase he made before we were together–for ten years, and it hasn’t even worked for more than 2 years! Plus it is MASSIVE, which has made it super hard to get rid of. We can’t even get it out of the room it is in without taking off 2 doors, but then it is too big for the garbage men to haul away. The only solution is to take it apart, which is a project in and of itself. It will probably take several garbage cycles to get rid of all the pieces, but it is a start, and that is good enough for me! Now that is romance! 
I always love checking out your posts and there were SO many good ones to choose from at Thrifty Thursday this week! It was hard to narrow it down, but here were my favorites:
* * *
First of all this Bacon Cheddar Chicken by Carrie This Home looks like a super easy but tasty recipe my family would love.

I’ve always wanted to try making popovers, and these Basic Popovers at True Blue Baking look totally doable! Yum!

We’re always looking for new breakfast options and these Greek Yogurt Banana Pancakes from Belle of the Kitchen look easy and delicious!

And speaking of easy breakfasts, I love this idea for making Freezer Breakfast Burritos from Coupon Crazy Girl. I’ve been doing a lot more freezer cooking lately and it is such an easy way to get food on the table fast!

Have I mentioned lately how much I like Chocolate? This Chocolate Almond Toffee from The First Year Blog looks absolutely amazing!


 .
.I am in love with this awesome Industrial Pipe Bookcase from Well-Groomed Home. It turned out so great and I love how she modified the plans to make it much more affordable!

This DIY Lip Scrub from Cheap Recipe Blog looks like a great solution to rough, dry lips. Be sure to check out her blog for more great homemade health and beauty products!

Angela Says has a list of 30 Germy Things You Forget to Clean. I almost don’t want to know where the germs are lurking!

I always love seeing how other people plan their days. Check out these super easy organizing tips from Snail Pace Transformations, How I Plan My Days and Weeks Plus Free Printable Goal Sheets.

And finally, being completely debt-free is a huge goal for many of us, but paying off a whole house can sometimes seem overwhelming. Live Like Your Rich has a really great post on 3 Secrets to Save $102,533.35 on Your Mortgage that you will not want to miss!

* * *
What did you love this week?
Pin It
The post Weekend Wandering appeared first on Living Well Spending Less™.
February 14, 2014
5 Secrets of a Happy Marriage


I can’t even tell you how excited I am to introduce you to my friend Melanie Shankle, aka Big Mama. I’ll spare you the boring details of how we met, suffice to say it involved much laughter (and a little wine) and an instant realization that she is my kind of people. She is an expert at finding the humor in the little things, and most days I can hardly wait to read her daily post over my morning cup of coffee. She just released her second book, The Antelope in the Living Room, and it is a gem. She captures perfectly and poignantly the ups and downs of being married to someone who is both your polar opposite and your best friend. It is a must read, and after this guest post, you will see why!
This a guest post from Melanie Shankle of The Big Mama Blog
A while back I was reading one of those articles about funny things kids say and one of the kids was asked the question, “How can a stranger tell if two people are married?” and he answered, “You might have to guess, based on whether they’re yelling at the same kids.”
Yes.
That about sums it up.
Because as much as we walk down that long center aisle wearing a gorgeous white gown, our own version of Wedding Day Barbie, with stars in our eyes, the reality soon sinks in that sometimes marriage is hard. And those glossy 8 x 10 photos from the wedding day that sit framed on our bookshelves are the only thing that remain of all our dreams of being the best married couple ever. You know? That couple that sits holding hands across the table at a restaurant while they throw their heads back in laughter?
Sometimes I hate that couple.
This is a phenomenon known as real marriage. It’s not as pretty and doesn’t always lend itself to great photo ops, but if you learn to embrace it you may find that it’s even better than what you imagined. Yes, it’s messier and filled with more heartbreak, laughter, sadness and joy than you imagined, but it also brings the comfort of knowing you have someone next to you to share life with all its triumphs and struggles.
My husband and I have been married for sixteen years now. It hasn’t always been easy and I’m sure there have been days or even years when we aren’t sure how we are going to make it to the other side, but we’ve covered it in a lot of prayer, asking God to give us the strength and wisdom and gentleness we need to make it through another day. And then another year. And for the rest of our lives.
Here are a few things I’ve learned along the way:
Don’t Give In to Comparison
This was a big one for me. When we first got married we were friends with another married couple that did everything together, like even went grocery shopping as a unit. And it concerned me that we weren’t like that. To make it even worse, I didn’t even want Perry to go shopping with me but I looked at this couple and thought they had something we didn’t.
And they did. It’s called co-dependency.
I’m kidding.
The truth is they enjoyed functioning that way. It worked for them and they thrived in a relationship where they did everything together. But Perry and I are both independent and like doing things by ourselves sometimes. We have separate hobbies and interests and that’s okay.
Don’t look at someone else’s marriage and let it define yours. The grass isn’t always greener on the other side and your marriage is as unique as your DNA. What you do may not work for other people, but you’re not married to other people. Make the choices and live the life that is right for the two of you and let go of your preconceived notions of what marriage is supposed to look like. Trust me, you’ll be so much happier that way.
 Protect Your Time Together
This one is so easy before you have kids. When it’s just the two of you and you’re free to go to the movies or eat quiet dinners that don’t involve chicken fingers whenever you want, it’s easy to stay connected. But after you have kids it takes a little more effort.
Don’t forget to carve out time to spend together as a couple. Those kids that can take up every minute of your time will be gone one day and you don’t want to look across the table at a spouse who’s become a stranger while you were busy driving carpool.
Take the time to sit on the couch at the end of the day and talk. Trade babysitting duties with another couple or sweet talk the grandparents and have a night out. Just make sure you don’t neglect the relationship that brought you the kids in the first place. Ultimately, a healthy marriage is the best gift you can give your children. It’s a legacy that they won’t even know to appreciate until they’re grown, but it shapes every part of their lives.
Remember to Laugh
Life is serious. There are bills to pay and problems to solve and kids to potty train. But don’t forget to laugh because, let’s face it, sometimes life is absurd and I think we do better when we take some time to acknowledge it.
I’ve always said my husband’s saving grace is that I still think he’s hilarious. Not every day, necessarily, but often enough that I’m still glad he’s the one that comes home to me every day. Make each other laugh. And bonus points if you can do it and put an end to a stupid fight you were having a minute earlier.
 Forgive and Move On
Some of the biggest fights we’ve had throughout our marriage are the ones that come after one of us (usually me, if I’m being honest) has let resentment build up over a lot of little things that then become a big thing. The next thing you know, we’re yelling at each other over the water bill and that isn’t even the real problem because the real problem began a month ago when I thought he wasn’t helping me enough around the house and being generally selfish.
Hypothetically speaking.
Your spouse isn’t a mind reader. And sometimes we need to follow the advice we give our kids and “use our words”. Let them know when something is bothering you or has hurt you when it happens and not a month later when you’ve stewed over it until you’re ready to explode.
And then – this is a big one – forgive them. One of the biggest realizations I’ve come to over the years is that my husband is never intentionally trying to hurt me. He may say or do something insensitive, but never purposely wanting to anger me.
Forgiveness is a huge key to a successful marriage. When we hold onto resentment and anger, then any little thing can be like a match thrown on a gas can. Once you’ve truly forgiven them, you need to let it go. Because don’t we want them to do the same for us?
It’s Always a Work in Progress
Sometimes I hear about couples who are getting divorced after thirty-five years of marriage and always kind of feel like, “What’s the point?” Because it seems like if you’ve made it that long, then you can stick with it for the duration.
But it’s a reminder that marriage is a constant work in progress. We never arrive at a finish line and declare that we have arrived and are victorious. It’s a daily promise to compromise and die to our own selfish desires and remember that we live with another human who may drive us crazy because they only use half a paper towel and leave the other half on the counter, but that we vowed to love them for better or for worse until death do us part.
Sometimes the key to a successful marriage is working at it even when you don’t feel like it. It’s loving our spouse when they seem unlovable and remembering that we might not be a picnic to live with either some days.
Ultimately, God gave us this person because he knows our strengths and weaknesses and where we are in need of a person who will refine us and sharpen us and make us better than we would be if left to our own ways. It’s not always easy, but in the end it’s always worth it.
Melanie Shankle lives in San Antonio, Texas with her husband, Perry, and daughter, Caroline. Melanie began blogging in July 2006 when she started her blog, Big Mama. She’s also a regular contributor to The Pioneer Woman blog. Her first book, Sparkly Green Earrings , came out in February 2013 and debuted on the New York Times Bestseller list. Her second book, The Antelope in the Living Room was released on February 4, 2014.
* * *
How long have you been married? What are your secrets to a happy marriage?
Pin It
The post 5 Secrets of a Happy Marriage appeared first on Living Well Spending Less™.
February 13, 2014
Thrifty Thursday {Week 47}


Happy Thursday! I hope you are all staying safe and warm wherever you are around the country! I don’t know about you but I am ready for spring….this winter is the pits! In fact this week I would especially love to see all your spring-inspired recipes, DIY projects, & household tips. Maybe if we wish hard enough, it will happen!
Here are the most clicked links from last week:
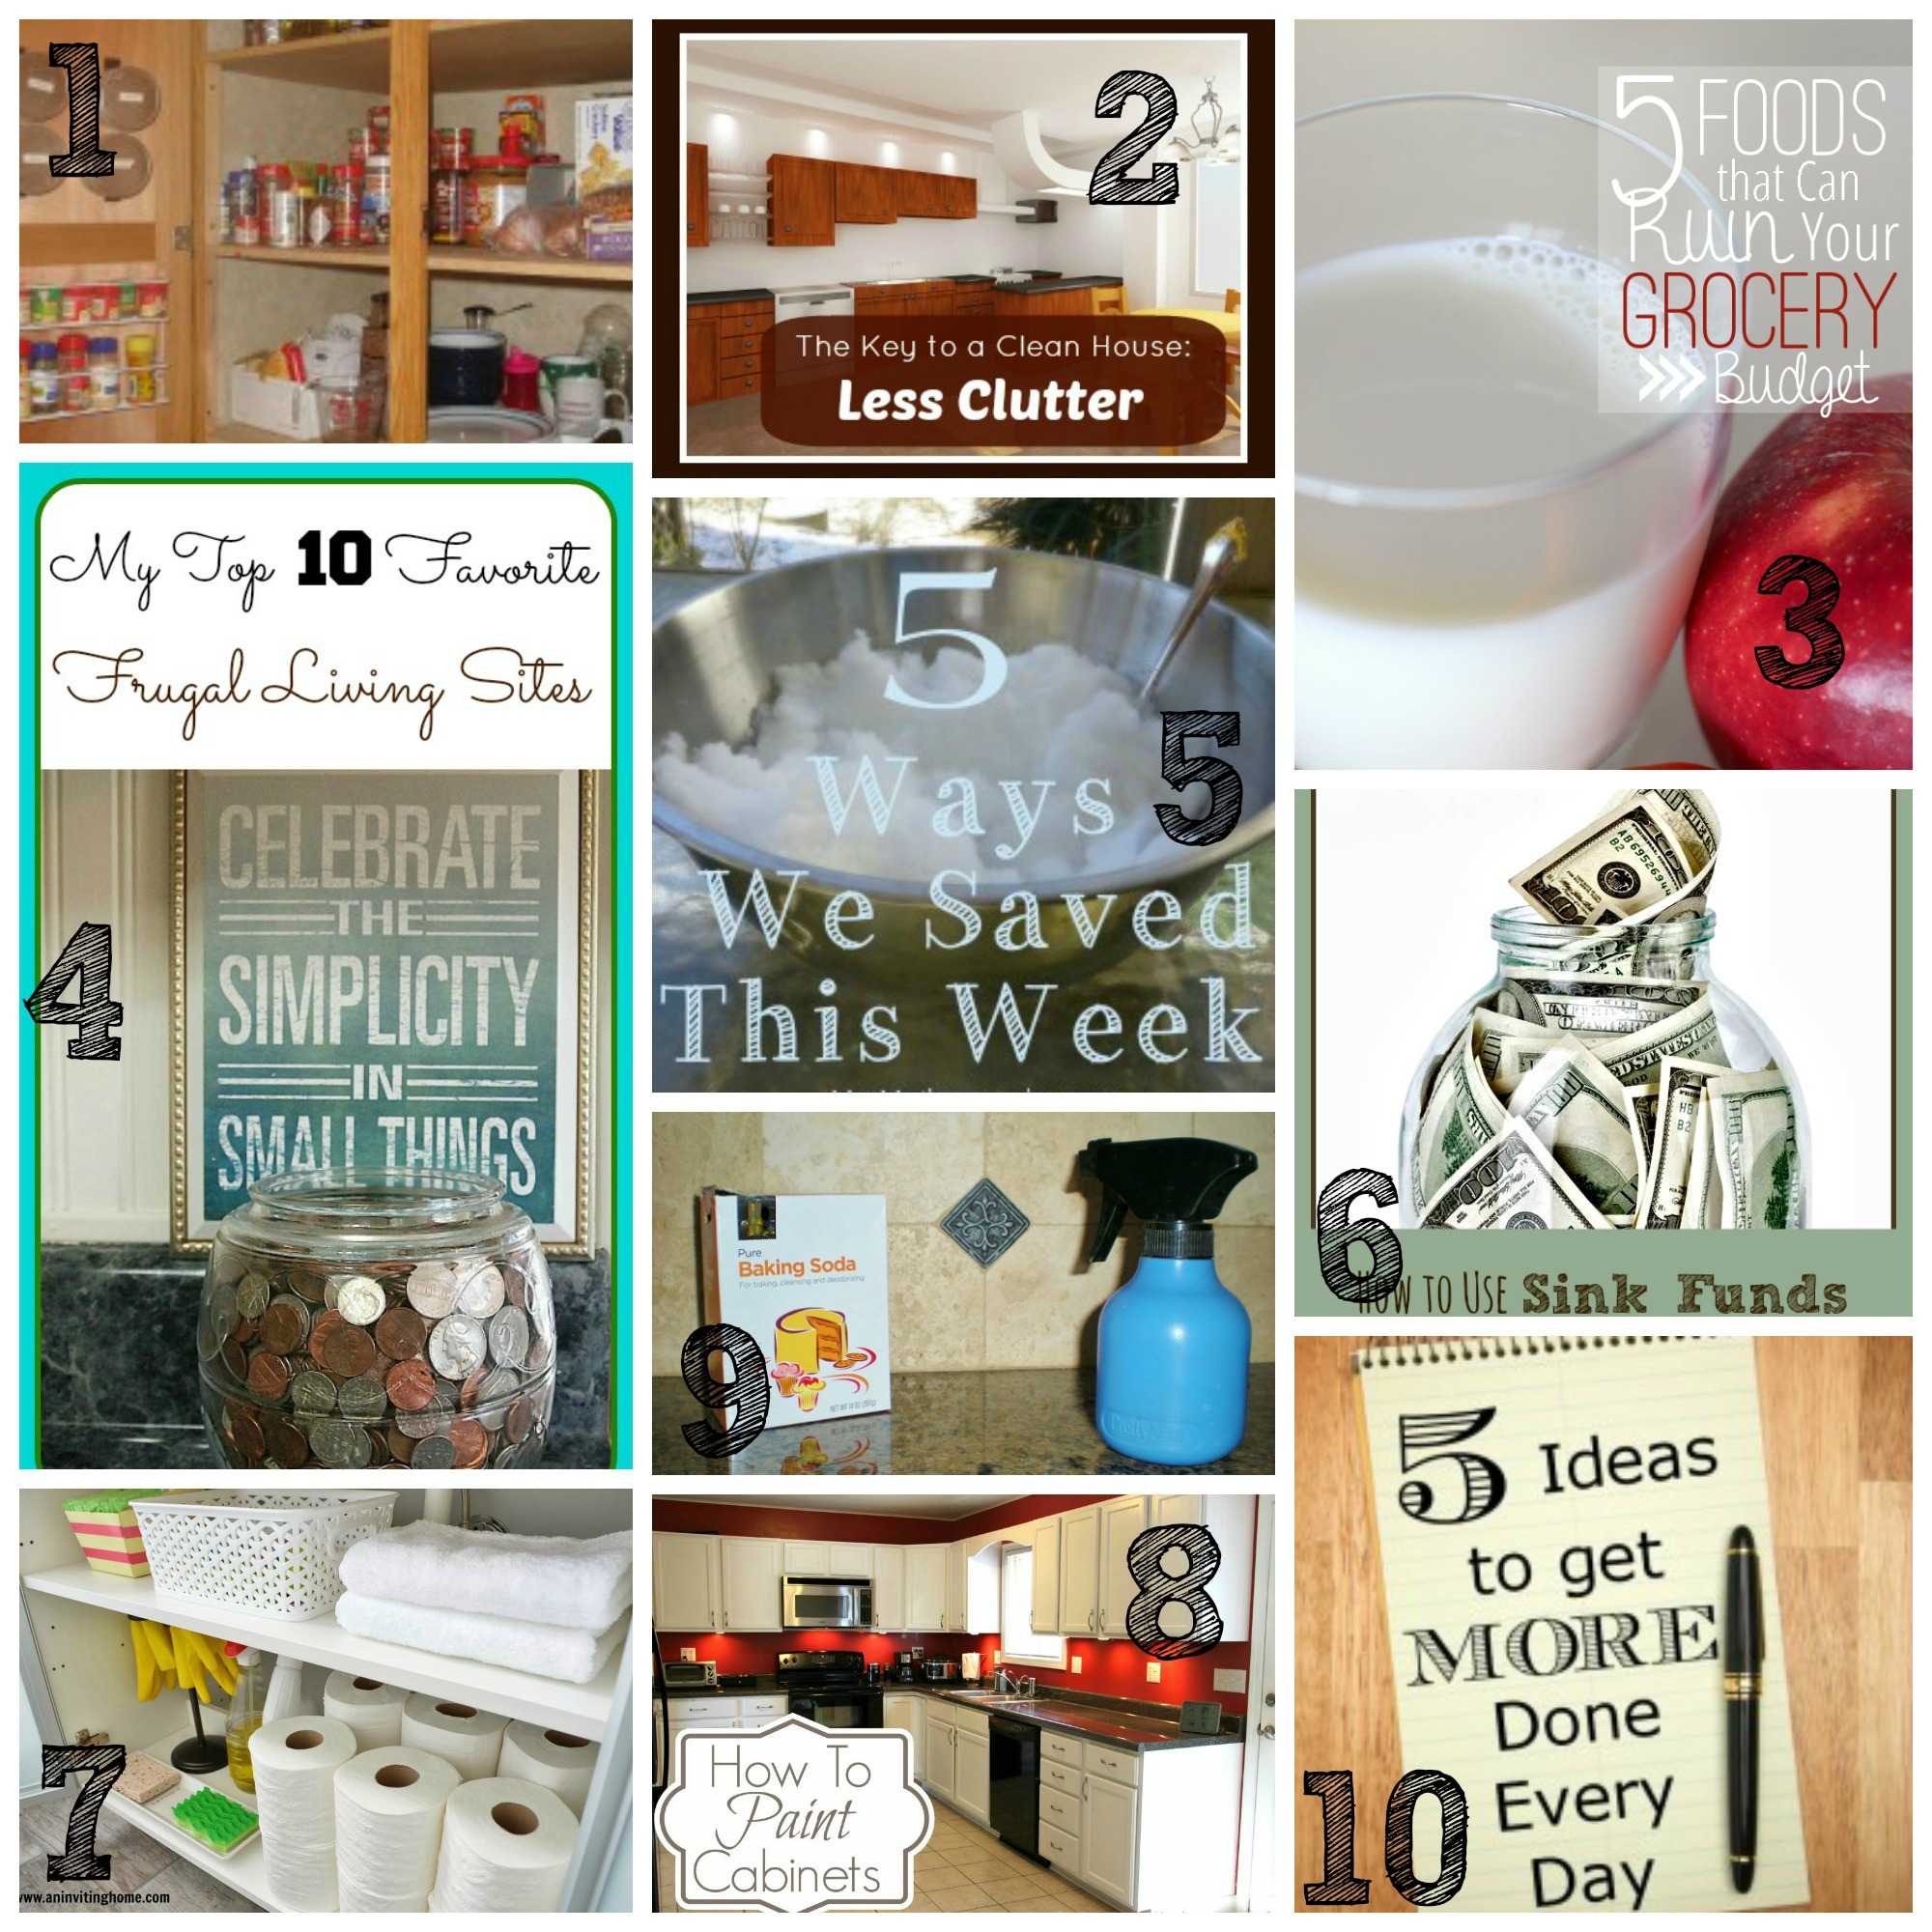
1. Purposely Frugal {How We’re Eating for $42.00 This Week}
2. Chief Family Officer {The Key to a Clean House: Less Stuff}
3. Creative Savings {5 Foods that Can Ruin Your Grocery Budget }
4. A Cultivated Nest {My Top Ten Living Frugal Sites}
5. My MotherMode {5 Ways We Saved This Week: Snow, Stockpile and Slow Cooking}
6. Kosher on a Budget {Using Sink Funds to Break the Paycheck to Paycheck Cycle}
7. An Inviting Home{6 Tips to Create an Inviting Bathroom}
8. Carrie This Home {How to Paint Cabinets}
9. Taylor Made Ranch {Staying Out of the Store}
10. Thrifty Homemaking {5 Ideas to Get More Done Every Day}
Never linked up to a party before? Here’s how:
Scroll down, find the little blue “Add your Link” Button and click on that.
Follow the instructions on the next page – add a great image of your project and an interesting title. Make sure you link to the direct page of your budget friendly post – not the main page of your blog!
Try to visit at least a few other blogs at the party. Be sure to leave a comment to let them know you stopped by!
Please link back to this post somehow. There are badges available here; a simple text link is just fine too.
 Feel free to tweet about Thrifty Thursday so others can join the fun, and don’t forget to check back here Sunday morning to see which posts have been featured this week!
Finally, if this is your first time here I also invite you to check out my eBook, How to Blog for Profit (Without Selling Your Soul). It has more than 100 five-star reviews on Amazon, and it is a fantastic resource if you are interested in building your blog, getting more traffic, or learning how to monetize.
An InLinkz Link-up
Pin It
The post Thrifty Thursday {Week 47} appeared first on Living Well Spending Less™.
February 12, 2014
Hummingbird Cake

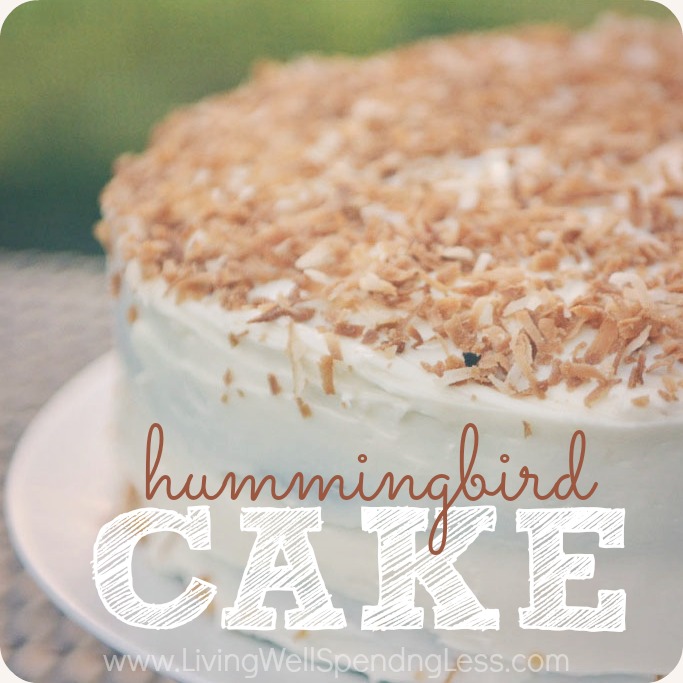
I have a confession. I’m not really a cake person, at least not usually. I much prefer brownies. Or fresh blueberry pie. Mmmmmmm…..pie….
The problem I have with most cakes is that they are either too dry or the frosting is too sweet, or both.
That was, of course, until I discovered this particular cake, which is apparently a Southern institution, right along with sweet tea and pimiento cheese. It is a little like banana bread with frosting, but even better. The original recipe comes from a 1978 issue of Southern Living Magazine but cuts back a little on the oil and nuts and adds a little coconut as well. You could just as easily skip both the nuts and the coconut if those aren’t your thing. Also, it is a great way to use up those overripe bananas!
And the frosting. Oh, the frosting. I use my Browned Butter Cream Cheese Icing because, well, it is pretty much the yummiest thing on the planet, and the slightly caramelized flavor of the brown butter is the perfect compliment to the richness of the cake. Don’t skimp on the frosting, or flake out and buy the store bought stuff. Its not that hard, and it is totally worth the effort!
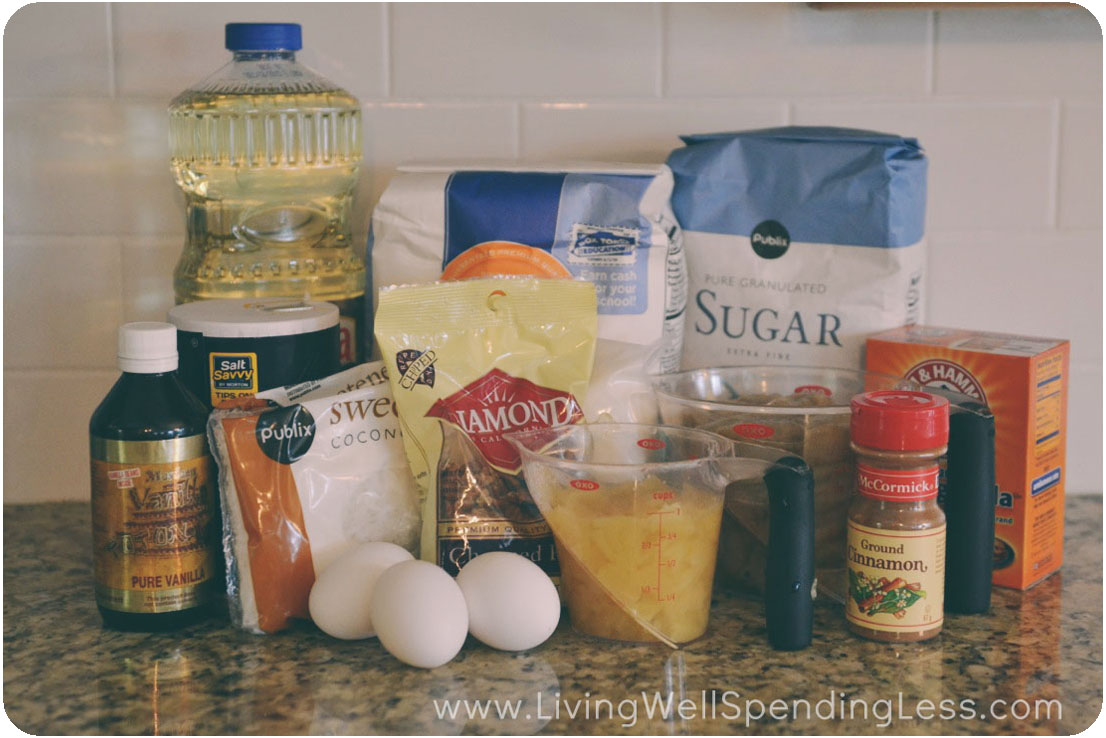
Here is what you need:
3 cups flour
1 teaspoon baking soda
1 teaspoon salt
2 cups sugar
1 1/2 teaspoons ground cinnamon
3 eggs
1 cup vegetable oil
2 cups very ripe chopped bananas
8 oz. crushed pineapple (undrained)
1/2 cup chopped pecans (optional)
1/2 cup coconut
Browned Buttter Cream Cheese Icing
3/4 cup coconut for top (optional)
1/2 cup pecans for top (optional)
softened butter & flour for greasing pan
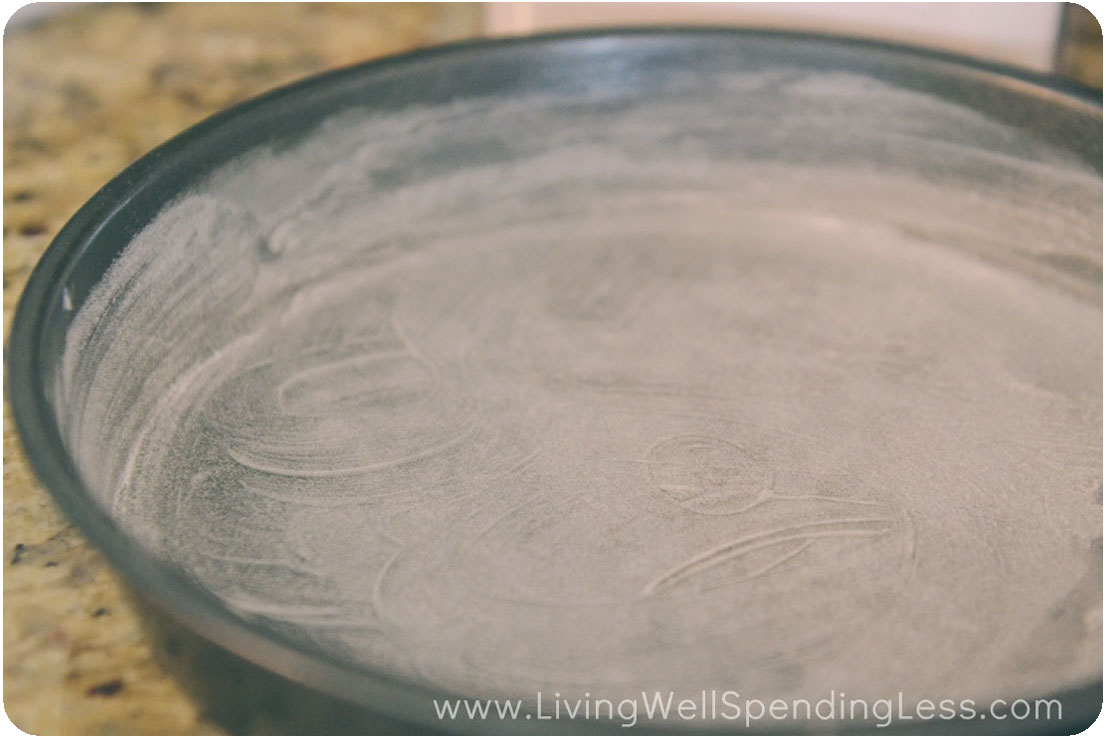
Step 1: Grease & flour 2 9″ round baking pans.

Step 2: Beat eggs in small bowl.

Step 3: Add eggs and oil to flour mixture; stir with spatula just until moistened.
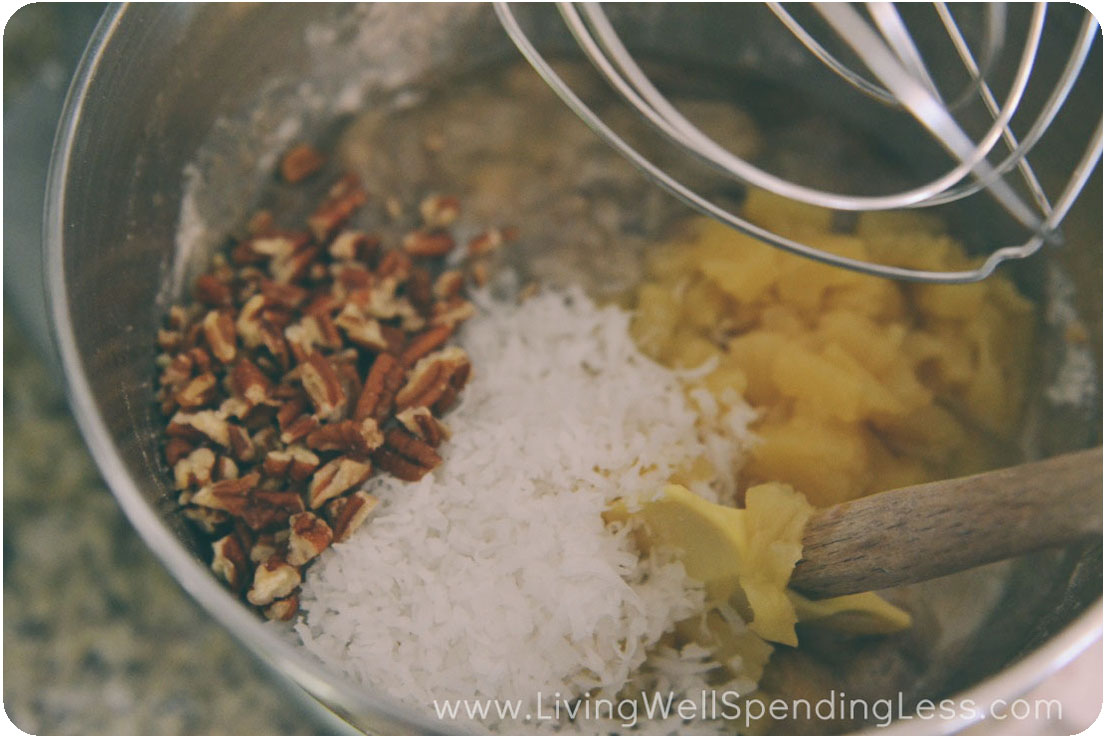
Step 4: Stir in bananas, pineapple, pecans, and coconut. Mix at medium speed until well blended, about 1 minute.

Step 5: Pour batter into baking pans. Bake at 350 for 30-35 minutes, until knife inserted into middle of cake comes out clean.

Step 6: Cool in pan on wire rack for 10-15 minutes, then invert cakes onto wire rack and cool completely.
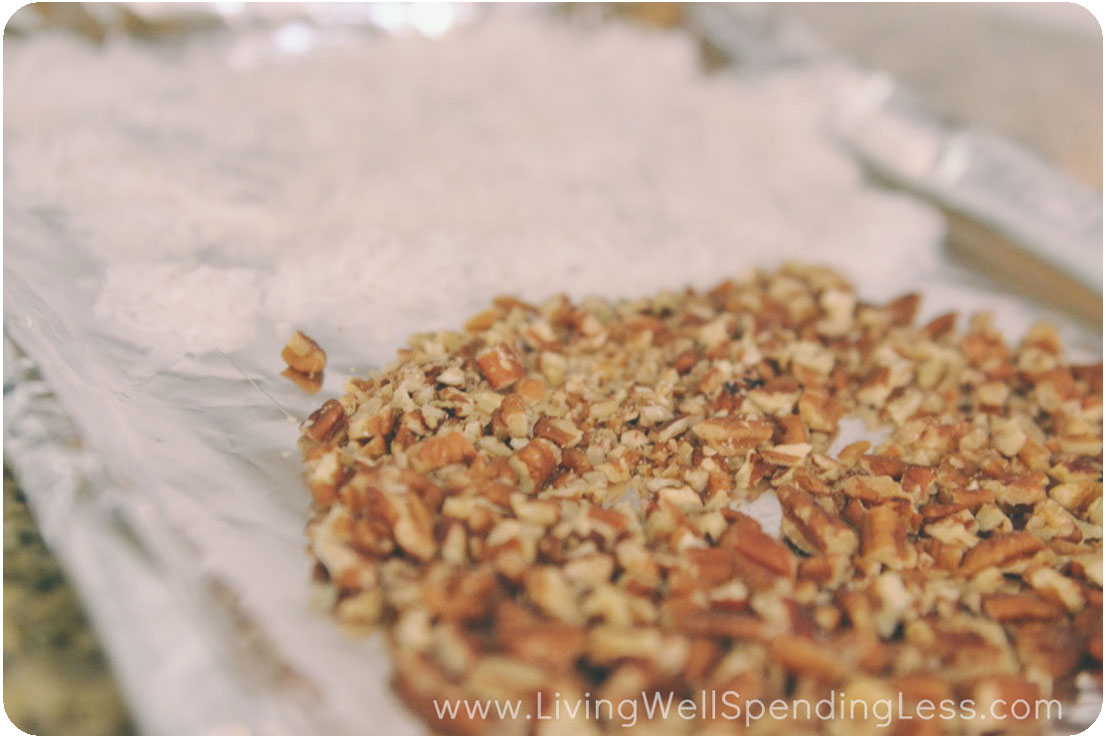
Step 7: Spread coconut and/or pecans on baking sheet; bake at 350 degrees for 5-8 minutes until toasted.

Step 8: Spread Browned Butter Cream Cheese Frosting between layers and on top and sides of cake. Sprinkle top with pecans and/or coconut if desired.

Print This!
Recipe: Hummingbird Cake
Summary: This truly southern cake is simply to die for!
Ingredients
3 cups flour
1 teaspoon baking soda
1 teaspoon salt
2 cups sugar
1 1/2 teaspoons ground cinnamon
3 eggs
1 cup vegetable oil
2 cups very ripe chopped bananas
8 oz. crushed pineapple (un-drained)
1/2 cup chopped pecans (optional)
1/2 cup coconut
Browned Buttter Cream Cheese Frosting
3/4 cup coconut
softened butter & flour for greasing pan
Instructions
Grease & flour 2 9″ round baking pans.
Beat eggs in small bowl.
Add eggs and oil to flour mixture; stir with spatula just until moistened.
Stir in bananas, pineapple, pecans, and coconut. Mix at medium speed until well blended, about 1 minute.
Pour batter into baking pans. Bake at 350 for 30-35 minutes, until knife inserted into middle of cake comes out clean.
Cool in pan on wire rack for 10-15 minutes, then invert cakes onto wire rack and cool completely.
Spread coconut and pecans on baking sheet; bake at 350 degrees for 5-8 minutes until toasted.
Spread Browned Butter Cream Cheese Frosting between layers and on top and sides of cake. Sprinkle top with pecans and/or coconut if desired.
Preparation time: 5-10 minutes
Cooking time: 30-35 minutes
Number of servings (yield): 12

* * *
Have you ever tried Hummingbird Cake?
Pin It
The post Hummingbird Cake appeared first on Living Well Spending Less™.
February 10, 2014
DIY Sharpie Mugs


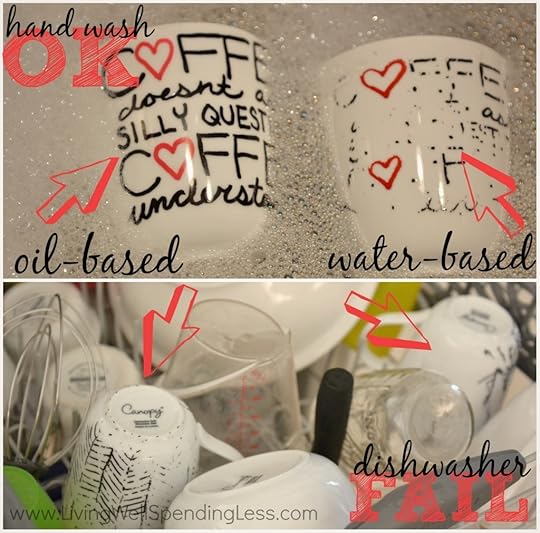
For the past year or two I’ve been seeing these Sharpie mugs all over Pinterest. And every time I see them, I think, “those are so cute. I should totally try that! They look SO easy!” But then I started noticing a lot of comments on those Sharpie mug photos, most of them complaining that while these darling little mugs are indeed the easiest craft ever, the marker is not actually wash resistant when applied to ceramic. And who wants a coffee mug they can’t wash?
But then I was on a hunt for some cute mugs for my new office and I couldn’t a single one that I liked, probably because in my head I was envisioning all those cute Sharpie mugs I had been drooling over. I finally decided to give it a try, doing my own research along the way.
I found out that that the plain old regular Sharpie markers do not work at all for this project. The trick, I discovered, is that the markers must be OIL BASED, not water-based. Thus, if you want to attempt this project, be sure to ONLY do it with the oil-based Sharpie paint markers!
Even so, as my field testing proved, these cute little mugs will NOT be dishwasher safe. They do just fine with soap and water but the dishwasher means a sure and sudden death to all your artistic effort. That said, they really are a fun & easy DIY project and turn out SO cute without much effort. The possibilities are practically endless, as my Sharpie Mug Pinterest Board will attest to, and they would make a fantastic gift idea for almost anyone. (Just make sure to include washing instructions!)
UPDATE:
LWSL reader Ana shared the following comment on Facebook: “I used oil based paint markers and even after curing them, they smudged when they got too hot. Instead I bought DecoArt glass paint markers, followed the directions to a T and I have washed it in the dishwasher several times, no smudges or washing off.”
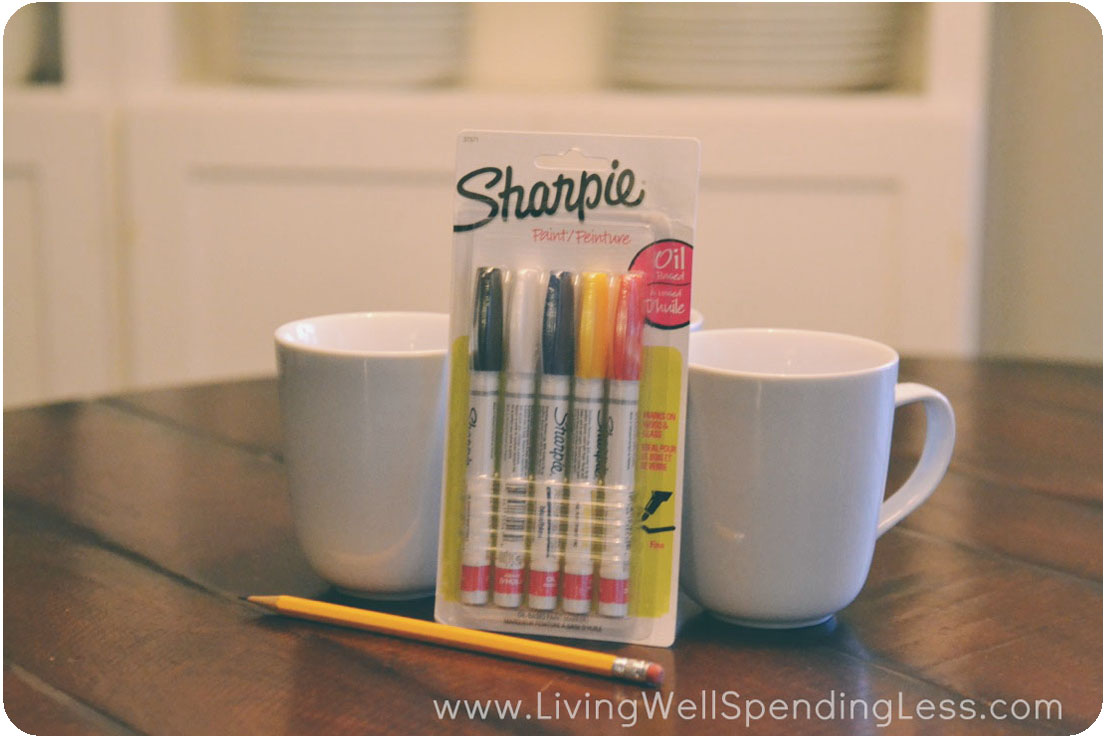
Here is what you need:
Plain mug
Sharpie paint oil-based markers or DecoArt glass paint markers
pencil (optional)
masking tape (optional)

Step 1: Wash and dry your mug, if new. Decide on a design and prep design with masking tape, if necessary.
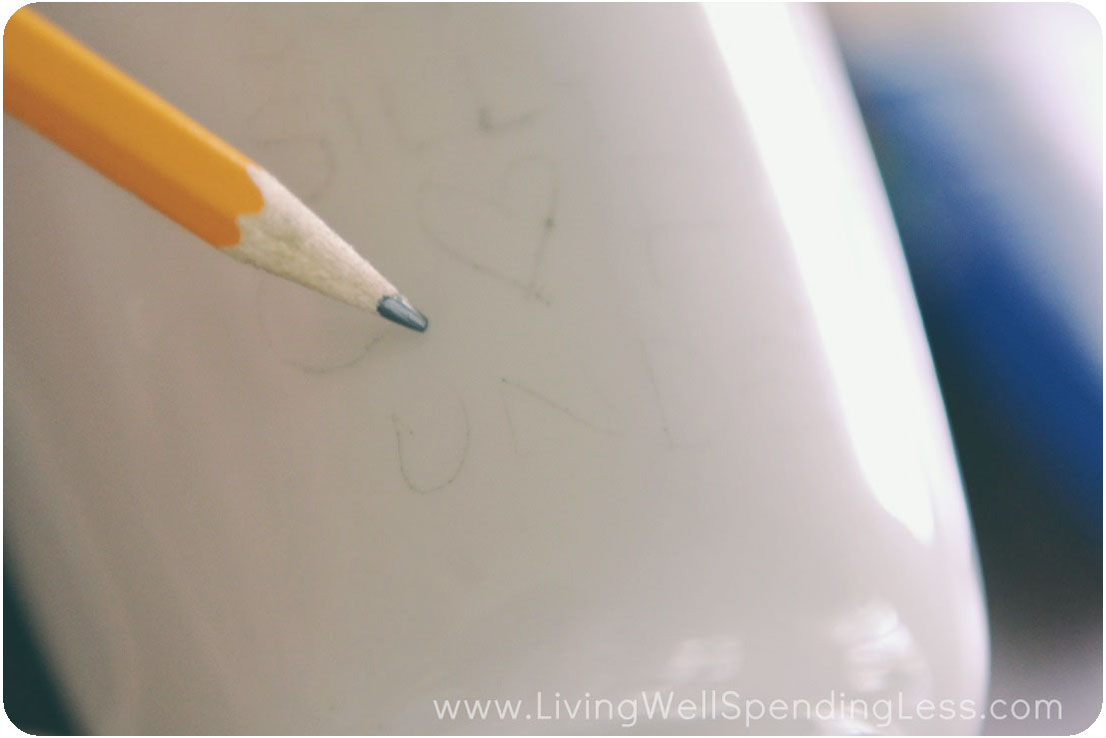
Step 2: Use a pencil to rough out design for any words or lines. Remove masking tape.

Step 3: Carefully draw design with Sharpie paint markers.

Step 4: Add accent colors, if necessary.

Step 5: Bake dishes at 350 degrees for 20 minutes to set paint; let cool completely.


Finally, remember that these will NOT be dishwasher safe! Be sure to hand wash ONLY!

P.S. For more cool design ideas, be sure to check out my dedicated Sharpie Mug Pinterest Board!
Follow Living Well Spending Less’s board Sharpie Mugs on Pinterest.
* * *
Have you ever tried making a Sharpie Mug? How did it turn out?
Pin It
The post DIY Sharpie Mugs appeared first on Living Well Spending Less™.
February 9, 2014
Weekend Wandering
Happy Sunday! With just a few days left until Valentine’s Day I am definitely feeling the love this weekend…..and apparently also seriously craving some cupcakes! :-) In any case, I’m sure I will be making some sort of treat for my daughters’ classes this week and I was happy for all the inspiration. What are your plans for Valentine’s Day?
This week was our biggest Thrifty Thursday link party ever, with more than 400 awesome recipes, DIY projects, household tips, and money-saving ideas linked up. So many posts made it even harder to choose favorites, but here are the posts I loved this week:
* * *
They say a way to a man’s heart is through his stomach. Bacon! And Little Smokies ! My husband would be SO all over these Bacon Brown Sugar Smokies by Spend With Pennies!

But now, onto the cupcakes! My girls would go crazy for these these super cute and yummy Cherry Limeade Cupcakes by This Silly Girl’s Life–they love anything with a cherry on top!

And speaking of cherries, these Cherry Coke Float Cupcakes by Belle of the Kitchen would be adorable for a class Valentine’s Day party too!

Nutella Stuffed Vanilla Cupcakes? Um yes please! You had me at Nutella, Titi Crafty.

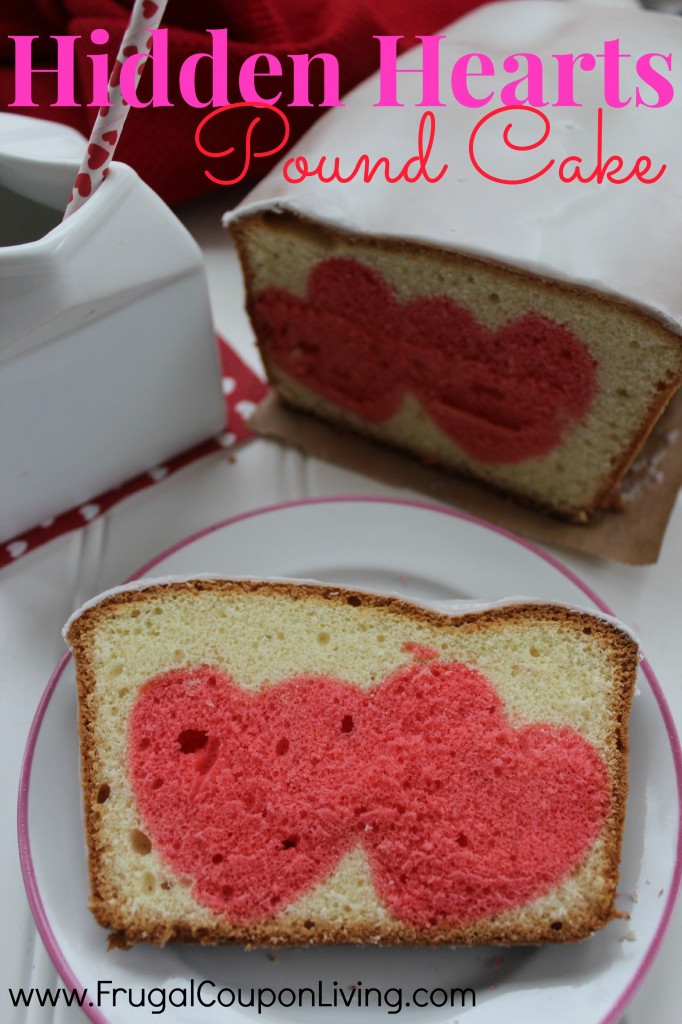
If cupcakes aren’t your thing, there were plenty of other sweet Valentine’s Day ideas linked up this week. How cool is this Hidden Hearts Pound Cake by Frugal Coupon Living?
I also LOVED these Chocolate Covered Strawberry Roses by The Pin Junkie! What a cool idea!

This Valentine’s Candy Bark by Life With the Crust Cut Off also looks super yummy and easy to make too!

If you’re looking for some non-sugar-loaded V-day ideas, I loved these easy-to-make 5 Minute Valentine Pins by A Few Miner Adjustments. They are the perfect alternative to candy!

The Blissful Bee has a step by step DIY Rose Tutorial that would make a sweet (and thrifty) Valentine’s Day gift as well.

Of course if you are more excited for the Olympics than Valentine’s Day, be sure to check out this Quick Guide to the 2014 Winter Olympics by Chaney at May Richer Fuller Be. It is a great resource for what’s new and when to watch.

If you’ve ever wanted to give your kitchen a facelift for not a lot of money, check out this post from Carrie This Home. She has a great tutorial on How to Paint Cabinets!

Finally, my Husband will be so happy to see a post about How to Load the Dishwasher by Angela Says. He truly believes there is a science to this and normally won’t even let me touch the dishwasher for fear of messing up his method. Learning how to do it “right” might just be the best Valentine’s Day gift of all!

* * *
What did you love this week?
Pin It
The post Weekend Wandering appeared first on Living Well Spending Less™.
February 7, 2014
How to Make a Dream Come True


This past weekend was a big one for me, and not just because Seattle won the Superbowl. No, this weekend was big because it was the weekend I turned in my completed manuscript for my first real book.
It will still be quite a while before that pile of pages is transformed into a real life book on the bookstore shelf, and there is still a long road ahead of editing and formatting and picking the perfect book cover before my baby is ready for the world. But it is done. 12 chapters. 55,000 words. Done.

It is a lifelong dream come true.
And now, as I cross this Big Thing off my list, I can’t even tell you how incredible it feels to have accomplished this goal. Honestly, I think I’m still pinching myself. There were so many times through this process that I didn’t know if I would make it, so many days I was crippled with self-doubt, and so many moments I wanted to throw in the towel.
But I didn’t quit.
Instead I’m here at the finish line, doing a dorky little happy dance. Friends, if I could give you all one gift, it would be this feeling! Instead, I’m going to do the only thing I can—share the things I’ve learned through this process about how to make a dream come true.
Be clear about your direction.
Take the time to write down your goals and your dreams and the things you would like to accomplish. Ultimately, a dream not written down is just a wish. When you can see what you are aiming for you are much more likely to hit it. Set big, scary goals and then, once you’ve written them down, don’t just stuff them in a drawer and forget about them. Tape them to your bathroom mirror or stick them to your fridge or write them on a giant poster for your living room. Put them someplace you will see them often. (If you struggle with goal setting, be sure to get my free goal setting workbook here!)
I have dreamed about writing a book my entire life, but it wasn’t until I wrote it down as a goal last year that I was finally able to make it happen. And quite frankly, seeing it written down scared the bejeebies out of me! It was such a BIG goal! What if I failed? But I re-read that goal almost every single day, and every day I made choices with my time that helped get me a little closer to the finish line. Remembering my long-term goal helped me focus my shorter term goals, which helped me plan out my days and which ultimately made it happen.
Work hard at everything you do.
Last year at the Teen Choice awards (of all places) Ashton Kutcher (of all people) gave a pretty profound speech about accomplishments. He said:
“I believe opportunity looks a whole lot like hard work. When I was 13 I had my first job with my Dad carrying shingles up to the roof, and then I got a job washing dishes at a restaurant, and then I got a job in a grocery store deli, and then I got a job in a factory sweeping Cheerio dust off the ground. And I’ve never had a job in my life that I was better than. I was always just lucky to have a job, and every job I had was a stepping stone to my next job and I never quit my job until I had my next job. And so opportunities look a lot like work.”
Every job we do is a stepping stone to the next one. When I look back at the past few years I can see how all the little jobs and successes I’ve had have helped lead to the next one. Since I started my blog four years ago, I have poured my heart and soul into every article that I write. I have gotten up early and worked weekends and stayed up late just to write, even when no one was reading. I submitted guest posts and wrote freelance articles and an eBook and experienced plenty of rejection and frustration along the way. But I learned what worked and what didn’t work, and along the way I also found my own unique voice. And then, when the opportunity finally arose to write a book, I was ready.
Be willing to make sacrifices.
Every measure of success comes with a price. There are only so many hours in any given day, which means that none of us can do it all. Pursuing a dream means that you will be forced to make choices, and often those choices are hard.
For me, it has meant being willing to get up ridiculously early almost every single day—even on the weekends—because that is my best time to write. It has meant sometimes no to things that seem like a lot more fun or more interesting, and watching my family go off on fun adventures without me so that I can stay home and work. It has meant reinvesting my income into things like blog & writing conferences and photography classes. It has meant tightening our belts even more in order to afford having my husband stay at home. It has even sometimes meant sacrificing my health. I have been sick more times in the past year than the rest of my life combined. (And in case you are wondering, now that this book is done, getting healthy is at the top of my priority list!)
Believe in yourself.
The bigger your dream, the less likely it is that other people will understand it, and the more likely that they will criticize or mock you or tell you it is impossible. If you want to make a dream come true, you have to believe in yourself. You have to be able to tune out all the voices around you that say “you can’t do that,” and find that inner core of strength that says “yes I can.”
This is hard.
When I started Living Well Spending Less in 2010 and suddenly began writing about how to use coupons and save money, there were a lot of people who laughed at me. For a long time even my husband couldn’t understand why I was spending so much time on a blog. He couldn’t see my vision, and no one else really could either. And that’s okay. It was my dream to believe in, not theirs.
Build a support team.
While you have to believe in yourself and your own dream, it is also extremely important to build a support network of people who will mentor, encourage, and motivate you. These are the people will help you pick yourself up when you fall, or convince you to keep trying when you want to quit. These aren’t the people who will laugh at your dream, but who will say a kind word when you need it most, and sometimes you have to look for them.
I have been so blessed by an amazing group of friends & family cheering me on, both here in “real life,” but also online. In that first few months of blogging, when I had a grand total of maybe fifteen readers, my childhood friend Alisha was the most loyal one of all. She would read every post, even the terrible ones that didn’t make any sense, and always leave an encouraging comment. My friend Edie, who for the past year has been my accountability partner, was a fellow blogger that I looked up to. We met at a conference and immediately connected, and have since become the best of friends. We talk almost every single day, and she is the one who talks me off the ledge, cheers me up, and makes me want to be better.
My husband too is an amazing support, the one who proofreads everything I write, who tells me to keep going when I want to quit, who tells me to slow down when I push too hard, and who works tirelessly behind the scenes so that I can pursue this dream. I would be nothing without him.
It is important to note that encouragement goes both ways! The most important rule of friendship is this: If you want to have a friend, you must be a friend. If you are feeling frustrated that your friends aren’t supporting you, take a look at how you can support and encourage them to follow their dreams. You may just be amazed at how that support comes back to you.
Be prepared to be broken again and again.
Following a dream is hard and sometimes humiliating and frequently very humbling. It is scary to pour your heart and soul into something that you’ve dreamed about your whole life. Because what if you fail? What then?
I can’t count the number of times in the past year where I have literally been brought to my knees because I felt so inadequate and so, so unworthy of this task. There were so many moments I was practically paralyzed with self-doubt. My prayers were little more than a collection of desperate pleas: I’m not good enough for this, Lord! I have nothing to say that hasn’t been said better already! I’m not smart enough! I’m not talented enough. I’m just a wannabe hack who can’t write! I can’t do this!
But it was exactly in those lowest moments, during those times I felt the most inadequate and completely broken that I realized how desperately I needed God. Over and over I would come back to those words of my favorite verse: My grace is sufficient for you, for my power is made perfect in your weakness. (2 Corinthians 12:9) I even made it the screen saver on my phone so that every time I looked down, I would be reminded that I might be weak, but he is strong.
Have faith in your calling.
I don’t think God gives us dreams or talents or passions at random; on the contrary, I think he calls us to follow the path he has envisioned for us, the one that allows us to live life to the fullest. I honestly believe that writing is not just my lifelong dream, it is my calling.
Listening to that little voice in the back of your head that tells you to GO FOR IT can be downright terrifying sometimes, but it is also exhilarating. If there is something you’ve been wanting to do or a dream you’ve wanted to pursue or a voice that has been nudging you to take action, DO IT! Don’t wait. Take the leap of faith and start today. In the end, you’ll only ever regret the chances you didn’t take

* * *
What’s your dream?
Pin It
The post How to Make a Dream Come True appeared first on Living Well Spending Less™.
February 6, 2014
Thrifty Thursday {Week 46}
Happy Thursday! Is it just me or has this week literally flown by? I feel like I blinked and it was Thursday! Where did Tuesday and Wednesday go? In any case, I am excited to see all the great recipes, DIY projects, and tips you have to share this week! I’d especially love to see any ideas you have for crockpot or freezer cooking, but, as usual, the sky is the limit as long as your ideas are budget-friendly!
Here are the most clicked links from last week:
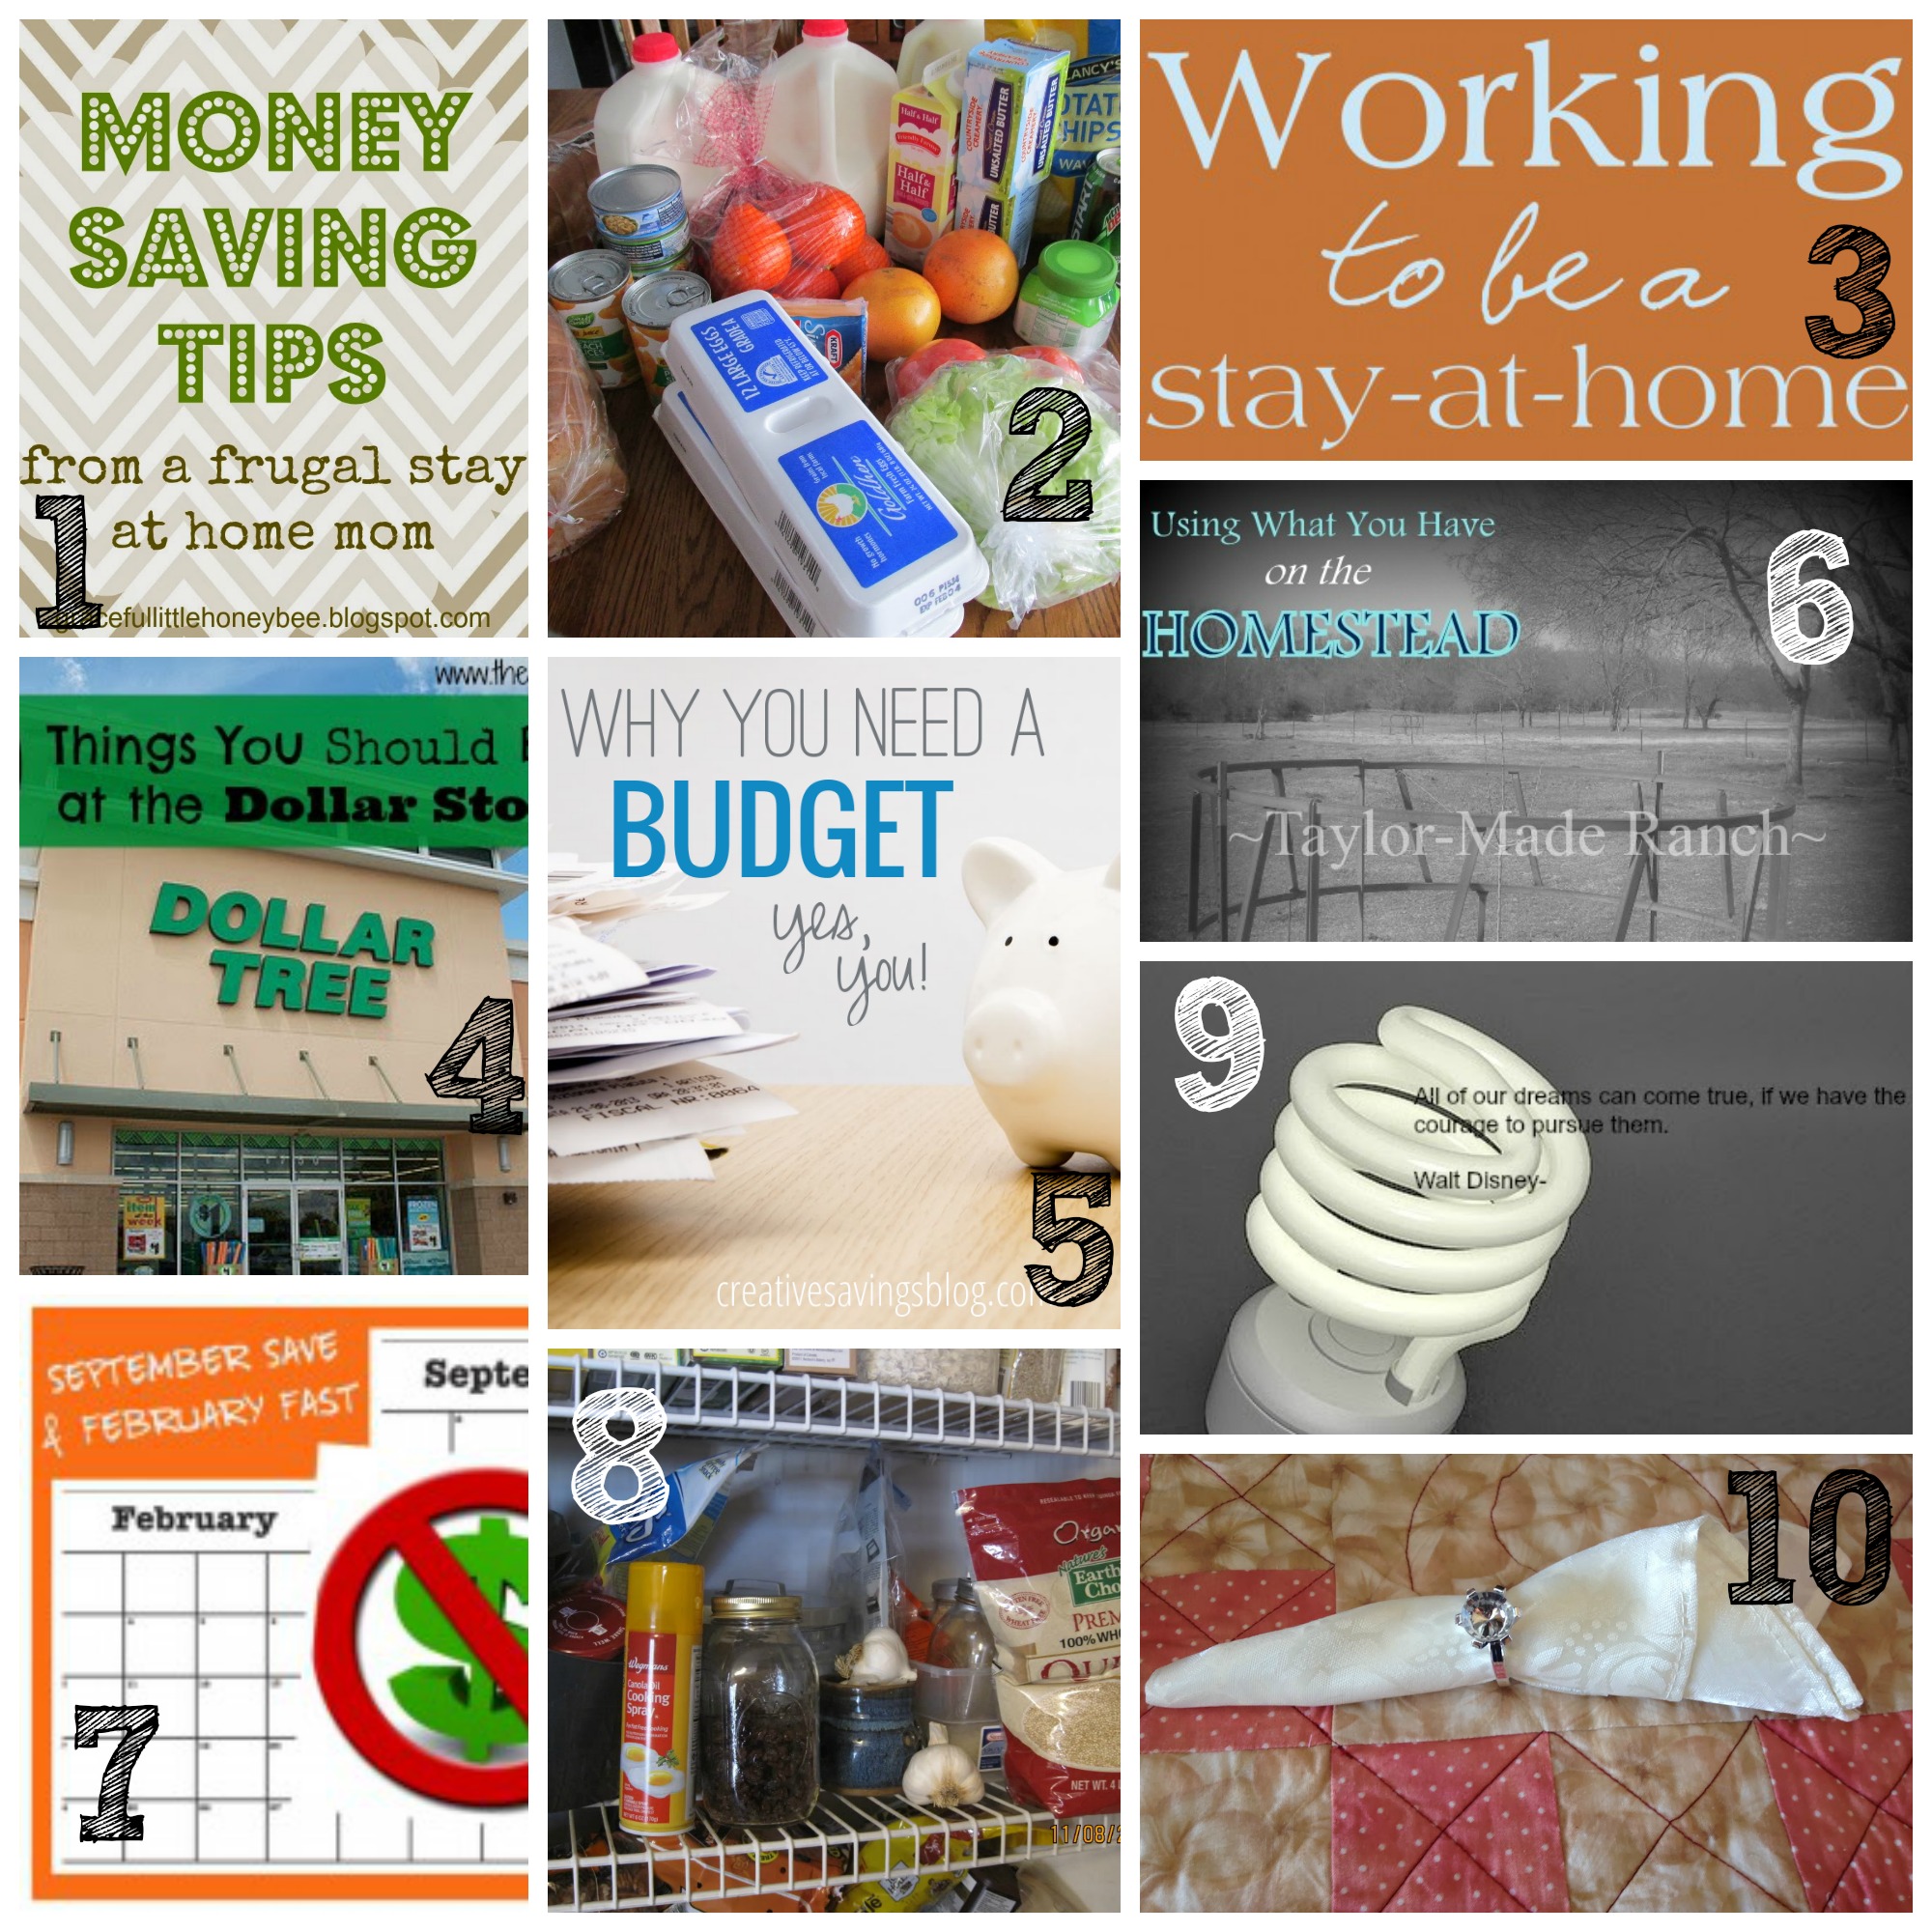
1. Graceful Little Honey Bee {Money Saving Tips From a Frugal Stay at Home Mom}
2. Whole Food Mom on a Budget {No Spend January – Week 4}
3. My Mothermode {Working to Be a Stay at Home Mom }
4. The Teacher’s Wife {Ten Things You Should Buy at the Dollar Store}
5. Creative Savings {Why You Need a Budget…Yes,You!}
6. Taylor Made Ranch {Using What You’ve Got on the Homestead}
7. Mission to Save{September Save & February Fast}
8. My Sister’s Pantry {Peeping in Our Pantries}
9. Mom’s Are Frugal {Frugal Friday: Where Did My Money Go?}
10. A Day in the Life on the Farm {Just Some Fun Stuff}
Never linked up to a party before? Here’s how:
Scroll down, find the little blue “Add your Link” Button and click on that.
Follow the instructions on the next page – add a great image of your project and an interesting title. Make sure you link to the direct page of your budget friendly post – not the main page of your blog!
Try to visit at least a few other blogs at the party. Be sure to leave a comment to let them know you stopped by!
Please link back to this post somehow. There are badges available here; a simple text link is just fine too.
Feel free to tweet about Thrifty Thursday so others can join the fun, and don’t forget to check back here Sunday morning to see which posts have been featured this week!
Finally, if this is your first time here I also invite you to check out my eBook, How to Blog for Profit (Without Selling Your Soul). It has more than 100 five-star reviews on Amazon, and it is a fantastic resource if you are interested in building your blog, getting more traffic, or learning how to monetize.
');
// ]]>
The post Thrifty Thursday {Week 46} appeared first on Living Well Spending Less™.
February 5, 2014
Easy Spaghetti & Meatball Pie


It really doesn’t get much easier than this 5 ingredient Spaghetti Pie! Well, okay, maybe, as my oh-so-loving husband was quick to point out, plain spaghetti is a tad bit easier. But, considering this pie is about 100 times yummier than plain old spaghetti, I think it worth the tiniest extra amount of effort. In fact, my husband wouldn’t stop making fun of me was just a little skeptical until he took a bite and couldn’t help but admit I was right. Sweet victory! Then he said I should call it “Spaghetti Lasagna” since that’s what he thinks it tastes like. I said that was a dumb name. He said to say anything else would be false advertising. I said it was my blog so I win. The end.
Isn’t marriage awesome?
By the way, this dish is super easy to double for a crowd!

Here is what you need:
1/2 package spaghetti noodles
1 jar tomato sauce
1 pound frozen meatballs
1 16oz container ricotta cheese
1 cup shredded Parmesan cheese
butter or olive oil

Step 1: Preheat oven to 350 degrees. Heat large saucepan over medium heat; add butter or olive oil & sauté frozen meatballs until lightly browned on outside but not cooked through, about 5 minutes.

Step 2: Add sauce to meatballs; cover and simmer 10-15 minutes.

Step 3: Fill large pot with water and bring to a boil; cook noodles according to package directions.

Step 4: Drain noodles; arrange a nest of noodles inside greased pie plate to form “crust” of pie.
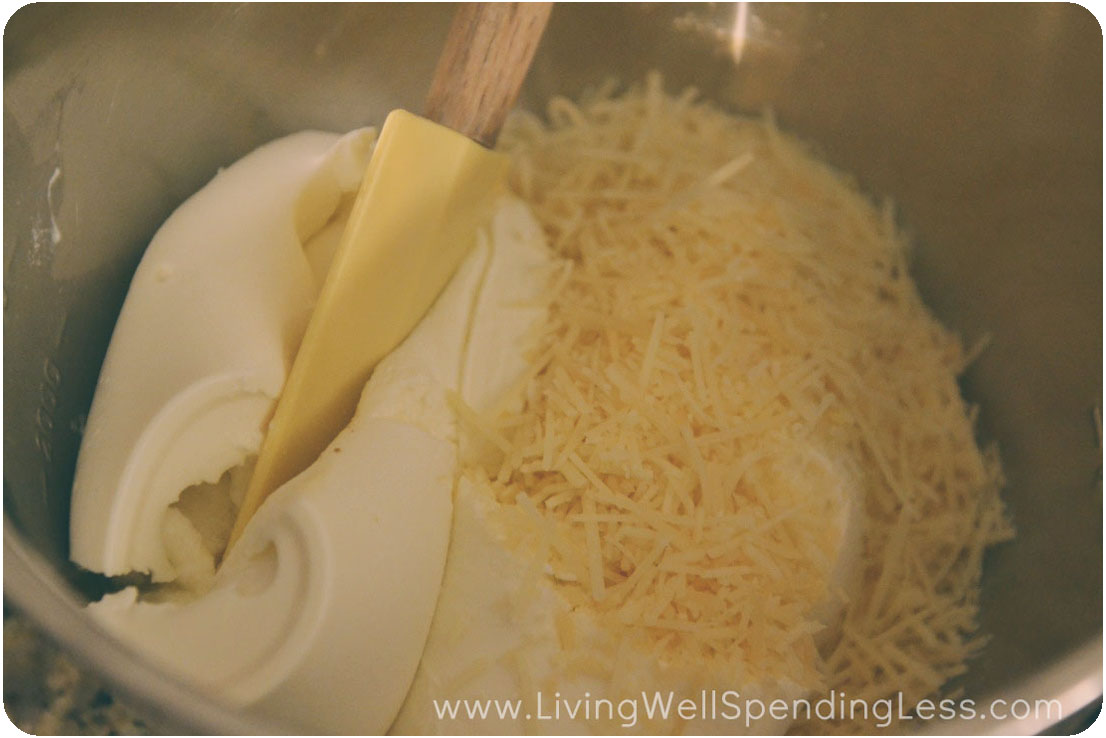
Step 5: In large bowl, combine ricotta and Parmesan cheeses.

Step 6: Spread ricotta mixture in over noodles, leaving at least 1″ of noodles showing along the edge.

Step 7: Spread sauce and meatballs over ricotta, again leaving the noodles showing along the edge, and making sure meatballs are evenly spaced. Bake at 350 degrees for 20 minutes.

Print This!
Recipe: Spaghetti and Meatball Pie
Summary: Spaghetti pie is 100 times better than just plain old spaghetti and meatballs!
Ingredients
1/2 package spaghetti noodles
1 jar tomato sauce
1 pound frozen meatballs
1 16oz container ricotta cheese
1 cup shredded Parmesan cheese
butter or olive oil
Instructions
Preheat oven to 350 degrees. Heat large saucepan over medium heat; add butter or olive oil & sauté frozen meatballs until lightly browned on outside but not cooked through, about 5 minutes.
Add sauce to meatballs; cover and simmer 10-15 minutes.
Fill large pot with water and bring to a boil; cook noodles according to package directions.
Drain noodles; arrange a nest of noodles inside greased pie plate to form “crust” of pie.
In large bowl, combine ricotta and Parmesan cheeses.
Spread ricotta mixture in over noodles, leaving at least 1″ of noodles showing along the edge.
Spread sauce and meatballs over ricotta, again leaving the noodles showing along the edge, and making sure meatballs are evenly spaced.
Bake at 350 degrees for 20 minutes.
Preparation time: 25-30 minutes
Cooking time: 20 minute(s)
Number of servings (yield): 8

* * *
Have you ever tried Spaghetti Pie?
Pin It
The post Easy Spaghetti & Meatball Pie appeared first on Living Well Spending Less™.


