Pamela Q. Fernandes's Blog, page 38
November 9, 2016
The Christian Circle Podcast
Coming Soon! Watch out for this space.


November 7, 2016
FREE Editing Software For Writers
As a writer, your most valuable advice comes through edits. Edits from friends, crit partners, editors, agents and even your mother. But sometimes don't you wish, you caught that silly errant comma, the extra preposition, those redundant words yourself?
That's where the editing software comes in. Like every other software out there, even editing with or without the software is work. While for some this may seem like a blessing, many others wouldn't bother with another step in their writing process. For me, ever since I've discovered it, I've loved using it, despite the fact that it takes considerable time to use, especially if you're crunching deadlines.
I've used each of these and I'll show why I like them. First of all they're all free, since they're in beta modes and or extensively used. The pictures are the same paragraph edited by the three different software programs and you can see the difference.
1. Grammarly
This is an extremely clean looking app.
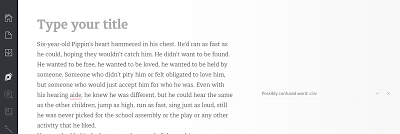
See what I mean. It's very neat and all your errors show up on the right side of the document which you can accept or ignore. It's got basic issues and advanced issues identified at the bottom of the page. The advanced issues are only revealed to paid subscribers. Overall I like it, because its simple to use. It can be downloaded as an app for your PC or MS Office.
2. Editminion
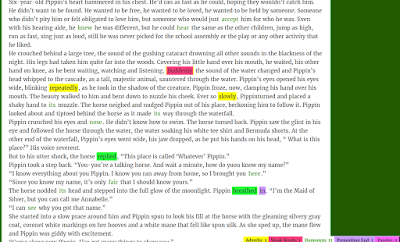
This is a bit complicated with all the colors. It tells you how many adverbs, homonyms etc I used by coloring up the paragraph. It's not helpful to me, because I have to read, then go back to my document and edit the colored words, if I choose to. I don't see much punctuation edited here and that's one of my primary requirements in editing software.
3. Slickwrite
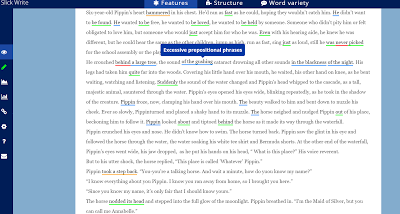
I do like Slickwrite. I used it in place of Ginger, except that there's too much correction on the page. You can see all the green, red and blue. It also looks at phrases in detail as you can tell by the red lines. But it can be overwhelming. So I'm not too sure about using it for my manuscript although I do use it for shorts. If you like this style of editing then you can go ahead. It also has structure and other features which you can use if you pay for it.
4. GingerI've downloaded Ginger's app, because it's free (at least partly) and its corrections can be accepted within the document. After the trial, they give you a weekly word limit that's free. This allows you to edit the manuscript with broad issues. It's not perfect. You have to do a line edit yourself, but punctuation gets checked well. All the other programs have a fixed word limit. Only x number of words on a page, but I haven't had that problem with Ginger.
All these programs assist you. They don't replace your editor. In the end, your editor has to be a human being who gets your story. It does help make a cleaner manuscript though. Before you pay for any program, I suggest you download the free version and see which one suits your needs. I also have to add that there are many other expensive software options out there, but for indie writers, self published people who are trying to save every penny, these seem like money savers.
That's where the editing software comes in. Like every other software out there, even editing with or without the software is work. While for some this may seem like a blessing, many others wouldn't bother with another step in their writing process. For me, ever since I've discovered it, I've loved using it, despite the fact that it takes considerable time to use, especially if you're crunching deadlines.
I've used each of these and I'll show why I like them. First of all they're all free, since they're in beta modes and or extensively used. The pictures are the same paragraph edited by the three different software programs and you can see the difference.
1. Grammarly
This is an extremely clean looking app.
See what I mean. It's very neat and all your errors show up on the right side of the document which you can accept or ignore. It's got basic issues and advanced issues identified at the bottom of the page. The advanced issues are only revealed to paid subscribers. Overall I like it, because its simple to use. It can be downloaded as an app for your PC or MS Office.
2. Editminion

This is a bit complicated with all the colors. It tells you how many adverbs, homonyms etc I used by coloring up the paragraph. It's not helpful to me, because I have to read, then go back to my document and edit the colored words, if I choose to. I don't see much punctuation edited here and that's one of my primary requirements in editing software.
3. Slickwrite
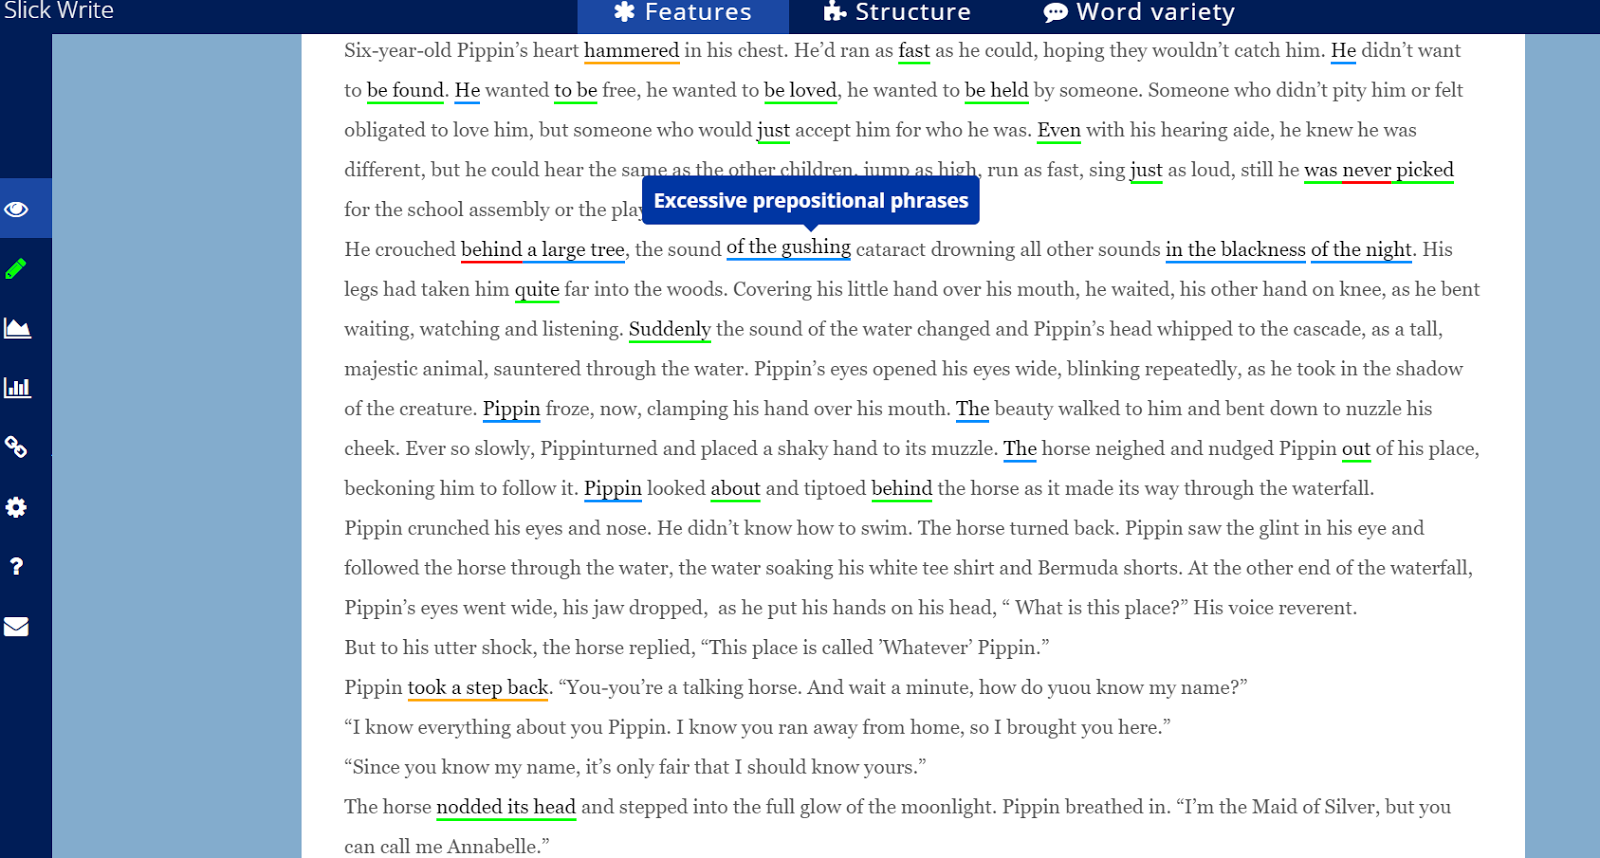
I do like Slickwrite. I used it in place of Ginger, except that there's too much correction on the page. You can see all the green, red and blue. It also looks at phrases in detail as you can tell by the red lines. But it can be overwhelming. So I'm not too sure about using it for my manuscript although I do use it for shorts. If you like this style of editing then you can go ahead. It also has structure and other features which you can use if you pay for it.
4. GingerI've downloaded Ginger's app, because it's free (at least partly) and its corrections can be accepted within the document. After the trial, they give you a weekly word limit that's free. This allows you to edit the manuscript with broad issues. It's not perfect. You have to do a line edit yourself, but punctuation gets checked well. All the other programs have a fixed word limit. Only x number of words on a page, but I haven't had that problem with Ginger.
All these programs assist you. They don't replace your editor. In the end, your editor has to be a human being who gets your story. It does help make a cleaner manuscript though. Before you pay for any program, I suggest you download the free version and see which one suits your needs. I also have to add that there are many other expensive software options out there, but for indie writers, self published people who are trying to save every penny, these seem like money savers.
November 1, 2016
Three Tips on Successfully publishing short stories
I wouldn't consider myself a successful writer as far as short stories go, but I have to admit that all of my publications so far have been shorts or novellas(about eight of them). This year after a gigantic creative push, I've managed to publish three different shorts and while there's no formula for stories, I wanted to share three tips that actually helped me (I think) get accepted.
So before getting to the tips I want to say that, different editors and readers are all reading different books, going through different circumstances, and therefore multiple things are affecting them. And all of these would affect your manuscript being accepted. So while editors say, its a very subjective process, you have to accept that it is. So what are these tips?
 Credit: istockphoto.com
1. Target submissions:
When I started writing, I was often writing shorts and then once done, I'd search through Duotrope and other lists in order to place the story. Days later, I would check the editor's name, read some of the free stories and then hit send to each magazine on my created list. The problem with this approach is that mine was just one story out of many in the slush.
However with my first that got accepted this year, I realized that random stories don't get anywhere. It was like a light bulb moment for me. If there's a competition, a call, a theme, an opening statement, then it's easier to create a story that's specific to the needs of the magazine/ journal/ anthology. So instead of just going about your story, write down your ideas and then tailor/ write/draft your story according to a call for manuscripts. This is a more targeted approach to short stories, with which I literally had a 25 % acceptance rate this year, submitting only as needed according to specific requirements of magazines.
2. The story behind the story:
I don't know where I heard this, but its fantastic advice. It's not always what's on the page that counts, but rather what isn't. It's the story behind the story that matters, the story that's being read behind and beyond the lines on the page. And that's something that you consciously have to be aware of while you craft a short. Too often we just want to add everything to the page, the backstory, the setting, the character development. For me the sweet spot of a short story is somewhere between 1800 and 3000 words. Anything less than or above is difficult to deliver that punch or develop the story or tighten the ms into a crisp story that editors would relish. So in that word count, while I craft, I often think about the deeper level of story telling, the stuff that doesn't need to be told, but the stuff readers would subconsciously think, ask and feel while they read the story.
3. The need for a plot twist
I know that a short story is too short for a twist, but this is one of the key things to acceptance by editors according to me. The short stories that got accepted this year for me were the one with really surprising twists in the plot. So what do I mean by plot twist?
Every story revolves on its own structural axis. But there's something that can completely unhinge that story from its central pivot which I refer to as the plot twist. Editors love stories that seem to be heading in one direction but then bam, suddenly head off tangential to your expectations. One of my shorts this year on sci fi and fantasy being published by Laksa Media has such an ending.
These three tips have worked pretty well for me this year. I have three publications coming up for 2017, two spec fic shorts and one novella in addition to my own Christian non fiction that I'm hoping I can get ready by June 2017.
So what are your tips for writing short stories?
July 20, 2016
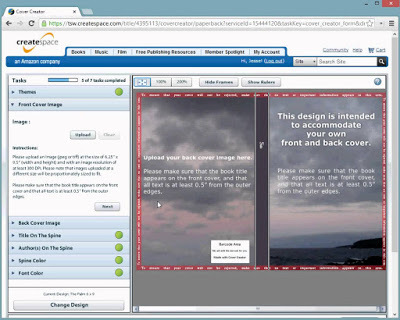
Print Book Cover using Createspace's Cover Creator
I received plenty of compliments on my physical book cover. I must say it took quite a bit of trial and error, and I mean more errors than I would like, to get it to look the way it does. I used Createspace's Cover creator, which is a free service provided by Createspace.
The cover creator is actually pretty easy to use.
There are various steps, but after a few tries you shouldn't have a problem, and who knows after reading this you might get it in one.
 From Google: Killer book Marketing
You can use this video from Killer book Marketing if you need detailed help. But above is a pic of what the template looks like.
But first things first.
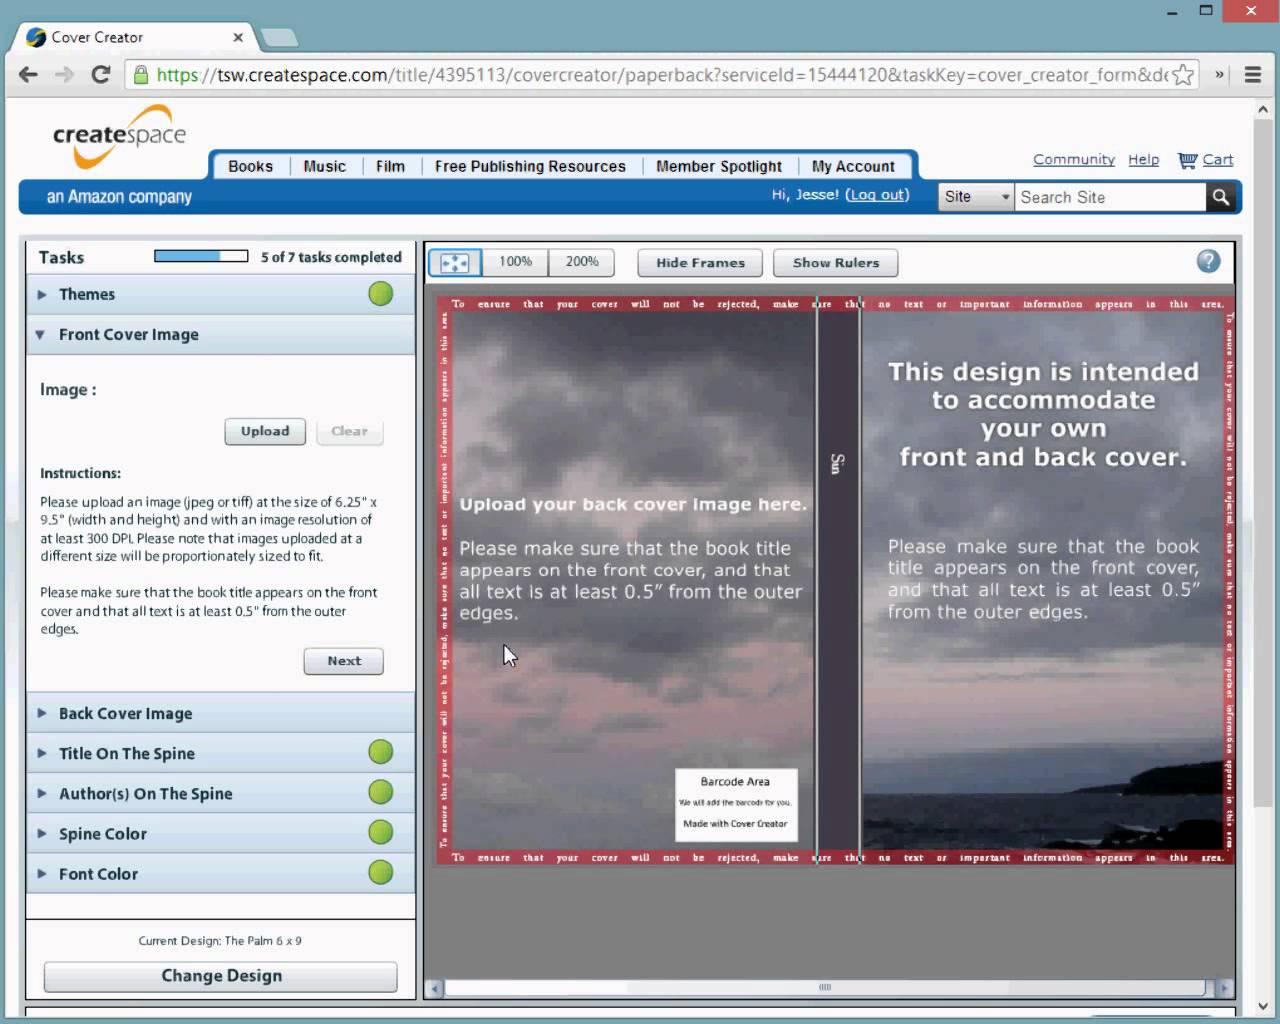
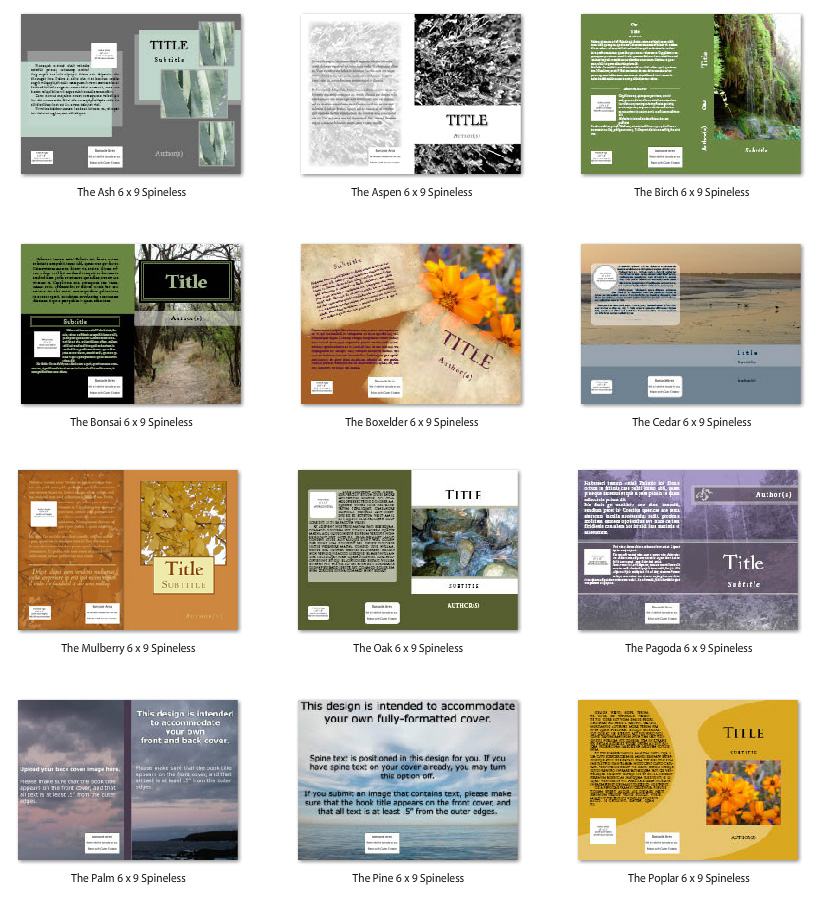
1. Themes:
Go through all of the themes. Cover Creator by Createspace allows you many templates with themes. Depending on the tone and mood of your book, you choose any.
Here are some just to give you an idea.
 From Creativeindiecovers.comSo all these are templates, with themes. I chose a 'Beginning' theme, because I had just one picture that my book cover designer created for me. (Thanks Mark and Peter) But you could pick any depending on the picture or image that you're using. Also different themes will have different requirements.
2. Front Cover Image:
This is the most important. You have to splash money on this because without an image, its not really going to make your book stand out. I did go through the copyright free images provided by the Createspace team. They've got a gallery, where a single key word can present a collection of related pictures, but I wasn't too happy with the images. Mine was better. The front cover image has to be 300 dpi and about 4.01 x 6.24 inches in size. That's important. The software will not accept a low resolution image.
3. Ornament:
Now my book has a design element or ornament. You can do with or without, but I felt with it, the cover looked more professional. Some themes have an ornament, some don't.
4. Title:
You'll have to fill the title the way you want it to be seen. The place where it will be captioned is fixed. Even the font is fixed for that particular theme. So check all these elements before you select a theme, in relation to your image. The only thing you can change is the color of your font. Test the colors, if you want a specific shade, get the RGB formula and type it in. The main thing is the font has to be seen against your image. So lighter fonts against darker images and vice versa.
5. Book cover color:
Now while you select font color, remember the same typeface color is used throughout. Keeping that in mind, you will have to select a book cover color that goes with that typeface or change everything in the previous step. Also your book color has to go with the image. Mine wasn't looking too good, so I had to change my image to a sepia mode and then use it. Plus a red book didn't go with my theme or tone of the book, so I switched to blue.
6. Back cover descriptions:
Its important to have this drafted and edited beforehand. It's the same description you would probably use in the 'about' page on amazon or smashwords. But do spend some time on your book jacket. It's important for physical books, because people do buy print books based on jackets, so write a compelling back cover.
7. Back over image:
This is your photo. You need to get a high quality image of yourself. I honestly wouldn't pick a book of someone with a cat unless its a book about cats. Nothing against cats, but this picture needs to be well done. You can read about getting professional author photos here.
8. Spine
Depending on your book, the spine width will determine the font size. Since my book is a 60 page 5x8 size, the spine was absent. But if I did have a larger book, the spine would have to have little. Don't pack it with too much information. Author name and Title is plenty.
Once you're done adding the elements, review if it all flows well. I would say give it a few days, come back to it. Share it with someone who understands design and see what they have to say.
After you submit it, Createspace will approve or will not, until its all done. If not, then one of the steps will have a red circle at the top and you will have to review it before you can submit again.
All in all its a pretty fun process. I enjoyed it a lot.
You have more control over the way you want your book to look. So with a little homework, the whole book cover prep will come together quite easily.
It took me a week, to get it right, because I had to change the image and the dpi, cut the back cover descriptions to make it look less cluttered, etc. Still its an absolute thrill to do it. I wouldn't mind doing it for others as well. Createspace has really provided an inexpensive way to do print on demand book covers. And as you change the colors and design, images and descriptions, it looks very different. So despite the limited templates, I guess they have fifty or more, you can still make a fantastic cover.
Song on my Playlist: Ireland of My Heart- By Cherish the Ladies
Book I recommend: God is not Mad at you -Joyce Meyer

The cover creator is actually pretty easy to use.
There are various steps, but after a few tries you shouldn't have a problem, and who knows after reading this you might get it in one.
 From Google: Killer book Marketing
You can use this video from Killer book Marketing if you need detailed help. But above is a pic of what the template looks like.
But first things first.
1. Themes:
Go through all of the themes. Cover Creator by Createspace allows you many templates with themes. Depending on the tone and mood of your book, you choose any.
Here are some just to give you an idea.
 From Creativeindiecovers.comSo all these are templates, with themes. I chose a 'Beginning' theme, because I had just one picture that my book cover designer created for me. (Thanks Mark and Peter) But you could pick any depending on the picture or image that you're using. Also different themes will have different requirements.
2. Front Cover Image:
This is the most important. You have to splash money on this because without an image, its not really going to make your book stand out. I did go through the copyright free images provided by the Createspace team. They've got a gallery, where a single key word can present a collection of related pictures, but I wasn't too happy with the images. Mine was better. The front cover image has to be 300 dpi and about 4.01 x 6.24 inches in size. That's important. The software will not accept a low resolution image.
3. Ornament:
Now my book has a design element or ornament. You can do with or without, but I felt with it, the cover looked more professional. Some themes have an ornament, some don't.
4. Title:
You'll have to fill the title the way you want it to be seen. The place where it will be captioned is fixed. Even the font is fixed for that particular theme. So check all these elements before you select a theme, in relation to your image. The only thing you can change is the color of your font. Test the colors, if you want a specific shade, get the RGB formula and type it in. The main thing is the font has to be seen against your image. So lighter fonts against darker images and vice versa.
5. Book cover color:
Now while you select font color, remember the same typeface color is used throughout. Keeping that in mind, you will have to select a book cover color that goes with that typeface or change everything in the previous step. Also your book color has to go with the image. Mine wasn't looking too good, so I had to change my image to a sepia mode and then use it. Plus a red book didn't go with my theme or tone of the book, so I switched to blue.
6. Back cover descriptions:
Its important to have this drafted and edited beforehand. It's the same description you would probably use in the 'about' page on amazon or smashwords. But do spend some time on your book jacket. It's important for physical books, because people do buy print books based on jackets, so write a compelling back cover.
7. Back over image:
This is your photo. You need to get a high quality image of yourself. I honestly wouldn't pick a book of someone with a cat unless its a book about cats. Nothing against cats, but this picture needs to be well done. You can read about getting professional author photos here.
8. Spine
Depending on your book, the spine width will determine the font size. Since my book is a 60 page 5x8 size, the spine was absent. But if I did have a larger book, the spine would have to have little. Don't pack it with too much information. Author name and Title is plenty.
Once you're done adding the elements, review if it all flows well. I would say give it a few days, come back to it. Share it with someone who understands design and see what they have to say.
After you submit it, Createspace will approve or will not, until its all done. If not, then one of the steps will have a red circle at the top and you will have to review it before you can submit again.
All in all its a pretty fun process. I enjoyed it a lot.
You have more control over the way you want your book to look. So with a little homework, the whole book cover prep will come together quite easily.
It took me a week, to get it right, because I had to change the image and the dpi, cut the back cover descriptions to make it look less cluttered, etc. Still its an absolute thrill to do it. I wouldn't mind doing it for others as well. Createspace has really provided an inexpensive way to do print on demand book covers. And as you change the colors and design, images and descriptions, it looks very different. So despite the limited templates, I guess they have fifty or more, you can still make a fantastic cover.
Song on my Playlist: Ireland of My Heart- By Cherish the Ladies
Book I recommend: God is not Mad at you -Joyce Meyer
July 14, 2016
Two Days to Book Launch! Yay
My physical proofs just arrived! I'm super stoked!

There's nothing like holding a physical copy of your book, smelling that new pages scent and seeing your name on it.
Well Createspace does give you an option to digitally proof or physically proof your book. I chose the physical option, even though it was more expensive, because of the following reasons:
1. Design elements: I wasn't so sure about the ornament, the shade of blue and the image working together. Besides I wondered if a glossy cover was better than matte. I chose glossy and it certainly gives the cover some sparkle. Moreover all my previous books for some reason have been red and black. The ebook version of this is red & black again. The audio version(coming soon) is sepia and maroon. So I wasn't so sure about changing the color, even though the red format wasn't working for my cover or its genre.
2. Interior work : My most important reason for physical proofs was to check the font. When I submitted my final copy, Garamond 12 looked really small. I wanted to go large, but it also meant the pages would increase and the book would be more expensive. For my target audience, I want this book priced as low as possible so getting the font right was important. I have to say that its not bad. Garamond 12 is pretty clear and legible. Garamond is also the industry standard.
3.Final edits : I hate to admit, but I found the MS littered with errors that escaped me when I did the digital proof. For some reason, during the conversion, my exclamation marks became question marks. I'd also left the template instructions in. Plus I had edited out the e-book formats but had forgotten to include those edits in the print format. For anyone whose self-publishing, please make a separate template for your format. Mine was for a 5x8 book, so the interior changed and I used a standard template, which makes life much easy. Nothing too fancy, but it does the job.
4. Back cover description: I missed the extra full stop at the beginning of the sentence, 'If you are.' It might seem like a glaring mistake, but when you're editing the cover, the print's too small. And you get so focused on other things, the bar code, the image, your photo, color of the heading, the font, the spelling. Its easy to slip past these minor things. A physical proof can help you see those descriptions again, in a new light and edit out whatever is unnecessary.
5. Just to savor it! - I do want to feel what the book feels like before it reaches the audiences hand. I want to see, smell and feel the physical copy, so that I know what my readers will experience when they see the book.
I did a weird little happy dance yesterday for my book. I'm so so so very happy.
Come pub day will share the links to the print version. Yippee! You can tell I'm happy right!
Songs on my playlist: Indescribable: By Laura Story
Movie I recommend: Brave

There's nothing like holding a physical copy of your book, smelling that new pages scent and seeing your name on it.
Well Createspace does give you an option to digitally proof or physically proof your book. I chose the physical option, even though it was more expensive, because of the following reasons:
1. Design elements: I wasn't so sure about the ornament, the shade of blue and the image working together. Besides I wondered if a glossy cover was better than matte. I chose glossy and it certainly gives the cover some sparkle. Moreover all my previous books for some reason have been red and black. The ebook version of this is red & black again. The audio version(coming soon) is sepia and maroon. So I wasn't so sure about changing the color, even though the red format wasn't working for my cover or its genre.
2. Interior work : My most important reason for physical proofs was to check the font. When I submitted my final copy, Garamond 12 looked really small. I wanted to go large, but it also meant the pages would increase and the book would be more expensive. For my target audience, I want this book priced as low as possible so getting the font right was important. I have to say that its not bad. Garamond 12 is pretty clear and legible. Garamond is also the industry standard.

3.Final edits : I hate to admit, but I found the MS littered with errors that escaped me when I did the digital proof. For some reason, during the conversion, my exclamation marks became question marks. I'd also left the template instructions in. Plus I had edited out the e-book formats but had forgotten to include those edits in the print format. For anyone whose self-publishing, please make a separate template for your format. Mine was for a 5x8 book, so the interior changed and I used a standard template, which makes life much easy. Nothing too fancy, but it does the job.
4. Back cover description: I missed the extra full stop at the beginning of the sentence, 'If you are.' It might seem like a glaring mistake, but when you're editing the cover, the print's too small. And you get so focused on other things, the bar code, the image, your photo, color of the heading, the font, the spelling. Its easy to slip past these minor things. A physical proof can help you see those descriptions again, in a new light and edit out whatever is unnecessary.

5. Just to savor it! - I do want to feel what the book feels like before it reaches the audiences hand. I want to see, smell and feel the physical copy, so that I know what my readers will experience when they see the book.
I did a weird little happy dance yesterday for my book. I'm so so so very happy.
Come pub day will share the links to the print version. Yippee! You can tell I'm happy right!
Songs on my playlist: Indescribable: By Laura Story
Movie I recommend: Brave
July 6, 2016
NYC through my eyes
Its been quite some time since I did a travel post. And I've done a fair bit of traveling for the past few months for work and otherwise. New York City has somehow become my go to place over the last few years. Its pace and texture is so different. Since I'm a metropolitan person, the big city life appeals to me. I've lived in every one of the boroughs. But my favorite would have to be in Brooklyn and the Far Rockaways.
I like the quiet of Mount Vernon and the wide spectrum of people you see in Queens but being by the seaside is truly amazing. You hear the ocean, see it from your window and it fills you with peace. So much so, that my (WIP) 'Rockaway Quietus' was inspired by the place.
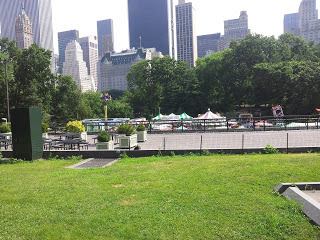 Central Park West
If you want to navigate New York as a first time tourist, you need two things - a phone with GPS and a metrocard.
The first- a GPS phone, because NYC is very easy to navigate using google maps or transit apps. Its pretty much down to the tee. Streets, restaurants, distance and even shortest routes. Its almost exact. You won't get lost. The transit app, tells you which subway line to take and where to get off etc.
The other thing is a metro card. The public system, buses and subways are one of the best in the world. At least, as far as I've come across. I'm sure Dubai, Seoul and the EU have better public transit.
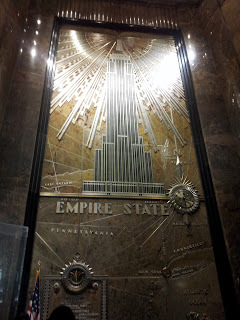 Empire State Building Lobby
Go to the booth or the vending machine, a single metrocard is 1$ and then you can get an unlimited ride card or just keeping adding value or time. Its very simple. Most credit cards work. As long as you pay the basic fare, you can use the metrocard and travel througout NY without fuss. No need of cabs or cars, its pretty neat.
I've clicked loads of snaps(over 300), in the summer, winter, autumn. I'm just sharing a few, I honestly wish I could share all of them.
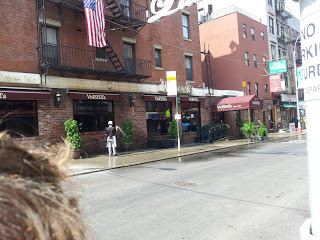 Little Italy
The first I would suggest anyone is a walking tour. In fact, its become my top event on a checklist when I go to a new place. Sign up for a walking tour. Don't go into something too specific. Just a general one, to give you the breadth of the city. Walking tours also include subway rides, so you learn how to travel, how to use the maps, how to change lines, what's uptown and downtown. I did a walking tour and I knew exactly what I wanted to see after and where I wanted to spend more time.
Like I knew I didn't want to go to ground zero. I also knew that I had to come back to Times Square on my own or Grand Central.In that sense walking tours can provide you with options, what to see or ignore.
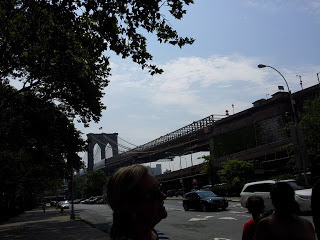 Brooklyn Bridge
I've shared pictures of the epic Brooklyn Bridge, the green of Central Park West and Little Italy being really little as it gets engulfed by Chinatown. I wish I could post more snaps of Grand Central and Lady Liberty and Times Square, maybe in another post.
At the risk of sounding like a travel writer, I have to say, travelling to NYC is pretty easy. It may seem daunting at first, but with the glut of tourists, its surprisingly easy once you get the hang of it.
Song on my Playlist: Faith Hill - It matters to me

I like the quiet of Mount Vernon and the wide spectrum of people you see in Queens but being by the seaside is truly amazing. You hear the ocean, see it from your window and it fills you with peace. So much so, that my (WIP) 'Rockaway Quietus' was inspired by the place.
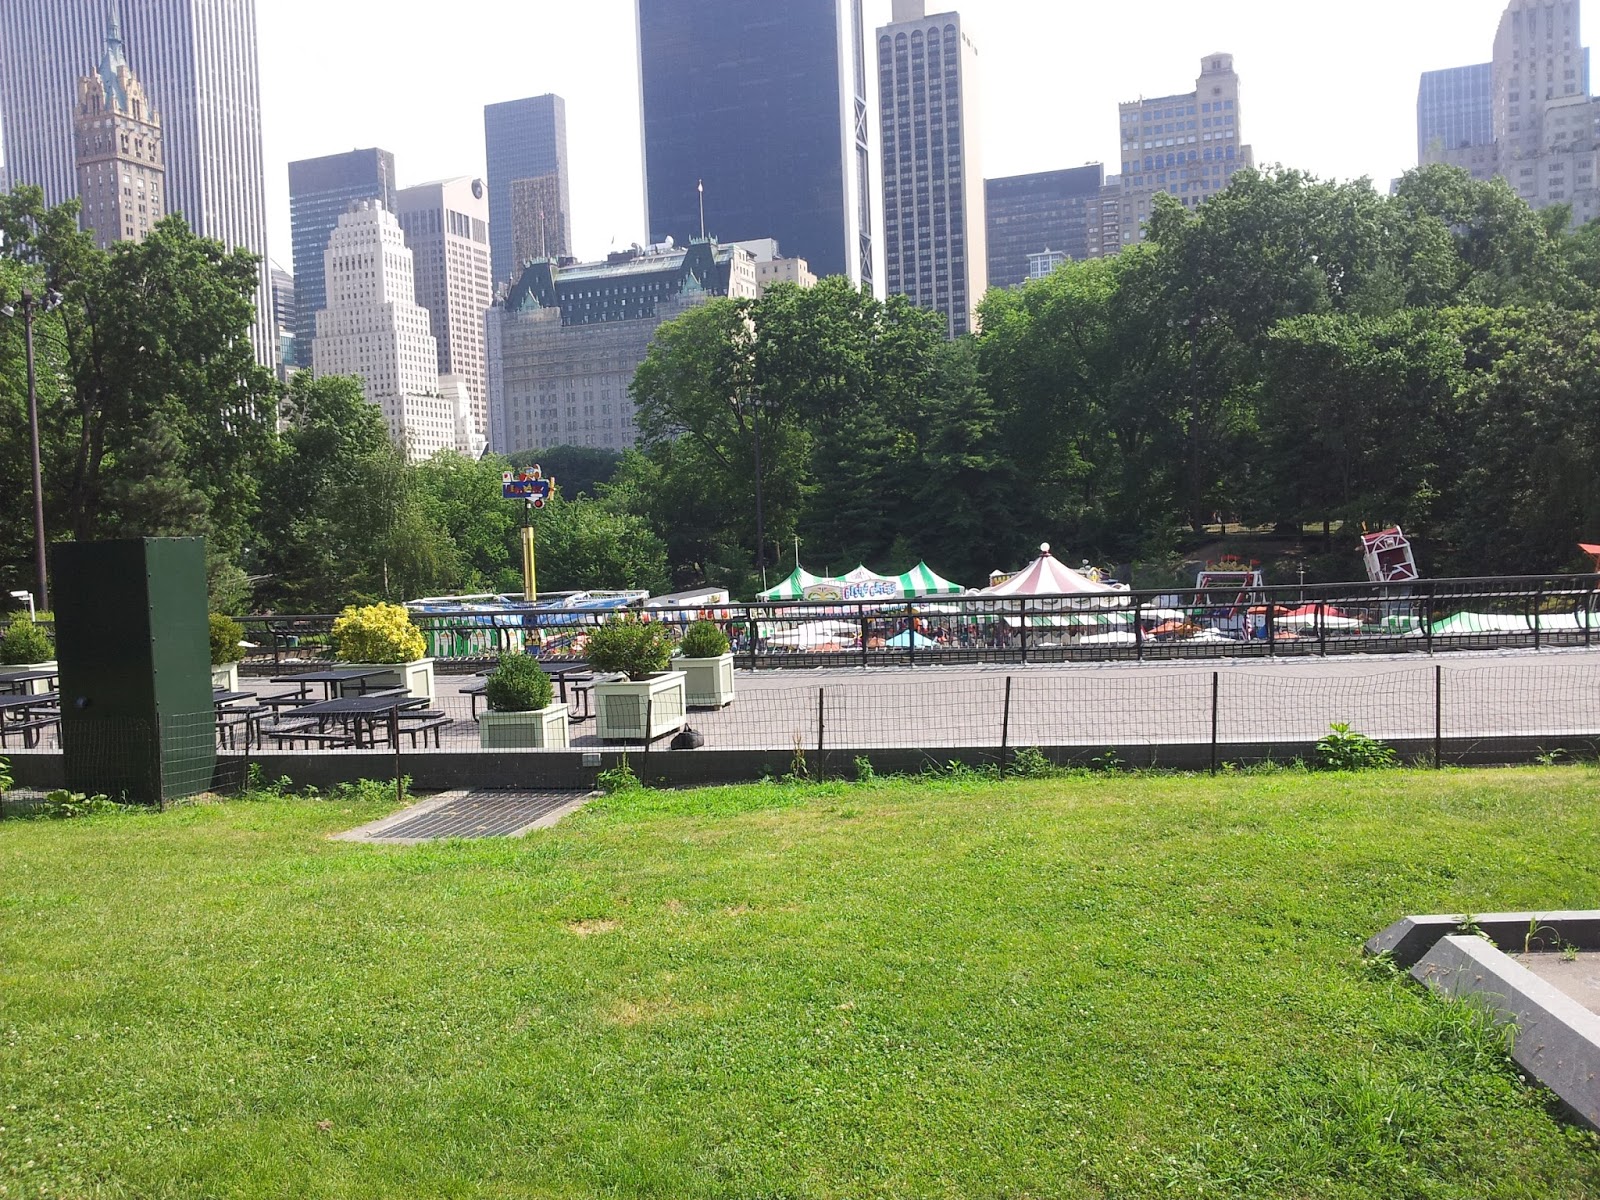 Central Park West
If you want to navigate New York as a first time tourist, you need two things - a phone with GPS and a metrocard.
The first- a GPS phone, because NYC is very easy to navigate using google maps or transit apps. Its pretty much down to the tee. Streets, restaurants, distance and even shortest routes. Its almost exact. You won't get lost. The transit app, tells you which subway line to take and where to get off etc.
The other thing is a metro card. The public system, buses and subways are one of the best in the world. At least, as far as I've come across. I'm sure Dubai, Seoul and the EU have better public transit.
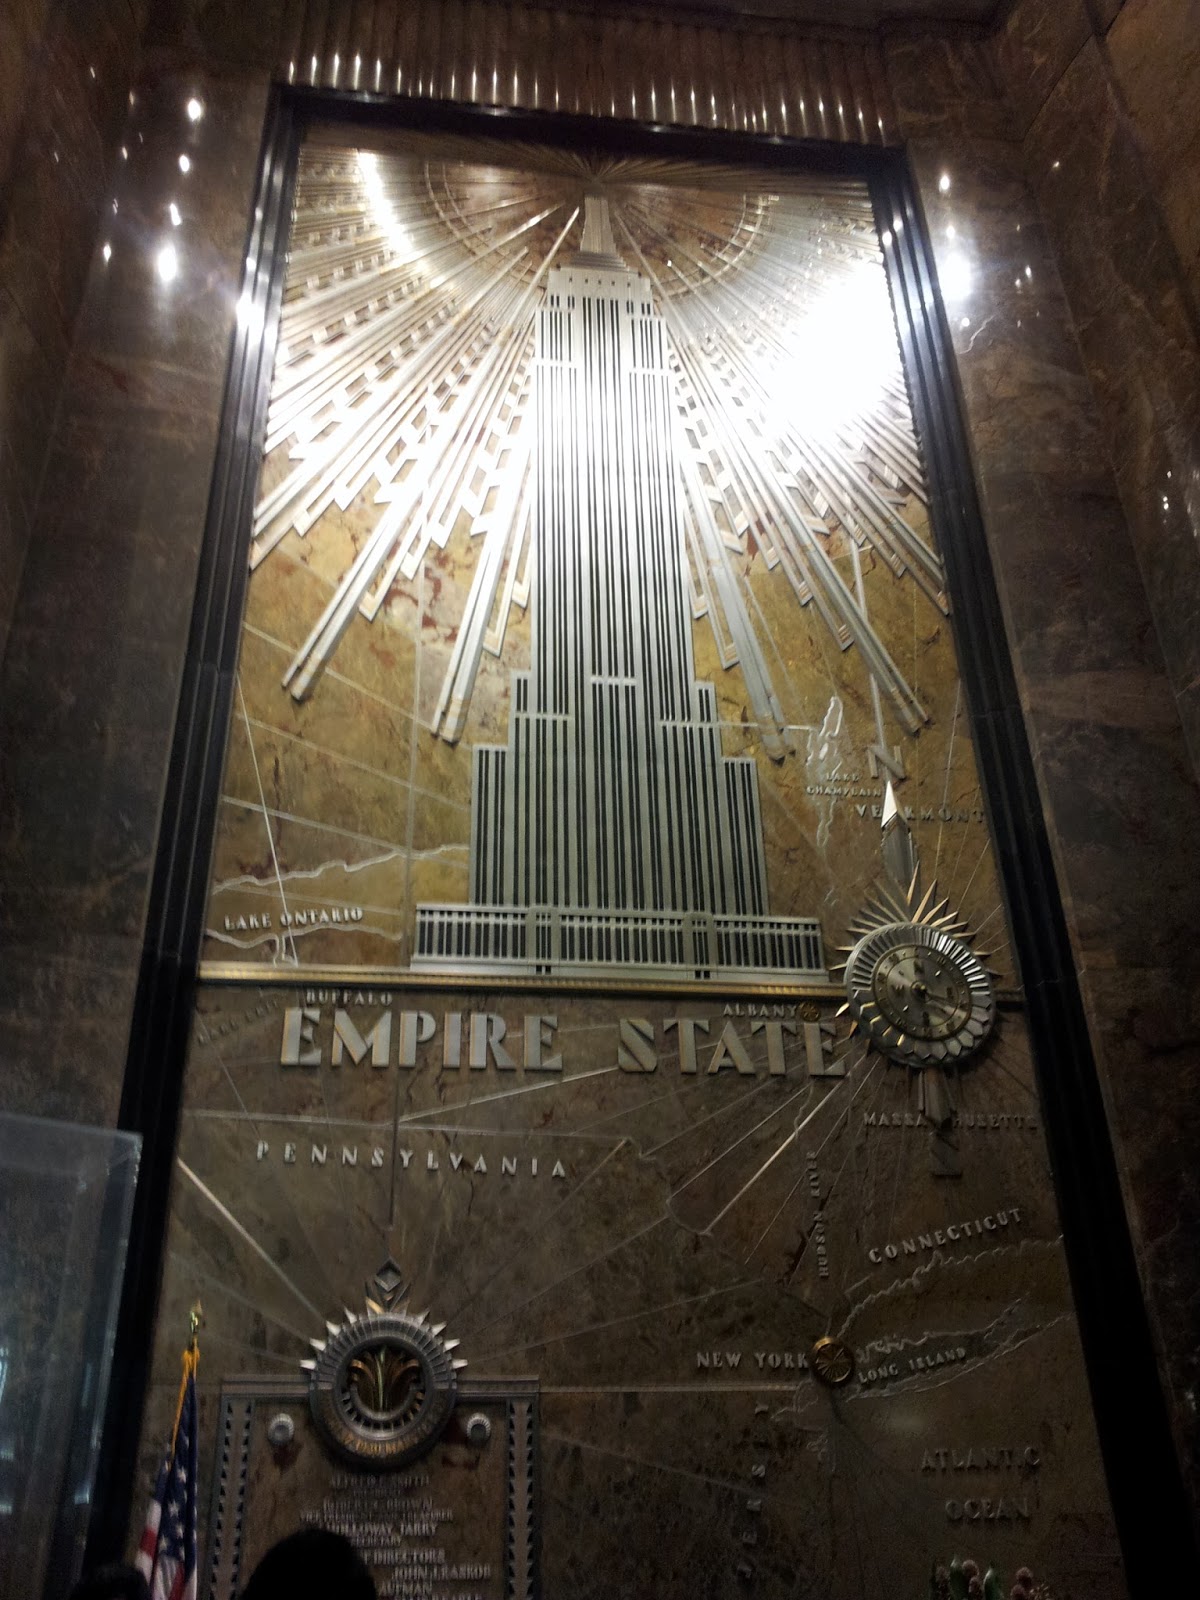 Empire State Building Lobby
Go to the booth or the vending machine, a single metrocard is 1$ and then you can get an unlimited ride card or just keeping adding value or time. Its very simple. Most credit cards work. As long as you pay the basic fare, you can use the metrocard and travel througout NY without fuss. No need of cabs or cars, its pretty neat.
I've clicked loads of snaps(over 300), in the summer, winter, autumn. I'm just sharing a few, I honestly wish I could share all of them.
 Little Italy
The first I would suggest anyone is a walking tour. In fact, its become my top event on a checklist when I go to a new place. Sign up for a walking tour. Don't go into something too specific. Just a general one, to give you the breadth of the city. Walking tours also include subway rides, so you learn how to travel, how to use the maps, how to change lines, what's uptown and downtown. I did a walking tour and I knew exactly what I wanted to see after and where I wanted to spend more time.
Like I knew I didn't want to go to ground zero. I also knew that I had to come back to Times Square on my own or Grand Central.In that sense walking tours can provide you with options, what to see or ignore.
 Brooklyn Bridge
I've shared pictures of the epic Brooklyn Bridge, the green of Central Park West and Little Italy being really little as it gets engulfed by Chinatown. I wish I could post more snaps of Grand Central and Lady Liberty and Times Square, maybe in another post.
At the risk of sounding like a travel writer, I have to say, travelling to NYC is pretty easy. It may seem daunting at first, but with the glut of tourists, its surprisingly easy once you get the hang of it.
Song on my Playlist: Faith Hill - It matters to me
June 29, 2016
Five Common Query Mistakes
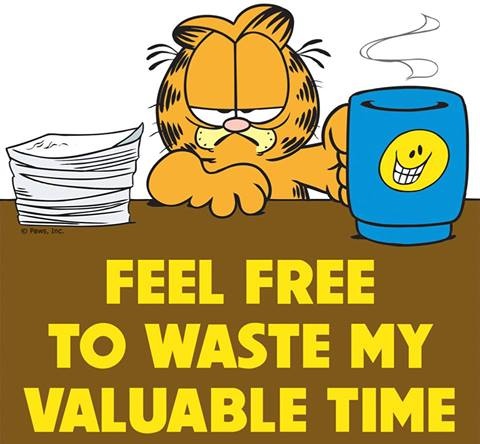
As a writer, we're always querying. Whether it's a pitch to a potential client, a chapter submission peddling your manuscript or a short story offering, querying is an integral part of the writing process. While I write about these common querying mistakes, let me say, I'm guilty of all of them. I'm not proud, but I have to admit, it happens. More often than I'd like. So here goes.
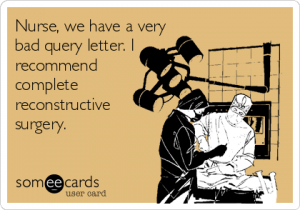 Credit: someecards.com
1. Misspelt name of agent/ editor
You know those days where you're staring at your Excel and you have to hammer out all those queries for short stories, articles, blogs, agents and then some. You go through MSWL's, submission websites, see your requirements and check your sheet again. Then if you're super organized like me, you've got twenty agents or editors with the same first name. I've queried Katie as Kate, and its easy to commit this mistake. (I hang my head in shame) Its very easy to get a wrong name on your address. Most of us have become anal about finding the name. We even agonize over whether first or last name? and without knowing it, you send that query with the name misspelt or to the wrong person. Well, you screw up.
Suggestion: I would advice doing a single query at a time. Don't go crazy looking at your sheet and then multitasking. There's plenty of room for error there. Look at the editor's website and finish writing your query, tailoring it for said person. Write the name last, comparing it to the website. Do not trust Twitter and MSWL for a full name. A Query is still a professional letter and the name has to be written to that standard. Even better, query one project a day.
2. Word count
I'm signed on Agent Query and every week, my digest is filled with people who write super long queries, like two pages long. Even I know that these are newbies, (and I'm not a literary agent or editor). A query is like a teaser. Think of the trailer of the movie. All of us can spot a bad one, where you can guess the entire movie just by watching the trailer. A good query whets your appetite for more.
Suggestion: Keep writing different queries as you write your drafts. Save them. Make sure they're about a page long. If they're crossing that limit, then you're including too much information. I've seen successful and long queries on Chuck Sambuchino's page. But the rule of thumb is always a page long. It has to be precise, every word has to be selected carefully. You'll get better at each draft. If you're doing it while you're drafting your novel, you won;t have too much trouble when your manuscript's done.
3. Typos
Its important to read through the query numerous times before you hit 'send.' I know the sense of urgency I get when I'm almost done with a query. But when I tailor queries, it does happen that by the end of the process, all I want is to be done with it. Enough frothing over the name, the commas, the address, the first three chapters, the formatting and all that.
Sometimes the tailoring work, leaps out of nowhere in the paragraph, has no continuity or is missing a comma or has been hastily written, albeit with typos that a tired eye can't see. Typos can come across as unprofessional. An editor might wonder if you can actually speak English, if your sentences are littered with errors.
Suggestion: Don't use a draft or query that's been tailored the same day. I've put myself through the wringer with this, almost training myself not to submit a query the same day or week(if possible) its tailored. So I usually craft a query and then tailor another and another. Then, a few days later, read it and look for typos. They're easier to spot with a fresh mind and eyes.
4. Not doing the research
Researching editors and agents can be a timesuck. Searching for their submission guidelines, sometimes after multiple clicks and links is really strenuous. Reading about their interests and their wishlists, well it can be painful. But it makes a big difference. Imagine spending a month only writing queries, half of which would be rejected because you didn't read the genres they represent, or because an editor prefers Arial typefont.
Suggestion: At the end of a writing day or even while you're taking a break, research your editor or agent. The guidelines(font, spacing), genre, requirements(synopsis, three chapters). Make a list and set aside something like how you prep before you'd cook. Come querying season, you don't have to start from scratch and it's less overwhelming.
5. Forgetting Contact details.
This one I'm still guilty of. Because I travel so much, sometimes I'm not really sure which address to add and so its one of the things I leave for the last moment, only to forget it completely. Email, phone and address, is very important, in case a publisher or editor wants to speak to you. Especially today with a lot of online forms for submission, it becomes very important to add in contact details. Sometimes email addresses are flagged or can't be seen by editors with all their filters. It helps tremendously to have your contact details at the end of your query.
Suggestion: Create an automatic signature for queries, with your books or website, and contact details. It helps to get all the relevant information across. Or create a basic template for your query with all these pre-filled details, when you're querying, you won't sweat about these minor, but important details.
Querying is a long drawn process. Not everyone is successful, but these basics can get you across a few hurdles. Happy Querying
For more querying advice, check out Queryshark or Miss Snark.
Song on my playlist: Sam Hunt- Leave the night on
June 13, 2016
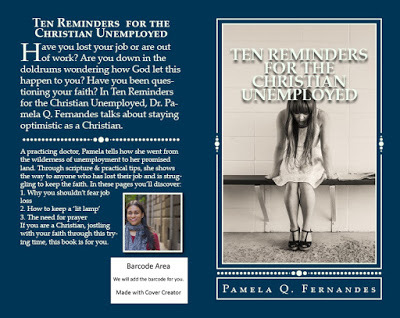
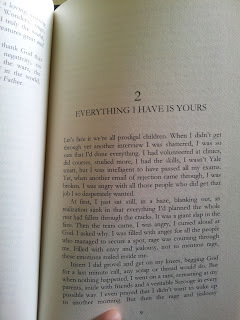
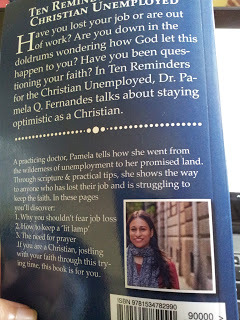
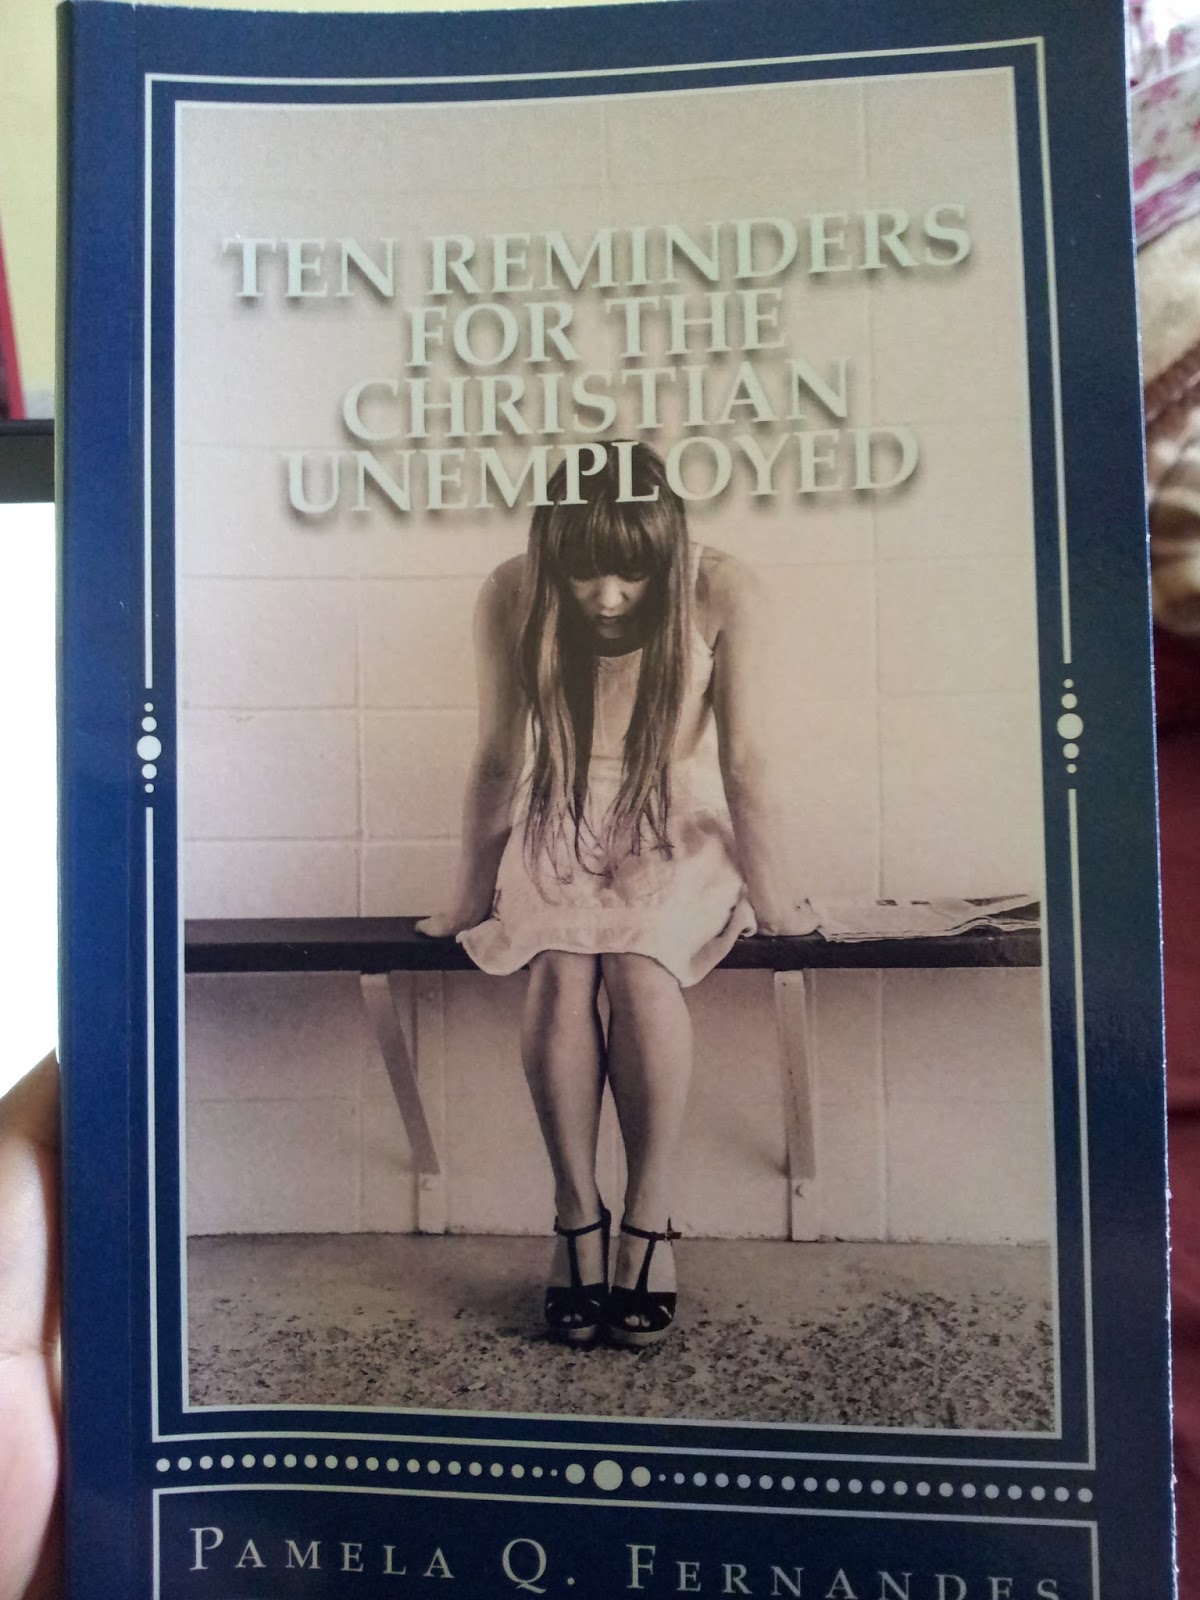
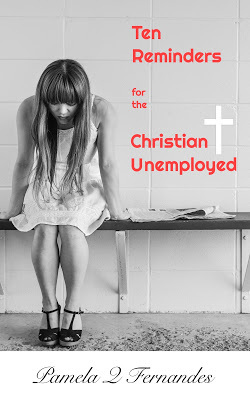
Cover Reveal: Ten Reminders for the Christian Unemployed
Yay! My first Christian non fiction has a publication date of July 16, 2016. The wonderful Peter and Mark from http://markobvio.com/ designed my cover.
I am so happy to have my next project out. While many may argue with me - 'But Pam, why isn't this a happier cover or brighter color?' I have to admit that book is no magic eraser for the pain and suffering that unemployment brings. If you haven't been in that position, you might not understand this cover at all.
But for me it represents the whole grey world you enter when you've lost your means to be gainful. The way you see the world, its all gray. So let me know what you think of the cover and do let me know what do you think I should do as an event for publication day?
I'm super stoked to do this cover reveal.
If you want to pre-order or give this to a friend going through a rough patch, then you can do it here.
Song on my playlist: What if God was one of us by Joan Osborne
May 30, 2016
Being A Good Crit Partner
 Source: Google Images
There's tons of advice about how to find a good critique partner and how to select them. Its pretty much like speed dating. But once you have a crit partner, there's plenty of advice on what they must do for you, but seldom will you find someone mention what you're expected to do as well.
My crit partner Maggie haven't met each other, but we exchange emails weekly and often I feel there's no need to reject anyone as your crit partner if you're doing it right.The right fit, not the genre and blah blah doesn't matter. I honestly believe that everyone who volunteers can become a critique partner because everyone is different just like your reading audience is. The more opinions, the more sounding boards, the more refined the product. You don't have to accept everyone's suggestions but it helps. So here's five things to help you be a better crit partner.
1. Attitude
 Source: Google Images
You cannot have this attitude. Everyone's time is important, so no matter where the other person is in their publishing career, newbie, novice, best-seller, self published, don't think that critiquing is a waste of time. Consider it an investment in someone else's publishing career. Besides, what goes around comes around. Do the work honestly, put in the minutes and be as helpful as you can.
2. Flexibility
Most likely you'll have a schedule, every week or fortnight to exchange a set number of chapters. In case your partner can't make the deadline, don't be a military drill sergeant, 'You were supposed to be here at 0700 hours on such and such day. Why haven't you done it?' Most authors work a full time job and have families. In addition to writing and editing their own work, they're carving precious time for you, to read and edit your work. Bend a little.
3. Constructive Criticizer
 Source: wittyfeed.com
That's what you're aiming to be- a constructive criticizer.. There's no need to rip any manuscript to shreds. Always start with the good, but if its really bad, ask your partner to walk from their project and come back to re-read it in three months time. Distance could help them. But if you're unhappy with the piece, say why. I've seen this in online public competitions that I've participated in, people just read the previous comment and string along a few extra words to say something, but there's no substance to the critique.(Its also one of the reasons I only read reviewer's comments after I've finished writing mine, especially on Goodreads.) Remember authors are going to shape their entire manuscript based on your comments and while they do have a thick skin, they'd appreciate constructive criticism, what's working, why, what's not, what can be changed or substituted, or even cut out. You don't have to be Simon Cowell!
4. Don't be Vengeful
Just because you're CP, strung up your last para in red, you're going to do just the same to his/hers. Drop that crap! Like yesterday! This isn't high school or even college (yeah some folks just never grow up), but that's not how to treat a fellow author. Save that temper of yours to create an antagonist, don't go bananas over a highly edited piece. In fact thank your stars, its your CP and not your editor chopping your manuscript to little pieces. So be nice, even if it hurts.
5. Easy does it
Don't stress out over a critique at any stage. There's plenty of other stuff to do it over. Your CP can become your ally when the goings get tough. Don' burn bridges or make things difficult for each other. If you can't make the time or are struggling, say so. Admit your weaknesses. When I started working with Maggie, I had to tell her I wasn't a grammar Nazi, but I could see plot and tension. I could give reader background, tell her what was working or not, flow or characters. And she was okay with that, she could find another CP who could do the things I couldn't. So stay cool. Writing is tough, there's no need to make it tougher.
Stay safe everyone!
Songs on my playlist: This I know David Crowder

May 22, 2016
Freelance Medical Content Writing Services
I've been getting emails from Indiamart and who-knows-where for writing services.
So I'm creating a post just to remind folks, that I do write fiction for myself, but when I take on writing services, my niche is medical writing. I do some travel writing, but query me first.
I do NOT do the following:
Finance- I don't know markets or money- I'm an idiot in counting, hell I took tuition for Math.IT- I wish, but HTML and CSS is worse than the human body, I'd prefer the latter any dayCement- Why does anyone assume I'd know about cement, heaven help me!
I do freelance medical writing. I've put up samples of the work I've done below. In addition to seeing patients, wherever I've worked, all our blogs, patient literature, brochures, leaflets and reports in all styles and formats were created in-house. For the past five years I've been doing most of the medical writing for patients, doctors and companies alike.
I also design and plan content. But I don't draw. I'm not an artist. While I can create the content, and even pattern and design it, you will still need a freelance designer to finish off your product. If you have someone on your team, who does this, then I can work with them via email or I can recommend someone who does this.
I'm usually comfortable with deadlines. My turnaround time is a week for smaller projects.And I accept Paypal only. Yes, I do issue invoices
If you have any additional questions then feel free to contact me using the contact form. Also, keep in mind, I'm a marketing medical writer, while I have taught courses on how to do regulatory writing, I haven't been part of that sphere with an active practice. So you can query me, but chances are I might turn you down.
Below are a few of my samples. I cannot include samples of reports I've done, due to their confidential content. But I can send snapshots if necessary.
This is a Brochure on Breast Cancer Awareness.
Below are patient literature newsletters that I created for various awareness events. You can download them and view them in larger formats. They look way better that way!
If you need to get in touch with me for any medical content writing, don't hesitate to contact me using the contact form here.
 Eating Out Campaign for Mycare
 Activity Calendar for Mycare
TLC diet for Mycare

So I'm creating a post just to remind folks, that I do write fiction for myself, but when I take on writing services, my niche is medical writing. I do some travel writing, but query me first.
I do NOT do the following:
Finance- I don't know markets or money- I'm an idiot in counting, hell I took tuition for Math.IT- I wish, but HTML and CSS is worse than the human body, I'd prefer the latter any dayCement- Why does anyone assume I'd know about cement, heaven help me!
I do freelance medical writing. I've put up samples of the work I've done below. In addition to seeing patients, wherever I've worked, all our blogs, patient literature, brochures, leaflets and reports in all styles and formats were created in-house. For the past five years I've been doing most of the medical writing for patients, doctors and companies alike.
I also design and plan content. But I don't draw. I'm not an artist. While I can create the content, and even pattern and design it, you will still need a freelance designer to finish off your product. If you have someone on your team, who does this, then I can work with them via email or I can recommend someone who does this.
I'm usually comfortable with deadlines. My turnaround time is a week for smaller projects.And I accept Paypal only. Yes, I do issue invoices
If you have any additional questions then feel free to contact me using the contact form. Also, keep in mind, I'm a marketing medical writer, while I have taught courses on how to do regulatory writing, I haven't been part of that sphere with an active practice. So you can query me, but chances are I might turn you down.
Below are a few of my samples. I cannot include samples of reports I've done, due to their confidential content. But I can send snapshots if necessary.
This is a Brochure on Breast Cancer Awareness.
Below are patient literature newsletters that I created for various awareness events. You can download them and view them in larger formats. They look way better that way!
If you need to get in touch with me for any medical content writing, don't hesitate to contact me using the contact form here.
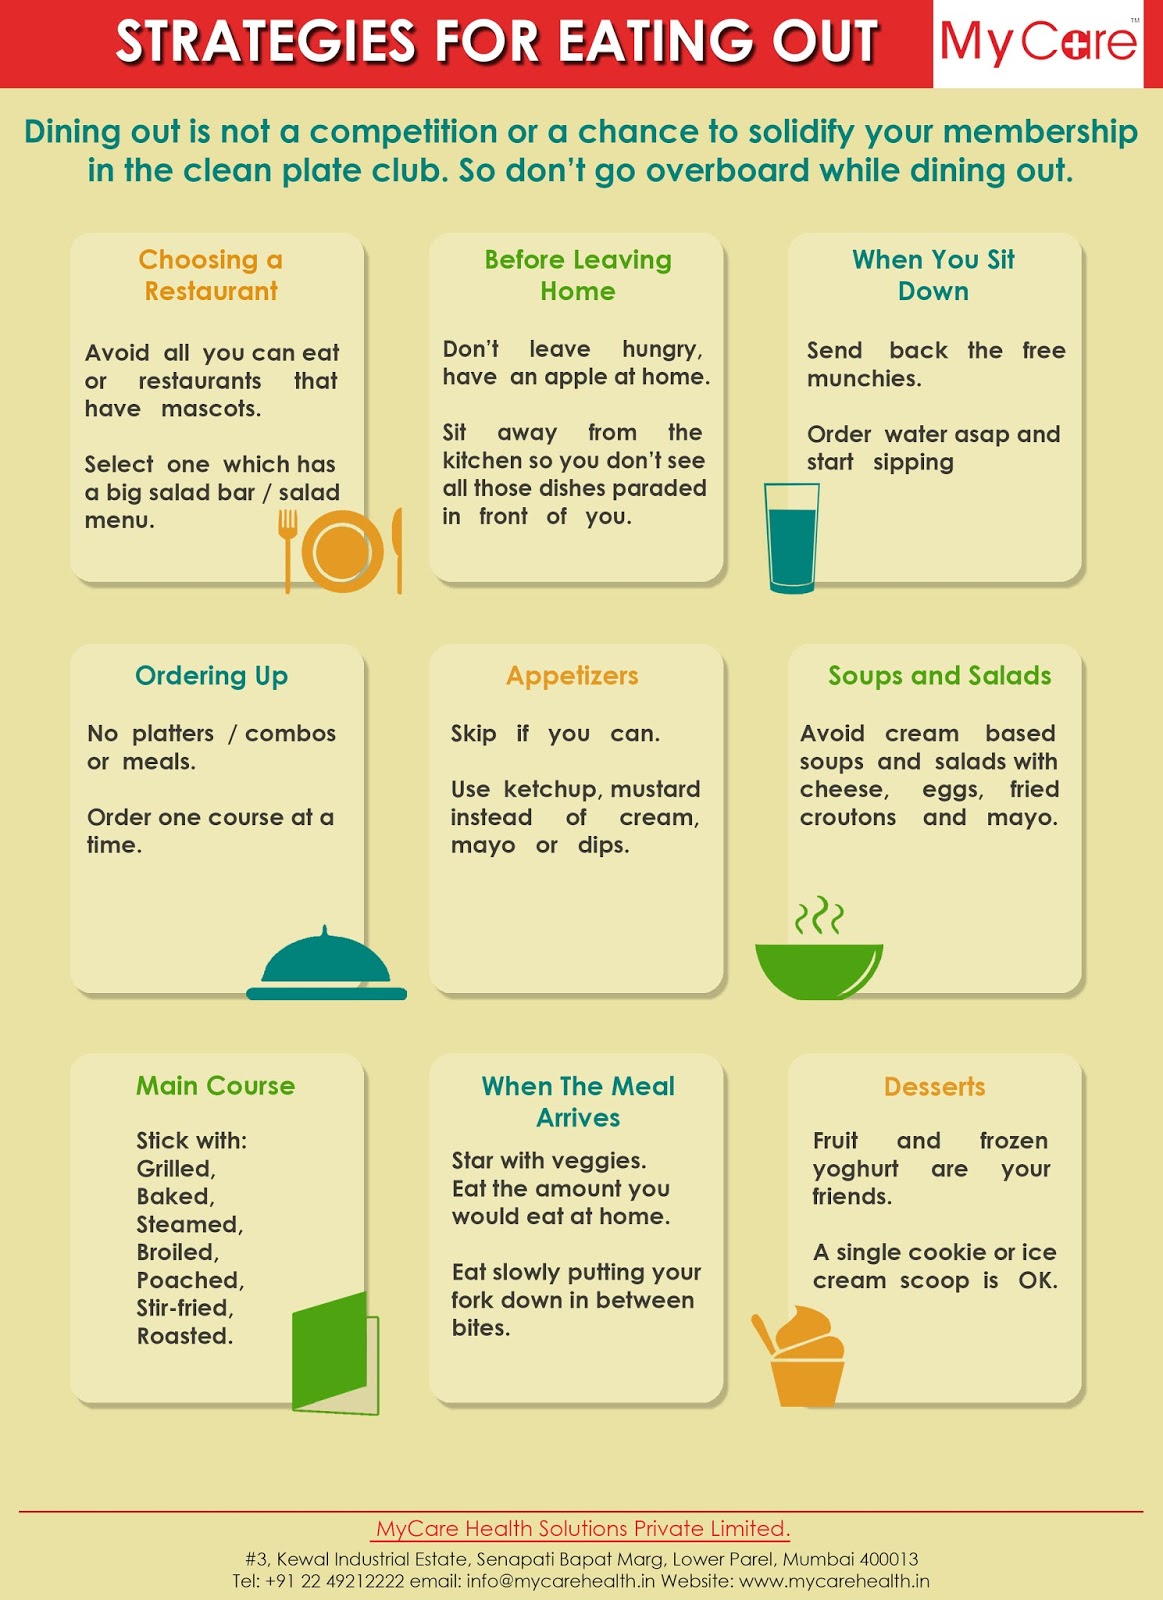 Eating Out Campaign for Mycare
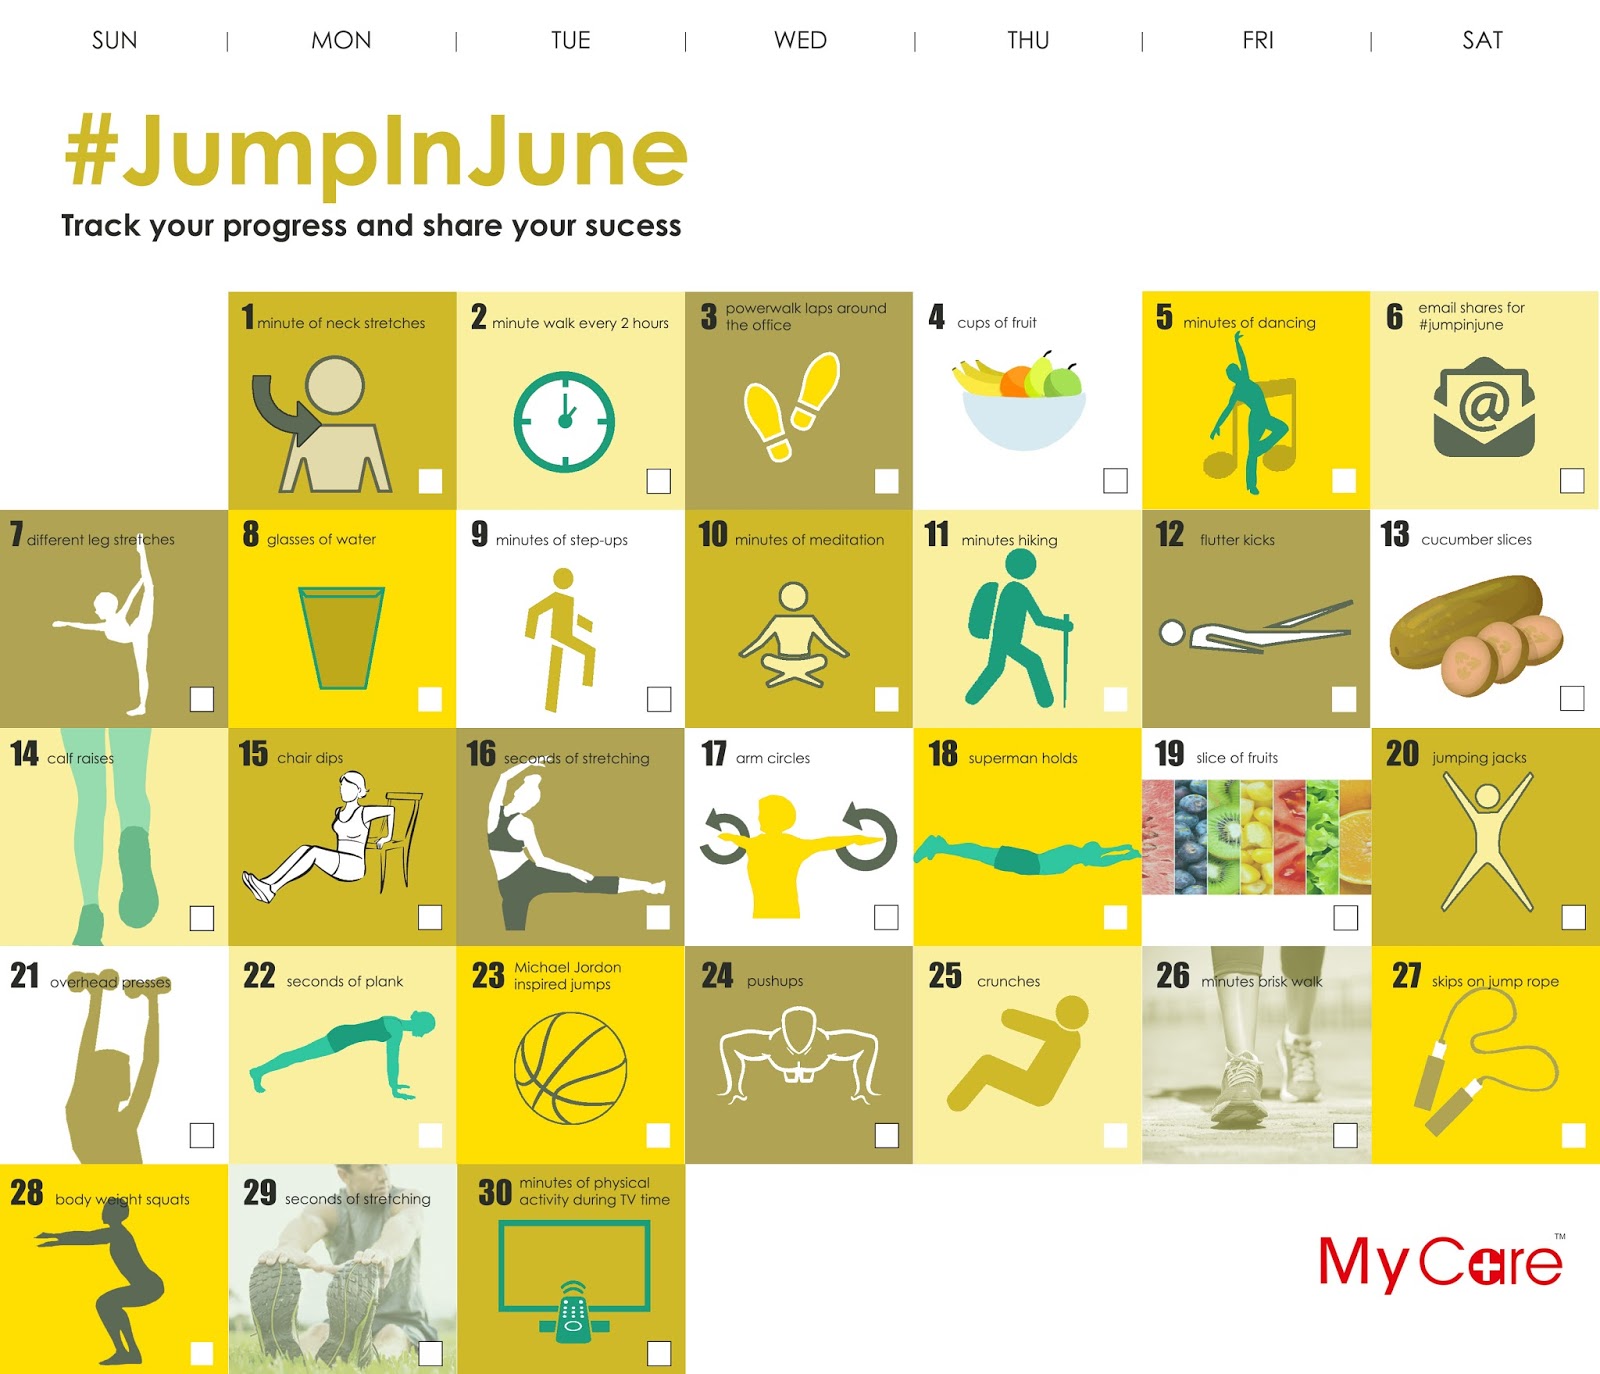 Activity Calendar for Mycare
TLC diet for Mycare