Jennifer Moorman's Blog, page 8
September 8, 2022
Chicken Pot Pie Hot Dish
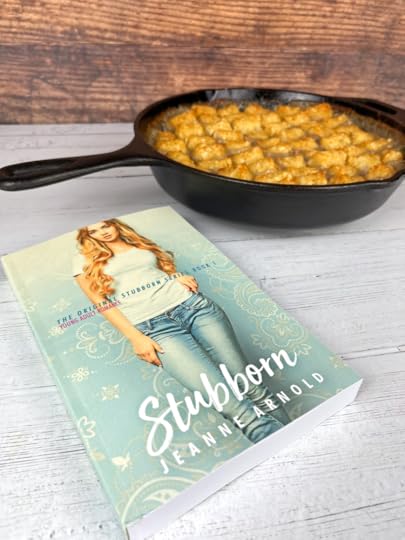 STUBBORN Love
With a train ticket, a bad attitude, and an unfortunate scribbling of obscenities across her forehead, seventeen-year-old Avery Ross is sent from New York to the vast oil field region of North Dakota. When a hazel-eyed boy with a sultry Texan accent comes to her defense, Avery has no clue that his actions will lead her into a passion-charged summer, full of temptation and loss. Stubborn is book 1 in a 7-book series (with more books coming!).
https://youtube.com/watch?v=jF_5GfwsvMYJeanne Arnold's Stubborn inspired this Cooking Through Fiction Recipe. Spoon yourself out a healthy portion, settle in with this captivating young adult romance adventure, and enjoy!
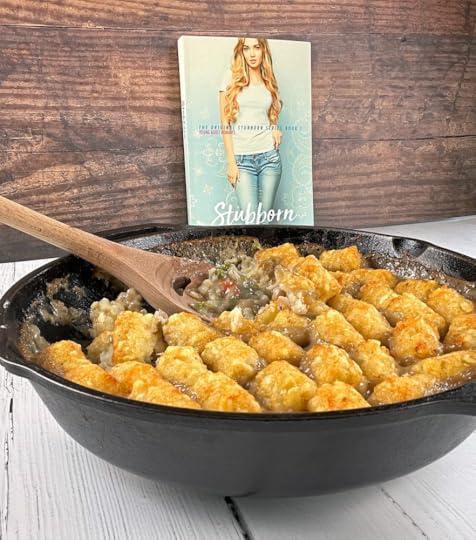 Stubborn's
Chicken Pot Pie Hot Dish
Stubborn's
Chicken Pot Pie Hot DishDifficulty: Easy
Ingredients
3 tablespoons unsalted butter3 carrots, chopped into 1/2-inch pieces 1 large onion, finely chopped Kosher salt 6 tablespoons all-purpose flour 3 cups whole milk 3 cups broth1 1/2 pounds boneless, skinless chicken thighs, chopped into 1/2-by-3/4-inch pieces 3/4 cup frozen peas 1/2 teaspoon dried thyme Freshly ground black pepper 1 1/2 pounds frozen tater tots
Directions
Preheat the oven to 400 degrees F. In a large skillet over medium-high heat, melt butter. Add carrots, onion and a pinch of salt and cook, stirring, until soft, about 10 minutes. Stir in the flour until combined and then cook for 1 minute. Add half the milk and cook, whisking continuously, until thickened, about 5 minutes; repeat with the remaining milk. Stir in chicken broth and then add chicken, peas, thyme and a few turns of pepper. Simmer, stirring often, until the chicken is cooked through and no longer pink, 10–15 minutes. Transfer mixture to an 8-by-11-inch baking dish and then cover with tater tots. Bake until the tots are golden brown; begin checking for doneness at 30 minutes.

August 14, 2022
Strawberry Popsicles
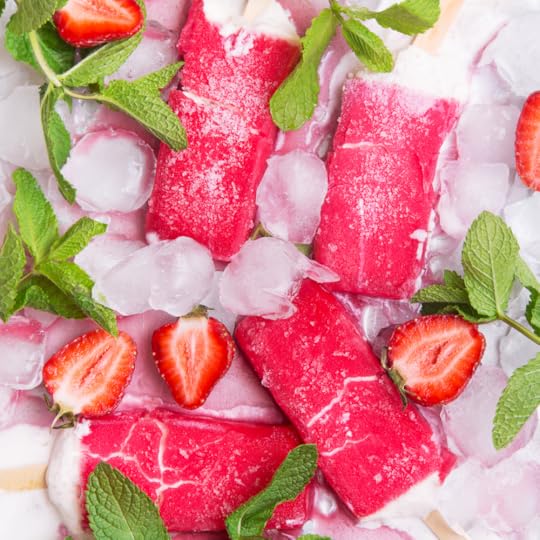
Strawberries are sweetest and ripest during the summer months. They are delicious fresh, but they also freeze well so that you can have them later in the year when strawberries are no longer in season.
These Strawberry Popsicles are featured in This Inspired Life Magazine and they are easy to make, and a skinny treat to beat the heat. Plus they only use 3 ingredients, and you can get creative with the ingredients!

This Inspired Life Magazine highlights a community of creatives who share their art, writings, crafts, recipes, and hearts. You’ll find these pages offer a wonderland of imagination, heart, and soul. The magazine’s mission is to inspire readers with stories of hope and encouragement and to spark the creative spirit in all of us.
Read an edition today and try this fun recipe!
Strawberry PopsiclesDifficulty: Easy
Ingredients
1 large ripe banana, peeled, cut into
chunks, & frozen
12 large strawberries, sliced in half
1/2 cup pineapple juice
Directions
Blend all of the ingredients together on high speed until smooth. Scrape down the sides of the blender as needed as you go. Pour the mixture into popsicle molds. Freeze overnight. Run popsicle molds under warm water to easily remove.
July 31, 2022
Exciting News — Cover Reveal!
I'm super excited to not only share with you this gorgeous new cover but also to reveal that @harpermusebooks is releasing THE BAKER'S MAN!
For everyone who fell in love with this story, you don't want to miss this new revised edition. The Baker's Man has received a significant editorial refresh (and a beautiful new cover). Plus it has an additional 20,000 words!!!
The Baker's Man is what might happen if The Great British Baking Show and Gilmore Girls were tossed into a mixer and baked into a delicious story. This enchanting and whimsical tale of friendship, love, and the power of baking dreams into life will open readers’ eyes to the magic all around them.
Some dreams require a little magic! On sale February 2023 — pre-order NOW!
https://video.wixstatic.com/video/ea0562_6afd3c772d964b7ab3e617fcb23ada05/720p/mp4/file.mp4July 5, 2022
Summer Fruit Flag Pie
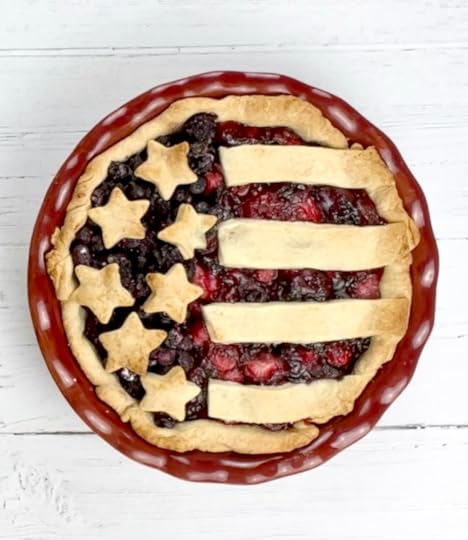
A Summer Beauty!
This SUMMER FRUIT FLAG PIE is inspired by my love of summer fruit and my birthday (July 4). If you're looking for a fun pie to try this summer, look no further. The decorations are easy to make but yield fantastic results! Don't miss the video for extra insight into how this is made.
https://video.wixstatic.com/video/ea0562_284d7baddda149e8beb64fb7deb4f0f7/1080p/mp4/file.mp4,Summer Fruit Flag PiePrep Time: 3 hours
Cook Time: 55 minutes
Total Time: 7 hours
Yield: 8–10 servings
Ingredients
Homemade or store-bought pie crust (enough for 2 9-inch pies)
½ cup granulated sugar, plus more if needed to sweeten blackberries/blueberry mixture
1/3 cup cornstarch
1 cup blueberries
1 cup blackberries
2 cups chopped strawberries
2 cups halved dark sweet cherries
2 teaspoons lemon juice, divided
½ teaspoon almond extract, divided
egg wash: 1 large egg beaten with 1 tablespoon milk
optional: coarse sugar for sprinkling on crust
tools: tinfoil
Instructions
1. Make the filling: In a small bowl, stir the granulated sugar and cornstarch together. In a medium bowl, combine the blueberries and blackberries together. In a large bowl, combine the strawberries and cherries together. Stir ¼ cup of cornstarch mixture into blueberries/blackberries. Stir remaining cornstarch mixture into strawberries/cherries. Add 1 teaspoon of lemon juice and ¼ teaspoon of almond extract to each fruit mixture. Place in the refrigerator for a few moments as you roll out the crust.
2. Preheat oven to 350°F.
3. Roll out the chilled pie dough: On a floured work surface, roll out one of the pie crusts (if using homemade dough). Store-bought dough is normally already rolled out. Carefully place the dough into a 9-inch pie dish.
4. Fold the aluminum foil several times to form a 2-inch wide strip. Place into crust, dividing it into 1/3 and 2/3 sections as seen in video.
5. Spoon strawberry filling into large section, leaving any excess liquid in the bowl. Spoon blueberry filling into smaller section. Discard the excess liquid. Place the pie in the refrigerator until top design is ready.
6. Design the flag: Roll the second pie crust into a circle that is about 12 inches. Using a sharp knife or pizza cutter, cut 4 strips that are 2 inches wide and 6 inches long. Using your star cookie cutter, cut out stars.
7. Remove the pie from the refrigerator, remove aluminum foil strip, and add top decor to pie. Stars over the blueberries; strips over the strawberries. Trim off excess dough on the sides. Crimp the edges with a fork or flute the edges.
8. Lightly brush the pie crust with the egg wash mixture. Sprinkle with coarse sugar, if desired.
9. Place the pie onto a large baking sheet and bake for 20 minutes. Check for browning on top, and if needed, cover with a pie shield or tinfoil to prevent overbrowning the edges or designs. Bake for an additional 30-35 minutes.
10. Allow the pie to cool for 3 full hours at room temperature before serving. This allows the filling to thicken. Cover leftovers, and store in the refrigerator for up to 5 days.
July 2, 2022
Baking Class with Jennifer Moorman
 Join Me!Free Cooking ClassLivestream baking experience with recipes inspired by fiction.
July 30 at 11 AM Eastern.
Join Me!Free Cooking ClassLivestream baking experience with recipes inspired by fiction.
July 30 at 11 AM Eastern.
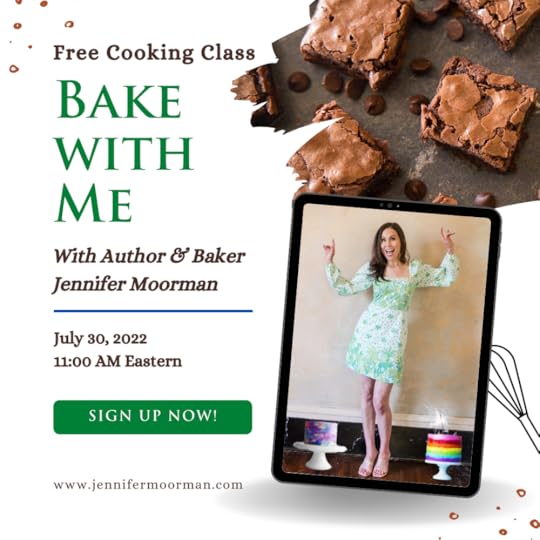
Join me for a whimsical time of cooking through fiction where our baking experience happens live via Zoom from my kitchen and yours!
On July 30 we'll be baking Pizza Margherita and Salted Dark Chocolate Brownies, which are inspired by Under the Tuscan Sun, and you don't want to miss these Italian treats.
Once you've signed up, you’ll receive an email with all the class information, the recipe, and a detailed list of ingredients and the quantities you'll need to make this recipe at home.
Come enjoy a FREE and fun cooking class where you’ll not only smile and laugh but you’ll also have a delicious treat to share with loved ones!
Adults & children (with supervision) are welcome! No previous cooking experience required!
 Pizza Margherita & Salted Dark Chocolate Brownies
“Life offers you a thousand chances . . . all you have to do is take one.”U Under the Tuscan Sun
 Let's Bake Together!
June 27, 2022
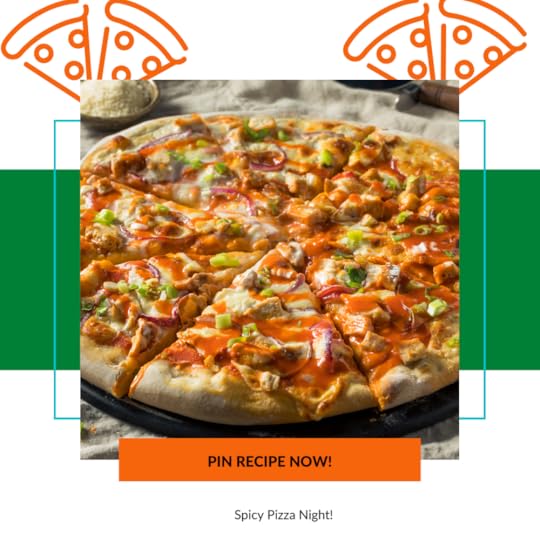
Buffalo Chicken Pizza

Spicy Pizza Delight!
This BUFFALO CHICKEN PIZZA is inspired by one of my favorite children's book series, The Spiderwick Chronicles and Beyond the Spiderwick Chronicles by Holly Black and Tony DiTerlizzi. In The Nixie's Song the kids eat a lot of pizza, and this Buffalo Chicken Pizza is on the menu!
Makes 1 12-inch pizza or 2 smaller pizzas
Ingredients
1 lb. pizza dough
4 Tablespoons unsalted butter
¼ cup hot sauce, plus more for drizzling
½ teaspoon garlic powder
1 teaspoon Ranch seasoning mix
2 cups cooked cubed chicken
8 ounces fresh mozzarella, torn or sliced
4 ounces cream cheese, room temperature
¼ red onion, thinly sliced
2 green onions, thinly sliced
Cornmeal, for pan
Directions
1. Preheat oven to 500°. Brush a large baking sheet with vegetable oil, and sprinkle with a layer of cornmeal.
2. Gently stretch ball of dough onto baking sheet.
3. Place butter in a medium microwave-safe bowl. Microwave until melted, 20–30 seconds. Whisk in hot sauce and garlic powder until combined. Pour half of the buffalo sauce over chicken and toss to coat.
4. Microwave the cream cheese until very soft and melty. Stir in the Ranch seasoning to combine. Spread the cream cheese mixture over the dough evenly. Then add half the mozzarella.
5. Add half the chicken on top of the cheese. Then top with remaining mozzarella. Finish with red onions.
6. Bake for 10–12 minutes or until the dough is golden and the cheese has melted.
Garnish with green onions and a drizzle of hot sauce if desired. Serve immediately
June 15, 2022
2-Book Deal with Harper Muse

Exciting News!
I am abundantly thankful and super-excited to share that I signed a 2-BOOK DEAL with Harper Muse @harpermusebooks!!!
In the next few weeks I'll have more details to share with you—like a book cover and release dates and ways we can toss glitter and dance around, waving our arms like an inflatable air dancer!
I can share that the first book will release early next year! Stay tuned for more!
Thank you thank you thank you for all of your support, encouragement, and love through the years while we sailed along this writing and reading journey together *cue the confetti cannon*

June 10, 2022
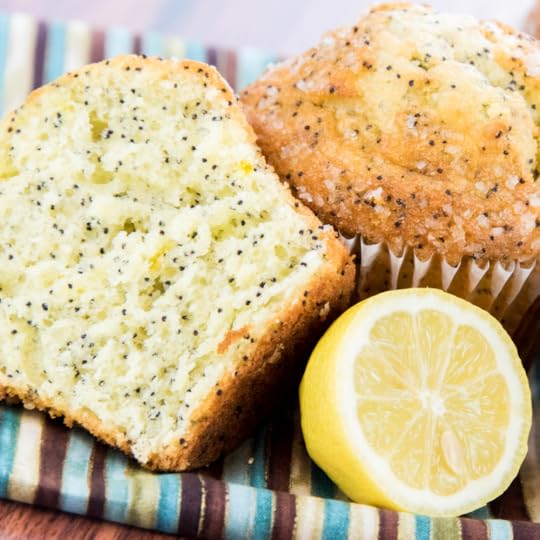
Lemon Poppy Seed Muffins
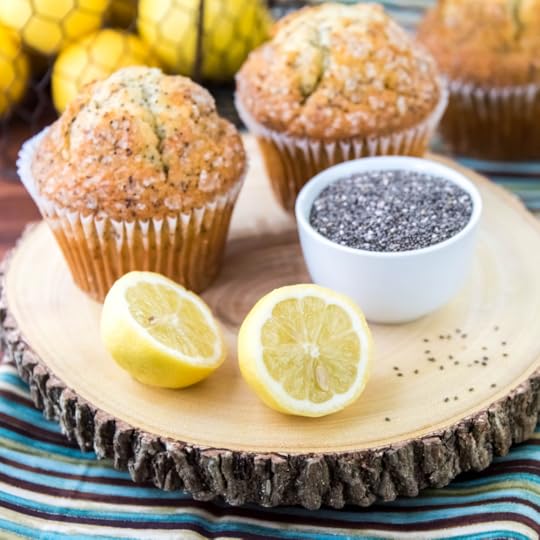
Zesty Brightness!
These Lemon Poppy Seed Muffins are inspired by Karen Hawkins' A Cup of Silver Linings. Perfectly sweetened and tender with a sprinkling of coarse sugar, these muffins will brighten up any morning with their zesty lemon flavor and crunch of poppy seeds.
Yield: 12 muffins
Bake time: 15 minutes
Cooling time: 15 minutes
Ingredients
2 ¼ cups all-purpose flour
1 cup sugar
2 tablespoons poppy seeds
2 teaspoons baking powder
¼ teaspoon baking soda
½ teaspoon salt
1 ½ cups plain whole milk yogurt or Greek yogurt
2 tablespoons fresh lemon juice
2 tablespoons lemon zest
2 large eggs
1 teaspoon vanilla extract
8 tablespoons unsalted butter, melted and cooled
Coarse sugar for sprinkling, optional
Directions
1. Preheat oven to 425 degrees F. Grease or line 12-cup muffin tin.
2. Whisk flour, sugar, poppy seeds, baking powder, baking soda, and salt together in a large bowl.
3. In a separate bowl, whisk yogurt, lemon juice, lemon zest, vanilla, and eggs until smooth. Gently fold yogurt mixture into flour mixture until just combined. Fold in melted butter. Do not overmix.
4. Divide batter evenly among prepared muffin cups. Sprinkle with sugar, if using. Bake until golden brown and toothpick inserted in the center comes out clean, about 15 minutes.
5. Allow muffins to rest in tin for 10 minutes then transfer to a wire rack to cool compl

May 13, 2022
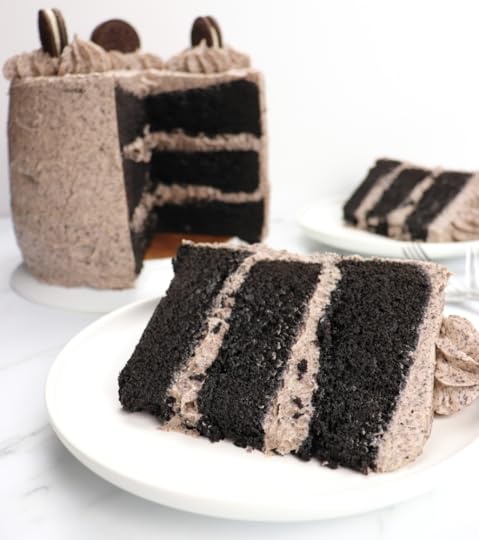
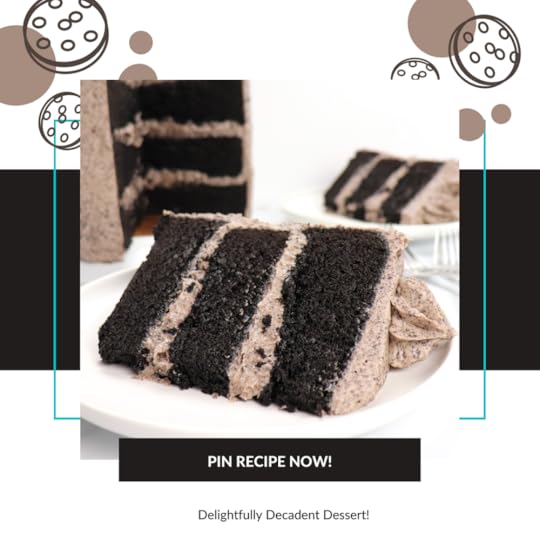
Cookies and Cream Cake
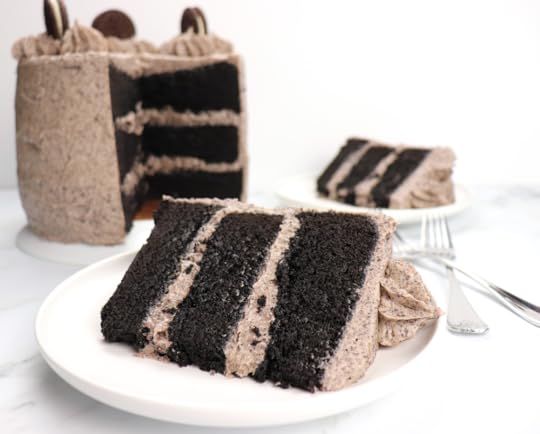
Calling All Cookie Lovers!
Do you love cookies? Me too!
This decadent Cookies and Cream Cake is part brownie, part cake, and part cookies and cream. Black cocoa, the secret to the rich color of Oreos, is whisked into the fudgy brownie layers to create a delightfully delicious base for the cookies and cream buttercream.
Ingredients
For the cake:
2 cups granulated sugar
1 ½ cup firmly packed dark brown sugar
1 ½ cups unsalted butter, melted
3 cups all-purpose flour
1 1/3 cup black cocoa powder, sifted
1 ½ teaspoons baking powder
1 ½ teaspoons kosher salt
1 ½ teaspoons instant espresso powder
6 large eggs, room temperature and lightly beaten
1 tablespoon vanilla extract
1 cup whole milk, room temperature
For the cookies and cream buttercream:
2 1/3 cups unsalted butter, softened
½ teaspoon kosher salt
8 ½ cups confectioners’ sugar
1 cup heavy whipping cream
2 teaspoons vanilla extract
2 1/3 cups crushed cream-filled chocolate sandwich cookies (about 23–25 cookies)
Directions
1. For the cake: Preheat oven to 350°F. Spray 3 (8-inch) round cake pans with baking spray with flour. Line bottom of pans with parchment paper.
2. In a large bowl, whisk together sugars and melted butter until smooth and well combined.
3. In another large bowl, whisk together flour, black cocoa, baking powder, salt, and espresso powder.
4. Slowly add eggs to sugar mixture, whisking until combined. Whisk in vanilla. Add flour mixture in three additions alternately with milk, beginning and ending with flour mixture, stirring just until combined after each addition. Divide batter among prepared pans, smoothing into an even layer.
5. Bake until tops are dry and wooden pick inserted in center comes out with a few moist crumbs, 28–38 minutes. Let cool completely in pans.
6. For the buttercream: In the bowl of a stand mixer fitted with the paddle attachment, beat butter and salt at medium speed until creamy, about 1–2 minutes, stopping to scrape sides of bowl.
7. With mixer on low speed, gradually add confectioners’ sugar alternately with the cream, beginning and ending with the confectioners’ sugar, beating until fluffy and combined.
8. Beat in vanilla. Using a spatula, fold in cookies. Use immediately.
9. Level cooled brownie layers, if desired. Place 1 cooled brownie layer on a cake stand. Spread 1 ½ cups buttercream on top. Top with second brownie layer, and spread 1 ½ cups buttercream on top. Top with remaining brownie layer. Spread a thin layer of buttercream on top and sides of cake to create a crumb coat; refrigerate for 20 minutes.
10. Spread 3 ½ cups buttercream on top and sides of cake.
11. Place remaining buttercream in a pastry bag and pipe dollops on top in the shape and design of your choice. Garnish with extra cookies.
May 8, 2022
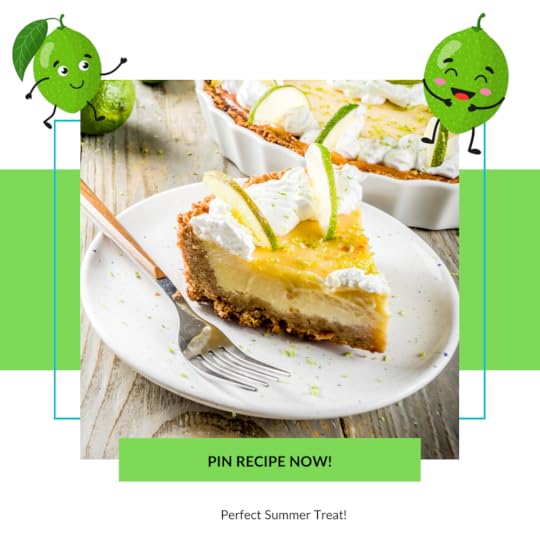
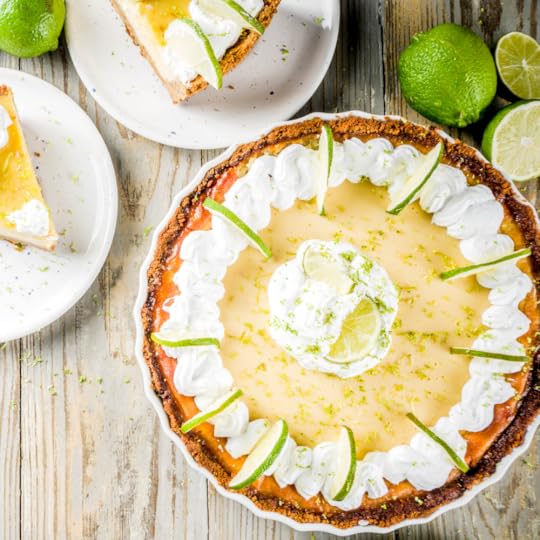
Classic Key Lime Pie

A Twist to a Classic Pie
A pretzel crust adds a new twist to this classic pie. This recipe is inspired by my love of beach reads and trips to the Florida Keys. A perfect way to unwind at the end of a long beach day reading in the sun (or the shade) is by cutting yourself a slice of this tart, delicious pie.
Prep 15 mins
Bake 28–32 mins
Total 3 hrs 43 mins
Yield one 9" pie
Ingredients
Crust
1 cup very finely ground salted pretzel crumbs
½ cup finely ground graham crackers
3 tablespoons brown sugar
7 tablespoons butter, melted
Filling
4 large egg yolks
2 14-ounce cans sweetened condensed milk
3/4 cup Key lime juice
3 tablespoons lime juice, fresh preferred
zest (grated rind) of 1 lime
Instructions
1. Preheat the oven to 350°F. Lightly grease a 9" pie pan with non-stick baking spray.
2. In a large mixing bowl, add the sugar, melted butter, and pretzel crumbs, tossing to combine. (If you've used a food processor to grind your pretzels into crumbs, you can add the sugar and butter and combine the mixture in the food processor.)
3. Press the mixture into the bottom and up the sides of the prepared pan.
4. Bake for 8 to 10 minutes; the crust won't change color much, but will firm up. Remove from the oven and make the filling.
5. Whisk together the egg yolks and condensed milk.
6. Add the lime juice (and zest, if you're using it). The mixture will thicken almost immediately.
7. Pour into the crust and smooth with a spatula.
8. Bake the pie for 28 to 32 minutes, until the filling is set, with a small spot in the middle still soft-looking. Cool for several hours (or overnight) before serving.
9. To serve, top with slightly sweetened whipped cream and a garnish of crumbled pretzels.
Note: A food processor is the perfect tool for turning whole pretzels into fine crumbs; about 30 seconds in the processor should do it. If you don't have a food processor, put the pretzels into a zip-top bag and gently pound/roll them to crush. We like the addition of fresh lime zest, but hate to have a leftover skinned lime. If you skin a lime for its zest, just go ahead and add its juice, as well. The filling will be a bit tangier.