
Jennifer Moorman's Blog, page 11
April 16, 2021
Can You Spot It?

Can you spot it?
The Legend of James Grey is a book in the Mystic Water series that I think you'll love (especially if you love libraries). Slumber party in the library, anyone?!
The Mystic Water series is a magical realism series set in the small, Southern town of Mystic Water. Quirky, lovable, enchanting characters invite you into their lives where magic floats on every breeze and anything can happen. The Mystic Water series encourages you to believe in your dreams, follow your heart, and trust in the wonder of the extraordinary. These novels inspire magic, hope, and fabulous treats!
There's also a Mystic Water Book Club! This month we're reading The Legend of James Grey, and our club chat is coming soon. Don't miss out!
Book Teaser: What if your favorite fictional character could be brought to life? One night after the library has closed, Emma Chase hears voices coming from the archives section, and she unexpectedly entangles herself in the long-held secrets of the library’s magic.

Click the banner above, and join the book club today!


March 15, 2021
Inspiration for Spring
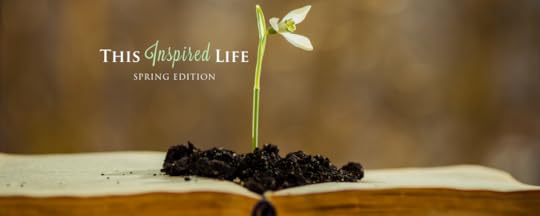
A Springtime Burst of Inspiration & Creativity!
It's here! Are you ready to feel encouraged, uplifted, and inspired? I have the perfect magazine for you!
✨This Inspired Life Magazine is a digital magazine that highlights a community of creatives where they share their art, writings, crafts, recipes, and hearts.
You'll find fantastic contributors who helped fill this spring edition with pages of imagination, heart, and soul, from our lives to yours.
 What's in this edition?
Fabulous articles about life, gardening, writing, nature, illustration, baking, cooking, spring cleaning, decluttering, health & wellness, inspiring lives, what to read and listen to this season, and more!
✨Fascinating Q&A with legacy farmer Crystal Benner @cabenner
✨Spark your creativity & passion with articles by Natalie Banks @officialnataliebanks Nancy Moore @sharingpassionandpurpose
Marvel over creations by Cara Nadolny @lowercasegirl Julianne St. Clair @juliannestclair Lucy Stapylton-Smith @lucystapyltonsmith
✨Read lifestyle & springtime stories by Elisa Fershtadt @travelisfers Deborah Whaley @wiltshirestyle Jeanne Arnold @jeannesbooks
✨Find fitness motivation by Dr. Al Lundeen @dr.al.health Brandie Smith @fitgingersmith
✨Expand your heart with inspirational pieces by Leslie Zemeckis @lesliezemeckis Tia Lee @tia_ferrell
✨Try these nostalgic recipes by Alex Moorman @alexmoorman Debra Moorman Hanelore Dumitrache @sugaryums Ashley Renken @wellwithashley Nat @themindfulmocktail

March 9, 2021
Win an Audiobook!
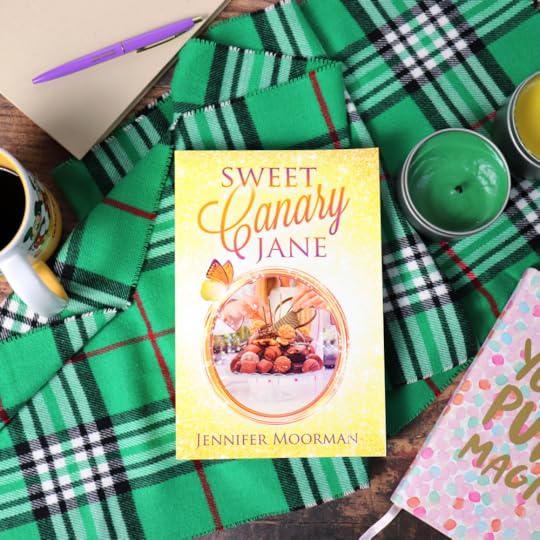
To celebrate the audiobook release of ✨,SWEET CANARY JANE✨ I’m hosting a giveaway on Instagram!
❤️ Let yourself be swept away to Mystic Water, a place of hope and kindness, where following your heart is necessary to finding where you truly belong. Enter for a chance to win a ✨,Sweet Canary Jane✨ audiobook in this giveaway!
Sweet Canary Jane tells the story of a disheartened pastry chef who dreams of opening a confectionery but ends up temporarily homeless, jobless, and loveless in a new town. In a last-chance effort to put her life back together, she leans on her magical confections to change her fate.
3 winners will receive an audiobook!
❤️ Entries open to US and UK listeners. Giveaway ends March 17! Winners will be announced soon afterward
Click the image below to enter!
February 9, 2021
I Melt for You
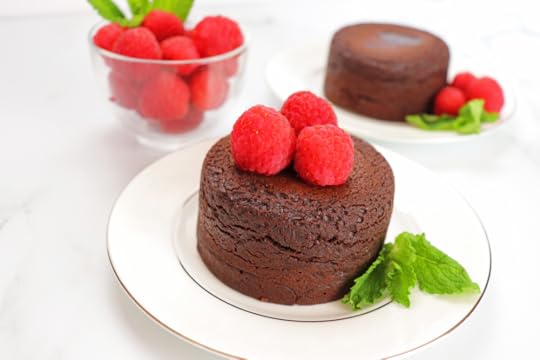 If there were a chocolate lava flow happening right now, would you grab my hand and run as fast as you could to it?Since a real chocolate lava flow right now is unlikely, how about a single-serve dessert with a gooey chocolate center?Whether you call it lava cake, molten cake, or fondant au chocolat (fondant is French for “melting"), this delicious treat has melted chocolate in the center, which runs a little when you slice into it.
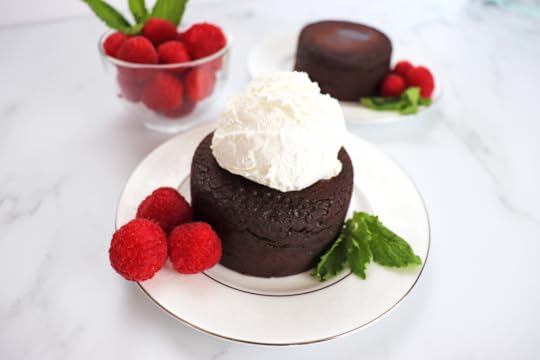 But why stop with a melting chocolate center? Search around a little and you'll find oozing caramel, creamy Oreo pudding, rich dulce de leche, and more!This month's Instagram baking collab hosted by @aredspatula and @sugarfacebakes brings you all sorts of melty baked goodness. Check out #moltenmyheart on Instagram and get googly-eyed over these desserts.I kept it simple this month with the flavor and went with the traditional chocolate. But this recipe isn't traditional! It's what I call my EASY-PEASY LAVA CAKE. But you can call it gone! Because that's what happens as soon as it comes out of the oven.
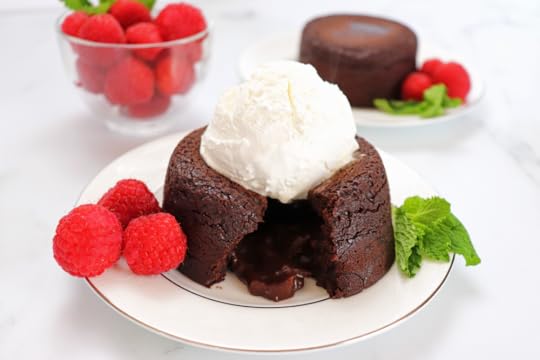 Easy-Peasy Lava Cake
These Easy-Peasy Lava Cakes start with a warm chocolate cake filled with a lava pudding center, and preparing the cake doesn’t even require any mixers. This is a great way to satisfy your sweet tooth for Valentine’s Day or any time you need a lava flow of deliciousness.
Ingredients
For the Cake:
1 cup 72% real chocolate, chopped
3/4 cup fat-free or low fat milk
1/2 cup all-purpose flour
1 teaspoons baking powder
2 tablespoons vegetable oil
For the Filling:
1/4 cup instant pudding mix (get creative and use your favorite kind)
1/2 cup cold fat-free or low fat milk
Directions
1. In a small bowl, combine pudding mix and cold milk. Beat with a whisk until completely smooth and no lumps remain. Let mixture stand at room temperature for about 5 minute so it can thicken.
2. Preheat oven to 350°F. Spray four (4-oz) ramekins with baking spray with flour. If you don't have an oil spray with flour, you can also grease inside of ramekins, sprinkle generously with flour, then tap ramekins (while they are turned upside down) to get rid of excess flour.
3. In a large mixing bowl, add chopped chocolate and milk. Microwave for about 1 minute. Stir with a whisk until chocolate is mostly melted. Microwave for an additional minute, and stir until melted chocolate is completely uniform.
4. Add in remaining cake ingredients. Whisk until batter is silky smooth.
5. Add batter into prepared ramekins, until they are about half full. Add 2 tablespoons of pudding to the center of each ramekin. Evenly divide remaining batter between the four ramekins, making sure to completely cover the pudding.
6. Place ramekins on a baking sheet. Bake for 15—17 minutes, or until the surface of cakes are just set.
7. Remove cakes from oven. Let sit for 1 minutes. Place a small plate on top of each ramekin. Very quickly, invert the plate with ramekin, so that the plate is now on the bottom and the ramekin is upside down on top. When you lift up the ramekin, the cake should be on the plate. Repeat with remaining ramekins. Serve immediately.
January 4, 2021
The Perfect Winter Brownie
 My Mint Chocolate Brownies are in the most recent published edition of ,Hope Magazine! You know what you need to kick off this new year with a smile? A gigantic dose of hope with a happy square of Mint Chocolate Brownies.
 These thick and fudgy brownies are layered with sweet green mint frosting and easy chocolate ganache. This classic mint chocolate combination is the perfect dessert for a cozy winter season.
I love being a contributor for and working with everyone at Hope Magazine. They make working together so uplifting, inspiring, and lovely. I'm honored to be included in such a love-filled movement.
Did you know you can ,subscribe to their printed magazine and have hope delivered to your mailbox? You can! Four printed issues a year will show up and brighten your day. Plus, their website is full of great content.
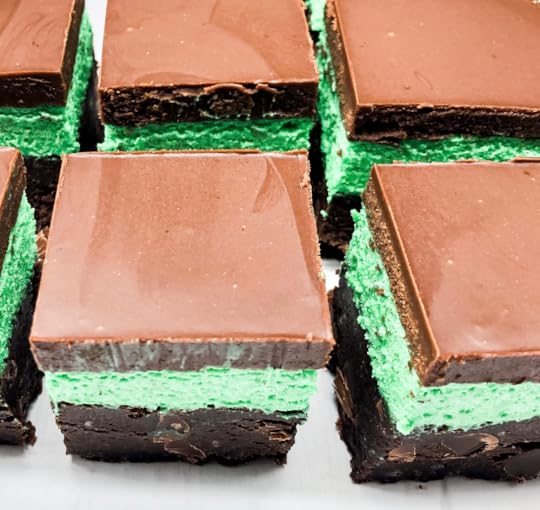 Mint Chocolate Brownies
These decadent brownies are inspired by the enchanting town of Mystic Water, where the townsfolk in ,The Baker's Man swing by the bakery every Saturday because it's Chocolate Day! ❤️
Prep Time: 1 hour
Cook Time: 35 minutes
Total Time: 6 hours (includes cooling)
Yield: 16 brownies
Ingredients
For the brownies:
1 cup unsalted butter
8 ounces dark chocolate, chopped
1 1/2 cups granulated sugar
1/2 cup packed light brown sugar
4 large eggs, at room temperature
2 teaspoons pure vanilla extract
1 teaspoon espresso powder
1/2 teaspoon salt
1/2 cup + 3 Tablespoons all-purpose flour
1/4 cup unsweetened cocoa powder
Mint Frosting Layer:
1/2 cup unsalted butter, room temperature
2 cups confectioners’ sugar
2 Tablespoons milk
1 1/4 teaspoons peppermint extract
1 drop liquid or gel green food coloring
Chocolate Layer:
1/2 cup unsalted butter
1 heaping cup semi-sweet chocolate chips
Instructions
For the brownies:
1. Melt the butter and chocolate in a saucepan on medium heat. Remove from the heat, pour into a bowl, and cool for 10 minutes. Preheat oven to 350°F. Line a square baking pan with aluminum foil, leaving an overhang.
2. Whisk the sugars into the cooled chocolate mixture. Add eggs, one at a time, whisking until smooth. Whisk in the vanilla. Gently fold in remaining ingredients. Pour batter into pan. Bake for 35 minutes. Allow brownies to cool completely on a wire rack.
For the mint frosting layer:
1. In a stand mixer, beat the butter on medium speed until smooth and creamy. Add the confectioners’ sugar and milk. Beat for 2 minutes on low, then increase to high and beat for 1 minute. Add peppermint extract and food coloring and beat on high for 1 minute. Frost brownies, and place in the refrigerator for at least 1 hour.
For the chocolate layer:
1. Melt butter and chocolate in a saucepan on medium heat, stirring constantly. Let mixture cool for 10 minutes, then pour over mint layer. Gently spread with a knife. Place the brownies in the refrigerator for 1 hour. Once cooled, cut into squares.
January 2, 2021
Zing in the New Year!
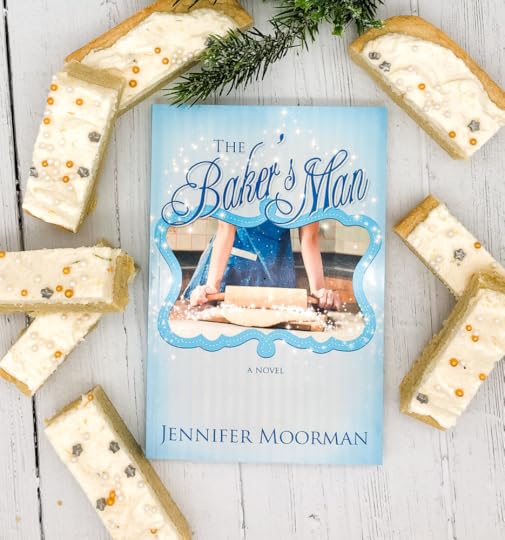
When I think of foods I want to eat in Florida, I always think of fresh citrus. Oranges, lemons, limes—zested into desserts, into drinks, into 5-Star meals. Speaking of 5-Star foods, my Citrus Sugar Cookie Bar is packed full of citrus! AND they're inspired by the 5-Star luxury resort and spa Acqualina !
Just like the Acqualina, these bars are festive, zesty, and will put a pep in your step!
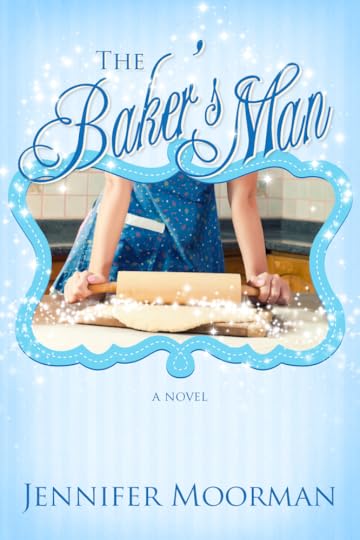
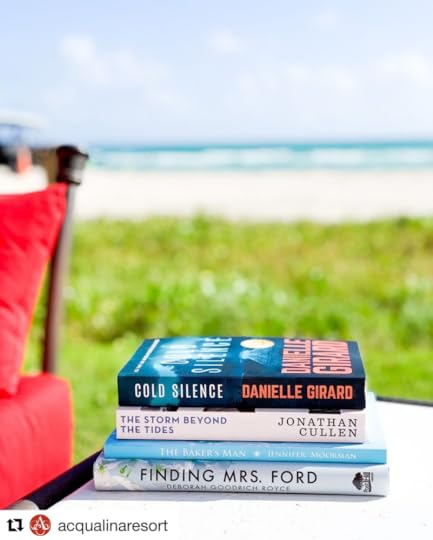 Acqualina gave all of their guests a copy of my magical realism novel
The Baker's Man
! So while you treat yourself to this citrus-packed dessert inspired by my novel, why not plan a future trip to Aqualina's gorgeous stretch of beach and read about a small-town baker who creates a man out of dough and turns her life upside down!
Acqualina gave all of their guests a copy of my magical realism novel
The Baker's Man
! So while you treat yourself to this citrus-packed dessert inspired by my novel, why not plan a future trip to Aqualina's gorgeous stretch of beach and read about a small-town baker who creates a man out of dough and turns her life upside down! Waves and waves of thank yous to the Acqualina Resort & Spa and
Bedside Reading
for sharing my books with their special guests and for their continued love and support for authors and readers during a time when we've needed an extra boost of magic!
Waves and waves of thank yous to the Acqualina Resort & Spa and
Bedside Reading
for sharing my books with their special guests and for their continued love and support for authors and readers during a time when we've needed an extra boost of magic!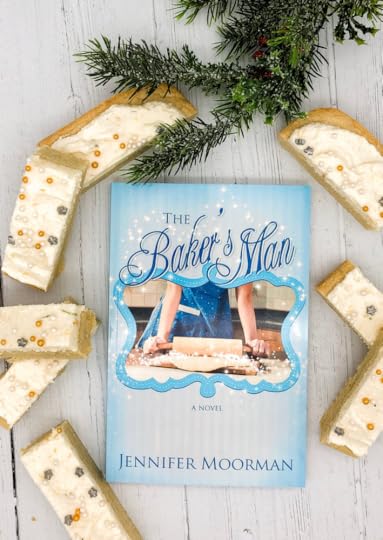 Citrus Sugar Cookie Bars
Ingredients
For cookie:
1 ¼ cups granulated sugar
4 Tbsp citrus zest* (orange, lime, lemon)
1 cup unsalted butter, room temperature
1 large egg, room temperature
2 tsp vanilla extract
3 cups all-purpose flour
1 Tbsp cornstarch
1 tsp baking powder
½ tsp Kosher salt
¼ tsp baking soda
For citrus icing:
½ cup unsalted butter
¼ cup crème fraiche (or sour cream, full fat)
¼ tsp Kosher salt
2 Tbsp citrus zest* (orange, lime, lemon)
1 tsp vanilla extract
2–3 cups confectioners’ sugar (to taste, add more ¼ c at a time for desired sweetness)
1–2 Tbsp citrus juice* (to taste)
Directions
For cookie:
1. Preheat oven to 350 degrees. Line a 13 x 9-inch baking pan with parchment paper, letting excess extend over sides of pan.
2. In a food processor, pulse together sugar and zest until zest is finely ground, approximately 1 minute.
3. In the bowl of a stand mixer, using a paddle attachment, beat citrus sugar and butter at medium speed until fluffy, 1–2 minutes.
4. Beat in egg for 30 seconds. Then add vanilla. Beat another 30 seconds.
5. In a medium bowl, whisk together flour, cornstarch, baking powder, salt, and baking soda. With mixer on low speed, gradually add flour mixture to butter mixture, beating until soft dough forms. Do not overmix.
6. Using a spatula, drop dough into prepared pan. Using a sheet of parchment paper coated with cooking spray, press dough into pan.
7. Bake until lightly golden and a wooden pick inserted into the middle comes out clean, 20–24 minutes. Ovens vary, so check often once you hit the 20-minute mark. Let cool completely in pan.
8. Using excess parchment as handles, remove from pan. Using an offset spatula, spread the citrus frosting onto bars. Create swirls and decorate with sprinkles if so desired.
9. Refrigerate until set, approximately 20 minutes. Cut into 24 bars. Refrigerate in an airtight container for up to a week.
For citrus frosting:
1. In the bowl of a stand mixer, using the paddle attachment, beat butter, crème fraiche, and salt at medium speed until smooth, 2–3 minutes.
2. Beat in zest and vanilla. With mixer on low speed, gradually add in confectioners’ sugar, beating until incorporated.
3. Add citrus juice, and beat at medium-high speed until light and fluffy, 1–2 minutes. Use immediately.
*For citrus zest and juice, you can use oranges, limes, lemons, and Meyer lemons. You can use only one type, a combination of your favorite types, or a combination of all. For the cookies I used 1 large Naval orange, 2 lemons, and 2 limes. I used the same amount of fruits for the frosting. Total: 2 oranges, 4 lemons, 4 limes.
 Ready to dive into this magical book?
Be swept away with your copy today.
Click the book and let the fun begin!
December 18, 2020
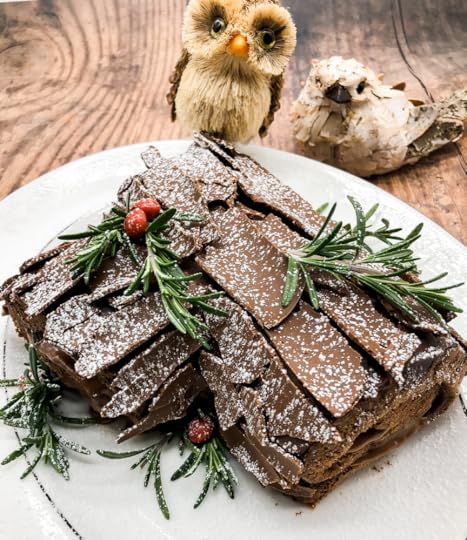
Bûche de Noël (Yule Log)
 ROLL OUT!
If you're ready to roll out of 2020, the #rollout2020 roll cake collab is a great send off!
December's collab hosted by Stacie, creator of @sugarfacebakes & Amy, founder of @aredspatula brings you enthusiastic bakers showcasing their lovely roll skills! Be sure to check out the hashtag on Instagram so you can be wowed and warmed by their creations!
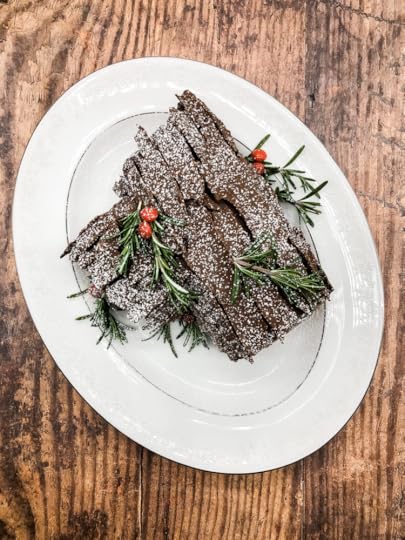 My Bûche De Noël (also called a Yule Log) is a first-time attempt for me on this classic holiday roll cake. It's inspired by the holiday, of course, and by my small-town baker, Anna, in my magical realism novel ,The Baker's Man!
 At her bakery in Mystic Water, Anna loves bringing people together with her baked goods because baked goods find our smiles and fill our hearts with joy. Even smelling a delicious cake baking in the oven makes us slow down, breathe deeper, and sigh.
During the holiday season, Anna hosts a Bûche De Noël decorating party! I never turn down a decorating party in Mystic Water. But I kept the decorations simple this year.
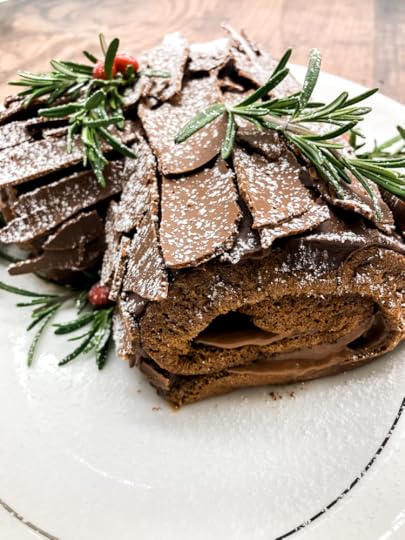 My chocolate roll cake is filled with Nutella mousse, coated in a thin layer of dark chocolate ganache, and covered with a milk chocolate bark. Adorned with fresh rosemary from the garden and red Skittles (hey, we use what we have, right?), this cutie is finished off with a dusting of confectioner's sugar.
Spread some cheer this week, and like, comment, and check out my Instagram post ,HERE! Give the other creative collaborators some love too by clicking on the hashtag #rollout2020
Bûche De Noël or Yule Log
Serves: 6–8
Level of Difficulty: Medium-Difficult (only the rolling part)
Ingredients
For the cake:
4 eggs, yolks and whites separated
1/2 cup sugar
1/4 cup unsweetened cocoa powder
1/3 cup cake flour
1/2 teaspoon instant coffee granules
1 teaspoon baking powder
1/4 teaspoon salt
For the filling:
2 cup heavy whipping cream
1 Nutella
For the frosting:
6 ounces dark or bittersweet chocolate chips, approximately 3/4 cup
1 1/2 tablespoons softened unsalted butter
1 teaspoon instant coffee granules
2/3 cup heavy cream
1/2 teaspoon vanilla extract
cranberries and rosemary for garnishing
Directions
Preheat your oven to 425°F and line a baking sheet or jelly roll pan with parchment paper. Set aside.
Drop the egg whites into the bowl of a stand mixer. Whisk on high speed for approximately 2 to 3 minutes, until wet, soft peaks form. You want the whites to stay hanging on your whisk when they're held upside down, but you don't want them so stiff and dry like you would for a meringue (aim for softly curled tips). Set the whites aside.
In a large bowl, whisk the egg yolks and sugar together until they're pale yellow. In a separate, smaller bowl, sift the cocoa powder, cake flour, coffee granules, baking powder, and salt together. Add these dry ingredients to the bowl containing the egg yolks and sugar. Whisk to combine (the batter will be thick and hard to mix, but this is okay! Do your best to mix everything together).
Add in half of the egg whites, and use a rubber spatula to gently fold the whites into the batter. You don't have to be extra gentle at this point since you are merely trying to loosen up the batter with the egg whites. Now, add the remaining half of egg whites and, this time, be very gentle when folding the whites into the batter with your spatula; make light, long folds.
Pour the batter into the prepared pan and use your spatula to gently smooth out the batter. Don't tap the pan or move the pan side to side (you don't want to ruin the air bubbles you created with the whipped egg whites). Bake the cake for 6 to 7 minutes, or until the cake springs back when gently pressed by the tip of your finger. Don't overbake! Let the cake cool in the pan for 2 minutes, no longer!
Meanwhile, prepare a kitchen towel by sprinkling powdered sugar all over it. Flip the cake out onto the towel and very gently peel the parchment paper off inch by inch. Grab one of the short sides of the cake and roll it toward the other short side, rolling the towel with it as you go. Let the cake remain in this rolled shape until it's completely cool. (Note: It’s important to do this while the cake is still warm as the cake is still flexible at this point and this prevents the cake from cracking or tearing as you roll it).
Meanwhile, create the frosting by adding the chocolate chips, coffee granules, unsalted butter, and vanilla extract to a medium bowl. Heat the heavy cream over medium-low heat until it’s hot but not boiling (the edges should begin to simmer and steam should rise from the cream). Pour this hot cream over the chocolate and contents in the bowl, then use a spoon to stir the mixture together until it’s completely smooth. Cover the bowl with a sheet of plastic wrap and refrigerate for 30 minutes, no longer!
I used Nutella mousse to fill my roll, but this is where you can get creative! You can use buttercream (any flavor, like peppermint, coffee, vanilla, cherry, etc.). You can also use a marmalade. Your creativity has no limits. If using the Nutella mousse, whip the ingredients together until stiff peaks form (but do not overwhip or you'll get Nutella butter, yikes or yum?!),
After the cake is completely cooled, gently unroll it, smear it with your filling of choice, leaving 1/4 inch around the side. It doesn't take much filling, so don't be tempted to overfill it or else the filling with squish out! Roll the filled cake gently. Don't worry if this one cracks because you'll be covering it in chocolate ganache.
Cover with ganache, and decorate! I made milk chocolate bark and used confectioner's sugar!
December 15, 2020
A Holiday Wonderland of Creativity
 Have you ever had a marvelous idea sneak up on you when you weren't expecting anything extraordinary? You were just doing laundry or walking your dog or washing dishes in the sink and KAPOW!
 Hello, bonkers—yet sparkling and lovely—idea! That's how this holiday edition, and the first-ever edition, of This Inspired Life was born.
,,This Inspired Life is a digital magazine that highlights a community of creatives where they share their art, writings, crafts, recipes, and hearts.
You'll find this creative endeavor is a wonderland of imagination, heart, and soul, from our homes to yours.
I'd love for you to read it!
I'd love for you to share it with someone you know who could use a smile or a laugh or a feel-good afternoon of cozy holiday reading.
Then hustle back here and let me know what you think!

November 10, 2020
Friendship, Cookies & Healing
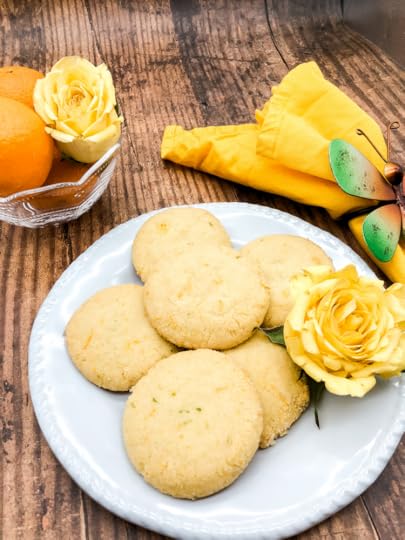 These Friendship Cookies are inspired by my newest magical realism novel ,,Sweet Canary Jane. As with many items and foods found in the enchanted Southern town of Mystic Water, these cookies offer something extra.
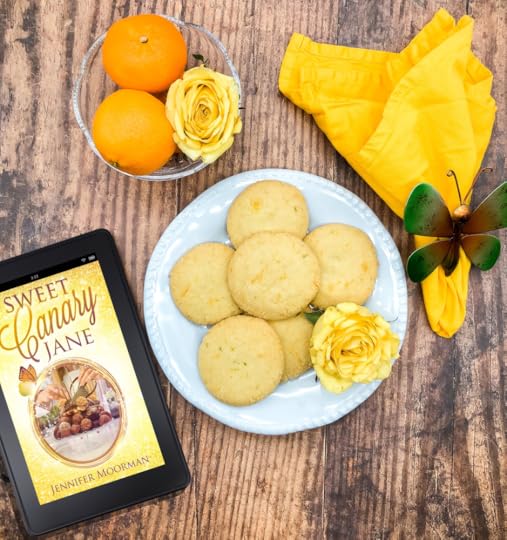 Not only are they delicious, with a zing of citrus and sugary crumbly texture, they also offer healing, relief, and restoration for heartache and broken relationships. A half dozen of these will encourage strength, success, and love in friendship.
Go on, buy a dozen and share them with the ones you love.
Friendship Cookies
Yield: 5 Dozen
Flavored with orange, lemon and lime, you'll get chewy, sweet cookies with a punch of zest and rolled in sugar.
Ingredients
3/4 cup unsalted butter, softened
1 1/2 cup granulated sugar, divided
1 egg
2 cup all-purpose flour
1 1/2 tsp baking powder
1/2 tsp baking soda
1 orange, zested
1 lemon, zested
1 lime, zested
1 tsp juice of each citrus fruit
Instructions
1. In a small bowl, zest all the citrus. Remove about 2 tsp of zest and place in a separate bowl. Add 1/2 cup granulated sugar to the 2 tsp of zest. Combine with a fork and set aside.
2. In a mixing bowl, add butter and remaining 1 cup sugar. Beat for 1-2 minutes. Add egg and beat until combined. Add flour, baking powder and baking soda. Beat until combined. Slowly add in zest.
3. Line a baking sheet with parchment paper. Roll cookies into 3/4-1inch balls. Then roll them in the sugar/zest mixture, coating generously. Place ball on cookie sheet and repeat. Using a flat bottom of a cup, press the ball slightly to form a disc. Repeat for all balls. I then pressed a little extra sugar on the tops of the cookies at this point (totally optional). Bake in a 350 degree oven for 10-12 minutes. Remove and cool on wire rack.
4. Store in a covered container for up to a week. ENJOY.
October 27, 2020
A Spook-tacular Tart
 I have always loved Halloween. Not the super-creepy, jump-out-from-the-bushes aspects of the spooky holiday, though. I love the costumes, the decorations, the way candy becomes a food group!
But what I love most of all is baking a Halloween-inspired treat.
 This year I decided to step way out of my comfort zone and try a few new tricks for this treat. I'd like to yell out a special thanks to my BFF Baking Buddy, Han, over a
SugarYums
who let me play the part of her Sorceress’ Apprentice. She’s the Jedi Master to my padawan, but look what I learned!
This year I decided to step way out of my comfort zone and try a few new tricks for this treat. I'd like to yell out a special thanks to my BFF Baking Buddy, Han, over a
SugarYums
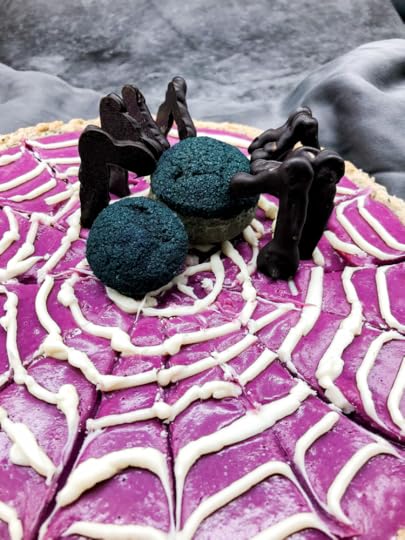
who let me play the part of her Sorceress’ Apprentice. She’s the Jedi Master to my padawan, but look what I learned!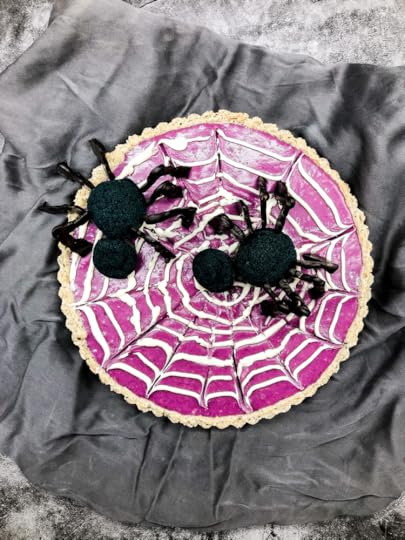 I made crème pâtissière, craquelin, frangipane, and choux pastry for the first time! We created a Spiderweb Blackberry and Pistachio Tart with a black sesame tart crust; pistachio, honey & lemon frangipane; and blackberry ganache.
 The Black Widow Spider Choux Puffs are filled with a decadent crème pâtissièret and topped with black craquelin.
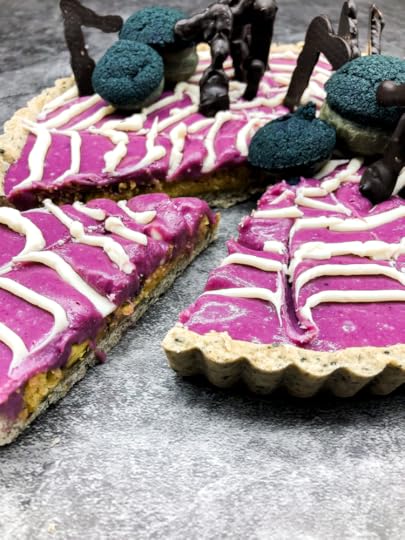 I hope this spook-tacular treat makes you smile because let’s creep it real here: My black widow spiders look a lot more like mild-mannered Aragogs than scary. But here’s to learning new techniques, spending a fantastical day with my BFF Baking Buddy (via Zoom), and eating delicious treats!
Wanna see Han's jaw-dropping version over on SugarYums?! Yes, yes you do, very much so! Creep on over to her Instagram page as well!
Wanna take a stab at this recipe? Don't be scared! If I can do this, so you can you! Find the full recipe HERE on SugarYums!


