
Jennifer Moorman's Blog, page 7
February 5, 2023
S'mores Cupcakes
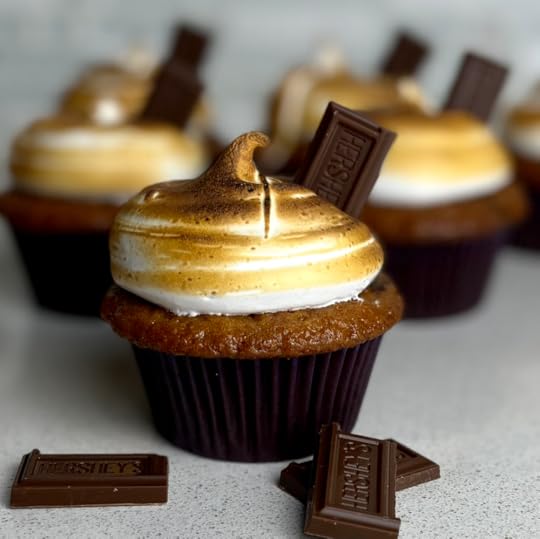
One of my favorite treats when the weather is cold and there's a campfire nearby is a S'mores. The gooey toasted marshmallow and melty chocolate sandwiched between crunchy graham crackers—yes, please!

How about this fun version of a favorite winter treat? All the flavors you love of a S'mores baked into a delicious soft cupcake!
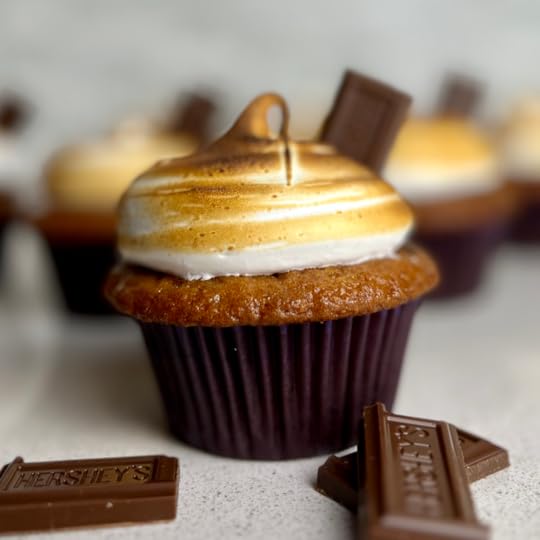 S'mores Cupcakes
Level: Easy
Total: 50 min (plus cooling time)
Active: 25 min
Yield: 9 cupcakes
Ingredients
Cupcakes
¾ cup all-purpose flour
½ cup graham cracker crumbs
1 teaspoon baking soda
½ teaspoon baking powder
¼ teaspoon kosher salt
¼ cup plus 1 tablespoon vegetable oil, divided
¾ cup granulated sugar
1 egg
¾ teaspoon vanilla extract
½ cup buttermilk
2 tablespoons boiling water
2 tablespoons dark cocoa powder
Marshmallow Topping
3 egg whites
¾ cup granulated sugar
¼ teaspoon kosher salt
½ teaspoon vanilla extract
12 squares milk chocolate, optional
Directions
1. For the cupcakes: Preheat your oven to 350°F, and a line muffin tin with liners.
2. Whisk together the flour, graham cracker crumbs, baking soda, baking powder, and salt in a medium bowl.
3. Beat together ¼ cup of vegetable oil with the sugar, egg, and vanilla in a large bowl until light and fluffy, about 2 minutes, scraping down the bowl about halfway through.
4. Add about a third of the dry ingredients into the sugar and oil mixture, and stir gently until almost combined. Add in half of the buttermilk and continue to stir just until combined. Stir in another third of the dry ingredients followed by the remaining buttermilk and finally the remaining dry ingredients. Stir in the boiling water.
5. Whisk together the cocoa powder with the remaining 1 tablespoon of vegetable oil in a medium bowl. Scoop about 1 cup of the graham cracker cake batter into the cocoa mixture. Whisk to combine and set aside.
6. Pour about 2 tablespoons of the graham cracker cake batter into each cupcake liner followed by 2 tablespoons of the chocolate batter. Using a butter knife or skewer, swirl the batters together to achieve a marbled effect.
7. Bake cupcakes for 20 to 25 minutes, or until set and a toothpick inserted into the center of a cupcake comes out clean. Cool to room temperature.
8. For the marshmallow topping: Whisk together the egg whites, sugar, and salt in a large metal or glass bowl or the bowl of your stand mixer, and place it over a saucepan containing about 1 inch of simmering water. Cook the egg whites, whisking frequently, until they reach 160° F, about 4 to 5 minutes.
9. Remove the bowl from the heat, and whip the cooked meringue using a whisk attachment or hand mixer on high speed until stiff peaks form, about 4 to 5 minutes. Whip in the vanilla extract, then transfer the mixture to a piping bag fitted with a large round tip or a large resealable bag with the corner cut off. Pipe large dollops of the topping onto each cupcake.
10. Using a kitchen torch, toast the marshmallow meringue until golden brown. If you do not have a torch, you can place the cupcakes under the broiler for a minute or two until toasty. If desired, garnish with a piece of milk chocolate.
11. Store the cupcakes in the fridge for up to 3 days, letting them sit at room temperature for about 30 minutes to soften up before eating.
 Ready for your next baking adventure through fiction? What happens if you create a man out of dough? Grab your copy of
The Baker's Man
today and find out!
Ready for your next baking adventure through fiction? What happens if you create a man out of dough? Grab your copy of
The Baker's Man
today and find out!


February 3, 2023
Triple Chocolate Muffins
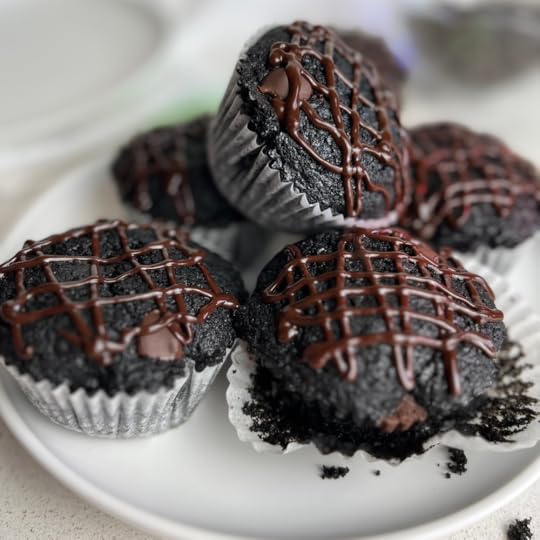
Anybody up for dessert for breakfast?! I don't know about you, but I never turn down chocolate. Never ever.
These Triple Chocolate Muffins are decadent, dense, and extra in all the best ways thanks to rich chocolate bars, dark cocoa powder, and dark chocolate chips. In case you're wondering, yes, these are August Gloop approved!
Triple Chocolate Muffins
Yield: 16—18 muffins
Ingredients
1 ½ cups vegetable oil
1 cup granulated sugar
¾ cup firmly packed light brown sugar
3 large eggs
¼ cup unsalted butter, melted
½ cup sour cream or yogurt
2 teaspoons vanilla extract
½ teaspoon distilled white vinegar
3 cupes all-purpose flour
¾ cup plus 1 tablespoon cocoa powder
3 ½ teaspoons baking powder
1 teaspoon kosher salt
¾ teaspoon baking soda
½ teaspoon instant espresso powder
1 ½ cups buttermilk
2 ½ cups 63% cacao dark chocolate chips, divided
½ cup heavy whipping cream
Garnish: flaked sea salt
Directions
1. Preheat oven to 425F. Line 2 muffin pans with muffin liners.
2. In a large bowl, whisk together oil, sugars, eggs, and melted butter until well combined, 2 to 3 minutes. Add sour cream, vanilla, and vinegar, and stir until combined and smooth.
3. In a medium bowl, sift together flour, cocoa, baking powder, kosher salt, baking soda, and espresso powder. Add half of flour mixture to oil mixture, and stir. Add buttermilk, and stir until combined. Add remaining flour mixture. Stir until just combined.
4. Fold 1 cup chocolate chips. Fill each prepared muffin cup with ¼ cup batter. Sprinkled ½ cup chocolate chips on top of batter.
5. Bake for 5 minutes. Reduce oven temperature to 350F, and bake until wooden pick inserted in center comes out with a few moist crumbs, 13–15 minutes more. Repeat until all batter is used.
6. In a small microwave-safe bowl, heat cream and remaining 1 cup chocolate chips on high for 45 seconds; stir. Heat on high for 15 seconds, and whisk together until smooth. Drizzle on top of muffins, and garnish with sea salt, if desired. Refrigerate in airtight container for up to 3 days.
Ready for your next adventure? Grab your copy of
The Baker's Man
today!
January 22, 2023
Spiced Eggnog Oatmeal Cream Pies
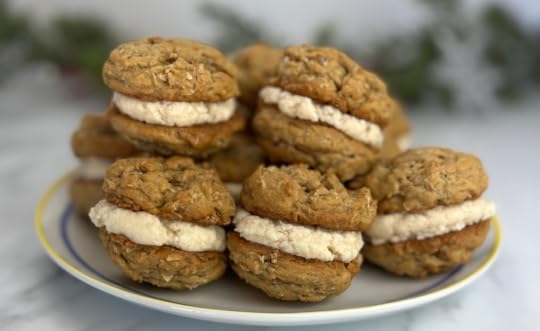
Spiced Eggnog Oatmeal Cream Pies for the win! Yes, the are holiday-flavored, BUT you can swap out the eggnog for your favorite coffee creamer flavor or milk.
I found a delicious oat milk cookie butter flavor recently and remade the recipe—fabulous!
Spiced Eggnog Oatmeal Cream Pies
For the Cookies
1 1/2 c all-purpose flour
1 tsp ground cinnamon
1/2 tsp ground nutmeg
2/3 c old-fashioned oats
3/4 tsp baking soda
1/2 tsp salt
1/2 c unsalted butter, room temp
1 c packed brown sugar
2 tbsp eggnog, at room temperature
1 large egg, at room temperature
1 tsp pure vanilla extract
For the Eggnog Buttercream Filling
10 tbsp unsalted butter, room temp
2 c confectioners’ sugar
3 tbsp eggnog, at room temperature
1/4 tsp pure vanilla extract
pinch each salt, ground cinnamon, and ground nutmeg
Directions Make the cookies: Whisk flour, cinnamon, nutmeg, oats, baking soda, and salt together in a medium bowl. Set aside. Using a mixer, beat butter and brown sugar together on medium-high until creamed, about 2 minutes. Add egg, eggnog, and vanilla, and beat on high until combined, about 1 minute. Scrape down the sides and up the bottom of the bowl and beat again as needed to combine. Add flour mixture to the wet ingredients and mix on low until combined. Dough will be very sticky. Cover dough tightly, and chill in the refrigerator for at least 2 hours. Preheat oven to 350°F. Line large baking sheets with parchment paper or silicone baking mats. Set aside. Scoop chilled dough, about 1 heaping tbsp, and place 3 inches apart on baking sheets. Bake for 11–12 minutes, or until very lightly browned around the edges. The centers will look very soft. Remove from the oven, and allow cookies to cool on the baking sheet for 10 minutes before transferring to a wire rack to cool completely. Make the buttercream filling: Using mixer, beat softened butter on high until creamy, about 1 minute. Add confectioners’ sugar and beat on medium for 1–2 minutes. Pour in eggnog and vanilla, and add a pinch each of cinnamon, nutmeg, and salt. Beat on high for 2–3 minutes until fluffy. Smear cream filling on the bottom side of half of the cookies; top with remaining cookies, right side up. Cover and store leftover cookies at room temperature for up to 1 day. Or store in the refrigerator for up to 1 week to keep the creamy filling fresh.Ready for your next adventure? Grab your copy of
The Baker's Man
today!
January 4, 2023
Maple Pound Cake
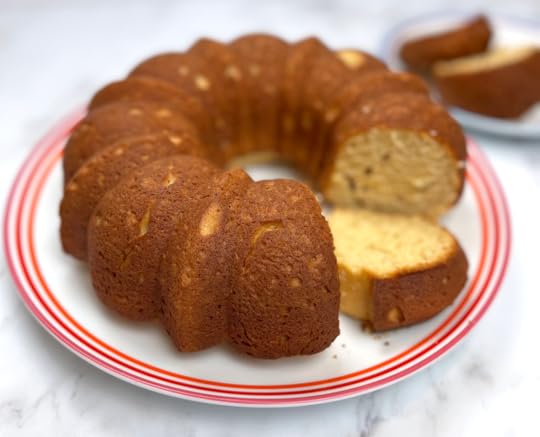
Hope Magazine is highlighting my Maple Pound Cake! Warm maple flavors and a rich glaze makes this moist, tender cake perfect for the cool weather.
This is a great recipe for using that Bundt pan that's been sitting around waiting for you to notice it. Don't have a Bundt pan? No problem! You can bake this recipe in a traditional loaf pan too.
Head to Hope's website for the full recipe! Click HERE or the on the image above!
December 27, 2022
Chocolate Peppermint Cheesecake Swirl Brownies
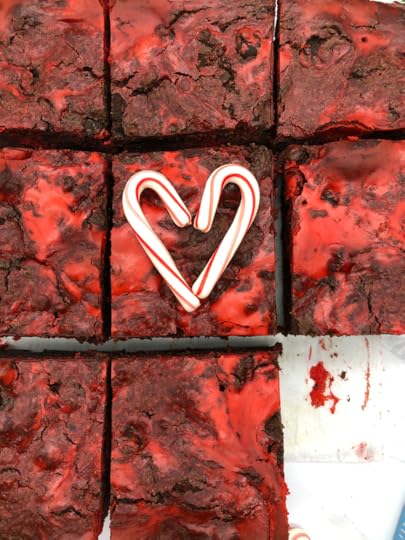 If you're looking for a 5-Star brownie, this is it! My Chocolate Peppermint Cheesecake Swirl Brownies are inspired by the 5-Star
Acqualina Resort & Residences on the Beach
! The vibrant red cheesecake swirl highlights the gorgeous crimson that accents the Acqualina Resort & Spa on the beach.The Acqualina gifted their guests a copy of my magical realism novel ✨
THE BAKER’S MAN
✨! So while you treat yourself to a piece (or two!) of this dessert that will leave you feeling inspired and thankful, why not relax by the pool or on the beach as you follow the life of a small-town baker who creates a man out of dough and turns her life upside down!
If you're looking for a 5-Star brownie, this is it! My Chocolate Peppermint Cheesecake Swirl Brownies are inspired by the 5-Star
Acqualina Resort & Residences on the Beach
! The vibrant red cheesecake swirl highlights the gorgeous crimson that accents the Acqualina Resort & Spa on the beach.The Acqualina gifted their guests a copy of my magical realism novel ✨
THE BAKER’S MAN
✨! So while you treat yourself to a piece (or two!) of this dessert that will leave you feeling inspired and thankful, why not relax by the pool or on the beach as you follow the life of a small-town baker who creates a man out of dough and turns her life upside down! A waterfall of thank yous to the Acqualina Resort & Spa and
Bedside Reading
for believing in me and my novels enough to share them with the world ❤️Who’s ready for a brownie and a resort retreat that will change your life?
A waterfall of thank yous to the Acqualina Resort & Spa and
Bedside Reading
for believing in me and my novels enough to share them with the world ❤️Who’s ready for a brownie and a resort retreat that will change your life?Chocolate Peppermint Cheesecake Swirl BrowniesServes: 16Ingredients8 ounces cream cheese, softened1 ¼ cups sugar, divided4 large eggs, room temperature and divided½ teaspoon peppermint extract20 drops of food coloring or red gel (optional)4 ounces 70% cacao dark chocolate, chopped¾ cup unsalted butter½ cup firmly packed brown sugar2 teaspoons vanilla extract1 teaspoon kosher salt½ cup all-purpose flour¼ cup unsweetened cocoa powderDirections1. In the bowl of a stand mixer fitted with the paddle attachment, beat cream cheese at medium speed until smooth and creamy, approximately 2 minutes. Add ¼ cup sugar, and beat at medium speed for 2–3 minutes.2. Add 1 egg and peppermint extract, and beat until smooth and well combined.3. Add food coloring, if using. Transfer cheesecake batter to a large bowl; set aside.4. Place chopped chocolate in a medium heatproof bowl.5. In a small saucepan, heat butter over medium heat. Cook, stirring frequently, just until butter comes to a vigorous simmer. Immediately pour hot butter over chocolate. Let stand for 2 minutes, and then whisk until smooth.6. Preheat oven to 350 degrees F.7. In the bowl of stand mixer fitted with the whisk attachment, beat brown sugar, vanilla, salt, remaining 1 cup of sugar, and remaining 3 eggs at high speed for exactly 10 minutes. It will look like a very thick batter.8. With mixer running, pour in slightly cooled chocolate mixture, and beat at medium speed until smooth.9. Butter (or use baking spray) an 8-inch square baking pan. Line pan with parchment paper, letting excess extend over sides of pan. Butter (or spray) parchment.10. In a small bowl, sift together flour and cocoa. Using a spatula, gently fold flour mixture into chocolate mixture just until combined.11. Pour half of the brownie batter in prepared pan, smoothing top with a spatula. Top with half of cheesecake batter. Repeat layers once. Using a small spatula or butter knife, gently swirl batters together to create a marbled effect.12. Bake until wooden pick inserted in the center comes out clean, 45–50 minutes. Let cool completely in pan.13. The center of the brownies will seem slightly underbaked, but the brownies will continue to cook and set as they cool. Using excess parchment as handles, remove from pan, and cut into 16 brownies.
Ready for your next adventure? Grab your copy of
The Baker's Man
today!
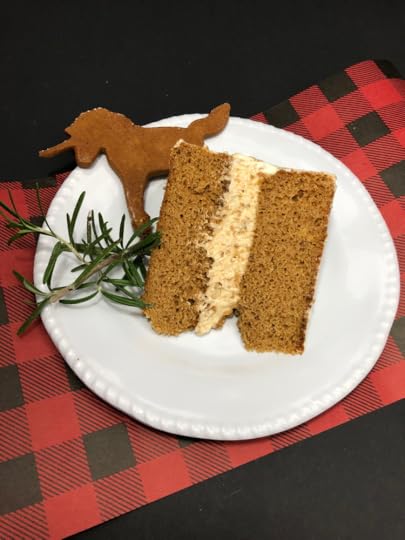
December 17, 2022
Magical Gingerbread Cake
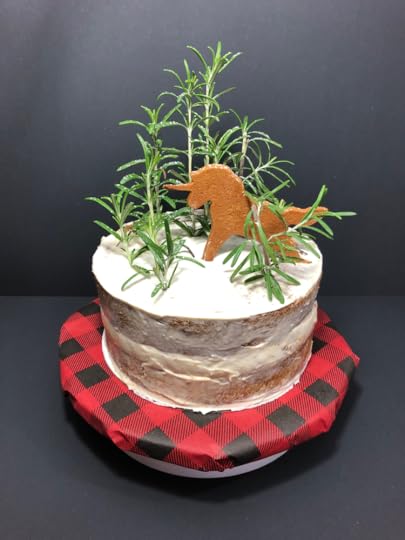
Anyone who’s been to Mystic Water (and if you haven’t, book a flight, a car, a train, and get there immediately!) knows they take their seasons and holidays seriously. Meaning, they love having a good time, celebrating, laughing, and getting together for nearly any reason.

Christmas is one of the most celebrated seasons of the year in Mystic Water. Colorful, sparkling lights are hung on houses and strung through trees, they twinkle in the downtown park and outline North Pole characters and giant gift boxes. Children count down the seconds after sunset until the lights turn on, and then they squeal with delight and run around the displays.
Letters to Santa collect at the post office until they can be delivered to the jolly old man. The whole town smells like baked goods—iced sugar cookies, chocolate chip cookies, deep rich chocolate truffles, and the warm, cozy scent of gingerbread.

Bea’s Bakery creates a magical gingerbread cake that locals rush in for as soon as December arrives, and then they talk about the delicious slices for the rest of the year. The bakery likes to surprise customers with what gingerbread cookie will be sitting atop the cake for the day. This one was created just for the young at heart and those who still believe in the magic all around.

Magical Gingerbread Cake
Serves 12
Level of Difficulty: as easy as eating a half dozen gingerbread cookies straight out of the oven
Ingredients
For the cake:
1/2 cup white sugar
1/2 cup butter
1 egg
1 cup molasses
2 1/2 cups all-purpose flour
1 1/2 teaspoons baking soda
1 teaspoon ground cinnamon
1 teaspoon ground ginger
1/2 teaspoon ground cloves
1/2 teaspoon salt
1 cup hot water
For the cream cheese icing:
1/2 cup unsalted butter, softened
8 oz brick-style cream cheese, softened
3–3.5 cups powdered sugar, sifted
1 tsp vanilla extract
1/4 tsp salt
1-2 tablespoons cream or milk, as needed
How to Make
For the cake:
Preheat oven to 350 degrees F (175 degrees C). Grease and flour 2 8-inch (or smaller) circle pans. In a large bowl of a stand mixer, cream together the sugar and butter. Beat in the egg, and mix in the molasses. In a bowl, sift together the flour, baking soda, salt, cinnamon, ginger, and cloves. Blend into the creamed mixture. Stir in the hot water. Pour into the prepared pan. Bake 1 hour in the preheated oven, until a knife inserted in the center comes out clean. Allow to cool in pan before serving.
For the cream cheese icing:
In a large bowl of a stand mixer, beat together the butter and cream cheese until evenly combined. Mix in the vanilla extract and salt. Beat in the powdered sugar about ¼ cup at a time until the desired sweetness level is reached. Then beat in 1-2 tablespoons of cream as needed. If the mixture is thin, you may not need to add any cream. Frost the cooled cake. Then optionally decorate with gingerbread cookies and fresh rosemary.
Recipe inspired by ,The Baker's Man and the town of Mystic Water.
#cookingthroughfiction #recipe #thebakersman
December 4, 2022
Bûche de Noël (Yule Log)
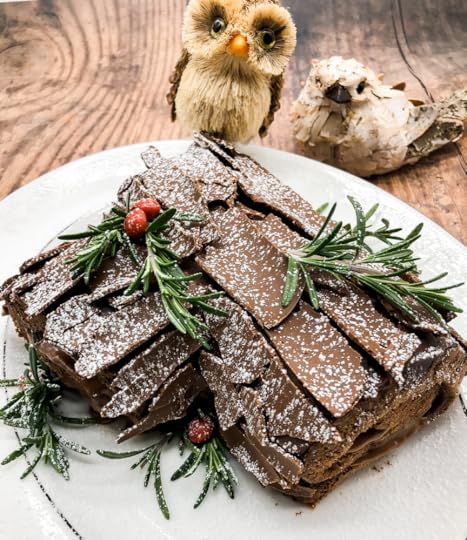 It's That Time of Year!Yule logs are a tradition I didn't grow up with, but as part of a December baking challenge, I baked my first chocolate roll cake. Did you grow up baking yule logs? Have you ever eaten one?
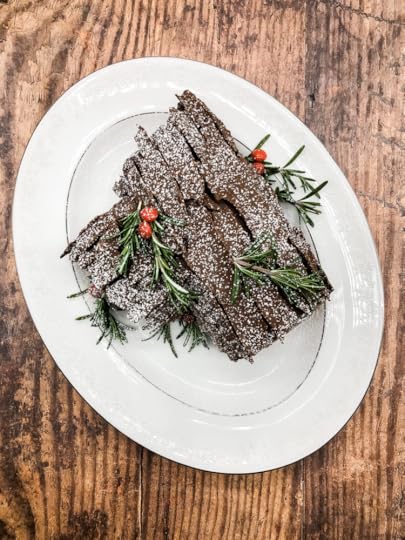 My Bûche De Noël (also called a Yule Log) is a first-time attempt for me on this classic holiday roll cake. It's inspired by the holiday, of course, and by my small-town baker, Anna, in my magical realism novel ,The Baker's Man!At her bakery in Mystic Water, Anna loves bringing people together with her baked goods because baked goods find our smiles and fill our hearts with joy. Even smelling a delicious cake baking in the oven makes us slow down, breathe deeper, and sigh.During the holiday season, Anna hosts a Bûche De Noël decorating party! I never turn down a decorating party in Mystic Water. But I kept the decorations simple this year.
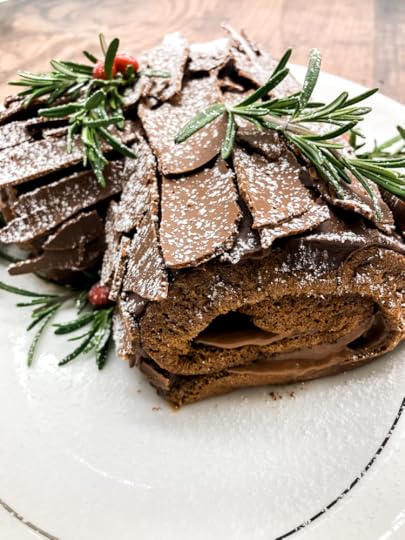 My chocolate roll cake is filled with Nutella mousse, coated in a thin layer of dark chocolate ganache, and covered with a milk chocolate bark. Adorned with fresh rosemary from the garden and red Skittles (hey, we use what we have, right?), this cutie is finished off with a dusting of confectioner's sugar.Bûche De Noël or Yule LogServes: 6–8Level of Difficulty: Medium-Difficult (only the rolling part)IngredientsFor the cake:4 eggs, yolks and whites separated1/2 cup sugar1/4 cup unsweetened cocoa powder1/3 cup cake flour1/2 teaspoon instant coffee granules1 teaspoon baking powder1/4 teaspoon saltFor the filling:2 cup heavy whipping cream1 NutellaFor the frosting:6 ounces dark or bittersweet chocolate chips, approximately 3/4 cup1 1/2 tablespoons softened unsalted butter1 teaspoon instant coffee granules2/3 cup heavy cream1/2 teaspoon vanilla extractcranberries and rosemary for garnishingDirections Preheat your oven to 425°F and line a baking sheet or jelly roll pan with parchment paper. Set aside. Drop the egg whites into the bowl of a stand mixer. Whisk on high speed for approximately 2 to 3 minutes, until wet, soft peaks form. You want the whites to stay hanging on your whisk when they're held upside down, but you don't want them so stiff and dry like you would for a meringue (aim for softly curled tips). Set the whites aside. In a large bowl, whisk the egg yolks and sugar together until they're pale yellow. In a separate, smaller bowl, sift the cocoa powder, cake flour, coffee granules, baking powder, and salt together. Add these dry ingredients to the bowl containing the egg yolks and sugar. Whisk to combine (the batter will be thick and hard to mix, but this is okay! Do your best to mix everything together). Add in half of the egg whites, and use a rubber spatula to gently fold the whites into the batter. You don't have to be extra gentle at this point since you are merely trying to loosen up the batter with the egg whites. Now, add the remaining half of egg whites and, this time, be
very
gentle when folding the whites into the batter with your spatula; make light, long folds. Pour the batter into the prepared pan and use your spatula to gently smooth out the batter. Don't tap the pan or move the pan side to side (you don't want to ruin the air bubbles you created with the whipped egg whites). Bake the cake for 6 to 7 minutes, or until the cake springs back when gently pressed by the tip of your finger. Don't overbake! Let the cake cool in the pan for 2 minutes, no longer! Meanwhile, prepare a kitchen towel by sprinkling powdered sugar all over it. Flip the cake out onto the towel and very gently peel the parchment paper off inch by inch. Grab one of the short sides of the cake and roll it toward the other short side, rolling the towel with it as you go. Let the cake remain in this rolled shape until it's completely cool. (Note: It’s important to do this while the cake is still warm as the cake is still flexible at this point and this prevents the cake from cracking or tearing as you roll it). Meanwhile, create the frosting by adding the chocolate chips, coffee granules, unsalted butter, and vanilla extract to a medium bowl. Heat the heavy cream over medium-low heat until it’s hot but not boiling (the edges should begin to simmer and steam should rise from the cream). Pour this hot cream over the chocolate and contents in the bowl, then use a spoon to stir the mixture together until it’s completely smooth. Cover the bowl with a sheet of plastic wrap and refrigerate for 30 minutes, no longer! I used Nutella mousse to fill my roll, but this is where you can get creative! You can use buttercream (any flavor, like peppermint, coffee, vanilla, cherry, etc.). You can also use a marmalade. Your creativity has no limits. If using the Nutella mousse, whip the ingredients together until stiff peaks form (but do not overwhip or you'll get Nutella butter, yikes or yum?!), After the cake is completely cooled, gently unroll it, smear it with your filling of choice, leaving 1/4 inch around the side. It doesn't take much filling, so don't be tempted to overfill it or else the filling with squish out! Roll the filled cake gently. Don't worry if this one cracks because you'll be covering it in chocolate ganache. Cover with ganache, and decorate! I made milk chocolate bark and used confectioner's sugar!
My chocolate roll cake is filled with Nutella mousse, coated in a thin layer of dark chocolate ganache, and covered with a milk chocolate bark. Adorned with fresh rosemary from the garden and red Skittles (hey, we use what we have, right?), this cutie is finished off with a dusting of confectioner's sugar.Bûche De Noël or Yule LogServes: 6–8Level of Difficulty: Medium-Difficult (only the rolling part)IngredientsFor the cake:4 eggs, yolks and whites separated1/2 cup sugar1/4 cup unsweetened cocoa powder1/3 cup cake flour1/2 teaspoon instant coffee granules1 teaspoon baking powder1/4 teaspoon saltFor the filling:2 cup heavy whipping cream1 NutellaFor the frosting:6 ounces dark or bittersweet chocolate chips, approximately 3/4 cup1 1/2 tablespoons softened unsalted butter1 teaspoon instant coffee granules2/3 cup heavy cream1/2 teaspoon vanilla extractcranberries and rosemary for garnishingDirections Preheat your oven to 425°F and line a baking sheet or jelly roll pan with parchment paper. Set aside. Drop the egg whites into the bowl of a stand mixer. Whisk on high speed for approximately 2 to 3 minutes, until wet, soft peaks form. You want the whites to stay hanging on your whisk when they're held upside down, but you don't want them so stiff and dry like you would for a meringue (aim for softly curled tips). Set the whites aside. In a large bowl, whisk the egg yolks and sugar together until they're pale yellow. In a separate, smaller bowl, sift the cocoa powder, cake flour, coffee granules, baking powder, and salt together. Add these dry ingredients to the bowl containing the egg yolks and sugar. Whisk to combine (the batter will be thick and hard to mix, but this is okay! Do your best to mix everything together). Add in half of the egg whites, and use a rubber spatula to gently fold the whites into the batter. You don't have to be extra gentle at this point since you are merely trying to loosen up the batter with the egg whites. Now, add the remaining half of egg whites and, this time, be
very
gentle when folding the whites into the batter with your spatula; make light, long folds. Pour the batter into the prepared pan and use your spatula to gently smooth out the batter. Don't tap the pan or move the pan side to side (you don't want to ruin the air bubbles you created with the whipped egg whites). Bake the cake for 6 to 7 minutes, or until the cake springs back when gently pressed by the tip of your finger. Don't overbake! Let the cake cool in the pan for 2 minutes, no longer! Meanwhile, prepare a kitchen towel by sprinkling powdered sugar all over it. Flip the cake out onto the towel and very gently peel the parchment paper off inch by inch. Grab one of the short sides of the cake and roll it toward the other short side, rolling the towel with it as you go. Let the cake remain in this rolled shape until it's completely cool. (Note: It’s important to do this while the cake is still warm as the cake is still flexible at this point and this prevents the cake from cracking or tearing as you roll it). Meanwhile, create the frosting by adding the chocolate chips, coffee granules, unsalted butter, and vanilla extract to a medium bowl. Heat the heavy cream over medium-low heat until it’s hot but not boiling (the edges should begin to simmer and steam should rise from the cream). Pour this hot cream over the chocolate and contents in the bowl, then use a spoon to stir the mixture together until it’s completely smooth. Cover the bowl with a sheet of plastic wrap and refrigerate for 30 minutes, no longer! I used Nutella mousse to fill my roll, but this is where you can get creative! You can use buttercream (any flavor, like peppermint, coffee, vanilla, cherry, etc.). You can also use a marmalade. Your creativity has no limits. If using the Nutella mousse, whip the ingredients together until stiff peaks form (but do not overwhip or you'll get Nutella butter, yikes or yum?!), After the cake is completely cooled, gently unroll it, smear it with your filling of choice, leaving 1/4 inch around the side. It doesn't take much filling, so don't be tempted to overfill it or else the filling with squish out! Roll the filled cake gently. Don't worry if this one cracks because you'll be covering it in chocolate ganache. Cover with ganache, and decorate! I made milk chocolate bark and used confectioner's sugar!Coming Soon! THE BAKER'S MAN!!!
November 26, 2022
Slow Cooker Sloppy Joes

Hope Magazine is highlighting my Slow Cooker Sloppy Joes! Put away the canned sauce and give these a try. They are truly the best version of a childhood favorite!
Prep time only takes 15 minutes—rather than spending all evening in the kitchen, dinner can simmer in your slow cooker while you do what really matters: spend time with your family.
Head to Hope's website for the full recipe! Click HERE or the on the image above!
October 28, 2022
Punk Rock Pink Animal Pasta
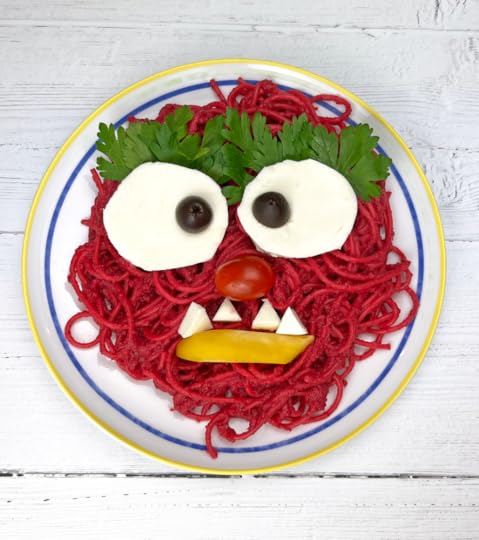
Having fun with beet sauce and spaghetti noodles! Recognize this face? It's one of my favorite Muppets: Animal! Recipe from Disney Eats cookbook, which is full of fantastical and delicious recipes.
Check out this fun video montage of it all coming together! Shared also on my Instagram page HERE!
https://video.wixstatic.com/video/ea0562_a8b6589e5272440ba3ec6bdc04ecec3e/720p/mp4/file.mp4October 4, 2022
Baking Class with Jennifer Moorman
 Join Me!Free Cooking ClassLivestream baking experience with recipes inspired by fiction.
October 22 at 11 AM Eastern.
Join Me!Free Cooking ClassLivestream baking experience with recipes inspired by fiction.
October 22 at 11 AM Eastern.
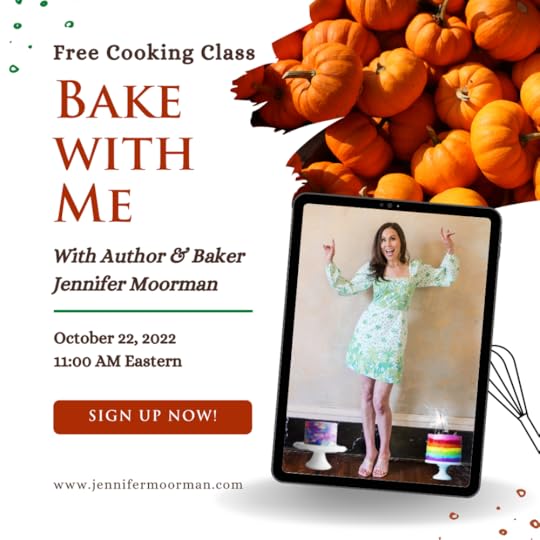
Join me for a whimsical time of cooking through fiction where our baking experience happens live via Zoom from my kitchen and yours!
On October 22 we'll be baking Savory Pumpkin Hand Pies and Caramel Apple Pie Bars, which are inspired by our favorite Halloween treats. Don't miss these spooktacular treats!
Once you've signed up, you’ll receive an email with all the class information, the recipe, and a detailed list of ingredients and the quantities you'll need to make this recipe at home.
Come enjoy a FREE and fun cooking class where you’ll not only smile and laugh but you’ll also have a delicious treat to share with loved ones!
Adults & children (with supervision) are welcome! No previous cooking experience required!
 Pumpkin Hand Pies & Caramel Apple Pie Bars
“There is something at work in my soul, which I do not understand.”
Mary Shelley, Frankenstein
 Let's Bake Together!


