
Jennifer Moorman's Blog, page 5
November 27, 2023
Waffle House Waffles

I had the privilege of being asked to read an ARC and endorse ,,KINFOLK, and wow, this heartfelt storytelling is masterful and genuine and takes you into the South in a way only Sean can do. Read my endorsement below!
Also, ,,KINFOLK inspired these copycat Waffle House Waffles!
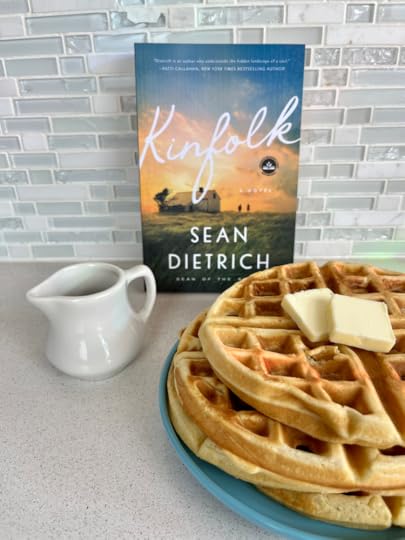
“Sean Dietrick is a master at creating Southern characters who are relatable in their brokenness, hope, and perseverance. Laugh-out-loud colloquialisms bring sincerity and realism to small-town life. Kinfolk spins both a heartbreaking and heartwarming tale about family, redemption, second chances, and the power of love that moves us all.”
❤️ Special thanks to Harper Muse @harpermusebooks for the opportunity!


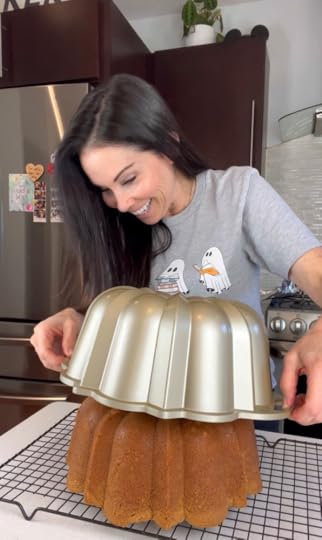
November 12, 2023
Cookie Butter Bundt Cake

I can’t say enough amazing things about this cake! It’s delicious, and if you’re a fan of Biscoff cookies @lotusbiscoffus or cookie butter, this cake is for you Recipe by Baked from Scratch @thebakefeed
October 7, 2023
Courage Quiche
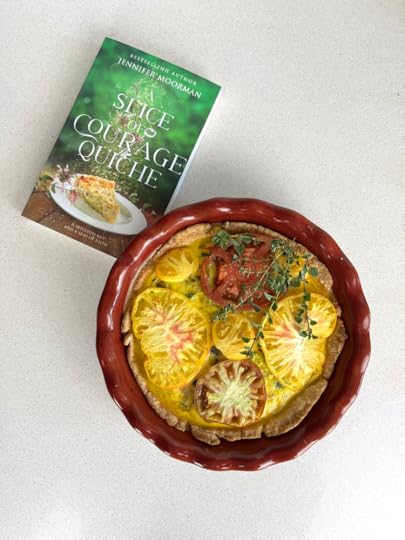
This magical quiche recipe is baked in a super flaky homemade pie crust and filled with a variety of mood-boosting ingredients, including saffron. One slice and you're guaranteed to feel braver. Eat willy-nilly from the dish, and prepare yourself to be amazed at what happens next.
Recipe inspired by and included in my book A SLICE OF COURAGE QUICHE!

Recipe inspired by
Grab your copy today from your favorite retailer!
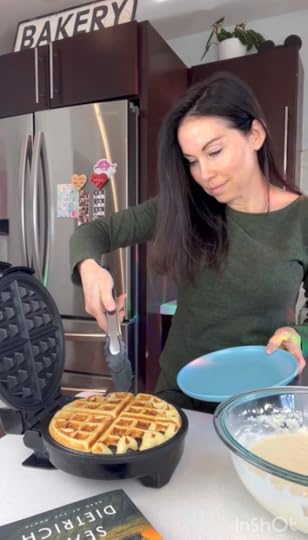
September 28, 2023
Strawberry Pancakes

STRAWBERRY PANCAKES!
Inspired by A SLICE OF COURAGE QUICHE. Tessa’s attempt at making these is a complete disaster! But they’re actually super easy to make. Quick, easy, and delicious.
Douse them with your favorite syrup. I've always been a fan of maple syrup, but most of my family eats pancakes with cane syrup, a Southern favorite!

I cooked my pancakes on a panini press that doubles as a grill (with switchable plates). You can cook these on any flat plan or even in a skillet, as long as it's level. Growing up, we had a pan dubbed "the grilled cheese pan," but we also used it for pancakes on Sunday morning.

Strawberry Pancakes
Strawberry Pancakes
These strawberry pancakes are light, fluffy, and packed with flavor. The vanilla makes this breakfast seem like dessert! Serve with butter and real maple syrup.
Prep Time: 10 mins
Cook Time:10 mins
Total Time: 20 mins
Ingredients
1 cup all-purpose flour
1 tablespoon brown sugar
1 tablespoon baking powder
1 teaspoon salt, or to taste
1 cup milk
1 large egg
2 tablespoons melted unsalted butter
1 tablespoon vanilla extract
1 cup chopped fresh strawberries
Directions
1. In a medium bowl, whisk flour, brown sugar, baking powder, and salt together.
2. Whisk together melted butter, egg, vanilla, and milk.
3. Add the wet ingredients to the dry ingredients, and whisk until well combined. There may be a few lumps, but don’t worry about these.
4. Let the batter rest for 10 minutes.
5. While the batter is resting, chop the strawberries into small cubes, discarding the leaves on top.
6. Fold the diced strawberries into the pancake batter.
7. Heat a flat-bottom pan over medium-high heat, and add a pat of butter or a tablespoon of oil to the surface of the pan. Scoop one-quarter cup of the batter, and pour it onto the heated pan.
8. When small bubbles appear on the surface of the pancake and burst, flip the pancake. Cook the other side for 2-3 minutes, until edges are slightly brown and set.
Recipe inspired by
Grab your copy today from your favorite retailer!
September 21, 2023
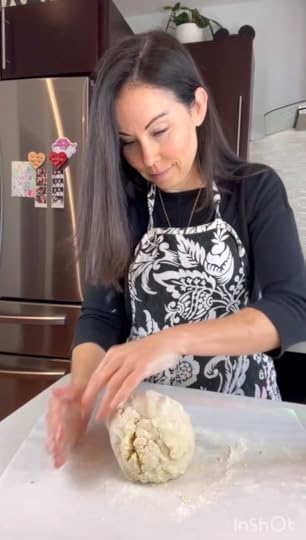
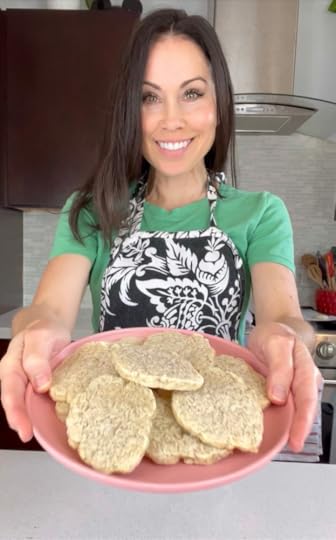
Lavender Cookies

Have you ever eaten Lavender Cookies?! These are inspired by my book THE NECESSITY OF LAVENDER TEA, and the book includes this recipe!

The shortbread-type cookie compliments the light lavender flavor ❤️ and they don’t taste like soap
Lavender Cookies
These light, buttery cookies have a subtle floral aroma. One bite will settle any restless heart and open the door for peace and calm. Paired with a cup of tea, these are perfect for a cozy day.
Prep Time: 20 minutes
Baking Time: 10 minutes
Chilling Time: 30 minutes
Total: 1 hour
Yield: 20 cookies
Ingredients
2 cups all-purpose flour
½ cup (1 stick) salted butter, cold
½ cup granulated sugar
1 teaspoon salt
1 teaspoon dried food-grade lavender buds
Instructions
Crush the dried lavender into smaller bits. In the bowl of stand mixer fitted with a paddle attachment, beat the sugar and butter until pale and fluffy, about two minutes. Add the crushed lavender and salt and mix for another minute. Sift the flour into the butter-sugar mixture. Add 1 to 2 tablespoons of ice-cold water, and mix on low until just incorporated. Turn out dough onto parchment paper, and knead for just a few seconds to combine all the crumbles into the dough. The dough should be soft but not sticky. If the dough seems too sticky, add 1 tablespoon flour at a time until it just starts to come together. Transfer the dough to a piece of plastic wrap. Shape the dough into a log about 2 inches in diameter and 8 inches long. Wrap up the log in plastic wrap, and put it into the freezer for 30 minutes to 1 hour. Line two cookie sheets with parchment paper, and preheat the oven to 325°F. Remove the dough from freezer and unwrap. Using a sharp knife, slice thin rounds off the log, and place them on the baking sheet, spacing the cookies 2 inches apart. Bake for 10 to 12 minutes. Watch the cookies closely while baking so they don’t overbake. It’s okay if the cookies look soft and underbaked. They continue to cook as they cool. Let cookies cool on the cookie sheet for 10 to 15 minutes or until they are set enough to be handled. Transfer the cookies to a wire rack, and cool completely.September 14, 2023
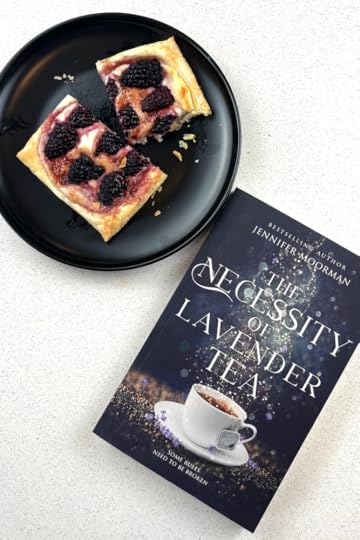
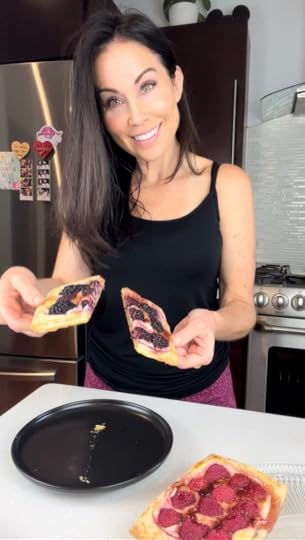
Quick and Easy Cream Cheese Danish
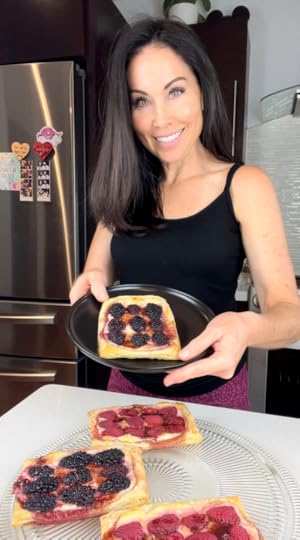
Super easy and delicious treat!
Inspired by THE NECESSITY OF LAVENDER TEA, these Quick and Easy Cream Cheese Danish topped with fruit are perfect for beginning bakers and kids (also great for everyone else)!
Another great thing about these danish is that the fruit can be changed out seasonally. In spring, berries are a delicious addition. In the fall, try stone fruit, pears, and apples.
Quick and Easy Cream Cheese Danish
Serves 8
Ingredients
1 (8-oz) package cream cheese, room temp
3 tablespoons granulated sugar
1 teaspoon vanilla extract
½ teaspoon grated lemon zest
3 tablespoons fruit jelly
½ teaspoon warm water, if needed
1 (17.3-oz) package frozen puff pastry sheets, thawed
All-purpose flour, for surface
2 (6-oz) packages fresh raspberries or blackberries
Directions
1. Preheat oven to 400 degrees F.
2. Stir together cream cheese, sugar, vanilla, and lemon zest until smooth.
3. In a separate bowl, whisk jelly until smooth, adding ½ teaspoon warm water, if needed.
4. Unfold 1 puff pastry sheet on a lightly floured surface. Roll into a 10 x 11-inch rectangle. Cut into quarters. Place pastry rectangles ½-inch apart on a parchment-lined baking sheet.
5. Prick centers of dough rectangles with a fork several times, leaving a ½-inch border. Spread half of the cream cheese mixture within the border (about 2 tablespoons per rectangle).
6. Arrange half of your desired fruit over the cream cheese. Spoon half the jelly over fruit. Brush pastry edges with beaten egg.
7. Bake until edges and bottoms are golden brown, about 22–30 minutes, covering loosely with foil during last 5 minutes if needed to prevent overbrowning. Repeat with the remaining puff pastry sheet. Enjoy!
September 8, 2023
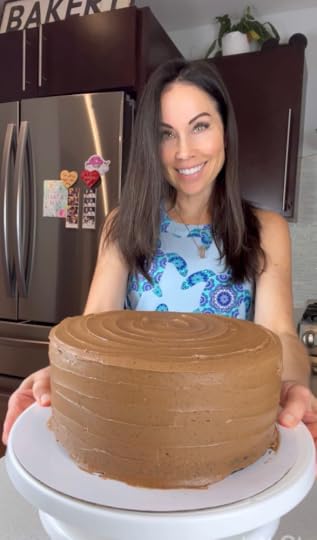
Hunka Burnin' Love Cake
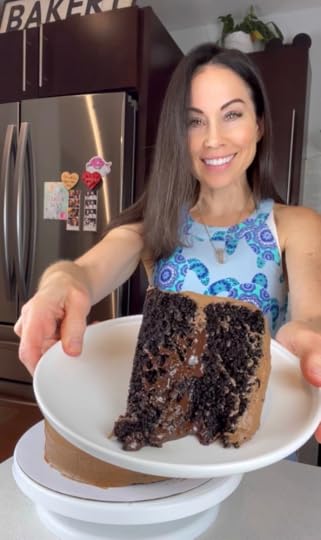
CHOCOLATE for the win!!!
This Hunka Burnin Love Cake is inspired by THE BAKER’S MAN Decadent chocolate cake, rich ganache, and espresso chocolate buttercream gives you THE richest, softest cake
QOTD: What’s your favorite cake flavor?
Hunka Burnin’ Love Cake
Difficulty: Average
Yields: 10–12 slices
Prep time: 1 hour
Baking & Finishing time: ~2 hours
Ingredients
For the Cake
2 cups sugar
1 ¾ cups all-purpose flour
¾ cup dark cocoa powder
2 teaspoons baking soda
1 teaspoon baking powder
1 teaspoon salt
2 eggs
1 cup buttermilk
2 teaspoon espresso powder in 1 cup hot water or 1 cup dark hot coffee
½ cup vegetable oil
1 teaspoon vanilla extract
For Dark Chocolate Ganache
1 cup heavy cream
8 ounces dark chocolate chips
For the Chocolate Frosting
6 ounces good semisweet chocolate
½ pound (2 sticks) unsalted butter, at room temperature
1 large egg yolk, at room temperature
1 teaspoon pure vanilla extract
1 ¼ cups sifted confectioners' sugar
1 tablespoon instant coffee powder
Directions
1. For the Cake: Preheat the oven to 350 degrees F. Butter two 8-inch x 2-inch round cake pans. Line with parchment paper, then butter and flour the pans.
2. Sift the flour, sugar, cocoa, baking soda, baking powder, and salt into the bowl of an electric mixer fitted with a paddle attachment and mix on low speed until combined. In another bowl, combine the buttermilk, oil, eggs, and vanilla. With the mixer on low speed, slowly add the wet ingredients to the dry. With mixer still on low, add the coffee and stir just to combine, scraping the bottom of the bowl with a rubber spatula.
3. Pour the batter into the prepared pans and bake for 30–35 minutes, until a cake tester comes out clean. Cool in the pans for 30 minutes, then turn them out onto a cooling rack and cool completely. Remove from pans and cool on wire rack.
4. For the Ganache: Heat cream in microwave safe bowl for 3 minutes. Pour hot cream over bowl of chocolate chips. Let sit for 2 minutes.
5. Stir until completely combined. Let cool for 10 minutes.
6. For the Chocolate Frosting: Chop the chocolate and place it in a heat-proof bowl set over a pan of simmering water. Stir until just melted and set aside until cooled to room temperature.
7. In the bowl of an electric mixer fitted with a paddle attachment, beat the butter on medium-high speed until light yellow and fluffy, about 3 minutes.
8. Add the egg yolk and vanilla and continue beating for 3 minutes. Turn the mixer to low, gradually add the confectioners' sugar, then beat at medium speed, scraping down the bowl as necessary, until smooth and creamy.
9. Dissolve the coffee powder in 2 teaspoons of the hottest tap water. On low speed, add the chocolate and coffee to the butter mixture and mix until blended. Don't whip!
10. Create a "dam" or line of frosting around the inside of the bottom cake round. Fill the center with the ganache. Place on top cake round, and cover the top and sides of cake with frosting. Best eaten immediately.
August 24, 2023
Mudslide Cookies

This brownie cookie recipe is all of the good parts of a brownie—crackly crust, fudgy middles, chewy edges and intense chocolate flavor—packed into one glorious cookie! When life feels as clear as mud, eat one of these rich cookies to invite a deep breath and watch how the path becomes clear.
Inspired by my novel, The Baker's Man, if you love brownies and cookies, you must bake these!

Mudslide Cookies
Prep time: 45 minutes
Chill time: 30 minutes
Cook time: 12 minutes
Total time: 1 hour 27 minutes
Servings: 16 large cookies or 32 medium-size cookies
Ingredients
8 ounces semisweet or bittersweet chocolate chips (60-70% cacao)
5 tablespoons unsalted butter
1 tablespoon canola oil
3 large eggs, room temperature
1 cup granulated sugar
¼ cup brown sugar
1 teaspoon vanilla extract
¾ teaspoon baking powder
¾ teaspoon salt
¾ cup + 1 tablespoon all-purpose flour
¼ cup unsweetened cocoa powder
½ cup mini semisweet chocolate chips
Directions
1. Melt 8 ounces semisweet or bittersweet chocolate chips and butter in a heavy saucepan over low heat, stirring constantly until melted and well-combined.
2. Remove from heat, and set aside.
3. In the bowl of a stand mixer fitted with a paddle attachment, beat the eggs, sugars, vanilla, baking powder, oil, and salt on high speed 5 minutes, or until the batter is thick and creamy. Make sure to beat the mixture for the full 5 minutes.
4. Reduce the speed to low, and mix in the melted chocolate until well-combined.
5. Fold in flour and cocoa powder just until combined.
6. Add mini chocolate chips. Fold to combine. The batter should be the consistency of a thick brownie batter.
7. Cover the batter, and chill for 30 minutes.
8. Preheat oven to 350 F. Line two baking sheets with parchment paper.
9. Using a 1.5 tablespoon cookie scoop, drop batter onto the prepared cookie sheets about 2 inches apart.
10. Bake cookies 8–12 minutes. The cookies will look puffed and cracked and set at the edges but still look a bit underdone in the center. Don’t overbake, or the cookies won’t be crackly and fudgy. The shiny, crackly crust will develop as the cookies cool on the baking sheet.
11. Let cool completely. Cookies are best the day of baking but will keep in an airtight container at room temperature for up to 2 days. Refrigerate for up to 1 week.
July 30, 2023
Key Lime Donuts

Key Lime Donuts! Lots of zesty, zingy lime flavor and topped with more zest and crushed graham crackers. If you can't find key limes, use regular limes!QOTD: What is your favorite summer flavor?
 Key Lime Donuts
For the Key Lime Donuts:
1 ¼ cups all-purpose flour
½ teaspoon baking powder
¼ teaspoon baking soda
¾ teaspoon salt
½ cup granulated sugar
2 tablespoons fresh lime zest
¼ cup buttermilk, room temp
1 large egg, room temp
3 tablespoons fresh key lime juice
3 tablespoons vegetable oil
For the Key Lime Glaze:
1 ½ cups confectioners’ sugar
2 tablespoons key lime juice
Green & yellow food coloring
Garnish: graham cracker crumbs, lime zest
For the Key Lime Coconut Donuts:
1. Preheat oven to 400 degrees F. Generously grease a donut pan; set aside.
2. In a small bowl, whisk together flour, baking powder, baking soda, and salt; set aside.
3. In a large bowl combine, sugar and lime zest until zest is evenly distributed in the sugar. Add in buttermilk, egg, lime juice, and oil and whisk.
4. Add in the dry ingredients and gently fold the mixture together using a rubber spatula, stirring only until mixture is evenly combined.
5. Divide the thick batter evenly among the molds of your prepared pan, filling each mold 2/3 full. Bake for 8–10 minutes, or until firm and lightly golden on the tops.
6. Remove pan from oven and allow donuts to cool for at least 10 minutes in the tray before transferring to a cooling rack to cool completely.
7. Make the Glaze: In a small bowl, combine juice and sugar, and whisk to combine. If the glaze appears too thick, add a little more lime juice until desired consistency is achieved; if glaze appears too thin, add a little more confectioners’ sugar.
8. Dip cooled donuts in the glaze. Garnish with graham cracker crumbs and lime zest. Let rest for 5 minutes, then enjoy!
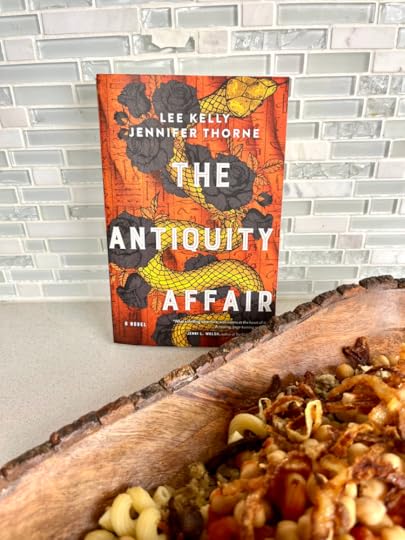
July 16, 2023
Koshari
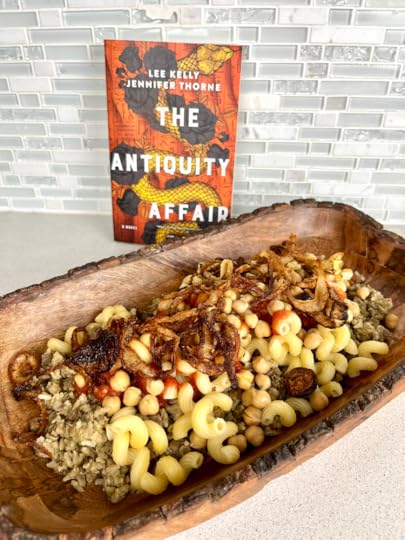
This koshari recipe is inspired by THE ANTIQUITY AFFAIR by authors @leeykelly and @jennmariethorne !
Koshari is an Egyptian comfort food dish, and it's delicious—made with lentils, rice, pasta, chickpeas, a spiced tomato sauce, and topped with crispy onions.
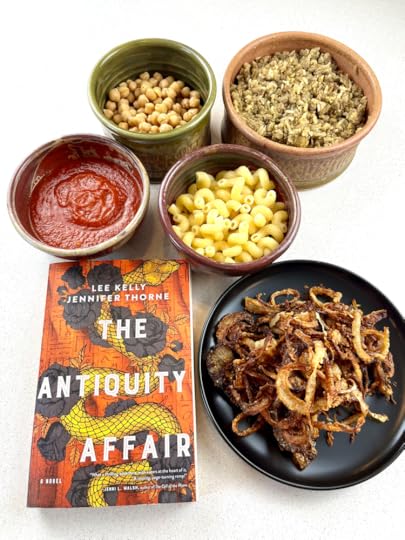
I absolutely loved The Antiquity Affair! It's women-centered nod to the beloved Indiana Jones stories, a high-stakes, trans-Atlantic thrill ride, with the page-turning excitement and romance of classic adventure novels and a poignant story of sisterhood at its core.
An exciting turn-of-the-century adventure Stand-alone novel Book length: 100,000 words Perfect for fans of Deanna Raybourn, Laurie King, Clive Cussler, and Indiana Jones Includes discussion questions for book clubsGrab your copy today!
 Koshari
Total Time: 1 hours 22 minutes
Yield: 4–6 servings
Ingredients
For the Crispy Onion Topping
1 large onion, sliced into thin rings
Salt
1/3 cup all-purpose flour
½ cup cooking oil
For Tomato Sauce
Cooking oil
1 small onion, grated
4 garlic cloves, minced
1 teaspoon ground coriander
½–1 teaspoon crushed red pepper flakes
1 can 28-oz tomato sauce
Salt and pepper
1–2 tablespoons distilled white vinegar
For Koshari
1 ½ cups brown lentils, picked over and well-rinsed
1 ½ cups medium-grain rice, rinsed, soaked in water for 15 minutes, drained
½ teaspoon
½ teaspoon pepper
½ teaspoon coriander
2 cups elbow pasta
Cooking oil
Water
1 15-oz can chickpeas, rinsed, drained and warmed
Directions
1. Make the crispy onion topping: Sprinkle the onion rings with salt, then toss them in the flour to coat. Shake off excess flour.
2. In a large skillet, heat the cooking oil over medium-high heat, cook the onion rings, stirring often, until they turn a nice caramelized brown. Onions must be crispy, but not burned (15-20 minutes).
3. Make the Tomato Sauce: In a saucepan, heat 1 tablespoon cooking oil. Add the grated onion, and cook on medium-high until the onion turns a translucent gold (do not brown). Add the garlic, coriander, and red pepper flakes, and sauté briefly until fragrant (30–45 seconds more).
4. Stir in tomato sauce and pinch of salt. Bring to a simmer and cook until the sauce thickens (15 minutes or so).
5. Stir in the distilled white vinegar, and turn the heat to low. Cover and keep warm until ready to serve.
6. Make the Koshari: Cook the lentils. Bring lentils and 4 cups of water to a boil in a medium pot over high heat. Reduce the heat to low, and cook until lentils are just tender (15–17 minutes). Drain from water and season with a little salt. Note: when the lentils are ready, they should only be par-cooked and still have a bite to them as they need to finish cooking with the rice.
7. Make the rice: Drain the rice from its soaking water. Combine the par-cooked lentils and the rice in the saucepan over medium-high heat with 1 tablespoon cooking oil, salt, pepper, and coriander. Cook for 3 minutes, stirring regularly. Add warm water to cover the rice and lentil mixture. (You'll probably use about 3 cups of water.) Bring to a boil; the water should reduce a bit. Cover and cook until all the liquid has been absorbed and both the rice and lentils are well cooked through (about 20 minutes). Keep covered and undisturbed for 5 minutes.
8. Make the pasta: While the rice and lentils are cooking, make the pasta according to package instructions by adding the pasta to boiling water with a dash of salt and a little oil. Cook until the pasta is al dente. Drain.
9. Cover the chickpeas and warm in the microwave briefly before serving.
10. To serve, fluff the rice and lentils with a fork and transfer to a serving platter. Top with the elbow pasta and ½ of the tomato sauce, then the chickpeas, and finally ½ of the crispy onions for garnish. Serve with the remaining sauce and crispy onions.


