Dan Eldredge's Blog, page 5
July 21, 2016
USS Massachusetts (BB-59)
 Recently I was fortunate enough to stop by Battleship Cove in Fall River, Massachusetts. I had been there before when I was maybe ten years old, but although the Cove is only an hour and a half drive from home, I had never been back. I was in the area recently so I felt compelled to stop by and check it out.
 This time, I had a camera with me. I felt a curious pressure--I didn't want to spend all day there, as it was an unplanned visit, but also I wasn't encumbered by my wife and young kids, so I could geek out and explore at my leisure. I found, however, that the museum is really large enough that if I really wanted to, I could have spent the entire day exploring.
Battleship Cove consists of multiple museum ships: The prime attraction is of course the USS Massachusetts (BB-59), a South Dakota-class battleship. Also is a former Soviet, then East German, then German missile boat, a Tarantul I-class corvette, the Hiddensee (formerly the Rudolf Egelhofer); the Balao-class submarine USS Lionfish (SS-298); and the Gearing-class destroyer USS Joseph P. Kennedy Jr. (DD-850).
 USS Massachusetts. Hiddensee and USS Lionfish are to the leftRight outside the gift shop are a few displays of an Army Huey and a Cobra Helicopter, a few indoor displays of PT Boats, and a Landing Craft. Beyond are the ships, and I boarded the Massachusetts first.
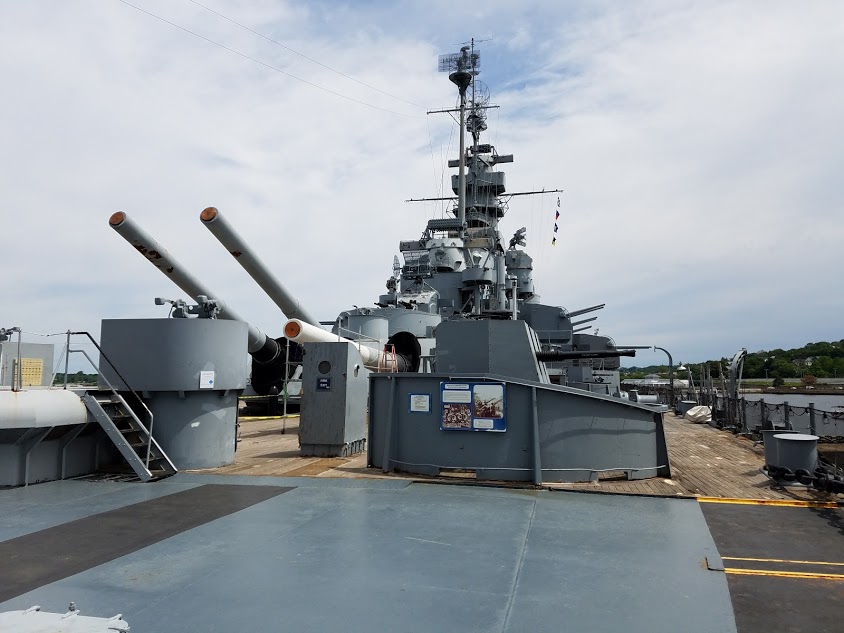 The first impression you have when boarding the ship is that it's big. Admittedly, it is a battleship, but standing on board, it's when you realize that you could comfortably stick a tennis court or a basketball court on any number of places on the deck that it really hits you just how big it is. (Note: I have been on board an aircraft carrier too, which was even bigger, but that was in high school so it's been a while)
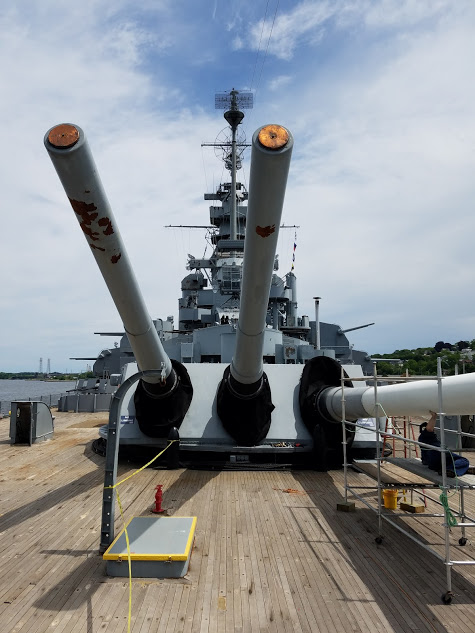 They were working on repainting the gun barrels of Turret #3.
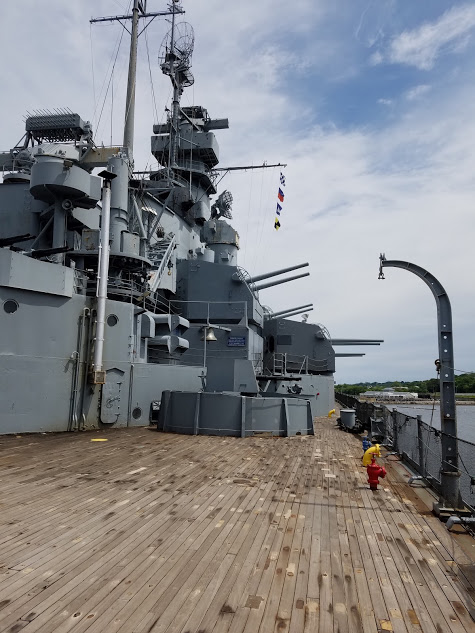 Secondary Battery
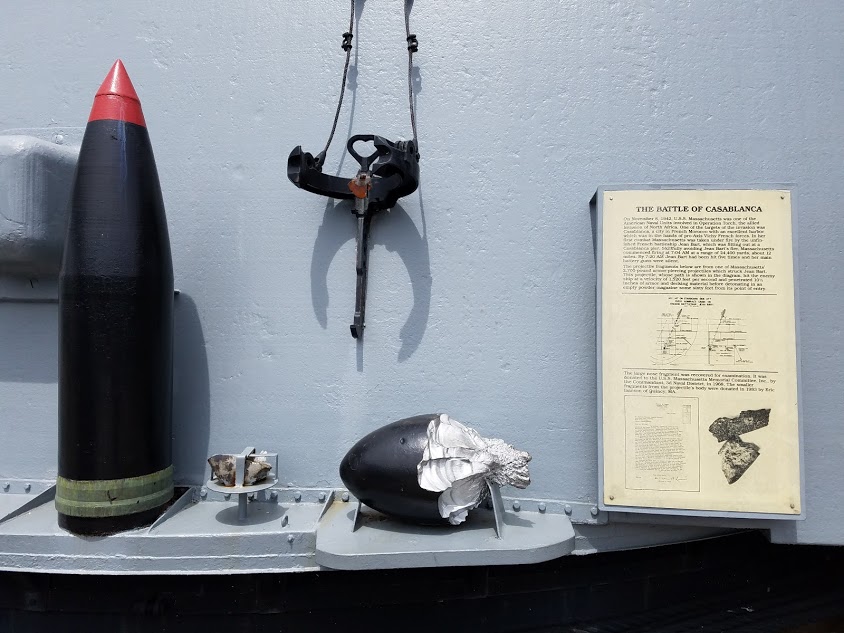 A display showing a 16" shell, and fragments from 16" hits against the French Battleship Jean Bart during the Battle of Casablanca.
 Shrapnel damage from an 8" shell that exploded over the deck during the Battle of Casablanca. The shrapnel damage reminds you that the deck is not a place you want to be during an action. It makes me wonder about those who worked the AA guns, who despite all the metal around them, must have felt very exposed. If shrapnel can tear chunks out of the steel of the ship's superstructure, one can only imagine which it would do to a person.
 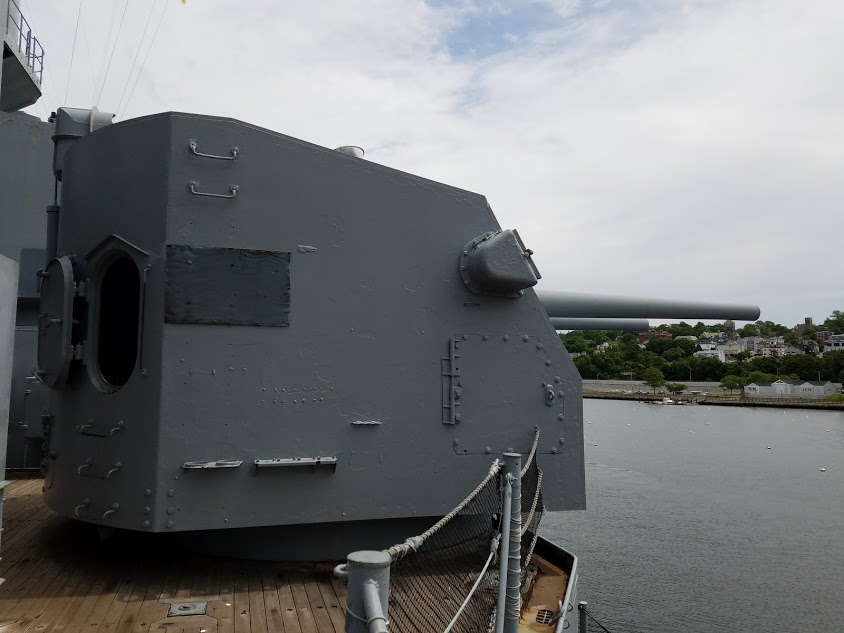 5"/38, one of the secondary battery turrets
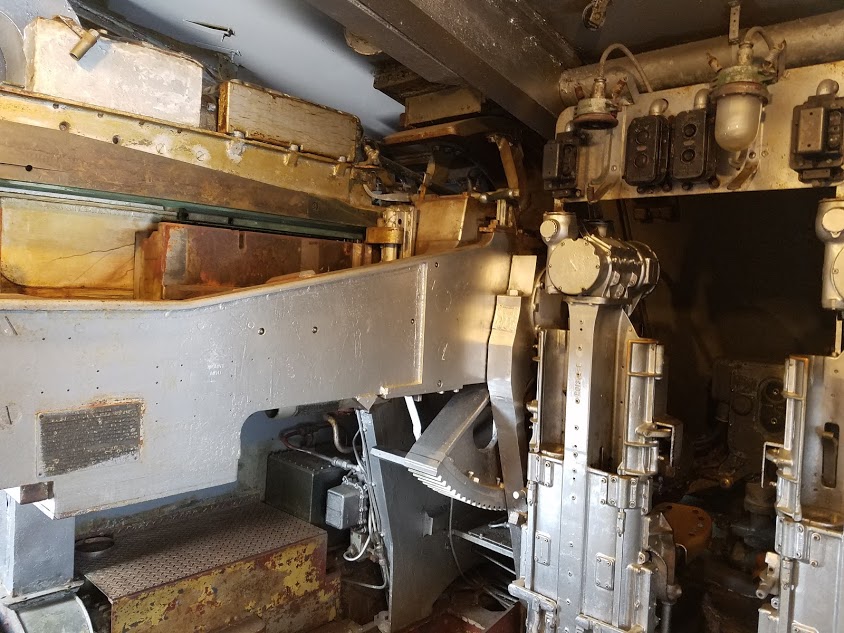 Inside the 5"/38 turretThe 5" gun turrets are very cramped inside, and must have been very crowded during battle. There is a seat to the far left where a crewman sighted the guns, and a pair of seats--they look like bicycle seats, really, between the two guns. When manned, it's so tight that the two men must have been in physical contact with each other. And then there are the loaders who were moving around in tight quarters as well.
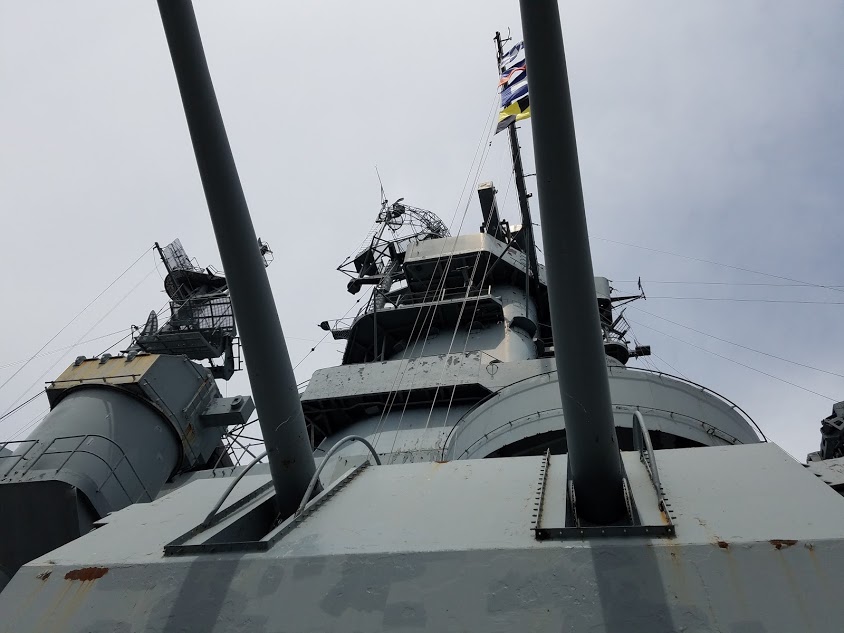 View looking up towards the superstructure
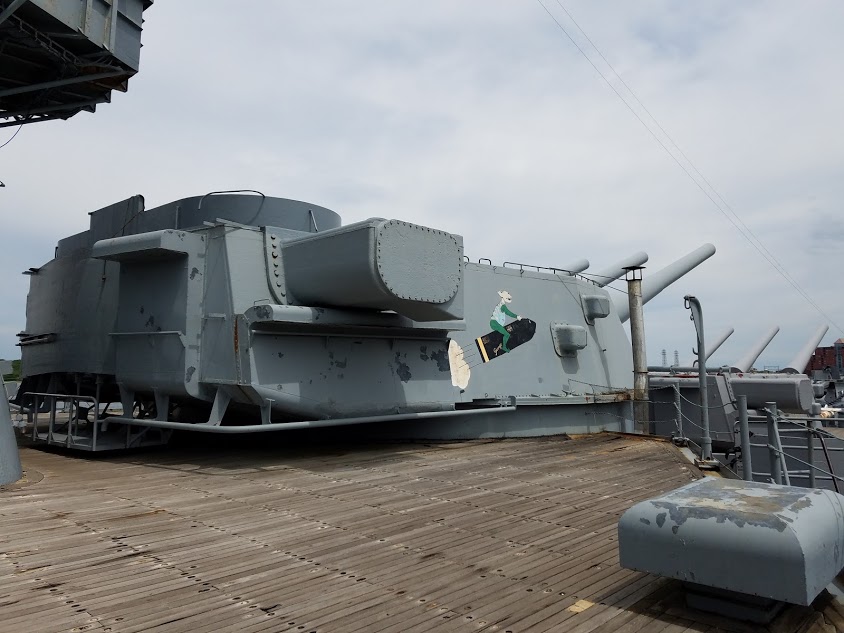 16" Turret #2
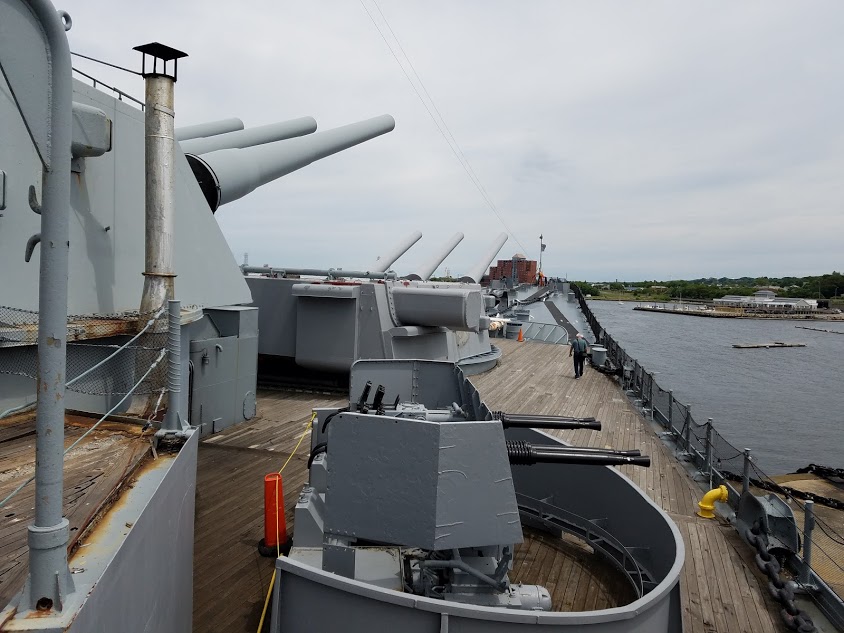 40mm AA gun and two 16" turrets
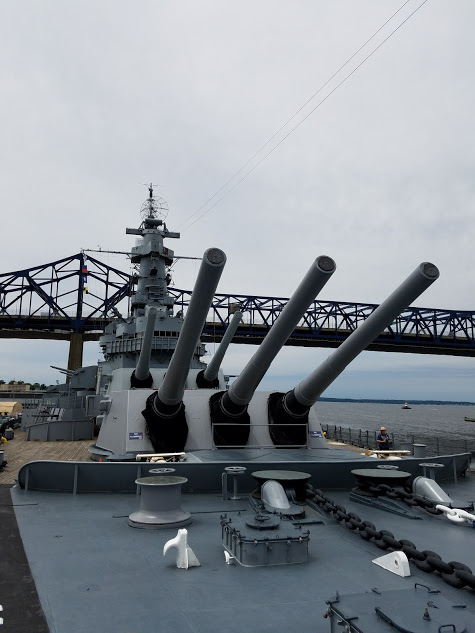
 View from the bow
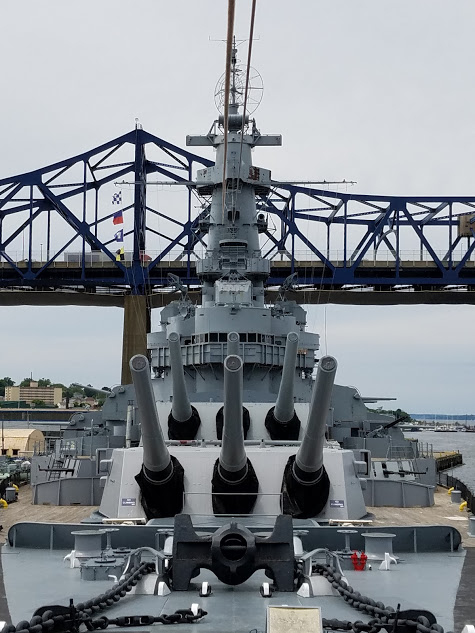
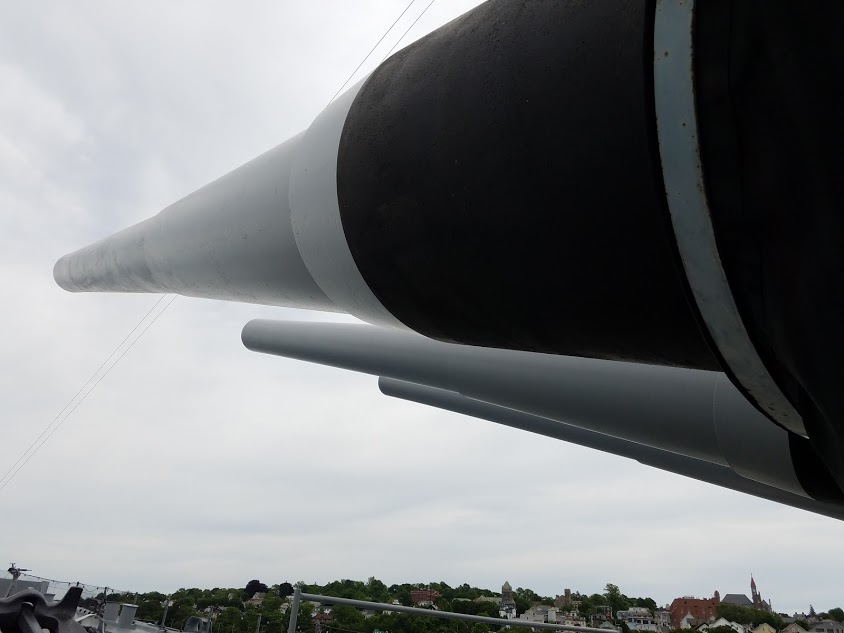 16" guns, looking pretty powerful
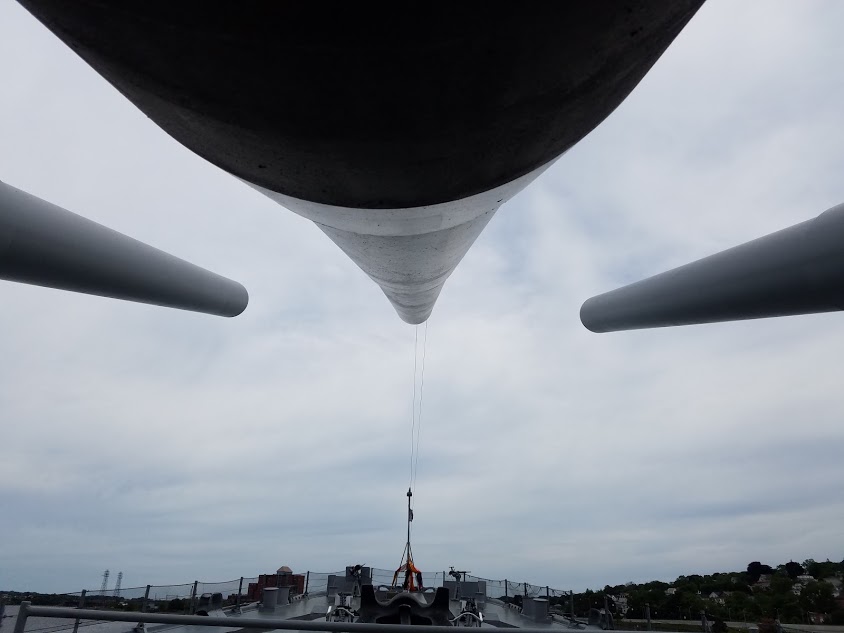 16" guns, still looking powerful
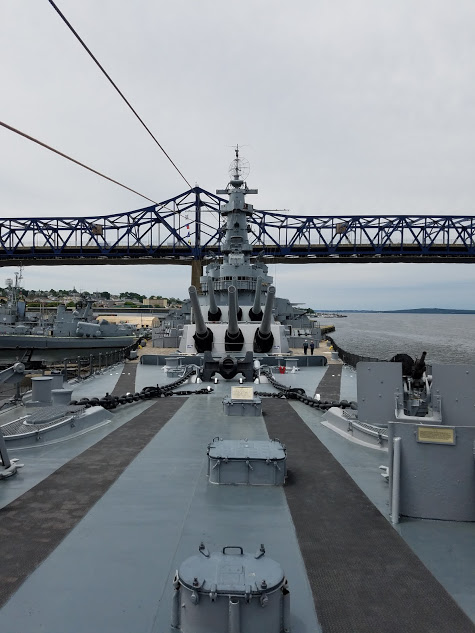
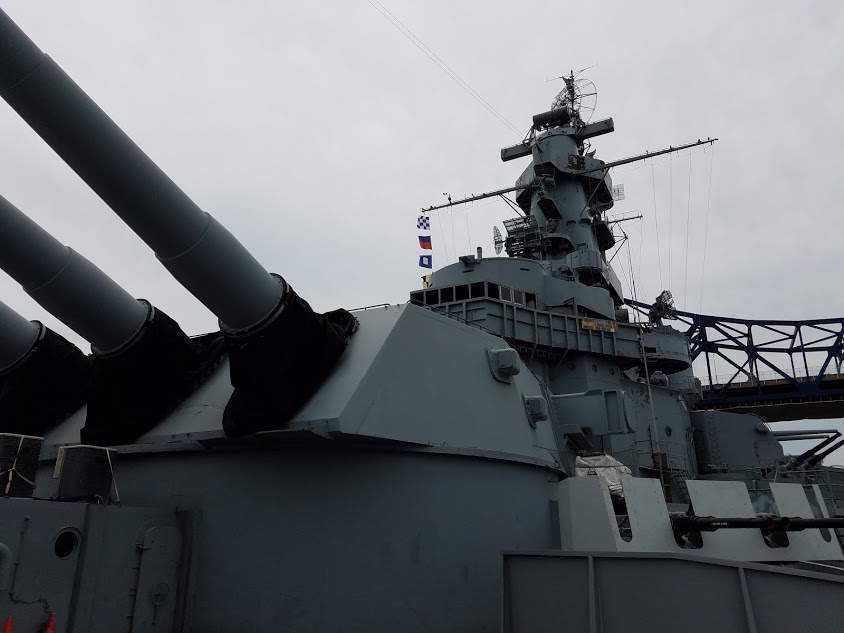 A view of the bridge from the deck near Turret #2
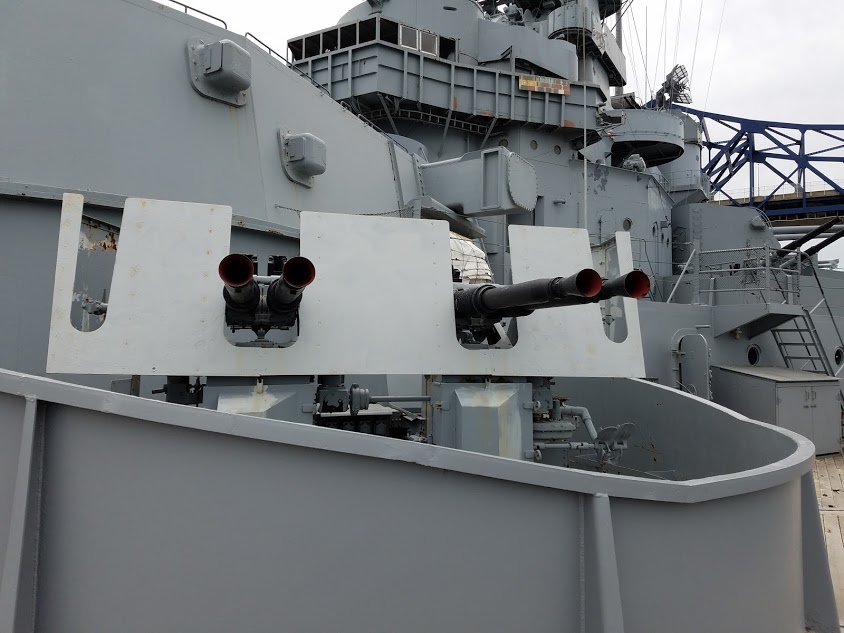 40mm "pom pom" AA gunAfter exploring the main deck, it was time to go below. The ladders are very steep, you have to watch both your head and footing and you make your way down.
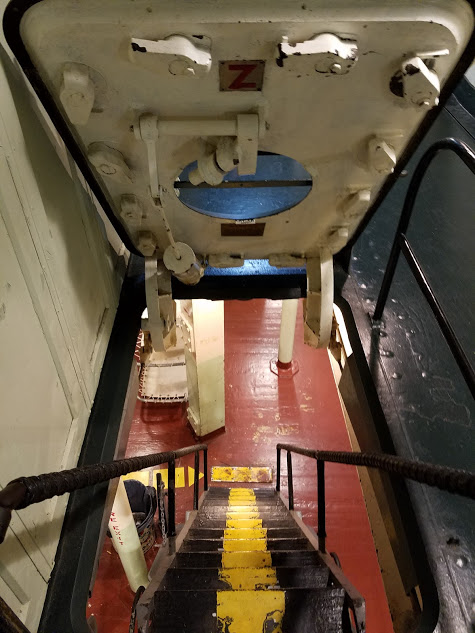 Hatch leading below decksThe "beds" were packed in rather tight... and were not very long either. I'm only 5'7", and I doubt I could have laid on one of these without my feet sticking off the end.
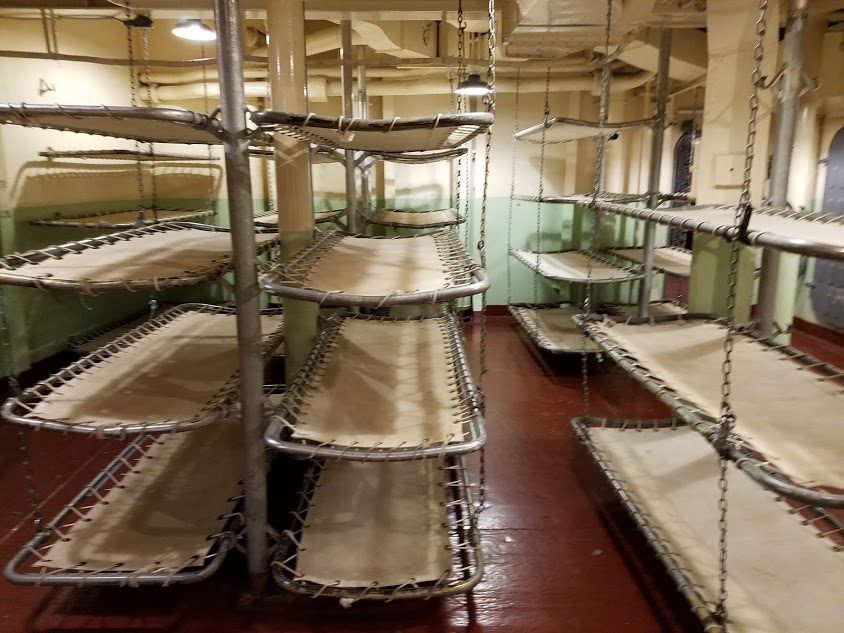 Luxury accommodations, to be sureMy father served on a Sumner-class destroyer in the late 1950s, and told me that the toilets were essentially a trough with water flowing along it, and seats on top. He wasn't kidding. The battleship's facilities were much the same.
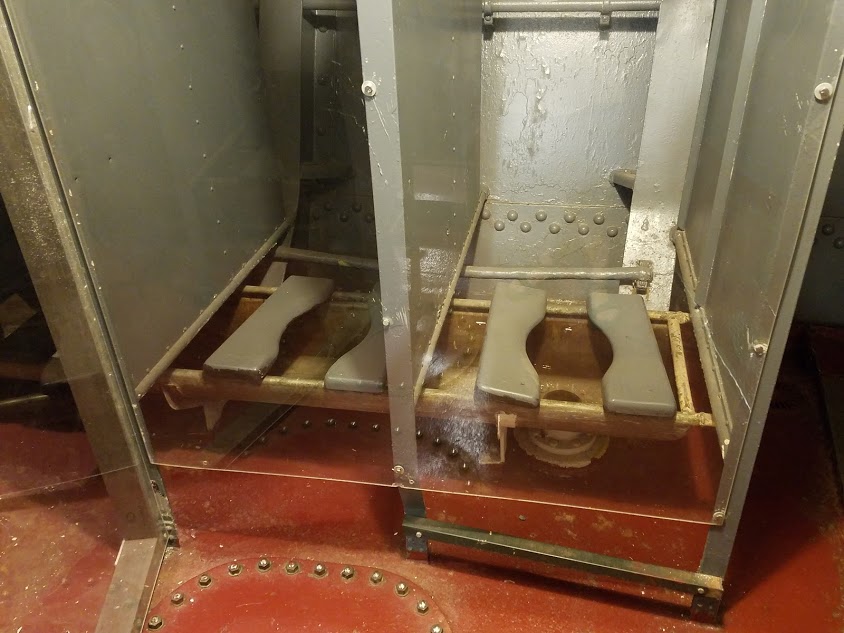 Just in case you need to use the bathroom...Underneath the secondary battery was the magazine, where both shells and powder was sent above by elevators.
  Ammunition hoists from the magazine to the 5" turrets above.After working your way through the bowels of the ship for a while, you get a few impressions. Everything is metal. It's very easy to bang your elbows or shins into something very hard. I can only imagine what it must have been like when lots of things were going on and crewmembers were going about their business in the tight passageways.
 The longest forward/aft passageway on the ship, aka "Broadway"You also get the impression that if something terrible happened, for example, the ship is torpedoed in the middle of the night, it would be complete chaos. Men running to their stations, the ship listing, lights perhaps going out, etc. If I was below decks and the ship was flooding and in danger of sinking, I'd have zero confidence of being able to make it up on deck in time. Despite this being a battleship, everything is tight, cramped, and could easily get claustrophobic. Add to that the chaos of a ship sinking, it's a miracle anyone survived sinkings at all, and makes you understand just why so many ships sank "with all hands." It gives you some additional respect for those working deep within the ship, and the trust they had to have in their shipmates. They were all trapped in the tin can together, each man depending on all the others for their safety.
 5" shell storage
 5" gun powder room. There are things here that don't respond well to bullets...
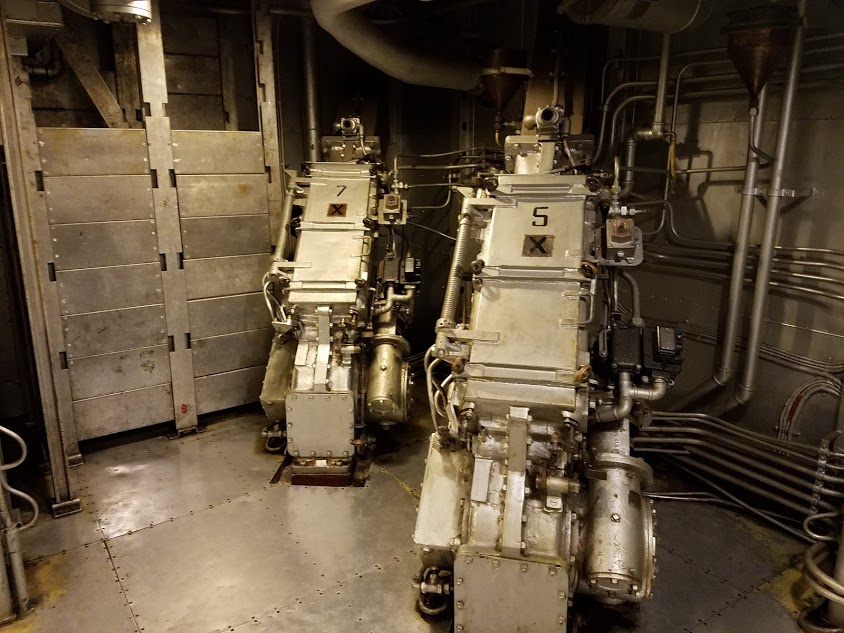 Ammunition hoists from the magazine to the 5" turrets above.The next few pictures are from within the Turret #2 barbette. All of the projectiles are stored within the upper levels of the barbette itself, while the powder is stored in the magazines below.
  16" shells, stored within the barbettesTurret #2, being the highest above the deck, has an additional level, called the balcony, and there more 16" shells are stored. During the Battle of Casablanca, the ship nearly ran out of 16" shells (which is pretty amazing to contemplate), and extra shells has to be transported from Turret #2 to Turrets #1 and #3. Fortunately the ship was designed with a rail system to do this, for just this situation. Transporting the shells through the passageways wouldn't exactly be easy, if it were even possible.
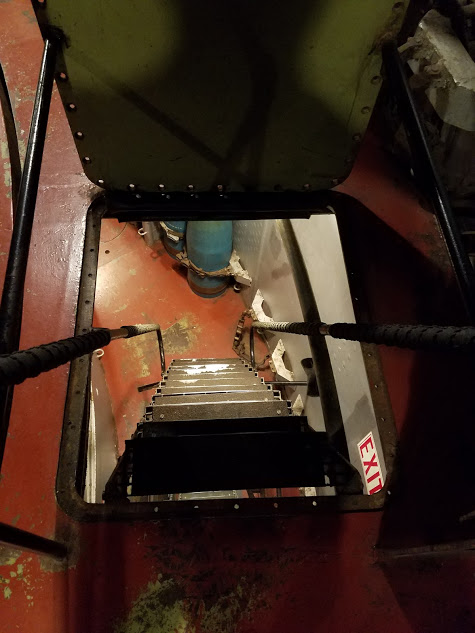 Ladder leading down from the "balcony" of Turret #2 down to the main level of the barbette. Watch your head!
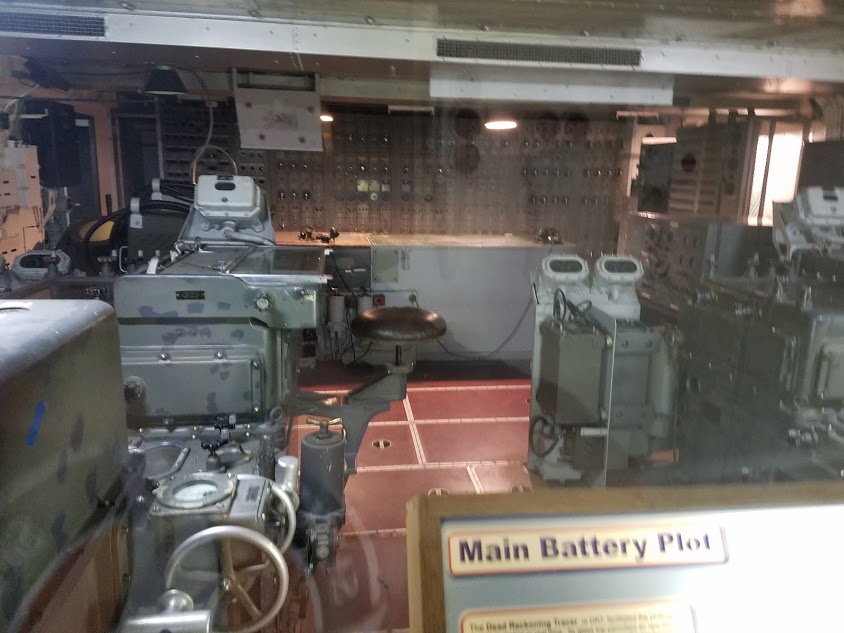 Main battery plotting roomThere were signs in the engine room saying that the room was typically 120 degrees F. Lovely working conditions...
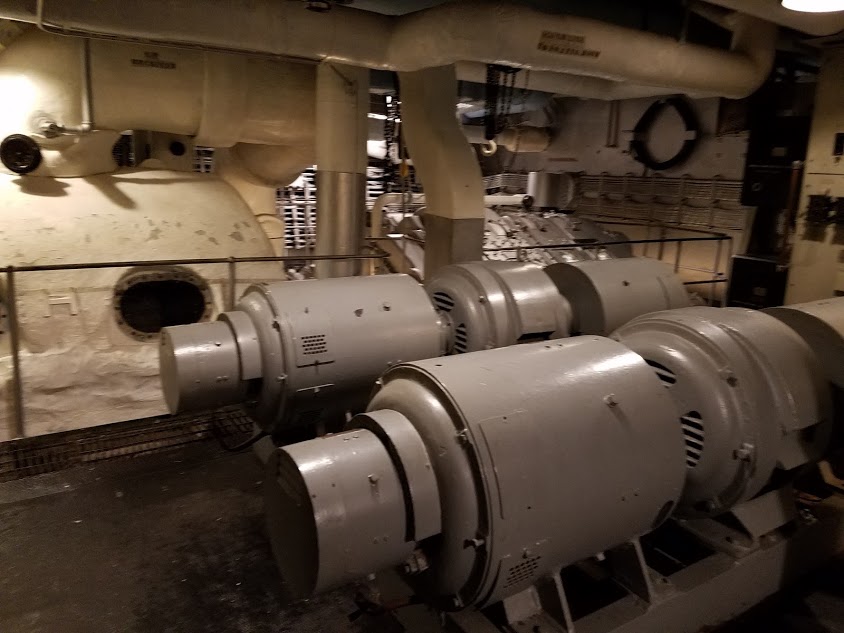 Engine room, complete with lots of asbestos!
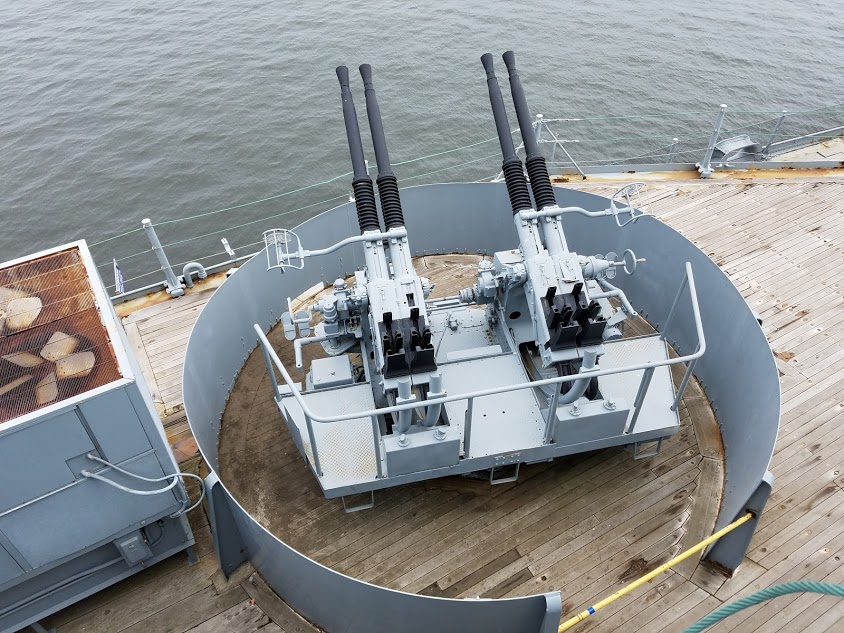 40mm AA gunI had always wondered about the bridge of a battleship. With 16" shells being lobbed back and forth between angry vessels, what is normally thought of as the "bridge", with its windows and nice views, would be a deathtrap. Indeed, in various books I've read about World War II naval battles, such as those at Guadalcanal, there are descriptions of the bridge being a slaughterhouse (q.v., HMAS Canberra and USS Quincy at the Battle of Savo Island, both cruisers, but you get the idea).
Seeing as the captain is rather important for the operation of a battleship, as well as other vital things like the helm, engine enunciator and so forth, it seemed to me foolish to leave them exposed. But it turns out the Navy isn't as dumb as I thought.
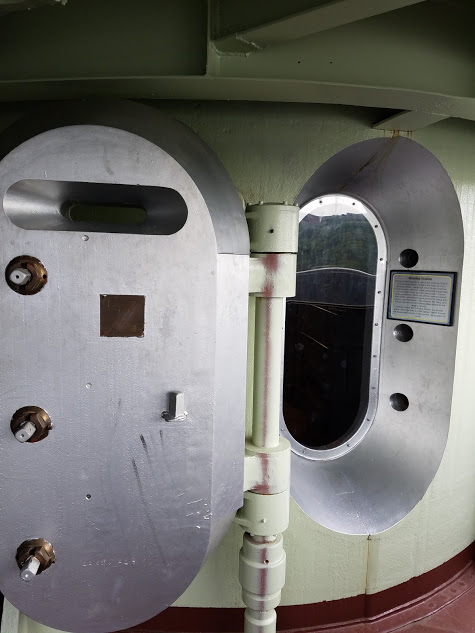 Hatchway (with 16" thick armor) to the Conning Station, where the ship was actually steered during combatThe bridge itself was empty except for a few chairs--it really was a pilothouse rather than the "bridge." The "real" bridge was the Conning Station--just aft of the bridge, and protected by no less than 16" of armor. Inside the room was the ship's wheel, some scopes, and the engine enunciator. In this well-protected compartment is where the ship would be controlled.
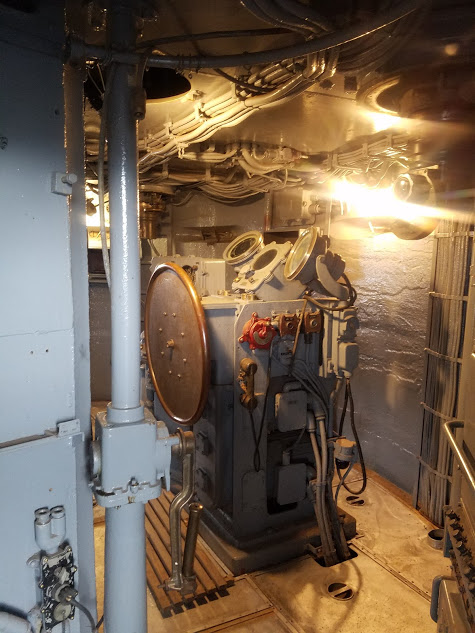 Within the Conning Station. During battle the captain, helmsman, and lee helmsman would be here. Rather claustrophobic...Scopes, but no windows.
 View from the bridge pilothouse
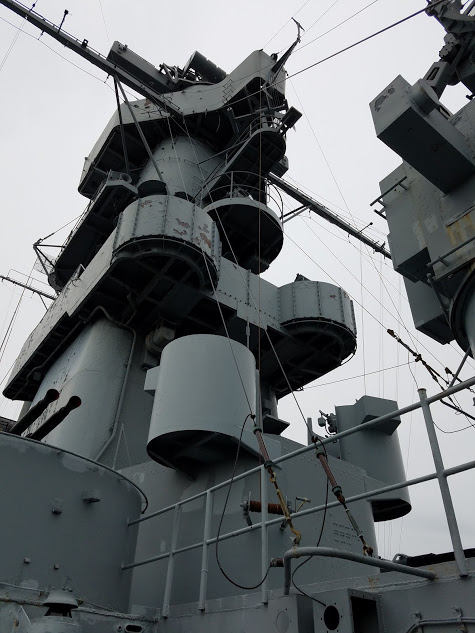 View of the superstructure
 Mark 37 Fire Control DirectorFire control was also kept well protected, the information being funneled down an armored section to the plotting rooms. The Combat Information Center was originally placed in the superstructure, was wisely moved into the bowels of the ship.
There's something about actually going to see something in person that answers more questions in five minutes than hours of research in books can't tell you. Seeing the Massachusetts was a real treat and I am glad I went. I wish I had the time to explore it a bit further, and beyond that, I wish I had spent more time on the other ships present. That will have to be a second trip, however.
In any event, if you happen to be in the area, I highly recommend Battleship Cove as a museum. Great stuff.


June 13, 2016
Samurai Sprint Mud Run
 2015 was the year where I tried Obstacle Course Racing to see if I could actually do it. The answer to that question was a definite yes, and my season reached its peak with The Killington Beast in September.
 2016 was supposed to build upon 2015, and be the year where I improved on everything. I would take on even more Obstacle Course Races, and try a variety of them to see which kind of races I enjoyed the most, thereby defining what direction my racing would take.
The Samurai Sprint Mud Run is a small local race, and I had resolved to support many such races this year to get a sampling of what they are like. It is held at the Westport Rivers Vineyard and Winery, and the course is about three miles in a large loop around the vineyards.
I arrived at the venue on time, and the parking lot was very close to the race, so no problems there. It had the small race vibe that both F.I.T. Challenge and the BoldrDash Winter Race have, but it felt smaller than either of those. No big inflatable "Start Line," but just the timing mats and a digital clock. I hung out with the Spahtens, and saw a lot of familiar faces, but as usual, I kept to myself. Despite being with the team for nearly two years, it's still hard to just introduce myself to people, and seeing as I'm so damn slow, I always find myself alone on the course, bringing up the rear. My drill shirt says "Glacier" for a reason.

Relatively soon the race started and we were off. The first part of the race was a jog, and the group quickly spread out, and as always I found myself towards the end of the pack. The first "obstacle", if it even was intended to be one, was a small mud pit. Most of the racers just went around it.
The first "real" obstacle were some Over-Under walls, which were pretty basic, and everyone zipped right through them. Next was the Monkey Bars, which I am getting better at. These were pretty standard, so I managed them just fine.
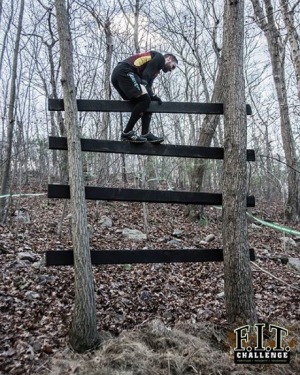
Next was a Tire Flip, the first half of which I powered through pretty fast, the second half I slowed down as all those squat lifts were taking their toll on my legs. There was a small back up here, so I caught back up to the crowd, but it wasn't long and soon we were off again. Next was a 8' Wall. The left hand side had some steps and a rope assist, but I went for the right side, which was a straight wall. On my first leap I got the top, but I wasn't quite able to pull myself over. On my second attempt I got closer but still couldn't quite make it, so I got a boost from another race to get over the top. My arms were getting pretty sore from the exertion already. By this time I was so slow that a group from the next heat already caught up with me.
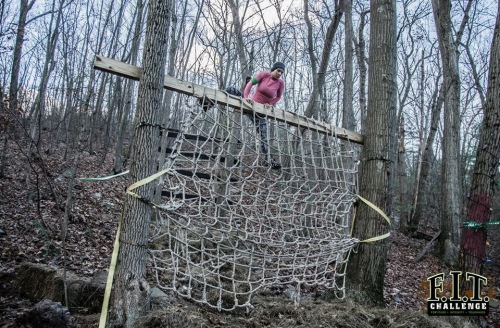
More walking and then a Trapeze/Rig. You had to swing on a trapeze to a horizontal bar, and then work your way along the bar, all over a small muddy pool. I swung on the trapeze and grabbed the bar, but I failed to complete the transition and fell into the water. I tried it one more time, grabbed onto the bar with one hand, and found myself hanging again. Then I heard both shoulders crunch as they popped out of their sockets, and while I still had grip, I couldn't move my arms. With no where to go, I dropped into the water again. My arms were messed up, and they would only get worse as the race continued.
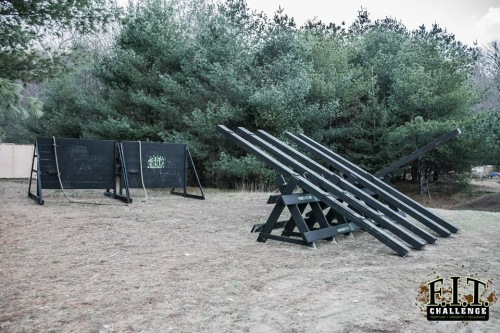
Next was a set of staggered Angled Walls: you jumped on one, used your momentum to hop to the next using the other foot, and back a few times. I was tired but I managed this ok. After this was a Reverse Staircase, which is a similar to a set of inclined monkey bars but with planks instead of bars. The planks had grooves in them to improve grip. However, as my arms were already sore, this one proved impossible without an assist, so I boosted myself on a support beam to get me up and down. Following this was a tall staircase Box Jump that you had to box jump about five times to get to the top--my legs were still functioning, so I managed this one ok.
After this was the Horizontal Traverse Wall. I failed this in my first Spartan race and it has been difficult ever since, but this time I managed to complete it, although it finished whatever grip I had left. Very tired and very sore, I kept going.
Next was a Water Slide down a hill--it was a massive tarp with multiple sprinklers to keep it slick. I watched the two guys ahead of me slide down on their backs. This was the "fun" obstacle, so I decided to take the plunge and went down head first.
At the bottom was the Rope Climb. I failed this obstacle at my first Spartan Sprint two years ago. Since then I have succeeded some times, and not others, but I recognized that this was one obstacle I needed to work on. I have a rope hanging from a tree in my front yard now, and I practice on it every so often. I feel like I have the technique down. But this time when I saw it, I dreaded it--my arms, shoulders, and hands were shot, and I found as soon as I touched the rope I had no chance. The rope was wet and slippery, and I couldn't even get on the rope. Acknowledging defeat, I moved on.
Next was a Inclined Wall with a Rope Assist, which I managed ok, and then, the Tyrolean Traverse. As at all Tyrolean Traverses I've seen, there was a line. By now I felt beaten, and I knew that there was no way I was going to make it, so I skipped it and moved on to the Wreck Bag Carry. The bag was only 25 lbs., so I slung it over my shoulders and trudged up the hill and back. The finish line was in sight. Next was a Tire Agility obstacle, which I managed just fine, and then a Low Crawl under some netting. My arms were hurting so bad I was contemplating rolling uphill because I thought a crawl on my hands and knees would hurt too much. But I sucked it up and did it, and then, all the obstacles completed, I headed toward the finish, jogging the last 50 yards.
Final stats: 3.10 miles in 1:09:33
I finished, and I got my medal, but I feel thoroughly disappointed in myself. The race should not have been as hard as it was. As a race itself it was fine, and it had some obstacles I had never done before, like the Water Slide, Trapeze/Rig, Reverse Staircase, Box Jump, etc. But I felt tired right away, and despite the training I had managed to do, mainly grip strength and rope climbing practice, everything was much harder than it should have been.
I had another race scheduled for this weekend, a Tough Mudder, that I have been looking forward to ever since last year. I've postponed it to a future event. Now my next race is Battlefrog on July 23. That gives me almost six weeks to prepare, and hopefully I will use the time wisely, train properly, and maybe even try to eat better.
We'll see how it goes.
May 25, 2016
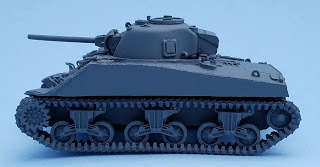
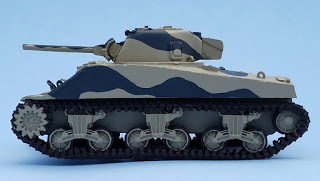
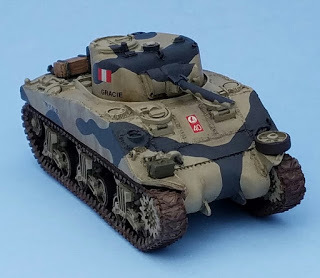
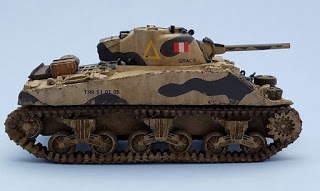
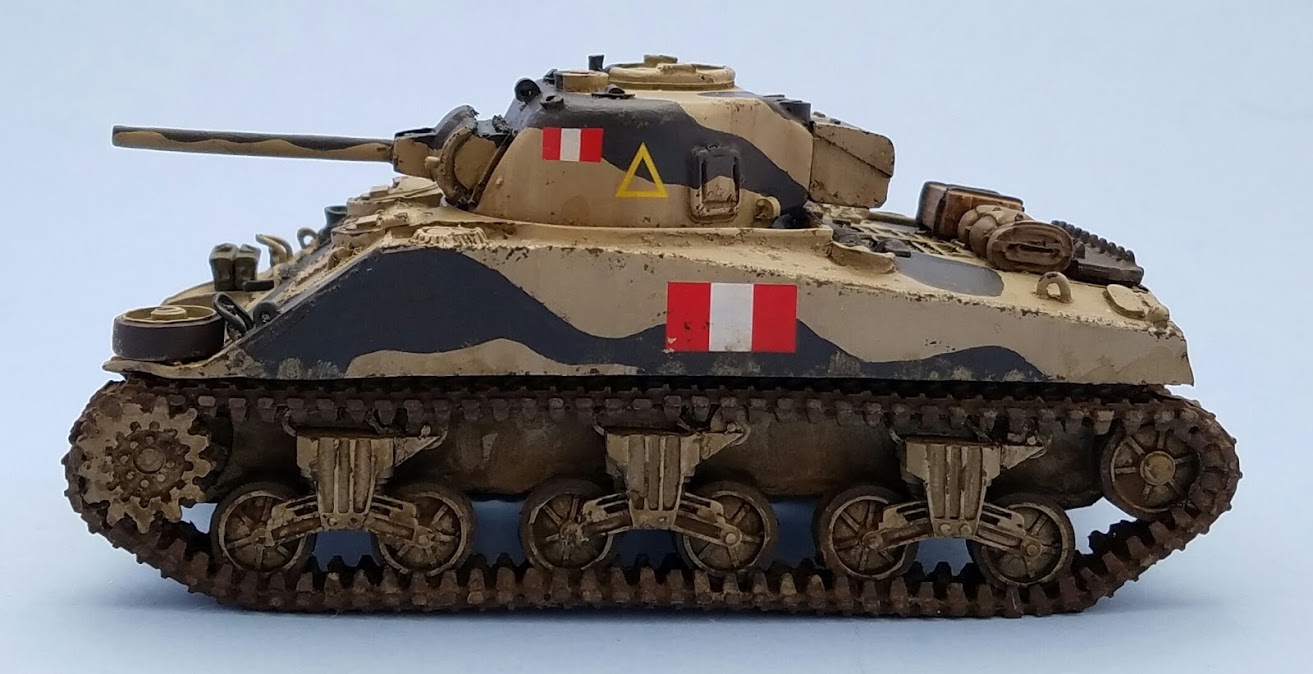
Sherman III
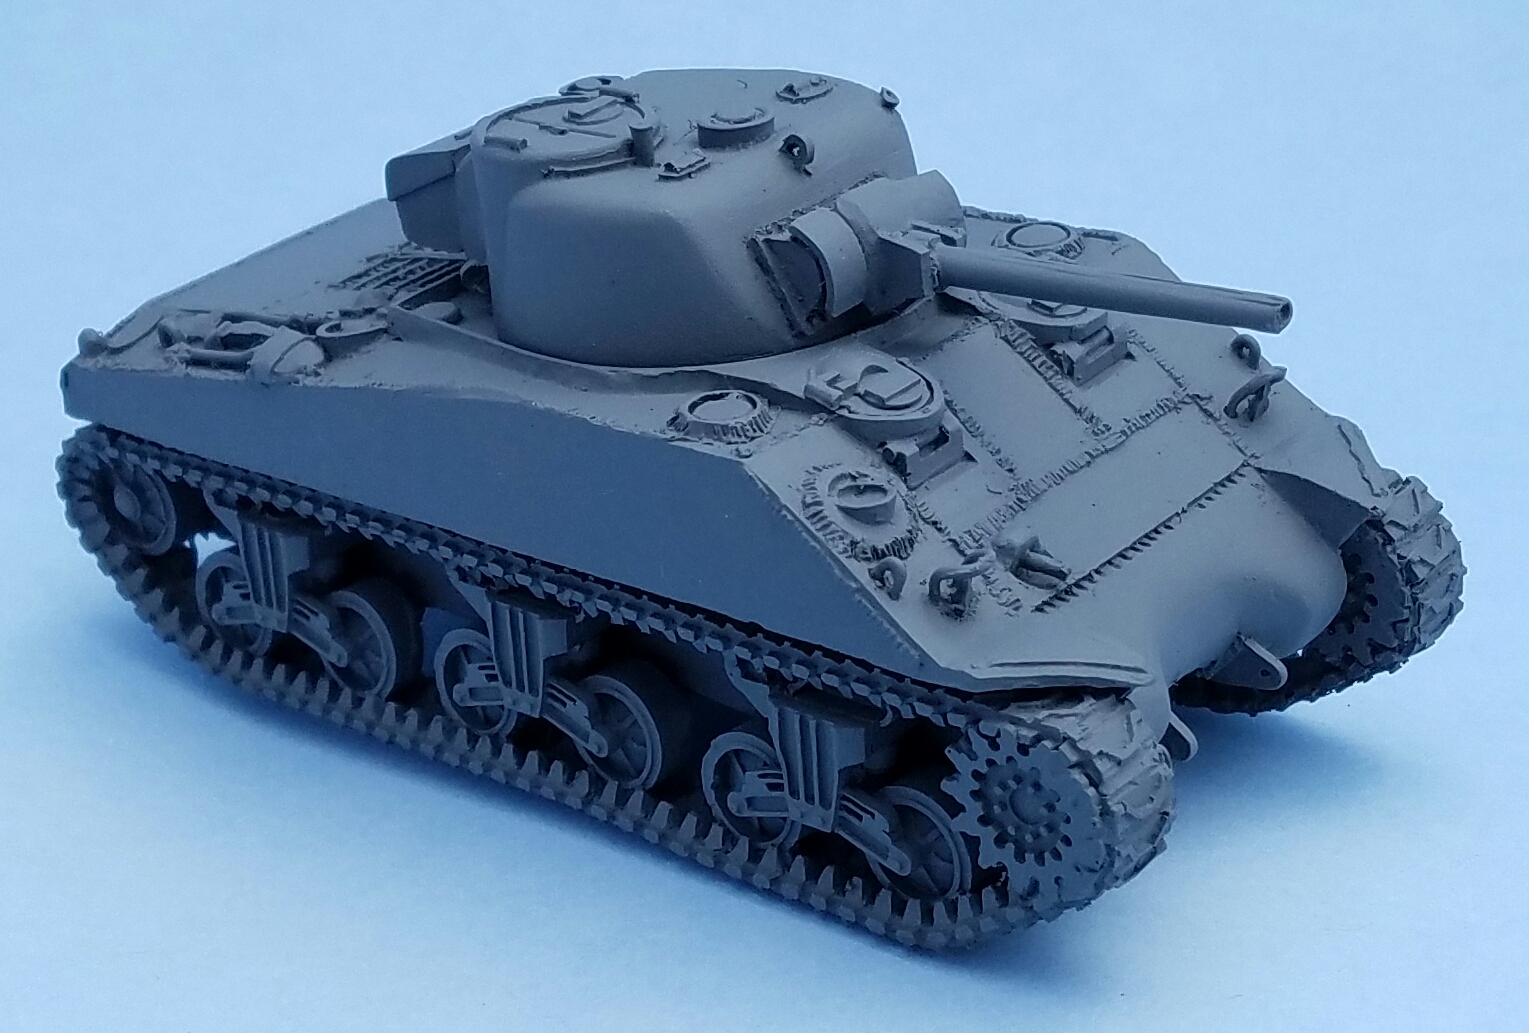
I recently purchased a Sherman III tank from Warlord Games. One of the theaters that my friend Jack and I have focused on for Bolt Action is the Mediterranean, from the Western Desert Campaign to Sicily and Italy: essentially everything covered by the Duel in the Sun supplement.
Jack's Desert Rats so I decided to do up a Sherman to add to his forces. I decided on painting a Sherman III from the 3rd County of London Yeomanry (Sharpshooters).
 I liked the idea of painting it in the camouflage Light Mud and Dark Grey instead of the usual Allied Olive Drab colors.
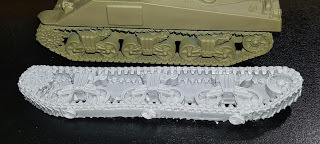
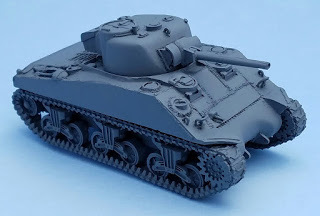
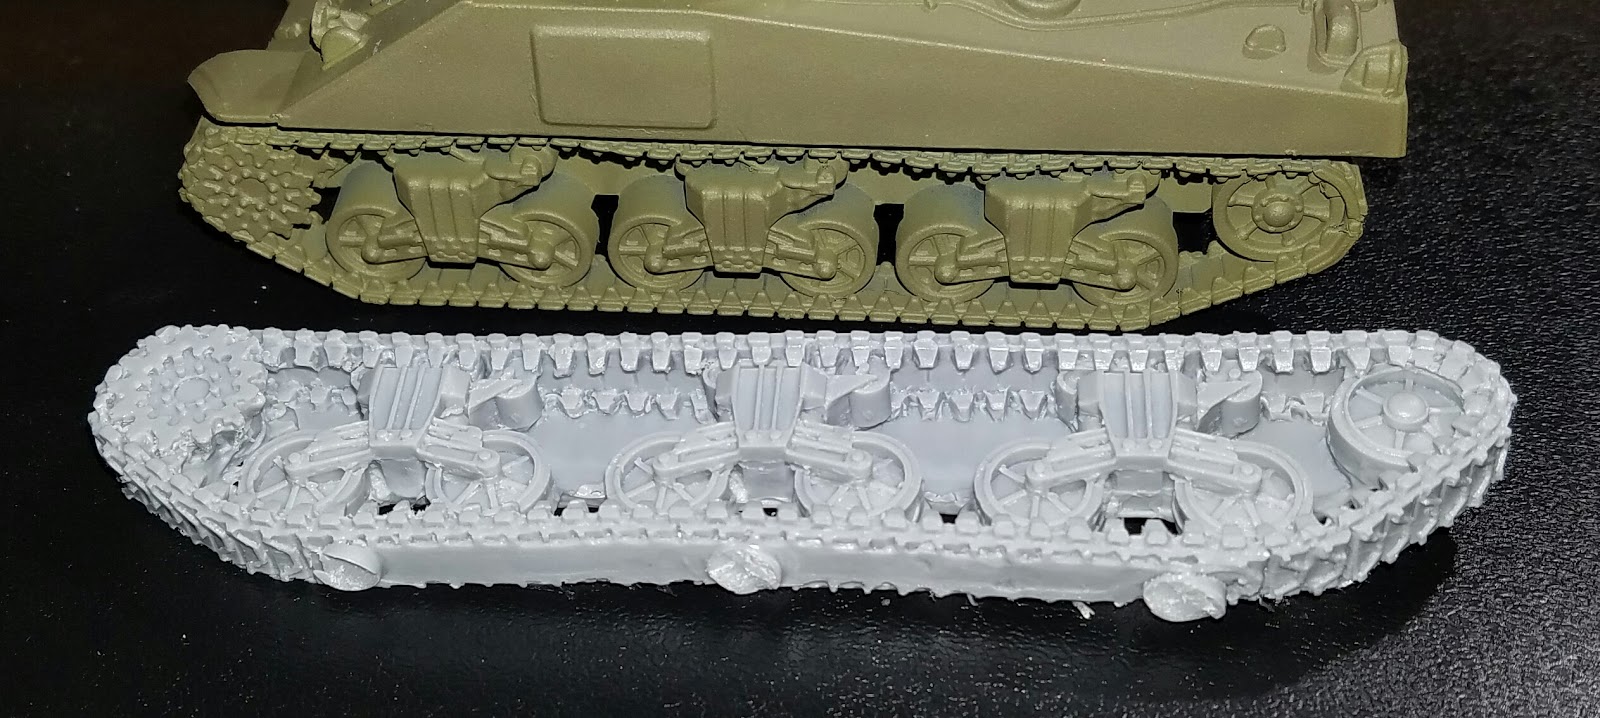
One of the first things I noticed was that as I was trimming the flashing off of the pieces I noticed that the tracks seemed to be a bit too long, at least compared to the M4 Shermans I have. Shermans come in many varieties, but one, the M4A4, had a lengthened hull compared to the others due to its Chrysler A57 multibank engine.
The problem is, the Sherman III is the M4A2 version of the Sherman. The M4A4 is the Sherman V. What are you doing to me, Warlord Games?
 Aside from a little grumbling, I got over this and started on the build.
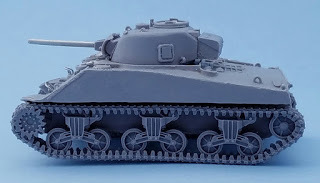
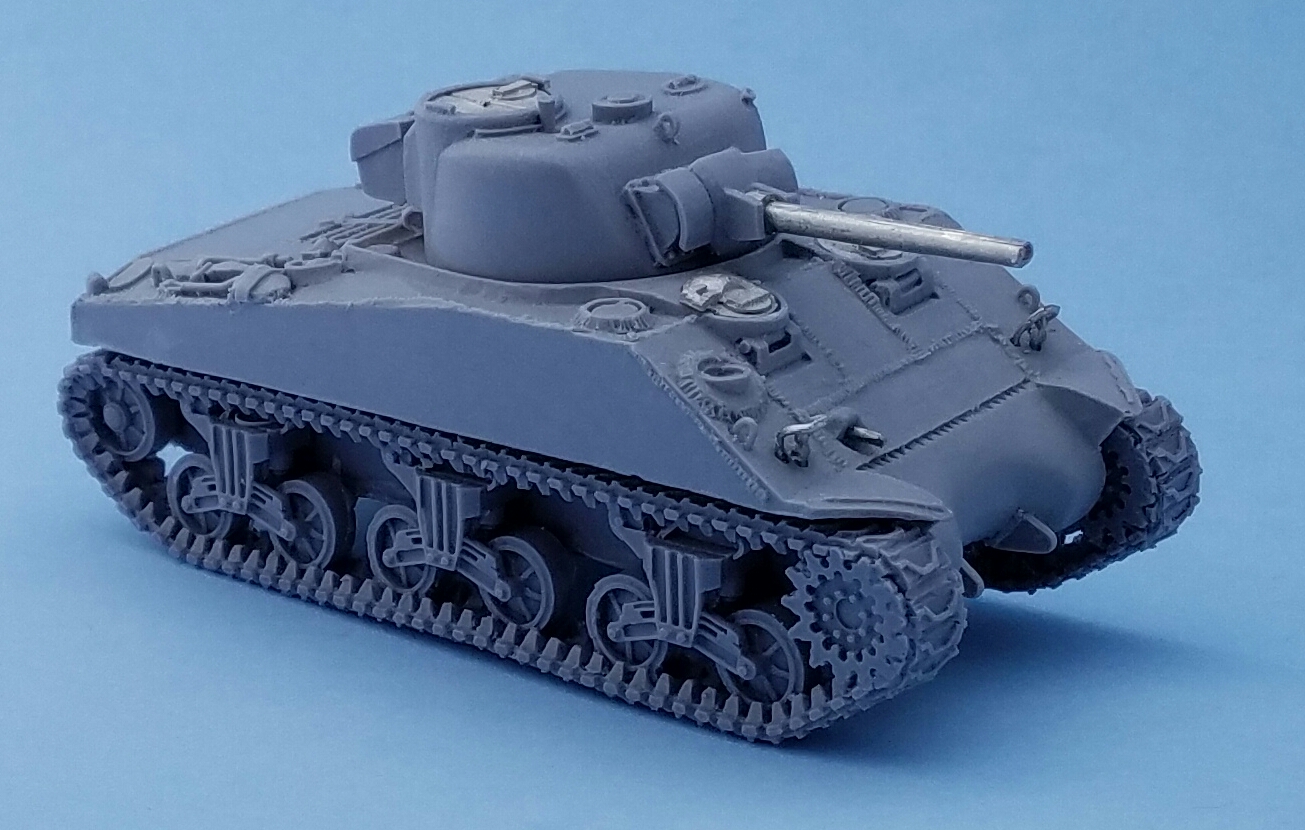
Assembled.
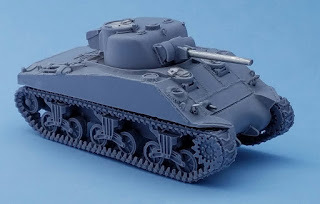 Primed.
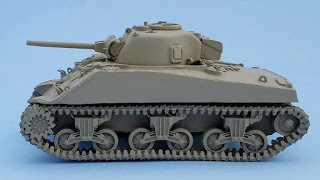
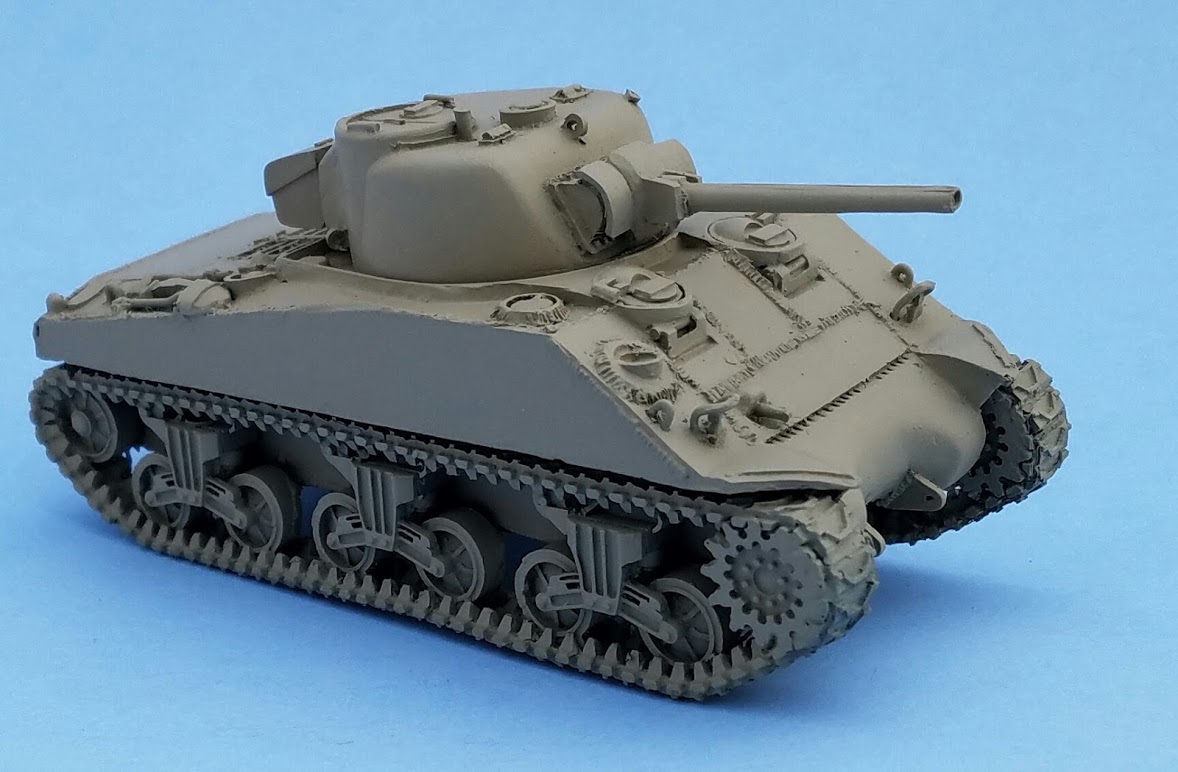
 For the basecoat I airbrushed it in Vallejo Panzer Aces #315 Light Mud.
 Next came the black stripes. In most pictures I've seen, the black isn't quite black, so I painted it in #862 Black Grey.

 Next came the tracks in #822 German Camouflage Black Brown.
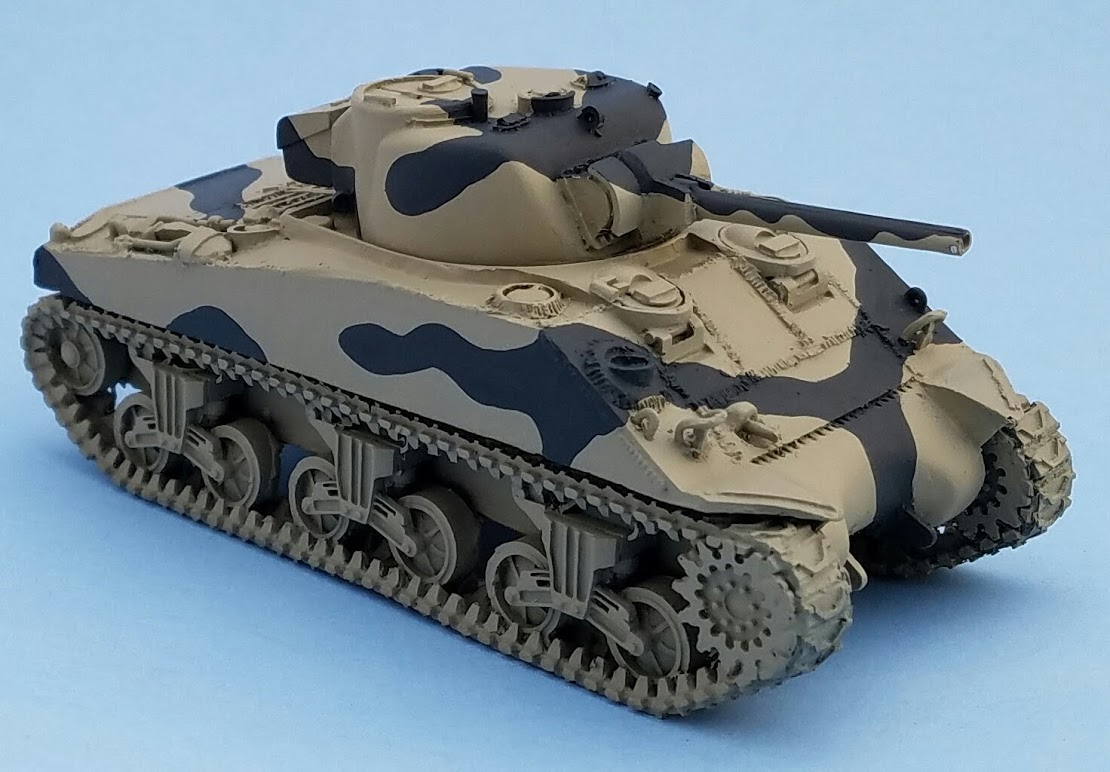
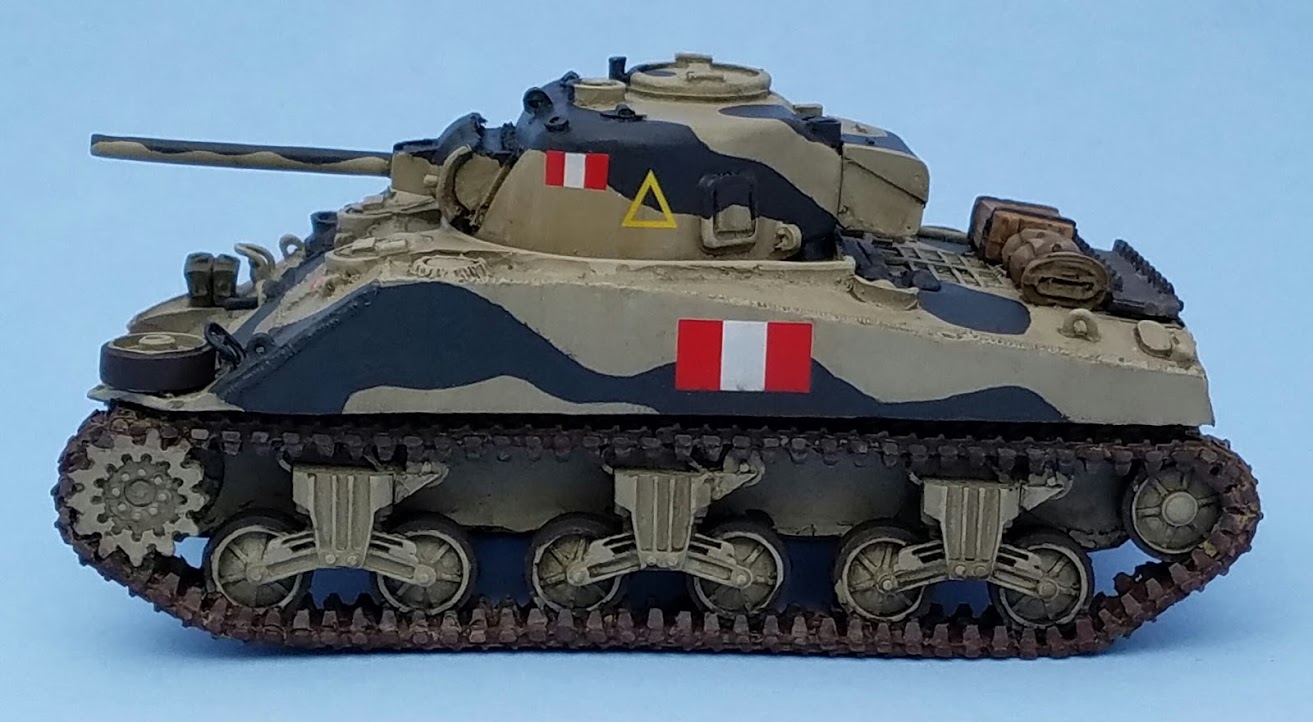
 After some waiting the decals arrived from the UK. Some of the decals (the hull number and the tank name) I used from some old Warhammer 40k Imperial Guard decals, and for the tank name, I had to apply the letters one at a time.
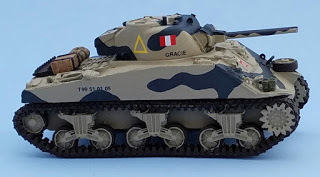
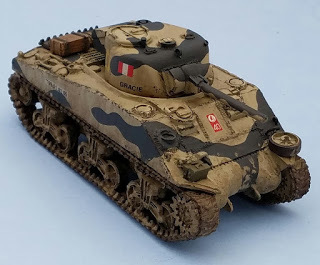
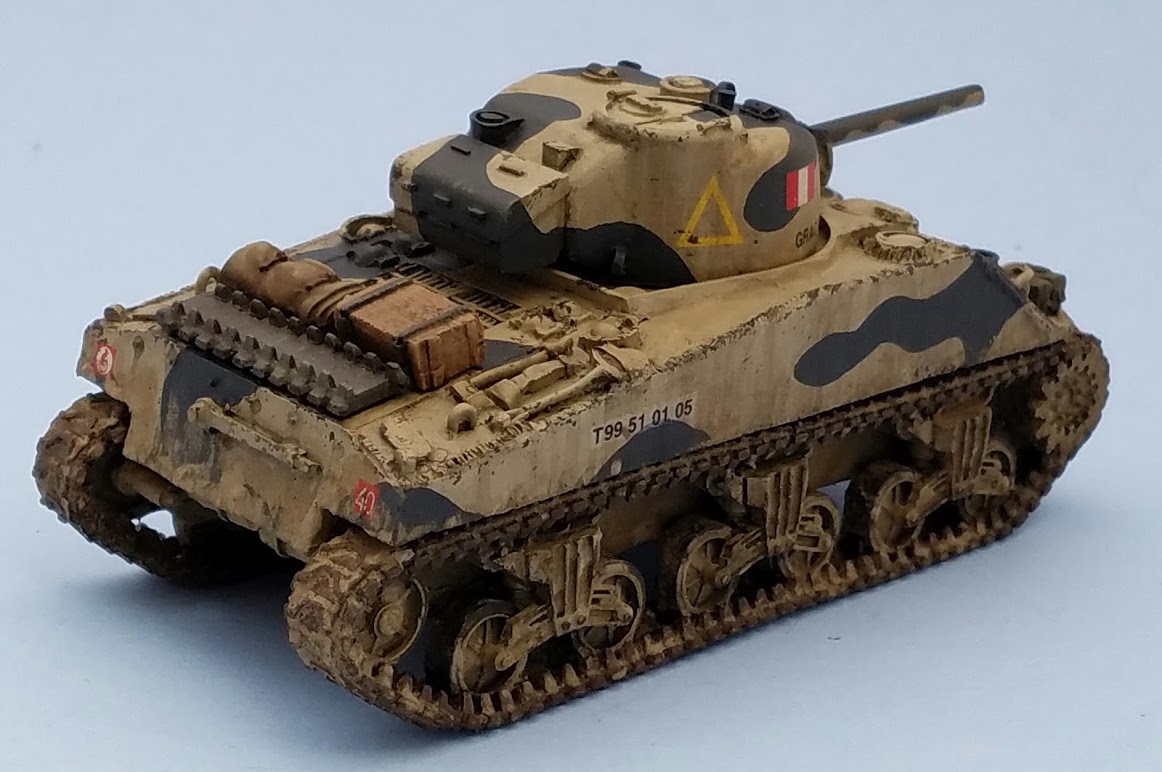
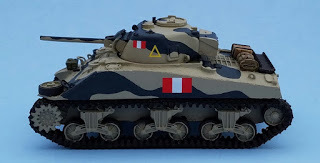 The tank is named "Gracie" which Jack will appreciate.
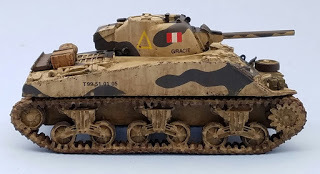
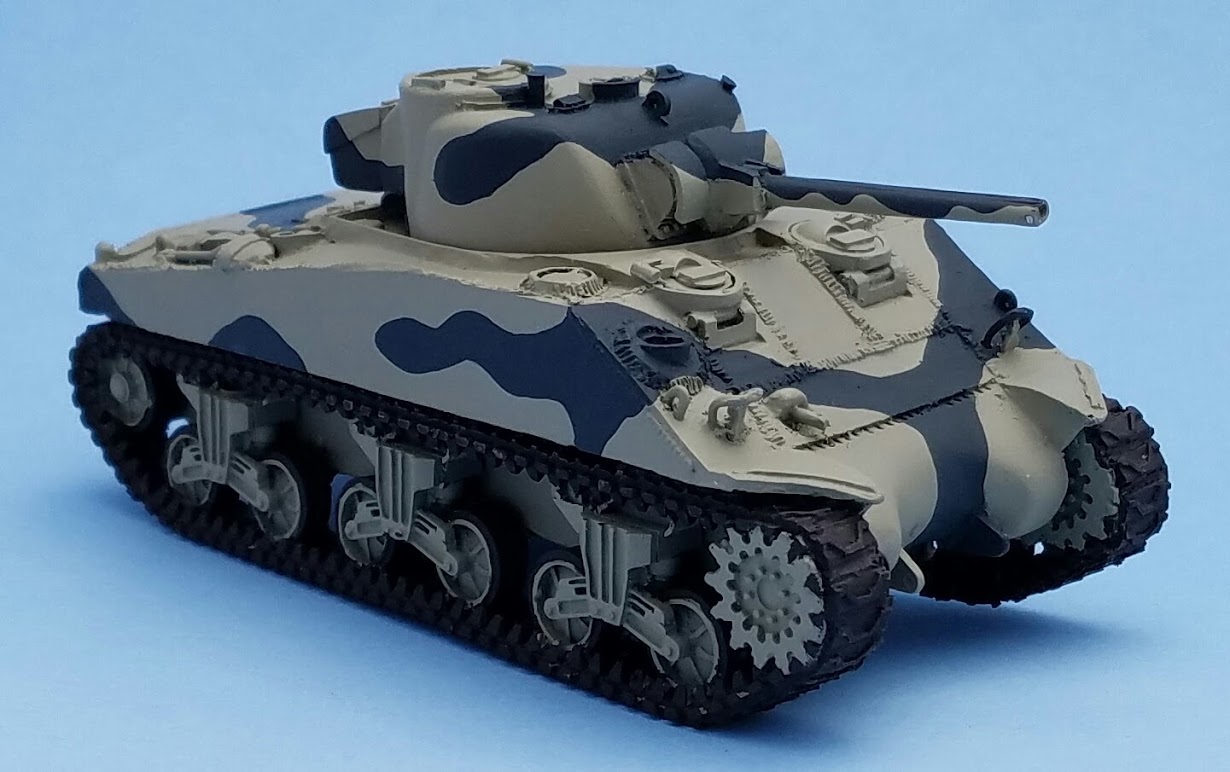
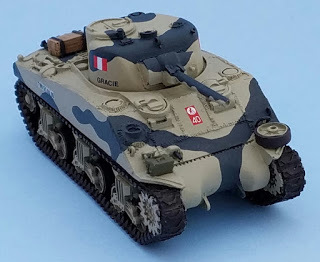 At this stage I also added some stowage.
 Next I started the weathering process, which is same process I did for my Tiger tanks.
 Layer of brown wash, as well as 976 Buff and 985 Hull Red on the tracks.
 Another layer of washes, paint chips, and Pigment added to represent mud.

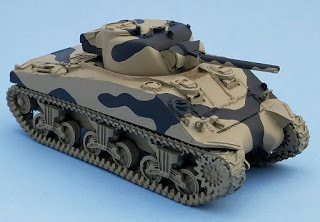
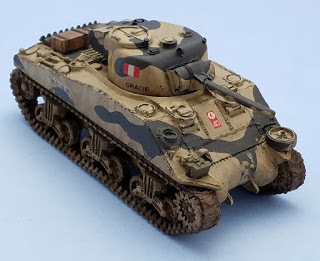 And the final result, with a protective layer of Matte Varnish airbrushed on:

 Soon this guy will see some battle against my Panzers...and we'll see if Gracie survives.
Jack's Desert Rats so I decided to do up a Sherman to add to his forces. I decided on painting a Sherman III from the 3rd County of London Yeomanry (Sharpshooters).
 I liked the idea of painting it in the camouflage Light Mud and Dark Grey instead of the usual Allied Olive Drab colors.
One of the first things I noticed was that as I was trimming the flashing off of the pieces I noticed that the tracks seemed to be a bit too long, at least compared to the M4 Shermans I have. Shermans come in many varieties, but one, the M4A4, had a lengthened hull compared to the others due to its Chrysler A57 multibank engine.
The problem is, the Sherman III is the M4A2 version of the Sherman. The M4A4 is the Sherman V. What are you doing to me, Warlord Games?
 Aside from a little grumbling, I got over this and started on the build.
Assembled.

 Primed.
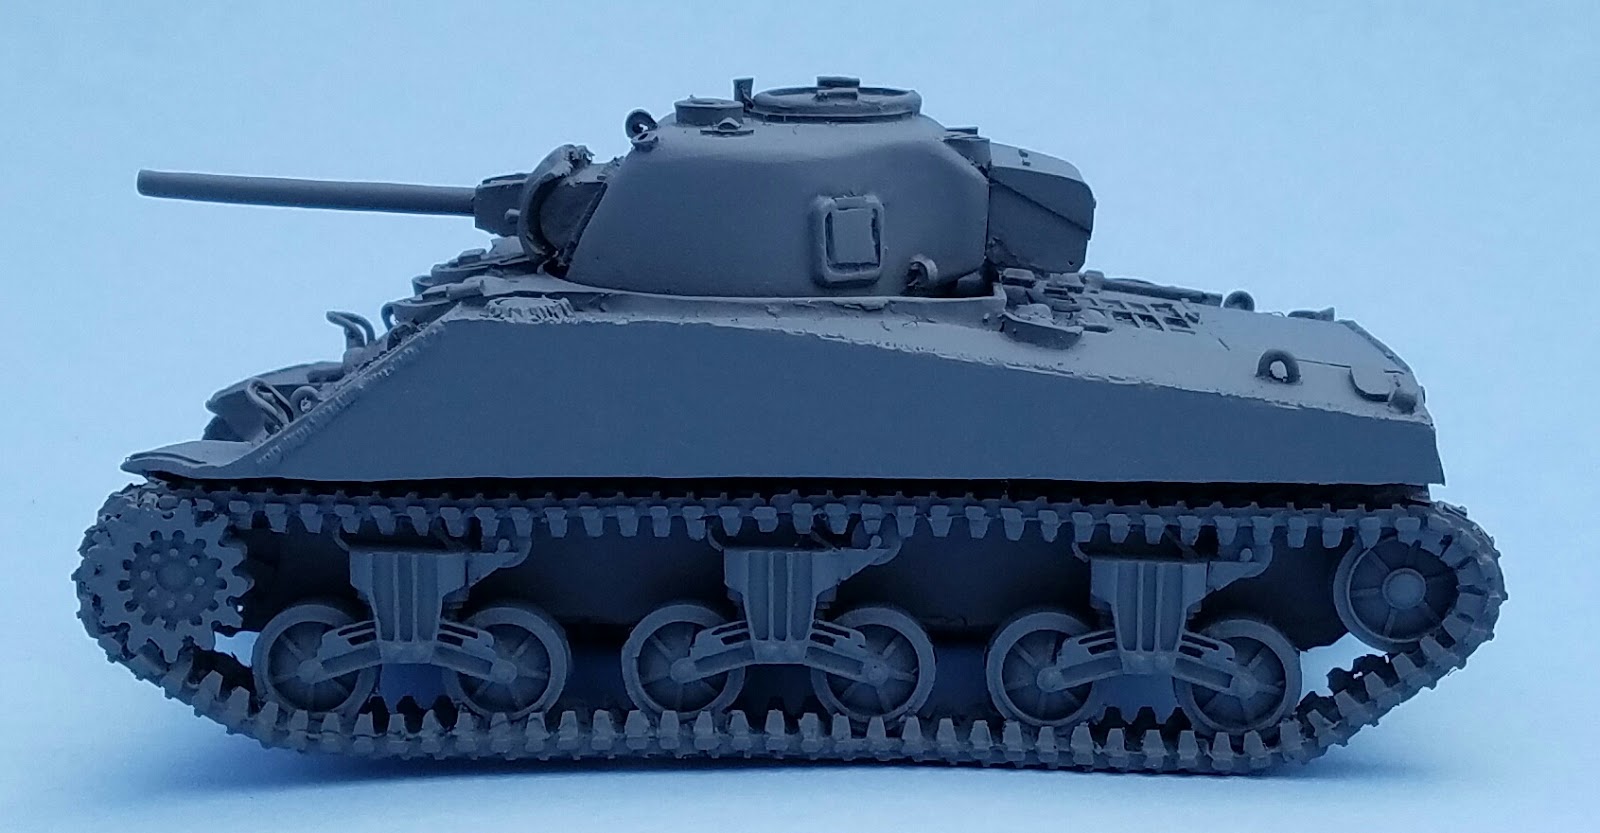
 For the basecoat I airbrushed it in Vallejo Panzer Aces #315 Light Mud.

 Next came the black stripes. In most pictures I've seen, the black isn't quite black, so I painted it in #862 Black Grey.
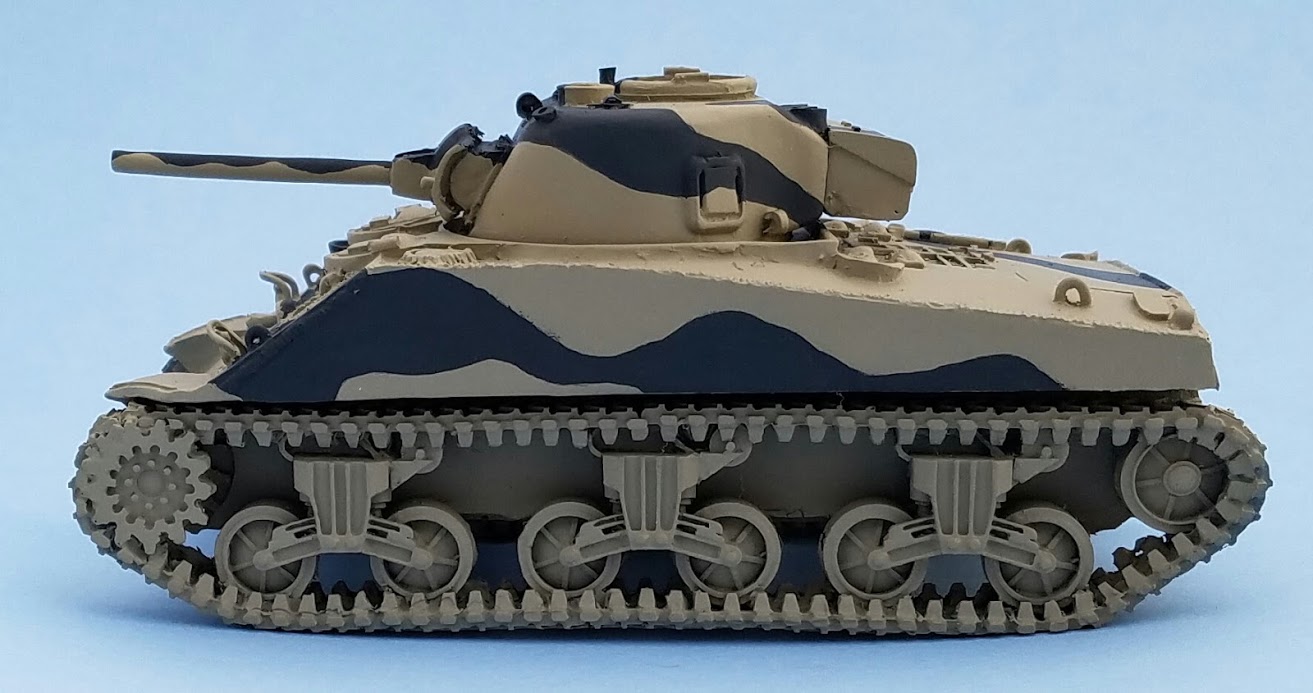
 Next came the tracks in #822 German Camouflage Black Brown.
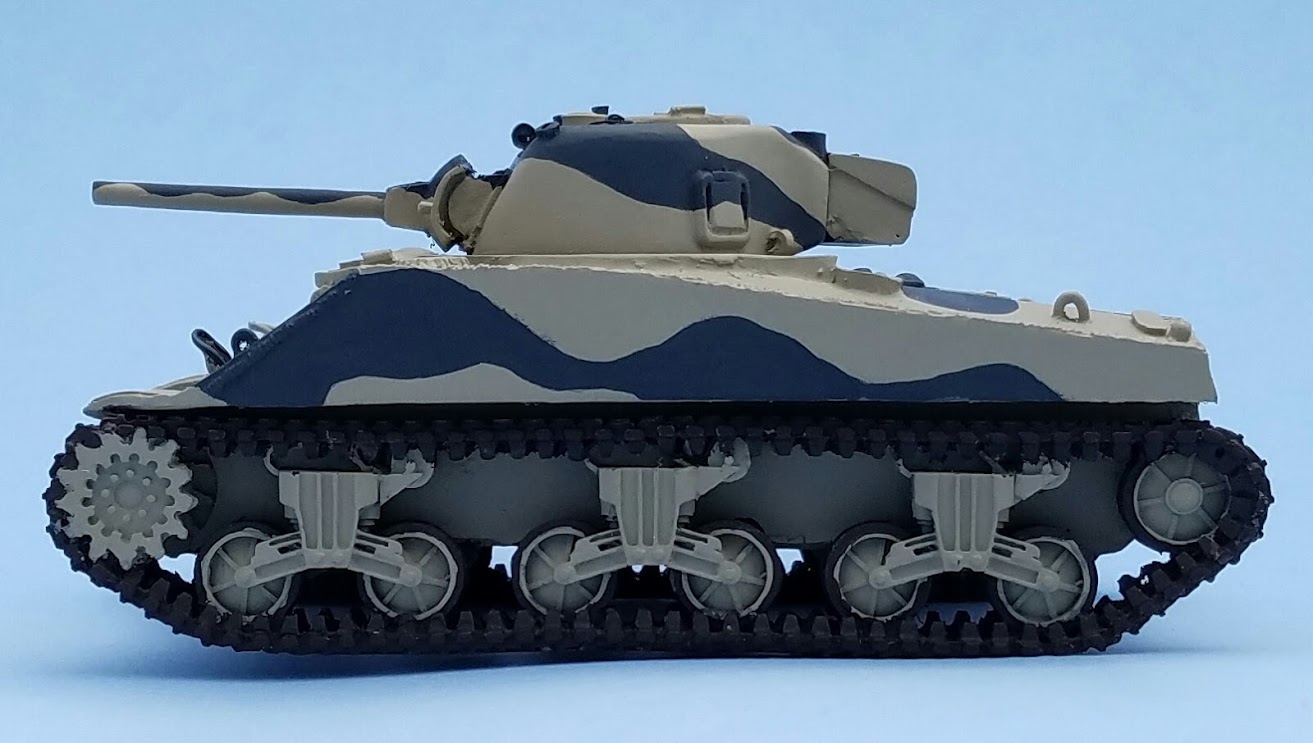
 After some waiting the decals arrived from the UK. Some of the decals (the hull number and the tank name) I used from some old Warhammer 40k Imperial Guard decals, and for the tank name, I had to apply the letters one at a time.
 The tank is named "Gracie" which Jack will appreciate.
 At this stage I also added some stowage.
 Next I started the weathering process, which is same process I did for my Tiger tanks.
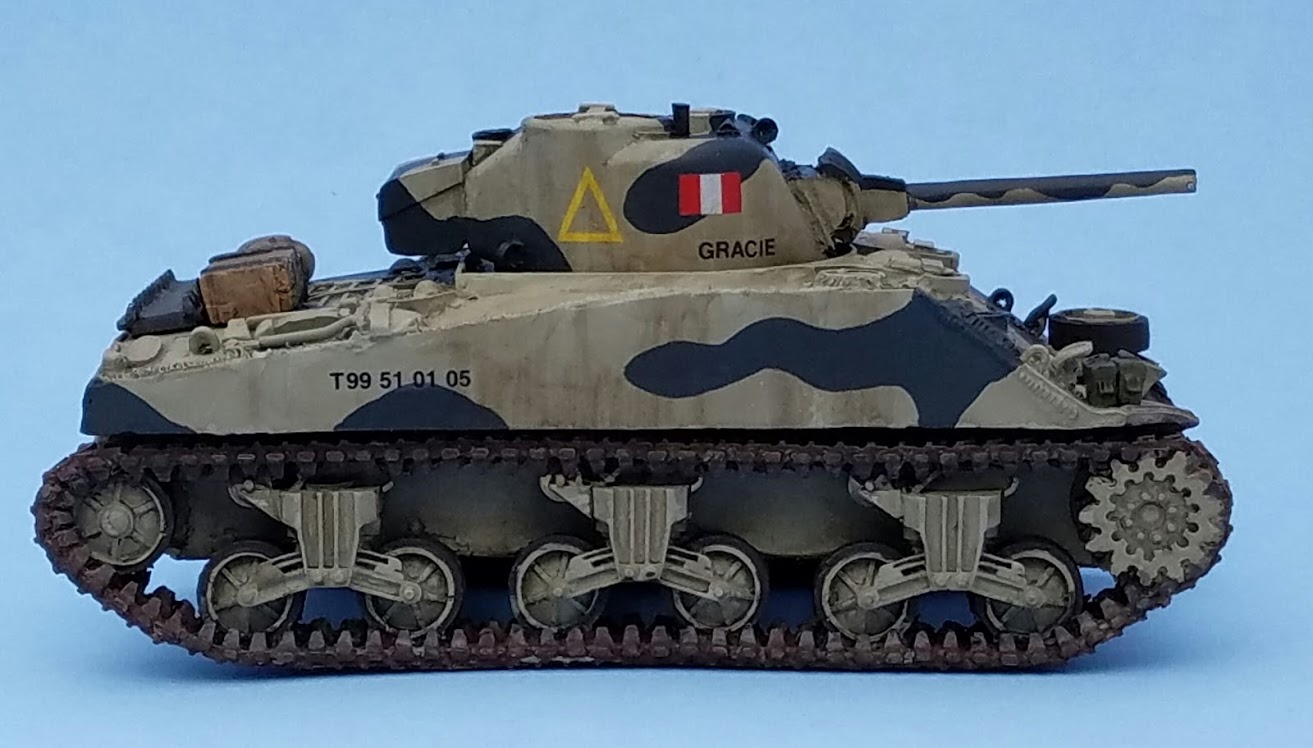 Layer of brown wash, as well as 976 Buff and 985 Hull Red on the tracks.
 Another layer of washes, paint chips, and Pigment added to represent mud.

 And the final result, with a protective layer of Matte Varnish airbrushed on:


 Soon this guy will see some battle against my Panzers...and we'll see if Gracie survives.
May 9, 2016
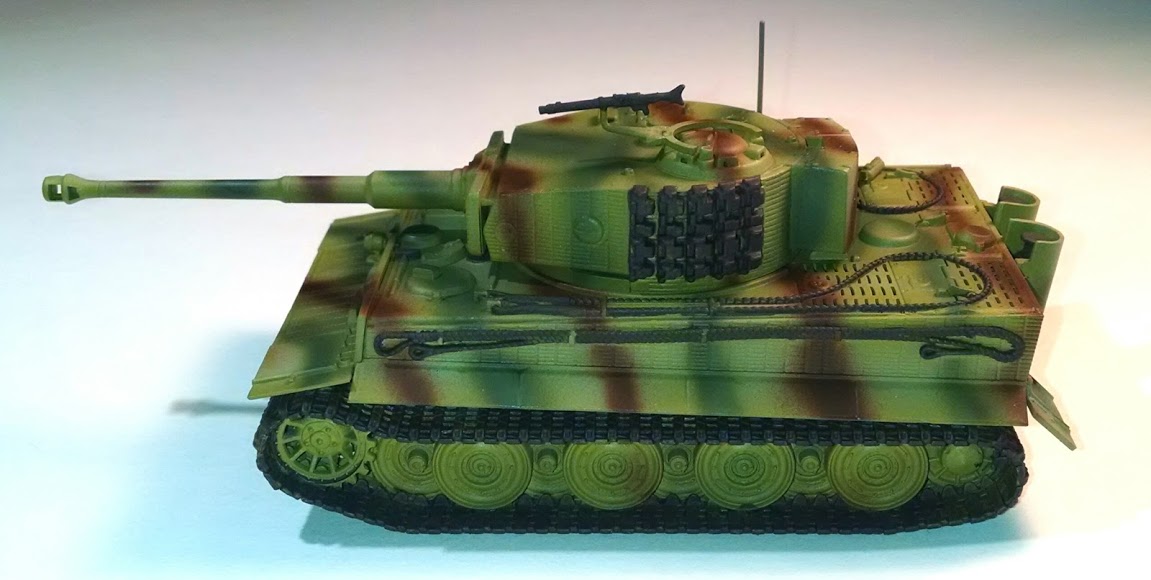
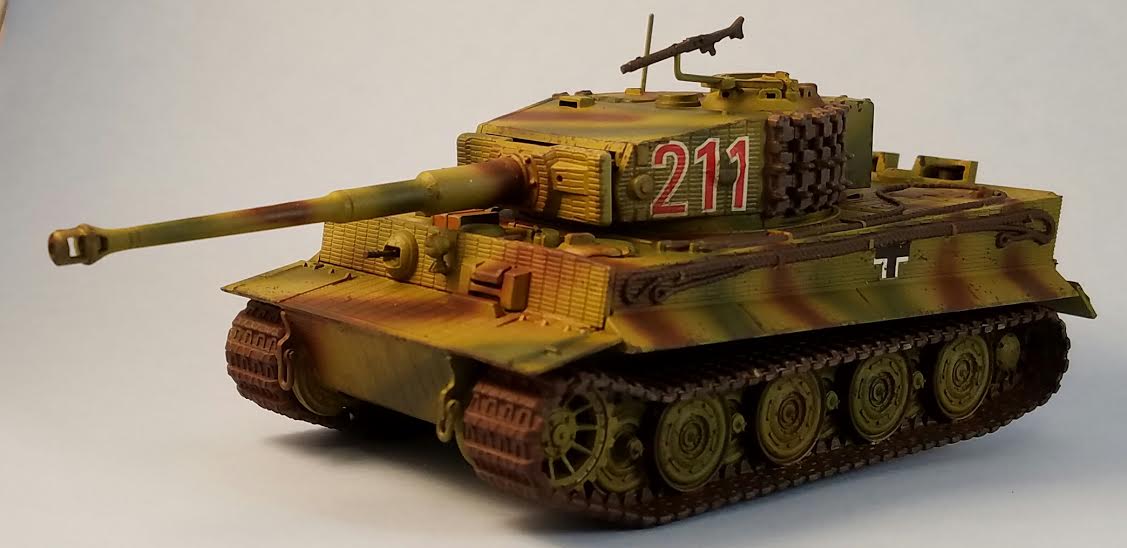
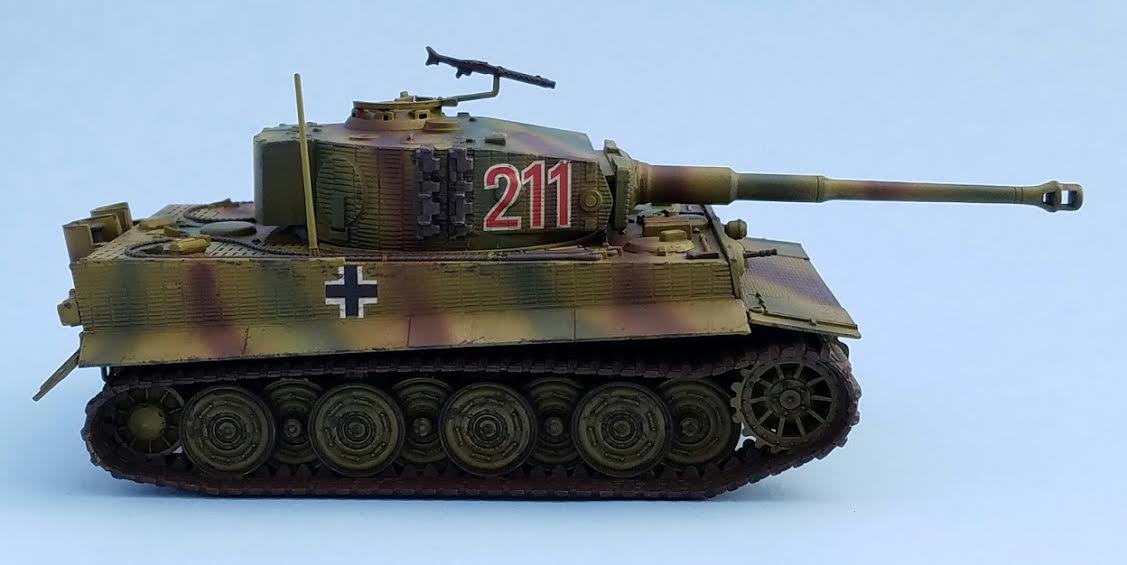
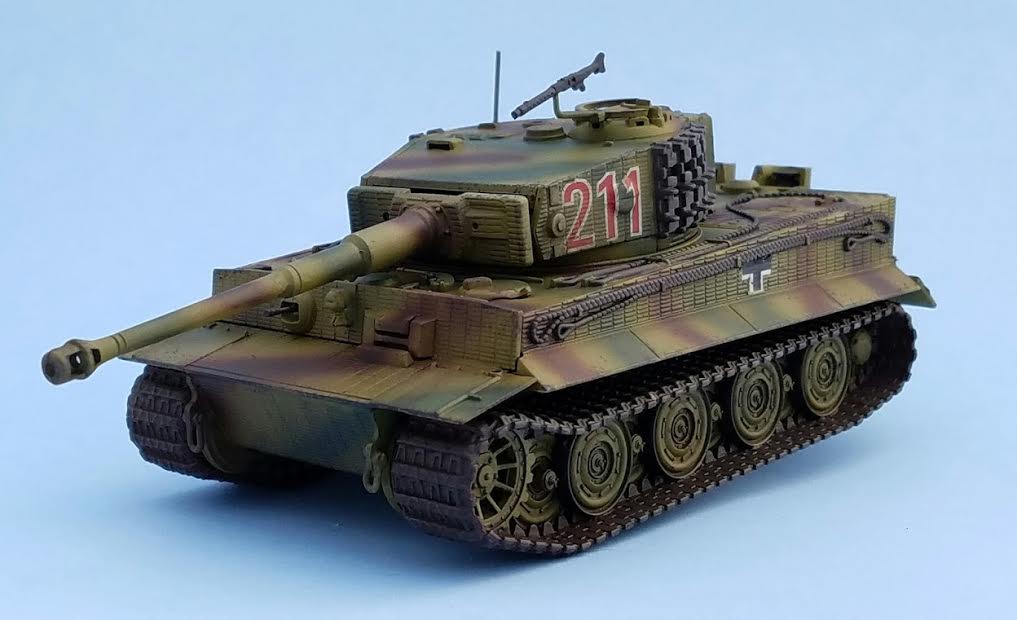
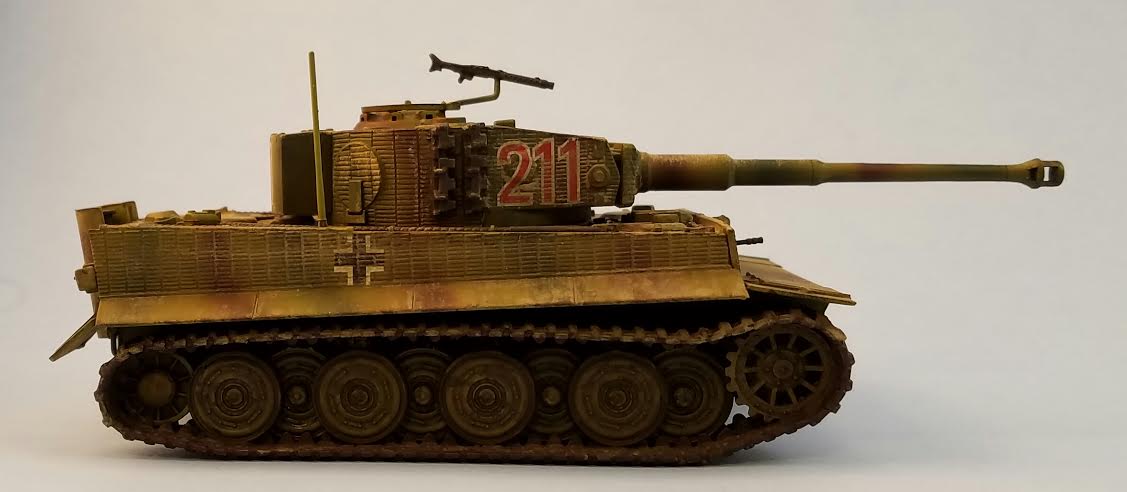
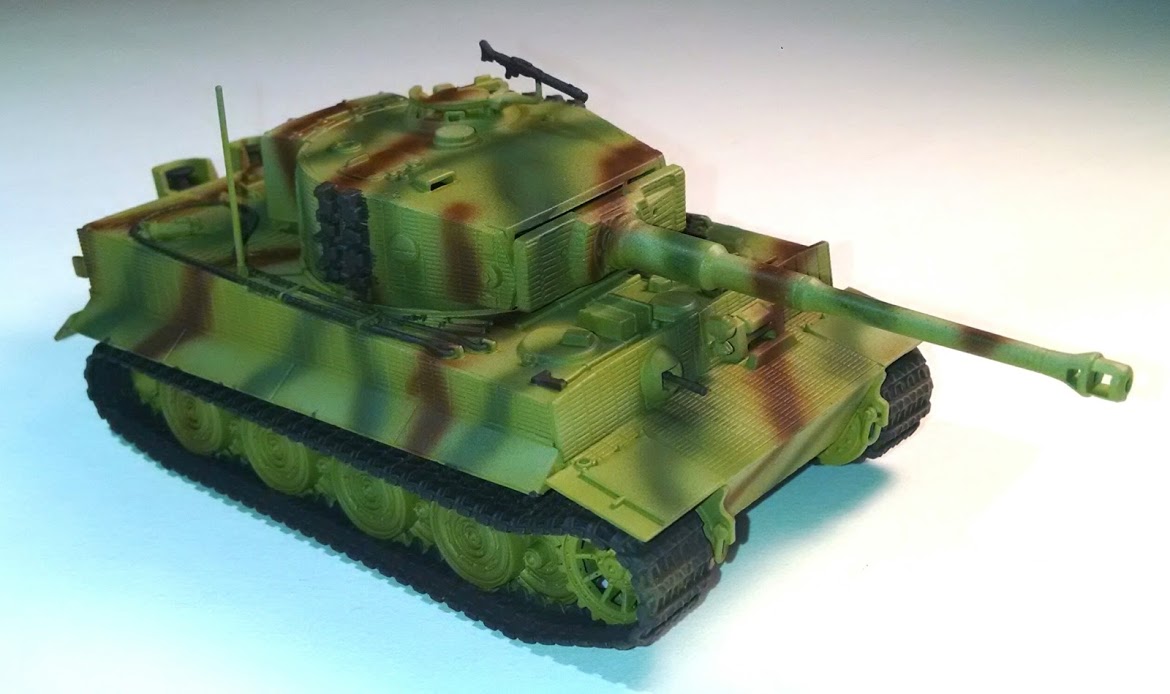
Tiger Tank, Part 3
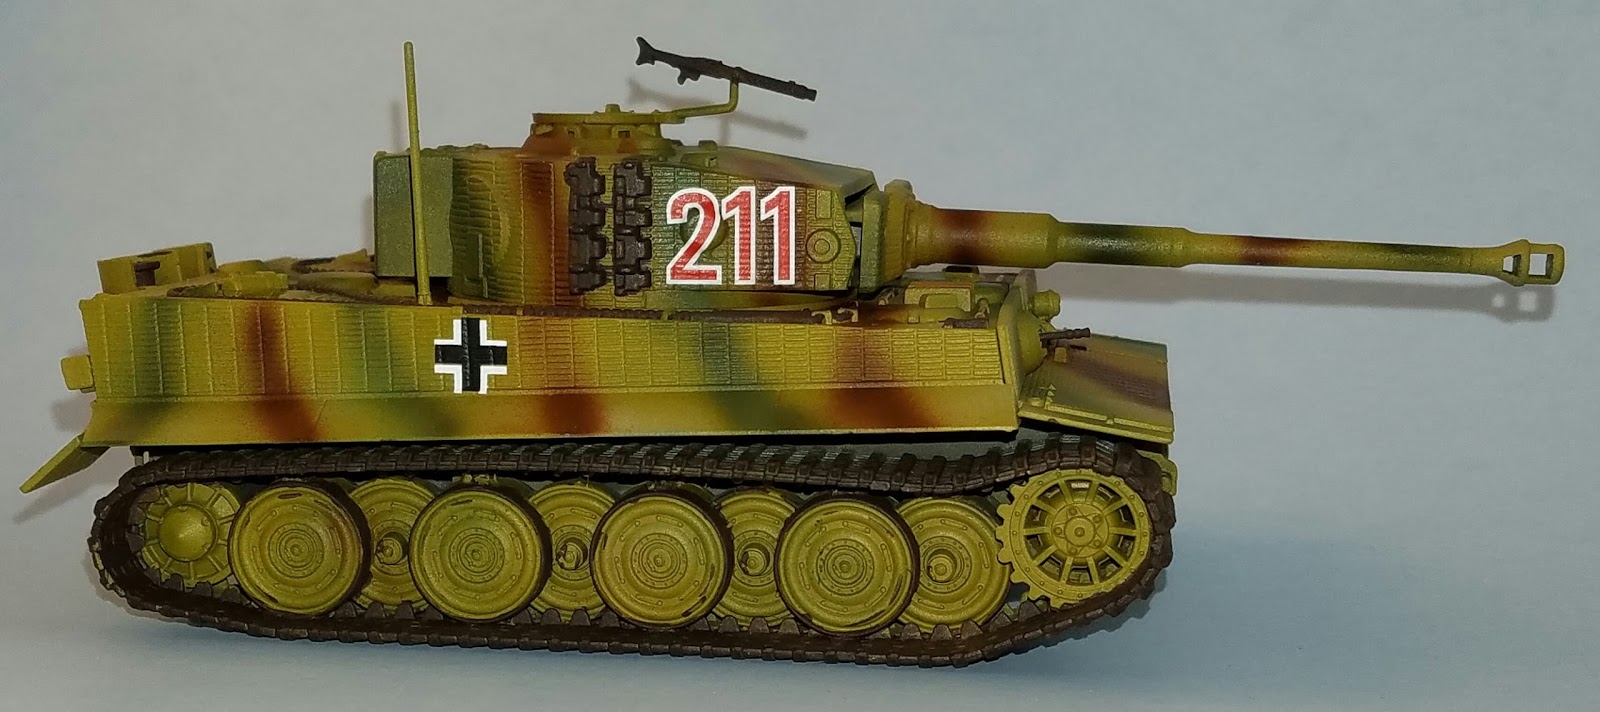 I don't have all that much experience with weathering. For most of the model vehicles I've done, the weathering consisted of slapping one some mud colored paint, and if I was feeling particularly ambitious, making some paint chips, smoke marks, and rust streaks. Doing it the "right" way, or at least, more in depth than that, seemed pretty daunting.
 I started with painting my Bolt Action Tiger tank with my airbrush, and things seemed to be coming out well so far, so I decided to go all in and do the weathering. Vallejo has a paint set specific to the purpose:
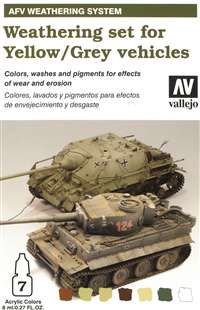
The set contains several paints, including Black Brown (for tracks & paint chips), Buff (sand/dust), Hull Red (rust), a wash for yellow vehicles, a wash for grey vehicles, a mud-colored Pigment, and Pigment Binder.
On the back of the box is a handy instruction chart that takes you step by step through the process.

Step 1
Paint the tracks in #822 German Cam. Black Brown...
 I painted the tracks, chains, and pintle machine gun before I applied the decals.
 ...and once dry, apply a well-thinned layer of #976 Buff and #985 Hull Red.
 Above is with the Buff layer. The instructions are ambiguous as to whether the "well-thinned layer of Buff and Hull Red" are supposed to cover the whole model, or just the tracks, so I played it safe and just went with the tracks. In some places on the tracks the Buff showed up very well, as I wasn't consistent with how I thinned it, but I suppose that's a good thing, as weathering isn't uniform. I thought I overdid it at first, but I reasoned that the next layers would tone it down.
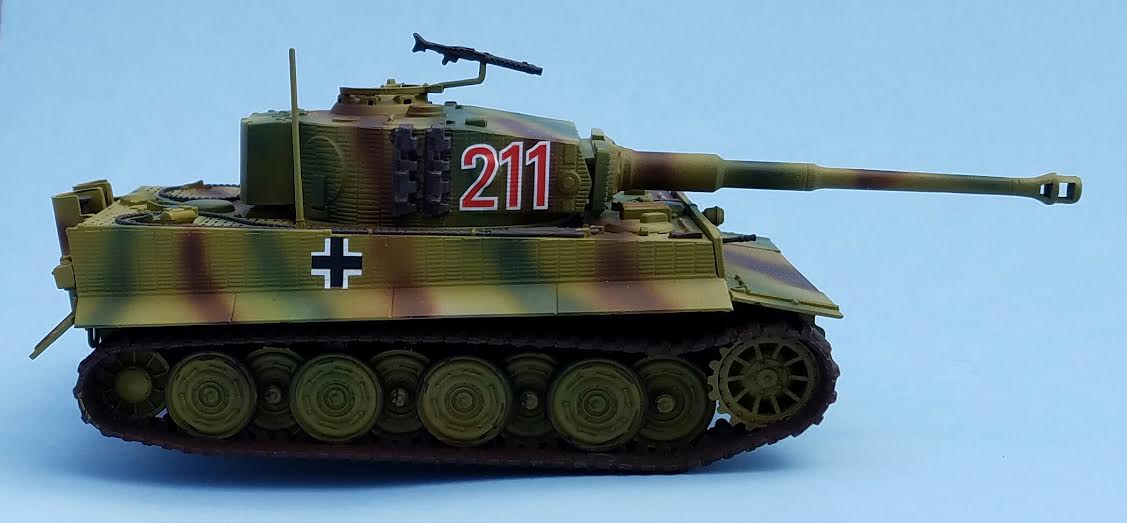
 And above with the Hull Red added. The Hull Red certainly did tone down the Buff, and the tracks are beginning to look more like worn metal rather than monochrome painted plastic.
I apologize for the different tints in the photos, as they were taken in different lighting conditions--the ones with the bluish backgrounds were taken in natural lighting conditions, while the more yellow-tinted pictures with whitish background were taken under indoor lights. In all the pictures the Tiger was placed on a sky-blue piece of posterboard for a background.
At this stage, also apply an overall coat of #513 Wash for German Yellow.
 I coated the entire model with the wash...and things started to look a bit grimy, which is good. The wash also toned down the decals a bit too, which up to this point looked a little too perfect.
Apply small paint scratches in #822 German Camouflage Black Brown. For this task you can use a small sponge and end the job with a brand new fine 10/0 brush.
 I used small sponge to dab on the paint chips, mostly near the edges of the plates, but with some over flatter sections as well for some variation. At this point I began to feel that the model was starting to come together.
Step 2 Apply an overall wash in #513 Wash for German Yellow. For this task use a medium flat brush. Pay a [sic] special attention to the running gear and tracks.
 I very liberally applied the wash all over the model, and as per the instructions, I paid special attention to the tracks and running gear. The grime was really building up on this thing, and it was starting to look pretty cool.
Apply the #104 Pigment well dispersed in #233 Pigment Binder. At this stage, make sure to pay special attention to the tracks and running gear.
I have had very little experience with pigments before, and none at all for the binder. The binder seemed like a great idea--as just putting the pigment on the model makes it look dirty, but it doesn't stay on by itself. I also found out that the pigment dissolves in subsequent layers of paint, so you could spend some time putting on the pigment, only to watch it all vanish when you put the next wash!
With that in mind, I mixed the pigment with the binder, but I had a very high ratio of pigment to binder, as I assumed that all of it would vanish after I applied. I slathered the stuff all over the model.
 Uh-oh...when it dried, the "mud" really stood out. I definitely overdid it here. I should have focused on the tracks and some splotches here and there, but I really covered the majority of the model. My brush strokes are visible in many places and look pretty terrible. Lesson learned: the binder does not dissolve the pigment, and actually protects the pigment from being dissolved by subsequent layers.
I was a bit disappointed here, but the model wasn't ruined--in the subsequent step I could try to fix the problem. On the bright side, the mud looked fantastic on the running wheels and tracks.
Step 3 Apply another coat of #513 Wash for German Yellow. This time around the most recessed and rasied parts. At this stage, also apply more fine scratches in #976 Buff and #985 Hull Red, just to add some color variation.
 Since I wanted to tone down the mud layer as much as possible, I gave the entire tank a thorough wash--not just the recessed and raised area. It worked...a little. I did put a few scratch marks in Buff and Hull Red, but I did it rather sparingly.
Apply #104 Pigment directly from the jar and once in the desired spots, fix it in place with #233 Pigment Binder.
 In order to break up some of the more egregious paint brush streaks, I focused the pigment additions in these areas and fixed them in place with the Pigment Binder. I think did some minor touch ups with the #513 wash. The last stage was to coat the model in Matte Varnish to protect everything. I loaded up my airbrush and sprayed the entire model.
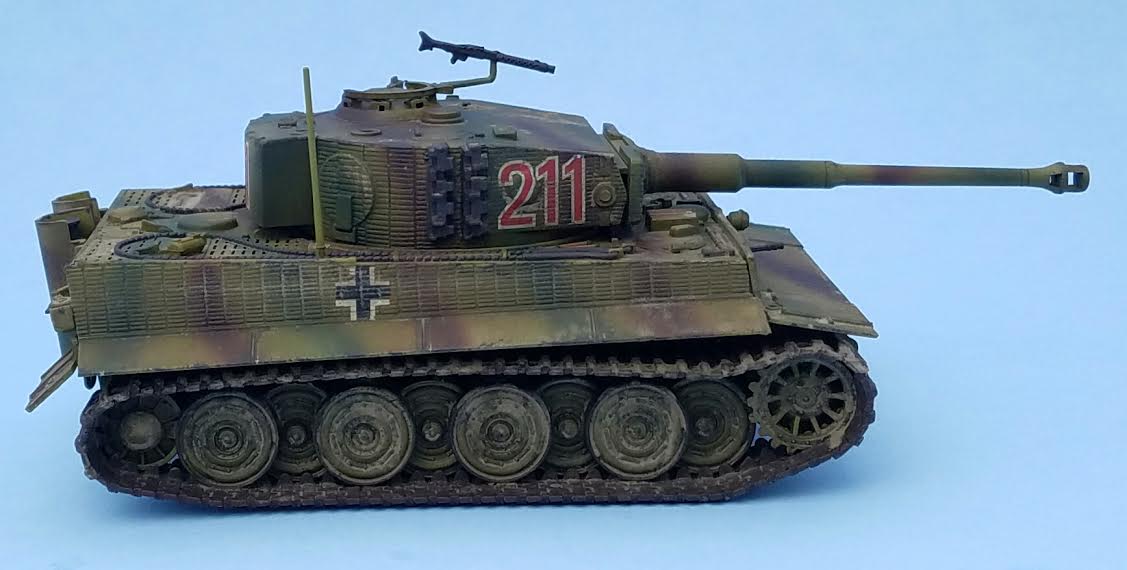
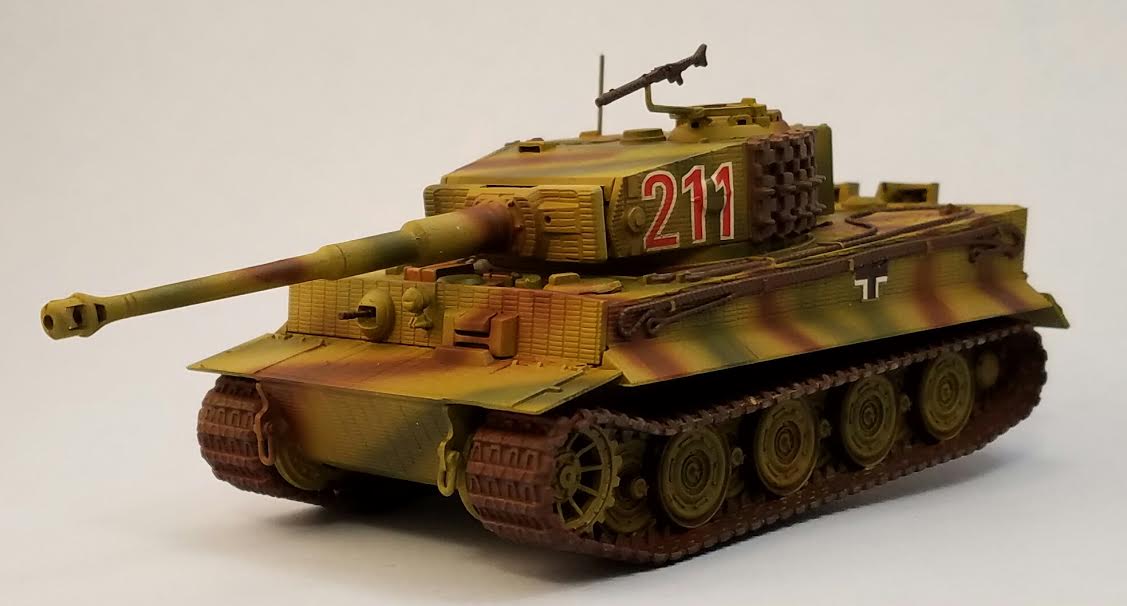
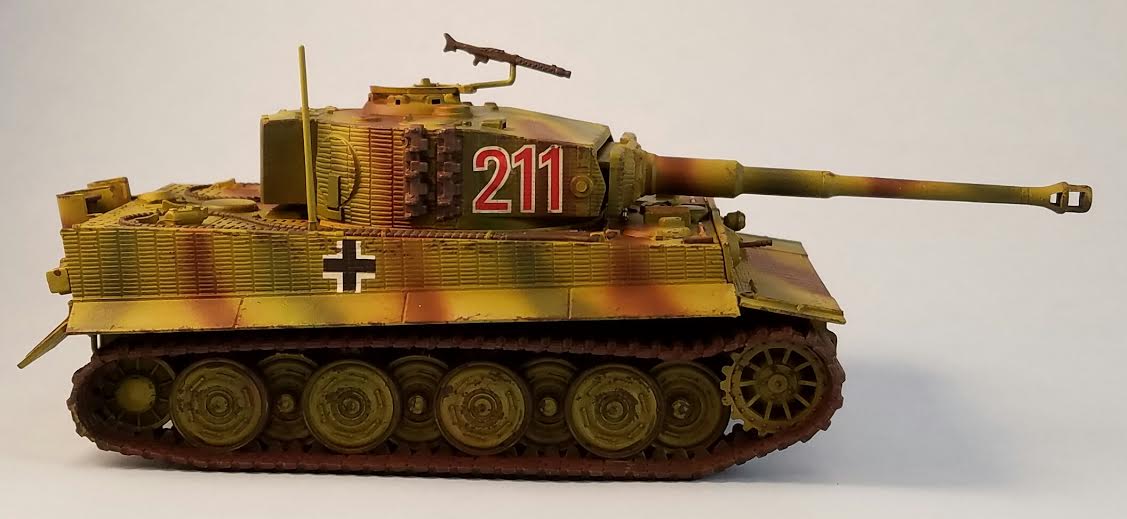
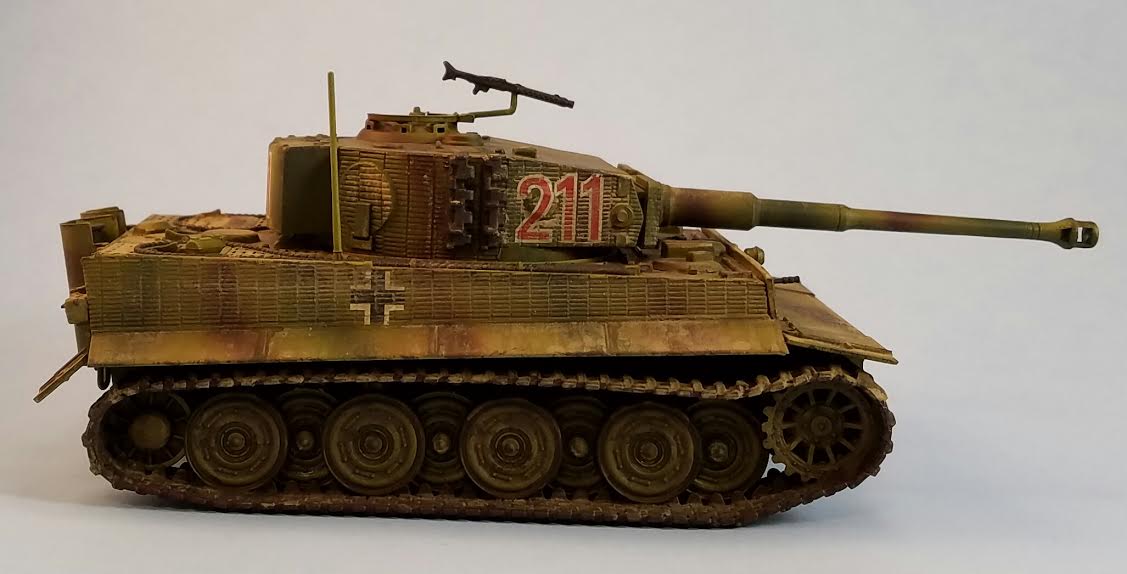
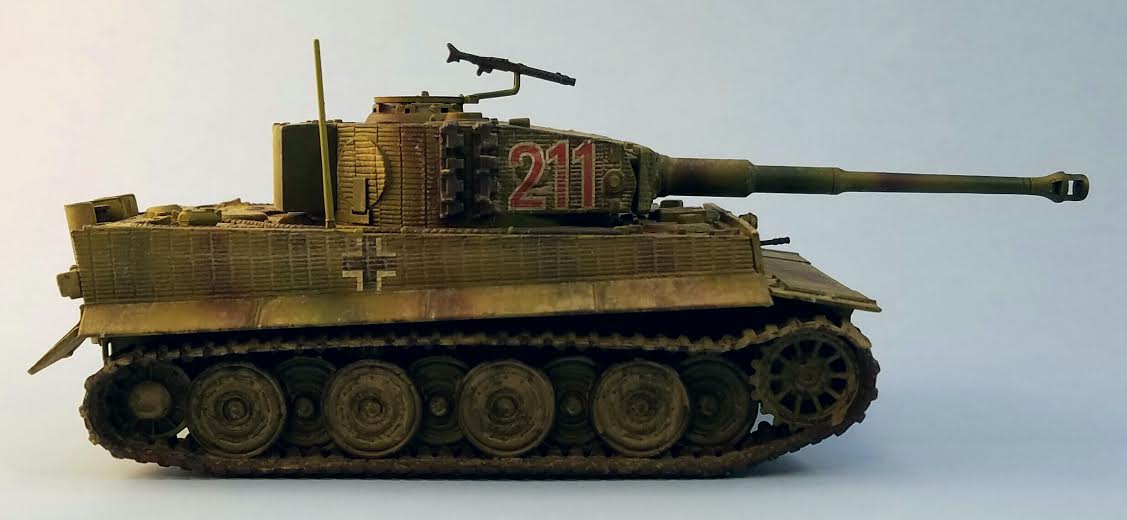
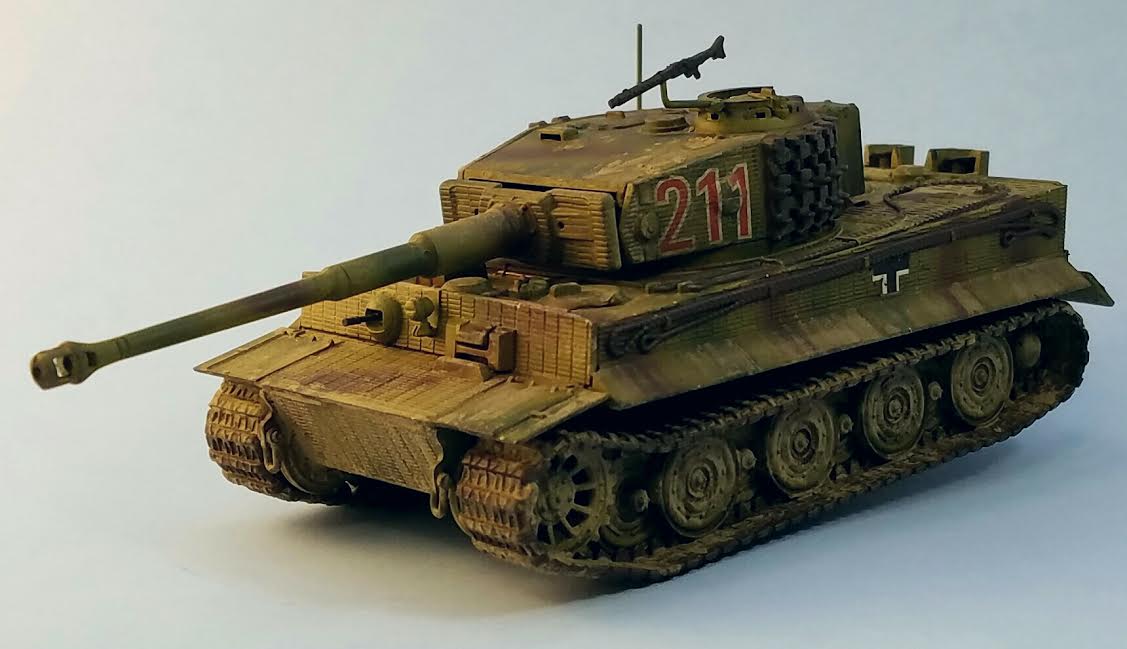
 The Matte Varnish also toned down a lot of the weathering--especially the pigment mud patches. Seeing as I originally overdid that step, the end result turned out pretty well, I think.
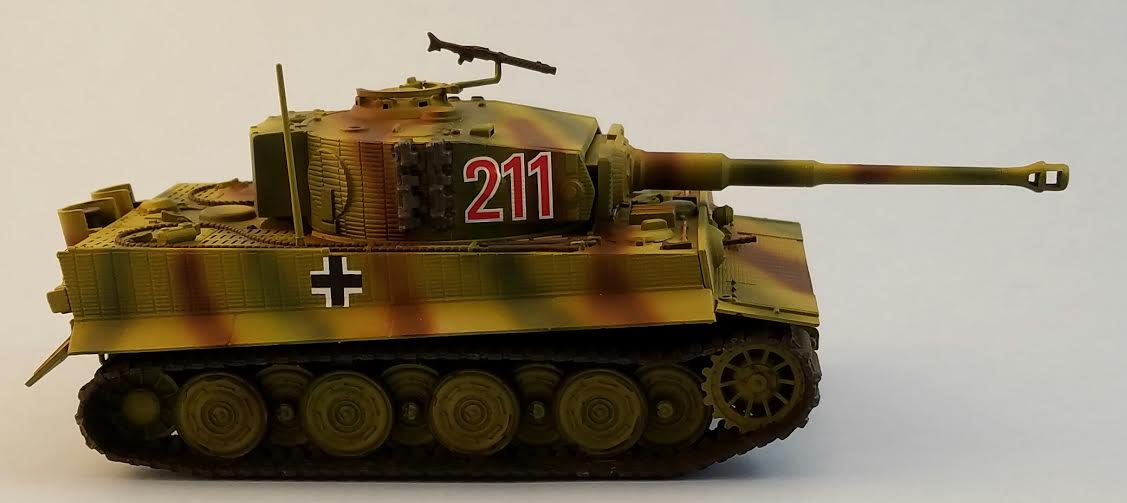
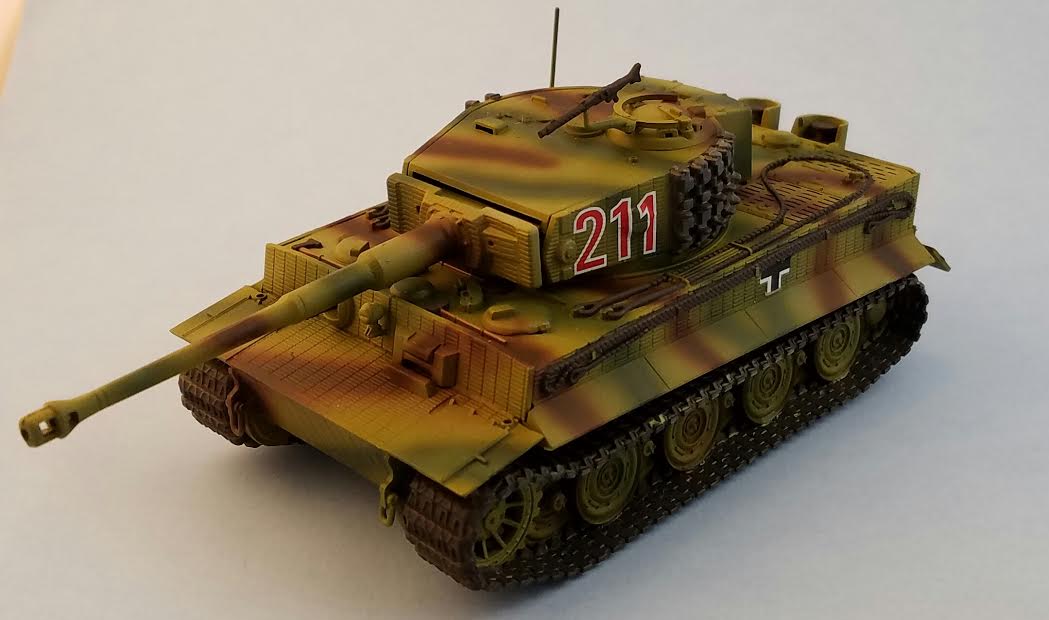
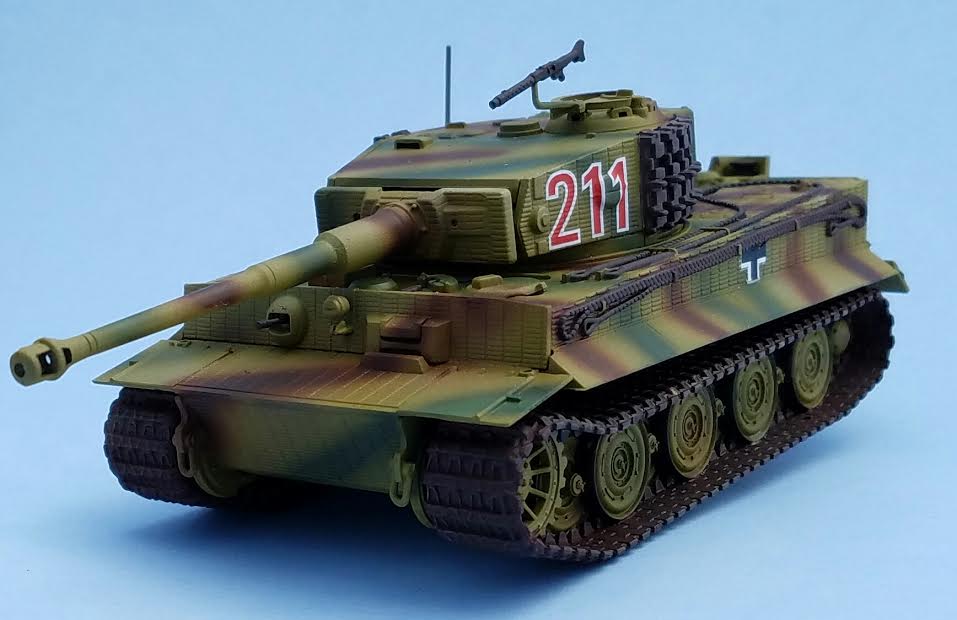
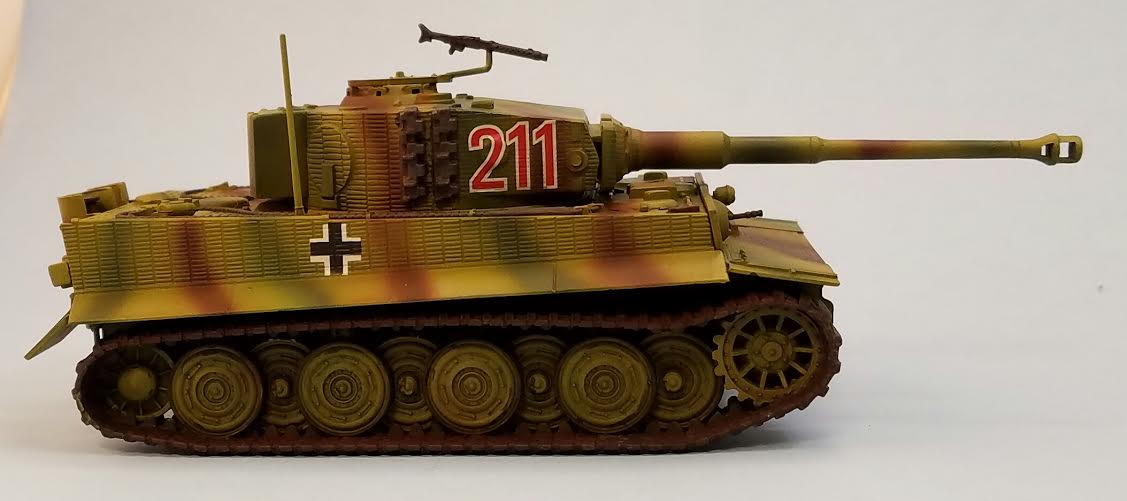
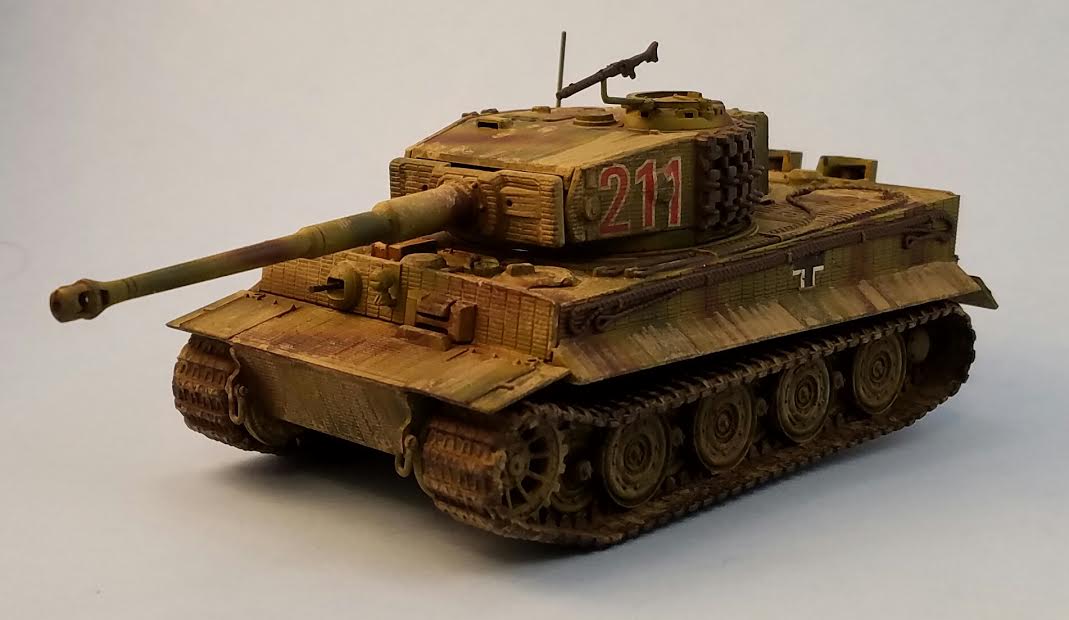
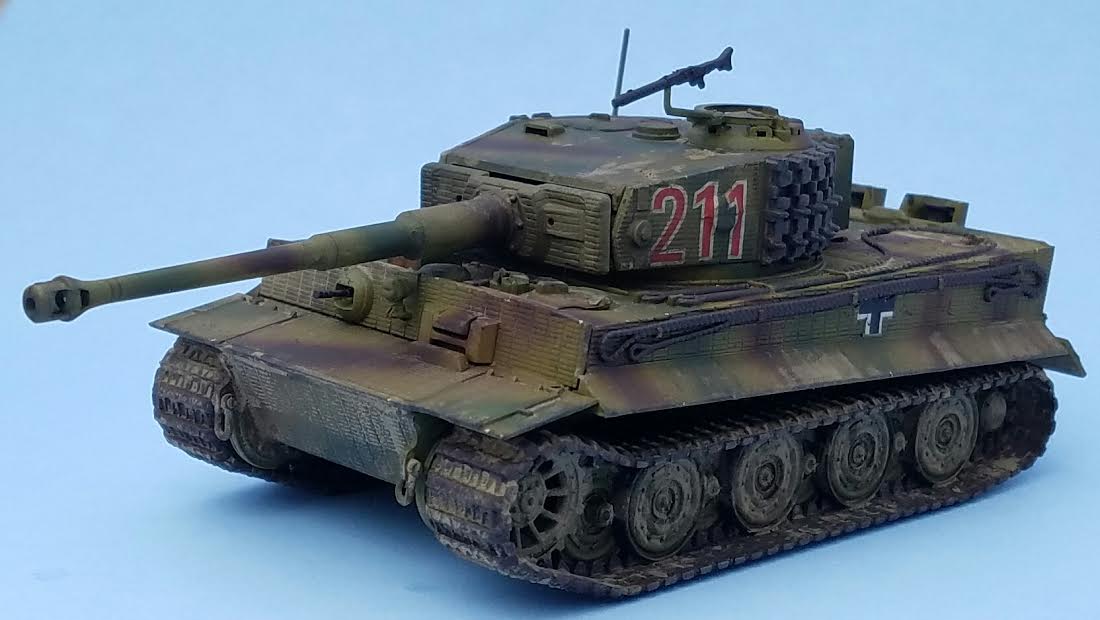
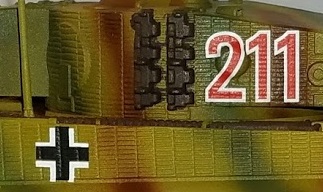
But wait! I didn't just paint up one Tiger. Tiger 211 has a pair of friends:
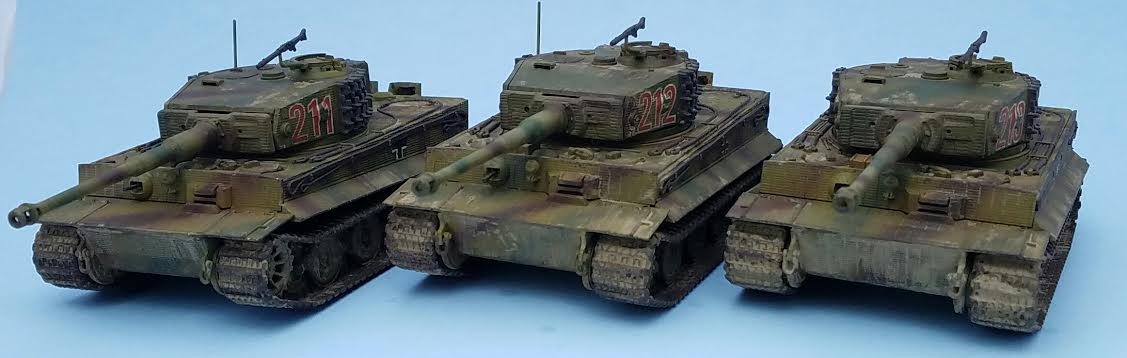 Turns out I have a platoon, ready for action. I'm going to have to bring home some Shermans or Cromwells to eat sometime soon. These big cats are hungry!
April 28, 2016
Swatches
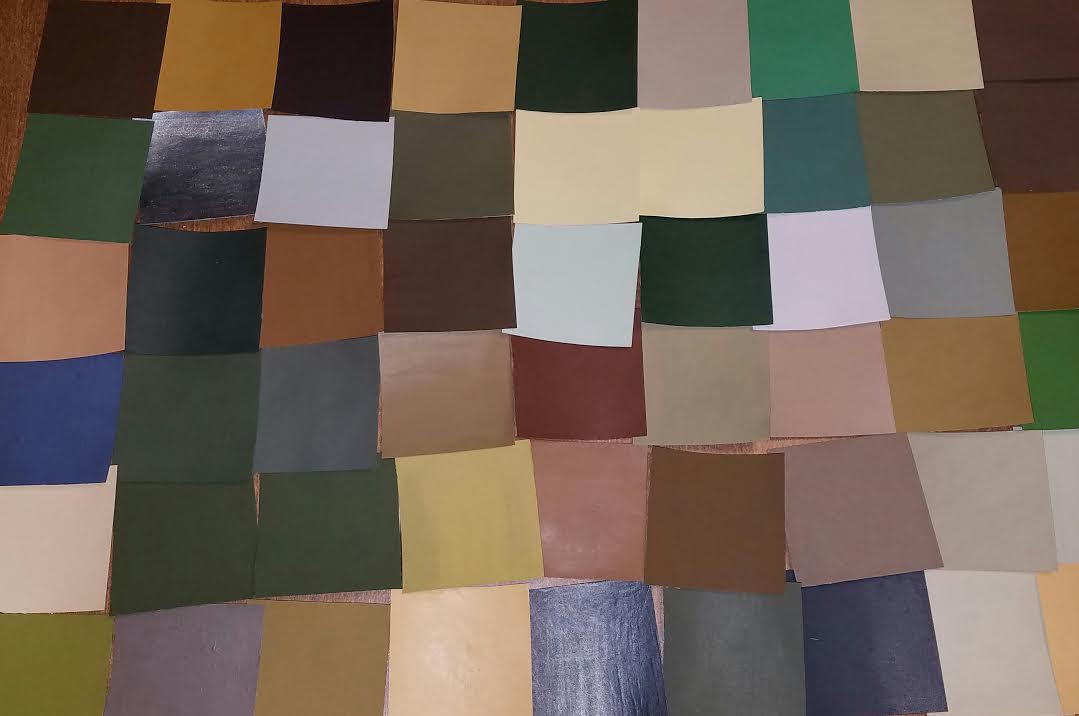 I have an unhealthy obsession with getting the "right" color for my miniatures. In trying to figure out the color I need for a particular project, picking the right color by its depiction on a store's website is impossible. They never match. Looking at a paint pot or bottle doesn't work either, because sometimes the paint is unmixed, and wet paint is usually a slightly different shade than what it is when dried.
So I make swatches.
It's pretty simple: I just cut out a lot of 2-inch squares of posterboard, and then painted them with each of my colors. Now I know just what the color looks like when dry. Whenever I'm dithering over which color to pick, I grab some of the swatches and do a comparison until I make my decision. A 2-inch square is also good in case I need to go to Home Depot and buy a pint of paint for larger projects.
April 22, 2016
Unboxing: Dungeon Saga: The Dwarf King's Quest
 As I've gotten older and had less time to play large scale wargames, I've had more and more thoughts of a smaller game that could be played that was also more accessible to non-gamer geeks. I even did a post about it, hoping for a return Warhammer Quest. That hasn't happened, but Mantic Games has answered the call with Dungeon Saga: the Dwarf King's Quest.
Originally I imagined playing with with adults, but now as my kids are getting older (currently 7 and 4), they will be interested in this sort of game as well.
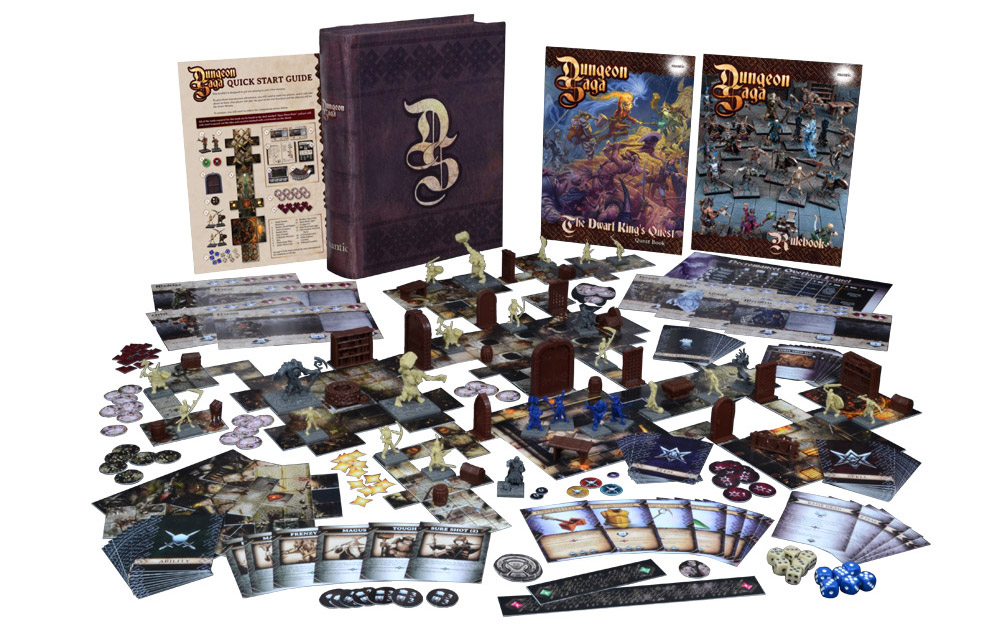
When Dungeon Saga arrived at my door, I opened it up to see what's inside.
 The main box is a sleeve that fits over another box that looks like a book, giving the gamebox an appearance of a ancient tome of wisdom.
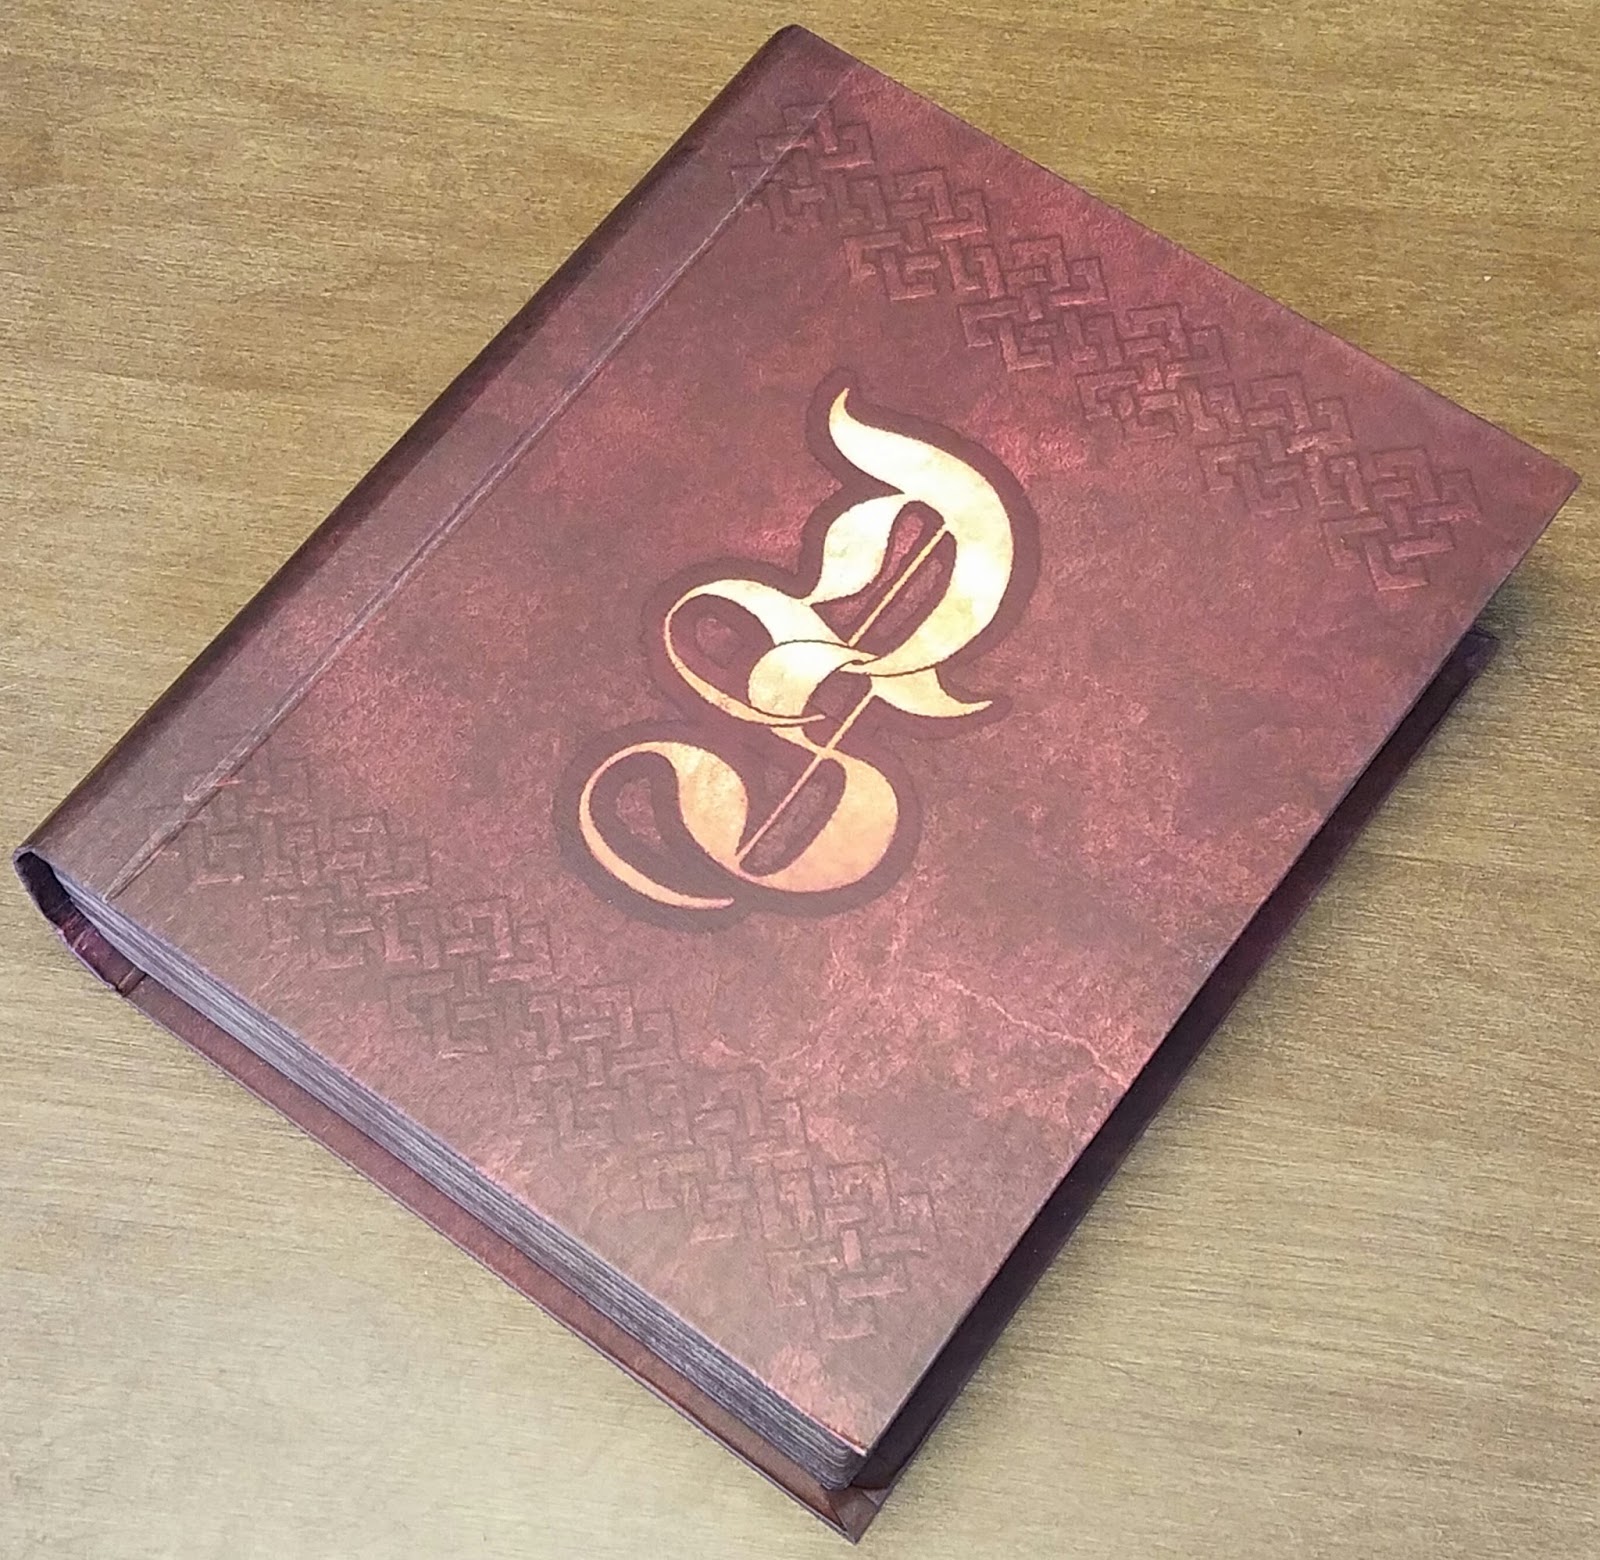 Opening up the "book" reveals a contents: miniatures/game pieces in plastic bags, two decks of cards, dice, and underneath all the cards and rulebooks. They are separated by two dividers that you could throw away, but would be wiser to keep in order to keep things organized.
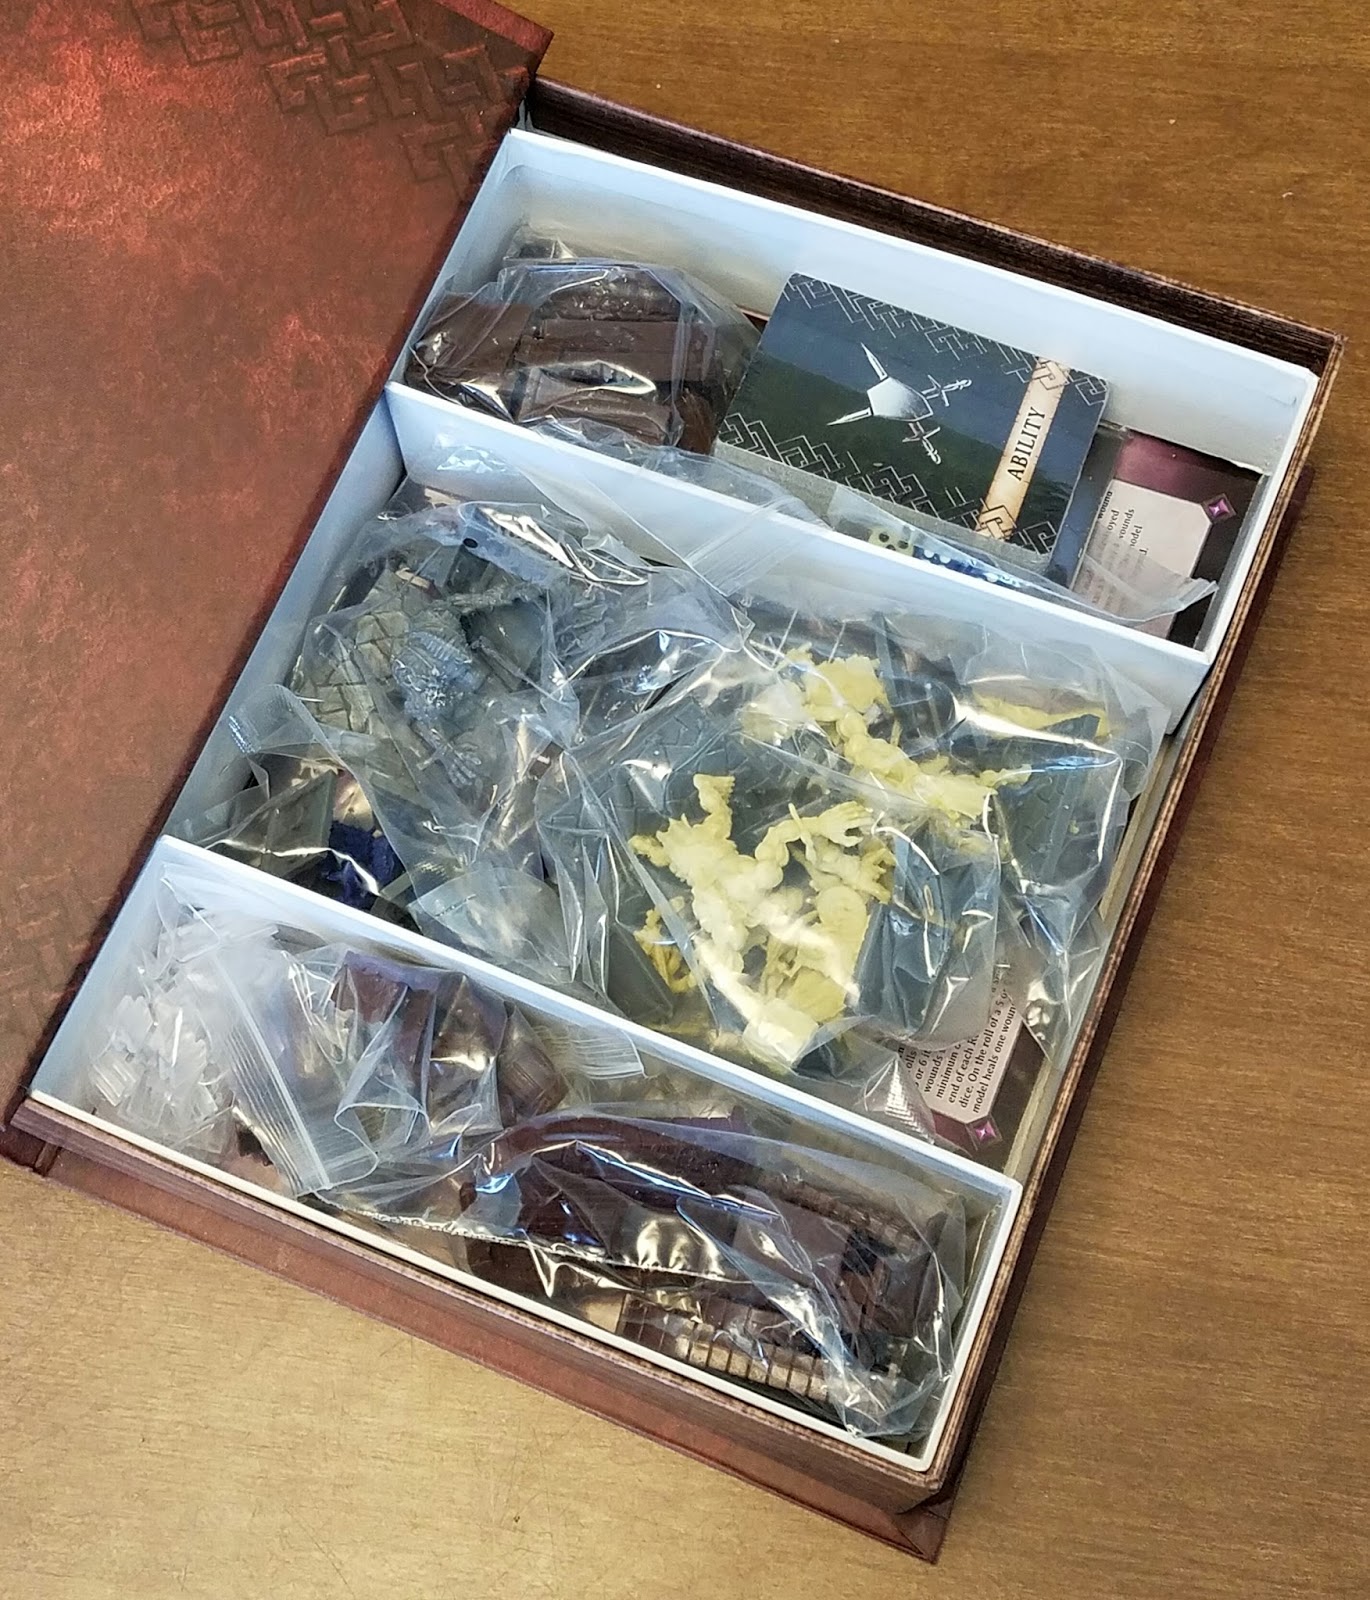 The "furniture" game pieces are doors and barrels and such, and are in little ziploc bags for reusability. The dice have their own bag as well.
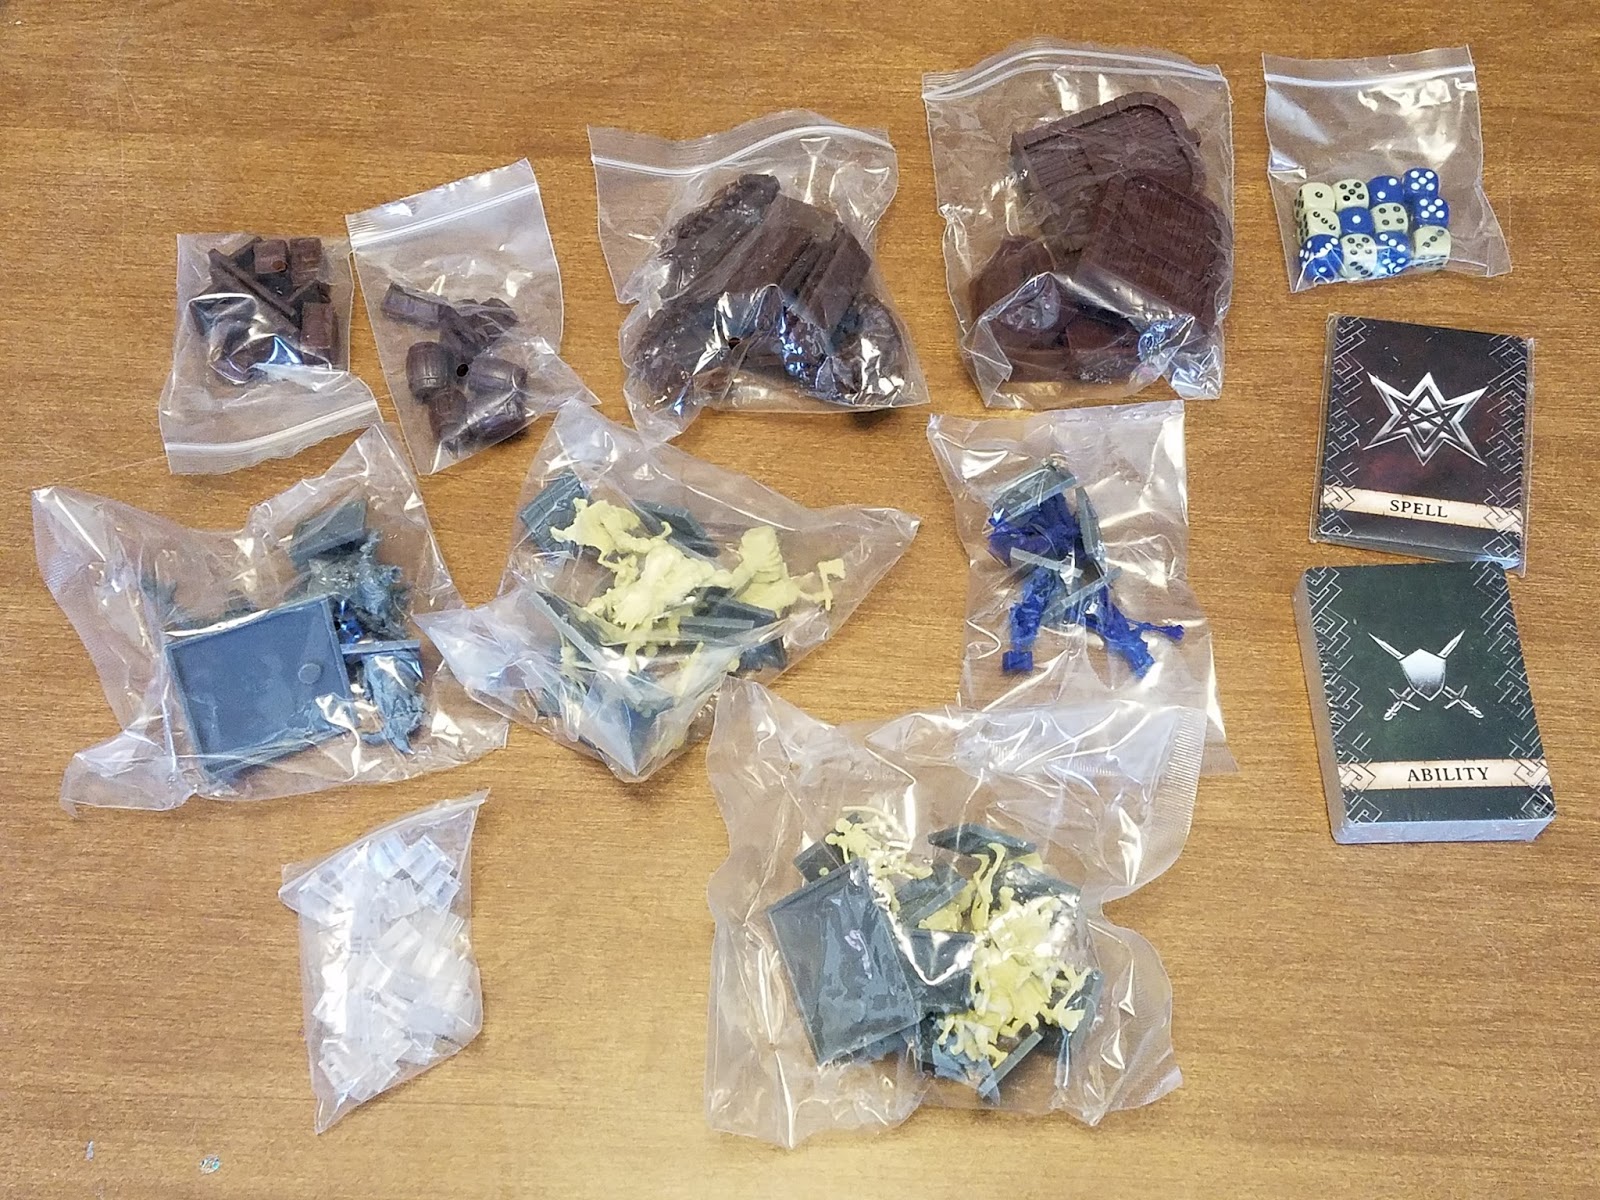 The miniatures are in other bags that you have to break open.
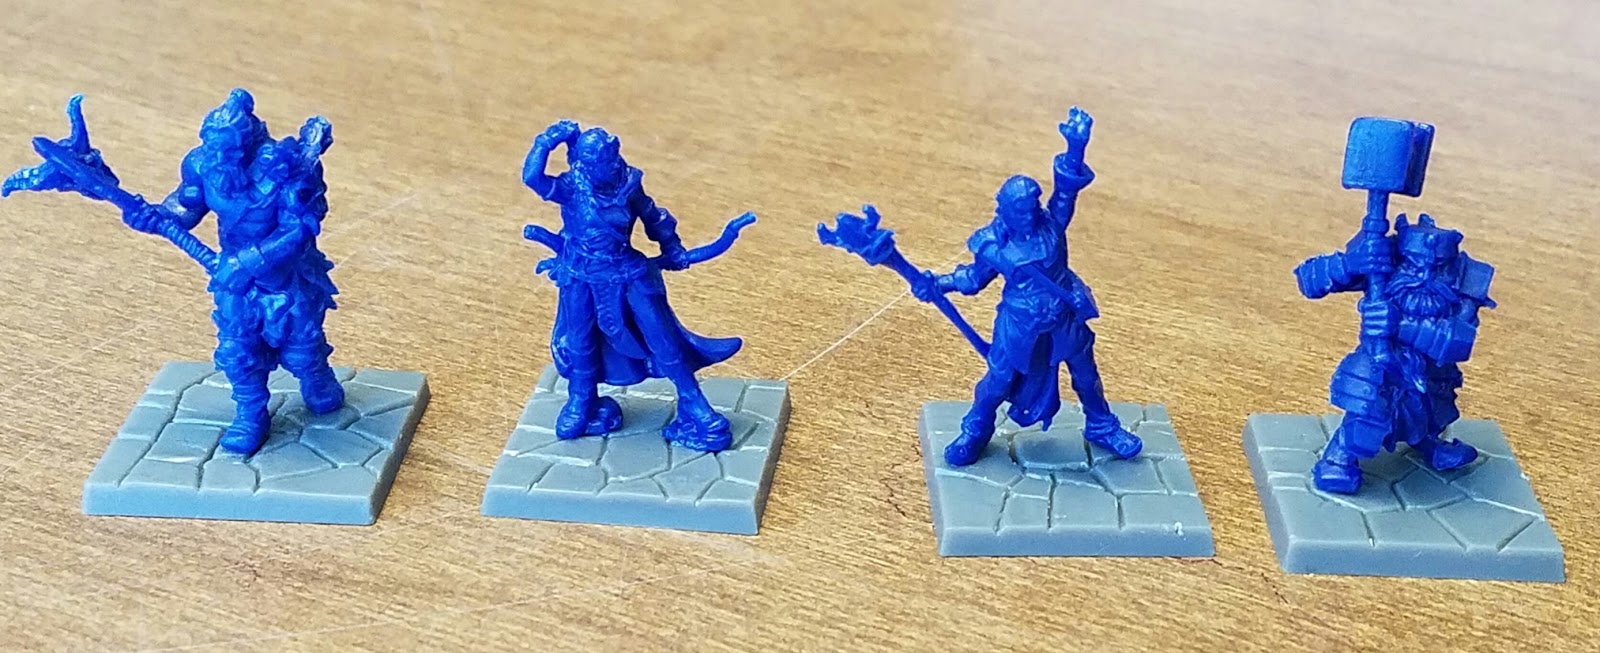 The miniatures themselves are all single piece, meaning no assembly required. This is a plus for those who want to dive right in. It really gives them a "game piece" feel to them, rather than a "miniature" feel. The miniatures themselves are made of a soft plastic that is easily deformed (a handout in the game actually tells you how to shape the miniatures using hot water if you want to repose them). For those of you who were hoping for GW-quality hard plastic miniatures, look elsewhere. That said, once painted up, these miniatures will look just fine. If you're the type looking more for a board game than a miniatures game anyway, they are more than adequate.
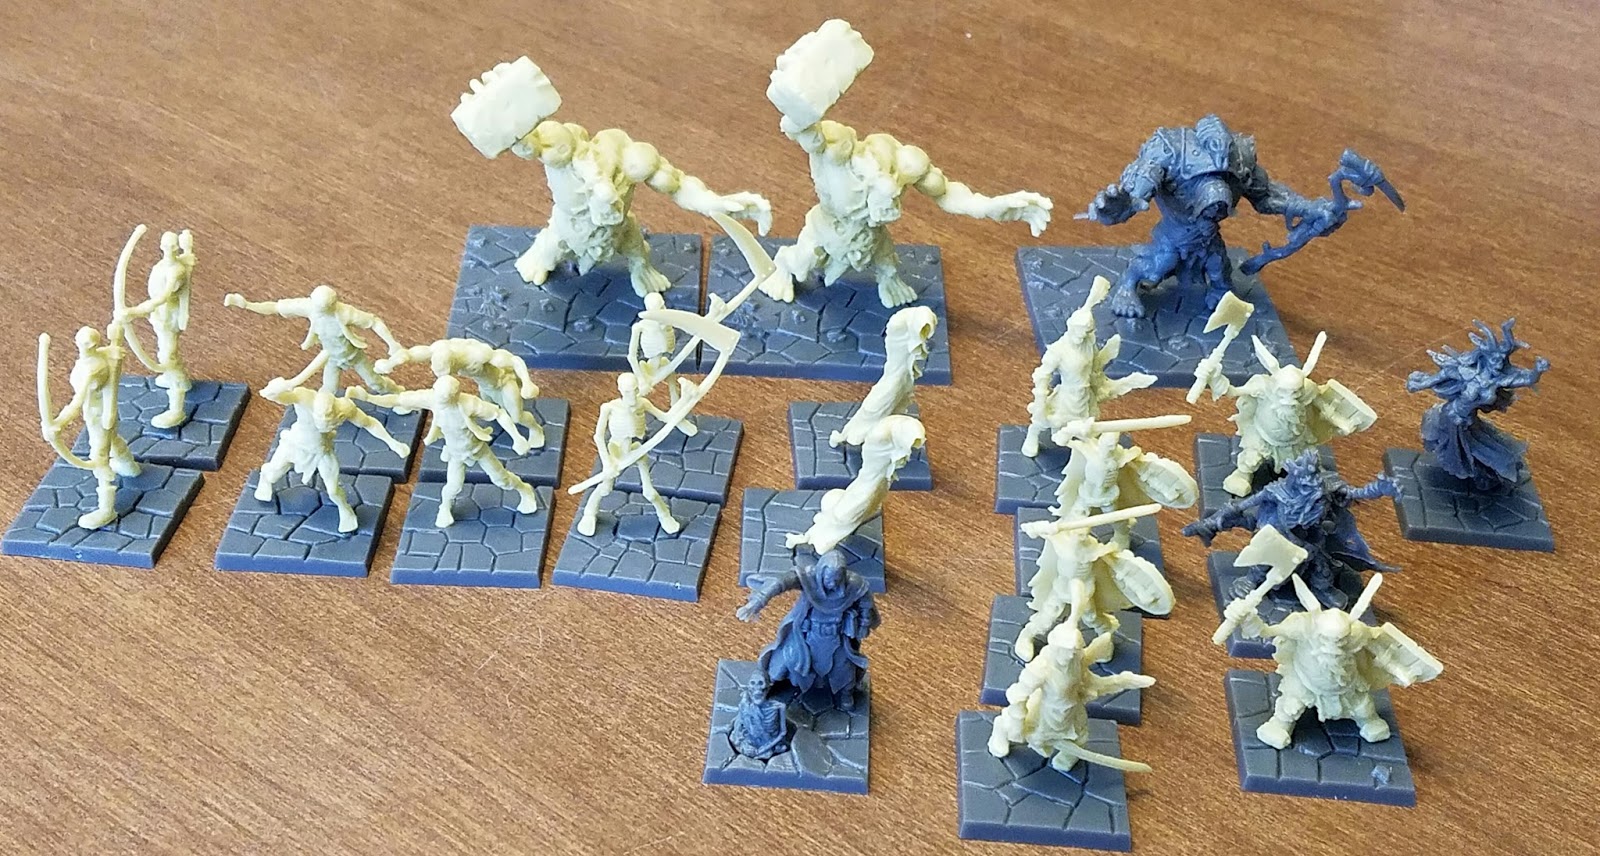 The bad guys come in a variety of creatures, including zombies, ghosts, skeletons, three larger monsters, and the Necromancer Overlord Mortibris.
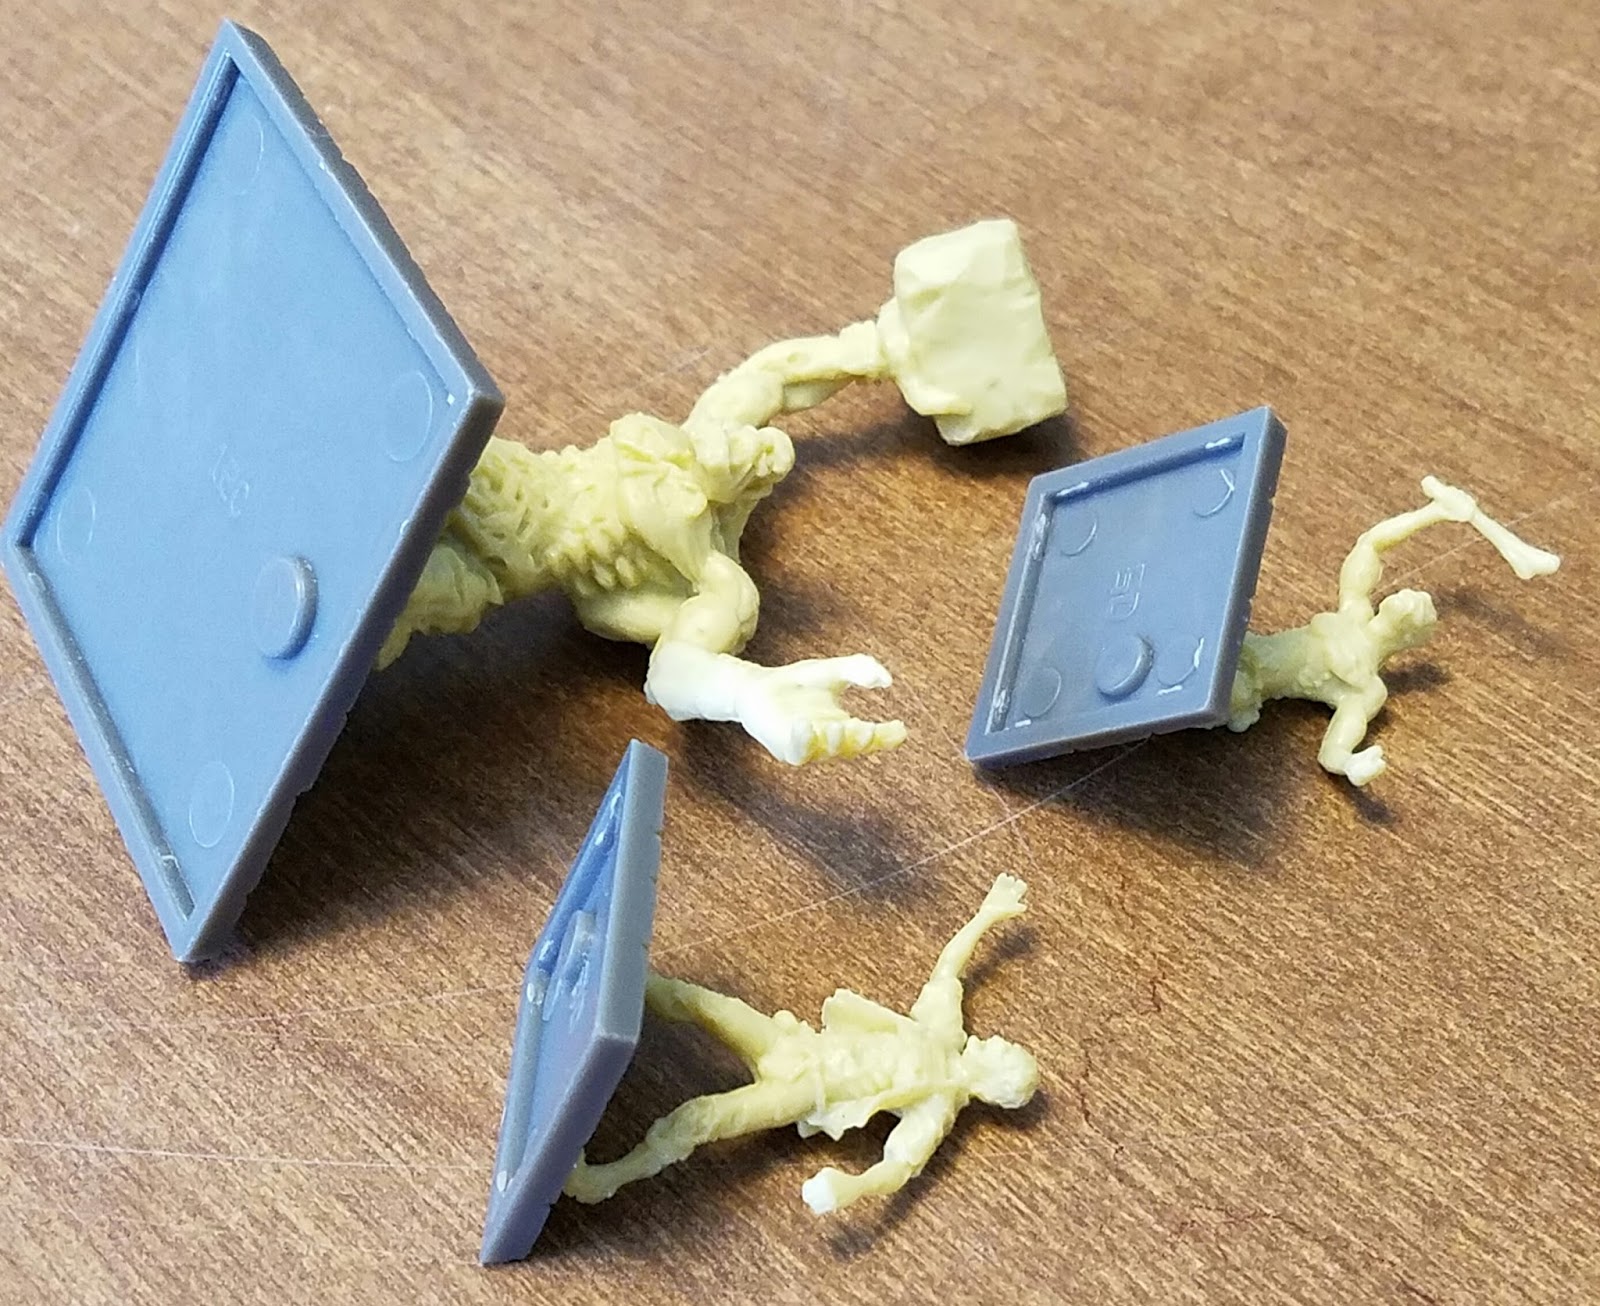 The quality of the bases are some lacking as well--like the miniatures they are soft plastic, and each miniature is permanently attached to them by a single foot. Again, this is good news for board gamers who just want to play, but to a miniature gamer, this seems like low quality. But as I mentioned above, once painted, the unpracticed eye won't be able to tell the difference.
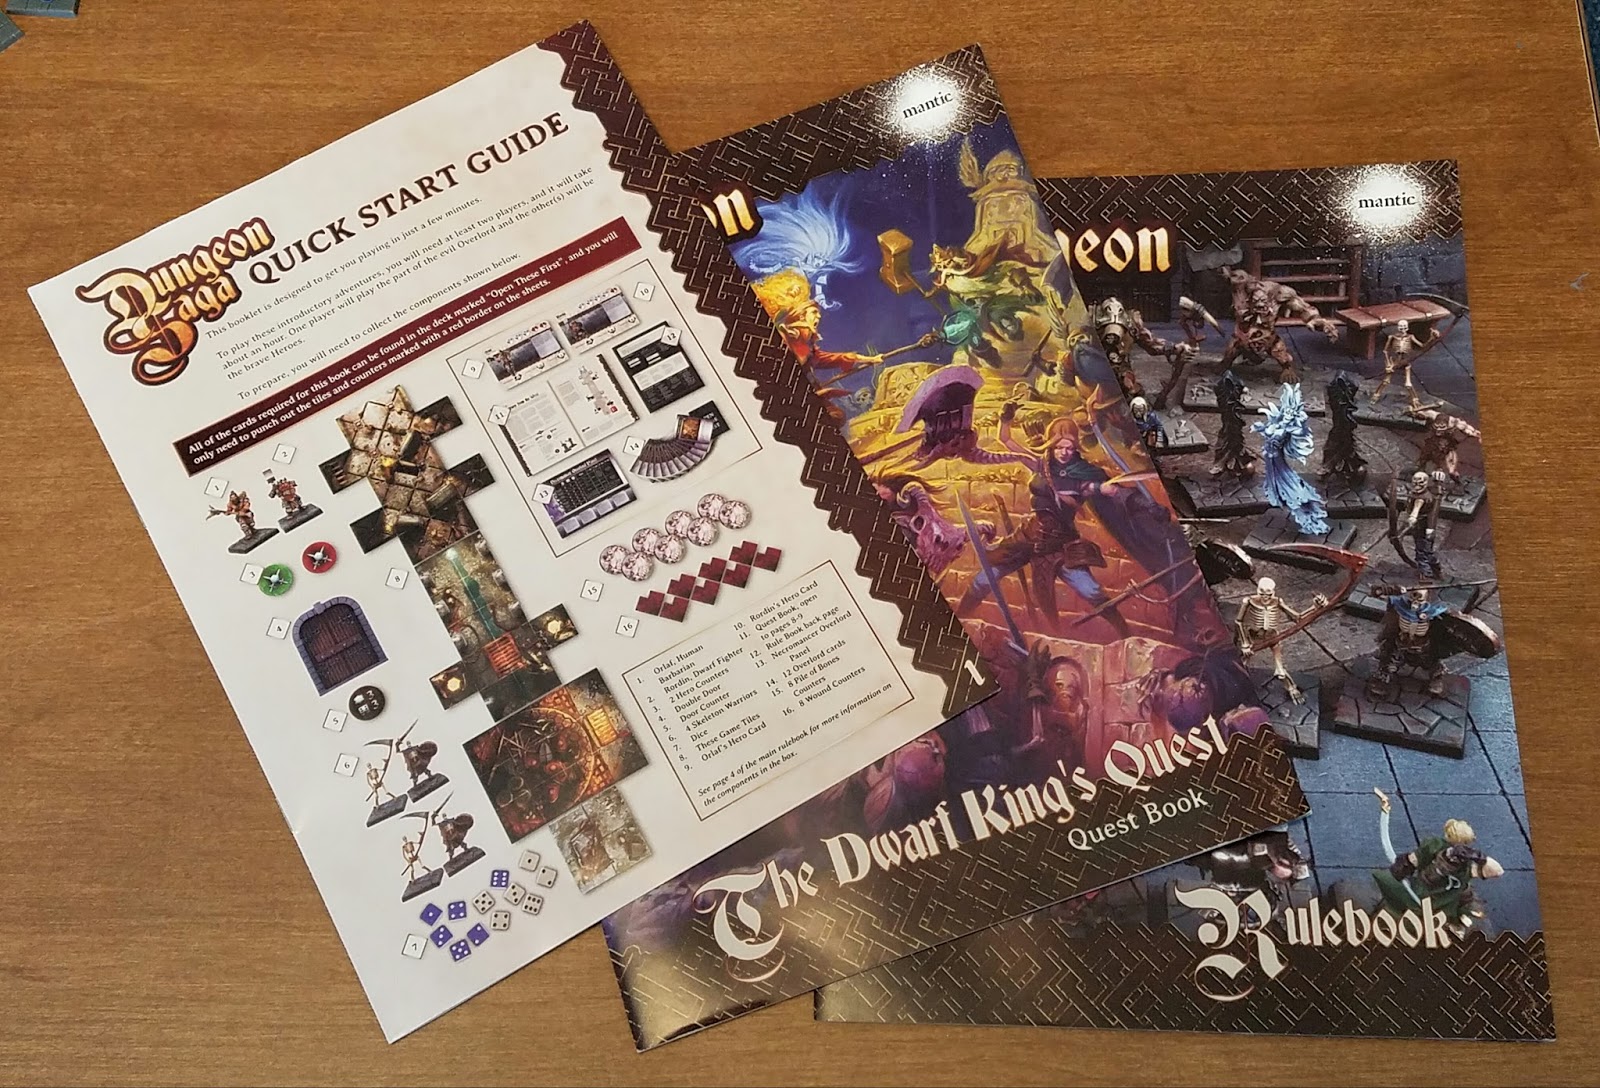 Three rulebooks are provided: a Quick Start Guide, a Rulebook, and a Quest Book, which details the scenarios.
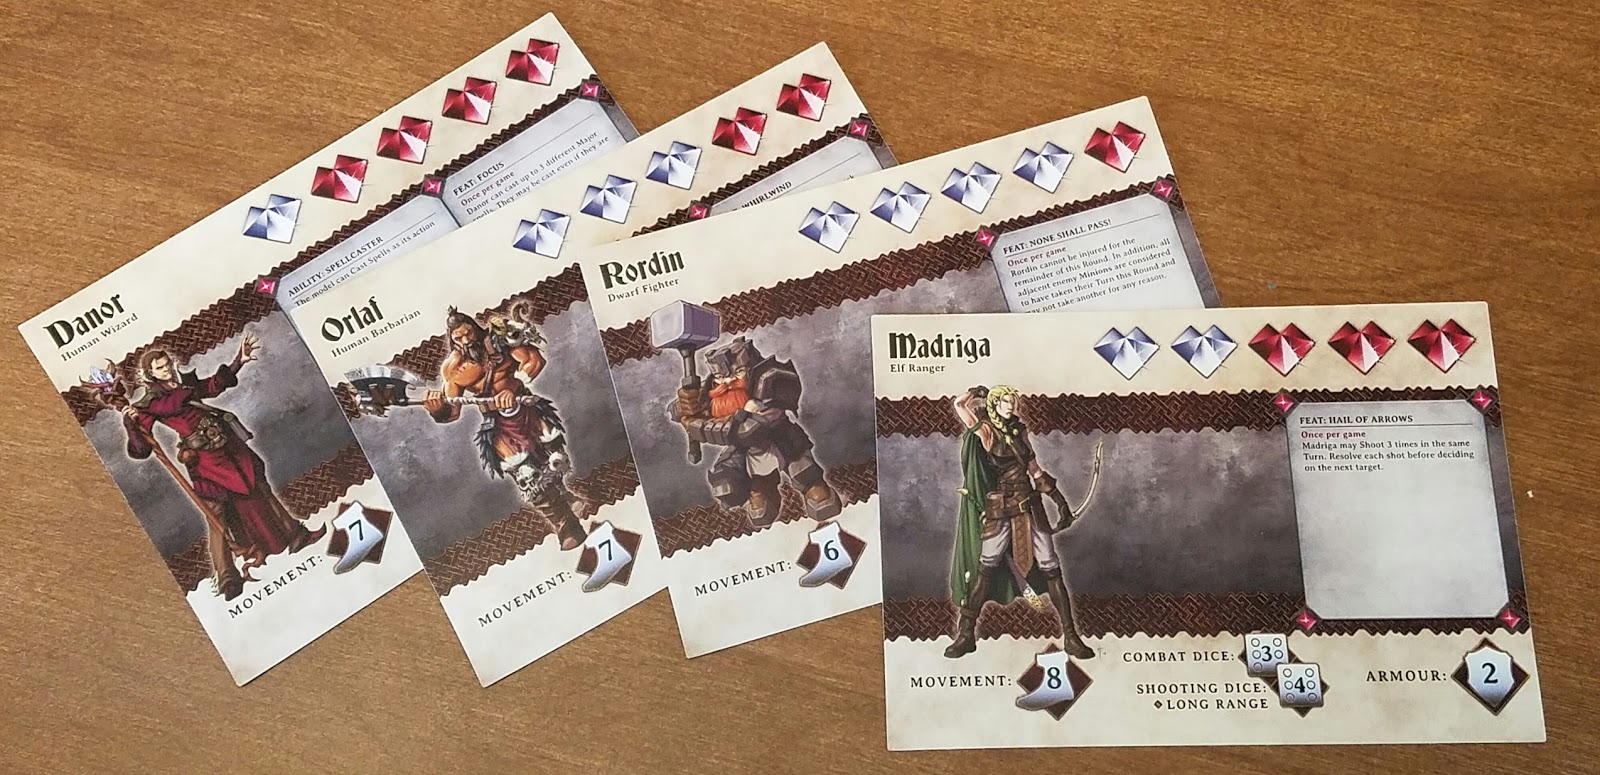 Each hero has its own card, detailing their stats.
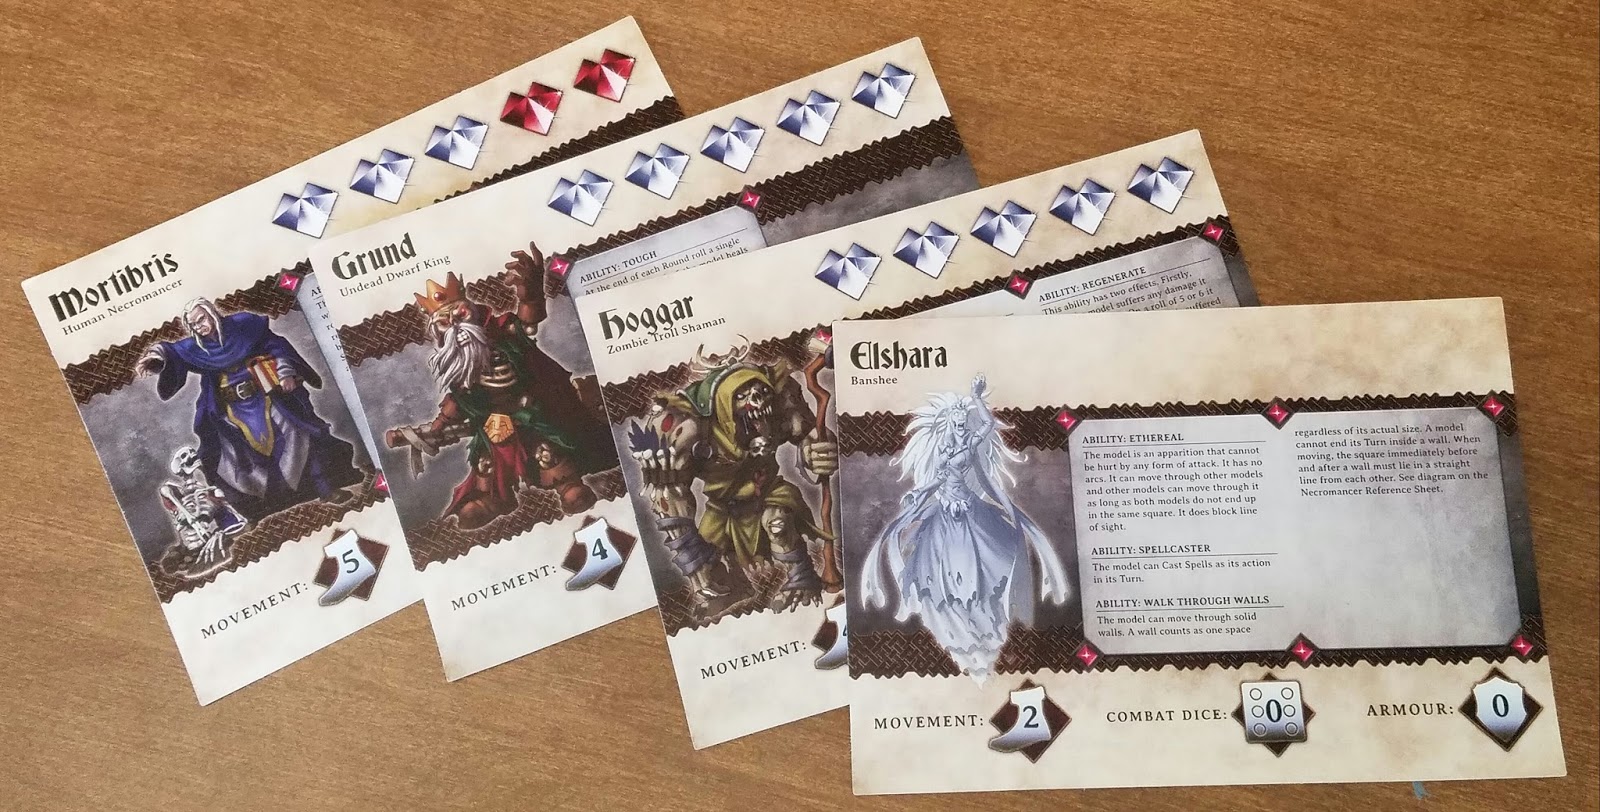 The Villains get the game treatment.
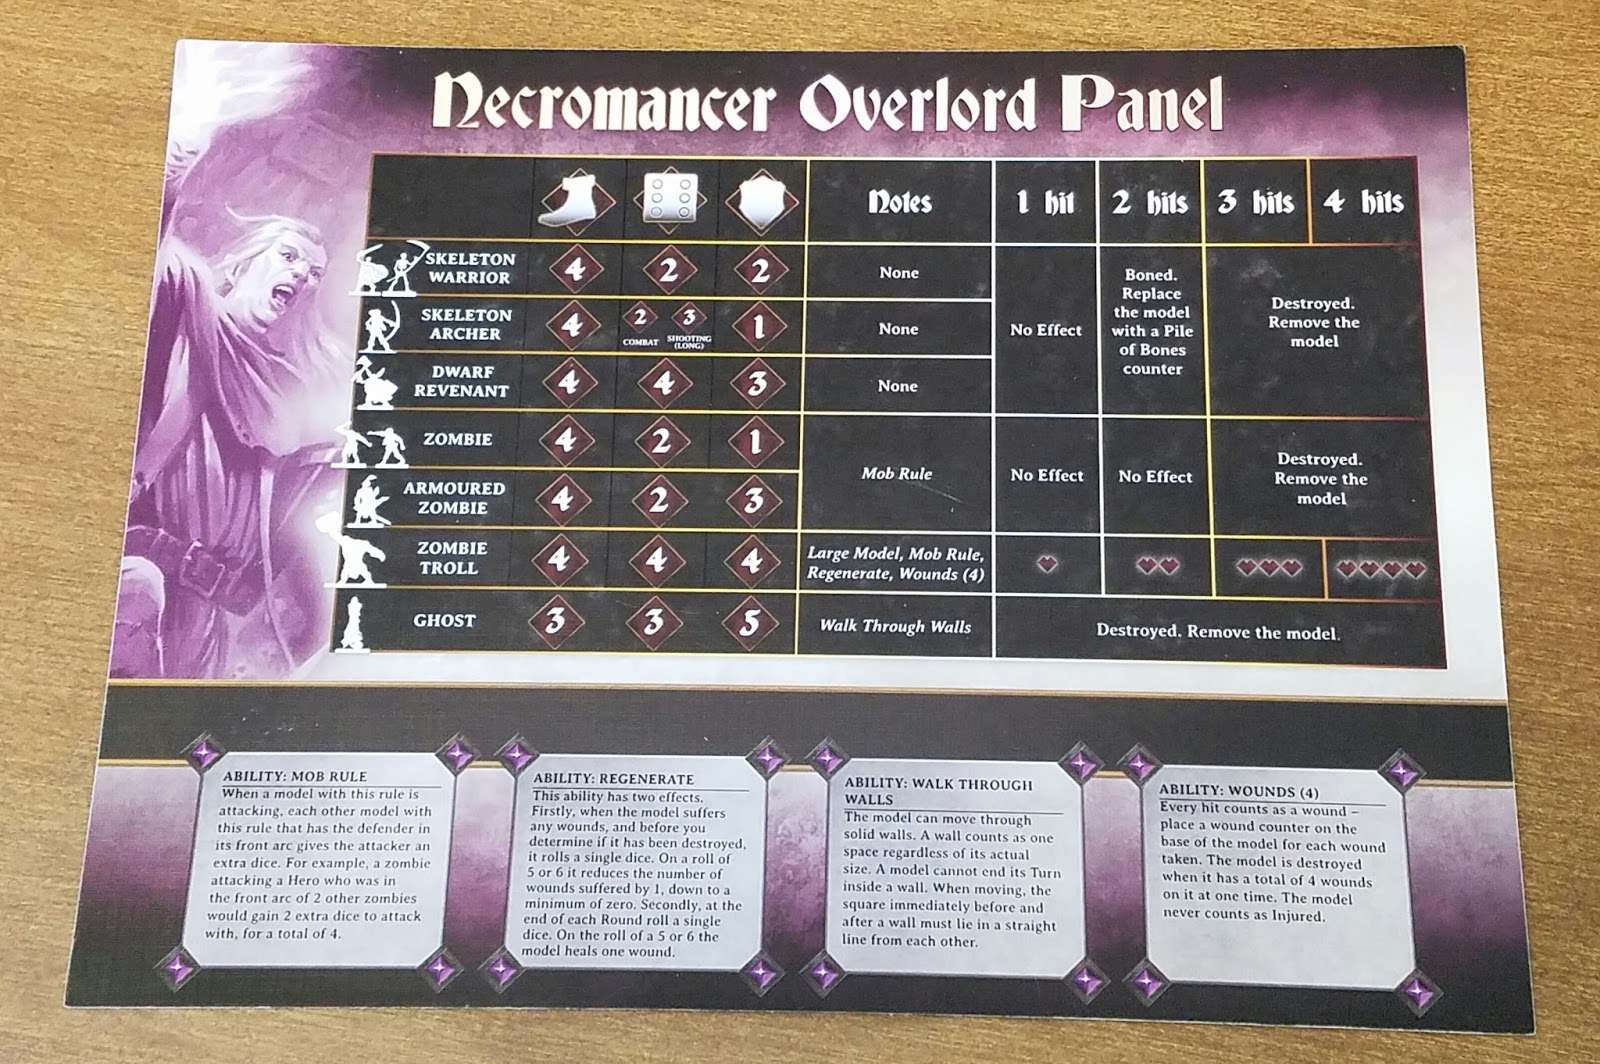 The Overlord player gets a reference card called the Overlord Panel, which has the stats of all the various monsters, and includes a damage table when those monsters inevitably get killed by the heroes.
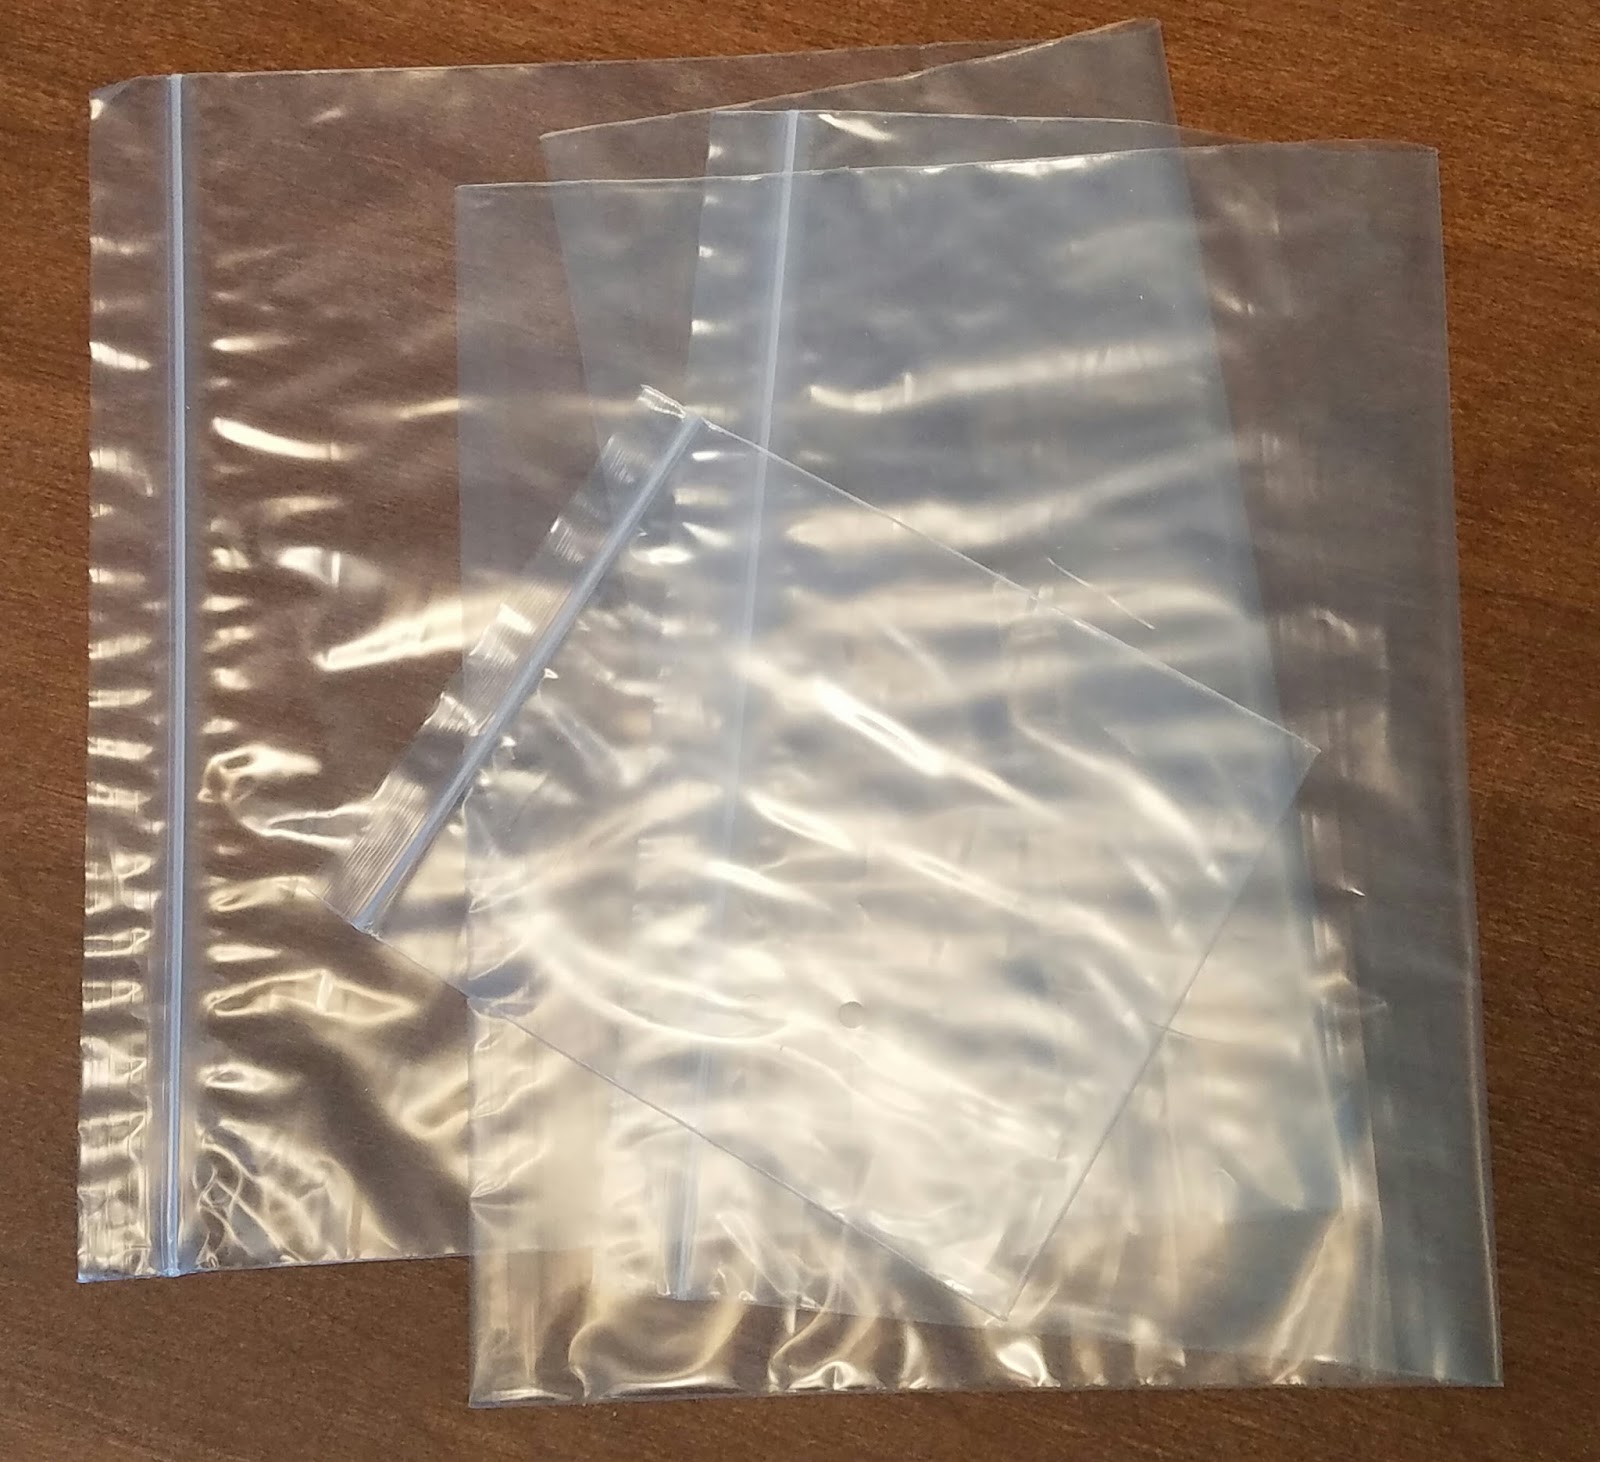 A nice added tough is the inclusion of some plastic bags where the miniatures, cards, counters and floor tiles can be stored. It's little additions like this that show that the company put some thought into the packaging.
 Finally, the last part of the box contents is the floor tiles and counters. They are of decent quality cardboard, which a matte finish rather than the standard glossy of GW board games.
 In conclusion, while not the over-the-top quality of the GW line of board games like Space Hulk, Dungeon Saga is of serviceable quality and should provide lots of fun games.
In glancing over the rules, they look simple enough for my 7-year-old to grasp, and my 4-year-old should have fun as well, with some coaching. I'm looking forward to playing this game with my family--once I do, I'll be sure to do a recap to describe how it goes.
April 18, 2016
Tough Ruck 2016
 After my 2015 Obstacle Course Race season, I knew that I had a lot of work to do. I felt that in spite my finishing seven OCRs in 2015, and improving a little bit over the journey, I still had a long way to go. By no means did I feel "in shape," so I was determined to do 2016 better. On Veteran's Day 2015, I saw an announcement for Tough Ruck 2016, which was a charity event to raise money for families of Fallen Servicemembers and First Responders. In addition to raising money for a great cause, it would be good motivation for me to train.
The anxiety ramped up as the date was closing in, and I thought how sore I was after my 16 mile ruck. Would I be able to go another 10 miles while carrying 1/3 more weight? Much of the weight of my ruck was water, so I rationalized that if things just got too hard, I could always dump some of the water to lighten the load.
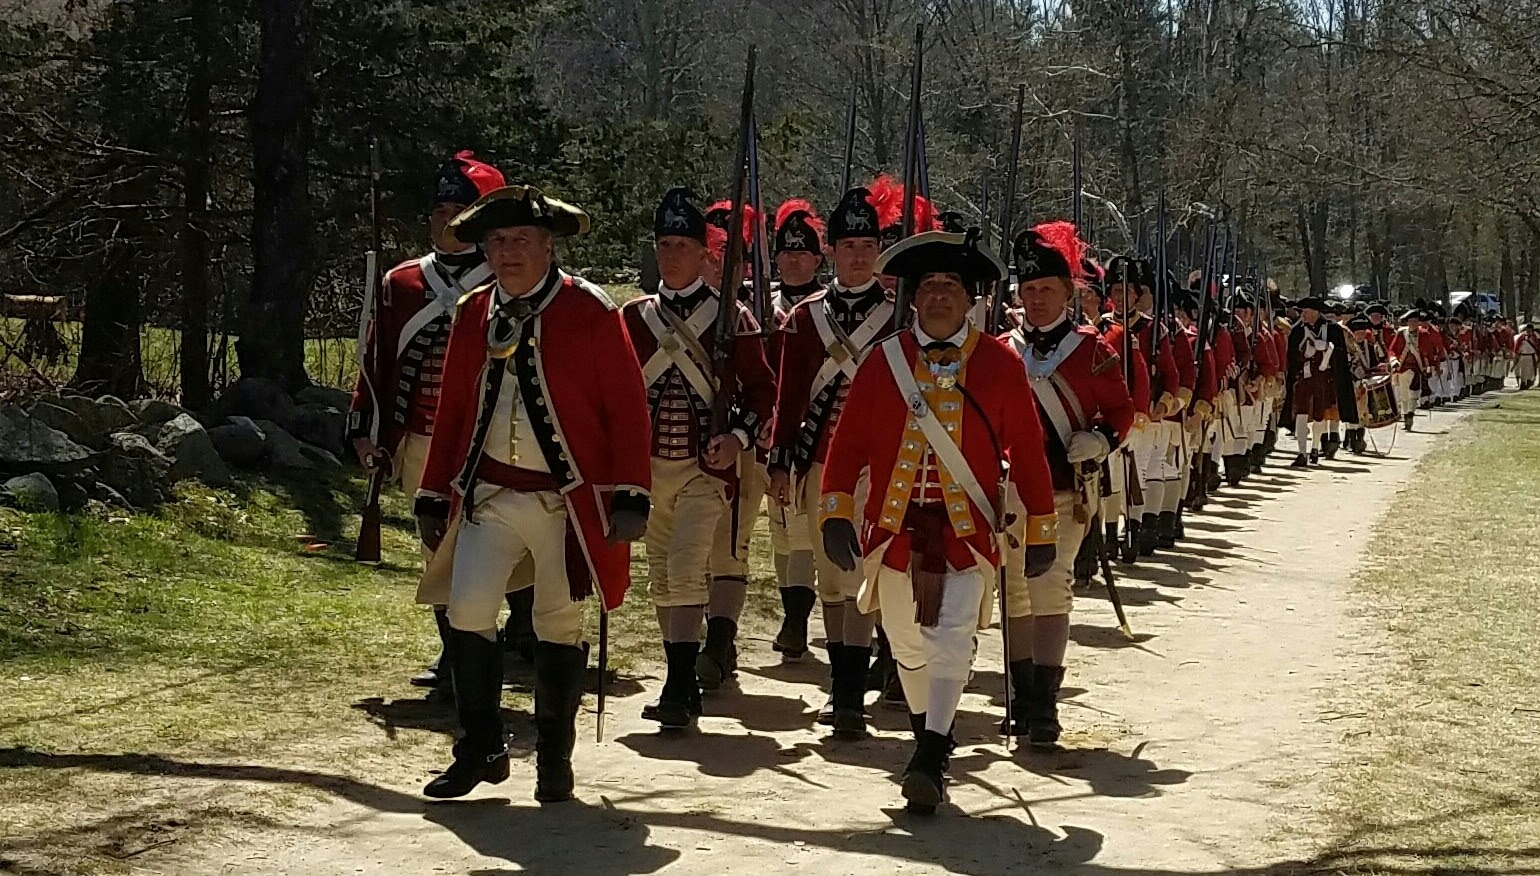
April 16 arrived. The weather was supposed to be good, but the morning was cold, so I dressed in layers. After taking the bus from the parking area I arrived at the Old Manse in Concord. Registration was organized and easy, and soon I met up with some other New England Spahtens and we took the team picture.
 Part of the New England Spahten contingentThere were a lot of people there. While awaiting the start, I stood by a charity group called 22 Kill, which is a support group for veterans, named for the statistic that on average, 22 veterans a day commit suicide. From their website:
22KILL is a global movement bridging the gap between veterans and civilians to build a community of support. 22KILL works to raise awareness to the suicide epidemic that is plaguing our country, and educate the public on mental health issues such as PTS.While one person read off names of lost veterans, the rest of us did 22 pushups. It was a poignant reminder of why we were all there that morning. I heard it many times that day: We ruck for those who cannot.
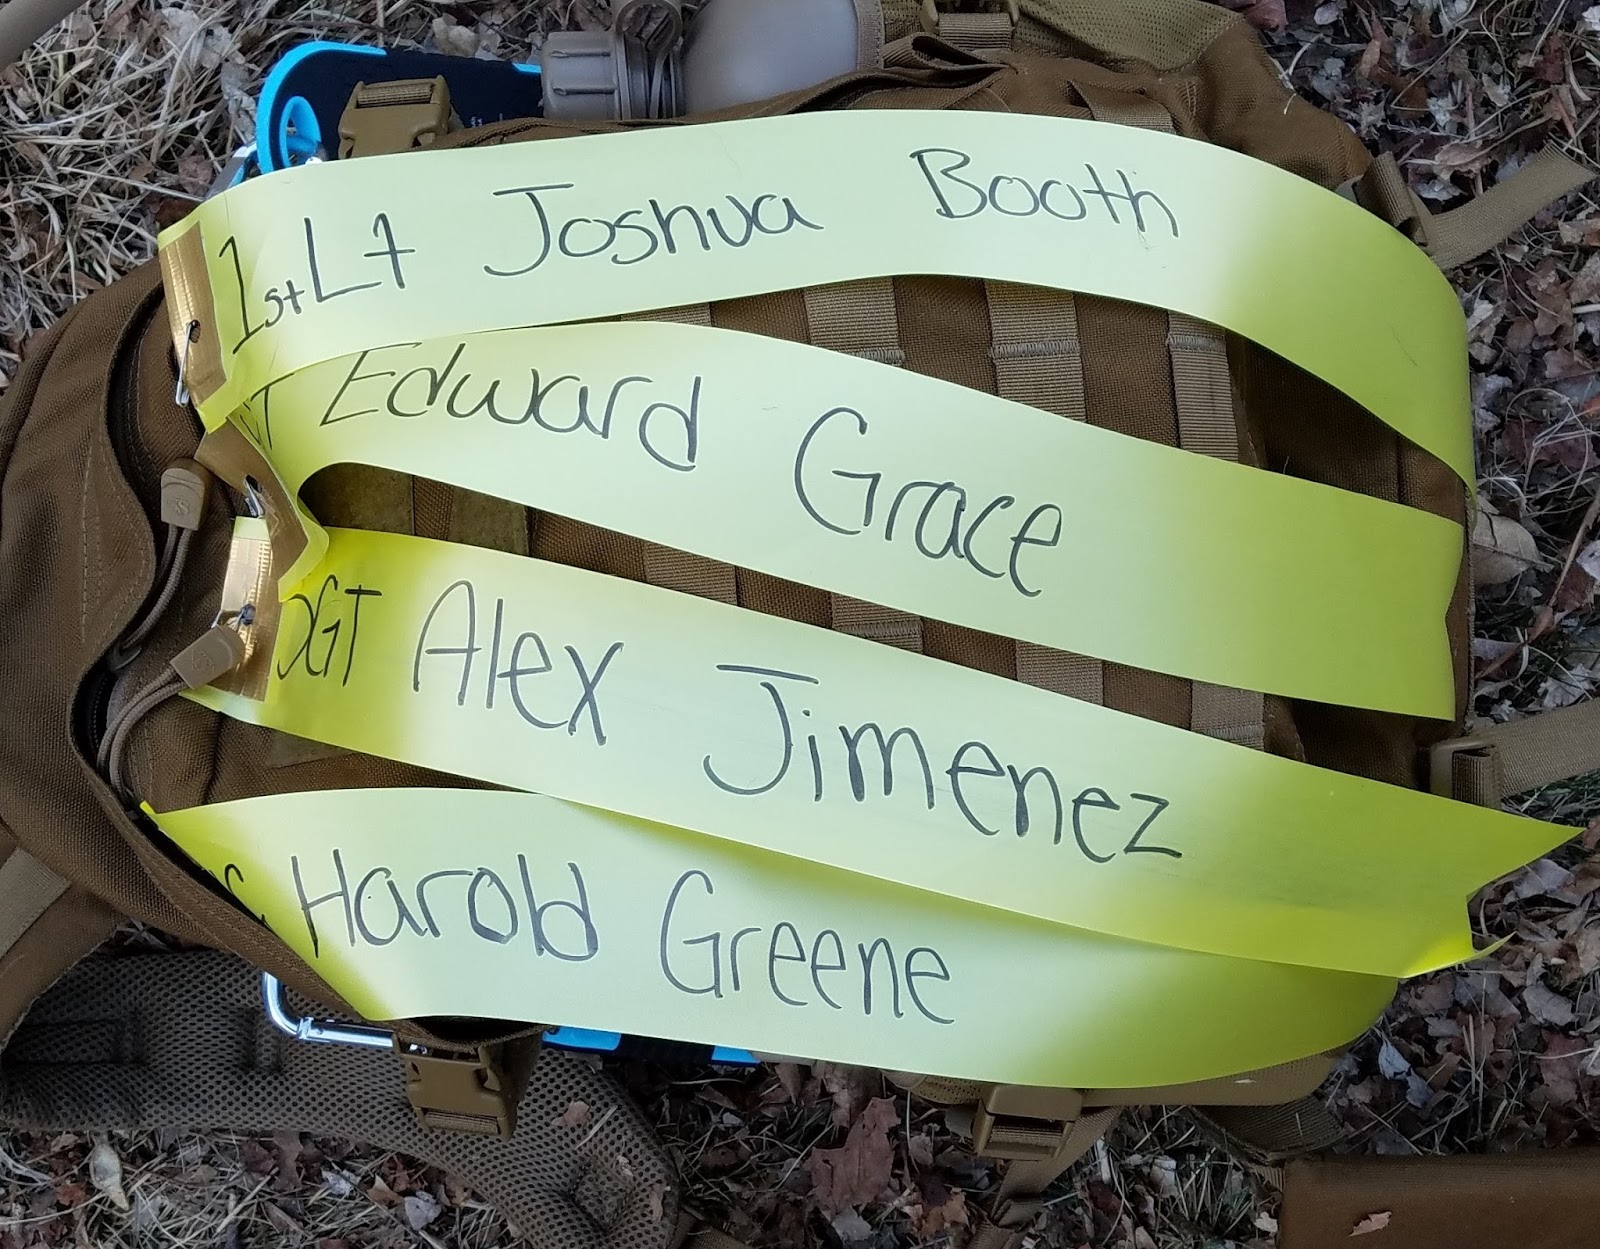 The four ribbons I carried on my ruckThe ruck was to start around 7:00am, and I was worried about time, as they were supposed to close the course at 4:15pm. I needed every minute because I am glacially slow, but if I could manage a 3 mph pace the entire way I would be ok. At about 7:10, we were called to the starting line. There we heard the national anthem, heard a few words from some speakers including a survivor from the Boston Marathon bombing, and then observed a moment of silence.
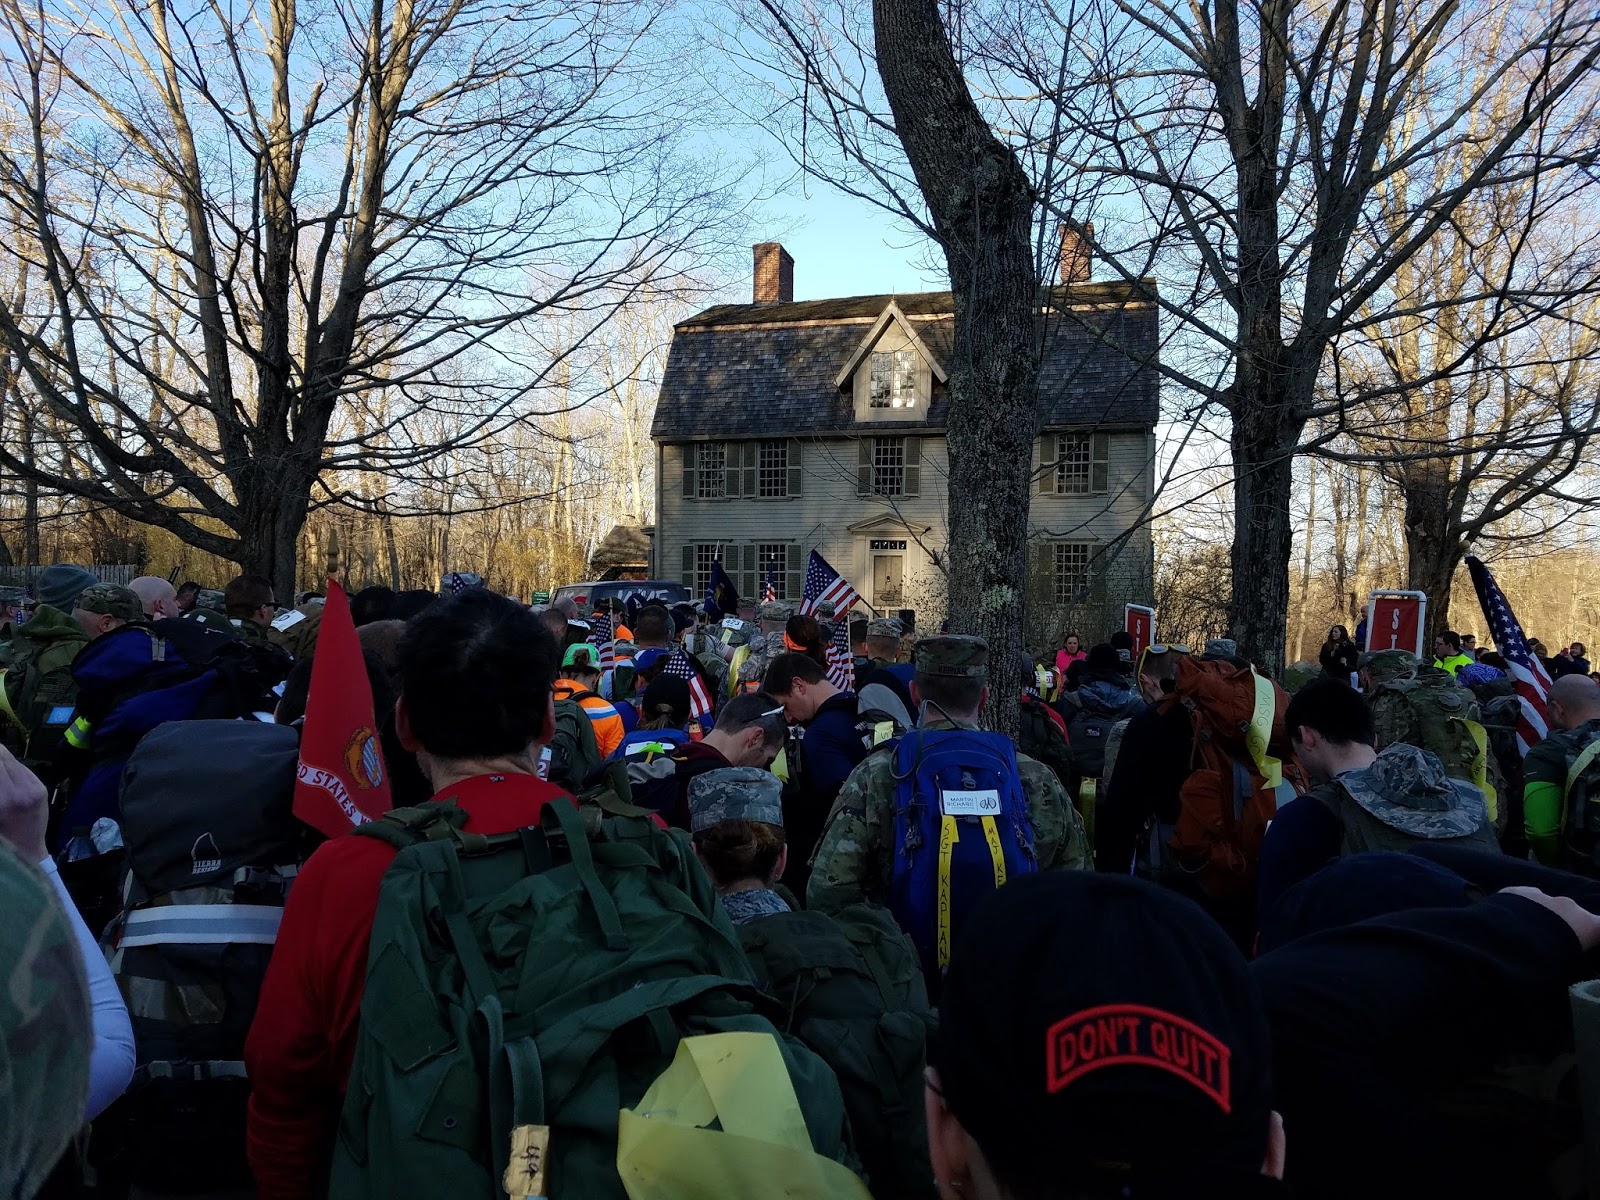 The starting line at the Old ManseAt about 7:20 the ruck started. Spirits were high and we set off at a brisk pace. Soon we crossed the Old North Bridge, where the Battle of Concord began 241 years ago. Some groups of ruckers who started towards the back of the line double-timed it so they could get towards the front.
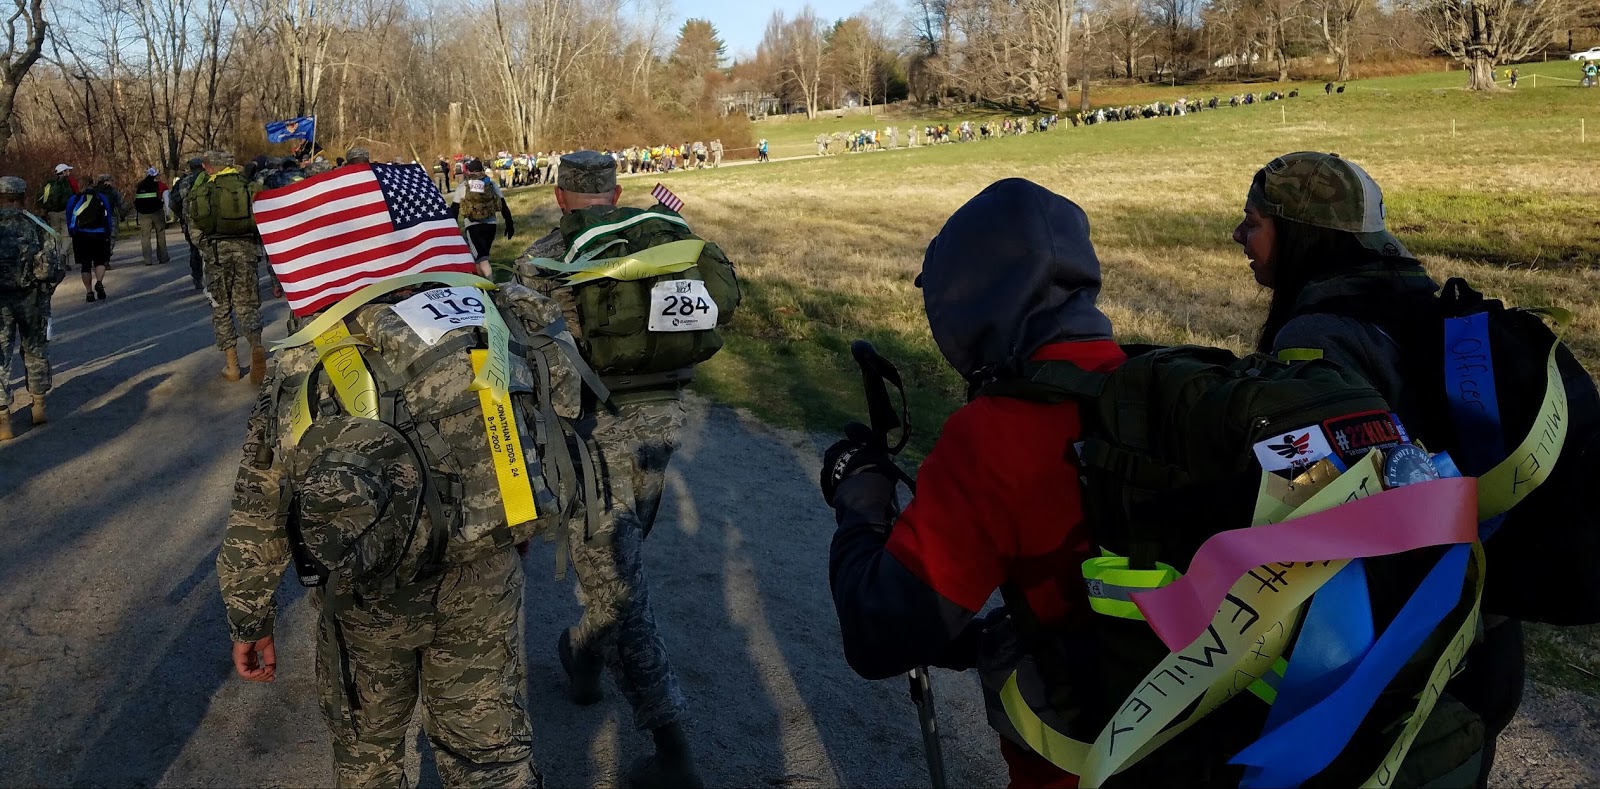 Just past the Old North Bridge and the Minuteman Monument. In the distance are the first ruckers.We did a loop around the field north of the bridge, and then headed south on Monument St., passing the starting point again. As we did so, several ruckers who regretted not using the bathroom ahead of time broke ranks and ran for the bathrooms. We headed into the center of Concord and turned east onto Lexington Rd.
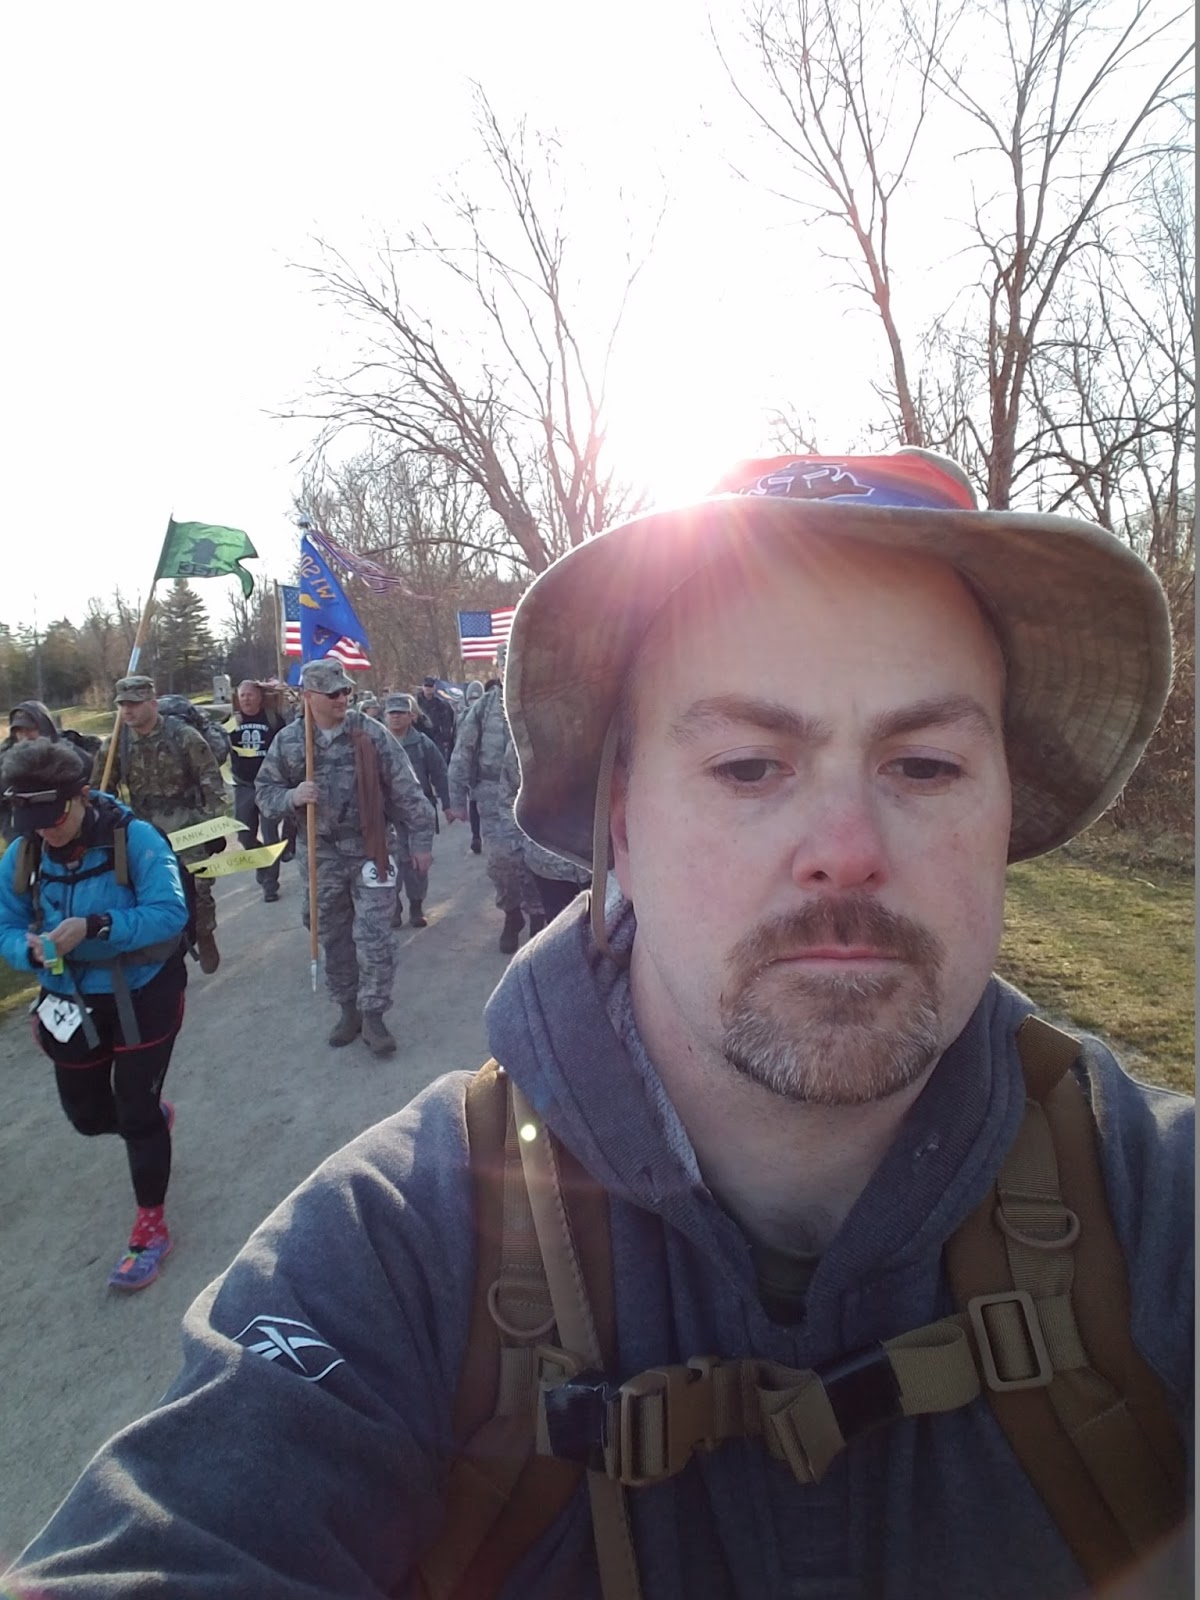 On the way to Meriam's CornerWe passed Meriam's Corner and headed north on Old Bedford road to do a loop to add some distance, and then returned to the beginning of Battle Road. We would have to travel the length of Battle Road four times during the ruck. Meriam House was also the location of the first hydration station. We had gone 4.5 miles in 1:20, and already people were sitting down to rest. It was warming up, so I shed my outer layers and got some food out of my ruck. I stopped for four minutes to do this, worrying about the lost time, and even that short time with my ruck off my shoulders was a relief, as my right shoulder was already aching. The short rest helped, and I was quickly on my way again.
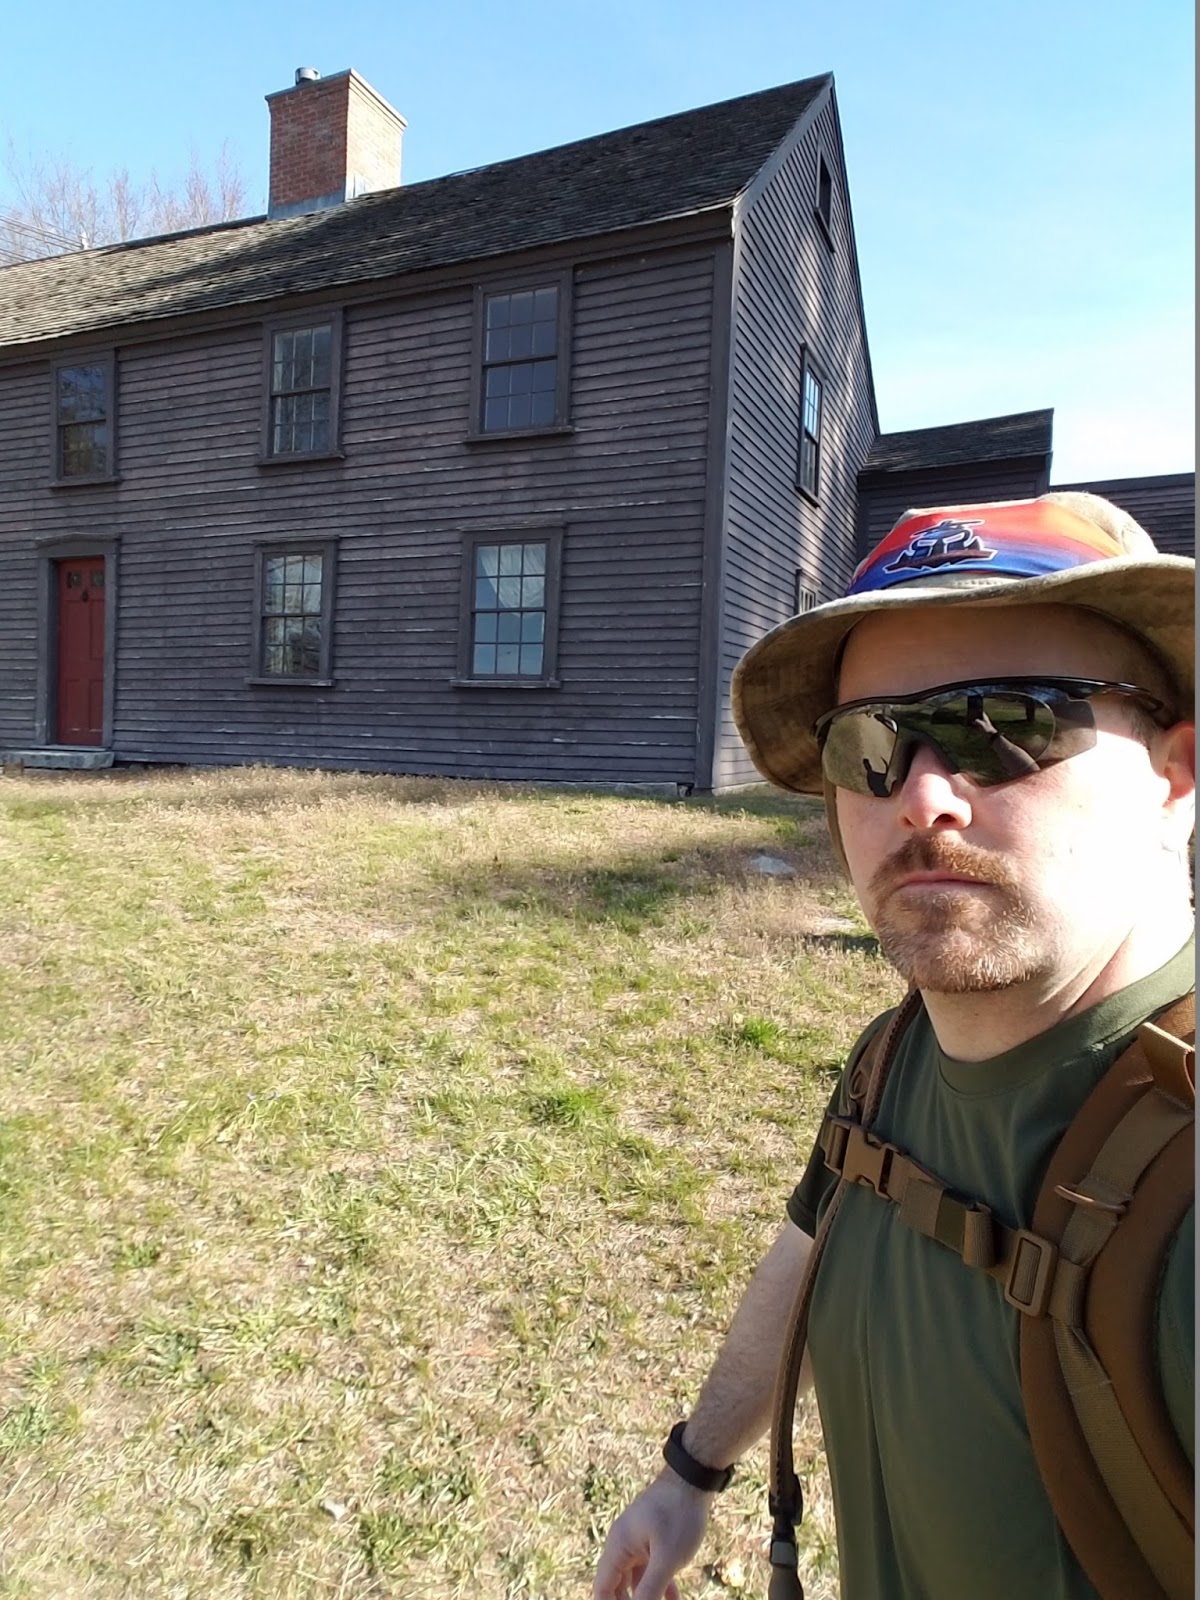 Meriam House, 4.5 miles in.The trail wandered through fields and a significant amount of swampy land over which we had to walk on a boardwalk. The trail itself was pretty and the weather was beautiful, and at times I felt I was just taking a casual walk along the trail rather than participating in an event.
 The boardwalkAlso along the trail were plaques and informational signs that told the story of the Battle of Concord, and how the British soldiers retreated under fire back to Boston. There were also several colonial houses along the trail with some reenactors there to interact with the public.
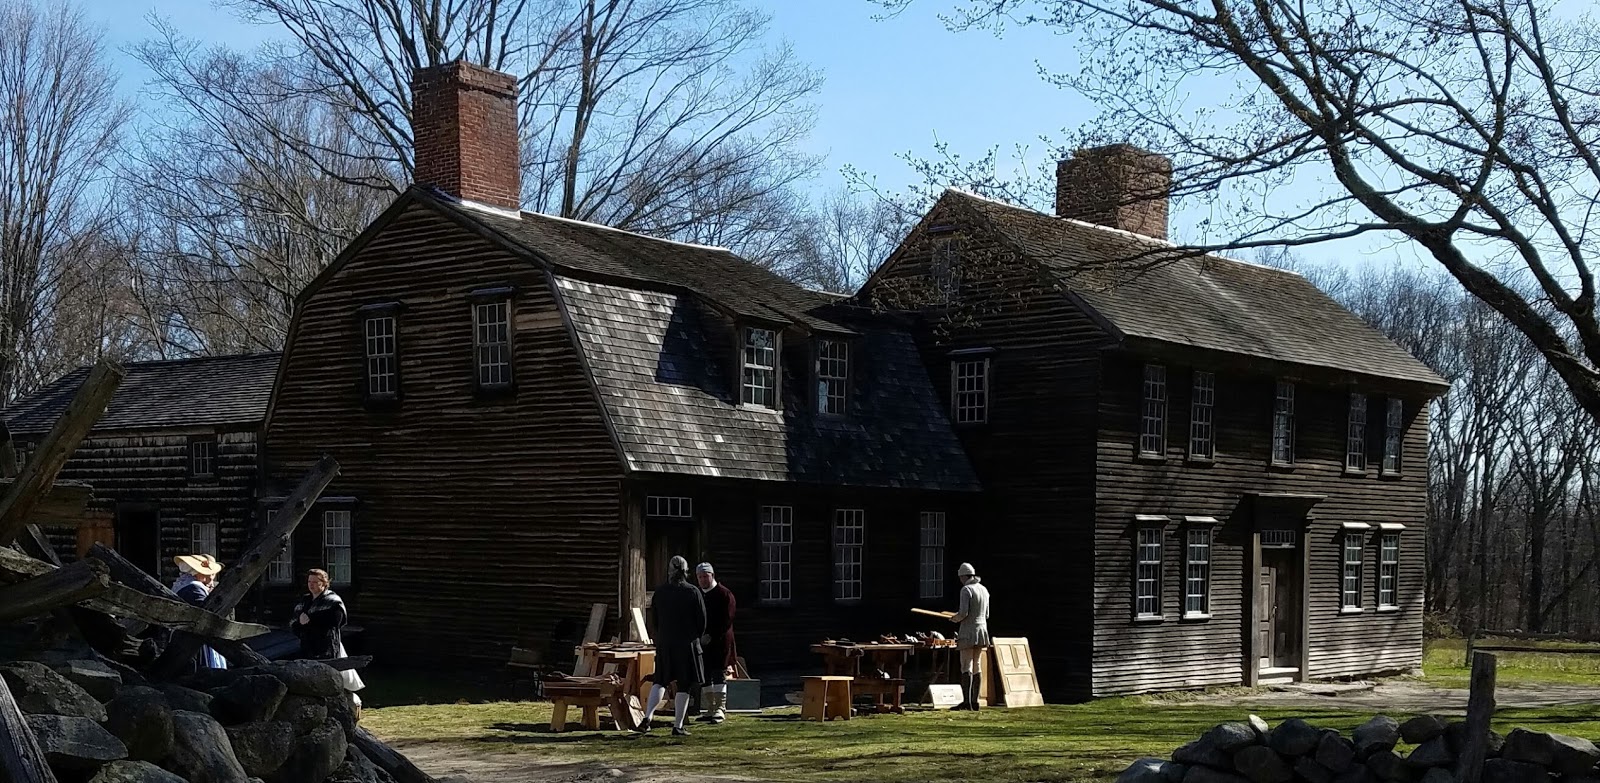 One of the many houses along the trailThe historical sights definitely made the ruck more interesting.
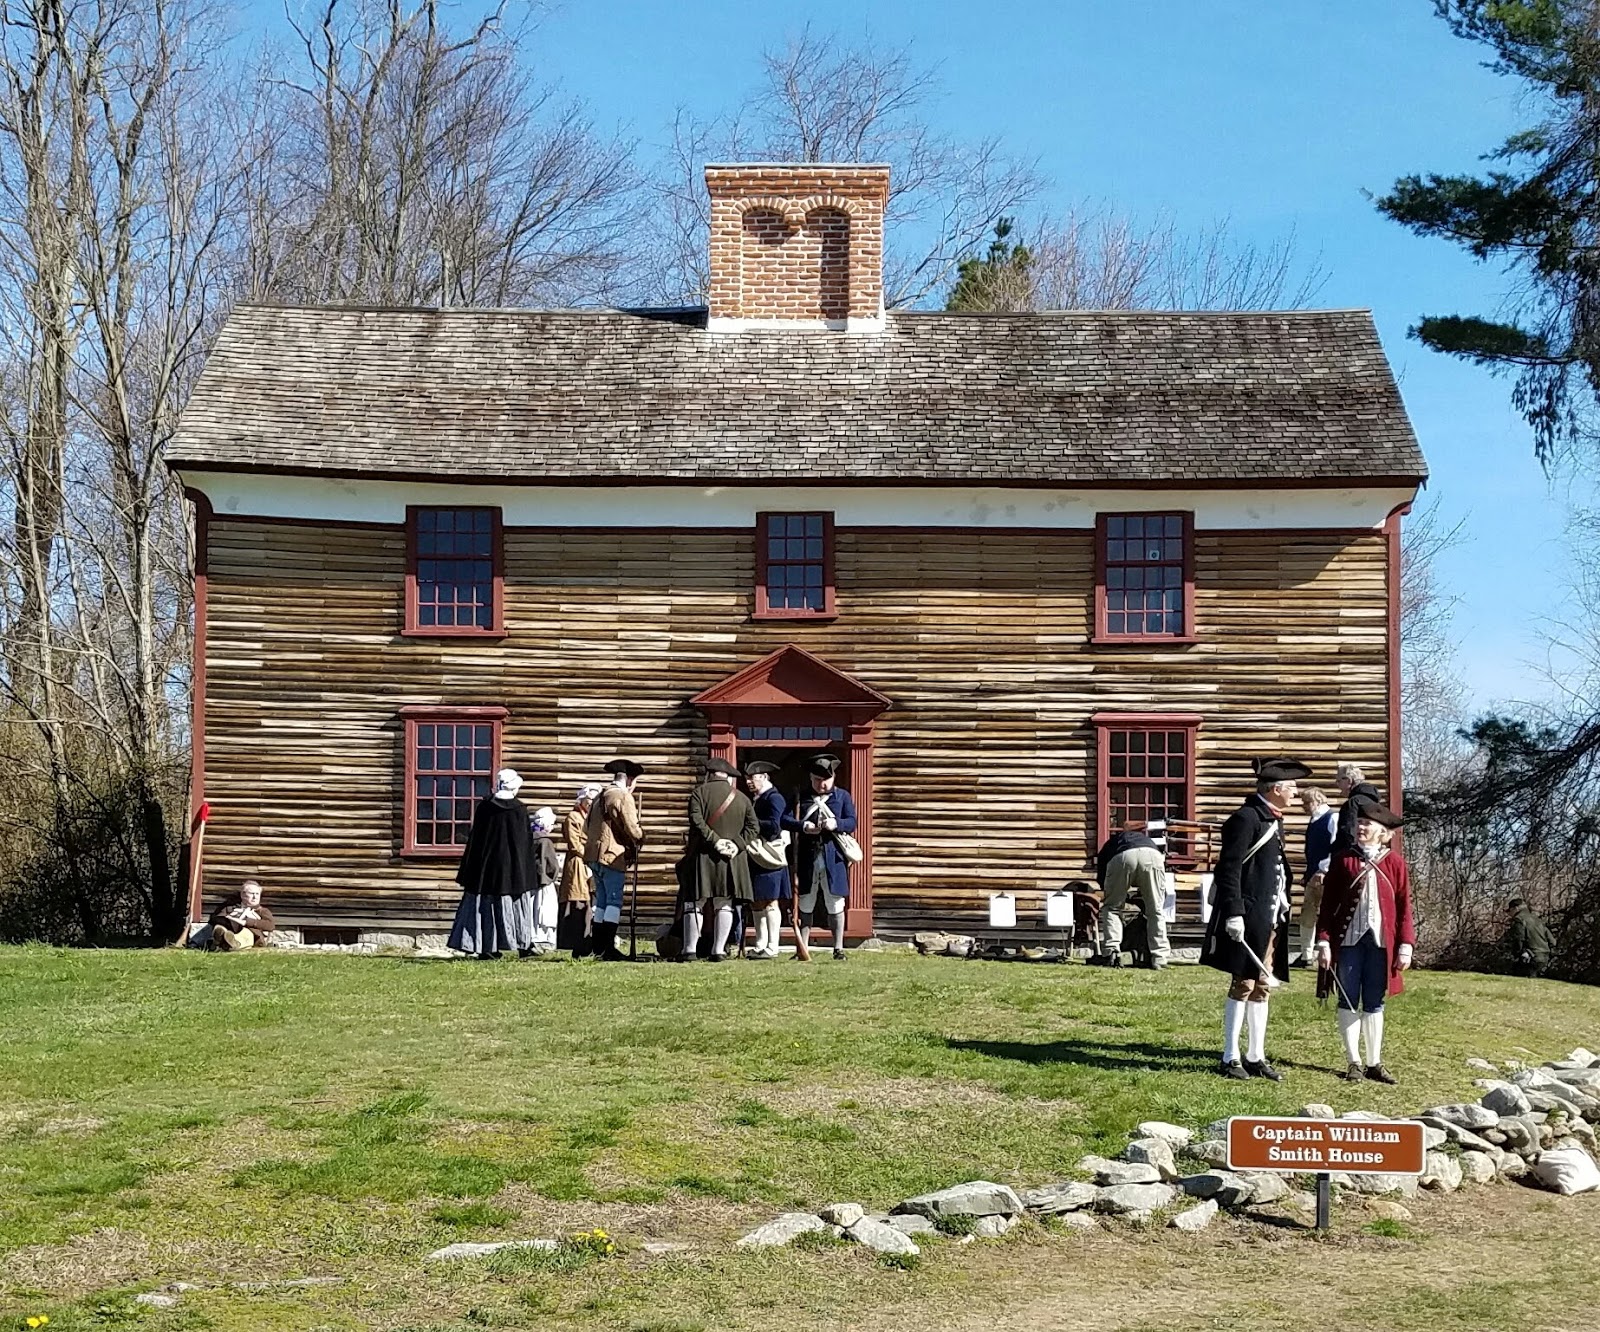 Captain William Smith HouseThere were several grave markers at various points along the trail, commemorating British soldiers who were killed during the battle.
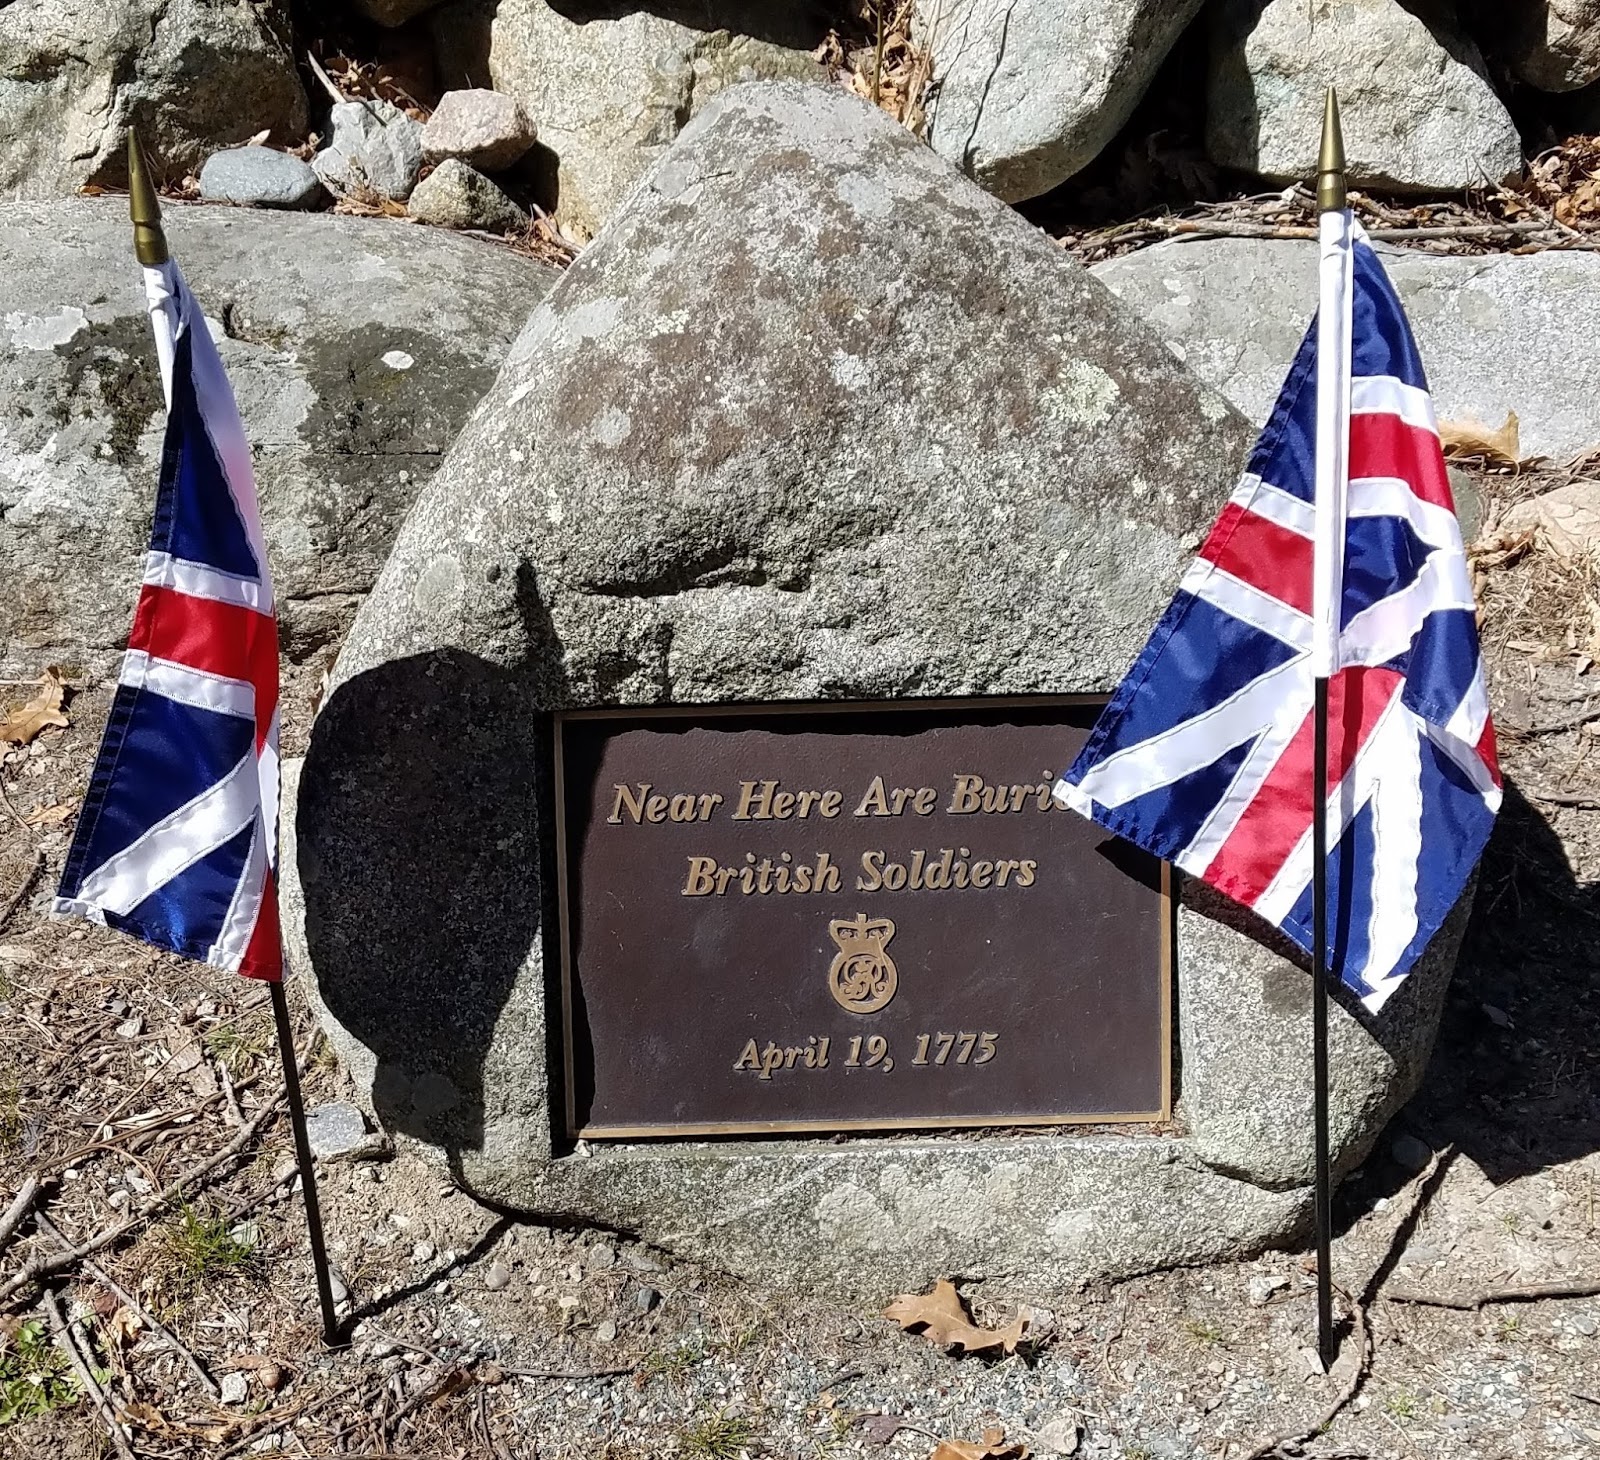 Near Here Are Buried British Soldiers. April 19, 1775.There were also spectators along the trail with water and snacks there to support the ruckers, which provided a morale boost. I was still keeping a good pace, but now the leaders, who had finished the first of four legs along Battle Road, were passing me going the other direction. Eventually I made it to Fiske Hill, which was the turnaround point at the end of the trail.
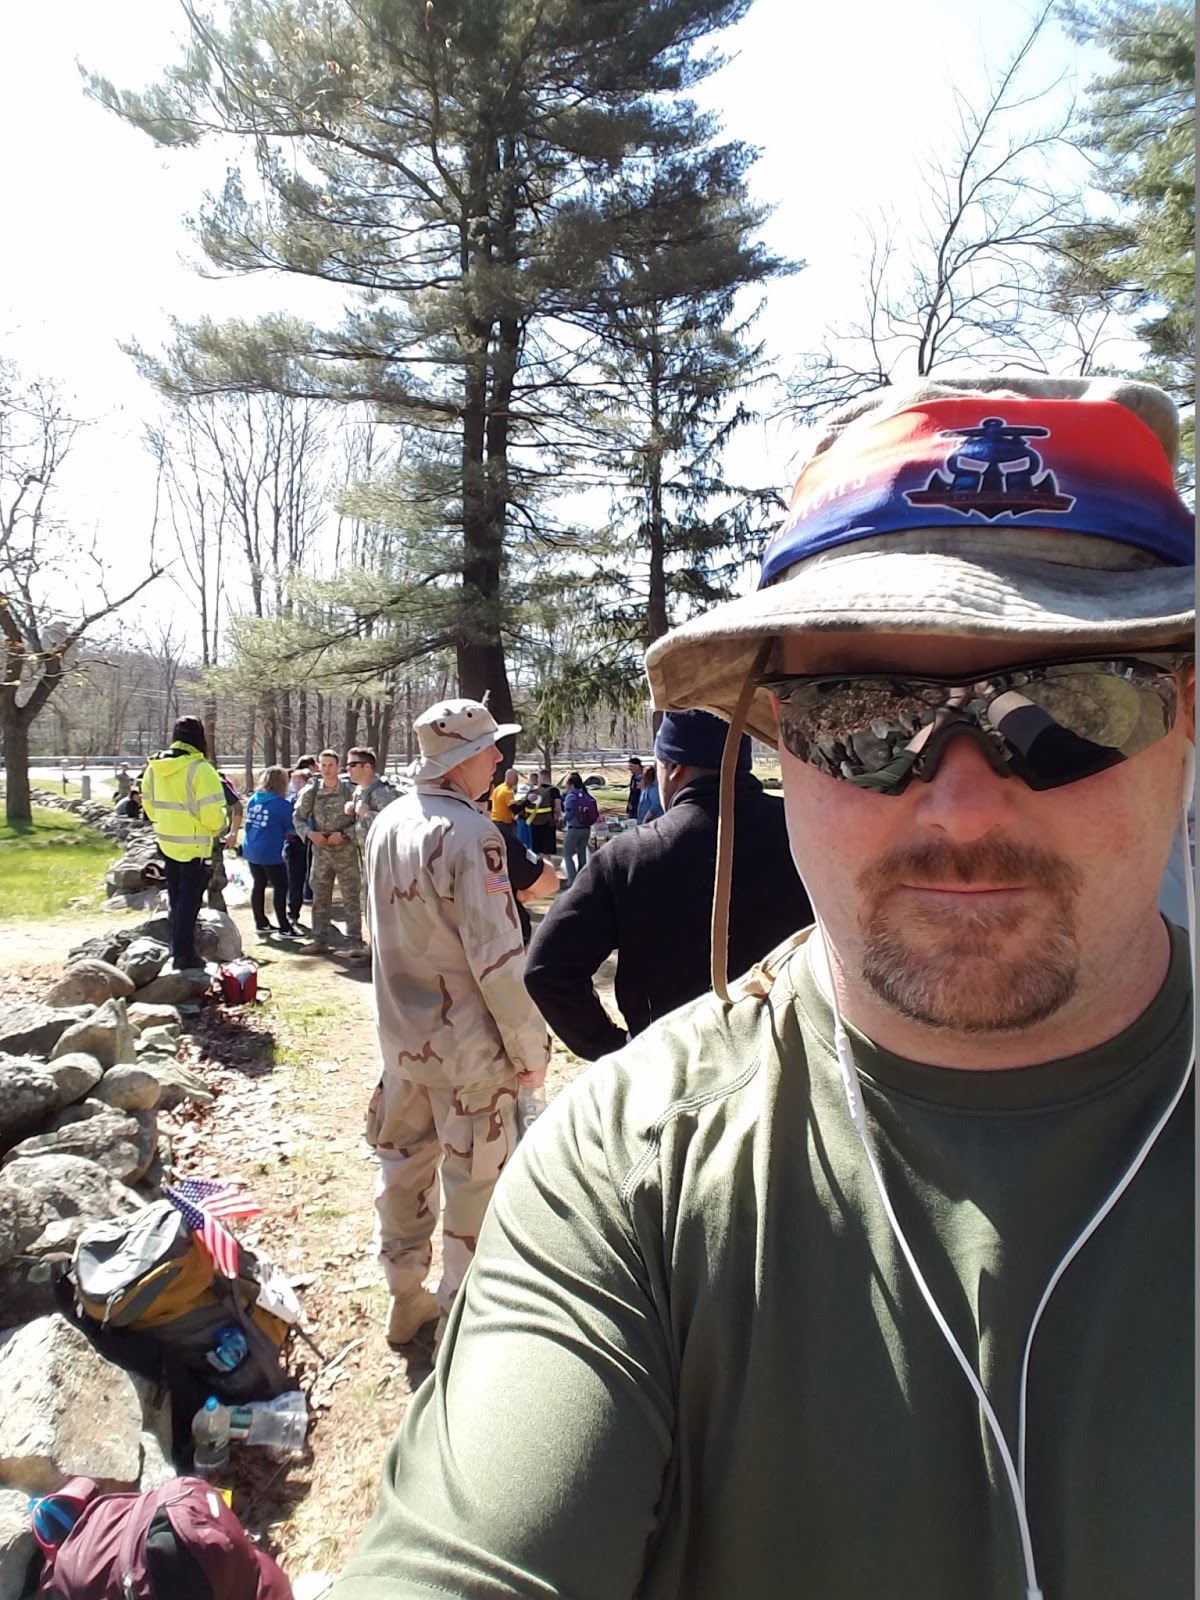 Fiske Hill, 9.23 miles in.Again, there were lots of people sitting and laying down on the ground, seemingly far too comfortable and looking like they were planning on having a picnic. For myself, I was worried about not finishing in time, so I paused only to get more food out of my backpack and in 3 minutes I was off again, back along the trail towards Meriam House again.
This time it was easier, as I knew what to expect, and I knew there would be supporters along the way. My pace was slowing down, but I was still ahead of the curve. I was still feeling good, and there were sights along the way to make you smile.
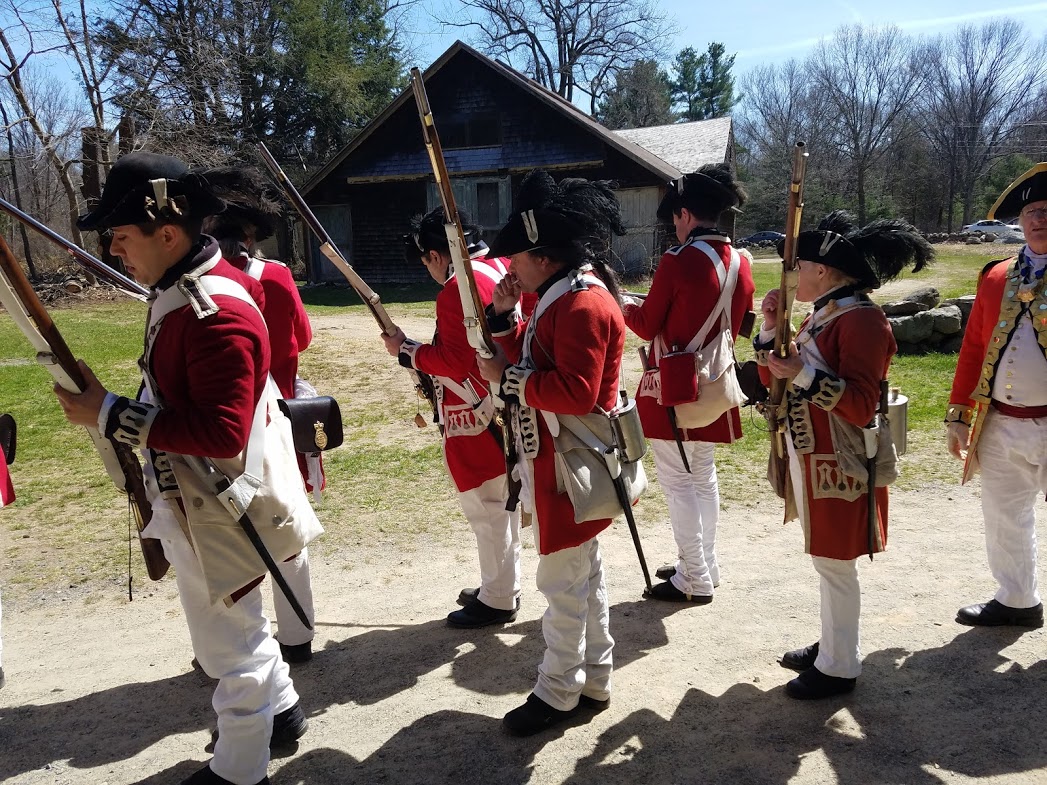
 A Minuteboy keeps an eye out for Redcoats from atop a large rockIt was getting closer to noon, and more reenactors were showing up in preparation for the reenactments of the Battle of Lexington and Concord.
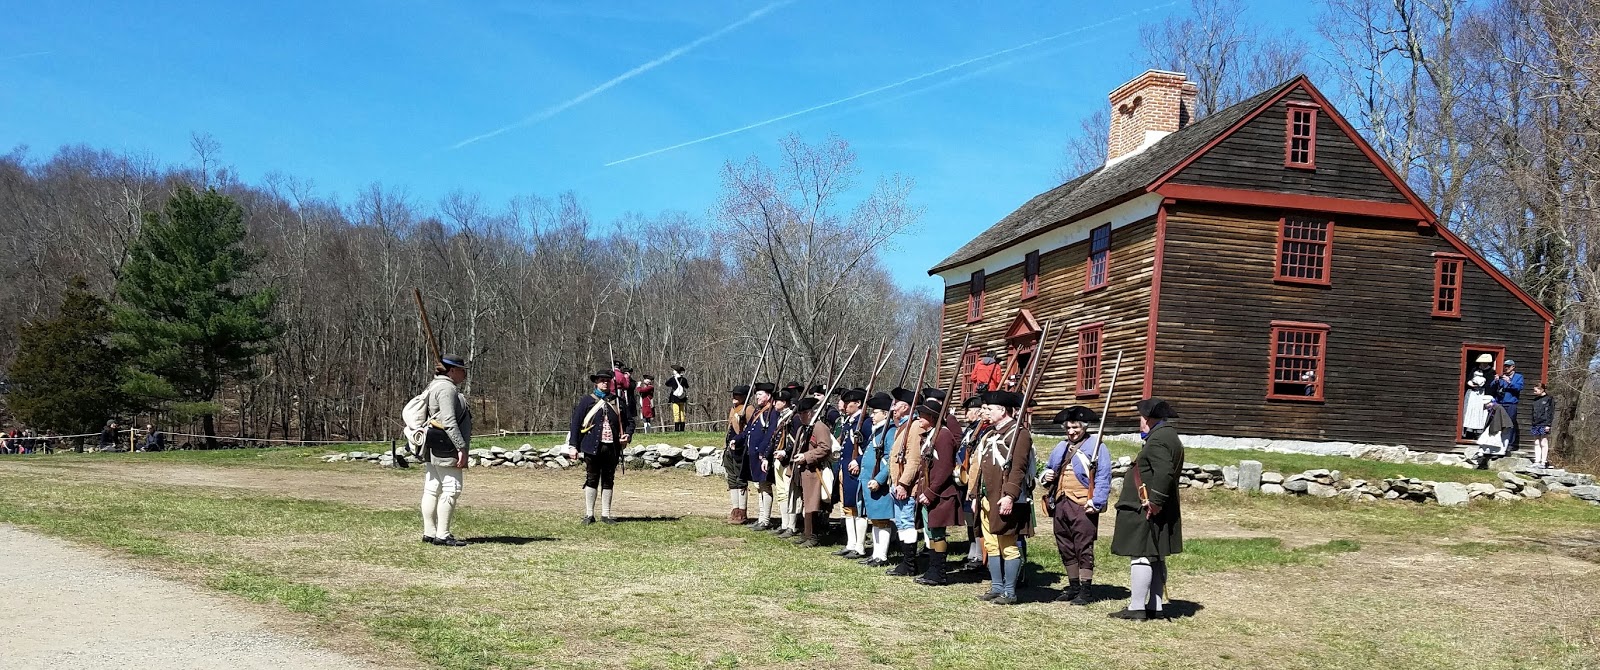 Colonial Militia reenactors drill outside of the Captain William Smith HouseMy feet were starting to get some hot spots, so I resolved to change my socks and take care of them when I got back to Meriam House, which would mark the halfway point of the marathon.
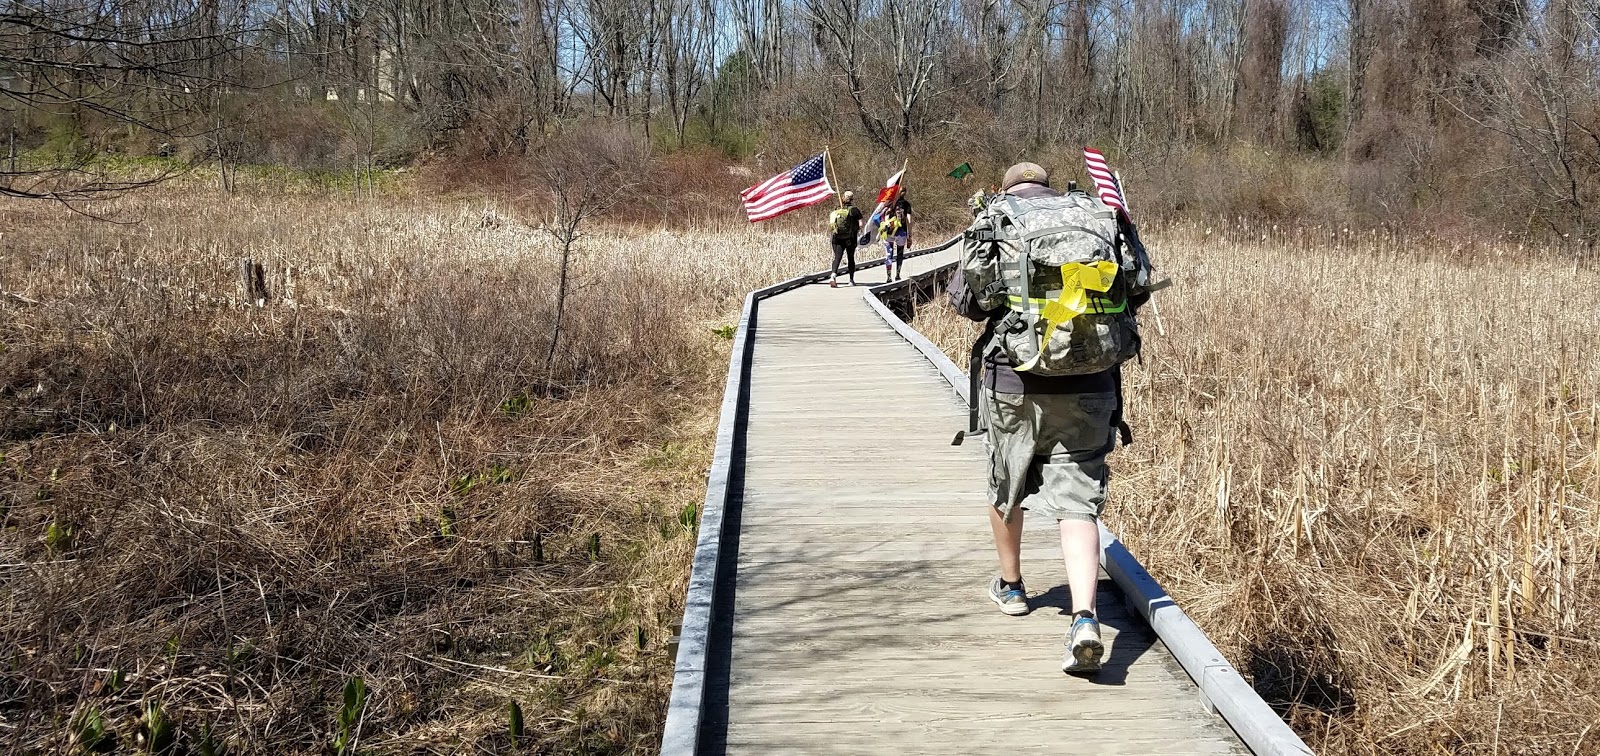 Back on the boardwalkI returned to Meriam House and took care of my feet, taping them up. I stopped for almost ten minutes, which ate into my time cushion a bit, so I was in a hurry to get back up and keep moving.
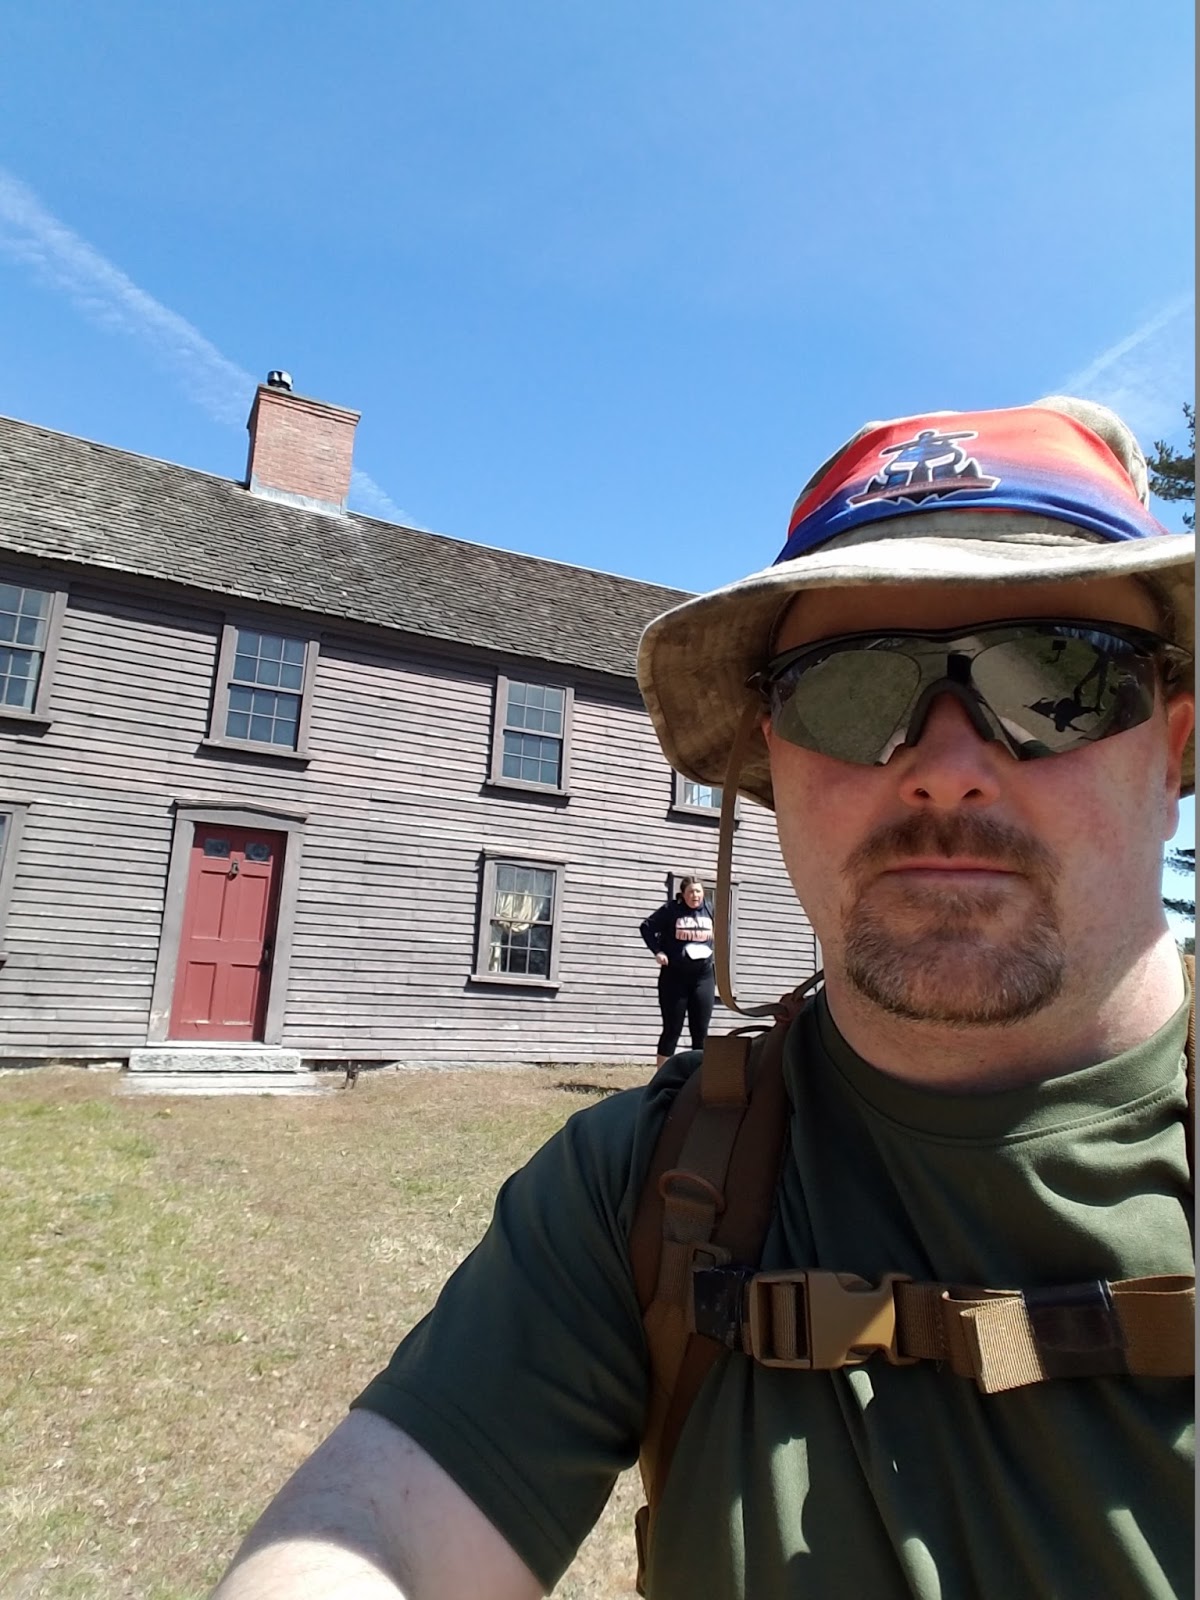 Back at Meriam House. 14.13 miles.I was past the halfway point, I knew what the rest of the course would be like, and I felt good, so it was all downhill from here.
But I screwed up in taping my foot. I put it on wrong, and with every step I could feel the tape pulling at the bottom of my foot. If I wasn't going to get a blister before, I knew I would now. I stopped on the trail to take some Tylenol, and kept going. Before long I was back at Fiske Hill for the final turnaround. I took off my shoe and found that yes, the tape had given me a blister. I put more tape on, taking care to do it right this time, dumped my trash, and was on my way again in a few minutes.
 Fiske Hill, mile 18.96. I look more tired than I felt.Now I was on the homestretch. I just had to make it back to the start line, a little more than seven miles to go. My feet were aching, my shoulders were sore (although not as bad as I thought they would be). But the knowledge that I was on the last leg gave me a mental boost, so I was able to pick up the pace again. Fortunately there were some interesting things going on now that it was later in the day, so it helped to keep me distracted.
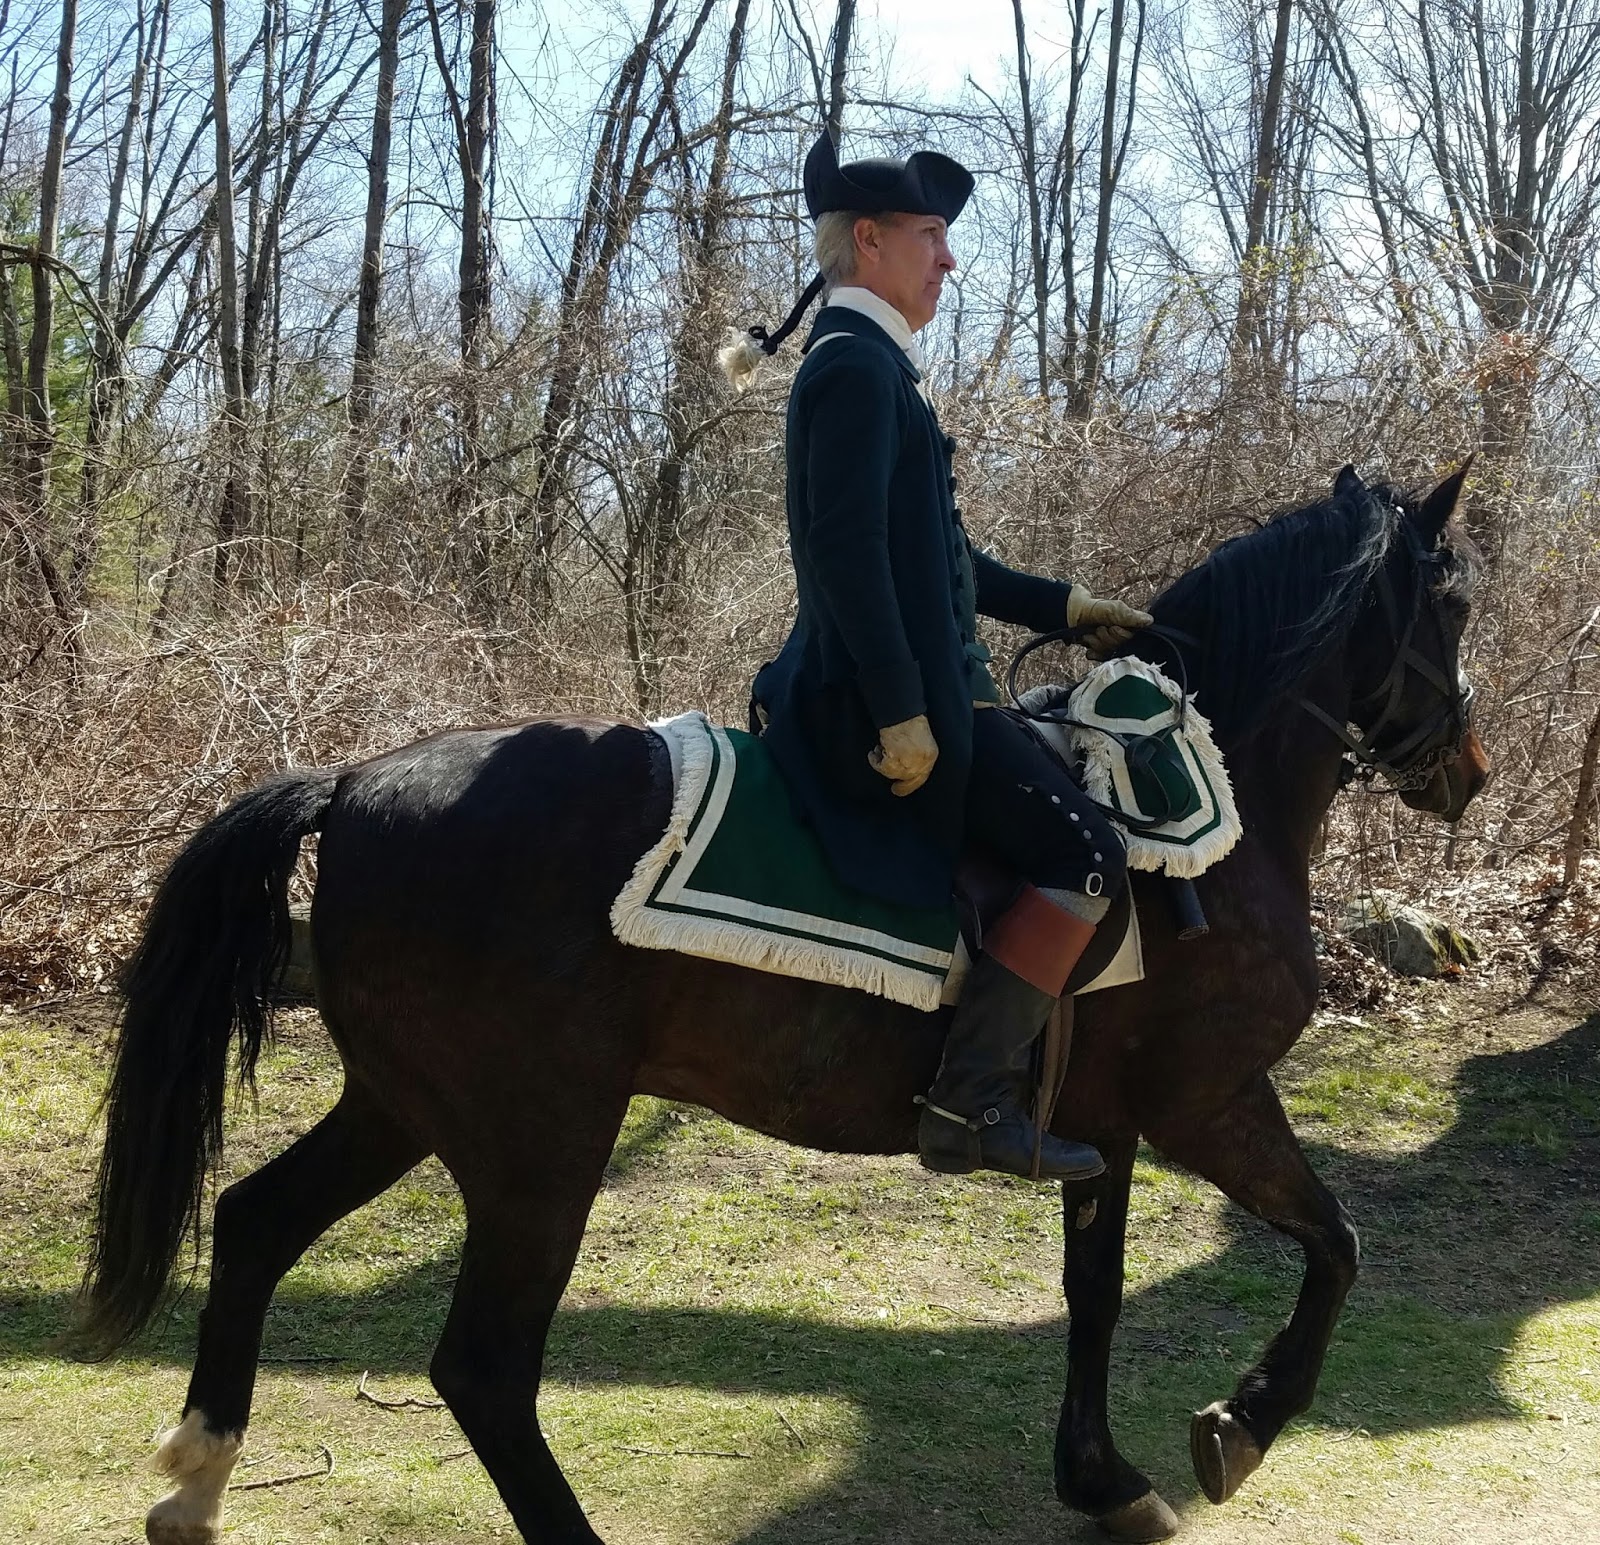 A Colonial Militia Officer rides forward to look for the British.
 There they are!
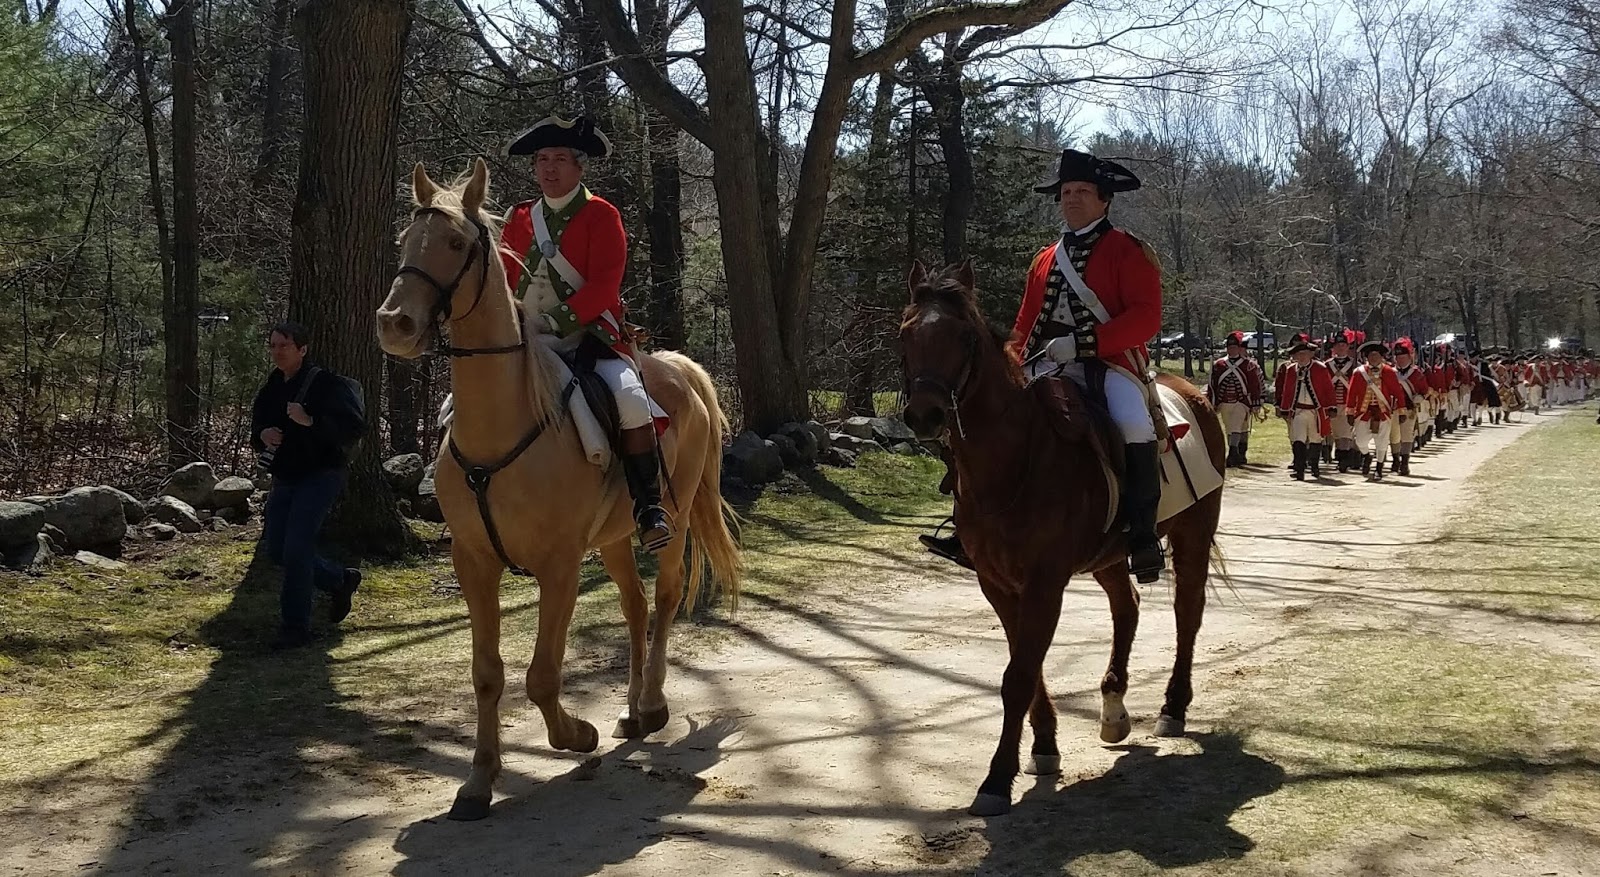
 The Regulars are out!
 British Light Infantry load their muskets.I was confident now that I would finish in time, so I felt more able to take sightseeing pictures along the way.
 Dawes * Revere * Prescott
1:30 a.m.
April 19, 1775But not everyone was doing as well as I could. Earlier in the ruck, I have to admit I felt a little intimidated by all the 20-somethings in uniform blowing by me on the trail, sometimes double-timing it. But now...I was passing more ruckers than were passing me, and those that were still on the third leg of the trail looked worn out. Some of them were limping, other looked beyond fatigued--they had looks of defeat, and in one case fear, on their faces.
I kept going.
I took some more pictures of the trail, which I can only imagine looks beautiful in the summer and fall.
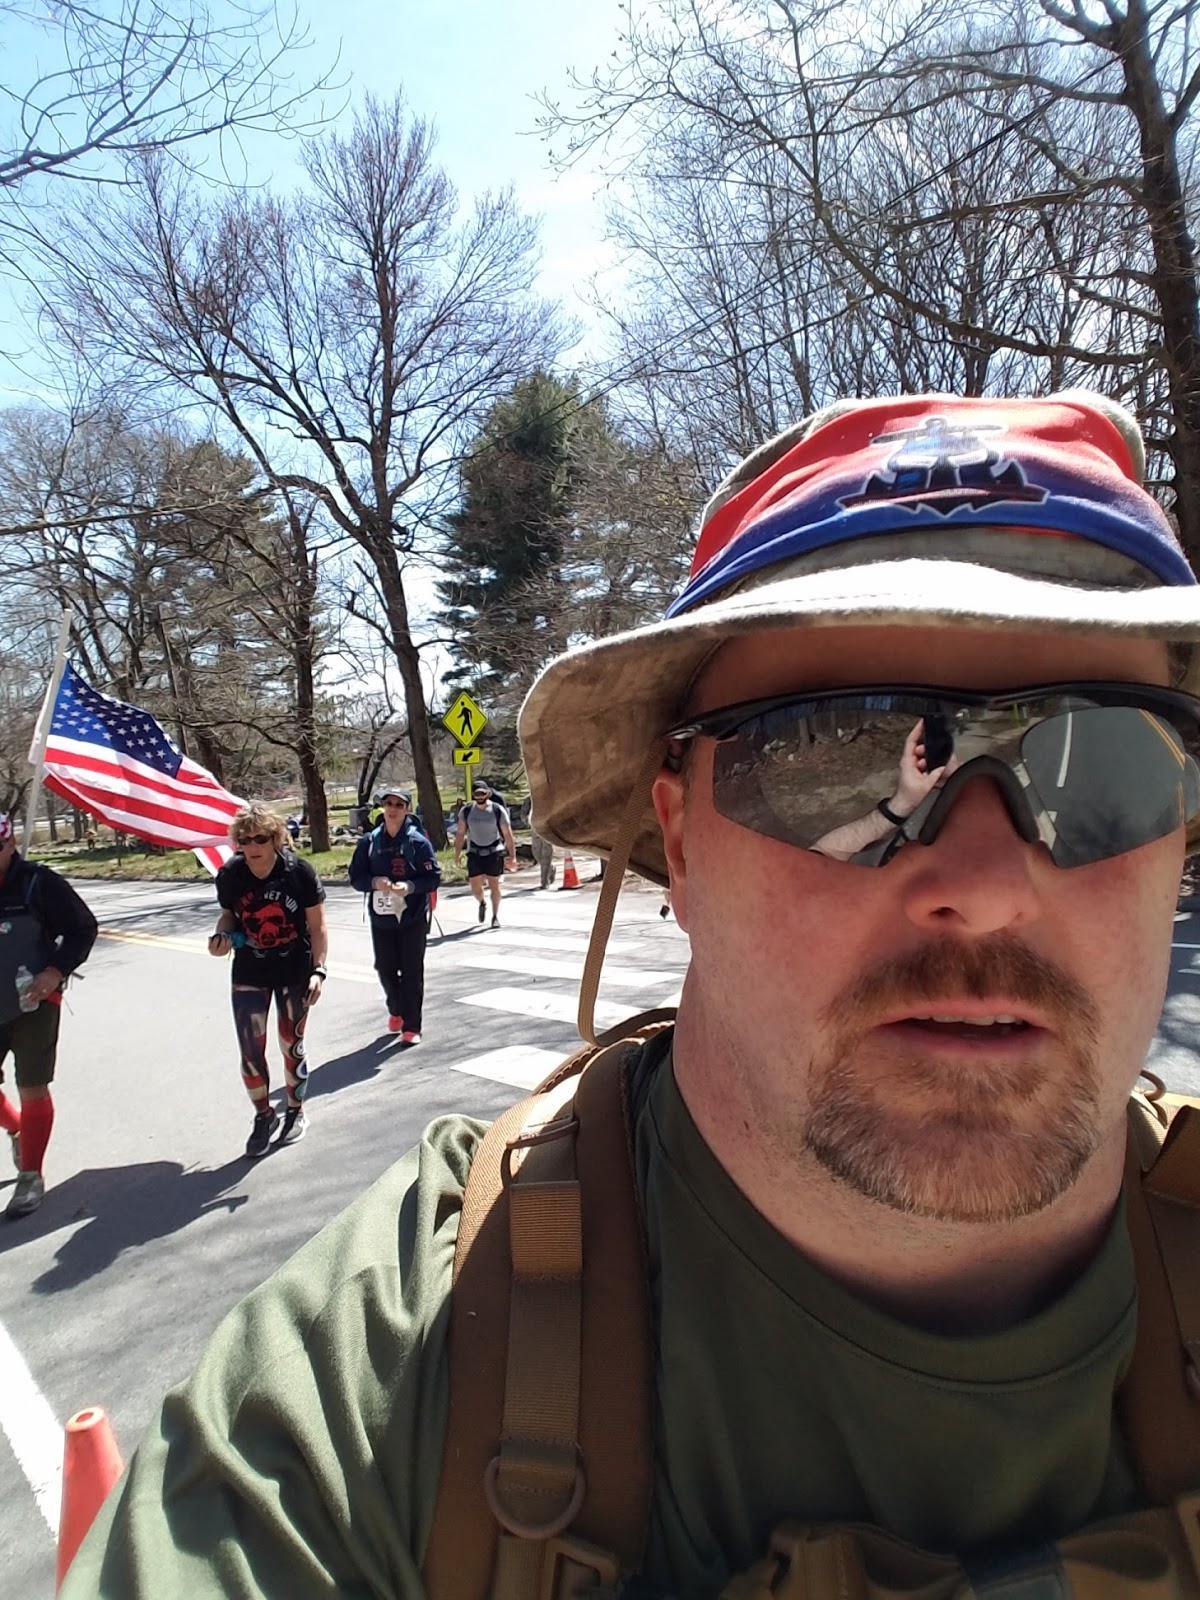
 Battle RoadIt's strange to think that over 200 years ago the British were retreating under harassment fire from the colonials here.
I got back to Meriam's Corner, and then it was the real homestretch, the roughly two miles to the finish. My feet were really starting to hurt now, but honestly I was getting used to the pain and so I just kept it up. The rest of the ruck would be on pavement, which wouldn't be fun, but so what? Only two miles. Two miles are nothing.
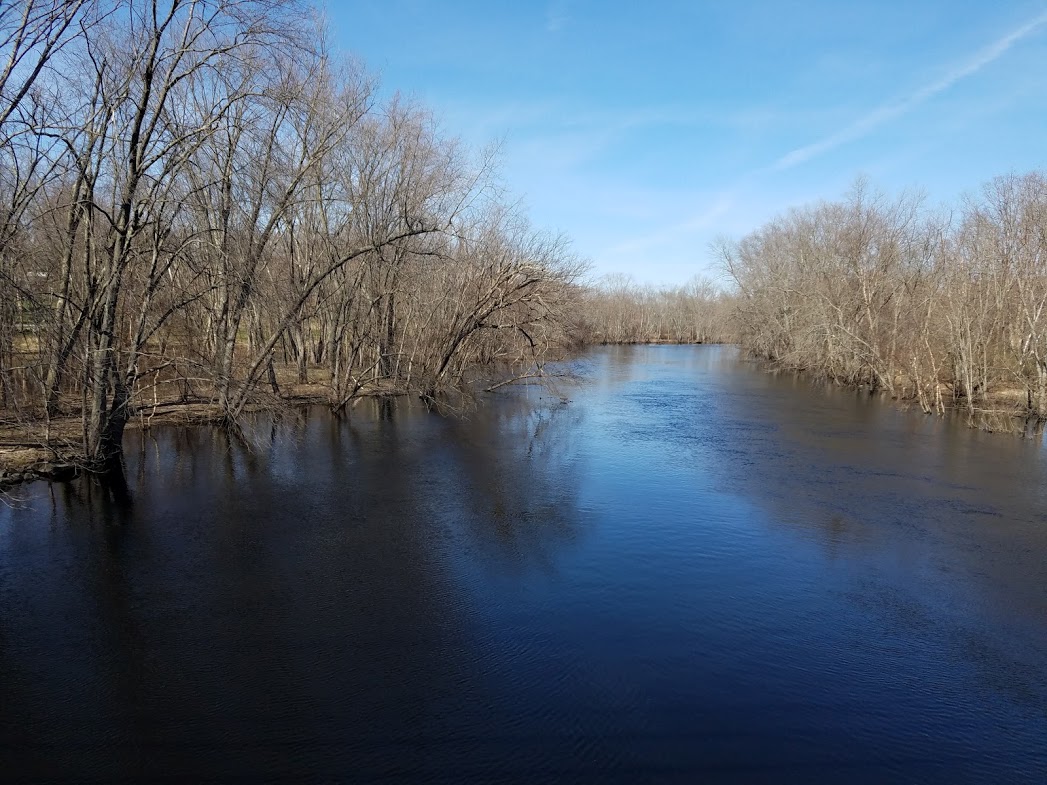 The Concord River, a short ways south of Old North BridgeBack into the center of Concord, where some cars passed by and honked to show their support. Then it was back up towards the Old Manse.
 The final leg. Minuteman Monument, and just beyond the Old North BridgeI crossed the bridge and then there was a path lined with American flags up to the finish. When I saw them I broke into a jog and ran the rest of the way to the finish line.
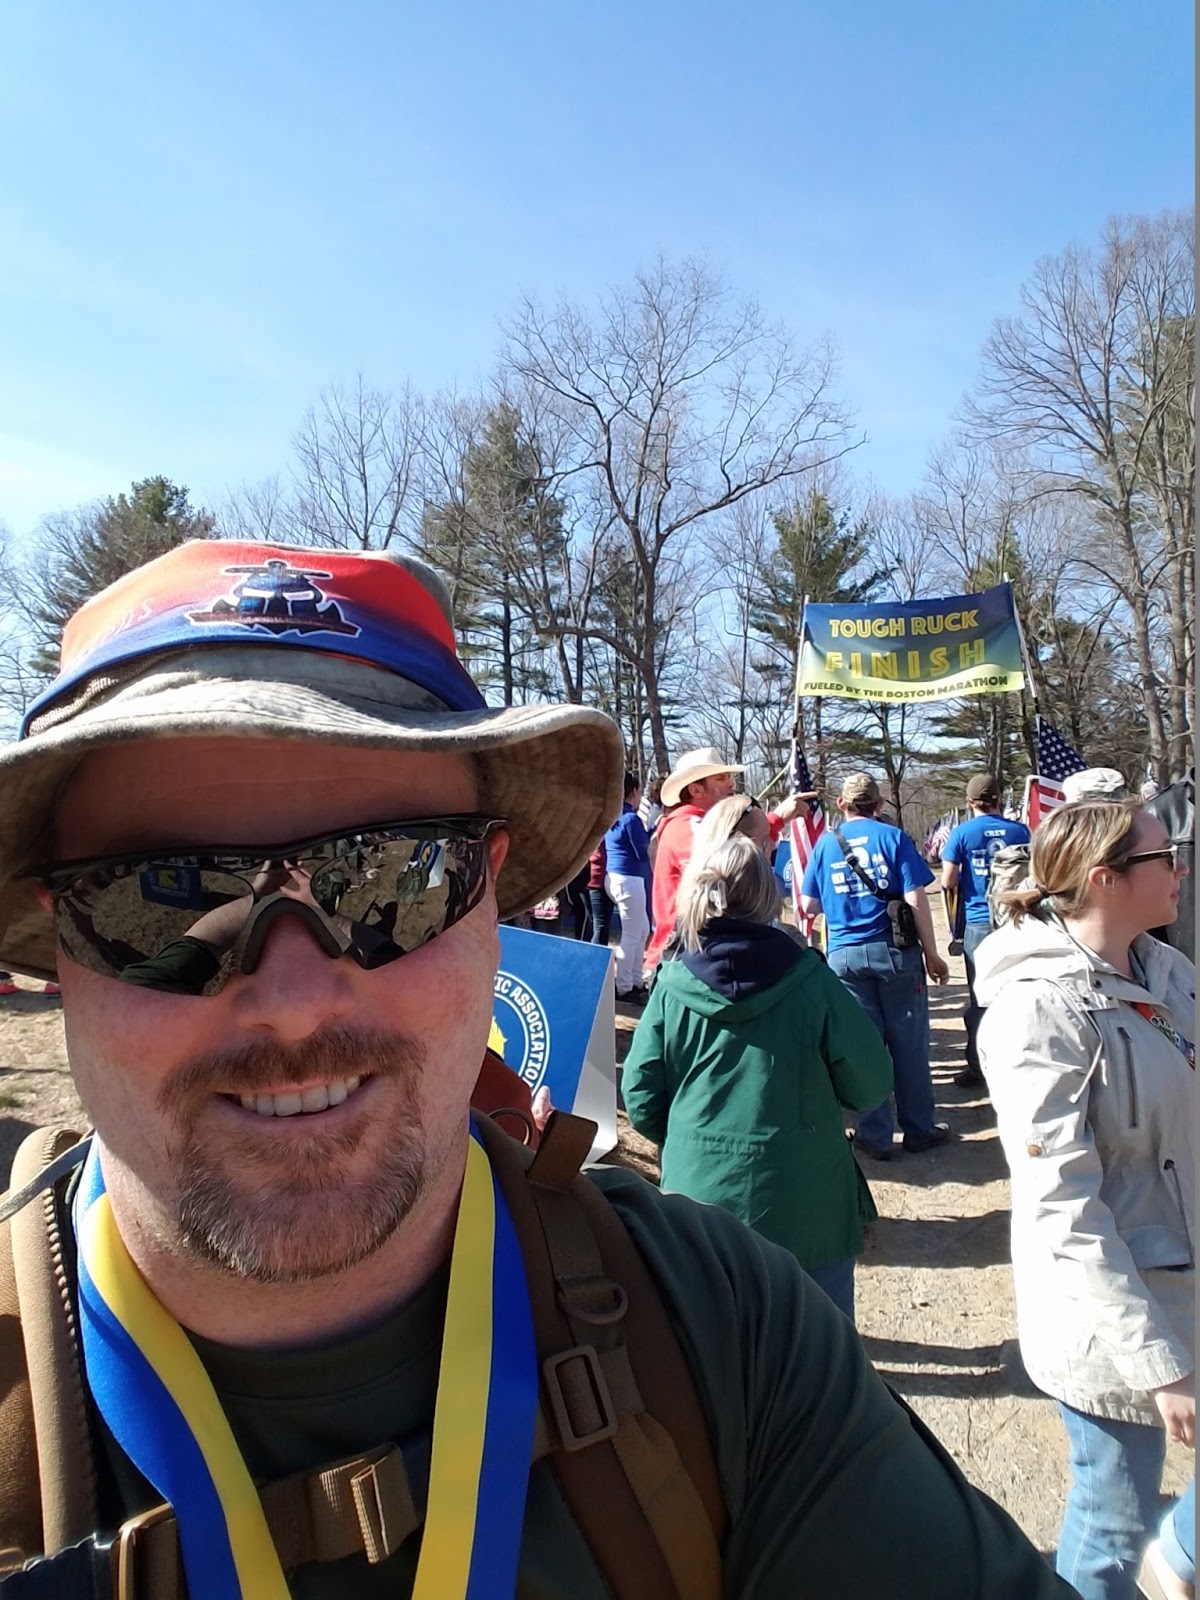 At the finish.My GPS read 26.45 miles, and my official time was 8:38:49. I was proud of the fact that I didn't dump any water along the way, that is, except for what I ate and drank out of my supplies: 3 granola bars, some Slim Jims, some Shot Bloks, and maybe 80 oz worth of water. So by the end my pack was probably less than 30 lbs. but I didn't deliberately dump anything to make it lighter.
The finish area was crowded, and several vendors were serving free food and such while everyone mingled, but never much of a social creature, I just wanted to go home.
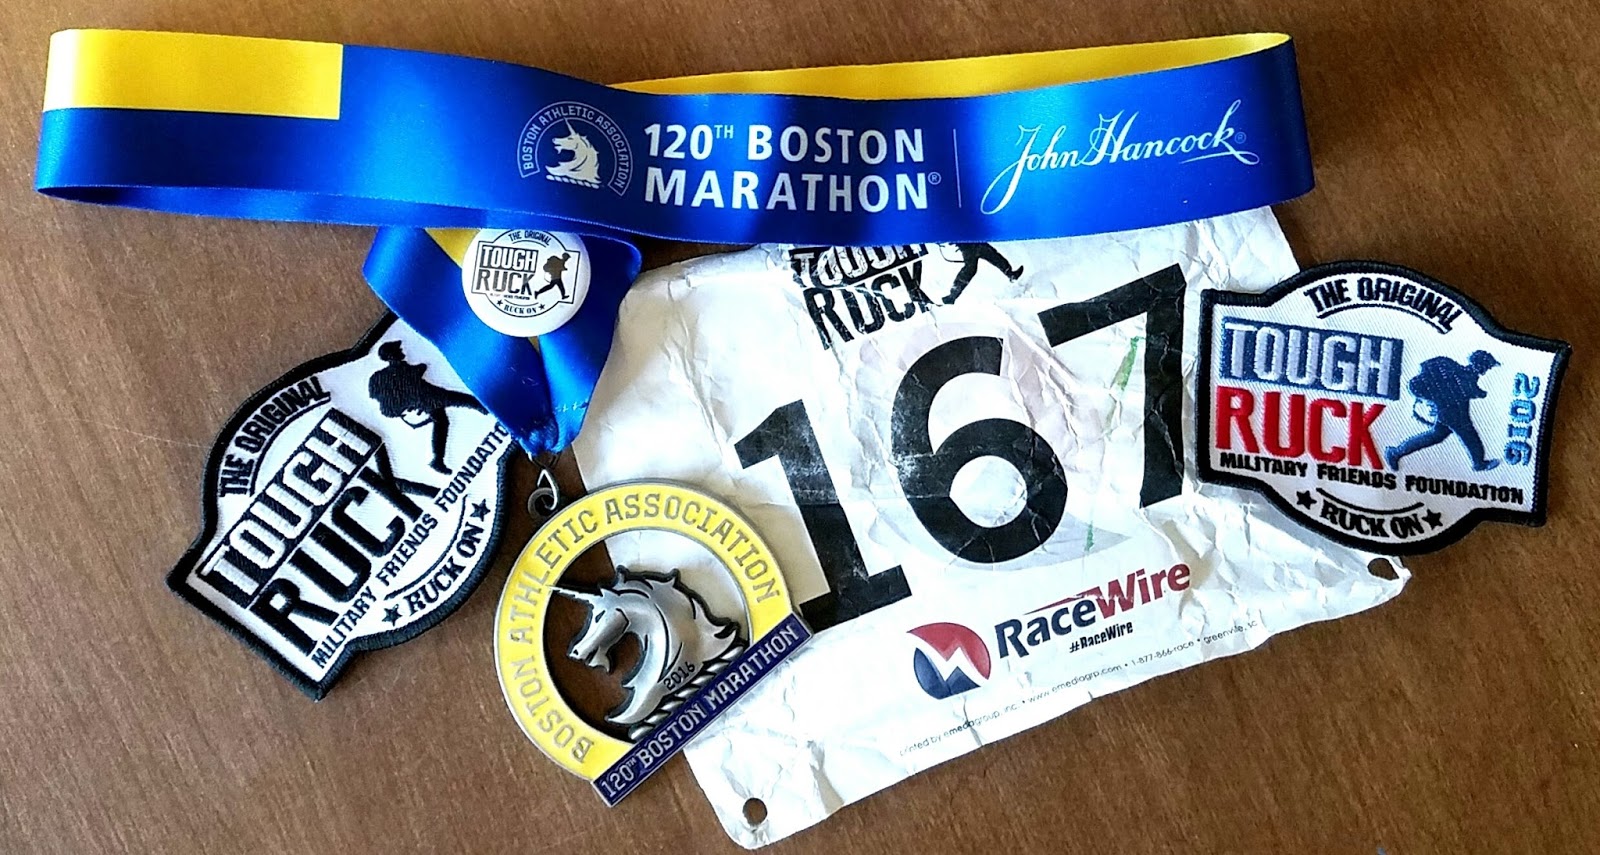 My Bib, patches, and Boston Marathon Medal.But the real reason I did this was to honor those would could not ruck, and whose ribbons I carried:
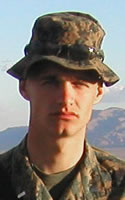
 1st. Lt. Joshua BoothSgt. Edward Grace
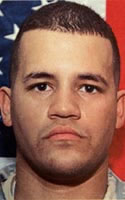
 SSgt. Alex JimenezMaj. Gen. Harold Greene
And one more: very early in the ruck, someone's ribbon was ripped off their ruck and blown away by the wind. I chased it down and grabbed it. I wasn't sure which rucker had been carrying it, so I carried it the rest of the way myself to ensure it got across the finish line.
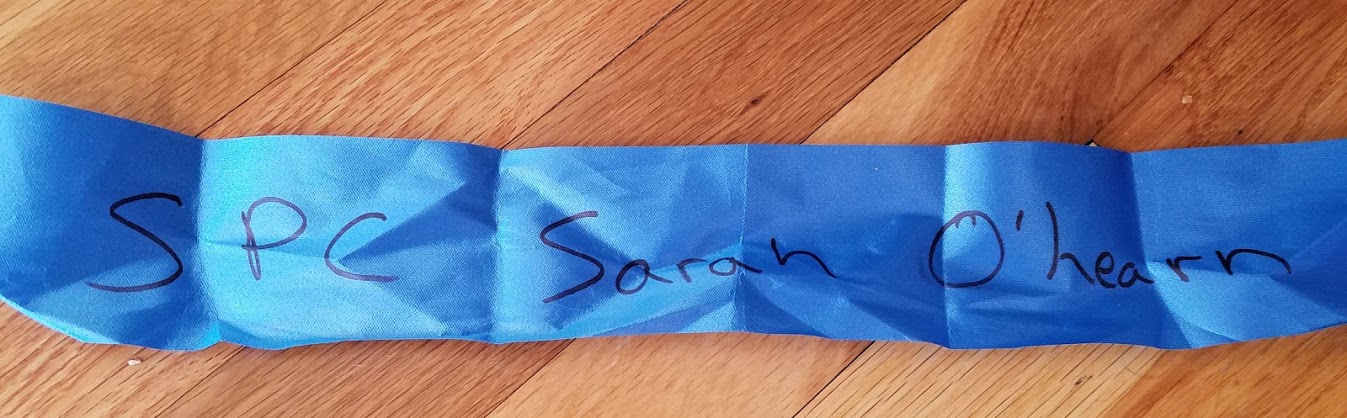 SPC Sarah O'Hearn
To all veterans and first responders: Thank you for your service and your sacrifice.
Tiger Tank, Part 2
 I have a love/hate relationship with decals. When I was young and before I got into miniature painting, I did model kits, primarily aircraft and warships. Most of them had waterslide decals, and applying them was pretty straight forward: soak them in water until they come off the paper, and use a paintbrush to put them on the model and adjust them...and voila, all done.
When I was building model kits, my skills were limited so this was the best I could do, so it didn't bother me.
When I started painting miniatures, some of them came with decals--the most prominent being the shoulder pad decals for Space Marines. I never had much success with them--they would never go onto the shoulder pads without folding due to the 3-D curvature of the pad. I had heard about things called "decal softeners" that would help the decal conform to the shape of whatever you were applying it to, but I never bothered to get any. So in the end, for models like my Raven Guard Company, I resorted to painting all the chapter symbols by hand.
For my Bolt Action miniatures, I wanted to try to go the extra mile and "do it right". I had already airbrushed my Tiger tank, so I wanted to see if I could apply decals the "right" way, and see if I got good results. I found a blog post on Vallejo's website that explained the process.
First you apply Decal Medium to the area where the decal is to be located, then apply the decal as normal, and when it's dry, apply Decal Fix, which softens the decal and causes it to conform to match the surface. Once you're done you apply some Matte Varnish to protect the surface.
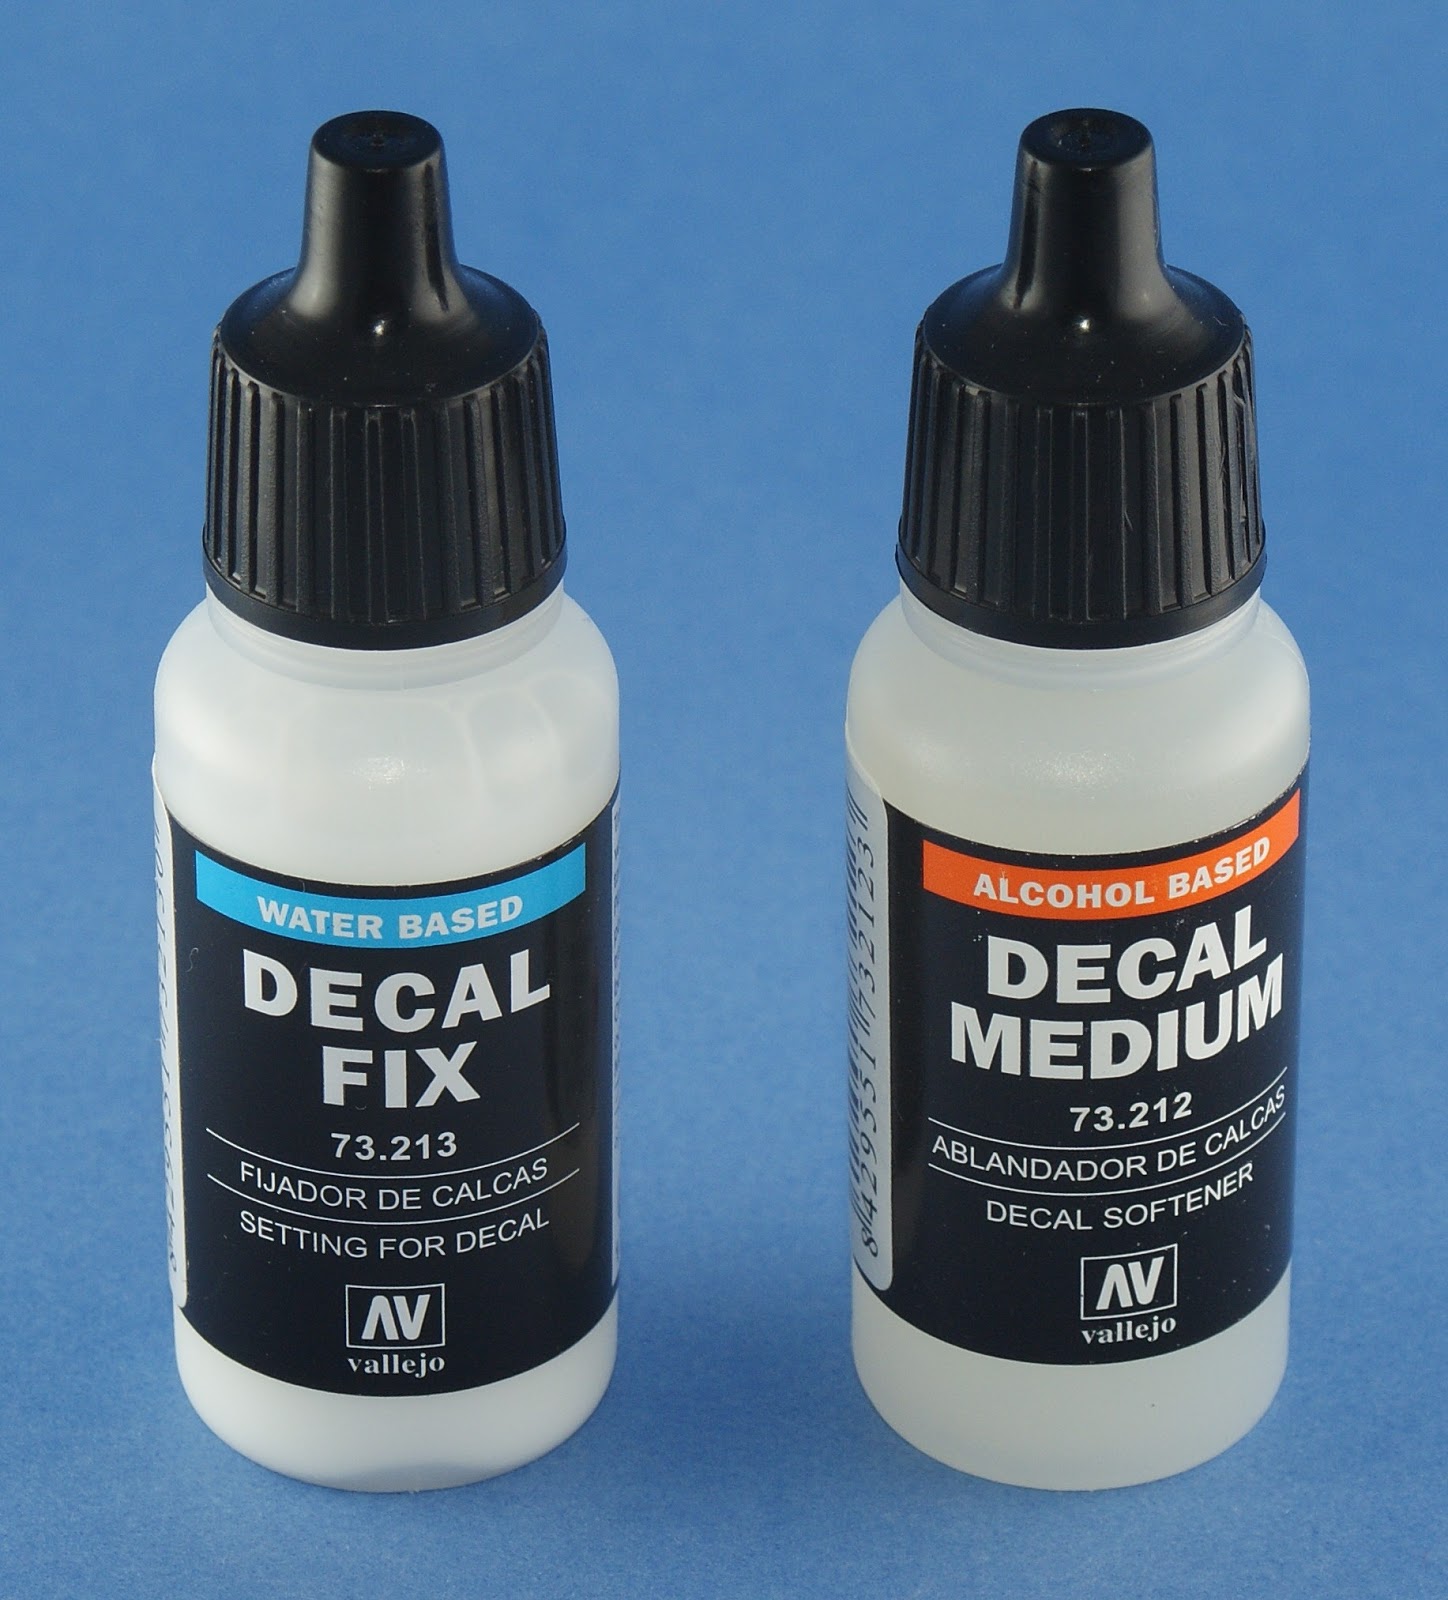 So I bit the bullet and bought some Decal Medium and Decal Fix. I would be apply some decals over the Zimmerit on the Tiger, a rough surface if there ever was one, so I was skeptical as to how well this would turn out.
I applied the Decal Medium to the surface and then applied the decals themselves to let them dry. As I expected, they dried like a piece of dry paper laid on a rough surface: they did not conform at all. So onto the Decal Fix. It says to apply "a little", but I slathered it on because in order to work, these decals needed lots of softening! According to the Vallejo website: Vallejo Decal Fix will do the rest! A few hours later, the decal will look just like it has been painted on the model. All the recessed or raised details will be visible under the decal.
Yeah, right.
I waited a little while, and looking back afterwards, it appeared that the decal had softened...a little. Instead of a piece of dry paper laid on a rough surface, now it looked like a blanket laid on a rough surface. It sagged over the rougher parts, but did not really "conform" to it. In fairness the Vallejo website does say "A few hours later..." So I let it dry overnight.
Here is the result:
 Holy crap, it does work! As the Vallejo website claims, you can see the recessed or raised details. As for looking like it has been painted on, well not quite, but that's because it looks almost too perfect.
In any event, I'm very pleased with the result. I painted some matte varnish on to seal it, and as I continue the weathering process I am sure that it will look even better.
In Part 3 of this series I will start the weathering process.
April 15, 2016
Commission: U.S. Marine
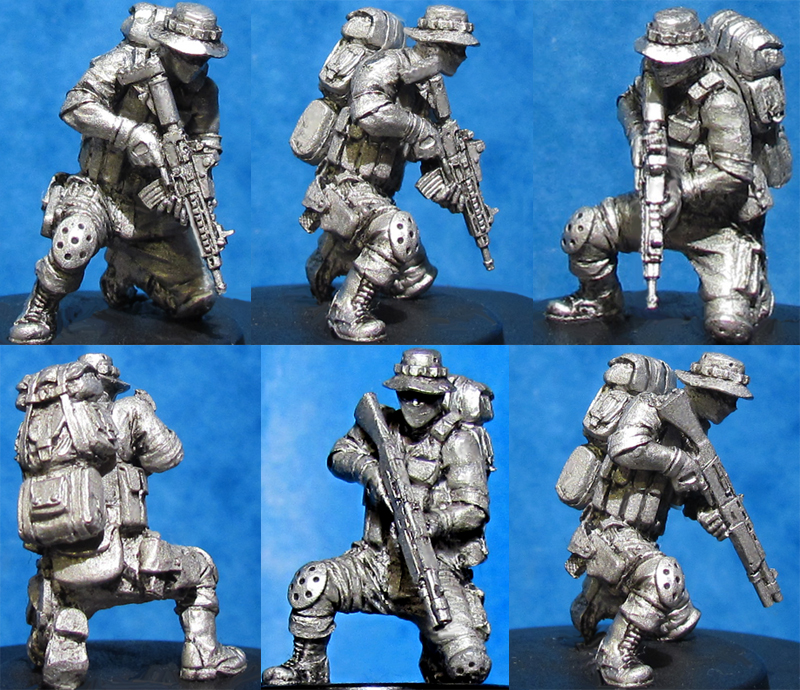 Apparently due to the popularity of my Woodland and Desert MARPAT tutorials, recently I was contacted to do a commission. The task was to paint two identical 28mm miniatures, one in Woodland MARPAT, one in Desert MARPAT.
I received the miniatures in the mail, and I expected them to be metal, as it certain looks metal in the image to the left. I was surprised to find out that they were resin instead! This is not normally a problem, but resin miniatures are more fragile, and unfortunately one of the miniatures was damaged in the mail. The butt of his pistol snapped off, as did the stock and barrel of his rifle.
 I had to do some repair work, but in the end he came out OK.
 The other miniature arrived intact. (assembly still required)
I got to work assembling and painting them. Back when I originally did the camouflage tutorials, I only primarily GW paints, but now that I've started painting Bolt Action miniatures, my paint range has expanded to include a large number of Vallejo paints.
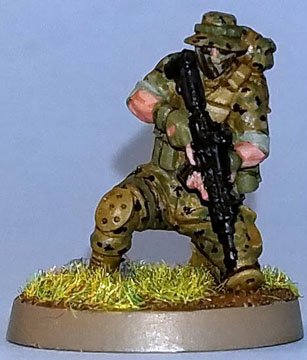
So this time around I had a much larger paint selection to choose from. For the desert pattern I used GW Terminatus Stone and GW Kommando Khaki for the largest patches, and 875 Beige Brown and GW Khemri Brown for the smaller ones.
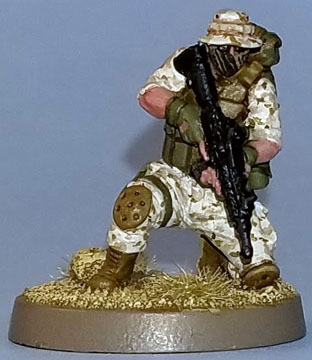 For the Woodland MARPAT figure, and the pack on the Desert MARPAT figure, I used the following colors: to represent Coyote Tan I went with 921 English Uniform. For the green, after some dithering I went with 890 Reflective Green. The black I used Chaos black, and for the smaller brownish spots I used GW Khemri Brown.
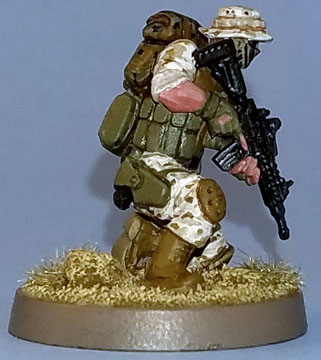 The rolled up sleeves on the Woodland MARPAT figure is 887 Brown Violet mixed with some 885 Pastel Green. The sleeves on the Desert MARPAT figure is GW Kommando Khaki highlighted with GW Terminatus Stone.
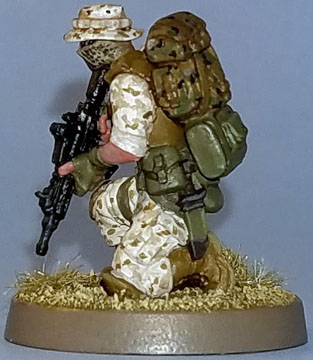
The equipment on both miniatures is the same, so I painted them using the same colors.
The rifle was painted black and highlighted with 862 Black Grey, while the magazine was drybrushed with 863 Gunmetal.
 The pistol holster, gloves, and some pouches were painted 887 Brown Violet, while the strapping was painted 893 US Dark Green.
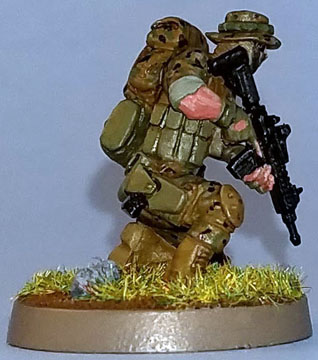 For my attempt at painting the Shemagh, I used 988 Khaki for the base color, and 822 German Camo. Black Brown for the pattern.
 The boots, kneepads, vest I used 921 English Uniform.
The skin was painted GW Tanned Flesh highlighted with GW Tallarn Flesh.
I think based the miniatures and put on some static grass representing the environment. Mailed them off, and the customer was happy, so I'll mark this one as a success.
April 12, 2016
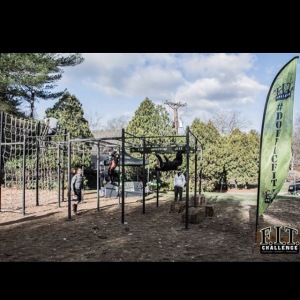
Epic Sixth F.I.T. Challenge
 The Epic Sixth F.I.T. Challenge was my second OCR of 2016. I have to admit I wasn't looking forward to it very much. It had been a very tiring week for me, and due to real life getting in the way, I had all but ceased training. Doing this race was going to stink in a big way. But I had paid my money, and so I went.
The first thing I noticed that it was a lot busier this time than it was for Epic Fifth in November. The parking lot was overflowing. The bathrooms were still beyond disgusting. Registration was easy and there was no line. It was chilly, but nowhere near as cold as it was in November. I killed some time and stretched while waiting for the start.
Eventually we got started and up Diamond Hill we went. Diamond Hill is roughly a 400 ft. hill that gets very rocky near the top. Lots of the rock is loose, so you have to watch your step. I followed the crowd uphill, and for the first mile or so, it seemed that we were following the same course as we did in November. I managed the hill ok, but my heart rate was really spiking--a testament to my lack of conditioning. The first few obstacles were simple climbing obstacles like ladders and cargo nets.
Some of the obstacles (sorry, I didn't get pictures) were unique involving a sloped cargo net, which had a short line, a horizontal cargo net that you had to traverse like monkey bars (which I failed miserably), and a "floating" ladder wall that swung freely, adding a layer of difficulty to an otherwise simple obstacle. At many of these new obstacles there was a line, which I didn't expect at this race, but all in all it wasn't too bad.
By the time we got to a log carry uphill, I was at my low point. I was slogging along, but I was tired, depressed, and felt very much out of shape. I had my "why am I doing this?" moment. But I got past it and just kept going.
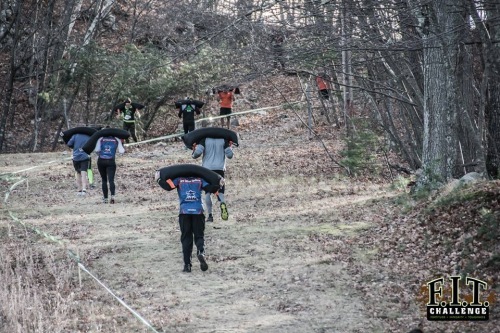
Back to the bottom of the hill for a flurry of difficult obstacles. First was the horizontal cargo net I described above, and shortly there after was a peg climb up a tree--I failed that in November, and I failed it again here. Then a rope climb, which I actually managed this time (I failed in November, at least partly due to the cold). After that was the mile two water station, which was a relief because it meant the halfway point. Next was carrying a 50 lb. Wreck Bag up the hill and back.
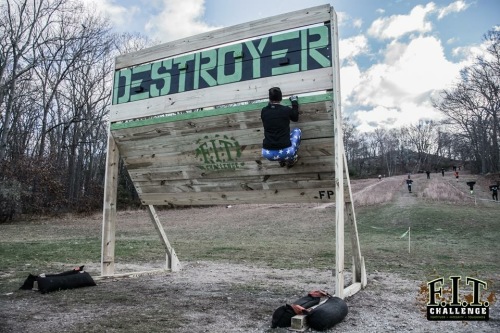
And then, the Destroyer. I managed it (with help) in November, and this year I did much better. I still needed help (although I think I stood a chance to make it without the help this time), but I got over.
Then another slog all the way up the hill, bit I knew that by this point, the hard stuff was mostly over except for the obstacles just prior to the finish.
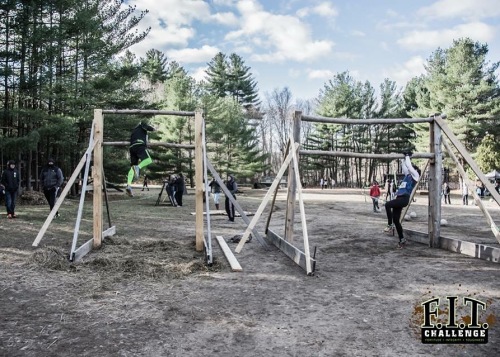
After making it to the top it was a gentler slope back down, and then a plethora of over / under obstacles. Then an climb over two logs where I needed a little boost.
And finally, the Rig obstacle. I was dreading this one. In November my hands were freezing, and after attempting the monkey bars and bashing my fingers against the metal I dropped off it and climbed the cargo net. This time, to my surprise, I was able to mange both the monkey bars and the horizontal swinging bar after it. Then over the cargo net.
Then five reps of lifting an Atlas stone and dropping it over my shoulder, over an open inverted wall, and across the finish.
The race was essentially the same length as November's: 3.71 miles this time to November's 3.68. My time was worse, 2:11:21 compared to November's 2:05:15. I can blame some of that difference on the lines at a few obstacles. On the other hand, I did manage some obstacles like the Rope Climb and the Rig which I couldn't do last time, which gave me a boost, but overall I felt like I did worse.
In the end I think it just reinforces that I have to step up my training if I'm going to get any better at this.