Dan Eldredge's Blog, page 2
August 7, 2017
Krazy Kids Inflatable Fun Run 2017
Last year I took my daughter to the Insane Inflatable 5k, which was fun, although the distance was a bit long for her. It was a good decision at the time to leave my 5-year-old son home, as he certainly wouldn't have been able to handle the distance.
But the Krazy Kids Inflatable Fun Run was the kids version of the same race. Half the distance, and kids only, so it was much more their speed. The price was also a lot easier on my wallet.
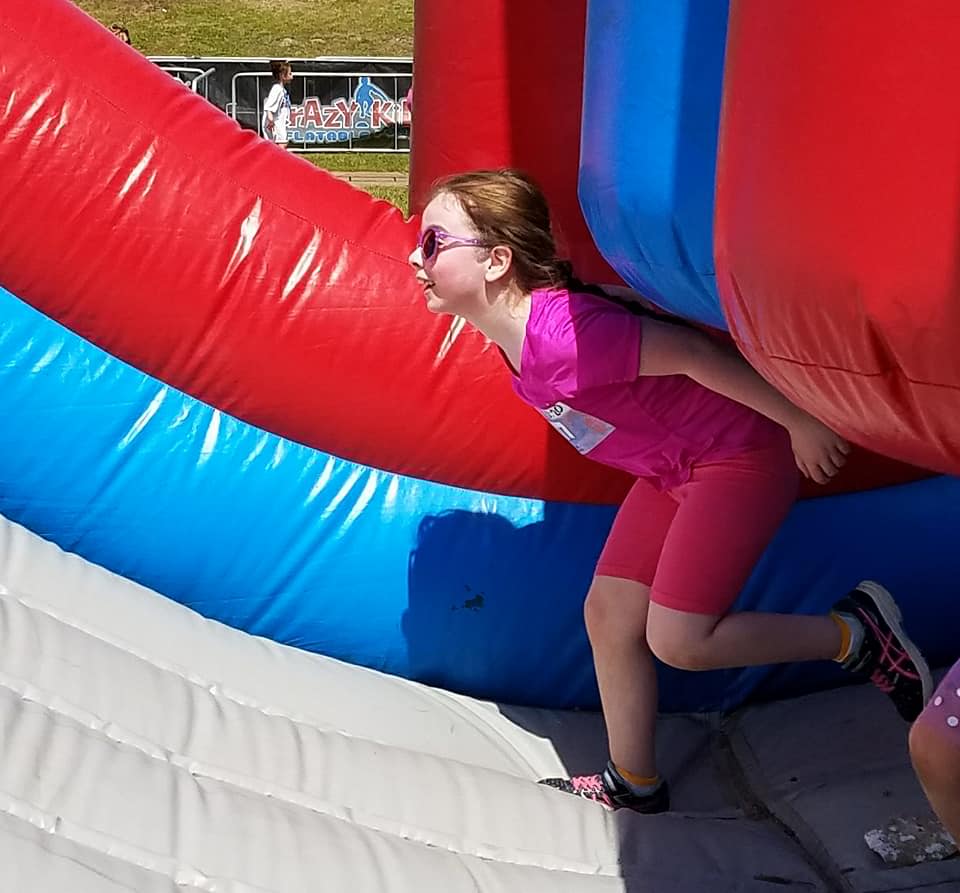
 Pre-race facesThe Insane Inflatable 5k was family-friendly, and it had a small bouncy house to keep kids occupied when they weren't racing. The Krazy Kids Inflatable Fun Run, however, was all about the kids, so they had several bouncy houses available, and the kids certainly made use of them.
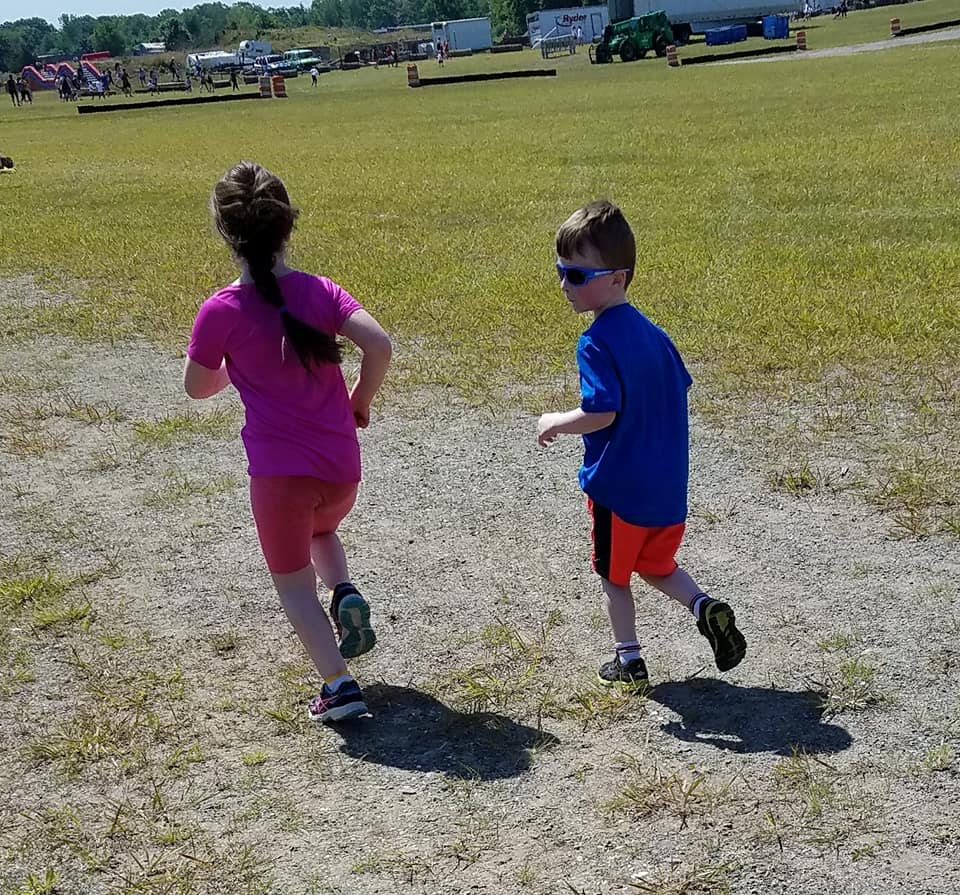 Running to the next obstacleThe check in was organized and quick, and it wasn't long before our wave time. Adults were not allowed on the obstacles, but I would be allowed to run alongside the kids and take pictures while they went on them.
 Negotiating the obstaclesI would be running alongside, but I gave orders that they should stick together so I could keep a better eye on them. This led to my son taking off, my daughter grabbing him to hold him back, him hitting her...and a fight ensued. After a few threats to take them off the course if they continued to fight, they continued on and had fun.
 Going down one of the many slidesIn one obstacle my daughter went through a tunnel and hurt her neck, so I ended up carrying her for a ways, but her desire to have fun overwhelmed her pain, so she continued on.
 Casually strolling through an obstacleAs with all such events involving large amounts of kids, there were collisions, stepping on each other, tears, etc. but for the most part the little troopers kept going and having fun.
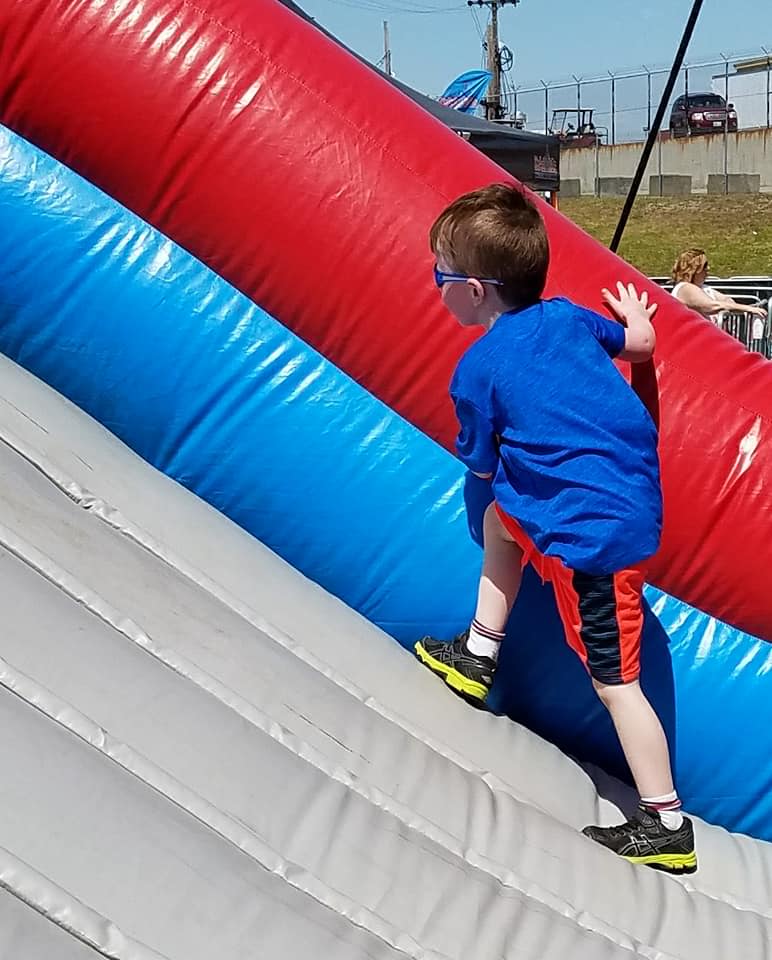 Climbing the hill
 Another slide
 More slides
 Heading for the hill
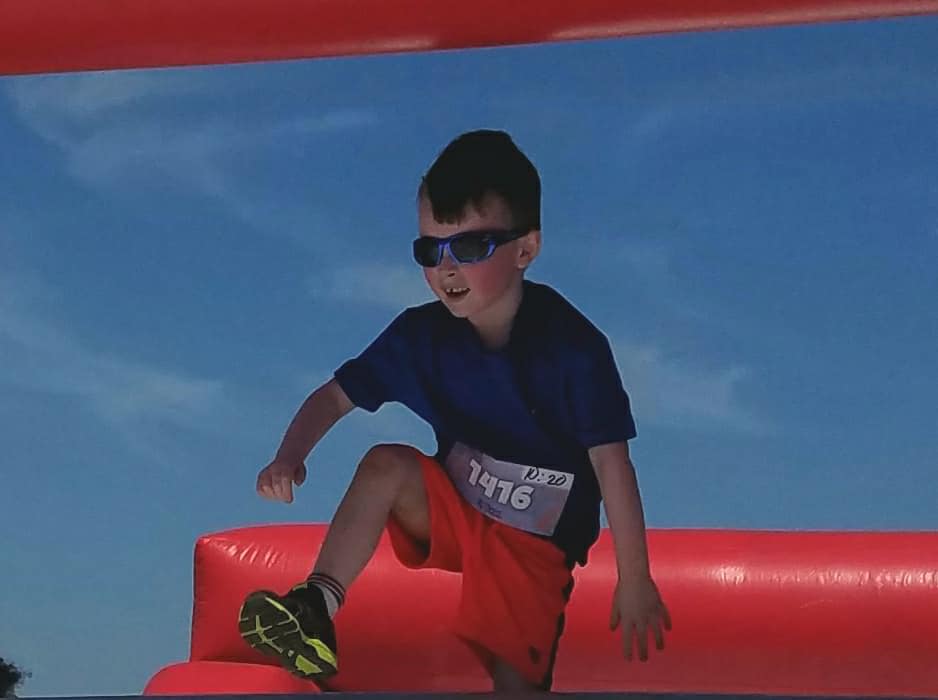 Over the top
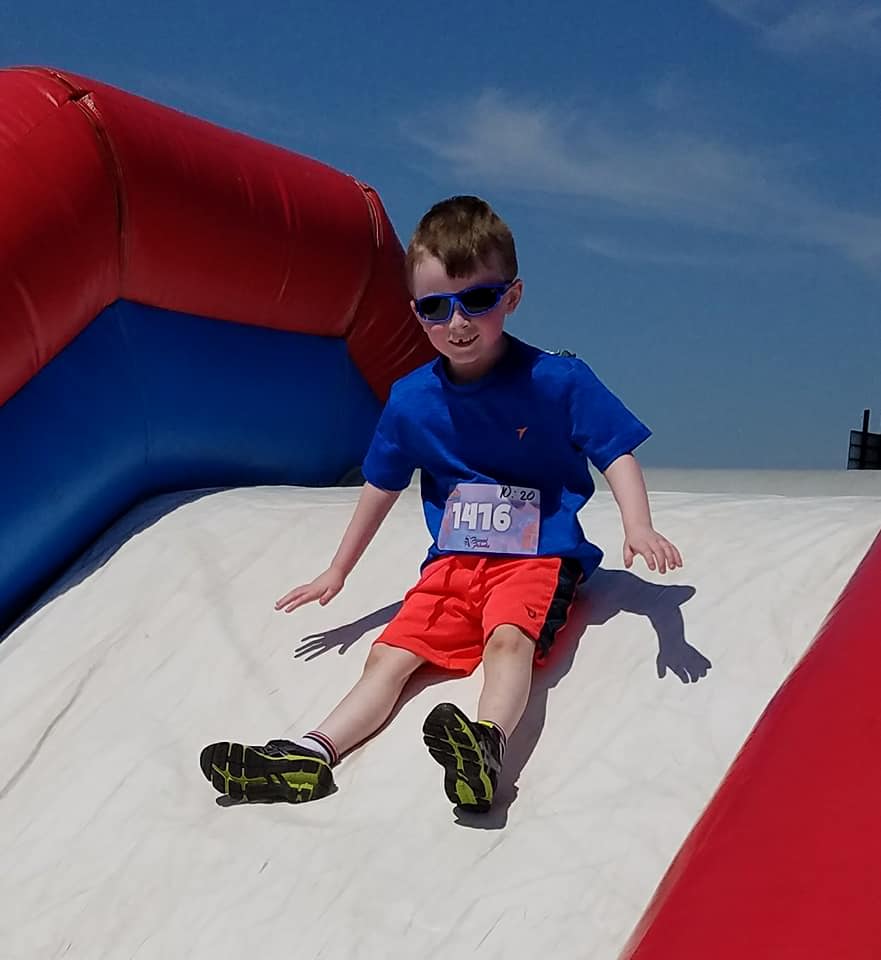
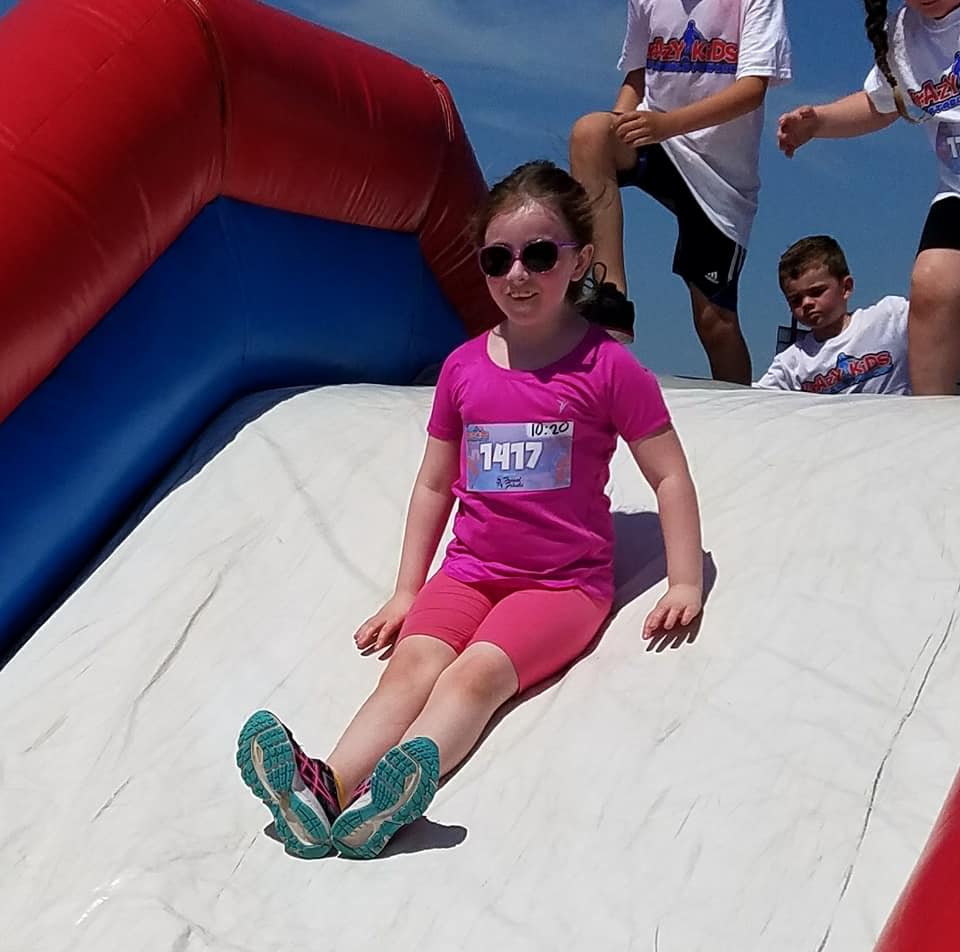
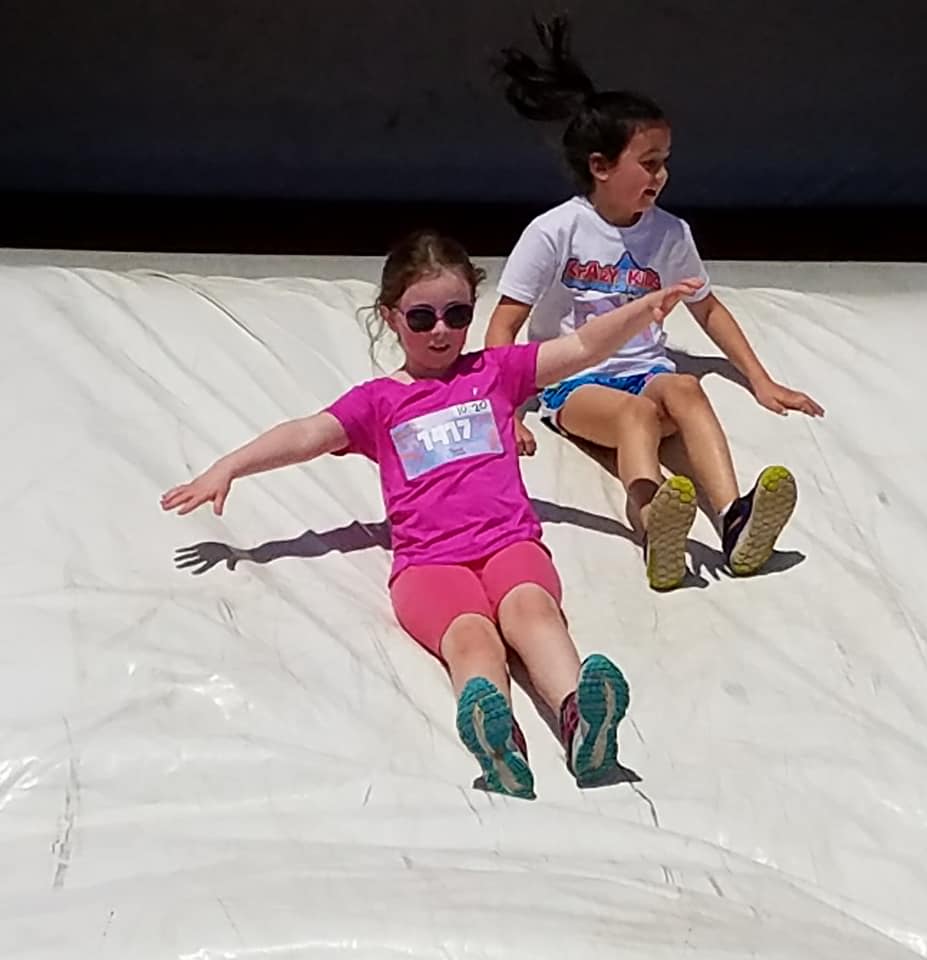 Down one more slideWe completed the 1.5 mile course in only a half hour, and both kids were tired, sweaty, and happy.
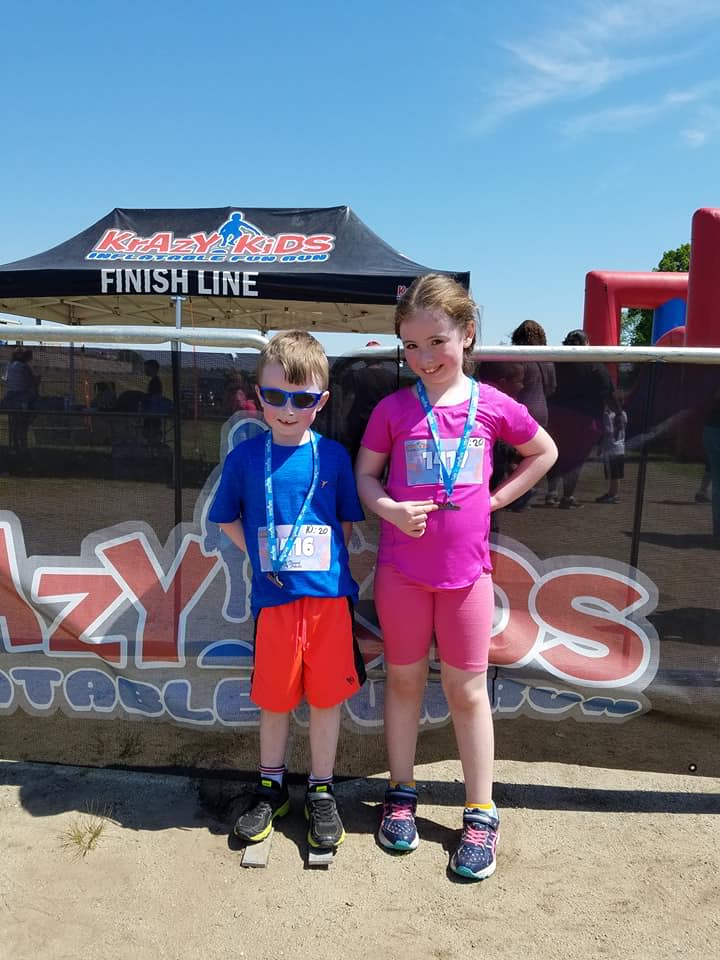 Showing off their medals
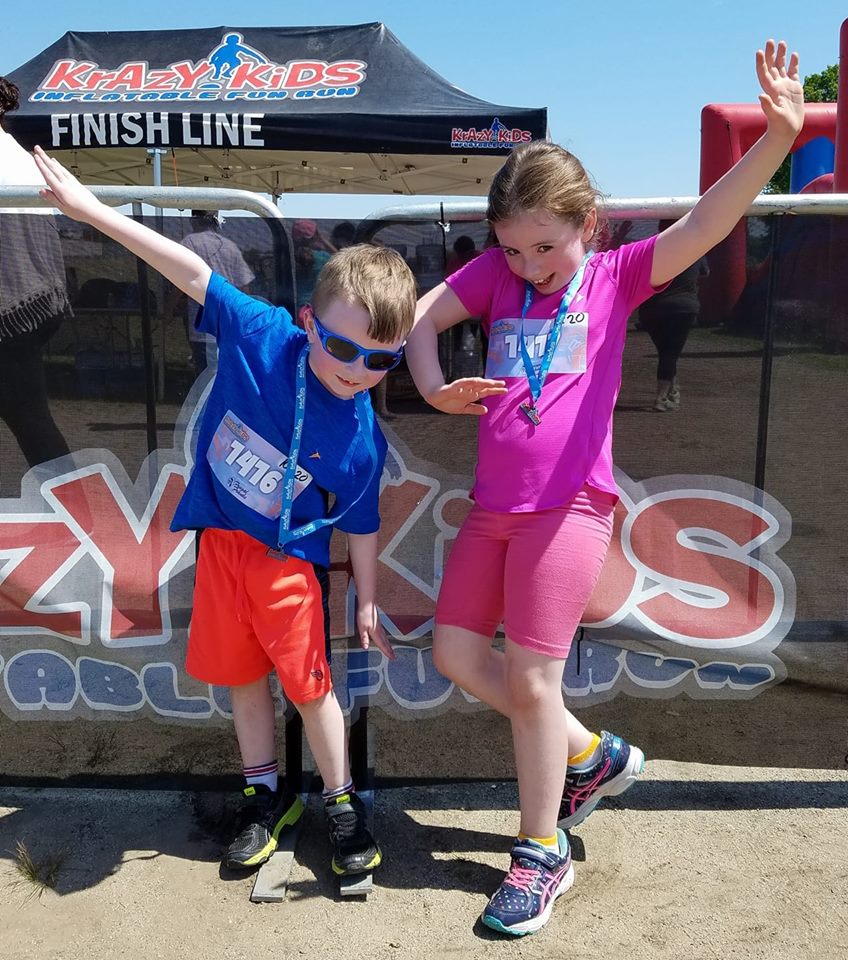 Ninja Pose!Looking forward to next year!

August 3, 2017
COMMAND: Northern Inferno Scenario 11: Fire and Brimstone Part 3
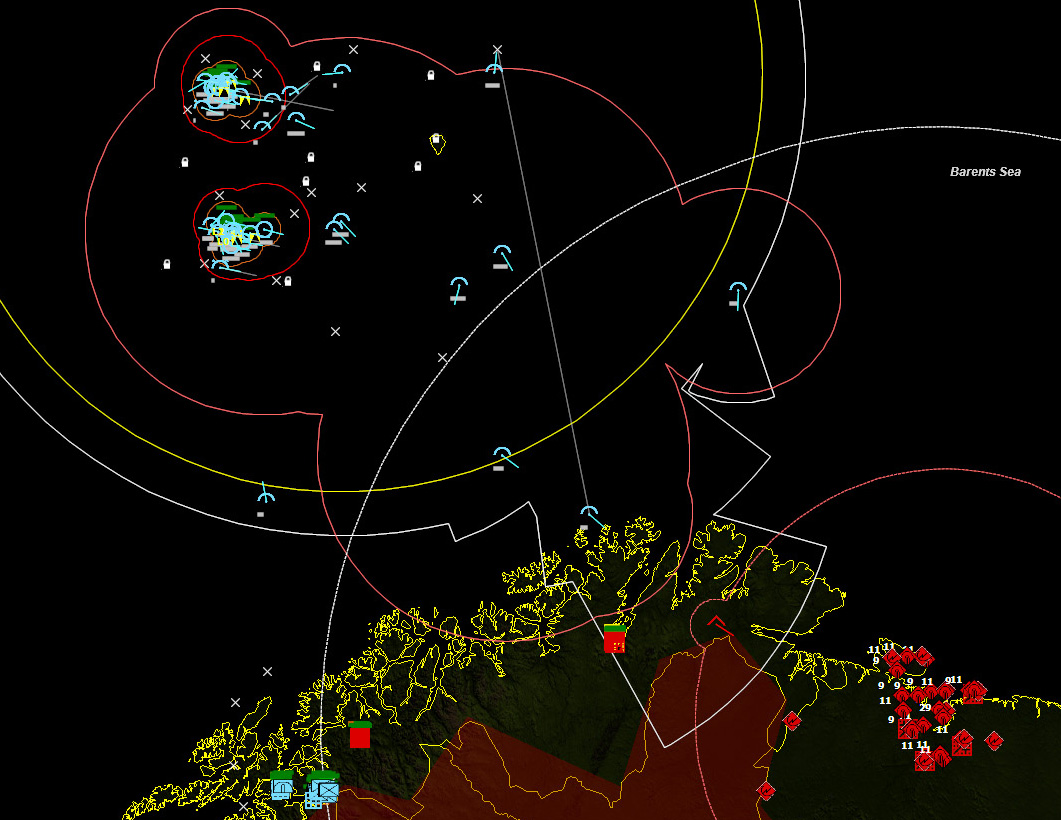
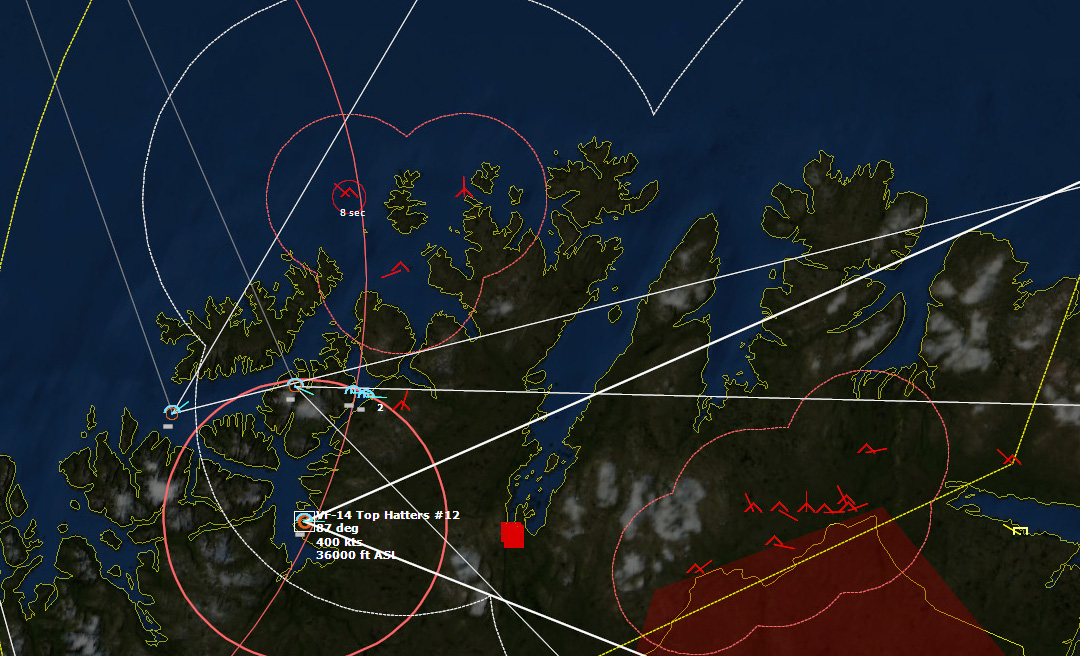
 In Parts One and Two of this scenario, The USS John F. Kennedy and the USS Saratoga CVBGs advanced on northern Norway, their mission to destroy Soviet forces in the vicinity of Bardufoss and Banak, supporting the hard pressed NATO ground forces attempting to keep the Soviets from taking Narvik. I've been diligent in wiping out Soviet recon planes, and thus far have succeeded in keeping the locations of my CVBGs unknown.
 I have been striking Bardufoss constantly, but so far it remains in operation. My ground forces north of Narvik have been sustaining both air and ground attacks.
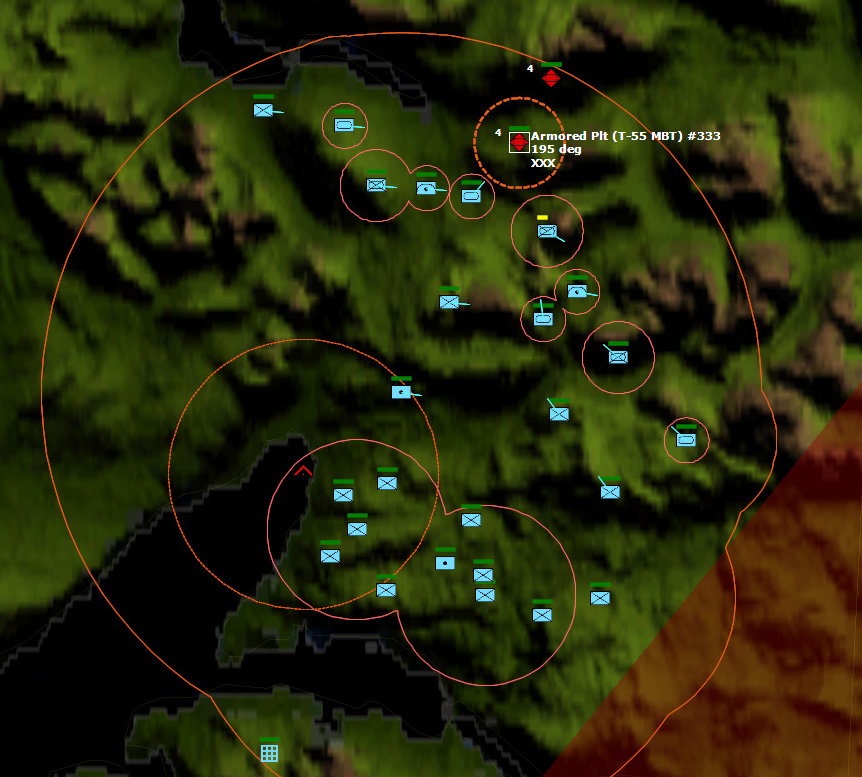
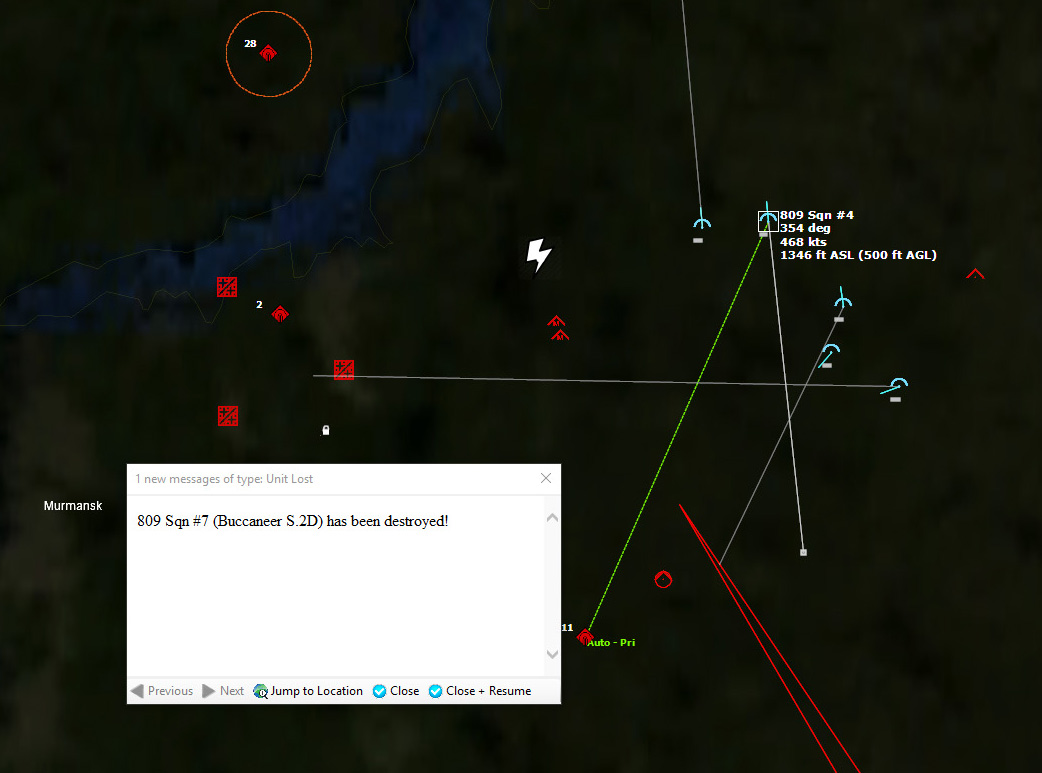
There is apparently a major attack going on north of Narvik, and I lose an AA section, two armored platoons of M48A5s, and a Mechanized Infantry Platoon in M113s. I've sent units to respond to this attack, but for some reason I cannot locate the Soviets to fire back!
 My armored platoon is under attack by an invisible enemy.My armor platoon is soon wiped out--I've lost twelve tanks now to an enemy I cannot see.
Finally, an infantry platoon spots the enemy tanks at a range of one mile, and subsequently identify them as T-64s.
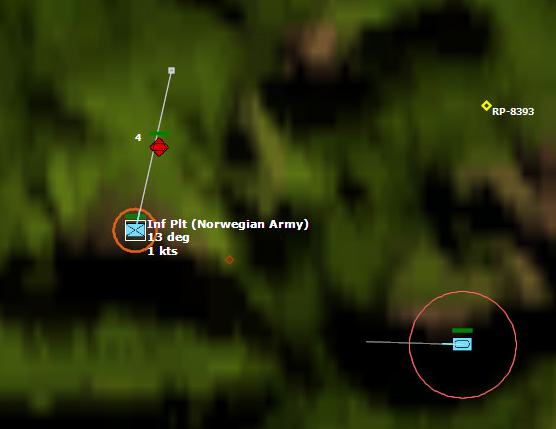 Finally I spot the enemyThe T-64s plow right over my Infantry Platoon. Having wiped out so many units, this enemy platoon has achieved a breakthough.
 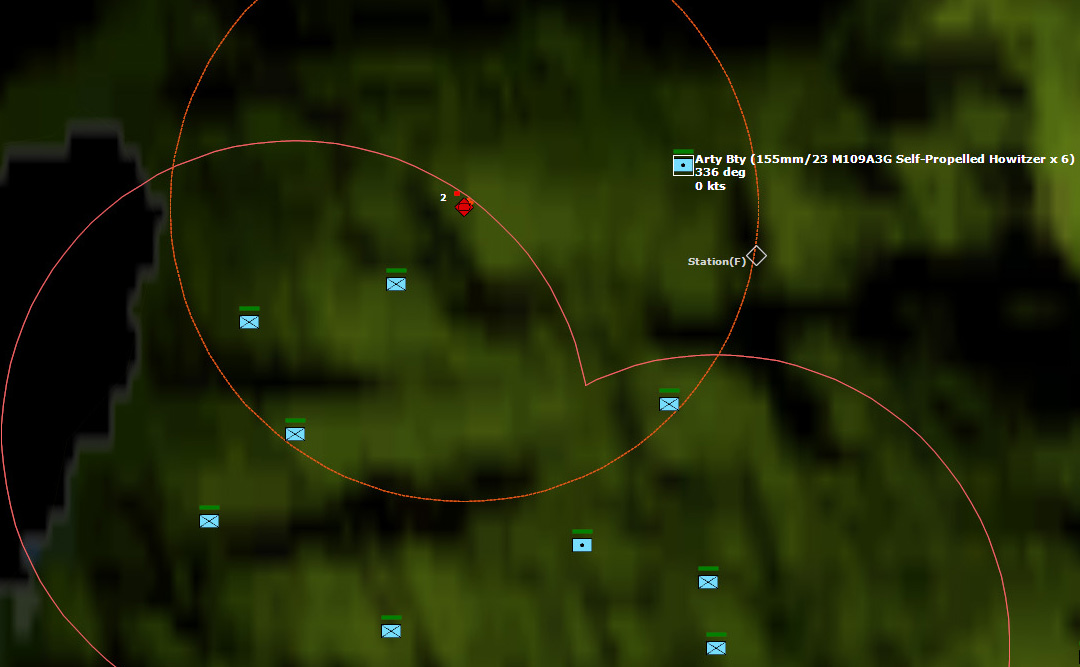 The Artillery battery damages the tanks.For a while, my 155mm Self-Propelled Artillery Battery has been firing on the tanks, mostly ineffectively, and the tanks completely ignore it, heading directly towards the NATO infantry. Finally, my battery scores a hit, and destroys two of the tanks, halving their firepower. The survivors continue towards the nearest infantry platoon, made up of Netherlands Marines, which fires a round from its Carl Gustav Recoilless Rifle, which promptly misses, but then another artillery barrage finishes off the platoon. My ground troops breathe a sigh of relief, as that was close. My line is ragged and not much is left. I reform them into a new line of defense closer to the Command Brigade.
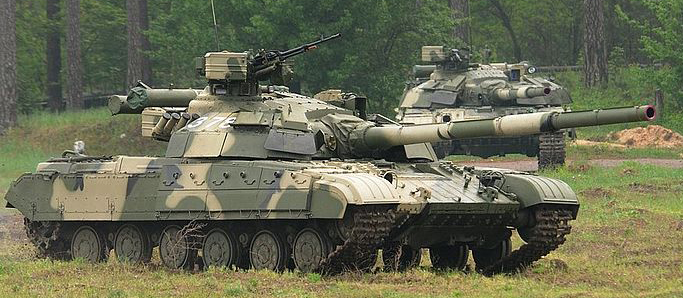 T-64s120639Z Meanwhile to the north, my anti-surface strike is well underway, and my A-7s drop their Walleyes on the Kresta I and Kresta II cruisers. I also have a pair of A-7s armed with Shrikes waiting in the wings in case the Krestas decide to light off their radars.
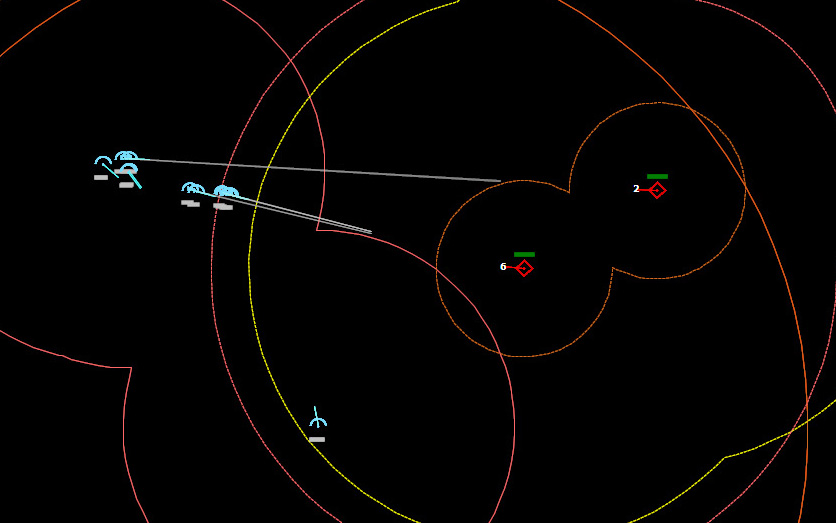 Walleyes away!Six Walleyes are targeted on the Kresta II, the Admiral Nakhimov, and two are targeted on the Kresta I, the Vice Admiral Drozd. The bombs close in without the ships taking any action to defend themselves. The first Walleye impacts Admiral Nakhimov and sinks it.
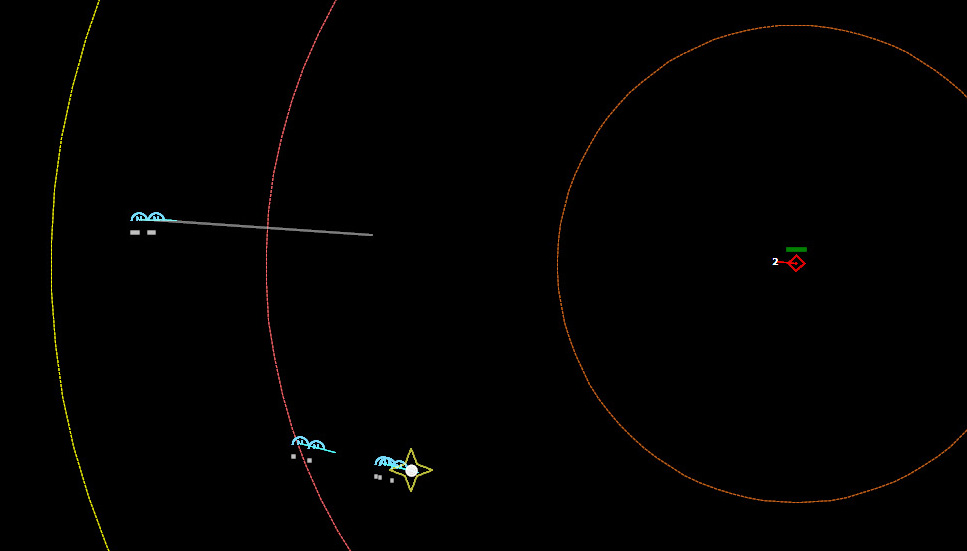 Admiral Nakhimov is hitThen the Vice Admiral Drozd wakes up and launches SAMs at the Walleyes, and my A-7s immediately respond, launching their Shrikes.
 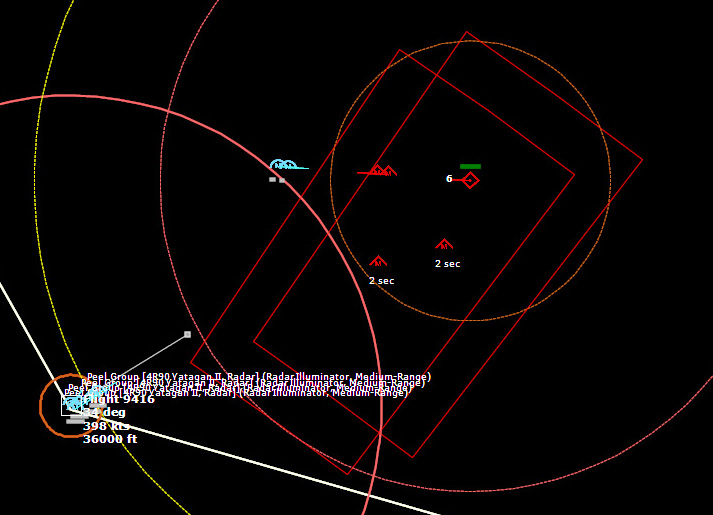 Vice Admiral Drozd wakes up and tries to defend itself.They needn't have bothered. The Drozd's SAMs miss the Walleyes, and the first one impacts and annihilates the ship.
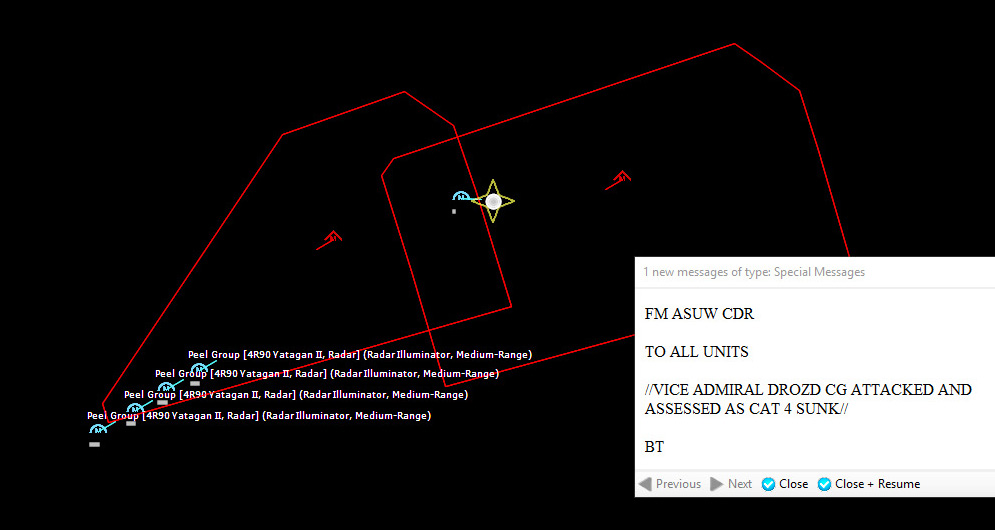 Vice Admiral Drozd is hit.To the north, my Vigilante identifies the second Soviet surface group, which consists of two BPK Kanins, the Derzky and the Zhguchy, along with a RKR Kynda, the Grozny. Currently all of my strike aircraft are readying, so a strike on this group will not be able to happen for a few hours.
 121847Z One of my Norwegian infantry platoons detects a Soviet armor formation. If this is similar to the previous one, this could hurt my forces badly...but this time, I have Harriers nearby. I immediately order them to attack.
 A new armor platoon is sighted, but this time I have air support.122101Z Just over two minutes after the CAS is called in, a Harrier drops its bombs.
 Bombs away!Direct hit. The cluster bombs hit the target and annihilate the tank platoon. After what the last Soviet tank platoon did to my forces, that was satisfying.
More of my Harriers are ready at Evenes, so I launch of pair of Harriers armed with Mk13 1000lb bombs and send them to bomb Bardufoss. The strike does little damage, so I follow it up with a pair of Jaguars from Bodo. The Jaguars can't hit the broadside of a barn (or runway...) so I'm going to have to follow up with more strikes.
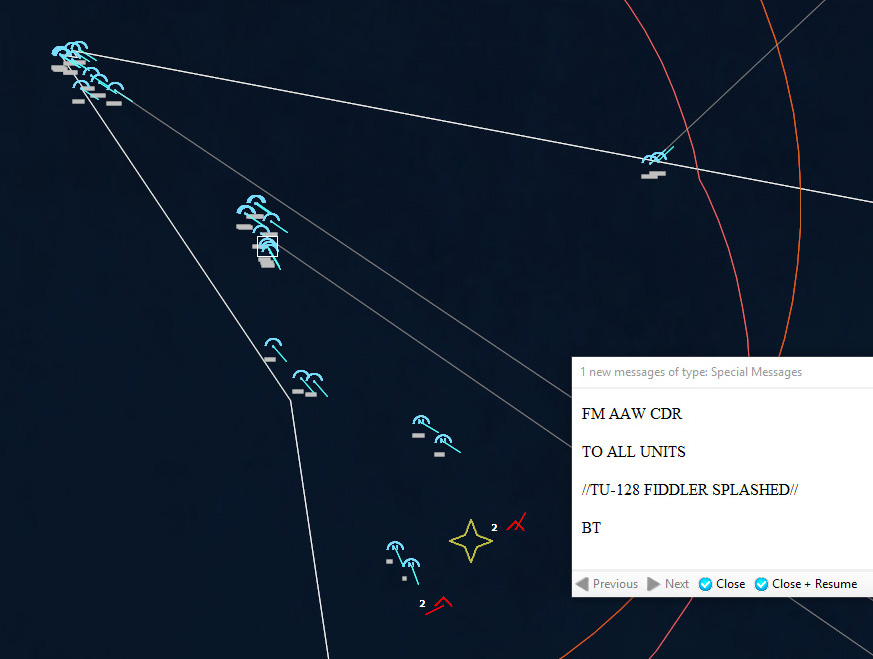
I have a pair of F-4s on patrol between Banak and Bardufoss, and they pick up several fighters and launch a BVR attack.
 My F-4s launch Sparrows at the Soviet fightersI wonder, are they MiG-21s evacuating Bardufoss? I shoot down two quickly, and confirm that they are MiG-21s. I launch Sparrows at the second pair, and promptly destroy them. Shotgun and close to Bingo, the F-4s head home.
155621Z Several hours of routine operations pass, in which my fighters have shot down number Su-15 Flagons, MiG-21 Fishbeds, a Tu-95 Bear Tanker aircraft, and my Harriers and Jaguars have done some CAS to help out the ground forces, killing some tanks. Some of my strike aircraft are have rearmed so I send them against the second Soviet surface fleet, and also send some more bombers to attack Bardufoss. My Walleyes target and destroy the DDG Derzky without any problems. It's as if the Soviet surface vessels are sitting ducks. A few minutes later I sink a Charlie I SSGN.
173132Z A pair of A-6s armed with HYDRA 70mm Rockets, Mk77 Incendiary Bombs, and Mk81 250lb LDGP bombs attacks the Grozny and the Zhguchy. The 70mm rockets take out the Grozny.
 The A-6s attack the Soviet surface groupJust after the A-6s drop their Incendiary bombs on the Zhguchy, the Soviet destroyer fights back, shooting its 57mm gun and launching a SAM.
 The A-6s come under fire.Both A-6s are shot down, but they damage the Zhguchy with a single bomb hit. A followup strike several hours later finishes off the Zhguchy.
 200000Z By this time, I'm striking Bardufoss with impunity. I never quite managed to put the runways out of commission, but seeing as I destroyed 24 MiG-21s operating out of Bardufoss, I'm guessing they might just be out of aircraft...so I'll call that a win. No more Tu-95 Bear Recons have been launched for hours, so I might have wiped those out too. They keep sending up Tu-95 tanker aircraft, and every time they do, I shoot them down. My planes are in range of Banak, and I've launched several strikes on it already, but they have been of limited effectiveness because my strike aircraft keep dropping their bombs from high level (which is my own fault for not paying enough attention and sending them in low). There has been no sign of the feared Tu-22M strikes on my carriers, probably because the Soviets never localized my position. I think I can chalk this one up as a victory.
 The CVBGs enter their patrol areas.Triumph
Score: 2200
SIDE: Soviet Union
===========================================================
LOSSES:
-------------------------------
4x Tu-95RT Bear D
1x PL-611 Zulu IV
4x Tu-95MR Bear E
1x Ka-25Ts Hormone B
24x MiG-21SM Fishbed J
3x Vehicle (Straight Flush [1S91])
10x SA-6a Gainful [2P25] TEL
4x 85mm M1939
1x Vehicle (Fire Can [SON-9])
1x AvGas (400k Liter Underground Tank)
16x T-55 Main Battle Tank
13x MiG-23BN Flogger H
26x Su-15MF Flagon D
18x BMP-1 [AT-3 Sagger B] IFV
12x 152mm/34 2S3 M1973 Akatsiya
1x PLA-627A November [Kit]
4x 57mm ZSU-57-2
2x SA-9b Gaskin [BRDM-2] TEL 2
16x T-64 Main Battle Tank
1x BPK Kresta II [Pr.1134A Berkut A]
1x RKR Kresta I [Pr.1134 Berkut]
3x Tu-16Z Badger A
2x BPK Kanin [Pr.57A Gnevny]
1x PLARK-670 Charlie I [Skat]
1x RKR Kynda [Pr.58]
EXPENDITURES:
------------------
27x Generic Chaff Salvo [4x Cartridges]
40x SA-6a Gainful [9M336]
4x FROG-7b [9M21]
21x SA-9b Gaskin [9M31M]
200x 57mm ZSU-57 HE
3x AA-2b Atoll [R-3R]
2x Generic Flare Salvo [4x Cartridges, Single Spectral]
44x 85mm M1939
20x BetAB-500SP CB [12 x Anti-Runway Penetrator Bomblets]
19x 23mm Gsh-23L Burst [40 rnds]
3x AA-3 Anab C [R-98R, SARH]
1x AA-3 Anab D [R-98T, IR]
99x 73mm 2A28 Grom HE
2x AT-3 Sagger B [9M14M Malyutka]
2x 7.62mm MG Burst [20 rnds]
24x FAB-250M-54 GPB
10x Generic Acoustic Decoy
16x FAB-100M-62 GPB
10x AA-3 Advanced Anab E [R-98MR, SARH]
2x AA-3 Advanced Anab F [R-98MT, IR]
512x S-5K 57mm Rocket
8x RBK-250-PTAB CB [30 x PTAB-2.5 Anti-Tank Bomblets]
11x SA-N-1b Goa [M-1M/P Volna-M/P, 4K91 / V-601]
2x SA-N-3a Goblet [4K60]
2x 23mm AM-23 x 2 Burst [50 rnds]
48x 125mm APFSDS-T
88x 125mm HE
57x 12.7mm/50 MG Burst [10 rnds]
24x 125mm HEAT
2x AA-2a Atoll [R-3S]
18x 57mm/81 ZIF-75 Quad DP Burst [6 rnds]
14x AK-230 30mm/65 Twin Burst [50 rnds]
SIDE: NATO
===========================================================
LOSSES:
-------------------------------
1x Harrier Gr.1
1x Jaguar GR.1
1x A-7E Corsair II
2x F-14A Tomcat
8x NM135 APC [M113A1]
8x 12.7mm/50 Quad M55
2x A-7B Corsair II
12x M-48A5 Main Battle Tank
5x 7.62mm MG/Unguided Infantry Anti Tank Weapon
2x A-6C Intruder
1x AvGas (400k Liter Underground Tank)
1x A-6E Intruder
EXPENDITURES:
------------------
227x AN/SSQ-47 Julie Active Range-Only
108x AN/SSQ-50B CASS
371x AN/SSQ-41B Jezebel LOFAR
49x AIM-7F Sparrow III
54x AIM-54A Phoenix
10x Mk46 LWT Mod 2
1x B57 Multipurpose Sub Bomb [20kT Nuclear]
32x AIM-7E4 Sparrow III
9x AIM-9H Sidewinder
80x Mk83 1000lb LDGP
60x Mk84 2000lb LDGP
16x AGM-45B Shrike [ARM]
22x BL.755 No.1 CB [147 x GP Anti-Armor Bomblets]
46x Mk13 1000lb GPB
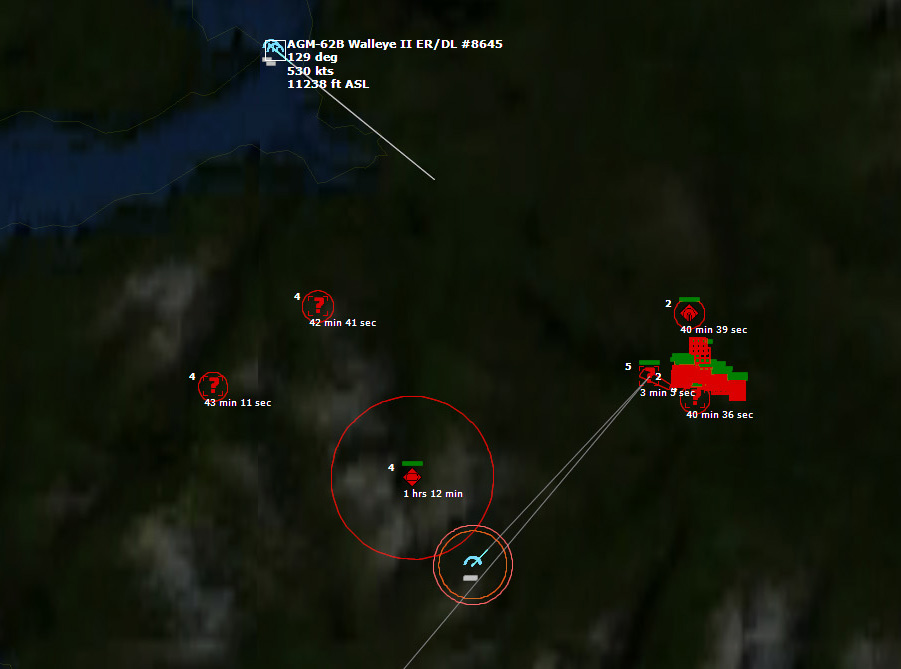
28x AGM-62B Walleye II ER/DL
62x 127mm/54 HE-CVT [HiFrag]
10x 127mm/54 HE-PD [HiCap]
4x 127mm/54 WP
21x Rapier Mk1
44x 40mm/60 Single Bofors Burst [2 rnds]
76x 12.7mm/50 M2 MG Burst
119x 20mm/80 Rhinemetall Mk20 Rh202 Burst [20 rnds]
4x Blowpipe
2x 20mm/85 M61A1 Vulcan Burst [100 rnds]
20x CBU-78/B GATOR [45 x BLU-91/B Bomblets + 15 x BLU-92/B Mines]
9x Generic Chaff Salvo [5x Cartridges]
124x 105mm L7A3 APFSDS-T
124x 105mm L7A3 HE
120x 105mm L7A3 HEAT
86x 155mm/23 HE
200x 12.7mm/50 Quad M55 Burst [20 rnds]
5x Generic Flare Salvo [3x Cartridges, Single Spectral]
16x CBU-59/B APAM [717 x BLU-77/B Dual-Purpose Bomblets]
8x Mk20 Rockeye II CB [247 x Mk118 Dual Purpose Bomblets]
18x Generic Unguided Anti Tank Weapon
1x Carl Gustav recoilless rifle (84mm)
5x AGM-78D Standard [ARM]
15x 7.62mm MG Burst [20 rnds]
152x HYDRA 70mm Rocket
4x Mk77 Incendiary Bomb
1x Generic Chaff Salvo [8x Cartridges]
12x Mk82 500lb Snakeeye
SIDE: Biological
===========================================================
LOSSES:
-------------------------------
EXPENDITURES:
------------------
SIDE: Cuba
===========================================================
LOSSES:
-------------------------------
1x Commercial Supply Vessel [6,000t DWT]
EXPENDITURES:
------------------
August 2, 2017
COMMAND: Northern Inferno Scenario 11: Fire and Brimstone Part 2
In Part One of this scenario, The USS John F. Kennedy and the USS Saratoga CVBGs advanced on northern Norway, their mission to destroy Soviet forces in the vicinity of Bardufoss and Banak, supporting the hard pressed NATO ground forces attempting to keep the Soviets from taking Narvik. I wiped out a bunch of MiG-21s which foolishly came out to fight, and took out multiple Tu-95 Bear aircraft searching for me, and I think that so far the exact location of my CVBGs remains unknown.
I managed a strike upon Bardufoss, causing limited damage, and I sank a Soviet submarine that got too close for comfort. I need to keep up the pressure and prevent the Soviets from locating my CVBGs, because if I'm found, then they'll send in the Backfires and Badgers against me, and that's something I want to try very hard to avoid.
A merchant ship was discovered a while ago near the John F. Kennedy CVBG, and USS California now identifies it as the Castro, an unfriendly Commercial Supply Vessel. If it was friendly or neutral I would have left it alone, but not if it was unfriendly.
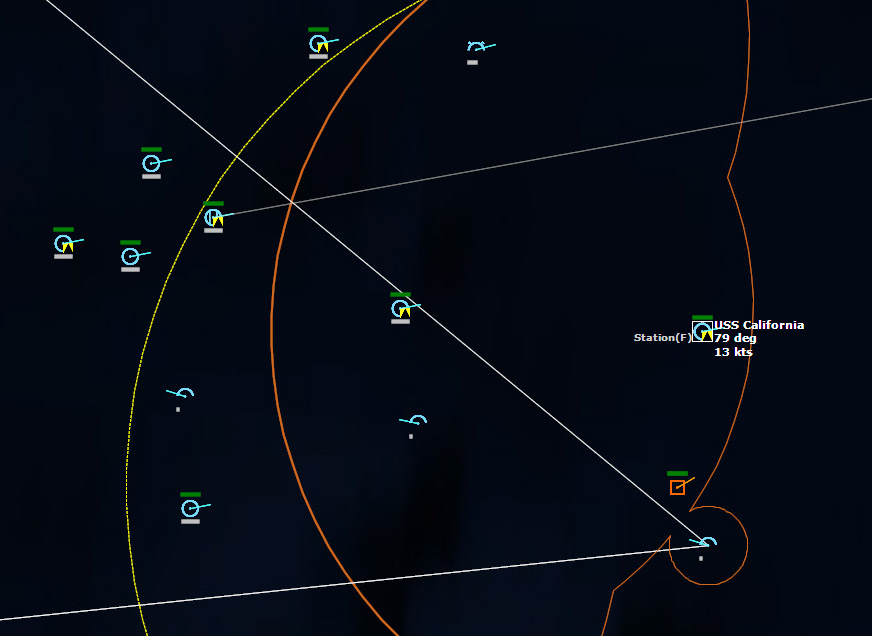 The Castro is wandering in the wrong neighborhoodCastro is declared hostile and California opens up with its 5" guns.
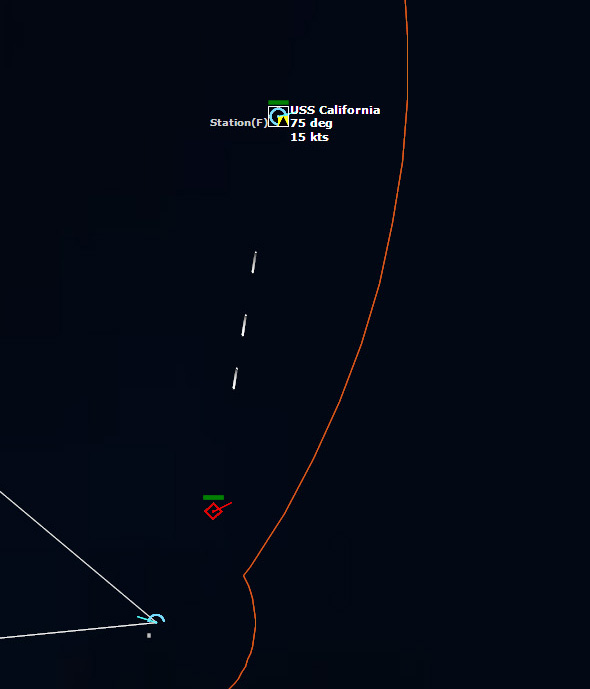 California opens fireIt takes approximately a hundred shells, but the Castro, burning and flooding, eventually sinks.
082535Z Soviet attack aircraft are detected over the 15th Infantry Brigade.
 Soviet raid inboundThe aircraft are soon identified as MiG-23BN Flogger Hs, and they head for Evenes. The air defenses include a Rapier SAM Platoon and some 40mm Bofors AA guns. I lose contact with the bogeys momentarily, but then the Floggers pops up within SAM range, and the Rapier Platoon opens fire.
 SAMs fire on the MiG-23sOne Flogger is shot down. The other continues its attack run, and drops bombs, damaging a Runway Access Point. Multiple SAMs go after it but miss. A second pair of Floggers appear, and the Rapier has its hands full launching SAMs. Both Floggers drop their anti-runway bomblets, starting a small fire and causing some light damage to the Runway Access Point and a Taxiway.
090000Z More aircraft are now ready on Saratoga, so I prepare and launch another strike on Bardufoss. To scout out targets at Bardufoss targets, I launch my Recon Harrier from Evenes.
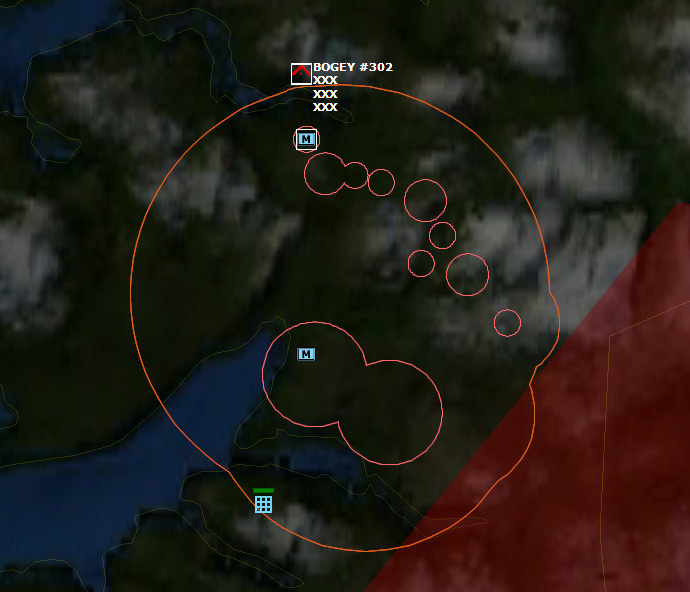
091149Z The Harrier locates an armor platoon, but also spots multiple aircraft. They are likely too far away to be of assistance, but I divert some of my CAP to investigate.
 My Harrier spots multiple aircraft north of BardufossTheir radar emissions make me think they are more MiG-21s.
091346Z My suspicions are confirmed. My Harrier identifies one of the aircraft as a Fishbed, and goes low to evade. I send it back towards friendly lines in the hopes of keeping it alive. Four Fishbeds are in pursuit. My Harrier increases speed to full military power in the hopes of outrunning them.
Now there are six Fishbeds in pursuit.
 My Recon Harrier is in deep trouble.I now detect eight Fishbeds in pursuit. The MiGs fire streams of bullets at the Harrier, but so far cannot hit it. I find that if I keep my Harrier jinking, the MiGs cannot keep up with the turns, but if I fly straight, the MiGs close the distance quickly. After lots of low-level maneuvering through the Norwegian mountains, my Harrier succeeds in making it over friendly airspace. (this would have looked awesome in a movie...my Harrier was literally flying circles around the pursuing MiGs, at 500+ kts, 300ft AGL, in the mountains...) The MiGs choose not to follow, instead loitering some ten miles north of the 15th Infantry Brigade.
092712Z The MiGs get impatient, however, and soon they chase the Harrier directly over the NATO ground forces, which open up with ground fire.
 The MiGs fly over the NATO ground forcesThe Harrier lures them over the 42 Commando Blowpipe sections, and one of the MiGs is shot down.
As my Harrier duels with the MiGs, Su-15 Flagons approach the area, and, hopefully unnoticed, a pair of A-7Es show up on the scene, ready to search for more Soviet ground units.
 The A-7s begin their attack runThe A-7s make several passes over the area, but have difficulty spotting the tanks. The MiGs in the area abandon my Harrier and go for the A-7s, shooting one down. The second A-7 abandons his ground attack and shoots down a MiG with a Sidewinder. He drops his bombs ineffectively, and then heads for home.
A pair of A-6s make their run on Bardufoss. They drop their 2000lb bombs on an Ammo bunker, doing light damage. Some of my F-14s arrive on the scene and start firing missiles at the Su-15s, which decide to leave the area. One of the Flagons is shot down by a Phoenix. My second pair of A-7s arrive on the scene and completely miss with their cluster bombs.
My F-14s, nearing the limits of their fuel detect some MiG-23s leaving Banak, and launch barrages of Phoenixes at them, shooting down four. An Su-15 Flagon is shot down as well.
My last pair of strike aircraft, A-7s, drop their Walleyes at Bardufoss, causing more negligible damage. Instead of attacking Ammo Bunkers, I need to focus on runways from now on.
To the north, the air battle continues. Many of my F-14s are RTB Bingo, but a few are still in the fight, picking off Soviet planes.
 F-14s bring the fight to the enemy.Another Flagon is shot down. One of my F-14s is shot down by a Flagon--an embarrassment. I shoot down another Flagon and dodge a few SAMs from Banak before my F-14s, all low on fuel, have to head home.
I launch another strike against Bardufoss, and as my aircraft takeoff and form up, I get reports that Soviet ground forces have engaged the NATO ground forces.
 The Soviet ground attack has begunMy platoon of M48 tanks annihilates a BMP-1, and a platoon of M113s take out another BMP-1, and then things are happening almost too fast to follow. It is clear a furious land battle rages.
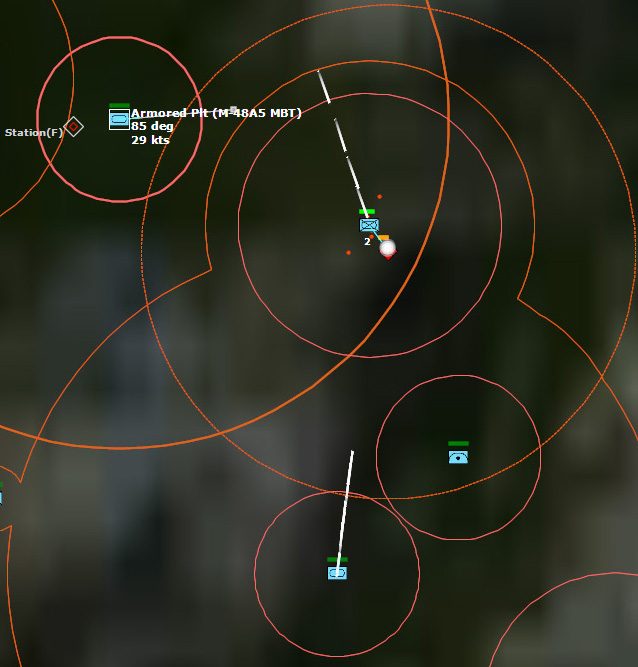 The land battle rages as my tanks engage Soviet Motorized Infantry.Relatively quickly I eliminate the Soviet attack, and turn my attention to the skies again. My strikes are airborne, as are relief for my CAP. The Soviets have two Tu-95s airborne, however, and I need to eliminate them before they can detect my CVBGs.
 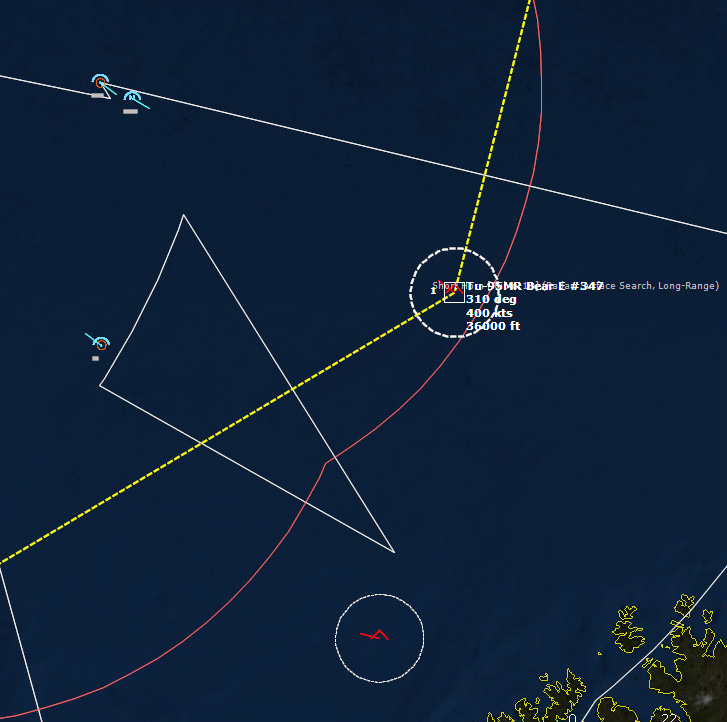 The F-14s engage the Bears.The Bears are both shot down, getting nowhere near my CVBGs.
North of Narvik, the ground battle still rages. Fortunately, Soviet units seem to be arriving piecemeal, allowing my ground forces to pound them.
 Soviet armored units arrive.The tanks are destroyed easily enough, but Soviet aircraft appear over the area. They turn out to be MiG-23s, circling the area but not dropping any bombs. I suspect they can't find any targets. My units shoot some AA fire, and a lucky shot downs one of them. Soon after, the MiG-23s bomb an 12.7mm AAA section, destroying it.
111107Z My strike on Bardufoss begins their attack runs, focusing solely on the runways, and led by a pair of A-7s with Mk84 2000lb bombs.
 Targeting the runwaysSoon after, some F-14s get in range of the MiG-23s that have been harassing my ground troops. The MiGs fly very low, and as such they frequently are masked by the terrain, causing the F-14's Sparrows to lose track and miss. Finally, one tracks and hits, but not before the crew of an M48 Patton shoots another down with its .50-cal machine gun.
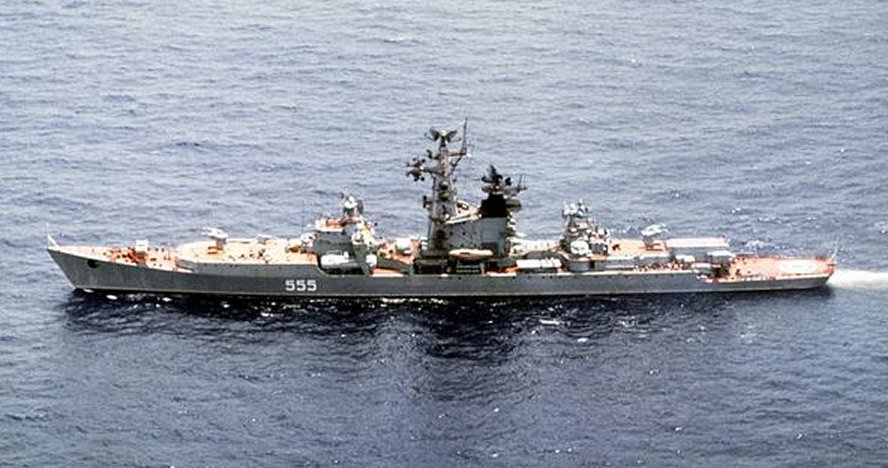 Kresta II A while back I sent a RA-5C Vigilante on a recon mission to identify the surface contacts, and it IDs one as a Kresta I CG, the Vice Admiral Drozd. The second vessel is another CG, and my Vigilante is soon Engaged Defensive as the two Soviet vessels launch SAMs. The second vessel is a Kresta II. The Vigilante dodges the SAMs and quickly maneuvers out of range. I immediately plan a strike against the two vessels.
 To the east my Vigilante identifies the Soviet shipsMy F-14s close in to the latest pair of Tu-95 Bears launched for recon, and attacks them down just off the Norwegian coast. There are many Su-15 Flagons in the area, but none are close enough to stop the F-14s.
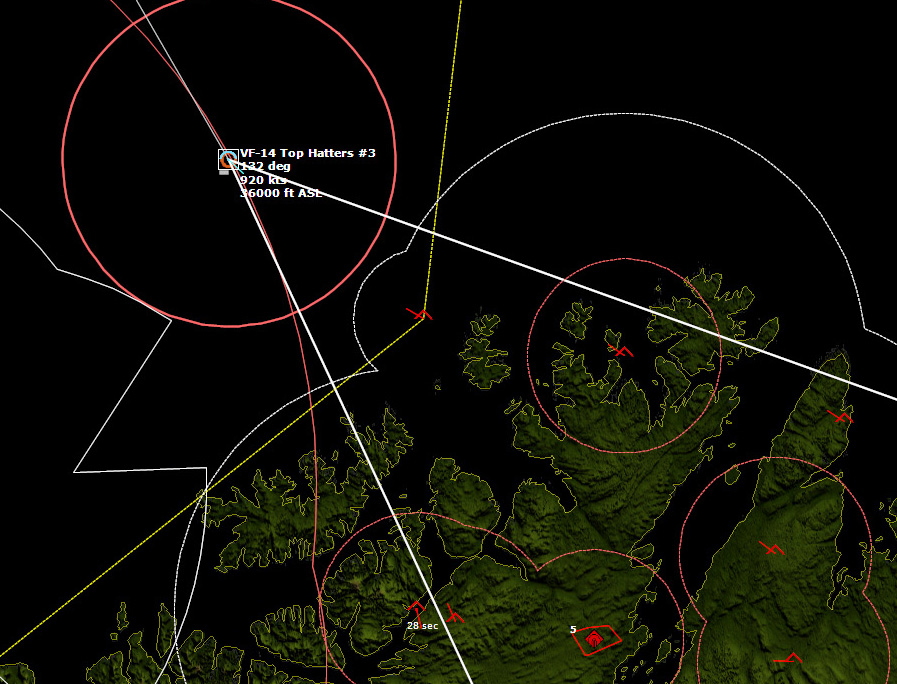 The Tu-95 is flying seaward with no protection; all of the Soviet fighters as well behind itMy lead Tomcat shoots down one with a Phoenix, misses the second with its Sparrows, and then closes in, and passing the Bear at close range it gets shot down by a very lucky shot by the Bear. Eventually the second Bear is shot down, and another Soviet recon element is wiped out.
While searching for targets near Bardufoss, my A-7s stumble upon a SA-9b Gaskin platoon, and two of the A-7s are shot down. The second pair of A-7s promptly drop their cluster bombs on the platoon, destroying it.
North of Narvik, my ground forces come under attack again, and I lose a Mechanized Infantry platoon to Soviet tanks. My armored platoons respond, but so far I cannot locate the attacking forces...
To be continued...
August 1, 2017
COMMAND: Northern Inferno Scenario 11: Fire and Brimstone Part 1
 Introduction
The Buccaneers of the Ark Royal CVBG successfully attacked Soviet airfields with WE.177 nuclear bombs - but the carrier group did not survive the operation. Cornered off Bear Island between multiple Soviet submarines and subjected to a barrage of nuclear-tipped torpedoes and cruise missiles, the Ark Royal group has been eliminated.
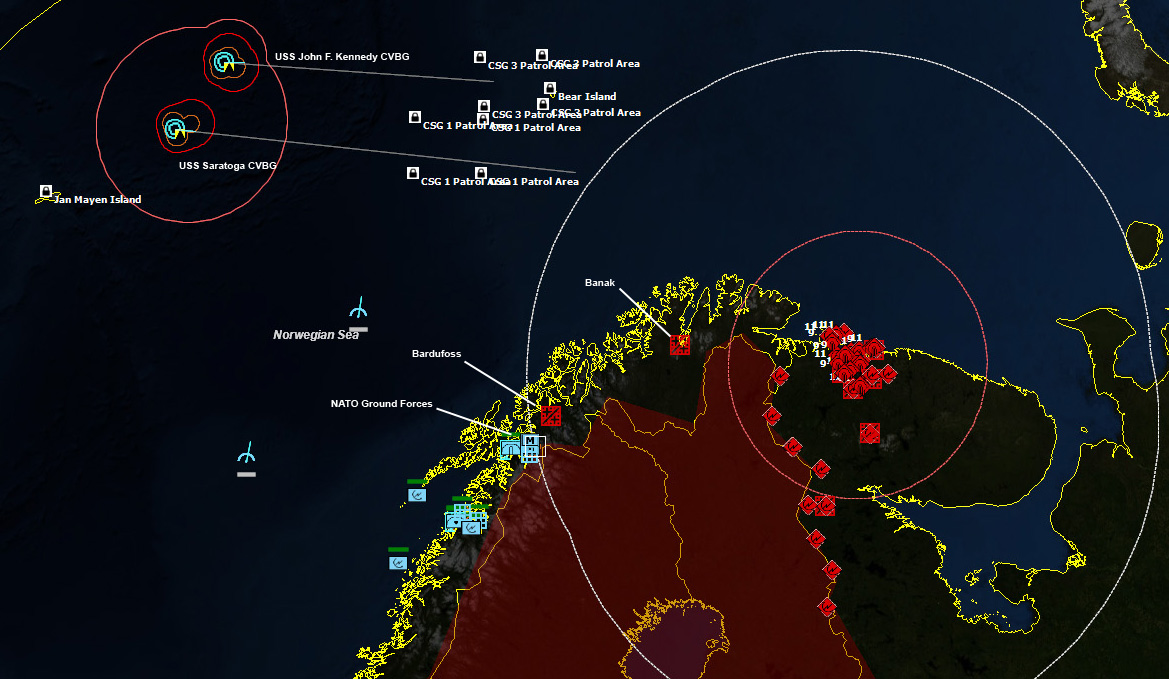
Now on station to the north-east of Jan Mayen Island are the Saratoga and John F. Kennedy carrier groups. Their primary role now is to support NATO land forces to stem and turn back the Soviet units present in the north of Narvik.
Two airfields are now in Soviet hands, Banak and Bardufoss, providing critical air support to their land operations.
Norwegian Army units have engaged in fierce delaying actions to slow down every step of the invaders' advance. The defending Norwegian brigades have been decimated by continuous Soviet attacks, and the only remaining viable formation is the hollowed-out 15th Infantry Brigade supported by USMC, Royal Marine and Dutch Marine units.
This polyglot tactical group and the remains of a few tank units with M48 tanks and M113 APCs are holding the line 20 miles from Narvik; but they are short on men, equipment and supplies. The next big Soviet push may well dislodge them out of the area altogether. To prevent collapse of the front, the Saratoga and John F. Kennedy CVBG's have been tasked to support these units.
The two carrier groups, tied down to a finite area by necessity (to support the ground troops) instead of roaming free in the open sea, could hardly go unnoticed by Soviet surveillance. Numerous Tu-16 Badger and Tu-22M Backfire bomber squadrons have been redeployed from the quiet Southern Front to nearby airfields. These fresh and unhurt units, trained and equipped for the task of destroying NATO carrier groups, will now attempt to do just that.
Can the carrier groups protect themselves while also holding the line in Norway?
Situation
At present the 15th Infantry Brigade and the remains of 3 Cdo Brigade are holding the line 20 miles from north of Narvik. With the few remaining tank units they are attempting to stop the Soviet horde from taking Narvik.
The Saratoga and John F. Kennedy CVBGs have been tasked to support the 15th Infantry Brigade by suppression of Soviet mech-infantry and armoured units in the surrounding area.
Bardufoss with MiG-23 Flogger and Banak with MiG-21 Fishbed aircraft are also in Soviet hands and will need to be neutralized.
Soviet naval and air units are also on high alert to stop the transit of both CVBGs to the area of operations.
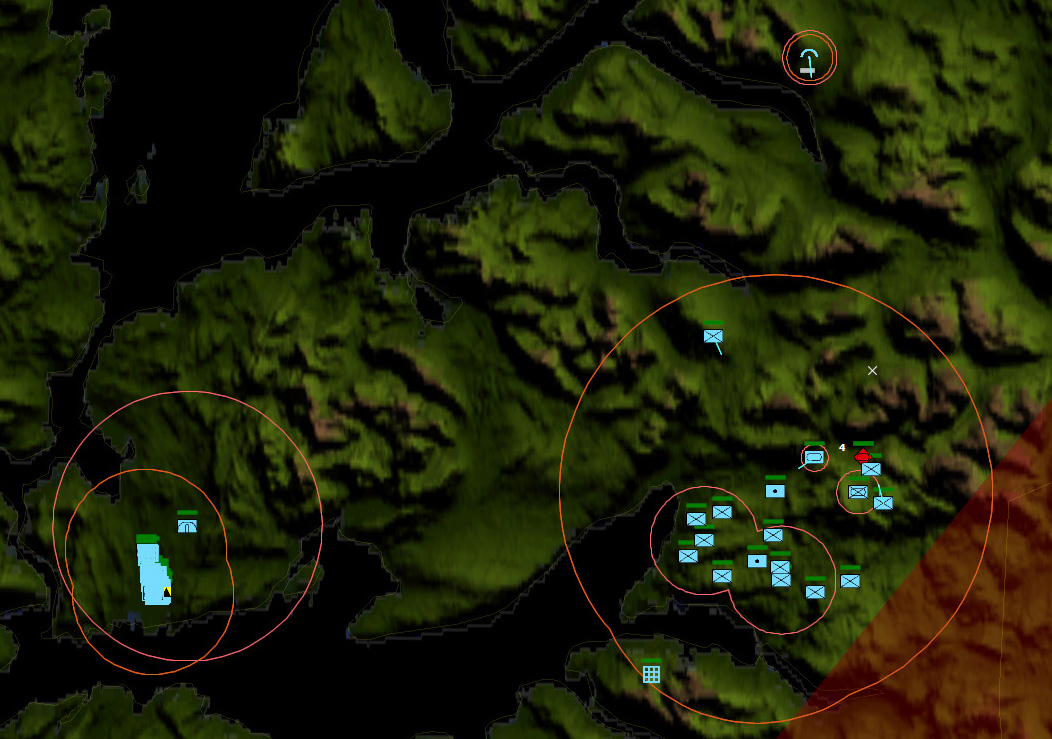
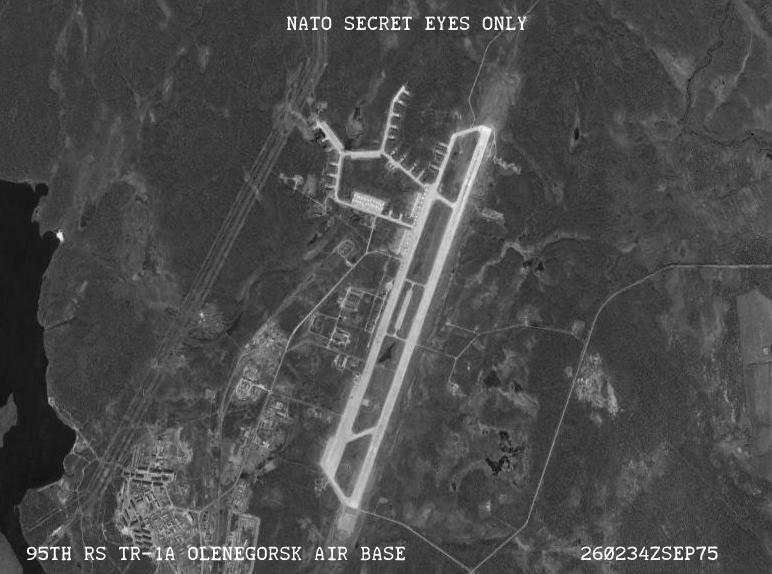
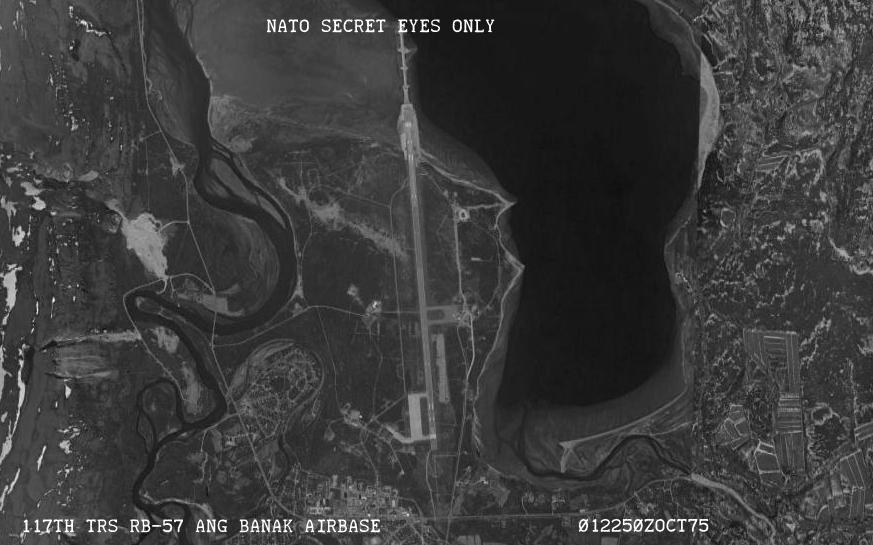 Recon imagery of Banak air baseEnemy Forces
Surface : Two surface groups remain undetected in the area around Spitsbergen.
Air : SNA and PVO units known to be on high alert, they are as follows:Tu-16Z Badger A Tanker Tu-16P Badger H Chaff Layer Tu-16P Badger J Jammer Tu-95MR Bear E Photo Recon Tu-95RT Bear D MRR Tu-22M Backfire B Strike Tu-16K-10-26P Badger C Mod Strike MiG-23BN Flogger H Attack MiG-21SM Fishbed J Fighter Subsurface : SSN, SSGN and SSK remain unlocalized in your area.
Ground Forces : 37th Motorised Rifle Division, with supporting armour and artillery.
SAM-AAA : SA-6, SA-9 and AAA systems reported around Bardufoss and Banak airfields, Red Army units with AAA and SA-7 SAMs.
Friendly Forces
Carrier Strike Group One : USS Saratoga CV, USS Albany CG, USS Richmond K. Turner CG, USS Sampson DDG, USS Lawrence DDG, USS Morton DD,USS Garcia FFH, USS Truett FFH, USS Detroit AOE, USS San Diego AFS.
Carrier Strike Group Three : USS John F. Kennedy CV, USS California CGN, USS Wainwright CG, USS Mitscher DDG, USS Brumby FFH, USS Francis Hammond FFH, USS Neosho AO, USS Mount Baker AE.
RAF Mildenhall
55th SRW (RC-135 Rivet Joint) 117th TRS-ANG (RB-57) Evenes
1 Sqn (GR.3 Harrier) Bodo
54 Sqn (GR.1 Jaguar) Mission
1. Conduct strikes against Bardufoss and Banak airfields.
2. Once located, engage and destroy the 37th Motorized Division and supporting units.
3. Locate and destroy Red Banner Fleet units in your area.
4. Detect and neutralize Soviet submarines in your area.
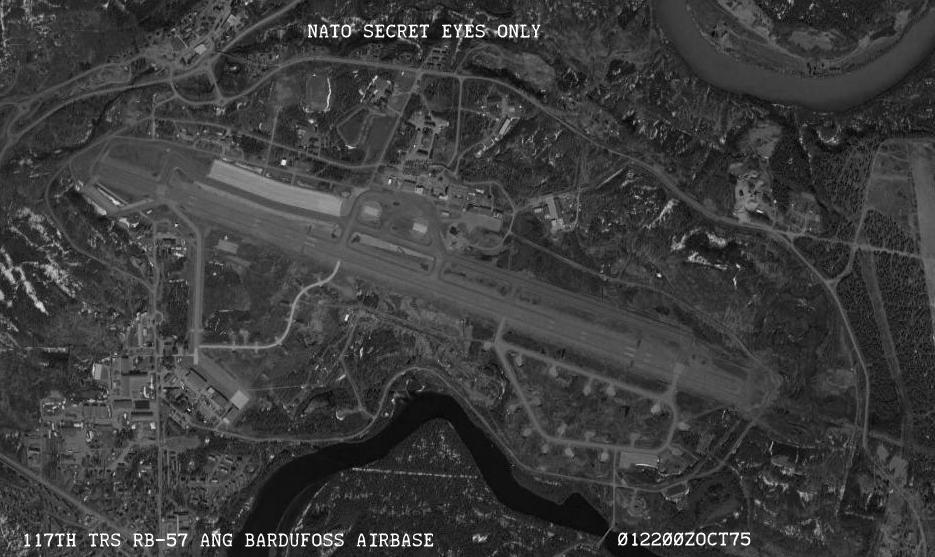 Recon imagery of Bardufoss air baseExecution
1. Saratoga and John F. Kennedy carrier groups to take up station as per patrol boxes.
2. Nuclear Release authorised on ASW and AAW weapons, NOT on strike weapons.
3. Conduct operations as per Mission Briefing.
4. Use Recon and ELINT assets at RAF Mildenhall to locate Soviet forces.
Command and EMCON
Command: USS Saratoga
EMCON: alpha-limited emissions.
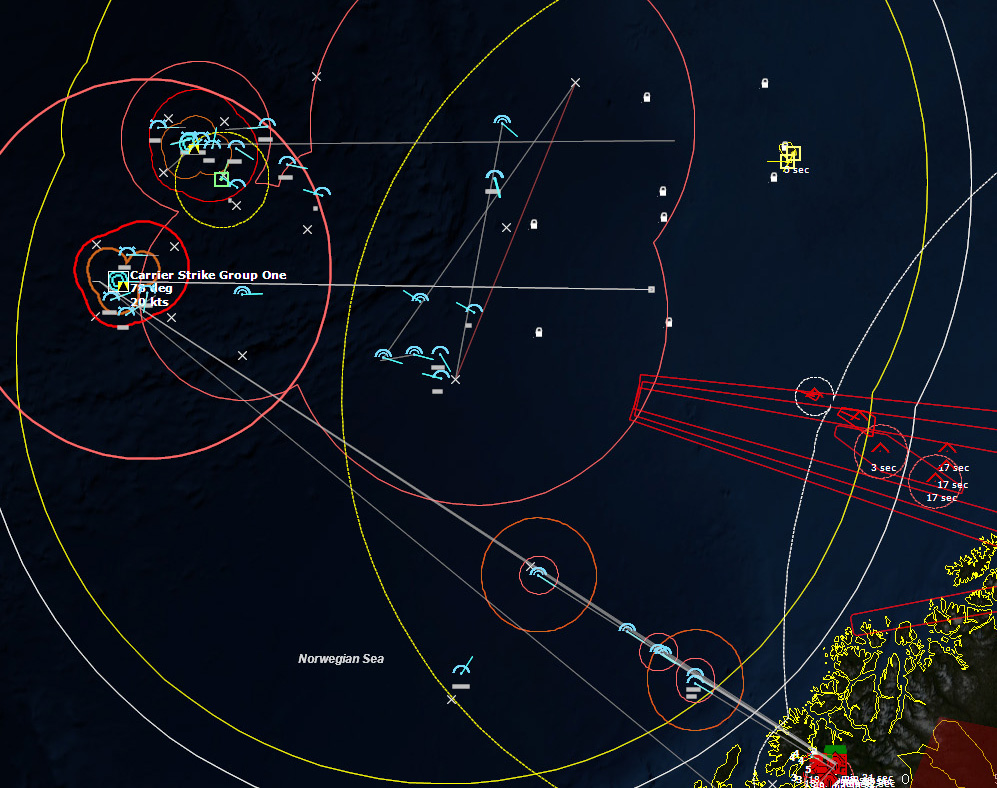
 Initial PositionsOctober 2, 1975, 0600Z
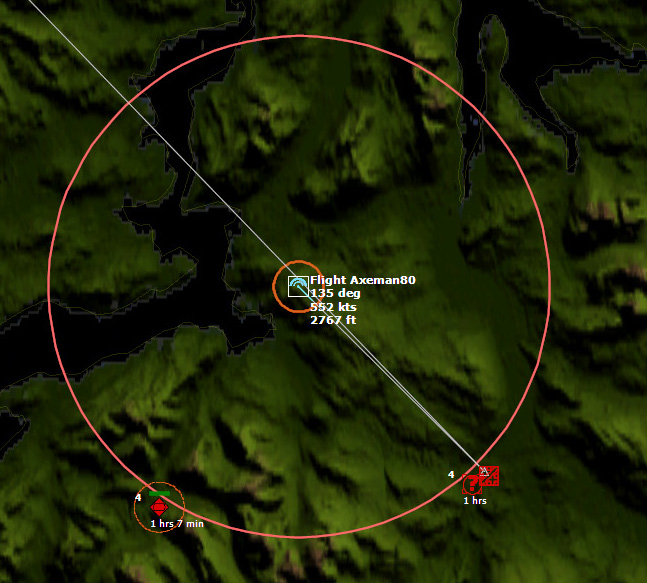
 This is a daunting mission. So daunting it's hard to know where to begin. I need to support NATO ground forces by locating and destroying the Soviet 37th Motorized Division. That's easy enough. But I also need to conduct strikes on Bardufoss and Banak airfields. Okay, more strikes is fine. But I also have to worry about Soviet submarines. That goes with the territory. Soviet subs are everywhere, all the time. But I also have to worry about two Soviet surface groups. Which undoubtedly I'll have to destroy if I find them. My attack aircraft are going to be working overtime, and to manage it all, so will I. But then, the icing on the cake are the "Numerous Tu-16 Badger and Tu-22M Backfire bomber squadrons have been redeployed...to nearby airfields." Groan. Normally, defending a CVBG against Backfires would be a scenario in itself, and surviving is a victory. But no, I have to not only survive, but kick butt all over Norway.
Fortunately I have two CVBGs to do it.
 USS John F. Kennedy and USS SaratogaAfter looking over my assets for a bit, I start to tackle things methodically. Force protection is always a primary concern, so I set up ASW patrols around my carriers and on their projected course. Next I set up AWACS support missions. After that comes some CAP aircraft--some F-14s from the JFK will handle that. I have 36 hours until the scenario completes, but there is no sense in waiting. I will launch an immediate strike against Bardufoss.
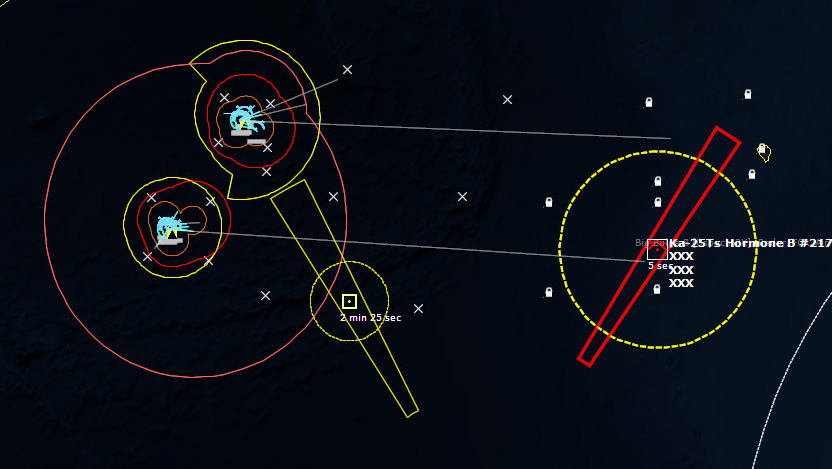
060019Z Before I even begin to plan out the strike, I detect a surface contact, and then shortly after an airborne contact, which turns out to be a Ka-25Ts Hormone B. Perhaps I will have to deal with the Soviet surface forces first.
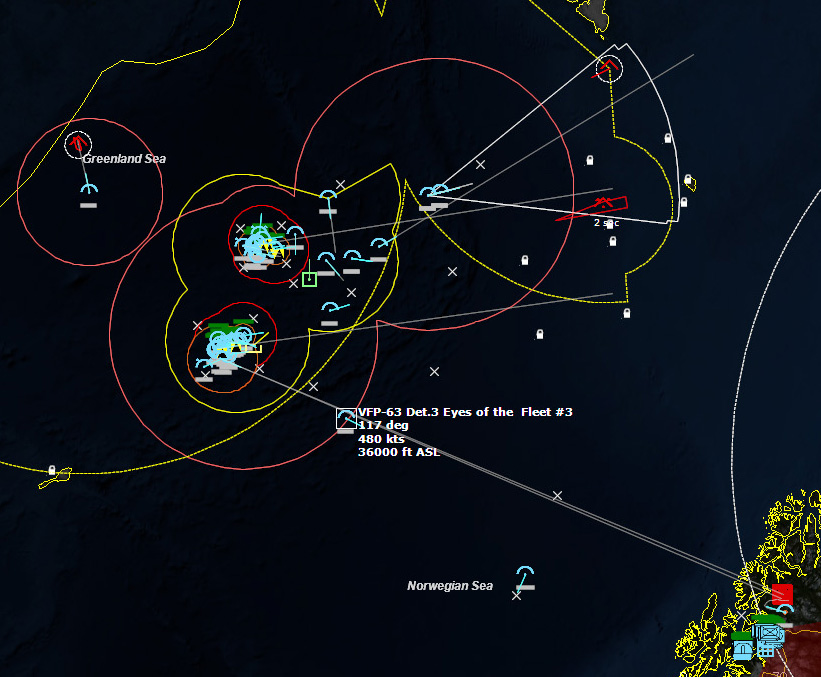
 Enemy contacts appear060453Z More contacts are appearing all over the place. Multiple airborne contacts are detected near Bardufoss, likely MiG-21s which are planning on striking the NATO ground forces. A Tu-95MR Bear E (Photo Recon) is detected south of Spitzbergen, while a Tu-95RT Bear D (Maritime Recon) is detected between the CVBGs and the Greenland coast. I'm going to need to send out some aircraft to take care of those snoopers. I launch a pair of F-4s from the Saratoga to go after them.
There are nine MiG-21s flying near Bardufoss. I launch a Recon F-8 Crusader from Saratoga to head near Bardufoss in the hopes of detecting their ground forces, and also a Harrier GR.1 from Evenes Air Base to do the same. As soon as I have detected the ground forces, I can launch strikes from Evenes and Bodo.
I lose contact with the MiG-21s, and it almost looked like they were heading northwest, towards my carriers. I launch some A-7Es with Shrikes to go for Bodo, and then USS Richmond K. Turner detects a subsurface contact, close to the Saratoga battle group. Things are getting busy very quickly.
 Things are getting busy...My Phantom tasked to take out the Tu-95RT Bear D closes in to missile range, lights off its radar, and shoots down the snooper.
063026Z My recon Harrier near Bardufoss picks up some enemy forces, but then is fired upon by SAMs.
 SAMs are launched at my HarrierFortunately the two SAMs miss, and the Harrier IDs it as an SA-6a Gainful Battalion.
Near the Saratoga battle group, one of my Sea Sprites drops on the subsurface contact, which turns out to be a Zulu IV submarine. At nearly the same time, my F-14s launch missiles against a Bear E and a Hormone.
The second torpedo kills the Zulu IV SSK.
 The Zulu IV is sunk.Literally less than a second later, 300nm away, the Bear E is shot down.
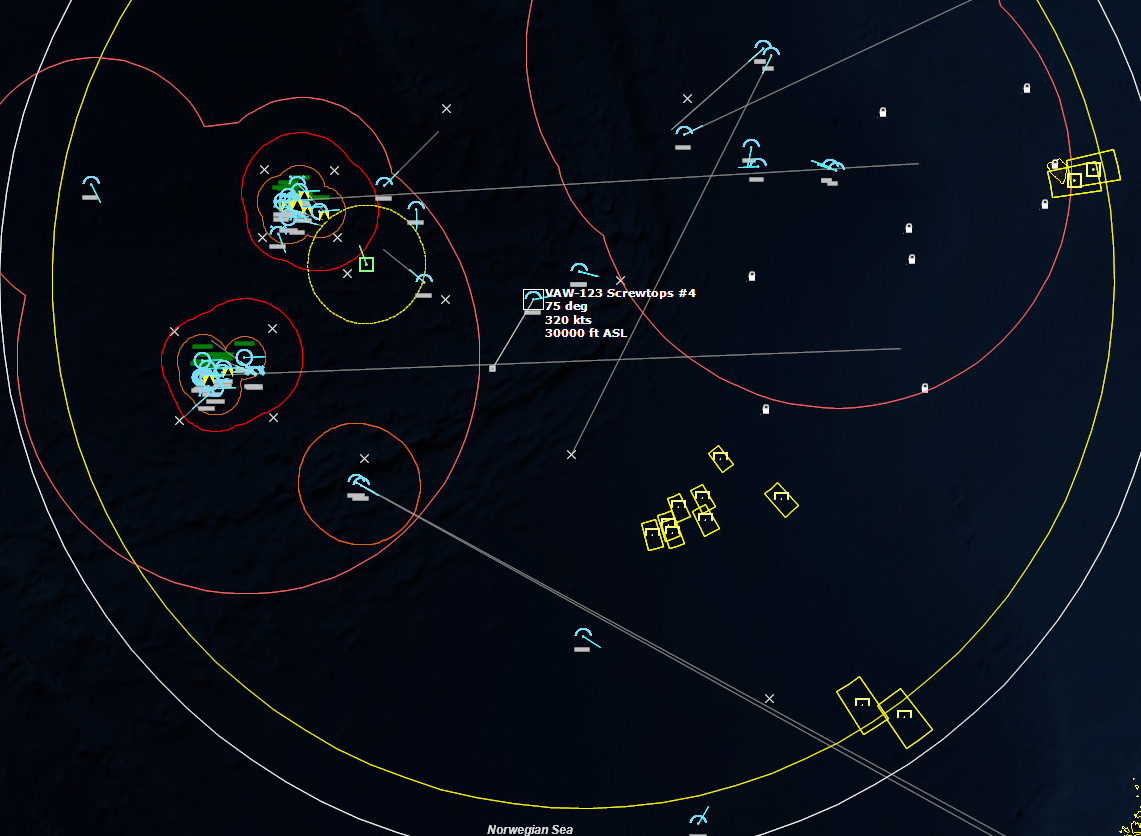
My E-2C Hawkeyes get on station, and I light off their radars. My earlier suspicions about the MiG-21s are correct, as I detect large amounts of aircraft to the southeast--apparently they're looking for the carriers. I also detect some surface units near Bear Island.
 Contact!I detect three Vampires headed towards my ground forces.
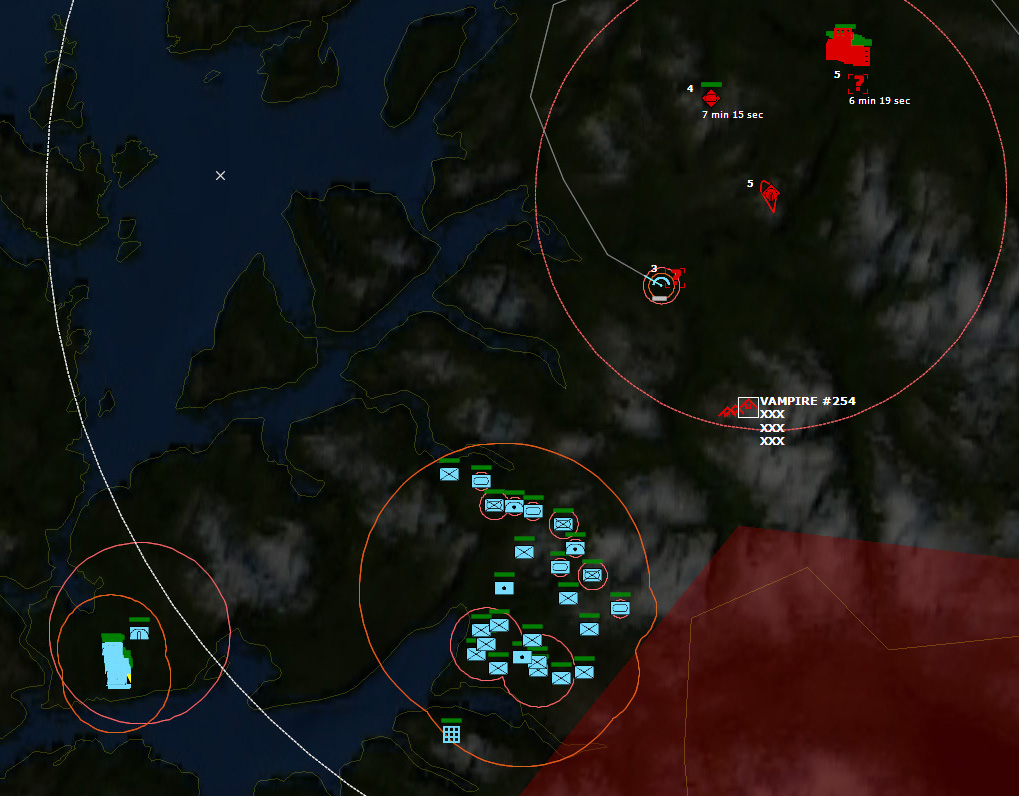 Vampires inboundI lose contact with the vampires, but then I detect them again heading towards Evenes Airbase.
 Vampires inbound!Based on Soviet actions in the past, I'm worried they might be nukes. They are FROG-7 cruise missiles, which are nuclear capable...fortunately, they are FROG-7bs, which is the conventional version.
 The F-14s on CAP attack the inboundsThe inbound fighters seem to be maneuvering towards whatever they can detect. Meanwhile, my Hawkeyes detect some Su-15MF Flagon Ds north of Banak, perhaps going after my CAP as well.
064116Z A Phoenix launched from one of my F-15s splashes one MiG-21SM Fishbed J. Soon after another Phoenix downs a Fishbed.
By this time all of my ready F-14s are already airbone, and it will be some 2 hours and 17 minutes before the next group is ready. I will have to rely on Saratoga's F-4 Phantoms to supplement the CAP.
Two more Fishbeds are downed, and the Flagons are moving in from the southeast.
 F-14s deal with the Fishbeds while the Flagons move in.Before my F-14s can get in range of the Flagons, they turn and head for home, possibly low on fuel.
070212Z While dodging SAMs, my Recon Harrier is shot down over Bardufoss by a ZSU-57 57mm AA gun.
One of my F-4s from Saratoga shoots down a pair of Fishbeds before heading home.
071946Z It looks like a raid might be shaping up. A Bear D and a Bear E are closing in on my CVBGs, and many other aircraft are behind, but so far it appears they might be Flagons.
 A raid might be shaping up to the eastI shoot down the Bear D, and my Fighters are going after the Bear E, but my strike is closing in on Bardufoss so I have to check in on that.
 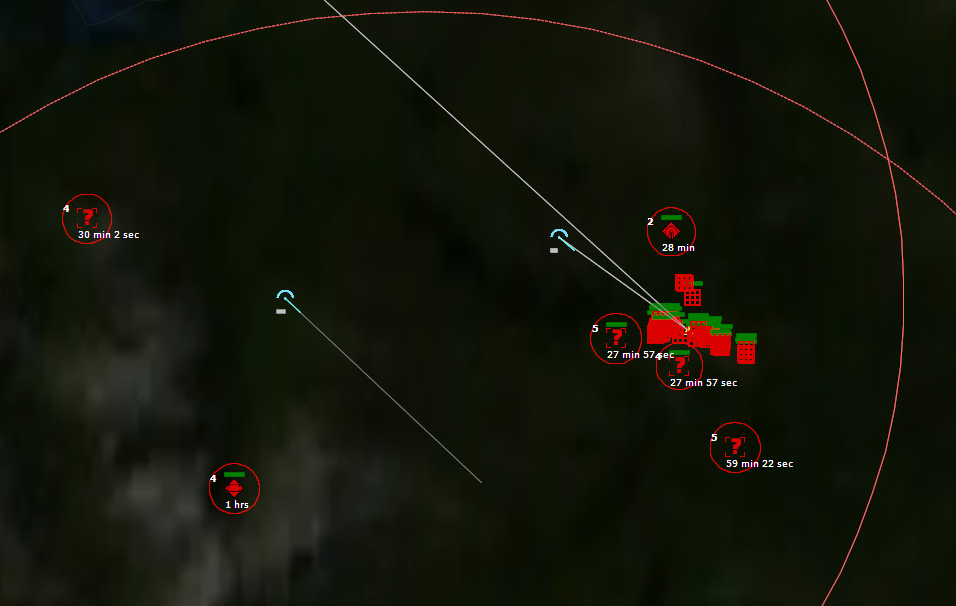 My strike moves in.My A-7s damage the SA-6 battery with their Shrikes, and then my Intruders do some minor damage to Bardufoss. A pair Harriers out of Evenes attack next, further damaging the SA-6 battery, and another pair of Harriers take out an M1939 85mm air defense gun.
Next inbound are a pair of Jaguars out of Bodo, and a pair of A-7s from Saratoga carrying Walleyes.
 More strikes inboundMy Walleyes hit the underground Ammo dump at Bardufoss, destroying it. The Jaguars have difficulty localizing their target, and maneuver over the area, taking lots of fire as they try to locate it. One of the Jaguars is shot down, so I reassign them. (that is, unassign them from the mission, remove the troublesome target from the target list, and then reassign them to the same mission, and they automatically choose another target) It has difficulties locating this target too, but at least it's not under continuous anti-aircraft fire while it searches.
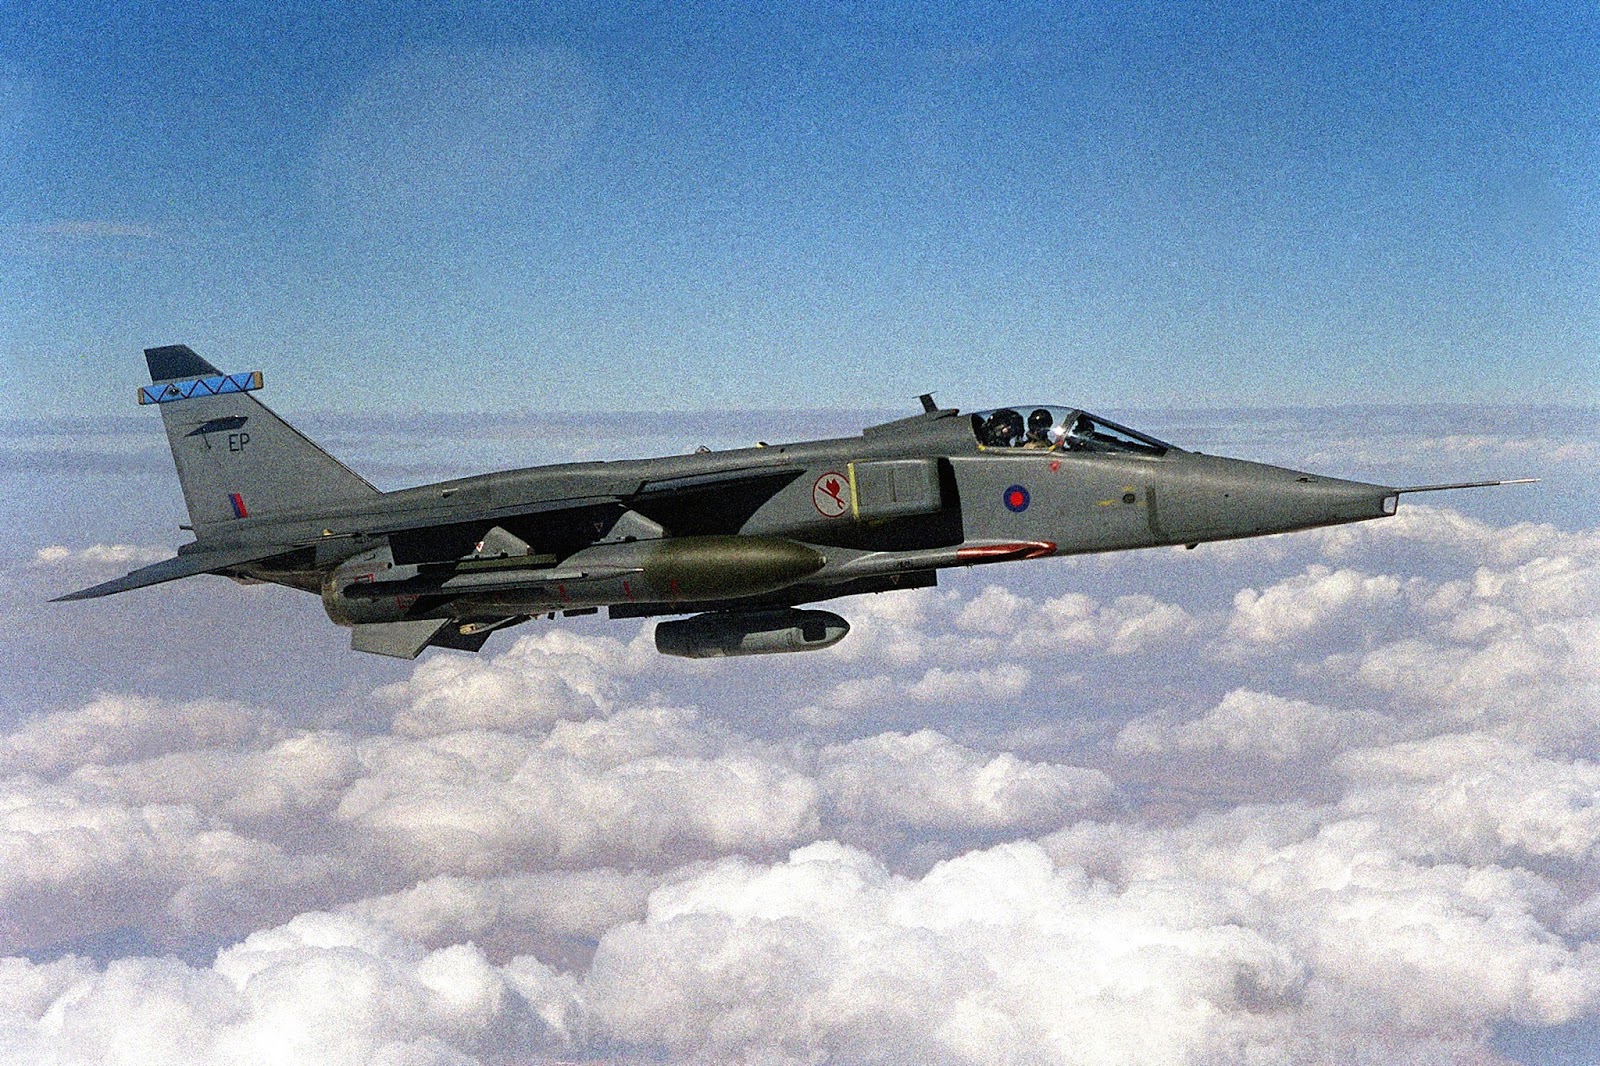 RAF Jaguar attack aircraftEventually the Jaguars locate and destroy some tanks. Other strike aircraft miss their targets. I've managed to damage the Soviet forces a bit, but the area will definitely need followup strikes. It will be an hour before more strike aircraft are ready on Saratoga, and four hours for the Harriers and Jaguars in Norway. For the moment the skies are quiet. But that may be about to change...
To be continued...
July 31, 2017
BoldrDash Winterdash 2017
I did the BoldrDash WinterDash in 2016 by myself, and this year I decided to do the family race with my 8-year-old daughter. In the day or so leading up to the event, I wasn't "feeling it," but in the end I'm glad I went because it went fine and my daughter and I had fun.
 Conquering the monkey barsAt times within the race we were just hiking in the woods, so it was more than just a race, it was some quality Daddy-daughter time. We also took the time for a photo-op at the bridge over part of the lake that makes up part of the course.
 Near a waterfall
 Checking out the lake
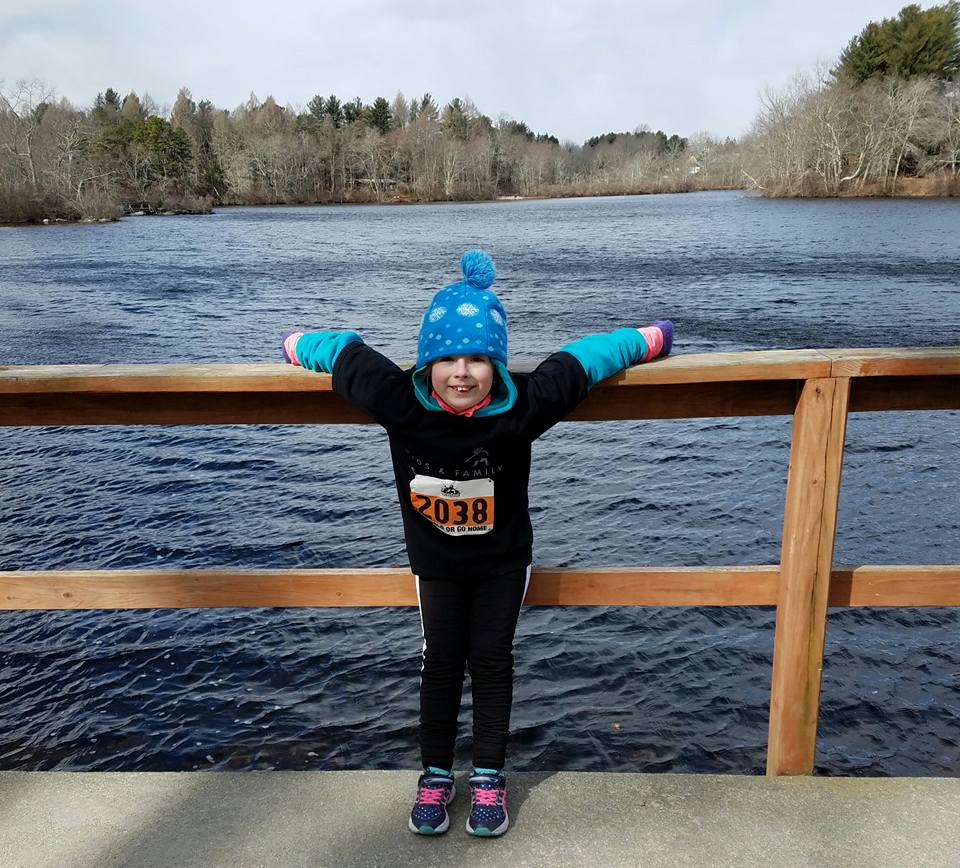 Add captionTowards the end of the race we made it a competition between us, and we raced together through the last few obstacles.
 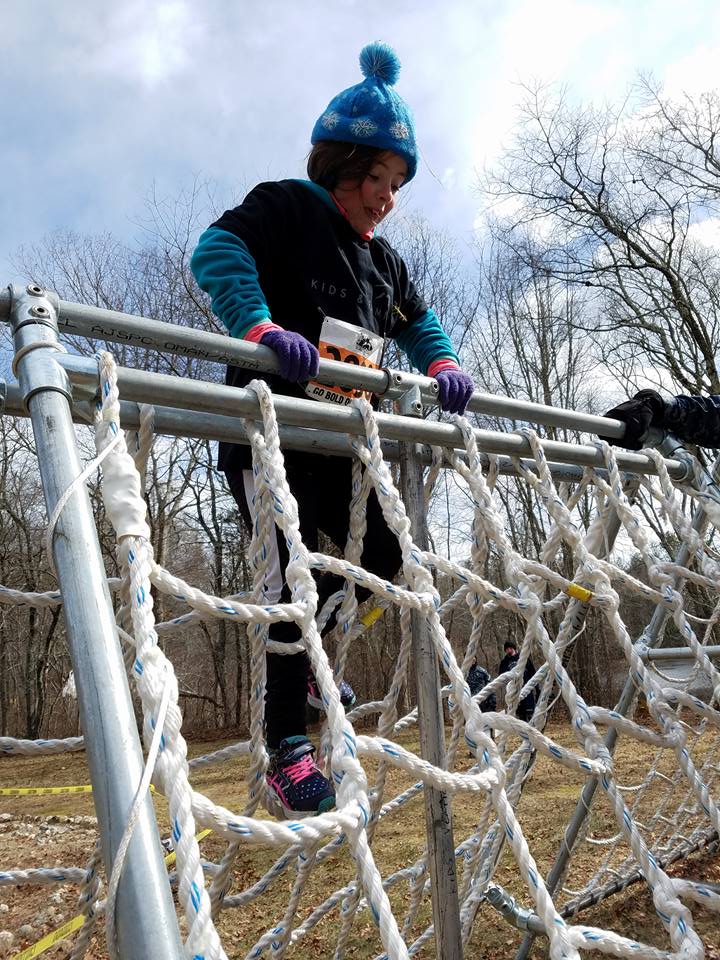 Add captionAfterwards, I wanted to get a picture of my daughter with her medal, but she suddenly became self-conscious so I had to sneak a picture to get anything at all.
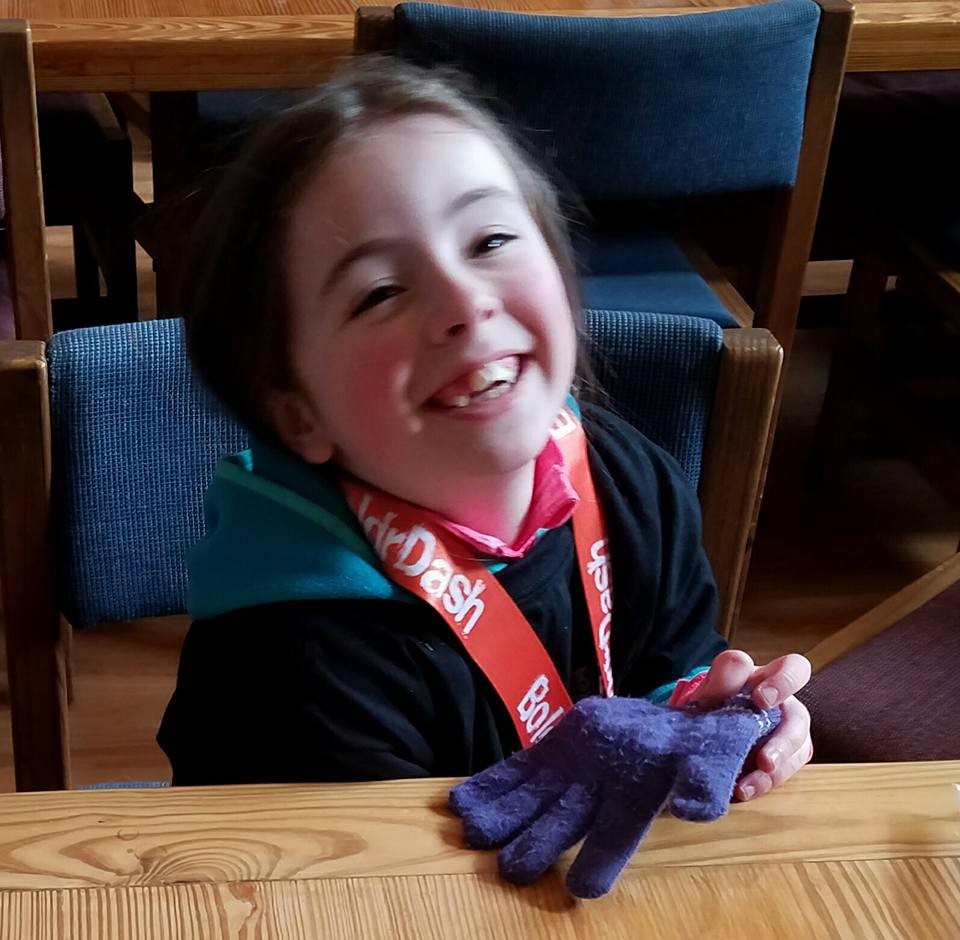 Sneaking in a picture
July 26, 2017
COMMAND: Northern Inferno Scenario 10: An Eye for an Eye
IntroductionDespite early warning, the Soviet use of nuclear weapons against mainland UK RAF bases came as a rude shock. The Prime Minister, with consultation with his Defence Staff, have agreed to order a retaliatiory strike against the Kola Peninsula.
The use of Polaris SLBMs or Vulcan B.2 bombers for a nuclear strike has been ruled out as their employment could escalate the situation into full-scale nuclear war, and these precious assets need to be withheld as the ultimate bargaining chip.
The majority of RAF bases in Scotland have been wiped out in a second-wave strike conducted by Soviet SSGNs firing nuclear cruise missiles, and RAF's nuclear-capable Buccaneer strikers in the UK midlands do not have the necessary range to conduct a strike, as recent losses have severely limited tanker support.
This means that the Fleet Air Arm must undertake the mission. 809 Sqn Buccaneer S.2Ds based on HMS Ark Royal have been ordered to conduct nuclear strikes on the Kola Peninsula.
The Ark Royal group now enters the Soviet backyard, to deliver the Queen's vengeance.
Orders for Cmdr NATO Forces
Situation
809 Sqn Buccaneers on HMS Ark Royal have been brought up to strength with additional aircraft from storage after the recent losses against Northern Fleet units earlier this month.
Soviet Air defences are estimated as heavy, with various SAM and AAA Systems, backed up with PVO Fighters.
Strike targets are the airbase in the Kola Peninsula which launched strikes on the United Kingdom mainland.
Projected strike aircraft losses are over 80 percent. We do not expect everyone to come back from this.
 Recon imagery of Olenegorsk air baseEnemy Forces
SAM Systems : SA-2 Guideline, SA-3 Goa, SA-5 Gammon.
Air : Su-15 Flagon, Yak-28 Firebar, Tu-128 Fiddler.
Surface : ASW Patrol Craft.
Subsurface : Possible SSN, SSGN from intel reports.
Friendly Forces
Carrier Strike Group 2 : HMS Ark Royal CV, HMS Glamorgan DDG, HMS Sheffield DDG, HMS Berwick FFH, HMS Galatea FFH, HMS Danae FFH, RFA Resurgent AE, RFA Tidespring AO.
HMS Ark Royal Air Group:
824 Sqn (SeaKing HAS.1) 809 Sqn (Buccaneer S.2D) 892 Sqn (Phantom FG.1) 849 Sqn B Flt (Gannet AEW) SAR Flt (Wessex HAS.1) Mission
Conduct tactical nuclear strikes on the Soviet air bases of Olenegorsk and Severomorsk-1.
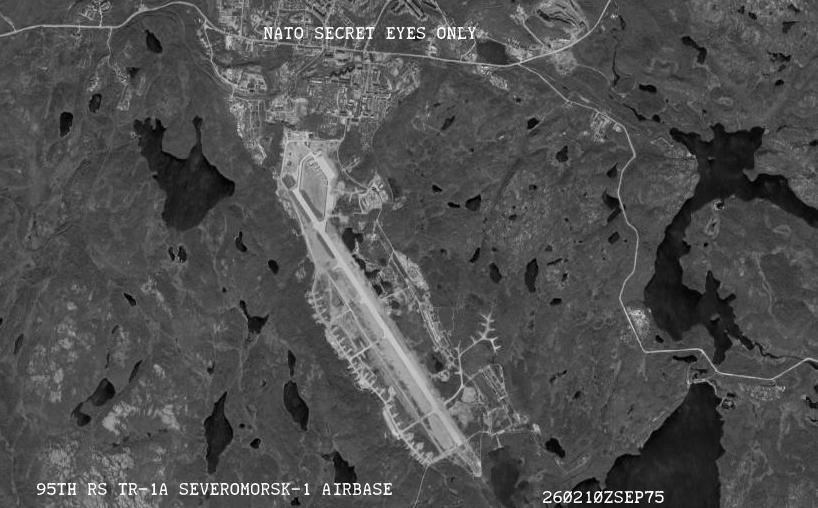 Recon imagery of Severomorsk-1 air baseExecution
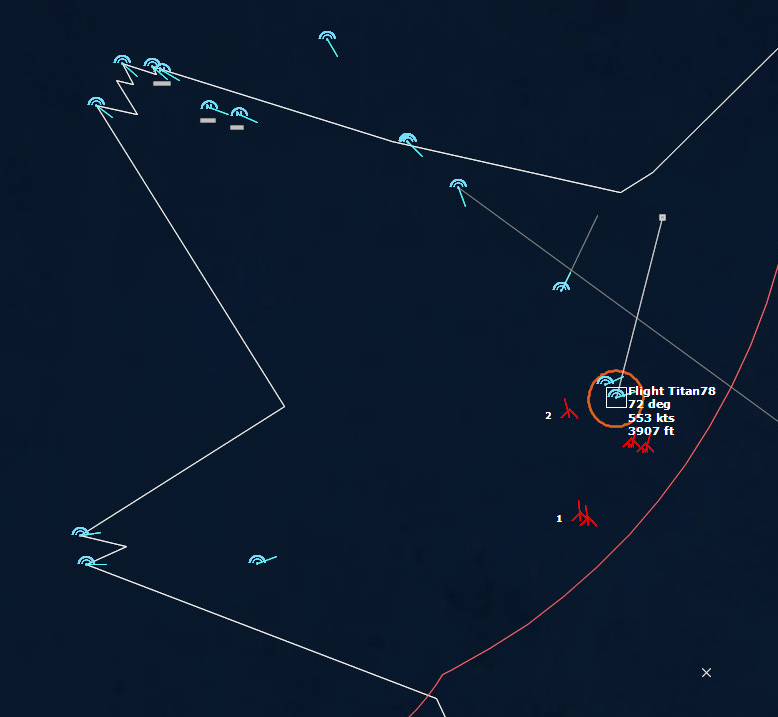
1. Two 809 Sqn Buccaneers loaded with WE.177 to strike Olenegorsk. (Titan 78)
2. Two 809 Sqn Buccaneers loaded with WE.177 to strike Severomorsk-1. (Dusty 79)
3. Eight 809 Sqn Buccaneers configured in the SEAD-ARM role to clear a path through for the strike package.
4. Two 809 Sqn Buccaneers configured for tanker role.
5. 893 Sqn Phantoms to provide escort for the strike aircraft.
Command and EMCON
Command: HMS Ark Royal
EMCON: ALPHA Limited Emissions
September 26, 1975, 0500Z
The Ark Royal's crew had been hard at work preparing the strike, and the mood was tense.
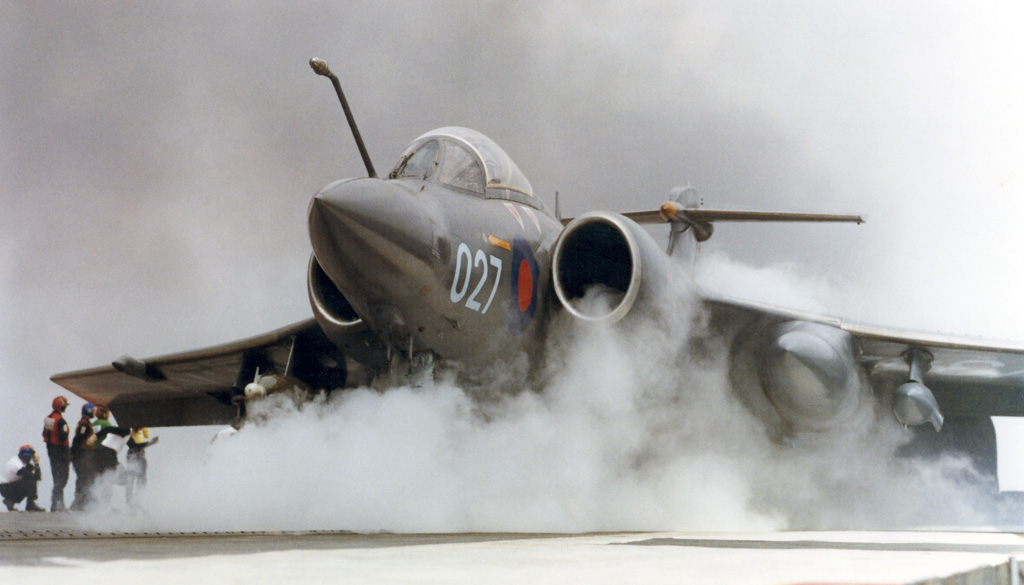 A Buccaneer of 809 Sqn on the catIt took over 20 minutes for the strike package to launch and form up.
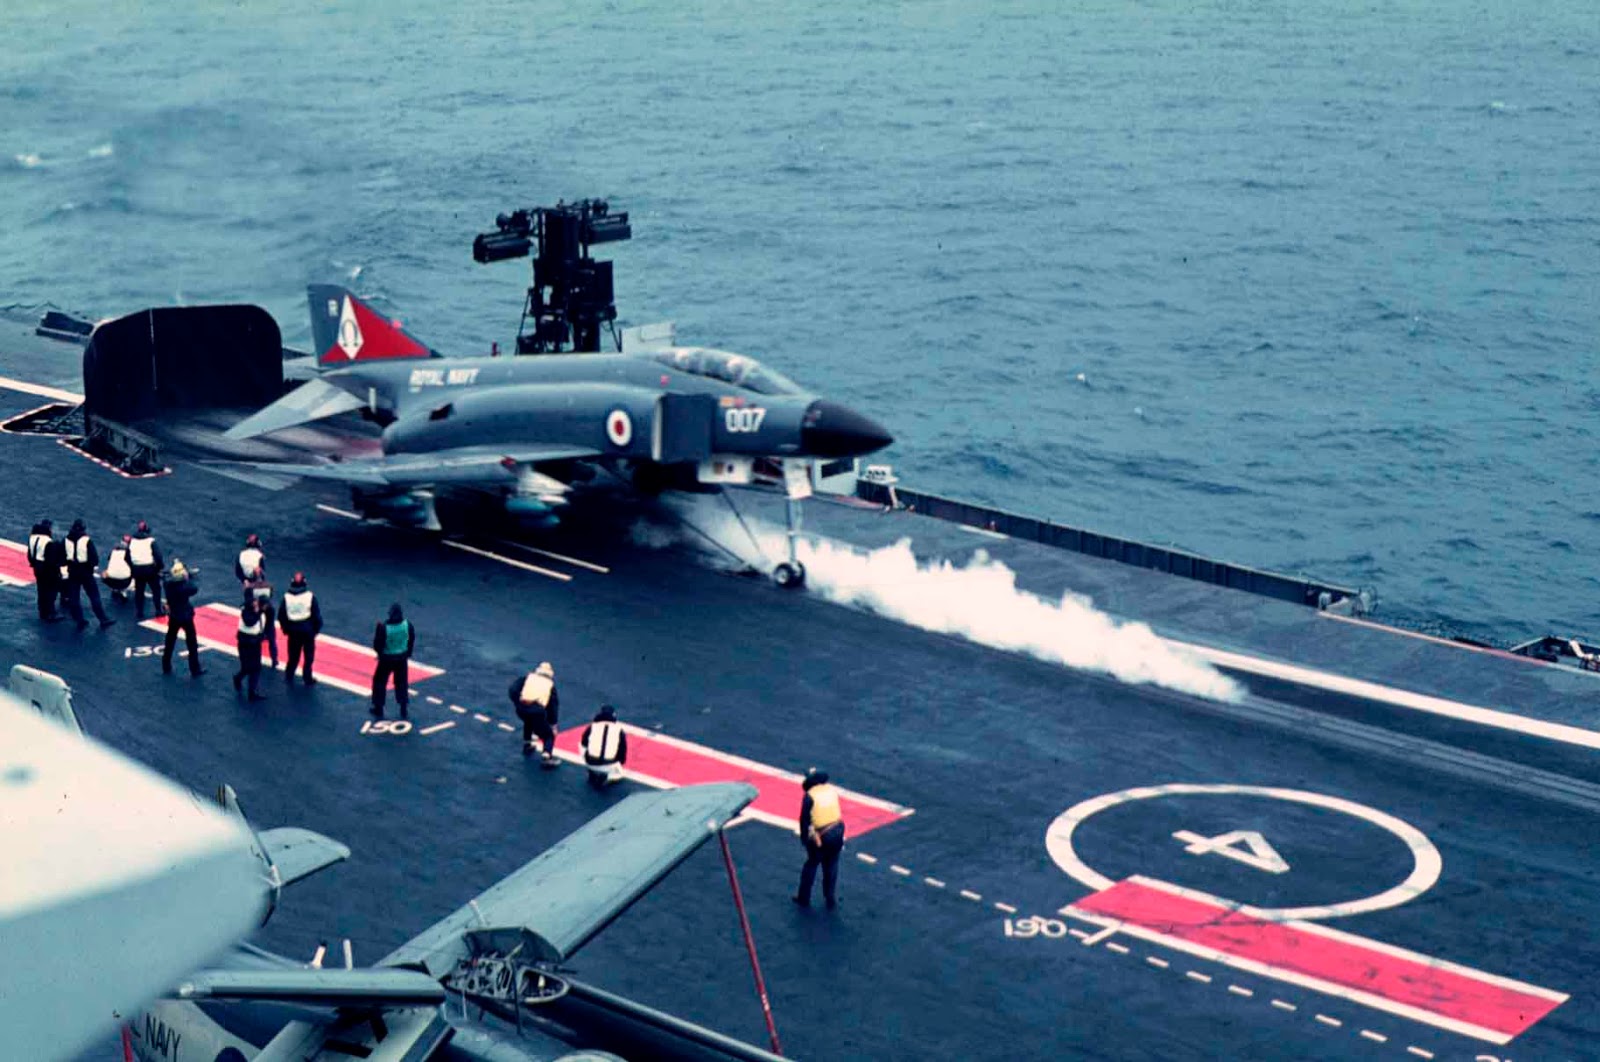 A Phantom of 829 Sqn launchingThe Gannet AEW detects multiple Su-15MF Flagon Ds, likely a CAP. It's doubtful that the Ark Royal's position is known.
 The plan to is fly low and avoid most of the SAM defenseThe plan is to descend at the extent of radar coverage, skirting the edge of SAM range, then make a dash for the targets from the northeast. A straight in run would take the strike right into the teeth of the Soviet air defenses.
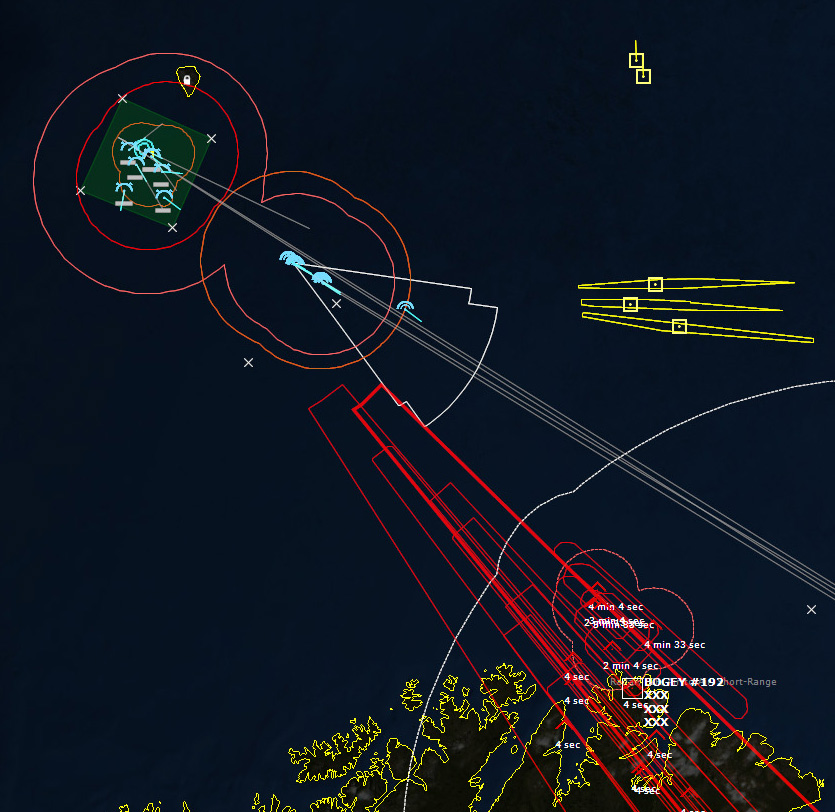 Multiple air and surface contacts are detectedThere are perhaps 16 air contacts and 5 surface contacts.
053518Z It looks like the interceptors aren't waiting for me to get too close.
 The first interceptors show upThe interceptor count increases to six.
 Interceptor count is sixThey aren't behaving as if they have detected the strike yet. The Phantoms, all twelve of them, move to intercept the interceptors.
To prevent them from burning up too much fuel, I slow my interceptors to cruise, and I set my strike package to loiter to give the interceptors time to get a little lead. I also start decreasing their altitude in the hopes of keeping them from being detected a little longer.
And then, the eight Soviet interceptors all turn and start to leave. Is it because they lost contact with me, or are they low on fuel? My F-4s still have their radars on, so it's hard to tell.
 The interceptors leave?I order my Fighters to break off and return to their packages. Just before the contacts are lost, they are identified as Yak-28P Firebars. The more distant contacts, some of them anyway, are Su-15 Flagons, identified by their radar emissions.
  More interceptors, for real this time.The Phantoms begin firing Sparrows.
Splash One. The contacts are identified as Tu-128 Fiddlers.
 Splash One.Missiles are detected inbound.
  Missiles fill the skyMissiles are everywhere, and I am tempted to micromanage every single aircraft's actions, but I decide that I have to trust my escorts to know what they're doing.
Splash Two.
Then one of my Phantoms is shot down by a lucky hit.
Splash Three.
Splash Four. I'm killing them, but it's using up a lot of Sparrows to do it.
Splash Five, and then Six.
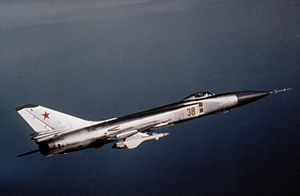 Su-15 FlagonNow I have three bogies bugging out, and three bogies closing in. One of them is a Su-15MF Flagon D.
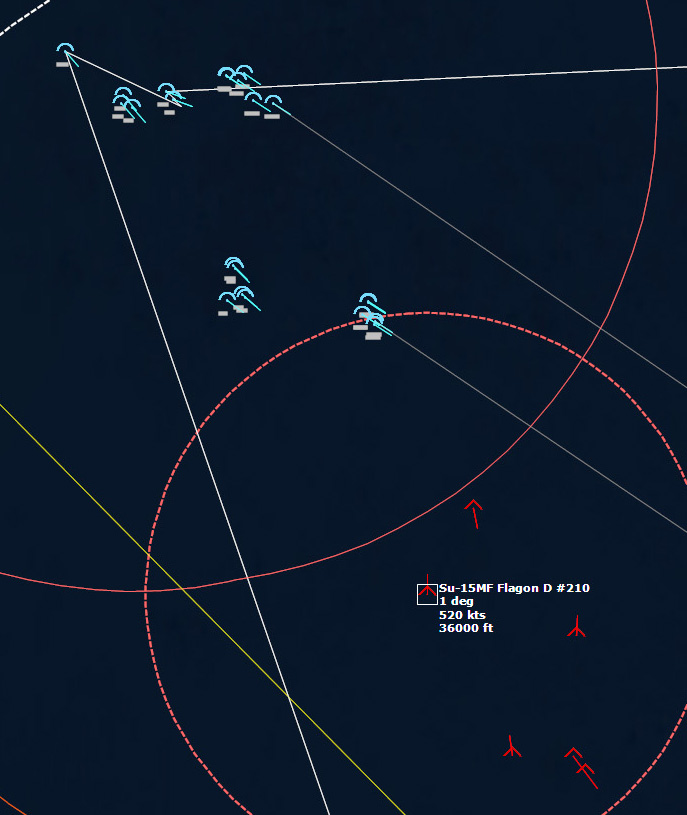 Here comes a Flagon...My F-4s expend a lot more Sparrows, and then one of my Phantoms is shot down at close range.
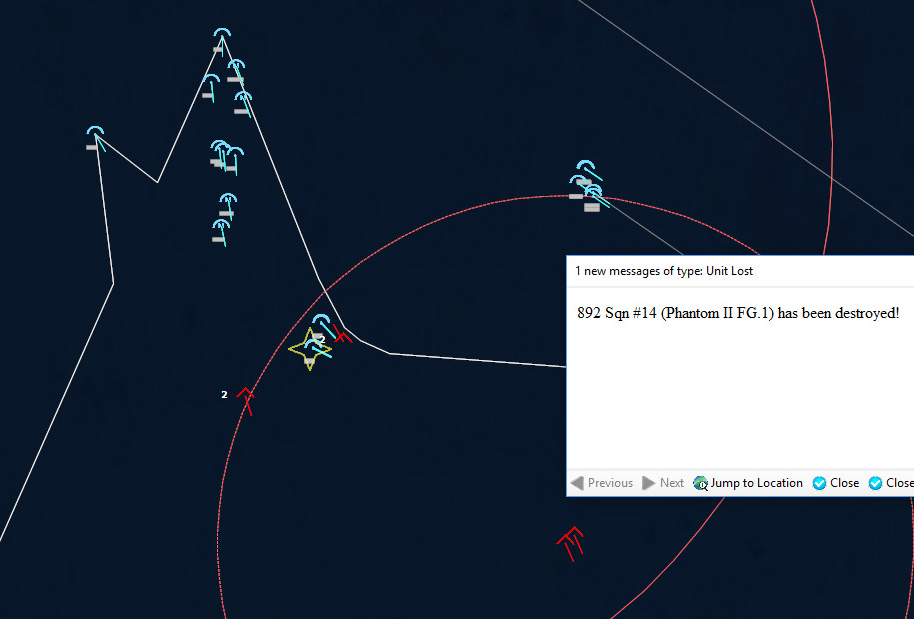 My second Phantom is shot downSplash Seven, this one a Flagon, and then Splash Eight.
Once most of the Soviet interceptors have turned tail, I constantly have to adjust the speed of my Phantoms down from afterburner to cruise. They have limited fuel, and I cannot afford to have them go Bingo when I need them most.
I splash two more Flagons, then notice that a three-ship is heading towards my strike package.
 Missiles inbound on the strike package!The first salvo of missiles miss. The second doesn't, and one of my ARM armed Buccaneers is shot down.
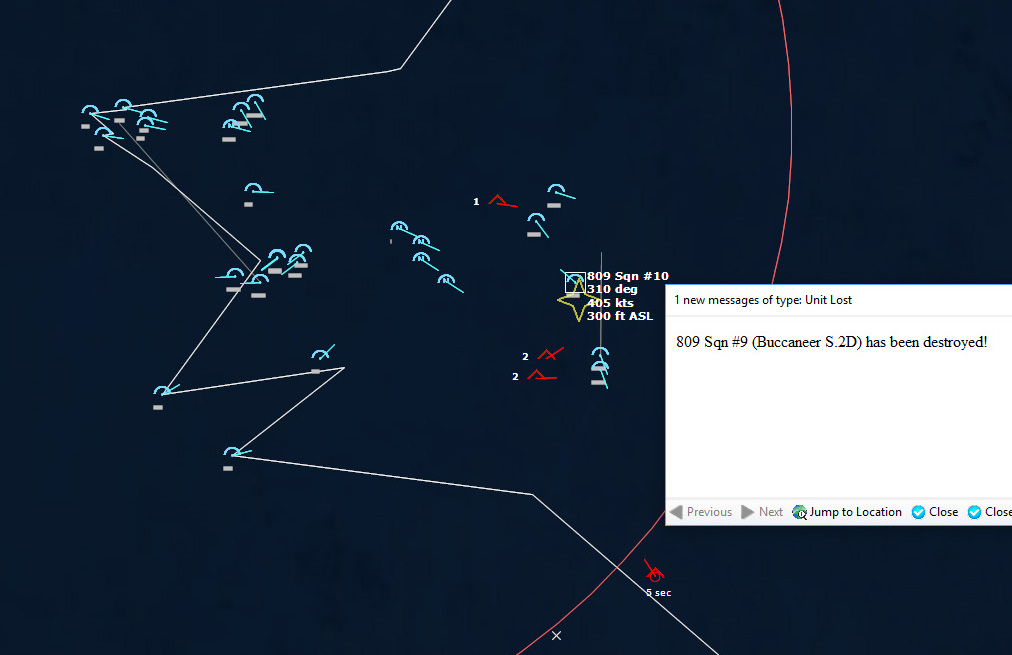 A Buccaneer is shot downMy strike flight is still in deep trouble. I manage to shoot down a Yak-28P Firebar. There are still three bogies in the immediate area, and a few more further out.
 Yak-28P FirebarA second Firebar is splashed, and then a third.
 More bogies inboundLooking further afield, four more bogies are inbound. My Phantoms are completely out of Sparrows, so hopefully this is all they have left to throw at me.
The Soviet fighters launch their radar-guided missiles first, which miss, but then they close in. One of the Su-15 Flagons shoots an AA-3 Advanced Anab F missile and succeeds in shooting down one of my strike Buccaneers. And just like that...I've lost one of my four nuclear bombs.
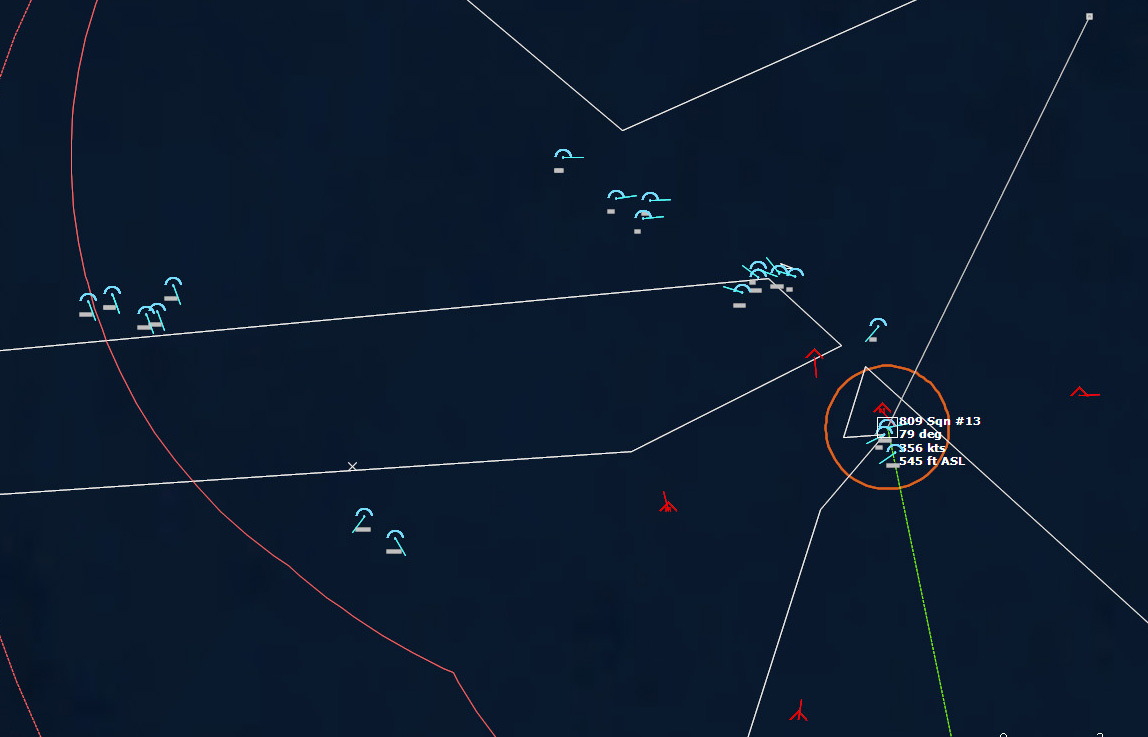 Buccaneer 809 Sqn #13, seconds before being shot down.A Phantom attempts revenge on the Flagon with a Sidewinder, which misses, giving the Flagon time to shoot down a different Phantom. Finally, a third Phantom shoots down the offending Flagon. After a chase, my escorts shoot down one more, and for the moment, at least, my strike packages are not threatened by interceptors.
The bad news is, I detect a bunch more bogies to the south. This could get ugly.
As the bogies approach, my strike package drops to the deck. The Soviets launch a few missiles, but fortunately none hit. And then, all about the same time, my Phantoms go Bingo and have to head home. My strikes are on their own.
 The Phantoms go RTB.My strikes still have approximately 80 miles to go to skirt the SAM batteries along the coast, and then the final dash inland, 60 miles to Severomorsk-1, and 95 miles to Olenegorsk.
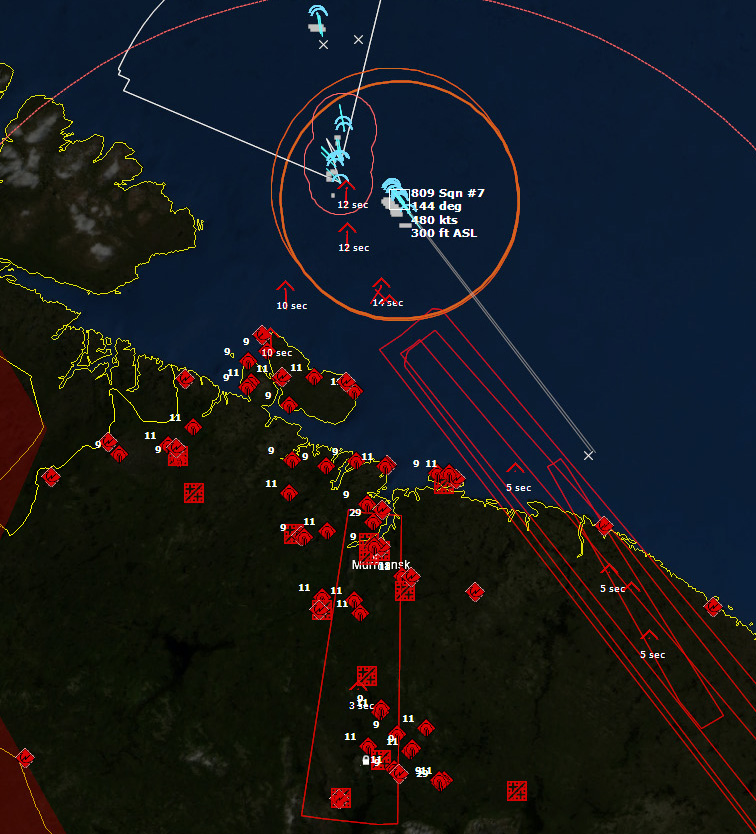 Still have a long way to go.061758Z Several SAMs are launched at my retreating Phantoms, but fortunately they mostly dodge them. In dodging the SAMs several of the Phantoms won't make it home without refueling, so I go through them, sending those that can make it home directly, while sending the rest to the tankers.
My strike package, however, despite flying at 300 feet ASL, is apparently still detected, as some Tu-128 Fiddlers attempt an intercept.
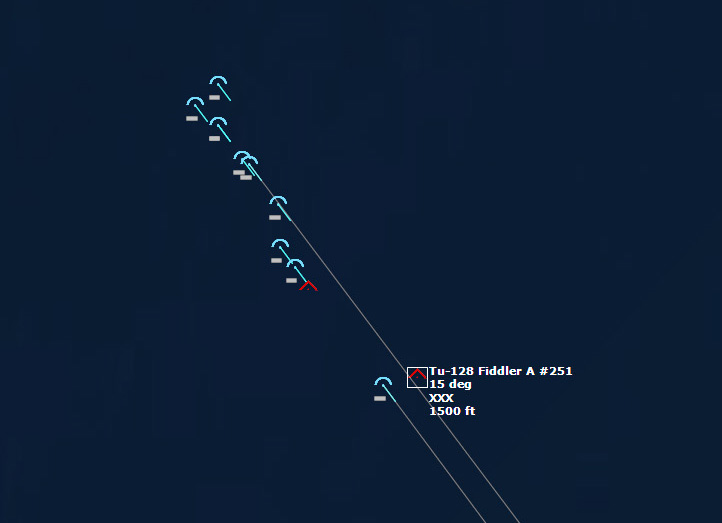 Fiddlers attempt to intercept.The Fiddlers pass, but have difficulty engaging the strike so low. Four Fiddlers chase the package, but seem unwilling to descend below 1500 ft. Then a Su-15 Flagon shows up. Although it descends to 300 feet, it still doesn't launch any missiles. Fortunately their radars are not "look-down shoot-down", so they can't engage the Buccaneers amidst the ground clutter.
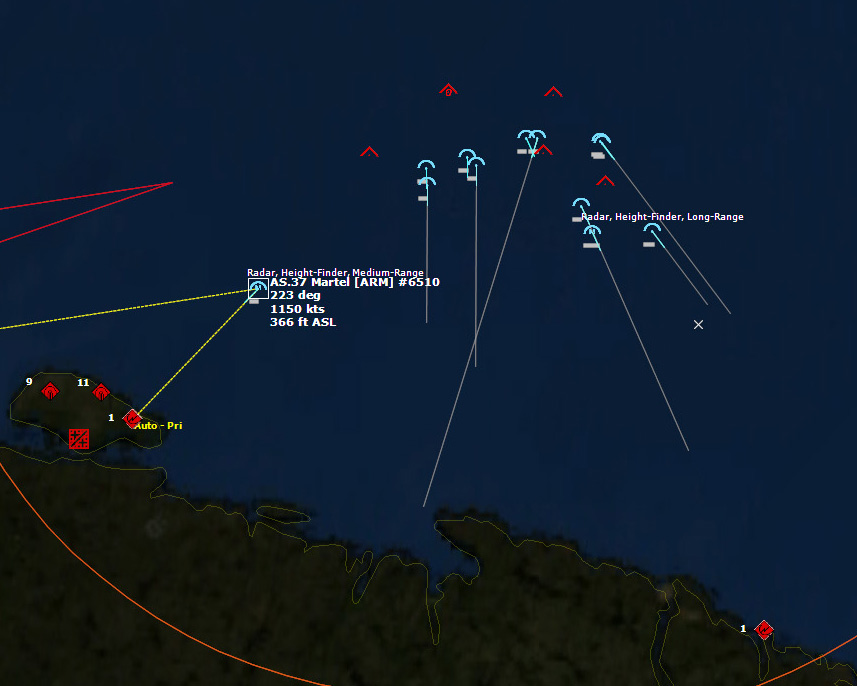 The escorts begin shooting AS.37 Martels to take out the radarsAs the strike closes in, the SEAD escorts begin launching Martels to take out radars on the coast.
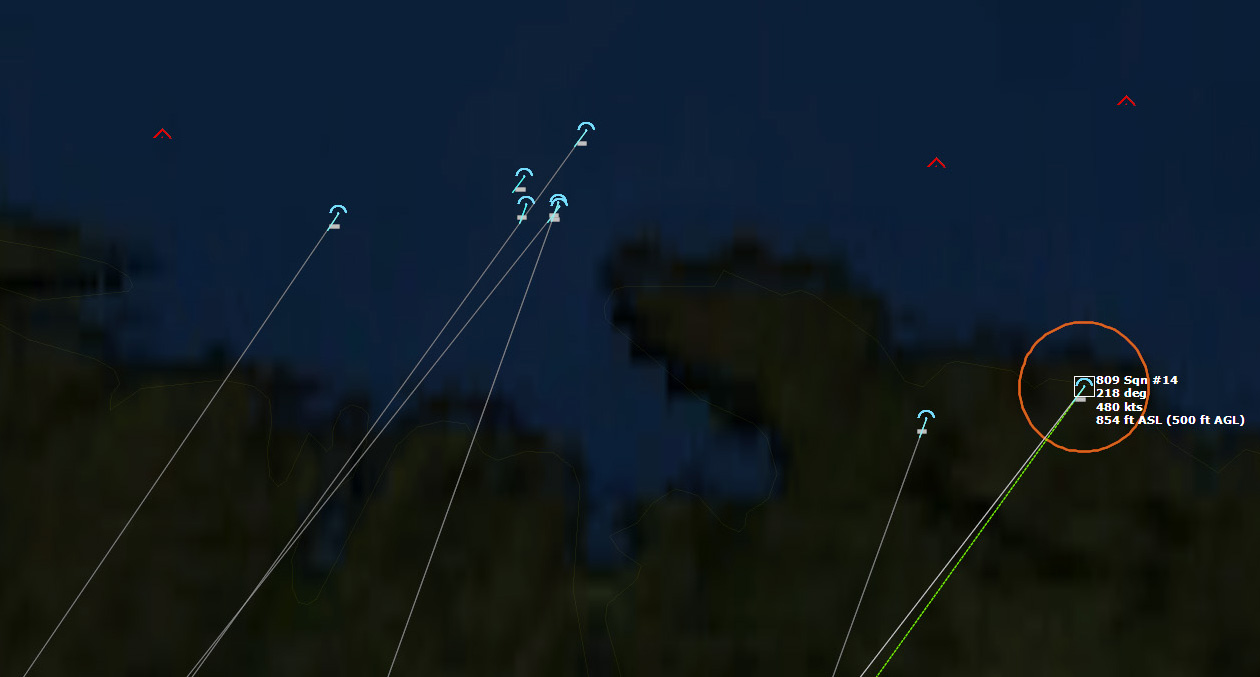 The Buccaneers go feet dry over the Russian coastStaying at 500 feet AGL, the Buccaneers hug the terrain as they close in on their targets. So far, no SAMs have been launched, but that could change very quickly.
The Severomorsk-1 Strike is 40nm away from its target, and the Olenegorsk Strike is 63nm away. The Soviet interceptors still attempt to shadow the Buccaneers, but are unable to attack them.
 The strikes are not yet being fired upon by SAMs063141Z With the strikes 27nm and 49nm away from their targets, the first SAM launch is detected, a SA-3b Goa near Severomorsk-1. The nearest Buccaneer immediately targets the SAM battery with its remaining Martels.
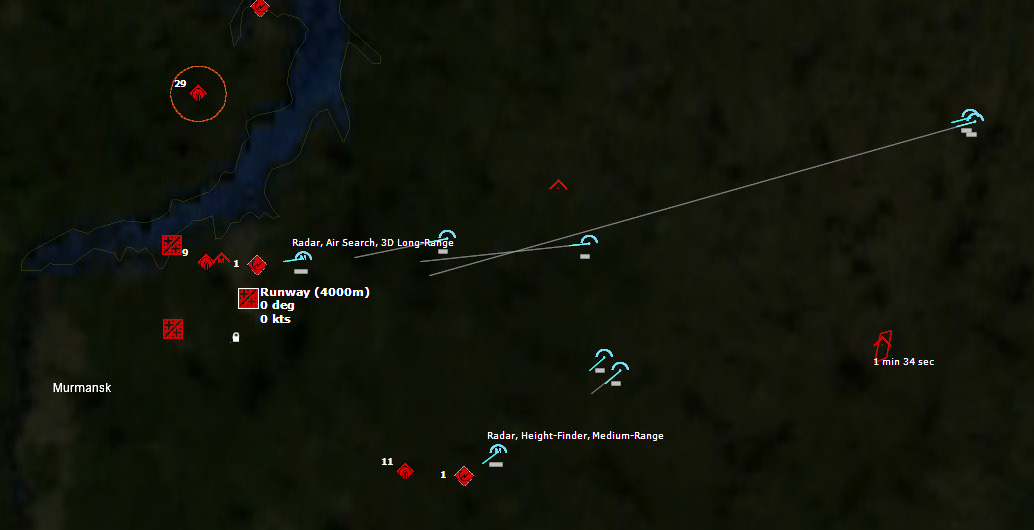 SAM launch!The SA-3b battery near Severomorsk-1 takes some Martel hits, hopefully reducing its effectiveness. The strike is 19nm out.
 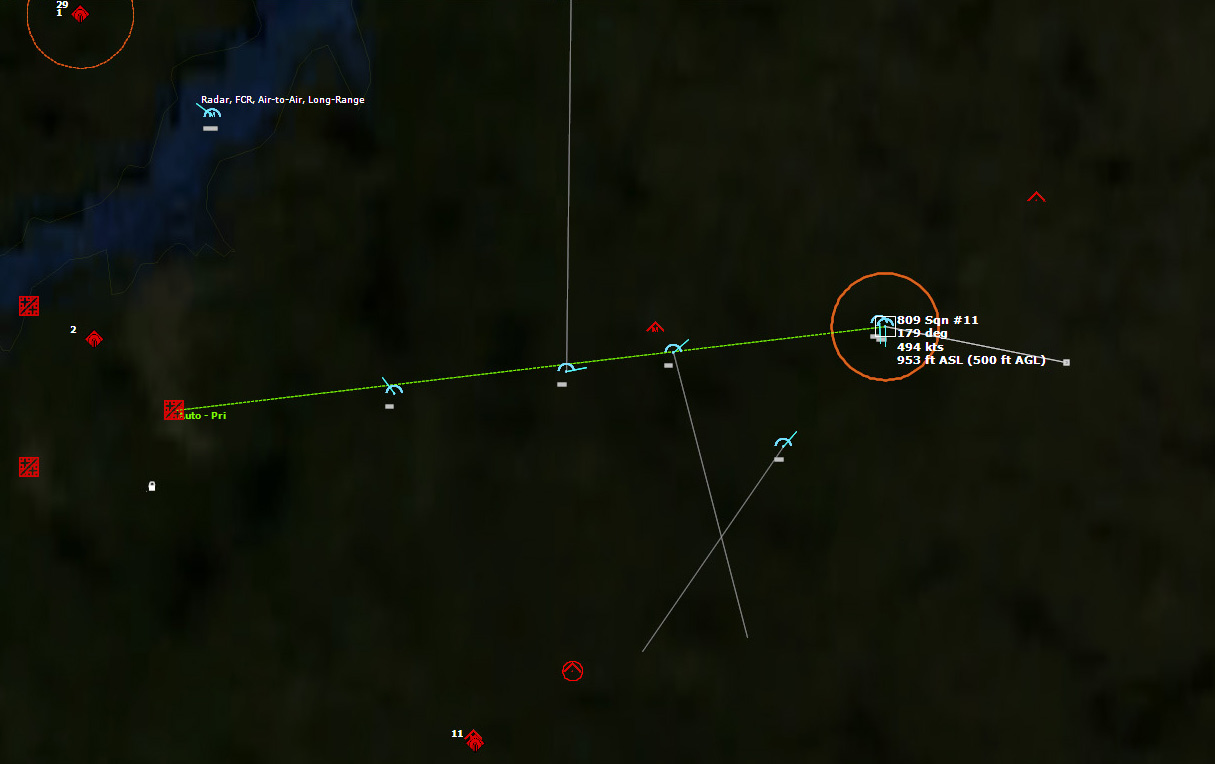 A nuclear SAM is inboundAs the Severomorsk-1 strike closes to within 15nm of its target, one of the escorting Buccaneers inadvertently ascends to above 1000 feet AGL, and the Soviets are ready. Instantly a nuclear SAM is launched. The Buccaneer immediately dives again, but the SAM closes in anyway. The strike package maneuvers in an attempt to avoid flying right into the fireball should it detonate.
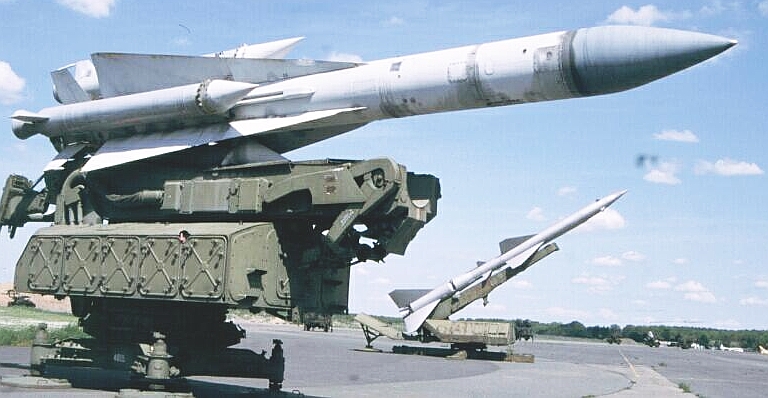 SA-5 GammonAmazingly, the 25kT nuclear SAM malfunctions...could it be that bad Soviet Quality Control has doomed the air base?
A second Buccaneer foolishly ascends, and this time the ambushing nuclear SAM does not malfunction.
 The 25kT nuclear SAM detonates
 The fireball blossomsAs the fireball expands, the escorting Buccaneers unleash salvos of Martels at the SA-5b Gammon launch site.
 SAMs launch everywhere063449Z As the Severomorsk-1 strike closes to under 10nm from its target, SAMs start launching everywhere. The Martels have hit the nuclear SAM site, silencing it temporarily, but it is but one of many sites in the area. SAMs are all over the place.
063520Z Bombs away!
 Bombs away!One of the escorting Buccaneers is shot down, but the rest of the Severomorsk-1 package turns and runs.
To the south, the Olenegorsk strike package has its hands full with SAMs.
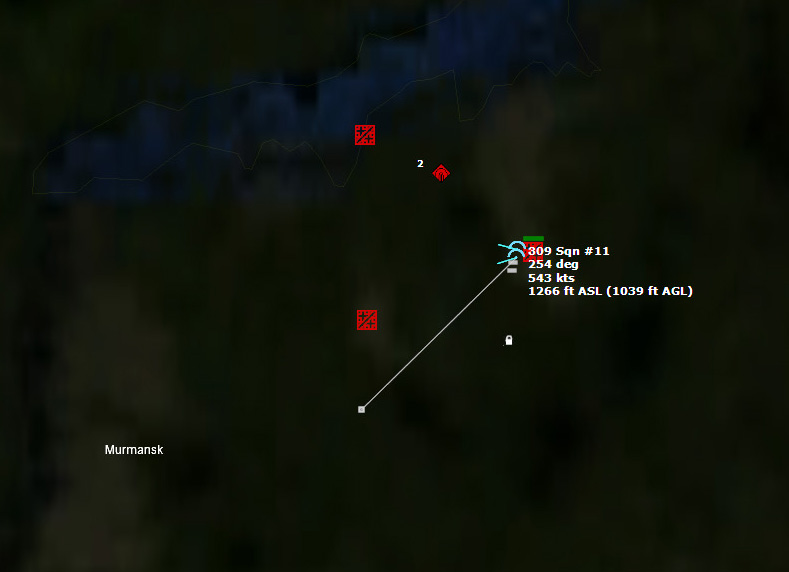
 The Olenegorsk strike is heavily engaged by SAMs063647Z The WE.177 Type B 400kt Nuclear bomb detonates over Severomorsk-1.
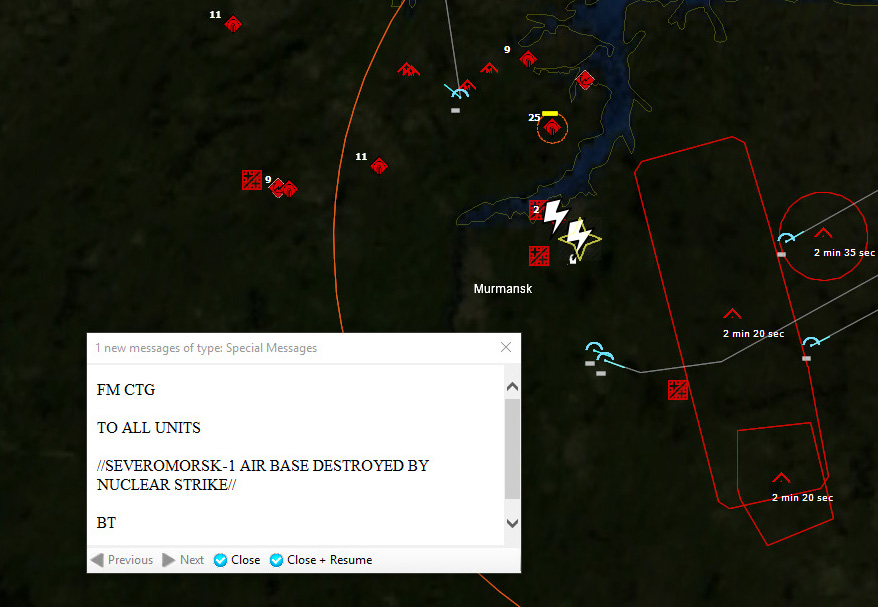 Detonation.
 The fireball expandsThe fireball destroys the town of Severomorsk with its 50,000 inhabitants, and expands to the outskirts of Murmansk, a city of nearly 300,000.
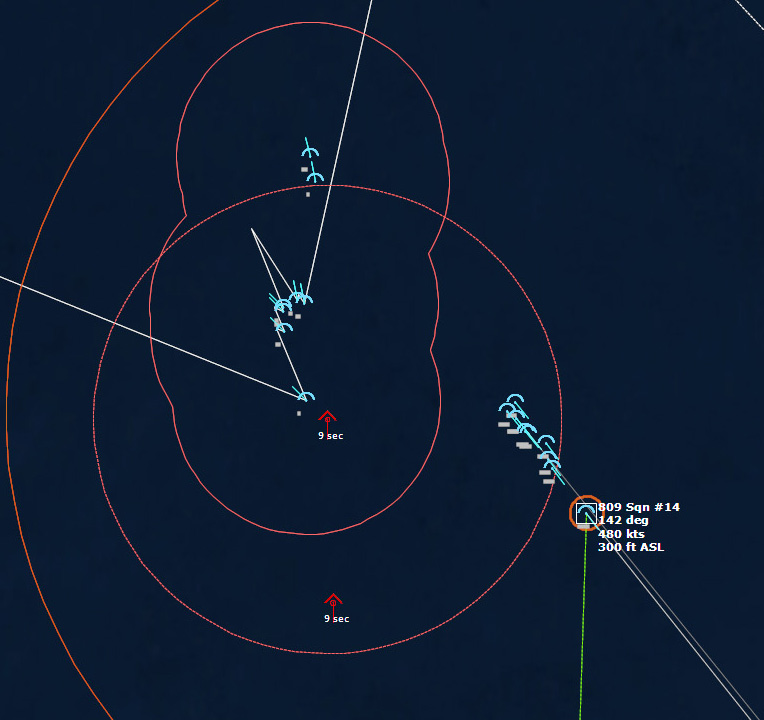
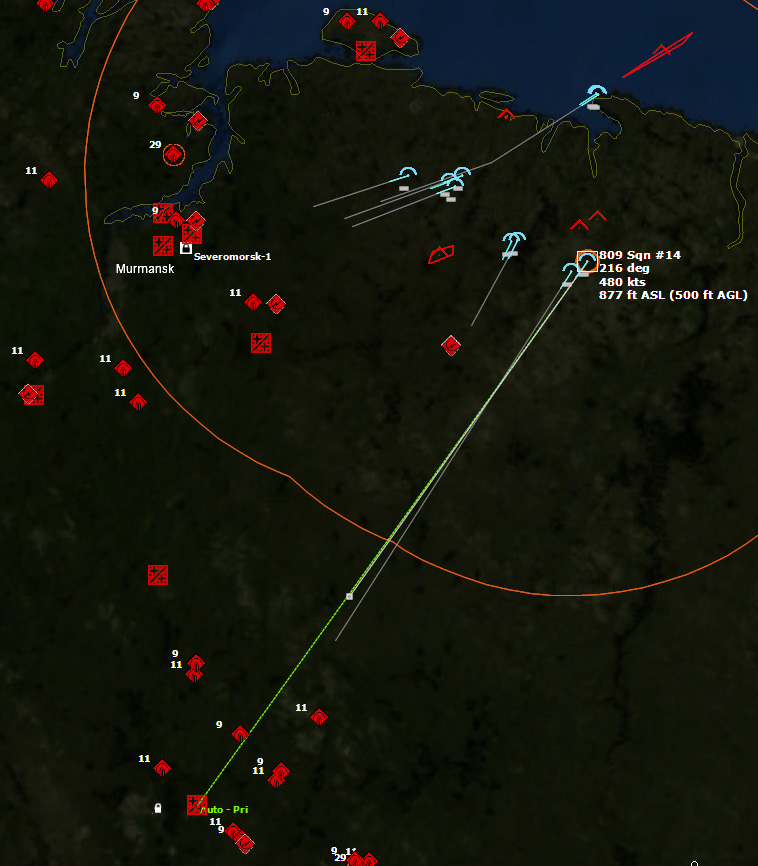
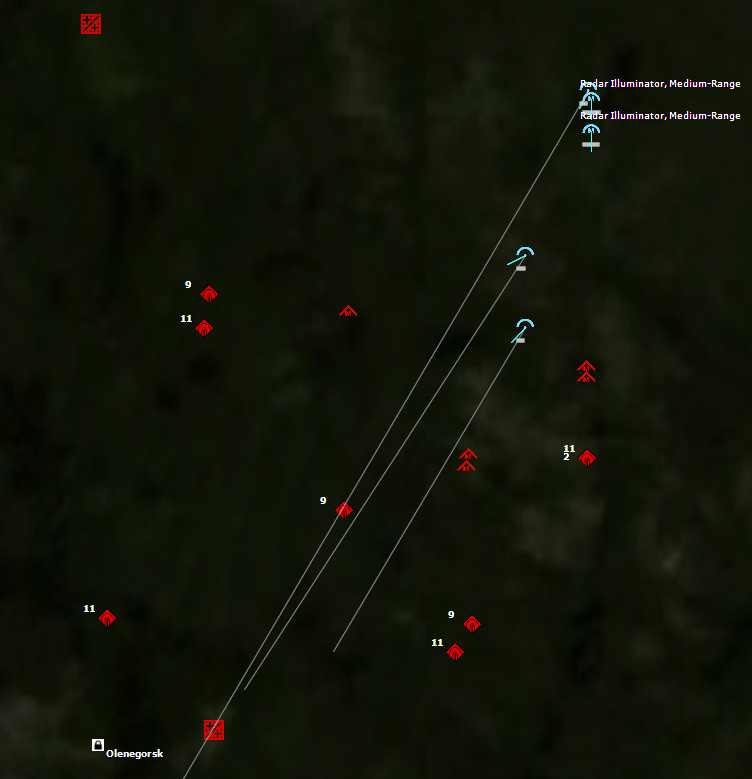
To the south, the Olenegorsk strike still deals with SAMs. The escorts are out of Martels, and so head for home. It's up to 809 Sqn #14 to go it alone. The Buccaneer dodges unbelievable amounts of SAMs as it bobs and weaves its way towards Olenegorsk Airbase.
And then, a mere 7nm from its target, the Buccaneer's luck runs out. Constantly dodging, it is forced to fly very close to a SAM site and it is hit by a SA-3b Goa.
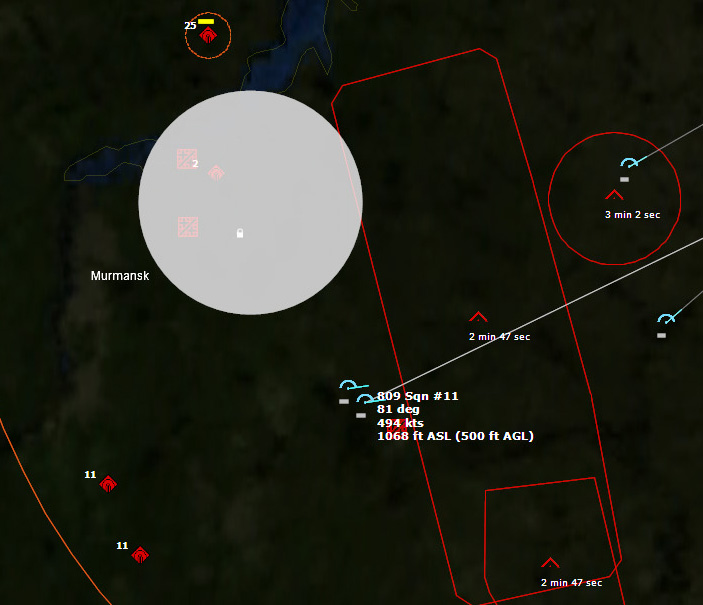
 Olenegorsk will survive.The surviving Buccaneers, six of them, fly low over the sea until they are out of SAM range and then climb and slow to 350kts to conserve fuel for the return home. The Gannet AEW.3 aircraft detects Soviet interceptors inbound, but the Soviets are blind and cannot find the leaving strike package.
 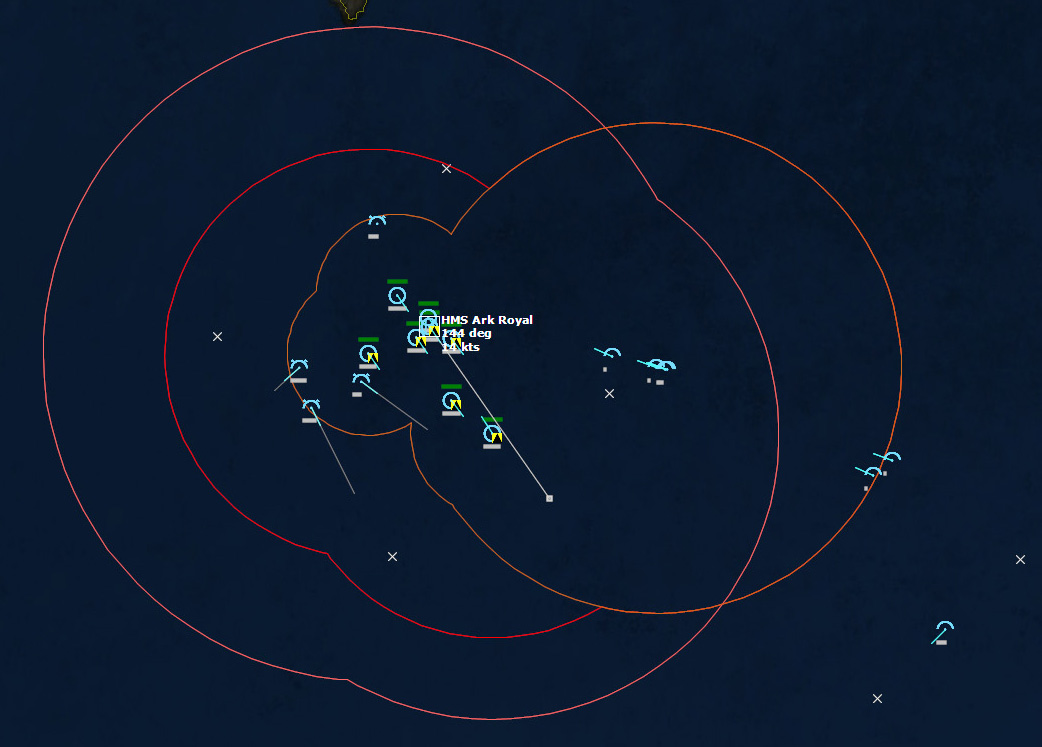 The survivors return home080516Z The surviving Buccaneers land safely on Ark Royal, which then sets a course west in an attempt to get out of harm's way...
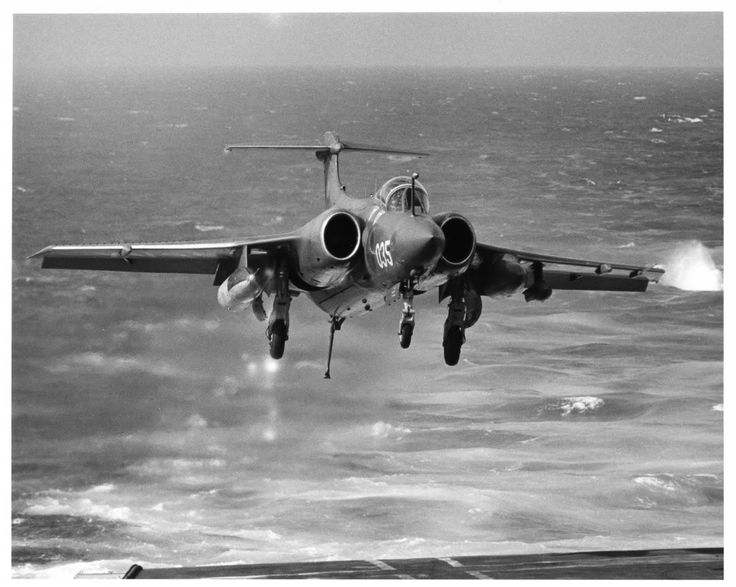 Home safe.
Conclusion
I have to admit that I "cheated" a little on this one. On my first attempt, my Buccaneers got to the Soviet coast and then refused to obey my frantic commands to keep them flying low. They soared into the sky, the SAM radars picked them up and send scads of nuclear SAMs at me...and in no time it was all over. My mistake was that I assumed the AI would keep the Buccaneers low and following the terrain.
So after that debacle, I opened a previous save from just before the Buccaneers went feet dry. This time I micromanaged the hell out of them, updating and plotting courses for each individual aircraft frequently to ensure they would stay as low as I could keep them. I would let the simulation run for maybe 5 seconds, then check each aircraft to make sure it was doing what I told it to, give it new orders if it was misbehaving, and then let the sim run for another few seconds. I had to do this for the entire attack run. Even so, two of my Buccaneers decided to go ballistic for no apparent reason and got shot down for their trouble.
Complaints aside, the mission was exciting, and I think my plan was basically sound. I was not expecting the air battle to occur so far out to sea, but my Phantoms did their job. Once the strike stayed low enough, they managed to get pretty far inland before the sky lit up with SAMs. If I did it again, I would have sent my Olenegorsk strike through the gap in SAM coverage between Severomorsk and Olenegorsk, and then south to attack Olenegorsk from the west. As it was, the eastern approach to Olenegorsk is overloaded with SAM batteries, and I'm surprised my strike Buccaneer made it as far as it did.
On to Scenario 11, which promises to be epic, but begins with some depressing news...
Triumph
Score: 1000
SIDE: Soviet Union
===========================================================
LOSSES:
-------------------------------
6x Tu-128 Fiddler A
7x Su-15MF Flagon D
3x Yak-28P Firebar
3x Radar (Thin Skin A HF [PRV-9])
1x Radar (Thin Skin B HF [PRV-16])
3x Radar (Spoon Rest C [P-12])
2x Vehicle (Low Blow [SNR-125])
4x SA-3b Goa Quad Rail
6x SA-7a Grail [9K32 Strela-2] MANPADS
2x Vehicle (Flat Face B [P-19])
2x Radar (Bar Lock A [P-37])
3x Building (Square Pair [5N62])
1x Building (Tall King C [P-14])
4x Vehicle (Fan Song F [RSNA-75M])
4x Vehicle (Spoon Rest C [P-12])
6x SA-2f Guideline Mod 1/2 Single Rail
1x Runway (4000m)
1x Single-Unit Airfield (1x 3201-4000m Runway)
EXPENDITURES:
------------------
8x AA-5 Ash A [R-4R, SARH]
6x AA-3 Anab C [R-98R, SARH]
1x AA-3 Anab D [R-98T, IR]
6x AA-3 Advanced Anab E [R-98MR, SARH]
1x AA-3 Advanced Anab F [R-98MT, IR]
1x AA-8 Aphid [R-60T]
29x SA-5b Gammon [5V28, 25kT Nuclear]
38x SA-3b Goa [5V27, V-601P]
30x SA-2f Guideline Mod 1 [S-75M2 Volkhov, 5YA23 / V-759]
12x 23mm ZU-23-2 Burst [20 rnds]
2x SA-7a Grail [9M32]
SIDE: NATO
===========================================================
LOSSES:
-------------------------------
4x Phantom II FG.1
6x Buccaneer S.2D
EXPENDITURES:
------------------
16x AN/SSQ-47 Julie Active Range-Only
46x AIM-7E2 Sparrow III
18x AIM-9D Sidewinder
26x AS.37 Martel [ARM]
1x WE.177 Type B [400kT Nuclear]
July 24, 2017
Boldrdash Kids & Family Rocky Point 2016
This was to be the second BoldrDash Kids and Family race that my family did, and it would be held at Rocky Point, Rhode Island, the site where an amusement park used to be. I had been there several times as a kid myself, my favorite being the Corkscrew, a roller coaster that lived up to its name.
There was no sign of the amusement park now; it was all covered in grass and all the of the rides and buildings were gone. Instead, there were lots of BoldrDash obstacles.
 Ready to raceThe course at Rocky Point was a standard three miles or so, winding around a large field but also along the beach for a portion. The family portion would stick primarily to the field with a very short section through the trees.
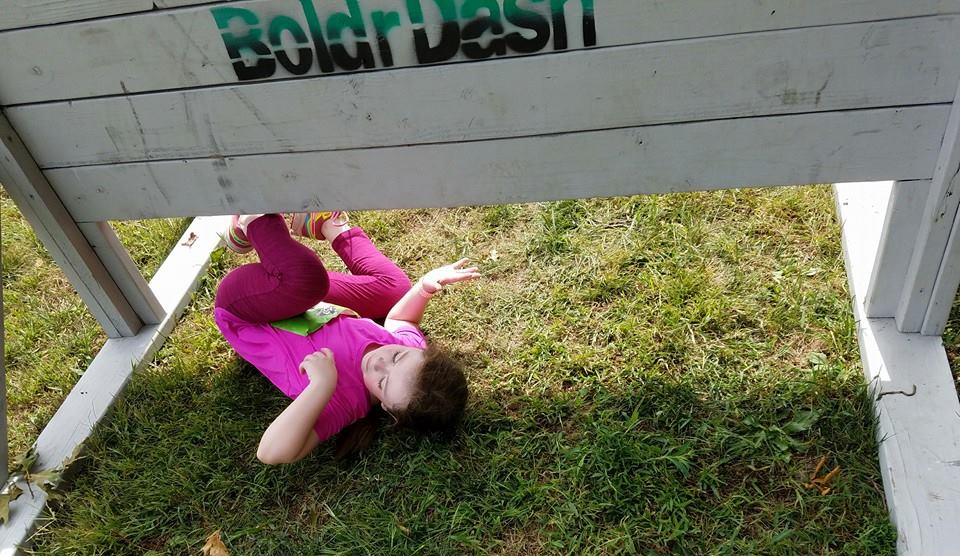 Laurelin rolls under a wallAt the previous event, my son was very young, and fell right at the starting line, with hordes of other racers running past him while I shielded him on the ground, while my daughter ran forward with her cousin. As a result, I ended up carrying him for most of the 1.5 mile race. This time, however, he was more up to the challenge, and did not fall at the beginning.
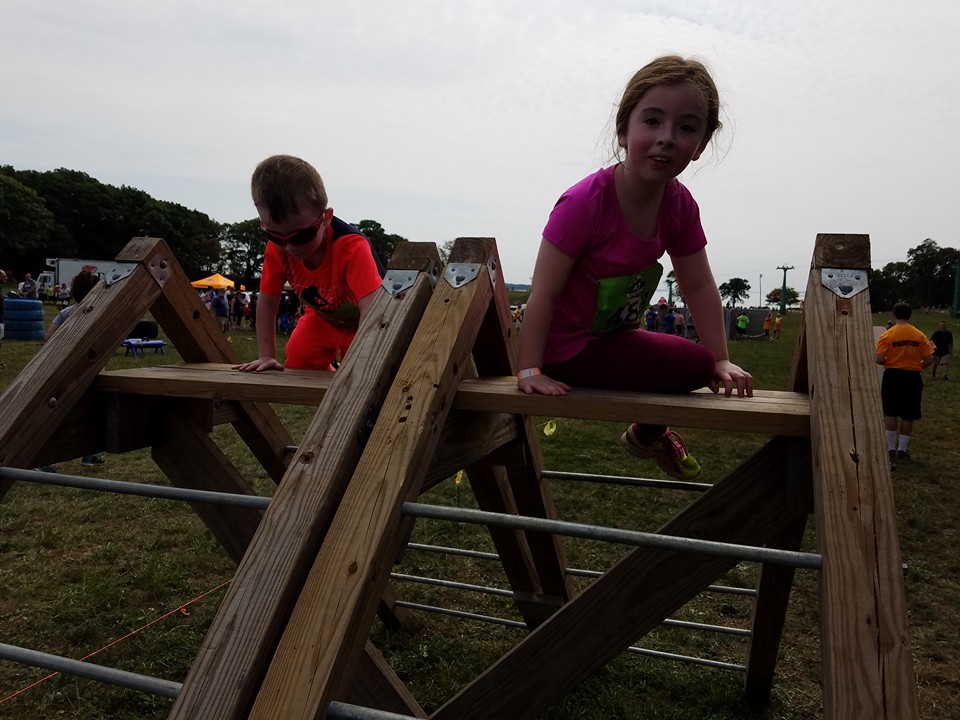 Over the topIn fact, both kids were much more willing to tackle obstacles that they had balked as previously, which means both that they're getting more mature and building confidence.
 Carrying rocksGetting them to go through the tunnels was never an issue, however.
 Through the tunnelThe trouble started when my son was getting thirsty, and since he had a fixation on drinking from straws at the time, he refused to drink it from a cup, despite the race organizers having plenty available. As the race went on, he got more and more upset and agitated, and despite my best attempts to get him to drink some water from a cup, he was completely melting down, and bowed out of the race within sight of the finish line. Lesson learned; next time I'll bring my hydration pack regardless of how short the race might be.
My daughter was getting tired and wanted to skip obstacles towards the end, but she still was tough do several before it was over.
 Negotiating the netLike her previous race, we ran through the finish line together and earned her another medal. On to the next one!
July 19, 2017
COMMAND: Northern Inferno Scenario 9: Fox Two
 Introduction
For the past few weeks northern Norwegian airfields have been pummeled by Soviet forces, rendering them unsuitable for fixed-wing operations. Forward-deployed RAF units have now withdrawn to airbases in Scotland to bolster home defence.
So far the United Kingdom has not been directly attacked; but now intelligence has suggested that the UKADGE and northern airfields are next on the target list.
Recon flights and satellite imagery have detected multiple bomber regiments fueled and armed with supporting assets in the Kola Peninsula. These forces are expected to be the spearhead of an attack on the UK mainland.
Will the RAF be able to protect the Crown and country once more?
Situation
43 and 111 Sqn at RAF Leuchars have been brought up to strength with additional Phantoms from storage. 43 Sqn has been forward-deployed to RAF Stornoway, while 5 Sqn Lightnings from Leaming have now forward-deployed to RAF Wick for additional point defence and interception tasking.
Intelligence strongly suggests a coming Soviet major attack against northern UK. Main targets will likely be UKADGE Sites in Scotland and the Outer Isles. 8 Sqn flying the venerable AEW Shackleton are now on round-the-clock patrol 200nm north of Scotland for early detection of possible raids.
HMS Bristol is set up-threat as a SAM trap to thin any raids inbound.
Latest intel has indicated a Regiment of Tu-128 Fiddler interceptors are based at Bardufoss air base, and one regiment of Su-24 Fencer strike aircraft in Iceland.
Enemy Forces
Surface: Nil
Air : Tu-95KM Bear C, Tu-128 Fiddler, Su-24 Fencer
Sub-Surface : Nil
Friendly Forces
RAF Stornoway : 43 Sqn (FGR.2 Phantom) (Callsign: Gamecock)
RAF Leuchars : 111 Sqn (FGR.2 Phantom) (Callsign: Scorcher)
RAF Lossiemouth : 8 Sqn (AEW Shackleton) (Callsign: Sentry)
RAF Wick : 5 Sqn (Lightning F.3A and F.6)
Silent SAM : HMS Bristol
Mission
Prevent Soviet strikes on mainland United Kingdom.
Execution
1. Deploy AEW Shackletons as required for long-range detection of incoming raids.
2. HMS Bristol to be deployed up-threat as SAM trap.
3. Use your Phantoms and Lightnings in their optimum roles, as long-range CAP and point-defence respectively.
Command and EMCON
Command: RAF Boulmer CRC.
EMCON: Bravo-ACTIVE ALL EMITTERS (exception HMS Bristol)
September 22, 1975 1000Z
 Royal Air Force Shackleton AEW.2NORWEGIAN SEA
The Reds were coming. Squadron Leader Mark Bolling sat at his control station in the venerable Shackleton AEW.2 high over the ocean. As long as the Shackleton was on station, he would be controlling the battle. Ultimately the Air Marshal at RAF Boulmer Control and Reporting Centre (CRC) was in nominal command, but Bolling was at the tip of the spear. It was he would would issue the orders to direct what interceptors where and when, to stop the Soviet attack. Intelligence had it that the the Soviets were planning a major attack on the UK mainland from its bases in northern Norway, the Kola Peninsula, and Iceland. The war had already taxed the RAF severely, and there were limited assets to fend off the next blow. Today he knew he was going to have his hands full.
On board the Shackleton the controllers were all in a row, sitting sideways in the cramped aircraft, facing their consoles with the starboard side of the fuselage behind them. Bolling could look to the right and see the cockpit, and look to his left and see the other controllers, wedged in between all of the equipment. Each man could stand up (slightly stooped), but that was about it.
Intelligence indicated that the attack would come soon, so two of the three remaining Shackletons were being launched from RAF Lossiemouth in Scotland, one to cover the approaches from Iceland west of the Faroe Islands, and the other over Norway near Trondheim Fjord. With their combined radar coverage, no raid would be able to slip by.
Each Shackleton had a pair of F-4s to guard them, and each sector--east and west, had both a separate CAP and tankers assigned to it. The Lightning Interceptors would stay on the ground until they were needed. They had short legs so they could not afford to go airborne before then.
HMS Bristol maneuvered in the Norwegian Sea east of the Faroe Islands and north of the Shetlands, radars off, waiting for any unwary Soviets to fly overhead. It headed eastwards, anticipating the most likely approach of any raids from northern Norway.
 Initial positionsIt did not take long for the Shackleton's radar to detect the first Soviet movements.
 "Contact, four-ship, bearing 275 for 200 miles from Faroes RP."
If the Soviets were initiating a major attack, they likely would target the forward deployed radar stations in the hopes of blinding the NATO forces before the main raid took place. "They're probably going for the Reporting Post," Bolling speculated aloud. A pair of F-4 Phantoms was headed to their CAP station, and Bolling ordered them rerouted to an intercept course.
"Contact lost," came the report a few seconds later.
"They probably dropped altitude," Bolling said. "The Phantoms will pick them up as they close in."
Confirming his suspicions, several minutes later the Phantoms reported in. "Sentry, Gamecock 91. Contact on the bogies, Angels One."
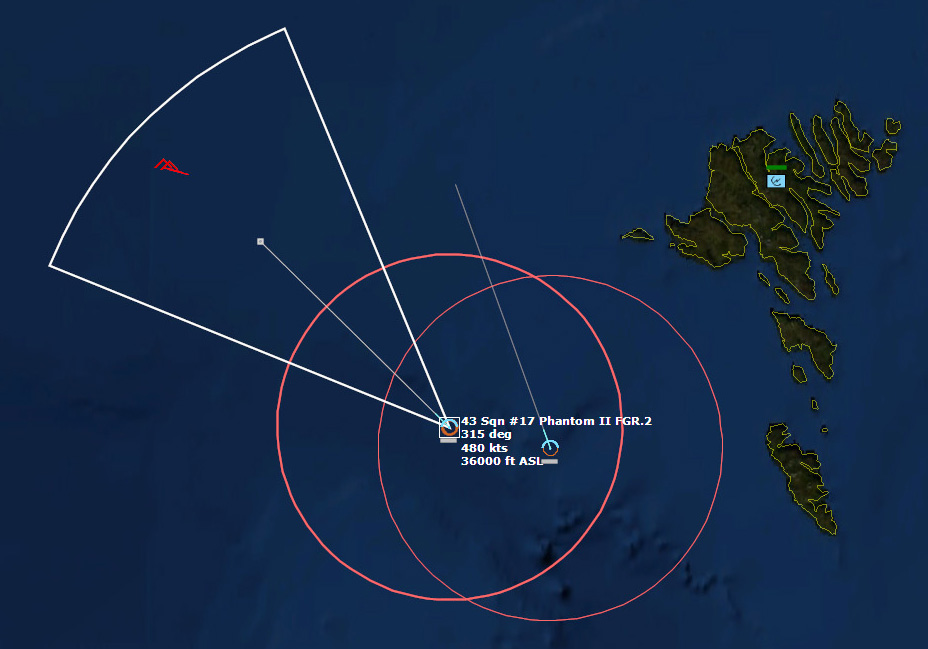 Bogeys detected101721Z The Phantoms closed the range and shot down all four Su-24 Fencers. Not bad, Bolling though, but this is just the beginning. In shooting down the Fencers, the Phantoms expended all of their Sparrows, so Bolling ordered them home. The sooner they got home, the faster they could rearm and refuel for the coming battle ahead.
114226Z "Sir, we're getting some jamming." The radar scopes on board the Shackleton turned to hash. The raid was was on its way, and it would take a while before the Shackleton's radar burned through the jamming.
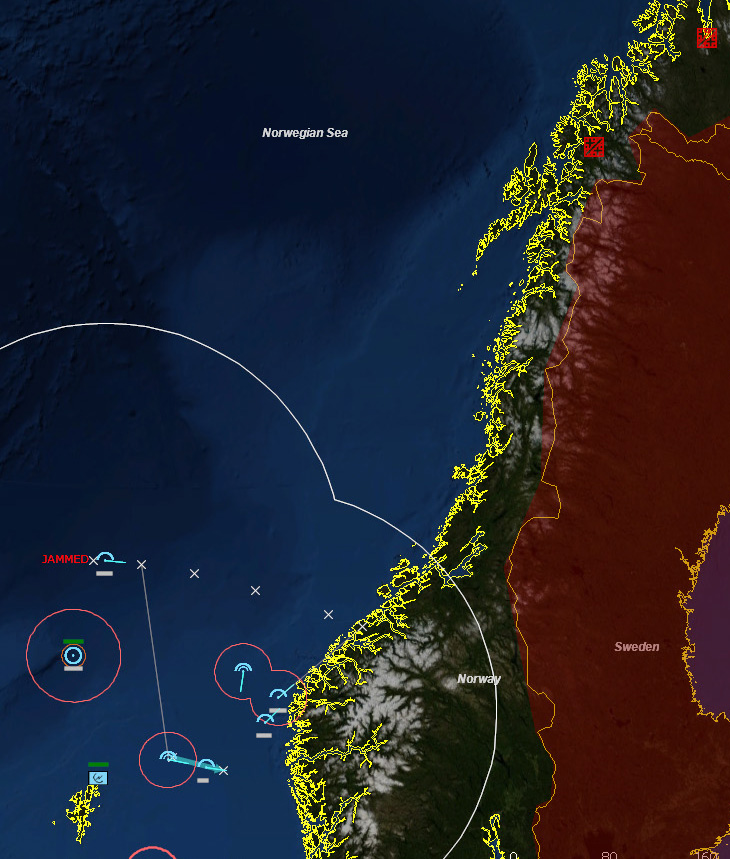 I don't detect a raid yet...but it's coming120617Z "Contact."
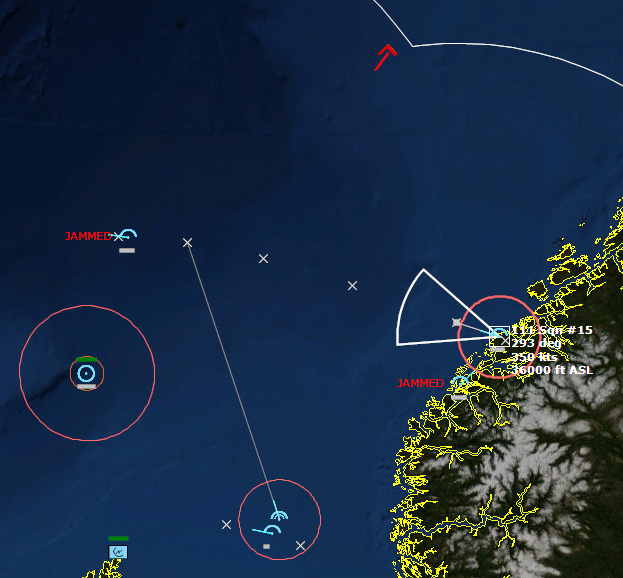 A three-ship of bogeys detected, undoubtedly with more behind121419Z "Sir, we have multiple contacts, designate Raid 1."
 Eight more bogies detected"Raid count is fourteen aircraft."
Bolling watched the scopes as more and more contacts appeared. "Raid count is now nineteen." Bolling smiled grimly. This was it....
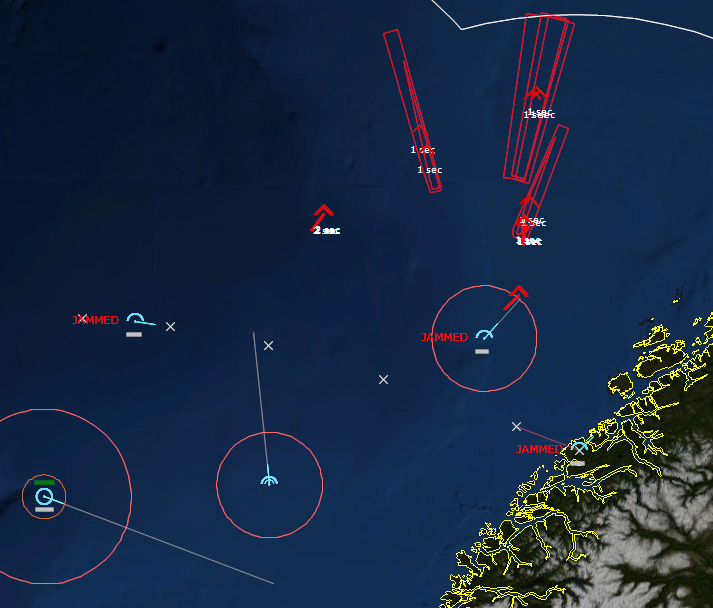 The raid just keeps getting biggerFlight Lieutenant David Lynch, in an F-4 Phantom II FGR.2, was the first pilot ordered to intercept. His wingman had to RTB early with engine trouble, so his Phantom was meeting the raid head on, all alone.
"Sentry, Scorcher 81, Fox One!" And then a short time later, "Good kill! I have visual, splash one Bear Charlie."
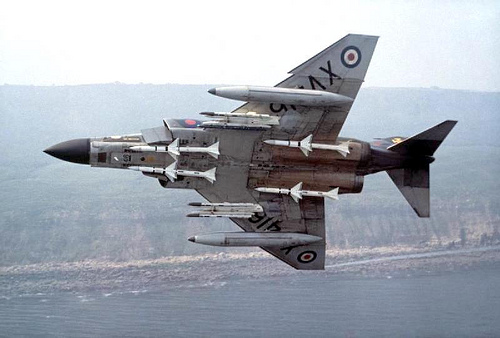 F-4 Phantom II FGR.2 from 111 Sqn.
"Copy, Scorcher. Raid count is now twenty-four."
Sqn Ldr Bolling considering diverting some F-4s from his western CAPs, but he was still concerned about a pincer attack by Fencers out of Iceland. For now, the eastern Phantoms were on their own. Scorcher 81 was out in front, and another pair of Phantoms was closing in to support but it would be some time before they got there.
121849Z "Raid count twenty-six."
"Sentry, Scorcher 81, splash two Bear Charlie. I am engaged defensive." Flt. Lt. Lynch dodged hard as the Bears' escorts, Tu-128 Fiddler As, began firing missiles.
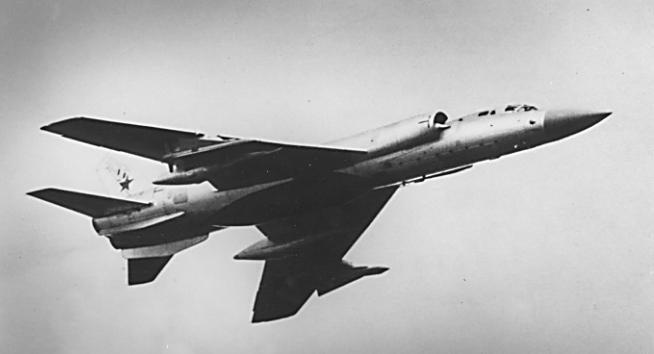 Tu-128 Fiddler"Raid count thirty."
No less than six Fiddlers had begun to engage him, and Lynch maneuvered his Phantom to go on the offensive. His Phantom was not the nimblest of dogfighters, but the Fiddlers were far, far worse. His best chance of survival was the Fiddlers was to duke it out.
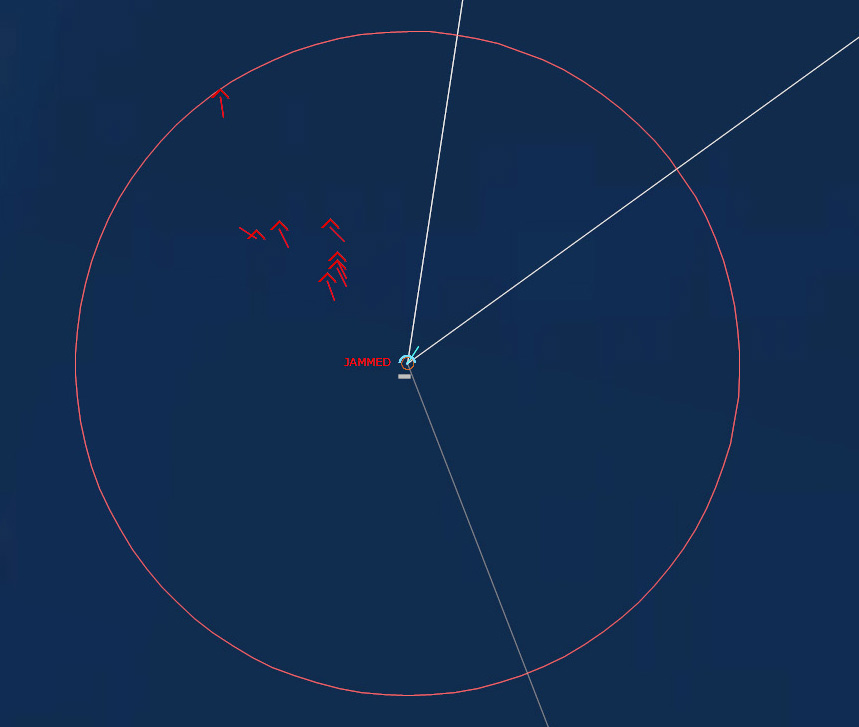 Phantom 111 Sqn #15 is engaged with six Soviet fighters"Raid count thirty-one."
Lynch maneuvered behind a Fiddler and launched a Sidewinder, bringing it down, and then his wingman. These things turn as bad as bombers, he thought to himself. He lined up on another Fiddler, closing in fast.
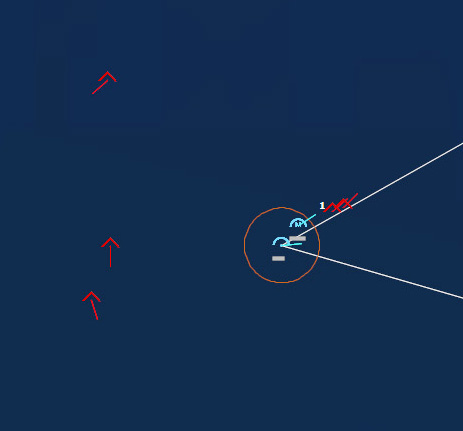 The F-4 shoots down a Fiddler with a Sidewinder"Fox two! Miss." The Phantom and the Fiddler turned together at 1600 ft ASL. Lynch couldn't turn hard enough to take out the first Fiddler, but there was another a little further away, so he sent a Sidewinder after that one, killing it. He had made ace in a single mission. He closed into gun range with the original Fiddler and opened up, killing it. "Splash Six!" he called out jubilantly. "Who's next!"
The two remaining Fiddlers turned and ran, Lynch's Phantom in hot pursuit.
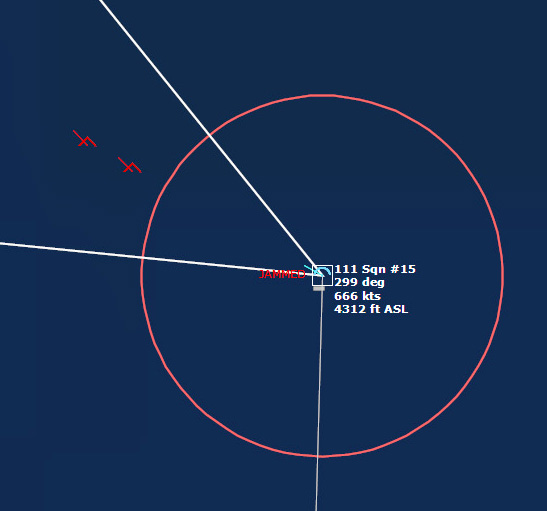 The Phantom chases down the fleeing FiddlersLynch's Phantom was whittling down a tiny portion of the inbound raid, but more and more aircraft appeared on the scopes. "Raid count is thirty-four."
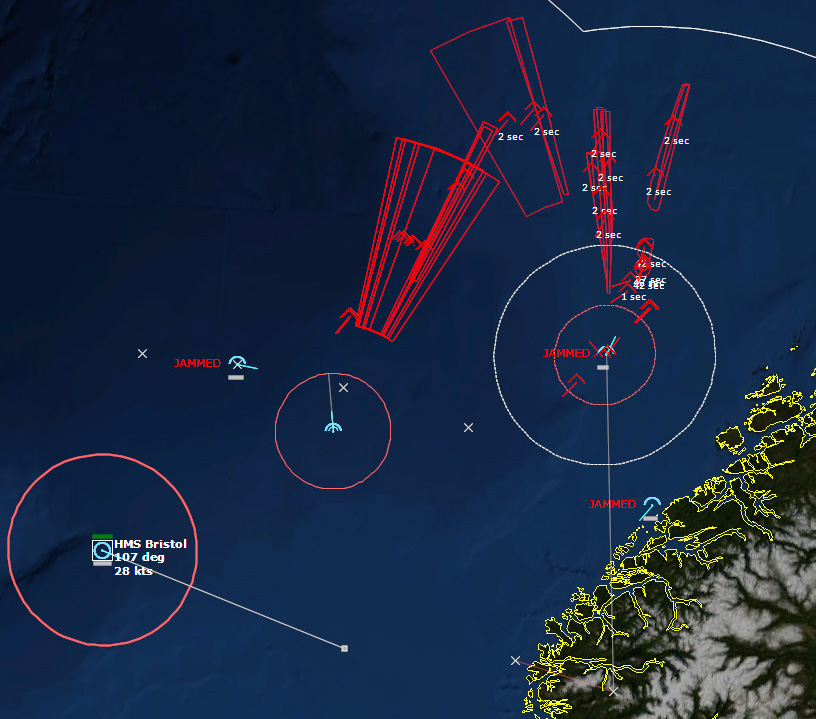 The skies above the Norwegian Sea are getting crowded"Correction, raid count is now forty." Some of those were escorts, and some were jammers, but a large amount of them were bombers.
 Lynch closed in on the retreating Fiddler, low on both fuel and ammunition.
"We need to break off," Lynch's backseater warned, looking at the radar picture which showed six more Fiddlers closing in.
"I'm going to get this bugger!"
"Missile inbound!"
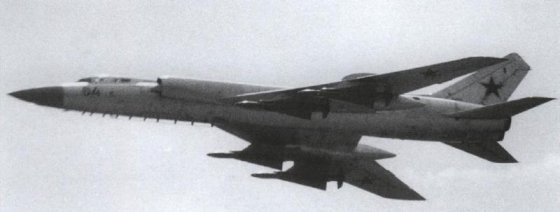 Tu-128 Fiddler armed with four AA-5 Ash SARH missilesLynch accelerated, overshooting his target and breaking left to evade the missiles. Both AA-5 Ashes soared past the Phantom, and Lynch was grateful they weren't that accurate. How many have I dodged already? he thought. Six?
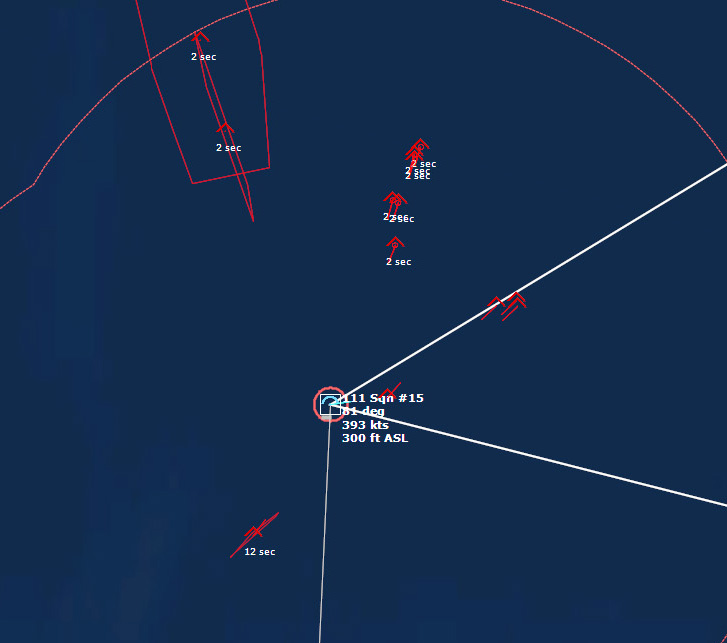 More fighters close in on the lone Phantom"Scorcher 81, Sentry, break off," Sqn Ldr Bolling ordered. He could sense by Flt. Lt. Lynch's voice that he was keyed up from all of his kills and not thinking straight. With the Phantom undoubtedly running low on fuel and out of missiles, it was better to preserve both the aircraft and its crew rather than throw it away against more escorts.
"Negative, Sentry, we still have some bullets left. We're taking out as many as we can."
"Raid count forty-three."
Bolling was about to repeat the order for Lynch to break off, but then his attention was drawn to another engagement. Farther west, two more Phantoms had gotten within range of a flight of Bears.
"Fox One!"
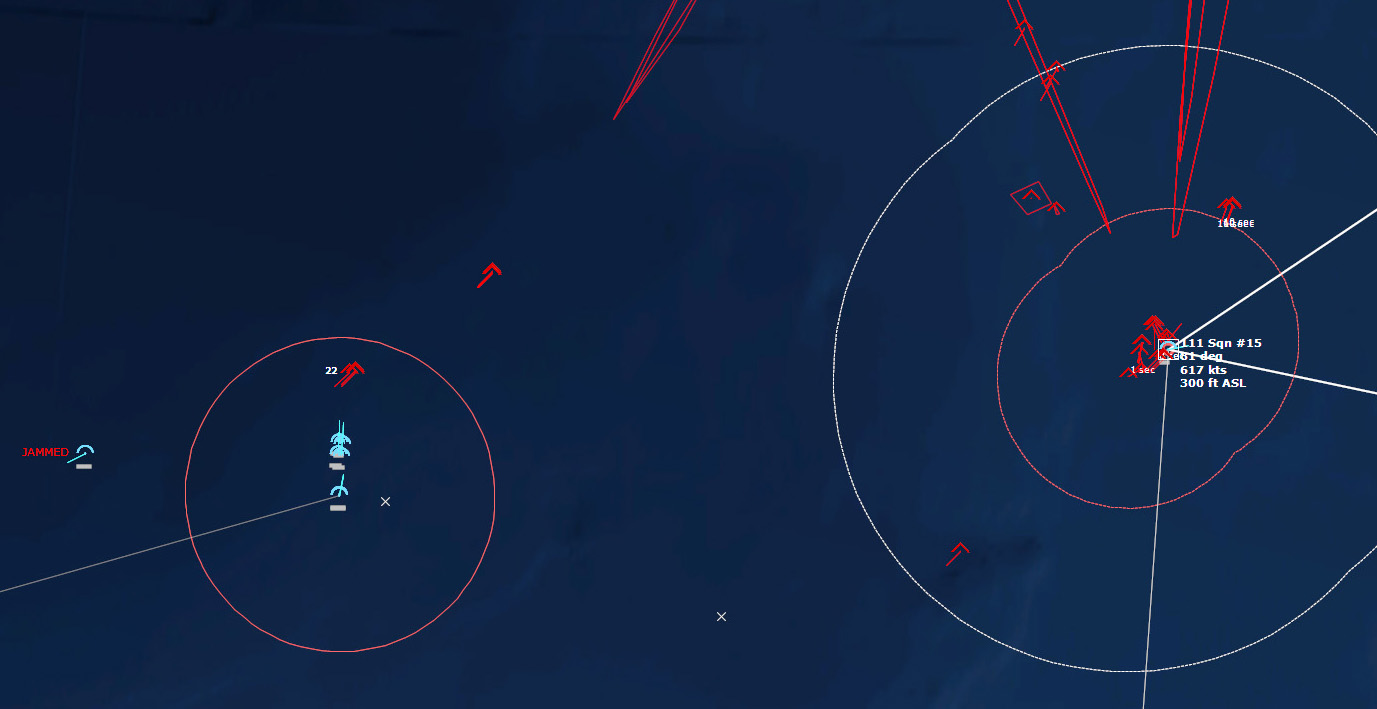 Two dogfights engagements are now underwayThe two Phantoms splashed three Bears, and Bolling turned his attention back to Lynch's fighter.
Lynch maneuvered wildly, his fuel state becoming critical. He was now engaged with eight enemy fighters, and only had enough bursts in his gun for five shots.
"Lynch, we're bingo," called his backseater, his voice tinged with worry. "We need to get out of here. Missiles inbound!"
Lynch slammed the Phantom into another hard turn, and dodged the ninth and tenth missile launched at him that day. He cursed and then turned the Phantom south. Six kills would have to be enough. It was time to go home.
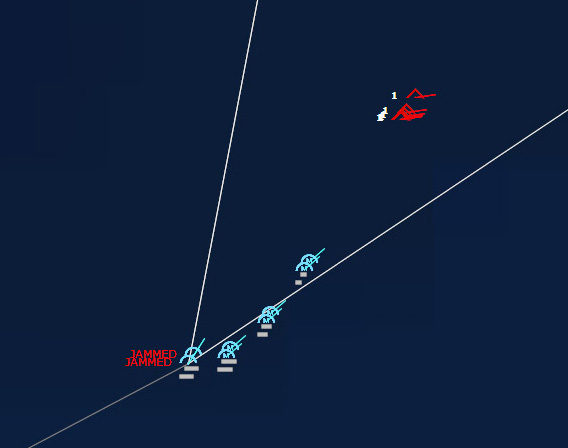 43 Sqn 5 and 6 fire Sidewinders at the retreating Fiddlers, splashing three before running out of SidewindersThe two western Phantoms together wiped out a section of six Fiddlers, killing three with Sidewinders and then the remaining three with guns. Bolling directed them to head after another flight of Bears.
 Lynch's Phantom headed south, and the Fiddlers followed, hoping to get their revenge. One by one they took turns shooting AA-5 Ashes at him, and each time he was forced to turn hard to avoid them.
He had dodged fifteen missiles already when the sixteenth forced him to pull the Phantom into another turn. His hand shook on the stick from exhaustion. The missile streaked in, and he almost dodged it. The warhead detonated, shredding the tail and aft fuselage with fragments. The Phantom shook violently, but he managed to level off. "Eject! Eject! Eject!"
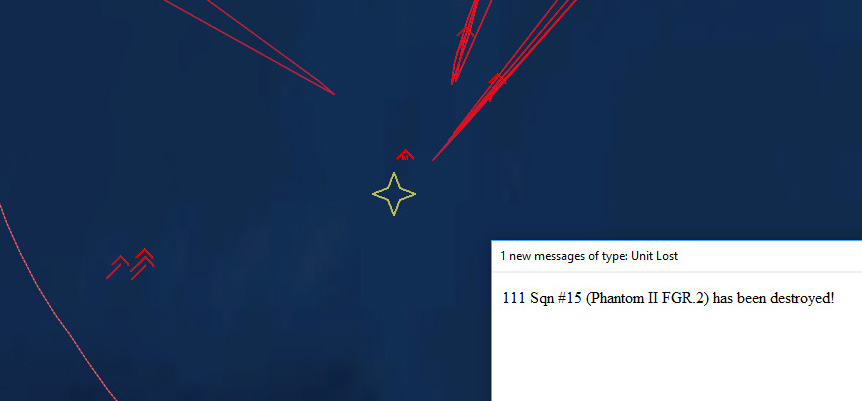 Flt. Lt. David Lynch's Phantom is finally shot downLynch's chute was good, and to his relief he could see his backseater's as well. Below the ocean looked huge and blue. He knew that Trondheim Fjord was maybe 100 miles to his east, and with the Norwegian Sea sanitized of Soviets, there was a chance he'd be rescued.
After Lynch's Scorcher 81 was shot down, the flight of six Fiddlers, out of SARH missiles, turned and headed for home.
Gamecock 31 and 32, the two other engaged Phantoms, closed on a trio of Tu-95KM Bear Cs, with only their guns, but they were unlucky On their first pass, Gamecock 32 was shot down by a lucky shot from the lead Bear's tailgunner, and as Gamecock 31 maneuvered back into position, the gunner shot him down as well.
Bolling assessed the situation. "Seven Fiddlers are bugging out," his controller said, "but three more bogies inbound. Raid One is now thirty-nine aircraft."
The next pair of Phantoms closed in on the raid, and Bolling knew it would be a while before more could be launched.
124419Z Scorcher 61 and 62 was the next Phantom flight in range of a lone Bear. It took all of their Sparrows against and finally a Sidewinder to kill it. The amount of missiles needed to bring down a Bear was frustrating. The Phantoms flew on to take on another flight.
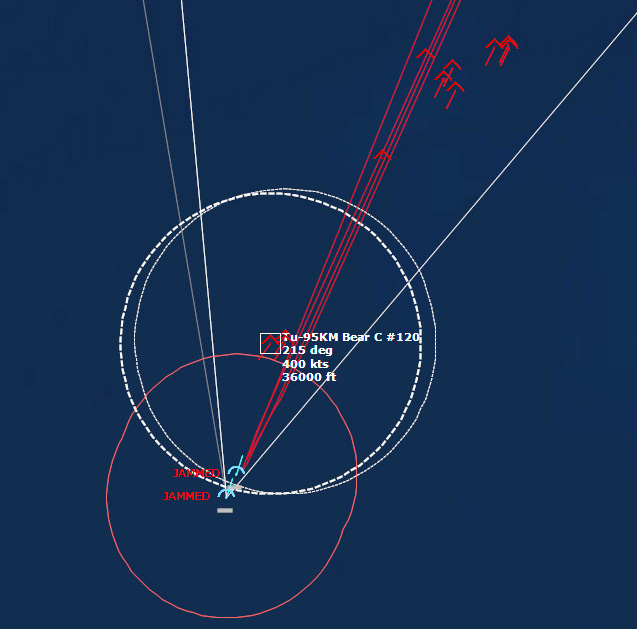 Scorcher 6 engages an endless stream of Bears"How long until those other fighters are ready?" Bolling asked.
"Twelve minutes."
Scorcher 61 and 62 shot through a formation of Bears at a combined speed of 900kts. They could see tracers in the sky from the Bears' tail gunners. Scorcher 62 lined up a shot. "Fox Two!" The Sidewinder streaked in and hit the Bear. He quickly lined up on the second. "Fox Two!" The shot was a little too close, and the missile didn't lock on.
Scorcher 61 took his place, killing the Bear with a Sidewinder. Scorcher 62 and the last Bear traded gunshots while Scorcher 61 moved to back him up.
"Fox Two! Fox Two!" Scorcher 61 called out, and 62 broke left to get out of the way as the missiles locked on. The first Sidewinder missed, but the second blew the wing off the Bear.
Scorcher 62 had two Sidewinders left, while 61 only had guns. Normally with so few weapons left they would head home, but with a raid this size inbound, there was no going home while they still had weapons.
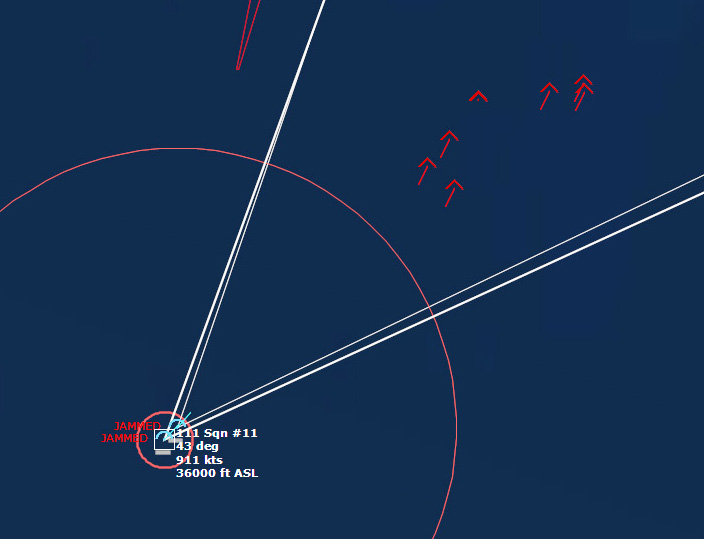 Gamecock 6, low on weapons, engages a host of bogies"Raid count?"
"Thirty-five."
"Distance?"
"Nearest bogies are 300nm from RAF Wick."
"How long until the Phantoms can launch?"
"Eleven minutes."
"Call Wick and have them start launching Lightnings."
124959Z Scorcher 61 and 62 came into range of another flight of bogies, identifying several as bombers.
"Fox two!" Scorcher 61 called, firing off his Sidewinders, both of which failed to track.
"Missile launch!"
"Break left!"
"No, wait! Vampire! Vampire! That's a cruise missile!"
"Sentry, Scorcher 61, we have missile launches from the Bears. Three Vampires, repeat three Vampires!"
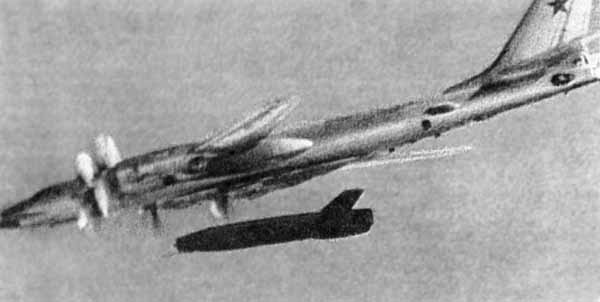 Tu-95 Bear launching an AS-3 Kangaroo
"Copy, Scorcher 6,"
"We are Winchester, repeat, we are out of missiles."
"Copy." The controller replied.
"Plot the course of those vampires," Bolling ordered his technicians, "I need a list of possible targets."
"Sentry, we have have a tally on two Tu-16P Badger Julietts in addition to the Bears," and then, a few seconds later, "I'm hit, I'm hit!"
"Sentry, Scorcher 61. 62 has been hit."
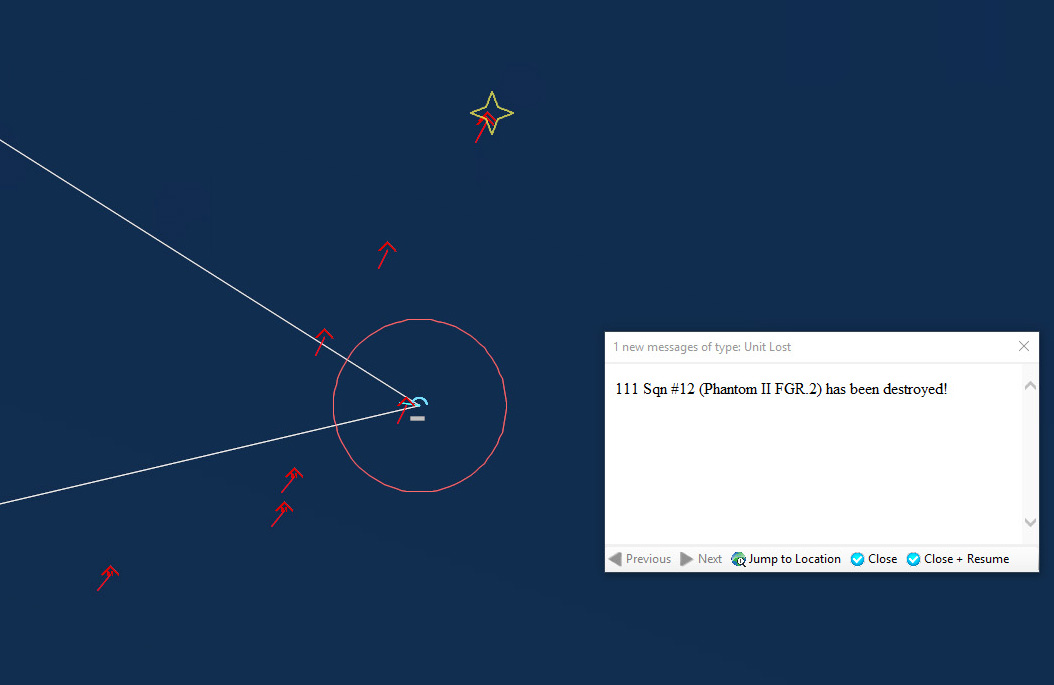 Scorcher 62 is shot downWith all of the Phantoms getting shot down, Bolling was about to order Scorcher 61 to break off when the Phantom's pilot called out, "Splash one Bear!"
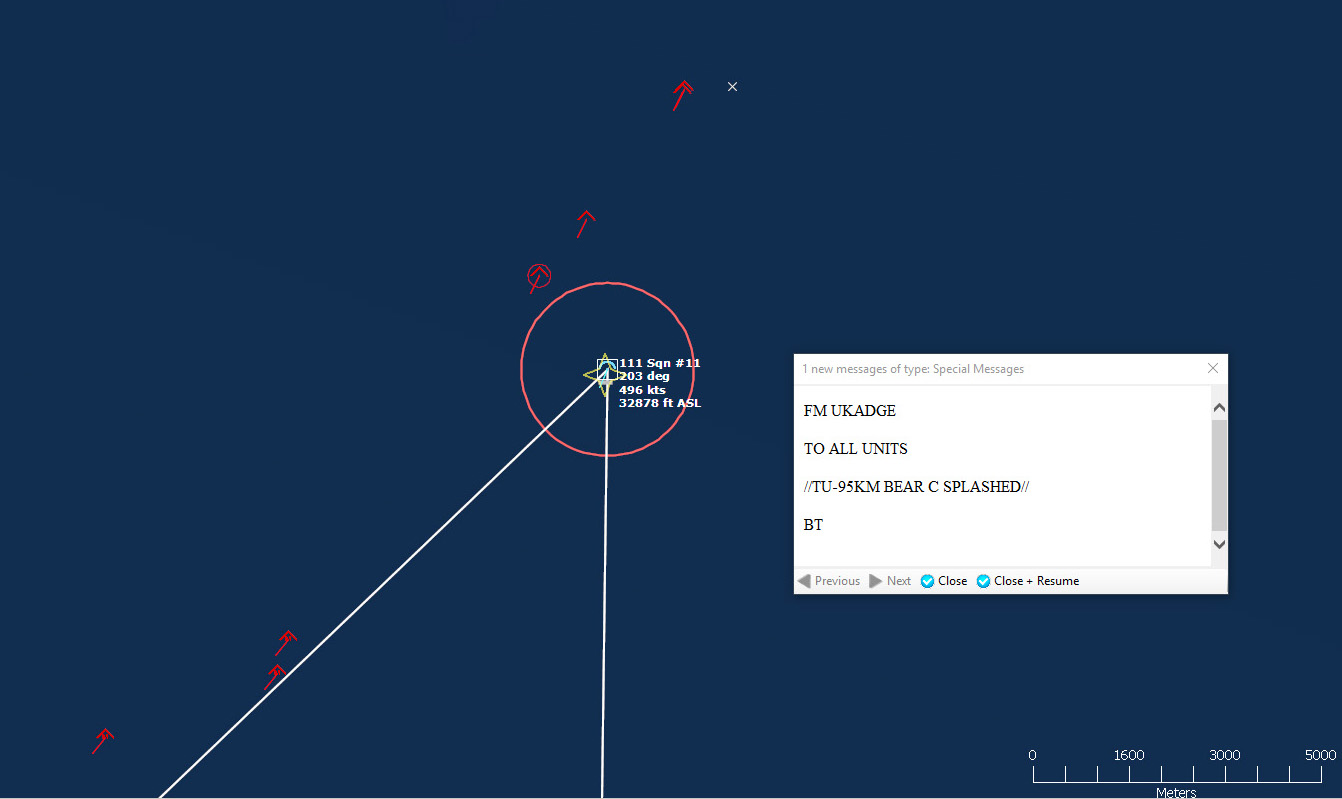 Scorcher 61 gets a killA few seconds after that, "Splash Two!" Scorcher 61 banked hard to the right and circled around behind the two trailing Badgers. Tracers lit the sky as both of their tail gunners tried to take out the Phantom, and the Phantom returned fire. The Badgers won the duel, and 23mm rounds from their tail guns tore into the Phantom's wings and fuselage, sending it tumbling from the sky.
The first four Lightnings took off from RAF Wick, climbing rapidly.
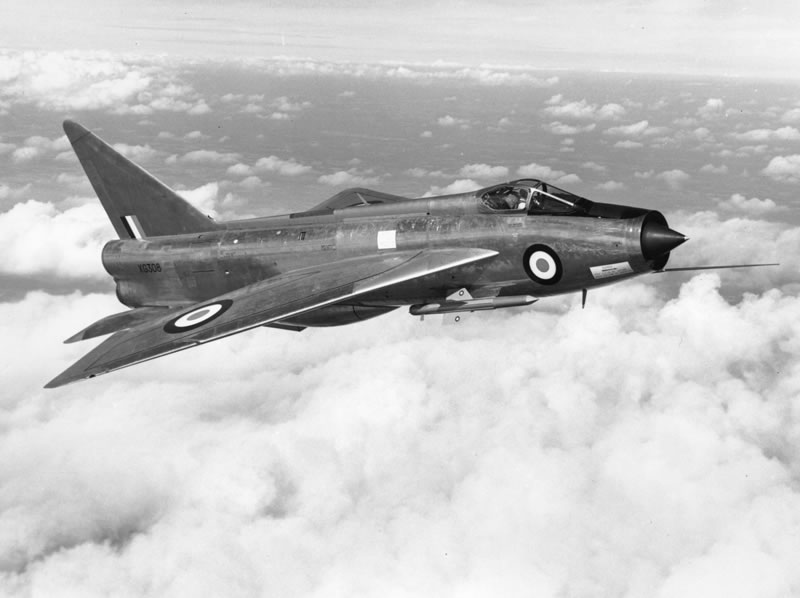 English Electric Lightning125520Z "Sir, we have multiple bogies entering Bristol's SAM envelope."
"Bristol, Sentry, five bogies, bearing 050 for 35 miles, Angels 36. Light 'em up."
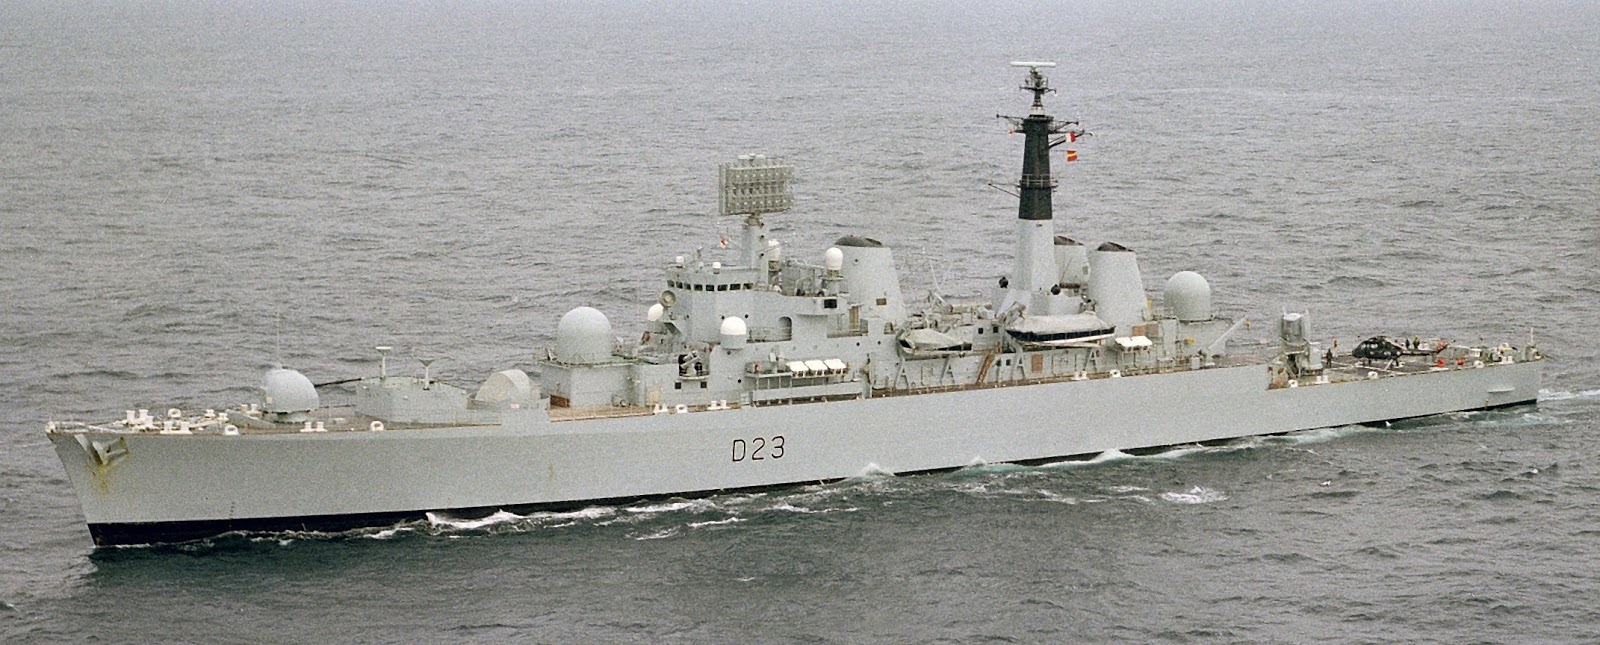 HMS BristolHMS Bristol, steaming at flank speed to try to get a better shot at the incoming range, lit off its Air Search and Type 909 Illuminator radars.
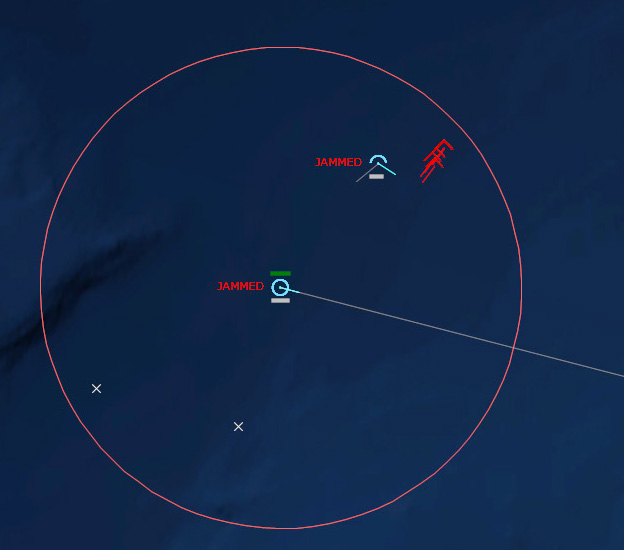 HMS Bristol lights off its radars"Birds away!" called out a controller. "Bristol is launching SAMs."
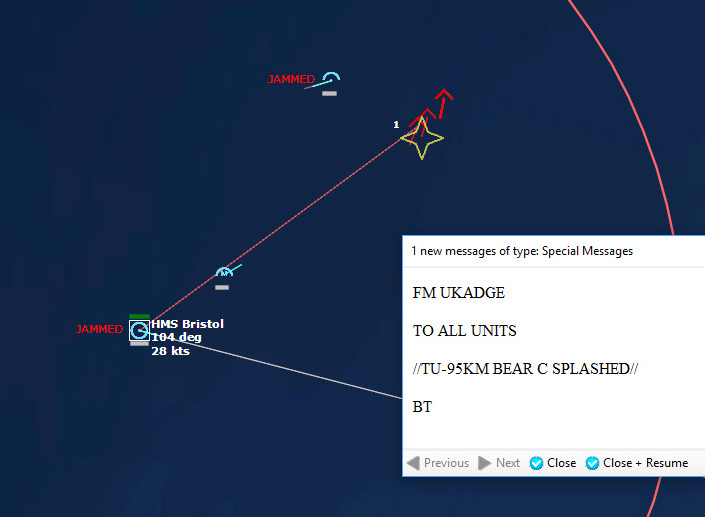 Bristol gets its first killBristol shot down the remaining two Bears, and then turned its attention to the trailing Badgers jammer aircraft.
"Sentry, Scorcher 7, we are engaging the inbound Vampires. Fox One!"
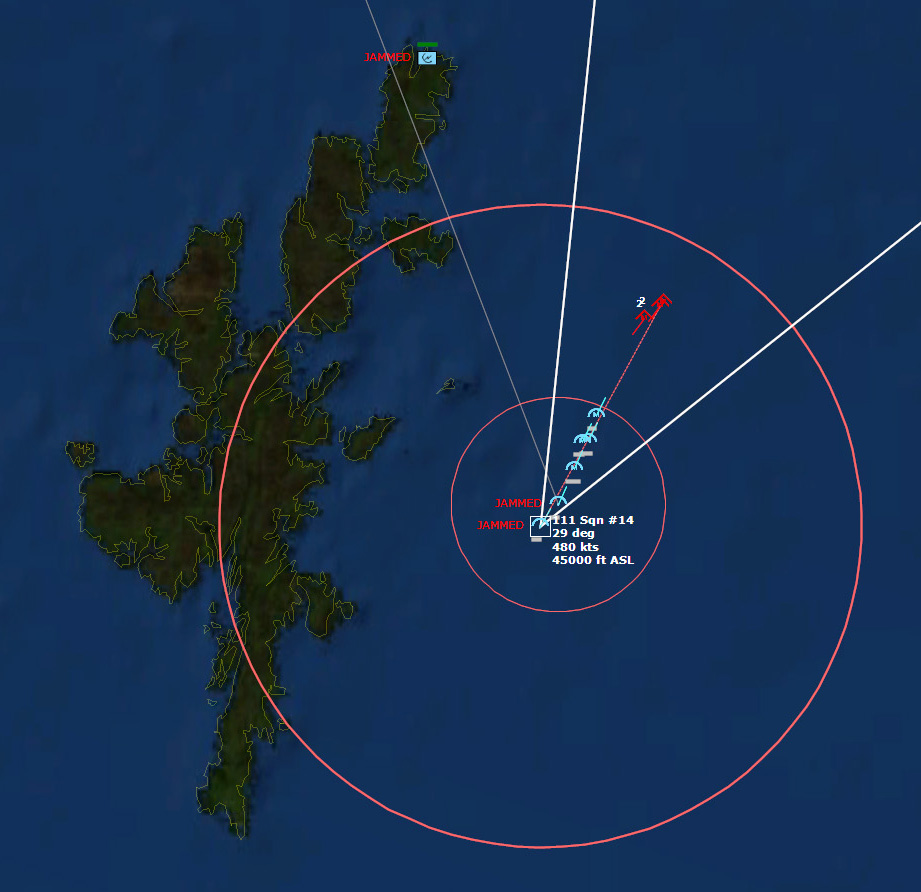 Scorcher 7 engages the nuclear cruise missiles just east of the Shetland IslandsThe pair of Phantoms was forced to expend all of their Sparrows, but they managed to shoot down all three Vampires.
"Sir, the Phantoms at Stornoway and Leuchars are ready."
"Get some airborne."
130307Z "Vampire! We have a missile launch!"
"Sentry, Scorcher 7, we are engaging a Bear Charlie and Badger Juliett-two-ship. Vampire! The Bear just launched! Fox Two!"
"Sentry, Gamecock 42, I am engaging the Vampire. Fox One!"
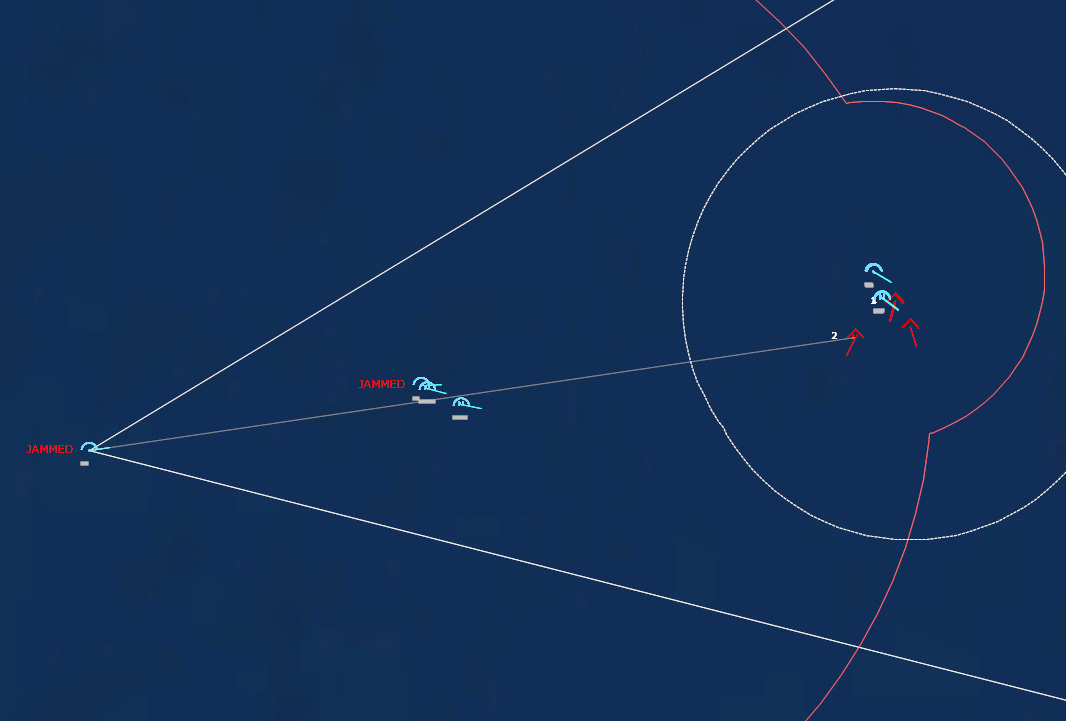 Scorcher 7 engages the Badgers with Sidewinders while Gamecock 4 engages the VampireGamecock 42's last Sparrow took out the Vampire, while the Scorchers took out the two Badgers, although they had to use all of their Sidewinders to do it. Scorcher 72 and the Bear each killed the other with guns as close range.
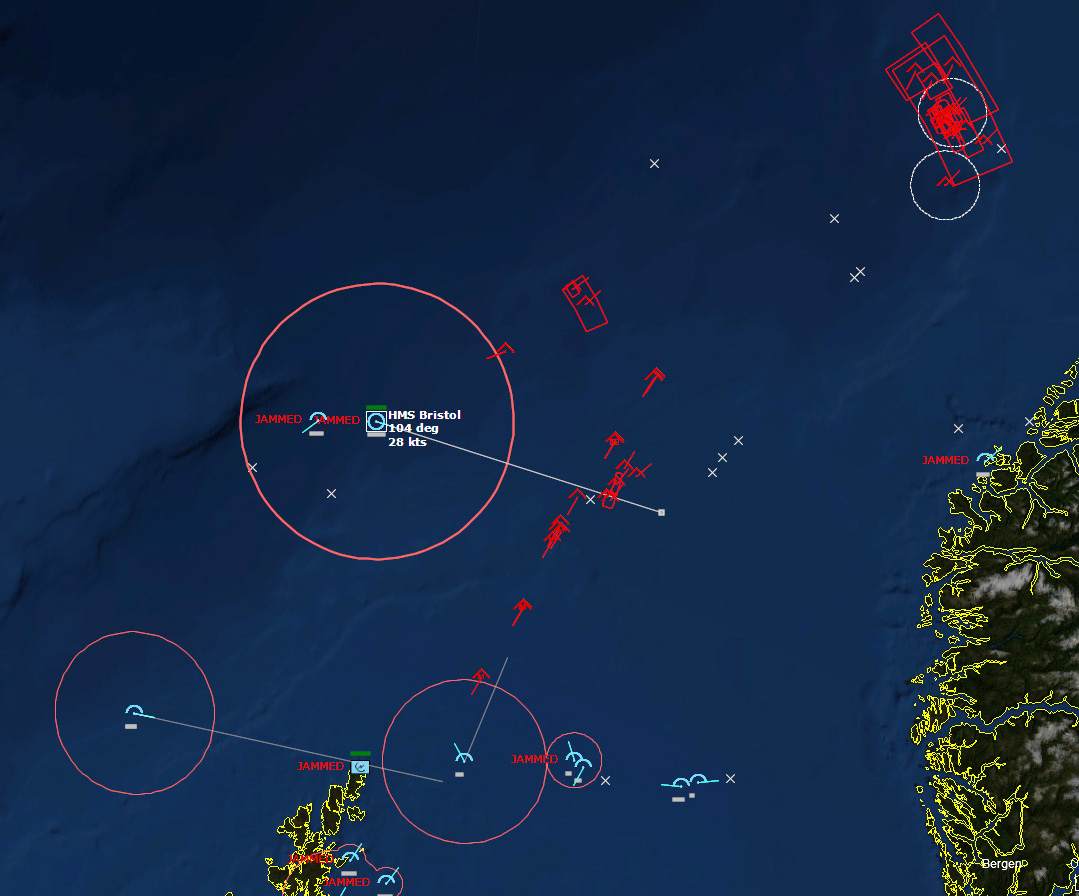 The skies are busyBolling stared at his scope, trying to make sense of the situation. There appeared to be some aircraft heading towards his Shackleton, perhaps Fiddlers, but they were entering Bristol's SAM envelope, so he ignored them. The primary raid was occurring to the east, and the airborne fighters were doing their best to take out the vampires as they were launched. Far to the northeast was a group of Soviet aircraft that appeared to be circling. Could they be the tankers? Bolling cursed that he could not send any fighters up there to take it out. The immediate danger was the present raid--they could not let a single Vampire through.
Gamecock 41 shot down another vampire. Five vampires were left. More Bears turned and began to head north.
HMS Bristol began to fire on the aircraft closing in on it. As a precaution Bolling ordered the Shackleton's pilot to head away from the aircraft--there was no way they could outrun them, but they could delay the intercept long enough for Bristol to deal with them.
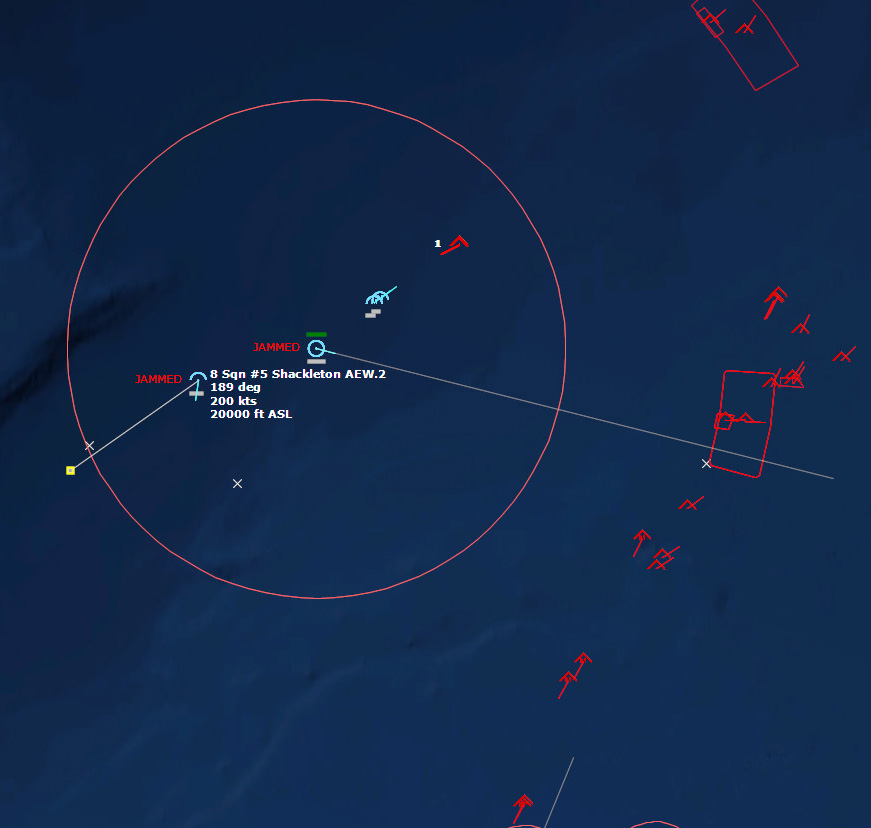 HMS Bristol launches on the approaching aircraft to defend the Shackleton AEW.2Bristol's first salvo took out a Fiddler, and the others dodged while Bristol launched another. Bristol's Sea Darts took out a second Fiddler, and then a third, and then two more.
 Gamecock 41 took out a pair of Vampires with its Sidewinders. There were three left. Gamecock 41 was running on fumes, and so was happy to leave the remainder to the Lightnings. The first Lightning expended his Firestreaks without a hit. The second pair of Lightnings shot past their targets and turned, but had a hard time catching up to the 920kt AS-3 Kangaroos.
131437Z Three more Vampires were launched. New F-4s from Stornoway were closing in to backup the Lightnings.
The Lightnings had failed in their intercepts, so it was up to the F-4s. Gamecock 62 launched its first Sparrows.
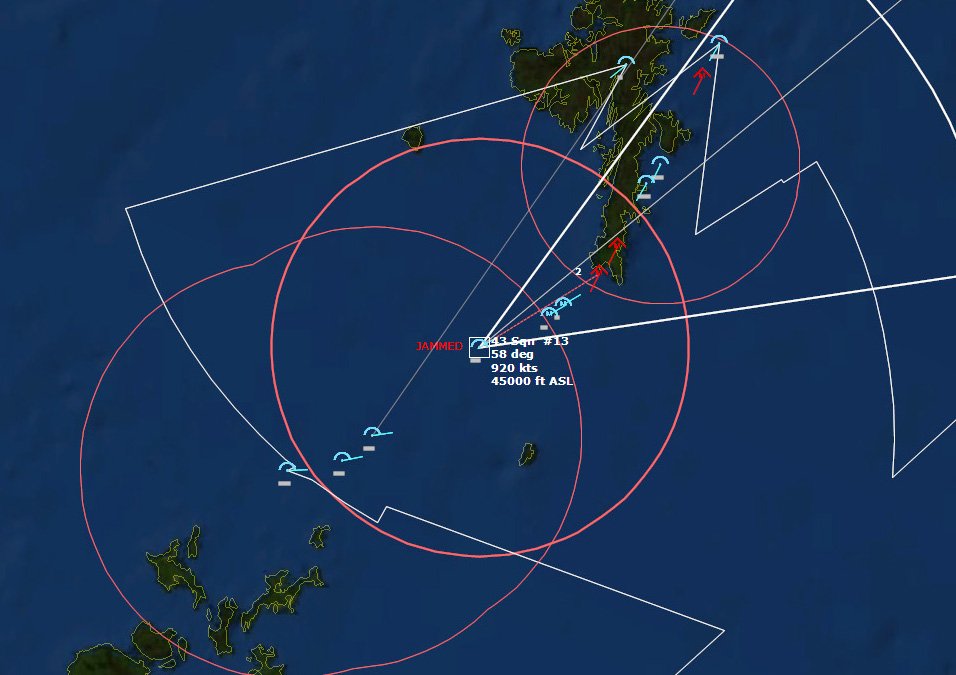 The Phantoms attempt to intercept the VampiresThe Phantoms did well, shooting down five out of six of the Vampires.
 132300Z Three more Bears launched cruise missiles, but this time there were plenty of Phantoms ready to shoot them down. By this time, most of the raid had turned back north. One Lightning shot down two of the missiles, and a Phantom shot down the third.
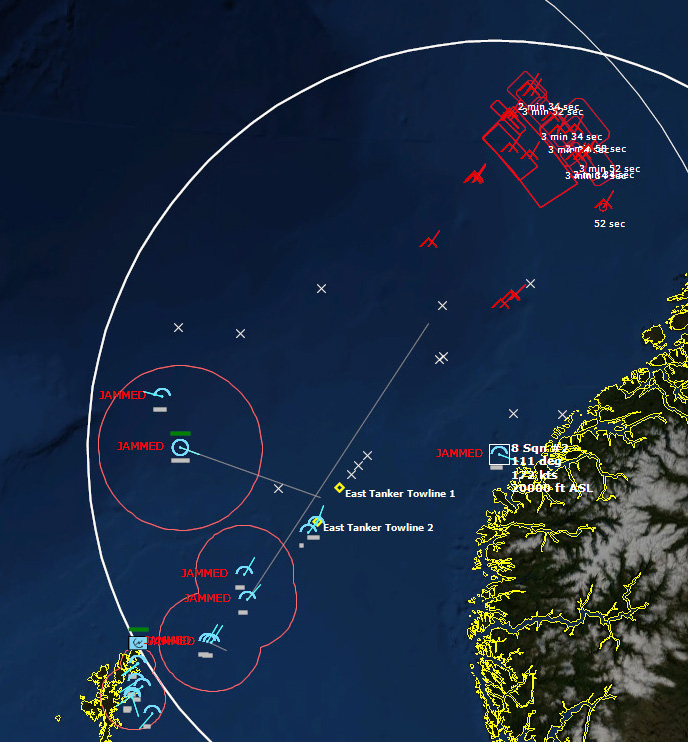 The raid appears to be over...will there be another?"Let's make sure this this is over," Bolling said. "Head north a bit," he ordered the pilot. The Phantoms on CAP were refueling, and most other aircraft were heading back to base to refuel and rearm. But Bolling was concerned another raid might be on the way, and he was determined not to get caught flatfooted.
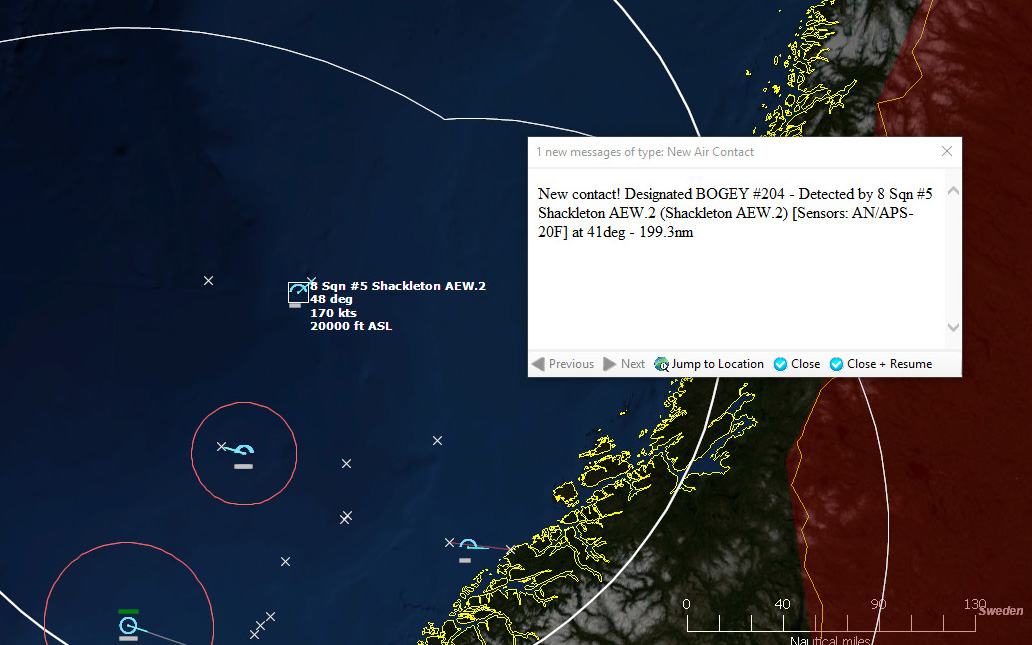 Contact143344Z "Contact, bearing 041 for 199 miles. Correction, contact is two-ship."
And then, a few minutes later. "Another contact, 344 for 196 miles."
The first two contacts were heading northwest. "What could they be doing?" he thought. "Is it their CAP?" He ordered the Phantoms on CAP to investigate.
The Phantoms closed in, and soon it was obvious. The contacts were not the Soviet CAP, but rather than Badger jammer aircraft and their Tankers. The two Phantoms managed to down one tanker and one jammer before they had to break off.
Conclusion
In short, I didn't think this was going to be a pure cruise missile attack. What I was expecting was a multi-axis attack, with coordinated attacks from Iceland and northern Norway, involving some cruise missiles, but also bombers and more short-ranged attacks by the Fencers. Instead, it was essentially a minor probe from Iceland followed by a major cruise missile attack from northern Norway. I kept holding back many of my interceptors so as to wait for the raids to get a little closer, but what happened was that the raid simply launched their cruise missiles at 200nm and then turned away (as they do...). My interceptors that were already airborne went Winchester shooting down planes left and right, but because I held so many back, I ended up shooting down only 15 Bears, rather than the 16 that were "required" to advance to the next mission. In the end the real victory was that I did not allow any cruise missiles to reach their targets.
So I could continue along with the campaign, I replayed the mission, and this time I sent everything I had north to intercept the inbound raid. The result was that I shot down a lot more Bears, but a single cruise missile slipped through and hit RAF Lossiemouth. Oops. On to Scenario Ten!
Minor Victory
Score: 750
SIDE: Soviet Union
===========================================================
LOSSES:
-------------------------------
4x Su-24 Fencer B
15x Tu-95KM Bear C
15x Tu-128 Fiddler A
1x Tu-16P Badger J
1x Tu-16P Badger H
5x Tu-16Z Badger A
EXPENDITURES:
------------------
22x Generic Chaff Salvo [4x Cartridges]
16x AA-5 Ash A [R-4R, SARH]
1x AA-5 Ash B [R-4T, IR]
77x 23mm AM-23 x 2 Burst [50 rnds]
28x 23mm AM-23 x 2 Burst [50 rnds]
14x Generic Flare Salvo [4x Cartridges, Single Spectral]
16x AS-3 Kangaroo [Kh-20M, ASM, 800kT Nuclear]
1x 23mm AM-23 Burst [25 rnds]
SIDE: NATO
===========================================================
LOSSES:
-------------------------------
6x Phantom II FGR.2
EXPENDITURES:
------------------
84x AIM-7E2 Sparrow III
44x AIM-9D Sidewinder
32x 20mm/85 SUU-23/A Gun Pod Burst [100 rnds]
20x Sea Dart Mod 0
4x Firestreak
2x Red Top
July 17, 2017
Savage Race 2017
There was a lot of anticipation for this race. Word of its good reputation had spread from other parts of the country and so many people were looking forward to it coming to New England.
From looking into it ahead of time, it looked much like a Spartan Race, but without the Spartan elitism. Similar obstacles, but with some fun ones thrown in. Spartan Race seems to be all about brute strength, whereas Tough Mudder's shtick is more about teamwork and mental obstacles, and the vibe I got from Savage Race was somewhere in between.
There were over two hundred New England Spahtens registered for the race, so the team was going to make a big showing. The event was to take place at Carter and Stevens Farm in Barre, Massachusetts, a venue I am familiar with, having raced there three times before (2015 Spartan Sprint, 2015 Spartan Super, and 2015 Battle Frog).
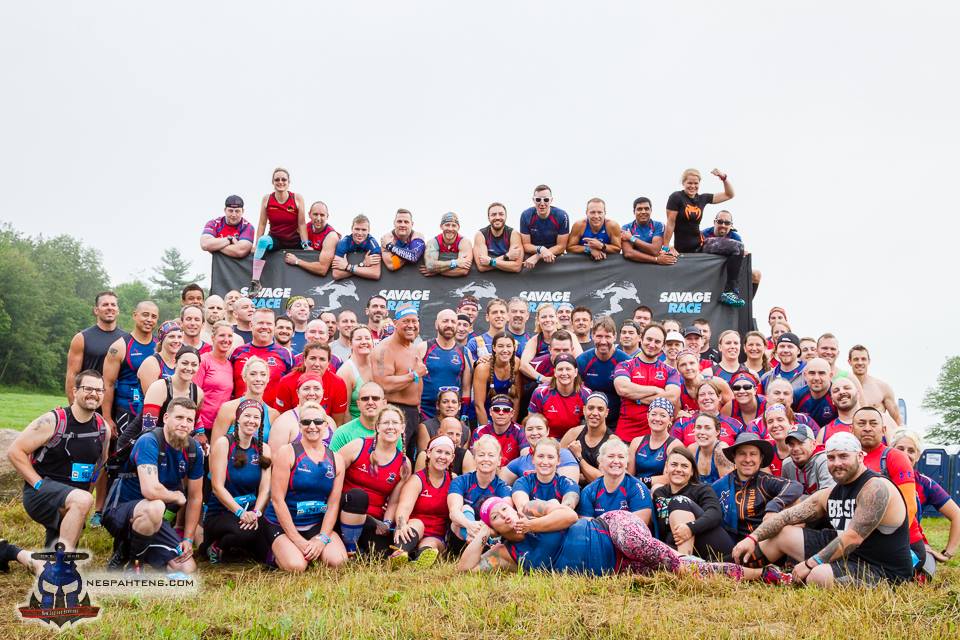 New England Spahtens Team PhotoLike the other races, parking was offsite in a large field, with shuttle buses to the venue. Once at the venue, check-in was quick and painless, and I realized I had nearly an hour to kill before my starting wave. I was debating whether or not to bring my hydration pack because while it was humid, it was also overcast and in the 70s. But ran into several friends I had met from previous races, and several of them were wearing theirs, so in the end I decided to bring it. I went to the bag check and was disconcerted as the line was extremely long, but fortunately it moved fast. The girl who took my bag kept repeating my bib number back to me wrong, but she wrote down the number correctly on the tag, so in the end all was well.
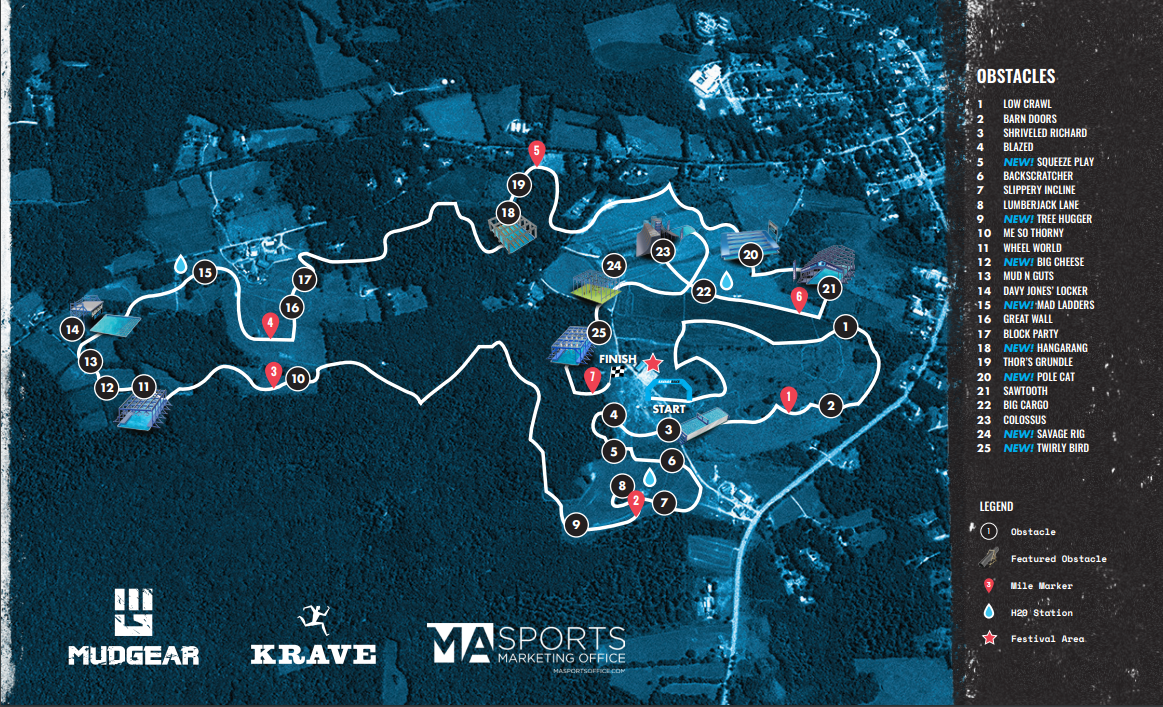 Course MapSoon it was off to the starting line, where the commentator turned out to be Dustin, a guy who also has also done the introduction for Spartan Races, who spoke in his characteristic speed-talking fashion, "pumping us up." In my opinion the intro was entirely too long, as I am always eager to get past the pep talk and get going. Finally we were off, and quickly any hopes I had that I would be running with the same group I did for Tough Mudder were dashed. The crowd quickly spread out, and while I was still in the middle (well, towards the back) of the pack, I wasn't running "with" anyone. This would be another race in which I raced essentially alone. I suppose I could have asked someone sheepishly "Can I run with you?" but that requires social behavior at which I am a disaster, so I didn't try. In any event, throughout the course there were usually Spahtens around, if not actually with me, so I suppose being alone is just my perception of it rather than the reality.
It was a half mile at least to the first obstacle, which was a simple Low Crawl underneath barbed wire. The wires weren't too low, so I was able to high crawl under it without any problems. Next was Barn Door, which was a simple climb over a wall with plenty of handholds.
We had already slogged through plenty of mud pits that qualified as obstacles themselves, up to knee deep. This would become common throughout the course, and all of them had a very characteristic "farm" smell to them.
This first loop brought us back towards the festival area, where we hit the first water station. I had my hydration pack so I skipped the water. Most stations at OCRs consist of large water bottles/kegs where the volunteers give you small cups of water, but these were all bottled water. As such it seemed very wasteful to me, as most people took a swig or two from their bottle, dumped out the rest, tossed the bottle in the recycle bin and moved on.
Soon after that was Shriveled Richard, a simple jump into a cold water tank followed by a duck under a small wall to dunk you, and then out of the tank. The water was cold, but did not have visible ice in it, and so wasn't too bad.
After that was Blazed, which was a simple fire jump, which felt odd being so near the beginning of the race rather than the last obstacle before the finish. Then was Squeeze Play, a low crawl underneath barrels that you had to push out of the way while crawling under them.
We left the festival area and it was off to into the woods and then fields, where we hit Backscratcher, which was a series of low walls to climb over with sections of barbed wire to crawl under in between them. Next was Slippery Incline, which is a simple inclined wall (but not very slippery) with a rope assist. Then was Lumberjack Lane, where you had to carry a large piece of wood (maybe 6" x 4" x 4') around a small loop.
Soon after that was Tree Hugger, the first obstacle I failed that day. It consisted of multiple vertical logs interspersed with metal posts that you had to maneuver across, with sparse hand and foot holds. I did not get very far before I gave up. Savage Race does not penalize you for failing obstacles, which I am appreciating more the more races I do. There's nothing that kills the fun of obstacle course races than overzealous volunteers screaming at you like drill sergeants while you struggle through obstacles, only to yell at you louder to do your burpees if you slip and fall (I'm looking at you, Spartan Race).
Next was Me So Thorny, which is just another barbed wire crawl, this one supported by a wooden frame. Following this was a long hike through the woods and mud and more woods and mud, until Wheel World. Wheel World is a monkey bar-like obstacle consisting of five pentagonal steering wheel-like contraptions hanging from a frame. You have to hang from each freely-spinning wheel in turn, spinning each one to be able to reach the next one. I didn't think I'd get very far on this, but seeing how far I got on the monkey bars at Tough Mudder, I thought I might have a small chance of completing it. Well, it didn't turn out that way. Despite the wheels being dry, my hands slipped right off of them as if they were greased, and into the water I went.
Then was Big Cheese, a wooden obstacle that looks vaguely like a cheese grater that you have to climb up and over that was relatively easy, followed by Mud N Guts, yet another muddy barbed wire crawl. This got us nice and dirty for Davy Jones' Locker, which was a jump from a 15 foot platform into a pool. Fifteen feet, but it always looks higher from the top. Like most obstacles of this type, I don't hesitate but just go for it.
Next was Mad Ladders, which consisted of a traverse across several rope ladders and cargo nets. I made it about 2/3 of the way through it before I couldn't go any farther simply because I couldn't reach the next ladder.
More hiking, and then to the Great Wall, which was an 8' wall. Tough Mudder had a similar wall with a small foothold near the bottom that you could use to help boost yourself up. I ran up to this one, jumped, grabbed the top, and tried to haul myself up and get my leg over the top...and my left shoulder gave way with a sharp stab of pain, and down I went. I've mentioned in previous posts that my shoulders have inferior instability and therefore are prone to subluxation (aka partial dislocation). I can pop them both in and out at will, generally painlessly. However, if they pop out involuntarily, usually caused by some kind of hanging or full extension reaching, depending on how much weight is on them, it can hurt really bad. This one did, and so after some swearing I gave up on the obstacle and went on to the next.
This was Block Party, which was dragging a cinder block at the end of a long rope across the grass maybe 15 yards, and then carrying it back to full extension. More hiking through mud and woods until Hangarang, which consisted of a pair of logs hanging from a rig that you had to traverse as they swung freely. This one looks difficult, but most people managed so long as they went slowly and carefully. The most difficult part is the transition from one log to another, and as I reached for the chain holding the second log, my shoulder popped out again, which hurt, but I was able to complete the obstacle successfully. After this was Thor's Grundle, which was another water/mud obstacle where you had to negotiate a muddy water pit and under a cargo net stretched across it.
Following that was more trails and it was somewhere along this point that I rolled my ankle, giving me a long jolt of pins and needles in my foot for a while. But I could still put weight on it, so I kept going until Pole Cat, which was a traverse over water where you had to brace your arms on one pole and your feet on another, halfway with hands higher than feet and halfway with feet higher than hands. This wasn't too bad, and then it was on to Sawtooth. This is a set of inclined monkey bars with a complication in the middle that makes it far more challenging. I had no illusions that could complete it, but I figured I could get to the halfway point. Unfortunately by this point my palms felt like large blisters, so my grip wasn't that great, and I only made it perhaps 1/3 of the way up the incline before I fell into the water.
 Just before my grip failed...Another hike across open fields to a water station, followed by Big Cargo, a tall A-frame cargo net.
Beyond that was Colussus, which I had been looking forward to. At first I thought it was just a big water slide that you climbed up to, but when I got to it I realized that it is more than that. The first part is a quarter-pipe with rope-assist climb that is similar to Everest 2.0 from Tough Mudder. You run up the increasing slope, grab the rope, and pull yourself up until you get a hold of the lip, and pull yourself (most of the time with help from those already on top) onto the platform above. The second part is a ladder up to the the third part: a very fun looking waterslide into a pool below.
But I had to complete the first part to get to the fun part. Several people were making the attempt, getting pulled up and over the lip as they got to the top. I wasn't with any friends at this point, so I suppose I couldn't count on any help, but I hoped that if I was making the effort, someone would step up to help.
My first attempt up the slip wall was a disaster: the ground leading up to it was uneven, so in my run up to the wall I became unbalanced and crashed into the wall rather than going up it. After brushing myself off I tried again, and this time I grabbed the rope and hauled myself up, and got both hands on the lip...and there I stopped. I had enough strength to hold myself there, but not enough to to get over the top. I could see people standing at the top not four feet away from me, straining and paralyzed, and no one moved an inch to help. It felt like longer, but I hung there for at least ten seconds, going nowhere. And then I distinctly both heard and felt a crunch in my right shoulder as it gave way, and I fell down the wall.
This was the low point of the race for me, and it soured me on the entire experience. This incident made the event stand out in sharp relief to Tough Mudder. On Everest, people are eager to work as a team and get everyone over the top. Every success earns a cheer, and every failure earns a sympathetic groan. Complete strangers are pulling for each other, and this spirit is one of the things I like best about Tough Mudder. At this obstacle, however, I hung there on the lip waiting in vain for a hand, and no one said a word when I tumbled down to the bottom. I suppose I shouldn't have expected anyone to help, and I always could have asked...but I didn't, so in the end it's my own fault. As I walked away disgusted (half with the experience, half with myself for failing), I passed a friend who said "No waterslide?" "I couldn't get to the top," I whined. "No one helped." Angrily I stalked past the spectators watching people have fun going down the slide. Looking at post-event pictures, I saw that there was a ladder that provided access to the top so I could have bypassed the climb and just gone down the slide. Had I done so, it probably would have improved my mood considerably. But at the time I didn't see it and I just kept going.
The next two obstacles--the final two obstacles--naturally, were both rigs: Savage Rig and Twirly Bird, which are pure upper-body strength obstacles. With my grip failing and my shoulders hurting, I skipped both, feeling like a failure. Into the woods again on several muddy trails to the Finish.
In 2015 I complained that the finish of the Spartan Super at Barre was a letdown--at the end you went through some wooded trails, only to break out of the woods 20 yards from the fire jump and the finish line. This time it was much the same, but no fire jump. You just exited the woods...and there was the Finish. With such a short run up to the finish and no obstacle prior to it, it felt like a let down.
 You can see what a good mood I was in.By all accounts I was the only one who didn't have a fantastic time, as everyone else raved about how Savage Race put on an awesome event, so my being disappointed is more a reflection on me than it is on the race or other participants.
Trying to look at it objectively, the race was pretty good. The tagline of Savage Race is The Best Obstacles, The Perfect Distance. I have no complaints about the distance. The obstacles were OK. I thought there were too many wire crawls, and most of the other obstacles, although many were fun, were just variations of obstacles I have seen at other races. Shriveled Richard is just a version of Tough Mudder's Arctic Enema. Davy Jones' Locker is just like Tough Mudder's Walk the Plank. And so on. Walls, cargo nets, rigs, monkey bars: they're all standard fixtures in races. The lack of penalties for failing obstacles is a plus however: I'm usually hard enough on myself for failing that the last thing I need is for someone to penalize me for it.
Despite my sour grapes, it was good to see the familiar faces I have come to expect at these races, and I'm glad that they enjoyed themselves, even if in the end I didn't. On the ride home I was in such a bad mood I was debating whether or not to go to the Tough Mudder I am signed up for next month, but hopefully my mood will improve enough to look forward to it.
Will I do Savage Race next year? (The race was such a hit they've already signed a contract with the venue, and Spahtens are excitedly signing up a year in advance). Probably. If I am still racing next year, I'll do it sooner than I will do another Spartan Race.
Other races in this series
Insane Inflatable 5k 2016
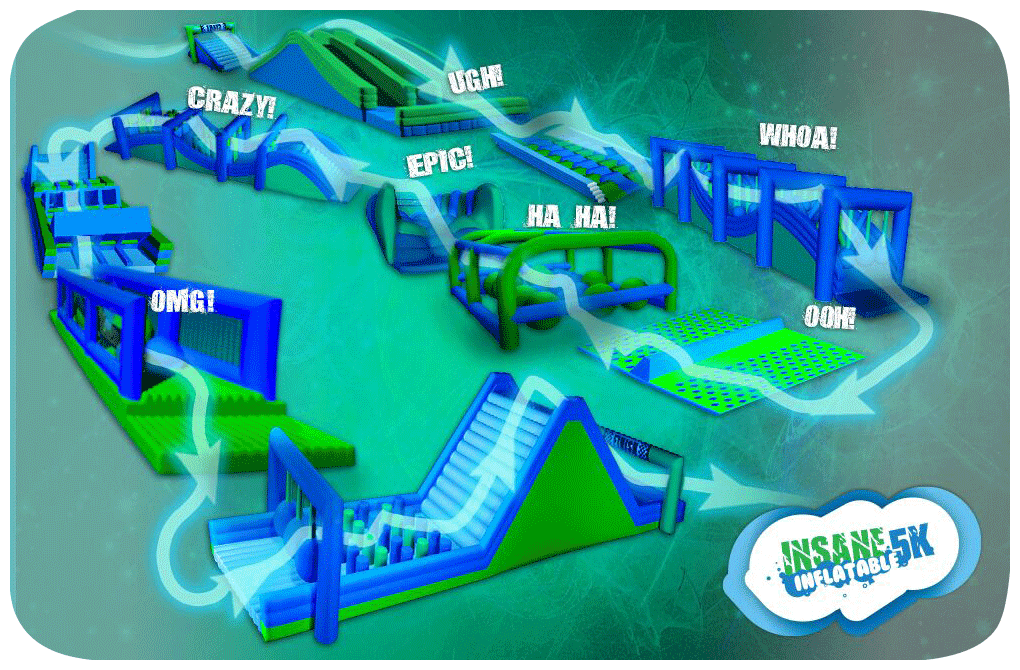 September 3, 2016
After the debacle that was the Samurai Sprint (not the race's fault, but rather my injuring my shoulders and not feeling good enough as a racer), I decided to focus a little more on "fun" races.
This race was the "Insane Inflatable 5k", a 5k race where the obstacles were all inflatable "bouncy house" type obstacles. I didn't think that my 5-year-old son would be up for the distance, and that coupled with the price made me decide to so only with my 7-year-old daughter. That turned out to be a good decision.
 Ready to raceWhile waiting for our wave, there was a small bouncy house for kids that Laurelin took full advantage of. But it wasn't long before our wave was ready to go. The course was on a speedway, which meant flat and open, so there wasn't any shade to speak of, except for within some of the obstacles themselves.
 The Beach Ball obstacleThe first obstacle was a simple climb up inflatable stairs and then down a slide, and we were off. Most of the group just took off running, but Laurelin and I went slower, which helped as group spread out and when we arrived at obstacles we didn't have to wait. the next was a simple run through a bouncy house like structure, and then one that was like a large mattress.
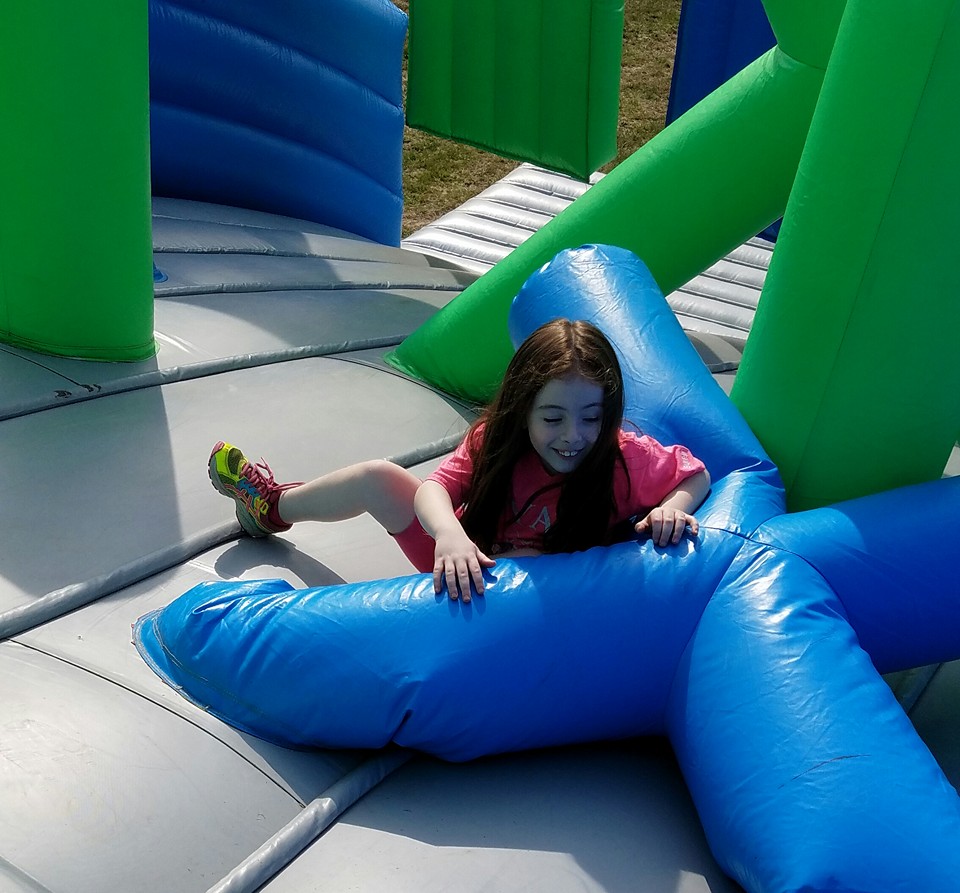 Fighting through the obstaclesLaurelin had a blast karate kicking making of the upright parts of the obstacles on her way through, but sometimes lost her balance. One of my favorite obstacles was a "ball pit" of sorts where you had to negotiate your way through beach balls as large as a person. I had a lot of fun when I got to the end and started hurling them back at racers behind us.
 Completing another obstacleThe heat and the distance started to wear on Laurelin, and we made it to the halfway mark water station.
 Taking a short breakThe second half of the race was much the same as the first, but by now Laurelin was tired and I started carrying her for stretches of the course. Of course her sore feet magically felt better every time we reached an obstacle...
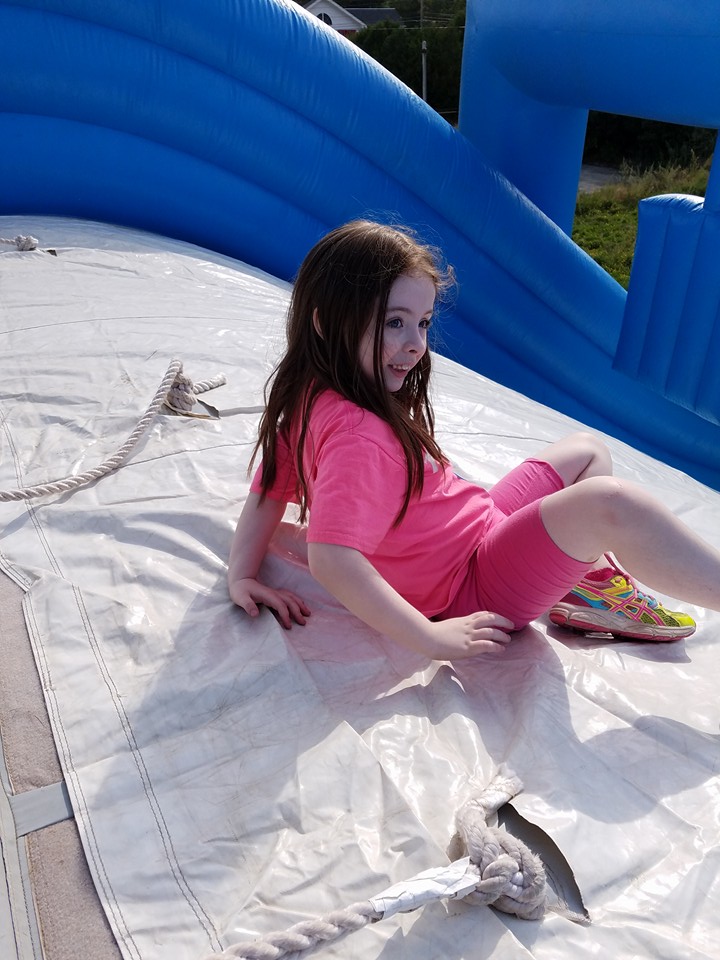 Down the slide!Sore feet or not though, Laurelin was still all smiles by the time we got to the end.
 Waiting our turn at the last obstacleBefore we knew it we were at the end, another race in the books. The only downside to this race was the price, which was something like $150 for the two of us. The Krazy Kids Inflatable Fun Run that we did later was much easier on the wallet, and just as much fun for the kids.
 With her medal and T-shirtThe race was fun but I'm not sure we'll be doing another one, if only because of the price. On the other hand, they're in the area only once a year, so we'll see.