
Jason M. Hough's Blog, page 5
January 7, 2014
Book vs. Film: "Casino Royale"
-- obligatory spoiler alert --
This may or may not become a series of posts, but I thought it might be interesting to compare films with the books they're based on. It's often said books are better than their film counterparts, and I'd like to explore that validity of that. I wonder if it is more often simply due to our imagination being better at visualizing a novel the way we'd want it to be, rather than any actual flaw in the films.
My kind and lovely wife (aka Santa Claus) gifted me a complete set of Bond films on Blu-Ray a few weeks ago, so I've decided to start there. I'll be reading each Bond book in the order they were published, and then viewing the corresponding movie. Given there are over 20 films, this might take a few years...
Casino Royale is an interesting place to start. It's the first James Bond novel Ian Fleming wrote, but was only recently made into a proper film (we will ignore the 1967 Val Guest comedy, thank you very VERY much, as well as the TV version that also failed miserably).
I first read the book back in high school, and had forgotten many of the details. Reading it again now, it's actually quite remarkable to me how closely the 2006 film follows it. But more than that, it's interesting to experience Bond in his first incarnation again. I did my best to table all of my previous experiences with the iconic character and look at this with fresh eyes. That's impossible of course, but I think mentally trying to do so helped.
It's clear from the outset that Fleming meant these books to be serious spy novels, at least at the beginning (we'll see how things progress in later books!). Bond is only recently of double-O status, but his particular qualification for this mission is simply that he's known within the service as being a capable gambler. It starts with a fairly straightforward setup: Bond is in France to try and out-gamble a Soviet spy. The man, La Chiffre, has made mistakes with funds he was supposed to use to further communist purposes in France. He intends to gamble his way back to positive account status before his paymasters back home catch wind of the problem. Bond's intelligence agency has discovered this, and hatched the plan to simply out-gamble the man, ensuring his operation in France will collapse as a result.
The film deviates from this mostly in the setup. La Chiffre runs a group that makes money by short-selling stocks on companies they organize terrorist attacks against. Bond foils such a plot in Miami, forcing La Chiffre to setup a high-stakes Texas Hold 'Em game (instead of Baccarat, presumably because American audiences are unfamiliar with it) in Montenegro where he hopes to recoup the money his terrorist financiers lost in the botched plot. None of this setup happens in the book. In the book, we start immediately with Bond arriving at the Casino Royale. La Chiffre's situation is entirely of his own doing, and Fleming slips the details to us with a deft if sometimes heavy hand. In my opinion this is one of the rare cases where the film improves upon the book. We've got a much better handle on who La Chiffre is and why Bond is trying to stop him in the movie version. On top of that, the scenes lend themselves well to the visual medium, whereas the book's main focus on the gambling events are much better served by the introspective nature of that format.
On the whole I'm struck by two things. First, Daniel Craig is exceptionally good as James Bond. I say this as a long-time Sean Connery loyalist. Craig's portrayal matches the character almost perfectly. Other than his physical appearance, which differs more from Flemings inspiration of Hoagie Charmichael than any other actor who has played the role, Craig really does capture the essence of the man. He's cold, calculating, and brutal. He's also chivalrous despite, in the novel, having inner thoughts often shockingly to the contrary. And the way he handles himself in moments of violence and pain are very true to the character in the book. Worth noting: the torture scene from the movie is in the book as well, and is almost exactly as filmed. I'd completely forgotten about it!
 Hoagie Carmichael, the physical inspiration for Ian Fleming's Bond
Most of all, other than some bits in the film that I fear will be very dated in a decade or so (the parkour chase, the use of Texas Hold 'Em instead of the more exotic Baccarat), it matches the seriousness of the book. The film is dark and brutal, which is very much in vogue right now when it comes to reboots of iconic characters (Batman, Superman, etc.), however here the approach is absolutely the right choice. The book and the film both leave you with the same feelings, and that is high praise I think for an adaptation.
I enjoyed both the novel and the film very much. I should also mention that, as is my way, I went with the audiobook version of the novel. It's read by Simon Vance, who also narrated my own DIRE EARTH books. As great as Sean Connery and Daniel Craig are, for my money it is Simon Vance who most accurately captures Fleming's secret agent. It's a remarkable performance, and well worth your time.
Novel: BFilm (on its own): A-Film (faithfulness to the source material): A-
Birth of James Bond tropes: Almost non-existent in this first novel. Bond is suave and handsome, and that's about it. He drives an old second-hand Bentley in the book, not the gleaming Aston Martin as is cliche now, has zero reliance on fancy gadgets, and even his relationship with the girl is complex and fraught with miscues and frustrations (the movie also captures this element well).
As for the film, it is of course saddled with the baggage of 20 other Bond films that came before, and audiences expect certain things. As such, the cars and the gadgets are present in the film version, but not they're not nearly as outrageous as some of the earlier movies. I think the filmmakers did the best they could in this regard.
Next up, Live and Let Die!


October 29, 2013
Scrivener: How I use it -- Part 3
In part 1 I talked about using Scriveners Chapter and Scene titles as a condensed version of an outline, which makes navigating your novel a breeze later on.
Part 2 covered using labels to flag each chapter (and/or scene) with some specific thing that is important to your book. In my case it was keeping track of whose POV each chapter would be from. In yours it might be the location the chapter takes place in, or the time period, maybe various subplots, or something else entirely. Whatever you think will be useful later when you might want to get a "view" of your story narrowed down to just one of these elements. In my case, I liked to be able to get rid of everything so that Scrivener only showed me the chapters from a specific character's POV.
Now, I'd like to talk about the other key feature I use in Scrivener: comments.
The comments in scrivener work a bit like they do in Word, so if you're used to that this shouldn't be too alien. The main difference is how they're displayed. Well, that and how I use them.
Before that, let me explain a bit about how Scrivener organizes your book, because that is VERY different from Word and you might already be a bit baffled by it.
In your manuscript there are folders and text.
Folder = A ChapterText = A scene
This is the key thing to remember: A FOLDER CAN CONTAIN TEXT, TOO. I'll get back to this in a second. But repeat it to yourself now. Okay? Okay.
If you want, you can do your entire manuscript at the folder level and never make scenes within them. Hell, you can even just write your entire book at the "Manuscript" level and never break it down into smaller chunks at all. For the purposes of this post I'm going to use folders and scenes, because that's what I do and that is something that opens up a lot of Scrivener's power.
Before we head back to our Star Wars example, I want to show you what I'm talking about with a blank "Novel" project.
Select File > New Project > Fiction > Novel
You should see something like this:
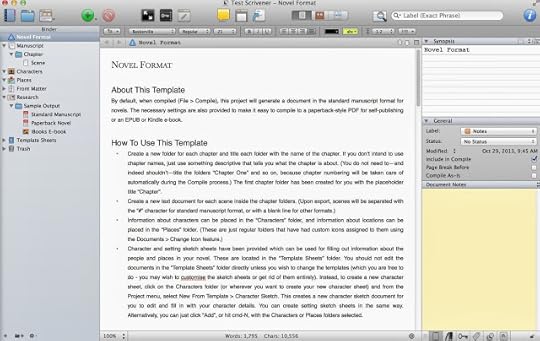
As you see the default project contains a top-level "Manuscript", one folder called "Chapter", and one text called "Scene".
Click on Manuscript. You probably just see a corkboard with a notecard on it. Ignore that for now.
Click on this little button, which is "Edit Scrivenings":

Now you should see a blank view with a line across it. Weird? Let me explain. You're looking at two pieces of your manuscript, the thing called "Chapter" and the thing called "Scene", simultaneously, and that's pretty cool. Try this: Above the divider line, type in "This is the chapter". Then below it, type "And this is the scene":
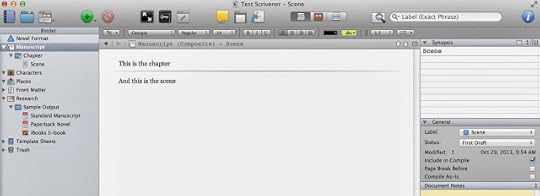
Now just click on Scene. You should only see the text for it. Click on the chapter, you should see the text for both. That's because we have that multi-document "edit scrivenings" view clicked. If this is confusing to you, stop here and do the tutorial that comes with scrivener. Or, just make some more chapters and scenes in here and play around with it.
What's the point of all this? Simple: In Scrivener, you're in control of what you see. From the entire manuscript, to a select sequence of chapters, to a tiny individual scene, you can narrow down your view to just what's important for your current task and get everything else out of the way. In Word, you're always looking at everything, and that can make navigating a large project cumbersome at best. It may be hard to grasp why this is so powerful now, but trust me, when you've got a 50-chapter, 300 scene manuscript going, you'll love it.
The main thing you need to know is that when you're writing (again, this is just my personal technique), you should put the meat of your words in scenes. I personally only use the "chapter" level for subheadings, like "Darwin, Australia 12.MAR.2282" or whatever.
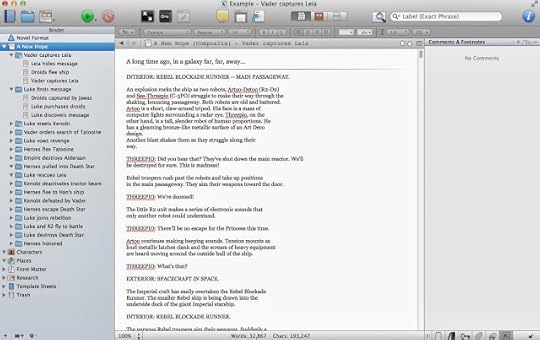
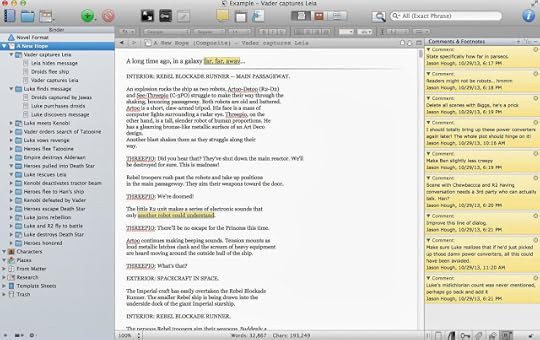
So here's our Star Wars example so far. Note that I have "Manuscript" selected in the binder. Also, just so you're aware, I've pasted in text from the screenplay just so this isn't empty (I'll make this scrivener file available for download in case you want to look at it more closely.)
On to Comments, then!
Let's imagine you're in the process of writing your first draft. You're in the chapter where Luke finds Leia's message (note: in the next screenshot that's the chapter selected, not "manuscript") and you've just written a throwaway line of pointless technobabble. An idea strikes you. "I should totally bring this back up later and have it be important!". But when? I'm going to cover two scenarios here to give you a basic taste of how I use comments:
Scenario 1: You have no idea where to bring this up later, but you want to remember to add it at some point. So add a comment right here:

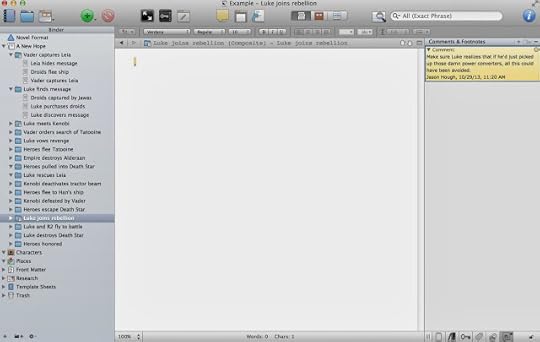
Scenario 2: You know roughly where you want to mention this later, so click on that unwritten Chapter. We'll say it's "Luke joins rebellion". It's empty because you haven't written it yet, and you can't add a note to emptiness, so just put in a single "." or something and make your note:
(Pro tip: Doing this while writing can take you away from the spot where you were. Learn how to use Scriveners split-screen mode and you won't have this problem.)(Feature wish: Sometimes if it's important enough I'll add comments in both places, just to be sure the text matches in terms of details. I kind of wish Scrivener had a way to link comments together, making it easier to keep track of these)
Comments can be for anything, not just when you want to remember to add something. Maybe you've written what you know is an ugly line of dialog, but you're drawing a blank on a better choice. Leave a comment to make sure you come back and fix it. Or maybe you realize you need to research the name of a town but don't want to lose your groove; just call it "FixMe town", and add a comment to the word "FixMe" to correct it later when you have time. This allows you to keep writing but not lose these kinds of things in the long haul.
Again, this is not too dissimilar from Word's comment feature, but I think it's better for two reasons:
1. Remember earlier when we were looking at one scene, a chapter and its scenes, or the entire document? Well guess what, the comments listed on the side there correlate to that. In other words, if you've only got your "Death Star" location scenes in view right now, you'll only see the comments you left in those scenes & chapters. When editing, this ability to focus in on just what you're working on is very handy.
2. A more subtle difference is simply in the way Scrivener displays these. While Word shows the comments sort of next to the text they go with, Scrivener just stacks them up on the right. This might seem like a step back compared to Word, but I actually prefer it. You navigate by clicking on the comments and seeing where they point, not the other way around. The reason I prefer this is the main thing I wanted to get across with all this:
I use Scrivener comments as my to-do list for the manuscript.
Every one of these is something I need to fix. Each time I fix one, I delete the comment, and I don't send off a manuscript to my editor until all the comments are gone.
Here's our Star Wars example with a bunch of comments added:
So there you go! Questions? Add a comment and I'll answer as best I can.
Part 2 covered using labels to flag each chapter (and/or scene) with some specific thing that is important to your book. In my case it was keeping track of whose POV each chapter would be from. In yours it might be the location the chapter takes place in, or the time period, maybe various subplots, or something else entirely. Whatever you think will be useful later when you might want to get a "view" of your story narrowed down to just one of these elements. In my case, I liked to be able to get rid of everything so that Scrivener only showed me the chapters from a specific character's POV.
Now, I'd like to talk about the other key feature I use in Scrivener: comments.
The comments in scrivener work a bit like they do in Word, so if you're used to that this shouldn't be too alien. The main difference is how they're displayed. Well, that and how I use them.
Before that, let me explain a bit about how Scrivener organizes your book, because that is VERY different from Word and you might already be a bit baffled by it.
In your manuscript there are folders and text.
Folder = A ChapterText = A scene
This is the key thing to remember: A FOLDER CAN CONTAIN TEXT, TOO. I'll get back to this in a second. But repeat it to yourself now. Okay? Okay.
If you want, you can do your entire manuscript at the folder level and never make scenes within them. Hell, you can even just write your entire book at the "Manuscript" level and never break it down into smaller chunks at all. For the purposes of this post I'm going to use folders and scenes, because that's what I do and that is something that opens up a lot of Scrivener's power.
Before we head back to our Star Wars example, I want to show you what I'm talking about with a blank "Novel" project.
Select File > New Project > Fiction > Novel
You should see something like this:

As you see the default project contains a top-level "Manuscript", one folder called "Chapter", and one text called "Scene".
Click on Manuscript. You probably just see a corkboard with a notecard on it. Ignore that for now.
Click on this little button, which is "Edit Scrivenings":

Now you should see a blank view with a line across it. Weird? Let me explain. You're looking at two pieces of your manuscript, the thing called "Chapter" and the thing called "Scene", simultaneously, and that's pretty cool. Try this: Above the divider line, type in "This is the chapter". Then below it, type "And this is the scene":

Now just click on Scene. You should only see the text for it. Click on the chapter, you should see the text for both. That's because we have that multi-document "edit scrivenings" view clicked. If this is confusing to you, stop here and do the tutorial that comes with scrivener. Or, just make some more chapters and scenes in here and play around with it.
What's the point of all this? Simple: In Scrivener, you're in control of what you see. From the entire manuscript, to a select sequence of chapters, to a tiny individual scene, you can narrow down your view to just what's important for your current task and get everything else out of the way. In Word, you're always looking at everything, and that can make navigating a large project cumbersome at best. It may be hard to grasp why this is so powerful now, but trust me, when you've got a 50-chapter, 300 scene manuscript going, you'll love it.
The main thing you need to know is that when you're writing (again, this is just my personal technique), you should put the meat of your words in scenes. I personally only use the "chapter" level for subheadings, like "Darwin, Australia 12.MAR.2282" or whatever.
So here's our Star Wars example so far. Note that I have "Manuscript" selected in the binder. Also, just so you're aware, I've pasted in text from the screenplay just so this isn't empty (I'll make this scrivener file available for download in case you want to look at it more closely.)

On to Comments, then!
Let's imagine you're in the process of writing your first draft. You're in the chapter where Luke finds Leia's message (note: in the next screenshot that's the chapter selected, not "manuscript") and you've just written a throwaway line of pointless technobabble. An idea strikes you. "I should totally bring this back up later and have it be important!". But when? I'm going to cover two scenarios here to give you a basic taste of how I use comments:
Scenario 1: You have no idea where to bring this up later, but you want to remember to add it at some point. So add a comment right here:

Scenario 2: You know roughly where you want to mention this later, so click on that unwritten Chapter. We'll say it's "Luke joins rebellion". It's empty because you haven't written it yet, and you can't add a note to emptiness, so just put in a single "." or something and make your note:

(Pro tip: Doing this while writing can take you away from the spot where you were. Learn how to use Scriveners split-screen mode and you won't have this problem.)(Feature wish: Sometimes if it's important enough I'll add comments in both places, just to be sure the text matches in terms of details. I kind of wish Scrivener had a way to link comments together, making it easier to keep track of these)
Comments can be for anything, not just when you want to remember to add something. Maybe you've written what you know is an ugly line of dialog, but you're drawing a blank on a better choice. Leave a comment to make sure you come back and fix it. Or maybe you realize you need to research the name of a town but don't want to lose your groove; just call it "FixMe town", and add a comment to the word "FixMe" to correct it later when you have time. This allows you to keep writing but not lose these kinds of things in the long haul.
Again, this is not too dissimilar from Word's comment feature, but I think it's better for two reasons:
1. Remember earlier when we were looking at one scene, a chapter and its scenes, or the entire document? Well guess what, the comments listed on the side there correlate to that. In other words, if you've only got your "Death Star" location scenes in view right now, you'll only see the comments you left in those scenes & chapters. When editing, this ability to focus in on just what you're working on is very handy.
2. A more subtle difference is simply in the way Scrivener displays these. While Word shows the comments sort of next to the text they go with, Scrivener just stacks them up on the right. This might seem like a step back compared to Word, but I actually prefer it. You navigate by clicking on the comments and seeing where they point, not the other way around. The reason I prefer this is the main thing I wanted to get across with all this:
I use Scrivener comments as my to-do list for the manuscript.
Every one of these is something I need to fix. Each time I fix one, I delete the comment, and I don't send off a manuscript to my editor until all the comments are gone.
Here's our Star Wars example with a bunch of comments added:

So there you go! Questions? Add a comment and I'll answer as best I can.
October 21, 2013
Doing NaNoWriMo? Some tips for success...
November is coming up fast, and right now there are 120,000+ people out there in the world getting ready to start writing a novel as part of National Novel Writing Month.
As you may already know, my novel The Darwin Elevator started life as a Nano project back in 2008. That was the second year I participated (2007 being the first), and so I thought I'd share some tips that might help you succeed.
Here we go!
Tip #1 - Write a novel. You might be wondering why I'm saying this, and it's because I'm insane. No, wait, not that. The point is, remember that it's 50k words of a novel that is your goal, not just 50k words. I know some people who do fifty 1000 word short stories, or any other combination you can imagine that results in 50k words written, and more power to them. This post is not for those people. You see, the prize for "winning" Nanowrimo is the knowledge of what it takes to write a book. You are finding out if that is something can, and want, to do.Tip #2 - Don't edit, just write. I don't care how screwy your project gets at the halfway mark, don't toss it and start a new one (the old 25k-split... we're on to you!). If you realize on November 13th that your story would have been ten times better if you'd just had that troll help the hero instead of attacking him, then make a note that you intend to go back and change that and keep writing as if you'd done it that way. Or hell, decide the troll survived and shows up NOW to help. Make it work, keep going. No first draft is flawless. The trick for finishing Nanowrimo is to learn how to resist the urge to edit. This may not be the way you'd do things without this artificial deadline, but that's okay, because...Tip #3 - Remember this: The prize you're getting from Nano is huge, and that prize is you. You, the writer. You, armed with the knowledge of what it a takes to write a book. You, with the extra swagger in your step because you know you've done it. You, on the path to knowing what your process is. Everyone's goal with Nano is to finish writing a novel, and everyone will have a different way of going about it. If you fail, okay, look back on it and figure out where things went wrong. Come up with a plan to fix those things next time around.Tip #4 - Track your progress. Whatever method makes sense to you, be it Nano's own tools or the built-in project goals in software like Scrivener. I use a spreadsheet I made. The thing is, it's sort of like trying to lose weight. You don't set a goal of losing 50 lbs. in a year, start eating better and exercising, but neglect to weigh yourself until a week before the end and realize you've only lost 15 lbs. so far. You weigh in daily. You celebrate every half-pound gone. You redouble your efforts if you get behind. Treat Nano the same way.Tip #5 - Plan ahead. It's already October 20th, so I'd say this post is 20 days too late because a month of planning is good. But that's okay, you still have time. There's 10 days or so left, so devote each one to a bit of planning. Make an outline, then throw it out and make another one that's better. Start brainstorming who your characters are, what makes them tick. What's your world like? Start jotting down ideas on these things. Unless you're a pantser (someone who prefers the blank page, and who thinks that any planning just stifles their creativity. Horseshit, in my opinion, but to each their own!). If you're a pantser I guess maybe start clearing your mind now! Either way, spend this time leading up to November getting your head in the game.Tip #6 - Take it seriously. Looking back on my Nano years, it's easy now in hindsight to spot the people who won't finish. Most of them, anyway. They were the ones who started making excuses before November even arrived. Little innocent caveats about how they "guess" they're going to participate, or how they'll probably start but because of that new job they just landed they might not have time. All fine and dandy, and I still encourage these people to participate because there's value, but it's defeating the whole purpose of NaNoWriMo. Nano is a marathon and you've just signed up to run it. Don't start in with the "oh yeah I'll be there at the starting line but I don't have any good running shoes right now. Plus I've got tickets to see a movie that same day so I need to duck out at the halfway point anyway. Also my leg is broken, which might make it hard to finish. Still, I'm THERE!!!" Don't do this. Take it seriously.See, the thing about Nanowrimo is that it has no stakes except those you create. That's not easy for a lot of people. No stakes, no motivation. No tangible reward, no drive. And for a lot of people it's hard, very hard, to invent stakes and impose them. Inventing a reward might be a bit easier, but not by much.
So in this regard, consider ways to put pressure on yourself, and/or reward yourself. The simplest possible way to do this is to let people know you're writing a novel in November. People who care, people who will ask you how its going, people you won't want to look in the eye and say "eh, I gave up." Don't have anyone like that in your life? Fine, tell me in the comments. I'll hold your nose to the grinder and promise to post here praising your victory or mocking your failure as the case may be.
You can go farther than this, of course. A lot farther. For example, put 100$ in an envelope (or whatever amount of money you can afford to lose but will sting if you didn't get it back). Give the envelope to a good friend or family member and tell them NOT to give it back to you unless you finish Nanowrimo. Even if it takes you until March, tell them to hang on to that envelope until you can show them you've written fifty thousand words. Someday you'll want that hundred bucks enough to get words on the page.
Any other questions? Ask in the comments!
October 2, 2013
Evolution of THE DARWIN ELEVATOR's North American cover
Since I'm often asked about the covers for my books, I thought I'd give you all an in-depth peek into the cover design process.
While it varies from publisher to publisher, authors are not always involved in the cover design process. The normal experience is to be shown a “final” cover, upon which feedback is given and generally ignored. I was warned of this by my agent early on, but luckily my experience did not go this way!
In this spirit, my editor has also provided some commentary for this post, which I'll include in grey and indented, like so:
So here’s a little history of TDE’s cover, start to finish. Actually this will go back even further than that!
Many moons ago, in 2009 when I was working on the book as a rank amateur, I decided it would be a good idea to commission a painting I could use on my website, on business cards, and so on. I reached out to my friends in the video game industry, asking if they had any concept artists at their studios who did freelance work. This eventually led me to Kelli Davis, a very talented young artist working (at the time at least) at Supervillain Studios in Irvine, CA.
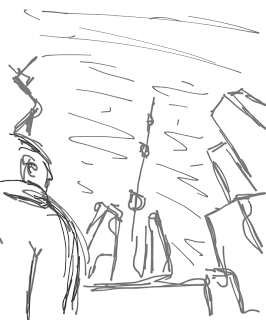
Kelli agreed to do a rough painting for me, and here was what I asked her for:
It's interesting for me to go back and look at this now, because it's actually not that different from the final cover! But we'll get to that...
Kelli took this and sent me back a few rough sketches of her own, asking which I liked:
The curve in the middle one had a dramatic appeal to me, so I asked her to go with that and here was the final result:

This was really excellent, and exactly what I was hoping for. I think the only criticism I had was the buildings were a bit too old-fashioned for futuristic Darwin. Between that and the color scheme more than a few people got a "steampunk" feel from this, but at the time I was fine with it and happily paid her for the piece.
Now, fast forward a few years. I've got a book contract with Del Rey and finally, months later, I get the email starting the discussion about covers. I'd been told many times before this that authors rarely get any say in their cover art, so being included in the conversation at all made me very happy.
Mike, my editor suggested one of two paths (quoting the email verbatim here):We could go for the sci-fi classic: figure with slightly futuristic garb/weapon in front of a slightly futuristic backdrop (with the Elevator, of course), a la John Scalzi, Jack Campbell, and Anne AguirrWe could go highly stylized: I was thinking about the pictographs aboard the Builders’ first ship
The idea to do something abstract was soon discarded, so the focus became a "character cover".
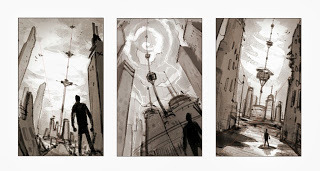
I was, to be honest, a little miffed that all other paths were apparently already closed. I replied with some thoughts on both of the above, and then pretty strongly indicated my preference for a "landscape cover", ala those done by Stephan Martiniere. It's worth noting I grew up with the ambition to do 3D graphics and animation for a living, and idolized artist like Syd Mead and Ralph McQuarrie.
Mike and I both exchanged examples of what we were thinking. So here they are side-by-side:
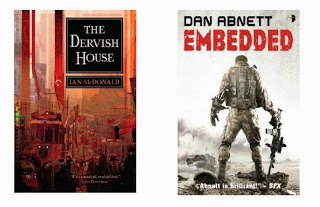 Jason's idea vs. Mike's ideaKeep in mind, my point of view was coming purely from what appealed to me, while Mike was thinking (as he rightly should) only about what would be the best cover to help Darwin fly off bookstore shelves.
My main concern with a character-focused cover was that they often look cheesy. The cover above for EMBEDDED was not cheesy at all, so I was happy about that. My comment back to Mike was that I'd seen the book before and had no idea it was Sci-Fi. From afar I'd assumed it was a military book and had never picked it up. I suggested if they go that route they at least try to get a sci-fi looking backdrop. And, I subtly urged him to try and find an artist who painted people well.
Fast forward a few months. In Mike's next email, he shared with me the three artists they were considering. I'm not sure if I can say who they all were, but suffice to say I looked at samples from each and they were all amazing. As someone who doesn't generally care for "character covers", I don't say this lightly. As far as I could tell, Del Rey was looking at the top three artists out there.
In the end they selected Christian McGrath, and I felt very confident then that the artwork would be of the highest quality. If Chris is anything he's amazingly consistent. Just glance at his portfolio and you'll see what I mean. Every one of his covers is well composed and none, in my view, could ever be called cheesy.
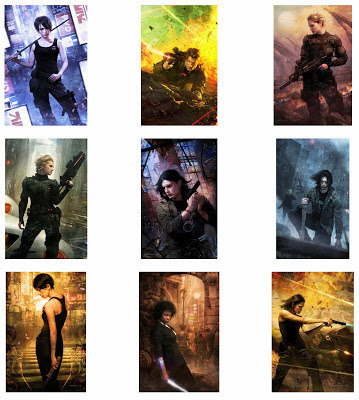 Some of Christian McGrath's covers
Despite being with one of the top publishers in the business, I think this news marked the first time I really felt like I'd joined the big leagues.
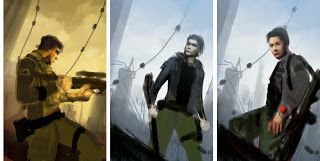
Fast forward again, as Christian went off and started to do his thing. Another month passed before Mike sent me this little preview: a few very rough sketches from Christian as he attempted to find the right pose, mood, and composition.
Here's the sketches Christian provided. Remember these are extremely rough:
We chatted a bit about the merits of these, and Mike also worked internally with his graphic design people. Eventually feedback was given to Christian, and he came back a month or so later with this gorgeous work: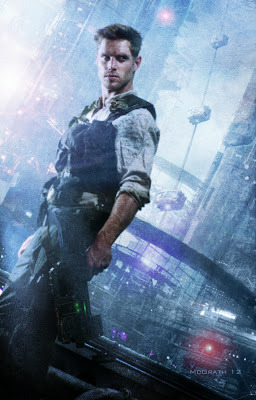
This painting really pleases me. I love how it captures both the character and the Sci-Fi aspect. My only feedback was that the climbers looked too much like those oversized ski-lift passenger cars. I sent a sketch of what I envisioned the climbers looking like, and Christian revised them before the final version.
Mike also felt something needed to be done about Skyler's hair.
Next up was the layout and typography. There were many iterations, a handful shown here in chronological order, and I'll only add a few comments between because I think the evolution of it speaks for itself:

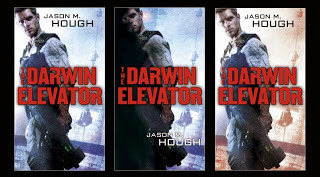 (Del Rey decided to change the angle so Skyler wasn't leaning, and crop in a bit. Personally I prefer the full painting)

And there we reach essentially the final version on the right.
All in all it was an interesting process and I'm happy with the result, especially the way the whole series looks together! If I haven't before, I'd like to publicly thank Michael Braff and Dave Stevenson at Del Rey for including me in the process and listening to my feedback, and Christian McGrath for his extraordinary talent and professionalism.
While it varies from publisher to publisher, authors are not always involved in the cover design process. The normal experience is to be shown a “final” cover, upon which feedback is given and generally ignored. I was warned of this by my agent early on, but luckily my experience did not go this way!
In this spirit, my editor has also provided some commentary for this post, which I'll include in grey and indented, like so:
Mike: Hi everyone! Creating covers for our books is one of the toughest things we do at Del Rey.
Basically, our job is to create a package for a product that is intriguing, informative, and iconic. We want potential readers to see the cover and be inspired to investigate more. In addition, we want to convey some of the cool things that a reader will find between the covers. Lastly, it has to stand out amongst other covers on the shelf (or online).
To accomplish this, we have to keep lots of things in mind: Who is the target audience and what would they like to see? What have similar successful books done to visually attract readers? How can we stand out? What do we think are going to be the visual trends when the book comes out? How can we appeal to the broadest possible audience? We’re lucky in that we have a great design team and lots of input from various departments such as editorial, marketing, sales, and publicity, so we can tackle these questions and more over the course of the cover design process.
I’m excited to share some of this process with you here, thanks for doing this, Jason!
So here’s a little history of TDE’s cover, start to finish. Actually this will go back even further than that!
Many moons ago, in 2009 when I was working on the book as a rank amateur, I decided it would be a good idea to commission a painting I could use on my website, on business cards, and so on. I reached out to my friends in the video game industry, asking if they had any concept artists at their studios who did freelance work. This eventually led me to Kelli Davis, a very talented young artist working (at the time at least) at Supervillain Studios in Irvine, CA.
Kelli agreed to do a rough painting for me, and here was what I asked her for:
As I've envisioned it, the focus of the cover is the space elevator itself, as seen from near the base of it looking up. I'd love to see the hints of tall, rundown buildings at the sides, and if possible a man looking up.I also included this sketch:

It's interesting for me to go back and look at this now, because it's actually not that different from the final cover! But we'll get to that...
Kelli took this and sent me back a few rough sketches of her own, asking which I liked:

The curve in the middle one had a dramatic appeal to me, so I asked her to go with that and here was the final result:

This was really excellent, and exactly what I was hoping for. I think the only criticism I had was the buildings were a bit too old-fashioned for futuristic Darwin. Between that and the color scheme more than a few people got a "steampunk" feel from this, but at the time I was fine with it and happily paid her for the piece.
Now, fast forward a few years. I've got a book contract with Del Rey and finally, months later, I get the email starting the discussion about covers. I'd been told many times before this that authors rarely get any say in their cover art, so being included in the conversation at all made me very happy.
Mike, my editor suggested one of two paths (quoting the email verbatim here):We could go for the sci-fi classic: figure with slightly futuristic garb/weapon in front of a slightly futuristic backdrop (with the Elevator, of course), a la John Scalzi, Jack Campbell, and Anne AguirrWe could go highly stylized: I was thinking about the pictographs aboard the Builders’ first ship
The idea to do something abstract was soon discarded, so the focus became a "character cover".
I was, to be honest, a little miffed that all other paths were apparently already closed. I replied with some thoughts on both of the above, and then pretty strongly indicated my preference for a "landscape cover", ala those done by Stephan Martiniere. It's worth noting I grew up with the ambition to do 3D graphics and animation for a living, and idolized artist like Syd Mead and Ralph McQuarrie.
Mike: We’re tasked with creating a cover that conveys the right information to the biggest potential audience so that a customer browsing the shelf (or online) goes, “Ooh! That looks cool! What’s that?” and then goes to investigate further.
When the Del Rey team was thinking about Jason’s covers, we wanted to convey several things. First, they had to be clearly sci-fi since that was the primary reader for this book. Beyond that we wanted to tell people that Jason’s books are about A) characters you actually care about and B) breathtaking action. We felt that a “character” cover with the right sci-fi elements would be the best way to communicate this to potential readers.
With regard to the “landscape cover”, we had briefly considered that too, but were put off by the fact that those types of covers can look static and monolithic and didn’t always inform about all of the great stuff inside. Some sci-fi readers go nuts for images of huge ships or colossal sci-fi landscapes, but they can also be a turn off for non SF readers. This was definitely on our mind as we felt that TDE had something to offer readers who didn’t regularly read sci-fi as well as those who have lots of experience in the genre.
Mike and I both exchanged examples of what we were thinking. So here they are side-by-side:
 Jason's idea vs. Mike's ideaKeep in mind, my point of view was coming purely from what appealed to me, while Mike was thinking (as he rightly should) only about what would be the best cover to help Darwin fly off bookstore shelves.
My main concern with a character-focused cover was that they often look cheesy. The cover above for EMBEDDED was not cheesy at all, so I was happy about that. My comment back to Mike was that I'd seen the book before and had no idea it was Sci-Fi. From afar I'd assumed it was a military book and had never picked it up. I suggested if they go that route they at least try to get a sci-fi looking backdrop. And, I subtly urged him to try and find an artist who painted people well.
Mike: I absolutely loved EMBEDDED and I really dug the cover. For me, seeing it made me want to know who this dude was, what was going on, and what shot down that craft in the background. I knew we could do something cool in a similar vein, but tailored to Jason’s books in a way that emphasized the series’ strengths, and did so with more color and oomf.
Fast forward a few months. In Mike's next email, he shared with me the three artists they were considering. I'm not sure if I can say who they all were, but suffice to say I looked at samples from each and they were all amazing. As someone who doesn't generally care for "character covers", I don't say this lightly. As far as I could tell, Del Rey was looking at the top three artists out there.
In the end they selected Christian McGrath, and I felt very confident then that the artwork would be of the highest quality. If Chris is anything he's amazingly consistent. Just glance at his portfolio and you'll see what I mean. Every one of his covers is well composed and none, in my view, could ever be called cheesy.
Some of Christian McGrath's coversDespite being with one of the top publishers in the business, I think this news marked the first time I really felt like I'd joined the big leagues.
Mike: We’ve all been big fans of Christian’s work for years at this point, especially the covers he’s done for Jim Butcher’s Harry Dresden books. I love that his figures are dark and purposeful, gritty and tough, but also appealing. I look at the images above and wonder, “Who’s ass is she going to kick and can I read about it?” We knew he was our guy and were very happy that Jason agreed!
Fast forward again, as Christian went off and started to do his thing. Another month passed before Mike sent me this little preview: a few very rough sketches from Christian as he attempted to find the right pose, mood, and composition.
Here's the sketches Christian provided. Remember these are extremely rough:

Mike: This first round of sketches is used to give us the opportunity to decide on the direction of the overall composition. How much would it suck for an artist to create a cover image, only to have the publisher say, “That’s cool, but can you change his pose?” Nope, the sketch is the time to have that discussion.
We chatted a bit about the merits of these, and Mike also worked internally with his graphic design people. Eventually feedback was given to Christian, and he came back a month or so later with this gorgeous work:

This painting really pleases me. I love how it captures both the character and the Sci-Fi aspect. My only feedback was that the climbers looked too much like those oversized ski-lift passenger cars. I sent a sketch of what I envisioned the climbers looking like, and Christian revised them before the final version.
Mike also felt something needed to be done about Skyler's hair.
Mike: I can’t tell you how much I love this image. Love, love, love. Skyler looks like a consummate badass, and Darwin and the Elevator are so freakin’ cool in the background. And the color palate? Brilliant. Christian McGrath is amazing. That said, the hair was a little poofy for my tastes (but this is coming from a guy who keeps his head shaved; I acknowledge my bias). Now that we had an arresting cover image, it was time to start tinkering…
Next up was the layout and typography. There were many iterations, a handful shown here in chronological order, and I'll only add a few comments between because I think the evolution of it speaks for itself:

 (Del Rey decided to change the angle so Skyler wasn't leaning, and crop in a bit. Personally I prefer the full painting)
Mike: As Jason mentioned, we wanted to zoom in on Skyler, again trying to focus on action and character above other elements. Unfortunately, to get Skyler to the right size and orientation, we had to crop some of the city. This bummed out the sci-fi nerd in me, honestly, but there are methods to our madness.
We also wanted to try some other treatments to the background as a means of highlighting the figure even more. Often this is done by shadowing the background, but we tried the opposite and instead lightened the background. With those options side by side, the lighter one was the clear winner.
Then it came time for text! We tried dozens of different typefaces, layouts, and colors, many of which were so off that we didn’t even bother sending them on to Jason for consideration. In the end, we liked the big, vintage-looking action font and decided that red/orange would pop against the blue-hued background.

And there we reach essentially the final version on the right.
All in all it was an interesting process and I'm happy with the result, especially the way the whole series looks together! If I haven't before, I'd like to publicly thank Michael Braff and Dave Stevenson at Del Rey for including me in the process and listening to my feedback, and Christian McGrath for his extraordinary talent and professionalism.
Mike: I’d like to echo the thanks for Dave and Christian, but also to thank Jason for his input and notes. But more than that, I’m grateful for his patience and trust. The cover design process is not an exact science and there is a somewhat complex system of thought behind the decisions that publishers make. In the end I’m ecstatic with the final covers and so glad that Jason is on board with them: to me they tell about a great character embroiled in an epic struggle, all set in a unique and realistic setting. Hopefully you agree but, even if you don’t, hopefully the cover was cool enough to make you look further into Jason’s fantastic series. Thanks for reading!
September 28, 2013
Scrivener - How I use it, part 2: Labels, keywords, and meta-data
First, let's recap the main takeaway from part 1: Name your chapters to denote what happens in them. The list can (and does, for me) end up serving as your outline, which makes it incredibly easy to navigate your book later.
To keep with our Star Wars example, here's the whole thing laid out (and viewed in "Outline Mode" which I've highlighted):
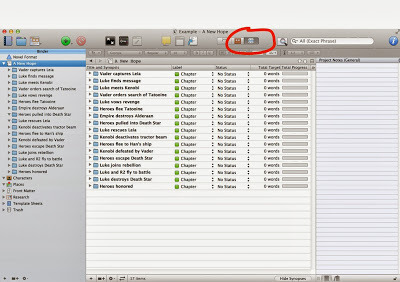
Nice and tidy, right? Now, as an outline this may look a bit light. If you didn't know Star Wars you wouldn't be able to get the full gist of the story from this. That's okay. This is for your use, not to communicate the story to others. And, once it's fleshed out with Scenes inside these chapters, the details, if needed, will emerge.
For you pantsers out there, it's perfectly fine to NOT do this ahead of time. Just create a new chapter, write it, and when you're done name the chapter with a terse summary.
Last note on this: If you look at these chapters, I've tried to have the words summarize what happens at the END of that chapter. This way, every time I start writing a chapter I know what my goal is, and I can have fun getting there. It works for me, but as always your kilometerage might vary.
Moving on then!
Labels, keywords, and meta-data
Scrivener gives you a lot of different wants to flag things for later reference. And because of that it can be easy to get overwhelmed by these options, and equally easy to go overboard using them.
So my main piece of advice here is KISS: Keep It Simple, Stupid.
You don't have to use all these features, and indeed I don't. I started out adding keywords and meta-data all over the place, but in the end I found I wasn't ever making use of them. Your technique will likely evolve, too. For now, we'll keep it simple and just make use of Labels.
In the screenshot earlier, you can see that each Chapter, by default, gets the label of... Chapter.
Personally, I think this is next to useless. For me, what was useful when writing my Dire Earth novels was to know which character's POV was used in each chapter. The reason's I'll get into in a second, but first let me show you how to change these.
First, click the little up/down arrow next to one of the "Chapter" labels and then select "Edit..."
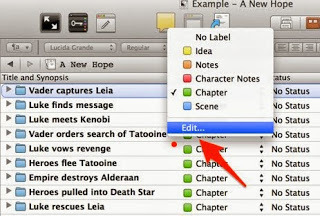
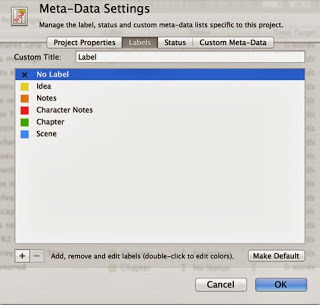
Here are the default labels:
Change the custom title from "Label" to "POV". Then, edit the label names themselves (double-click on them) to be the main characters in your book.
For our example purposes, here's what the screen should look like:
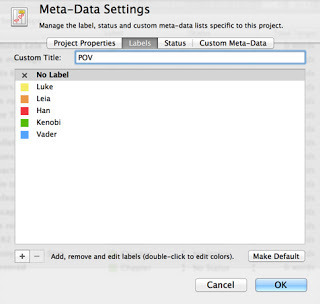
I also made "No Label" the default.
When you click OK, everything that labeled "Chapter" before will now have "Kenobi", since we edited the existing label. That's okay. Go through each chapter now and change it to the character who's point-of-view is used. The final result is something like this:
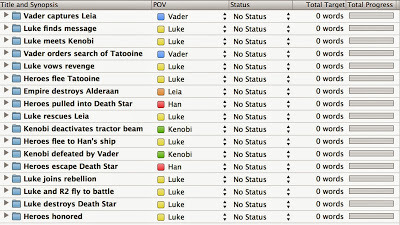
Now, Star Wars itself might not be the best example for using POV as the label we care most about. But for my novels POV was very important, so let's just pretend it matters here, okay? Okay.
What you can learn from this is if some characters are under or over represented. There's a lot of Luke chapters at the end for example, so perhaps sticking a Vader POV chapter in there might be better for flow (again, just pretending - the actual film cuts back and forth a lot between characters, I know). Maybe the final chapter can be told from Leia's POV. And so on...
If you're writing a mystery, maybe change the label column to "Clues" and keep track of what is learned when. Or if you're writing a 1st person story of emotional journey, you could denote the mental state of the main character. Again, this is all to help you identify issues like pacing or focus. In the mystery example, you might find at this stage that you've got a large section in the middle of your book where no clues are given. Whether or not that's an actual problem is something for you to decide. Follow your gut!
Now, Scrivener does offer other ways to do this. In addition to label there's status, keywords, and meta-data. For me, just using labels is really enough. I've done other things like adding keywords for locations and meta-data to note every character that appears in a given scene, but honestly I hardly ever used these. For the more detail oriented writer, you might LOVE this sort of thing, and I also suspect some of you are already looking at this POV label and thinking it wouldn't help you at all.
The main thing you need to realize about using these is that once setup you can SEARCH based on them. It's easy, just click the little down error next to "Search" and tell it you only want to search labels. Search for "Luke" and you'll find every chapter where Luke is the POV character. Again, perhaps not so useful with this Star Wars example, but imagine if you had 60 chapters with 10 different POV characters. Using this, you can instantly get a view of your book from just that character's POV. Used well, this can be very, very powerful tool.
Part 3 of this series will cover using comments as an amazing way to keep track of every little idea or correction or concern you think of as you write.
To keep with our Star Wars example, here's the whole thing laid out (and viewed in "Outline Mode" which I've highlighted):

Nice and tidy, right? Now, as an outline this may look a bit light. If you didn't know Star Wars you wouldn't be able to get the full gist of the story from this. That's okay. This is for your use, not to communicate the story to others. And, once it's fleshed out with Scenes inside these chapters, the details, if needed, will emerge.
For you pantsers out there, it's perfectly fine to NOT do this ahead of time. Just create a new chapter, write it, and when you're done name the chapter with a terse summary.
Last note on this: If you look at these chapters, I've tried to have the words summarize what happens at the END of that chapter. This way, every time I start writing a chapter I know what my goal is, and I can have fun getting there. It works for me, but as always your kilometerage might vary.
Moving on then!
Labels, keywords, and meta-data
Scrivener gives you a lot of different wants to flag things for later reference. And because of that it can be easy to get overwhelmed by these options, and equally easy to go overboard using them.
So my main piece of advice here is KISS: Keep It Simple, Stupid.
You don't have to use all these features, and indeed I don't. I started out adding keywords and meta-data all over the place, but in the end I found I wasn't ever making use of them. Your technique will likely evolve, too. For now, we'll keep it simple and just make use of Labels.
In the screenshot earlier, you can see that each Chapter, by default, gets the label of... Chapter.

Personally, I think this is next to useless. For me, what was useful when writing my Dire Earth novels was to know which character's POV was used in each chapter. The reason's I'll get into in a second, but first let me show you how to change these.
First, click the little up/down arrow next to one of the "Chapter" labels and then select "Edit..."

Here are the default labels:

Change the custom title from "Label" to "POV". Then, edit the label names themselves (double-click on them) to be the main characters in your book.
For our example purposes, here's what the screen should look like:

I also made "No Label" the default.
When you click OK, everything that labeled "Chapter" before will now have "Kenobi", since we edited the existing label. That's okay. Go through each chapter now and change it to the character who's point-of-view is used. The final result is something like this:

Now, Star Wars itself might not be the best example for using POV as the label we care most about. But for my novels POV was very important, so let's just pretend it matters here, okay? Okay.
What you can learn from this is if some characters are under or over represented. There's a lot of Luke chapters at the end for example, so perhaps sticking a Vader POV chapter in there might be better for flow (again, just pretending - the actual film cuts back and forth a lot between characters, I know). Maybe the final chapter can be told from Leia's POV. And so on...
If you're writing a mystery, maybe change the label column to "Clues" and keep track of what is learned when. Or if you're writing a 1st person story of emotional journey, you could denote the mental state of the main character. Again, this is all to help you identify issues like pacing or focus. In the mystery example, you might find at this stage that you've got a large section in the middle of your book where no clues are given. Whether or not that's an actual problem is something for you to decide. Follow your gut!
Now, Scrivener does offer other ways to do this. In addition to label there's status, keywords, and meta-data. For me, just using labels is really enough. I've done other things like adding keywords for locations and meta-data to note every character that appears in a given scene, but honestly I hardly ever used these. For the more detail oriented writer, you might LOVE this sort of thing, and I also suspect some of you are already looking at this POV label and thinking it wouldn't help you at all.
The main thing you need to realize about using these is that once setup you can SEARCH based on them. It's easy, just click the little down error next to "Search" and tell it you only want to search labels. Search for "Luke" and you'll find every chapter where Luke is the POV character. Again, perhaps not so useful with this Star Wars example, but imagine if you had 60 chapters with 10 different POV characters. Using this, you can instantly get a view of your book from just that character's POV. Used well, this can be very, very powerful tool.
Part 3 of this series will cover using comments as an amazing way to keep track of every little idea or correction or concern you think of as you write.
September 19, 2013
Scrivener - How I use it, part 1
To the aspiring authors out there:
Before reading this, there's one thing you absolutely need to know. When it comes to writing, "there's no rules, only tools." Take all writing advice with a grain of salt. If you have time, or know you need a change, give things a try and keep what works for you. If things are working for you, keep doing what you're doing and file this stuff for future reference.
Now then, ready?
Scrivener. You've probably heard about it by now. If not, you should give it serious consideration for your next project. I say next because I think Scrivener works best when you use it from Day 1. And, generally speaking, it's a bad idea to switch software tools in the middle of a project. With November approaching, that's a pretty good opportunity for all you Nanites out there to give Scrivener a shot, especially since they usually offer a free trial version in November (and a discount if you finish Nano).
Why Scrivener?
If you've ever developed any software, you should get what I'm about to explain instantly. For the rest of you, I'll try to make this as clear as possible.
Scrivener treats your manuscript like source code. You've got a project (the book, or even books in my case), and all the material involved is contained in that project. Not just the manuscript, like you'd have in Word, but everything. Chapters, scenes, research, character bios, you name it... each is within the project and each is treated as a separate thing.
Whereas in Word your manuscript is the file, just one big stream of text, in Scrivener you can keep everything in nice tidy chunks. Why's that important? Well, first and foremost is speed.
You can zip from one chapter to another in seconds, and since each is titled with a name you provide, making a quick jump to review what happened in a previous chapter is just a single click away, rather than minutes of scrolling around in Word trying to find the right spot. If you've never dealt with a long document in Word you might not realize this is even an issue, but once you've got a big novel going, it's incredibly useful.
Let me highlight a few things I can do in Scrivener that are impossible, or so cumbersome they might as well be, in Word:
I have a single Scrivener project that contains all three manuscripts (multiple versions, too), every bit of research (text, images, audio, even video), worldbuilding notes including maps, character sketches, deleted scenes, plus hundreds of notes or ideas I came up with during this process. That's 500,000 words of core work, plus tons of additional stuff, and it's all instantly available and searchable. Word basically chokes on anything over 300 pages or so. In Scrivener I can zip around nearly 1800 pages easily, and it's all lightning fast and incredibly stable (zero crashes).Scrivener focuses on content, not "the document". I've tagged every scene with who is in it and where it takes place. This means I can instantly filter down my view to just the bits where a certain character is present, or scenes that take place in a certain location. If you're writing multiple POV's, or have many subplots, this is unbelievably helpful.Scrivener treats each chapter, indeed each scene, as a separate entity. Want to try a different chapter arrangement? Just drag and drop. Its as easy as moving files.Scrivener treats the final "document" as a product you produce at the end. You're not editing a document in Scrivener, you're editing the content that will make up a document. This is the key paradigm shift over something like Word, and probably the hardest thing for a new user to grasp. Programmers probably get this quickly because basically it's a workflow they're used to: your content is like source code, and the outputted manuscript is compiled. Need a standard manuscript in Word format? Compile. Ebook properly setup for Kindle? Compile. PDF with notes and watermarks and with the alternate ending? Compile. None of this changes the content at all.As with software development, a few simple organizational tips up front will help you immensely down the road. I'll start with one here, and cover others in subsequent posts.
TIP 1: Naming chapters
Or, perhaps a better way to say it, let your chapter names be your outline. Never, ever, name them "Chapter 1, Chapter 2," and so on. Why? Chapter numbers will change and besides naming them this way doesn't help you at all.
Here's an example that uses the first few "chapters" of the movie Star Wars as an example:

As you can see, some of these have scenes in them, but the bottom two do not. Whether you choose to break things down smaller like this or not doesn't really matter. The point is, look at how easy that is to navigate! Imagine this expanded over 50 chapters each with multiple scenes. Can't recall if Han shot first in that bar scene just before they flee Tatooine? Well, just click the chapter in your binder and there you are. With split view mode, you don't even need to leave the spot you were writing in to do this. Using tags properly is another way to do this, and I'll cover that in part 2.
By the way, this doubles as an example of how I outline, which I've mentioned before here and in some interviews. A few words per chapter or scene, usually noun-verb-noun, is what I use once I start writing. This is enough for me to know where the chapter is going without taking all the creative spontaneity out of the writing itself.
August 17, 2013
Contest winners!
Thanks to everyone who sent in entries for the EXODUS TOWERS contest. I'll be sending out books today to J. Mast and J. Tice! I picked the first because it amused me, especially since it's a topic Prumble ruminates on in a short story I'm currently writing. The second I liked simply because it sounded very much like the type of thing Skyler would bag without thinking while on a mission, knowing it would be needed.
If your entry didn't get picked, fear not! I'll do a few more of these in September.
J. Mast's entry:
J. Tice's entry:
If your entry didn't get picked, fear not! I'll do a few more of these in September.
J. Mast's entry:
Recordings of light jazz music
Music players for every climber
I'll be the only provider of the Darwin Elevator Music
J. Tice's entry:
My allergies are so bad that in the event of the apocalypse, I would literally kill for a stash of Mucinex and Benadryl.
WorldCon Schedule
Here's my schedule for LoneStarCon3 (aka the World Science Fiction Convention).
Thursday 09:00 - 10:00: Stroll with the Stars
Friday 12:00 - 13:00: CGI and Storytelling
Can modern CGI effects properly illustrate the soul of a story like The Lord of the Rings? Now that incredible, eye popping special effects in genre films are a given, will we ever return to the importance of story? Can CGI enhance the story, without the prominence it has in so many films? Or will CGI just distract from the story?
Friday 15:00 - 16:00: Colossus, Skynet, or the Culture?If and when our AI masters arrive, how will they come about? Will they spring spontaneously from the internet or be deliberately built by men? Our panelists discuss the possibility. Will they rule us, destroy us, or partner with us?
Saturday 10:00 - 11:00: Geeks in Popular CultureThe changing portrayal of geeks in media, comics and pop culture in general.
Sunday 10:00 - 11:00: Big Data. Check. Next Stop: Big Brother?Google+Facebook+Microsoft+Prism=NSA becoming big brother. Or does it?
Monday 14:00 - 15:00: Autographing
August 16, 2013
Exodus Towers giveaway
I have two copies of The Exodus Towers to give away! So here's the deal:
Email me (contest@jasonhough.com) a brief (120 characters or less) list of things you'd want Skyler to bring back for you from "The Clear" if you were stuck in Darwin. Can be one thing or many, whatever you choose. Bonus points for creativity, and this can be humorous or serious. I'll pick two winners at noon on Saturday the 17th -- yes TOMORROW -- and send out the books for quick arrival, hence giving you week or so of RELENTLESS GLOATING.
Rules: Anything rude or offensive I will chuckle at and treasure for all eternity, but I probably won't pick as the winner because I want to post the winning entries.
Okay, ready? Go!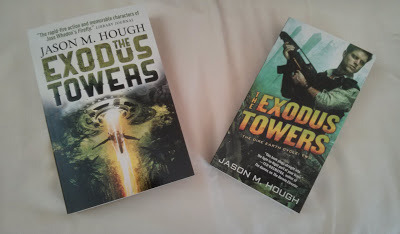

August 9, 2013
Zombies, but different...
My guest post on the subject of subhumans in the DIRE EARTH books is live over at My Shelf Confessions. Enjoy!


