
Scrivener: How I use it -- Part 3
In part 1 I talked about using Scriveners Chapter and Scene titles as a condensed version of an outline, which makes navigating your novel a breeze later on.
Part 2 covered using labels to flag each chapter (and/or scene) with some specific thing that is important to your book. In my case it was keeping track of whose POV each chapter would be from. In yours it might be the location the chapter takes place in, or the time period, maybe various subplots, or something else entirely. Whatever you think will be useful later when you might want to get a "view" of your story narrowed down to just one of these elements. In my case, I liked to be able to get rid of everything so that Scrivener only showed me the chapters from a specific character's POV.
Now, I'd like to talk about the other key feature I use in Scrivener: comments.
The comments in scrivener work a bit like they do in Word, so if you're used to that this shouldn't be too alien. The main difference is how they're displayed. Well, that and how I use them.
Before that, let me explain a bit about how Scrivener organizes your book, because that is VERY different from Word and you might already be a bit baffled by it.
In your manuscript there are folders and text.
Folder = A ChapterText = A scene
This is the key thing to remember: A FOLDER CAN CONTAIN TEXT, TOO. I'll get back to this in a second. But repeat it to yourself now. Okay? Okay.
If you want, you can do your entire manuscript at the folder level and never make scenes within them. Hell, you can even just write your entire book at the "Manuscript" level and never break it down into smaller chunks at all. For the purposes of this post I'm going to use folders and scenes, because that's what I do and that is something that opens up a lot of Scrivener's power.
Before we head back to our Star Wars example, I want to show you what I'm talking about with a blank "Novel" project.
Select File > New Project > Fiction > Novel
You should see something like this:
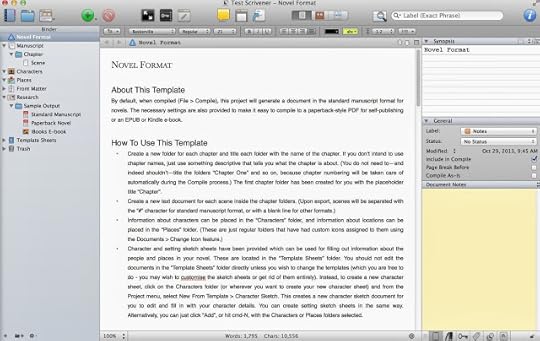
As you see the default project contains a top-level "Manuscript", one folder called "Chapter", and one text called "Scene".
Click on Manuscript. You probably just see a corkboard with a notecard on it. Ignore that for now.
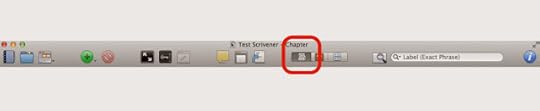
Click on this little button, which is "Edit Scrivenings":
Now you should see a blank view with a line across it. Weird? Let me explain. You're looking at two pieces of your manuscript, the thing called "Chapter" and the thing called "Scene", simultaneously, and that's pretty cool. Try this: Above the divider line, type in "This is the chapter". Then below it, type "And this is the scene":
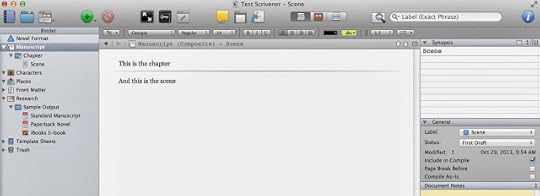
Now just click on Scene. You should only see the text for it. Click on the chapter, you should see the text for both. That's because we have that multi-document "edit scrivenings" view clicked. If this is confusing to you, stop here and do the tutorial that comes with scrivener. Or, just make some more chapters and scenes in here and play around with it.
What's the point of all this? Simple: In Scrivener, you're in control of what you see. From the entire manuscript, to a select sequence of chapters, to a tiny individual scene, you can narrow down your view to just what's important for your current task and get everything else out of the way. In Word, you're always looking at everything, and that can make navigating a large project cumbersome at best. It may be hard to grasp why this is so powerful now, but trust me, when you've got a 50-chapter, 300 scene manuscript going, you'll love it.
The main thing you need to know is that when you're writing (again, this is just my personal technique), you should put the meat of your words in scenes. I personally only use the "chapter" level for subheadings, like "Darwin, Australia 12.MAR.2282" or whatever.
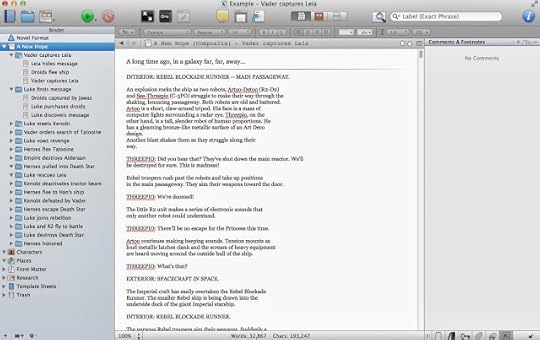
So here's our Star Wars example so far. Note that I have "Manuscript" selected in the binder. Also, just so you're aware, I've pasted in text from the screenplay just so this isn't empty (I'll make this scrivener file available for download in case you want to look at it more closely.)
On to Comments, then!
Let's imagine you're in the process of writing your first draft. You're in the chapter where Luke finds Leia's message (note: in the next screenshot that's the chapter selected, not "manuscript") and you've just written a throwaway line of pointless technobabble. An idea strikes you. "I should totally bring this back up later and have it be important!". But when? I'm going to cover two scenarios here to give you a basic taste of how I use comments:
Scenario 1: You have no idea where to bring this up later, but you want to remember to add it at some point. So add a comment right here:

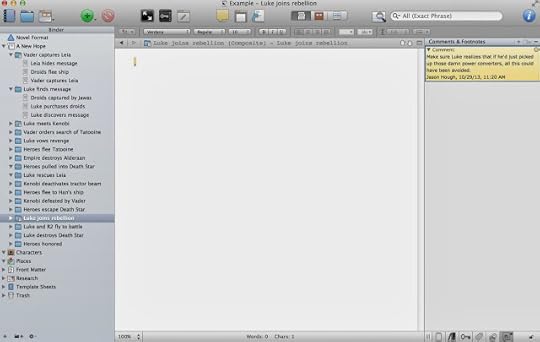
Scenario 2: You know roughly where you want to mention this later, so click on that unwritten Chapter. We'll say it's "Luke joins rebellion". It's empty because you haven't written it yet, and you can't add a note to emptiness, so just put in a single "." or something and make your note:
(Pro tip: Doing this while writing can take you away from the spot where you were. Learn how to use Scriveners split-screen mode and you won't have this problem.)(Feature wish: Sometimes if it's important enough I'll add comments in both places, just to be sure the text matches in terms of details. I kind of wish Scrivener had a way to link comments together, making it easier to keep track of these)
Comments can be for anything, not just when you want to remember to add something. Maybe you've written what you know is an ugly line of dialog, but you're drawing a blank on a better choice. Leave a comment to make sure you come back and fix it. Or maybe you realize you need to research the name of a town but don't want to lose your groove; just call it "FixMe town", and add a comment to the word "FixMe" to correct it later when you have time. This allows you to keep writing but not lose these kinds of things in the long haul.
Again, this is not too dissimilar from Word's comment feature, but I think it's better for two reasons:
1. Remember earlier when we were looking at one scene, a chapter and its scenes, or the entire document? Well guess what, the comments listed on the side there correlate to that. In other words, if you've only got your "Death Star" location scenes in view right now, you'll only see the comments you left in those scenes & chapters. When editing, this ability to focus in on just what you're working on is very handy.
2. A more subtle difference is simply in the way Scrivener displays these. While Word shows the comments sort of next to the text they go with, Scrivener just stacks them up on the right. This might seem like a step back compared to Word, but I actually prefer it. You navigate by clicking on the comments and seeing where they point, not the other way around. The reason I prefer this is the main thing I wanted to get across with all this:
I use Scrivener comments as my to-do list for the manuscript.
Every one of these is something I need to fix. Each time I fix one, I delete the comment, and I don't send off a manuscript to my editor until all the comments are gone.
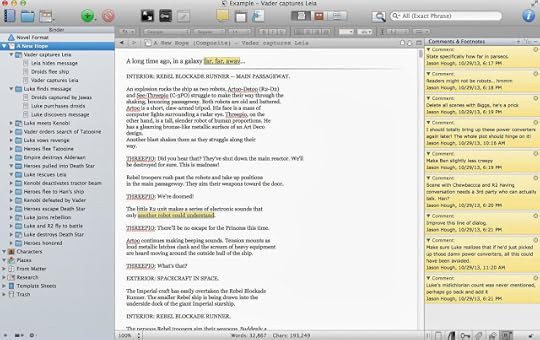
Here's our Star Wars example with a bunch of comments added:
So there you go! Questions? Add a comment and I'll answer as best I can.
Part 2 covered using labels to flag each chapter (and/or scene) with some specific thing that is important to your book. In my case it was keeping track of whose POV each chapter would be from. In yours it might be the location the chapter takes place in, or the time period, maybe various subplots, or something else entirely. Whatever you think will be useful later when you might want to get a "view" of your story narrowed down to just one of these elements. In my case, I liked to be able to get rid of everything so that Scrivener only showed me the chapters from a specific character's POV.
Now, I'd like to talk about the other key feature I use in Scrivener: comments.
The comments in scrivener work a bit like they do in Word, so if you're used to that this shouldn't be too alien. The main difference is how they're displayed. Well, that and how I use them.
Before that, let me explain a bit about how Scrivener organizes your book, because that is VERY different from Word and you might already be a bit baffled by it.
In your manuscript there are folders and text.
Folder = A ChapterText = A scene
This is the key thing to remember: A FOLDER CAN CONTAIN TEXT, TOO. I'll get back to this in a second. But repeat it to yourself now. Okay? Okay.
If you want, you can do your entire manuscript at the folder level and never make scenes within them. Hell, you can even just write your entire book at the "Manuscript" level and never break it down into smaller chunks at all. For the purposes of this post I'm going to use folders and scenes, because that's what I do and that is something that opens up a lot of Scrivener's power.
Before we head back to our Star Wars example, I want to show you what I'm talking about with a blank "Novel" project.
Select File > New Project > Fiction > Novel
You should see something like this:

As you see the default project contains a top-level "Manuscript", one folder called "Chapter", and one text called "Scene".
Click on Manuscript. You probably just see a corkboard with a notecard on it. Ignore that for now.
Click on this little button, which is "Edit Scrivenings":

Now you should see a blank view with a line across it. Weird? Let me explain. You're looking at two pieces of your manuscript, the thing called "Chapter" and the thing called "Scene", simultaneously, and that's pretty cool. Try this: Above the divider line, type in "This is the chapter". Then below it, type "And this is the scene":

Now just click on Scene. You should only see the text for it. Click on the chapter, you should see the text for both. That's because we have that multi-document "edit scrivenings" view clicked. If this is confusing to you, stop here and do the tutorial that comes with scrivener. Or, just make some more chapters and scenes in here and play around with it.
What's the point of all this? Simple: In Scrivener, you're in control of what you see. From the entire manuscript, to a select sequence of chapters, to a tiny individual scene, you can narrow down your view to just what's important for your current task and get everything else out of the way. In Word, you're always looking at everything, and that can make navigating a large project cumbersome at best. It may be hard to grasp why this is so powerful now, but trust me, when you've got a 50-chapter, 300 scene manuscript going, you'll love it.
The main thing you need to know is that when you're writing (again, this is just my personal technique), you should put the meat of your words in scenes. I personally only use the "chapter" level for subheadings, like "Darwin, Australia 12.MAR.2282" or whatever.
So here's our Star Wars example so far. Note that I have "Manuscript" selected in the binder. Also, just so you're aware, I've pasted in text from the screenplay just so this isn't empty (I'll make this scrivener file available for download in case you want to look at it more closely.)

On to Comments, then!
Let's imagine you're in the process of writing your first draft. You're in the chapter where Luke finds Leia's message (note: in the next screenshot that's the chapter selected, not "manuscript") and you've just written a throwaway line of pointless technobabble. An idea strikes you. "I should totally bring this back up later and have it be important!". But when? I'm going to cover two scenarios here to give you a basic taste of how I use comments:
Scenario 1: You have no idea where to bring this up later, but you want to remember to add it at some point. So add a comment right here:

Scenario 2: You know roughly where you want to mention this later, so click on that unwritten Chapter. We'll say it's "Luke joins rebellion". It's empty because you haven't written it yet, and you can't add a note to emptiness, so just put in a single "." or something and make your note:

(Pro tip: Doing this while writing can take you away from the spot where you were. Learn how to use Scriveners split-screen mode and you won't have this problem.)(Feature wish: Sometimes if it's important enough I'll add comments in both places, just to be sure the text matches in terms of details. I kind of wish Scrivener had a way to link comments together, making it easier to keep track of these)
Comments can be for anything, not just when you want to remember to add something. Maybe you've written what you know is an ugly line of dialog, but you're drawing a blank on a better choice. Leave a comment to make sure you come back and fix it. Or maybe you realize you need to research the name of a town but don't want to lose your groove; just call it "FixMe town", and add a comment to the word "FixMe" to correct it later when you have time. This allows you to keep writing but not lose these kinds of things in the long haul.
Again, this is not too dissimilar from Word's comment feature, but I think it's better for two reasons:
1. Remember earlier when we were looking at one scene, a chapter and its scenes, or the entire document? Well guess what, the comments listed on the side there correlate to that. In other words, if you've only got your "Death Star" location scenes in view right now, you'll only see the comments you left in those scenes & chapters. When editing, this ability to focus in on just what you're working on is very handy.
2. A more subtle difference is simply in the way Scrivener displays these. While Word shows the comments sort of next to the text they go with, Scrivener just stacks them up on the right. This might seem like a step back compared to Word, but I actually prefer it. You navigate by clicking on the comments and seeing where they point, not the other way around. The reason I prefer this is the main thing I wanted to get across with all this:
I use Scrivener comments as my to-do list for the manuscript.
Every one of these is something I need to fix. Each time I fix one, I delete the comment, and I don't send off a manuscript to my editor until all the comments are gone.
Here's our Star Wars example with a bunch of comments added:

So there you go! Questions? Add a comment and I'll answer as best I can.


No comments have been added yet.


