Matthew Houde's Blog, page 11
February 10, 2023
Playa Dominicalito: Surf, Splash, or Fish
Two Weeks in Costa Rica |
Costa Rica’s southern Pacific coast has dozens of almost empty beaches. One hidden gem is Playa Dominicalito near the town of Dominical. This beach has calmer water at lower tides and nice surfing waves at mid-to-high tide. There is also a cultural element, as this beach is the launching point for many of the area’s artisanal fishing boats. In this post, we’ll share more about Playa Dominicalito and help you plan your visit.

Playa Dominicalito is located just a few minutes south of Dominical on Costa Rica’s Costanera Highway (Route 34). There are two entrances to the beach.
The first entrance is almost directly across from the Dominicalito soccer field (Plaza Deportes Dominicalito), a large grassy area on the inland side of the highway. This is the primary entrance where there is more shade and a nicer part of the beach. The road slopes down off the highway so is a little hard to see.
 Entering the beach from the first entrance
The second entrance is another one km (0.6 miles) south. Look for signs for La Parcela Restaurant. This entrance is where many of the local fishing boats launch from.
The southern end of the beach isn’t as pristine, with some driftwood and more rocks, but gives you better access to the peninsula and small island off the point.
Playa Dominicalito – About the BeachPlaya Dominicalito translates to Little Dominical Beach because it is smaller compared to its neighbor, Playa Dominical.
The views at Playa Dominicalito are spectacular. Each end of the cove has craggy rocks and a lush backdrop of green jungle. On the southern end of the cove, there is a small island that can be reached at low tide.
 Looking towards the southern end of the beach
The sand at Playa Dominicalito is brownish gray and somewhat rocky in places. Larger rocks and tidepools become exposed at low tide.
There is not much development along the beach aside from a cluster of makeshift homes at the primary entrance. In this small neighborhood, you’ll find locals selling a few souvenirs, snacks, and fresh coconuts.
Otherwise, the beach is backed by tall palm trees with one area of swampy shrubland near a shallow lagoon and stream outlet. A sandy, dirt road runs parallel to the shore and allows you to pull up your car right under the trees. Just be sure not to park (or sit) under coconuts!
 Palm trees along the beach
Local fishermen keep their boats moored at the southern part of the cove and some pull them up right onto the sand. During the morning or early evening, you may see these fishermen launching their boats to go out, either for the day or for overnight fishing.
Activities at Playa DominicalitoSurfingAt mid-to-high tide, Playa Dominicalito is a popular beach for surfing. The waves are usually less intense than at Playa Dominical because the beach is more sheltered. Surfers line up for waves from the middle to the northern part of the beach (first entrance).
Many of the surf schools in Dominical also bring students to Playa Dominicalito since conditions can be ideal for learning.
 Surfers catching a wave
Even though it is popular, the surf lineup here is usually nowhere near crowded. There is plenty of room to spread out and have your own space.
If you are looking to rent a board, there are usually one or two vendors offering them right from the beach. The going rate was $10 for a one-hour rental or $15 for a two-hour rental when we last visited.
 Surfboards for rent at the beachBeach Time
Playa Dominicalito is a fun beach to visit if you want to relax under the shade of some coconut trees, play in the sand, or splash around a bit. Sunsets are also beautiful here.
Sundays and holidays are popular times for locals to visit and you may see them setting up for the entire day with the whole family.
Low tide at Playa Dominicalito is nice because you can walk along the cove and explore between the rocks and tidepools. There are usually nice shells and rocks to find or some small fish and snails to watch.
 Playa Dominicalito at low tide
If you have kids, it is one of the best area beaches in the Costa Ballena since it is a bit more sheltered and has smaller waves. Still be careful though, because there can always be riptides and forceful waves.
With little kids, the shallow tidepools and wet spots in the sand are perfect for playing.
During our last visit, the person renting surfboards also had some chairs and umbrellas for rent.
 Our kids splashing in the shallow waterFishing
Since Dominicalito is historically a fishing village, it is a great place to throw in a line. When the rocks are exposed at low tide, you may see fishermen climbing out over them to get to the deeper water. The locals usually use handlines or simple spinning rods to catch fish like snapper, snook, and other inshore species.
Fishing tours and whale-watching tours by small boat are also available in the area.
Dominicalito has an Association of Fishermen (Asociación de Pescadores) as well. This group is trying to promote artisanal fishing as a tourist activity, while keeping the trade alive. The association also does beach cleanups and training like CPR and ocean-emergency tactics for the town’s boat captains.
 Local fishing boatsSafety
 There was no lifeguard at the beach during our last visit (January 2023). Even though the cove at Playa Dominicalito is sheltered a bit, strong waves and riptides are common.
Also important is that car break-ins and petty theft have been a problem on this beach in recent years.
Our advice is to bring very little to the beach and always keep someone with your belongings. Never leave things in your car or unattended on the sand while you are swimming/surfing.
It’s also good to park near the surfboard rentals or next to other visitors so that you are not off on your own.
Overall, the beach is safe to visit but like anywhere in the world, you have to use precautions to avoid any problems.

Playa Dominicalito is a beautiful, uncrowded beach on Costa Rica’s southern Pacific coast. From the local fishermen tending their boats to the surfing waves or tidepools, there is something for everyone to enjoy.
Have a question about visiting Playa Dominicalito? Want to share your thoughts? Leave a comment below. Looking for more amazing area beaches? Check out these articles.Surf Lessons in Uvita: Consistent Waves for Learning – Read our experience taking beginner surf lessons near Uvita’s Whale Tail.
Playa Ventanas, Puntarenas: A Beach with Caves – This beach has large caves that you can walk through at low tide.
Playa Arco: A Secret Beach Near Uvita – This beach is harder to access but beautiful and secluded.
The post Playa Dominicalito: Surf, Splash, or Fish appeared first on Two Weeks in Costa Rica.


February 4, 2023
Surf Lessons in Uvita: Consistent Waves for Learning
Two Weeks in Costa Rica |
Surfing is definitely the number one watersport in Costa Rica. And while we have lived here for many years, we’ve only tried it a couple of times. With our kids getting older though, we’ve found that learning to surf as a family can be really fun. In this post, we’ll share our experience taking surf lessons in Uvita and tell you why it’s a great place to start.

Costa Rica has hundreds of surfing beaches and Uvita is, of course, not the only place to find great conditions. However, there is something special about this spot.
The Uvita area is most famous for what is known as the Whale Tail. This is a giant sandbar jutting off the coast. From above it is shaped just like a tail.
 The Whale Tail in Uvita
The rocky formation collects sand and distributes it onto the tail itself and along the adjacent beaches.
To the north of the Whale Tail is Playa Hermosa de Uvita. This beach is popular among intermediate and more advanced surfers.
And just south of the main beach (Playa Uvita) is Playa Chaman. Playa Chaman has sandbars offshore that create consistent rolling waves. At most tides they aren’t too big but still have a strong pushing momentum that is great for learning to surf.
This is where our lessons started.
Gearing UpWe met up with our surf instructor, Gabriel, at the Uvita 360 office, near the entrance of Marino Ballena National Park. He told us that we’d be driving down the road a bit (to the Playa Chaman entrance) where conditions were ideal.
Gabriel already had the surfboards, cooler, and rash guards loaded on his vehicle and told us to follow him.
 Driving through Bahia (Uvita) to Playa Chaman
Once we parked the car, showed our national park tickets (provided by the tour company), and walked to the beach, we were ready to learn.
For today’s tour, it would be Sam (7 years old) and me (Matt) taking the lesson. This would be the second lesson for both of us, but first time doing a lesson together.
To learn about when Sam and Jenn did their first surf lessons in Guanacaste, read the post, Family-Friendly Surf Lessons in Playa Grande.
Introduction and RefresherSince it was a hot and sunny day, Gabriel kept us in the shade of the palm trees at first. Here we discussed what we would be doing. Gabriel also asked us questions about our previous surfing experience.
Drawing some lines in the sand with a stick and then laying right on his belly, Gabriel reminded us how to lay on the surfboard, paddle with our arms, and pop up in the right position. His brief but concise directions sparked memories for both Sam and me of our past lessons.
 Our instructor explaining about how to center ourselves on the board
Next it was our turn. Sam and I both laid down on the sand and tried to mimic the moves that Gabriel had showed us. To be honest, it wasn’t pretty.
After some laughs and more tries, we were getting the hang of it. Gabriel corrected a few wrong moves and seemed happy with our skills.
Learning to Turn“Today you guys are going to learn how to turn,” Gabriel said as he got back in front of us. “Since you have already surfed, I know you can do it!”
Sam and I both smiled and got excited. We hadn’t expected this, but it made sense that it was the next step in learning to surf.
Gabriel went on to show us how to keep crouched down on the surfboard. “Then to turn,” he said, “you lean down and touch the board here,” pointing to a spot between his feet. “This shifts your weight and makes you turn. Now you try it.”
 Practicing our stance with Gabriel
Sam and I both practiced and were eventually coached into the right positions.
“Ok guys, let’s hit the water. You are ready!” Gabriel said.
Taking on the WavesCarrying our surfboards down to the water’s edge, we looked out at the amazing view along Playa Chaman. Behind us was a thick row of palm trees. In front of us was the sparkling ocean with small islands offshore.
 Getting ready to hit the waves
The tide was low but coming in as we got up to waist deep and listened to Gabriel’s instructions. Gabriel was with me, and an assistant named “T” was helping Sam.
Laying on the boards, we paddled out, guided and pulled by our instructors.
Soon it was time to take on the waves. T swung Sam’s surfboard around as a nice wave of whitewater swooshed in. The whitewater is a second wave that forms after the larger original wave has already crashed in the deeper water.
Pushed a bit by T, Sam got some momentum from the whitewater and popped right up on his board. He rode the wave about 20 feet (6 meters) and then plopped into the shallow water.
 Sam catching his first wave of the day
Now it was my turn. Gabriel eyed a wave coming in, helped me turn the board toward the shore, and gave me a little push. “Paddle, paddle, paddle!” he called out.
I dug my hands into the water and paddled hard. I immediately felt the momentum of the wave propel me forward. I popped up, standing in a sideways position and awkwardly gained my balance, then surfed in toward Sam and jumped off the board next to him.
Turning the BoardGabriel’s plan was to have us practice popping up and surfing in a straight line for a while until we got the hang of it. To his surprise, Sam, on his second try, leaned down like we were instructed on the shore and turned his board!
Gabriel shouted and clapped in excitement and my jaw dropped.
Eventually I was able to turn on some of my tries too. We were each having fun and learning a lot.
 Matt learning to turn the boardGreen Waves
After a short break on the sand with some fresh fruit and cold drinks, Gabriel took us back out to the water. This time we were looking to catch “green waves” he told us.
A green wave is an unbroken wave. Since we were in the whitewater before (area with waves that had already crashed), this meant going out a little deeper to catch the wave where it breaks the first time.
I could tell this was going to be a big challenge for both Sam and me, but we were ready to try. Luckily Gabriel and T were there to help us.
As we waited for the ideal wave to come, Gabriel told us about how a lot of surfing is being patient. “If you chase after every wave, you will wear yourself out,” he told us.
Gabriel and I watched as T eventually set up Sam for a green wave. T helped guide him into the right position and pushed him a little to gain some forward momentum. Sam popped up on the board, rode if for a second, and then crashed hard into the water. He came up to the surface quickly, smiling and looking to try again.
 Sam catching a green wave
My first attempts at green waves went a lot like Sam’s. Eventually though, we each caught one. Catching the green wave had a much different feeling. There was a lot more strength behind the wave and that gave us more speed on the board.
Gabriel worked with me on catching some more green waves while T did the same with Sam. This one-on-one instruction was priceless.
Reading Waves and Picking a DirectionI laid on the surfboard in the deeper water and Gabriel stood with me, up to his chest. He spent a lot of time explaining what each wave was doing and why it was either good or bad. He was teaching me how to read the waves.
Some waves were cresting too far out, others were either too small or too big. And even more were just a little off, cresting near us but not in the exact right spot. Again, patience was the key.
Gabriel helped me catch four or five good green waves. He taught me which direction they were going (left or right) and how to turn into them. I wasn’t doing it perfectly, but I was learning each time.
With our tour time ticking toward the end, Gabriel wanted to see me catch a green wave all on my own. He wouldn’t push or pull me into the right spot. I had to paddle and get the timing right myself.
This took a while, maybe 10 attempts, but I finally caught one. The feeling was amazing. I was hooked and I could tell Sam was too.
 Matt about to stand up on the board and catching a green wave. Gabriel in the background smiling
  Conclusion
After a couple of hours surfing, Sam and I were tired and ready to stop for the day. Surfing was hard. It was a lot of exercise and we had been beaten up by many waves. However, we both loved it. The feeling of catching a wave, gaining speed, and even turning was a real rush for us both. We will definitely be doing more lessons and renting boards in the future. Hopefully our experience has also inspired you to give it a try.

Playa Ventanas: A Beach with Caves – This beach near Uvita has cool caves that you can walk into at low tide.
The Whale Tail at Uvita’s Marino Ballena National Park – Learn more about Uvita’s famous Whale Tail-shaped sandbar.
Rental Car Discount – Exploring the Uvita area is best done with a rental car since things are spread out. Get 10% off from one of the best companies in the country, plus free extras.
The post Surf Lessons in Uvita: Consistent Waves for Learning appeared first on Two Weeks in Costa Rica.
January 28, 2023
MareBlu: Protecting Costa Rica’s Beaches
Two Weeks in Costa Rica |
Costa Rica translates to “Rich Coast” and for anyone who has ever visited, you know why. From calm coves to crashing surf, palm-tree-backed sands to rocky points, each beach offers something unique and beautiful. But even paradise has its problems. Plastic and other trash is a major issue along Costa Rica’s beaches. Today we are highlighting one organization, MareBlu, that is working hard to protect these natural treasures. We’re lending our support and will let you know how you can too.

While we would like to think Costa Rica is just about perfect, the truth is that like anywhere else, pollution is a major problem. Every day, thousands of pounds of plastic and other trash wash up along the country’s beaches. This is not only an eyesore but also bad for the local wildlife and sensitive marine ecosystems.
 Tons of plastic along a beach near Tarcoles
The trash comes from several places, but most is thought to flow into the sea from Costa Rica’s many rivers and streams. The biggest source is the San Jose metropolitan area and Tarcoles River, but smaller coastal communities also contribute.
Initiatives are in place to reduce illegal dumping and littering; however, those problems won’t be solved overnight.
MareBlu – Combating the ProblemHeadquartered on Costa Rica’s central Pacific coast, the MareBlu organization is combating coastal pollution head on.
Geronimo Ciuti, the founder, grew up enjoying Costa Rica’s pristine beaches with his family. But as an adult, he noticed something had dramatically changed. Trash was washing up in huge quantities.
Passionate about the problem, he took a leap of faith, quitting his day job in San Jose and moving to the beach to start MareBlu.
Geronimo told us that in just 4.5 years, they have removed around 300 tons (66,000 pounds or 27,000 kg) of plastic from local area beaches!
Recruiting HelpWhile in the beginning Geronimo was collecting a lot of trash himself, he knew that he could not do it alone. With limited funds, he was inspired by other pay-to-volunteer programs. These groups charge a minimal amount to cover food and lodging and recruit volunteers looking for unique, educational experiences.
To date, MareBlu has hosted over 250 volunteers from more than 40 countries around the world. Individuals spend anywhere from one to six weeks living at the MareBlu base camp. There they learn all about the problem and Costa Rica in general, and are assigned various responsibilities within the organization.
 Collecting plastic bottles on the beachBeach Cleanups
Beach cleanups are the cornerstone of the organization’s work. Each week, MareBlu sends out its custom-built plastic-recovery expedition vehicle for beach cleanups.
Volunteers and sometimes local businesses and other organizations are mobilized along the beach to collect all the trash in sight.
This trash is loaded into bags, which the recovery vehicle then tows back to base camp.
 MareBlu’s cool plastic recovery vehiclePlastic Processing
Most local beach cleanups fill bags and wait for trash trucks to pick them up. What’s different about MareBlu is that all the trash does not go into a landfill. Their goal is to send zero plastic to local landfills.
Back at base camp, volunteers sort all the plastic. It is then repackaged and sent in bulk truckloads to be upcycled. Each canvas bag holds around 3.5 tons of plastic waste.
 Beach plastic in bags, ready to be put to another use
The organization hopes that soon, they will be able to purchase a shredder to cut the plastic into smaller pieces. Then they can load even more weight into each bag (about nine tons).
This will cut down significantly on trucking costs and allow the program to send fewer loads with even more plastic.
Upcycling Beach PlasticsUsing his former business skills in the textile industry, Geronimo and MareBlu have been able to partner with various industrial companies in Costa Rica. These companies have agreed to take the recycled plastic and incorporate it into different products.
Products range from concrete pavers and cement blocks to composite wood products and even asphalt. The plastic that is incorporated reduces the amount of raw materials needed. It is a win-win situation for everyone, including the environment.
 These pavers from the company Pedregal are made with MareBlu plasticCompounding the Effort
While cleaning the beaches is important work, Paula Sanchez, MareBlu’s volunteer coordinator told us that volunteers can quickly get burnt out picking up trash all day. So, to keep things interesting and make more of an impact, the organization has other projects as well. Here are just a few.
Artificial ReefsOne exciting initiative is installing artificial reefs in the Playa Blanca marine reserve. This beach zone is just steps from the MareBlu base camp.
With backing from the Punta Leona Resort & Club, around 200 large concrete spheres will be placed, just offshore. These structures are specifically designed to promote coral growth. They also offer protection for fish and other marine species.
Volunteers at MareBlu get hands-on experience constructing these spheres and can see their placement in the nearby ocean waters.
This project has only recently started but already fish and corals are populating the spheres.
 Artificial reefs being installed at Playa BlancaBeach & Neighborhood Plastic Collection
Only about 7% of plastics are recycled in Costa Rica. One of the MareBlu’s goals is to increase that number.
Volunteers have been installing giant turtle-shaped plastic collection sculptures along beaches, in parks, and near shopping centers.
Each turtle is collecting about 30-50 kg (65-110 pounds) of plastic per month. That is about a half ton of plastic, per turtle, per year.
This initiative has been very successful and new businesses have since been requesting their own plastic collectors. Maintaining these collection points is yet another job for the busy volunteers.
 A MareBlu plastic collector in JacoTurtle Hatchery
Although a smaller project within the organization, the turtle hatchery is a favorite among volunteers. While conditions along the beaches of Punta Leona, near the base camp, are not ideal for nesting sea turtles (there are many visitors, dogs, and other threats), there is evidence that more and more turtles are showing up to lay their eggs.
With the help of volunteers, the turtle eggs can be carefully moved to the safety of the hatchery. When the eggs fully develop and hatch, the baby turtles can then be released by volunteers as well.
Currently around three to five nests per year are being protected but there are hopes that this number will increase.
 Turtles about to be released from the hatchery in Punta LeonaGrowing a Movement
MareBlu is impressive as it stands but the organization and founder, Geronimo, are just getting started. They have plans to improve upon everything they are doing. They also will keep fostering new ideas to see how they grow. The plastic shredder is a perfect example. And Geronimo also mentioned that they would like to try to make some upcycled products onsite as well.
How We Are Helping and How You Can Too!Currently the volunteer program at MareBlu keeps the day-to-day operations running and beach cleanups going. This is backbone of the organization.
The Punta Leona Resort & Club has generously hosted the organization’s base camp on their property. And while they are free to keep using the resort’s space, MareBlu needs to build a larger base camp and dorm for its volunteers. Luckily, the architectural plans are ready, and building is set to begin.
 One of the containers for MareBlu’s new base camp
Our company Two Weeks in Costa Rica, Inc. has donated $5,000 toward this new project. But with our donation and other funds only 20% of project costs are covered.
If you’d like to help this great cause, you can donate through PayPal or by local Costa Rica bank transfer or international wire transfer. Visit their Get Involved page for details.
MareBlu is also always looking for corporate sponsors or individual volunteers. If you would like to volunteer, sponsor a cleanup, install a turtle sculpture, or contribute something else, reach out to them through their website or social media channels.
 Proud volunteers!Conclusion
The beach and oceans are a big part of what makes Costa Rica a special place. If you have spent time under an almond tree, ridden a breaking wave, or played with your kids in the soft sand, you know that it is something worth protecting. We have been inspired by the work of MareBlu and hope that you are too. Let’s help them out and keep this movement going.
If you have made a contribution to MareBlu, leave us a comment below and tell us why it was important to you. This will inspire others to do the same. Looking for more ways to give back to Costa Rica? Check out these posts:Keeping Costa Rica Green: How We Are Giving Back – This tree-planting program that we support in Costa Rica’s Southern Zone is using existing farmers and landowners to regrow the rainforest.
Shuttle Booking Service – We book private shuttle transportation throughout the country. When you place an order, you have the option to add a donation to our tree-planting initiative.
Macaws Flying Free: A Visit to the Ara Project – This breeding center in Punta Islita has been helping increase the population of Scarlet and Great Green Macaws. It’s a fun visit from Nosara or Samara.
The post MareBlu: Protecting Costa Rica’s Beaches appeared first on Two Weeks in Costa Rica.
January 12, 2023
A Night Walk in Monteverde: Sleeping Toucans, Sloths & Snakes
Two Weeks in Costa Rica |
Exploring Monteverde’s cloud forest by day will let you enjoy views of mossy trees, twisted roots, and misty horizons. Wildlife, however, can be hard to find in these dense woodlands. While it may seem counterintuitive, cloud-forest creatures can be much easier to spot at night. In this post, we’ll share our experience on a Monteverde night walk.

Monteverde is an iconic destination in Costa Rica. The quaint mountain town sits at about 4,200 feet (1,300 meters) in elevation, right along the Continental Divide. This means that the mountains sweep down toward the Pacific Ocean in one direction and the Caribbean Sea in the other. From some spots in town, you can see the Pacific on a clear day.
At this Divide, wind and wet weather converge to create a lush, green, and cloudy environment. These elements make for the perfect hiding place for many species of birds, insects, reptiles, and mammals.
Our Night Walk ExperienceOur night walk started at the Monteverde Wildlife Refuge where we met our guide, Esteban. It was about 6 p.m. and darkness was falling quickly over the forest.
 Our guide’s powerful scope, which let us see creatures up close
In Costa Rica, the sun sets on a regular schedule because of its proximity to the equator. So, by 6 p.m., it is almost always dark, year-round.
Starting the TourAfter some introductions, we quickly got started on the tour. It was just our family, which was nice since we had our two young boys with us (ages 3 and 6).
With a sprinkle of rain hitting our heads, we set off with flashlights in hand. Esteban, our certified naturalist guide, explained that it was important for us to stay on the trail and let him lead the way. There were things in the forest that could potentially be dangerous.
A Short History LessonWalking up a small hill, Esteban told us about the land that made up the Monteverde Wildlife Refuge.
The property began as a large dairy farm. Over time, the owners began to see the environmental significance of their land. They also realized that tourism could eventually replace the farm’s earnings.
People from around the globe were showing up in Monteverde to view the beautiful landscapes and many birds and animals. The family transitioned from farming to conservation, and the forest quickly returned.
As we walked the uneven path, it was hard to believe that fields and barns once made up the land. Our flashlights beamed up at giant trees and through broad-leafed shrubs and wispy vines.

It wasn’t long before Esteban had found something for us to take a closer look at. It was a golden-orb spider perched in its web. The silk from this spider, he told us, was one of the strongest materials in the world. It is even used to make bullet-proof clothing.
As we looked at the large black and gold spider with our flashlights, we heard some excitement on the trail nearby. Esteban listened for a moment and then told us that another group had seen a snake.
Weaving our way along the trail behind him, we came to another guide and small group. The two guides made an exchange in Spanish along with some pointing.
Esteban set up his scope after the group left. Taking a closer look, he told us that it was indeed a snake—the same one he had seen for the past few days in this very spot. He thought it may have eaten a large meal and was now digesting it while staying on the same branch.
The snake was about 30 feet (9 meters) away, but through Esteban’s scope we could see it in close detail. It was a side-striped palm-pit viper.
The snake was dark green with a light yellow belly. Its head was triangular, telling us it was likely venomous. Esteban confirmed that it was a dangerous snake and told us it was one of the most common in the cloud forest. This one was about 2-feet (0.6 meters) long.
 A Side-striped Palm-Pit Viper we spotted along the trail
After the snake sighting, everyone stayed especially close to Esteban as we continued down the trail. Now the rain had returned, but we kept mostly dry under umbrellas and raincoats.
Interesting InsectsAs we walked, we saw many interesting insects along the way. One was a katydid, a sort of grasshopper that looks exactly like a leaf. Esteban quizzed our oldest son (age 6) about why it would look like that. They then had a discussion all about camouflage and predators.
 An insect called a katydid – an expert at camouflage
 There were also a lot of stick bugs of various shapes and sizes. Talk about camouflage, these awkward bugs blended in so well that, even when they were close by, they looked just like dead sticks.
 A stick bug
Esteban did an excellent job explaining that most creatures living in the cloud forest try to blend in as best they can. If they are left exposed, they may get snatched up by a predator. That is why they are especially hard to see during the day. At night, they move around much more, using the darkness for additional protection.
The River TrailEsteban could see that our family was getting a bit wet and tired. In fact, our three-year old was strapped onto Jenn’s back fast asleep in the carrier. At the next trail intersection, he asked if we wanted to go back or do a short loop down to the river.
We appreciated his flexibility but those of us who were still awake were ready to see more. Esteban reassured us that usually some cool stuff was found down by the river.
At the bottom of some steps, we were rewarded.
Esteban shined his light into the trees where a beautiful Keel-billed Toucan was perched. We had woken him from his slumber, but he sat still, allowing us to get the scope set up. Drops of rain dripped from the toucan’s large colorful beak as we watched through the special lens.
 Our guide put our phone up to his scope to get this picture of a Keel-billed Toucan
We continued forward, letting the bird doze back to sleep.
Farther up the trail we saw another side-striped palm-pit viper snake. This one was a baby, only about 8 inches (20 cm) long. It was curled up on some barbed-wire fence.
And close to the water, Esteban was able to focus his scope on some frog eggs. He explained that the eggs were safer up in a tree, hidden under the leaves. When they hatched into tadpoles, they would drop down into the water and then develop into baby frogs.
 Some frog eggs on a leafOne Last Critter
Our final highlight was on the walk back to the reception area. The group ahead of us had stopped and were shining their lights into the branches above. To be honest, they were being very loud and obnoxious. Soon we learned why. There, creeping along through the canopy, was a two-toed sloth.
We have seen sloths all over Costa Rica and at the Sloth Sanctuary in Monteverde. But this was the first time we had seen one in the wild, in Monteverde. With the rain, we weren’t able to snap a good picture, but it was still really fun to see.
 Everyone trying to get a look at the slothConcluding Our Tour
Back at the reception area and out of the rain, we said goodbye to Esteban and thanked him for a great experience. Taking a night walk tour in Costa Rica’s cloud forest was an adventure, maybe a little wet, but totally worth it.
Booking a TourIf you would like to book your own night tour adventure, we can help. Booking through us costs the same and helps support our website.
We can book groups of 4 or more.
Please send us an email at bookings(at)twoweeksincostarica(dot)com with the number of people, ages of children (if applicable), preferred date, and pick up location (if you need transportation). If you have a rental car, we recommend driving yourself to the Monteverde Wildlife Refuge. It’s right outside downtown Santa Elena.
Tour DetailsThe night walk tour is about 2 hours and includes a bilingual naturalist guide, flashlight, and transportation from/to your hotel or vacation rental in the Monteverde area (if needed).
CostGuided Group Tour: $30 per person (group size is limited to 9 people) + admission
Guided Private Tour: $50 per person (private for only your group/family) + admission.
*Private tours are nice because the guide can focus on only your group and your interests. If you have young children, we highly recommend it so that they can pace the tour to your family.
Admission to the Monteverde Wildlife Refuge is $8 per person, paid separately and directly to the reserve.
Self-guided night tours are not allowed for safety.
Tour Start Time & DurationNight walks start around 6:00 p.m., just after sunset. The tour lasts about 2 hours.
AccessibilityThe trails at the Monteverde Wildlife Refuge are uneven, have steps, and are not recommended for those with limited mobility or wheelchair users.
Have a question about the night walk in Monteverde? Have you been? What did you see? Leave us a comment below. Looking for more information to help you plan? Check out these posts:Selvatura Park: Cloud Forest Hanging Bridges Walk – If you are looking to check hanging bridges off your list, this is one of our favorite places.
Monteverde Hummingbird Gallery – Stay alert as hummingbirds are darting all around you. This quick stop is the perfect add-on to a hike or adventure activity in the cloud forest.
Curi-Cancha Reserve: Avoiding the Crowds in Monteverde – With a limit to the amount of visitors let in at any one time, the Curi-Cancha Reserve can be a lot less crowded. It’s also a great place for birders.
The post A Night Walk in Monteverde: Sleeping Toucans, Sloths & Snakes appeared first on Two Weeks in Costa Rica.
January 5, 2023
La Mona Golosa: An Artisanal Chocolate Tour Near Jaco
Two Weeks in Costa Rica |
Most visitors to the Jaco area head to the beach for sun or surf. But for those interested in experiencing a taste of the culture, there’s a wonderful chocolate tour nearby. La Mona Golosa is a little-known cacao farm in the countryside outside Jaco. Our family recently visited and got to experience the tour and check out the property. In this post, we’ll tell you all about it and how you can plan a visit too.

La Mona Golosa is a working cacao farm about 35 minutes from Jaco, far removed from the hustle and bustle of the main strip.
The vast farm is near the small community of Quebrada Amarilla. Surrounded by a mix of open fields, farmland, and forest, La Mona Golosa will show you a side of Costa Rica you can’t experience just staying in downtown Jaco. The setting is peaceful and serene, with thick rainforest all around and little development.
 Cacao plants with rainforest in the backgroundAbout the Farm
La Mona Golosa started as a regular farm. Much of the land was used for pasture for cows, which is typical of many farms in Costa Rica.
In 2008, an Italian family purchased the property. They wanted a way to eat healthy chocolate without chemicals or artificial additives like you find in commercial chocolate. So they soon started transitioning the land for sustainable cacao production.

Little by little, they grew the plantation. Today, La Mona Golosa has over 7,000 native cacao plants spread out over 13 hectares (32 acres).
Even with so many plants, their cacao production isn’t very high.
Interestingly, this is because of monkeys!
They estimate that monkeys take about 40% of their crop each year to eat. They have tried many different things to keep the monkeys away, but nothing has worked well. So they have resorted to just planting more cacao.
The name of the farm, La Mona Golosa, fittingly translates to “The Greedy Monkey.”
 The main building at La Mona GolosaLa Mona Golosa Chocolate TourMaya House and Cacao Ceremony
Our tour began with meeting our friendly guide, Diego, a local from the Jaco area. He started with a quick explanation about the farm then led us down a path beside the cacao fields.
Soon we came upon a large thatched-roof structure. Diego told us this was a replica of a traditional indigenous house.
 Path leading to the Maya replica house
Indigenous people in Costa Rica lived in structures similar to this. Although the building was almost completely closed up, it was cool compared to the hot weather outside. Diego explained that this was due to the tall ceilings, a clever design used to let the heat escape.
Diego began explaining about the significance of cacao to indigenous people. He invited us to take part in a cacao ceremony.
We each took a small cup filled with hot water and pure cacao. They had also mixed in some salt, honey, and a bit of chili to make it more palatable. The salt and chili were added to take away the bitterness of the pure chocolate. This “Drink of the Gods” was actually quite tasty, though our two young boys weren’t so sure.
 Taking part in a traditional cacao ceremony
Diego went on to explain that this sacred drink was only served to royalty in indigenous times. It was said to connect their souls to the universe and nature.
Walking the Cacao FieldsAfter the cacao ceremony, we followed Diego into the fields. We explored only a small patch of the farm compared to the vast land we had seen from the road.
Diego showed us a cacao pod and helped us understand how long it takes for a cacao plant to produce a mature pod.
Astoundingly, we learned that it took 3-3.5 years from baby tree to flower.
Finding a small yellow flower, the guide then showed us the tiny baby fruit inside. It was barely visible with the naked eye.
 That tiny reddish part inside the flower is the baby cacao pod
From flower to ripe fruit would take an additional 8-9 months, about the same amount of time as a human pregnancy.
Diego then invited our son to help open a pod. After hitting it a few times against a rock, the pod cracked open, revealing the rows of large white seeds inside.
 The seeds inside a ripe cacao pod
Most people don’t realize it but cacao straight from the pod tastes like fruit. Each seed has a slimy white covering that you can suck off and eat. The favor is similar to pineapple or banana, and is very sweet (hence why the monkeys like it). Diego invited each of us to try it.
Fermentation and DryingFrom the cacao fields, we visited the fermentation room.
After the cacao seeds are removed from the pods, they are brought to this dark building where they sit covered in wooden containers to let the natural sugars ferment. This process helps elevate the nutrients in the chocolate.
In 5-7 days, the seeds turn brown. They are then dried naturally in the sun for another 5-7 days, or longer if it is rainy. This is the stage where they get that familiar color and start to look like chocolate.
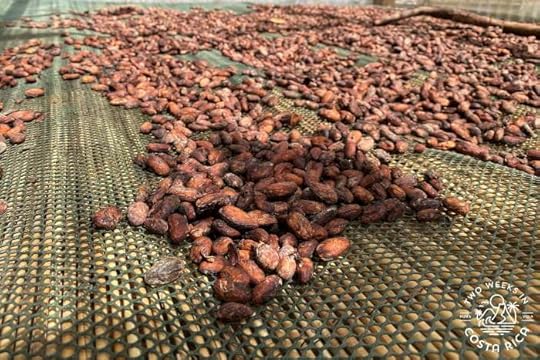 Cacao seeds drying in the sunRoasting and Grinding
Once dried, Diego told us that the seeds are roasted and ground with modern machines. We weren’t able to go into the room where the family does these final steps but observed it from the outside.
We were, however, able to do our own roasting demonstration.
Diego again invited our son to help make chocolate. He poured some of the dried, raw cacao seeds into a hot pan and asked him to stir. After several minutes, we could all smell that they were ready. It smelled like chocolate cake or brownies cooking!
With the beans roasted, we removed the thin, hard shells with our hands.
Using an old-fashioned grinder, our kids then turned the nibs into a fine paste.
 Our kids grinding the cacao nibsTasting the Chocolate
With our raw 100% cacao ready, we were invited to add sugar, honey, and other spices and flavors to make our own creations. Some of our favorite combinations were salt and honey and vanilla and honey.
The taste of the chocolate was really amazing – dark and rich. After having just a couple of teaspoons, we were satisfied.
 Mixing the chocolate with honey and spicesThe Chocolate Cave
During the tour, we also got to visit the cave.
This is a stone structure that houses all the delicious chocolate that you can take home. They had different combinations with milk chocolate, 80% dark chocolate (with a little sugar), and even 100% pure dark chocolate (with no sugar added) for the serious chocolate lovers out there.
 Entering the cool chocolate caveTrail and Monkeys
After the tour, you can check out the short trail behind the property. This goes around a natural lagoon that has caimen (small crocodile). We weren’t able to spot a caimen but did see a troop of white-faced monkeys and also some Scarlet Macaw parrots flying by. Though less common, spider monkeys also come through the property.
 One of the greedy monkeysPlanning Your Visit to La Mona Golosa Chocolate FarmTour Times
Tours are offered at 9:00 a.m., 10:00 a.m., 11:00 a.m., 1:00 p.m., and 2:00 p.m.
Advanced reservations are highly recommended so that they can arrange a guide for you.
Email them at dtourscostarica(at)gmail(dot)com or send a WhatsApp message to 506-8741-2607 for reservations.
CostFull Tour (recommended) – 1.5 hoursAdults – $45 per person. Children ages 5-12 – $35 per person. Children under 5 are free.
Breakfast or lunch is available for an additional cost if reserved in advance.
Self-guided Visit$20 per person. This allows you to walk around the property and along the trail.
Buying SouvenirsAlthough they have a credit card machine, internet can be spotty in this area so be sure to bring some cash if you want to take home some chocolate.
 Chocolate for saleTransportation
If you don’t have a rental car, transportation can be arranged for $10 per person.
Directions to La Mona Golosa Chocolate FarmThe farm is in the town of Montelimar de Turrubares about 13 km (8 miles) off Highway 34.
From Jaco, head south along the coastal highway. A few miles after Playa Hermosa, you’ll pass a village with some houses and small grocery stores. Shortly after that, look for a turnoff on the left for a paved road. There will be signs for La Mona Golosa Chocolate Farm, Ocean Ranch Park, and Royal Butterflies.
This road is paved at times and dirt at others but is in good condition (no need for a 4×4 vehicle). Follow the curvy, narrow road along the river through the town of Mata Platano. In about 15-20 minutes, you will come to the entrance for La Mona Golosa. This is marked with a giant cacao pod statue and a big sign.
Here is a map with driving directions from Jaco.
GPS coordinates: 9°37’17.8″N – 84°29’27.4″W
ConclusionWe have done many chocolate tours in Costa Rica and La Mona Golosa was one of our favorites. It has an authentic feel and does a great job teaching the intricate process of making chocolate. If you’re visiting the Jaco area or just passing by, it’s worth a stop.
Have a question about visiting La Mona Golosa Chocolate Farm? Ask us below.Looking for more information to plan your trip to Costa Rica? Check out these posts:El Penon de Guacalillo: Scenic Ocean Cliffs and Caves – This is another lesser-known activity in the Jaco area. It’s a great place to catch sunset!
Villa Vanilla Spice Farm: A Rainforest of Flavors Near Manuel Antonio – Villa Vanilla is a biodynamic farm that grows vanilla, cinnamon, and lots more spices. It’s another one of our favorites.
Jaco Restaurant Guide: Check out our picks for Jaco’s best restaurants.
The post La Mona Golosa: An Artisanal Chocolate Tour Near Jaco appeared first on Two Weeks in Costa Rica.
December 30, 2022
El Penon de Guacalillo: Scenic Ocean Cliffs and Caves
Two Weeks in Costa Rica |
Not far off the Pacific coast highway lies a scenic viewpoint unlike any other in Costa Rica. El Penon de Guacalillo is a dramatic rocky cliff that rises about 40 feet (12 meters) from the sand. To add to the drama, powerful waves crash into the steep ledge at higher tides. In this post, we’ll you know what to expect when visiting El Penon de Guacalillo. We’ll also tell you about some more rock formations and caves just north that can be explored.

El Penon de Guacalillo is located on the central Pacific coast, north of Tarcoles and south of the city of Puntarenas. The rock formation is considered part of Playa Guacalillo. The tiny town of Bajamar and Playa Bajamar is just north.
Although this area is only about 25 minutes off the highway, it has a remote, campo (country) feel. From Highway 34, you’ll pass through villages with modest homes, pulperias (small grocery stores), and small schools and churches.
 The road off the highway to Penon de Guacacillo
El Penon de Guacalillo can be easily visited from the Jaco area. It also makes a nice stop on the way to the central or southern Pacific coast (e.g., Manuel Antonio, Dominical, Uvita, Osa Peninsula).
See directions below.
About El Penon de GuacalilloArrivingRight before you get to Playa Guacalillo, you’ll see a small guard house on a hill to the right. This is where you will enter and pay the 3,000 colones (about $5) admission. This fee is per car. It lets you park there and use the basic amenities (bathhouse, showers, and pergolas).
 The guardhouse and gate
You can park anywhere along the top of the cliff.
As soon as you step out of your car, you’ll see the impressive cliffs cascading below.
The CliffsThese grand cliffs formed from ancient volcanic eruptions. As Costa Rica is in the Ring of Fire, much of the beaches have volcanic sand, but it’s unusual to see tall rock formations along the coast like at El Penon.
The cliffs are in sections. You can walk along the edge to a few points to see different angles. Be sure to bring your camera for some amazing captures.
 Looking to the south
 Looking to the north
Keep in mind that there are no guardrails or fences at all for safety. We had our two young children with us, and it was a bit nerve-racking to say the least. It is a big drop!
SunsetEl Penon de Guacalillo is a popular spot for sunset among locals. If you want to catch sunset, plan to arrive early. Sunset in Costa Rica is around 5:30 p.m. year-round.
Walking Down to the BeachIf you walk north along the cliff, on the inland side, there is a path that takes you down to the beach. Even at mid-tide, we were able to access it without having to get wet.
 The rocky path down to the beach
From here, you can see Playa Bajamar to the north and a lagoon backing it. Always be on the lookout for crocodiles at lagoons like this in Costa Rica.
People also access the bottom of the cliffs from right outside the entrance to the parking area. This beach area is just south of the cliffs and is completely public and free to visit. At low tides, you can walk below the cliffs along the sand.
Other than taking in the view of the cliffs and ocean, there isn’t much to do at El Penon de Guacalillo. Luckily, we found some other interesting sights not far away.
Punta del Pacifico, Tivives Cliff, and Penon de BajamarAnother Place to VisitIf you drive a few kilometers north of El Penon de Guacalillo, you’ll come to another rocky point. This spot has some caves to see. Accessing this area is free. It is separate from El Penon de Guacalillo.
To get here, you’ll take the beach road that runs along Playa Bajamar. Near the point, the road will become very narrow (only wide enough for one car) with some big ruts. You’ll have to go slow and it’s best to have a higher clearance vehicle. If you’re coming in rainy season (May to end of November), opt for a four-wheel drive.
During the rainiest times of year, large puddles may prevent you from accessing these sections.
 The rough road to the smaller cliffs and caves north of Penon de GuacacilloCliffs and Caves of Punta del Pacifico, Tivives, and Penon de Bajamar
Once you get to the end of the road, you can park and explore the rocky cliffs. These ones are smaller, around 15 feet (4.5 meters) tall, but still really interesting.
 The smaller cliffs at Punta del Pacifico between Playa Bajamar and Playa Tivives
The rock is composed of different types of magma, with varying colors and random smaller rocks incorporated throughout. If you have an interest in geology, you will be fascinated.
 Close up of the volcanic rock formations
At lower tides, you also can walk down to see some of the caves that have formed. Our kids enjoyed this. Just be careful as the ocean does come crashing through when the tide is coming in.
 The caves at Punta del Pacifico/Bajamar
If you go to the northern end of Punta del Pacifico, you can walk down to the beach where it meets the Jesus Maria River. Across to the right is Penon de Bajamar, which is another tall cliff with a big cave below. The river divides the two beaches (Tivives Beach is on the other side) so you can’t access Penon de Bajamar from the point, but you can still see it.
 Looking across the river at Penon de Bajamar
Unfortunately, on our visit, this beach had a lot of trash. We also have heard that the water quality isn’t good so we don’t recommend swimming.
Tips for Visiting El Penon de GuacalilloDirectionsFrom Highway 34, you’ll take the turn towards the ocean for the town of Lagunillas. Look for a big liquor store and market called Super y Licorera El Sol Naciente.
Follow the road towards the beach. It will be paved until Escuela Cuarros de Tarcoles (about halfway). At the school, the road turns to dirt but is in good condition (fine with a regular sedan).
When you get closer to the beach, you’ll come to an intersection with several signs. Keep left.
Once you arrive at Playa Guacalillo, the entrance/guard house will be on the right. It’s up a somewhat steep hill. There is a sign. In rainy season, if you don’t have 4×4, you may need to leave your car parked below on the main road.
Here is a map with drections from Jaco.
If you plan to visit the other cliffs and caves at Punta del Pacifico, Tivives Cliff, and Penon de Bajamar, it’s best to have an SUV for clearance (4×4 recommended during rainy season due to mud).
AdmissionThe cost to enter the gated area of El Penon de Guacalillo is 3,000 colones (about $5) per vehicle
HoursEl Penon de Guacalillo is open 7:00 a.m. to 7:00 p.m. every day
AmenitiesEl Penon de Guacalillo has a basic bathroom and showers. There are a few simple pergolas for shade.
 The rustic bathroom at El Penon de Guacalillo
An outdoor vendor sells drinks nearby. There is no grocery store in the immediate area so bring what you’ll need for the day.
What to Wear/BringThere are no trees for shade anywhere along the beaches near El Penon so be sure to have a hat and sunscreen. It’s usually windy so a baseball cap or something with a strap is best.
This area also can get really hot, especially in dry season, so bring plenty of water.
You have to do a bit of walking to see everything, so we’d recommend hiking sandals like Keens, especially for kids.
RestaurantsIf you’re looking for a restaurant, there are only a couple of options around.
We enjoyed Donde Vin on Playa Bajamar. Donde Vin is a casual spot owned by locals that serves traditional Costa Rican food. They have tables right on the sand.
ConclusionEl Penon de Guacalillo and the nearby cliffs and caves are a worthwhile stop. Even if you only have an extra hour, you can get some amazing photos of El Penon. And if you have extra time, it’s fun to check out the smaller cliffs and caves to the north.
Have a question about visiting El Penon de Guacalillo? Leave a comment below.Looking for more information to plan your trip to Costa Rica? Check out these posts:Jaco: Costa Rica’s Booming Beach Town – Learn about one of the biggest destinations on the central Pacific coast. Our recommendations for hotels, activities, restaurants, and more.
Tarcoles River Bridge: This is another fun stop on the way to Manuel Antonio and points south. You can see giant crocodiles right from this bridge.
Costa Rica Rental Car Discount: To explore remote places like El Penon, it’s best to have your own vehicle. Check out our discount through a reputable company in Costa Rica to save 10% and get free extras.
The post El Penon de Guacalillo: Scenic Ocean Cliffs and Caves appeared first on Two Weeks in Costa Rica.
December 9, 2022
Installing a Pool in Costa Rica: Our Experience
Two Weeks in Costa Rica |
After purchasing our home in Costa Rica and doing some renovations to the interior, it was time to think about the yard. Even though we live near the beach, everyone in our family really wanted a pool. Somewhere we could swim for an hour or two without getting all sandy, packing up the car, etc. In this post, we’ll tell you more about our experience installing a pool in Costa Rica. Hopefully it will help you plan and avoid some headaches if you are installing one yourself.

Costa Rica has two major options for inground pools, concrete or fiberglass.
Concrete pools are constructed onsite. They dig the hole, lay a foundation, and use cement blocks and rebar to build the walls. Finally, the pool is sealed and tiled to make it watertight.
 A concrete pool build in progress
Fiberglass pools are made in a warehouse and shipped to you on a large truck when they are finished. A backhoe digs a hole, and it is dropped into place.
 Fiberglass pool options – these are premade and delivered to you
Gunite pools, where they spray the framework of the pool with a concrete and sand mixture, seem to be rare in Costa Rica. Likewise, vinyl inground pools don’t seem to be used very much.
We chose to go with fiberglass for a few reasons.
Why We Chose FiberglassWhen researching the options, there was a lot to learn. Here are three reasons why we decided on a fiberglass inground pool over a concrete pool.
(1) From our research, we learned that fiberglass pools generally use less chemicals and are easier to maintain. We’re sure many concrete-pool builders will debate this, but it was an appealing feature for us. Here is an article we found useful when comparing the two.
(2) We had lived at houses with and have friends who have concrete pools. Many of them eventually leak and need to get retiled or resealed. It seemed like fiberglass was a bit sturdier and had a lifespan of 25+ years (with normal maintenance, of course).
(3) Fiberglass pools were supposed to be installed quickly. Dig the hole, pop it in, and hook up the pump. A few days is all you need (they said).
A concrete-built pool typically takes about four weeks to construct if the crew is experienced and efficient.
Since we were starting our pool-installation process in the early rainy season, we thought it would be important to get it installed quickly. We have a property that gets a lot of rain and sits near the bottom of a mountain. The thought of a crew digging a gaping hole in the ground and trying to lay cement blocks for weeks on end didn’t seem like it would work in our situation.

Putting all other things aside like pool decking, pumps, and structures, we found that the cost of fiberglass and concrete pools was similar. The total price will depend on the pool’s shape, size, and features.
When getting quotes, we found a wide range from $14,000 to $25,000 USD. Again, this is just for the pool itself. The price varies with the design and features. You can spend more with a larger or fancier pool.
You also will have to cost out the elements for your pool surrounds. Pool decking, landscaping, and structures like the machine room (pump house), ranchos, or a separate bathroom/pool house are all additional expenses.
Our Experience Installing a PoolInstalling our pool was an adventure but worth the effort. Below is more about the process we went through.
Hiring a CompanyWe contracted with a fiberglass pool company in the Orotina/Caldera area. After picking out the design of our pool at their showroom, a representative came to our house to evaluate the space. We had already had a backhoe prepare the area to make it flat and there was good access for their big truck to enter the property.
Moving forward, the pool company had a very formal, legal contract, which included a firm delivery date. It laid out all the features of the pool, with structural drawings, and what would be delivered on the specified date.
Our pool company included the pump, filter, and other equipment in the final price. All the specifications for the pump type, tubing, and everything else was included in the contract so we knew exactly what we were getting. The equipment they used seemed to be high quality, from a company in the United States.
 Our pump house
In the contract, they also specified some requirements that we needed to meet. The pool company’s role would be limited to constructing and delivering the pool, then helping us get it started. We were responsible for everything else.
One of our main responsibilities was to build a machine room of a certain size with a certain type of breaker box for the electrical system. We hired a crew to do this. They constructed a small building that would have a pump house for the pool equipment on one side and a bathroom on the other.
Installation DayThe day our pool arrived, there was a lot of excitement. Our two young boys got to see the huge flatbed truck back up our driveway with the pool on top.
 Our pool being trucked in
Then the backhoe started digging the hole. It took a full day to dig and truck the dirt away, slide the pool into the hole, level it, begin backfilling, and hook up the pipes.
 The backhoe digging the hole. This had to be the done the same day as installation.
Amazingly, the giant pool was lifted by only the backhoe at one end and every available person’s strength at the other. We lifted and shifted it slowly into place. There was a lot of teamwork and shouting out orders, and a few sore backs.
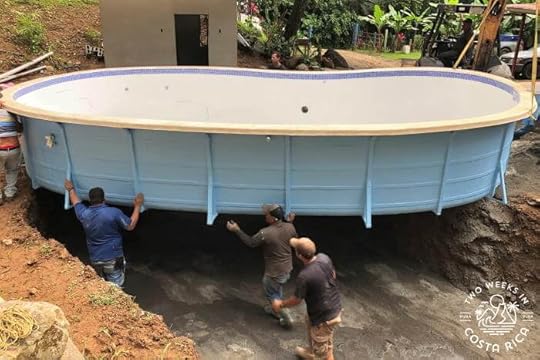 Dropping the pool into the holeProblems
By the end of the day, our pool was in. We were relieved! Unfortunately, the stairs had been manufactured separately and were the wrong size. They didn’t fit. This meant that what was going to be a two-day installation turned into an extra week of onsite work.
It also meant that the pool needed to remain without water. This was concerning because if heavy rains came, the area of backfill around the pool could become saturated with rainwater and its hydraulic pressure could push the sides of the pool inward (with no water inside the pool to counteract it). Or just as bad, the pool could pop up and float because of groundwater.
Luckily, that week we had very dry weather (for rainy season), and the fiberglass worker was able to finish the stairs before any heavy storms hit.
 Ongoing work to install the stairsFinishing the Project
 Although the pool was now in the ground, filled, had the stairs, and was hooked up to the pump and running, it was still a long journey to completing the project.
The crew we had hired to do work on the pump house and small bathroom still had a long list of things to finish.
They needed to install the pool coping, pool deck, rainwater drainage, and finish the bathroom. This all took several more weeks with some frustration and headaches along the way.
 Pouring a concrete base for the pool tile decking
We also had a solar company come and install a solar water heater on our roof for the pool. This was an important feature for us because it gets chilly at night where we live and really cools down the water. Our kids were turning blue, even in the tropics!
When it was all said and done, our pool installation was a success. However, we learned a lot through the process. Here are some things to keep in mind.
Costa Rica-Specific Considerations When Installing a Pool Pool CopingOne of the big challenges for our pool installation was sourcing the pool coping.
We assumed that there would be different options available around the country, or at least in San Jose.
While there were some options for square or rectangular pools, we only found one simple concrete coping available that would work for a curved pool like ours. When we asked about availability, they told us it would take 90 days to manufacture.
Ultimately, we had a contractor make a wooden form and pour a special mixture of concrete and a sand-like product called marmolina. It wasn’t our first choice, but we didn’t have time to have anything manufactured or imported.
 The form to pour the pool copingPool Decking
For finishing off the area around the pool, we also ran into some hurdles. We wanted to go with concrete pavers, but not just the brick shaped ones. We were hoping to have a pattern with some different sized rectangles and squares.
We discovered, however, that these were not available or also needed to be manufactured. We found one small business in Alajuela that could make them, but eventually they didn’t fulfill our order.
This left us with very few options. Many people choose a manufactured stone product called Coralina. It is tan/beige in color and has a look of coral and shells embedded in the design. Having lived at homes with this product, though, we found it got very dirty and grew algae in the textured parts.
Another popular option is to just have a concrete patio poured around the pool. This would have worked but we wanted something a little nicer.
We finally settled on a non-slip porcelain tile manufactured by Atlas Concord. We found it at Construplaza in San Jose. This tile has a lot of texture that won’t have you sliding around when it gets wet. If you have visited some other pools around Costa Rica with regular tile surrounding them, you may know the importance of this!
The tile is also light in color, which is important since the sun can be strong in Costa Rica. You don’t want to burn your feet.
 Our tile installers hard at work. It took several days to put in the tile decking.Permits
One final consideration is if you are going to get a building permit for the work. Technically, you are supposed to do this according to most municipalities, especially if you are building a small structure as well. Many people do not.
We decided that in case we ever sell our home, we would rather have everything done legally.
We applied for our permit before the start of the project, and it was finally approved (four months later) just after everything was completed. Go figure. The lesson here is to start the process early since it will likely take a lot longer than expected.
 The finished pool and pumphouse/bathroomConclusion
When we began our process of installing a pool in Costa Rica, there was a lot to think about and research. We found a few articles about building pools but wished there was more information out there. We hope this post helps those of you just starting out. If you need us, we’ll be by the pool.
Have a question about installing a pool in Costa Rica or have something to add? Leave a comment below. Looking for more information about living in Costa Rica? Check out these posts:Home Decor and Furniture Stores in San Jose, Costa Rica: Looking to stylize your new oasis? San Jose has the most options. Check out this post for a list of good stores.
What It’s Like to Live in Costa Rica in Rainy Season: Will the rain drive you away or will you learn to love it?
Renovating a House in Costa Rica: Read about our experience finding a contractor and renovating an existing home in the tropics.
The post Installing a Pool in Costa Rica: Our Experience appeared first on Two Weeks in Costa Rica.
December 2, 2022
Monteverde Hummingbird Gallery
Two Weeks in Costa Rica |
Many visitors to Costa Rica want to see hummingbirds. While these tiny birds are indeed abundant in Costa Rica, when viewing them in the wild, you typically catch little more than a glimpse as they flit by. But in Monteverde, there is one place where you can see these gorgeous birds up close. The Monteverde Hummingbird Gallery has feeders that attract dozens of hummingbirds. In this post, we’ll tell you more about the hummingbirds you can see as well as tips for planning your visit.

As the name implies, the Monteverde Hummingbird Gallery is located in Monteverde, Costa Rica. This region is in the mountains and known for its cooler cloud forest habitat.
The Hummingbird Gallery is situated just outside the entrance of the main cloud forest reserve called the Monteverde Cloud Forest Biological Reserve. It makes a great quick stop after a hike in the reserve.
Previously, Santa Elena/Monteverde had other hummingbird-specific exhibits (e.g., at Selvatura Park). However, they have since closed, making the Hummingbird Gallery the best option.
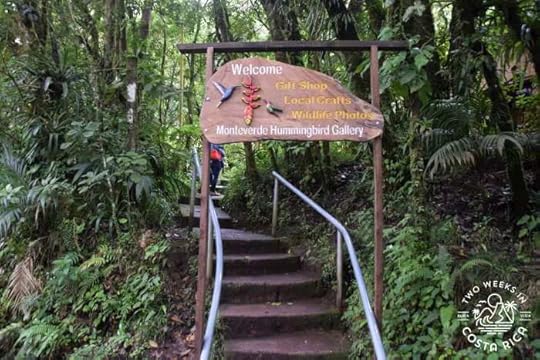 The entrance to the hummingbird garden and cafeMonteverde Hummingbird GallerySet Up
The Monteverde Hummingbird Gallery has gardens and feeders as well as a café and gift shop. The property is set on a small hill with thick forest backing it.
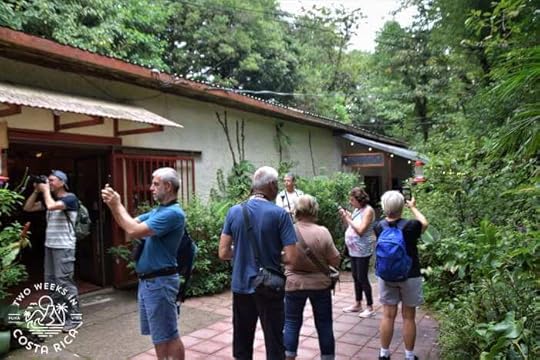
In the front of the simple structure are a handful of feeders. These are spread out, allowing plenty of room for visitors. Some are located near the outdoor seating for the café, while others are on their own.
 Lots of people taking pictures of the birds zooming aroundThe Hummingbirds
 What makes the Monteverde Hummingbird Gallery so special is that the birds are wild so you never know what you will see.
Monteverde has a huge diversity of wildlife living in its thick forest and is an especially good place for birding.
According to the Cornell Lab of Ornithology’s eBird website, an astounding 248 different bird species have been spotted at the Monteverde Hummingbird Gallery property alone!
Costa Rica has 52 species of hummingbirds. Among the long list you can see at the Hummingbird Gallery are the Green Hermit, Lesser Violetear, Green-crowned Brilliant, Purple-throated Mountain-gem, Magenta-throated Woodstar, Violet Sabrewing, Coppery-headed Emerald, Stripe-tailed Hummingbird, Blue Vented Hummingbird, Cinnamon Hummingbird, Canivet’s Emerald, Rufous-tailed Hummingbird, Stripe-throated Hermit, White-bellied Mountain-gem, Crowned Woodnymph, White-necked Jacobin, Ruby-throated Hummingbird, Brown Violetear, Fiery-throated Hummingbird, Purple-crowned Fairy, Black-crested Coquette, and Blue-tailed Hummingbird.
 A Violet Sabrewing. These hummers were really aggressive and tried to kick all the other birds out when they came to feed.
 A Green-crowned Brilliant (female)
 A colorful Purple-throated Mountain Gem
 A Lesser Violetear
For the birding enthusiasts looking to add other species to their list, there are plenty more interesting birds to see. These include the Masked Tityra, Three-wattled bellbird, American Kestrel, Highland Tinamou, Northern Emerald-Toucanet, Long-tailed Manakin, Lesson’s Motmot, Turquoise-browed Motmot, Broad-billed Motmot, Slaty-tailed Trogon, Bananaquit, Spangle-cheeked Tanager, Blue-and-gold Tanager, Bay-headed Tanager, and Emerald Tanager.
 Some Bananaquits joining a hummingbird at a feederPhotographing the Birds
Although the feeders are definitely what draw the birds to the property, they also stop to rest frequently on nearby branches in the gardens, providing the perfect photo opp.
 A Violet Sabrewing resting on a branchOther Wildlife
Since the Monteverde Hummingbird Gallery abuts the forest, it is also possible to see some animals. On one of our visits, we have seen white-nosed coati. These are raccoon-like animals with a long muzzle and long, striped tail that points up.
 A white-nosed coati on the short trailCafé and Gift Shop
There is no charge to see the hummingbirds at the Monteverde Hummingbird Gallery. It’s nice to support them, though, by picking up a souvenir or getting something from the café.
 Inside the gift shop
The café, Café Colibri (Hummingbird in Spanish), is small, but well-stocked.
In the display case, you’ll find many tasty treats like pastries, cakes, empanadas, and cinnamon buns. The coffee is also very good. They have an espresso machine for specialty coffee.
 Cafe Colibri
Seating at the café is limited to a handful of tables inside and a few tables outside; however, the turnaround is fairly fast.
 Outdoor seating overlooking some of the hummingbird feedersTips for Visiting the Monteverde Hummingbird GalleryHours
8:30 a.m. to 5:00 p.m. daily
CostFree
ParkingThere is no parking lot, but people park along the street. Alternatively, there is a paid parking lot (around $5) for the Monteverde Cloud Forest Reserve 1.5 km before the Hummingbird Gallery. This lot has a shuttle van that will drop you off in front of the reserve.
ConclusionIf you’re looking to see hummingbirds up close, the Monteverde Hummingbird Gallery is a great stop. You’ll be amazing at the number of birds you’ll see in just a short time.
Have a question about visiting the Monteverde Hummingbird Gallery or have you been? Leave a comment below.Looking for more information to plan your trip to Costa Rica? Check out these posts:Monteverde Hotel Guide: Recommendations for where to stay to enjoy the cloud forest.
Catarata del Toro: A Hidden Gem in Costa Rica: Another good stop to see hummingbirds and also check out an amazing waterfall is Catarata del Toro. This property has elaborate gardens and a few hummingbird feeders set up.
Selvatura Hanging Bridges: These hanging bridges are a nice way to explore the cloud forest and learn about this unique ecosystem. Read our post for more information about visiting.
The post Monteverde Hummingbird Gallery appeared first on Two Weeks in Costa Rica.
November 26, 2022
Which Costa Rica Airport to Fly Into
Two Weeks in Costa Rica |
Costa Rica is a small country, but it still takes a while to get from place to place. When designing an itinerary, choosing the right airport to fly in and out of can be crucial to saving hours of travel time. In this post, we’ll tell you about Costa Rica’s two international airports. We’ll cover their locations and give you an idea of which destinations they’re convenient to.

The largest airport in Costa Rica is Juan Santamaria International Airport (SJO).
 Inside SJO, Costa Rica’s biggest airport
SJO is located in the city of Alajuela near San Jose, Costa Rica’s capital.
San Jose is the middle of the country, in the mountains, in a region known as the Central Valley. The majority of the population lives and works in this area. San Jose and its surrounds are the economic center of the country and not known for tourism, though there still are plenty of things to do for visitors.
 Plaza de la Cultura, in the heart of downtown San Jose
SJO has the most flights coming and going and is the most popular airport. Often, it has the most economical flights as well, especially if coming from farther destinations like Europe.
Liberia International AirportThe other international airport in Costa Rica is Daniel Oduber Quirós International Airport located in Liberia. Liberia is the biggest city in the Guanacaste region, though it is still relatively small.
Guanacaste is a large swath of land in northwestern Costa Rica. It stretches along the northern Pacific coast from the Nicaragua border south and goes inland through some volcanic areas.
Liberia Airport is small but several airlines do fly into it.
 LIR, Costa Rica’s smaller airport in GuanacasteWhich Airport Is Best?Overview
San Jose often makes the most sense for visitors to fly in and out of, as it is centrally located and allows you to travel in any direction. There are some destinations, however, where it makes a lot more sense to fly into Liberia Airport.
A great example is if you are planning to visit a beach town in Guanacaste like Tamarindo, Playa Flamingo, Playa Hermosa, or Playas del Coco. In this case, you should use Liberia Airport, which is much closer than San Jose.
Sometimes it is best to fly into one airport and out of another. This can really save on travel time.
Specific Regions/DestinationsBelow, we give a list of popular destinations in Costa Rica and which airport is closest. For some destinations, the airports are about equidistant, making them equally good choices.
In general, if you’re planning to visit Guanacaste, Liberia Airport is closest. If you’re planning to go to the central or southern Pacific coast, San Jose Airport is best. For the Caribbean coast, San Jose is also the closest.
La Fortuna/Arenal VolcanoLIR or SJO (they are both about 2.5 hours away)
 Costa Rica’s most famous volcano, ArenalMonteverde Cloud Forest
LIR or SJO (they are both about 2.5 hours away)
JacoSJO (about 1.5 hours away)
Herradura & Los Suenos MarriottSJO (about 1.25 hours away)
 Playa Herradura on the central Pacific coastManuel Antonio/Quepos
SJO (about 2.5 hours away)
DominicalSJO (about 3.5 hours away)
UvitaSJO (about 3.5-4 hours away)
Drake Bay (Osa Peninsula)SJO (4.5 hours away + boat taxi tide). SJO is about 4.5 hours from Sierpe, where you catch the 1-hour boat taxi to Drake Bay. For more information, check out our Drake Bay post.
 A hanging bridge over the Agujitas River near Drake BayPuerto Jimenez (Osa Peninsula)
SJO (about 6 hours away)
TamarindoLIR (about 1.25 hours away)
Playa GrandeLIR (about 1.25 hours away)
Playa FlamingoLIR (about 1.25 hours away)
PotreroLIR (about 1.25 hours away)
Playa Hermosa (Guanacaste)LIR (about 30 minutes away)
 The light-sand Playa Penca, near Playa Hermosa (Guanacaste)Playas del Coco
LIR (about 30 minutes away)
Papagayo PeninsulaLIR (about 40 minutes away)
NosaraLIR (about 2.5 hours away)
SamaraLIR (about 2 hours away)
Santa TeresaLIR (about 4 hours away). SJO is about 4.5-5 hours. If flying into SJO, the trip to San Jose includes a 1-hour scenic ferry ride across the Gulf of Nicoya.
MontezumaLIR (about 3.5 hours away). SJO is about 5 hours, including a 1-hour scenic ferry ride across the Gulf of Nicoya.
 Montezuma BeachBijagua/Rio Celeste
LIR (about 1.5 hours away)
San Gerardo de DotaSJO (about 2.5 hours away)
Puerto Viejo de SarapiquiSJO (about 2 hours away)
Poas Volcano AreaSJO (about 1-1.5 hours away)
 Lush greenery at a coffee farm near Poas VolcanoTortuguero (Caribbean Coast)
SJO (about 3.5 hours + boat taxi ride). SJO is about 3.5 hours from La Pavona, where you can get the boat taxi to Tortuguero. The boat taxi takes 1-1.5 hours. See our Getting to Tortuguero post for more information.
Cahuita (Caribbean Coast)SJO (about 4.5-5 hours away)
Puerto Viejo de Talamanca (Caribbean Coast)SJO (about 5 hours away)
ItinerariesHere are some sample itineraries for a first-time visit, with which airports to fly in and out of.
Volcano and BeachSuggested Itinerary: LIR or SJO Airport – La Fortuna/Arenal Volcano to Manuel Antonio – SJO Airport
For a breakdown of this itinerary, including what the areas are like and available activities, read our post, Costa Rica: Your One-Week Itinerary.
Best of Costa Rica – Volcano, Cloud Forest, and BeachSuggested Itinerary: LIR or SJO Airport – La Fortuna/Arenal Volcano to Monteverde to Manuel Antonio – SJO Airport
 The hanging bridge inside the Monteverde Cloud Forest ReserveRainforest, Guanacaste Beach Town, and Volcano
Suggested Itinerary: LIR or SJO Airport – La Fortuna/Arenal Volcano to Guanacaste Beach Town – LIR Airport
For more about this itinerary, including different options for beach towns in Guanacaste, read our post, Family Itinerary for Costa Rica. Although it is focused on family travel, it covers activities that most travelers would be interested in.
Volcano, Beach, and Wildlife ViewingSuggested Itinerary: LIR or SJO Airport – La Fortuna/Arenal Volcano to Manuel Antonio to Drake Bay (Osa Peninsula) – SJO Airport
Our post, Costa Rica: Your Two-Week Itinerary, has details on this option.
Volcano + Caribbean Coast Beaches and WildlifeSuggested Itinerary: LIR or SJO Airport – La Fortuna/Arenal Volcano to Cahuita or Puerto Viejo de Talamanca – SJO Airport
Travel to Remote Destinations – Small PlanesSome destinations are remotely located and far from both international airports. These include Drake Bay and Puerto Jimenez on the Osa Peninsula, and Tortuguero on the Caribbean coast.
Costa Rica does have small plane carriers that connect the international airports to airstrips around the country. These can save travelers a lot of time.
Although most flights go on without any problems, we are still reluctant to recommend taking them right now for safety and reliability reasons.
What we usually recommend is that you strategically plan your itinerary to limit the amount of driving to the remote destination.
For example, if you’re going to Drake Bay on the southern Pacific coast, you could stay in Manuel Antonio or Uvita/Dominical for a few days before to get closer to Drake. Itineraries usually can be designed in such a way that most drive times are manageable, especially with strategic stops to break up the travel day.
ConclusionAlthough it has only two airports, SJO and LIR are convenient to most of the sights in Costa Rica. With some careful planning, you can easily limit your time in the car so that you can enjoy everything this country has to offer.
Have a question about which airport to fly into in Costa Rica? Ask us below.Looking for more information to plan your trip? Check out these links:Video Chat Service: It can be a good idea to plan your itinerary before buying plane tickets to make sure you’re choosing the right airport based on what you want to do. Our Video Chat Service lets you talk to us one on one about your plans.
Arriving at SJO Airport: What to expect when flying into San Jose Airport.
Traveling to Costa Rica: The Basics – More general information about visiting Costa Rica, including visas, climate, money, and lots more.
The post Which Costa Rica Airport to Fly Into appeared first on Two Weeks in Costa Rica.
November 19, 2022
Selvatura Park: Cloud Forest Hanging Bridges Walk
Two Weeks in Costa Rica |
One of the best ways to explore Costa Rica’s unique cloud forest environment is by walking along hanging bridges. These suspension bridges literally bring you through the treetops where you can fully enjoy the surrounding ecosystem. In this post, we’ll tell you about the hanging bridges at Selvatura Park in Monteverde. These bridges are a fairly easy hike and good for all sorts of travelers.

Selvatura Park is located in one of Costa Rica’s most famous mountain destinations, Monteverde.
Monteverde is made up of two towns, Santa Elena and Monteverde itself. Santa Elena is where many of the restaurants, hotels, and attractions are located, while Monteverde is famous for its cloud forest reserve.
For more information about the area, including hotels and other activities, read our post Monteverde: A Forest in the Clouds.
Selvatura Park is about 20 minutes outside Santa Elena, down a gravel road. The park borders the Santa Elena Cloud Forest Reserve and Children’s Eternal Rainforest.
While Selvatura Park does provide transportation for its guided tours, many people visiting the area choose to have a rental car since things are spread out.
Selvatura ParkThe PropertyImmersed in 850 acres (344 hectares) of cloud forest habitat, Selvatura Park is a sea of green.
 Looking at the cloud forest from above on a hanging bridge – almost never ending green
In the thick forest, you’ll find both secondary and primary trees (some hundreds of years old), broad leafed plants, and giant ferns. An abundance of mosses and vines stick to everything—a signature of the cloud forest.
In addition to the hanging bridges walk, the park has other activities that you can combine. There is zip lining, a butterfly garden, sloth sanctuary, and reptile and amphibian exhibit.
The lodge-style reception area has a gift shop, bathrooms, and waiting area. Parking is free for visitors.
 The reception area
For those who do spend the day, an onsite restaurant is available.
Restaurante El Jardin (the Garden Restaurant) serves typical Costa Rican cuisine as well as some fast-food items like hamburgers and sandwiches. There is also coffee, tea, and desserts. The prices are a bit higher but there are no other restaurants close by.
Selvatura’s Hanging BridgesAt Selvatura Park, you will find eight hanging bridges spread out along a 2-mile (3 km) trail. The trail is fairly flat and well maintained. As you walk, you’ll wind through the cloud forest to see all kinds of trees and plants. If you’re lucky, you may even see some cool birds and animals (read What You’ll See section, below).
 The concrete trail at Selvatura
At eight spots along the path, you’ll come to the various hanging bridges. These stretch long distances from one high point in the forest to another. Each of the suspension bridges has a different length and height off the ground.
 One of the hanging bridges
The shortest bridge is 170 feet long (51 meters), and the longest is 560 feet long (170 meters).
The highest bridge is 190 feet (60 meters) off the ground!
Those with a little hesitation should know that these are not Indiana Jones-style bridges. There are no rickety wood planks or frayed ropes. The bridges at Selvatura Park are structurally engineered, made with metal cables, bridge-like trellises, and have stable walking paths and handrails.
 The sturdy hanging bridge structure
While there is some movement as you cross, you will not be swaying all over the place. Walking slowly, in the middle of the bridge, also helps reduce movement.
Guided or Self-Guided OptionsOne question people often ask is if they really need a guide when visiting the hanging bridges. After all, the guided option is more expensive.
We have visited both with a guide and without. Our first visit was without a guide, and while we did enjoy the hike, we left feeling like we didn’t see a whole lot (besides the cool bridges, of course).
In the cloud forest, many of the animals are hidden. There are thick layers of plants on top of other plants. Combine that with the misty, cloud-forest weather conditions and you can really have a tough time spotting anything.
The Value of a GuideOn a guided tour, our experience was much different. Our guide, Jose, was so knowledgeable. He pointed out lots of interesting plants, insects, birds, and even found some animals.
 Our guide, Jose, with his trusty spotting scope
Jose also explained the basics of how the cloud forest works.
He showed us how all the plants were competing for sunlight. Each species was climbing and growing as high into the canopy as possible. This made the treetops the center of life in the cloud forest. Jose even told us that a recent study found more than 7,000 plants living on just one medium sized tree!
 A tree covered in lush plants – imagine the ecosystem in just this one spot!
Jose went on to explain that these trees can get too heavy and eventually fall from the weight of all those plants. And when a giant 100-year-old tree falls, it can cause a giant scar in the forest. But as he showed us, that fallen tree also gives new plants an opportunity to grow as a new area of the forest is exposed to the sun.
It was this type of knowledge and insight that we would have missed out on if we hadn’t had a guide. We would have walked by that giant fallen tree and thought little of it.
What You’ll SeeAs we mentioned, seeing a lot in the cloud forest can be challenging. However, with the help of our guide, we had some great highlights.
For birds, we were able to spot the Chestnut-capped Brush Finch, Common Bush Tanager, Red-faced Spiny Tail, Black-breasted Wood-Quail, Black-faced Solitaire, Slaty-backed Nightingale-Thrush, and Spotted Woodcreeper. We would not have been able to find most of these without Jose’s help and especially his scope.
 A Slaty-backed Nightingale-Thrush that we saw along the trail
While we all thought the birds were cool, our kids were most intrigued by some bats that had made a home in a hollowed-out log. Jose was very patient, using his phone’s flashlight and scope to let us see far inside the log.
 Our guide showing us some bats
 Bats huddled together in an old log
Near the bats there was also something growing on a tree that Jose wanted to show us. It was one of the smallest orchid species in the world. A type of lepantes species with a flower no bigger than the tip of a pencil. Interestingly, the pollinator of this tiny flower happens to be the mosquito.
From one of the smallest things, we then got to see Costa Rica’s biggest tarantula species, the orange-kneed tarantula. Well, at least we got to see its legs deep inside the den.
 The thick black legs of an orange-kneed tarantula
Overall, we were able to see much more with the guide and really got to appreciate the plants and trees we were passing by with all the knowledge he shared.
AccessibilitySelvatura Park’s hanging bridges are not handicap accessible. However, the trail is not steep and has concrete walking paths without many bumps or inclines. For the suspension bridges, each one is 5 feet (1.5 meters) wide, with a handrail about 4 feet (1.2 meters) high.
Additionally, Selvatura has some of the best hanging bridges for young children because the sides are completely closed.

We recommend making your plans ahead of time for the hanging bridges to ensure there is space, especially if you would like a guide. You can book directly through Selvatura’s website.
CostSelf-Guided Hanging Bridges$39 per person adults
$33 per person students up to age 18 (ID required)
$27.50 per person children ages 4-12
Free for children under 4
Guided Hanging Bridges Tour (Natural History Walk)$61 per person adults
$55 per person students up to age 18 (ID required)
$43 per person children ages 4-12
Free for children under 4
*All rates plus tax.
HoursGuided hanging bridge tours are offered every day (including holidays) at 8:30 a.m., 11:00 a.m., 1:00 p.m., and 2:30 p.m.
What to BringClosed toe shoes, pants, light rain jacket, insect repellent, sunscreen, and water. If you’re into birding, binoculars are also handy.
ConclusionIf you are looking to explore Monteverde’s cloud forest, the hanging bridges at Selvatura Park is a great option. As you walk through the treetops, you’ll have fantastic views of this unique habitat. And on a guided tour, we’re sure that you’ll learn some interesting facts too.
Have a question about visiting Selvatura Park Hanging Bridges or have you been? Leave a comment below. Looking for more information to help you plan your trip? Check out these posts:Driving to Monteverde: Best Routes and Road Conditions – The roads to Monteverde are some of the worst in Costa Rica; however, there have been big improvements. Find the best route for your trip with this post.
Monteverde Hotel Guide: 10 of our favorite places to stay near the cloud forest. Includes options for high-end hotels, mid-range hotels, and budget hotels.
The Famous Monteverde Cloud Forest Reserve: Looking for another fun hike? Learn about Monteverde’s most visited reserve.
The post Selvatura Park: Cloud Forest Hanging Bridges Walk appeared first on Two Weeks in Costa Rica.