Matthew Houde's Blog, page 14
June 17, 2022
Rio Agrio Waterfall and Blue Pools
Two Weeks in Costa Rica |
If you are visiting Bajos del Toro, you’re no doubt in search of some beautiful waterfalls. One of our favorites in this area is the Rio Agrio. To see this tall cascade, you’ll hike through a beautiful canyon and lush jungle. It doesn’t get much more Costa Rica than that. In this post, we’ll share all about visiting the Rio Agrio Waterfall, some natural blue swimming pools nearby, and the dinosaur park they have onsite as well.

The Rio Agrio Waterfall is located in the small town of Bajos del Toro. This town, about two hours from Costa Rica’s capital of San Jose, is best known for its many waterfalls. The Rio Agrio is one of the area’s most visited because of its relatively easy access.
Rio Agrio translates to ”Sour River” because of its very low pH. The nearby Poas Volcano emits acidic ash and gases, which collect in the watershed and run downstream.
On a typical day, the pH of the Rio Agrio’s headwaters is somewhere between 1.4 and 2.5. That’s about the pH of a lemon! Luckily, it gets a bit diluted before reaching the waterfall.
 The Rio Agrio
The extremely acidic water of the Rio Agrio is what has over time carved out the beautiful canyon that you walk through to view the waterfall. You’ll even be able to see colorful yellowish mineral deposits along the canyon walls.
The PropertyThe Rio Agrio Waterfall is on a larger property that also has a dinosaur park, viewpoint, restaurant, and down the street, some blue swimming holes. We will talk about them all separately below.
The Rio Agrio WaterfallTrailAfter checking in at the reception, you’ll make a short walk up the hill toward the trail entrance (5-10 minutes). It is off to the right of the Dino Land entrance. You also can connect with this trail from the end of the Dino Land exhibit.
From the trail entrance, the hike/walk to the Rio Agrio Waterfall is a short 0.4 kilometers (0.25 miles) each way.
The trail to the waterfall is well maintained and mostly concrete but can be wet and slippery. There are some steeper inclines and steps. You’ll also cross a couple of small, sturdy metal bridges that bring you over the river.
 Metal bridge leading to the waterfallThe Canyon
Probably our favorite part of visiting this waterfall was the deep canyon that you walk through to get there. As you walk down the trail, the walls of the canyon surround you. They are coated with lush tropical plants and mosses.
 One of our favorite views – the canyon
As you approach the waterfall, you can’t really see around the giant canyon wall. You can hear water rushing but only a smaller trickling waterfall is visible to the left. This makes your approach a little dramatic and mysterious.
When you finally round the corner, you’ll then see the impressive Rio Agrio Waterfall in front of you.
The WaterfallThe beautiful Rio Agrio Waterfall cascades about 50 meters (165 feet) to the bottom of the canyon. At the bottom, a small pool forms with boulders all around. The water then spills out into the river on the right.
 The view of the giant waterfall from the last bridge
The trail ends slightly before the waterfall, but you can walk along the rocks to get a better view. Just be careful because there is a constant mist which keeps everything wet and slippery.
Because the water is acidic and the currents are strong, there is no swimming allowed in the river or waterfall.
 The gorgeous (and powerful) Rio Agrio WaterfallMirador (Lookout)
 After visiting the waterfall, you’ll walk out on the same short trail you entered on. Near the end, the trail splits and continues left to a lookout.
To get up to this viewpoint, the hike is steeper. The trail zigzags up the hill. When we visited, it had some washouts from heavy rain, though they were quickly repairing them. The hike up to the lookout is about 0.6 kilometers (0.37 miles) each way.
At the top, there is a big platform with a pair of colorful wings. People take turns getting pictures in front of these. The view looks out over the valley, and at the right angle, makes you look like you are flying.
 The photo platform at the LookoutDino Land
On the same property as the Rio Agrio Waterfall is Dino Land.
At this dinosaur park, you can see 25 life-size dinosaur replicas. Many of them are mechanical and make sounds. They are all set in a nice tropical garden. With the mountain backdrop, they look very realistic.
 One of the life-like dinosaurs at Dino Land
You do not need to visit this part of the property if you don’t want to. Packages are available without it. But if you have kids or like dinosaurs yourself, it’s definitely worth the small extra price of admission.
To learn more about Dino Land, see our post all about it, Dino Land in Bajos Del Toro.
Pozas Celestes (Blue Pools) Getting ThereAnother attraction that you can pair with the Rio Agrio Waterfall are some natural blue pools just down the street. If you add this onto your entrance ticket, they will provide transportation in an open truck. The truck drops you off at the main road where there is a small booth.
From there, you just have to go down a long set of concrete steps and along a short trail. Near the bottom, right before the pools, are some simple bathrooms and changing rooms.
How the Blue Pools Get Their ColorThe blue pools are actually in a different river that is known as the Rio Desague (Discharge River). It gets that name because it is formed by the water that is discharged from Poas Volcano. The slow-moving water in this river collects mineral deposits, and when stirred up by the current, the minerals reflect the intense blue color.
 The Blue Pools, just down the road from the waterfall
A lifeguard at the pools explained to us that depending on rains and how stirred up the river is, it can reflect different colors like black or even red.
SwimmingThe pools are beautiful and fun to visit; however, when we went (April), the water was extremely cold. Not many people were swimming. One girl even became physically shocked and cramped up from the cold. A couple had to quickly help her get back to the rocks.
If you do go in for a quick dip, there are a few nice calm pools to relax in and one spot that makes a small natural slide. Of course, in places like this, water levels and conditions can quickly change, so be sure to follow the guidance of the onsite lifeguard.
 The natural waterslide is on the left sidePlanning Your Visit to the Rio Agrio WaterfallHours
 The Rio Agrio is open daily, 7:00 a.m. to 5:00 p.m. The last entrance is at 3:00 p.m.
CostOption 1: Adults – 6,000 colones (about $10). Children (ages 4-10) – 3,000 colones (about $5.50). Children under 4 free.
Includes: Admission to Rio Agrio Waterfall, Mirador, and blue pools.
Option 2: Adults – 10,000 colones (about $15). Children (ages 4-10) – 8,000 colones (about $15). Children under 4 free.
Includes: Admission to Rio Agrio Waterfall, Mirador, Dino Land, and blue pools
ParkingThere is a large parking lot at the Rio Agrio Waterfall. Parking is free.

Reservations are not usually needed during the week, but it is a good idea just in case. It can be much busier on weekends, holidays, and vacations, so be sure to make reservations ahead of time. This is a popular spot among locals.
The Rio Agrio park is available via WhatsApp at +506-8887-0310 or by email at cataratarioagrio(at)gmail(dot)com
AccessibilityThe Rio Agrio and the other attractions on the property are, unfortunately, not suitable for those with limited mobility.
What to Wear/BringThe weather can change quickly in Bajos del Toro so it’s important to pack an umbrella or light raincoat. A water bottle and snacks are recommended for the trail. There is an onsite restaurant that serves good typical Costa Rican cuisine.
For the blue pools, we would recommend water shoes (the rocks can be sharp), a bathing suit, towel, and change of clothes to keep warm after.
If you visit the dinosaur park, it is in full sun for most of the trail, so be sure to wear a hat or use sunscreen.
ConclusionIf you are looking for a beautiful waterfall in a lush tropical setting, we highly recommend a visit to the Rio Agrio Waterfall. With the short hike and other activities onsite, you can easily enjoy half a day here and have time to explore one of the town’s other great cascades.
Have a question about visiting the Rio Agrio Waterfall? Ask us below. Looking for more waterfalls in Bajos del Toro? Check out these posts:Catarata del Toro – This is the waterfall that put Bajos del Toro on the map. It’s a giant cascade that falls into an extinct volcanic crater!
Blue Falls Costa Rica – If you are looking for an intensely blue waterfall, the blue falls will show you several. The biggest, Las Gemelas, will fill up your photo reel.
Cascadas Pozo Azul: Bajos del Toro’s Biggest Waterfall – If you are looking for a harder hike, this one to the region’s tallest waterfall will give you a challenge.
The post Rio Agrio Waterfall and Blue Pools appeared first on Two Weeks in Costa Rica.


June 10, 2022
Dino Land Costa Rica in Bajos del Toro
Two Weeks in Costa Rica |
At the base of an active volcano, nestled in thick jungle and alongside a cascading waterfall, is Dino Land. Here, you will hear the roars and trumpets of all your favorite dinosaurs. As you walk, you’ll see life-sized mechanical replicas of them. These realistic recreations are sure to get smiles from the kids and adults alike. In this post, we’ll tell you more about Dino Land Costa Rica and how to plan a visit.

Dino Land is located in the village of Bajos del Toro, Costa Rica. This quaint town sits at the northern base of Poas Volcano. Poas has one of the largest active craters in the world. From town, the volcano looms in the distance.
Bajos de Toro is an off-the-beaten path destination with only a few small hotels, some vacation rentals, and a handful of restaurants.
Most of the town’s tourist activity is from weekend locals traveling the roughly two hours from San Jose and the Central Valley.
But with a plethora of beautiful waterfalls and unique dinosaur park, that is sure to change.
Dino Land is also about 1 hour and 45 minutes east of the popular destination La Fortuna, where Arenal Volcano is located.
About Dino LandDino Land is a newer attraction at a property already popular (mostly with locals).
The property is best known for a gorgeous waterfall called the Rio Agrio. The Rio Agrio is an attraction in and of itself, but for those interested in checking out the dinos, your entrance tickets can be purchased as a combo with Dino Land, the waterfall, and some blue swimming holes.
The Dinosaurs at Dino LandThe Dino Land property has 25 dinosaur statues, 22 of which are mechanical. They make small movements, roars, and other lifelike sounds.
All the dinosaur statues are spaced out in an open garden along a short trail with a nice gravel path. There are some steeper parts toward the end but nothing too strenuous. If walking slow, it will take about 30 to 45 minutes to wander through the prehistoric exhibit.
What’s great about Dino Land is the environment. This region of Costa Rica has very thick, lush jungle, reminiscent of Jurassic Park.
 Looking through a giant dinosaur skeleton at the rocky trailDinosaur Highlights
We were visiting Dino Land with our two boys, ages six and three, so it was perfect for them. Since they have been playing with dinosaur toys and reading books about them for years, it was no surprise that they were familiar with almost all the ones we saw.
Here were some of the favorites.
Hatching Dino Eggs and “Toothless” the DragonNot far into the Dino Land exhibit is a covered area with some bathrooms. Right next to those are large dinosaur eggs with mechanical T. Rex hatchlings that pop up and down from their eggshells. There’s also an eggshell that the kids can go in for a picture.
In this same spot, our kids also really enjoyed the mechanical dragon, Toothless from the show/movie, How to Train your Dragon.
Toothless has a saddle on his back and once mounted, an employee will activate a sort of mechanical bull mechanism to make him bounce around and make noises.
 The Toothless ride at Dino LandBrachiosaurus
 Sitting center stage in the main garden is a giant Brachiosaurus. It towers over the area and must be 40 feet (12 meters) tall! The Brachiosaurus moves its long neck and occasionally bellows out a trumpeting call.
This is one of the scenes where, with the lush mountain backdrop, you really feel like you’ve gone back in time.
 The giant BrachiosaurusCarnotaurus
Another giant highlight was Carnotaurus, which sort of looks like a big T. Rex. This dinosaur statue is in a lunging forward position with its mouth wide open to make it extra scary.
There is also a flat concrete pad in front of it. We had fun taking some pictures here that made it look like the big meat-eater was chasing the kids.
 Watch out for this hungry Carnotaurus!Dilophosaurus
A smaller dinosaur but hard to miss, Dilophosaurus was a fun one to encounter on the trail. This is the dinosaur that was modified in the Jurassic Park movie to spit poison. It has umbrella-like flaps on both sides of its head, which make it intimidating.
This one’s movements really made it seem more realistic.
 The DilophosaurusT. Rex
Of course, no visit to a dinosaur park would be complete without seeing the king, Tyrannosaurus Rex. Along the path, you may actually hear T. Rex before you see him.
The path winds its way down a hill to the river’s edge and, as you approach, you’ll start to notice some loud roars.
 The King of Dinosaurs, T. Rex
T. Rex is actually one of the last dinosaurs you will see on the trail before walking a bit uphill to the exit or continuing on to the waterfall.
Rio Agrio WaterfallAfter the dinosaurs, the trail splits. If you have a bracelet for the combo tour, an employee will show you how to continue to the Rio Agria Waterfall. This trail is about 400 meters (437 yards) each way. It winds through the jungle, along the river and into a canyon where the spectacular waterfall awaits.
 The gorgeous Rio Agria Waterfall
We’ll be sharing a post about the Rio Agrio Waterfall soon, so be sure to check back.
Mirador (Viewpoint)After returning on that same waterfall trail that you came in on, there is another trail that climbs higher to a viewpoint.
At the top, they have set up some colorful wings that you can stand in front of for a photo op. This hike is steeper, but the path is in good condition.
RestaurantAfter the lookout, you’ll return the same way and walk past the entrance of the dinosaur garden to get back to the parking lot. There is also a restaurant, which serves good traditional Costa Rican food. Our kids loved that their food came in a cute dinosaur basket.
 A fun kids’ mealPlanning Your Visit to Dino LandHours
 Dino Land is open daily, 7:00 a.m. to 5:00 p.m. The last entrance is at 3:00 p.m.
CostOption 1: Adults – 8,000 colones (about $12). Children (age 4-10) – 5,000 colones (about $7.50). Children under 4 free.
Includes: Admission to Dino Land, Rio Agrio Waterfall, and Mirador.
Option 2: Adults – 10,000 colones (about $15). Children (age 4-10) – 8,000 colones (about $15). Children under 4 free.
Includes: Admission to Dino Land, Rio Agrio Waterfall, Mirador, and blue pools
ParkingDino Land has a large parking lot, which is free.
Making ReservationsDuring the week, you do not normally need a reservation, but it is a good idea to ensure they have space, especially if driving a long distance. On weekends and holidays, it gets busier so it is better to make reservations ahead of time.
You can contact Dino Land via WhatsApp at +506-8887-0310 or email at cataratarioagrio(at)gmail(dot)com
AccessibilityDino Land, the waterfall, and lookout have trails that are uneven, rocky, and, at times, slippery. Though the beginning of the dinosaur exhibit is fairly flat, it has loose gravel. Overall, this property is not ideal for those with limited mobility.
What to Wear/BringThe first part of the trail is very open so make sure to pack a hat and some sunscreen.
The trail to the waterfall is more forested and shadier. You may want insect repellent. Sturdy sneakers or light hiking boots are recommended.
It often rains in Bajos del Toro, so pack an umbrella or raincoat.
You’ll want to bring a water bottle and snack since there is nothing along the trail.

Costa Rica is the perfect setting for dinosaurs, and the lush mountain and volcano backdrop in Bajos del Toro makes it all that much more special. Our family had a great time visiting Dino Land Costa Rica. If you have kids or are a kid at heart, we know you will too.
Have a question about visiting Dino Land or have you been? Leave us a comment below. Looking for more information to help with your trip planning? Check out these articles.Driving in Costa Rica: What to Know Before You Go – A place like Dino Land is best accessed with a rental car since it is off the tourist trail. Check out this post for what to expect when driving in Costa Rica.
Packing for Costa Rica: The Essentials – This post has advice on packing for different climates. Bajos del Toro is similar to the cloud forest and can be cooler and rainy (especially at night). Read this post for some essential gear recommendations to keep you comfortable.
The Truth About Visiting Poas Volcano – If you are exploring the Poas Volcano region and want to see one of the largest active craters in the world, read this post first so you know what to expect.
The post Dino Land Costa Rica in Bajos del Toro appeared first on Two Weeks in Costa Rica.
June 3, 2022
The Truth About Visiting Poas Volcano
Two Weeks in Costa Rica |
Poas Volcano is one of Costa Rica’s most iconic volcanoes. At almost a mile (1.5 kilometers) wide and 900 feet (300 meters) deep, this crater volcano is surely impressive. Every day, droves of people head to Poas to try to catch a glimpse of the glorious crater and its blue-green lake. But what many people do not know is that it is actually not that easy to see. Often, the volcano is hidden behind a thick layer of clouds. Moreover, due to current protocols, visits must be planned in advance and the time you can spend at the crater is limited.
In this post, we’ll give current information about visiting Poas Volcano. We’ll include how to reserve tickets, current safety protocols, and what you can expect to see.
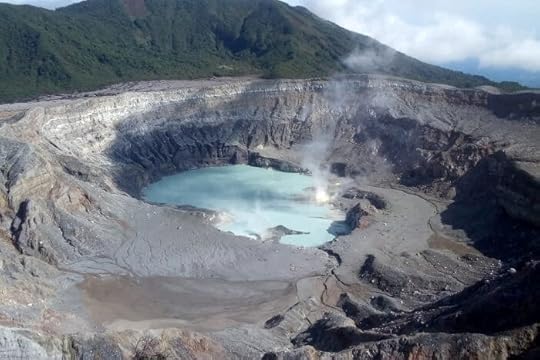 Photo Credit: Parque Nacional Volcan PoasBackground
Poas Volcano is located in the mountains north of the capital city of San Jose. Although it looks fairly close on a map, it is still about a one-hour drive due to road conditions. The roads leading to Poasito, where Poas Volcano National Park is located, are slow and steep.
Because of its relative proximity to San Jose, Poas Volcano is a popular destination. Tourists come from San Jose looking for a day trip and locals head to Poas to get out of the city. It’s a big stop for tour companies as well, and you will often see large tour buses in the parking lot.
Tip: Although you can easily visit Poas Volcano on a day trip, it is worth spending a few days in the area. Poasito and the nearby town of Vara Blanca are very charming, with rolling green mountains, strawberry farms, waterfalls, and coffee tours.
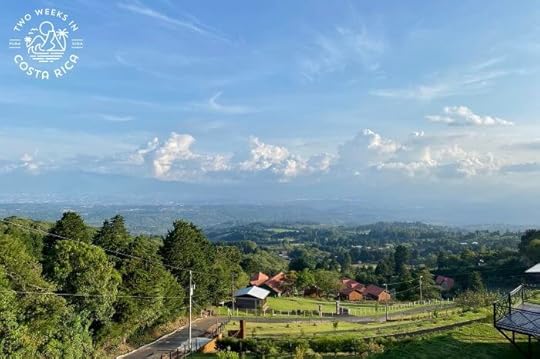 Landscape in the Poasito area, with San Jose in the distanceBackground on Poas VolcanoVolcanic Activity
Poas is an active volcano (a complex stratovolcano) that is about 600,000 years old. It has been making headlines for the last several years with its showy eruptions.
Although Poas has been active since the 1800s, its activity intensified dramatically in 2017. In March and April 2017, the volcano experienced tectonic earthquakes, tremors, explosions (some over 500 meters/1,640 feet high!), and fumaroles (steam columns). It threw mud, ash, and gas, the lagoon changed from green to gray, and strong eruptions destroyed most of what was left of the volcano’s dome.
These eruptions led to the closure of the national park.
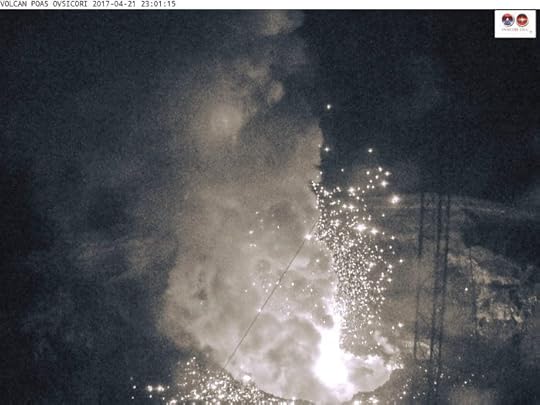 Nighttime footage of Poas erupting in April 2017. Photo Credit: OVSICORIReopening with Safety Measures
In August 2018, the park was permitted to reopen, after seismologists and health officials deemed it safe for visitors. There were a lot of changes, though.
Now, visits are much more controlled. The biggest changes are that you need to buy tickets in advance, the time you can spend at the crater is limited to 20 minutes, and all the side trails are closed. We’ll cover this more below.
Buying Tickets to Poas VolcanoTo get tickets, you’ll need to go online to the SINAC government website.
First, you’ll create an account. There is a button to change the language to English.
Once you’re logged in, go to Buy on the left, then select Online Reservation.
Use the dropdowns to select Parque Nacional Volcan Poas.
Choose your date and time of visit (under Sector/Schedule). You’ll see that there are 18 timeslots in 20-minute increments. They start at 8:00 a.m. and go until 2:20 p.m.
Select the number of people, adults and children.
On the last page, you will need to fill in everyone’s full names and passport numbers, then enter your credit card information to pay. You’ll then get a confirmation, which also will be emailed to you.
At the park entrance, they will ask to see your confirmation. It’s best to have it saved to your phone in case you don’t have cell phone service at the park.
Visiting Poas Volcano – What to ExpectArrivingWhen you arrive, you’ll drive up to the gated entrance where they will make sure you already have tickets. You’ll likely see people pulled over buying them on their phone who haven’t done it yet. You’ll also pay for parking ($2).
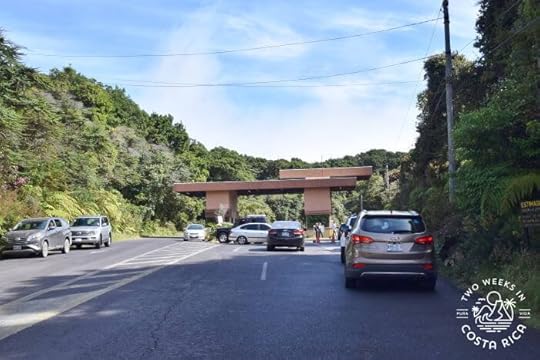 The entrance to the national parkSafety Precautions
You’ll continue to the parking lot and walk to the main reception to get a hard hat.
Now, everyone has to wear a hard hat in the unlikely event of an eruption. This makes for some pretty goofy, but memorable, photos.
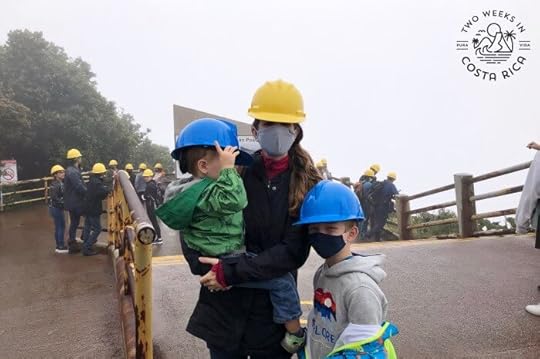 Donning our hard hats at the crater
You’ll then join the rest of the group in the theater to watch a short video about the volcano and safety measures in place. The video is in several languages.
Near the crater are a few concrete structures in case of emergency. You’ll also notice something that looks like a traffic light. This monitors the level of volcanic gas and would change color and alarm if you needed to head to a shelter. Remember that scientists are constantly monitoring the volcano, so these are just precautions.
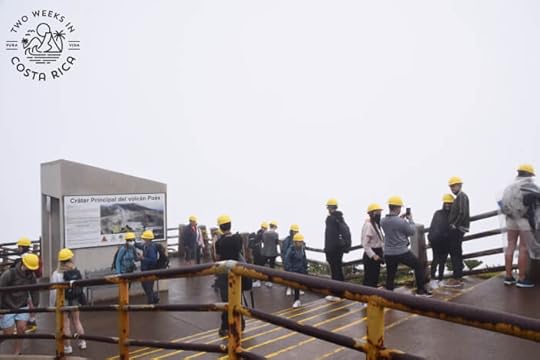 The crater viewing area and shelterWalking to the Crater
Once the movie is done, a park official will escort the whole group (usually they combine multiple groups from different timeslots) to the crater.
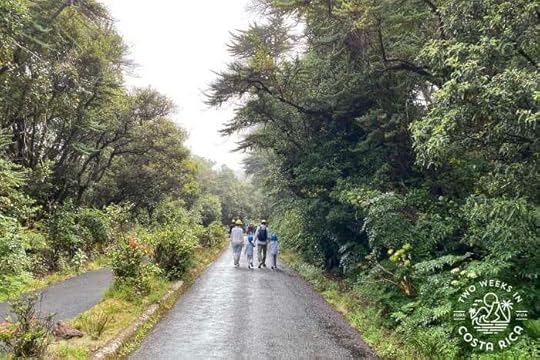
The walk to the crater is short, only about 10 minutes, along a flat, paved path. It’s an easy walk, but because you’re at a higher altitude, the air is thinner, which can make it a little harder to breathe.
 The paved trail to Poas’ crater
Although only the main trail to the crater is currently open for safety reasons, you’ll still get a sense of the beautiful, unique landscape.
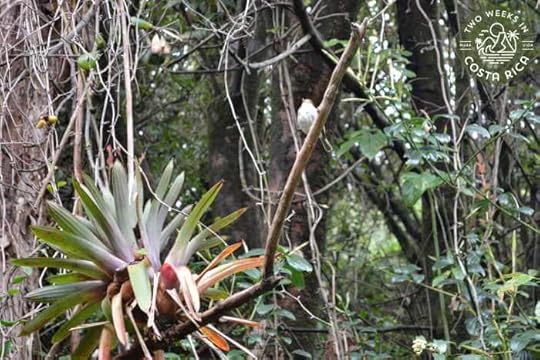
Poas has cool temperatures (for Costa Rica), wind, and lots of moisture. The environment is different than elsewhere in the country and the ecosystem reflects this.
One noteworthy plant you’ll see is the so-called Poor-man’s Umbrella plant. These broad-leafed plants are dotted all along the trail and are so large, you could use them as an umbrella. You’ll also see lots of thick moss, vines, and epiphytes (air plants).
 The thick forest around Poas VolcanoArriving at the Crater
Once you get to the crater, hopefully you can peek past the barrier to get an amazing view! Since the crater is so wide, there’s plenty of space along the edges to get some good pictures.
If you aren’t so lucky and there are clouds, you can wait it out (up to the 20 minutes allowed by your tickets). The weather around Poas is constantly changing so it’s not uncommon for the crater to be clouded over one minute and perfectly visible the next.
But the reality is, it is not that easy to see the crater. We have been to Poas three times over several years and have NEVER seen the crater! We’ve visited at different times of year and in the morning when people say visibility is the best, and the crater has always been completely clouded over. Here is a link to our post, Racing the Clouds at Poas Volcano, about our first time visiting.
[image error]The “view” on our most recent visitThis is very common, and now that visits are limited to 20 minutes and you need advance tickets, it’s harder than ever to catch a glimpse of Poas Volcano.
Live CamOne really cool feature you can take advantage of is a live cam on Costa Rica’s Volcanic and Seismology Observatory’s website. This lets you see Poas’ crater in real time. Here is the link.
We spent some time watching it when working on this article and saw the crater go from full view to complete clouds over and over again!
Sometimes in a matter of 10 or 15 minutes, it can go from completely clear to completely obscured. So it’s definitely worth waiting the 20 minutes at the crater’s edge when it is your turn.
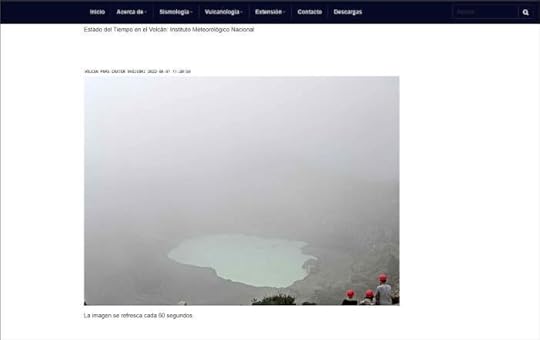 Screenshot of the live cam, showing the crater partially visible.Ongoing Volcanic Activity
Poas continues to have eruptions and monitoring is ongoing. To see videos of recent activity, check out the national park’s Facebook page.
Tips for Visiting Poas VolcanoWhen to GoPeople say that the best time to see the crater is early in the morning, so when the park opens at 8:00 a.m. We have been early ourselves, getting there before 9:00 a.m., without seeing the crater. So some of it is just luck.
Because of the new protocols with having to get a helmet and watch the movie, it takes a while to actually get to the crater so we recommend getting the earliest time slot possible if you want to be there by 9:00 a.m.
We used to think that it was easier to see during dry season (December through April) but have heard from other locals that it doesn’t really matter if you go in dry or rainy season (May through November).
The national park is busiest on the weekends and holidays.
What to Wear/BringSince Poas is high altitude, it is quite chilly, with temperatures around 12°-15 °C (50-60 °F). Wear pants and dress in layers. Definitely bring a raincoat or poncho, as rain comes and goes and it’s often misty with all the clouds. If you wear glasses, opt for contact lenses that day.
CostForeigners: $15 adults, $5 children ages 2-12, free for children under 2.
Citizens and Residents: 1,000 colones adults, 500 colones children ages 2-12, free for children under 2.
Visitors CenterPoas Volcano National Park now has a huge, modern visitors center. Downstairs are bathrooms and upstairs is a large cafeteria and gift shop.
The cafeteria has empanadas, croissants, breads, sandwiches, muffins, donuts, desserts, and an assortment of drinks, including specialty coffees.
 The cafeteria in the visitors centerAccessibility
Poas Volcano National Park is handicap accessible. A wheelchair can easily go the whole way to the crater.
ConclusionPoas Volcano is one of Costa Rica’s most famous volcanoes, but if you’re thinking of visiting, know that there’s no guarantee you’ll actually see it. It takes a bit of time and organization to visit so may not be worthwhile for everyone. After trying to see it three times ourselves, it will probably be a while before we venture back.
Have you seen Poas Volcano? Any tips on how to see the crater? Leave us a comment below.Looking for more information to plan your trip to Costa Rica? Check out these posts:Arenal Volcano National Park – Arenal is Costa Rica’s best-known volcano. Although this cone-shaped giant also can be hidden behind the clouds, it’s a bit easier to see than Poas.
Irazu Volcano: Easy Access, Crater Views, and Extreme Climate – Irazu is another crater volcano located east of San Jose.
La Paz Waterfall Gardens: Another great attraction in the Poas area is this wildlife center and set of waterfalls.
The post The Truth About Visiting Poas Volcano appeared first on Two Weeks in Costa Rica.
May 28, 2022
Cascadas Pozo Azul: Bajos del Toro’s Biggest Waterfall
Two Weeks in Costa Rica |
Bajos del Toro is the land of waterfalls in Costa Rica. You could visit a different waterfall every day for weeks in this small town. But one of the most spectacular is Cascadas Pozo Azul. This property has a handful of different waterfalls, some for swimming and others so grand, they will leave you in awe. Cascadas Pozo Azul is best known for having the largest waterfall in the area. In this post, we’ll explain how to visit this set of waterfalls, including details on the challenging hike.

Cascadas Pozo Azul is located in Bajos del Toro, a very small town in the mountains north of San Jose. Bajos del Toro is on the back side of Poas, a wide crater volcano that is still active.
This region is high in altitude and covered in thick rainforest. Its plentiful rain feeds the many waterfalls and swimming holes you can find in the valley around town.
Cascadas Pozo Azul is a private property right off Route 108, the main road through Bajos del Toro. It is about a 20-minute drive from the small center of town.
Tip: Because Bajos del Toro is rural and most attractions are outside town, we highly recommend a rental car to explore the area. Check out our rental car discount to save 10% and get free extras. Opt for an SUV with higher clearance. There are lots of potholes on the local roads!
The PropertyWhen you arrive at the property, you’ll come to a large rancho where you can buy your tickets. The local working will show you a trail map (we recommend taking a picture of it) and explain the property.

This is also where they serve lunch, which we highly recommend. See the Tips for Visiting section, below, for more information.
 The rancho where lunch is offeredOverview of Trail Conditions
The trail starts right behind the rancho. Along well-manicured grass, you’ll follow the flags to the first three waterfalls and swimming holes.
The first part of the hike to see the smaller waterfalls is short and easy. There are some steps to get down to the waterfalls but not too many.
After visiting the smaller falls, the trail cuts into the thick forest. The hike becomes more difficult at this point. Reaching the largest waterfall, Catarata Caida Nieve y Paz, involves a steep walk down several hundred rustic steps.
The entire hike takes between 2-2.5 hours depending on how fast you go.
We cover more details below.
The First Set of WaterfallsThe waterfalls along the first part of the trail are smaller but still nice. They are called Catarata Las Rocas, Catarata Poza Azul, and Catarata Las Nacientes. These waterfalls and pools all flow along the same river in the same area so blend together.
Catarata Poza Azul and Catarata Las RocasCatarata Poza Azul (Blue Pool Waterfall) and Catarata Las Rocas (The Rocks Waterfall) is a group of gentle waterfalls and pools. The largest is 6.7 meters/22 feet tall.
From the trail, you first come to the top of a bunch of wispy waterfalls. These flows into a deep pool (4 meters/13 feet).
 Pozo Azul (Blue Pool)
If you head left along the rocks, there’s another small cascade and pool. This is a popular spot with locals for swimming and hanging out, as the water is usually calm. You’ll also notice an old waterslide (tobogon in Spanish), but this wasn’t working on our visit in April 2022.
 One of the river’s swimming holes. The slide (tobogon) is to the left and Catarata Las Rocas is in the background.Catarata Las Nacientes
Catarata Las Nacientes (The Source/Springs Waterfall) is the next waterfall. This one is larger (16.5 meters/54 feet) and very pretty. There is actually one big waterfall and a few smaller ones beside it. They converge into a shallow blue-green pool.
The waterfalls are surrounded by moss-covered rock and thick green rainforest, making for a beautiful tropical backdrop.
 The picturesque Catarata Las Nacientes
To get to the small pool, there are some smaller rocks to walk over. It isn’t too difficult, but the rocks can be slippery, so be careful.
Catarata Caida Nieve y PazThe main attraction at Cascadas Pozo Azul is Catarata Caida Nieve y Paz (Waterfall of Falling Snow and Peace). It’s a fun, but challenging, adventure to reach this waterfall.
From the grassy trail, the path turns to dirt and heads into the rainforest.
The beginning part of the trail is fairly easy, with just a few ups and downs.
Cable CarSoon, you’ll come to one of the most exciting parts of the hike: a cable car!
A river divides the trail, and to cross, you can either walk along some rocks or take a ride in a self-propelled cable car. Jenn and the kids opted to load into the cable car. It was fairly easy to pull themselves across the river and super fun.
 Jenn and the boys gliding over the riverMiradors (Viewpoints)
On the other side, you follow along the river and soon arrive at a viewing platform. This looks down at the biggest waterfall on the property that you will hike to next, Catarata Caida Nieve y Paz.
The view from the small metal box looking down over the giant waterfall is breathtaking. You can see the water gush all the way down to the ground, then follow the path of the river.
 Looking down the waterfall’s 500+ foot drop
You’re hovering 155 meters (508 feet) up, and although the viewing platform looks well supported, we don’t recommend it for anyone with a fear of heights!
After the viewing platform, the trail goes up some more and leads to another lookout. This view is out to the lush green valley in the same direction of the waterfall. The focal point here is a couple of huge concrete structures in the shape of an O and a heart where you can take pictures.
 The O and heart-shaped structures are popular for photos
Be sure to fuel up with some water and food because right after this mirador, the trail gets tough.
Hike to the Largest WaterfallBefore starting this section of trail, there’s a sign that warns of the 350 steps and 600-meter (1,968-foot) descent.
The hike is indeed difficult, with many dirt steps, irregular terrain, rocks to maneuver, loose soil, and some slippery spots. But the trail is well-maintained and has handrails, which makes it a little easier.
It helps to use a walking stick. These were not available at the entrance, but it was easy enough to make some with sticks we found on the ground.
 Trail leading down to the base of the waterfall
Jenn did the hike with our three-year old in the baby carrier. Our six-year old did it too, and there was another boy about the same age who also took on the challenge. Both were complaining for sure but managed to make it down to the waterfall and back up again.
Arriving at Catarata Caida Nieve y PazOnce you get down to the waterfall, it’s well worth the effort.
The trail comes out of the jungle and opens to a wide viewing area. You can see the gigantic waterfall almost right away.
The powerful 155-meter (508-foot) falls flows over an ivory-colored sheet of rock in long wispy streaks. To the right are bright green shrubs and plants, the kind that feed on the constant nourishment of water.
 The towering Catarata Caida Nieve y Paz
Looking back to the left, the waterfall drops into a wide rocky river. Surrounding the river is a sweeping valley full of tall, mature trees.
The property has put up a handrail to discourage people from walking down to the river. That didn’t stop a few from going on our visit anyway. Just remember that you don’t want to get stuck down there in the rain due to the chance of a flash flood. It’s best to stay up in the viewing area.
After admiring the waterfall, you’ll have the hardest part of the hike ahead of you. Going back up all the steps to the mirador took us about 40 minutes, with a few breaks along the way.

Entrance is 4,000 colones per person (about $6).
Lunch is an additional 4,000 colones, and we definitely recommend it! On our visit, we could choose between a casado (traditional lunch plate) with chicharron (fried pork rinds), pollo (chicken), or pescado (tilapia, which is raised locally). It came alongside some lovely sides and included a fruit drink and rice pudding for dessert. Delicious home cooking!
 Our reward after a hard hike!Hours
Cascadas Pozo Azul is open every day from 7:00 a.m. to 5:00 p.m.
What to BringWe highly recommend sturdy sneakers or hiking boots. This is a technical hike. You will want good-gripping shoes. Also bring some insect repellent and sunscreen.
Plenty of food and water. We had to give one woman a granola bar to help her make it back up the steps because she didn’t have any energy!
AccessThe property is about 800 meters (a half mile) off the main road. The road is dirt and bumpy, but you don’t need a 4×4 vehicle to access it. There is concrete on a few areas that are steeper.
Note that there are other waterfalls with a similar name in the Bajos del Toro area, which can make it confusing. On Google Maps, the name of these waterfalls is Cascada Pozo Azul. Here is the Google Maps link.
DogsThe property is pet friendly. You can bring your dog to hike the trail. Some locals who were hiking at the same time as us brought their small dog and it was cruising along the trail. We also saw some locals carrying a cat!
AccommodationsFor an authentic experience, you could stay at one of few small cabinas (cabins) on the property. Next to the cabinas is a freshwater swimming pool and some changing rooms that you are free to use with your admission ticket.
You can find more information about the cabins on their Facebook page.
ConclusionCascadas Pozo Azul is a gorgeous property with that offers an authentic experience to see one of Costa Rica’s most amazing waterfalls. If you’re looking for a more challenging hike, we highly recommend it.
Have a question about visiting Cascadas Pozo Azul? Leave a comment below.Looking for more information to plan your trip to Costa Rica? Check out these posts:Blue Falls of Costa Rica: Cataratas Las Gemelas – This is another beautiful waterfall in Bajos del Toro with unique blue water.
10 Day Pack Essentials for Costa Rica: Read our tips for what to bring on hikes like this one.
9 Off-the-Beaten-Path Destinations in Costa Rica: Check out our recommendations for more lesser-known towns to visit in Costa Rica.
The post Cascadas Pozo Azul: Bajos del Toro’s Biggest Waterfall appeared first on Two Weeks in Costa Rica.
May 20, 2022
Blue Falls of Costa Rica: Cataratas Las Gemelas
Two Weeks in Costa Rica |
Costa Rica has thousands of waterfalls, from towering cascades and wispy veils to churning jets and relaxing trickles. Each one is unique. But there is something about a bright blue waterfall that heightens its allure. In Costa Rica, there are several blue waterfalls, the Rio Celeste being the most famous. In this post, we’ll tell you about another spot to see the blue-water phenomenon. It is a series of cascades, pools, and river, together called the Blue Falls of Costa Rica.

The Blue Falls are located near a very small town called Bajos del Toro. Sitting at the northern base of Poas Volcano, this town is about two hours from San Jose and one hour 40 minutes from the popular tourist destination of La Fortuna.
The blue color of the river and waterfalls comes from volcanic minerals released by Poas Volcano. The water from the crater and surrounding volcano collects into a river, which winds its way down the hillside and close to the town.
Getting to the Blue FallsIf you take Route 708 all the way from Sarchi (near San Jose), the road is paved, but very steep, narrow, and cloudy. The drive can be scary at times if it is clouded in.
Instead, we would recommend taking Route 126 to Route 140, then connecting to Route 708 from there. It is longer but much more enjoyable.
From any direction, we do not recommend driving to Bajos del Toro at night because visibility can be very poor. When we have driven in this area, it has often been enshrouded in clouds, making it even harder to navigate on the narrow mountain roads.
About the PropertyThe Blue Falls of Costa Rica is a private 126-acre (51 hectare) property. It has hiking trails that lead to seven blue waterfalls, two regular waterfalls, and several swimming holes. The most famous waterfalls on the property are a set of two cascades called Las Gemelas. These sit right next to each other. Fittingly, las gemelas translates from Spanish to “the twins.”
There are picnic areas and plenty of spots to observe birds and other animals on the Blue Falls property as well.
 Thick forest is mixed into the pasture land near the Blue Falls
The project was still under development when we visited in mid-2022. Notably the trails, which cut through a lot of pasture, were being expanded and planted with native plants and trees.
The owners are committed to keeping the entire property wild. Already, 37 acres (15 hectares) of the property is considered primary rainforest (never been cut down). They are hoping to add to those pristine areas with their planting initiatives.
You also can visit a sister property just up the street called Catarata del Toro. This is another impressive waterfall worth checking out.
TrailsFrom the entrance along Route 708, one main trail winds its way through the Blue Falls property. A narrow stone path has been built in the middle to prevent muddy conditions. The trail is well marked and maintained.
 The stone path leading to the river and waterfalls
In about 20 minutes, the trail splits. To the right is the path leading to the main waterfalls (Las Gemelas) and another blue waterfall called the Tepezquintle Waterfall. To the left is a trail leading farther down river to some smaller waterfalls and blue pools.
From here, it’s about a 10-minute walk to reach the Blue Falls.
Overall, the trail is easy to moderate with a few ups and downs, but nothing too intense. Hiking sticks are provided at the entrance. There are a couple of benches to rest along the way as well.
One thing to note is that closer to the Gemelas Waterfalls, you’ll need to climb down a steep metal ladder and some steps. This was a little tricky for us with one of our kids in a baby carrier, but we managed.
 The steep ladder near the waterfalls
After the ladder, you’ll cross a sturdy bridge over the blue river. This leads to a path with some small rocks that are not too hard to navigate.
Then there’s another short bridge with some incline. After this point, it’s all rocks to get closer to the waterfall. These can get slippery, so be careful.
One of us opted to stay with our youngest son since there was a lot of mist coming from the waterfalls, making the rocks very wet.
WaterfallsThe highlight of the Blue Falls is, of course, seeing the waterfalls.
Keep in mind that rainfall can affect the color of the water. It can be blue, clear, brown (from silt), and even almost black depending on recent rain.
If there has been heavy rain, it is best to wait about a half-day to visit to increase your chances of seeing the blue color.
We actually visited a full day after some very heavy rains, and the color was blue and beautiful.
Las Gemelas WaterfallsCataratas Las Gemelas are some of the most famous waterfalls in Bajos del Toro because of their gorgeous blue color.
After crossing the blue river, you’ll see the largest of the twins first. This picturesque waterfall falls into a small rocky pool. The blue river then spills over the rocks towards you.
 The first waterfall you come to
If you continue up the left side of the river, you can then see the second twin waterfall off to the left. This one is a bit smaller but also has the nice blue water at the base.
 The second waterfall – you have to walk on the rocks to see this one since it’s around the corner.
Las Gemelas Waterfalls are accessible from another property as well, but we have heard that the trail is a little harder and muddier.
Other WaterfallsWe had a short window of time to visit the Blue Falls, so only hiked to the Gemelas Waterfalls. This took us about 1.5 hours total, with about a half-hour at the falls.
If you have more time, you can continue above and below Las Gemelas to see five other blue cascades and two clear-water waterfalls. The entire property can be explored in three to four hours.
 La Celestial Waterfall, another blue waterfall on the propertyThe Blue River
In our opinion, the gorgeous celeste-colored river at the Blue Falls of Costa Rica was just as spectacular as the waterfalls. The contrast of color against the dark rocks and green forest looks like something out of this world.
 The blue river
A local expert explained to us that the blue color is only a reflection of sunlight on the minerals floating in the water. At night, the water is completely clear.
Blue Pools and SwimmingIt is possible to swim in some of the blue pools, if you are up for it.
Personally, we felt the climate was a bit chilly, and the water was especially cold for swimming. The water comes down the mountain from a high elevation, and temps locally are cool at night (mid-60s °F or around 18 °C).
But if you are set on getting some pictures of yourself in blue pools, this would be a great place to do it.
Otherwise, the pools are extremely photogenic on their own.
 One of the blue poolsPlanning Your Visit to Blue Falls of Costa Rica Cost
 Self-guided: Adults – $15, Children – $7.50, Seniors (65+) – $7.50
Guided Extreme Tour: $50 per person (recommended for ages 18+ with good physical ability)
Combo Entrance to Blue Falls & Catarata del Toro: Adults – $25, Children – $12.50, Seniors (65+) – $12.50
HoursMonday to Saturday, 7:00 a.m. to 5:00 p.m. Closed Sunday.
AccessibilityThe trails at Blue Falls are not accessible for those with limited mobility. There are many uneven rocks and some slippery spots.
Those looking for a more accessible waterfall can head to Catarata del Toro. You can get a nice view of this waterfall right from the visitors center without having to hike down the trail.
ParkingAcross from the entrance to the Blue Falls of Costa Rica is a grassy parking lot. An attendant can see part of this lot from the entrance but always be cautious when leaving valuables in your car. Another parking lot is available at the Catarata del Toro Waterfall down the street, if needed.
What to BringWe recommend sturdy, closed-toe footwear like sneakers or hiking boots, sunscreen, a hat, insect repellent, and a lightweight raincoat or poncho. Also be sure to bring plenty of drinking water and snacks/food since nothing is available on the trails.
 The main bridge leading to the waterfallsConclusion
 The Blue Falls of Costa Rica was one of our favorites in the Bajos del Toro area. The blue water and majestic waterfalls made for a really nice afternoon hike. Since our family didn’t have a lot of time to explore the entire property, we are already looking forward to going back again soon.
Have a question about visiting the Blue Falls of Costa Rica? Have you been? Leave us a comment below. Looking for more information to help you plan your trip to Costa Rica? Check out these articles:Car Rental Discount – If you are exploring off-the-beaten path activities like the Blue Falls, you’ll want your own set of wheels. Check out our discount to save.
Best Waterfalls in Costa Rica – Looking to see more spectacular waterfalls? See some of our favorites with this post.
9 Off-the-Beaten-Path Destinations in Costa Rica – Read more about less trafficked destinations and why they are worth a visit.
The post Blue Falls of Costa Rica: Cataratas Las Gemelas appeared first on Two Weeks in Costa Rica.
May 13, 2022
Tambor: A Relaxing Escape on the Nicoya Peninsula
Two Weeks in Costa Rica |
Nestled in the rugged jungle of the southern Nicoya Peninsula, Tambor (also called Playa Tambor) is a quiet town with nature as its backdrop. Tambor isn’t a well-known destination, but it does have a couple of larger resorts and properties as well as some lovely hotels. Despite its remote location, it still has some interesting things to do. In this post, we’ll give you a sense of what Tambor is like, including accommodations and activities in the area.

Tambor is located on the eastern side of the southern Nicoya Peninsula. It’s between Paquera, which hosts the ferry landing, and Montezuma, farther down the peninsula.
The closest international airport to Tambor is Liberia (LIR), at about three hours.
San Jose Airport (SJO) is about five hours away. The fastest way to drive from San Jose to Tambor is to take the Puntarenas-Paquera Ferry. This large vessel cuts across the Gulf of Nicoya, saving about one hour of drive time.
The ferry ride is really nice. It offers scenic views, and you can even bring a car on. For more information, read our post, Taking the Puntarenas-Paquera Ferry.
 One of the islands you see on the ferry from Puntarenas to Paquera
Tambor also has an airstrip for small planes/domestic airlines. Some travelers opt to take these to shorten the trip from San Jose when traveling to Tambor, Montezuma, or Santa Teresa.
About the TownTambor is spread out along Route 160, a coastal road that runs through the southern Nicoya Peninsula. Along the stretch near Tambor, you’ll find clusters of modest residential neighborhoods with a few businesses mixed in.
Tambor does have a very small main area of town. Here, you’ll find a church, basic grocery store, combo souvenir shop/clothing store, pizza restaurant, some rustic cabinas (motel), and another nicer hotel. This is located on a short side road off Route 160 that leads to the beach.
 The tiny main area of town in Tambor
Since Tambor doesn’t have much for amenities, you will want to stock up on the way. Paquera has a couple of larger grocery stores, an ATM, and gas station.
There are only a handful of restaurants in Tambor. Because of this, many hotels have restaurants onsite.
The main developments in Tambor are the Barcelo resort and Los Delfines Golf and Country Club. Because of these resorts, this area does have some tourism. A community of year-round or seasonal expatriates also live in Tambor.
Activities in TamborTambor may be a small destination, but it does have some awesome things to do. Here are the options.
BeachesPlaya TamborThe main draw of Tambor is its beach. Playa Tambor is a wide cove with very calm water. This makes it a great beach for swimming. The sand is volcanic and a rich brown color.
Playa Tambor has a pristine feel, with a thick backing of palm and almond trees. Scarlet Macaw Parrots love beach almonds, and you will often see them in the trees or cruising around town.
The beach is almost never busy but does pick up on weekends with locals coming from San Jose.
 Playa TamborPlaya Muertos
If you’re up for some adventure, take a panga boat over to Playa Muertos. This beach is visible from the main bay but is separated from Playa Tambor by a river. Because of this, you have to ask a local to take you by boat for the five-minute ride from the town of Pochote.
Once you get to Playa Muertos, you’ll find a gorgeous remote beach. The sand is light, and the ocean waters are often calm and clear, making it a decent spot to snorkel.
For more information on visiting, read our post, Discovering Playa Muertos: A Hidden Beach with an Island Feel.
Curu National Wildlife RefugeSince so much of this area of Costa Rica has remained pristine and undeveloped, there is a lot of wildlife hiding in the thick jungle. The best place to see this is Curu National Wildlife Refuge.
Curu is a short drive up the peninsula from Tambor, about 25 minutes away. Curu is not as popular as many of Costa Rica’s other parks and reserves but has just as much to offer.
The many ecosystems on the property host diverse birds and animals like monkeys, coati, deer, agouti, crocodile, and some unique birds like the Long-tailed Manakin.
Curu has several trails to choose from, making it a good option for all hiking abilities.
For more information, check out our post, Curu National Wildlife Refuge – Refugio Nacional De Vida Silvestre Curu.
 A Northern Jacana in the crocodile pond at Curu ReserveIsla Tortuga
Just a short boat tide away is Isla Tortuga (Turtle Island). This white-sand island is known for its clear turquoise water. It’s a popular spot, with tours coming from the southern Nicoya Peninsula, Puntarenas, and the Jaco area. Pickups are available right on the beach in Tambor.
Bioluminescent Kayak TourThe southern Nicoya Peninsula is known for a natural phenomenon called bioluminescence. Bioluminescence is the term used when living things give off natural light. In the Tambor-Paquera area, it’s algae on the surface of the ocean waters that creates this effect.
On a nighttime kayak tour, you can observe this amazing phenomenon. The Paquera area is one of the best places in Costa Rica to see this. It is possible to see bioluminescence here year-round.
To learn more about bioluminescent tours, read about our experience in our post, A Bioluminescent Kayak Tour on the Nicoya Peninsula.
 Getting ready to go out on a bioluminescent tourDay Trip to Montezuma
If you’d like to check out a town with a little more going on, there’s Montezuma.
Montezuma is about 30 minutes from Tambor, heading down the peninsula. It is still a small town but has a nice main area along the beach with restaurants and cafes. The town is super laid back and eclectic.
The beach in Montezuma is different than Tambor. It’s very pretty and has bigger waves and rocky outcroppings.
To learn more about Montezuma, read our post, Montezuma: A Bohemian Beach Town.
Accommodations in TamborFor a small town, Tambor has a good selection of accommodations.
It’s worth noting that since this area is lesser known, prices for hotels and condos are significantly lower than in Costa Rica’s more popular destinations.
Here are some good options for accommodations in and around Playa Tambor.
Barcelo TamborThe best-known hotel in the area is the Barcelo Tambor. This all-inclusive resort has all the comforts you would expect from the Barcelo chain. It has bright, comfortable rooms, a large pool, kids’ pool area, and a handful of restaurants. If you’re just looking to sit on the beach with a cold beverage, this is a great option. $200-400/night double occupancy, with all meals included. Check Rates and Availability Here.
Los Delfines Golf and Country ClubLos Delfines is a large, gated community with houses and condos. It is divided into a few different areas, with many homes designed in the same style. Some units are owned by year-round residents, while many others are rented out on websites like Airbnb and VRBO.
 Inside Los Delfines Golf and Country Club
We have stayed in Los Delfines and enjoyed it. The condos are affordable and most have a private pool. The development is walking distance to Playa Tambor. It used to have a restaurant, but it has not reopened since Covid.
A main draw of Los Delfines is its golf course.
 The golf course at Los Delfines
There is also a small, but well stocked, mini-market right at Los Delfines.
Lodge MargouillatFor a smaller, more intimate property, there’s Lodge Margouillat. This hotel set in the hill has private villas with kitchenettes, Balinese-style gazebos, and deluxe bungalows. The property is in the thick tropical forest so it’s very tranquil and quiet. There are two pools onsite. $70-100/night. Check Rates and Availability Here.
Tambor Tropical Beach ResortAnother nice beachfront option that is smaller is Tambor Tropical Beach Resort. This is right near the main area of town but set off along the beach on its own. The hotel consists of a few buildings made of beautiful local wood. A spacious pool fronts the rooms with the ocean providing a backdrop. Adults only. Around $200/night. Check Rates and Availability Here.
 Tambor Tropical Beach ResortTango Mar Beachfront Boutique Hotel and Villas
A little past Tambor on Quizales Beach is the popular Tango Mar Beachfront Boutique Hotel and Villas. This upscale hotel has different suites, some farther up the property and others close to the sand. It also has a few Tiki-style villas, perfect if you’re looking for a romantic escape. All have nice outdoor terraces to take advantage of the views. $200-400/night. Check Rates and Availability Here.
ConclusionTambor may not be well known but it still has a lot to offer. It’s a great escape if you’re looking to relax and unwind in a peaceful, tropical setting. And with a decent amount of activities, there’s enough to do to stay busy—if you want to.
Have a question about visiting Playa Tambor or have you been? Leave a comment below.Some of the links in this post are affiliate links. If you book a hotel using one of the links, we receive a small commission at no extra cost to you. Read our Privacy Policy for more information.
Looking for more information to plan your trip to Costa Rica? Check out these posts:Costa Rica Rental Car Discount – Unless you’re staying at an all-inclusive resort, you’ll want a rental car to get around the Tambor area. Check out our discount through one of the country’s most reputable companies.
Santa Teresa: Costa Rica’s Trending Beach Town – On the other side of the Nicoya Peninsula is Santa Teresa. This surfer town has been growing in popularity, with many boutique hotels, international restaurants, and trendy shops.
La Fortuna: What to Expect – If you’re looking to do some adventure activities before hitting the beach, La Fortuna/Arenal is a great destination to pair with Tambor. Read our detailed destination guide for more information.
The post Tambor: A Relaxing Escape on the Nicoya Peninsula appeared first on Two Weeks in Costa Rica.
May 7, 2022
Curu National Wildlife Refuge – Refugio Nacional de Vida Silvestre Curu
Two Weeks in Costa Rica |
Sitting casually along the roadside on Costa Rica’s Nicoya Peninsula is the Curu National Wildlife Refuge. Marked by a few simple signs, most travelers race past this reserve on their way to destinations like Montezuma, Tambor, and Santa Teresa. But for those who do stop, an abundance of wildlife and variety of habitats are waiting to be explored. In this post, we’ll tell you all about the Curu National Wildlife Refuge so you can plan a visit.

Curu National Wildlife Refuge is located on the southeastern side of Costa Rica’s Nicoya Peninsula. It’s between the small tourist town of Tambor and locals’ town of Paquera.
Paquera is best known for its ferry terminal where the Puntarenas Ferry arrives and departs. This large boat transports passengers and vehicles to and from the southern part of the Nicoya Peninsula, saving a lot of driving miles.
Most people visiting Curu National Wildlife Refuge stay in nearby Tambor or Montezuma. The reserve also has some very simple lodging.
Curu is about 3 hours south of LIR Airport in Guanacaste and 4 hours west of SJO Airport, including the ferry ride.
Tip: This area is best explored with a rental car since beaches and attractions are spread out. If you are looking to rent a car, check out our discount through one of the largest and most reliable agencies.
About the Curu ReserveBefore becoming an official wildlife refuge in 1981, the vast property of Curu was used for many purposes, including farming and tree harvesting. Later those practices were scaled back to make way for conservation and ecotourism.
Today, Curu National Wildlife Refuge protects 75% of its 3,697 acres (1,496 hectares) as pristine forest. The remaining 20% is used for farming/ranching, while 5% makes up the reserve’s hiking trails and visitors center.

One thing that makes Curu National Wildlife Refuge so special are the variety of habitats on the property. There is tropical dry forest, wet forest, mangrove, pasture, beach, and marine zones.
This makes it especially attractive to wildlife like birds as well as mammals, reptiles, amphibians, insects, and of course fish.
During our visit, we saw a lot of wildlife hanging out near the streams and mangroves.
 Close up with a white-faced monkeyVisiting Curu National Wildlife RefugeThe Trails
From the visitors center at Curu National Wildlife Refuge, you can walk along several trails to make a loop. Each one is unique and will allow you to see some of the different habitats.
A few of the trails were closed when we visited. Here are some of the major trails that make for a good hike.
 Trail Map of Curu National Wildlife RefugeManakin Trail – Sendero Toledo
This short 200-meter (0.12 mile) trail is named after the Toledo bird (Long-tailed Manakin) that can be found inside the reserve. It starts at the visitors center and goes south along Playa Curu. Along the beach trail, there are some picnic tables nestled into the shrubby forest.
We came back to this spot after our hike to cool down and have a snack. Beware that there can be wildlife looking to grab your food. We saw both racoons and white-faced monkeys, which were aggressively trying to investigate our cooler.
It is important not to feed these animals as you can make them very sick. They also become more aggressive towards future visitors.
After the beach section, the Toledo Trail has a long, rustic bridge that crosses a tidal river. We saw lots of fish swimming in the shallow water as well as birds and iguanas along the banks. Signs also warn of crocodiles.
 Bridge along the Manakin TrailMonkey Farm Trail – Sendero Finca de Monos
After the Manakin Trail is a turnoff for the longer Monkey Farm Trail (Sendero Finca de Monos). This trail is roughly two kilometers (1.25 miles). There are a few ups and downs along this trail, but the hike overall is fairly flat and easy.
The Monkey Farm Trail goes inland through some of the tidal mangrove forest before transitioning to a normal lowland jungle.
During our visit, it was low tide so the roots of all the mangrove trees were exposed. There were lots of crabs peeking out of their holes and foraging for food. We also saw a giant Ivory-billed Woodpecker up in the trees.
This trail eventually ends at a small stream and the entrance road. If you are looking for a short hike, you can simply follow this road back to the parking area and visitors center.
Where the trail curves around the stream (near the road), we saw a large family of howler monkeys lounging in the tall trees. Make sure to keep an eye up to the trees around this area. At first the monkeys were being very quiet and were hardly noticeable. Later they started calling with their loud calls, which made them easier to spot.
 A howler monkey along the Monkey Farm TrailCeiba Trail – Sendero Ceiba
If you want to continue hiking from the Monkey Farm Trail, you can trek along the Ceiba Trail. This trail continues inland another two kilometers (1.25 miles) before meeting up with the entrance road. Like the other trails, it is fairly flat and easy.
 The Ceiba Trail
The Ceiba Trail was interesting for us because it went past some little waterways, which had small fish in them. Our kids loved looking in these puddles to see what they could find.
The water also attracted some animals called agouti. These are small rodents that sort of hop like rabbits. They are really shy and eat fruits and vegetation off the forest floor.
 Agouti
Another highlight on the Ceiba Trail is a manmade lagoon near the end. The lagoon is sectioned off with a fence and gate. That is because there are crocodiles inside! When we visited, one was sunning itself right in the shallow water. It was small but still intimidating.
 Small crocodile in the lagoonEntrance Road – Camino Principal
Though technically not a trail, we would be leaving out an important part of the reserve if we didn’t mention the entrance road. You walk this back to the visitors center after leaving either the Monkey Farm Trail or Ceiba Trail.
It was along this road that we saw a lot more wildlife. First, it was a family of coati (pizote), which are similar to racoons but have a long snout and slender tail that they often stick straight up in the air. They were foraging under some dead logs, digging up insects to eat.
We also saw a lot of white-tailed deer along this road. They were a bit shy but also curious and let us get close enough to get some nice pictures.
 White-tailed deerCrab Trail – Sendero Cangrejal
The last trail we took was Sendero Cangrejal, named after the land crabs in the area. At times, these crabs, which live inland, flock to the water in droves to breed. They march across roads, fields, and mountains, no matter what is in their way.
On this flat, one kilometer (0.62 mile) trail, you loop around a section of sparse forest and mangrove. We didn’t see much in this area, but it was later in the day and very hot. It could be much better for birds and animals during the early morning or late afternoon.
Closed TrailsA few of the trails inside the Curu National Wildlife Refuge were closed at the time of our visit. Notably, the long (5 km/3.1 mile) trail to Playa Quesera was closed. This is supposed to be a gorgeous, pristine beach.
Also closed were the Avispero (Hornet’s Nest) and Killer Trail. Based on those names, we weren’t too disappointed.
AccessibilityAlthough some of the trails above are flat and easy, they still have uneven parts that would be difficult for someone with limited mobility. However, the entrance road, as well as the area around the visitors center and beach can still offer a pleasant experience and plenty of wildlife viewing.
Other Things to EnjoyRestaurant & Gift ShopThere is an onsite restaurant and gift shop at the Curu visitors center.
The restaurant serves traditional food. It’s best to order what you would like inside the gift shop before starting your hike. That way, they can prepare. Otherwise, you might be waiting a long time to eat.
Inside the gift shop is a nice selection of T-shirts, souvenirs, and handmade gifts, as well as some cool old photos of the area.
Curu BeachWith your admission, you also can enjoy the remainder of your day at Playa Curu. The beach is set in a wide cove and is very tranquil. There are only gentle waves, making it a great place to swim with kids. There is some shade near the visitors center, but again, watch out for the aggressive monkeys!
 Playa CuruTours
 If you have more time to spend at Curu National Wildlife Refuge, you can take some of their tours. They offer horseback riding, kayak rentals or tours, night tours to see bioluminescent algae, and day tours to Tortuga Island. The activities are very affordable; for example, horseback tours are $15 per hour.
The tours do not include the entrance fee, so if you plan to come back another day for tours, you will have to pay the entrance again.
Planning Your VisitWhat to Wear & BringWe recommend wearing lightweight clothing, sturdy shoes for walking/hiking, and a hat for sun protection. Be sure to bring along some sunscreen, insect repellent, and a lot of drinking water since the trail can be very hot.
For more tips on what to pack in your daypack, see this post.
HoursOpen Daily, 7:00 a.m. to 4:00 p.m.
Admission CostAdults: 9,000 colones (foreigners). 3,000 colones (nationals).
Children: 3,000 colones (foreigners). 1,500 colones (nationals).
ConclusionWe really enjoyed our visit to Curu National Wildlife Refuge. We had driven past this reserve many times but hadn’t had the chance to stop. We always wondered if it was worth the effort to visit. Now we can definitely say that it was, and we are already looking forward to going back again. We hope you’ll go and experience it too.
Have a question about visiting Curu National Wildlife Refuge? Leave a comment below. Looking for more information to help you plan your trip? Check out these articles:Taking the Puntarenas-Paquera Ferry – This is the ferry that you will likely take to reach the southern Nicoya Peninsula if flying into SJO Airport. We cover all the details.
Renting a Car in Costa Rica: Clearing up the Confusion – If you want a car to explore this area of the country, read this article to find out how the insurance works and what else to watch out for.
A Bioluminescent Kayak Tour on the Nicoya Peninsula – This tour is located near the Curu Reserve. It’s an amazing experience to see the natural phenomena of glowing algae in the sea.
The post Curu National Wildlife Refuge – Refugio Nacional de Vida Silvestre Curu appeared first on Two Weeks in Costa Rica.
April 29, 2022
Discovering Playa Muertos: A Hidden Beach with an Island Feel
Two Weeks in Costa Rica |
From the cafe-colored shores of Tambor Bay, a white-sand oasis lies in view just to the east. Intrigued, we recently made the trip to explore this beach, Playa Muertos, during a visit to Tambor. Playa Muertos is a little-known locals’ beach with a pristine island feel. It has stayed off the tourist trail because of its harder accessibility and remote location. In this post, we’ll tell you about Playa Muertos, including details on how to visit and what to expect.

Playa Muertos is located on Costa Rica’s southern Nicoya Peninsula. The small cove is situated between Paquera to the east and Montezuma to the west. It is part of the wide Gulf of Nicoya, where you’ll find some islands, including the popular Isla Tortuga.
 Tambor Beach. Playa Muertos is the white sand beach barely visible off to the right.
The closest major town is Playa Tambor, though Tambor itself is still quite small. Montezuma, a small tourist destination with more amenities, is about 40 minutes away. The popular Santa Teresa/Mal Pais area is a little more than a one-hour drive.
Getting to Playa MuertosOverviewGetting to any secret beach is always an adventure, and Playa Muertos is no exception.
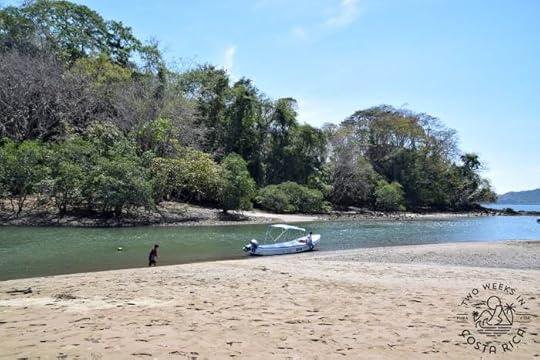
The easiest way to get to Playa Muertos is to take a small boat from the village of Pochote. Boats go up the river into the bay, bringing you to Playa Muertos in less than five minutes.
Below are all the details you’ll need to make this trip. Keep in mind that this is a super authentic, informal process. You don’t need tickets in advance and there’s no set schedule.
Driving to Boat Launch AreaFrom Tambor, head east on Route 21 towards Paquera. In just a few minutes, take a right into the small neighborhood of Pochote. There is a sign. Then take another right at the sign for Camping Don Trino. This is a dirt road but flat and smooth.

You’ll follow the narrow road, passing some houses and thick mangrove forest along the way.
Soon you’ll approach the beach and arrive at Camping Don Trino (see map location). Drive along the sandy path until you can’t go farther and park off to the left.
 Camping Don Trino
Camping Don Trino is a campground with basic facilities where locals come, mostly on the weekends, to camp and hang out at the beach. It is also the location for the boat to Playa Muertos.
Once you’ve gathered everything you’ll need for the day from your car, walk towards the river. There was a rope blocking vehicles from entering this area at the time of our visit. You’ll pass a small house and building right next to the river. Some tour companies keep their boats here so there will probably be some people around.
Be sure to check in with someone from the campground to tell them that you would like to park there while you go to Playa Muertos.
When you get down to the river’s edge, there should be some simple speedboats waiting. You can ask one of them to take you to Playa Muertos. They’ll help you load up into the boat, and you’ll agree to a time for them to come get you after for the return to Pochote.
 The boat launch area in PochoteBoat Ride
When we visited Playa Muertos, our captain was Armando. Armando had long curly hair and was dressed in a long sleeve rashguard. He had a couple of helpers along with him. A young boy gave us a shy smile, while a teenage boy helped with our bags and got us on the boat.
 Our friendly crew
We had our own two young boys with us. Not knowing what to expect, we made sure to put our then two-year old in a lifejacket, just in case.
The boat ride was smooth and quick, though. We sailed over the gentle waves of the bay and arrived at the beach in under five minutes.
 The quick boat ride to Playa Muertos
Armando and his team jumped out of the boat once we reached the shore and helped us out. It was a water landing, since there is no dock at Playa Muertos. Exiting the boat into thigh-deep water was a little challenging with all our bags and our two-year old, but we made it. The crew was very helpful.
Playa Muertos – The BeachOverviewArriving by boat to a beach is special enough, but when the beach itself is pristine and gorgeous, that tops off the experience.
Playa Muertos is a white and tan sand beach with a wild feel. You’ll find tall palms stretching towards the turquoise sea, lofty driftwood anchored to the sand, and a thick backing of jungle.
 The beautiful Playa Muertos
Although the beach is not very big, it stretches far enough in both directions so that there’s plenty of space. The main area where boats drop off tends to be the busiest.
On weekends and holidays, locals flock to Playa Muertos, looking to escape the crowds of the city. During the weekday, the beach is almost deserted.
If you walk to the right towards the point, there are plenty of interesting places to sit and explore, away from everything.
One of the most interesting features of the beach for us were the rocks. Small to medium red, orange, brown, yellow, green, and blue pebbles collected in certain areas near the water. The constant wave action made them appear smooth and perfect, almost as if they had been in a rock tumbler.
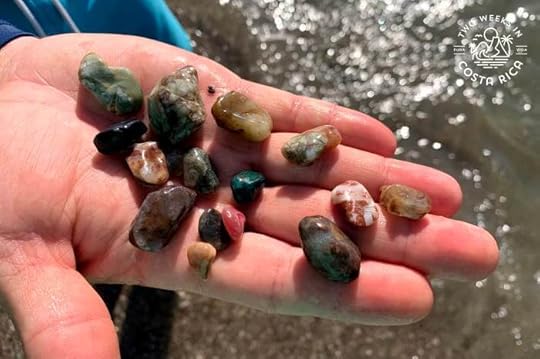 Colorful pebbles along the sandActivities at Playa MuertosSnorkeling
Playa Muertos is a rocky beach, with several areas carved out by black volcanic outcroppings. We tried snorkeling in one sheltered area to the right, but conditions weren’t good on the day we visited. The water was murky, and we couldn’t see to the bottom, even though it was perfectly sunny. We were able to see a few things like a large puffer fish and some small reef fish. So snorkeling is possible under the right conditions.
Before we visited, we saw a lot of pictures of crystal-clear water that you can see right through. While the water was beautiful on our visit (in January), it was a little choppy and not as clear.
 Rocky area with sheltered water for snorkelingBanana Boat Rides
A tour company offers banana boat rides right from the shore. We saw some locals taking advantage of this and it looked really fun!
 Banana boat ride funPlanning Your Visit to Playa MuertosCost
Parking at Camping Don Trino is 2,000 colones (about $3) for the day.
The boat ride is 3,000 colones (about $5) round-trip per person.
You do not need to make reservations for parking or the boat. The boats do not run on a set schedule but are there every day of the week. If one is not there when you arrive, just wait a few minutes. Most likely, one will be returning from Playa Muertos after having dropped people off.
Other Ways to ArriveKayakingYou also can kayak to Playa Muertos. It’s about a 30-minute paddle from Pochote, best done at higher tides. Kayak rentals are available in Pochote.
DrivingWe’ve also heard that you can drive most of the way to Playa Muertos, around the mangrove forest, then walk 30 minutes in from where the road ends. This walk must be done at low tide. It isn’t easy, with a lot of rocks to traverse. We definitely recommend taking the boat instead. It’s cheap and simple once you know the process!
What to BringSince there are no amenities at all, be sure to bring everything you will need for the day. Some obvious musts are a hat, sunglasses, and sunscreen.
You’ll see locals with big bags of food and even coolers filled with drinks. Pochote doesn’t have any large grocery stores, so stock up before arriving in Paquera, Montezuma, or Santa Teresa.
Be sure to wear shoes that come off easily for the beach landing.
A dry bag is a good idea to make sure your electronics don’t get wet on the boat ride.
The beach has a thick backing of trees with a good amount of shade so you probably don’t need an umbrella.
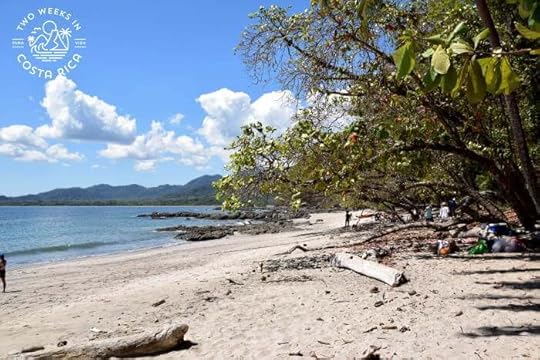
There are no trash cans at the beach so be sure to carry everything out with you. Sadly, we did see quite a bit of trash.
ConclusionVisiting Playa Muertos is definitely an adventure and will make you feel like a local. The boat ride brings just the right amount of excitement to make visiting this beach feel like a special outing. We highly recommend making the trip to Playa Muertos if you’re staying on the southern Nicoya Peninsula.
Have a question about visiting Playa Muertos? Ask us below.Looking for more information to plan your visit to Costa Rica? Check out these posts:A Bioluminescent Kayak Tour on the Nicoya Peninsula – This is another great activity on the Nicoya Peninsula. Seeing plankton light up in the ocean at night is a truly unique experience.
Montezuma: A Bohemian Beach Town – If you looking for an off-the-beaten path beach town, Montezuma may be it. It has maintained a small feel over the years, but still has a good amount of restaurants and things to do.
Playa Carrillo: A Favorite Locals’ Beach in Guanacaste – Though more popular, Playa Carrillo near Samara is another favorite beach among locals in Costa Rica.
The post Discovering Playa Muertos: A Hidden Beach with an Island Feel appeared first on Two Weeks in Costa Rica.
April 23, 2022
International Driving Permit in Costa Rica
Two Weeks in Costa Rica |
Most tourists traveling to Costa Rica can use their license from their home country to drive. But visitors from some countries will need an international driving permit. Likewise, people who normally use a Costa Rica driver’s license may find one necessary when traveling to other countries. In this post, we’ll let you know what an international driving permit is and give details about how to apply for this special document.

We recently had to apply for an international driving permit in Costa Rica. Though originally from the United States, we have permanent residency in Costa Rica and hold Costa Rica driver’s licenses.
Our driver’s licenses in the United States had expired, so we needed a way to rent a car in the States (to visit family). We needed to use our Costa Rica license, until we could get the US one renewed.
The rental car agency in the United States that we were using told us that we could only use our Costa Rica license if we also had an international driving permit to go along with it.
What is an International Driving License/Permit?An international driving permit is a document that translates your current driver’s license into 12 different languages. This makes it easier for law enforcement to read your license in the country you are visiting. The permit also certifies that you have a valid driver’s license in your country of residence (i.e., you can legally drive).
International driving permits are regulated by the Federation Internationale de l’Automobile (FIA/IAT) under direction of the United Nations (UN) and Organization of American States.
These permits are considered a valid form of identification in more than 150 countries.
It is important to mention that the international driving permit must be presented along with the original driver’s license to be valid.
Important: Do You Need One to Drive in Costa Rica?An international driving permit is not typically required for visitors traveling to Costa Rica. Most tourists can use their home country’s license, even if it is in a different language. The license just needs to be in the same alphabet that Costa Rica uses (e.g., A, B, C, D).
For example, those traveling from the United States, Canada, United Kingdom, Spain, etc. will NOT need an international driving permit to rent a car in Costa Rica.
Foreigners with licenses in different alphabets (e.g., Mandarin, Arabic, Hebrew) WILL need to get an international driving permit before they arrive in Costa Rica, if they want to rent a car.
Be aware that some websites make it sound like you should still get an international driver’s permit, even if one is not required. These sites say that local police or officials can give you a hard time if they cannot read the license. We have not heard of any travelers experiencing this problem in Costa Rica.
Tip: If you are renting a car in Costa Rica, be sure to use our discount through one of the most reputable companies. Get 10% off plus free extras like car seats for kids, surfboard racks, and coolers.
How to Apply for an International Driving PermitThe application process for an international driving permit varies by country. Typically, the process is carried out by the country’s automobile club or association. These clubs are something like AAA (link) in the United States. Other countries use different offices, like the post office, to issue them.
The best way to find out the specific requirements for your country is to visit the official International Driving Permit website. On this site, you can enter the country where you hold a driver’s license. You will then be directed to the official agencies in your country that offer the service. Those websites will explain the requirements and let you know how to apply.
Note: There are many unofficial websites claiming to sell international driving permits. Only agencies that are FIA/IAT approved can issue valid permits. If you go through the International Driving Permit website, they will direct you to the official page for the country where you reside.
How Much Does the International Driving Permit Cost and How Long Are They Valid?The cost of the license/permit varies by country. Some are as little as $5 USD in the case of the United Kingdom, or upwards of $100 USD in the case of Costa Rica (read more below).
In Costa Rica, an international driving permit is valid for only one year, then you need to apply for a new one.
Some countries issue permits that are valid for three years. It depends on which UN Convention they are signed onto.
Applying for an International Driving Permit in Costa RicaIn Costa Rica, applying for an international driving permit is simple. The process is done through the Automovil Club de Costa Rica (Automobile Club of Costa Rica).
 Entrance to the Automobile Club of Costa Rica in downtown San JoseThe Automobile Club of Costa Rica
 The Automobile Club of Costa Rica (ACCR) is a non-profit association that was founded in 1955. In addition to issuing international driving permits, they also do campaigns and studies on road safety, pedestrian and cyclist accessibility, and driver-training programs.
Another cool thing that the ACCR does is that it issues sport licenses (for motorsport racing) and helps supervise Costa Rica’s motor-sport races and activities.
 Trophies on display from Costa Rica motorsport racesSteps for Applying (Costa Rica License Holders)
You can apply for the international driving permit in person (with an appointment) or online.
When applying online, you will then need to go in person to pick it up, or give authorization to someone who can pick it up for you.
The Automobile Club of Costa Rica is located in San Jose, a little south of La Sabana Park. It is inside Centro Comercial Sabana Sur (found on Waze or Google Maps).
Since we live far from San Jose, we did the process online and picked up the permit when it was ready. The process was fast – it only took four days for them to process our application and have the permit ready.
International Driving Permit (IDP) Requirements (Applying Online)To apply online, you will email the following information to the Automobile Club of Costa Rica. Please double check their page to make sure nothing has changed.
1) Photo (front and back) of your cedula (identity card) in JPG format.
2) Photo (front and back) of your Costa Rica driver’s license in JPG format.
3) A 5×5 cm passport-style photo (without any borders) in JPG format.
4) Copy of the $90 USD payment voucher. Payment is by bank deposit or transfer. They will email you the bank account information after you send the first three items.
The Club may email you some additional questions, like where you were born, what province you live in now, and your phone number. They will notify you when the permit is ready and give you an appointment to pick it up.
When you arrive to pick up your international driving permit, you also will need to bring the following:
1) Printed 5×5 cm passport-style photo on glossy photo paper.
2) Your original ID (cedula).
3) Your original Costa Rica driver’s license.
ConclusionGetting our international driving permit in Costa Rica was very simple. The whole process took less than a week, and we are now allowed to drive in other countries, like the United States, using our Costa Rica license. The only downside is that the permit was expensive, at $90, and is only valid for one year.
Have a question about getting an international driving license? Ask us below. Looking for more practical information for your trip. Check out these articles:Arriving at SJO Airport – Looking for information about Juan Santamaria International Airport? This post will let you know what to expect.
Renting a Car in Costa Rica: Clearing Up the Confusion – If you are overwhelmed with the information online about renting a car in Costa Rica, this article will help you understand things like the mandatory insurance and extra charges that are often left out of quotes.
Getting a SIM Card in Costa Rica – If you need to stay connected during your trip, this article will explain how to get a sim card for your phone.
The post International Driving Permit in Costa Rica appeared first on Two Weeks in Costa Rica.
April 2, 2022
A Bioluminescent Kayak Tour on the Nicoya Peninsula
Two Weeks in Costa Rica |
Seeing glowing bioluminescence in person is one of those things in nature that just makes you go, wow! Witnessing it in Costa Rica, on a kayak, in the dark, under the starlit sky makes the experience even more special. In this post, we’ll take you along on a bioluminescent kayak tour on the Nicoya Peninsula.

Bioluminescence is when living things give off a natural light or glow. You’ve probably experienced it when seeing fireflies (lightning bugs), but it also can be found in mushrooms, jellyfish, worms, and other creatures. It can be somewhat magical or somewhat creepy (in the case of worms).
Water also can give off a bioluminescent glow, but it is not from the water itself. The light comes from microscopic algae or plankton living near the surface of the water. These organisms only grow and thrive under the right conditions.

While some places in the world only experience the right conditions for bioluminescent algae occasionally, some spots in Costa Rica, like the Gulf of Nicoya, have it very consistently. This is especially true near the town of Paquera, where we took our tour.
This bioluminescent kayak tour is located about a half-hour from the small destination of Tambor on the southern Nicoya Peninsula. It is an hour from Montezuma and about 1.5 hours from Santa Teresa/Mal Pais.
The roads in this area are mostly paved but very curvy, so use caution driving at night.
Our Bioluminescent Kayak Tour ExperienceWaiting Until DarkOur tour began in Punta Cuchillos as the sun was falling. This little point is about ten minutes from the Paquera ferry landing on Costa Rica’s Nicoya Peninsula. Most people get off the Puntarenas to Paquera ferry and drive right past it.
We were guilty of that too, having done it many times. But tonight, we felt like we were in on the secret.
From the main road, we parked and walked down a narrow path to the Bahia Rica base camp.
Here, we were greeted with refreshments and told to just relax until it got a bit darker. Everyone on the tour took in the spectacular sunset over Paquera Bay. As the sun sank, the green mountains of the Nicoya Peninsula grew dark in the background.

Our guides, Jose and Luis, soon appeared with smiles and introduced themselves. They gave us a lot of information about bioluminescence and quizzed us a bit on what we already knew.
Luis was quite passionate about the bioluminescence and how each evening was a little different. He was excited for us all to experience it.
Jose added in some practical information about where we would go in the kayaks, how to see the most, and how it would be difficult to photograph the glow from a moving kayak.
Jose also added that they would try to get some photo opportunities throughout the tour, but it was best to just enjoy the experience in person.
Setting OffSince there were about a dozen of us taking the tour that night, our guides split us into two groups for a more personalized experience. Half of us went along with Jose and the others went with Luis. We were given life jackets and paddles, and before we knew it, were led down to the water’s edge.
There, the kayaks were lined up for us. The guides shined their flashlights while we got in and pushed off from shore. Some couples and friends shared double kayaks, while the rest of us took singles.

Kayaking in the dark was a different experience. Many of us were already bumping into a half-sunken log and each other before the guides got us organized and paddling forward.
Once we all got the hang of it, though, it was quite relaxing and beautiful. The stars overhead looked amazing in the dark night, and the occasional lights from homes on the shoreline gave us a sense of where we were.

We weren’t but ten minutes into the tour before Jose asked us to paddle closer to a small rocky island. Here, we found a very calm cove away from the current.
Jose splashed the water with his paddle. We all immediately saw the blue glow! We tried it too while Jose explained that the current and wind gather the algae along rocks and in coves. When these concentrations of algae are disturbed by waves or a splash, they give off the light.
Tour HighlightsWhile our first experience at the small island was amazing, it got even better. As we rowed past the island, the current from our paddles made swirling blue patterns in the water. The gentle waves made by our kayaks gave a shimmering glow.
We soon approached a shoreline where the concentration of algae was even denser. A tiny splash in the water set off intense sparkles of blue light.

We then saw a school of fish darting through the shallow water, leaving streaks like shooting stars.
Jose told us to stop for a minute and touch the water with our hands. As we lifted our hands in and out of the sea, they came up covered with what looked like glowing blue glitter. After a minute, the lights slowly disappeared.
Photographing the BioluminescenceBefore the tour, we had done some research on taking photos of bioluminescence. It seemed that the best way to do this was from shore, using a tripod, and a slow shutter speed. You then need to disturb the water and snap your picture.
From a kayak, of course, this was nearly impossible. We tried the slow shutter speed, but with the constant small movements of the kayak, we could not get a shot. Writing about this experience without getting any pictures was not an option so we needed a backup.
Our cell phone worked a little better but was still very difficult. We got a lot of plain black photos.
What eventually worked with our iPhone was to set it to take live photos. And take a lot of them! Live Photo takes a picture in a short window of time, sort of like a two second video clip. You can then go in and edit which frame you want to keep. You adjust the frame until you find the one which focused on the blue glow.
Though we got a whole reel of black pictures, we did manage to get a few usable ones.

Overall, we’d recommend trying a few photos but just putting the camera or phone away so that you can enjoy the experience and remember it yourself. Once we did that, it was much more fun.
Booking a Bioluminescent Kayak TourTour CompanyThere are a couple of different bioluminescent kayak tours available in the Paquera area. We were really happy with Bahia Rica and the guides were great.
One other company we met out on the water had a really large and noisy group. We were glad that Bahia Rica broke us into smaller groups for a more enjoyable experience.
Duration and CostTours are around 1.5 hours long and cost about $35.
Full MoonKeep in mind that around the full moon, it can be difficult to see the bioluminescence. The darker the night sky, the better the experience.

If you’re looking to experience Costa Rica’s bioluminescence for yourself, the Nicoya Peninsula is one of the best spots in the country. We were really surprised by how cool it was to see it in person and hope you get a chance too.
Have a question about the bioluminescent kayak tour? Ask us below.Looking for more information to help you plan your trip? Check out these posts:Taking the Puntarenas-Paquera Ferry – If you are heading to the southern Nicoya Peninsula, make sure to read this post to learn about the ferry that cuts across the bay.
Car Rental Discount – This area of the country is best explored with a rental car since attractions and tours are spread out. Get a discount and free extras when booking through our page.
Santa Teresa: Costa Rica’s Trending Beach Town – Santa Teresa has changed a lot recently. Although remote, it has become a hot spot for tourism and digital nomads.
The post A Bioluminescent Kayak Tour on the Nicoya Peninsula appeared first on Two Weeks in Costa Rica.