
Andrew Macarthy's Blog, page 11
December 29, 2020
3 FREE Social Media Marketing Tools Every Business Needs in 2021
3 FREE Social Media Marketing Tools Every Business Needs in 2021
Are you looking for free social media tools to boost your social media marketing in 2021?
In this blog post, I’m going to share three of my favourite (and in my opinion, some of the best) FREE social media marketing tools that are perfect for streamlining your workflow and creating great content for any social media platform in 2021. Let’s get going!
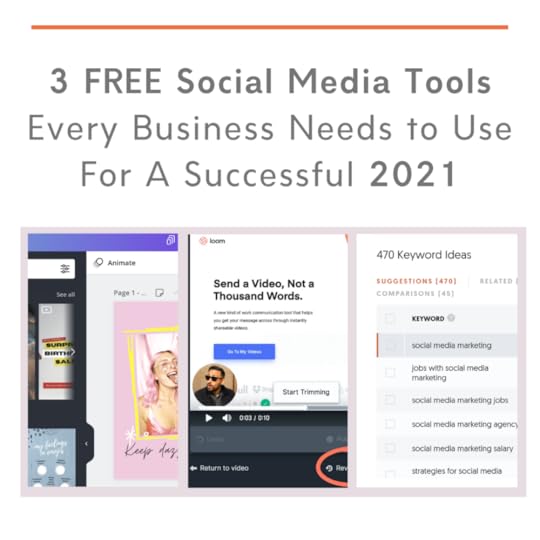
1. FREE Social Media Tool For Screen Recording: Loom
Free Social Media Tool For Screen Recording #1: Loom
Customer support has become a huge element of successful social media marketing, and that trend is likely to continue in 2021. Loom is a free desktop or iOS app, or Chrome extension that allows you to screen record and share video clips with ease. Loom can be used in tons of different ways for business and social media, including:
Customer support: Customers having trouble with your website? Need to make a quick “How-to” video? Record and share a clip of you talking through a solution to the problem in seconds, and share a link straight to it.
Product marketing: Record your website or service to share information on new features, or to onboard new sign ups. Alternatively, you could record a video to encourage customers to share testimonials that you can publish to your social media profiles.
Sales: Capture a prospect's attention with a personalised video recorded over your website and your face chatting away on-screen. Share the video direct with your prospect to build a personal connection from the off, and share a link to your calendar/pitch deck too.
Other things I really like about Loom include:
Letting you add a CTA button at the end of your videos.
Simple editing tools to make your video more engaging to watch.
The ability to add password protection to your videos.
Engagement metrics to see who’s been watching your videos and how well they’re performing.
Find Loom at www.loom.com
2. FREE Social Media Tool for Keyword Research: Ubersuggest
FREE Social Media Tool for Keyword Research: Ubersuggest
Need inspiration for blog post ideas? Ubersuggest has a ton of different features, but my favourite is its keyword suggestion tool. Whack a keyword into Ubersuggest and it will return a bunch of suggestions, questions, related ideas and more, ranked by popularity.
For the top 30 results, you'll be able to click through to see which website ranks highest for that particular keyword and check the page/article out for yourself.
Ubersuggest's free version gives you 3 free searches per day, which you can copy to your clipboard or export to a CSV file.
If you're looking for a mega deep-dive into blogging data and strategy, you won't get it without upgrading. But as a starting point for keyword research, Ubersuggest's free version is a great place to start.
Find Ubersuggest at www.ubersuggest.com
3. FREE Social Media Tool for Graphic Creation: Canva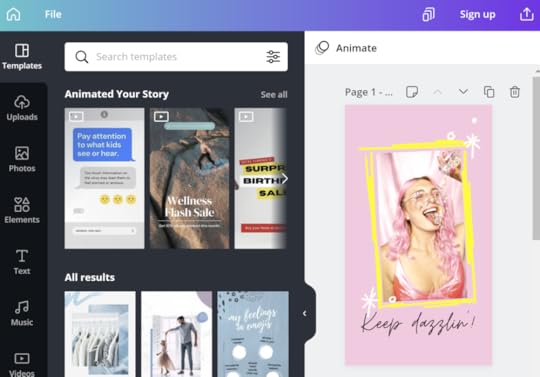
Creating consistently eye-catching social media graphics can be a challenge, but Canva makes the job so much easier! Most social media managers will be pretty familiar with Canva already, but as a quick and easy tool to create professional graphics for social media, I’ve yet to come across one that I like as much. It’s so easy to create still images, videos with animated text, and more.
Canva’s generous free plan gets you access to features including:
250,000+ free templates
100+ design types (social media posts, presentations, and more)
Hundreds of thousands of photos and graphics
Real-time collaboration and commenting tools
5GB cloud storage
Full disclosure: I use a paid Canva plan which gives me access to (amongst other things) premium stock graphics and instant re-sizing tools, so I can turn a square piece of content for, say, Instagram, into a long and tall image for Pinterest, instantly. So handy!
Find Canva at www.canva.com
FREE Social Media Tools for 2021 Conclusion
So there you have it, my top 3 FREE social media tools for 2021. If you’d like to me suggest more ideas for free tools, including scheduling and link sharing, do let me know in the comments below!


December 27, 2020
5 Simple TikTok Video Tips to Increase Views and Followers (And Even Go Viral! ✨)
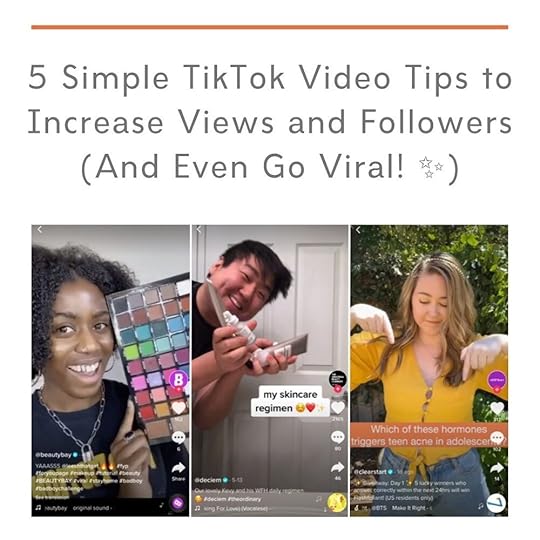
5 Simple TikTok Video Tips to Increase Views and Followers (And Even Go Viral! ✨)
Want to get people to watch your TikTok videos for longer and to get more followers in the process?
I'm going to share 5 simple TikTok tips and tricks that encourage people to watch your TikTok videos til' the end, drive them to watch more of your content, and to follow your profile. Let's go!
TikTok Tip 1: Begin your video with a strong opening hookGrabbing your audience's attention within the first 3 seconds is likely the single most important factor in a video performing well on TikTok.
One way to deliver a strong hook is to tell people what your video is about, whilst putting on a suspenseful or interesting spin on it, or by asking a question. For example: "Want to learn how to speed read in an hour?" or "Here's why ALL bananas will taste different in a few years..."
TikTok Tip 2: A short and engaging captionYour video caption can be used in combination with the opening hook as another way to encourage people to watch your video, and stick around until the end.
For example, let's say your video teaches people the secret to making perfect poached eggs every time. Your opening hook could say "Want to know the secret to perfect poached eggs every time?", while your caption could support it with something like "The poached egg secret only pros know about..."
Well, now I want to know what the pros know about poached eggs, and then I can be a poached egg pro too!
It's so important that your caption is short and funny or suspenseful, working in tandem with your opening hook to keep people watching.
TikTok Tip 3: Always use viral soundsTikTok factors the use of viral sounds in its algorithm, so it's important to add one to your video. But don't worry if this audio overlay would drown out you speaking in a video - just turn the volume of the viral sound way down to one or even zero. It doesn't matter that your audience can't hear it, only that it's there.
TikTok Tip 4: Close with a call-to-actionOnce you've hooked your audience in to watch your video, you want to encourage them to watch more of your videos and to follow your profile. A simple call-to-action should help to do the trick, something simple like: "If you enjoyed the video, I cover X and X on my page!" or "Follow me for more daily fitness tips!"
A call-to-action like those above tells people what they can expect from your other content, and reminds them to follow if they don't want to miss out on your future content.
TikTok Tip 5: Build on the success of top-performing videosIf one of your videos takes off, obviously you'll want to try and repeat its success (or at least build on it). One simple way to do this is to give more of what your audience wants - cover the topic in more depth, create video replies that answer questions or comments left on the original video, or even turn the topic into a video series.
Using the same music in this series of videos will help to mark them out as related to one another, and may even give you a boost in the algorithm.
TikTok Tips ConclusionThere you have it! 5 simple TikTok tips and tricks to keep viewers watching and to help you grow your audience.
What's your favourite audience-building strategy for TikTok? Let me know in the comments below!
Andrew Macarthy is a social media consultant and the author of the #1 Amazon Web Marketing Bestseller, 500 Social Media Marketing Tips.
Buy 500 Social Media Marketing Tips
Amazon US: http://www.amazon.com/dp/B007L50HE6
Amazon UK: http://www.amazon.co.uk/dp/B007L50HE6
Follow Me:
http://www.facebook.com/500socialmediatips/
http://www.pinterest.com/andrewmacarthy
http://www.twitter.com/andrewmacarthy
December 24, 2020
How to Find Your Target Audience and Introduce Them to Your Brand on Instagram (5-Minute Strategy!)
Want to grow your business on Instagram? Of course you do!

How to Find Your Target Audience and Introduce Them to Your Brand on Instagram (5-Minute Strategy!)
Everyone knows that creating great content for your target audience is a must, but going out there to hunt down and attract new followers is another great strategy.
And I have one simple method to share with you that will almost guarantee you can find exactly the customer you are looking for.
I’m not going to lie, it won’t skyrocket your account overnight. But you don’t have to dedicate too much time to per day, and the results will speak for themselves if you’re patient enough. Here’s what you have to do:
Step 1: Go to the accounts of people or brands that share your target audience and look for a post that is something that you can see yourself posting on your own profile.
Step 2: Tap to see who has liked the image/video and click through to one of these people’s profiles.
Step 3: Tap on the newest image on the person’s profile and leave a comment. It is crucial that your comment is genuine and meaningful, not just empty platitudes like “Love this!” or “So cute!”.
Thousands of businesses rely on this lazy tactic, and it comes across as spammy and disingenuous more than anything else - not something you want related to your brand.
I like to comment by mentioning something positive related to the image/video in question and include their name (if featured on their profile). Flattery goes a long way :)
Step 4: Repeat however many times you like per day, as time/resources allow.
What’s the reason for all this?For what only really needs to be a couple of minutes work a day if you want it to be, you’re able to pinpoint and engage with real people who, as fans of the account that you found them on, are likely to be keen on what you have to offer as well.
By commenting on their post in a genuine and friendly way, not only are you introducing yourself to them - your comment itself provides a direct link to your profile - but you’re also, hopefully, giving a really good first impression, enough to make them want to tap through and check you out.
And while they’re there on your profile, there’s every chance they’ll like what they see. And who knows, maybe, in time, they’ll become a valued customer.
What are your most successful strategies for attracting followers on Instagram? Let me know in the comments below!
Andrew Macarthy is a social media consultant and the author of the #1 Amazon Web Marketing Bestseller, 500 Social Media Marketing Tips.
Buy 500 Social Media Marketing Tips
Amazon US: http://www.amazon.com/dp/B007L50HE6
Amazon UK: http://www.amazon.co.uk/dp/B007L50HE6
Follow Me:
http://www.facebook.com/500socialmediatips/
http://www.pinterest.com/andrewmacarthy
http://www.twitter.com/andrewmacarthy
December 23, 2020
How Much Should You Spend on Social Media Ads? A 5-Minute Guide

How Much Should You Spend on Social Media Ads? A 5-Minute Guide
Wondering how much you should be spending on social media advertising for Facebook, Instagram, Twitter, etc?
For the majority of businesess wanting to generate consistent growth on social media, an advertising budget is a must.
Obviously the limits of your company budget will affect how much you have to spend on social media ads (ranging from tens of dollars to thousands per month), but as for how much you should spend, it’s all very circumstantial. Here are some things to consider:
Your total monthly budgetOnce all expenses other expenses are factored in, how much money will you have available to allocate to social media advertising?
Your product or serviceThe kind of advertising budget you need (or more so, how far the budget you set will go) will depend on the industry you are in. Some types of products (those with a lot of competition in the marketplace) will hit your budget harder than a very niche product, whose audience is a lot smaller.
Types of ads you want to runSimply put, different types of ads command higher fees to utilise at their entry level, e.g. video ads are typically more expensive than a single static image. If you want to run long, media-rich video or stories ads, your ad spend is generally going to have to be higher.
Your budget for A/B ad testingCreating just one social media ad and crossing your fingers it will succeed isn’t much of a sound strategy. When you first launch a campaign, you’ll want to test multiple different ads that are slightly different in a variety of ways (and budget for it accordingly): different image, headline, call-to-action, etc. Once you’ve given the ads a few days to bed in, you’ll be able to knock a few out to concentrate on the ones that are. And within that subset, you’ll want to A/B test further until your ad is as optimised as it can be.
Your Goals and KPIBefore you launch an ad campaign, you need to have a main goal in mind (e.g. sales, traffic, brand awareness) and detail out some key performance indicators that will tell you if you’re meeting your main goal. For example, if you’re aim is to drive a purchase of a product that sells for $30, the effectiveness of your ads should mean that your spend is making it worth your while.
On this point, you may want to increase your spend up until the point of diminishing returns: where your return on investment is down to a margin that you are no longer happy to throw money at.
The truth is that the amount you should spend on social media ads will differ for every business, and that there is no one perfect dollar figure or ratio. The key ad spend figure is the amount that delivers you the largest profit for your product in the current market right at this moment.
And once you’ve found a near-enough sweet spot once, always keep testing and experimenting. All kinds of factors, from historical trends to current events, to holidays, a change in your audience, etc. will always influence the performance of your ad, and therefore your eventual ad spend.
To get yourself started, set yourself up with an Excel spreadsheet and monitor your ad spend and performance monthly.
What are your best social media ad tips? Let me know in the comments below!
Andrew Macarthy is a social media consultant and the author of the #1 Amazon Web Marketing Bestseller, 500 Social Media Marketing Tips.
Buy 500 Social Media Marketing Tips
Amazon US: http://www.amazon.com/dp/B007L50HE6
Amazon UK: http://www.amazon.co.uk/dp/B007L50HE6
Follow Me:
http://www.facebook.com/500socialmediatips/
http://www.pinterest.com/andrewmacarthy
http://www.twitter.com/andrewmacarthy
December 22, 2020
How to Get More TikTok Video Views With One Simple Change to Your Strategy

How to Get More TikTok Video Views With One Simple Change to Your Strategy
Struggling to get views and engagement on TikTok?
The same video that does well on Instagram and Facebook might tank on TIkTok. Here’s just one major way to re-align your content strategy for TikTok - think FUN! Quick bursts of enjoyable content.
Because TikTok videos have to be short, people expect to entertained quickly - your videos must deliver something entertaining right off the bat, within the first few seconds.
Create unique content that makes people laugh fast, or makes them feel cool about having followed you.
Most of all, keep it relevant to the audience you want to attract!
To get you started, here are a selection of TikTok video ideas to inspire you:
Share a quick how-to tutorial or tip that will impress your audience or make their lives better!
@wonguyMy phone got wet for this, don’t let it flop
May 12, 2020
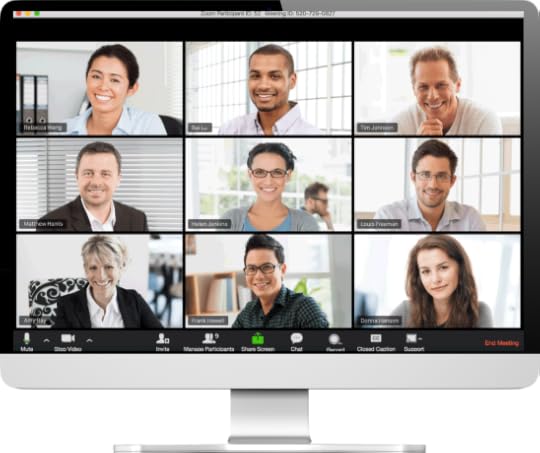
The Complete Guide to Zoom Etiquette: 20 Video Meeting Tips For A Great Conference Call

The Complete Guide to Zoom Etiquette: 20 Video Meeting Tips For A Great Conference Call
Zoom etiquette: best practices for better video calls
Now that Zoom, Skype, and other video conferencing services have taken over our daily lives as we know it – including meetings, job interviews and dinner parties – you might be wondering how to act and look your best during video calls.
Especially if you're new to video conferencing (thanks coronavirus), you'll know just how jarring the whole experience can be versus in-person meetings, and video etiquette can differ quite a lot to that in real life.
Practicing good video meeting etiquette is critical to ensuring that your meetings are professional, efficient, and valuable. And, importantly, that you come across well to your colleagues, customers, friends, or whoever you’re speaking to.
While I’ll primarily mention Zoom as a video conferencing tool in this post, much of the advice also for other online meeting software including Google Hangouts and Microsoft Teams.
Ready for a complete checklist to help you look and act your best on any Zoom video call? Let’s get started.
Jumping straight into a Zoom meeting with zero preparation is never a good idea - especially if you want to look and sound good during the call. And you probably do. So, let’s get the pre-call must-dos out of the way first.
Only invite people who really need to be there
People do not like meetings, period. And if you’re a host on Zoom, inviting co-workers who don't need to be at a meeting or to make decisions can have a knock-on effect on the overall quality of the meeting.
The more people there are on a call, the more opportunity there is for something to go wrong - poor connections, audio and video issues, etc. Less people means less issues and a smoother conversation overall, with less chance for people to talk over one another or interrupt when someone else is speaking.
So, if there's someone who doesn't have to set aside time for a Zoom call, then do be kind and spare them.
As an invitee, review any Zoom meeting invites to determine whether you really need to attend. If not, put in a request for a recording of the meeting or a summary of what was discussed, if necessary.
Note: It’s also good practice to keep to a tight agenda for Zoom meetings, since it's easier to drift off in your own space than at the office. You don’t want to be the person in your organization known for scheduling lots of unproductive meetings.
Dress for the occasion

It might feel a bit strange or unnecessary to dress professionally when you're working at home, but you'll be surprised at the difference it makes to the way you act - switching from “lounging around” mode into “work” mode.
It can be easy to give in to the temptation to wear sweatpants and an old t-shirt on a Zoom call, but if your colleagues and customers expect you to have a professional appearance, dress for your video conference the way you would for an in-person meeting.
As for what specifically to wear, steer toward solid colours, and avoid sleeveless tops or anything off the shoulders. Otherwise, you run the risk of seeming like you’re taking the call without wearing much of anything at all.

Although our homes are inherently less equipped for professional meetings than an office settings, there are better spots to take a call than others.
When you dial into a Zoom call, people won't just be looking at you - they'll also naturally be nosey and want to see what's in view directly behind you. So before your meeting starts, check that your camera isn't pointed at the sight of anything that will draw attention - a pile of dirty laundry, your unmade bed, or last night's discarded pizza boxes.
Don't be one of those people who uses Zoom as a way to show off your vast library of business mastermind books or a room filled with zany art prints. That kind of home décor flexing takes focus away from you who - stick to a plain, white background wherever possible.
You should also try to attend the meeting from a quiet area that has minimal background noise and movement. If you are in a room with a door, close it, consider putting a "meeting in progress" note on the door, and tell other members of the household to please not interrupt unless it's an emergency.
If you can't alter the physical environment itself, you can still hide the appearance of your space via Zoom's virtual background feature. Zoom allows users to add a fun virtual background to their video instead of just showing the contents of their messy rooms. You can even upload your own photo or create a virtual background with Canva templates made for Zoom.
Note: As a matter of etiquette, do not comment on other people’s backgrounds, no matter how tempting it can be.
Also, don't forget about limiting distractions from the likes of your mobile device (ringtone, notifications, etc.), and applications running on your desktop, which can make your attendees feel disrespected and undervalued if you’re constantly averting your gaze to check. Mitigating these distractions helps keep the meeting focused and free from interruption.
Of all the presentation considerations for video, lighting is arguably the most important. Where Zoom video meetings are concerned, in general, the more light there is, the better. And since you've made the effort to actually get dressed for the meeting, you want the attendees to be able to see you properly.
Front-facing natural light from a nearby window is ideal. It evenly accentuates and brightens your skin and features, giving you a clear, flattering and presentable image on video.
If there's little or no sunlight or your meeting is being held at night, there's no need to splurge on an expensive lighting rig from Amazon. Grab a lamp and position it in front of you and behind your laptop.
Placing the light source behind you will backlight you and make you harder to see, cast unflattering shadows on your face, or even turn you into a spooky silhouette. If you have a window behind you, shut the blinds. Light coming from behind you could also cause a harsh effect on everyone else’s screen, and you don’t want to start a meeting by immediately hurting everyone’s eyes - not a great first impression!
Note: If you wear glasses, don't use the brightest setting on your laptop or monitor. The bright monitor can reflect in the glasses and be distracting.
To give the appearance that you're speaking at eye level to participants rather than as a giant gazing ominously down upon them (and if you don’t want to show off a double chin or the contents of your nostrils), prop your laptop or mobile device up so that is at your eye level.
Use whatever you have to hand - old shoe boxes and piles of books are perfect for bumping up the height of your camera. If you’re using a laptop and still need to be able to type (not easy or ergonomic if your PC is perched up high), investing in a cheap USB keyboard to use temporarily during Zoom meetings is an easy workaround.
As for distance, try to position yourself so the camera is seeing you from the chest or waist up, instead of your face taking up the whole frame. Seeing more of you is more natural for the viewer, more akin to a face-to-face meeting in real life.
In a world dominated by video meetings where you want to look your best and your face will be up close to camera for scrutiny, practising good skincare is even more important than usual. The harsh light from a computer screen tends to highlight oil on your face, for example.
Beauty experts recommend blotting your face before you go live, and to keep an eye out for uneven skin tone or chapped lips. A tinted moisturiser can be used to help even out your skin tone, and if all else fails, Zoom even has a filter that can be used to even your skin tone.
Nothing is more infuriating when it comes to video calls than a slow internet speed, connectivity issues, or malfunctioning hardware. So, one of the most important things to do before joining a Zoom call or hosting one is to make sure your hardware (microphone, speakers and headphones) works and that your internet speeds are fast enough to support a decent level of quality for a video Use a headset with an external mic for best hearing and speaking capabilities, and aim for internet speeds of at least 20mb per second for smooth video.
Zoom has a feature that lets you test your settings before your meeting begins: just go to zoom.us/test. There are also several free websites that will allow you to test your internet speed prior to any meetings - too slow and you’ll be stuck in a hellhole of laggy video and broken audio when it comes to joining in the meeting.
Zoom's video quality is mostly great, but it can sometimes struggle when there is a lot of movement, which can cause freezing issues. To prevent this, try to restrict fast or jarring movement as much as possible during video calls, including the urge to 'talk with your hands."
Note: If you know your connection might struggle, enable video to view only the host. You can only see a limited number of participants depending on your screen size as it is, and enabling video for all of them will gobble up precious bandwidth.
As frustrating as technical glitches can be, try to practice patience when they inevitably crop up – particularly those suffered by your colleagues. Sometimes, despite the best of intentions, it just can’t be helped.
Getting yourself onto a Zoom call on time and feeling relaxed is a very important step and is easier said than done sometimes, even if a meeting is just a click away. Set a reminder for the meeting and get prepared well in advance. Know your talking points, write an agenda and set yourself an objective for the meeting.
Zoom and other video conferencing tools offer lots of ways that a host can manage participants during a call - muting attendees (or telling them that their mic is accidentally switched off), sending files, managing chat options, screen sharing, etc. Familiarise yourself with what's available and how the functions work, before a meeting, so that you're not left fumbling around when the time comes to use them.
So you’ve finally joined in on the Zoom call - now’s not the time to let your etiquette standards slip! Let’s rise to the ocassion with these essential pointers.
Don’t be a lurker
Lurking is a common breach of Zoom etiquette - the act of sitting in a meeting with video mysteriously turned off. Of course, there may be good reasons why someone has their video turned off (poor connection, sudden interruption, etc.) or you may all agree to stick to audio, but to lurk in the background when everyone else is visible can come across as quite bad manners.
What's more, showing your face can improve your business prospects and boost your personal brand. An AMG study found that more than 80 percent of business professionals believe face-to-face meetings are better for building trust and strong client relationships. When you have video switched on, people will see you as a real person and not just a voice on a conference call.

When it comes to Zoom, there's no concept of mingling or floating between groups to introduce yourself. The moment someone clicks ‘Join Meeting’, they'll be abruptly thrust in front of potentially dozens of faces staring at them, many who they might not know.
Just like a meeting in person, you wouldn’t initiate a conversation between two people who haven’t met without introducing them. The same rule applies to a virtual Zoom meeting. Be sure to introduce everyone individually to create a welcoming environment and to stimulate engagement. As each person pops on, name them,say hello, and begin any necessary introductions.
In order to give enough time for introductions and to prevent overwhelm, make use of Zoom's waiting room feature. As well as being beneficial for security reasons (stopping outsiders crashing your meeting, you can let people enter the gathering one at a time, and then you can take that time to introduce each person to the group.
Note: For “mega meetings” of 20 people or more, Zoom also recommends short ice-breaking sessions for everyone to introduce themselves.
When you're in a Zoom meeting - and especially while talking - it's important to look directly into the camera rather than at the windows populated by the other participants or the image of yourself, as this will mimic the making of eye contact. If you look at the image of yourself on the screen, you'll appear on camera to be looking off to the side.
It’s important to gauge reactions by looking at other participants on the screen, but alternating that with looking into the camera makes attendees feel like you’re really talking to them. Since most in-built cameras are located at the top of a laptop, try to aim your gaze at the top third of your screen for consistency.
Note: Zoom gives you the option to use either Speaker or Gallery view. Choosing Gallery view allows you to see all the members of your meeting at one time, which is preferable because it lets you see everyone’s reactions to what’s being said.
Due to the nature of video conferencing versus real life meetings, Zoom calls really work best when people talk one at a time - it's the only way that everyone can listen clearly to what is being said.
If you adjust to this reality, things will go so much more smoothly. Deliberately adding pauses into your speech is crucial afterfinishing a point, especially since lagging internet speeds or glitching audio may mean it’s easy for someone to talk over someone else.
If you find yourself in a politeness contest with someone who’s speaking at the same time as you – “no, you go ahead” – use Zoom’s “raise hand” function or the chat box to let the other person know that they can go ahead with their point. You can then add your idea in the chat, so your train of thought is not lost. The host can come back to your point and ensure that your ideas are heard.
Stay on mute if you’re not talking
Any kind of background noise can be really distracting during a Zoom meeting - screaming kids, dogs barking, even something as innocuous as doors and cupboards opening and closing. So if you aren't talking, hit mute to silence any unnecessary audio coming from your end.
Don’t multitask, stay focused on the meeting

Since you're not in the same room as any of the attendees, you might be tempted to work on other tasks during a video meeting. However, one thing about video conferencing is that your presence tends to be magnified and it will be more obvious to your co-workers that you aren’t paying attention if you constantly appear to be gazing elsewhere while someone else is talking.
Taking notes on the content discussed during the meeting is fine, but other activities such as eating, should be kept to a minimum or avoided. The one exception to this rule? If it's an impromptu meeting that interrupts your already-in-progress meal, just tell your host, "Hey! Glad we could be part of the call! Sorry, you caught me in the middle of lunch." Then eat as politely and quietly as possible.
Note: If you need to get up for any reason, give a quick explanation as to why you're leaving, reassure attendees that you'll be back momentarily, and simply turn off your video.
Show others that you are listening
Yes, Zoom calls can be boring and you'll often yearn for the days of telephone-only voice meetings where people couldn't see what you were up to throughout. But since you're on camera, you want to at least look like you're paying attention.
Show some support for your colleagues through nonverbal cues that you're paying attention to them. Nod or shake your head, smile, give a thumbs up, etc. Even if they can’t hear you, they’ll be able to read your body language and appreciate your responsiveness.
Note: Remember that if you are muted while someone else is talking, they won’t be able to hear your verbal reactions to anything they are saying, so non-verbal communication is even more important.

The likelihood is that meeting attendees (you or others) will want to ask questions during the call. But unlike in a real meeting, it can be tricky to find the right moment to interject without coming across as rude and disrupting the flow of the conversation.
Instead, have all attendees agree to use Zoom's chat function as a less intrusive way to pose questions. This way, you and your colleagues can submit all the questions you want during the meeting without audibly interrupting anyone who is speaking. And then, during a natural lull in the meeting, the host can answer those questions at their convenience.
Alternatively, Zoom’s “raise a hand” feature can be used to let it be known you have something to say or a Q&A session can be held at the end of the call. If the moderator/leader of the meeting doesn’t make it clear what the protocol is, ask before the meeting starts or suggest one for everyone to follow.
Asking your host before taking a screenshot is the courteous thing to do. If permission is granted, you must also advise them where you plan to post your screenshot.
Exit the meeting politely; the host should leave last

Take your time to leave a Zoom meeting; avoid being abrupt. Don’t just say ‘I’m off now, bye all’ and click ‘End Meeting’. “Take a minute to say: ‘Nathan, Joanna, it’s been great talking this afternoon. Robert – really good to have met you, hope to chat again soon’. Give a friendly wave goodbye! That way you leave other attendees feeling recognised, but it makes you look a bit more distinguished as well.
The host of the meeting is the person who decides when it eventually terminates. So to ensure that no one misses any last-minute information that might have to be shared separately later on, and so that no attendees feel abruptly cut off, hang around until the end to make sure everyone is happy. Close the call after every other participant has left. Just good manners :)
Especially so if you and your team are working from home, if your Zoom meeting gets interrupted by your kids, a parcel delivery, whatever, be understanding. Better still, laugh it off. Accept that it will happen and roll with it, and everyone will be able to relax and enjoy Zoom video meetings that bit more (or at least make them more tolerable).
Andrew Macarthy is a social media consultant and the author of the #1 Amazon Web Marketing Bestseller, 500 Social Media Marketing Tips.
Buy 500 Social Media Marketing Tips
Amazon US: http://www.amazon.com/dp/B007L50HE6
Amazon UK: http://www.amazon.co.uk/dp/B007L50HE6
Follow Me:
http://www.facebook.com/500socialmediatips/
http://www.pinterest.com/andrewmacarthy
http://www.twitter.com/andrewmacarthy
The Complete Guide to Zoom Etiquette: 20 Video Meeting Tips For A Great Conference Call
October 14, 2019
IGTV Marketing: 3 Big Reasons Why Brands Can’t Afford to Ignore it Any More (Plus 5 Killer IGTV Strategies For Business Success)
IGTV Marketing: 3 Big Reasons Why Brands Can’t Afford to Ignore it Any More (Plus 5 Killer IGTV Strategies For Business Success)
Are you curious about using IGTV for business? Still wondering what it’s all about and if it’s even woth bothering with?
In this post, I’ll tell you everything you need to know about IGTV to help you make up your mind, and - if you do decide to take the leap - explain how to optimise your IGTV strategy for success.
What is IGTV? A Brief History

IGTV is an offshoot of Instagram that allows you to upload and share videos from 60 seconds to 1 hour in length on their own dedicated Channels - separate from, but connected to the main Instagram app.
Launched in June 2018, the idea was that Instagram wanted a slice of the long-form video pie currently dominated by YouTube and at the time it promised that IGTV would “change the video landscape forever”.

Source: G2
Despite Instagram's best efforts, studies show that brands have been slow to adopt IGTV. In fact, according to a recent G2 study, only 16% of marketers reported having used IGTV.

Source: gartner
But contrary to the above, research by Gartner showed that almost 66% of brands on Instagram employ IGTV, with fashion and department store brands leading the charge.
Who to believe? IThe truth probably lies somewhere in the middle. But what is obvious is that for certain brands that are using IGTV - and utilising its strengths - are finding success.
3 Ways Instagram and IGTV work together to drive engagement

A lot of brands’ success on follows Instagram's decisions to allow landscape videos to be published on IGTV (previously just vertical), followed by the introduction of preview clips in the main Instagram feed, and the ability to jump from Instagram to IGTV (previously siloed in a standalone app).
After previews were introduced, IGTV videos views skyrocketed across the board, increasing by ~300-1000%, according to Later.
Instagram has also launched a feature that allows you to promote IGTV videos in stories - people can tap to go through to watch and share your videos in their own stories.
What's more, the Explore page also features a section dedicated to IGTV — another great way to drive traffic and discovery of your IGTV videos.
Despite some bad press and a sluggish start, the truth is that hundreds of thousands of people are watching IGTV videos every day.
What are the benefits of posting to IGTV?By posting on IGTV, brands are capitalising on the growing homogeneity of video products across social platforms, as well as the longer exposure that IGTV videos enjoy on Instagram. This is because IGTV content can appear within Instagram — in a user’s feed, in the app’s Explore tab or on an account’s profile page.
Where long-form video is concerned, IGTV has been dubbed by some as “the new podcast”; a place to launch content series' that feature more authenticity and interesting points of discussion that people crave.
Shorter videos - 5-10 minutes long also allow for an expansion of the content that appears in Instagram Stories, and a more comprehensive touch point for customers to engage with.
If you already post long-form content to Facebook or YouTube, you might consider re-purposing it on IGTV for added exposure.
What to post on IGTV (and how to test what will work)

IGTV is a place people go to for long-form content, so ideally you don't just want to replicate Stories there. As it is an offshoot of Instagram in its own right, ideally you will want to publish videos that appeal to those who want to invest in your brand for longer lengths of time.
Unlike off-the-cuff snippets of your daily life in Stories, Instagram recommends is that IGTV videos should be based on a format. They should have a repeatable theme and style that your audience can expect in every episode.
Tutorials and Q&As are a popular option amongst brands, as are casual podcast-like discussions.
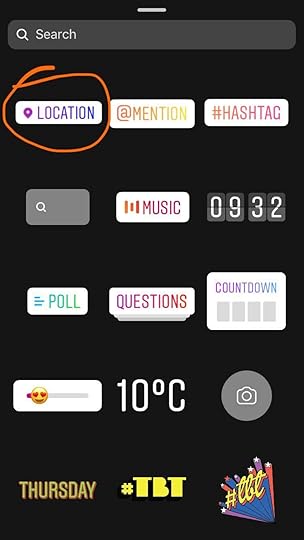
To decide what theme(s) to run with, use Stories as a testbed to see what kinds of content resonate with your audience, and what you can expand upon into IGTV. Don’t forget to use tools like the Question and Poll stickers to survey your audience on what they want to see.
5 IGTV Strategies for SuccessNow that you know what IGTV is and why excitement for it is growing among brands, let’s look at tips and strategies that will help you hone your IGTV content, to attract the maximum amount of eyeballs.
1. Share and optimise IGTV Previews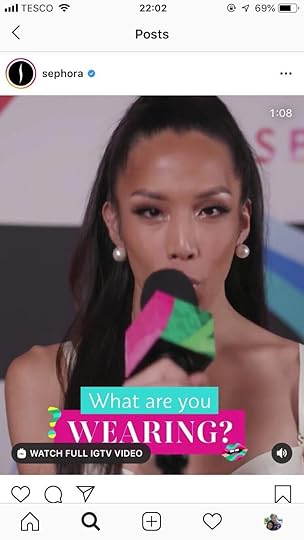
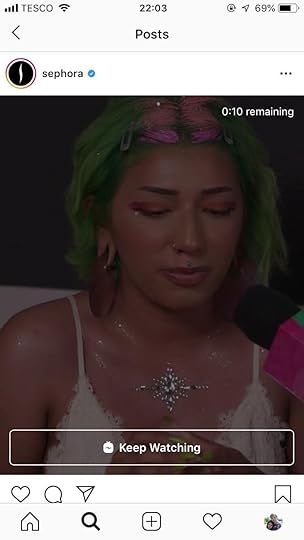
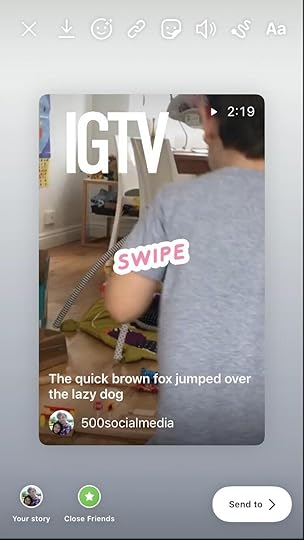
IGTV previews are 60-second teasers of your full IGTV content and can be shared to your main Instagram feed. The 60 seconds of footage that plays (without audio unless tapped) is the opening minute of the IGTV video you are working on.
The preview will also appear as a post on your profile page. When someone taps on it, they will see a link to the full video. Viewers of the video will have the option to click to "watch full video on IGTV."
Why are IGTV previews so useful? Ordinarily, Instagram users have to leave the main feed to and visit a separate tab to view IGTV content - which a large majority of them simply don't do.
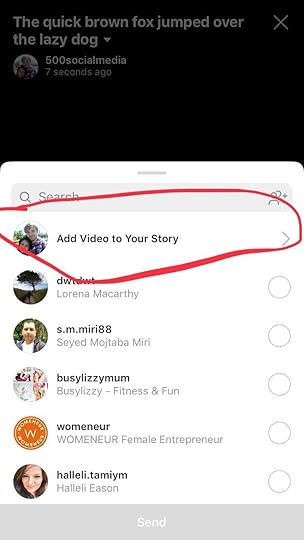
IGTV previews allow you to capture the attention of your main Instagram audience, hook them in, and drive them to engage fully with your IGTV content. To create and share an IGTV preview, tap on the "post a preview" option that appears just before you publish an IGTV video.
With IGTV previews being a minute long, there is ample opportunity to grab people's attention, but the start and end of the clip is probably your best chance of getting people to act..
You could put your focus in the first 10 econds or so, crafting a compelling message that encourages people to tap through to watch in full right away.
Or you could opt for a slow build, leading up to the 60-second mark and ending with a cliffhanger that means viewers won't be able to resist watching more. Build curiosity and excitement throughout.
As mentioned earlier, IGTV feed previews will initialy play without sound until tapped. So think about how your visuals can compel without audio, or make sure to edit in subtitles where needed.
All of the above are things you will have to think about even before you start filming, so factor this strategy into the planning stages of all your IGTV content.
2. IGTV Preview Covers

As the whole aim of an IGTV preview is to drive people to watch your IGTV videos in full, Instagram offers a few ways to make it function as effectively as possible.
Before you create a preview, you can also choose:
- a cover image: a still shot to represent your video, chosen from a single frame of the video itself or an image uploaded from your camera roll.
- a profile cover: positioning your thumbnail image into the square grid on your profile.
Since the thumbnail will appear in your profile grid and will only show a small IGTV logo to distinguish it, you will want to make sure it slots nicely with the rest of your content, and that it matches your brand aesthetic.
It the thumbnail really won't fit, you can remove the preview if you wish - it won't affect the visibility of the IGTV video, but rather defeats of the object if you're aim is to craft one that drives views.
One other thing to consider with IGTV covers is whether your video is in portrait or landscape mode. When shown on your followers’ feed it is cropped to the portrait size with the aspect ratio of 4:5. On your Instagram profile grid, it appears in a square with an aspect ratio of 1:1.
The tricky part is choosing an image that works well for all of these sizes and placements simultanously. One simple fix is to ensure that the subject of your thumbnail is right in the centre of the frame, so that inevitable cropping will ensure that it is still visible.
And whatever image you choose, make sure that it grabs people’s attention. A close-up on someone’s face - to evoke emotion - is a good idea, as is an unfussy design with colours that stop people scrolling to take a look.
3. Optimise IGTV titles and captions for search

At present, IGTV's search only returns results for channels and nothing else - so concentrate on building captions that will draw attention fron non-followers in the main Instagram feed.
Because IGTV is on mobile, any long IGTV titles will be truncated. Therefore, it's crucial that the first handful words of your title grab people's attention and make them want to watch.
Note: When you post an IGTV preview, your IGTV video’s full title becomes the first line of the caption of that preview. So, you need to select a title that describes what the video is about and that works both as a title and a caption. However, if you do want to change your caption or make it more descriptive, you can always go back and edit the preview post after you have posted it.
Also include relevant hashtags in your description. Your videos will show up on the corresponding hashtag page on Instagram, where people searching for or following that hashtag can discover your content.
You can also add clickable links to your IGTV video descriptions - a great way to drive your IGTV viewers to your website, or to relevant external links.
4. Promote your IGTV videos effectively
Although IGTV content is disseminated through the main Instagram app, you can't rely on the platform to carry out promotion on your behalf. Make use of all the tools that Instagram offers (and external avenues) to generate as much buzz around your IGTV videos as possible.
A couple of days before an IGTV video is due to go live, this could include teasing screengrabs of the video on your Instagram stories.
As the launch gets closer still, you could add a Countdown sticker in your stories to encourage people to be notified when the IGTV video goes live.
Of course, you'll want to create an IGTV video preview as part of the publishing process. At the same time, you’ll want to share it with a call to action from your Instagram Stories. The ordinary 'Swipe Up' link option is available for accounts with over 10,000 followers. But you don’t need 10K followers to promote an IGTV video. As soon as you publish your IGTV video, you will have the option to share it to your stoties with a Swipe Up link attached.
Depending on the type of video, you may want to invite users to provide feedback and discuss what they've seen. You can do this through Instagram Q&As in your stories or through Instagram Live.
Over the longer term, you can use stories Highlights to save and collate the links to your IGTV videos - easily accessible from your Instagram profile page.
5. Working With Instagram Influencers


Many brands that are getting results with IGTV videos are partnering with social media influencers to support their marketing. In particular, micro-influencers - those with a following between 10,000 and 50,000 are a wortwhile group to target.
As an emerging platform with less competition than the likes of YouTube, IGTV has provided a fresh opportunity for smaller influencers to gain real traction.
In support of their ordinary Instagram feed, these influencers are producing long-form content that resonates with their audience - that you can tap into.
Whether it's through content containing sponsored product mentions or just direct payment, the market brand-influencer relationships on IGTV is only going to grow.
Over to youHave you taken the plunge with IGTV? Or are you going to experiment with it soon? Let me know your thoughts in the comments below!

Andrew Macarthy is a social media consultant and the author of the #1 Amazon Web Marketing Bestseller, 500 Social Media Marketing Tips.
Buy 500 Social Media Marketing Tips
Amazon US: http://www.amazon.com/dp/B007L50HE6
Amazon UK: http://www.amazon.co.uk/dp/B007L50HE6
Follow Me:
http://www.facebook.com/500socialmediatips/
http://www.pinterest.com/andrewmacarthy
http://www.twitter.com/andrewmacarthy
March 16, 2019
10 Instagram Stories Stickers Every Business Should Use For Marketing (And How to Use Them)

10 Instagram Stories Stickers Every Business Should Use For Marketing (And How to Use Them)
Instagram stories are used by hundreds of millions of people and businesses every day to connect and engage with followers, with casual and authentic content that works as a great supplement to the more carefully staged main feed.
For businesses especially, Instagram stories’ stickers can be used in a variety of ways to amplify their marketing - to boost brand engagement, drive sales, build closer customer relationships, and more.
In this blog post, I’ll show you how each of the most prominent stickers can be put to the best business use, complete with real-life examples.
Ready? Let’s go!
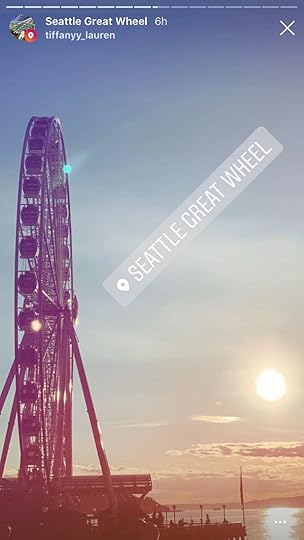
Tons of people use Instagram to search for local business recommendations like restaurants, haidressers, or other bricks-and-mortar locations, with the bonus that they can find images and videos about them instantly.
Instagram’s search will return businesses and content that corresponds to a location-based business if has its address set up through Facebook or Instagram. The Top tab will have a mixture of all content, while the Places tab will list only businesses. Users can also choose to search for points of interest “Near current location.”
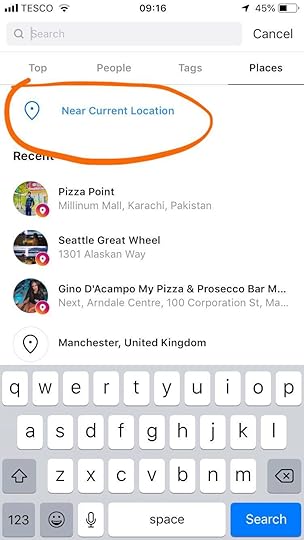

Tapping on one of the locations listed in the Top or Places tabs takes you to all of the Instagram content available for that location.
Some location searches will also populate with a story icon, allowing users to view recent stories - like yours and those of your customers - using that location sticker.


Adding location stickers to your Instagram stories work best for businesses that have a physical location, but you don’t just have to use your own business' location as a sticker in your stories. Experiment with using location stickers for local landmarks, tourist spots, and other popular public locations nearby, so that you show up in those more popular search results.
Adding location stickers to your Instagram stories will help your content to appear in more search results and make it easier for potential customers to find you.
Depending on the popularity of the location you choose, your location-tagged story may be amongst the few stories featured, allowing you to more easily spotlight your business and benefit from the full attention of your target audience.
2. Use the Hashtag sticker to boost brand awareness

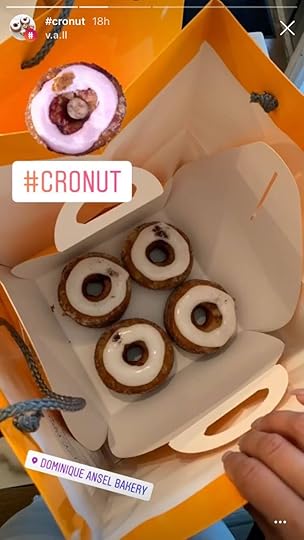
For almost any type of business, hashtags are helpful in aiding discovery on Instagram. You can use hashtags related to your business industry, topic, style, or another factor.
As hashtags are one of the most common ways people search for content on Instagram, using the right hashtags related to your brand or industry in stories can boost your chances of getting found by potential customers.

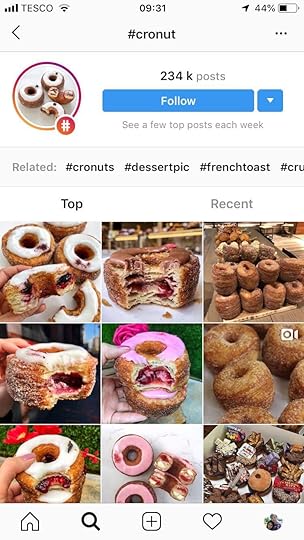
Hashtag searches will return content that includes the corresponding hashtag in stories, post captions, and comments. As with location stickers, the list of hashtag search results will populate in the Tags tab and tapping on the desired hashtag result will open a gallery of content - including stories - associated with that hashtag.
Tagging products in Instagram Stories stickers can be a more natural way way to promote shopping on stories, and allows you to showcase product details without the hard sell.
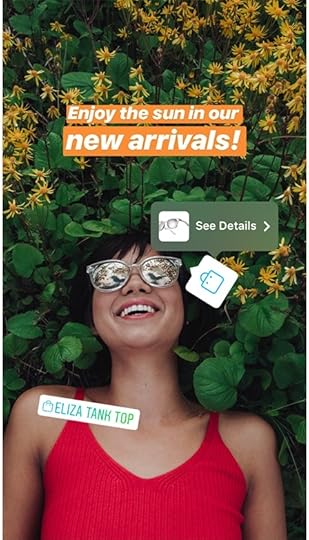
E-commerce brands can use the Product sticker in Instagram Stories to tag specific products in stories, just like you can with regular Instagram shopping posts.
Brands have already been using Instagram Stories to encourage their viewers to shop - via the "swipe up" call to action to drive people to an external website. However, this option is limited to accounts with over 10,000 followers, whereas any business can set up Product stickers.

When watching your story, followers can tap on each sticker to learn more about the product and, ultimately, make a purchase.
Product stickers can be placed on both images and videos, and there are four different types of stickers including a shopping bag icon and decorating the product name in different colours.
Similar to shoppable posts on Instagram, there are a set of steps and eligibility requirements you’ll need to meet before you can access shopping stickers for Instagram Stories, including linking your Instagram profile to a Facebook product catalog. For more information about these, check out my post on setting up Shoppable posts in Instagram.
When you’re done, you’ll be ready to use the Product sticker and to start tagging items from your catalog.
Whether you're sharing user-generated content or working in collaboration with other brands on Instagram, use the mention sticker to give them a shout-out in your stories.


The profile that you mention will receive a notification when you do so, and they then have the option to share your story with their own followers, which hopefully they will do! Crediting people with the Mention sticker in this way is key to helping to build relationships and grow your following.
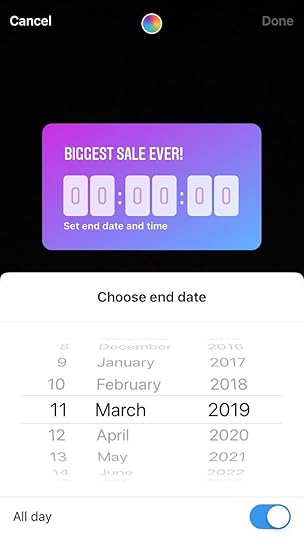
The countdown sticker can be used to count down to any moment in time - down to the day and minute - up to a year in the future.
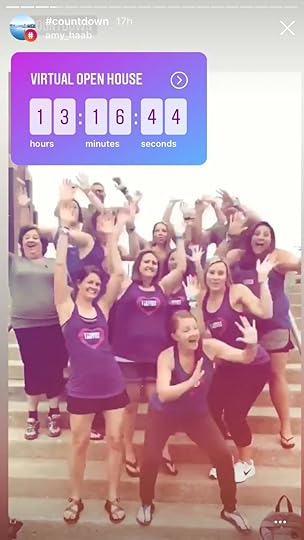
Combine the countdown sticker with action buttons on your profile (like Book, Buy Tickets, Start Order, etc.) to encourage people to click on the live link in your Instagram bio to drive business results.
When followers see your countdown sticker in your story, they have two options:
To set a reminder to receive a notification in Instagram when the countdown ends. A pop-up will often appear next to the countdown to tell users that they can do this. Don't rely on Instagram laying out that message, though - use text or audio to tell people what you want them to do it.
Note: When people begin to turn on the notification reminder sticker from your countdown sticker, you'll receive notifications in the app to tell you which individuals it was. Not only will this give you some insight into the numbers of people who are interested in the campaign your countdown is ticking down to, but it can also be a great way to educate yourself on your most engaged fans, and to build closer bonds with them.

One idea would be to create a file of the people who chose to receive a notification of the event, and to surprise them with an interaction as it nears - perhaps a discount code, or a simple "can't wait to see you there, come and say hello!"
For another, you could perform a deep dive into the profiles of people who chose to receive a notification. What is their content like? Do they have a sizeable audience? Could they work as an influencer to help you promote your brand and its events now and in the future?

2. The ability to share your countdown to their story. This will put the countdown sticker (but not the rest of your story) into a story on their own profile, which they can then customise and share with their own followers. The shared countdown will also show a “Created by [user]” link underneath it, so people can always find their way back to your profile.
When you're building excitement for the event/sale/launch you're using the countdown timer to promote, ask fans to share it to their own stories to help increase awareness. If you are promoting an event with a countdown timer, telling people to set a reminder, but not really getting much of a response - perhaps it's something to do with your story structure and countdown design.
6. How to setup and customise a countdown timerBuilding your own countdown timer is easy. After you’ve created a story photo or video clip, select the sticker icon and choose the Countdown sticker.
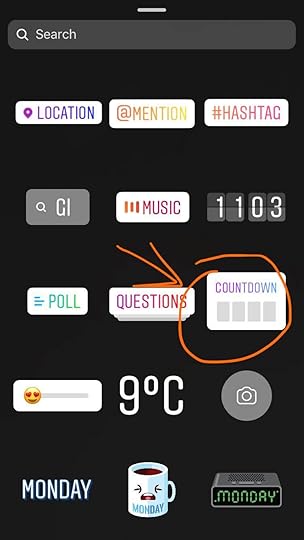
Give your countdown timer a name, then tap to select the end date and time. Tap the colour wheel to change the look of the countdown timer, and pinch and pull to change its size and orientation.

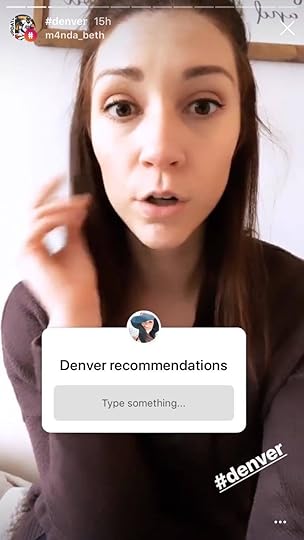
7. Use the Questions Sticker to increase brand engagement
The Questions sticker is a fun and useful way to engage directly with your audience. Use it to learn more about your customers' needs, receive product feedback, ask for recommendations, host a "Q and A, etc.

Every question you receive will arrive privately, and you will then have the option to share the answers as part of a new story, providing you with a chance to spotlight indivudals' questions and provide wisdom to all of your followers in public.
Note: Although there isn't a built-in means to provide a private reply via the Questions sticker, there is a workaround. Instead, you could visit the profile of the person who submitted the question (you'll receive a notification so that you know who it is), and respond to them via direct message. Obviously this is situation-specific, and really something you want to avoid, as sharing answers publicly is what will help to drive exposure.


The above examples show a few of the ways that the Question sticker has been used. Take note of the timings that each reflects:
The first is a spontaneous “ask me anything” opportunity while killing time at the airport. The perfect opportunity to invite fun and frivilous questions to help your audience get to know you.
The second asks for recommendations ahead of time of a visit to Denver. Such recommendations could be turned into future content for stories or the main Instagram grid, with “thank you” shout-outs as each point of interest is ticked off.
The third, asking for questions about student placements was pre-planned and promoted on The University of Surrey’s other social accounts. To maximise participation with your Questions sticker, consider hosting it at a specific date and time and telling your followers all about it.


Above are a selection of questions from followers, converted into stories and paired with images; the answers typed below.
8. Use the Poll sticker and Emoji Slider to increase interaction and engagement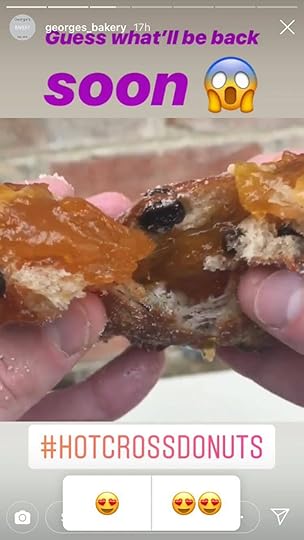

The poll sticker and emoji slider can be used to guage the opinion of your audience in answer to a question. By letting followers answer via emoji, you also add a layer of emotional context that helps those answering understand your tone and answer accordingly.
Followers choose their answer by tapping an option, or in the case of the emoji slider, sliding the slider left or right. The current average answers of respondents will be displayed in realtime.
Note: If your profile has the “swipe up” option to send users to an external link, you could utilise this in combination with a poll question, e.g, “How much money does an astronaut earn?” [user chooses answer], “Swipe up for the answer”. Send people to your website for more detail on the answer and to draw them into your sales funnel or promote other business goals.
When you view your story and swipe up, you can see the current results. Not only will you see how many votes each option received, but you’ll also see who voted and what option they chose. That way, you’ll be able to compare votes from the followers whose opinions you trust most.
As you can see in the examples above, the poll and emoji slider stickers are often used in casual and light-hearted scenarios. But if the result really does matter, make sure you note the tally of answers before the story is removed for good after 24 hours (or else save it to your Highlights before that happens).
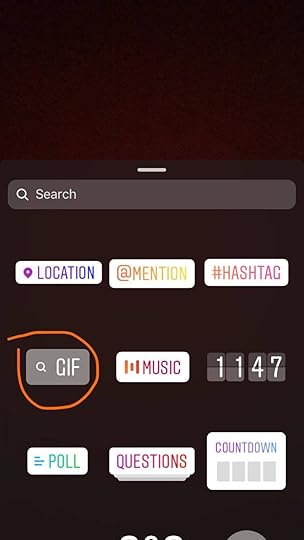
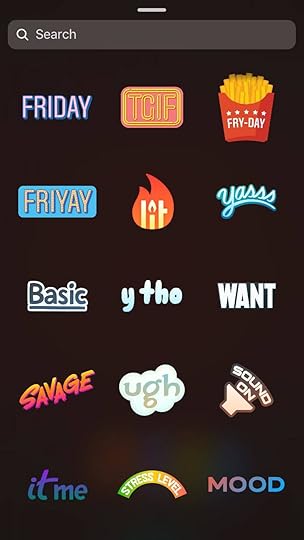
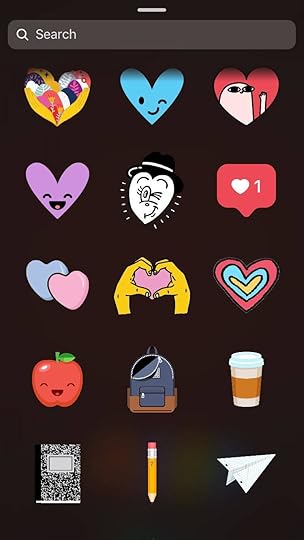
Using GIF stickers in your stories is a way to create content that’s more attention-grabbing and engaging. Instagram has partenered with GIPHY to build a library of high-quality GIFs, and many are perfect for business use.
Whether you’re looking to highlight links and call-to-actions, promote a campaign, add excitement to a product shot, or just add some personality to your stories, there'll be a GIF sticker to fit.
10. Use the Music sticker to set the mood
The Music sticker offers a creative way to create a mood or amplify the emotion of a story, and is especially useful at bringing a static image to life.

You can select tracks from those that are most popular, by mood, or genre.

After selecting a song, you’ll be asked which 15-second clip you want to add to your story. Instagram will automatically highlight the chorus for you, but you can drag the slider to whichever section you like.
Over to youWill you be experimenting with stickers in Instagram stories to help deliver your business goals? Let me know which stickers you’ll be using - and how you’re using them - in the comments below!

Andrew Macarthy is a social media consultant and the author of the #1 Amazon Web Marketing Bestseller, 500 Social Media Marketing Tips.
Buy 500 Social Media Marketing Tips
Amazon US: http://www.amazon.com/dp/B007L50HE6
Amazon UK: http://www.amazon.co.uk/dp/B007L50HE6
Follow Me:
http://www.facebook.com/500socialmediatips/
http://www.pinterest.com/andrewmacarthy
http://www.twitter.com/andrewmacarthy
November 15, 2018
How to Grow Your Business With Facebook Recommendations (And Outrank Your Rivals)
How to Grow Your Business With Facebook Recommendations (And How to Get More Reviews)
When people want to find out if a business is any good or write a review about their experience, they'll visit TripAdvisor, Yelp, Google, etc. - and increasingly over the year - Facebook.
Like other sites, Facebook used to rely on customers giving businesses a star rating from 1 to 5 and typing out their thoughts, but that has now changed.
In this blog post, I will explain everything you need to know about how to use Facebook Recommendations, and how to use it to grow your business.
Facebook Reviews has become Recommendations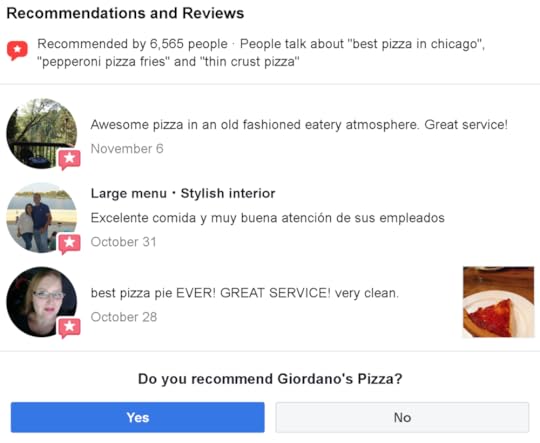
Facebook Recommendations marks a major overhaul for reputation management on social media - a great change for customers and businesses.
As well as offering a quick and easy way for customers to rate businesses, it puts an emphasis on providing genuine and trustworthy business recommendations that can be digested quickly - easily separating great businesses from their weaker competitors.
Businesses that capitalise on the change from Reviews to Recommendations are likely to benefit, while those that don't could suffer in the long run.

The move to Recommendations represents a streamlining of Facebook business reviews. They are quick to submit, encouraging customers to be specific about their experiences, and provide business with clearer examples of positive or negative feedback.
Instead of asking people to rate a business out of 5, users are faced with just one question: "Do you recommend [business name]?”
Depending on the selection of Yes or No, customers will be appropriately prompted to provide more details.
If Yes: “What do you recommend about [business]?”
If No: “How could [business] improve?”
After choosing, a customer can explain their reasoning by typing into a text box. For certain businesses like restaurants and cafes, users can also tag the review with auto-generated descriptors to help flesh out their thoughts - stuff like "too crowded", "fantastic sushi" or "hidden gem". They can also add photos to help others decide upon whether to visit or not themselves.
It's worth nothing that even the wording the recommendations prompt will likely influence the response from customers. By asking "What do you recommend about [business]?” it prompts them to think about specific factors about their experience.
For those that choose to not recommend your business, the wording “How could [business] improve?” positions them in a way that will encourage them to suggest solutions, rather than only stating what was bad about their experience.
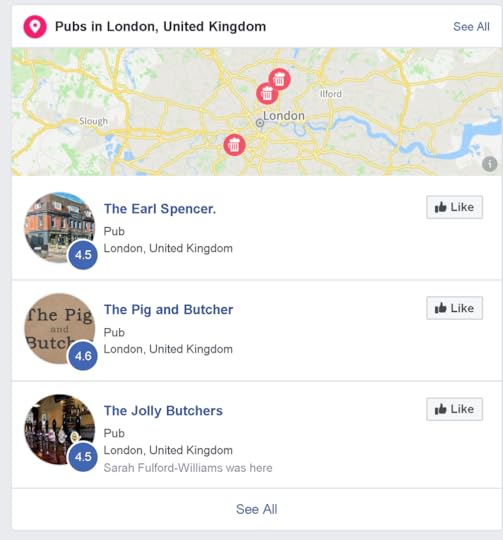
While Facebook reviewers no longer have to choose a star rating, Facebook will automatically generate a rating out of 5 based on the balance of opinions. If you already had a star-rating from old reviews, this will be factored in. This rating appears on your Page and - more importantly - right next to your business name and profile photo in Facebook search results (see image above).
When customers are searching for places to go and things to see, they will often judge a business simply on the rating they see in search results.
Note: It looks like Facebook's algorithm favours ranking businesses in order of their distance from a customer and popularity combined. So, if your business is to be ranked higher than your competitors - especially so that it appears in the top three results first visible on mobile - securing plenty of positive Recommendations is a must.
Why Facebook Recommendations is Good For BusinessesNow that you know what Facebook Recommendations is, how it differs from Reviews, and how it works, let’s look at how the transition will benefit your business:
More Reviews, More CustomersThe switch to asking customers a simple yes/no question - rather than making them dither over star ratings - should mean that businesses can encourage more reviews, especially if it takes next to no time at all to submit one. More reviews equals more visibility on Facebook, which equals potentially more customers, which equals more reviews - all positive, hopefully!
More Engaged Customers
With a more streamlined reviews process, customers can quickly and easily express what they did or did not like about a business. And when a potential customer spots a business with a positive rating, Recommendations makes it easier for them to quickly hone in on what the business offers to make it special.
A selection of the most talked-about things at a business are displayed in search results, e.g. "People talked about good beer, gluten free pizza, and profiteroles." These tags can be tapped so that potential customers can read about the highlights in more detail.
Businesses that monitor the parts of their offering that customers rave (or complain) about most are at an advantage; able to double-down on things that make them popular, or rectify areas that people criticise.
How to Get More Facebook Reviews and Recommendations
With Recommendations central to a business’ showing on Facebook, it makes sense that you’ll want to encourage as many customers to submit reviews as possible. Let’s look at plenty of ways to help you do it, starting with…
Turn Recommendations OnYou're not going to get any if customers can't leave them :) Turning Recommendations on for your Page lets anyone logged into Facebook publish a Recommendation on your Page, see your Page's rating and see Recommendations shared with Public. Recommendations help customers learn more about your business and may make your Page easier to find in Facebook search. So, if for some reason the Recommendations tab isn't activated on your Page, here's how to add it:
1. Click Settings at the top of your Page.
2. Click Templates and Tabs in the left column.

3. Scroll down and click Add a Tab.

4. Click Add Tab next to Recommendations or Reviews.
Respond to All Reviews
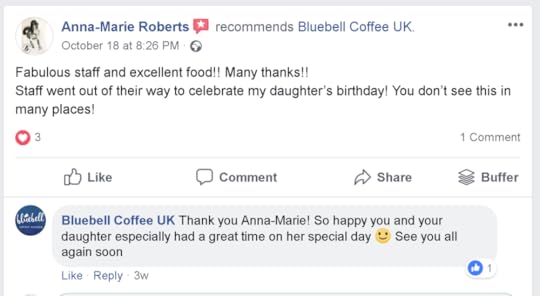
Good or bad, responding to all reviews in a timely manner will show the reviewer that you value their opinion, and highlight to potential customers that you are a business that cares about the experience you provide and the opinions of your patrons. There's something in all of us that likes the recognition from a brand who responds to our comments. That fact alone is often enough for many people to want to take the time to leave a Recommendation.
For plenty of tips and strategies about responding to negative reviews in particular, check out my guide here.
Ask For Reviews
Despite all of the opportunities that online platforms offer, still nothing can compare to a one-to-one in-person relationship. If you recognise a repeat customer or feel like another has had a good experience, simply ask them if they'd be kind enough to leave you a review on Facebook. You'll be surprised how many people will be happy to help you out.
If asking for reviews in person isn't your style, a subtler strategy is to ask on receipts and marketing material. Format your receipts (digital or real) to include a “Leave us a Review on Facebook" request, with a link that leads to your Page.
Time Your Request RightIf you ask customers at the time they are most receptive, they’ll be more likely to leave you a review on Facebook. For some businesses this might mean asking for a review directly at the time of purchase, while for others, particular B2B companies, contacting clients 3-5 days after a purchase might make more sense. In any case, thank them for their purchase, and ask for a review.
Provide an Incentive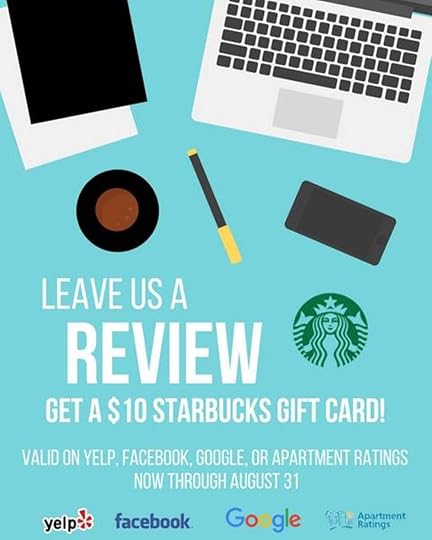
Giving customers something in exchange for leaving a review is one easy way to nudge them into doing so. It may mean a small outlay for you, but the long-term benefits of a bunch of positive reviews are likely to make the investment more than worth it. For example, you could offer customers a 10% discount if they leave a review and show it to you on their phone upon payment at their next visit.
Promote Existing ReviewsBy highlighting existing reviews on your profile or website, you can encourage others to submit their own. Lift the text from a review and use it in a branded graphic or video, or embed the review (using the drop-down menu next to it to grab the code) and share it on your website or in an e-mail newsletter. In each case, use a clear and concise call-to-action to encourage users to leave a review.
Make Submitting A Review A Contest Entry RequirementTo generate buzz and get more reviews at once, you can make leaving reviews a mandatory part of a social contest. Make sure you clarify that to enter, that the customer must write an honest review, and that its contents (good or bad) won’t be taken into consideration while choosing a winner.
Giving customers something in exchange for leaving a review is one easy way to nudge them into doing so. It may mean a small outlay for you, but the long-term benefits of a bunch of positive reviews are likely to make the investment more than worth it. For example, you could offer customers a 10% discount if they leave a review and show it to you on their phone upon payment at their next visit.
Over to youHow will you be adapting your business to make the most of Facebook Recommendations? Which of the strategies above will you be putting into practice? Let me know in the comments below!

Andrew Macarthy is a social media consultant and the author of the #1 Amazon Web Marketing Bestseller, 500 Social Media Marketing Tips.
Buy 500 Social Media Marketing Tips
Amazon US: http://www.amazon.com/dp/B007L50HE6
Amazon UK: http://www.amazon.co.uk/dp/B007L50HE6
Follow Me:
http://www.facebook.com/500socialmediatips/
http://www.pinterest.com/andrewmacarthy
http://www.twitter.com/andrewmacarthy
September 5, 2018
5 New Facebook Page Features Every Business Must Use to Boost Engagement and Sales

5 New Facebook Page Features Every Business Must Use to Boost Engagement and Sales
Any business that has been using Facebook Pages for at least a few years will tell you that getting posts seen in the News Feed (especially without paid ads) has gotten tougher.
Increased competition and a shift to Facebook's algorithm showing more posts from users' friends and their family has a lot to do with it - I even wrote a blog post to explain why the News Feed is dying and how your business should combat it.
While that post focused largely on ways to draw people directly to your Facebook Page, and keep them coming back - thus avoiding the gamble of the News Feed altogether - in this post, I want to shift your attention to something slightly different.
Unlike in the past, Facebook Pages are no longer primarily a place for people to view your business' Facebook Posts.
With the increased ineffectivenss of the News Feed, Facebook has moved to create additional value for businesses by making Pages a place where people can find all the information they need about your business, and to easily act upon it.
Chances are that many people will come across your Facebook Page before even your website, whether through Google or a search on the Facebook app. So, the key is to make it as useful to them as possible.
In short, these days your Facebook Page should act as a central hub for everything your business offers.
If you haven't optimised your Facebook Page in a while, there are a raft of new features available to help turn it into a mechanism for driving new and repeat business. Let's look at some of the most prominent update and features that all businesses should be using:
1. Update Essential Info, Action Button and Our Story
In August 2018, Facebook launched a redesign of the consumer Page experience on mobile. Key information about your Page is more prominent, including information like business type, rating, price range, category and hours. Make sure your Page's About section is fully populated to ensure all of this information appears!
In addition, people can now tap on a simplified and prominently featured suite of action buttons near the top of your Page, to do things like book an appointment, send a message or write a Recommendation. To make the most of the updated Page design be sure to select the Page template and action button that make the most sense for your business.
Note: It will be easier for people to find your Page in search when it has a unique username. Pages with usernames can also create custom URLs that let people quickly visit and message them. To create a username for your Page, click Create Page @Username on the left side of your Page.
Add Your Story
The Our Story section is located prominently on the right-hand side of your Facebook Business Page when viewing on desktop, and just beneath your cover photo, or beneath your Community section when viewed on mobile.
This section gives you the chance to share a more personal glimpse into your business to Page visitors; a few paragraphs to tell customers who you are and what you do, and a chance to connect with them in a more human sense than the typical About section.
The Our Story section also allows you to upload a header image. As a means to connect more personally with visitors, a photo of you or group photo of your team would work well here.
2. Encourage Reviews and Recommendations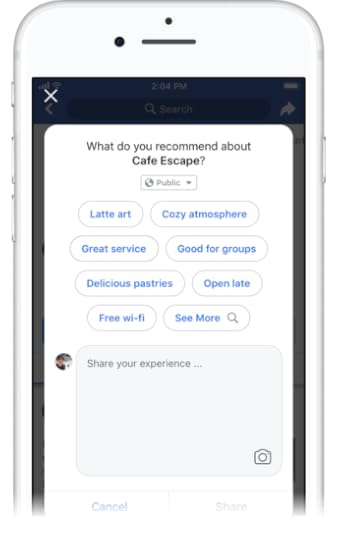
Local business Pages have always been able to feature ratings and reviews on their Page, but now Facebook is updating Reviews and Ratings to Recommendations. Recommendations mean that can share richer feedback about your business to help you be more visible in your local community and attract more customers:
Facebook users can indicate whether they recommend a business with a simple "Yes" or "No” and can explain why with tags, text and photos.
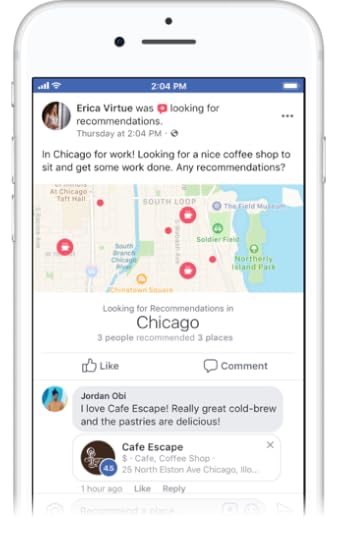
Recommendations can be created from directly on a Page, as a comment on a friend's post asking for Recommendations and via a prompt after tagging a Page in a photo or post.
Recommendations given publicly across Facebook now appear on the Reviews tab.
As mentioned above, Recommendations appear on your Page and are discoverable across Facebook when people are searching for or talking about your business. The opinions of the people they know and trust most will be surfaced most prominently.
So, after their purchase from you, encourage happy customers to post a recommendation or review of your business, in order to generate buzz and interest in your offering.
3. Add Custom Tabs to Drive EngagementFacebook allows businesses to add and arrange a variety of tabs to Pages, depending on your business and what you provide. These tabs can be a fantastic way of promoting your products, services, and offers.
To add any of the following tabs, visit Page Settings > Edit Page, and scroll down to the Tabs section.
Services Tab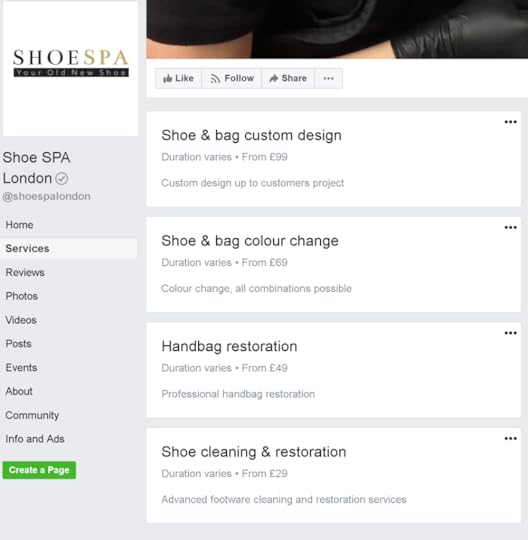
As a way to showcase what services your business offers to customers, and to give them an easy way to enquire about them, add the Services tag to your Page.

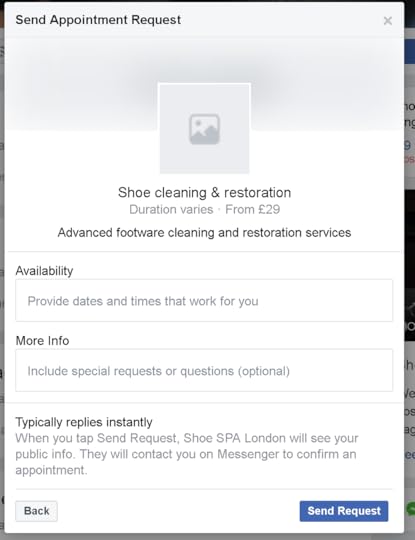
When you setup a service, you'll be asked to add in information like its name, a photo, price, and duration. When customers enquire through your Services tab, you'll receive a notification through Messenger and be able to arrange and confirm the appointment through a private conversation.
Shop Tab
You can use the Shop tab to list products you're selling and connect with more customers on Facebook, who can buy and enquire about your items directly through the site. Although any business Page can add a Shop tab, it will have different features depending on your location. For any Shop, you can:
Add products and product information.Curate your shop's product inventory.Receive insights (such as views or clicks) about your product listings.For US-based Shops, you can sell and manage orders directly from your Page. You can then mark orders as shipped or cancel and refund orders right from your Page. Elsewhere in the world, you can specify a link (outside of Facebook, like to your website) where customers can purchase an item).
When you add a shop section, your products may also appear in Facebook's Marketplace, allowing more people to discover them. As I write, this feature is gradually being introduced, so it may not be available to you yet.
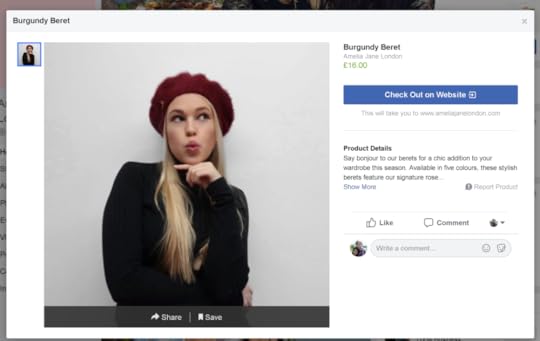
Once you've uploaded a new product to your Shop tab, consider sharing it on your Page to make customers more aware of it. To make posts about your products stand out, add content and context to them. For example, explain if the product is brand new, on sale, limited edition, etc.

After you add a Shop section to your Page, you can create a collection to categorize your products. Dividing your products into collections will make it easier for customers to find what they're looking for when they're browsing your products.
To add a collection
On your Page, click the Shop sectionClick the "cog" dropdown menu and select Manage ShopIn the menu under Shop, click Collections.Enter the name of the collection, and decide if this collection will be the featured collection that appears at the top of the shop section. You can add as many products to a featured collection as you like, but Facebook only display the first 10 on your Page.
To finish, check the boxes next to the products you want to add to the collection and click Save.
Events Tab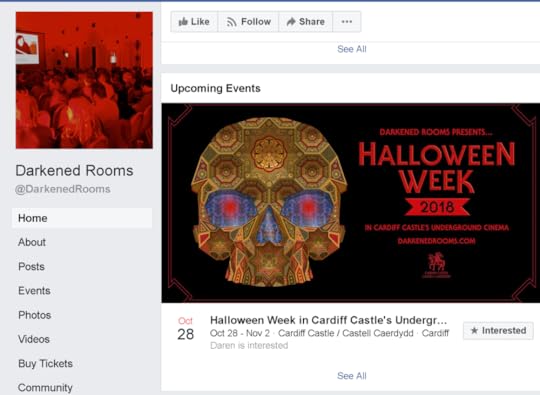
Use the Events tab to promote upcoming, well, events, hosted by your business! Once an event has been created, it will be published to your Page as a post, and sit in the Events tab on your Page. Here, Facebook users can register their interest and discuss the occassion.
For everything you need to know about setting up and optimizing Events on your Page, check out this post: The Complete Guide to Using Facebook Events to Promote Your Business (Best Practices and Strategies)
4. Setup Messenger for BusinessAll Pages have access to Messenger as a way to interact and respond to messages from customers. In an era where time is scarce and many people prefer to communicate with brands via messenging apps versus phone conversations, Messenger acts as a powerful tool for customer service.
Turn messaging on via Page Settings > Messenger when you’re ready to start receiving and responding to messages. Let's look at some of the key features of Messenger to help you encourage and then manage business enquries:
Prompt people to send messages
People visiting your Page may see more ways to send you a message, such as an open chat window. These will appear if you're online or if your Page is very responsive to messages.
Help people start a conversation with your Page
Show frequently asked questions to make it easier for people to start a conversation with your business.

Instant Replies
Instant Replies allows you to send an automated reply to anyone who messages your Page. This feature can be used to greet customers and thank them for reaching out before you can respond personally.
Welcome Greetings
Set a custom greeting to appear when someone begins a conversation with your Page for the first time. This greeting will appear before any messages are sent and can provide any information you want people to know about before they message you.
Away Messages
Whenever you’re away from your computer or phone, turn on Away Messages to let customers know that you’ll get back to them as soon as possible. This helps you keep your responsiveness rating and set expectations with your customers.
Saved replies
Saved replies allow you to write, save and re-use messages. Saved replies can be useful for commonly asked questions like your hours, email or phone number.

Similar to Instagram Stories, Page Stories allow you to share photos and videos -short, relatable, and fleeting moments that represent your brand or business - directly from your mobile device. Page Stories are a way to engage your audience in a more frequent, authentic and casual way to develop deeper connections.
While Page Stories aren't strictly a structural feature of Pages like the others in this blog post, they are key to increasing the humanised and community-driven appeal of Pages that Facebook is trying to encourage, so definitely worth considering.
What's more, people can view your Page story by tapping on your mobile page's profile picture, and they also appear to followers of your Page at the top of News Feed in a highly visible area - separate from the scuffle and competition of the main News Feed.
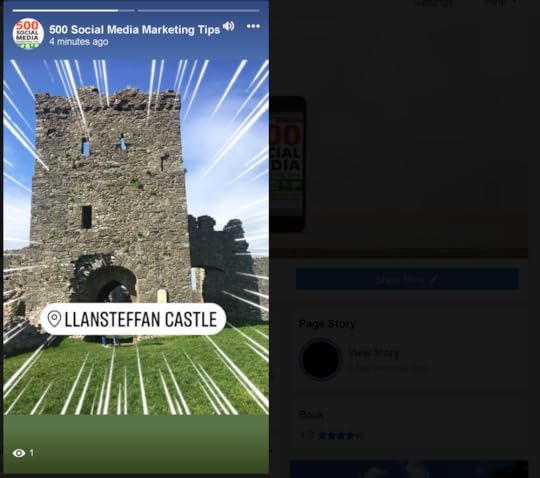
You can post Page Stories in one of two ways:
Facebook Camera
In either the iOS or Android Facebook app, go to your Page, tap "..." in the top-right corner, and then tap Open Camera.
How has the way you use your Facebook Page changed over the years? Will you be implementing any of the features above? Let me know in the comments below!

Andrew Macarthy is a social media consultant and the author of the #1 Amazon Web Marketing Bestseller, 500 Social Media Marketing Tips.
Buy 500 Social Media Marketing Tips
Amazon US: http://www.amazon.com/dp/B007L50HE6
Amazon UK: http://www.amazon.co.uk/dp/B007L50HE6
Follow Me:
http://www.facebook.com/500socialmediatips/
http://www.twitter.com/andrewmacarthy
http://www.pinterest.com/andrewmacarthy
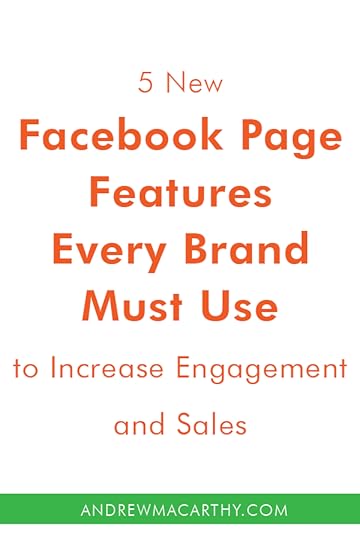
5 New Facebook Page Features Every Business Must Use to Boost Engagement and Sales


