
Marisa McClellan's Blog, page 97
January 24, 2015
Other People’s Preserves: Jolene’s Jars

Other People’s Preserve is my opportunity to shine a spotlight on some of the very delicious jams, pickles, and preserves being made by dedicated professional canners. If you spot one of these products in the wild, make sure to scoop up a jar.
I met Jolene and her jars a couple years back, when she emailed me to offer me some of her pickles and ask for a bit of canning advice. We met up and, as two people with a shared love of pickling so often do, fell into easy conversation and friendship (it didn’t hurt that her pickles were awesome).

Since those early days, she’s expanded her line of pickles, added some spice blends, and moved her whole operation from the Philadelphia suburbs to Delray Beach, Florida.

Now, everything Jolene makes is really delicious, but when forced to pick just one thing to spotlight, my thoughts immediately went to the Pickled Za’atar Cauliflower. These florets are tangy, crisp, and fully infused with the ground herbs and toasted sesame seeds in the za’atar spice blend.
They are still available at some locations around Philadelphia and you can meet Jolene herself at the Delray Beach Green Market on Saturdays from 9 am to 2 pm.
Related Posts:
Other People’s Preserves: Department of Sweet Diversions
Other People’s Preserves: Love Beets
Other People’s Preserves: Caulikraut


January 23, 2015
My Other Favorite Cookbooks from 2014

Last month, I wrote about all the terrific canning, preserving, fermenting, and food books that had come out in the last year. In that post, I mentioned that I also had plans to write another post dedicated to all the other 2014 cookbooks that I had known and loved. Today is that day and here is that list.
Please know that this is an imperfect collection, gathered from the piles of books around my desk. Some I bought, some were sent to me by publishers. I am absolutely certain that were a number of excellent books that came out in 2014 that I somehow missed. But these were books I particularly enjoyed and think you might too.

On the very top of the stack is Fully Belly. Written by my dear friend Tara Matazara Desmond (while she was pregnant with her twins), this book takes all the nutritional advice often given to pregnant women and translates it into usable, delicious recipes. Next time you hear that a friend is expecting, buy a copy of this book for them. (Amazon | Powell’s)
For those in search of healthy, flavorful food, look no further than Molly Watson’s Greens + Grains. You’ll find soups, salads, a few breads (green whole wheat flatbread!), and main dishes appropriate for every season. The recipes are wholesome, hearty, and were written by someone who has no time for nonsense and just loves food (Molly’s a friend, too). (Amazon | Powell’s)
A Boat, A Whale & A Walrus by Renee Erickson (and Jess Thomson) has gotten a lot of love lately and it is all well-deserved. It’s a beautiful book, full of stories, beautiful pictures, and the most stunning recipes. There are even a few perfect preserves, including a Pickled Fresh Plum Jam that I will be making when summer comes. (Amazon | Powell’s)
One-Hour Cheese by Claudia Lucero is a kick. It shows you how to make 16 different kinds of cheese (with plenty of step-by-step pictures), all in no more than an hour. She also includes recipes that include your fresh cheeses. No book has demystified home dairy more. (Amazon | Powell’s)
Vegetarian for a New Generation is the third book in Liana Krissoff’s “New Generation” series (previous installments dealt with canning and whole grains). For those (like me!) who adore Liana’s writing and clever flavor combinations, this book will not disappoint. (Amazon | Powell’s)
I met Kimberley Hasselbrink in early 2012 at a book party in New York. In the course of our conversation, she told me about the book she wanted to write. It went from glimmer to reality and Vibrant Food even better than the vision she described. The food is clean but not precious, and the photos make me want to live in her world. (Amazon | Powell’s)

The only cookbook I sat down and read cover to cover in a single sitting last year was The B.T.C. Old Fashioned Grocery Cookbook. Written by grocery store founder Alexe van Beuren, it is a gorgeous book and a compelling story. Oh, and the recipes are pretty darn good, too. (Amazon | Powell’s)
Part cookbook and part travelogue, In Her Kitchen features grandmothers from around the world, in their kitchens, making their signature dishes. Written and photographed by Gabriele Galimberti, it’s a lovely way to get see food and home kitchens from every corner of the globe. (Amazon | Powell’s)
Flourless by Nicole Spiridakis is focused on gorgeous baked goods and desserts that all just happen to be gluten-free. What makes it particularly special is that she has managed to make every recipe feel like a treat instead of a sacrifice. (Amazon | Powell’s)
I love everything that Jennifer McLagan writes, and Bitter is no exception. It celebrates foods like coffee, dandelion greens, orange zest, and even burnt toast to appealing effect. (Amazon | Powell’s)
I like a big, beautiful cookbook as much as the next girl, but when it comes daily cooking, there is no better handbook than Jenny Rosenstrach’s Dinner: The Playbook. It bills itself as a guide to the family meal, but it’s got plenty to offer for even the smallest household. (Amazon | Powell’s)
Much like the original Flavor Bible, The Vegetarian Flavor Bible by Karen Page is an incredible resource for home cooks. Every conceivable veg friendly food has an entry that offers a tremendous amount of detail. You’ll get its season, basic flavor profile, best techniques for prepping/cooking, relatives, and suggested flavors that would pair well. If you subscribe to a CSA or farm share and occasionally new and unknown things, this book is invaluable. (Amazon | Powell’s)

Nigel Slater is a master at writing about food and cooking in a way that is both inspirational and entirely approachable. His new book Eat offers up hundreds of simple recipes and ideas for quick, solid meals, with all his trademark appeal. Plus, the book just feels good in the hands. (Amazon | Powell’s)
As someone who has long played around with oat, teff, and millet flour, I’ve been totally delighted by the recent cluster of books dedicated with making the most from flours made from grains other than wheat. Alice Medrich’s Flavor Flours is a new entry in this category and it’s just wonderful. (Amazon | Powell’s)
Okay, so Wintersweet by Tammy Donroe Inman didn’t actually come out in 2014. It was among the group of books that came out in the very last days of 2013 and I included it in this stack because I don’t think it got enough love last year. This is a glorious baking book for fall and winter, which is actually the time of year when you want to be running your oven. (Amazon | Powell’s)
If you live in the New York region, you’ve probably heard of Red Jacket Orchards. Owner Brian Nicholson teamed up with author Sarah Huck and created this gorgeous, seasonal cookbook called Fruitful. I like it because it includes some interesting preserves, but you’ll also find fruit-focused savory dishes, sides, and desserts. (Amazon | Powell’s)
We eat a lot of broccoli, cauliflower, cabbage, and cauliflower in my household, and I am always on the lookout for novel ways to prepare all this cruciferous veg. Enter Laura B. Russell’s Brassicas. It’s got gorgeous, moody photography and more than 75 recipes for making the most of stalks, florets, leaves, and stems. (Amazon | Powell’s)
I dedicated a blog post to Megan Gordon’s Whole Grain Mornings last February, so I will be brief. It’s a beautiful, approachable book that will have you downright excited to get up in the morning an make a meal. I’ve continued to use it and love pulling it off the shelf with each change of season. (Amazon | Powell’s)
Last book on the stack is Ashley English’s Handmade Gatherings. This is a book-length love note to the art of entertaining casually and inclusively. If you’re looking to up your dinner party and potluck game, you will so enjoy it. (Amazon | Powell’s)
Related Posts:
January 22, 2015
Makrut Lime Marmalade

The citrus situation in my kitchen is out of control. There’s a big bowl of clementines on the table, three red grapefruits in the basket with the onions, and a open bag of cara cara oranges on the counter (not to mention the remaining Meyer lemons, which are lined up on a rimmed baking sheet and hanging out in the living room). I realize I should probably restrain myself, but citrus feels like the only good way to combat the short days, chilly weather, and non-stop parade of head colds.

Up until a couple days ago, there was also something a lime situation. Because I’m a long-time customer, Karen from the Lemon Ladies will occasionally slip an extra treat into my order. This year, she tucked in a bonus pound of makrut* limes in with the Meyers. Both makrut limes and their leaves are used a great deal in Thai cooking and have a heady, slightly woodsy fragrance.

Because I am who I am, you should not be surprised to hear that I took those makrut limes and made marmalade with them. I used the Hungry Tigress’ Lime on Lime Shred Marmalade as a starting place and got to work (just a glance at her site makes me nostalgic for the days of the Can Jam).
I stretched the making of this marmalade out over three days. I find that this is my favorite way to make any labor-intensive preserve, because it never ends up feeling like too much of a pain. If I force myself to do it all at once, I often end up hating the process. If I work in small spurts, I end up delighted with the experience instead.

So, on Monday evening, after the dinner dishes were cleaned and I had clear counters and an empty sink, I turned on a podcast and set to work. I had a scant pound of makrut limes and three quarters of a pound of conventional limes. After giving the makrut limes a good scrub, I cut them in half across their equators, plucked out the seeds, and using a freshly sharpened knife, cut them into the thinnest half moons I could manage.

Because the other limes weren’t organic, I didn’t want to use their skins. Instead, I cut away the peels to expose the interior flesh and, using my very sharp knife a little too close to my fingertips, I sectioned out the pulpy innards. Then I pulled down a wide mouth half gallon jar and scraped all my prepared fruit bits into it. Four cups of filtered water went in on top, and it all spent the night in the fridge (next to some fermented dilly beans and leftover soup).

The next night, I poured the contents of that jar out into a big, wide jam pan (this one, to be specific) and added four cups of granulated sugar. I stirred the sugar into the fruit and brought it to a brief boil. Then I killed the heat, fitted a round of parchment paper to serve as a makeshift lid, and went to bed.

The next morning, before I’d even taken a shower, I fired up the canning pot, brought the lime slurry to a boil, cooked it until it reached 222°F (a little higher than I sometimes recommend, but I wanted to ensure a firm set). The end result was just a little less than four half pints (I canned it in hexagonal jars that hold four ounces, and there was a bit left over that went into a jar for the fridge).
The finished marmalade is bright, pleasantly bitter, and may well travel with me to the Philly Food Swap next week. Who knows!
*Makrut limes also go by another name. It is deeply problematic and so I’ve chosen not to use it here.
PrintMakrut Lime Marmalade
Ingredients
1 pound makrut limes3/4 pound limes
4 cups filtered water
4 cups granulated sugar
Instructions
Wash the makrut limes well. Cut them in half across their equator, pluck out the seeds, and cut them into thin half moons (gathering up as much of the juice as possible as you do this). Pour everything into a large bowl or jar.Cut away the peel from the conventional and section out the lime flesh (this process is called supreming and there are lots of tutorials available on the internet if you need some guidance). Add the lime segments to the bowl or jar.
Cover the prepared fruit with four cups of filtered water and refrigerate for up to 48 hours.
When you're ready to make the marmalade, pour the fruit and water out into a low, wide pan. Add the sugar, stir it in and bring it to a boil. You can either finish the cooking process now, or cool it down and let it rest (as described in the blog post above).
Cook, stirring regularly, until the syrup thickens, and an instant read thermometer displays a temperature of 222°F.
Remove marmalade from heat, funnel into prepared jars, wipe rims, apply lids and rings, and processing in a boiling water bath canner for ten minutes.
When time is up, remove the jars from the canner and let them cool on a folded kitchen towel.
3.0http://foodinjars.com/2015/01/makrut-lime-marmalade/
Related Posts:
Tips for Selecting, Prepping, and Preserving Lemons
Canning 101: How to Use a Thermometer to Achieve Set
Canning 101: Tips For Making Good Marmalade
January 20, 2015
Tips for Selecting, Prepping, and Preserving Lemons

Every January, I order a ten pound box of unsprayed Meyer lemons from the Lemon Ladies in California. I spend the next week or two transforming those lemons into marmalade, lemon curd, preserved lemons, dehydrated slices, syrups, and even infused vinegars. These preserves satisfy many of my lemon needs and help bring a much-needed bright spot into an otherwise dreary time of year.
Now, I realize that spending $65 on citrus isn’t in the cards for everyone. However, that doesn’t meant that you have to write off all lemon preservation projects. There’s a lot you can do with regular grocery lemons that will be delicious and won’t break the budget.
First off, if you’re making marmalade or using the zest in some way, organic lemons are best (but no judgment here if you can’t swing it). When you’re selecting the fruit, make sure to search out the lemons with the very smoothest skin. That almost always leads you to lemons that have thinner pith layers, which will make for a better marmalade or preserved lemon.
You also want to look for lemons that have a touch of green on the tips. Many years ago, I went on a press trip hosted by Sunkist and they taught us that lemons are always picked with some green remaining on the skin. They yellow up during storage and shipping. A hint of green means that they haven’t been off the tree as long as some of their compatriots.
When you’re ready to use your grocery store lemons, put them in the sink. Bring a kettle of water to a boil, let it cool for a moment, and then rinse the lemons with it. When they’re cool enough to handle, give them a good scrub with a vegetable brush and rinse with warm tap water. This process will remove any traces of the wax that lemons are typically coated with to extend their lifespan.
Now you’re ready to preserve. You can make just about all the recipes listed in this post with your grocery store lemons. You can make Kaela’s citrus salts. You can juice them, heap the peels in a jar, and cover them with distilled white vinegar to make an effective cleaning fluid.
How are you all preserving your citrus this year?
Related Posts:
Air-Dried Lemon Peel
Meyer Lemon Syrup
Honey Sweetened Meyer Lemon Jam
January 19, 2015
Giveaway: Purple Heritage Collection Jars

Two years ago, Ball Canning released a limited run of Heritage Collection blue pint jars. Last season, the Heritage Collection featured green jars, in both regular mouth pints and wide mouth quarts. This year brings the final installment in the Heritage series and the jars are purple. PURPLE!

They are available in regular mouth pints and wide mouth quarts and they are glorious. I’ve had a case (six jars per case) of each in my possession for the last week and occasionally walk over to the boxes just to pick one up and gaze at it in delight.
Like the previous Heritage jars, these are safe for canning and all manner of food storage. They even have a dark enough tint that you could stash herbs and other foods that lose their color in them for a little extra light protection.

Just so you know, these jars are only available from the Fresh Preserving storefront right now. Amazon has them listed as currently unavailable and I’ve not seen them in any bricks and mortar stores yet. I hear that as we head into the spring canning season, they will become more readily available.
Thanks to the nice folks at Ball Canning, I have two sets of these jars to give away. The two winners will each get a case of pints and a case of quarts. Here’s how to enter.
Leave a comment on this post and tell me about an experience you’ve had with a jar from the Heritage Collection. Did you serve drinks in the blue ones at your wedding? Give holiday gifts in the green ones? Or just looked longingly at them at the store?
Comments will close at 11:59 pm east coast time on Saturday, January 24, 2015. The winner will be chosen at random and will be posted to the blog by Sunday, January 25, 2015.
Giveaway is open to US residents only (sorry!).
One comment per person, please. Entries must be left on the blog, I cannot accept submissions via email.
Disclosure: The folks at Ball Canning sent me the jars you see pictured above and they are providing the jars for the giveaway. However, rest assured that I will be buying more with my own money, because I love them.
Related Posts:
Giveaway: Fresh & Fermented
Giveaway: New West Knife Works Paring Knife
Giveaway: ToGoJar Lid and Connector
January 18, 2015
Links: Marmalade, Soups, and a Winner

This last week was a nice, quiet one. I’ve been plugging away at the next book (natural sweeteners!), preserving 10 pounds of meyer lemons from the Lemon Ladies, and drinking a ton of water (cold weather makes me thirsty). No complaints here! Now, for links about marmalade, soups, and the occasional pickle.
Tiny candied limequats (and their syrup!).
Homemade marmalade, in four parts.
Tips for award winning marmalade.
My blood orange marmalade on Use Real Butter.
Spicy pickled carrots with garlic!
Grilled squash, lightly pickled. Oh yes.
Why does pickled garlic sometimes turn bright blue?
Super simple homemade mustard.
Suggestions from chefs on how to use up extra jam.
This pot of soup for one sounds so delicious.
I would like a bowl of this vividly green potato leek soup. Or this healing, brothy one.
Homemade bialys seem somehow less daunting than bagels
Buckwheat cake filled with lingonberry preserves.

A couple weeks ago, offered up a copy of Fresh and Fermented for giveaway and then never posted the winner. Oops. The winner is #253/Matt.
Related Posts:
Links: Marmalade, Kimchi, and a Winner
Links: Bourbon, Linzer Bars, and Winners
Links: Thumbprint Cookies, Hard Cider, and Winners
January 15, 2015
Worker B Rescue Putty Saves My Hands
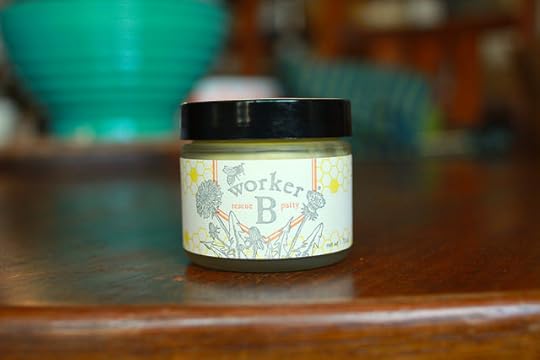
I am deep in the recipe testing phase for my next book. This has meant lots of chopping, shredding, and peeling, as well as many loads of dishes (so many dishes). The end result is that between the acids in the fruit, the hot, soapy water, and the bitterly cold weather we’ve been having and my hands are broken.
The skin on my fingers crack and split to a certain degree every winter, but this season has been the worse to date. I have a basket of salves, balms, and ointments, each one purchased in the hopes that it would be the magic bullet, but each ultimately leading to disappointment.

A couple of weeks ago, on a desperate whim, I ordered a little jar of Rescue Putty from Worker B. When it arrived, I opened the jar and rubbed a small portion into my hands. It was thick, not at all greasy, and just a little bit sticky (but not in a bad way). Once on my hands, it felt like it formed a protective layer on my skin. Coupled with a pair of goofy cotton gloves, my skin is finally starting to heal. Nothing else has worked like this.
At $19.90 for a 1.75 ounces, Rescue Putty isn’t cheap, but is amazingly effective. Made from just beeswax, raw honey, and olive oil, I feel completely okay applying it throughout the day. When I run out (happily, a little goes a long way, so that day is far in the future), I may try to make my own version, but for the time being, I’m delighted to have Worker B’s version (their lip balm is also excellent, if you’re in the market for a good one).
Now, for the disclosure. Worker B doesn’t know who the heck I am. I bought this product with my own dollars. I just thought I’d share it with you guys, in the event that some of you also suffer from chapped and cracked hands this time of year.
Related Posts:
January 13, 2015
Veggie-Stuffed Hippie Soup

I spent the weekend at the Pennsylvania Farm Show. In between my canning demos, Scott and I explored the many halls and sampled a goodly portion of the treats and fried delicacies on offer. By the time we got home on Sunday evening, I was feeling decidedly overfed (french fries, a hot dog, two potato doughnuts, a smoked brisket sandwich, a buttered soft pretzel, and a milk shake from the PA Dairymen will do that to a girl).

I ate lightly yesterday, but woke up this morning feeling strongly that I needed to focus primarily on vegetables for a little while. Other times of the year, I might spend a few days slurping down green smoothies for breakfast and eating salads for lunch and dinner, but current temperatures make all cold foods seem unappealing. Enter my mom’s signature green soup.

It’s a recipe that found its way into her recipe binder sometime in the 1970s under the title Bieler Broth. The name is misleading, as there’s nothing brothy about this soup. It’s a hearty puree of greens, carrots, onions, broccoli, garlic, and nutritional yeast (total hippie ingredient) and it’s just the thing when you’ve binged on the kind of food you can only get at festivals, state fairs, and farm shows.

The ingredients are fairly flexible, but the basics are these. You want at least half the substance of the soup to be green leaves of some kind. I use a combination of spinach, kale, and parsley (chard, beet greens, collards, and even arugula work nicely). Broccoli florets, grated carrot, half a chopped onion, and a few peeled garlic cloves make up the balance of the soup.

When they’re in season, summer squash is a nice addition, but they’re just no good this time of year (being that it’s not summer). Green beans and peeled celery can also be added, but I didn’t have either in the fridge, so I left them out. A little chopped cabbage is fine, but use it sparingly.
I always opt for the curly kind of parsley because it’s what my mom prefers, but flat leaf is okay too. It is really good for you, but if you’re sensitive to bitter flavors, use a sparing hand.

To make the soup, you pour two cups of boiling water into the bottom of a roomy pot (a 5 1/2 quart Dutch oven is my go-to) and set it over medium heat. Add the greens first and stir until the wilt into the water. Then add the broccoli, carrots, onion, garlic, green beans, and whatever else you’re including. Simmer for 15-20 minutes, until the firmest vegetables are tender (but not entirely limp).
When the vegetables are finished cooking, ladle them along with their cooking liquid into a blender. Add 2 generous tablespoons of nutritional yeast, a healthy pinch of salt, the juice from 1/2 a lemon, and a couple turns of a pepper grinder. Hold a towel over the top of the blender and puree (gradually increasing the speed until things are really moving). Taste and adjust the seasonings. Know that if it’s tasting a little TOO green for you, the flavor will mellow in just 15 minutes time.

At this point, the soup is done. I like to eat it warm, but it’s also good chilled. I find that I need a spoonful of plain yogurt or a little bit of coconut milk swirled in to make a meal out of a bowl(if it’s the kind of thing you have around, some cashew milk or creme is also good). Anything with a little fat helps keep me full a bit longer and that’s always useful
I find that it will keep three or four days in the fridge, so I typically make a big batch and have it for lunch all week. Just know that the color will fade a little over time. It’s not a sign of spoilage, though, so no need to worry!
What do you guys eat when you’re recovering from a period of overindulgence?
PrintVeggie-Stuffed Hippie Soup
Ingredients
10 ounces spinach (baby spinach makes for a milder soup)1/2 bunch of kale, chopped (remove tough stems)
1 bunch parsley (no stems)
1 head broccoli florets (no stems)
1/2 medium onion, chopped
1 large carrot, grated
3 cloves garlic
2 tablespoons nutritional yeast
1 teaspoon salt
1/4 teaspoon freshly ground black pepper
juice from 1/2 lemon
Instructions
Measure 2 cups of boiling water into a medium Dutch oven set over medium heat.Put the spinach, kale, and parsley into the pot and stir it into the water so that it wilts slightly.
Add the broccoli, onion, carrot, and garlic to the pot and put a lid on the pot. Simmer for 15-20 minutes, until the onions and garlic are tender (they tend to be the last to soften).
Pull the pot off the heat and let the contents cool for a couple minutes.
Transfer the vegetables and the cooking liquid to a blender carafe. If you have more than fits in your blender, do this in two batches.
Add the nutritional yeast, salt, pepper, and lemon juice.
Holding a towel over the lid of the blender, puree the soup until it is smooth. Add an extra splash of water if it is too thick. Taste and adjust seasoning, if necessary.
Serve warm or chilled, topped with a dollop of plain yogurt or a little coconut milk. 3.0http://foodinjars.com/2015/01/veggie-stuffed-hippie-soup/
Related Posts:
January 10, 2015
A Few Glimpses of the Pennsylvania Farm Show

The 99th Pennsylvania Farm Show opened up today in Harrisburg. I spent most of the day at the Fillmore Container booth, demonstrating some recipes from Preserving by the Pint and chatting with people about new guidelines for jar lids, good things to pressure can, and some of the fun jar accessories on display.

I slipped away from the booth a couple times to scout out the rest of the show. It was intensely crowded, so I didn’t manage to take more than a few pictures, but I thought I’d share some of the scenes I did capture.

I heard that there were a lot more entries to the Jazzy Jar Contest this year than in those past. Jars are hot!

Dust motes in the sunbeams.

Some of the entries in the preserves contests. I always enjoy seeing the wide variety of new and old jars people use to hold their fruits and vegetables.
Related Posts:
Canning Demos with Fillmore Container at the Pennsylvania Farm Show
Pictures from the Pennsylvania Farm Show
A Pomona’s Pectin and Fillmore Container Giveaway
January 8, 2015
Guest Post: Sailboat Canning and Mango Chutney from Heather Francis

Today’s guest post comes from Heather Francis. For the last six years, she and her partner Steve have been sailing around the world. They document their travels and their edible DIY projects on their blog, Yacht Kate. Enjoy!
I didn’t start canning until I moved into my smallest kitchen ever; the galley on Kate, our Newport 41’ sailboat.
The galley (boat speak for kitchen) is a typical U shape. It would politely be described as compact but I often just say that there is only room for one bum.
When I stand at the stove it feels like I am getting a hug from the countertops. It is designed this way so there are lots of places to hold onto and lean against while we are sailing. The sink, stove, pots, pans, dishes, utensils and ingredients are all within arms-reach, literally. When I cook organization is of the utmost importance and chaos occurs after a few dirty dishes are in the sink.

The first preserve I ever made was Strawberry Jam. Six months after we bought Kate in board in Southern California strawberries went on sale; $10 for 10 pints. The plan was to sail south to Panama and then across the great expanse of the Pacific Ocean to Australia. I knew we wouldn’t be seeing strawberries for a long, long time. I lugged 10 boxes of berries, a bag of sugar and a new case of mason jars across town on the trolley and set to work.
I read a couple recipes, followed the directions loosely (I have a tendency to fiddle with recipes) and in no time had a pot of jam bubbling away on the stovetop. To take my mind off of obsessively checking to see if the jam had set I turned on the oven and made a batch of bread. The cabin became unbearably hot but I didn’t leave the stove. I couldn’t. I was mesmerized by that pot and the sticky, sweetness that filled the air.

By the time I had ladled the jam it into jars and taken the bread out of the oven it was almost dark. I sat in the cockpit with few slices of warm bread and the small bowl of froth I had skimmed off the surface of the jam and watched the sun set.
Before I knew it I had eaten half a loaf of bread and most of the bottle of still warm strawberry jam. It tasted like summer. It tasted like childhood. It tasted just like the jam my Grampy used to make, well almost. That it came out of my little galley was nothing short of amazing.

Since then I have made Lemon Lime Marmalade in Costa Rica, Pineapple Passion Fruit Jam in Bora Bora, Mango Chutney in the Marquesas Islands, Sweet Pepper Jelly in the Kingdom of Tonga and recently Tomato Relish and Sweet Mustard Pickles in Fiji. Whenever there is an excess of fruit and some empty bottles you’ll find me sweating next to my little stove.
Sometimes I have to be creative as the standard canning cookbooks don’t usually have recipes that include passion fruit or mangos. Out of necessity I often have to use what I have on hand or what is available in local shops; substituting a bitter orange for a lemon, or using raw sugar instead of the near impossible to find white sugar (in the South Pacific anyway). The results may not look picture perfect but they are always pretty tasty.

I do a lot of cooking and every piece of equipment in my galley does double duty as space on a boat is at a premium. I use my pressure cooker with a standard glass lid for boiling bottles and a stainless steel or well-loved enamel cast iron pot I bought at Goodwill for cooking the preserves.
I do all the chopping, dicing and grating by hand, no matter how tedious. We depend on solar and wind power so except for a small immersion blender I don’t own any electrical appliances. If I have a really big bunch of fruit to use up I either make several small batches or borrow a large pot from another boat in the anchorage. But no one seems to mind me asking when I offer to repay the favor with a jar of homemade chutney.

I don’t remember what island we were anchored at when I opened the last jar of strawberry jam. Chances are we had been on the move for the last few months and hadn’t seen anything resembling a traditional super market in several weeks. Most likely we were getting bored of eating bananas and pineapples.
I know that it was a Sunday and Steve had made us pancakes as a special treat. And I recall searching deep in the bilge for the jar and feeling like I stuck gold when I found it. We had breakfast in the cockpit and dabbed tiny spoons of strawberry jam onto our pancakes, hoping that the little bottle would last forever. The flavours were bright and sweet and familiar. It tasted like home.

PrintHeather Francis' Festive Mango Chutney
Yield: 5 to 6 half pints
Since cranberries are not to be found in the tropics I usually make this chutney in lieu of the traditional cranberry sauce to serve with a roast chicken during the holidays. It hints at all the spices and smells of the holiday baking while using what is in season here. Once in a while I find dried cranberries and use them instead of raisins and then it feels particularly festive. It is also a delicious addition to a cheese plate or slathered on fresh bread. Serve Chilled.
Ingredients
1 large onion, diced5 garlic cloves, minced
1 inch fresh ginger, grated
4 large mangos, peeled and diced (about 6 cups)
1-1 ½ cups water (varies depending on how juicy your fruit is)
½ cup of granulated sugar
6 whole cloves
2 cinnamon sticks
4 cardamom pods
2 tablespoons lime juice
chili powder to taste
1 cup raisins or dried cranberries
Instructions
In a large pan sauté onion in a little oil until translucent. Add garlic and ginger and sauté until fragrant.Add the peeled and diced mangoes, sugar and water enough to cover. Stir to dissolve sugar then add whole spices.
Bring to a boil and turn to low, simmering with the lid on until the fruit is soft (will depend on how ripe the fruit was), about 20-30 minutes.
Keep an eye on it and add more water if necessary to prevent burning. This should be a thick, spoon-able sauce. If there is too much liquid remove lid and reduce.
When fruit is soft but not mushy add raisins/cranberries, chilli and lime juice simmer for 5 minutes more.
Ladle into clean, dry jars, wipe rims, apply lids and rings, and process in a water bath for 10 minutes.
Notes
1. You can substitute pineapple for 1/3 of the mango. Instead of dicing grate the pineapple on a box grater, it will give you a much smoother texture.
2. I use whole spices so that the chutney retains a nice yellow color, but dried will give the same flavor. I don’t mind picking out the whole spices later, but if that bothers you simply tie them in cheesecloth and remove before canning.
Related Posts:
Guest Post: Honey-Vanilla Bean Quince Preserves from Camille Storch
Blackberry Sage Jam Story and Recipe on the Driscoll’s + Berry Coupon Giveaway
Guest Post: Pickled Beets with Honey from Camille Storch


