
Nancy Zieman's Blog, page 112
May 3, 2016
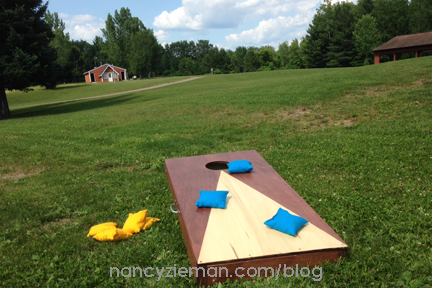
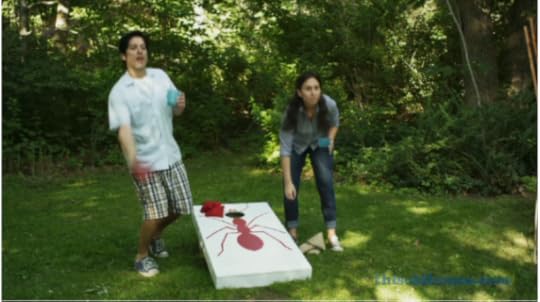
Colorful Bean Bag Toss Project

Does your family have family reunions? Are you planning any summer birthday parties? One of my family’s favorite outdoor games goes by quite a few names, but in short can be called bean bag toss. What would the game be with out festive, colorful bags? Today, learn how to sew your own bean bags or corn bags, then play cornhole, tailgate, bean bag toss, doghouse, Baggo, or, whew, just plain bags. This is a perfect afternoon sewing project to create with kids. Then, go have some backyard fun.
How to Sew Bean Bags for Cornhole or Bean Bag Toss
Using the following instructions, you’ll be able to create regulation-size bags as set by the American Cornhole Organization. If you’re going to play the game, you better be official!
Supplies, Notions, and Fabric
12 oz. duck canvas, 1/4 yard each of two colors
Quality feed corn, 15 oz. for each corn bag (or use 15 oz. dried beans)
Zipper foot
Optional: 5-in-1 Sliding Gauge
Optional: Clover Point 2 Point Turner
Optional: Wonder Clips
Note from Nancy: If you opt to use novelty print cotton fabrics for your bean bags, perhaps to align with your favorite sports teams, you’ll want to underline the cotton squares with duck canvas for durability.

Create
For each bag, rotary cut two squares of fabric 7″ x 7″.

Use the 5-in-1 Sliding Gauge to measure a 1/2″ hem on one side of each square.
Press. Fold open prior to stitching.

Match right sides and use a 1/2″ seam allowance to stitch one side of the square.
Stitch seams twice, or choose a double-stitch decorative stitch for durability. (I used Baby Lock 1-05.)


“Wrap” the corners: Fold the fabric along the stitch line at the bottom corner; pin.
Stitch the bottom seam starting at the fold. Use a 1/2″ seam allowance.
Fold the bottom seam along the stitch line and sew the remaining side. Use a 1/2″ seam allowance.

Note from Nancy: In the following pressing steps, it will help to press the bean bag envelope around a free-arm sleeve board or tailor’s pressing seam roll.
Press seam allowances open at the top edge.
Remove a small rectangle within the seam allowance to reduce bulk.

Refold the 1/2″ pressed seam allowance.
Press again.

Turn the bag right side out.
Use the turning tool to push out the corners.

Fill with 15 oz. of corn.

Pin the pressed folded edges together, placing pins parallel to the fold.
Optional: Using a hand sewing needle, sew a long basting stitch along the top edge to hold the corn in place when you move to the sewing machine.

Attach the zipper foot to your sewing machine.
Carefully sew the opening closed; removing pins as you stitch.

Optional: Use Wonder Clips at this step for ease of pinning.

Use an anchor cloth (starter piece of fabric) to stitch the final seam. Reverse stitch on the fabric to secure the seam. Then, clip away the anchor cloth.

What a great project combining sewing and backyard fun!

Learn How to Build Your Own Corntoss Board
Check out this blog and video on how to make the corntoss board, compliments of This Old House.
To learn more about the game, visit the American Cornhole Organization website.
Wrapped Corner Tips
The wrapped corner technique detailed above is also featured in my book, The Absolute Easiest Way to Sew or watch the demonstration online on Sewing With Nancy.
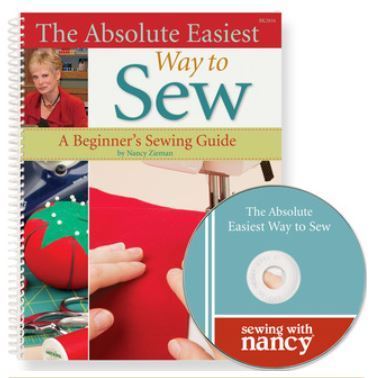
Watch The Absolute Easiest Way to Sew on Sewing With Nancy online.
To watch Sewing With Nancy on your iPad, iPod Touch, or iPhone, download the app.

What one sewing technique do you find the most intimidating? Leave your answer in the comments for a chance to receive a copy of the book, The Absolute Easiest Way to Sew. One winner will be selected randomly.
Thank you Sew Mama Sew for featuring my Fabric Bins tutorial on your blog today. If you are joining me from their site, welcome! I am glad you are here.
Bye for now,

Content in this feed is © copyright 2016 by Nancy Zieman and may not be republished without written permission. You’re welcome to forward the email to a friend or colleague but it’s not okay to add the RSS feed automatically as content on a blog or other website.
Make sure you are subscribed to my enews mailing list so you won’t miss a thing. Sign up here . Join us on Facebook , plus a host of other social media channels. Connect With Nancy today!


April 30, 2016
Sew a Kite in Seven Steps
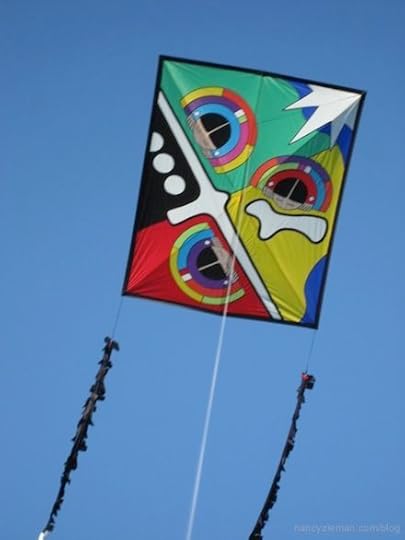
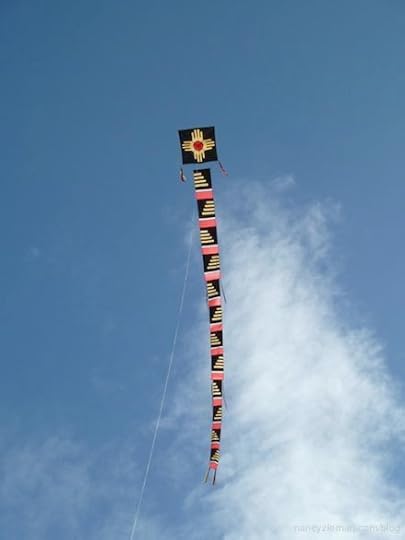
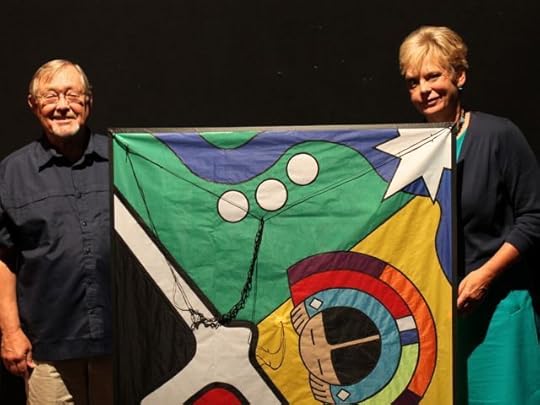
Sew for home; sew for kids; sew for warmth, but have you ever considered sewing a kite? Paul Fieber, a recent Nancy’s Corner Guest on Sewing With Nancy, shares his love of kite flying and sewing. I know you’ll be impressed with his technique.
Watch my Sewing With Nancy interview with Paul Fieber
Fabrics and Supplies:
Fabric: Rip Stop nylon sailcloth (not the ripstop fabric sold as clothing)
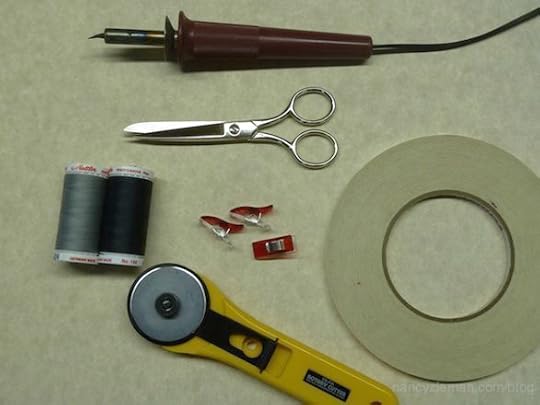
Hot tacker: Wood burner with a very fine point
Sewing Machine: Only a zigzag and straight stitch are typically needed
Thread: All-purpose polyester thread
Needles: Microtex (sharp) 11/12
Scissors : Good quality with narrow, sharp tips
Tape: Double-sided for holding fabric where necessary
Light table : Very useful for laying fabric on the working pattern
Kitemaking Techniques by Paul Fieber
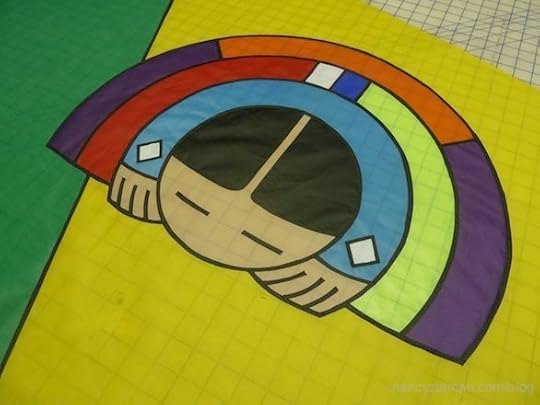
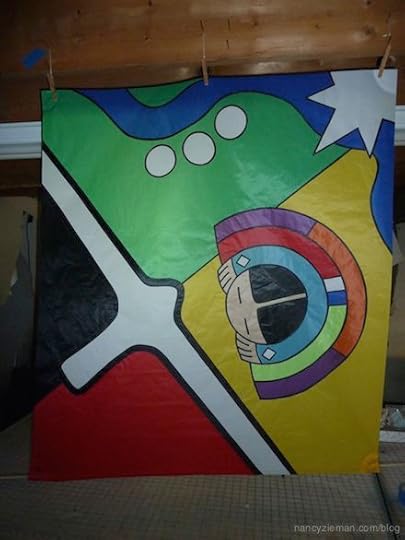
The kite design, in the photos, has an original Mound Builder’s theme. The rectangular and flat kite style is 41″ x 46″ and is called a della Porta.
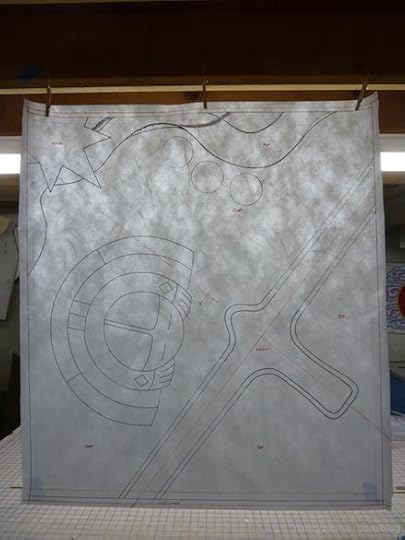
Step 1 Create a full-sized pattern
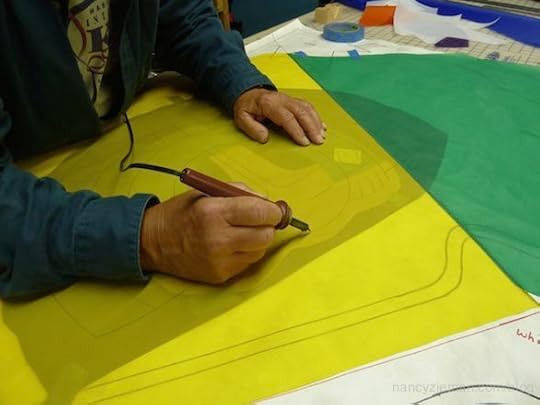
Decide on the kite’s style and draw out a full-size shape on paper. Since you’ll be stitching from the back of the kite, the kite image will be the reverse image of the drawing.
Or, draw the design or a traced shape onto light-colored paper and attach to a smooth wall.
Use a fine-point black Sharpie to darken the lines for your final working pattern. Take your time on this step since the lines become your stitching lines and fabric layout.
Option: If you have a way to enlarge your design by the use of a projector, tape a large sheet of paper to a smooth wall and trace the larger design on the paper.
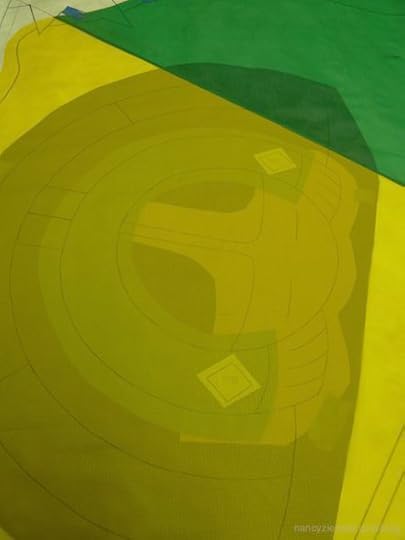
Step 2 Trace stitch lines and layer fabric
Select fabric colors based on the design.
Find the “lightest” color and cut a rectangle or square slightly larger than the full pattern size. This is the base of your kite.
Trace the lines on this “light” colored base fabric. These will be your stitching lines. Then, begin layering the other fabrics under this piece to introduce the color scheme.
Finish the layering process with black fabric at the front (face of the kite).
Step 3 Hot tack layers together
Hot tack layers every couple of inches on the lines to “pin” all the pieces together. Tack carefully and quickly. Avoid large holes but tap just enough to connect all layers together. (If available, a light table makes this step much easier.)
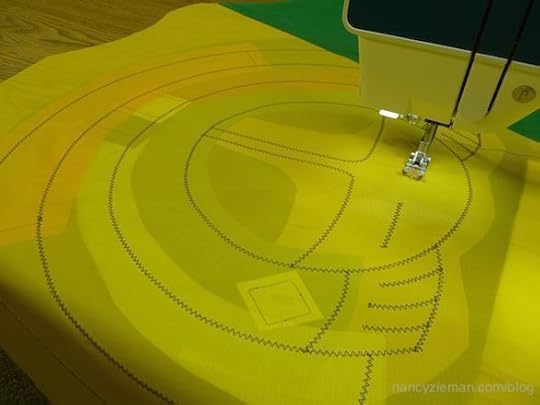
Step 4 Stitch from the back
Stitch using a zigzag stitch. I usually use a 3.0 mm wide by 4.0 mm long zigzag for this step. It helps to begin sewing where two or more lines meet. And, if the design permits, stitch the longest continuous and more centered lines first to avoid shifting fabric as much as possible.
Backstitch at the beginning and ending of a stitching line to strengthen the kite for heavier winds. Backstitching is also helpful where lines meet or severe direction change occurs.
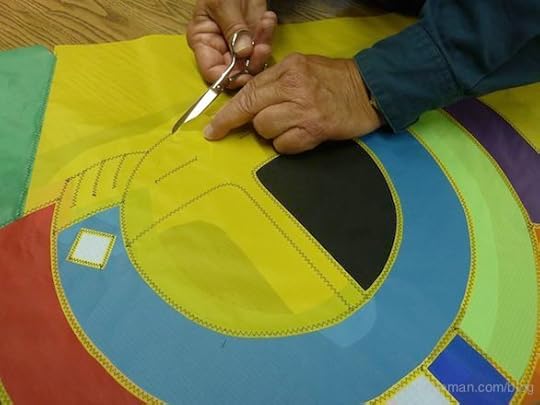
Step 5 Cut away fabric to reveal design
Now the fun part. Removing fabric to reveal colors is the next process. I generally complete the back of the sail first, then finish up on the face of the kite. Make sure you work on a smooth surface. Practice on some scraps before moving on to your precious kite sail.
To get the working point of your scissors into the right layer, cut a small slit (very, very carefully!) with a #16 X-acto blade held backwards. Or, you might be more comfortable using a sharp pin to lift the fabric before cutting a slit.
If you have to go through more than one layer to find the color you seek, open up the first opening a bit and cut another slit to get at the next layer. Then, run your scissors to the beginning of the stitch, snip and turn left. Always cut from the left of the stitch and open the scissors only a 1/4″ or so. The idea of this technique is to put some tension on the layer (or layers) being removed with your nonscissors hand, then run the scissors along the stitch but not too close. If you hear or feel your scissors rubbing along the stitch, you are too close! A single layer is cut easily. Multiple layers are more difficult. But if you feel the scissors grab, make sure you are not hung up in a stitch, and if not, make a snip or two rather than forcing the cut.
Step 6 Finish module from the front
After removing all the unwanted fabric at the back, and removing (and wasting) a lot of black fabric at the front, you’ll achieve the desired “stained glass” effect.
It is helpful if the design permits working in modules or sections. This is a good way to proceed, because it limits the number of times you have to push the entire sail material back and forth through the sewing machine arm.
Step 7 Finish raw kite
Since the gold and green right side of the sail was joined earlier, I was able to add in (again by layering) the blue river, the North Star and a few round burial mounds. This was also done without the lower left side fabric being in place. I then added the black and red background with the white eagle effigy mound using the same layering technique to essentially finish the sail.
This is how the kite looks before the 5/8″ black hem was added on the edges.
For questions or comments, please contact Paul Fieber. His email address is bethewind@yahoo.com for you to copy and paste in an email.
Thank you, Paul!
Watch Sewing With Nancy online at NancyZieman.com.
To watch Sewing With Nancy on your iPad, iPod Touch, or iPhone, download the app.

Bye for now,
Content in this feed is © copyright 2016 by Nancy Zieman and may not be republished without written permission. You’re welcome to forward the email to a friend or colleague but it’s not okay to add the RSS feed automatically as content on a blog or other website.
Make sure you are subscribed to my enews mailing list so you won’t miss a thing. Sign up here . Join us on Facebook , plus a host of other social media channels. Connect With Nancy today!
April 28, 2016
Foster Creativity with Doll Costumes
Sewing doll clothes for 18″ dolls is a wonderful way to nurture imaginative play. Doll Costume Dress Up is this week’s featured Sewing With Nancy online TV show with author, Joan Hinds. Watch Doll Costume Dress Up online!
Here’s a preview of the doll clothes patterns and sewing tips.
Cowgirl Doll Pattern
Sewing for dolls gives us permission to try a variety of techniques and to work with unique fabrics. The Cowgirl outfit is the case in point! Adding fringe to a cow print is not the norm for sewing. Yet, with this costume, your little girl and her doll will win first prize in the imaginative rodeo.

Witch Doll Pattern
Witches don’t have to be scary! This doll is donned in a mod-style Halloween outfit ready to give a little girl pleasant dreams. You too will have enjoyment with this costume, learning clever ways of adding trim and quickly finishing edges.

Super Hero Doll Pattern
Leap tall building in a single bound—well, not really. But that’s an option for play! Joan’s super hero pattern can create those playful thoughts, after you spend just a small amount of time doing the stitching!

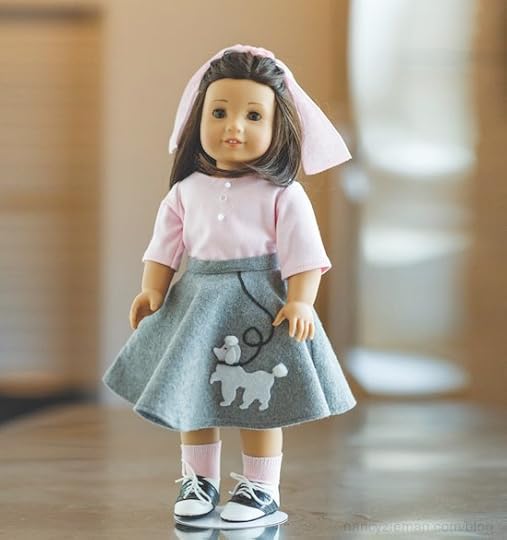
Poodle Skirt Doll Pattern
It’s all about accessories! The sewing is streamlined, but the accents make the outfit.
Ladybug Doll Pattern
Next, a “cute as a bug” costume! It’s amazing what a little polka dot fabric, pompoms, and sheer fabric can turn into! This costume makes me wish I were a little girl again!

Pumpkin Doll Pattern
The ladybug and pumpkin costumes share the same basic pattern. Watch Doll Costume Dress Up to see how both costumes are made.

Watch Doll Costume Dress Up(Part One and Part Two) on Sewing With Nancy online.
To watch Sewing With Nancy on your iPad, iPod Touch, or iPhone, download the app. For a chance to win a copy of the book, Doll Costume Dress Up please leave a comment below. Tell me which costume you’d make and why. This clearly illustrated book, Doll Costume Dress Up, includes 20 patterns designed by author Joan Hinds. A random winner will be posted.

Bye for now,
Content in this feed is © copyright 2016 by Nancy Zieman and may not be republished without written permission. You’re welcome to forward the email to a friend or colleague but it’s not okay to add the RSS feed automatically as content on a blog or other website.
Make sure you are subscribed to my enews mailing list so you won’t miss a thing. Sign up here . Join us on Facebook , plus a host of other social media channels. Connect With Nancy today!
April 26, 2016
Sew a Handy Organizer for Your Needle Packs
By Emily Jansson, Nancy’s Notions guest blogger
I’ve been going a little overboard on projects lately. With Sewing Weekend 2016 fast approaching, my studio is looking more and more like a tornado hit it. When my supplies are in chaos, so is my mental state. Something needed to be done.
What do I do when I’m feeling out of control? I organize like a madwoman. This project was born when I thought I’d run out of sharps in the midst of a late-night stitching spree. I needed all of my needle packs fully visible, and in one place…and fast.
This organizer whips up in an afternoon, and boasts 32 slots for your needle packs. The clear vinyl allows you to see your whole inventory at a glance. The elastic closure lets you pack it up neatly to store out of sight or pack for class. Hope you like it!
Supplies
1/3 yd. Peltex 2-Sided Fusible Interfacing
Outer fabric: scrap measuring at least 10″ x 15-1/2″
Lining fabric: scrap measuring at least 10″ x 15-1/2″
1/8 yd. Clear Vinyl
1 pack Fuse ‘n Bind Fusible Binding Tape
10″ Elastic 1″ wide or less (We used a decorative 1″ wide elastic.)
6″ x 24″ Ruler
Marking pen
Rotary cutter and mat
Iron and ironing surface
Teflon sheet (or parchment paper)
Pins
Wonder Clips
Teflon Foot
Sewing machine, etc.
Instructions
Begin by cutting the following:
Peltex 2-sided fusible interfacing: 10″ x 15-1/2″
Outer fabric: 10″ x 15-1/2″
Lining fabric: 10″ x 15-1/2″
Clear vinyl : 4 strips, cut at 1-1/2″ x 15-1/2″
Elastic : 10″
Approximately 54″ of 2″ wide strip for binding (You may need to piece for length.)
Use a Teflon sheet or parchment paper to protect your ironing surface. Lay the lining fabric right-side-up on the Peltex 2-sided fusible interfacing. Fuse.
Mark the lining side as shown:

Attach the Teflon Foot and set your stitch length to a longer stitch—around a 3–4.
Lay the clear vinyl strips in marked areas and secure with Wonder Clips at the ends. Stitch a scant 1/8″ along the bottom of each strip to secure.
Stitch the divider rows that run perpendicular to the strips, as marked, but do not stitch the foldlines. It’s best to sew these rows from bottom to top of the organizer, so that the vinyl lies as flat as possible.
Fuse the remaining outer fabric to the other side of your divider. At this point, you may need to remark the foldlines on the inside if they’ve disappeared while you’re fusing.
Stitch the marked foldlines through all layers.
Place the elastic on the outer back of the divider 1-1/2″ from edge and stitch at both ends to secure.
Mark 1/2″ in from the left side of each corner with a pin, as shown.

Center the fusible (rough) side of Fuse ‘n Bind to wrong side of the binding strip (10 seconds without steam).
Fold one short end toward the inside and press to make a crisp, finished end.
With the folded end on your left, fold the lower long edge of the binding up to the inside, along the Fuse ‘n Bind Fusible , and press.

Align the unpressed long side of binding to the lower right edge of the inside of your divider, and secure with Wonder Clips . Starting about 1″ from the short side of your binding, stitch 1/2″ from the edge until you’ve reached the first of your marking pins. Backstitch to secure.
Fold the binding up at a 45-degree angle, aligning the cut edges of the binding with the cut edge of the divider.

Now fold the binding back on itself, matching the binding fold to the bottom edge of the divider, where you just finished stitching. The raw edge of the binding should align with the side of the divider.

Begin stitching again, a 1/2″ seam all the way to the next corner’s marking pin. Backstitch, and repeat that folding technique at each corner.
When you’ve reached your starting point, tuck the end of your binding into the beginning, trim any excess fabric, and finish the remaining seam.
Press the binding up, flip over to the front of the divider, and clip. At each corner, make the same mitered fold on the outer side (I like to use Nancy’s suggestion and pin this part.).
Stitch the binding down, a scant 1/8″ from the open edge.

That’s all there is to it! Arrange your machine needle cases in this handy organizer, and simply fold the elastic over the front cover to secure when not in use.
Thanks to Emily Jansson and the Nancy’s Notions Team for sharing this tutorial!
Bye for now,
Content in this feed is © copyright 2016 by Nancy Zieman and may not be republished without written permission. You’re welcome to forward the email to a friend or colleague but it’s not okay to add the RSS feed automatically as content on a blog or other website.
Make sure you are subscribed to my enews mailing list so you won’t miss a thing. Sign up here . Join us on Facebook , plus a host of other social media channels. Connect With Nancy today!
April 23, 2016
Dreams Come True–Your Ideal Sewing and Quilting Day

If you were asked to describe your dream sewing or quilting day, what would it include? Earlier this month I asked, via Facebook and Pinterest, for you to describe your dream sewing or quilting day. The responses show quite a range of big dreamers! Our creative imaginations aren’t limited to our quilting and sewing designs, but our entire lives. Your responses are quite fun. My staff and I chose several of the responses to share, plus a spotlight on one of my followers.
Below, be sure to check out May’s Share Your Insight question and if you’d like, submit a response. Enjoy!
Describe your dream sewing or quilting day.
Here’s what you are saying:
Dream Big
“I would like to regain my youth when I could spend twelve hours straight in the sewing room. I would like to do everything perfectly so I didn’t have to rip things out on that day and I would like to have Nancy there to give me some tips. I have a Designer Diamond Royale machine—my preference over a Caribbean cruise, and I would love to have Nancy give me a private lesson. I would love to have my dream come true.”—Ann Cuffley, Ottawa, Canada
Organization and Accuracy
“My dream sewing day would begin with waking up to a bright sunny day with lots of energy. I would make a cup of coffee, and start work in my clutter-free, organized sewing space. My threads would all be in order by colors and types. My sewing machine and serger would never make a mistake. The colors I select would all coordinate and my completed project would just be perfect. My tools and notions would be right where I had put them. It would be so blissful!!! Then I would probably wake up for real.” —Becky, Coudcroft, NM
Sewing with Family
“My dream sewing day would be a location in FL with my grandchildren and my daughter all working on some fun sewing project, having a great lunch, and finishing the project later that day. An entire day of being with those I love and doing what I love. What could be more perfect?”—Carolyn Andrew, Bonney Lake, WA
Sewing and Culinary Enthusiast
“I wake at 8 AM to French toast and a fresh fruit breakfast. Then, I go to my sewing room and begin collecting the already cut pieces to the quilt top. I begin chain piecing the strips and blocks, then sewing the rows together to complete the top. Lunch is served and it is an Artisan turkey breast sandwich with artichokes, avocado, and spinach, with a tall glass of sweet tea! The quilt top is laid out on the batting and backing, which had been pieced previously. The basting of the 3 layers is done and the freehand machine quilting is completed before dinner, which is a lite grilled tilapia filet, salad, and a double chocolate slice of cake topped with a dollop of vanilla ice cream. The evening is spent completing the binding. The completed quilt is hung on the wall to ogle the next day in sunlight. The label was attached just after the binding and before hanging! I admire the finished quilt with my hubby and a glass of Riesling wine.” —Deborah Herold, Riesel, TX
Peaceful Sewing
“My dream day of sewing would be to have my sewing machines, fabric, and all needed supplies, I would be in a cabin in a quiet serene location, with close availability of a great fabric/quilt store. I could sew morning till night, with no interruptions, except for a trip to the fabric shop when a break is needed! I also need enough space in my cabin for friends to join me to share sewing time and inspirations! Now that I have thought this through, I need to make this happen.” —Debra Bowman, West Milton, OH
Sewing With Nancy
“Oh my! My dream sewing day would be to actually Sew with Nancy! I would like to get a quilting lesson from her and maybe she could even teach me how to use my serger!” —Janice Smith, Aubrun, NY
It’s the Little Things
“Any day that I have everything I need to work on/finish a project and the sewing machine purrs like a kitten is a dream day. If I don’t run out of bobbin thread during a seam and my husband fixes my lunch and does the dishes, it’d be perfect!” —JoAnn Travioli, Marshall, IL
A Day Away
“My children used to bug me about taking a “real” vacation. One day, in exasperation, I said my ideal vacation would be to go somewhere and do nothing but sit and sew all day. The more I thought about that statement, I thought if that really was my ideal vacation, then, why don’t I do it. So I went to a sewing school where I sewed all day and had breakfast, lunch, and dinner provided along with wonderful instructors to teach me something new. That experience would still be my dream sewing day.” —Judy Parker, Madison, AL
Uninterrupted
“To me, every day is a good sewing or quilting day. It’s just that other things like cooking, cleaning, laundry, and those unexpected surprises that get in the way.”—Mary Bryan, Port Orange, FL
Living the Dream
“I have lived my dream sewing or quilting almost every day this past winter. Both my husband and I are retired and live on our farm in the country about 25 miles from the closest village. My husband is the chief cook and bottle washer so I don’t have to stop to fix meals. I just do the dishes and once in a while fix a salad and I can go back to my sewing room. I sew in a wonderful basement sewing room and although it has no natural light there is plenty of light and wonderful storage thanks to my husband. The laundry room is right next door and I have a storage/ junk room that I have taken over as a cutting room. The best thing of all is that this room is out of the way and I can shut the door on my mess and go to more peaceful surroundings when I get sick of sewing. Lots of days I watch documentaries as I sew. The time just flies by, and I could never have imagined a life like this when I was busy with children, farming, and working as a kindergarten teacher. There are some really nice things about getting old!”—Ruth Haas, Lefor, ND
UFOs
“Finishing all my UFOs while completely organized and by myself!” —Susan Spiers, Carriere, MS
April Reader Spotlight:
Emily Williams’ Answer
My dream sewing day begins with my fairy godmother’s delivery of my breakfast of fresh fruit, pastries, and coffee. She then leads me to my freshly cleaned and organized sewing room where music is playing and my unfinished projects are neatly laid out (with ALL necessary pieces) for me to choose from. I have the remainder of the day to myself to sew or read as I see fit! (You said “dream,” right?!) —Emily, Newton, MA
About Emily:
How often do you sew? Often! Sewing is my fun and my business.
What are your favorite types of projects to create? There is something magic in the creation of a three-dimensional object from a piece of flat fabric that I find endlessly fascinating. And, I love anything where I can play with color. Whether it’s an apron, a bag, or a quilt; I love the art of combining and balancing colors and patterns. Probably the most fun/challenging is making a memory or story quilt for someone. The process of taking a special, and mixed bag, collection of items and working with them to create a cohesive vision is very satisfying.
How long have you been sewing? I grew up surrounded by my mother’s exquisitely crafted sewing, knitting, and needlework projects. My first sewing projects were based on need—Barbie needed new clothes! By high school I made most of my own clothes until the era of jeans and T-shirts took over. After a degree in Zoology, years of working in the science business, and then freelance writing, I could no longer resist the “call of the needle” and began sewing again.
May’s Share Your Insight Question
May Question: What’s your favorite sewing or quilting process? Please share a few details.

Submit your answer by May 21, using the form below, to be considered for our May Reader Spotlight.
Disclaimer: We may contact you to verify your answer. Your contact information will not be used for any other reason. Your submission to Nancy Zieman Productions, LLC, including contact formation, gives us the right to modify, use, distribute, reproduce, publish and display the submission indefinitely in all media, means, and forms without any payment to you. You hereby represent that you haven’t copied the content from a book, magazine, newspaper, or other commercial source.
Watch Sewing With Nancy online.
To watch Sewing With Nancy on your iPad, iPod Touch, or iPhone, download the app.

Mary Mulari offered a giveaway in her guest blog, Sew an April Showers All-Weather Wrap. The random winner of her All Occasion Fabric Wraps book is Betty. She said: The All-Weather Wrap is perfect for collecting eggs from my flock of chickens each day. Those eggs have to be collected rain or shine and carrying an umbrella….well you can imagine. My chickens and I like red.
Content in this feed is © copyright 2016 by Nancy Zieman and may not be republished without written permission. You’re welcome to forward the email to a friend or colleague but it’s not okay to add the RSS feed automatically as content on a blog or other website.
Make sure you are subscribed to my enews mailing list so you won’t miss a thing. Sign up here . Join us on Facebook , plus a host of other social media channels. Connect With Nancy today!
Finishing all my UFO’s while completely organized & by myself!
April 21, 2016
Doll Costume Dress Up – Part One
Make believe play with 18″ dolls dressed in costumes is a great way to foster a child’s imagination! What child hasn’t envisioned being a princess, super hero, or even a mermaid? Joan Hinds, doll clothes designer and author of Doll Costume Dress Up, which includes 20 patterns, is my guest for this new two-part Sewing With Nancy series.
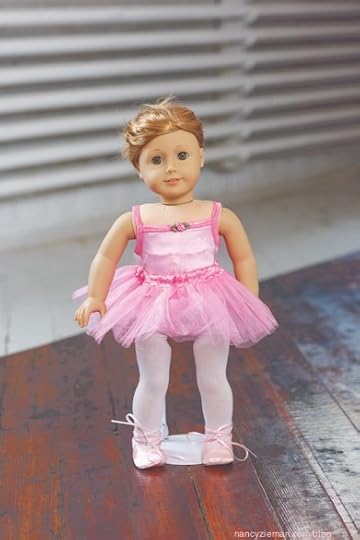
Lilac Fairy or a Ballerina Costume
Fanciful costumes are easily made with small pieces of fabric and trim, yielding creative results. The Lilac Fairy is our first doll dress-up idea. A combination of netting, stretchy knit, and a little time will result in a costume made to spark imagination. Learn how to add elastic in small spaces and even stitch over wire!

Once you know a few sewing basics, a Ballerina could be your next doll costume!
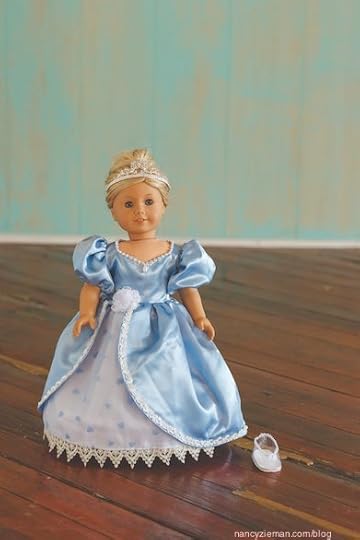
Cinderella, Bride, or Southern Belle Doll Costumes
Be the fairy godmother for your little girls’ doll when you create one of these lavish gowns. Satin fabric with sequins and rhinestones add the glam, you add the magic! The sewing steps for these three dresses are very similar. with flat construction for ease of sewing and playing. Which one will you choose?


Mermaid Doll Costume
Your little girl’s doll will look swimmingly in Joan’s Mermaid Costume. Sequin fabric, glittery and pompom trims, plus clever patterns make short work of this imaginative costume. I can’t wait for you to see how to sew the fish tail! Blog Exclusive: Sew a matching mermaid tail for your child. You’ll find the free pattern in my October 10 Blog Posting.

Watch Doll Costume Dress Up, Part One on Sewing With Nancy online.
To watch Sewing With Nancy on your iPad, iPod Touch, or iPhone, download the app.
For a chance to win a copy of the book, Doll Costume Dress Up from F+W Media, please leave a comment below. Tell me which costume you’d make and why. This clearly illustrated book, Doll Costume Dress Up, includes 20 patterns designed by author Joan Hinds.
The random winner of a No-Hassle Triangles Gauge from Clover is Linda Spurger. She said: I love the star of hope. I have made it as a friendship quilt, having the star points signed by friends of the recipient of the quilt. However, I have never seen the Card Trick, and I LOVE it. I think I may just have to try it for my next quilt. Thanks for sharing all of your expertise with us.
Learn what this easy-to-use quilting notion can create by reviewing the last two weeks blog posts titled: Easily Sew 1/2-Square Triangles and Sew Accurate 1/4-Square Triangles.
Bye for now,
Content in this feed is © copyright 2016 by Nancy Zieman and may not be republished without written permission. You’re welcome to forward the email to a friend or colleague but it’s not okay to add the RSS feed automatically as content on a blog or other website.
Make sure you are subscribed to my enews mailing list so you won’t miss a thing. Sign up here . Join us on Facebook , plus a host of other social media channels. Connect With Nancy today!
April 19, 2016
Watch Hundreds of Sewing & Quilting Classes
Sewing With Nancy has been on PBS for over 30 years. Gosh, it really doesn’t seem like that long. I love what I do and hope that through sewing education, you also love what you are creating, no matter what stage of learning you are in. Each day I wake up thankful that you are part of my life. Thank you for watching!

My show is produced by Wisconsin Public Television (WPT) in Madison, WI. WPT hosts content from the Sewing With Nancy program and you can watch ALL of the episodes free! There are over 270 demonstrations available to you anytime online.
I thought it might be fun, today, to share the three top-viewed Sewing With Nancy videos.
Number One: Free Motion Quilting for Beginners (Part One)
Free-motion quilt with ease—it’s fast and fun! Learn to free-motion quilt on your sewing machine and you’ll never look back. Nancy and guest Molly Hanson show how to quilt like a pro and create finished projects without using a long-arm machine.
Number Two: Sew Simple with Rectangles & Squares (Part One)
Nancy creates time-saving gifts such as a cosmetic bag, tote, and luggage saddlebag using comparable sewing steps, straight stitching, and double-sided quilted fabric. Plus, all of the projects start with easy patterns—rectangles and squares!
Number Three: The Absolute Easiest Way to Sew (Part One)
Over the years Nancy tweaked sewing and quilting steps to make them easier and for the best looking results. In this program she shares some of the easiest ways to lay out, cut, and mark fabric; sew darts; gather four different ways; and add elastic. Whether you’re a new sewer or looking for a refresher class, these techniques are the easiest!
- – - – - – - – - – - – - – - – - - – - – - – - – - – - – - – - – - - – - – - – - – - – - – - – - – -

Watch Sewing With Nancy online.
To watch Sewing With Nancy on your iPad, iPod Touch, or iPhone, download the app.
Bye for now,
Content in this feed is © copyright 2016 by Nancy Zieman and may not be republished without written permission. You’re welcome to forward the email to a friend or colleague but it’s not okay to add the RSS feed automatically as content on a blog or other website.
Make sure you are subscribed to my enews mailing list so you won’t miss a thing. Sign up here . Join us on Facebook , plus a host of other social media channels. Connect With Nancy today!
April 16, 2016
2016 Quilt Extravaganza – April Block of the Month by Nancy Zieman
The fourth block of the 2016 Quilt Extravaganza is here! This month, you’ll learn how to create a contemporary quilt block, featuring semicircles machine appliquéd to the scrappy background fabrics. Use the Carefree Curves Template to create the shapes easily and without setting in any curved seams.
Have you selected fabrics and created the strata for your 2016 Block of the Month? Check out the details in the January 9 blog. I encourage you to use as many scraps from your stash as possible. I’m using bright and neutral fabrics in this quilt.

All blocks for 2016 will be created from pieced fabric strata. Read more on this blog post.


Block #4: Angled Quarter Circles
Supplies:
One neutral fabric strata
One bright fabric strata
Lightweight fusible interfacing
Point 2 Point Turner
Trace ‘n Create Carefree Curves Template Set
Monofilament thread
Fine Tip Non-Permanent Marking Pen
Cut Fabrics
Cut the following fabric and interfacing pieces:
Cut four 6-1/2″ x 6-1/2″ squares from neutral strata. (not pictured)
Cut two different 8-1/2″ x 8-1/2″ squares from two different bright strata.
Cut two 8-1/2″ x 8-1/2″ squares interfacing .

Cut two 1″ x 6-1/2″ fabric dividing strips (horizontals)
Cut one 1″ x 12-1/2″ fabric dividing strip (vertical)
Create the Semicircles
Make two circles from each bright interfacing square by layering interfacing on the right side of the bright strata.
Pin.
Center the Carefree Curves Circle Template on the interfacing .

Use a fine tip marking pen to trace the quarter circle 6″ finished block onto the interfacing. (This is the pink ring on the template.)
Straight stitch, using a short stitch length, 2.0–2.5, directly on the marked curve.
Note from Nancy
Use a short stitch length to ensure a smooth stitching line when sewing a curve. I often compare using a short stitch length to driving in the mountains. To maneuver the curvy road, a slower speed ensures that you’ll stay on course.

Use a rotary pinking blade to remove excess fabric.

Remove the excess interfacing from within the circle, leaving approximately 1″ of interfacing.

Turn the interfacing to the wrong side with a turning tool .

Press.


Build the Block
Set the strips on a perfect 45 degree angle with this trick:
Position the template on the finished circle aligning the horizontal line parallel with strata seams.
Mark the twelve o’clock and three o’clock positions.

Place pins in the twelve and three o’clock marks.

Repeat these steps for remaining bright strata and interfacing .
Working with one prepared circle at a time, fold circle in half matching pins and wrong sides.
Press along fold.

Remove pins. Unfold.
Move pins to the ends of pressed foldline.
Fold in half again, matching pins.
Press along new foldline; unfold and add pins at ends of new foldline.

Align pins with grid marks on rotary cutting mat.
Cut along the vertical and horizontally marked lines.
Choose opposite quarters of the circle.
Note from Nancy
Pin together and save the unused quarters. You’ll be using these sections later in the year.


Repeat these steps for the remaining prepared circle.
Arrange the block pieces as shown.
Note from Nancy
Notice how the direction of the background strips are turned 90 degrees in each quadrant.

Layer the quarter circle on the background square by aligning the corners.
Pin
Edgestitch with monofilament thread .
Note from Nancy
You may choose a narrow blanket stitch to stitch the quarter circle to the background. Each point takes a small dip into the circle itself. Choose a blanket stitch, decorative stitch, or straight stitch to apply the shapes.

Repeat this step to apply all quarter circles to background squares.
Using a 1/4″ seam allowance, add a 1″ x 6-1/2″ strip to the lower edge of right and left top quadrants.
Note from Nancy
Here’s where accuracy is important. If the seam allowance is wider or narrower than 1/4″, the finished block will not be square.

Add the lower right and left quadrants.


Press seam allowances towards the narrow dividing strip.

Use a 1/4″ seam allowance to join the center dividing strip to one side of the block.


Press seam allowances towards the center dividing strip.

Use a 1/4″ seam allowance to add the remaining side.
Press seam allowances towards center strip.

Ta-dah! Another block is complete.

If you are on social sites, let all your friends know you are working on The 2016 Quilt Extravaganza Blocks by tagging your post with the hashtag: #NZBoM.
What would a Quilt Look Like?
Suppose we were to make a quilt using only this block style, what would it look like?
This large, 88″ x 100″ traditionally-set quilt repeats 56 blocks in an expected quilt grid. The sashing in between the blocks is intentionally narrow, finishing at 1/2″, to replicate the dividing strip design in each block. You’ll notice the blocks are turned 90 degrees. If you were to make this quilt in fabric, rather than virtually, the circles will be much more diverse as they’d be cut from various bright strip sets.

The second digital concept quilt uses the block presented and a secondary block created from this month’s directions. The secondary or Plus Block mimics the original design, though the quarter circles have been omitted.

The last digital quilt builds on the two previous designs. Isn’t that often the case? This last modern quilt concept is set on a traditional grid and features four different quilt blocks: 1. Quarter Circle Block, 2. Plus Block (described above), 3. Single Line block, 4. Neutral Strata Block. See if you can find all four.

We’ll be using the Carefree Curves Template throughout the entire 2016 Quilt Extravaganza. Watch episodes online for more tips on using the templates in my two-part series featuring the Trace’n Create Carefree Curves tools on Sewing With Nancy.
Watch Quilt with Carefree Curves (Part One and Part Two) on Sewing With Nancy online.
To watch Sewing With Nancy on your iPad, iPod Touch, or iPhone, download the app.
An InLinkz Link-up
Sew and Share
Send in a photo of your blocks and quilts and we’ll share with others in upcoming blogs and on Facebook. I’d really like to see what fabrics you’re using! Send the images to info@ziemanproductions.com
Bye for now,
Content in this feed is © copyright 2016 by Nancy Zieman and may not be republished without written permission. You’re welcome to forward the email to a friend or colleague but it’s not okay to add the RSS feed automatically as content on a blog or other website.
Make sure you are subscribed to my enews mailing list so you won’t miss a thing. Sign up here . Join us on Facebook , plus a host of other social media channels. Connect With Nancy today!
April 14, 2016
Sew Accurate 1/4-Square Triangles

Triangular shapes can be sticklers to piece! Quilt patterns with 1/2-square and 1/4-square triangles are found in many traditional quilt pattern designs. Here’s how to take the hassle out of creating triangles, in particular 1/4-square triangles. For more details watch the second episode of No-Hassle Triangles Quilt Blocks online.
The Sampler Quilt
This 12-block quilt features both 1/2- and 1/4-square blocks. In a previous blog, I featured six of the 1/2-square triangle blocks. Now learn how to combine the two block styles to create amazing quilt designs. Note: The instructions to create this quilt are found in No-Hassle Triangles Quilt Blocks.

1/4-Square Dance
Some quilt block names have a long history; others are simply made up on the fly! I’ll let you decide the authenticity of this block named the 1/4-Square Dance! Regardless of what it’s called, it’s the perfect block to begin our no-hassle quilt block journey.
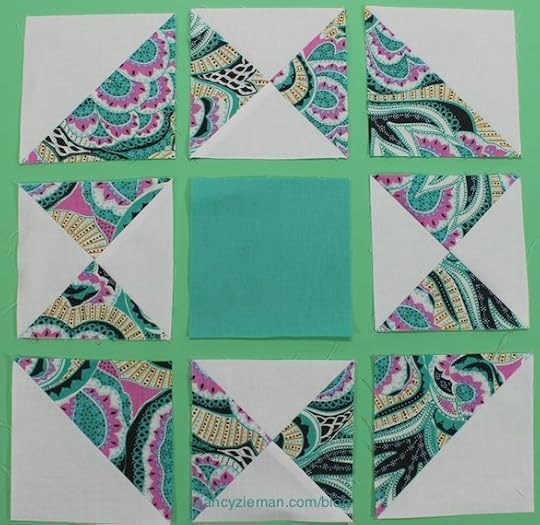
Boy’s Nonsense (1898)
This quilt block named, Boy’s Nonsense, was officially recorded and appears in print in 1898. The block appears to include rectangular strips. Not so, the design is a combination of 1/2- and 1/4-square triangles plus a plain center square.
Silent Star
It might be difficult to comprehend, but the next block, Silent Star, is almost identical to the last block, Boy’s Nonsense. The main difference in construction is the center block—all the other blocks are the same. This is the case where fabric choices totally change the design!

Ohio Star
Simple in design, yet elegant, the Ohio Star quilt block has been in use since the early 1800s, with a spike in popularity in the 1930s. See how this 9-patch block can be made the no-hassle way in the 21st century.

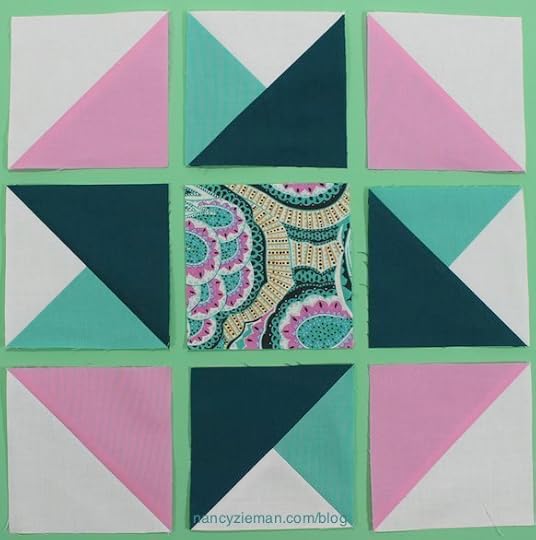
Star of Hope (1980)
Now for your master’s degree in 1/4-square triangles! The Star of Hope combines a 1/2- and 1/4-square triangle; I call it a modified 1/4-square. Notice the three-color block of aqua, ivory, and teal. Success comes by thinking this through and following the directions!
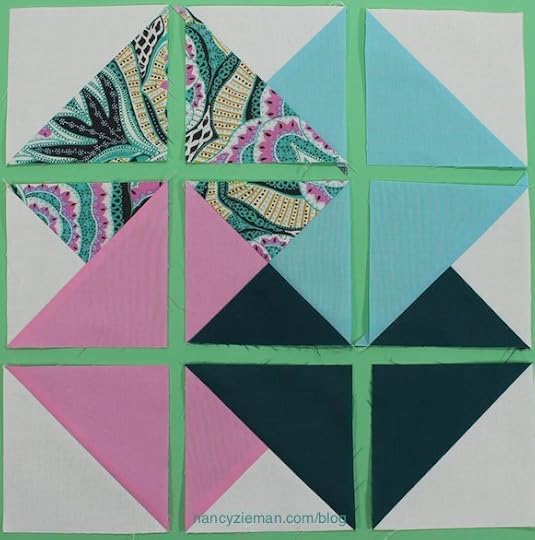
Card Trick (1979)
The Card Trick Quilt Block, like most magic, seems impossible to reproduce. What appears as sleight of hand, is a very logical block to create once you see the elements. The Card Trick—I know you will not be fooled by the design!
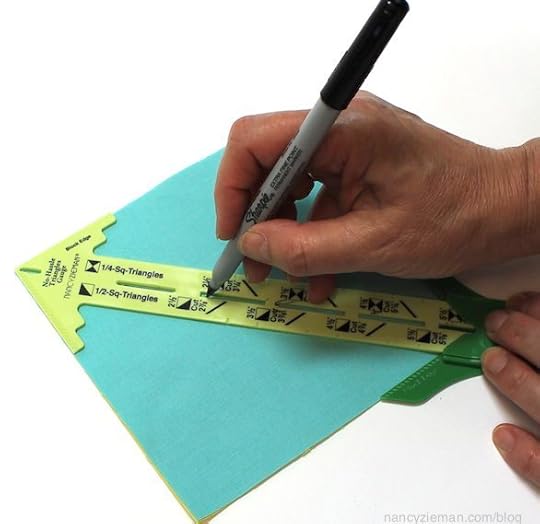
How to Make 1/4-Square Triangles
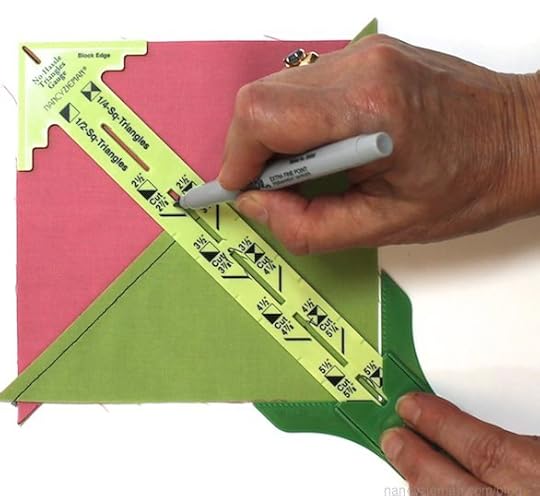
There are several ways to make triangles; my preference is to use the No-Hassle Triangles Gauge. Reference the left side of the gauge for 1/2-square triangles and the right side for 1/4-square triangles.
Depress and slide the guide to the size triangle you’d like to make. The guide will lock in place.
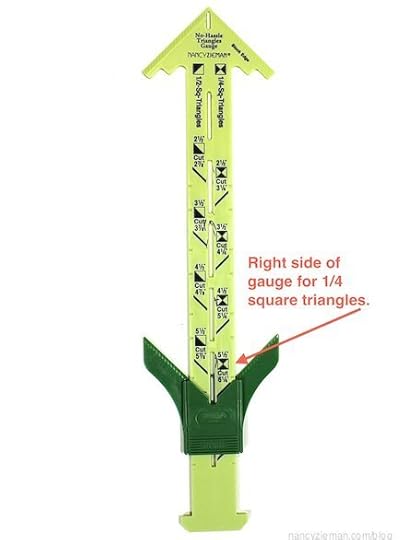
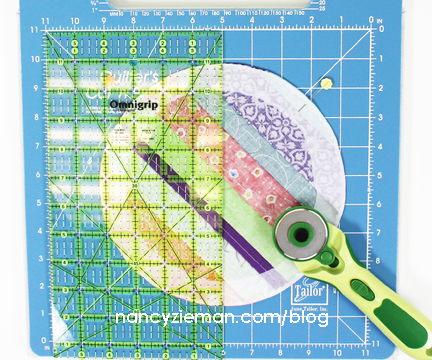
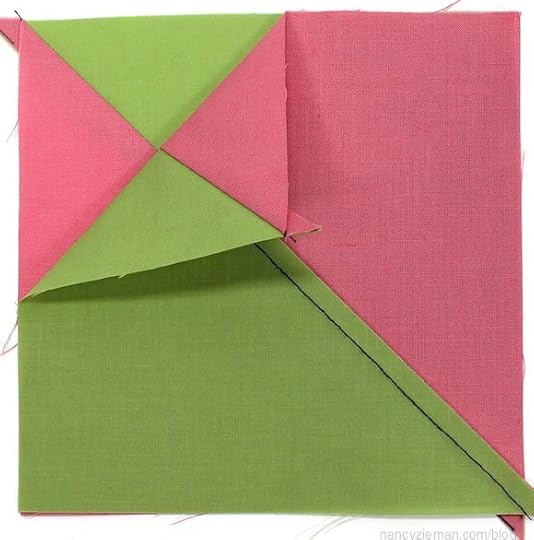
Cut strips the size printed on the gauge. Then cut strips into squares. In this example, cut 6-1/4″ strips, then cut strips into 6-1/4″ squares.
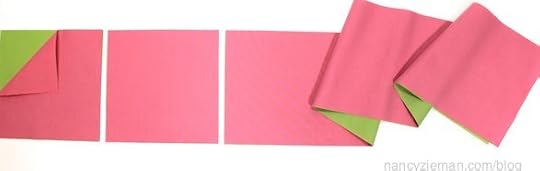
Stack two blocks.
Mark center diagonal line through the die-cut openings on the No-Hassle Triangles Gauge.
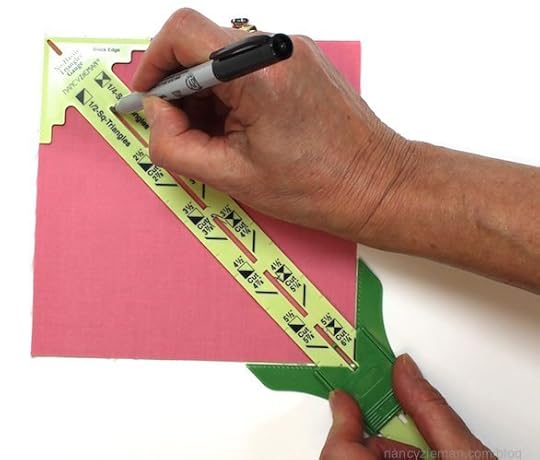
Stitch a scant 1/4″ from each side of center.
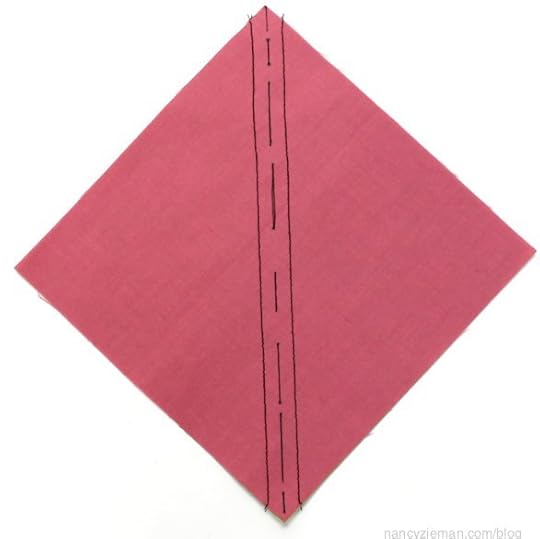
Cut along center; press.
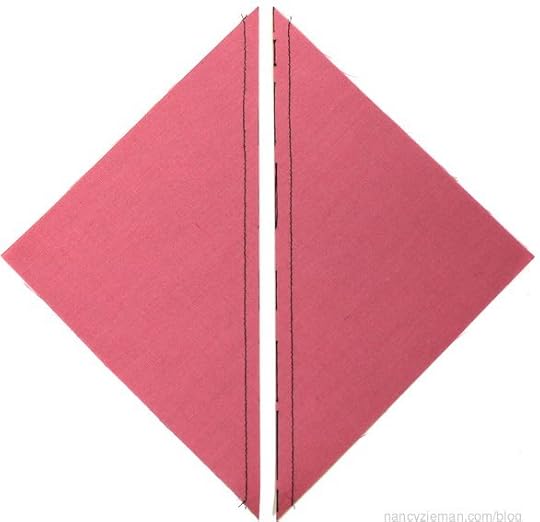
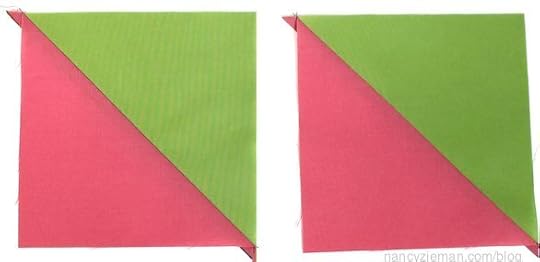
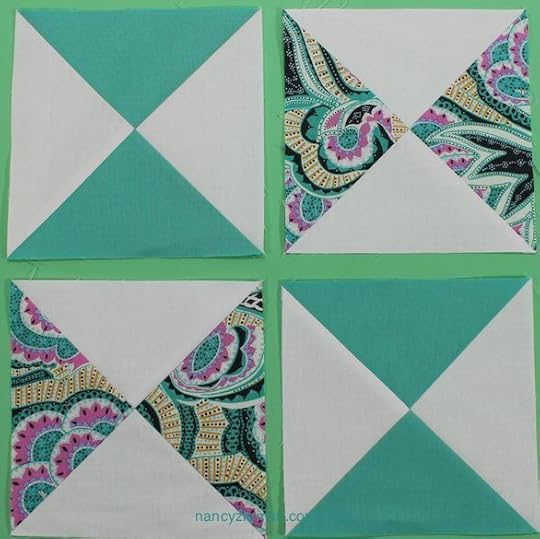
Stack two 1/2-square triangles, meeting opposite colors.
Slide the gauge to the 1/2-square triangle marking on the left side. Double check that the block fits within the gauge perimeters.
Mark center diagonal line through die cut openings.
Cut along center marking; press.
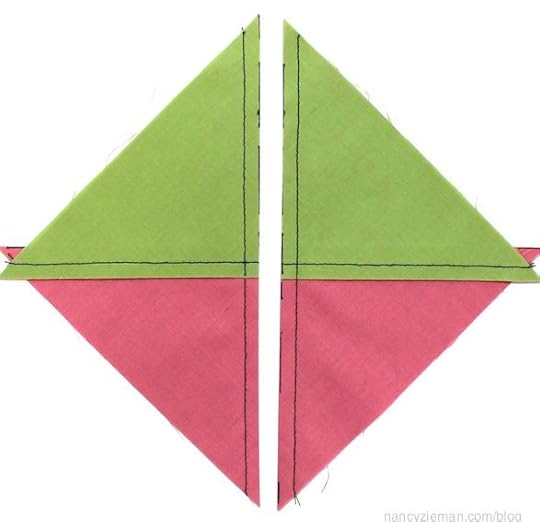
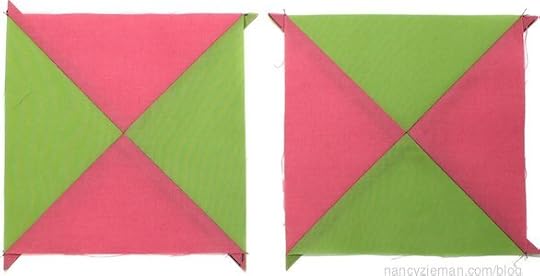
This time, you’ll have two accurate 1/4-square triangles! Using the No-Hassle Triangles Gauge guarantees that the sizes of the 1/2-square and 1/4-square triangles are compatible in a quilt design!
Make This Sampler Quilt at Home
The No-Hassle Triangles Quilt Blocks book shows exactly how to make the 12-block sampler quilt. For best results, use the No-Hassle Triangles Gauge.
Watch No-Hassle Triangles on Sewing With Nancy online.
To watch Sewing With Nancy on your iPad, iPod Touch, or iPhone, download the app.
An InLinkz Link-up
For a chance to win a No-Hassle Triangles Gauge from Clover, please leave a comment sharing which of these six 1/4-square triangle blocks is your favorite. The six quilt block titles are listed below and pictured above.
1/4-Square Dance
Boy’s Nonsense (1898)
Silent Star
Ohio Star
Star of Hope (1980)
Card Trick (1979)
Bye for now,
Content in this feed is © copyright 2016 by Nancy Zieman and may not be republished without written permission. You’re welcome to forward the email to a friend or colleague but it’s not okay to add the RSS feed automatically as content on a blog or other website.
Make sure you are subscribed to my enews mailing list so you won’t miss a thing. Sign up here . Join us on Facebook , plus a host of other social media channels. Connect With Nancy today!
April 12, 2016
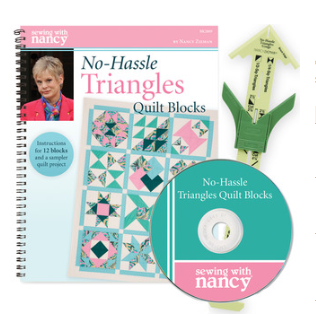
Stress-Free Quilting Showcase Tote
 Create this showcase tote using your embroidery machine or with your traditional sewing machine. That’s right, you can piece perfectly and quilt with your embroidery machine. This new
Stress-Free Quilting Showcase Tote
bundle from Amazing Designs includes pieced blocks and a computer-guided embroidery machine quilted design, in addition to the fun bag pattern, bonus table topper pattern, and optional foundation paper-piecing templates. Talk about bang for your buck!
Create this showcase tote using your embroidery machine or with your traditional sewing machine. That’s right, you can piece perfectly and quilt with your embroidery machine. This new
Stress-Free Quilting Showcase Tote
bundle from Amazing Designs includes pieced blocks and a computer-guided embroidery machine quilted design, in addition to the fun bag pattern, bonus table topper pattern, and optional foundation paper-piecing templates. Talk about bang for your buck! 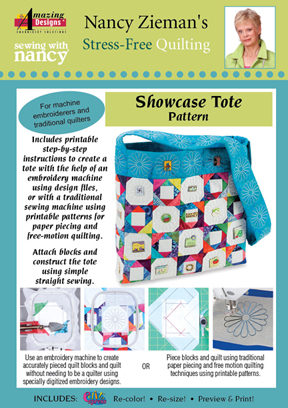
.
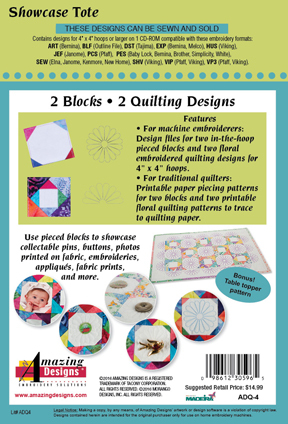
The blocks, Snowball and Square-in-a-Square, are combined to show off your favorite collectible pins, buttons, photos printed on fabric, embroideries, appliqués, fabric prints, and more with this attention-grabbing tote. You’ll be able to fussy-cut fabrics or even feature a special photograph with this design.

The Snowball and Square-in-a-Square blocks are skillfully pieced either by the embroidery machine or by paper piecing with a sewing machine. Finished quilt blocks measure 2-3/4″ x 2-3/4″.
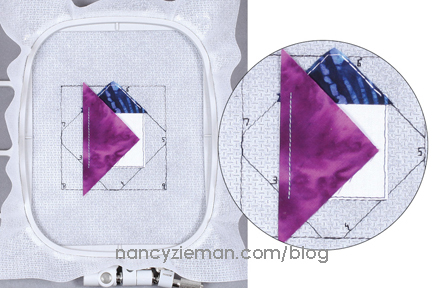
Accurately Piece Quilt Blocks with Machine Embroidery
Here’s a brief look at the fabrics and steps you’ll need to create each block in the hoop:
Square-in-a-Square Block:
Required fabric pieces:

Hoop a single layer of Cut-Away No-Show Fusible Mesh Stabilizer.
Stitch thread Color 1, the numbered stitching sequence of the block design, directly onto the stabilizer.

Place Section 1 fabric square over the Section 1 stitched on the stabilizer base, right side up. Fabric must cover the stitched lines.
Fuse in place with a mini-iron.
Stitch thread Color 2 to baste down fabric Section 1.

Trim away excess fabric along previously stitched basting line.
Align Section 2 fabric triangle edges, right sides together. Make certain fabric extends equally beyond the outline on the stabilizer at opposite ends.
Embroider thread Color 3 to stitch this section of the block.

Fold the fabric section over the stabilizer.
Start pressing along the folded edge with a mini-iron, working to the outer edge to eliminate any wrinkles.
Embroider with thread Color 4 to baste pressed section in place.
Trim excess fabric past basting line.

Add fabric Section 2, following the numbers consecutively.
Embroider, flip, press, baste, trim, and move to the next section.


Continue adding pieces until the block is complete.
Finish with the last thread color, basting the blocks edges.

Trim the block per the package directions.

Snowball Block:

Simply follow the detailed directions included in the package to apply each fabric section in consecutive order, similar to the construction of the Square-in-a-Square block.
This is the finished and trimmed block.

Foundation Paper Piecing Templates
You can also use this design bundle to print foundation paper piecing templates. Use them as you would any other foundation pieced pattern. Detailed instructions are included in this bundle. Here’s an overview:
Print off as many blocks as you need, using the embroidery software program.
Place Section 1 fabric square over the Section 1 printed on the foundation paper, wrong side of fabric to wrong side of paper foundation. The fabric must extend past the printed lines.
Pin.

Place Section 2 fabric triangle aligned with the corresponding edge of pinned fabric square, right sides together.
Pin.

Stitch right on the Section 2 printed line.

Trim threads.
Remove pin and press fabric triangle over Section 2 of the paper foundation using a mini iron , Little Wooden Iron, or Hera Marker .
Mark for Section 2 trimming line by placing a gridded quilting ruler on the foundation paper, aligning the ruler’s 1/4″ line on the stitching line.
Using the curved edge of the Hera marker, emboss a foldline along the ruler’s edge.
Remove the ruler and fold back the paper onto itself.

Repeat for remaining corner of Section 2.


Trim away excess with rotary cutter.

Continue in sequential order to add fabric sections, fold, and trim. Press each section along the way.

Lastly, stitch around the marked perimeter line to secure the block. Trim per the instructions.

Sew and Quilt the Projects
This extensive design bundle includes two project patterns: a tote and a table topper.
Prepare the required number of blocks for the design you choose.
Assemble them per the directions.
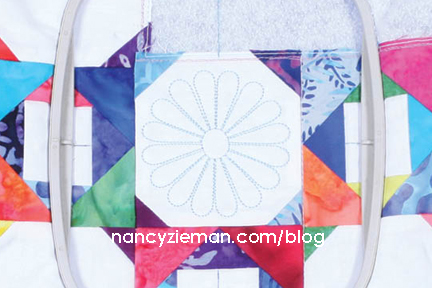
Use the Embroidery Machine to Quilt

Add the first quilting lines by using a Walking Foot to stitch “in the ditch.”

Use the floral quilting design included to plan the computer (embroidery machine) guided quilting.
Print a template using an embroidery software program, such as Amzaing Designs® Edit Xpress.
Position paper on fabric at desired location.

Align the project in the embroidery hoop. Quilt the design.
Repeat quilting steps in all areas that you would like quilted.
Use a Free-Motion Quilting Foot to Quilt
Print the flower quilting design motif onto paper.
Trace the design onto quilting paper.

Cut to separate each of the quilting paper patterns.
Position pattern, then tape to fabric at desired location.

Use the Free-Motion Quilting Foot to quilt. Use the paper as a guide.

Remove the quilting paper.

Repeat quilting in all desired locations.
With so many options and variations in this Stress-Free Quilting Showcase design bundle, you’ll have a variety of finished designs completed with computer accuracy. This package is quite the skill-builder, as well. If you have never tried these techniques—machine embroidery piecing, foundation paper piecing, computer-guided quilting, or free-motion quilting—you are in for a treat! I hope you enjoy the collection!
Watch Stress-Free Quilting with Machine Embroidery on Sewing With Nancy online.
To watch Sewing With Nancy on your iPad, iPod Touch, or iPhone, download the app.
Bye for now,
Content in this feed is © copyright 2016 by Nancy Zieman and may not be republished without written permission. You’re welcome to forward the email to a friend or colleague but it’s not okay to add the RSS feed automatically as content on a blog or other website.
Make sure you are subscribed to my enews mailing list so you won’t miss a thing. Sign up here . Join us on Facebook , plus a host of other social media channels. Connect With Nancy today!
Nancy Zieman's Blog

- Nancy Zieman's profile
- 21 followers

