
Nancy Zieman's Blog, page 110
June 18, 2016
2016 Quilt Extravaganza—June Block of the Month

The sixth block of the 2016 Quilt Extravaganza is here—the Spinning Top. We’ll take advantage of the direction of the sewn strata lines and machine appliqué to give the block the appearance of spinning. Use the Carefree Curves Template to create the shapes easily and without setting in any curved seams.
Have you selected fabrics and created the strata for your 2016 Block of the Month? Check out the details in the January 9 blog. I encourage you to use as many scraps from your stash as possible. I’m using bright and neutral fabrics in this quilt.

All blocks for 2016 will be created from pieced fabric strata. Read more on this blog post.


Block #6: Spinning Top
Supplies:
One neutral fabric strata
One bright fabric strata
Lightweight fusible interfacing
Point 2 Point Turner
Trace ‘n Create Carefree Curves Template Set
Monofilament thread
Fine Tip Non-Permanent Marking Pen
Cut Fabrics
Cut the following fabric and interfacing pieces:
From each bright and neutral strata cut two 6-1/2″ x 6-1/2″ fabric squares (background).
From each bright and neutral fabric strata cut one 9″ x 9″ fabric square (for circles).

Cut two 9″ x 9″ squares of interfacing to create circles.
Note from Nancy: Cut an additional 9″ x 9″ square of interfacing to apply behind the 9″ x 9″ square of the neutral strata if the background may show through when appliquéd.
Create the Circles
Optional: Apply a 9″ x 9″ square of interfacing to the wrong side of the neutral strata to prevent show-through of the bright background fabric.
Using the 9″ x 9″ squares of fabric and interfacing, pin the smooth side of the interfacing on the right side of the fabric. Make two pair; one bright strata and one neutral strata.

Center the Carefree Curves Circle Template on the interfacing .

Use a fine tip marking pen to trace the 8-1/2″ circle onto the interfacing. (This is the pink ring on the template.)

Straight stitch, using a short stitch length, 2.0—2.5, directly on the marked curve.
Note from Nancy:
Use a short stitch length to ensure a smooth stitching line when sewing a curve. I often compare using a short stitch length to driving in the mountains. To maneuver the curvy road, a slower speed ensures that you’ll stay on course.


Use a rotary pinking blade to remove excess fabric.


Remove the excess interfacing from within the circles, leaving approximately 1″ of interfacing.

Turn the interfacing to the wrong side.

Use a turning tool to smooth the curves.

Press.

Divide the Circles
The circle shape is divided into fourths and, thanks to the strata, appears to spin on top of the background. Here’s a trick to create a perfect 45 degree angle:
Position the template on the finished circle aligning the horizontal line parallel with strata seams.
Mark the 12 o’clock and three o’clock positions on both bright and neutral circles.

Note from Nancy: You may opt to add pins at the marked location, if the marks are hard to see on colorful fabrics.

Fold circles in half matching marks and wrong sides.
Place a pin at the fold.

Open both circles.
Position the template on the finished circle aligning the single pin with one of the straight lines.

Mark the straight lines in both horizontal and vertical directions on both bright and neutral circles.


Remove the template; make sure the marked lines are visible.

Using rotary cutting tools, cut the circles into fourths along the marked lines.


Build the Quilt Block
Pin quarter circles to the 6-1/2″ x 6-1/2″ backgrounds matching cut corner edges. Alternate the colors: bright quarter circle onto neutral background and vice versa.
Note from Nancy: You will have two quarter circles of each bright and neutral left over. Save those to use on a later block or to create additional Spinning Top blocks.

Edgestitch with monofilament thread .
Note from Nancy:
Notice in the photo I used an Open Toe Foot and a narrow blanket stitch to stitch the circle to the background. Each point takes a small dip into the circle itself. Choose a blanket stitch, decorative stitch, or straight stitch to appliqué the shapes.


Arrange the block.

Fold the top left onto the top right square and repeat for the bottom squares. Match right sides.

Pin along the edges.

Use a 1/4″ seam allowance to join pairs.

Press seam allowances open.


Fold the top unit onto the bottom unit.
Pin along the top edge.
Join using a 1/4″ seam allowance.

Press seam open.
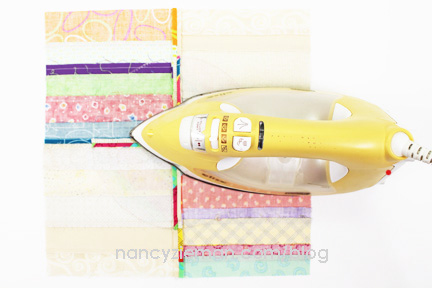
Note from Nancy: This block will have unavoidable bulk in the seam allowances. To really flatten the seams, press with steam and then apply even pressure using a wooden Tailor’s Clapper while the fabric is warm. It’s magic!

Ta-dah! Another block is complete.
If you are on social sites, let all your friends know you are working on The 2016 Quilt Extravaganza Blocks by tagging your post with the hashtag: #NZBoM.
What would a Quilt Look Like?
Suppose we were to make a quilt using only this one block style, what would it look like?
This first digital concept is a table runner made from five Spinning Top blocks. You’ll notice blocks consistently place a bright strata background in the upper right corner.

The second digital concept quilt uses the background strata to create a secondary design. The quilt itself is structured in a 5-block by 7-block grid. Turning every other block creates the illusion.

The last digital quilt is large. When finished this 8-block by 8-block quilt measures 96″ x 96″. The design uses neutral strata cut to 12-1/2″ x 12-1/2″ to create interest in the negative space.

We’ll be using the Carefree Curves Template throughout the entire 2016 Quilt Extravaganza. Watch episodes online for more tips on using the templates in my two-part series featuring the Trace’n Create Carefree Curves tools on Sewing With Nancy.
Watch Quilt with Carefree Curves (Part One and Part Two) on Sewing With Nancy online.
To watch Sewing With Nancy on your iPad, iPod Touch, or iPhone, download the app.
An InLinkz Link-up
Sew and Share
Send in a photo of your blocks and quilts and we’ll share with others in upcoming blogs and on Facebook. I’d really like to see what fabrics you’re using! Send the images to info@ziemanproductions.com
Bye for now,
Content in this feed is © copyright 2016 by Nancy Zieman and may not be republished without written permission. You’re welcome to forward the email to a friend or colleague but it’s not okay to add the RSS feed automatically as content on a blog or other website.
Make sure you are subscribed to my enews mailing list so you won’t miss a thing. Sign up here . Join us on Facebook , plus a host of other social media channels. Connect With Nancy today!


June 16, 2016
Learn Free-Motion Quilting Tips for Beginners
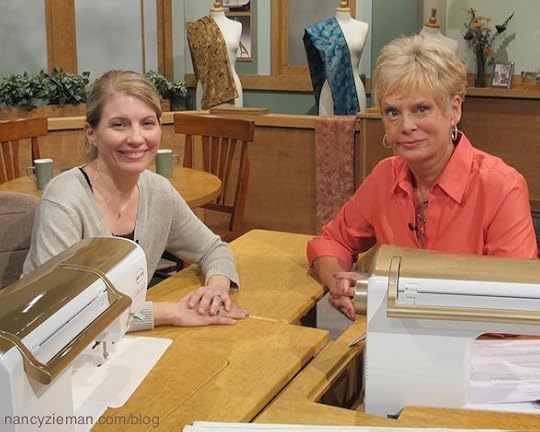
Curious about learning how to free-motion quilt, but haven’t had the courage to try? Gain quilting confidence with help from my guest, Molly Hanson. According to Molly, quilters at any skill level should give this quilting style a try. Molly Hanson, who taught herself free-motion quilting early in her sewing career, shares methods from her new book on this week’s Sewing With Nancy. Molly’s goal is to instill confidence in new quilters.
Free-Motion Quilting for Beginners is this week’s online Sewing With Nancy feature. Watching Molly free-motion quilt is the best way to learn her techniques. Watch online, on Public TV, or on DVD.
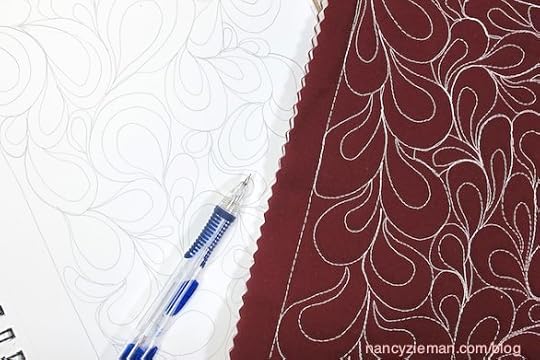
Stippling
The most common free-motion quilting technique is stippling. Its versatility, light texture, and ability to blend and not compete with the piecing make it a favorite among quilters. If you’ve been hesitant to learn this technique, fear not! Learn and use Molly’s muscle memory technique to master this first of many free-motion quilting options.
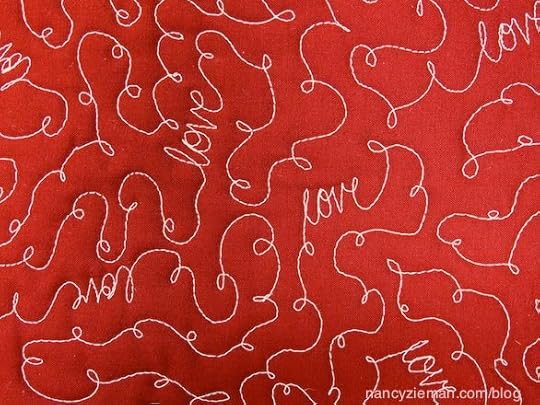
Loop de Loops and Handwriting
What free-motion design should I stitch first? Where should I start? These are questions that you might ask. Molly’s answer is, “Start by stitching your name or a favorite word!” The basic loop de loop design—just like cursive—allows you the freedom to incorporate words into free-motion quilting designs.
Pebbles and Chains
Pebbles and Chains consist of a space filled with as many touching circles as possible. Pebbles can fit just about anywhere. Even a single row of pebbles, called a chain of pearls, can be beautiful in small spaces.
10 Free-Motion Quilting Techniques, Plus 15 Projects
In Molly’s book, Free-Motion Quilting for Beginners, learn how to:
Set up your machine for free-motion quilting, no technique is left out
Begin by learning how to quilt your name, because soon you’ll be signing unique works of art
Master all the fundamentals of free-motion quilting by working on manageable fat-quarter-sized fabric pieces
Confidently stitch 10 different quilting designs, including stippling variations, pebbles, square meander, swirls, and woodgrain
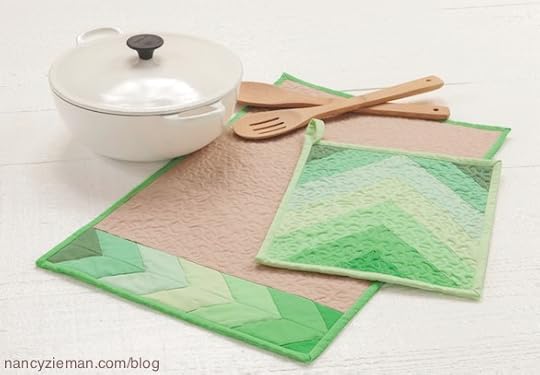
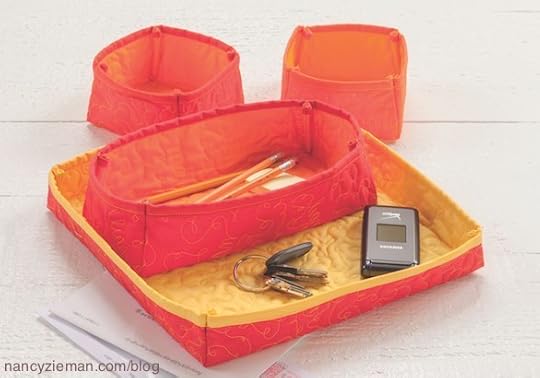
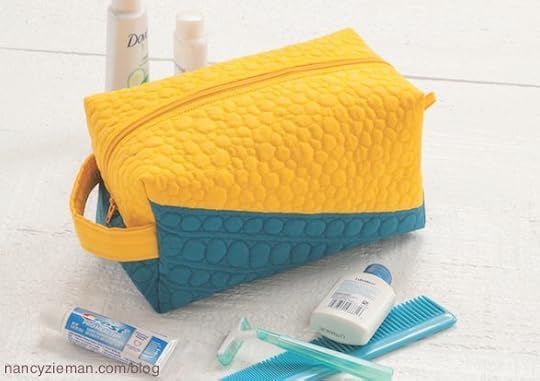
Take your skill to new heights as you quilt 15 practical projects to enhance your daily life, such as a table-top organizer, table runner, tote bag, weekender bag, and laptop sleeve

Watch Free-Motion Quilting for Beginners on Sewing With Nancy online.

For a chance to win a copy of Free-Motion Quilting for Beginners, compliments of Martingale/That Patchwork Place, let us know which free-motion style is your favorite. Please leave your comment below.

The random winner of a copy of The Absolute Easiest Way to Sew book, is Patti K. Her comment was: This sounds like a great book!! I learn so much from Nancy every time I watch one of her programs. Thanks for making them available to us.

Bye for now,
Content in this feed is © copyright 2016 by Nancy Zieman and may not be republished without written permission. You’re welcome to forward the email to a friend or colleague but it’s not okay to add the RSS feed automatically as content on a blog or other website.
Make sure you are subscribed to my enews mailing list so you won’t miss a thing. Sign up here . Join us on Facebook , plus a host of other social media channels. Connect With Nancy today!
June 14, 2016
Sewing With Border Prints—A Simple Solution

When it is time to sew a new tote, choose a fabric border print and let the artistic design simplify the sewing process.
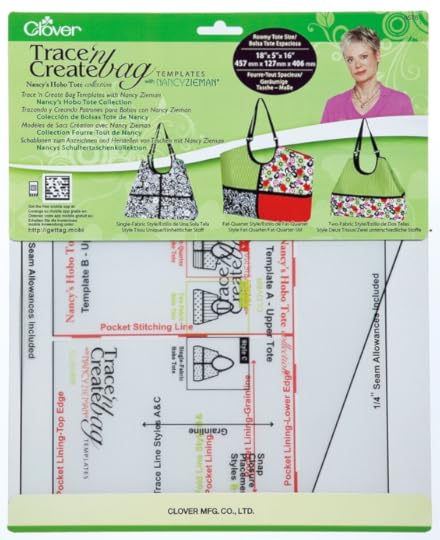
Border print fabrics are readily available and easy to fussy-cut. If you aren’t familiar with the term, fussy-cut, it means to feature a certain portion of the textile print in your sewing design. Using the Trace ‘n Create Hobo Tote Template collection, the designer upgrade is quite simple.
Supplies, fabric, and notions:
Pellon Peltex Interfacing
Fine-tip non-permanent marking pen
Border Print Fabric : Note from Nancy: Use the fabric requirements listed on the Hobo Tote pattern. Keep in mind that you may need extra yardage to center the design. The fabric from Lecien is, unfortunately, no longer available. Shop at your local fabric retailer for the newest in border prints.
Trace ‘n Create Hobo Tote Bag Template
Modify the Template
To easily fussy-cut the border print, we’ll create a full front/full back template from the provided pattern as described in the Hobo Tote: Style B.

Lay the bag template on the interfacing.
Use a non-permanent marking pen to trace around the template marking center front/back. Notice the center is not the edge of the template, but rather the marked seam allowance line shown in yellow.

Flip the template to the left-hand side.
Align the center front markings and trace the left side of the bag.
Make two interfacing templates: one front and one back.

Cut out the interfacing templates.

Position each interfacing shape over the border print.

Note from Nancy: I decided to only showcase the floral portion of the fabric design. Notice that the Peltex is positioned with the bag base plus the 1/4″ seam allowance on the green section.

Cut the shape.
Fuse the interfacing to the wrong side of the fabric, following the manufacturer’s directions.

Repeat these steps to create a bag front and bag back.

Join the bag front and back by stitching the bottom seam.

From this point, the border print designer tote can be stitched following the directions for the Hobo Tote: Style B. Read more about the Hobo Tote construction on this blog post.

Watch Hobo Totes-Casual To Classic on Sewing With Nancy online.
For a chance to win a Trace ‘n Create Hobo Tote Bag Template from Clover Needlecraft, Inc., please leave a comment below sharing your plans to make a border print Hobo Tote Bag.
Thank you for sharing your comments, in last week’s post, regarding The Simple Simon Guide to Patchwork Quilting. The random winner of a copy of this book, compliments of Interweave Press, is Kathleen Sackett. She said: This book sounds so exciting and just what I have been looking for to improve my sewing and quilting skills.
Bye for now,
Content in this feed is © copyright 2016 by Nancy Zieman and may not be republished without written permission. You’re welcome to forward the email to a friend or colleague but it’s not okay to add the RSS feed automatically as content on a blog or other website.
Make sure you are subscribed to my enews mailing list so you won’t miss a thing. Sign up here . Join us on Facebook , plus a host of other social media channels. Connect With Nancy today!
June 11, 2016
Learn the Tricks of Sewing With Double Needles

When sewing with knits, one of my favorite ways of hemming is using a double needle, or sometimes referred to as a twin needle. With one row of stitching, you’ll achieve two perfectly stitched lines. Or use the closely spaced double needles for heirloom sewing or the wide widths for embellishment.
Double Needle Facts
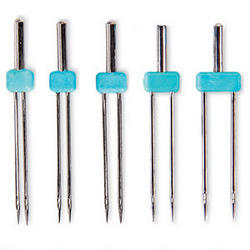
Double needles fit any machine where the needle is threaded front to back not side to side.
Common double needles sizes include: 1.6, 2.0, 3.0, 4.0, and 6.0 .
The sizing refers to the distance in millimeters between the needles.
Size 6.0 is too wide for some machines. If the widest zigzag stitch is 4.0 on your machine, do not use a 6.0. The opening in the throat plate is not wide enough for this extra wide double needle.
The bobbin thread catches both top threads, resulting in a zigzag look on the fabric underside.
Sewing Tips for Double Needles
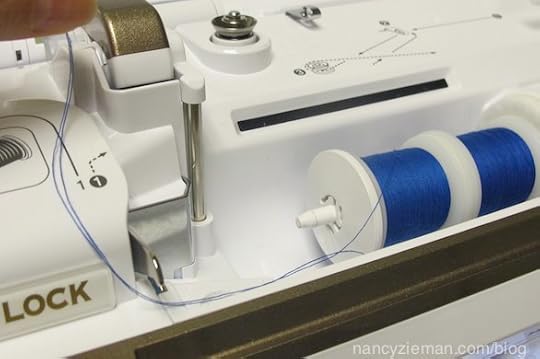
Use two spools of thread on the top of the machine, position them so the threads unwind in opposite directions. This prevents the threads from tangling.
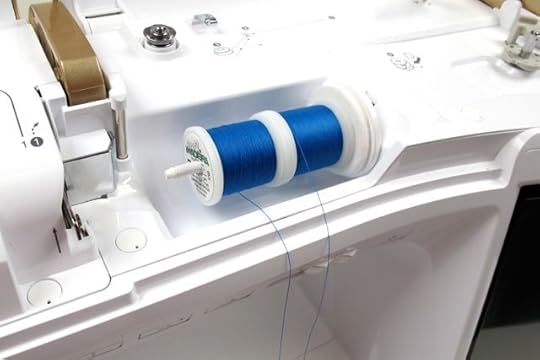
If your machine does not have two spool pins, wind an extra bobbin and stack the bobbin with the spool on the spool pin. Again, stack them so the threads unwind in opposite directions.
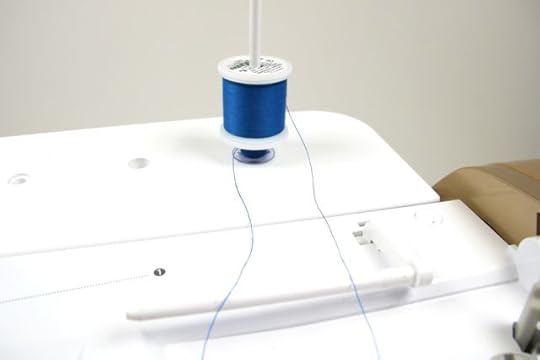
Treat the two threads as one when threading the machine. At the needles, separate the threads and thread each needle.

Before stitching, pull the threads to the back of the machine to ensure there isn’t any twisting of the threads.

Double check that your machine is set at a straight stitch. A zigzag setting, for example, could cause the needles to swing beyond the presser foot opening. You know what could happen then!

Now, stitch! The details are all in the set-up.
The bobbin accommodates both threads. It’s rather magical!

Use double needles to create an embellishment.

To create a raised effect, slightly tighten the top tension. On the wrong side of the fabric, notice that the fabric tunnels due to the tighter thread tension.

All my favorite sewing tips are in one book.
The Absolute Easiest Way to Sew chapters include:
Sewing Notions
Sewing Machine Confidence
Serger Spotlight
Patterns
Fabric Facts
Sewing Basics
Beyond the Basics
Watch The Absolute Easiest Way to Sew (Part One, Part Two, and Part Three) on Sewing With Nancy online.
From last week’s post, the random winner of a Supersized 5-in-1 Sliding Gauge, compliments of Clover, is Helen. She said: I love the smaller gauge and know I will love the big brother for measuring grainlines, circles, and a straight edge.
Bye for now,
Content in this feed is © copyright 2016 by Nancy Zieman and may not be republished without written permission. You’re welcome to forward the email to a friend or colleague but it’s not okay to add the RSS feed automatically as content on a blog or other website.
Make sure you are subscribed to my enews mailing list so you won’t miss a thing. Sign up here . Join us on Facebook , plus a host of other social media channels. Connect With Nancy today!
June 9, 2016
Sew Invisible Zippers Easily

I often hear the stitching community say they are afraid of zippers. Today, I’d like to demystify the invisible zipper. It is one of the most useful zippers in garment/apparel and home décor sewing. The application is straightforward after you learn The Absolute Easiest Way to Sew! To seamlessly—pun intended—insert an invisible zipper into the seam use this modified approach, attaching the facing before sewing the zipper. It’s a new approach and one of my absolute easiest sewing tips. Conquer the zipper fears!
How to Insert an Invisible Zipper
Stitch the shoulder seams of the top or dress.
Fuse interfacing to the front and back neckline facing fabrics.
Stitch the shoulder seams of the facing pieces.
Do not stitch the center back seam at this point.
Align the facing to the garment, right sides together, matching notches.
Stitch the facing to the neckline.

Grade the seam allowances, using a pinking blade with a rotary cutter for the fastest and easiest results.

Press the seam allowances toward the facing.
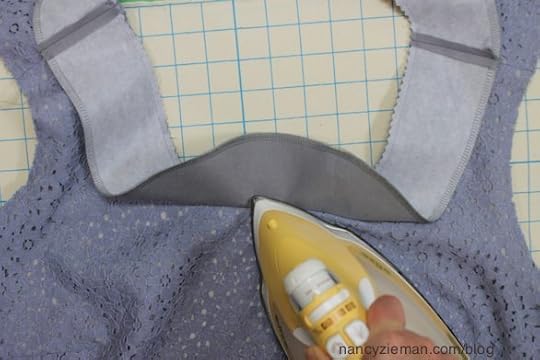
Understitch, stitching the seam allowances to the facing. Use a multi zigzag stitch.

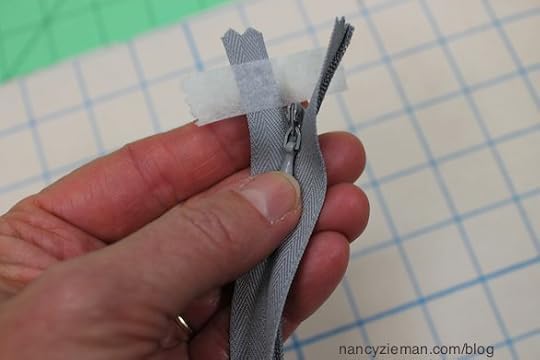
Flatten out the zipper tape, pressing the teeth to the outside.
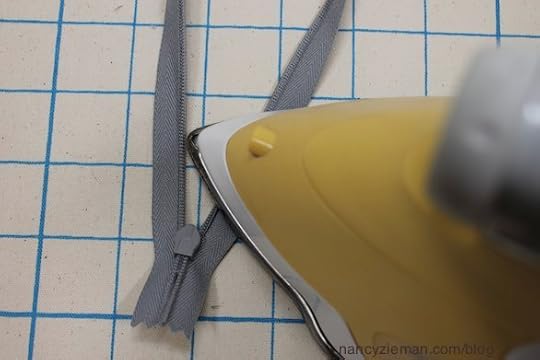
Place a piece of tape or a pin above the zipper stop on one side of the zipper.
Mark the 5/8″ seam allowances along both sides of the center back seam. Begin marking at the neckline seam, and continue marking the length of the zipper opening.
Align one side of the zipper tape to the corresponding side of the dress, meeting the zipper teeth to the 5/8″ marking and placing the zipper top slightly below the neckline seam.
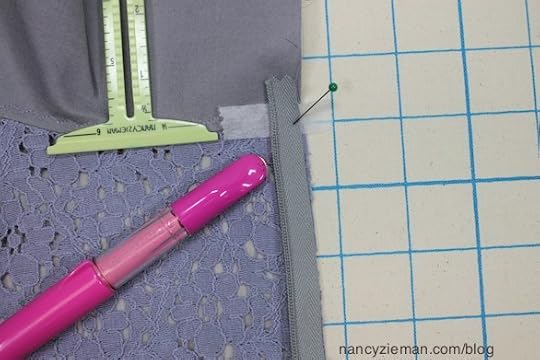
Pin one side of the zipper to the fabric.
Attach the I nvisible Zipper Foot . Starting at the neckline seam, position the presser foot on top of the zipper tape with the needle stitching along side of the zipper teeth.
After stitching, close the zipper to check that the zipper stop is directly below the neckline seam.
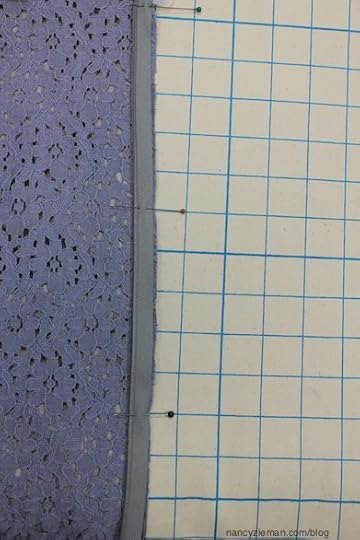
Align the second half of the zipper at the top of the neckline, placing the remaining side of the zipper at the same distance from the top of the neckline.
Align the zipper teeth to the marking; pin. Then, stitch the zipper to the remaining side of the dress/top.

After stitching, check to make certain the neckline edges align.
Fold the facing over the zipper tape; hand stitch.

Pin the lower portion of the seam from the hem to the end of the zipper.
Move the invisible zipper foot completely to the left of the needle. Stitch from the zipper stopping point to the hem.

Ta dah!

The Invisible Zipper technique, plus much more is printed in The Absolute Easiest Way to Sew.

Kudos to Diane Dhein, the editor, and Laure Noe, the illustrator, for making this book possible.
The Absolute Easiest Way to Sew chapters include:
Sewing Notions
Sewing Machine Confidence
Serger Spotlight
Patterns
Fabric Facts
Sewing Basics
Beyond the Basics
Watch Absolute Easiest Way to Sew (Part One, Part Two, and Part Three) on Sewing With Nancy online.

For a chance to win a copy of The Absolute Easiest Way to Sew book, let me know what sewing tip/technique you like the most or would like help fine-tuning.
Bye for now,
Content in this feed is © copyright 2016 by Nancy Zieman and may not be republished without written permission. You’re welcome to forward the email to a friend or colleague but it’s not okay to add the RSS feed automatically as content on a blog or other website.
Make sure you are subscribed to my enews mailing list so you won’t miss a thing. Sign up here . Join us on Facebook , plus a host of other social media channels. Connect With Nancy today!
June 7, 2016
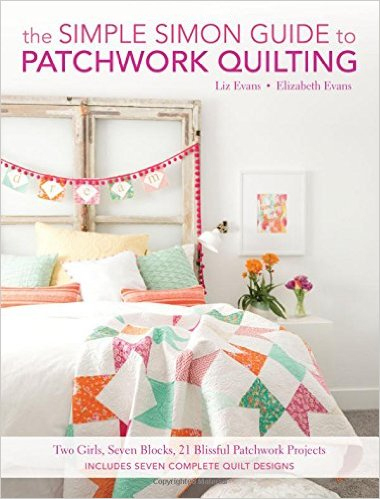
Simple Simon Guide to Patchwork Quilting Book Tour

Welcome to the Nancy Zieman Blog stop on the Simple Simon Guide to Patchwork Quilting Blog Tour . The first-time quilt authors who also happen to be sister-in-laws, Liz Evans and Elizabeth Evans, are online bloggers and active in Facebook and now authors of The Simple Simon Guide to Patchwork Quilting . Recently, I had the opportunity to interview the authors about their upcoming book.
Meet the Authors:

Q: When did you start sewing/quilting?
Elizabeth—My grandmother bought me my first sewing machine when I was 12, and I began whirling on the machine. I took a long break during high school and college, but I found sewing again as a young mother when I felt part of me was missing. I borrowed Liz’s sewing machine that was still in the box—I was off and running. I call sewing my “thing that I can do everyday that can’t be undone.” It fills my soul.
Liz—I never wanted to sew or quilt or do anything even remotely domestic. In fact I was kicked out of my 8th grade Home Economics class. Later in my 20′s, I cried when my mom gave me a sewing machine for Christmas. (I thought it was the worst gift ever.) But then one night my mom dragged me to a quilt block making class and everything changed! I fell in love with the fabrics and limitless possibilities, and I have been sewing and quilting ever since!
Q: When did you first start brainstorming this creative book collection?
Liz—Elizabeth and I are both former school teachers and avid readers. Once we started our blog, we knew that writing a book was something that we could accomplish together. The book breaks down the basic fundamental quilting block units.
Q: Do you have a favorite quilt block?
Elizabeth—I am partial to the half-square triangle block. They are a simple unit, but they can make some pretty amazing quilts.

Liz—The basic 9-patch will always have a special place in my heart. It’s the first one I learned to sew together and still use ALL THE TIME!
Q: What is your favorite project in the book? Ok, you can pick the top two.
Elizabeth—My favorite is the flying geese quilt because we got to use our first fabric line in that quilt. It was a thrill to see it all come together.

Liz—I love the Ohio Star Chapter. I am named after my Great Grandmother Elizabeth who was known for her beautiful Ohio Star Quilt Blocks. (I even have one of her Ohio Star Blocks framed and hanging in my sewing room.) We were able to use her original treadle sewing machine in the photos of that chapter and I was so happy to have a piece of my family history included there!
Q: M y staff and I are particularly fond of the 9-Patch Quilt. Can you give us some insight?

Liz—We wanted to create a quilt that although simple in construction is visually interesting. We chose a modified Irish Chain pattern, which is a 9-patch block next to a solid block. We’re very happy with the results!
Q: What is next from authors in the world of sewing, quilting, and design? Should we mark our calendars?
Elizabeth—We have been working on our fall fabric lines with Riley Blake Designs. We also do have some other upcoming hush-hush projects!
Q: Any other info you’d like to share with quilters & seamstresses of all skill levels?
Liz—It’s never too late or too early to begin sewing or quilting. Also, don’t strive for perfection. Enjoy the process.
Q: If you weren’t writing sewing books and working on your blog site, what would be your dream job?
Elizabeth—It sounds weird but I always saw myself going to law school. But, I am certainly glad I didn’t; I love this job so much more!
Liz—I would love to be hired by Disneyland to redesign “It’s A Small World”…that would be SO MUCH FUN!
The Simple Simon Guide to Patchwork Quilting—About the Book
Liz and Elizabeth show you how to create 21 quilting projects, each using one of seven different quilt block designs. The projects are contemporary, the instructions are thorough. Here are some of the 21 projects included in the book:
Bold, colorful quilts with graphic designs
Stunning skirts and accessories
Unique home décor, from whimsical wall art to a fabulous fabric basket
The Simple Simon Guide to Patchwork Quilting also includes tutorials to complete for each project, from cutting fabric to attaching binding. Whether you’re new to quilting or are simply looking for inspiration, you’ll be inspired with this stylish approach to a traditional patchwork.
For readers who would like to purchase the book through Interweave, use code SIMPLES to receive 20% off.
Join the Simple Simon and Company Blog Tour:
Tuesday June 7th– Nancy Zieman
Thursday June 9th– Polka Dot Chair
Tuesday June 14th– Flamingo Toes
Thursday June 16th– Amy’s Creative Side
Tuesday June 21st– Missouri Star Quilt Company
Thursday June 23rd– Sewing in No Man’s Land
Tuesday June 28th– Diary of a Quilter
Wednesday June 29th– The Tattooed Quilter

For a chance to win a copy of The Simple Simon Guide to Patchwork Quilting, please leave a comment below and let us know the name of your favorite traditional quilt block. Interweave Press will give away one book to one US resident in the 48 contiguous states.
Bye for now,
Nancy Zieman—author, pattern designer, businesswoman, producer, and national sewing authority—is the host of the popular show Sewing With Nancy, which appears exclusively on public television stations across the United States and Canada. Follow Nancy’s blog at NancyZieman.com/blog and sign up to receive Nancy’s E-News for the latest news in sewing, quilting, & creating.
Content in this feed is © copyright 2016 by Nancy Zieman and may not be republished without written permission. You’re welcome to forward the email to a friend or colleague but it’s not okay to add the RSS feed automatically as content on a blog or other website.
Make sure you are subscribed to my enews mailing list so you won’t miss a thing. Sign up here . Join us on Facebook , plus a host of other social media channels. Connect With Nancy today!
June 4, 2016
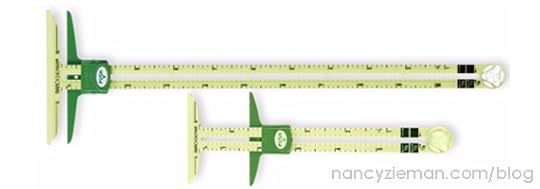
New Sewing Notion: Supersize 5-in-1 Sliding Gauge

Welcome the newest member of the family: Supersize 5-in-1 Sliding Gauge. One of my most popular notions, the 6″ original 5-in-1 Sliding Gauge, now has a big brother. The new tool can accurately mark up to 11″ in length.

The super-sized sliding gauge is as easy to use as the original gauge. Use it for sewing, quilting, home décor, and long-arm quilting projects. The slide locks into place allowing you to accurately mark projects.
Let me demonstrate a few of my favorite uses for this larger sliding gauge. Watch the demonstration of the original tool online, here.
Make Perfect Circles
Use the eye at the end of the gauge to mark the center of a circle.
Lay fabric on a cardboard or foamboard surface.
Note from Nancy: A large ironing board surface may also be used.
Add a push pin to the eye to anchor the center.
Slide the gauge to the desired circle’s radius.
Trace.

Mark a Straight Edge
Use the larger gauge to create precise straight edges of any distance.

Determine Grainlines
Grainline is important in apparel construction. It determines the stretch and drape of a garment. Make sure your next pattern is set on the straight of grain using the Supersize 5-in-1 Sliding Gauge.

Hems and Home Décor
When projects need a wide hem, use the Supersize 5-in-1 Sliding Gauge. The gauge lets you make long marks, equidistant across your project’s extra wide edge. This application is wonderful for curtain and drapery sewing. You’ll also find the gauge useful when creating a flanged-edge on a throw pillow.

Trim Placement
Mark the edge of your next project with the larger sliding gauge to determine trim and decorative stitch placement. The two straight edges work together to create perfectly parallel lines.

Watch Sewing With Nancy online and watch Nancy’s 5-in-1 Sliding Gauge demonstration here:
Leave a comment sharing which 5-in-1 Sliding Gauge application you’d try first. One winner will be randomly selected.

Bye for now,
Content in this feed is © copyright 2016 by Nancy Zieman and may not be republished without written permission. You’re welcome to forward the email to a friend or colleague but it’s not okay to add the RSS feed automatically as content on a blog or other website.
Make sure you are subscribed to my enews mailing list so you won’t miss a thing. Sign up here . Join us on Facebook , plus a host of other social media channels. Connect With Nancy today!
June 2, 2016
Absolute Easiest Way to Sew Collars
What if I told you: Collars are so easy to sew that even a first time stitcher will have success. Bold. I know, and that kind of assertive statement is out of character for me, but it’s true. You’ll be successful sewing collars in the absolute easiest way.
The Absolute Easiest Way to Sew Collars
In my Sewing With Nancy series and companion book, I share my favorite absolute easiest way to sew techniques. The collar being my signature speedy sewing tip. Here goes!
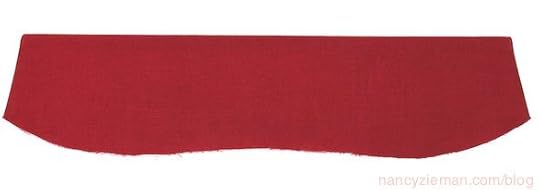
Interface the collars. Cut out two collar shapes from lightweight fusible interfacing and fuse one to the wrong side of each collar. One of my favorite fusible interfacings is Pellon’s Sof Shape .
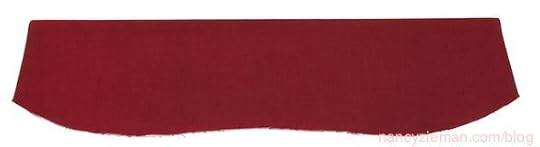
Meet collars right sides together. Stitch the outer collar seam.
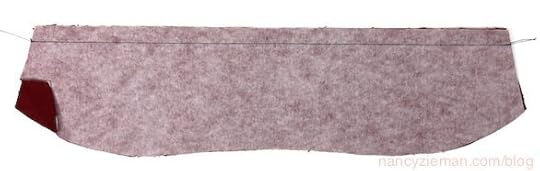
Grade the seam, trimming the under collar seam allowance narrower than the upper collar.

Press the seam flat; then press toward the under collar.
Understitch, stitching the seam allowance to the under collar. I like to use a multizigzag stitch. Or, you could use a straight stitch.
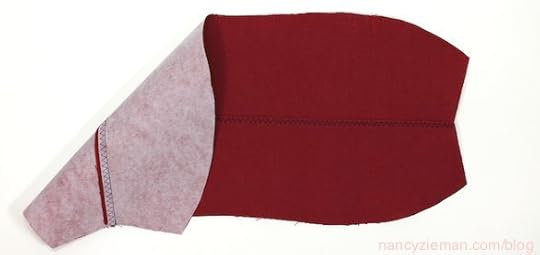
Fold the collar along the first stitching line, right sides together. Meet the collar front edges. Notice the outer collar seam allowance is already graded (trimmed) and completely understitched. This wrapped-corner sewing technique is what makes it the absolute easiest way to sew collars!

Stitch both collar front seams.
Grade the seam allowances, and angle cut the corners.
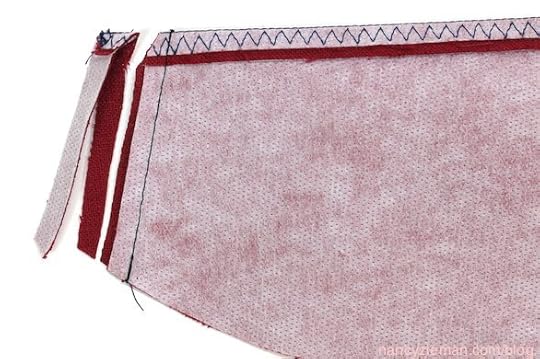
Turn the collar right side out and press. That’s it!
All my favorite sewing tips in one book.
The Absolute Easiest Way to Sew chapters include:
Sewing Notions
Sewing Machine Confidence
Serger Spotlight
Patterns
Fabric Facts
Sewing Basics
Beyond the Basics
Watch The Absolute Easiest Way to Sew (Part One, Part Two, and Part Three) on Sewing With Nancy online.

For a chance to win a copy of The Absolute Easiest Way to Sew book, let me know what sewing tip/technique you like the most or would like help fine-tuning.
Bye for now,
Content in this feed is © copyright 2016 by Nancy Zieman and may not be republished without written permission. You’re welcome to forward the email to a friend or colleague but it’s not okay to add the RSS feed automatically as content on a blog or other website.
Make sure you are subscribed to my enews mailing list so you won’t miss a thing. Sign up here . Join us on Facebook , plus a host of other social media channels. Connect With Nancy today!
May 31, 2016
DIY Your Way to a Healthier Laundry Room
Felt some static-reducing, fabric-softening wool dryer balls. It’s a quick craft that can save you a bundle.
These sweet little spheres can reduce allergens in the air and in fabrics, and they help your clothing dry faster. Less time in the dryer means less gas or electric usage, and more money in your pocket. It’s win-win! Plus, they won’t wear out. Make ‘em once and that’s all you’ll need.

I read an article in Scientific American the other week about how harmful the chemicals in fabric softeners and dryer sheets can be. It was alarming to learn that dryer sheets especially, are swimming in such baddies as carcinogens, neurotoxins, and respiratory irritants.
The fact that our skin is the largest organ in our bodies should give us all pause on this matter—the clothing we wear acts as a loose compress, filled with whatever good or bad things may be in our laundering routine. Not to mention the irritants that become airborne as they tumble in our dryers.
Bonus: If you’re missing that fresh scent, try spraying your dryer balls liberally with some wardrobe spray you make yourself with natural essential oils. Hop on over to our Dec 2016 blog to learn how.
Here’s what you’ll need:
One package of wool roving (0.7oz)
Aluminum foil
Dish soap (I prefer Seventh Generation for its lack of chemicals)
Sink
1. Tear off about an arm’s length of foil and crumble into a tight ball—the more spherical, the better. You want the diameter to be approximately 2″ (add more foil if you need to—it’s not an exact science). Make 3 balls of foil.

2. Fold your piece of roving so it’s divided into thirds. Cut at the folds so that you have three equal(ish) pieces.

3. Tear one of the pieces of roving in half, lengthwise. Wrap it around the foil ball tightly in one direction. You don’t want the edges to stray too far from the ball.

4. Now take the second half of the roving and wrap it tightly in the perpendicular direction. You shouldn’t see any foil at this point.

5. Go to the sink and run some warm water (I like it very warm, but not hot). Pour a little dab of dish soap in your hands, suds it up, and grab the wool-wrapped ball.

6. Wrap your soapy hands around the ball and saturate it under the warm water. Turn the water off. Begin worrying the wool ball from hand to hand like a baseball pitcher. The dish soap should build a nice lather.
7. Keep passing and rolling, worrying the ball back and forth. All you need to get the felting process going are warm water, soap, and agitation. The wool will start to felt and tighten around the foil.

8. When the wool feels secure and tightened around the ball (this will take a few minutes), you can rinse the lather out.

9. Repeat for the other two foil balls. Allow them to air dry on the counter overnight (or you can toss them into the dryer with your next load).
Throw them in your dryer—they can live there forever. No need for dryer sheets or fabric softener ever again!
Thanks to Emily Jansson and the Nancy’s Notions Team for sharing this tutorial!
Bye for now,
Content in this feed is © copyright 2016 by Nancy Zieman and may not be republished without written permission. You’re welcome to forward the email to a friend or colleague but it’s not okay to add the RSS feed automatically as content on a blog or other website.
Make sure you are subscribed to my enews mailing list so you won’t miss a thing. Sign up here . Join us on Facebook , plus a host of other social media channels. Connect With Nancy today!
May 28, 2016
What’s Your Favorite Sewing or Quilting Process?

Earlier this month I asked, via Facebook and Pinterest, for you to share your favorite sewing or quilting process. My staff and I chose several of the many responses, plus a spotlight on one of my followers.
Be sure to check out June’s Share Your Insight question below, and if you’d like, submit a response. Enjoy!
What’s your favorite sewing or quilting process?
Here’s what you are saying:
Company
“Sewing and quilting with my 5-year-old granddaughter.”—Jearit, Seattle, WA
Gifts and Generosity
“I enjoy making wristlets and key fobs to give away.”—Beverly Morten, Baltimore, MD
Inspirational Therapy
“I love appliqué! I started quilting after my cousin sent me a quilt that she made. I was recovering from having four strokes. When I looked at the quilt she made me, I knew what my NEW therapy was going to be. I looked at dozens of books and found that I really liked the appliquéd quilts the best. I started my first quilt using an appliqué technique and also doing everything with my stroke-affected hand. It turned out somewhat well and I have been doing it ever since. My arm is now recovered! ”—Michele Mann, Madison, WI
Garment Piecing
“I love the process of sewing my cut out pieces together, and watching a garment take shape. There is a Zen quality to the simple process of running the seams through my machine and a sense of self-worth when it is done.”—Carla Taylor, Bend, Oregon
All-Encompassing Enjoyment
“I enjoy every part of the process. Maybe the planning is my favorite part: which pattern, which fabric, what style changes, etc. I also enjoy the cutting and sewing, too. Of course, I really enjoy wearing what I’ve made or seeing the face of the person I’ve made the gift for!”—Charlotte Trayer, Mountlake Terrace, WA
Fabric! Fabric! Fabric!
“Picking out the fabric is my favorite part of the sewing process. I sew for my nieces, and I love the process of finding fabrics, patterns, and their favorite colors to make them a piece of clothing, purse, or doll clothes.”—Connie Caudill, Springfield, MO
Sweet Sounds
“I love the hum of the machine as it stitches along. With the completion of each seam, I get closer to seeing the results of the effort invested in creating the project. ”—Ellie Donald, Catonsville, MD
Free-Motion Quilting
“My favorite quilting process is free-motion quilting on my domestic machine. However, my favorite sewing process is embroidery. I love how both give me a sense of creativity. Each time I use one of these processes, I learn new skills. I love learning new things, don’t you? ”—Doreen Hersh, Wichita, KS
Accuracy
“Doing it right the first time. Oh, what bliss!”—Judy Englis, Portland, OR
Big Finishes
“My favorite by far is completing a project. For example: taking the last few stitches on a quilt binding and then placing it onto a bed or seeing the look on the face of my seven-year old granddaughter when I show her the latest princess dress-up gown finished.”—Judy Englis, Portland, OR
Hand Quilting
“I must be the black sheep of the family, I guess—I love hand quilting. I’ve even purchased tied quilts that have interesting blocks and hand quilted them if I didn’t have a project almost ready for quilting.”—Karole Walla, Big Timber, MT
One-Seam Flying Geese
“One Seam Flying Geese is my answer! I used to hate making Flying Geese until I saw a YouTube video by Ricky Tims demonstrating one seam flying geese it has changed my life! After finding a finished size cutting guideline, I can take any pattern using traditional construction and convert it to the one seam.”—Kay Jinks, O’Fallon, MO
Beginning and Endings
“I love quilting from the beginning to the end of each project! Strangely enough, it is the beginning and ending that I most enjoy. Choosing my fabrics is so much fun for me—that mixing and matching challenge is such a delight. The ending process of putting on the binding is so rewarding and exciting, knowing that my project is almost finished! All the in-between parts are lots of fun, also.”—Kathy Biciocchi, Weldon Spring, MO
Templates
“It’s funny you asked… Yesterday as I had your Hex Twist template in hand, and I found myself saying ‘Thank you, Nancy, for bringing me such pleasure.’ When I follow your instructions everything fits! I just made a couple of 3D blocks from the hex twist template and they look like a small box inside of a larger box. Nancy, your tip on starching saved me so much frustration! By the way, whenever I see a quilt pattern, that could be made using a template of yours, more times than not you’ll hear me say, ‘Hey, that’s a Nancy,’ when I spot the block.”—Kate Aitken, Cushing, OK
Piecing
“Piecing the blocks. I love to see them come together.”—Nancy Toney, Kihei, Hawaii
Sewing Clothing and Accessories
“Clothing and accessories are my picks. I like watching your shows as your methods make sense, are simple to follow, and have beautiful results. I need a group that deals with clothing construction since I enjoy others’ company.”—JeannieSue Anderson, Glyndon, MN
Heirloom Sewing
“I am completely in love with heirloom sewing and I love putting in a Dresden plate pattern. I have used beautiful embroidery, cutwork, puffing, lace shaping, reverse appliqué, pintucks with embroidery, lace sewn to lace or material, and entredeaux insertion between the petals of a Dresden plate. I am working on smocking by machine to add to the petals.”—Lee Wilson, American Fork, UT
May Reader Spotlight:
Shirley Haag’s Answer
“I’m whimsical, so I like to put my thoughts together and think of whom I might be making a quilt for. Then, I use colors we both like, find a pattern, and do my own variation. I always add a kitty to the quilt, as I love kitties. I’ve gone from painting to making quilts, and I love them both.”—Shirley, Portland, OR
You mentioned painting as a previous hobby. Does that skill add to your quilting design work?
Yes, oil painting definitely plays a part in my quilting. I always have to add my own artistic touch, even if it is a class project.
Where do you find sewing inspiration?
An inspiration for quilting, as with any art, is whatever is around you, magazines, or pictures you have taken, mine or those that others have taken. Landscapes are my favorite. I give most away; so I think of the person who is going to receive the item.
On a scale of 1 to 10, how big is your fabric stash? And, do you have a favorite piece?
I would say a 2 in comparison to my best friend, who got me started and who has been quilting for more than 20 years.
What color is most prevalent in your work?
I love all colors! Currently, I’ve used tones of purple.
June’s Share Your Insight Question
June Question: If you knew you wouldn’t fail, what sewing or quilting project would you try?

Submit your answer by June 17, using the form below, to be considered for our June Reader Spotlight.
Disclaimer: We may contact you to verify your answer. Your contact information will not be used for any other reason. Your submission to Nancy Zieman Productions, LLC, including contact information, gives us the right to modify, use, distribute, reproduce, publish, and display the submission indefinitely in all media, means, and forms without any payment to you. You hereby represent that you haven’t copied the content from a book, magazine, newspaper, or other commercial source.
Watch Sewing With Nancy online.
The random winner of a copy of the book, The Absolute Easiest Way to Sew is Cecilia. She said: The two most intimidating sewing processes are fitting pants and sewing in a zipper, yet I have sewn for awhile. I would love to win this book, as it could be very helpful to me. I always love your shows and books. Thanks for making this information available to us.
Naomi is the random winner of Nancy’s 30 Favorite Gifts to Sew book. Her comment was: I definitely need to make the Roll Up Chalkboard for my grandchildren.
Thanks for the comments regarding the blog, Six Easy Knit Sewing Tips . The random winner of a pattern from McCalls is Barb L. She said: Love 7331 as the styles are so classic. And, thanks for all the tips. I need to practice working with the serger on knit fabrics.

Bye for now,
Content in this feed is © copyright 2016 by Nancy Zieman and may not be republished without written permission. You’re welcome to forward the email to a friend or colleague but it’s not okay to add the RSS feed automatically as content on a blog or other website.
Make sure you are subscribed to my enews mailing list so you won’t miss a thing. Sign up here . Join us on Facebook , plus a host of other social media channels. Connect With Nancy today!
Nancy Zieman's Blog

- Nancy Zieman's profile
- 21 followers

