Kathleen Flinn's Blog, page 7
April 2, 2022
Easy Coq au Vin [Chicken Cooked in Wine] with Instant Pot option
This classic French dish sounds impressive. But if you can sear chicken and cook up some vegetables, you can make this easy coq au vin recipe, and offer a variation for cooking it in an Instant Pot. The name means simply, “chicken with wine,” and in this version, I’ve removed some of the more laborious steps without sacrificing either the flavor or the final result.
In its original French inception, the coq in coq au vin referred to a rooster, typically mean old birds who wore out their welcome in the hen house. The tough nature of the meat required a long simmering time to soften. Wine was used to help tenderize the meat thanks to its sugar content.
This easy coq au vin dish is great for entertaining, taking to a potluck or when preparing ahead for weekday meals as it taste better reheated. To make it even easier, I have included an Instant Pot variation.
Even though this dish calls for wine, it remains an economical dish. You don’t need an expensive bottle and you only need a cup or so. I’ve made this with $8 table wine and a expensive French red and frankly, it was a struggle to tell the difference.
Given that the odds of finding a rooster at your local supermarket are essentially none, I recommend employing chicken thighs and legs – or better yet, the full hind quarter piece with leg and thigh attached. You can use white meat if you’ve got non-dark meat fans in your posse.

At Le Cordon Bleu in Paris, we made the classic version that includes pearl onions and lardons, diced pieces of salted pork. In this recipe, I use a quality bacon over lardons. It’s easier to find and lends an earthy bit of flavor. I’ve also used diced ham leftover from a holiday meal, too.
Pearl onions do impart a certain sweetness, but they tend to be wickedly expensive and take a woefully long time to peel if you buy them fresh. I’ve come to rely on the frozen variety. They’re already peeled and it just takes a quick bath in butter to make them taste fresh. I’ve made this dish with both pearl onions and classic yellow and it’s good both ways.
It’s not easy coq au vin without wine…What kind of wine to use for this easy coq au vin? Choose a wine decent enough that you’d drink it alone. I prefer something a bit hearty, such as a Syrah, a Cabernet Sauvignon or a blend.
Not a red wine fan? Here’s a surprising tip: you can also make this with white wine. It yields a different flavor, but it’s still delicious. Use white wine or an inexpensive sparkling wine in place of red. When Mike and I visited the Chablis region, we ordered coq au vin and lo and behold, it came swimming in the region’s famed white. The end flavor tends to be a bit sweeter and lighter, yet still hearty and savory.
I usually buy two bottles of wine for this dish – one to cook the chicken in, and one to drink with it when it’s done. This dish also calls for brandy or Cognac, and while optional, definitely adds something to the dish, but you don’t buy a big bottle if you don’t have it on hand. I admit that I employ E&J Brandy at such moments; it runs about five bucks for a small bottle.
Paired with noodles or mashed potatoes, this serves six to eight.
– Updated May 5, 2022
How to make basic chicken stock (video)
How to cut up a whole chicken (video)
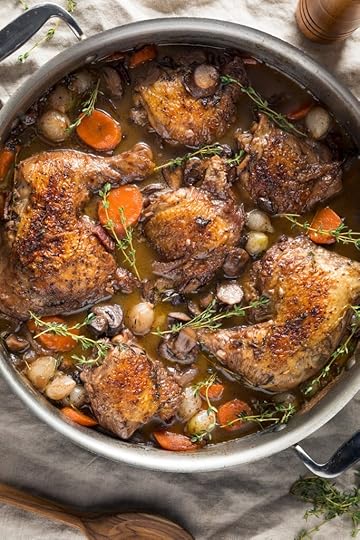
 PrintEasy Coq Au Vin (Chicken Braised in Red Wine) with Instant Pot optionCoq au Vin or "Chicken with Wine" is a classic French braised dish that sounds impressive but is surprisingly inexpensive and uncomplicated. If you don't want bones in the finished dish, use 3 pounds of boneless thighs. Use a higher-heat oil for the chicken, such as avocado oil – any type of olive oil will smoke too much. Course Main CourseCuisine FrenchKeyword braise, budget friendly, chicken, chicken legs, chickent thighs, comfort food, French cuisine, whole chickenPrep Time 40 minutesCook Time 2 hoursServings 6 servingsEquipmentDutch oven or heavy pot with lidIngredientsFor the braise5 lbs chicken, preferably thighs, legs or quarter pieces3 tablespoons avocado or grapeseed oil8 ounces (250g) bacon, sliced1 large yellow onion chopped (about 2 cups)4 ribs celery chopped (about 1 ½ cups)2 medium carrots about 1 ½ cups3 tablespoons butter2 tablespoons all-purpose flour2 tablespoons brandy or Cognac3 cups (700 ml) chicken stock1/2 bottle dry red wine (about 2 cups)4 cloves garlic chopped10 sprigs thyme tied togetheror 1 tablespoon of dried thyme2 bay leavesCooked separately from braise2 cups peeled frozen pearl onions thawed8 ounces (250g) brown mushrooms sliced3 tablespoons parsley choppedServe withMashed potatoes or wide noodlesInstructionsPreheat oven to 350°F /180°C. Pat dry with paper towels. Cut off extra fan and excess skin. Season the chicken pieces with salt and pepper. In a heavy Dutch oven, brown in batches in hot oil over high heat. It’s important to get the chicken nice and browned, as shown. Don’t rush this step; properly browned chicken is a key to the final outcome. Once browned, set chicken aside on a plate.
 Turn the heat to medium-low and add the bacon and cook slowly until slightly browned, about 5 minutes. Add the onions, celery and carrot and stir until tender. Add the brandy (if using), reduce slightly. Sprinkle with flour and stir until coated.
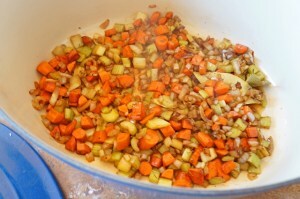 Return the chicken to the pan. Add the chicken stock, garlic and herbs. Then, add enough wine so the liquid just covers chicken pieces; this could be up to 2 cups. Bring the liquid to a boil, skimming off any foam or fat. Cover tightly and place in oven for about two hours or until meat is very tender.
 Meanwhile, cook the pearl onions and mushrooms in a medium skillet in 2 tablespoons of butter. Before serving, add the mushrooms, onions and chopped parsley to the cooked chicken. Check seasonings, adding salt and pepper until it taste right to you. Serve with noodles or mashed potatoes.
 Instant Pot optionPrepare steps as directed using the saute mode. Pressure cook for 20 minutes, then do a careful quick release. You may need to do a thorough skim of any accumulated fat before adding the pearl onoins and mushrooms. Finish as directed.
 Process photos by Kathleen Flinn. Finished dish photo by Brent Hofacker.
The post Easy Coq au Vin [Chicken Cooked in Wine] with Instant Pot option appeared first on Kathleen Flinn.


March 27, 2022
Want to start a podcast? A guide to gear
Do you want to start a podcast? The second I mentioned I was launching mine, my husband Mike immediately began to research audio equipment. In part, this was to be helpful, but it also provided an excuse to geek out on tech gear. He even asked Doug Berman, famed producer of NPR’s Car Talk and Wait, Wait Don’t Tell Me for his thoughts. (They became friends in the 1990s when Mike convinced the Car Talk team to partner with MSN.com; early listeners may remember my husband as “Mike from Microsoft.”)
Audiophiles may roll their eyes as some of my selections but our goal was to find the most cost-effective way to record a good quality podcast. I’m sharing this information here to show, in part, that you don’t have to spend a fortune to create good audio. Please note this page contains affiliate links.
RECORDING DEVICES
 Zoom ZH1 H1 Handy Portable Digital Recorder ($70)
This was my first recorder and I still use it regularly. It’s small and light yet it’s X/Y mic configuration captures terrific stereo sound. It has one line jack which means you can plug in a small microphone such as a clip-on lapel type known as a lavalier mic. I use this mic when I record the cooking segment of my show, or when I’m out on location since it’s so small. As a journalist, I got in the habit of recording interviews to assure that I got quotes and information exactly right, and I am still in this habit when I do research for stories or books and I use the Zoom H1 for those recordings. It takes a single battery, and with a 32 gig micro SD, it can records hours of content. If you’re starting out with a podcast in which it’s primarily just you talking (as opposed to recording guests) or you just want to improve sound for YouTube-style videos, this is probably all you need.
 Zoom H5 Four-Track Portable Recorder ($269)
This is my primary system for recording interviews. This powerful handheld device allows you to record up to four tracks simultaneously. Like the H1, the X/Y mics at the top allow stereo recording even when you’re not using an additional mic. However, what ups the game on the H5 is the inclusion of a built-in audio mixer and two mic inputs with XLR/TRS combo connectors which means you can plug in professional quality microphones as well. The X/Y portion of the system is removable and can be swapped out for other types of microphones, including a module that allows for two extra XLR/TRS mic inputs — which means you can record up to four professional mics at once. Like the H1, this unit can also be mounted on top of a video camera to provide a higher quality sound recording than most built-in mic systems.
There are two other possible Zoom models to consider. One is the Zoom H4 Pro, which retails for about $200 which has four-track recording ability and two microphone inputs. Many people use the H4 and love it, and if you’re primarily recording yourself and/or one other person, it’s a solid choice and I know NPR contributors who use H4 units.
I also considered the Zoom H6 which allows for up to six tracks of recording. Since I knew that I would be doing primarily one-on-one or one-on-two interviews, I didn’t feel that I needed six inputs. The H6 is also significantly bulkier; it’s not something you walk around with in your hand. I preferred the lighter, handheld format of the H5.
In the end, I chose the H5 because it had the option of expanding to four mic inputs by swapping out the X/Y mic with a dual input module, an option I did end up using.
MICROPHONES
 (For the H5) Sennheiser e835 Dynamic Cardiod Vocal Mic ($100)
You can spend a lot of microphones, and cheap mics are always a good value. Mike settled on Sennheiser mics; we have both an e835 and an e935. They’re solidly built and can accommodate a wide range of sound without distortion. They use an XLR connection cable which is compatible with the Zoom H5 but not the H1 which has only a standard audio plug-in. Mike discovered that live performers typically use Shure mics, but the Sennheisers have a warmer NPR-style tonality which is what we preferred for Hungry for Words.
 (For the H1/lapel mic) Sony ECME23 Clip-On Mic ($20): The Sony clip-on mic is handy if you’re walking around or doing something while recording audio and has a standard audio plug-in which makes it compatible with the Zoom H1 as well. It’s an omni-directional mic which means it picks up everything, but the nice thing about this Sony mic is that you can direct it where it’s pointing to more accurately capture the sound you want.
HEADPHONES
 Bose Quiet Comfort 3 Noise-Canceling Headsets ($160): It’s critical that you use headsets when recording. It’s the only way to tell what the mic is actually recording. We purchased these Bose headsets years ago to wear while flying. When I lost them for awhile during an office move, I used Sony earbuds and they worked fine, too. However, I strongly recommend headsets that cover your ears to help isolate the sound coming through the mics. It’s worth heading into a store to try on headsets to see what feels the most comfortable on you head, and to hear the sound for yourself, then pick out the ones you like best in your price range. If you’re interviewing guests, it’s always a good idea to have a set of headsets for them, too.
ACCESSORIES
 Zoom H1 Accessory Pack ($25) Since I recommend getting a case, a stand and an AC plug-in, it’s worth getting the H1 accessory pack as it includes all that plus a mic clip adapter and a decent foam windscreen. Price wise, I’ve seems cheaper to buy the H1 and the accessory pack separately even though that seems counter intuitive.
 AC plug-in for the Zoom H5 ($12) The H5 doesn’t come with a plug-in. Nothing sucks more than having your batteries die in the middle of an interview, so I recommend getting a power cord. The H5 comes with a hard case, so you don’t need to purchase one. If you’re going to use the H5 with a video camera, the standard Zoom H5 accessory pack might be worthwhile as it comes with a remote and a “dead kitty” windshield. However, I don’t really use either for podcast work, so I just bought an AC adapter plug-in.
 Male to Female XLR Cables ($6 to $15 each, depending on length).
These standard studio cable allow you to connect microphones to an input device, such as the Zoom H5. This kind of connection allows for a more optimal sound connection than a standard audio plug-in, such as the input on the H1. I have a few cables: a pair of three-foot cables for when I’m conducting a face-to-face interview in my kitchen, and then a six-foot and a 10-foot cable when I use a mic with a PA system.
 SD Cards and SD Card Reader ($15) The Zoom records take micro SD cards. The H5 takes a micro-SD card with an SD adapter. The price of these storage cards has come down dramatically in years, so a 32-gig will run you as little as $12. I mainly use Sandisk brand SD cards. If your laptop or computer doesn’t have an SD card reader built-in, you’ll need an SD card reader to plug into your USB port. Kingston is a reliable brand. It’s worth adding that micro SD cards are fragile and you should upload audio regularly. It’s always a good idea to keep a backup, too.
 Octopus Device Wrangler: I’m a big fan of bendy “octopus-style” device holders. They’re great because you can bend them to your will and they can do multiple duty as a holder for your recorder, or a cell phone, a go pro or camera. Since I record while cooking, I end up wrapping mine around weird places to capture ambient sounds. However, if you just need a stand to hold your recorder, you can use one of the inexpensive folding stands below and just take off the mic cap.
 Mic stands: What types of stand(s) you need depends on how you’re planning to use them, whether it will be you recording yourself at home, interviewing other people, etc. I recommend getting small folding stands if you’re going to travel at all with your gear. If your recording area will be static, it’s worth getting heavier stands with flexible arms so that you can get the mic as close to your guest as possible. I have two sets of stands, an inexpensive folding desktop set from Bearstar ($15 for two) and two Gator heavy based arm-style stands ($30 each). Make sure whatever stand you get comes with a mic clip.
 Pop filter: When people talk, they tend to “pop” sound letters, such as Ps. You can buy inexpensive covers to place in front of a directional mic to reduce this effect. I use Aokeo pop filters ($7 each) but it was less about the brand than just getting filters that work with your mic stands. You can also purchase foam mic covers which help cut down on extraneous sound but they don’t necessary stop popping sounds.
NON TECH
![]() Moving blankets ($25 for six) If you’re going to record in an open space, say your dining room, cover your table with a layer of moving blankets, an extra quilt or even towels to absorb the sound that would otherwise ricochet off that hard surface. I also often hang a moving blanket from the back of my oven’s vent hood to help deaden sound. The rafters in my basement office are stuffed with recycled denim insulation to help retain heat but it works to absorb noise, too. Evaluate your space and see what hard surfaces you can cover with soft material to mimic a studio. One NPR contributor I know goes into his closet to record material. It works like a charm thanks to all those sound-absorbing clothes.
Moving blankets ($25 for six) If you’re going to record in an open space, say your dining room, cover your table with a layer of moving blankets, an extra quilt or even towels to absorb the sound that would otherwise ricochet off that hard surface. I also often hang a moving blanket from the back of my oven’s vent hood to help deaden sound. The rafters in my basement office are stuffed with recycled denim insulation to help retain heat but it works to absorb noise, too. Evaluate your space and see what hard surfaces you can cover with soft material to mimic a studio. One NPR contributor I know goes into his closet to record material. It works like a charm thanks to all those sound-absorbing clothes.
This post was originally published in 2018; it has been updated. This page contains affiliate links.
The post Want to start a podcast? A guide to gear appeared first on Kathleen Flinn.
Sous Vide Steak vs. Grilled
 Conventional Grilled Steak
 Sous Vide Steak
Last night, our neighbor, Dr. Vince, invited us down for dinner. “We’re doing a competition,” Dr. Vince told Mike. “Sous vide steak vs. grilled.”
 Dr. Vince
For those unfamiliar, sous vide grew from the cannon of techniques developed as part of molecular or modernist cuisine. In a nutshell: food goes into a sealed plastic bag and is then cooked in a water bath at a precise temperature, generally one much lower than used in traditional cooking and for a longer period of time. In French, sous vide means “under vacuum” or “without air.”
This is the kind of thing that Dr. Vince does when he’s not working as a medical doctor. For instance, he once invited us over to test two versions of ramen made from different flours. (Ramen made with 00 flour won out.)
How each one was cooked
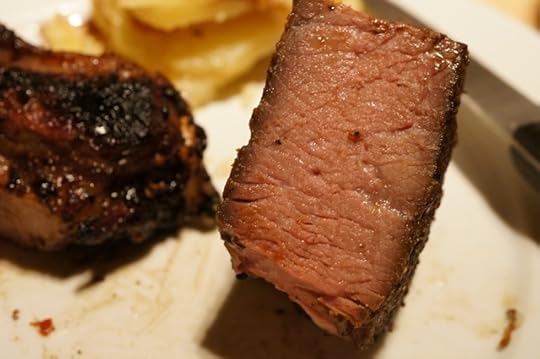
We treated both steaks with a homemade dried porcini rub, plenty of sea salt and pepper. Per ChefSteps, Dr. Vince placed the sous vide steak into a plastic bag and cooked at 140F/60C for about 50 minutes. He and I cooked the grilled steak on a hot charcoal grilled, first on direct heat, then finished off the heat with the lid on. Total cooking time, about 12 minutes. Dr. Vince seared the cooked sous vide steak in a pan with some butter to brown and slightly caramelize the outside.
As sides, Mike made this potato gratin from my site, although he substituted in prosciutto for pancetta. The four of us ate nearly the entire pan. Dr. Vince’s wife, Dr. Susan, made a homemade apple pie and a side salad.
 Sous Vide up close
The Results
The sous vide steak had the classic even cooking throughout that the method is known for. It lost no juice in the cooking process, while the other grilled steak displayed the traditional trickles of reddish brown liquid seeping from underneath following cooking. Dr. Vince decided earlier in the day to cook the sous vide steak to just a touch medium. We aimed for the same with the grilled steak, but it turned out medium-rare.
 Convention steak left, Sous Vide on right
The conclusion in sous vide steak vs. grilled? Generally inconclusive, but in this test, at least, the conventional grilled steak received slightly better marks. This might be because the sous vide version was cooked a bit past medium rare. We could taste the subtle umami of the porcini rub more clearly on the sous vide steak. We all agreed the texture was better on the sous vide steak, softer and with the solid, evenly cooked texture that you find in slow-cooked meats, such as smoked brisket or barbecued pork. The conventional steak had a bit more flavor on the exterior imparted from the caramelizing factor from the fire.
If the sous vide steak had been cooked medium rare? Or finished on the grill, instead of a crazy-hot iron skillet? I could see it beating the conventionally grilled steak. Ah, another test, another time.
This post was originally published in 2013. It has been updated.
The post Sous Vide Steak vs. Grilled appeared first on Kathleen Flinn.
March 10, 2022
Why Is There Iodine in Table Salt and Is That a Bad Thing?

 I was inspired by The Kitchen Counter Cooking School, but I was wondering why you’re so against iodized table salt? Also, why is there iodine in table salt. Is this a bad thing? I’ve heard that people need a certain amount of iodine and it’s impossible to get otherwise. Is this why there is iodine in table? Any clarification would be helpful! – Sally B., Madison, Wis.
Kathleen says: Let me clarify. I’m not against iodine in salt. I’m not a fan of highly processed table salt as the natural trace elements have been stripped out. That’s why I recommend unrefined salt for home cooking instead of highly processed table salt. There are many affordable, healthier and ecologically better options out there, as I recently learned from the excellent book Salted by Mark Bitterman.
Unrefined or natural salts, such as mineral or sea salts, contain a variety of trace elements, often mirroring the makeup of these minerals in the body. These include magnesium and potassium, both of which help the body metabolize sodium. Bluntly put, unrefined salt has minerals that help you process the sodium better and flush out what the body doesn’t use.
Refined salt has been through an arduous chemical transformation to strip away these trace minerals to leave it pure white and pure sodi um paired with an anti-caking agent and added iodine . So you get a wee bit of iodine, but none of the trace minerals that help you break down and use the sodium more efficiently. If you’ve had that container of table salt in your cupboard for more than a year, the iodine may have likely evaporated, too.
Another reader asked, “Why do they strip all the trace mineral elements out of table salt?” Only a single digit of processed salt – about 7% – is used in food or sold to consumers as table salt. The rest is sold for a wide range of industrial applications that require chemically pure sodium chloride. Pure sodium is required to make various pharmaceuticals, baking soda, fertilizer, injection-molded plastics and explosives, among other things.
Why do is there iodine in table salt in the first place? Some areas of the world, including the Great Lakes region of the United States, don’t have iodine as a naturally occurring mineral, so in the 1920s salt manufacturers began to add it to fight against disorders related to iodine deficiency, notably thyroid disorders such as goiter and cognitive development in infants and children. But not every area is deficient in iodine; for instance, South Carolina is sometimes referred to as the “iodine state.”
The World Health Organization combats iodine-deficiency by promoting iodized salt globally. In a famine setting, the lack of iodine — among many other nutrients — is a serious health issue. At that point, what salt tastes like or how much it’s refined doesn’t matter.
But in most industrialized countries where people have an adequate diet, there are other options for getting iodine. Some argue that salt isn’t the most effective way to get iodine in your system, and eating foods with iodine are a better bet. Most dairy products contain iodine, as does seafood, kelp and seaweed, such as the kind used in sushi rolls. For the non-seafood eaters, you can also get iodine by eating spinach, asparagus, garlic, strawberries, lima beans, mushrooms, sesame seeds, zucchini, Swiss chard, collard greens and turnip greens. Another option is to take a multi-vitamin with iodine.
I used to advocate kosher salt, but after reading Salted, I learned that it too can be highly processed with most of the minerals stripped out. So I now recommend sea salt or sel gris for daily cooking which includes important minerals that your body needs, notably magnesium, calcium, potassium, and sometimes – depending on the provenance – many more. In my kitchen, I used a variety of salts and one of my standards is Trapani’s a natural sea salt with iodine from Italy.
Try this: Get some table salt and some sea salt. Put them in a bowl and compare the color, texture and taste. This is fun to do with friends; ask them to bring whatever salt they have at home (other than table salt) and do a comparative tasting. You don’t have to eat highly processed sodium that doesn’t taste good. Salt is used in such limited quantities in cooking, and life is short. Buy decent salt, get yourself some real flavor and extra minerals.
This story was originally published in 2012. It has been updated and may contain affiliate links.
The post Why Is There Iodine in Table Salt and Is That a Bad Thing? appeared first on Kathleen Flinn.
February 1, 2022
How to Avoid Wasting Food
A couple of years ago, comedian John Oliver took to task the issue of food waste on an episode of This Week Tonight. It’s a great primer on a serious problem.
I find that my diligence on wasting food waned in the past year. At the start of the pandemic, I panic-shopped and bought too much. I did all I could to avoid tossing anything, in part because I wanted to limit how often I had to go to the store to buy anything. In the past months, though, I’ve found myself getting lax. When I cleaned out the fridge yesterday, I was a bit shocked at how much I tossed into the bin. I cleaned out my freezer and, quelle horror, I found an entire stash of hamburger from March 2020. WTH? (Although, experts say it is still fine to eat.)
So I watched Oliver’s story again. I dedicated myself to eating everything in our freezer.
I dedicated an entire chapter of my 2011 book, The Kitchen Counter Cooking School, to the issue of food waste. Here’s an excerpt from my chapter titled “Waste Not, Want Not,” courtesy Viking/Penguin Random House:
“Even as they bemoan food prices, American consumers are generally unaware that they spend the smallest percentage of their wages on food than any other country in the world; just above 10 percent of paychecks go toward putting food on the table. Compare that to 1900, when 40 percent of wages went toward food. Around 1960, the first time the amount spent on food was no longer the biggest expenditure, we spent about 25 percent.
The declining cost comes with the rise industrialization of farming practices and the shift of everything we eat – from pigs to cows to orange juice –into mass-produced merchandise.
Perhaps it’s the lack of investment that leads to a cavalier attitude toward food. We may give thanks for our bounty once a year, but then as a country we collectively waste about 40 percent of the food produced for consumption the rest of the time.
Anthropologist Timothy Jones spent more than a decade studying food wastes. His research finds that some crops sit abandoned or unharvested in the field where it’s grown. Supermarkets or suppliers discard another few percent dismissed as too imperfect for retail. The rest – about 25 to 30 percent –we throw away at home.
That food goes into landfills to rot where they emit clouds of methane, a greenhouse gas more toxic and damaging than carbon monoxide.
“By treating edibles as a disposable commodity, we teach our children not to value food,” says Jonathan Bloom, author of the book, Wasted Food: How America Wastes Nearly Half of its Food (and What We Can Do About It). He puts the figure on what we waste at more than $100 billion annually.
This jived with what I found in the interviews with the volunteers and the kitchen visits, and what I observed in my own house and in the homes of friends. A few of the volunteers agreed to keep a journal of what they bought, ate and threw out for two weeks. The result? They reported less waste due to the guilt they felt knowing they had to write it down, but even then, an average of 18 percent of their groceries bill went into the trash.
But why do we waste so much? Both Jones and Bloom offer some interesting insights.
First, people often shop for their aspirational life, not their real one. Everyone knows that you’re supposed to eat fruit and vegetables, so we stock up on perishables. But that leads into the second problem. Since most people don’t plan meals for the week, those beets or greens that looked so great at the farmer’s market sit untouched, as we end up eating convenience foods.
With proper planning, buying in bulk or loading up on two-for-one deals can be a genuine money saver; without a plan, it’s just a recipe to double or triple the amount of food tossed away.
Here are some strategies on how to avoid wasting food:
 These veggies represent $8.50 in post-tax income
-> The Post-It Note Trick: When you bring food home from the grocery store, put a post-it note on each perishable item with the amount it cost. No one would throw $5 into the trash, but wasted food is also wasted money. When you do toss that food without eating it, put those post-its in one place. At the end of the month, total up how much you tossed. The first time I tried this, I realized I had wasted $114 in food.
-> Take an Inventory of Your Fridge and Cupboards: Empty them out. Toss the truly expired stuff. Get to know what’s in them. I even recommend making a list. Have stuff that’s been around for a long time that you’ll never use? Or four jars of paprika? Donate excess stuff to a food bank. Start to research recipes to use up the stuff that’s been languishing. I just did this. It was a motley array from anchovies to udon. Why so many cans of pineapples and tomatoes? Ah, that Costco trip! Damn it.
-> Eat Down Your Fridge and Freezer: This challenge was developed by food writer friend, Kim O’Donnel. It’s pretty simple: Skip at least one shopping trip a month and try to use up your remnant food instead. I am dedicating the next month to eating all that frozen pandemic beef.
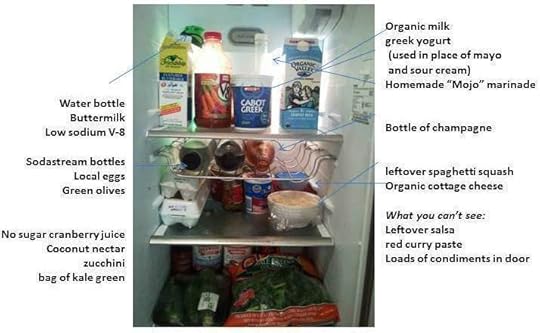
 Our fridge, with a photo of Mike and I kissing in Paris.
-> The Photo In the Back of the Fridge trick: Chef Thierry Rautureau of Seattle suggests putting a favorite photo in the back of your refrigerator. “If you can’t see it, your fridge is too full.”
-> Shop more often, buy less: Buy one pepper, not three. Buy three potatoes, not three pounds. Says Chef Rautureau: “If you have less food in your fridge it will actually push you as a cook. You will have to make something different. It will force substitutions. You think, ‘I don’t have a green pepper but, oh wait, I have a zucchini so I will try that.’ It’s a good thing. That’s how you learn.”
-> Don’t give up on food too easily: Apple has a dent in it? Cut it out and use the rest of the apple. If a few leaves of lettuce go brown, pluck them out, don’t chuck the whole bag.
-> Learn to make soup: Check out my “How to Make Soup out of Anything” guide. Soup is basically sauteing a half onion, adding chopped up leftover vegetables, some water and stock and simmering it for an hour.
-> When a jar of jam, mustard or peanut butter is nearly empty, use it to make vinaigrette: Seriously, this is a great trick. Watch the video here.
-> Home-style Individually Quick Frozen (IQF): This is a super easy way to preserve almost any vegetable or fruit. I do it all the time with berries. Spread them on a tray, freeze, and when frozen solid, put them into a plastic bag. In January, you can pull out a handful onto your pancakes, or add to a morning smoothie.
Learn a few super flexible recipes to use up common leftovers, such as:
-> Stir-fried rice – I use this version from Simply Recipes way to use up leftover rice and random vegetables
-> Omelets – Another simple way to create a new meal with a couple of eggs and leftovers. Watch Jamie Oliver in this video lesson
-> Quesadillas – My husband will eat almost anything taste good stuck between two tortillas with some cheese
ALSO
> Follow Jonathan Bloom’s excellent blog, Wasted Food: Get his newsletter or an RSI feed, follow him on Twitter. Keep this issue top of mind.> Order the classic book, More With Less by Doris Longacre: Written for the Mennonite Church, this book offers all kinds of suggestions for menu planning, shopping and rethinking how we consume in this world of such intense consumerism.Longacre’s book taught me a lot about how to stop wasting food. As Oliver notes, we don’t need all-you-can eat ribs or “endless shrimp buffets” in a country that not only wastes so much food but also has the dual issues of obesity (about 35% of Americans are morbidly obese) while nearly one-in-six children go hungry.
Do you have any suggestions or strategies for wasting less food? Let me know.
This post may contain affiliate links. It was originally published in 2015. It has been updated.
The post How to Avoid Wasting Food appeared first on Kathleen Flinn.
January 28, 2022
How to Outfit a Kitchen on a Budget or 14 Kitchen Essentials Every Cook Needs
What are kitchen essentials? People have been quite successful making food in the past centuries with little more than a pot, spoon, bowl, knife and cutting surface. Years ago, I started a guide for college students but I’ve expanded it to a list for anyone who is outfitting a kitchen — or downsizing one. Please note that this page may include affiliate links.
 A Good Chef’s Knife
Don’t waste money on a cheap knife block set. You’ll get a bunch of cheap knives, and won’t use most of them. I mean, what’s the point of a “vegetable knife?”
Start with a chef’s knife, usually around eight-inches but this can vary by your size and your hands. I always suggest going to a store that will allow you handle the knife first. What you’re after is what I call “the steel and the feel.” If it’s uncomfortable, you won’t want to use it. It should have a blade of good enough quality that it can take an edge and keep it. After your chef’s knife, follow it up with a serrated bread knife and a couple of paring knives.
Never put a knife in the dishwasher; the detergent will dull the blade, the heat from the steam may warp it and neither will do much for the handle, either.
IKEA makes a decent (if not long lasting) chef’s knife for about $10, and Victorinox makes a high-carbon steel one for about $30, but you’ll be replacing both in a few years. You can find great deals at restaurant supply stores and at the business-focused Costco outlets. If you want to splurge, explore mid-range options from German or Japanese knife manufacturers such as Henckels, Wusthof and Global. Avoid their very cheapest, entry-level goods, though; at that point, you tend to be paying more for the name brand than the quality of knife. If you invest in a knife and treat it well by hand washing it and getting it regularly sharpened, like other kitchen essentials, it can last a lifetime.
 Cutting Board (or two)
A good-looking cutting board can double as a serving platter for parties. If you’ve got two, you can use one for meat during food prep. Absolutely avoid glass; it has a grating sound and will ruin your knife blades.
My favorite kind of cutting board is the Epicurean-brand variety made from recycled paper, looks great, it can go into the dishwasher and will last for years ($24), so it’s eco-friendly and a value.
Next up are cutting boards made from bamboo. They’re inexpensive, look good, and are also eco-friendly. Just don’t put them in the dishwasher; wash them by hand and let air dry. A large inexpensive cutting board such as food-grade plastic can be had for little money and I prefer to use these for meat or fish preparation since they can be sanitized in the dishwasher; just be aware that they tend to warp over time ($12). Wooden cutting boards are handsome, but need a little extra care. ($30+).
 Measuring cups and spoons
Stick with basic metal measuring cups and spoons to start. You’ll find good deals from IKEA, a warehouse store or online, but note that you can often find them at Goodwill or Salvation Army stores with a decent housewares section for as little as a $1 each.
Hot pot or electric kettle
A hot pot or kettle is great for rapidly boiling water. Whether you use it to brew a cup of tea, get a jump on water for pasta, or cook even ramen noodles. You’ll find one can find 1,000 potential uses for it. ($13+)
Can opener
Go a step up from the hand killer $2 version and get a heavier one that works that won’t destroy a can or leave dangerously sharp edges.
 A large heavy-bottomed pot or Dutch Oven
A six- to eight-quart heavy bottom pot will keep you from burning everything you put into it, and will allow for an even sauté onions and vegetables, thus making this a good choice for soup, beans, chili, stock, etc. in addition to using it for boiling water for pasta or steaming vegetables.
You can get an inexpensive stainless one from IKEA or a restaurant supply store, but the best value for money is an enameled cast-iron Dutch oven. Just avoid a thin non-stick version or aluminum, both of which will leach stuff you don’t want into your food and will generally be too thin to do anything other than boil water.
 A 3-quart heavy skillet or sauté pan
Food writer Michael Ruhlman made this observation in his book The Elements of Cooking: “I can’t think of anything less useful in a kitchen than a cheap non-stick pan.” I totally agree.
Get one that is at least three quarts, and preferably stainless steel, cast iron or a quality non-stick, such as this “everyday pan.” When taken care of, both types will last for years. Be sure to get one that has no plastic in its design (including the handle) so that it can go into the oven, far-extending its value beyond the stove top. Avoid non-stick which limits its use and can’t be used over anything other than low- to moderate-heat and will eventually need to be discarded.
 A cast-iron skillet (or this awesome combo set) with can be purchased for about $25 and has the bonus of being great for roasting a chicken, making a casserole or baking bread in the oven. Follow directions for cleaning it and you’ll have it for years. Or, hit a restaurant supply store or a Costco business center and spend $30 on the same kind of pans used in restaurants. If splurging, go directly to a quality brand such as All-Clad. Sure it’s $150 for a 3-quart sauté pan with lid, but if you take care of it, you won’t ever have to buy another one.
Colander
A colander ensures you don’t burn yourself trying to drain pasta or while making stock, plus you can use it to wash fresh produce or as a fruit bowl for the table. If you can find a mesh one, it’s even more useful. They’re often found at thrift stores for a buck.
 A set of nesting bowls
You need at least one large bowl to mix stuff in. Consider buying a set of different-sized bowls that nestle into one another. You’ll have multiple options without taking up too much space. Glass or stainless steel are your best investment; avoid plastic as you won’t want to put anything hot (such as freshly made stock) into them and they may stain.
Pro tip: Both glass and stainless steel bowls of varying sizes can often be found for $1 each at Goodwill, and restaurant supply places carry new ones inexpensively, too.
Utensils
Start with a large spoon. Add a silicon spatula ($4), a vegetable peeler and then a good set of tongs such as those made by Oxo ($8). Add a grater. After that, what you cook will help you determine what you need such as whisks, ladles, etc. When we stocked up my niece’s apartment, we bought most of her large spoons, spatulas, whisks, a pasta separator, a vegetable peeler etc. at a Goodwill and these items cost less than a buck each.
A baking or casserole dish
Great for casseroles, lasagna, quiches, pot pies, brownies or small cakes, plus even roasting a chicken, a small yet heavy baking dish is a great place to start when cooking for one or two people. Consider a square glass one to start, and go with stoneware, glass or ceramic for the most functionality, or commercial stainless steel version (often referred to as a “hotel pan”) at a restaurant supply store. ($12 to $45)
 Side towels, oven mitts
A couple of side towels are handy, too; many restaurants and culinary schools use quality cloth diapers since they’re cheap and they have a padded center and can double as a heat pad. I’m a fan of getting a good pair of oven mitts, preferably infused with or made from silicone.
Check their heat resistance; anything less than 400 F isn’t worth buying. You can use an oven mitt as a trivet, too, once something hot has to go onto a table.
Plenty of storage for leftovers
I’m partial to glass for storing food as plastic can seep into foods, especially fatty stuff like meats. In addition to preventing food from going to waste, you can also store foods you can buy in bulk, such as cereal, spices, flour, sugar, oatmeal, nuts, spices, etc. Plus, a glass jar is great for making vinaigrette. When on a budget, no food should be left to spoil as wasted food is wasted money.
Any other thoughts on kitchen essentials?
The post How to Outfit a Kitchen on a Budget or 14 Kitchen Essentials Every Cook Needs appeared first on Kathleen Flinn.
January 24, 2022
How to Make Ramen Healthier

It’s hard to beat the guilty pleasure of instant ramen. It’s inexpensive and endlessly versatile, but as sold it’s just empty carbs and a ton of sodium. So how to make ramen healthier? Here’s my strategy.
For those purists who will balk at this version and say, “Hey, that’s not authentic!” Yes, I know. I’ve had the real thing in Japan, too, where ramen masters can elevate it to a culinary art form. If you want to make more authentic-style ramen, I suggest checking out the book Let’s Make Ramen. It’s both functional and fun, and offers step-by-step instructions in comic book form. This is for those home cooks looking for an updated, healthier version of the beloved cheap ramen packets.
Consider Upgrading Your NoodlesThere’s absolutely nothing wrong with those super cheap packets of noodles. But, I prefer to buy Hime Ramen Noodles on their own as the flavor is better. You can get 16 bundles of noodles for about $12 from Amazon and for even less at an Asian market if there’s one near you. The texture and flavor is better, and while it’s not 25 cents, it’s still a great value as one bundle makes two legit servings while the packets say they offer two servings, but in reality, it’s one.
Toss That Flavor PacketThe first step to make ramen healthier? Throw out the flavor packet, which is little more than an artificially flavored salt lick. Instead, I use miso to flavor the broth. You can find a tub of white miso in many supermarkets these days, either in the international food aisle or near tofu in the fresh aisles of a produce section. It’s the least expensive at Asian food-focused stores if there’s one nearby, or you can buy on Amazon. Once you have miso on hand, try adding it to soups, spaghetti sauce and salad dressings for an extra kick of umami. I love miso so much that I even wrote a recipe for miso chicken for the Japanese Ministry of Agriculture. Packaged instant miso soup works well, too, and you can find it most grocery stores, including Trader Joe’s.
If miso isn’t your thing or you can’t get your hands on some, you can also use vegetable broth, chicken or beef stock. In a pinch, you can use your choice of Better Than Bouillion.
Pork is the go-to protein for ramen in Japan. I’ve made this recipe for Japanese-style pork butt for years. However, after having chicken ramen at Wagamama in London, tofu ramen at a Japanese restaurant in Seattle and shrimp ramen in Tokyo, I can assure you that pretty much any kind of protein will work. I’ve even used leftover shredded dark turkey meat from Thanksgiving, leftover chicken from Coq au vin and leftover Texas-style beef brisket.
If you start with a protein, cook it first. For chicken breast, I recommend leaving it whole and toss with the lime or lemon juice, salt and pepper and quickly sear in canola oil for about three minutes per side until cooked through. Slice, and place on top of finished ramen soup. Or, just crack and egg into it and let the heat cook it through. (Don’t use sesame oil for searing; it is too delicate and will smoke up your whole house.)
If you’ve got leftover roasted chicken or precooked shrimp from another recipe, just add it in at the end and warm through.
To make ramen healthier is to add to it. Like so many soup recipes, this is just a starting point. I like to include a bit of chopped leafy greens, green onions leftover veggies and siracha. If have it, add slices of ginger or onion. I might add a bit of wasabi powder into this mix. Leftover steamed bok choy, cooked cabbage, roasted carrots, sliced raw onions, thawed frozen spinach, dried seaweed, all are great additions and part of what makes ramen such a great vehicle for leftovers. Just think about what might taste good together and start from there.
Notes from recipe testers: “To experiment with new flavors, add a little at a time to preference. Taste the separate ingredients (such as miso paste) to get an idea of how much to start with or how it will affect flavor. My miso paste seemed pretty salty so I didn’t start with any salt and then checked for taste later in the process.”
“I make the broth first to get the flavor I want, then add in the noodles. I’ve added in all kinds of leftover vegetables, from green beans to Brussel sprouts. Just be sure whatever you add in isn’t seasoned with something that will conflict with the flavor you’re going for.”
Also: “Usually when I add raw egg to the ramen broth, I stir it in just before I take it off the heat so we have more of an egg-drop thing. Makes it easier to divide the soup up than deciding who gets the poached egg.”
This post contains affiliate links. It was first published in 2013. It has been updated.
 PrintRamen Revisited – A Flexible Recipe for Healthier ResultsA strategy to use the classic comfort of ramen noodles to make an inexpensive, vegetable-laden dish with much lower sodium. A key to this strategy is to toss the soup packet that comes with inexpensive packs of ramen noodles as its mostly sodium and chemicals. I prefer to buy Hime Ramen Noodles on their own as the flavor is better. You can get 16 bundles of noodles for about $12 from Amazon and for even less at an Asian market if there's one near you. Course PastaCuisine JapaneseKeyword budget friendly, Easy, fast, ramen, soup, vegetarianIngredientsFor the protein1 lime or small lemon4 oz. shrimp, tofu, sliced beef or chicken breast1/8 tsp coarse saltSeveral cranks of fresh pepper1/4 teaspoon red pepper flakes2 tablespoons vegetable or olive oilFor the broth1 package ramen noodles1 tablespoon miso paste or 1 packet instant miso soup2 teaspoons soy sauceTwo or three green onions chopped (optional)2 tablespoons chopped parsley, cilantro, kale or spinachOptional garnishes1 egg1/2 can bamboo shoots or 1/4 cup fresh sprouts optional1/2 to 1 cup cooked vegetablesHot chili sauce such as sirachaSesame oilInstructionsCut the lime or lemon in half. Juice one half into a bowl large enough to hold your shrimp, tofu, beef or chicken. Cut the other into small pieces and set aside. Toss with the salt, pepper and about half the oil and let rest for a few minutes. Add the rest of the oil to a small saute pan or skillet over medium-high heat and saute the shrimp or chicken until cooked through.Bring 3 cups of water to boil. Add the noodles and cook as directed by the package. If using a raw egg, carefully crack it into a corner of the pan and poach it in the water as noodles cook. Remove from heat and add the miso paste or soup mix plus the soy sauce and let steep for a couple of minutes.Portion the soup into two bowls. Add the green onions and herbs, plus any vegetables, bamboo shoots and stir through. Top with the egg and shrimp, tofu and the reserved lemon or lime pieces. Add Sriracha, soy sauce and/or sesame oil to taste if that’s your thing.
The post How to Make Ramen Healthier appeared first on Kathleen Flinn.
January 1, 2022
What’s Your Resolution for 2022?

I have one word to sum up 2020 and 2021 – Kuchisabishii. It’s Japanese for “eating when you’re not hungry but you eat because your mouth is lonely.” My mouth got so lonely so often that I gained 20 pounds of pandemic weight.
Is there a word for cooking when your heart is lonely?
Our kitchen, so often bustling with cooking classes, brunches, lunches or dinner parties, has been mostly empty. We’re lucky to be able to spend loads of time with my beautiful mother in Florida; I am profoundly grateful. Mike and I even rang in 2022 with mom, toasting with Veuve Clicquot at midnight while watching Betty White’s skits on SNL. (RIP Betty. I will always love you.)
Resolutions for 2022Some people bake to procrastinate. I cook when I need to calm my mind and pretend my heart isn’t lonely. A sad news story can send me into the kitchen to conjure up something comforting. I can tell that 2021 was tough simply by the number of chickens I roasted and the mounds of potatoes I mashed.
Today, I’m looking forward. I’m working on a new series of online cooking classes. I had planned to debut them this week, but I broke my ankle in mid-December and I’ve decided to put them off until I’m out of my boot.
I’m also working as a consultant on a pitch for a TV show based on one of my books. I can’t talk about it yet (or maybe, never) and these things often don’t pan out. The Sharper Your Knife has been optioned four times, most recently by Darren Star; he made “Emily in Paris” instead.
Every year I make a few resolutions. Usually, it’s to lose 10 pounds, drink more water, use less plastic, that sort of thing. This year, I’m going a different route.
Resolution #1 – Tell more stories. Teach more cooking. Teach more writing. Years ago, while I trying to focus on my “brand,” Mike came up with a tidy phrase that captured how I think of myself. “Storyteller. Cook. Teacher.” I’ve lived, but I haven’t told the stories. I’ve written, but I haven’t shared the words. I’ve cooked, but not taught. So I’m going to work on that in 2022. I’ve got new books in the works, and I’m planning on restarting my podcast in February.
Resolution #2 – Be a better friend. Reconnect. I feel like my world has become so much smaller since March 2020.
So, let’s start with the cooking and teaching part. If you’ve made resolutions that involve improving your diet, losing weight, etc. here’s something for you. Below are links to a few video lessons and primers that may be helpful to you if your resolutions include cooking more, eating better and saving money — all are good things to aim for, right?
 Knife Skills How to Make Vinaigrette How to Make Vegetable Stock How to Cook in Parchment A Cheat Sheet to Flavor Profiles Quick Guide to Herbs & Spices Basics of Soup Making
Here’s a New Year’s resolution for you
Start the year by knowing what’s actually lurking in your kitchen. Take everything out of each and every one of your cupboards, your fridge and freezer. Clear out expired stuff, junk food and the stuff you’ll just never use. In your fridge, post a photo of your favorite thing – your children, your husband, your dog, whatever. Make a point to never fill your fridge so stuffed that you can’t see it. Research shows that an emptier fridge leads to weight loss. “Eat down” your fridge, shop more often. More on this process.

If you want to eat better but not spend more, here’s a simple tactic: waste less food. The average American household wastes about 30% of all the food they purchase. No one would throw a $5 bill in the trash, but if you toss that lovely bunch of organic beets, it’s the same thing.
A couple of tips: when you bring home your produce, get out some post-it notes. Write down the price of that broccoli ($3) and put it right on the broccoli or the bag holding it. Do the same for all your fruit, vegetables, dairy or anything perishable. Then, when you go to throw out that item, collect that post-it with the others. Do this for a month. How much did you waste?
To learn more about the impact of food waste, I highly recommend the book Wasted Food by Jonathan Bloom.
Bad cooks welcome! To join my league of recipe testers, send me an email and I’ll send you the “secret” page for my Fearless Friends, and the password.
I post new recipes regularly, and ask testers to simply fill out surveys afterward. I sometimes get in touch to ask you more questions. I give away gifts and get to know my testers, so don’t be shy!
[image error]The post What’s Your Resolution for 2022? appeared first on Kathleen Flinn.
December 8, 2021
Recipe: Mom’s Cranberry Bread
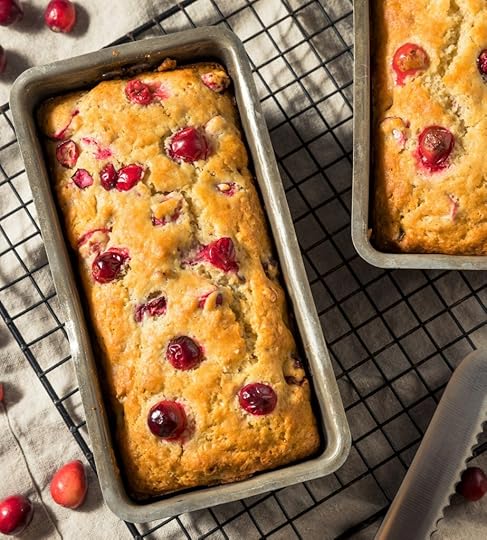
Gently warmed and slathered with butter, this cranberry bread tastes like Christmas morning to me. The flavor is sweet yet tart, and the look beautiful thanks to the cranberries studded throughout. My mother makes this cranberry bread pretty much every Christmas. The idea is based on her Swedish grandmother’s habit of making breads with dried fruit around the holidays.
When she noticed cranberries on sale at Thanksgiving many years ago, my ever-frugal mother decided to try them in a bread. Slipped into a plastic bags tied with a handsome bow, a this lovely fruit-studded cranberry bread makes a lovely holiday hostess gift. It’s also a nice addition to a traditional holiday menu, plus it can offer a nice alternative to cranberry sauce. It’s the bomb when used with leftover turkey for sandwiches.
Walnuts are an obvious seasonal choice for nuts here, but I’ve used almonds and pecans with great success. Although my husband, Mike, doesn’t like nuts in baked goods. It’s a texture thing, so I typically leave them out if making any for us. This makes one standard-size loaf, three or four mini loaves or about a dozen cranberry bread muffins. I’ve become a little obsessed with silicon baking gear, so last year I made this recipe into batches of muffins and handed out four each to friends with the recipe printed on a little card and a silicon muffin tray as a gift.
 PrintRecipe: Mom’s Cranberry BreadI like to use a micro-planer for the orange peel; it spreads the flavor more evenly throughout the finished bread. This yields one large loaf, about three small loaves or about 12 muffins. Course BakingCuisine AmericanKeyword Baking, Bread, cranberries, cranberry, food gifts, gifts, holidays, leftovers, ThanksgivingEquipmentloaf pan or muffin trayIngredients2 cups (230 g) fresh or frozen cranberries, coarsely chopped1 cup (150 g) chopped nuts optional2 tablespoons grated orange peel4 cups (500g) all purpose flour2 cups (400g) sugar1 tablespoon baking powder2 teaspoons salt4 tablespoons shortening, vegan butter or unsalted butter1 1/5 cups orange juice3 eggs well beatenInstructionsPreheat oven to 350F/180C. Generously grease and lightly flour a 9-inch x 5-inch loaf pan or 3 mini loaf pans. If using this recipe to make muffins, line a muffin tin with parchment or paper cups.Prepare cranberries, nuts (if using) and orange peel. Set aside. In a large bowl, mix together the flour, sugar, baking powder, salt and soda. Cut in shortening, vegan butter or butter to incorporate it in the bowl. Stir in orange juice, egg and orange peel mixing just to moisten. Fold in the prepared cranberries and nuts using a spatula. Spoon into a prepared pan up to about halfway up. For a loaf, bake 50 minutes or until wooden pick inserted in the center comes out clean. For mini loaves or muffins, baked for 25 minutes and then check with a toothpick. Cool on rack 15 minutes. Remove from pan, cool completely. Wrap and store overnight.
This post was originally published in 2014; it has been updated. As with all my posts, it may contain affiliate links. Photo by Brent Hofacker.
The post Recipe: Mom’s Cranberry Bread appeared first on Kathleen Flinn.
November 29, 2021
How to Cut Up a Whole Chicken

Food, particularly meat, has become more expensive, thanks to the pandemic. Supply chain issues, packing plant outbreaks, it just adds up over time. Buying turkey pieces for stock last week, I experienced some sticker shock. Seriously, $4 per pound for turkey necks? For a couple dollars more than the price of a few necks or two wings, I bought a chicken. That episode reminded me home cooks everywhere need to learn how to cut up a whole chicken.
After reviewing dozens of videos on this subject, I decided to use this one by the wonderful Melissa Clark of The New York Times to demonstrate what’s arguably one of the most valuable lessons a home cook can master. Why is it so important? Here’s an excerpt from The Kitchen Counter Cooking School:
“If there’s one skill that I think people need to learn is how to cut up a whole chicken,” said Rick Rodgers, the author of 35 cookbooks. “Roast chicken is iconic, we all love it and that’s a great skill to learn, but being able to do something with all the various parts of chicken is something even more people need to know in terms of how it fits in with their daily life.”
Why learn how to cut up a whole chicken?Knowing your way around a chicken is a valuable lesson to learn. On average, a whole chicken costs about the same as a package of boneless skinless chicken breast, whether it’s a standard supermarket chicken or a more expensive organic variety. Used efficiently, a single chicken can provide the goods for two or three meals for a small household, plus offer up to two quarts of stock. It’s a win-win-win.
Leave the breast on the bone and bake either in a microwave or toaster oven. Quickly pan-sear or stir-fry a boneless breast for dinner. Thighs are great for braising, the legs are great in air fryers. I collect wings and freeze them, then thaw out when I have enough for a sports game snack. The remaining meat can be used in a seemingly endless parade of dishes: salads, pasta, burritos, casseroles sandwiches and so on, virtually any recipe that calls for cooked chicken.
As Rodgers notes, you not only get the eight chicken pieces, but all the bones, the back and the giblets, too. Given that popular brands of stock average about $2.50 per quart and remnant bones from just one chicken can yield up to two quarts, one chicken can provide about five bucks worth of stock.
Chicken is the No. 1 Food Search TermIn commercial terms, it’s hard to beat the importance of chicken. It’s the No. 1 search term on recipe sites such as Epicurious.com, Allrecipes.com and Foodista.com. On Google, worldwide traffic for “chicken recipes” dwarfs requests for beef, fish or vegetarian recipes. Americans consume an average 60 pounds of chicken annually, edging out beef as the nation’s preferred meat. American chicken growers process 38 million chickens daily – one for every man, woman and child in the state of California every single day. Annually, that’s 43 billion pounds each year, says the American Meat Institute, equivalent to the weight to 860 luxury cruise ships.
How Chickens Have ChangedAs Michael Pollan noted in his book, The Omnivore’s Dilemma, commercial poultry growers engineer chickens through breeding to grow significantly greater portions of breast meat. From a monetary point of view, it makes perfect fiscal sense. Boneless, skinless chicken breasts fetch as much as $6 per pound. That’s roughly five times the retail price for whole chickens, and at least twice as much as the other portions of the bird.
When Julia Child debuted in the early 1960s, shoppers purchased more than half of all retail chickens whole. Now, it’s around 10 percent. There’s a strong financial incentive to grow bigger-breasted chicken.
The Downside of Commercially Raised ChickensTo maximize profits, chickens are often confined to massive barracks where they are fed around the clock but given little exercise.
As depicted in the documentary Food Inc., some birds grow so big, so fast they ultimately cannot support themselves under the weight of their mighty breasts and fall down. Detractors of the industrial poultry process say that the system ratchets up the stress level for the chickens and breaks down their immune systems. As a result, they’re fed a blitz of antibiotics.
Upgrade to Organic for the Same MoneyMany home cooks want to purchase organically raised chicken, but when it’s prefabricated into pieces, it’s often expensive and seemingly out of their budget. This is especially true for boneless, skinless chicken breasts. Learning how to cut up a whole chicken can make buying organically raised poultry more economical. At my local grocery this week, I found the following variations in pricing for whole chickens, each about 3 ½ to 5 pounds:
Basic commercial chicken: $7.50 to 8.75 per bird
Store-brand organic (Publix Greenwise): $8.60 to $10.25
Murray’s Organic: $9.40 to $12.50
So, for a couple dollars more, you can purchase organic. If you use the chicken wisely, end up with the goods for multiple meals and some chicken stock for your freezer. So go ahead. Give it a try. Even if it doesn’t look beautiful, you know what? It will still taste the same.
Related stories:
How to Make Stock
Basic Chicken Soup
How to Use a Knife
Recommended Reading:
Eating Well: Supermarket Guide to Buying Chicken
This story was originally published in 2018. It has been updated. This story may contain affiliate links.
The post How to Cut Up a Whole Chicken appeared first on Kathleen Flinn.