Kathleen Flinn's Blog
August 21, 2025
Overnight Oats

Rolled oats soak overnight in milk and yogurt, softening into a creamy, ready-to-eat meal by morning. They’re packed with fiber, complex carbs, and essential minerals, giving you steady energy that lasts for hours. With endless flavor variations, you can prep several jars at once for grab-and-go breakfasts all week.
PrintEasy Overnight OatsJust stir together and let sit overnight. These may be made a few days in advance, but too far ahead they may become a little soggy. Ingredients½ cup rolled oats not instant½ cup milk or plant-based milk¼ cup yogurt optional for creaminess1 to 2 teaspoons honey maple syrup, stevia or sugarPinch of saltInstructionsCombine oats, milk, yogurt (if using), sweetener, and salt in a jar or container with a lid. Stir in your chosen flavor add-ins (if using). Cover and refrigerate at least 4 hours or overnight. Eat cold or warm gently in the microwave.NotesVariationsPeanut butter banana: add 1 tablespoon peanut butter, ½ chopped bananaBerry almond: add ½ cup fresh or frozen berries, 1 tablespoon sliced almondsApples and cinnamon: add ½ chopped apple, ¼ teaspoon cinnamon, pinch of nutmegThe post Overnight Oats first appeared on Kathleen Flinn.
The post Overnight Oats appeared first on Kathleen Flinn.


Chia Pudding

Chia pudding is popular because it’s healthy, filling, low-calorie and like overnight oats, virtually effortless. Chia seeds are tiny nutrition powerhouses packed with fiber, protein, omega-3 fatty acids, and minerals like calcium and magnesium. When soaked, they absorb liquid and form a thick, creamy texture.
PrintEasy Chia PuddingCombine the ingredients, stir and let sit. That's all there is to it. Then tailor to your tastes. Course Breakfast, SnackIngredients3 Tbsp chia seeds¾ cup milk or plant-based milk1 to 2 teaspoons honey maple syrup, stevia or sugarPinch of saltInstructionsCombine chia seeds, milk, sweetener, and salt in a jar or container. Stir well, then wait 5 minutes before stirring again to prevent clumping. Cover and refrigerate for at least 2 hours or overnight, until the mixture has thickened.NotesVariationsHot chocolate: add 1 tablespoon cocoa powder and extra sweetener to tasteTropical: add ¼ cup finely chopped pineapple or mango, 1 Tbsp shredded coconutMocha: add 1 tsp instant coffee, 1 tsp cocoa powderThe post Chia Pudding first appeared on Kathleen Flinn.
The post Chia Pudding appeared first on Kathleen Flinn.
Recipe: One Pot Beans and Rice

The classic budget meal found in cuisines around the world, together they make a complete protein and keep you full for hours. Cooking them in one pot saves time and lets flavors blend as they simmer. With a few pantry spices and simple add-ins, you can easily fine-tune to your taste. Black, kidney, pinto, cannellini, great northern beans and garbanzo beans all work well. You can also use brown rice or quinoa; cook the whole pot according to package directions. Bouillon is salty, so if you use it, avoid adding more salt. Makes 3 to 4 servings.
PrintOne Pot Beans and RiceInexpensive, endlessly variable, this simple recipe can keep you well fed for as little as $1 a serving. Course Main CourseKeyword beans, budget friendlyServings 2Ingredients1 tablespoon oil or butter1 medium onion chopped (1 cup)1 to 2 cloves garlic or ½ teaspoon garlic powder1 cup uncooked long-grain rice1 can 15 oz beans, drained & rinsed2 cups broth or water + 1 bouillon cube1 tablespoon oil or butterSalt pepper to tasteInstructionsHeat oil in the pot over medium heat. Add onion and garlic and cook until softened. Stir in the rice, beans and any seasonings. Add broth/water and bring to a boil. Then, lower the heat to a simmer and cover. Cook for 20 minutes until the rice is tender. Fluff, adjust seasoning.NotesVariations:Tex-Mex: Use black beans, add 1 cup frozen corn, 1 teaspoon chili powder, ½ teaspoon cumin. Optional: Top with shredded cheese, salsa and/or hot sauceMediterranean: Use cannellini or chickpeas, add 1 teaspoon of dried oregano and ½ teaspoon of paprika. Optional: Stir in a handful of spinach and crumbled feta when servingCurry: Use kidney beans or chickpeas, add 1 tablespoon curry powder, ½ cup frozen peas or other vegetables. Optional: stir in a spoonful of yogurt or coconut milk after cookingThe post Recipe: One Pot Beans and Rice first appeared on Kathleen Flinn.
The post Recipe: One Pot Beans and Rice appeared first on Kathleen Flinn.
Recipe: Quesadillas

The ultimate fast, budget-friendly meal — just tortillas, cheese, and whatever fillings you have on hand. They cook in minutes and are endlessly adaptable for breakfast, lunch, dinner, or snacks. Perfect for using up leftovers, they’re a crispy, melty way to turn odds and ends into something tasty. Stock some chili powder, oregano and grab extra packets of hot sauce when you’re out for your pantry. Frozen vegetables, especially mixes, work great, just be sure to thaw them first.
PrintEasy QuesadillasServings 1Cost $2Ingredients1 large flour tortilla or 2 small1/3 to ½ cup shredded cheese about 4 oz1 to 2 teaspoons butter or oil for cookingInstructionsHeat the butter or oil in a skillet over medium heat. Place a tortilla in the pan. For a large tortilla, fill one half and fold over. For two, add cheese and top. Cook for 2 to 3 minutes per side, until browned and the cheese has melted. Slice into wedges and serve with salsa, sour cream and hot sauce, all optiNotesVariationsTex-Mex: ¼ cup each black beans, corn, chopped green peppers, ½ teaspoon chili powder, hot sauce, Monterey Jack cheesePizza Q: 2 tablespoons marinara sauce, mushrooms, pepperoni, mozzarella, ½ teaspoon oreganoHot wings Q: chopped meat from 3 to 4 buffalo wings (tossed in extra hot sauce if desired), chopped green onion, cheddar or Monterey Cheese, served with ranch or bleu cheeseBreakfast: scrambled eggs, ¼ cup chopped veg, chopped sausage, and cheddar cheeseThe post Recipe: Quesadillas first appeared on Kathleen Flinn.
The post Recipe: Quesadillas appeared first on Kathleen Flinn.
Budget-Friendly Recipes for One or Two
I’ve been hearing from many readers looking for simple, budget-friendly recipes—especially now that food prices seem to get higher every week. I know what it’s like to cook for just yourself or one other person and not want to deal with a pile of dishes afterward.
Most recipes are designed for four or more servings, but I’ve always wondered why. More than half of U.S. households are two people or fewer, and nearly a third live alone.
So most of the recipes below are for one or two portions. Most use just one pot, a jar, a bowl and a spoon, cost under $2 a serving, and are easy enough for beginner cooks and those without fancy cooking equipment. Whether you’re a college student, working hard to make ends meet, a single parent, a couple with a small kitchen or retired, all of these were designed with you in mind.
Every recipe below features an easy standard version and at least three variations. The goal is for you to learn a technique for a simple recipe, then make it your own based on your own tastes and what you’ve got on hand.
I’ll keep adding new recipes and tips, and I’d love your input. Send me your questions, requests, or cooking challenges—I’m here to help make everyday meals easier and cheaper. info @ kathleenflinn.com
Quesadillas
The ultimate fast, budget-friendly meal — just tortillas, cheese, and whatever fillings you have on hand. They cook in minutes and are endlessly adaptable for breakfast, lunch, dinner, or snacks.
One-Pot Beans & Rice
The classic budget meal found in cuisines around the world, together they make a complete protein and keep you full for hours. Cooking them in one pot saves time and lets flavors blend as they simmer.
White Beans & Greens
Like beans and rice, this simple recipe packs a lot of nutrition into a simple, affordable one-pot meal.
Overnight Oats
Rolled oats soak overnight in milk and yogurt, softening into a creamy, ready-to-eat meal by morning. With endless flavor variations, you can prep several jars at once for grab-and-go breakfasts all week.
Chia Pudding
Chia pudding is popular because it’s healthy, filling, low-calorie and like overnight oats, virtually effortless.
Ramen Revisited
Tips for making this go-to budget staple into a more satisfying, protein-rich and nutrient-dense meal rather than just starch and salt.
Baked Sweet Potatoes
Sweet potatoes cook quickly in the microwave, store well without refrigeration, and are rich in vitamins A, C, potassium, and fiber.
Risotto
This sounds fancy, but at its heart, it’s a one-pot rice dish that can be endlessly customized and made with pantry staples and leftovers.
Minimalist Baker – 56 Easy Budget-Friendly Cooking Tips
AllRecipes – 22 Easy Recipes for College Students
The post Budget-Friendly Recipes for One or Two first appeared on Kathleen Flinn.
The post Budget-Friendly Recipes for One or Two appeared first on Kathleen Flinn.
May 21, 2025
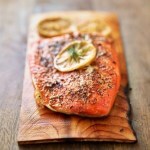
How to Make Planked Salmon

The first summer I moved to Seattle back in the 1990s, I decided I had to learn how to make planked salmon. Until I’d moved to the Northwest, I’d never even heard of it and within two weeks of arriving, I’d had it twice – and loved it. Back then, I’d also never been hiking in the mountains, seen Orca whales in the wild and certainly never laid eyes on a geoduck.
History of Planked SalmonMost culinary historians I’ve talk to agree that Native Americans in the Pacific Northwest widely used the technique of cooking freshly caught fish on or attached to wood planks set on the edges of open fires. This legacy is one reason it’s popular in the Northwest.
However, if you read up on the history of European cuisine, plank cooking is noted as a Scandinavian technique used by Vikings as far back as 12th Century. It’s plausible that both populations (and others) developed the technique separately. After all, if you’re out fishing in the wild, there’s generally plenty of wood around, and cooking fish on a roaring fire designed to provide heat to cold humans isn’t exactly the best means to cook delicate fish. Attaching fish to a plank next to the fire makes sense. Later, putting it over the fire seems like a logical extension. (Genetically, according to my DNA, I’m about 38% Swedish, so perhaps that’s why I gravitate toward this cooking technique.)
To me, a perfect summer day in Seattle starts with an early morning visit to Pike Place Market, the city’s massive historic waterfront market. The crowds don’t move in until around 11 a.m. and by then, I’ve been to Pure Foods Seafood Market, hit Sosio’s Produce, picked up some flowers and I’m back at home.
I’m a Fisherman’s DaughterAs a kid, I didn’t know that you could buy fish at a store. This was back before supermarkets felt compelled to offer everything from deli meat to sushi. Our local supermarket chain in Davison didn’t have a fish counter; the closest they came to seafood were the fish sticks in the frozen food aisle, a product that I never consumed outside of a school lunch.
That’s because my dad was a fisherman. He used to say that they deducted time in heaven that you’d spent fishing on earth, or something like that. Seasons were no obstacle. No matter the weather, we dragged our aluminum fishing boat behind our station wagon from to some lake in search of fish.
 A scene from a family fishing trip circa 1971
In spring, we huddled together under umbrellas in cold, pouring rain. In the summer, we fished until everyone was thoroughly sunburned. Winter brought ice fishing, with the family shivering together, staring at their lines dropped below the hole cut in the ice. For all of that, we had the great reward of fresh-from-the-water fish.
As my brothers got older and developed social lives and jobs, they fished less often. By her late teens, my sister chose never to fish, but instead lay across the stern of the boat in her bikini, trying to get tan. Eventually, we moved to Florida and that left just me and my dad and our two poles at the Rod n’ Reel pier together, chatting and fishing, staring at the warm, green water. My father had some odd power of fish; even when the fish weren’t biting, he always caught something.

So when I go to the market now and I see the parade of all the fish, once exotic and new, I think of those days with my dad, and how I used to look into the water, wondering how all those fish breathed down there.
Yesterday, I picked out a nice hunk of fresh Alaskan salmon and cooked it my favorite way, on a plank of wood over a hot fire. I like a bit of spice with everything, so I tend to put together a mix of Cajun spice and Italian herbs, but you can use whatever you like, even just salt, pepper and a bit of lemon. I also love the Seattle Salmon Rub from World Spice Merchants in Pike Place Market. I paired it with lemon risotto and simple sautéed fiddlehead greens. For the risotto, start with this recipe. At the end, add about 2 teaspoons lemon zest and 1/3 cup of fresh lemon juice plus a tablespoons of butter toward the end cooking. A couple tablespoons chopped parsley is a nice finish.
How to Make Planked SalmonIf you’ve never cooked planked salmon or any fish on a plank, give it a try, especially if you’re uneasy about grilling fish. This method slows down the cooking of the fish, making it less likely to overcook. The main benefit to cooking on a plank is that it gives the fish a lovely smoked flavor. Most grocery stores carry planks now, or you can order online for less than $2 each [affiliate link].
You can read all about planking fish here, but here’s the short version. Be sure to soak the plank or planks in water for at least an hour before grilling to avoid having them catch on fire. Lightly brush the plank with a bit of oil, put the fish on top, sprinkle on the seasonings. I keep a spray bottle of water handy just in case the edges alight. Keep the lid on for as long as possible. Have a pair of tongs and a metal baking tray handy so that you can easily remove the fish from the grill when it’s done.
In the Northwest, it’s most common to cook cedar planked salmon, and cedar is definitely the most economical as its the most available retail wise. The truth is the wood only imparts a hint of flavor, so I haven’t noticed much difference between cedar and alderwood planks.
How to Make Planked Salmon in the OvenWhile this technique is usually done over a grill, you can certainly do it in the oven, the flavor just won’t be as intense. Preheat your oven to 375F/195C and roast for about 15 to 25 minutes (depending on thickness) or until the internal temperature reads 125F/50C to 135F/57C degrees. When making any fish in the oven, it’s best to remove it a few degrees less than your desired temperature. As it rests and the sugars readjust post cooking, the temperature will go up a few points.
 PrintRecipe: Spicy Planked SalmonPlank grilling takes a bit longer than other cooking methods; allow for about fifty percent more time for the fish to cook. When the fish is done, it should be firm to the touch and register around 140 degrees Fahrenheit with an instant-read thermometer. In the summer, when wild Alaskan halibut and salmon are plentiful, I use this method at least once a week. This mother also works well for any reasonably firm sweet fish as grouper, black cod or snapper, too. I prefer to use this method over a charcoal fire. If you use a gas grill, avoid placing the wood plank directly over the gas flames. Allow about four ounces of fish per serving.Course SeafoodPrep Time 1 hour hour 20 minutes minutesCook Time 10 minutes minutesTotal Time 1 hour hour 30 minutes minutesServings 4 servingsAuthor Kathleen FlinnIngredientsAbout 1 lb. halibut salmon or any dense white fish1/4 cup of olive oil1 teaspoon mixed Cajun spices1 teaspoons mixed Italian herbsJuice of 1/2 lemon about 2 tablespoons3 garlic cloves minced1/2 teaspoon coarse sea saltGround black2 to 3 slices lemonInstructionsSoak the planks in water for at least one hour. Prepare the coals. When ready, lightly dry the plank. Brush one side of the fish with a generous coat of olive oil; if the fish has the skin attached, oil that side. Place the fish oiled side down onto the platter. Sprinkle the top with Cajun spices, mixed Italian herbs, paprika and garlic over the top of the fish. Juice half the lemon, slice the other half thinly. Evenly sprinkle the fish with oil and lemon juice. Finish off with sea salt and freshly ground black pepper. Top with the sliced lemon.Put the plank on the metal rack over hot coals and cover. How long the fish takes to cook depends on the heat of your grill; at 350 degrees, it should take about eight to 10 minutes per pound. Fish is cooked when it’s hot in the center (about 145 degrees on a thermometer) and flakes easily with a fork at its thickest point. Take care not to overcook the fish. Serve hot, directly off the plank if desired.
Originally published April 20th, 2009; updated 27 May 2025. This page contains affiliate links.
The post How to Make Planked Salmon first appeared on Kathleen Flinn.
The post How to Make Planked Salmon appeared first on Kathleen Flinn.
April 2, 2025
How to Freeze Meat, Cheese, Milk, Butter and Fish So You Can Actually Use It Later

Reader question: “I have bought far more meat and cheese than usual due to the pandemic and now I am worried about it going bad. Is freezing meat OK? What about butter and cheese? How long will it last?” – Rebecca, Orlando FL
Answer: I have been teaching people cooking in their homes foryears. One of the first things I do is to inventory their fridge and freezer.For many, the freezer turns into the Land That Time Forgot. I’ve found14-year-old packages of hamburger in a client’s fridge.
This question came up during the pandemic, but there’s now a lot of people stocking up due to impending tariffs and economic uncertainty, I’ve had similar questions again. Learning how to safety store foods like meat and cheese in your freezer is a critical lesson. A few key tips:
What Not to FreezeFor starters, don’t freeze anything past its expiration date. Freezing it will not magically make it safe to eat again. Prepared convenience foods from your supermarket generally should not be frozen. This includes those pre-stuffed chicken breasts or chops and fresh salads containing potatoes, eggs or pasta. Canned ham, too, should not be frozen, although whole hams, chops or roasts are fine. Eggs are tricky business. Don’t freeze eggs in their shells – they’ll explode. Hard-boiled eggs or egg substitutes that have been opened are also not freezer candidates. See below for tips on meats, cheese and milk.
Always let food cool before freezingIf you’re making meals and then storing the leftovers, it’s important to cool them and store in the refrigerator before freezing. This will assure that new, hot items will not affect already frozen items. Don’t overfill containers, as foods tend to expand when they freeze, so it’s important to leave a bit of headspace in containers. Also, wait until containers are frozen before stacking them.
Wrap meat twice before freezingThe packaging from your local supermarket alone will not keep your meat and poultry safe in the freezer. The trick to freezing meat, according to the Food and Drug Administration and the Meat Sciences department at Texas A&M University, is to wrap it twice, preferably in heavy duty aluminum foil, plastic wrap or freezer paper, or put the whole package inside a plastic bag. Personally, I remove meat from its plastic and wrap it in parchment, then plastic and then a layer of foil and then freeze. Alternately, you can seal meat, fish and poultry in heavy plastic using a vacuum sealer. This will allow the food to remain frozen longer.
How long will it keep in the freezer?I recommend printing out this awesome flyer from the FDA has an easy-to-read chart that covers how long to freeze all kinds of food, including meat and cheese. It also includes how long stuff can last in your fridge, too. I keep a copy right on my fridge for easy reference.
Label and date everythingIt’s easy to forget what’s what. Do what many professional kitchens do. Use blue painter’s tape and a sharpie to mark down the contents and the date. No tape? Write the contents on a piece of paper and secure in place with plastic wrap. Be sure to check your freezer regularly. One of my classic “clean out the fridge or freezer” recipes is soup. Check out my Soup 101 primer on how to make soup out of (almost) anything.
What about freezing cheese?According to the National Dairy Board, softer cheeses like mozzarella andyoung cheddar can be frozen, especially when shredded. Firmer cheeses, likeaged cheddar become crumbly and shift texture, so plan on using those inrecipes, rather than highlighting on a cheese plate.
There’s an important key to freezing shredded cheese and it’s in the way youthaw it. This is because cheese containsa fair amount of moisture and this becomes frost when frozen. Allowing it to thawslowly will allow this moisture to get absorbed back into the cheese.
Have blocks of cheese? Chop them into half-pound blocks or smaller and wraptwice in plastic or freezer bags.
 What about milk and butter?
The Dairy Board suggests putting milk into small, air-tight containers
before freezing. Be sure to leave at least an inch at the top because milk,
like other liquids, expands when frozen. Personally, I find that freezing milk
tends to slightly change its taste, so try freezing a small amount to see if
you like it.
Once you’re ready to use the milk, let it thaw completely in the
refrigerator. Milk fats thaw separately than the water in milk, so if it’s not
completely thawed, you may notice that it isn’t smooth. A quick shake or stir should resolve this. Try to use thawed milk within three days.
I always keep butter in my freezer. Unsalted butter can last up to five months and salted can last up to nine. Keep it in its original packaging and then double wrap.
What about freezing fish?Fish is best when cooked the day you buy it. If it must sit overnight, consider placing it on top of ice. Often, seafood sold as “fresh” in your supermarket case was previously frozen. Freezing raw seafood twice won’t render it inedible, but it will break down more of the protein so the texture will be a bit mushier when you thaw it again. Like meat, wrap fish twice. I prefer to wrap it in parchment first, then a layer of plastic or aluminum foil. Fish is best left to thaw in the fridge where, like cheese, it can reabsorb frost as moisture into its flesh. Fish are a good option for a vacuum sealer.
Please note: This post was originally published in March 2020. It contains affiliate links.
The post How to Freeze Meat, Cheese, Milk, Butter and Fish So You Can Actually Use It Later first appeared on Kathleen Flinn.
The post How to Freeze Meat, Cheese, Milk, Butter and Fish So You Can Actually Use It Later appeared first on Kathleen Flinn.
March 1, 2025
Protected: Recipe Testing Tips
This content is password protected. To view it please enter your password below:
Password:
The post Protected: Recipe Testing Tips first appeared on Kathleen Flinn.
The post Protected: Recipe Testing Tips appeared first on Kathleen Flinn.
February 4, 2025
Recipe: White Beans and Greens – Inexpensive, Simple and Powerfully Good
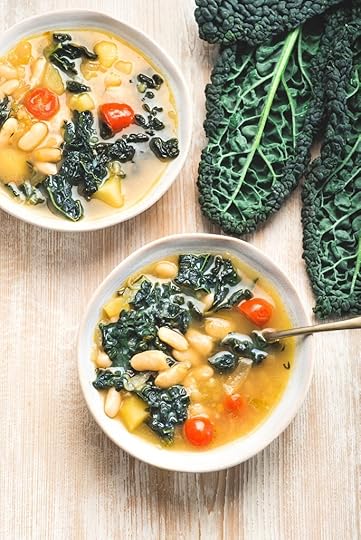
I love the pairing of white beans and greens. When the weather turns chilly, it offers a flavor or sunny southern France or Tuscany. When the pandemic hit, I bought cases of white beans, and let’s just say, we ate a lot of white bean soup and stews as their sell-by dates loomed. Of all the versions I’ve made, this one is my favorite as it can be easily adapted to whatever leftovers you’ve got on hand. It’s a comfort food that’s budget-friendly, good for you and good for those extra bits in your fridge.
Also, since you can start with canned beans, it doesn’t take long to prepare, either. It’s a terrific way to use up some of your random greens in your crisper drawer, too. I’ve made variations of this soup with just about every vegetable possible, but I always seem to return to the original combination of white beans and dark greens; they just complement each other.
Another tip – if you’ve got some leftover rotisserie chicken or random meats left over from a charcuterie platter, some leftover sausage, ham or even some leftover barbecue such as pulled pork or brisket, chop up a cup or so and add them in for a boost of flavor.
White Beans and Greens = “Superfood” ComboBut beyond being a strikingly good flavor combination, white beans and greens is a one-two punch of nutrient-dense foods.
White beans, though simple, deliver a strong nutritional boost that has slowly earned a special place in my kitchen. They are full of plant-based protein and fiber, which help repair muscles, support digestion, and keep blood sugar steady, turning each bite into an act of self-care. Packed with important minerals like iron, magnesium, and potassium, these beans offer a humble yet effective boost for both energy and heart health.
Hearty greens like kale and collards remind me of a well-tended garden, inviting us to nourish ourselves with their fresh, earthy flavor. Loaded with vitamins A, C, and K, they help strengthen the immune system, improve skin health, and support proper blood clotting. With an abundance of antioxidants and essential minerals.
This is great with some crusty bread (like this no-knead version). If you don’t have stock in your freezer, check out my guide to making chicken stock or vegetable broth. Both work just fine in this recipe.
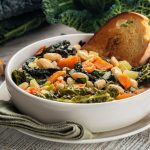 PrintWhite Beans and GreensA protein-packed nutrient-packed dish for cold winter days and beyond. Like most soups or stews, this is a flexible way to use up leftover vegetables. Use kale, collard or other hearty greens. But feel free to add in other vegetables, I've used a fistful of leftover green beans sweet potatoes, zucchini. carrots and artichokes. This is the kind of recipes where I use that last bit of the bag of frozen veg. If using cooked vegetables, add them at the end of cooking so they don't overcook. You can also add a bit of roasted chicken, leftover sausage, charcuterie, pot roast or smoked meats. I most recently made this with the last bits of pulled pork and brisket leftovers from a local BBQ. To avoid overwhelming the dish, don't add more than a cup or so of meat. I offer this recipe using canned beans for convenience, but you can obviously include dried beans in their place; just simmer them until soft and then commence with the recipe. To make this properly vegetarian, simply swap vegetable stock for chicken.Course Main CourseCuisine FrenchKeyword beans, budget friendly, greens, kale, soup, vegetarianServings 6Ingredients2 tablespoons oil1 medium onion, chopped1 carrot, chopped2 celery stalks, chopped
3 garlic cloves, chopped
6 cups chicken stock or vegetable stock
1 quart water
1 14 oz. can great northern or cannelloni beans, drained, rinsed
1 14 oz. can chopped and seeded tomatoes, or 2 cups fresh
1 to 2 cups other vegetables
1 tablespoon dried mixed Italian herbs
1/2 teaspoon cayenne or red chili flakes (for heat)
2 cups kale or collard greens, roughly chopped
Salt, ground pepper
Grated Parmesan cheese
InstructionsIn a large pot, heat olive oil over medium heat. Add onion and saute until soft, about three minutes. Add the garlic and cook for another minute. Add the stock, water, beans, tomatoes, vegetables (if raw), herbs, cayenne and pepper and simmer for about 20 minutes. Add greens simmer about 10 minutes. Add soft and pepper to taste. Ladle into bowls; sprinkle with grated Parmesan and a couple grinds of fresh pepper.To make this in an Instant Pot:Heat olive oil in the Instant Pot pan on saute. Add onion and cook until soft, about three to five minutes. Add the garlic and cook for another minute. Add the stock, water, beans, tomatoes, vegetables, herbs, cayenne, pepper and any other add-ins such as meats into a pressure cook for 7 minutes. It can stay on warm for at least an hour. Serve with grated cheese and fresh pepper.This post was originally published in February 2009, and was updated in 2025. It may contain affiliate links.
The post Recipe: White Beans and Greens – Inexpensive, Simple and Powerfully Good first appeared on Kathleen Flinn.
The post Recipe: White Beans and Greens – Inexpensive, Simple and Powerfully Good appeared first on Kathleen Flinn.
January 20, 2025
Join me for a unique Beach Getaway on Anna Maria Island


For web site readers – use code FRIEND100 to get $100 off. Bring a friend to share your room and use the code and they will get $100 off PLUS 20%
In January 2024, I held my first Beach Cooking Getaway at our home on Anna Maria Island. I’ve been thinking about doing this kind of cooking experience for years and decided to just host a couple and see how it went. The result was nothing short of magical and I can’t wait to host some more.
Spending a few days with readers and getting a chance to understand what people most need to learn to gain confidence in their own skills was inspirational for me, not just for those who joined me in my kitchen.
This year is especially poignant, since it comes after losing my mom last September, and rebuilding our island home after it was damaged by two hurricanes immediately afterward.
So, whether you’re a seasoned cook or you need a crash course on how to chop an onion, this body- and soul-feeding beach getaway is for you. We’ll focus on fundamental techniques and craft a variety of dishes based on French and Mediterranean cuisine while incorporating all kinds of healthy variations and seasonal produce, seafood and more. I send out a lengthy survey ahead of each class to customize it to what each group most wants to learn.
We’ll also do some writing/journaling exercises to get you thinking about where you are on life’s journey. Don’t worry, you don’t have to be a writer, just be yourself.
Join me on Anna Maria Island!Your stay includes all meals, cooking lessons, a dozen comparative tastings and a nearby field trip. Accommodation is complimentary; you’ll be staying as my guest. Bring a friend or partner to share your room and they get a 20% discount. You’ll receive a digital packet of recipes and hopefully a heart full of inspiration. To assure everyone gets plenty of individual attention, each session is limited to a maximum of eight participants.
To learn more, see the full itinerary and book your place, click the date you’re interested in below.
2025 – Saturday to Tuesday
April 5 to April 8th – 3 SPOTS LEFT
May 24th to 27th (Memorial Day weekend)
November 8th to 11th (Veterans Day weekend) – SOLD OUT


 271478588


The post Join me for a unique Beach Getaway on Anna Maria Island first appeared on Kathleen Flinn.
The post Join me for a unique Beach Getaway on Anna Maria Island appeared first on Kathleen Flinn.