
Kathleen Flinn's Blog, page 4
July 23, 2023
I Never Had a Barbie, and I’m OK With That

I never had a Barbie growing up. I had a single cheap knockoff, but never an honest-to-God Barbie.
All my life, I harbored this notion my parents gave the matter deep thought. Perhaps they considered her an insufficient role model? Or, they feared giving me an inferiority complex. After all, I was a bookish, awkward skinny girl with straight brown hair who had Coke bottle glass by age eight. On a cerebral level, maybe they didn’t approve of the shallow consumerism and lookism that Barbie symbolized.
With the new movie coming out, I asked my mom. “Oh no, they were just too expensive,” she revealed.


 Who Can Blame Them?
Mom told me they knew Barbie represented a slippery slope. A single doll didn’t cost that much, but it was like a gateway drug. No doll is an island, so then you had to buy her friends. Then, you have to buy more clothes, then accessories, and before you know it, you’re unboxing a Dream Ski Chalet and new skis for Skipper and Ken and the other hangers on.
They were not wrong. My neighbors, The Stevensons, had five girls. They had it all when it came to Barbie: the pink corvette, the penthouse, the Malibu Dream House and dozens of shoeboxes stuffed with outfits. Barbie shoes littered their house like breadcrumbs left by many desperate children.
I saved up my allowance and bought a Barbie-like doll at Kmart. I had enough for the doll and one outfit. I recall standing for seemingly hours weighing which outfit to buy. If memory serves, I settled on a gold ballgown.
Back at home, I soon tired of having only one costume change for my doll. I asked my mom for money to buy her some more clothes. My ever-practical mother said she’d think about it.


On our next trip to the store, I started to drag her toward the toy section. Instead, she grabbed my hand and guided me into the sewing supplies aisle. “Making clothes for your doll will help you learn how to sew. Won’t that be fun?”
This was so my mother. Like my dad, she was a child raised in the Great Depression. She bought me a sewing kit and a few squares of fabric meant for quilts – as if anyone would even think of dressing a Barbie in calico.
She promised we’d make one outfit together, which we never did (also so my mother), but she did show me how to do a simple running stitch.
I studied the clothes on the Stevenson’s Barbies, and looked at what women wore in movies and on TV. I turned a stained lace napkin into a racy see-through onesie. I made an awkward looking sleeveless Pan Am uniform out of a worn blue pillowcase.
My greatest fashion achievement was turning a discarded fluffy white mitten into a calf-length formal gown that made the doll look like she was wearing a giant marshmallow, replete with matching muffs and booties. It was a daring look, one that would have been either adored or pummeled by judges on “Project Runway.”

Three weeks later, I was ready. I took my doll and her best wardrobe items over to the Stevensons. Their response was the kind of uncharitable mockery you’d expect from a band of Barbie-wielding elementary school girls. My doll was ugly, her clothes were stupid. Their mom made them apologize, which made the whole thing worse. I ran home and cried on my bed for hours.
My dad came home from work first. I showed him my doll. He acted impressed by all the clothes I’d made. Those girls across the street could “go to hell.”
He insisted I hold a fashion show for my mom when she got home. I set up a runway on our Formica kitchen counter. Sipping Boone’s Farm wine, she declared them all the “prettiest doll clothes she’d ever seen.” She noted that now she also knew what happened to that black satin nightie that had gone missing.


A week later, my mother casually offered to buy me a real Barbie. In retrospect, I realize this was fueled by guilt that her earlier refusal had resulted in a traumatic childhood experience. But I’d already moved on.
Instead, I turned to writing stories about Barbies. The first was about a Barbie that came to life and made the girls who owned her cry – a perfect example of art imitating the way I wished life could turn out.
 “Barbenheimer”
The new Barbie movie debuts on the same weekend as masterful telling of the story of Robert Oppenheimer, the architect of the nuclear bombs. This match-up has generated endless memes, opinion pieces and rants on social media. Many note that despite being an American icon, the doll has never been manufactured in the United States. Others point out that the woman who created her couldn’t get it made — until the Germans made a version first.
The Washington Post notes that perhaps Oppenheimer and Barbie tell the same story, each highlighting a tipping point of collapse from which the world will never recover. After all, Barbie is “a toy that takes more than three cups of oil to produce before it lingers in landfills around the world.”
The story goes into a lot of detail about eras, epochs and ice ages, and I didn’t study geology. But the gist is that the rise of over-reliance on fossil fuels, microplastics and the emergence of a nuclear era are part a larger sum of our eventual demise. That’s about as dark a take on Barbie as you can get.


 No Writer or Author Barbie until 2018
 I’m glad that I never went down Barbie’s plastic rabbit hole, as my 1970’s-childhood contributed enough to landfills. But I suppose I also never identified with her. I was never going to grow up to be tall, blonde and anatomically incorrect. Plus, she showed little interest in my favorite subject: books.
While Barbie has been an astronaut, doctor, veterinarian, teacher, scientist and many other roles but Mattel never made a “Writer Barbie” or a “Best-Selling Author Barbie” while I was growing up.
Around 2010, they launched “News Anchor Barbie,” close, but not the same. In 2018, Mattel released their first true writer Barbie. Writer and poet Maya Angelou – one of my personal “she-roes” — was honored with a Barbie modeled after her that year as part of its Inspiring Women Series.
That same year, Pioneer Woman food writer/icon Ree Drummond made it into Barbieland, too. And earlier this year, Mattel released a journalist Ida B. Wells Barbie, who exposed the horrors of lynching in the 1800s.

Who can blame Mattel for waiting so long to focus on writers? I sit around in my sweats drinking coffee half the day. Generally, writers aren’t glamorous unless they’re Candace Bushnell of “Sex and the City” fame. But then I wondered, do we need a plastic toy to help us decide who we want to be when we grow up?
Out of curiosity, I used AI photo creators Dall-E and ShutterStock AI to conjure up what “Writer/Author Barbie” might look like. Those are the photos littered throughout this post. I started with a doll that I might identify with, and then expanded to look like the other women author and writer friends.
My mother insists she wasn’t anti-Barbie, her Depression Era mindset preferred spending the money on something else than a vapid blonde clotheshorse. She might have balked at buying me a Barbie, but never once hesitated to buy a book I wanted.
Plus, mom was right. I did teach myself to sew by making clothes for that doll. It turns out, human size clothes are easier.


Note: Images created by Open AI’s Dall-E and ShutterStock AI Generator, except for Maya Angelou doll, courtesy of Mattel. This post contains affiliate links.
The post I Never Had a Barbie, and I’m OK With That appeared first on Kathleen Flinn.


July 18, 2023
Recipe: Easy Salmon Cakes with Avocado Basil Dressing
[image error]If you live in Seattle, it’s required by state law to consume wild salmon during the summer or at least it feels that way. As a result, I end up with a lot of leftovers, so I created this easy salmon cakes recipe. Lately, I’ve been grilling more than we need in order to use the leftovers for these fragrant salmon cakes that I developed last year when faced with a pile of leftover salmon after a rained-out BBQ. They’re simple to make and freeze well and offer a healthy alternative to fish sticks. They’re easily dressed up by a simple sauce.
I adore avocados, but my husband is less enthusiastic, so I end up with halves or slivers of leftover avocado. One day, trying to develop a spa cuisine-style low-fat dressing for a guest chef gig at Rancho La Puerta, I came up with this winning Avocado-Basil Dressing. Inspired by a 1974 “spa cuisine” cookbook, I blended together a bit of leftover avocado and a bit of seltzer water with a wonderful result. The result is a light, airy dressing that works well with simple, tossed salads and also with salmon and grilled chicken.
Make your own breadcrumbs
Two slices of toast pulsed for 30 seconds in a small food processor makes about a cup of bread crumbs, and the flavor beats the gritty store-bought variety.
Using fresh fish? No problem
If using fresh fish, simply poach it quickly in water. The salmon cakes make enough for two as a meal, or four as an appetizer, but the recipe is easily doubled or tripled.
Note: This post was originally published in July 2012; its publish date reflects the addition of updated material. PrintEasy Fragrant Salmon CakesThis is an easy way to use up leftover any kind of leftover fish. I tend to use salmon as we eat it a lot during the summer here in the Pacific Northwest, but I've also used leftover halibt, cod and other white fish as well. I've even added a few leftover shrimp into the mix. You can use a toaster oven or air fryer set on bake instead of a conventional oven. Course Appetizer, Main Course, SeafoodCuisine American, Creole/Cajun, FrenchKeyword Easy, Fish, Healthy, leftovers, Light, SeafoodPrep Time 10 minutes minutesCook Time 12 minutes minutesServings 2 as a main, 4 as an appetizerIngredients1/2 lb. 225g cooked salmon or mild white fish filets1 whole egg + 1 egg white1 cup bread crumbs divided in half1 small handful any combination of chopped fresh herbs such as parsley dill, basil or cilantro4 green onions white and light portions minced1 tablespoon fresh lemon juice2 teaspoons Old Bay seasoning½ teaspoon Dijon mustard1/8 tsp or two to cayenne or cajun seasoning optionalOlive oil or cooking sprayInstructionsPreheat oven or toaster oven to 400°F/200°C degrees. If using an air fryer, set to 370°F/185°C on "bake" if yours has that specific function. Combine egg, half the breadcrumbs, chopped herbs, green onions, lemon juice, Old Bay seasoning, mustard, ¼ teaspoon coarse salt, cayenne and several grinds of black pepper in a large bowl. Put the remainder of the breadcrumbs into a separate shallow bowl. Discard fish skin.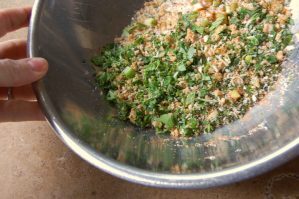 Crumble fish into bowl, sifting to uncover any bones. Mix thoroughly.
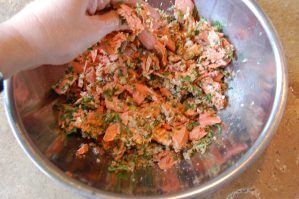 Coat a cookie sheet with cooking spray or olive oil. Form the fish mixture into small cakes, about 1/3-inch thick. Dip both sides of the fish cakes into breadcrumbs and place on the cookie sheet.
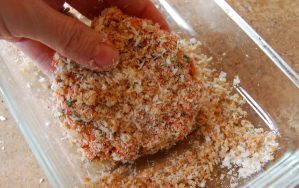 In an oven or toaster oven, bake at 400°F/200°C degrees for about five minutes, then broil for about 90 seconds until golden. Turn off broiler, remove sheet from pan and carefully flip cakes. Bake another five minutes and then broil until the top is golden another 90 seconds.If using an air fryer, bake for eight minutes, turning halfway through. Serve warm.
  PrintAvocado Basil DressingThis is an easy, low-fat dressing that can be used with salmon cakes, as a salad dressing or even as a simple sauce for simply grilled fish, chicken or steak. IngredientsOne quarter of a pitted peeled avocado6 basil leaves1 tablespoon fresh lime juice½ teaspoon minced shallots1 1/2 tablespoons olive oil2 1/2 tablespoons sparkling waterInstructionsCombine the vinaigrette ingredients into a small food processor or blender and mix until smooth. Add salt and cranks of black pepper to taste.
The post Recipe: Easy Salmon Cakes with Avocado Basil Dressing appeared first on Kathleen Flinn.
July 17, 2023
Recipe: French Onion Quiche
 Quiche is like pizza — it can be made with almost anything. Although it sounds posh, quiche one of my fridge clean-out dishes. I rummage through the crisper drawers, explore the pull-out where I keep cheese and poke through other nooks to see what needs to be used up that might taste good together. Then, I use this basic French onion quiche recipe as a guideline.
Don’t get me wrong, the original version of this quiche made only of caramelized onions is absolutely great on its own. I made it dozens of times while on tour with my first book, The Sharper Your Knife, the Less You Cry.
I created the basic recipe while living in Paris and studying at Le Cordon Bleu in Paris. A small bistro near our apartment on Rue Etienne Marcel served what it referred to as French onion quiche one unseasonably warm March afternoon. It was exactly as advertised, with sweet brown onions usually found in the base of a bowl of French onion soup. The owner told me that this quiche was the result of caramelizing too many onions. “It was warm the past few days, so no one wanted hot soup,” he said, shrugging his shoulders. So he sold the quiche with a salad and voila, he found a way to unload all those extra onions.
So I tried it in our small Paris kitchen, looking out the window at the environs of a five-way intersection that lay below every as the onions simmered. I admit that many onions seemed like an insurmountable pile, but they reduced drastically as the heat changed them from hard, spicy and white to soft, brown and almost sugary.
Basic Recipe
This basic recipe focuses on onions, but try asparagus, mushrooms, ham, artichokes, spinach, sun-dried tomatoes, bacon, chopped up ham or whatever you have in your fridge that needs to get used up. If you have a lot of vegetables, simply reduce the amount of onions so you don’t overload your quiche. I recommend cooking mushrooms in some oil, and/or lightly steaming asparagus or broccoli before cooking. If you’re using fresh spinach or kale, give it a quick whirl it in a hot pan with some olive oil until it wilts. Let any cooked vegetables cool before adding the filling or the heat may cook the eggs prematurely.
French Tart Pans – An Explanation
 Quiche is traditionally made in a special tart pan that allows the bottom to be removed. You can find one online for around $10 [affiliate link] or use a standard pie pan or frankly, a cake pan, a brownie pan or anything that can go into the oven with at least 1/2 inch sides. I also use parchment and pie weights [affiliate link] to “blind bake” the pastry shell first. I’m a fan of cookie-sheet sized pre-cut parchment [affiliate link] but any kind will do. You can use aluminum foil in place of parchment and dried beans in place of pie weights. Do not use wax paper or you’ll end up with a waxy pastry shell, something no one will find appetizing.
Like pie, quiche is best with a butter-laden homemade crust. I recommend the pâte brisée from my friend Elise Bauer’s site, SimplyRecipes. However, I am certainly not going to judge you if you buy prepared pie dough. Life is too short for that.
Originally published Aug. 11, 2011. Updated July 19, 2023. This post contains affiliate links.
 PrintFrench Onion QuicheQuiche can be served hot, warm or at room temperature. It also reheats well in a low oven. If you don’t have Gruyere, you can substitute Swiss cheese, or use a blend of Swiss and Parmesan. This recipe is designed for a nine-inch quiche pan, or about six servings.Course BakingCuisine FrenchKeyword brunch, Easy, French, onion, pastry, quicheServings 6EquipmentNine-inch quich pan with removeable bottom or pie dishIngredientsPrepared pie dough or pâte briséeCaramelized onions3 large onions about two pounds, sliced2 tablespoons butter1 tablespoon olive oil1 bay leaf1 tablespoon flourQuiche filling3 large eggs¾ cup 175 ml heavy creamCoarse salt ground pepper½ teaspoon fresh thyme3 ounces 90 grams Gruyère cheese, gratedInstructionsPreheat oven to 425° F / 220°C.In a large sauté pan melt the butter with the olive oil. Add the onions and bay leaf. Cook and stir patiently until they’re brown and soft, about a half hour. Once browned, sprinkle with flour and a dash of salt and cook another 2 minutes. Set aside to cool. Remove the tomato petals from the sheet, let cool.Roll out the dough, press it into a quiche or pie pan. Pierce the bottom with a fork. To keep its shape, set parchment or aluminum foil in the center and fill with pie weights or dry beans. Bake for 5 minutes. Remove weights, brush the pastry with beaten egg and return to oven for 7 minutes. Cool slightly.Whisk the eggs and cream in a bowl. Stir in about one-third of the cheese, salt, pepper and thyme. Stir in the cooled onions and then pour into the pastry shell. Arrange tomatoes in decorative pattern on top. Sprinkle on remaining Gruyère. Bake for 25 to 35 minutes until firm, slightly browned and a bit puffy.
The post Recipe: French Onion Quiche appeared first on Kathleen Flinn.
July 8, 2023
Recipe: Easy Tuna Ceviche
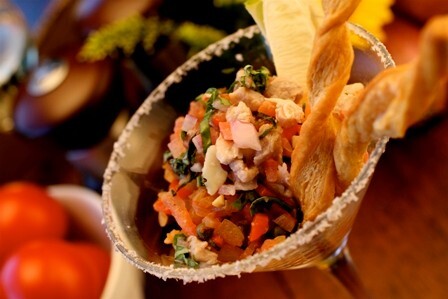
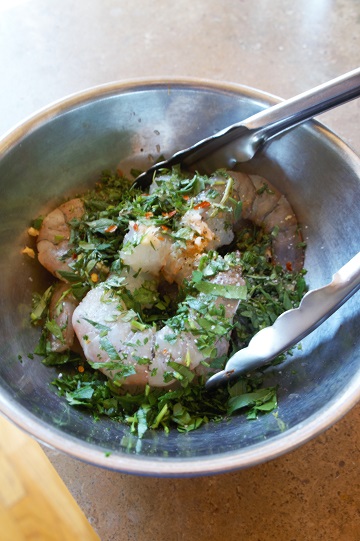
This is an easy tuna ceviche recipe that can also work with salmon. Ceviche is a classic of South American cuisine that is “cooked” in lemon and lime juice – decidedly non-French, but terrific and refreshing nonetheless. I like to serve it with puff pastry but it is equally delicious with tortilla chips or toasted bread points. I have also made this same recipe with fresh, high-quality salmon.
PrintEasy Tuna CevicheIf you can chop, you can make this easy tuna ceviche in a matter of minutes. You can also use high-grade salmon.Course Appetizer, SeafoodIngredients1 pound 500g Ahi tuna or salmon, cut into small cubes½ medium red onion finely diced2 medium tomatoes peeled and chopped (1 cup)1 or 2 cloves garlic finely chopped2 teaspoons coarse sea saltGround pepper to tasteTabasco or cayenne to tastePinch of ground oregano1 cup 15 grams chopped basil½ cup 125 mlof fresh squeezed lime juice½ cup 125 mlof fresh squeezed lemon juiceInstructionsIn a non-reactive casserole dish, preferably glass, or in a gallon-sized Ziploc bag, combine the tuna, onion, tomatoes, garlic, salt, pepper, Tabasco, oregano and basil. Cover with lemon and lime juice. Let sit covered in the refrigerator for an hour, and then stir to ensure all the fish comes into contact with the marinade. Let rest for about six hours. Fish should appear white and cooked.When ready to prepare, preheat the oven to 350° F / 180° C. Roll out the puff pastry on a pastry sheet, topping it with a cooling rack if available to keep it flat while cooking. Bake for about 30 minutes, or until golden. When the pastry is done, remove from oven to cool slightly. Alternately, use toast points or even tortilla chips.Add the chopped basil to the seviche mix, then drain. Layer the ceviche on top of the pastry. Sprinkle with olives on top. Serves eight as a plated appetizer, or four as an entrée with salad.The post Recipe: Easy Tuna Ceviche appeared first on Kathleen Flinn.
June 30, 2023
Join Me for Writing at Ranch La Puerta
I’ve been teaching at “the ranch” for around a decade. Usually I teach cooking, but this year I’ll spend the week teaching writing at Rancho La Puerta.
This year, I’ll be back at the ranch September 23rd to 30th to teach writing. I’ll be doing four classes, starting with one focusing on the wonderful exercise, “The Six-Word Memoir.” After that, the classes will focus on writing scenes, developing voice and more.


Rancho La Puerta is a very special place not just to me, but many people who have been finding it a place of solace and comfort for decades. Rancho La Puerta been named the top wellness spa year-after-year by Conde Nast Traveler and other publications, and invariably wins the “Best Spa/Resort for the Solo Traveler.” It focuses on wellness via exercise and taking in the great outdoors, healthy food and creating a positive mindset. I feel like this review from Trip Savvy captures the experience quite well.
If you decide you can’t swing a whole week, you can opt for a Saturday to Wednesday trip and you’ll catch most of my workshops for writing at Rancho La Puerta. Regardless of how long you stay, if you decide to join me at ranch that week, let me know! Can’t make it in 2023? I’ll have dates for 2024 in October.
The post Join Me for Writing at Ranch La Puerta appeared first on Kathleen Flinn.
June 21, 2023
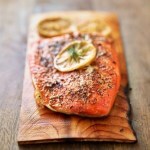
How to Make Planked Salmon (or any other fish)

In summer months (also known as salmon season here in Seattle), I make this planked salmon about once a week. Before I moved to Seattle in the 1990s, I’d never heard of cooking on a plank, and frankly, it sounded like a strange concept. But then, I’d also never been hiking in the mountains, seen Orca whales in the wild and certainly never laid eyes on a geoduck.
History of Planked SalmonMost culinary historians I’ve talk to agree that Native Americans in the Pacific Northwest widely used the technique of cooking freshly caught fish on or attached to wood planks set on the edges of open fires. This legacy is one reason it’s popular in the Northwest.
However, if you read up on the history of European cuisine, plank cooking is noted as a Scandinavian technique used by Vikings as far back as 12th Century. It’s plausible that both populations (and others) developed the technique separately. After all, if you’re out fishing in the wild, there’s generally plenty of wood around, and cooking fish on a roaring fire designed to provide heat cold humans isn’t exactly the best means to cook delicate fish. Attaching fish to a plank next to the fire makes sense. Later, putting it over the fire seems like a logical extension. (Genetically, according to my DNA, I’m about 38% Swedish, so perhaps that’s why I gravitate toward this cooking technique.)
To me, a perfect summer day in Seattle starts with an early morning visit to Pike Place Market, the city’s massive historic waterfront market. The crowds don’t move in until around 11 a.m. and by then, I’ve been to Pure Foods Seafood Market, hit Sosio’s Produce, picked up some flowers and I’m back at home.
I’m a Fisherman’s DaughterAs a kid, I didn’t know that you could buy fish at a store. This was back before supermarkets felt compelled to offer everything from deli meat to sushi. Our local supermarket chain in Davison didn’t have a fish counter; the closest they came to seafood were the fish sticks in the frozen food aisle, a product that I never consumed outside of a school lunch.
That’s because my dad was a fisherman. He used to say that they deducted time in heaven that you’d spent fishing on earth, or something like that. Seasons were no obstacle. No matter the weather, we dragged our aluminum fishing boat behind our station wagon from to some lake in search of fish.
 A scene from a family fishing trip circa 1971
In spring, we huddled together under umbrellas in cold, pouring rain. In the summer, we fished until everyone was thoroughly sunburned. Winter brought ice fishing, with the family shivering together, staring at their lines dropped below the hole cut in the ice. For all of that, we had the great reward of fresh-from-the-water fish.
As my brothers got older and developed social lives and jobs, they fished less often. By her late teens, my sister chose never to fish, but instead lay across the stern of the boat in her bikini, trying to get tan. Eventually, we moved to Florida and that left just me and my dad and our two poles at the Rod n’ Reel pier together, chatting and fishing, staring at the warm, green water. My father had some odd power of fish; even when the fish weren’t biting, he always caught something.

So when I go to the market now and I see the parade of all the fish, once exotic and new, I think of those days with my dad, and how I used to look into the water, wondering how all those fish breathed down there.
Yesterday, I picked out a nice hunk of fresh Alaskan salmon and cooked it my favorite way, on a plank of wood over a hot fire. I like a bit of spice with everything, so I tend to put together a mix of Cajun spice and Italian herbs, but you can use whatever you like, even just salt, pepper and a bit of lemon. I also love the Seattle Salmon Rub from World Spice Merchants in Pike Place Market. I paired it with lemon risotto and simple sautéed fiddlehead greens. For the risotto, start with this recipe. At the end, add about 2 teaspoons lemon zest and 1/3 cup of fresh lemon juice plus a tablespoons of butter toward the end cooking. A couple tablespoons chopped parsley is a nice finish.
How to Make Spicy Planked SalmonIf you’ve never cooked planked salmon or any fish on a plank, give it a try, especially if you’re uneasy about grilling fish. This method slows down the cooking of the fish, making it less likely to overcook. The main benefit to cooking on a plank is that it gives the fish a lovely smoked flavor. Most grocery stores carry planks now, or you can order online for less than $2 each [affiliate link].
You can read all about planking fish here, but here’s the short version. Be sure to soak the plank or planks in water for at least an hour before grilling to avoid having them catch on fire. Lightly brush the plank with a bit of oil, put the fish on top, sprinkle on the seasonings. I keep a spray bottle of water handy just in case the edges alight. Keep the lid on for as long as possible. Have a pair of tongs and a metal baking tray handy so that you can easily remove the fish from the grill when it’s done.
In the Northwest, it’s most common to cook cedar planked salmon, and cedar is definitely the most economical as its the most available retail wise. The truth is the wood only imparts a hint of flavor, so I haven’t noticed much difference between cedar and alderwood planks.
My dad died when I was 13. I never got a chance to show him all those fish at Pike Place Market. He would have loved it. An Indian friend told me that she was raised to believe the first bite of any meal is meant for God. Whenever I eat fish, I always think, this first bite is for my dad.
 PrintRecipe: Spicy Planked SalmonPlank grilling takes a bit longer than other cooking methods; allow for about fifty percent more time for the fish to cook. When the fish is done, it should be firm to the touch and register around 140 degrees Fahrenheit with an instant-read thermometer. In the summer, when wild Alaskan halibut and salmon are plentiful, I use this method at least once a week. This mother also works well for any reasonably firm sweet fish as grouper, black cod or snapper, too. I prefer to use this method over a charcoal fire. If you use a gas grill, avoid placing the wood plank directly over the gas flames. Allow about four ounces of fish per serving.Course SeafoodPrep Time 1 hour hour 20 minutes minutesCook Time 10 minutes minutesTotal Time 1 hour hour 30 minutes minutesServings 4 servingsAuthor Kathleen FlinnIngredientsAbout 1 lb. halibut salmon or any dense white fish1/4 cup of olive oil1 teaspoon mixed Cajun spices1 teaspoons mixed Italian herbsJuice of 1/2 lemon about 2 tablespoons3 garlic cloves minced1/2 teaspoon coarse sea saltGround black2 to 3 slices lemonInstructionsSoak the planks in water for at least one hour. Prepare the coals. When ready, lightly dry the plank. Brush one side of the fish with a generous coat of olive oil; if the fish has the skin attached, oil that side. Place the fish oiled side down onto the platter. Sprinkle the top with Cajun spices, mixed Italian herbs, paprika and garlic over the top of the fish. Juice half the lemon, slice the other half thinly. Evenly sprinkle the fish with oil and lemon juice. Finish off with sea salt and freshly ground black pepper. Top with the sliced lemon.Put the plank on the metal rack over hot coals and cover. How long the fish takes to cook depends on the heat of your grill; at 350 degrees, it should take about eight to 10 minutes per pound. Fish is cooked when it’s hot in the center (about 145 degrees on a thermometer) and flakes easily with a fork at its thickest point. Take care not to overcook the fish. Serve hot, directly off the plank if desired.
Originally published April 20th, 2009; updated 27 May 2023. This page contains affiliate links.
The post How to Make Planked Salmon (or any other fish) appeared first on Kathleen Flinn.
June 1, 2023
Mushroom and Lentil Burgers

Years ago, I found myself the only vegetarian at a barbecue hosted by co-workers. I’ve dabbled with vegetarianism on and off; this was during one of my “on” phases. Thoughtfully, or so I thought, I packed my own frozen meatless patties so no would even notice that I wasn’t eating meat. Of course, that didn’t happen.

Instead, my hard hockey puck commercial discs became the center of everyone’s attention.
“These don’t even look like meat!” remarked one of the “hosts,” a rotund guy named Mac who considered himself a comic. He cooked them – right on the same grill with the ground beef – and then tasted one afterward.
“No wonder you’re so skinny, you’re eatin’ cardboard!”
No More PucksThese mushroom and lentil burgers would shut Mac up. They offer a similar meaty umami quality to the real thing. Topped with cheese, it hits the same satisfying flavor receptors as a traditional burger. Make your own breadcrumbs by either pulverizing an extra hamburger bun or leftover bread in a food processor; these can be made from leftover gluten-free breads as well.
This calls for steak seasoning. I am a fan of the Montreal Steak Seasoning from World Spice Merchants in Seattle’s Pike Place Market, although you can certainly use the classic Montreal Steak Seasoning from McCormick, or use your own favorite blend. You can use canned pre-cooked lentils available on market shelves, but the texture of making them from dried beans is superior for burgers and takes 20 (hands-free) minutes.
Pre-cooked lentils come in 15 oz. cans so if you’re using those, you might as well double the recipe since these patties freeze so well. Topping with cheese is optional. Great toppings for these burgers include sliced avocado, tomatoes and mixed greens. One cup dry lentils yields about two cups cooked. Makes four burgers and is easily doubled. These mushroom and lentil burgers can be made a day ahead and then simply re-heated on the grill.
You May Also Like:
Black Beans, Greens and Corn Burgers (vegan, gluten free)
Go With the Flow Lentil Soup
 PrintMushroom and Lentil BurgersYou can make these gluten free by simply swapping out the breadcrumbs for a GF option. Course Main CourseCuisine AmericanKeyword BBQ, Burgers, good grilling recipes, mushrooms, vegetarianIngredients1 cup dry green or red lentils OR 8 oz. 225g pre-cooked lentils1 tablespoon vegetable oil or cooking spray½ medium onion 225g, chopped (3/4 cup)2 garlic cloves minced6 oz. cremini or Portobello mushrooms 180g, chopped fine (2 cups)2 teaspoons Dijon mustard2 teaspoons chopped fresh thyme1/4 teaspoon freshly ground black pepper1/2 teaspoon kosher salt1 cup breadcrumbs1 large egg lightly beaten½ teaspoon steak seasoning optional6 oz. cheeseInstructionsHeat a large ovenproof skillet (such as cast iron) over medium-high heat, adding a bit more vegetable oil. Cook the patties for about four minutes on one side until browned, adjusting the heat so it doesn’t burn. Then put into the oven for about 10 minutes. If you want to make cheese burgers, remove the patties after six minutes, add the cheese and finish under the broiler until the cheese melts.NotesNote: These also freezer well. Simply wrap tightly with plastic wrap or parchment and then store in an air-tight container. Use within two months to retain optimal flavor.
Photos by Kathleen Flinn. This page contains affiliate links. Originally posted in 2013; it has been updated.
The post Mushroom and Lentil Burgers appeared first on Kathleen Flinn.
April 22, 2023
Shrimp Pasta with Tarragon & Wilted Greens

A small, tiny pot inspired this shrimp pasta.
It started as just a tiny container from a local nursery. Then, like something out of a 1950s horror film, by August last summer, my French tarragon grew into a green tendril monster on the patio of my Seattle home. On a chilly day in late autumn, I hacked most of it back and dried it to make my own fine herbs, that classic combination that’s a mainstay in French cuisine. The traditional ingredients include parsley, chives, tarragon and chervil, all of which I grow all on my patio garden most summers.
Generally, herbs don’t overwinter well in Seattle. They make a show over summer, tolerate my regular hacking and then retreat until I let them drift into stiff vines or get around to drying them.
To my surprise, however, the tarragon resurrected with exceptional vigor this spring. When I first investigated my frigid, neglected patio in March, the tarragon greeted me like a baby unexpectedly standing up in a morning crib, happy and ready for the day. It reminded me that too often, we underestimate people or things, even plants.
I had an embarrassment of riches of frozen shrimp, so my mind went to shrimp pasta. I stumbled across this recipe while researching tarragon, originally published in Bon Appetit in 2005. I made some changes, notably tossing the greens with a bit of pasta to round it out as a meal.
I first made it for my mother visiting from Florida. “It tastes like spring in France,” she said. I agree.

 PrintShrimp Pasta with Tarragon and Wilted GreensYou can use frozen shrimp, but thaw according to package directions and pat down to sop up any leftover water. No shallots? You can use sweet onion or leek instead. No fresh tarragon? You can use two teaspoons dried but I recommend adding in some chopped fresh parsley if you've got it. You can substitute chopped kale for the spinach if desired.Course SeafoodCuisine FrenchPrep Time 15 minutes minutesCook Time 12 minutes minutesTotal Time 27 minutes minutesServings 4 servingsAuthor Kathleen FlinnIngredients6 ounces linguine cooked and drained3/4 pound of large shrimp peeled and deveined1/3 cup chopped parsley1 tablespoons + 2 tablespoons olive or avocado oil1 tablespoon + 2 tablespoons fresh lemon juice2 teaspoons lemon zest2 tablespoons chopped fresh tarragon2 teaspoon minced peeled fresh ginger½ cup finely chopped shallots (about two large)¼ cup white wine2 tablespoons butter2 tablespoons whipping cream or half & half10 oz. baby spinach leaves2 tablespoons chicken or vegetable stockInstructionsAdd water to a large stockpot and bring it to a boil. Add 1 tablespoon salt and add the pasta, cooking it according to package directions while you prep the rest of the dish.Peel and devein the shrimp while the water boils.Toss shrimp, parsley, 1 tablespoon of the olive oil, 1 tablespoon lemon juice, lemon zest, half the chopped tarragon, and half the minced ginger in medium bowl. Generously season the mixture with sea salt and ground pepper.Heat 1 tablespoon oil in large skillet over medium heat. Add the shallots and sauté until soft, about four minutes. Add white wine and reduce let reduce for two minutes. Add shrimp. Saute until almost cooked through, about 3 minutes. Add butter and cream; bring just to simmer. Add remaining 1 teaspoon ginger. Season with salt and pepper. Set shrimp aside in another bowl, scraping out most of the pan’s contents.Put the pan back on medium-high heat. Add remaining 1 tablespoon oil in large nonstick skillet. Add spinach and remaining 1 tablespoon lemon juice; sprinkle with salt and pepper. Toss until just wilted, about 25 seconds. Add the cooked spaghetti and vegetable stock. Stir and mix into the pasta. Mound spinach pasta mixture in center of plates top with shrimp and sauce. Sprinkle shrimp with remaining 2 teaspoons tarragon. Serve warm.
This was originally published in 2015; it has been updated. It may contain affiliate links.
The post Shrimp Pasta with Tarragon & Wilted Greens appeared first on Kathleen Flinn.
April 2, 2023
Grilled Lamb with Rosemary & Olives and Instant Pot White Beans (Recipe)
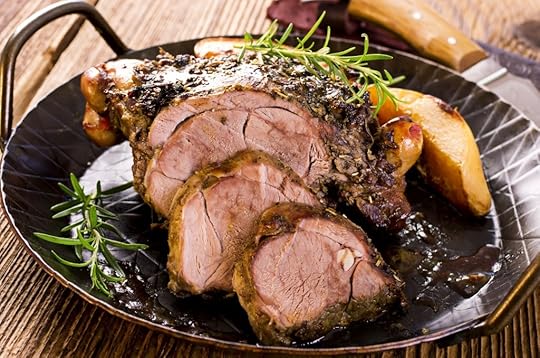
This grilled lamb dish is my favorite recipe from The Sharper Your Knife, the Less You Cry. In the book, it’s listed by its French name, Agneau grillé mariné aux olives, artichauts et tomates.
People who say they don’t like lamb (like my mother) will like this dish. The earthy rosemary, the briny, salty goodness of the olives, the bite of garlic and the bright acid of lemon tenderize the meat making it moist plus lend it a a burst of flavors.
One key tip in making lamb to avoid overcooking it as it can make the meat chewy. Your goal is to cook it just to medium-rare, about 145°F/63°C, then let it rest before slicing.
Lamb and White Beans: So Very French
I first had a dish like this on a trip to Paris around 2002. I was single and living in London and decided to spend a stormy April weekend in Paris on my own. I wandered into a small bistro that specialized in food from Provence. This dish was the special that night, in part, because lamb is less expensive and more plentiful in April due to Easter.
High quality olives make all the difference in this dish, so don’t skimp. Go to a deli and get a glistening Mediterranean mix, or pick up this great mix from Trader Joe’s.
Key to Grilling: Butterfly the Leg
A butterflied leg is simply one with the bone remove and slit open like a book. This makes for an easy grilled lamb main with lots of flavor. With the bone removed, you can lay it flat on the grill and maneuver it as needed. Supermarket butchers will sometimes butterfly a leg if you ask nicely, while any full-service butcher will do it and be sure to give you the bone.
If you’ve got a sharp knife and confidence, it’s not hard to do yourself and takes about 15 minutes. BBC Good Food has a good video primer. I add the bone into with the beans for extra flavor.
Marinade the Lamb
Ideally, the lamb should marinate overnight in the refrigerator and be brought back to room temperature before grilling. If you don’t have that kind of time, marinate for at least a couple of hours. Don’t need a whole leg? I use this recipe for steaks cut from a lamb leg when serving just two or three.
No plans to grill? No worries. Roast the lamb uncovered for 50 to 70 minutes at 350°F/175°C turning at least once until an instant-read thermometer reads 145°F/63°C. Cover with foil and let rest for 15 minutes before carving.
Instant Pot the White Beans
White northern and Cannelloni beans both work well. Use a mix of fresh rosemary and thyme that I bought for the herb mix in the marinade. I start the beans from dried, something I strongly recommend. (I’m a fan of Bob’s Red Mill Cannelloni beans.)
These days, I use my Instant Pot to cook dried beans in my Instant Pot as they’re cooked in less than an hour and no soaking is required. You’ll find instruction on how to cook dried white beans in your Instant Pot at the bottom of the recipe below. No Instant Pot? Saute the initial ingredients as directed and allow it to cook for about two hours, adding water if needed to keep the beans moist.
Round out this easy grilled lamb with simple steamed asparagus or green beans and rosemary popovers.
 PrintEasy Grilled Lamb with Rosemary & Olives and Instant Pot White BeansA great holiday recipe or just something different to put on the grill during summer. You can also make the white beans on their own. One note: if the lamb doesn't come butterflied, ask the butcher to do it. You can add the bone to the beans for extra flavor, or just treat your dog. Course Main CourseCuisine French, Greek, ItalianKeyword BBQ, Christmas, Easter, good grilling recipes, grill, holidays, Lamb, marinated, olives, PassoverServings 8 peopleEquipmentElectric pressure cookerIngredientsLamb and marinade4 ½ to 6 pounds (2 to 2.5 kgs) boneless leg of lamb butterflied¾ cup (80 g) high quality olives, pitted1 tablespoon coarse salt2 teaspoons ground black pepper1 cup mixed fresh herbs chopped6 tablespoons olive oil6 cloves garlic peeled, smashedJuice of two lemonsBeans4 ounces 125 g salt pork or thick cut bacon, cubed1 medium onion chopped (about 1 cup)2 medium carrots chopped (about 1 cup)1 pound (500 g) dry white beans1 sprig fresh rosemary2 bay leaves3 tablespoons fresh thyme chopped or 1 tablespoon dry2 cloves garlic chopped1 14 oz can chopped, seeded tomatoes2 16 oz cans artichokes hearts, drained2 quarts (2 liters) chicken stock2 tablespoons butter2 tablespoons fresh parsley choppedHot sauce such as TabascoInstructionsMarinade the lamb Combine the ingredients in a small food processor. Blend until the olives and garlic are minced, and the mixture emulsifies. Slather on the lamb, and set into a non-reactive bowl and cover with plastic wrap. Marinate at least two hours or overnight. Make the beansStart the beans in a 6 qt. electric pressure cooker by sauteing the salt pork or bacon slowly over low heat until browned. Add the onion and carrots until softened. Add the beans, rosemary sprig, bay leaf, thyme, garlic, tomatoes, artichokes and enough chicken stock to cover the beans by about three inches. Secure the top and set to Manual for 28 minutes, allowing 10 to 15 minutes for pressure to build. Allow the pressure to release naturally according to your manufacturer's instruction, about 10 to 30 minutes. Grill the lambDiscard marinade, pat the meat dry with paper towels. If grilling a whole leg, start cooking the fat side down, about 15 to 20 minutes per side or until a meat thermometer reaches 125°F/ 51°C degrees for medium rare. Let lamb rest for 10 minutes before slicing. Finish the beansFinish beans with butter, salt, pepper and hot sauce to taste. Remove rosemary sprig, bay leaves, stir in chopped parsley. Serve with sliced lamb.
 Please note this page may contain affiliate links. Originally published in 2009, updated in 2022.
The post Grilled Lamb with Rosemary & Olives and Instant Pot White Beans (Recipe) appeared first on Kathleen Flinn.
March 10, 2023
Why Is There Iodine in Table Salt and Is That a Bad Thing?

 I was inspired by The Kitchen Counter Cooking School, but I was wondering why you’re so against iodized table salt? Also, why is there iodine in table salt. Is this a bad thing? I’ve heard that people need a certain amount of iodine and it’s impossible to get otherwise. Is this why there is iodine in table? Any clarification would be helpful! – Sally B., Madison, Wis.
Kathleen says: Let me clarify. I’m not against iodine in salt. I’m not a fan of highly processed table salt as the natural trace elements have been stripped out. That’s why I recommend unrefined salt for home cooking instead of highly processed table salt. There are many affordable, healthier and ecologically better options out there, as I learned from the excellent book Salted by Mark Bitterman.
Unrefined or natural salts, such as mineral or sea salts, contain a variety of trace elements, often mirroring the makeup of these minerals in the body. These include magnesium and potassium, both of which help the body metabolize sodium. Bluntly put, unrefined salt has minerals that help you process the sodium better and flush out what the body doesn’t use.
Refined salt has been through an arduous chemical transformation to strip away these trace minerals to leave it pure white and pure sodi um paired with an anti-caking agent and added iodine . So you get a wee bit of iodine, but none of the trace minerals that help you break down and use the sodium more efficiently. If you’ve had that container of table salt in your cupboard for more than a year, the iodine may have likely evaporated, too.
Another reader asked, “Why do they strip all the trace mineral elements out of table salt?” Only a single digit of processed salt – about 7% – is used in food or sold to consumers as table salt. The rest is sold for a wide range of industrial applications that require chemically pure sodium chloride. Pure sodium is required to make various pharmaceuticals, baking soda, fertilizer, injection-molded plastics and explosives, among other things.
Why do is there iodine in table salt in the first place? Some areas of the world, including the Great Lakes region of the United States, don’t have iodine as a naturally occurring mineral, so in the 1920s salt manufacturers began to add it to fight against disorders related to iodine deficiency, notably thyroid disorders such as goiter and cognitive development in infants and children. But not every area is deficient in iodine; for instance, South Carolina is sometimes referred to as the “iodine state.”
The World Health Organization combats iodine-deficiency by promoting iodized salt globally. In a famine setting, the lack of iodine — among many other nutrients — is a serious health issue. At that point, what salt tastes like or how much it’s refined doesn’t matter.
But in most industrialized countries where people have an adequate diet, there are other options for getting iodine. Some argue that salt isn’t the most effective way to get iodine in your system, and eating foods with iodine are a better bet.
Most dairy products contain iodine, as does seafood, kelp and seaweed, all common in Japanese cuisine. For the non-seafood eaters, you can also get iodine by eating spinach, asparagus, garlic, strawberries, lima beans, mushrooms, sesame seeds, zucchini, Swiss chard, collard greens and turnip greens. Another option is to take a multi-vitamin with iodine.
I used to advocate kosher salt, but after reading Salted, I learned that it too can be highly processed with most of the minerals stripped out. So I now recommend sea salt for daily cooking which includes important minerals that your body needs, notably magnesium, calcium, potassium, and sometimes – depending on the provenance – many more. In my kitchen, I used a variety of salts and one of my standards is Trapani’s a natural sea salt with iodine from Italy.
Try this: Get some table salt and some sea salt. Put them in a bowl and compare the color, texture and taste. This is fun to do with friends; ask them to bring whatever salt they have at home (other than table salt) and do a comparative tasting. You don’t have to eat highly processed sodium that doesn’t taste good. Salt is used in such limited quantities in cooking, and life is short. Buy decent salt, get yourself some real flavor and extra minerals.
This story was originally published in 2012. It has been updated and may contain affiliate links.
The post Why Is There Iodine in Table Salt and Is That a Bad Thing? appeared first on Kathleen Flinn.


![[image error]](https://i0.wp.com/kathleenflinn.com/wp-content/uploads/2010/08/cake_with_avocado_sauce.jpg?ssl=1)