
Bill Loguidice's Blog, page 114
October 27, 2015
Dragon’s Lair: The Movie Kickstarter – Why you need to be careful!
As an original-and-still fan of all things Dragon’s Lair, this is a hard blog post for me to write, but one that I believe is important. While I casually made my thoughts known about the Dragon’s Lair: The Movie Kickstarter on a few social media sites, it’s clear there’s enough confusion out there that something more formal needed to be written.
Typically, Kickstarter has been used to fund a specific project to completion, with most rewards centered around eventually delivering said completed project. It struck me as odd that this particular Kickstarter offered no reward tiers with the finished product, even though some, like the $125 pledge tier, offers a copy of Dragon’s Lair Blu-ray (plus all prior reward tiers). Unfortunately, if you don’t look carefully, you may not realize that the Dragon’s Lair Blu-ray that’s being offered is the same one that was released in 2007 (in case you didn’t know, that version is essentially a remastering of the original Dragon’s Lair arcade game playable on any device that plays Blu-ray movie discs).
Now, that may not be a big deal if you think you’re funding work on a movie. Unfortunately, again, if you don’t look carefully, you may not realize that what you’re actually funding is a pitch video so they can try and get funding to then go on to create a movie. So yeah, we’re at least one step removed from the movie making process, which makes sense considering the budget goal of $550,000. That’s not much for a movie, but seems like a lot for a pitch video that may or may not get “real” investors interested.
If, knowing all of this you still want to support them, by all means, do so, but all the Dragon’s Lair– and Space Ace-related items I’ve bought over 30+ years will have to suffice for now from my end. I’ll nevertheless be keeping a close eye on the progress of the funding, even though I obviously can’t share in what I feel is misplaced excitement over this particular effort.
The post Dragon’s Lair: The Movie Kickstarter – Why you need to be careful! appeared first on Armchair Arcade.


October 26, 2015
Review: JClaw Tek Flash LED Headlamp

CONTEST UPDATE: If you’d like to win your own JClaw Tek Flash LED Headlamp, drop us a line via our Contact Us form (be sure to leave your email address). A winner will be selected at random by November 2, 2015.
While we’ve reviewed several types of LED flashlights here on Armchair Arcade, we had not, until now, reviewed an LED headlamp. While we all know how useful the traditional cylinder-like form factor of regular flashlights is, headlamps, which work hands-free and shines light from roughly eye level, can provide a whole other level of utility.

The front of the box for the JClaw Tek Flash LED Headlamp.
The JClaw Tek Flash LED Headlamp is an excellent example of this utility. First off, it’s very light weight and has a comfortable strap, so it stays in place and can do so for long periods of time. These features allow you to be quite active, including using this when running or for other high performance activities. It’s also rated to a water resistance of IPX6, which means it has no issue handling sweat or rain.

The back of the box.
Its separate two button control allows for easy control of a variety of illumination modes. These modes include High (a 168 lumen spotlight that shines up to 110 meters (about 3600 feet!)), Medium, and Low brightness. There’s also an SOS-like flashing mode. A particularly nice illumination mode is when you switch to its RED LEDs, which is ideal for preserving night vision (great for using a telescope or binoculars at night), reading, or simply for lessening the chance of disturbing others the way traditional white light can.

What you get.
Three AAA batteries (not included) power the JClaw Tek Flash LED Headlamp for up to 120 hours at Low brightness, 55 hours at Medium brightness, and 30 hours at High brightness. That’s impressive, and, when combined with all of its other positives makes it an easy headlamp to recommend.
Thanks to JClaw Tek for the review unit.
The post Review: JClaw Tek Flash LED Headlamp appeared first on Armchair Arcade.
First Impressions of the Surface Pro 4 Type Cover and Pen Upgrades for Surface Pro 3
Although tempted, I resisted the urge to upgrade from a Microsoft Surface Pro 3 to a Surface Pro 4 (or Surface Book, for that matter). Fortunately, several of the upgraded peripherals designed in conjunction with the Surface Pro 4, including the Surface Pro 4 Type Cover and Pen, are backwards compatible with the Surface Pro 3. So, while I don’t get the benefits of the bigger screen and faster processor, I do get to enjoy a new keyboard and pen experience.

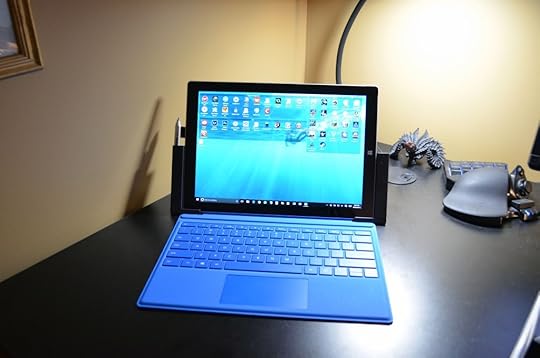
My old keyboard is to the right.
One of the first things I noticed about the new keyboard cover is that the buttons are all well spaced apart. On the original Surface Pro 3 keyboard, all of the keys were right next to each, with no breathing room. The old way worked without much complaint, but the new way is decidedly better. I also like the addition of a PrtScn (Print Screen) key (pulling double duty with F7) that was missing from the previous keyboard, as well as the addition of a right mouse/menu key. Combined with the enhanced typing experience, this keyboard is a big improvement in every way, while fitting almost exactly the same.
Another key improvement of the keyboard is the trackpad, which is a significant advancement on the already improved trackpad on the old Surface Pro 3 Type Cover. It’s oversized and smooth as silk. While I despise trackpads in general, in my limited time with this one, I can say without a doubt that I’ll be reaching for my wireless Logitech trackball far less.

The old pen is on the right.
As for the pen, it’s a radical redesign. Now, it’s roughly pencil shaped (angled body) with a discrete erase button that serves multiple other functions depending upon how you click it. It feels great in the hand and you can really tell the difference with the new pen tip. It definitely does a far better job of simulating writing on a traditional surface. While I haven’t tried out the other included pen tips, I’ll have something to look forward to as time permits. As it is, with my test drawings, it was a real treat.

The included interchangeable pen tips (for a different feel) are a nice touch.
This time around, no pen loop is included. I still have my third party pen loop on my Surface Pro 3 itself, so I’ll be making use of that. While this new Surface Pen does indeed have a far stronger magnet to attach to the right side of the unit, even the most powerful magnet doesn’t do great when tossed about in a bag. I’ll be erring on the side of safety. With that said, for casual use, I’ll have no issues with letting it snap itself to the ride side of the unit when that’s more convenient than slipping it into the loop.
In my original Surface Pro 3 dock, the new keyboard no longer compresses up on it, so it needs to lay flat. That’s a minor inconvenience, but nevertheless something to note.
If you type a lot like I do on the Surface Pro 3, I wholeheartedly recommend the keyboard upgrade. Even if you don’t type a lot, the greatly improved trackpad may be the type of enhanced functionality you didn’t know you were missing out on. The pen is a definite upgrade, but if you don’t use the pen a lot, there’s probably less incentive to upgrade that. Either way, if you’re a Surface Pro 3 owner and have Surface Pro 4 envy, this is a great way to reap some of the benefits of what would otherwise be a far larger monetary (and, frankly, time) investment.
The post First Impressions of the Surface Pro 4 Type Cover and Pen Upgrades for Surface Pro 3 appeared first on Armchair Arcade.
Building the Picade Mini Arcade Cabinet: Part 02
This is part two of my attempt to build the original Kickstarter version of the Pimorini Picade. Part one is here.
As we left off, I was getting ready to work on the control panel. As you’ll read, I took a brief detour first…

Although my plan was to start in on the next step in the process, the control panel, the rear access panel was bothering me. Although it worked, I was able to get only two of the four screws and bolts in and I had the swivel joints reversed, so they showed on the outside of the panel (it should have just been the screws that showed). As you can see from the photo, I was able to get it on the right way. I still could only fit two of the four screws and bolts, but I took out my drill and its smallest bit and drilled out a little extra room. Now all four screws and bolts fit and it’s secure. I had to adjust the locking clip a bit, but now it’s perfect. I wish I could do a similar fix for the cloudy marquee mystery, but this to me was more important.

It closes nicely.

The next step was to sandwich the control panel art (I chose the same style as the marquee) between the control panel plexiglass and wood backing. I was worried about this step after the marquee issue, but after peeling both sides of the plexiglass, it was nice and clear.

The finished product.

The next step was attaching the joystick. I just removed the ball top and plastic disc, then inserted it through the hole. I secured it with two of the longer screws.

The next was to attach the buttons. These popped in fairly easily.
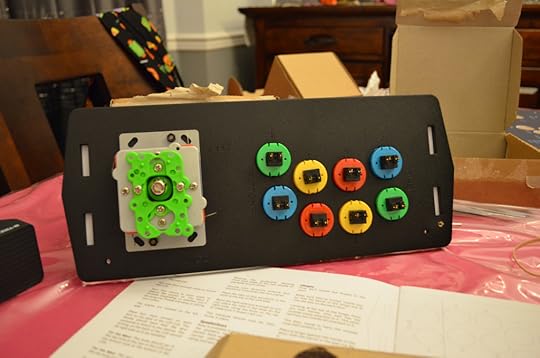
The bottom of the completed control panel, prior to the wiring.

The remaining buttons in the kit went directly on the cabinet.
Next step, which will be covered in the the third entry, is the control panel and PCB wiring. That’s going to be quite the process, perhaps only second in frustration to attaching the rear door. We’ll see.
On a side note, even though I already have a Raspberry Pi Model B (it originally had another purpose), I decided to order a Model B+, which is faster and has more RAM. I also ordered a 32GB Class 10 MicroSD card to go in it (the older Model B board uses a full-sized SD card). While this added $50 to my build cost, I think it will be worth it in the end, providing all of the performance as a transportable emulation machine this should ever need. Hopefully it arrives by this Wednesday.
The post Building the Picade Mini Arcade Cabinet: Part 02 appeared first on Armchair Arcade.
October 23, 2015
Building the Picade Mini Arcade Cabinet: Part 01
Originally a Kickstarter project from the UK that ended on November 29, 2012, I received my Picade kit here in the US around the second week of November 2014. I only just started building it tonight, which tells you a lot about my To Do list. If you’re interested in your own kit, it’s now available directly from the Pimoroni Website.
This is part one of what will likely be a three or four part series, but ultimately, who knows at this point? In this (hopefully) short series, I’m going to visually document the build process and provide light commentary that’s mostly related to any issues I’ve run into.
The Picade is a mostly complete kit in your choice of two sizes of joystick-based mini-arcade cabinet. The only thing that’s missing is the brains to actually play the games. Typically, this is some version of the Raspberry Pi, which I plan on using (right now I have an original Raspberry Pi on hand, but if I get that working I’ll swap it out for the latest model), but the kit is also designed to accommodate any of a number of other inexpensive small form factor computing devices.
While there are video tutorials online, I’m mostly following the paper manual that’s included with the Picade because I have no way of knowing at this point what version of the kit someone else may have. In any case, in general, the included manual is well written and easy to follow, although there are some parts that could really benefit from more visuals or a better description (more on that later). So, without further ado, here I go:

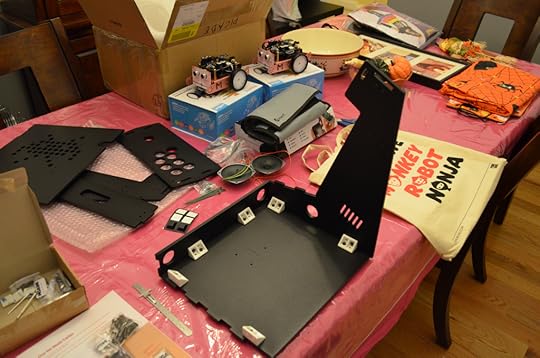
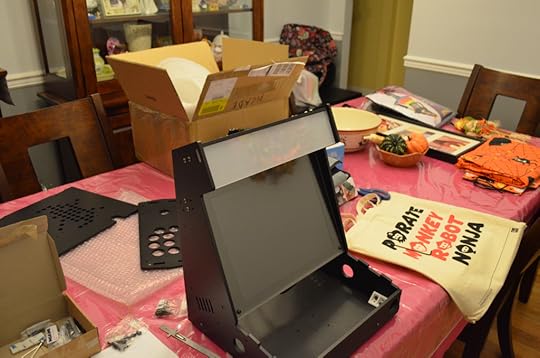
These are all of the components from inside the shipping box.

I’m getting the components ready for the first part of the build, which is the base.

Attaching clips.

Attaching the rubber feet. This part you kind of wing with general guidelines from the manual.
Attaching one of the side panels. You always know what part faces the inside because it has text on it.

The other side panel and top panel.

Placing the monitor.
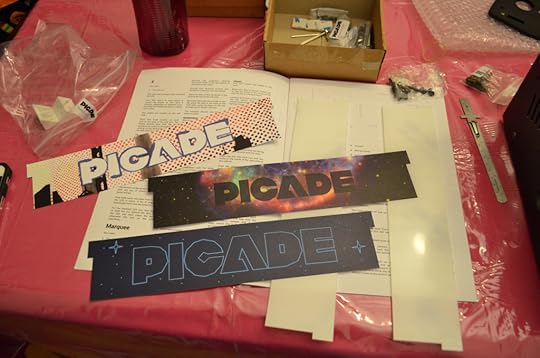
Choosing a marquee. I chose the one in the middle.
I removed the backing and sandwiched the marquee as indicated in the manual, but it’s hard to see. Clearly something is wrong here, but I don’t know what. It’s not something I want to bother with at this point.

Securing the speakers to the case.

This is where the manual failed me. The rear door is very difficult to know how to attach. I consulted a video that gave me a clue, but it still wasn’t quite enough to avoid re-doing this many times. Essentially, one part of the hinge goes on the outside and the other part of the hinge goes on the inside. I think on mine I have it reversed, so it probably doesn’t look as good as it’s supposed to. I can’t be sure, though. In any case, I was also only able to get two of the four screws and bolts in. It seems stable enough, so I’m leaving it. What a headache!

Attaching the clip that holds the rear access panel in place. It works well.
In the later photos, you’ll note fine black dust on the table cloth. That’s from repeated screwings of the door. The cabinet is powder coated well, but it does come off with abuse.
In part two, I’ll start in on the joystick control panel.
The post Building the Picade Mini Arcade Cabinet: Part 01 appeared first on Armchair Arcade.
October 22, 2015
Outlaw Golf: The Sexiest Videogames of All Time (08)
In Armchair Arcade‘s ongoing series (first started back in 2012 on the old version of our Website, here and continued on our current site, here), we ask the provocative question, “What makes a particular videogame sexy?” Each feature explores some of the many intriguing approaches game designers have taken over the years to make their games more sensual, not just with increasingly detailed graphics, but also with romantic and seductive gameplay. While some of the games we’ll be looking at are unabashedly low brow, displaying their raw sexuality like a badge of honor, other games in contrast are remarkably subtle, often downplaying their suggestive themes.
Today’s series entry, which is the eighth, features an adult take on casual cartoon-style golf games:
Outlaw Golf
Developer: Hypnotix
Publisher: Simon and Schuster Interactive
Initial Release Date: 2002
Platforms: Microsoft Xbox, Nintendo GameCube, PC Windows
Game Type: Sports
Golf has been called the gentleman’s game. It’s also been called stuffy, pompous, slow, and boring. Outside of cartoon characters and miniature golf – the latter of which is like golf’s fun, but embarrassing presidential sibling – the sport of golf has typically been presented in videogames in a similarly stuffy, pompous, slow, and boring manner. Likewise, unless you found super deformed cartoon characters or out-of-shape middle-aged men particularly attractive, these games certainly didn’t bring the sexy. Or at least until 2002 when Outlaw Golf came out.

The character selection screen gives a good idea of what you’re in for.
Years before Tiger Woods’s being chased by a golf club wielding Elin Nordegren suddenly brought the world’s most famous golfer’s remarkably convoluted off-the-course shenanigans to the public eye, Outlaw Golf rendered a world where he would have fit in far better than we – and the now defunct videogames that bore his name – ever envisioned.

Despite its trappings, Outlaw Golf is actually a pretty good golf game.
A pre-The 40-Year-Old Virgin and The Office Steve Carrell sets the scene with his sarcastic commentary. He zings everything from the three extreme courses – one of which takes place near the infamous New Jersey Turnpike and features overpasses as hazards – to the 10 stereotype-ridden golfers and their individual caddies, who are there to both help titillate and to be on the receiving end of a composure restoring beat down.

Summer giving Autumn a beat-down.
Even though the 10 in-game golfers represent an even mix of five women and five men, it’s in no way indicative of how the game’s sex appeal is balanced. While male characters like the perfectly coiffed El Suave show some promise in this area, in the end, only the ladies really get to complement the outrageous with the sexy. In fact, with its female roster, Outlaw Golf hits some of the most popular sexual archetypes.

Suki giving Puddin’ a beat-down.
There’s Harley, the tough, tattooed biker chick who rides her pudgy caddy and live-in boyfriend, Snake, during beat-downs. There’s Summer, the PhD stripper, who straddles both the flag pole and her caddy sidekick, Autumn, who – if it wasn’t clear from the name – is also a stripper, and is also clearly more than just a friend. There’s Mistress Suki, the no holds barred dominatrix complete with gimp caddy, Puddin’. There’s sassy urban tomboy C.C., who pities no fools, least of all, caddy Heavy G. And finally, there’s Trixie Monroe, the naughty school girl all-grown-up, complete with ham-handed, worshipful caddy, Conner.

El Suave is probably the closest male counterpart to Summer and Autumn, but he’s more jerk than titillating.
From the erotic character models complete with different outfits to the sexy beat downs to the double entendre-laden word play and all the way through to the gratuitous camera angles that include plenty of up-skirts, Outlaw Golf displays its sexy proudly and with tongue planted firmly in cheek. Even with all that going for it, though, unlike some of the other sexiest videogames of all time (including some of the additional entries in the Outlaw series), it’s actually a really good game to boot, or should we say, to putt?
The post Outlaw Golf: The Sexiest Videogames of All Time (08) appeared first on Armchair Arcade.
October 21, 2015
Special Offer: Coupon Code for 1byone iPhone 6/6s Cases, Red or Mint
As a service to our readers, Armchair Arcade will occasionally present special offers, coupon codes, and deals on previously vetted products. Here is today’s special offer:
1byone iPhone 6/6s Cases, Red or Mint
Originally $9.99, now just $ 5.99 with coupon on Amazon (Coupon Code: 4D6BOICY).
Start Date: October 16, 2015
End Date: October 28, 2015

1byone iPhone 6/6s Case, Red
The post Special Offer: Coupon Code for 1byone iPhone 6/6s Cases, Red or Mint appeared first on Armchair Arcade.
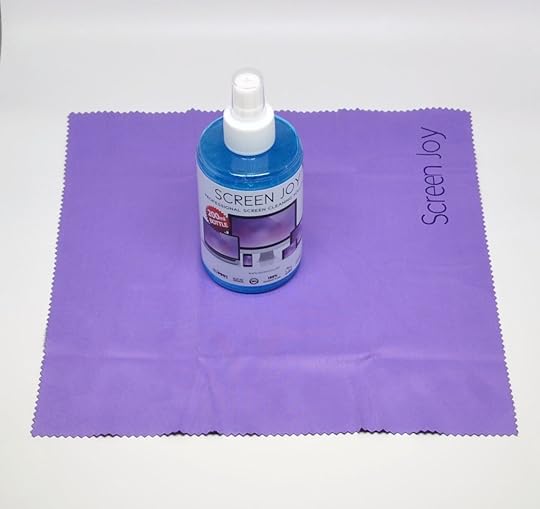
Review: Screen Joy Computer Screen Cleaner and Microfiber Cloth
If there’s a universal truth we can say about the screens and surfaces on our modern devices, it’s that they sure do get a lot of fingerprints on them. Unfortunately, the days of whipping out the Windex and paper towels are long behind us. If we use anything but microfiber cloths and special cleaning solutions, we can pretty much kiss the pristine surfaces of our TVs, smartphones, tablets, videogame consoles, laptops, eyeglasses, and more goodbye. Fortunately, the Screen Joy Computer Screen Cleaner and Microfiber Cloth combo is inexpensive (only $10.00 on Amazon right now) and does a fantastic job of safely cleaning just about any of our beautifully designed, but surprisingly fragile, modern technology.

The packaging for the Screen Joy Computer Screen Cleaner and Microfiber Cloth.
The Screen Joy spray bottle is a generous 6.8oz (200ML), which should be good for hundreds of sprays on its equally generous 10x10in (25x25cm) washable microfiber cloth. As you would expect – and should demand – this combination is anti-static, non-smudging, and cloud-free. In my testing, it really did a great job cleaning all kinds of surfaces, including my Apple iPhone 6 Plus, Microsoft Surface Pro 3, Microsoft Xbox One, and Panasonic plasma TV. I’m confident it would do an equally great job on all of the other devices scattered throughout our home.
What you get.
As for usage, it’s important to remember some simple rules to keep your devices safe when cleaning. Always spray the microfiber cloth and not the surface you want to clean. Use the wet side of the microfiber cloth to clean the surface, then flip to the side you didn’t spray for a final polish. Simple, yet it’s amazing how few people bother doing it the right way despite the potential for some pretty disastrous results. So for your wallet’s sake, clean your device’s the right way and do it with something like this excellent offering from Screen Joy.
Thanks to IX Better Home for the review unit.
The post Review: Screen Joy Computer Screen Cleaner and Microfiber Cloth appeared first on Armchair Arcade.
Special Offer: 1byone 400-Watt Fog Machine or LED Stage Light
As a service to our readers, Armchair Arcade will occasionally present special offers, coupon codes, and deals on previously vetted products. Here are today’s special offers:
HALLOWEEN DEAL 01
1byone 400-Watt Fog Machine & Remote Control
The lowest price, with excellent quality for $26.99.
Start Date: October 14, 2015
End Date: March 30, 2016
Original price: $35.00
Discounted price: $26.99
You Save: $8.01
HALLOWEEN DEAL 02
1byone 8.6″ Crystal Super LED Stage Light with Sound Activated & Dmx512 Control
The lowest price, with excellent quality for $32.99.
Start Date: October 14, 2015
End Date: March 30, 2016
Original price: $42.99
Discounted price: $32.99
You Save: $10
 Armchair Arcade.
October 20, 2015
Review: Nerdwax – Wax for slipping eyeglasses
Both successfully Kickstarted and pitched on ABC’s hit TV series, Shark Tank, Nerdwax has gotten more than its fair share of buzz for such a simple idea. Basically, it’s like ChapStick for eyeglasses, except instead of helping to lock in moisture, Nerdwax helps keep said glasses from sliding down your nose, which is rarely a good look.

The Nerdwax packaging.
While you might ask why don’t you get eyeglasses that fit your face better, some people simply have noses that don’t properly accommodate eyeglasses, no matter how well designed. While I usually don’t have major slippage, my oldest daughter does. Even if your eyeglasses are well designed and your nose accommodating, over time, your eyeglasses, sun glasses, protective eye gear, etc., may still slip due to oil build-up, sweat, or even how your face might change subtly (e.g., swelling) throughout the day. So yeah, it’s more or less a universal problem, which is probably why Nerdwax got the kind of traction (pun intended) that it did.
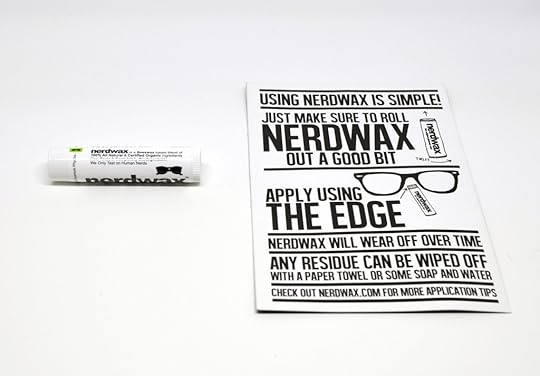
The inside of the package.
Nerdwax boasts of its all natural and certified organic ingredients in its beeswax-based formula. I’m no believer in the purported benefits of organics myself, but I do care that a company takes pride in their ingredients, which this company clearly does.
Application is simple using the edge of the waxy stick to apply a little or a lot to the inside bridge of the eyeglasses, then putting said glasses on as usual. Depending upon how much you apply, your activity level, and the vagaries of your own skin, it should last about an hour to all day. In testing on my own glasses I got a little over an hour before I noticed some sliding, while my oldest daughter got a bit longer. As an extreme case, it didn’t stop all of her slippage, but it certainly did help reduce it.
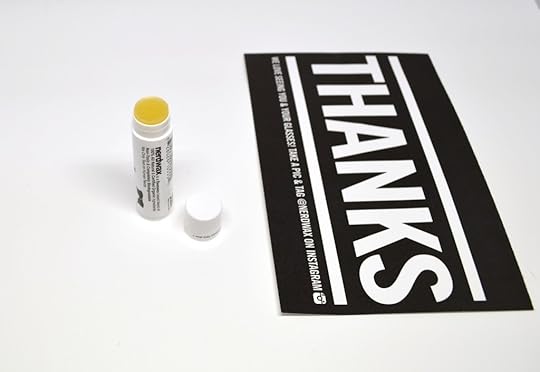
Nerdwax in all its glory.
While you do notice the Nerdwax substance when it’s applied to your eyeglasses, it’s not particularly annoying or distracting, and certainly does offer the benefit of not having to fuss with your glasses, or others’ glasses (much to her chagrin, I push my oldest daughter’s glasses back up her nose all of the time), quite so much. It’s clearly no miracle product, but it does work, albeit a bit too briefly versus how long I’d really like it to. Re-application, at least, is trivial, and it’s equally easy to wipe it right off if it doesn’t dissolve naturally on its own (and, in general, while it’s more or less just on the bridge of your nose, it’s actually a good moisturizer). Considering one stick of Nerdwax is estimated to last six to eight months of use, it’s definitely worth at least one purchase to see how well it works with the vagaries of your glasses, skin type, and activity level, and ultimately whether it will find a permanent home in your pocket or purse.
Thanks to Coco Joy for the review unit.
The post Review: Nerdwax – Wax for slipping eyeglasses appeared first on Armchair Arcade.


