
Bill Loguidice's Blog, page 113
November 10, 2015
Sega Genesis Classic Game Console (2015): The Official Game List
Here’s the official game list for the latest (2015) version of the AtGames Sega Genesis Classic Game Console (available at various big box retailers). It can not only play the 80 built-in games, but, thanks to being powered by what is effectively a Genesis-on-a-chip, most Sega Genesis cartridges as well. I’ll post a full review of both this and the similarly new AtGames Atari Flashback 6 in the coming weeks.
Air Hockey
Alex Kidd in the Enchanted Castle
Alien Storm
Altered Beast
Arrow Flash
Black Sheep
Bomber
Bonanza Bros.
Bottle Taps Race
Brain Switch
Bulls and Cows
Cannon
Chakan: The Forever Man
Checker
Chess
Color Puzzle
Columns
Columns III
Comix Zone
Crack Down
Cross the road
Curling 2010
Decap Attack
Dominant Color
Dr. Robotnik’s Mean Bean Machine
Ecco
Ecco Jr
ESWAT: City Under Seige
Fatal Labyrinth
Fight or Lose
Fire Fly Glow
Flash Memory
Flicky
Formula Challenge
Gain Ground
Golden Axe
Golden Axe II
Golden Axe III
Hexagonos
Jack’s Pea
Jewel Magic
Jewel Master
Kid Chameleon
Logic Dial
Mahjong Solitaire
Match Eleven
Mega Brain Switch
Memory
Memory Match
Mirror Mirror
Mortal Kombat
Mortal Kombat II
Mortal Kombat III
Mr. Balls
Naval Power
Panic Lift
Reaction Match
Ristar
Shadow Dancer: The Secret of Shinobi
Shinobi III: Return of the Ninja Master
Snake
Sonic & Knuckles
Sonic Spinball
Sonic the Hedgehog
Sonic the Hedgehog II
Space Hunter
Sparkling Truffle
Spider
Streets Of Rage
Streets Of Rage 2
Streets Of Rage 3
Sudoku Quiz
Table Magic
The Ooze
Treasure Hunt
Vectorman
Vectorman II
Virtua Fighter II
Warehouse Keeper
Whack-A-Wolf
The post Sega Genesis Classic Game Console (2015): The Official Game List appeared first on Armchair Arcade.


Review: FSL Xylem Wood Headphones
 Although not as hot of an item as Bluetooth headsets these days, there’s still a place for wired headphones. For one thing, they’re a bit more portable, for another, they don’t require charging, and, perhaps most importantly, work with just about any device with a headphone jack.

The packaging for the FSL Xylem Wood Headphones.
The FSL Xylem Wood Headphones, as the name suggests, have a natural wood housing, which helps create a passive method for improved sound response, including reflecting bass frequencies and helping to absorb high frequencies. In my testing, this did indeed translate into an excellent listening experience, which is particularly impressive considering how inexpensive these are (only $14.99 right now on Amazon).
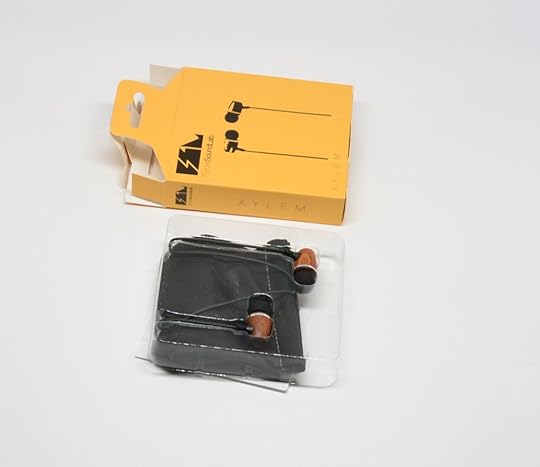
The contents of the box.
You not only get the headphones themselves, but also three sizes of ear pieces and a nice squeeze top leatherette (maybe it’s just plastic, but either way it feels nice) storage case to help minimize cord tangles in a bag or pocket. An integrated microphone and one button remote on supported devices (like your smartphone) round out its feature set.

What you get.
As with other FutureSoundLab products, there’s a three year warranty and a dedicated Website for support. With the excellent build quality, right down to the gauge and feel of the cord, I doubt you’ll need it.
Thanks to IHeadphones for the review unit.
The post Review: FSL Xylem Wood Headphones appeared first on Armchair Arcade.
November 9, 2015
Review: FSL Reflex Bluetooth Earbuds
Bluetooth earbuds are becoming more popular each day, and with good reason. There are no cords to manage or get tangled, and the form factor makes them well-suited for actually staying in your ears. In other words, they’re great for when you’re moving about, be it something as vigorous as going for a run or something more leisurely like walking around your house.

The box for the FSL Reflex Bluetooth Earbuds.
The FSL Reflex Bluetooth Earbuds come with a hard zip case for storage and safe transportation, as well as four different sizes of interchangeable rubber eartips for the best possible fit. A nice feature of these earbuds is that each side has its own battery, which combine for up to an impressive 12 hours of usage once fully charged via any standard micro-USB cable (a short one is included), although you’ll probably want to cut that figure by several hours if you listen at higher volumes. As you would expect from this type of device, it has an IPX-3 rating for water resistance, which means you don’t have to worry about sweating on it or getting caught in the rain.

The carrying case is nice and compact.
While the FSL Reflex Bluetooth Earbuds will work with the audio output of almost any Bluetooth-enabled device, its built-in microphone, volume controls, and track selection features will likely only fully work on specific devices, like smartphones. As is usually the case with small headphones like this, Bluetooth range is not the greatest, so you won’t want to be more than three to six feet away from the device it has a connection with.
Audio quality is solid. There’s a decent amount of bass with excellent voice and instrument clarity. These aren’t audiophile headphones, but they’re not priced like them either (only $34.95 right now on Amazon), and they still sound pretty great.

The contents of the package.
With excellent sound quality and a competitive price, the FSL Reflex Bluetooth Earbuds are well worth considering if you’re in the market for a Bluetooth headset. The only potential caveat is that like similar products, the design of the connecting cable that goes between the two earpieces may be a bit bothersome to some. I know I tend to prefer a more rigid connection, which I don’t notice on the back of my neck like I do with this type of soft connector.
Thanks to IHeadphones for the review unit.
The post Review: FSL Reflex Bluetooth Earbuds appeared first on Armchair Arcade.
November 5, 2015
Review: 1byOne Magic Plasma Wireless Bluetooth Speaker
Once a high priced item, Bluetooth speakers have officially hit the inexpensive novelty stage. One such Bluetooth speaker novelty is the 1byOne Magic Plasma Wireless Bluetooth Speaker (click for 1byOne Website or Amazon shop).

The front of the box for the 1byOne Magic Plasma Wireless Bluetooth Speaker.

Another angle on the box.
The 1byOne Magic Plasma Wireless Bluetooth Speaker outputs a modest three watts for decent, if mostly bass-free sound quality, and has a Bluetooth transmission distance of approximately eight to 10 meters (26 to 32 feet). The novelty part is the “magic electrostatic plasma lighting” globe on the top portion of the unit. It’s a well known and cool effect and something you can influence by touching the outside of the globe. Of course, since it’s integrated with the speaker, you can set the unit to automatically respond to the music input, which, beyond the standard Bluetooth connection that should work with most Bluetooth-capable mobile devices and computers, also has a Micro SD (TF) card slot for MP3s, as well as allows for line in via a standard 3.5mm stereo audio jack (AUX). A short 3.5mm male-to-male cable is included in the package if you need one.

The box contents.
There’s also a mini-USB port on the unit that provides the sole source of power from any standard DC 5V USB port or USB AC adapter (not included). A short, standard mini-USB cable is included for this purpose if you don’t already have one handy.
The 1byOne Magic Plasma Wireless Bluetooth Speaker is available in two styles, one with blue accents and one with red. My review unit has the red accents, which, I must say, looks great. Size-wise, it’s nice and compact at 4.2 x 4.2 x 8.4 in (106 x 106 x 213 mm).

The speaker.
Even if you don’t necessarily want to use the speaker portion much, the plasma effect, which doesn’t require audio input to work, is fun all on its own. While 1byOne recommends that you don’t keep the plasma effect running for more than five hours at a time due to possible overheating of the globe, I actually left mine on for more than 24 hours during this past Halloween to no ill effect.

The plasma effect in action.
At only $23.99 right now on Amazon, it’s definitely a fun, versatile novelty worth investigating.
Thanks to 1byOne for the review unit.
The post Review: 1byOne Magic Plasma Wireless Bluetooth Speaker appeared first on Armchair Arcade.
Review: OxyLED N08 Motion-sensing Night Light
By taking the place of traditional incandescent bulbs that consume surprising amounts of energy, generate heat, and are prone to quick failure (the tell-tale pop of an incandescent bulb is an iconic sound for a reason), LEDs are helping to usher in a more environmentally friendly (about 3,000 percent longer life), cool, and efficient (far lower power consumption with greater brightness) era of lighting. Hopefully you’ve already started replacing, or already replaced, all of your incandescent bulbs, but one light source that you might have overlooked is the night light. If you still have night lights with incandescent bulbs, it’s time to replace those dinosaurs as well with something like the OxyLED N08 Motion-sensing Night Light.

The packaging for the OxyLED N08 Motion-sensing Night Light.
Available in a single pack ($10.99), reviewed here, or in a more cost effective three pack ($19.99), the night light lights up when you’re within about 10 feet (3 meters) of its sensor. Powered by three AAA batteries (not included), the night light can be attached to one of two mounting plates, one either magnetically (e.g., on a refrigerator) or via a recessed hook for hanging on a nail or screw, or the other with 3M adhesive.
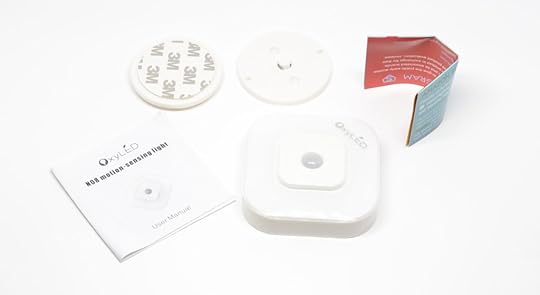
The contents of the package.
The OxyLED N08 Motion-sensing Night Light has a switch with three modes of operation: ON, AUTO, and OFF. As you would expect, AUTO makes use of the sensor, while the other two modes either leave the light on or off, respectively, all of the time. While the switch is only accessible with the light removed from its mounting plate, since you’ll almost certainly have it permanently set to AUTO, this shouldn’t be a major deal.
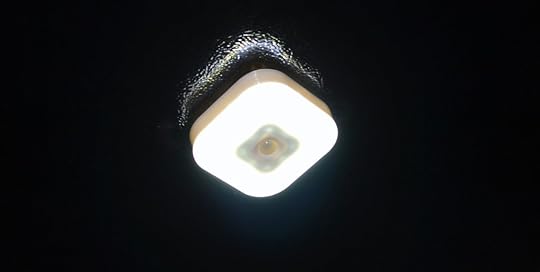
The night light in action on our refrigerator.
At 55 lumens, which is about 1/8th the brightness of a traditional 40 watt incandescent bulb, this night light certainly won’t illuminate a large area, but then again it’s not meant to. This does the job it’s intended to, and that’s to light up areas like portion of a hallway or the interior of a cabinet. On AUTO, it lights up right when you need it and goes off after about 15 seconds, making for an ideal night light.

Another angle of the nice white light it produces.
Thanks to Hisgadget for the review unit.
The post Review: OxyLED N08 Motion-sensing Night Light appeared first on Armchair Arcade.
November 2, 2015
Review: Four Esddi Caden Waterproof Camera and Gadget Organizer Bags
Esddi has a line-up of four different camera and gadget bags that they asked me to review. I’ll first review the bags in general, then break down the specifics of each model in their own subsections.
While each bag is sold primarily on its capabilities for holding DSLR cameras and accessories, their versatile interiors can also organize and hold a variety of other personal gadgets and items.
The one backpack is made from canvas, while the other bags are made from nylon. Regardless of bag material, all are considered waterproof. While you obviously don’t want to purposely submerge any of these bags, the outer material won’t absorb water, so, more practically, your gear will stay dry in even the heaviest of downpours. In my own tests, placing the bags under a running sink faucet, I can confirm that they do indeed repel water.
As you’ll see from the photos, each bag is stylish in its own way and offers slightly different ways of organizing things. Naturally, the most radical design departure is with the canvas backpack. All other designs are the more traditional shoulder bag styles.
Esddi Caden N2 Brown Canvas Camera Bag
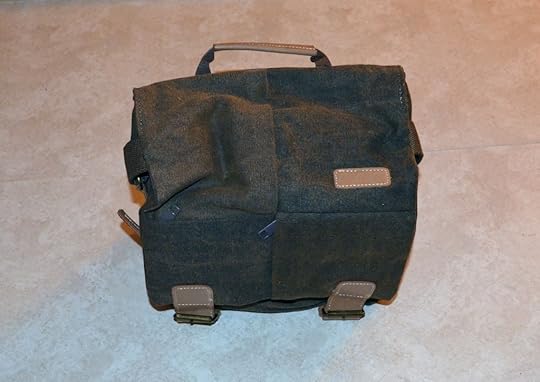
Esddi Caden N2 Brown Canvas Camera Bag
The Esddi Caden N2 Brown Canvas Camera Bag measures approximately 6.69 in (17 cm) x 5.12 in (13 cm) x 9.06 in (23 cm). It’s a two piece design, with an outer bag, and a removable padded interior bag with a single removable insert (divider) and a handle of its own on its zipper top. The outer bag has a zippered front pocket with four interior slots, an interior slot with a touch fastener (generic Velcro), and two zipper pockets on its exterior flap. The two flap straps close with belt loops.

Esddi Caden N2 Brown Canvas Camera Bag
Esddi Caden F3 Khaki Canvas Camera Bag

Esddi Caden F3 Khaki Canvas Camera Bag
The Esddi Caden F3 Khaki Canvas Camera Bag measures approximately 10.63 in (27 cm) x 5.51 in (14 cm) x 8.27 in (21 cm). It’s a two piece design, with an outer bag, and removable interior padding with a bottom and two removable inserts (dividers). The outer bag has two front pockets, two side pockets with snap enclosures, and an interior zippered pocket with two small adjacent slot pockets. The two flap straps are adjustable and attach with snap enclosures.

Esddi Caden F3 Khaki Canvas Camera Bag
Esddi Caden E5 Bright Orange Nylon Camera Backpack

Esddi Caden E5 Bright Orange Nylon Camera Backpack
The Esddi Caden E5 Bright Orange Nylon Camera Backpack measures approximately 16.14 in (40 cm) x 8.27 in (21 cm) x 9.84 in (25 cm). It’s a two piece design, with an outer bag, and a removable padded interior bag that closes with pull tabs and has five removable inserts (dividers). The outer bag’s interior flap is heavily padded and has an interior pocket. Additional zippered pockets and mesh slots round out the exterior. The adjustable shoulder and sternum straps are strong and comfortable and feature a detachable waist belt for extra stability.

Esddi Caden E5 Bright Orange Nylon Camera Backpack
Esddi Caden F1 Khaki Canvas Camera Bag

Esddi Caden F1 Khaki Canvas Camera Bag
The Esddi Caden F1 Khaki Canvas Camera Bag measures approximately 14.96 in (38 cm) x 7.09 in (18 cm) x 7.87 in (19.99 cm). It’s a two piece design, with an outer bag, and removable interior padding with a bottom and two removable inserts (dividers). The outer bag has a large zippered front pocket, two smaller side pockets with snap enclosures, and an interior zippered pocket. The two flap straps are adjustable and attach with snap enclosures.

Esddi Caden F1 Khaki Canvas Camera Bag
Regardless of which bag design you ultimately choose, thanks to excellent craftsmanship and a solid 18 month warranty, you’re all but guaranteed a quality experience.
Thanks to Esddi for the review units.
The post Review: Four Esddi Caden Waterproof Camera and Gadget Organizer Bags appeared first on Armchair Arcade.
November 1, 2015
Review: Raw Wallet
While it may be hard to think of wallets as featuring a new type of technology, the truth is, minimalist wallets are a thing now. For someone like me who doesn’t like bulk in their pockets, that’s a good thing. Of course, if size is no object, traditional leather and other padded wallets get the job done. Unfortunately, size often is an object and the added material in traditional wallets introduces superfluous bulk.

How the Raw Wallet arrives.

The back of the package.
There are actually two major types of minimalist wallet, both of which are made of similar stretchable, flexible material. One is the type that tries to hold nearly as much as a traditional wallet. The other type is like the Raw Wallet I’m reviewing here, where the product itself is not only minimalist, but also what it can hold. You’re limited to approximately 3 – 6 credit card-sized cards, and some cash money. That’s about it.

The contents.
It has two interior dividers, which help with organization, and no bottom. While I personally prefer minimalist wallets with bottoms, which to me provide an extra layer of security from something falling out, the fact that the Raw Wallet is meant to hold so few cards means it shouldn’t present much of an issue. The flexible material it’s constructed from does its job well to hold everything in place.

Holding two credit cards and a license.
If you’re looking for this specific type of minimalist wallet, then it’s hard to go wrong with the Raw Wallet.
Thanks to Residual Products for the review unit.
The post Review: Raw Wallet appeared first on Armchair Arcade.
October 31, 2015
Building the Picade Mini Arcade Cabinet: Part 03
This is part two of my attempt to build the original Kickstarter version of the Pimorini Picade (Maxi version). Part two is here.
As we left off, I was getting ready to work on the wiring loom…
I’m now tasked with wiring all of the buttons on the cabinet, as well as everything on the control panel. It’s relatively easy once you sort through all the wiring looms. You just have to have one ground for every active plug, and each section has two pins.

This is the PCB. I need to loosen all of the screws in order to insert the wires. It actually came with a small screwdriver, but I didn’t see it, so I used my own.
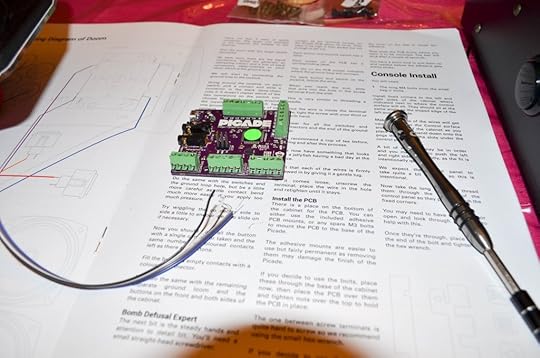
I struggled mightily getting the wires into the holes and locking the wires down. I ended up having to strip some to reveal additional wire for the ones that I damaged. I eventually figured out that if I slightly looped the end of the wire, I could get it to stay better. Hopefully this technique allows everything to work the way that it should.

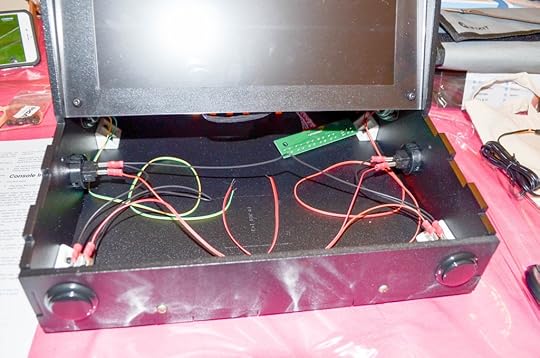
In terms of difficulty and frustration on this project, I’d put this wiring at the top. As you can see, however, I did get it done finally.

It was difficult connecting the wiring from the control panel buttons to the PCB (I didn’t state it before, but everything goes to a specific place on the PCB), but I eventually got that as well. I also attached the speakers, referring to the manual to remember which was the left speaker and which was the right speaker. As stated earlier, the further I get in the manual, the less detail they seem to go into.

I used the included sticky tape and plastic bolts to secure the PCB. You can also screw it in, but that was too difficult.

Next, I secured the control panel. That involved screws and bolts and access from the rear panel.

Now I had to secure the LCD panel’s controls.

The LCD panel’s control panel lines up with the holes on the outside of the cabinet.

I then applied the sticky exterior buttons. It works really well.

I attached all of the remaining wires before connecting the CPU (in this case, a Raspberry Pi 2).
The next steps are going to be the big finish. I need to configure RetroPie on a microSD card, then insert that into my recently received Raspberry Pi 2 Model B. Then I hook everything up and see what works and what doesn’t (hopefully my wiring is OK). Of course, there’s going to be a lot of additional configuration with RetroPie and the Raspberry Pi 2 Model B in general. This part is definitely not going to be plug and play, and will likely rank highly on the frustration scale. Until next time…
The post Building the Picade Mini Arcade Cabinet: Part 03 appeared first on Armchair Arcade.
October 27, 2015
Review: OxyLED T-01 DIY Stick-on Anywhere 4-LED Touch Tap Light
The old style of tap lights really weren’t that great. They used traditional bulb technology, meaning battery and bulb life weren’t that great, plus you had to really push to make them go on or turn them off. Today’s tap lights, including the OxyLED T-01 DIY Stick-on Anywhere 4-LED Touch Tap Light I’m reviewing here, leave those issues solidly in the past.

The packaging for the OxyLED T-01 DIY Stick-on Anywhere 4-LED Touch Tap Light.
The OxyLED T-01 features four bright white LEDs that pump out 4 watts at about 20 lumens of brightness. That’s sufficiently bright to light up smaller dark spaces, like the inside of a cupboard or cabinet, or the under- or back-side of a desk (at only 6.89 x 1.77 inches, it can fit just about anywhere). Since the OxyLED T-01 is LED-based, battery life is in the 100 hour range from the required three AAA batteries (not included).
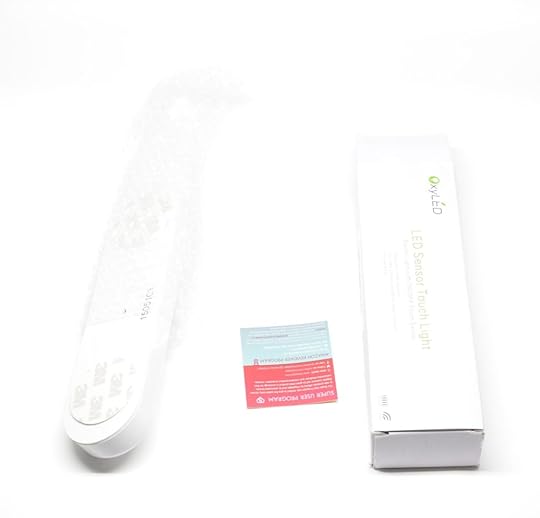
What you get.
Attaching the OxyLED T-01 to a surface is simple with the included 3M sticky pads, which of course are designed for semi-permanent installations, yet still easy removal on most surfaces when the time comes. Of course, the main unit detaches from the backing for easy battery changes even when its adhered to said surface.

The light off.
The main unit itself has a touch sensor for easy on or off. This same unit also has a tilt function. While not quite 180 degrees, you should still be able to angle the light to where you need it most.

The light on.
At only $7.99 on Amazon right now, it’s a great value for when you need that little bit of extra light, particularly in the dark recesses of hard-to-reach places that you need access to on a regular basis.
Thanks to Sunflor for the review unit.
The post Review: OxyLED T-01 DIY Stick-on Anywhere 4-LED Touch Tap Light appeared first on Armchair Arcade.
Review: Ohuhu DSLR Digital Camera Gadget Organizer Bag
While the Ohuhu DSLR Digital Camera Gadget Organizer Bag is primarily designed as a DSLR camera bag, its versatile interior can also organize and carry a variety of personal gadgets. To keep your gadgets safe, the canvas outer material resists absorbing water and the interior insert is heavily padded with a sponge-like material. Perhaps just as important, it looks great too. While I’m reviewing the stylish Retro Khaki, it’s also available in a slightly different design in Dark Brown.

You get it with the bag itself inside its interior protection.

The bag without its interior insert.
The bag can comfortably hold an oversized DSLR camera body and two lenses. The two interior panels can be removed for any other combination of gadget or accessory storage, or the whole interior removed completely for more of a messenger bag style (which also gives access to an interior pocket). Naturally, there are also exterior pockets for smaller additional items. Overall bag dimensions are approximately 13 x 6 x 7.8 inches, and it weighs about 2.7 pounds.

If you don’t use the insert, you get access to an interior pocket.
Thanks to the materials and padding, as well as the zipper top and large buckle flaps, your gadgets are about as safe as possible. As you can see from the photos, it also doesn’t hurt that when providing that kind of protection it’s still a great looking bag.

The insert provides superior protection.

With the two dividers put in.
Thanks to Leesan for the review unit.
The post Review: Ohuhu DSLR Digital Camera Gadget Organizer Bag appeared first on Armchair Arcade.


