
Bill Loguidice's Blog, page 111
January 19, 2016
Upgrading the Commodore PET 2001-8: Part 2
To quickly recap from Part 1, I had purchased the PET microSD with datasette power and Commodore PET 2001 ROM/RAM upgrade board from Tynemouth Software, and I thought I’d document the upgrade process on my Commodore PET 2001-8 for those interested in doing it themselves.
As we left off, I had bent and lost a pin on my 6502 chip, so I ordered a replacement. That replacement is now ready for insertion in the Commodore PET 2001 ROM/RAM upgrade board:
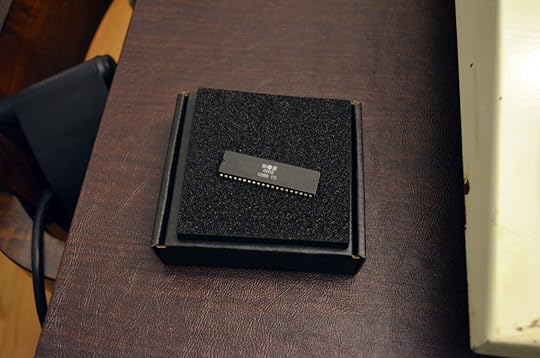
The new 6502 chip.

Awaiting the 6502 chip.
I was having trouble getting the chip’s pins in the sockets. I also noticed I was trying to insert the chip backwards. Fortunately, there’s a silk screen on the board that indicates the correct chip orientation.
After struggling some more, I finally decided to remove the board, thinking it would be easier to insert the chip into the socket if I had unrestricted access to see all angles. It took a lot of tries, and a few bent pin scares, but I finally did get the chip in. I’m really not cut out for this type of thing!

Finally!
Now to get the board back in without messing up its pins any more.

A mighty struggle, but I think/hope it went back in correctly.
Now to power it up.

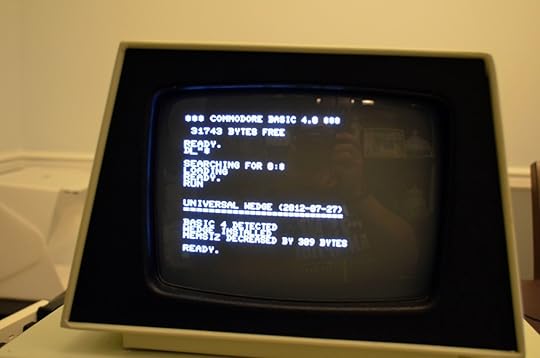
Success!
I of course chose BASIC 4.0 and 32K among the many available dipswitch options.
So now that gorgeous display has fully working memory (no need for me to fix up the faulty onboard memory now) and a bug fixed and feature rich operating system. Nice.
Now it’s time to try the PET microSD with datasette power. I power off and plug it in.

The PET microSD with datasette power.

It’s in. Distressingly, the motherboard moved quite a bit up and down as I was inserting the PET microSD into the IEEE-488 port (far right; Power is supplied from the datasette drive connector on the far left).
So I powered it on…

Indicator lights are a go, and my PET still booted correctly to its BASIC 4.0 and 32K startup screen.
After figuring out that I knocked the microSD card from the lock position and putting it back in the slot after powering off and then on again, I followed the instructions for accessing the files on the microSD card from here.
I did SHIFT and RUN/STOP to automatically load in the wedge.
The wedge is loaded.

The directory command.

Running Down.
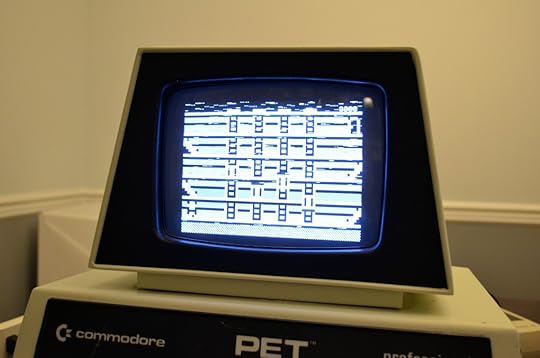
As you can see, while Down was running, there was screen distortion/garbage. Time to try another program.

Running Maze.
Running Maze was a little better, but there are still “sparkles” on the screen.

Running Invaders.
Running Invaders was fine, with no major visual issues, although there was still the occasional screen sparkle. Apparently this was an issue with the orignal PET 2001 and involves a delay with refreshing the display, so I’m not terribly concerned. I planned on primarily using the PET microSD with my SuperPET anyway.
With testing complete, I decided to remove the microSD card (again, after switching the system off) and put my own software on the card. I copied over a Galaga PRG file and then brought the card back over to the PET microSD and powered on the PET. A directory listing showed that it was listed as galaga.prg, so once I did the /galaga.prg command to load it, it worked, after initially failing with just galaga.

It works!

Lots of sparkles.

Another shot.

And another. Obviously, taking a photo of a CRT is not ideal.

A demo.

The same demo.
As you can see, it works, but the sparkles are oppressive. It seems that the fast action stuff will need to be saved for my other PETs.

A final memory test, which was a success.
Overall, despite the issues, which were primarily my own doing, I’m happy with how it turned out, and certainly thrilled with the products. I definitely recommend Tynemouth Software‘s stuff.
Finally, I decided to give the built-in tape drive one more test. I took one of my brand new Revival Studios games, Stairrunner, and tried to load it. Sadly, no go, so the tape drive is almost surely shot.
I then plugged in an external tape drive. Once I figured out how to access tape 2 (Load”*”,2), I began my test with the same tape. No luck either. For the heck of it, I tried it again, but instead of using the *, I went with Load””,2, which worked (I never did have a need to access a second tape drive on any of my Commodores, and I can’t immediately think of any other models outside of the PET 2001-8 that even readily accommodates it)).

Success.

More sparkles, but at least it loaded.
In game, with sparkles.
I may add an entry or two in the future because there are a few more PET-related things (accessories and other items) I want to get around to trying, but for now, I’ll consider this minor excursion complete.
The post Upgrading the Commodore PET 2001-8: Part 2 appeared first on Armchair Arcade.


January 10, 2016
Review: PDP PS3 Versus Controller (plus additional new Retro Freak console information)
I bought the PDP PS3 Versus Controller specifically to use with the Retro Freak console from Cyber Gadget that I reviewed here, although this can of course be used with an actual PlayStation 3, PC, or other devices that can utilize standard USB controllers. As you’ll note from the Retro Freak review, while I really liked the overall console hardware, I wasn’t totally enamored with the quality of the included Super NES-like controller and, while I don’t mind using a standard first party Sony PS3 controller, I was looking for something a bit more purpose-built (the Retro Freak doesn’t make use of analog sticks, for instance).

The front of the box.

The back of the box.
The packaging is interesting in that you can access the d-pad and buttons. It’s very clicky, very noisy, and does this fan of mechanical keyboards proud. The d-pad is a bit like an analog stick, very loose, but very clicky; as a result, it moves extremely easily. The buttons are also super sensitive to presses.

The inside of the box.
Setup on the Retro Freak was relatively straightforward. It saw the controller as a standard USB controller and then it was just a matter of mapping the buttons with a custom profile in each of the supported systems.

The front of the controller.
Unfortunately, while it’s a pretty nice controller, it’s not necessarily something I’d recommend for classic console games like you play on the Retro Freak. The feel of the controller is unique in a way that really doesn’t make it quite as versatile as a more traditional plus-style d-pad and non-microswitch button design. In fact, while I like the responsiveness of the unique d-pad, the buttons, while sufficiently reactive, have an odd feel, making super fast button presses a bit of a sloppier experience than I usually like.

The rear of the controller. It has a nice, tacky surface on the back.
Some additional information came to light in regards to the Retro Freak both from my own experimentation and in my discussions with other owners. It seems that Sega SG-1000 support is not yet implemented, which might be why the Retro Freak Gear Converter is delayed into next month (when mine arrives, I’ll post a review). Presumably a firmware update will be available by then to make both adapted cartridges and regular ROMs work.
I also confirmed that the Retro Freak Controller Adapter can be loaded up with legacy controllers on all of its available ports, with each registering individually on the console. It also works perfectly well on a PC (I tested in Windows 10), with each port registering as its own USB controller (although they’re all generically labeled the same, so you’ll need to figure out which controller port goes to the specific controller or controllers you have plugged in).
Finally, I actually got a wireless controller to work on the Retro Freak, albeit with some caveats. I had a second generation OnLive controller, which was different from the first generation OnLive controller in that the first generation only works with the now-defunct OnLive console, while the second generation OnLive controller is more of a generic Bluetooth controller. I plugged in the wireless USB dongle into the Retro Freak and the controller was immediately controlling the menus. Even the left analog stick worked, although use of it in a game caused malfunction. Unfortunately, in the case of button mapping (it has a SNES-style button layout, with two shoulder bumpers and two shoulder triggers), not all of the buttons work correctly, so it doesn’t really work right for games that require more than three buttons, and really is only ideal for two button games because of what buttons work properly with that layout. It’s a pity, but at least it shows that some type of wireless solution should be possible at some point, and maybe one even exists already.
The post Review: PDP PS3 Versus Controller (plus additional new Retro Freak console information) appeared first on Armchair Arcade.
Review: iOttie Easy One Touch 3 Car Mount
I was hesitant about reviewing yet another car mount, but I’m glad I did for the iOttie Easy One Touch 3 Car Mount. The build quality alone is enough to elevate it above most other car mounts, but it’s the wonderful configuration options that really set this apart.

The front of the box.

The back of the box.
The iOttie Easy One Touch 3 Car Mount comes in three pieces. The first is the mount base, which features a unique telescoping arm. The second is the smartphone cradle, which supports devices up to 3.5 inches wide (and nothing shorter than 2.3 inches), which, for reference purposes is more than enough for my oversized Apple iPhone 6 Plus in Rokform case. The third is the Dashboard Gel Pad, which allows you to mount this on your vehicle’s dashboard, even with today’s heavily textured surfaces.

The package contents.
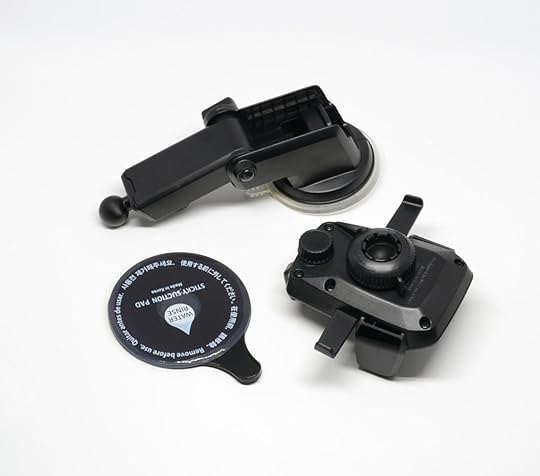
Out of the wrappers.

The arm at maximum telescope.

Another view of the cradle.
Installation is simple:
Connect the cradle to the ball joint on the mount base.
Decide whether you’re going to dashboard (use the gel pad) or windshield mount. Either way, the connection is extraordinarily secure even before you pull down the lever to secure the mount (in fact, I repositioned the mount on my windshield once already and it was quite difficult to remove!).
Pull down the lever to secure the mount.
Tighten all knobs.
Press the release bars on the cradle into the locking position.
Press your smartphone against the “Easy One Touch Trigger,” which will automatically close the arms, securing your device. Adjust the bottom foot support as necessary.

My Apple iPhone 6 Plus in the mount.
You can then make any other adjustments you need, including the length of the telescoping arm. I really can’t imagine there wouldn’t be a way you wouldn’t be able adjust this to exactly how you want to see your smartphone. This is a definite recommendation if you’re in the market for a premium smartphone car mount.

How my phone is mounted in my car.

Another angle.

It’s easy to position into portrait.
Thanks to iOttie for the review unit.
The post Review: iOttie Easy One Touch 3 Car Mount appeared first on Armchair Arcade.
December 30, 2015
Review: Cyber Gadget Retro Freak (plays games from 17 videogame systems) (includes videos)
Although I’m an enthusiastic fan of the Hyperkin RetroN 5, which plays original cartridges from the NES, Famicom, Super NES, Super Famicom, Genesis, Mega Drive, Game Boy, Game Boy Color, Game Boy Advance, and Sega Master System (with a Power Base Converter or equivalent) in glorious HD, it’s not without its frustrations. Perhaps the biggest of those frustrations is that there’s no easy and official way to play flash-based multi-carts or run ROMs. It’s strictly for playing original cartridges. That’s why the Japanese Retro Freak console from Cyber Gadget had me so excited. Not only does the Retro Freak do many of the same things that the RetroN 5 does, it can also run ROMs directly from an optional microSD or microSDHC card (up to 32GB, although you’ll read later why a card of that size is not necessarily all that useful at this point).

The box for the Premium edition.
The mix of systems for the Retro Freak is a bit different from the RetroN 5. The Retro Freak plays original cartridges and ROMs for the Famicom, Super NES, Super Famicom, Genesis, Mega Drive, Game Boy, Game Boy Color, Game Boy Advance, Super Game Boy, TurboGrafx-16, PC Engine, PC Engine SuperGrafx, and, with an adapter if you want to play physical cartridges, NES, Game Gear, Sega Master System, Mark III, and SG-1000. Interestingly, unlike the RetroN 5, the Retro Freak is not entirely self contained, with, for instance, the tiny main unit inserting into a larger shell for when you want to use cartridges (its total size is still smaller than the RetroN 5) and the controller adapter to use a single original controller (versus two ports built into the RetroN 5 for each of its main supported systems) for the SNES, Famicom, NES, PC Engine, and Sega Genesis/Mega Drive an optional add-on outside of the Premium model. A further deviation from the RetroN 5 is the lack of a wireless controller option (there are rumors of third party Bluetooth adapters from 8Bitdo in development), with only a lightweight, wired controller modeled somewhat after the Super NES/Super Famicom included, although you can plug in many USB adaptable controllers, both classic and modern, including Sony PlayStation 3 and 4 DualShock gamepads.
Although the Retro Freak is available from a variety of sellers on eBay, the most cost effective and reliable method is to do what I did for the Premium model and get it from Play-Asia, which was only recently able to meet the incredible demand for the product with sufficient stock levels. Play-Asia stocks the Retro Freak Standard, Retro Freak Premium, Retro Freak Gear Converter (for adapting Sega Game Gear, Mark III, and SG-1000 cartridges), Retro Freak Controller Adapter (which comes with the Premium set), and a Retro Freak AC Adapter (in case you want another one; note that this is the same type of adapter used on the Sony PSP and devices like the indispensable XRGB-mini Framemeister). Although you’ll pay a premium for the FedEx shipping option at Play-Asia, the fact that you’ll get your delivery in a few days helps make up for it (just be sure to have someone present to sign for the package).
What you get with the Premium edition.
The Retro Freak comes with the console itself, a short HDMI cable, and an AC adapter (it’s universal, so it works fine in both Japan and North America). If you got the Retro Freak Premium like I did, you also get the controller adapter box and miniUSB cable for connecting it to the console.
Starting Out
When you first start the Retro Freak, it helpfully gives you a choice of language. I of course chose English. It also prompted me to automatically update the RetroFreak Cartridge Adapter. And that was that. You can see the whole process in the absolutely unexciting video that follows:
I then went into Settings and set it up the way I like it. You can see that and my play session from the Sqoon Famicom cartridge I inserted:
Unfortunately, Sqoon‘s performance was miserable. I decided to go into System settings and request a firmware update. I took the microSD card and inserted it into my computer. I then followed the instructions here to get the update. Unfortunately, after multiple tries, I always got the “<< ERROR >> Invalid update request (bad magic)” error.
The main part of the console sitting on top of the bottom of the cartridge unit.
As it turned out, I was using a microSD card that wasn’t newly formatted, i.e., it had stuff on it. Obviously, the Retro Freak didn’t like that. Once I fixed that issue with a fresh format, I was able to both dump a cartridge (Wildtrax for the Super Famicom) and write a working update request. I’m now on system version 1.4. You can see the update process in the video:
As you can also see in that second video, I put a random Genesis ROM (Streets of Rage) in a sub-folder under Games to see if I’m able to organize ROMs in that manner. Fortunately, I am. As you can also see, Wildtrax performed reasonably well, although there was some glitching in the in-game menu. After the firmware update, Sqoon clearly worked much better, although I find the performance of the game on the RetroN 5 superior.
ROMs off microSD
My next task was to load up my microSD card with some additional ROM sub-folders for the various other systems it’s supposed to support. With lots of ROMs, even in sub-folders, it does seem to take the system several minutes to parse and make them accessible, which is frustrating.
On a subsequent start-up, it didn’t even find the same microSD card, so I’m thinking it got corrupted, even though there were no signs of it. Other times, it would just endlessly try to parse the games without giving me access to the microSD card. Instead of trying to work with an overstuffed microSD card, I just reformatted the card and decided to put just a handful of ROMs for each system to finish my testing:
What this sluggishness with too many ROMs means is that this system is not a good solution at present for those of us who want to have large numbers of ROMs accessible. With that said, with a more modest collection of ROMs, I have no complaints with how quickly it parses and loads the listing, as you can see in the previous video. And even though it clearly has issues with running some ROMs correctly, other ROMs like Virtua Racing for the Sega Genesis that give other systems fits, works well here.
The console inserted into the cartridge unit.
Unfortunately, I couldn’t get any SG-1000 ROMs to run (with .sg extension), and I don’t have an adapter to try one of my SG-1000 cartridges. I don’t know why it doesn’t work.
While I didn’t load any SuperGrafx ROMs in that previous video, I did put in a SuperGrafx cartridge so I could show every system it supports.
The Controller
The included wired controller is OK, but seems to lack some precision and responsiveness. While the Bluetooth RetroN 5 eventually grew on me after my initial hatred of it, I’m not sure this one will have the same unexpected recovery. The build quality just doesn’t seem to be there. I suspect when I’m not using a classic system’s controller, I’ll be using a PS3 or PS4 controller, which seems to work fine, although only with the d-pad and not the analog stick(s) (I only tested a PS3 controller, since I had it handy after testing the disappointing PlayStation TV).
The Retro Freak Controller Adapter
I happened to have a copy of the Famicom version of Arkanoid II, complete with paddle controller, ready to go. I plugged both the cartridge and Famicom controller into their respective slots and turned the system on. It loaded the game just fine and, surprisingly, the controller worked beautifully (in the first video, without scanlines, it picked up where I left off, which is a nice feature of the system):
Conclusion
It still seems to be early days for this console. In its present state, it’s tough to fully recommend considering the RetroN 5 can presently be had for so much less money in a more complete configuration. The main advantage that the Retro Freak has outside of TurboGrafx-16, PC Engine, and PC Engine SuperGrafx support is its ability to rip cartridges to microSD, as well as run ROMs from microSD, ripped or otherwise. Unfortunately, it’s this latter experience that is the biggest let-down of its enormous potential at present, since you have to carefully manage the number of ROMs you have on your microSD card. Nevertheless, when it works, it works well, and the ROM thing, however limited, is still a critical differentiator. As such, if you have the money to invest in this and any relevant adapters or add-ons, it’s presently the only such system of its type available with this overall feature-set.

How the Premium edition looks all hooked up.
Naturally, if its niggly issues get resolved with future firmware updates, I’ll be sure to do a follow-up review.
The post Review: Cyber Gadget Retro Freak (plays games from 17 videogame systems) (includes videos) appeared first on Armchair Arcade.
Review: Laura Sullivan’s Calm Within – Music for Relaxation of Body and Mind
I often like to listen to music with a good pair of headphones when I’m reading or working – and particularly when I’m in the middle of writing – when concentration and needing to tune out the distracting sounds of the outside world are critical. Of course I can’t just listen to any old type of music. It needs to not only be free of vocals, which is a given, but also free of distracting instrumental arrangements. That’s where something like Laura Sullivan’s Calm Within comes into play.
Each song is clearly carefully arranged for maximum distraction-free enjoyment. Regardless of the track, I know I can put it on, tune out the outside world, and get down to business. If you’re in the market for something like this, I can’t recommend it enough, and, if your browser supports it, be sure to check out some of the tracks for yourself in the player at the bottom of this posting.
Thanks to Laura Sullivan for the review unit.
The post Review: Laura Sullivan’s Calm Within – Music for Relaxation of Body and Mind appeared first on Armchair Arcade.
December 16, 2015
Review: KOVOT Gamer Chip and Dip Dish
 For the videogame fan who thought they had everything, there’s now a chip and dip dish that’s designed to look like a game controller to prove them wrong. It’s available in black or white. I’m specifically reviewing the black one, which looks a bit like a game controller Bat-Man might use.

The box for the KOVOT Gamer Chip and Dip Dish.

Some button detail. It’s a solid ceramic dish.
It’s ceramic, with (clumsily) hand painted buttons, and measures approximately 15 (L) x 6.75 (W) x 2 (H) inches. The two chip compartments flank the central dip compartment, giving it it’s length.

A closer look at the other side of the dish.

The underside.
It’s a decidedly fun, if somewhat unnecessary product that nevertheless delivers on what it promises. The only real downside I can think of is that you’re not going to want to put something like this in the dishwasher. Like certain other, fancier dishware, you’ll want to limit this to careful hand washing. And like that other, fancier dishware, having to hand wash it certainly shouldn’t stop you from picking up the KOVOT Gamer Chip and Dip Dish if you want to add some flair to your next game night, or simply want an unusual chip and dip dish for your next shindig.

Dip and chips at my house. Yes, I’m Bat-Man.
Thanks to Sharp Gear for the review unit.
The post Review: KOVOT Gamer Chip and Dip Dish appeared first on Armchair Arcade.
Review: intelliGLASS Hardened Glass Screen Protector (plus coupon code)
With our youngest daughter now at 14 months old and counting, she’s long since been into all of our electronics, particularly the touchscreen ones. Right now, her primary device is a hand-me-down Apple iPad 2, which has a Fintie iPad bumper case, something we had previously gotten for our middle daughter back in 2013 (she’s now nine and only slightly less destructive). The Fintie has done it’s job well, but there’s one area that’s not protected with such a case, and that’s the screen. That’s where the intelliGLASS Hardened Glass Screen Protector comes in.

The packaging for the intelliGLASS Hardened Glass Screen Protector.

The back of the box.
A variety of intelliGLASS Hardened Glass Screen Protectors are available for iPad, iPhone, Nexus, iPod, Galaxy Note, LG, Moto G, and other, similar devices. You can order direct from the company’s Website or via Amazon. As a special offer for Armchair Arcade readers, if you use the intelli20 coupon code, you’ll get 20% off the already discounted price.
The inside of the package.

The contents.
With that out of the way, I was obviously interested in the one for the iPad 2, which also works on the iPad 3 and 4 due to their similar exteriors. The basic premise behind such a protector is that it provides a clear, scratch and fingerprint resistant barrier between itself and your device’s expensive screen. Because it uses real glass, there’s no noticeable difference in screen clarity or touch responsiveness.

How it looks with the screen protector on.
I have to admit I was a bit skeptical about this product, having tried to use cheap plastic protectors in the past. No matter what I did, I could never get the bubbles out and ended up removing and disposing of them (I’m not the best at delicate procedures like that). Not so with the intelliGLASS Hardened Glass Screen Protector. After I removed the Fintie case and then thoroughly cleaned the screen with the included alcohol prep pad, microfiber cloth, and dust removal film, I removed the protective coating on the intelliGLASS. I then stuck it on with no issue and no noticeable bubbles on the screen, as you can see in the photos. As stated earlier, both screen clarity and touch responsiveness didn’t seem affected, with the only difference now being the screen should be able to absorb drops and hits far better than before. Our youngest daughter didn’t skip a beat with it on either. If you’re in the market for a screen protector like this, this is definitely a quality choice.

Even with the screen protector, it still fit the case just fine.
Thanks to IntelliArmor for the review unit.
The post Review: intelliGLASS Hardened Glass Screen Protector (plus coupon code) appeared first on Armchair Arcade.
December 11, 2015
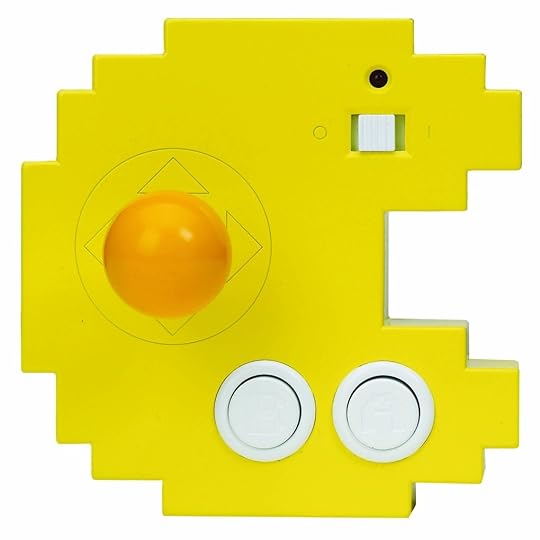
Review: Pac-Man Connect & Play 35th Anniversary Edition (includes videos)
Bandai’s Pac-Man Connect & Play 35th Anniversary Edition is one of those rare TV Games that sports an incredible low price with minimal sacrifice in quality. While not perfect, it does set a high standard for other TV Games to try and match. For those who just want to see videos of how each of the 12 included games performs, you can skip straight to the Menu and Games section of this review. Otherwise, start with Console and Control and read on from there to get the complete picture.

The console is self-contained and certainly looks interesting.
Console and Control
The Pac-Man Connect & Play 35th Anniversary Edition is a highly portable, self-contained unit. Pull apart the two pieces of the case and you’ll find the attached composite cables and a battery compartment. Four AA batteries are required, but not included, and there is no provision for using an AC adapter. The mono composite cables (yellow for video, white for audio) are fairly short at about 6 feet (1.8 meters), so you’ll either want to get extensions or settle for playing close to your TV.

You pull the console apart to replace batteries and get at the audio/video cables.
I’ve read reports that the previous versions of this product had poor joysticks. That seems to have been addressed with this edition branded with the 35th Anniversary markings, so you’ll want to be sure to specifically get that model (assuming there was an issue in the first place). With that said, because of the interesting looking, yet unfortunate, shape of the shell, this is not really great for handheld use. If you use it on a table top like I’ve been doing, then you’ll find the joystick and buttons incredibly responsive for each of the 12 included games. It really does have a nice arcade feel.

Do yourself a favor and play this like you would a tabletop console.
Menu and Games

That’s a nice selection of games.
The colorful menu screen appears to be in an unusual resolution, but looks nice enough and packs in a good amount of information. The nice thing about the menu is that all 12 game titles fit on one screen, so it’s easy to select your game of choice with the joystick and A button. What follows then is an alphabetical listing of the 12 games and a short, direct feed video showing each one in action:
Bosconian—Although little known today, this 1981 free-roaming scrolling shooter was technically impressive for its time.
Dig-Dug—One of the more original game creations, this 1982 release tasks you with digging underground tunnels to try and inflate and pop various monsters.
Galaga—This 1981 sequel to Galaxian (also included) is arguably the definitive Space Invaders-style shooter.
Galaxian—Namco’s full color answer to Taito’s legendary Space Invaders (1978), this straightforward shooter from 1979 is still fun for a spin.
Mappy—Although the music gets repetitive, this 1983 release ups the cute factor for its challenging chase-and-evade platforming.
Pac & Pal—This 1983 release was a Japanese exclusive that used the same arcade hardware as Super Pac-Man (also included). It’s yet another Pac-Man variation with oddball additional features like unlockable items (by turning over cards), an assistant (Miru, aka “Pal”), and the ability to shoot (spit) a ray, smoke, musical notes, freezing rays, or min-Pac-Men (Pac-Mans?).
Pac-Man—The 1980 classic in all its glory. It’s a shame Ms. Pac-Man (1982) wasn’t thrown in as well.
Pac-Man 256—This is the infamous glitch-fest that’s the 256th, and final, level of the original Pac-Man game, and about the only way most of us game playing mortals will get to experience it. Unfortunately for us same game playing mortals, we have to beat the 255th level first.
Pac-Man Plus—A minor 1982 update of the original, you’ll mostly find slightly altered visuals, some new power-ups, and slightly more challenging play.
Rally-X—This 1980 release mixes oversized Pac-Man-like mazes and flag collecting with frantic racing and evasion and some much-needed defense via strategic use of a smoke screen.
Super Pac-Man—A 1982 variation on the Pac-Man theme, Super Pac-Man does away with pellets in favor of fruits and prizes, and adds additional features like speed boosts and super power-ups.
Xevious—Among the first top-down vertical scrolling shooters, this 1982 release challenges you to shoot both air- and ground-based targets. This is also the one game that makes use of the second button on the controller.
I’m not sure if these are emulations or just really good simulations, but I assume it’s the latter. As such, certain arcade patterns or exploits won’t work since the game logic isn’t the same. From a more practical standpoint, without me bothering to do an exhaustive and largely unnecessary 1:1 comparison between this and something like MAME, I can say that all of the games really do play, look, and sound great.
Audio/Video
As you can tell from the videos, each game is an audio-visual treat. Frankly I’m baffled at how Bandai was able to get the quality they were out of this device’s lowly composite connection, particularly since other TV Game devices don’t come anywhere close. However they did it, I’m glad they pulled it off, because this is now a target for other TV Game manufacturers that use composite output to try and match. Of course, it’s not quite perfect, and you will notice the occasional off-sound, but overall, it’s really impressive.
Conclusion
No, it’s not the most comfortable design if you want to hold it in your hands.
Prices vary wildly, but keep in mind that the regular price is usually $19.99 (versus a list price of $24.99), and can often be had for as low as $14.99. At either price, it’s a steal, even if the joystick does get a bit creaky with heavy use. While I think I’m rightly critical of the superfluous Pac-Man pixel-shaped case design and too-short, hard-wired composite cables, I can’t think of much else I’d want changed. Even if you have emulation options or home ports you’re happy with, this convenient and flashy portable package is still something well worth a look. If you have friends or family that don’t have other options, yet still have an interest in classic gaming, then this moves from well worth a look to must buy.
The post Review: Pac-Man Connect & Play 35th Anniversary Edition (includes videos) appeared first on Armchair Arcade.
Review: DESTEK 3D VR Virtual Reality Headset
The noble purpose behind Google Cardboard headsets is to offer a simple, low-cost way of providing a workable virtual reality (VR) platform for use with our existing Android- or iOS-based smartphones. This has proven a nice success story for both Google and VR enthusiasts, highlighted by the recent high profile inclusion of a Google Cardboard viewer in the November 8, 2015 edition of the print version of The New York Times.
The basic components of Google Cardboard are cut cardboard, 45 mm focal length lenses, magnets or conductive lever, a hook and loop fastener (don’t say Velcro), and a rubber band, along with your own smartphone of up to six inches in size (earlier versions of Google Cardboard maxed out to device sizes of about 5.7 inches). Once Google Cardboard is assembled, your smartphone is inserted in the back of the device and held in place by the fastener.

The box.
While you can fashion your own Google Cardboard or buy low cost commercial versions, some manufacturers, like DESTEK, with their 3D VR Reality Headset, offer a more premium product. Features of the DESTEK offering include foam padding, adjustable straps, and fresnel lenses. For that latter feature, which is a flat lens made of a number of concentric rings to reduce spherical aberration, DESTEK says, and I quote, “reduce clarity to protect your eyes and for longer time use without dizzy, also it have reasonable focal length without any adjustments, but need several minutes to adapt 3D scenes to make it more clear. Suitable for myopic within 300 degree, but not for presbyopia. ” Ahem. To summarize, that basically means it works in a slightly different way than the usual Google Cardboard design.

What you get.
The package includes the glasses themselves, two nose pads, thinner padding for inserting thicker phones, a cleaning cloth, a manual, and an NFC tag (a sticker). Of course, my Apple iPhone 6 Plus doesn’t support NFC, which is a feature found primarily in many Android phones, but that’s probably OK though, since there are no instructions on what do with the NFC tag. I’ve also read reports that when NFC does actually work with this, it takes you to a defunct app. It’s not really important either way.

A closer look at the optics.
The DESTEK 3D VR Reality Headset leaves out any magnet or conductive lever to control the phone, so once it’s placed in the holder (which does close with a magnet), that’s that. I did have a Bluetooth remote shutter button from a selfie stick I previously reviewed, but that doesn’t seem to provide the right functionality. An optional Bluetooth Remote Controller is available from DESTEK at a discount, which offers – depending upon the platform – functions like a mouse cursor, separate play/pause key, and previous/next key controls. Unfortunately, I didn’t have one for review, so I can’t speak to how well it works.
My test platform was my iPhone 6 Plus, but of course should work with most any Android- or iOS-based phone, as long as it runs a relatively recent version of the respective OS and doesn’t exceed 6 inches in size, while being a minimum of 4 inches (the inside of the front cover holder is 6.25 x 33.46 inches, or 159 x 85 millimeters, so your phone will have to fit in that). When inserting my phone, I was unable to close the 3D VR Reality Headset‘s front compartment without removing the Rokform case from my iPhone (yes, even with the thinner pad). That’s annoying, but not unexpected given the already generous uncased size of my phone.

Where you insert your phone.
While there are various apps and demos (DESTEK says to look for “VR games” and “3D split screen” videos) for Google Cardboard to try, I went straight to the Google Google Cardboard app on the Apple App Store. One of the steps is finding the QR code on the viewer, which this one doesn’t have, so I skipped that step. It still worked just fine without that step, but without a way to acknowledge prompts, it’s a barely functional experience. It did at least let me move about in the various demo worlds (just be careful when walking about your room since you can’t see outside the viewer!).
I also tried the Vrse – Virtual Reality app, one of several recommended from the Google Cardboard app. I streamed The Displaced and caught the beginning before it crashed. I then downloaded U2’s Song for Someone from this app, as well as Walking New York. Needing no more interaction than you walking about and turning your head, those videos worked far better and were pretty immersive. Since I have no specific controls, I didn’t bother trying any games.
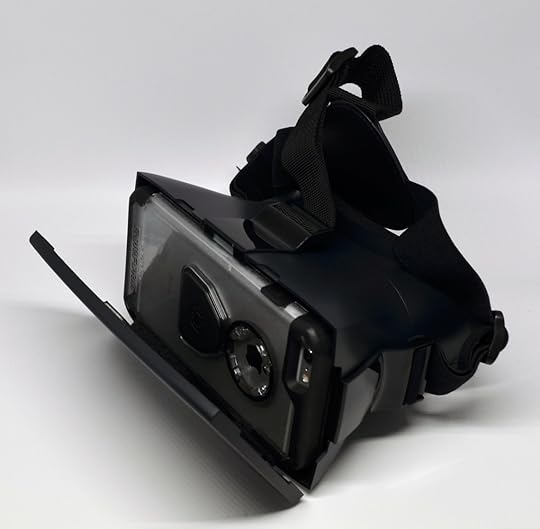
My iPhone 6 Plus didn’t allow the door to close until I removed the pictured Rokform case.
Unfortunately, there’s a somewhat narrow field of vision here and no way to adjust focal distance – both by design – so it either works well with your phone and eyes out of the box, or you’re out of luck. Having not tried other Google Cardboard solutions, I can say I felt a bit wonky eye-wise after removing the headset, as well as mildly nauseous, which may or may not be my reaction to all of these, or just the way this particular product affects me. Comfort-wise, it could be a lot better, but I had no major issues for short sessions with the strap or the nose piece. I didn’t even bother adding one of the pads for the latter, but I suspect for longer sessions I’d want to.
Considering the higher price, lack of certain Google Cardboard features, and poor comfort (don’t even try using this with glasses), I have a hard time recommending the DESTEK 3D VR Reality Headset. It’s probably best to save some money and go for one of the many other options available instead. In fact, that’s what I’m going to do, since this tease at the potential and possibilities of cheap VR certainly whet my appetite for a better solution.
Thanks to DESTEK for the discounted review unit.
The post Review: DESTEK 3D VR Virtual Reality Headset appeared first on Armchair Arcade.
December 7, 2015
Review: Oak Leaf Dimmable Portable LED Desk Lamp
I’m fortunate to get to review many products. As such, I can usually be a bit picky about what I choose to review. If a product doesn’t have some type of unique feature or other selling point, I’m probably not going to be interested in reviewing it. Since you’re reading this review, as you might expect, the Oak Leaf Dimmable Portable LED Desk Lamp is in fact one of those products with a unique feature.
The box for the lamp.

Package contents.
It’s great as a desk lamp that’s always plugged in, but also has the wonderful flexibility of being able to be unplugged and used wherever else you might need it. While you get a maximum of about four hours of usage from a typical eight hour charging cycle (the replaceable battery is good for about 400 charging cycles), the fact that it can be powered over USB with the included cable means you’ll probably have a lot more flexibility than that since USB ports are just about everywhere these days.

The lamp folded up.

Another angle.
You get the piano black lamp itself, a USB cable, an AC adapter that the USB cable can plug into, and a small instruction sheet. The top portion of the lamp can be moved up or down 180 degrees, and also swivels 225 degrees. The small base is also able to rotate 90 degrees if you want to use the Oak Leaf Dimmable Portable LED Desk Lamp as a stick light. Of course it all folds down for easy transport and even has a mounting hole for even greater flexibility if you wanted to mount it on a wall. In short, there are few situations where this light couldn’t find a use.

The lamp off.
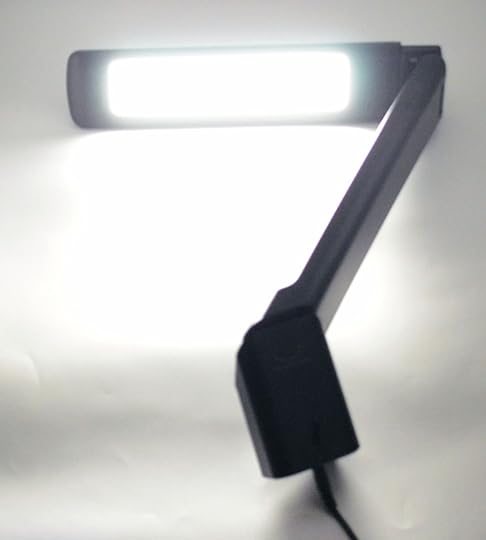
The lamp on.
Operation is simple, with a single button that lets you set the light level to low, medium, or high, as well as of course off. At its brightest, the Oak Leaf Dimmable Portable LED Desk Lamp can easily light a sizable portion of a work surface.

Me charging the lamp from a USB hub.
From its build quality to its flexibility as both a desk and portable lamp, it’s easy to recommend the Oak Leaf Dimmable Portable LED Desk Lamp. As you would expect, the low power warm white LED light source (66 LEDs for 3000K – 3500K brightness) is rated to last over 25 years, and, paired with a 24 month manufacturer warranty, should give you plenty of peace of mind that this product was built to last.
Thanks to Better Home & Garden for the review unit.
The post Review: Oak Leaf Dimmable Portable LED Desk Lamp appeared first on Armchair Arcade.


