
Ree Drummond's Blog, page 10
March 29, 2016
Hawaiian Burgers by Ree
 This is one of my favorite recipes from my newest cookbook, and I want to share it with you today because a) It has nothing to do with lovely, pastel Easter recipes, b) We’re not to far away from burger/grilling season (huh? How did that happen?), and c) This is hands-down one of the most delicious burgers I have ever, ever, ever eaten. It is a loose interpretation of what an official Hawaiian burger would look like if there was such a thing as an official Hawaiian burger, and I don’t know if there is or not, because how in the world would I ever find something like that out? I suppose I could Google “Official Hawaiian Burger” and spend the rest of the day researching it and determining the authentic elements of what one would involve…
(But I think I’d rather just eat this one instead.)
Here’s how to make it!
 First, stir together the sauce ingredients: Mayo, teriyaki sauce, honey, and a little cayenne for heat.
Oh, this sauce. It is so incomparably scrumptious, but was it ever a journey to get here. My first attempt at a sauce for this burger involved—get ready—orange marmalade, and it turned out to be one of the most unpalatable (read: grody!) things I’d ever prepared in my natural born life. So if you ever have the bright idea of attempting to mix mayo, soy sauce, and orange marmalade together—which, of course, you won’t since you’re a logical person—run, run, RUN from the kitchen!
 On a grill pan, quickly grill the pineapple slices and bell pepper rings until they have nice grill marks on both sides. Remove them and put them on a plate.
 Season the ground beef with salt and pepper and form it into 4 equal-sized patties. Cook them on the grill pan or in a skillet over medium heat for 4 to 5 minutes on the first side, then flip them over…
 And add a splash of teriyaki sauce on top of each one. Let it sink in a second…
 Then place a slice of provolone on top and let it melt while the burger cooks through, 4 minutes or so more, until it’s no longer pink in the middle.
 Butter a griddle or separate skillet and grill th ebuns over medium heat until golden brown. Spoon a little bit of the sauce on the cut side of the buns and allow it to slightly soak into the bread. This stuff is…MAGICAL!
 Place the patties on the bottom buns and top each one with a couple of pineapple slices…
 Some thinly sliced red onion…
 The bell pepper and some green leaf lettuce.
This is a huge, beautiful burger and calls for a steak knife…
 And, most certainly, a dish of extra sauce on the side, which will be gone by the time you finish the burger. Irresistible! Try this once. I know you’ll be hooked.
Here’s the handy dandy printable.


March 21, 2016
Pan-Roasted Chicken Thighs by Ree
 Chicken thighs are my life. Absolutely, positively my life. If I had to choose a cut of chicken to eat the rest of my days, I would choose thighs every day of the week, and nine hundred times on Sunday. I always wonder why breasts get all the dang attention in this world. Thighs are the way to go, baby!
(Sorry. There’s just no elegant way to talk about breasts and thighs without sounding immature.)
(Or maybe I’m the one that’s immature. I seem to be the only one snickering.)
ANYWAY, ANYHOW, ANYHOO…this is a loose adaptation of an old Emeril recipe and can be changed up however you’d like in order to send the flavors in different directions. This is a lemon/chicken/wine/broth approach, but you can add herbs, a little tomato paste, a splash of cream at the end—seriously, anything goes.
Here’s how I make ’em!
 First, dice up an onion so it’ll be ready.
 Then add some olive oil to an ovenproof skillet and turn the heat to medium-low to start heating it up.
 Grab the chicken thighs and sprinkle them generously with salt and pepper on both sides….
 Then violently hurl them into a bowl of seasoned (with salt, pepper, and whatever else you want) flour…
 Turning them over to dredge and shake off the excess.
 Set them on a plate until the oil is nice and hot and ready.
 Set the chicken, skin-side down, in the pan.
I love the skin side.
Move the thighs around, shake the pan, whatever you need to do for the next 3 or so minutes in order to ensure that the first side gets evenly golden brown and doesn’t burn. Keep your eye on ’em!
 Then turn ’em over and let ’em cook on the other side for a minute or two.
 Remove them to a plate and set them aside for a minute. (You don’t need to cook them through at this stage! They’ll go in the oven here in a minute.)
 Back to the skillet: If there’s a lot of grease in the pan, pour off all but about 1/4 cup. Then add the onions to the pan…
 Along with some minced garlic. I actually added twice this amount! The garlic makes it so durn good.
 Oops! I forgot to take pics of the onions cooking, but basically, you want to stir them around and cook them for a couple of minutes until they start to soften. Then pour in some white wine and let it cook/reduce for a minute as you stir and scrape the pan.
 Next, pour in some chicken broth. Now, if you would rather not use wine, or if you don’t have any wine, just use all broth—it’ll still be delicious.
 Now you just need to cook the liquid for a minute or two to let it reduce. If you need to, splash in a little more broth (if it evaporates/reduces too fast.)
 Next, whack a lemon in half…
 And squeeze in the juice, using your hand as a sieve so the seeds won’t wind up in the dish.
 Oh, and add some lemon zest, too! If you’re a normal person who plans ahead, you will have zested the lemon before you halved and juiced it. But I don’t operate that way…unfortunately.
In any event, just add half the zest to the skillet, because you’ll need the rest later!
Oh, and you can add more lemon if you’d like. Whatever your acid-loving heart desires.
 Stir some salt and pepper into the liquid, then nestle the chicken thighs, skin side up, into the liquid. There shouldn’t be a ton in the pan—But make sure there’s enough to slightly slosh around.
 Now, cover the skillet—which, in my case, means inverting a second skillet on top…but if you have a lid, that works swimmingly—and put it in a 350 degree oven for about 15-20 minutes. This will allow the chicken to start to cook through and stay nice and moist!
 After that time, remove the lid…
 And carefully spoon the liquid over each chicken thigh. This coats it with the flavor, but it also gets some of the onions on top of the thighs…and I’ll show you the global significance of that here in just a moment.
Before I do that, pop the skillet back into the oven for about 10 to 15 minutes…
 Until it’s sizzling and beautiful. And just look at those onions! They’re like a little bonus.
 And remember that remaining lemon zest? Just stir it into some cooked rice along with a sprinkling of salt.
 Pile it onto a plate…
 Grab one of those sensationally succulent thighs…
 And put it on the side of the rice, spooning the cooking liquid all over the top.
 Oh, and while the chicken was in the oven, I made some super simple green beans. Lemme show you what I did.
 Small iron skillet. Butter. Medium-high heat.
 Sad, pallid green beans. But I’m about to make ’em delicious!
 Throw them into the pan…
 And cook them until they’re starting to blister (you might need to turn the heat up to high for this!) Use tongs to move them around the pan.
 When they have great little blackened areas, turn the heat to low and pour in some soy sauce. Not a ton, just enough to coat the beans.
 Stir them around until the soy just becomes part of the mix…and that, my green bean loving friends, is it.
 This makes a lovely, lovely dinner.
 Some oven-roasted grape tomatoes would also be nice. But I didn’t have any in my fridge, so I’ll just save that dream for next time.
And as usual…the chicken thighs totally came through for me. Moist, flavorful, beautiful.
Below is the handy dandy printable! But before that, here are some of my favorite recipes made with chicken thighs:
Cashew Chicken (yum!)
Orange Chicken (double yum!)


March 18, 2016
Hot Fudge Sauce by Ree
 I have a problem with ice cream sauces, whether it’s strawberry sauce, caramel sauce, or this hot fudge sauce I’m sharing with you today: I pretty much love them so much that I don’t really need to eat them with ice cream. I only need a spoon. Now, I guess you could call this a good thing because I’m saving the ice cream calories, which would most assuredly wind up on my bottom. But you could also call it a bad thing because once I eat a spoonful, particularly of this silky, velvety chocolate goodness—I’m liable to eat the whole jar.
So see? I’m better off going ahead with the ice cream!
I’m glad we had this talk.
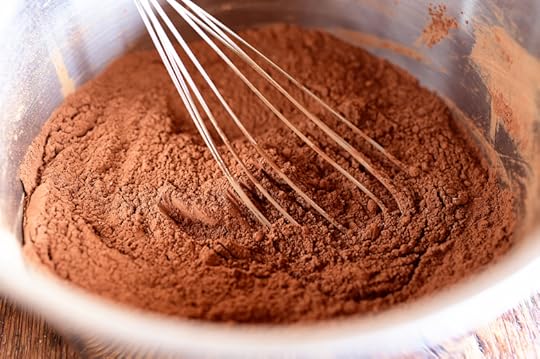 There’s nothing complicated about this stuff! In a medium saucepan, gently whisk together cocoa powder and sugar.
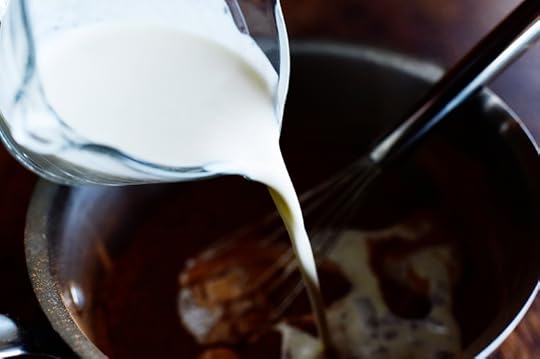 Gently whisk in some heavy cream, then turn the heat to medium and whisk it as it warms up.
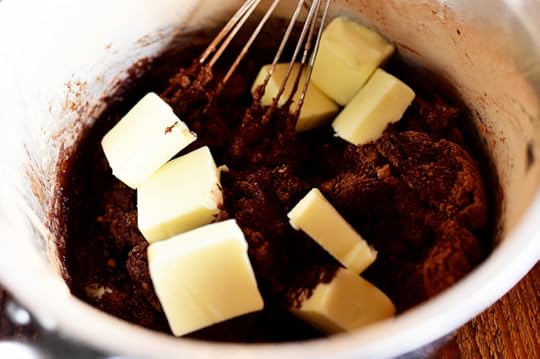 When the (very thick) mixture starts to heat up, drop in some butter and stir it until it’s totally melted.
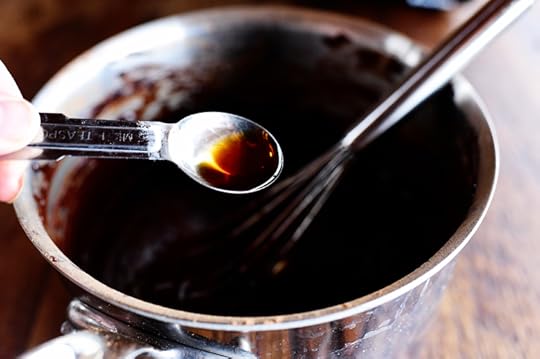 When it’s melted and smooth (sorry, the lighting makes it hard to see!), add vanilla and stir it to combine.
And that’s seriously it! Ridonkulously easy.
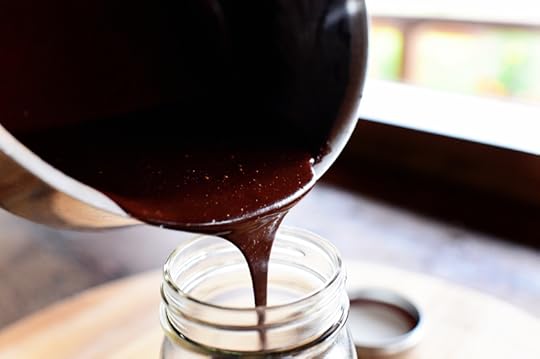 Serve it right away if you have guests hanging around or you can pour it into a jar!
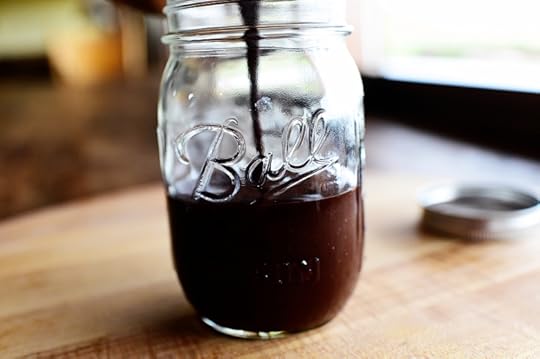 Mmmmmmm!
 This’ll keep in the fridge forever! Well…for as long as it’ll take you to go through it, which is like nine hours. Ha.
 Or, in this case, eight hours.
Okay, seven.
Okay, no hours. This was right after I made the sauce! I’m incorrigible. But if you do refrigerate it, just be aware that it will solidify in the fridge. To heat it, just grab a spoonful (or nine) and put it in a bowl, then microwave it for 20 seconds, give it a stir, and microwave it for 10 more seconds. Yum!
Here’s the handy dandy printable!


March 16, 2016
For St. Paddy’s Day! by Ree
I can’t believe it’s 2016, let alone March, let alone the middle of March…let alone the day before St. Patrick’s Day! Things are sneaking up on me left and right these days.
Thought I’d share some St. Paddy’s Day recipes below as I prep a new recipe for tomorrow. (Guinness Float for breakfast, anyone?)
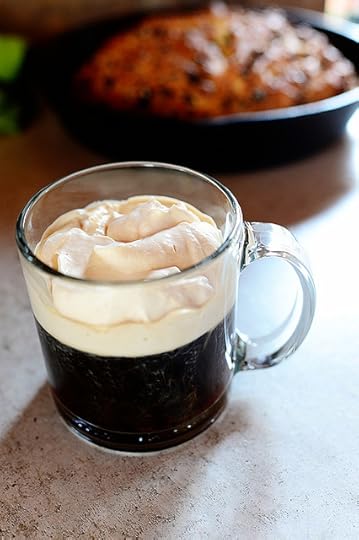
 Guinness Float! I just decided to start with the craziest thing on the list. Vanilla (or coffee…or caramel) ice cream with Guinness stout poured over. Very weird and very tasty!
 Irish Grilled Cheese. The secret’s in the cheese. I want this for breakfast. Right now.
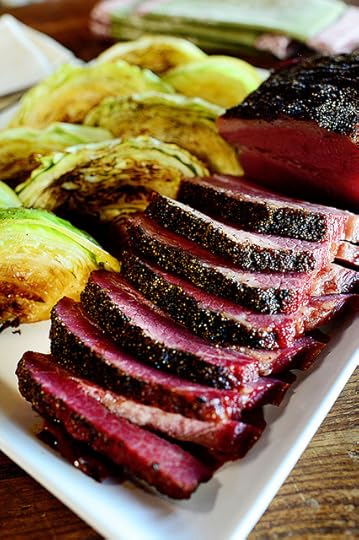 Corned Beef & Cabbage. I doctor up packaged corned beef and cook wedges of cabbage over a little Guinness just for kicks. A balsamic glaze gives it just the right kick.
 Irish Hills Cupcakes. They’re unapologetically green and they remind me of the ol’ Irish hills.
At least what I’ve heard about Irish hills. I’ve never been there! Ha.
 Irish Coffee. Speaking of “I want this for breakfast…”
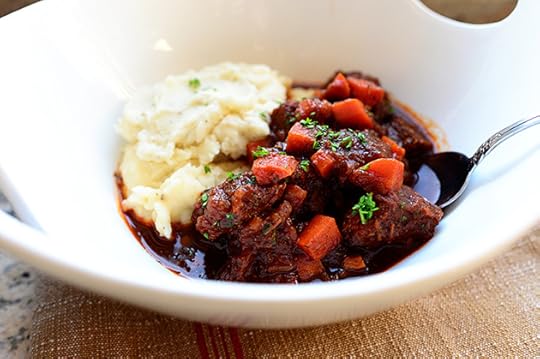 Sunday Night Stew. Throw in lamb instead of beef, and this hearty stew is just perfect!
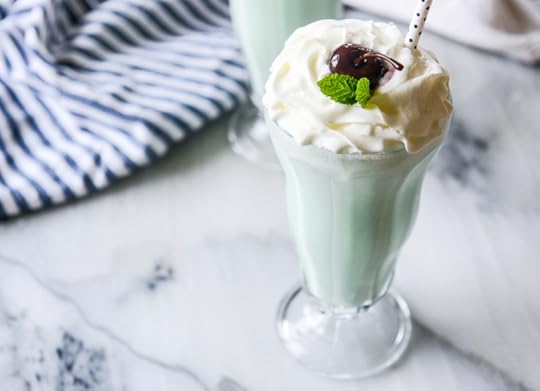 And don’t forget homemade Shamrock Shakes! These were made by my friend Jessica over on PW Food & Friends, and I pretty much need one of these right now.
Happy St. Paddy’s Day Eve, everyone!


March 14, 2016
Pies for Pi Day by Ree
As we all know, of course, today is Pi Day, also known as March 14, also known as 3/14, also known as 3.14, also known as Pi. (Whew. I’m exhausted.) And as Kate, a friend of mine on Facebook pointed out, this is a particularly significant year: As she explained it, 3.14159 is pi. You round it up to 3.1416. Today is 3/14/16. OH MY GOODNESS! EPIC!
That, of course, means we need to eat lots of pie today. Here are some of my favorites through the years! Click on the individual titles to find the printables you’d like.
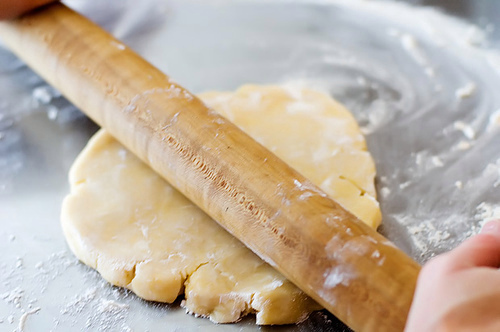 First, the pie crust. This is Sylvia’s Perfect Pie Crust and I’ve used it for years. These days I do equal parts butter and shortening, but the point is, it’s flaky every time!
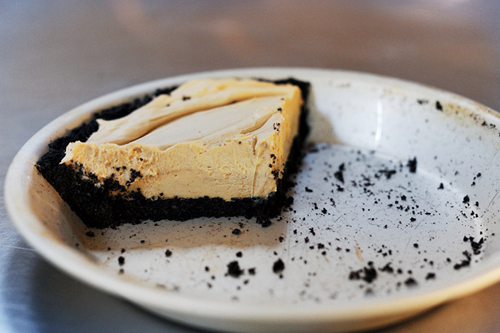 Chocolate Peanut Butter Pie. I’m not a huge lover of peanut butter desserts…but I could eat this entire pie by myself any day of the week and twice on Sunday. It’s just darn delicious. That is all.
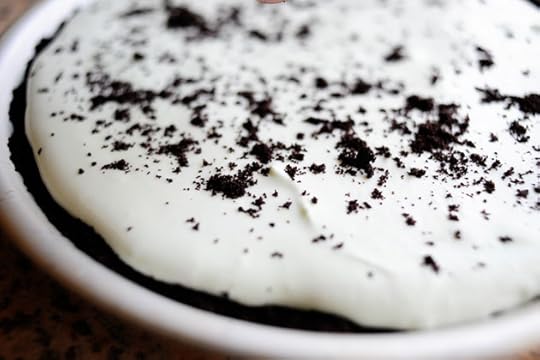
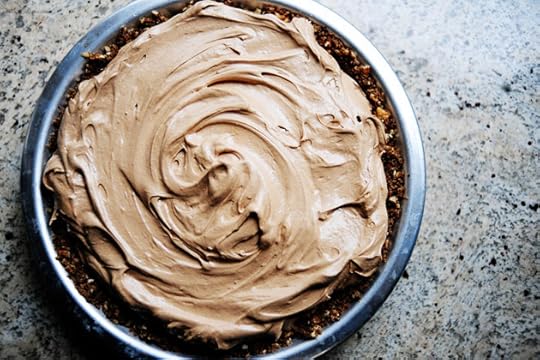 Mocha Silk Pie. Just like French Silk, but with a little bit of coffee flavor and a nutty crust. Mmmmmm!
 Raspberry Cream Pie. A summer favorite, this one’s good when the weather starts to get unbearable.
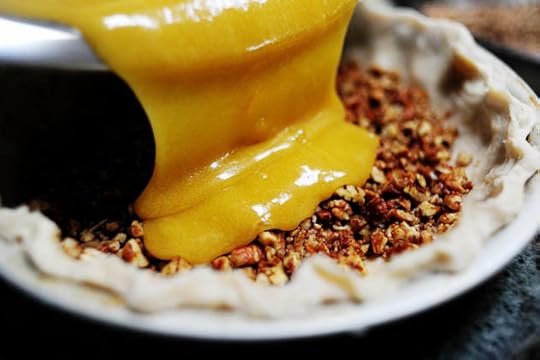 Pecan Pie, also known as The Pie That’ll Make You Cry. It is tremendous. One of Marlboro Man’s top 5 favorite things to eat in the universe.
 Grasshopper Pie. You can add a little green food coloring to really up the color. Either way, this is a good one. Throwback to the seventies.
 Mini pies are still pies, right? You’ll love these Mini Blueberry Galettes…and you’ll laugh at how painfully simple they are. Perfect when you need pie in a jiffy!
 Chocolate Pie! It’s not fancy. It’s not gourmet. It’s basic, timeless chocolate pie. And it’s a winner.
 Strawberry Pretzel Pie. Say what?!? It’s so good, though! If you’d prefer a traditional crust, just sub that out instead. It’s also good with a graham cracker crust. Glossy, red, and fabulous!
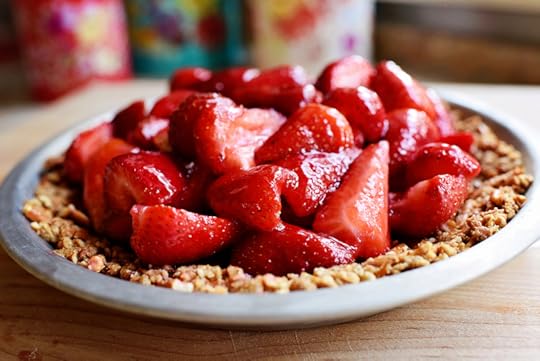
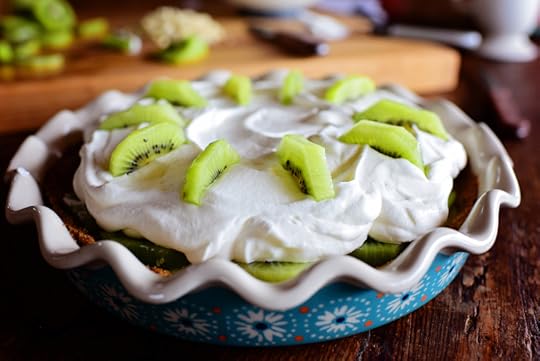 And finally, Kiwi Pie. One of my favorite pies in recent years. It’s cool and refreshing, with the wonderfully weird flavor of kiwi.
Have a wonderful day, friends! I hope you enjoy celebrating this blessed holiday with your families. (Ha.)


Big Pi Day This Year! by Ree
As we all know, of course, today is Pi Day, also known as March 14, also known as 3/14, also known as 3.14, also known as Pi. (Whew. I’m exhausted.) And as Kate, a friend of mine on Facebook pointed out, this is a particularly significant year: As she explained it, 3.14159 is pi. You round it up to 3.1416. Today is 3/14/16. OH MY GOODNESS! EPIC!
That, of course, means we need to eat lots of pie today. Here are some of my favorites through the years! Click on the individual titles to find the printables you’d like.
First, the pie crust. This is Sylvia’s Perfect Pie Crust and I’ve used it for years. These days I do equal parts butter and shortening, but the point is, it’s flaky every time!
Chocolate Peanut Butter Pie. I’m not a huge lover of peanut butter desserts…but I could eat this entire pie by myself any day of the week and twice on Sunday. It’s just darn delicious. That is all.
Mocha Silk Pie. Just like French Silk, but with a little bit of coffee flavor and a nutty crust. Mmmmmm!
Raspberry Cream Pie. A summer favorite, this one’s good when the weather starts to get unbearable.
Pecan Pie, also known as The Pie That’ll Make You Cry. It is tremendous. One of Marlboro Man’s top 5 favorite things to eat in the universe.
Grasshopper Pie. You can add a little green food coloring to really up the color. Either way, this is a good one. Throwback to the seventies.
Mini pies are still pies, right? You’ll love these Mini Blueberry Galettes…and you’ll laugh at how painfully simple they are. Perfect when you need pie in a jiffy!
Chocolate Pie! It’s not fancy. It’s not gourmet. It’s basic, timeless chocolate pie. And it’s a winner.
Strawberry Pretzel Pie. Say what?!? It’s so good, though! If you’d prefer a traditional crust, just sub that out instead. It’s also good with a graham cracker crust. Glossy, red, and fabulous!
And finally, Kiwi Pie. One of my favorite pies in recent years. It’s cool and refreshing, with the wonderfully weird flavor of kiwi.
Have a wonderful day, friends! I hope you enjoy celebrating this blessed holiday with your families. (Ha.)
March 10, 2016
Cashew Chicken by Ree
 We have a post all about the merits of comfort food over on PW Life & Style today, and there’s no other category I can put Cashew Chicken than that.
Well, I guess there are a few other categories I could put it in.
Chicken Dinners
Quick Dinners
16-Minute Meals
Sensational Stir-Fries
Simple Suppers
Darn-Tootin’ Yummy Recipes
The list goes on.
But Cashew Chicken is definitely, for me, a lifelong comfort food. I used to go to China Garden in my hometown, whether with my group of friends or my boyfriend (at the time) Kevin…and this is what I always ordered. Whenever I eat it, I think of Jeep Wagoneers, Giorgio perfume, Stiff Stuff hairspray, toe shoes, Pontiac Fieros, and size 6 Guess jeans.
(Not that I’m mired in nostalgia or anything.)
Here’s how I make Cashew Chicken! I could eat it weekly for the rest of my life and never get tired of it.
 First make the yummy sauce, which will eventually cook in the pan with all the ingredients. Mix together soy sauce, rice vinegar, brown sugar, oyster sauce, and sesame oil. A grand, sweet, sour combo! Stir it to combine and set it aside for a sec.
 Heat a heavy skillet over high heat and add some vegetable oil. Throw in cut up boneless chicken thighs (the best cut of chicken there is!) and leave them alone, undisturbed, for at least a couple of minutes. This’ll give ’em a chance to start browning.
 When the chicken has started to turn golden, start stirring it around so it’ll brown all over.
 Add some minced fresh garlic and ginger, because flavor is your life. (Pssst. It’s my life, too.)
 Next, chuck in some bell peppers. I used green, but a mix of green, red, or yellow would be tremendous!
 Stir in the bell pepper and let it cook for 2 to 3 minutes.
 While the pan is still hot, pour in some sherry. You can also use white wine or just broth, but I really think the flavor of sherry is special in stir fries like this. And it will remind you of the seventies, which is an added bonus!
At least it reminds me of the seventies.
But then again, everything reminds me of the seventies.
 Stir in the sherry, scraping the bottom of the pan to loosen up any bits.
 Turn the heat to medium-low and pour in the sauce mixture…
 Then mix the cornstarch with 1/2 cup water to make a slurry…and pour that in, too. Stir the sauce for 1 to 2 minutes to thicken the whole shebang. It’ll happen quickly!
 Add cashews and chopped up water chestnuts at this stage.
Important Note: Cashews must be unsalted or you’ll wind up with a salty calamity!
 Mmmm. Stir this all in so everything is coated and wonderful. Add a splash of water if the sauce seems overly thick.
 A sprinkling of green onions…
 And a bed of cooked rice is all it needs!
Here’s the handy dandy printable.


March 8, 2016
National Pancake Day: Hooray! by Ree
 Word on the street is that it’s National Pancake Day! Now, I always think of “Pancake Day” as Shrove Tuesday or Fat Tuesday, the day before Lent begins. But evidently National Pancake Day is something completely different.
I’m not going to overanalyze it. I’m going to embrace it!
Here are all of the pancake recipes that I’ve posted through the years. (And some I haven’t posted! Haha.)
 Perfect Pancakes. Basic and yummy. They turn out great every time.
 Lemon Blueberry Pancakes. Sweet and tart at the same time. The best of both worlds!
 Cornmeal Pancakes with Blackberry Syrup. Mmmmm. Grainy and hearty and lovely.
 Silver Dollar Pumpkin Pancakes. It doesn’t have to be October to enjoy these beautiful babies.
 Wild Rice Pancakes. Had these in Minnesota a few years ago and couldn’t believe how delicious they were. Try ’em. Just once!
 Edna Mae’s Sour Cream Pancakes. They are holy. I don’t know what else to say. Definitely one of the top recipes I receive positive comments about!
 Pancake Mini-Muffins. Sometimes you just want a little pancake snack without committing to the whole stack. You’ll love these diminutive wonders.
I made these Strawberry Granola Pancakes in Colorado last year, and I used a grocery store “cheat” ingredient that turned out to be a winner.
 Greek Yogurt Pancakes. A direct descendant of Edna Mae’s Sour Cream creations. A slightly healthier option!
 We’ve also got some fabulous pancake options from my friends over in my Food & Friends section! How about Hot Chocolate Pancakes from Bridget? Wow!
 And Apple Spice Pancakes from my birthday buddy Dara. I’ve gotta try these!
 Now, it’s been established that I do not like bananas. But these Banana Bread Griddle Cakes from Heather Christo? They might convert me.
(“Might” being the operative term!)
Happy National Pancake Day, everyone!


March 4, 2016
Smothered Pork Chops by Ree
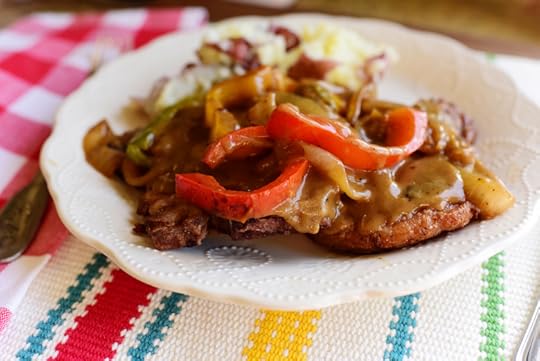 Sometimes you just need a big honkin’ plate of pork chops dripping with bell pepper gravy. I made this recipe yesterday, Snapchatting in real time along the way. And by the way, if you’re saying to yourself, “I do NOT get Snapchat,” please know that I was in the same boat probably three months ago. I thought it was the most hieroglyphic-esque app there was, and I didn’t think I’d ever understand it.
But then it clicked. And now I love it! If you’re a Snapchatter, my username is “thepioneerwoman.”
This recipe on Snapchat is essentially the same, with the same ingredients, prep, and steps. But there are some video clips and random life moments, like when Todd walked through the kitchen and yelled “AAADDDDRIAAANNNNNNNNN!” because he’s on a serious Rocky kick lately.
Is that normal? For eleven year olds in the new millennium to watch, devour, and love Rocky movies? Please advise.
And in the meantime, please enjoy this yummy comfort food recipe!
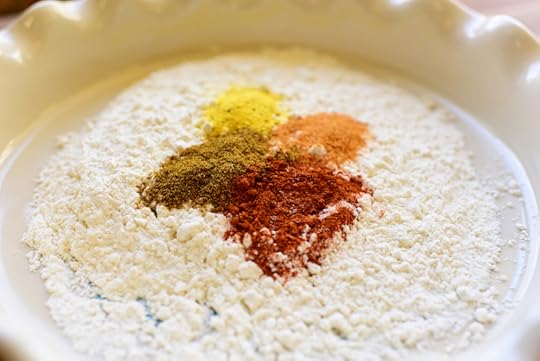 First, make the seasoning for the pork chops: Flour, lemon pepper, seasoned salt, cumin, cayenne, salt, pepper, and love.
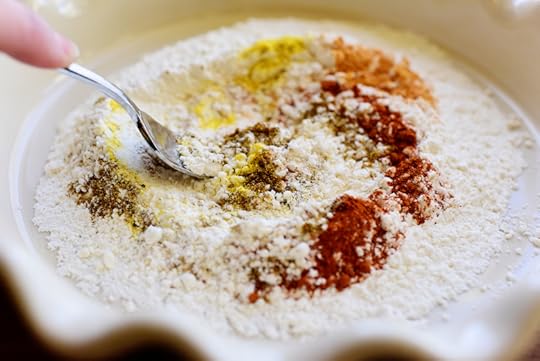 Stir it together…
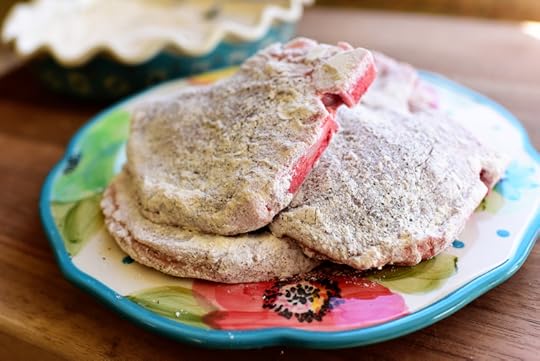 And dredge thin, bone-in breakfast chops in the mixture, shaking off the excess.
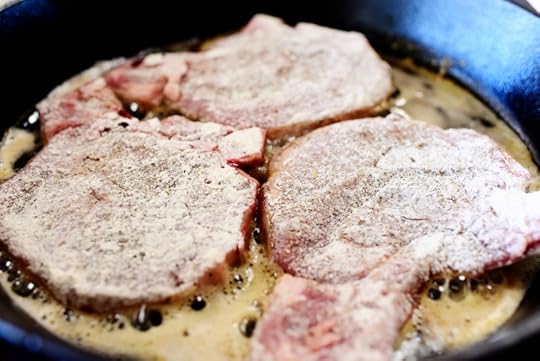 Heat vegetable (or olive!) oil in a large skillet over medium heat and add 3 of the pork chops.
 Move the pork chops around the skillet a bit and let them cook until they’re sizzling around the edges and golden on the first side.
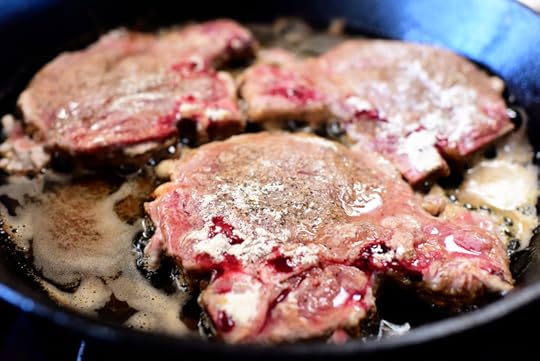
 After a couple of minutes, use tongs or a fork to turn them over. Look how gawgeously gawgeous they are!
Gawgeous.
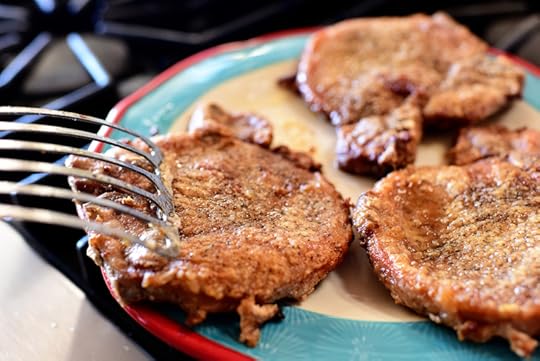 Finish cooking them on the second side, about 1 1/2 minutes or so, then remove them to a plate.
 Finish frying the rest, then set them on the plate and keep the chops warm! You can cover them with foil, or you can invert a second plate on top. Or you can do the hokey pokey and you can turn yourself about.
Just keep them warm!
That’s what it’s all about.
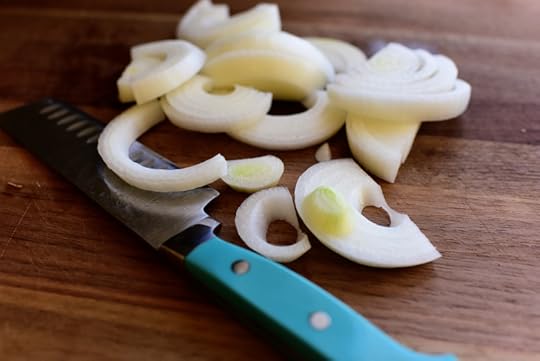 Turn off the skillet while you get some veggies ready. (Or, if you’re organized, which I am not, you can prep these veggies before you even start this whole adventure.) Slice an onion…
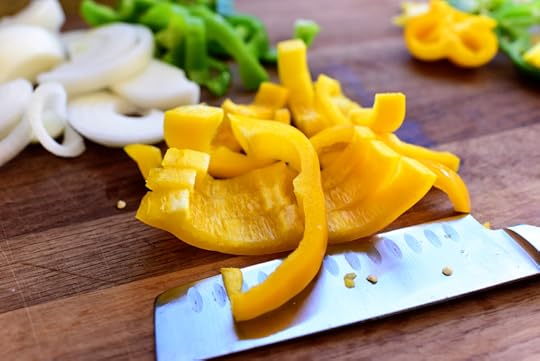 A green and yellow bell pepper…
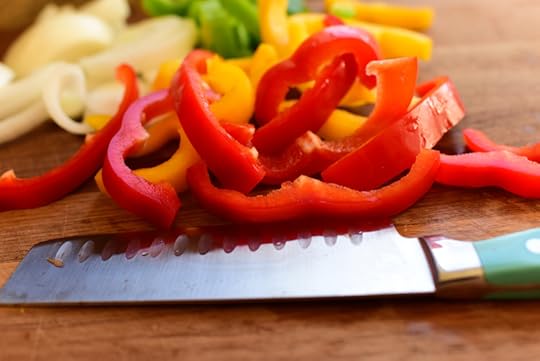 And a red bell pepper.
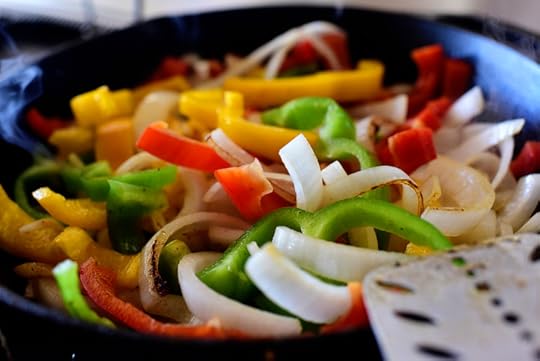 Turn the skillet to medium heat and throw in all the veggies.
 Cook them for about 8 to 10 minutes, stirring frequently, until they have some nice color and are soft but not mushy.
Sorry to be so bossy today! Sheesh!
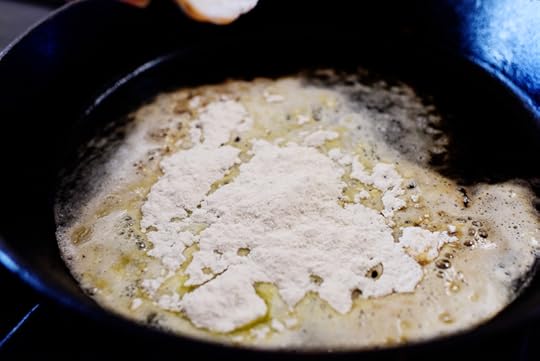 Remove the veggies from the pan and add 3 tablespoons butter and 3 tablespoons flour.
 Whisk the flour into the butter to make a roux…
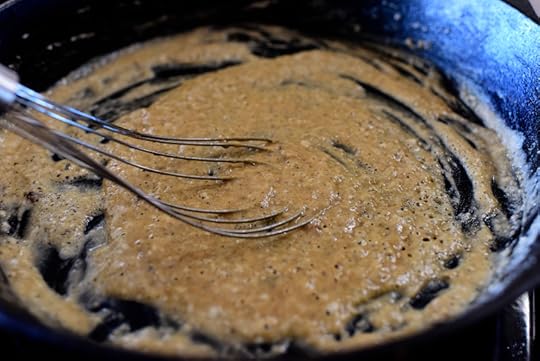
 Then cook the roux until it’s lovely and deep golden brown.
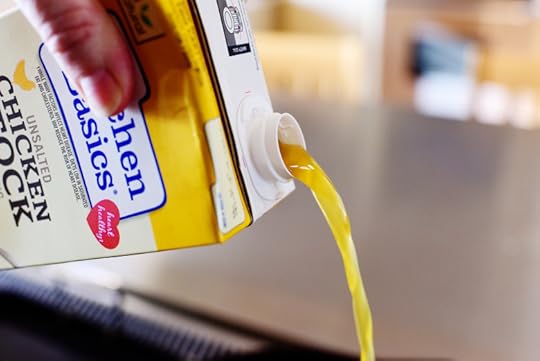 Add broth and whisk to combine…
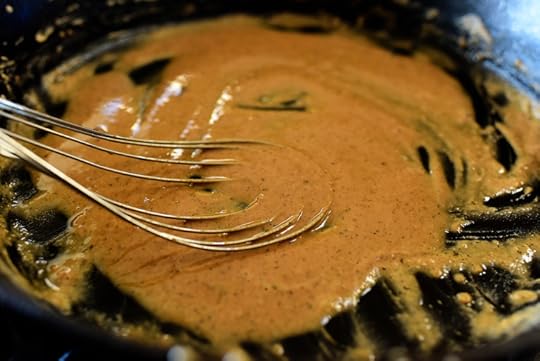
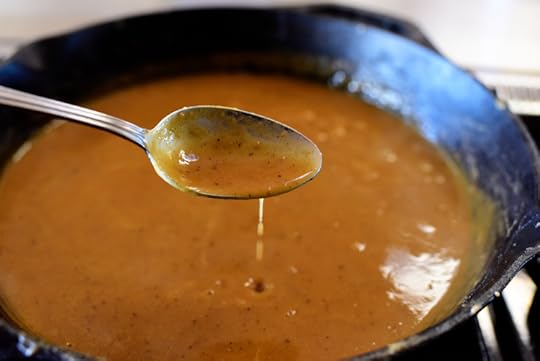 Then cook the sauce/gravy, whisking constantly, until it’s nice and thick. Season it with salt and pepper and give it a taste, and if it’s overly thick, just splash in more broth.
 For a little added richness and creaminess, splash in a little cream.
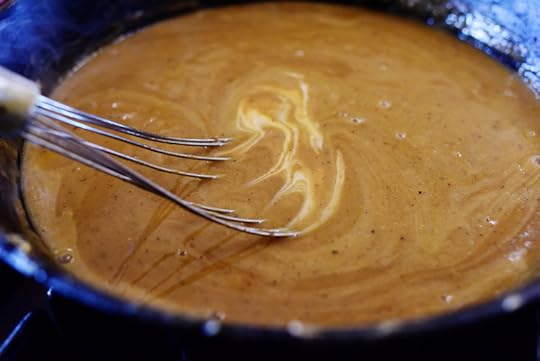 Whisk it in, take a whiff, and dream about a time, five to six minutes from now, when you’re going to get to lap up this lusciousness.
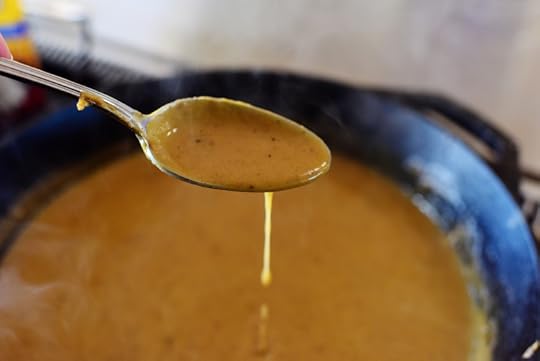 Give it a final taste and make sure it’s poifect!
 Now—you guessed it—add the peppers back to the skillet.
 And stir it all together.
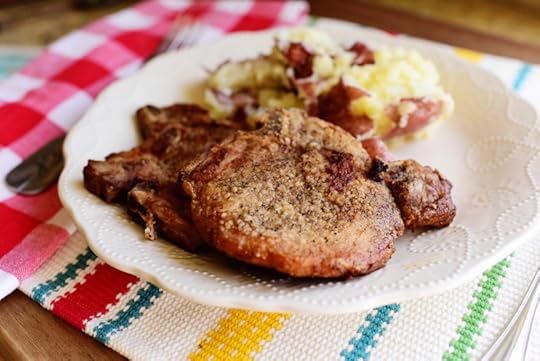 Pork chops + Potatoes + Plate = Progress!
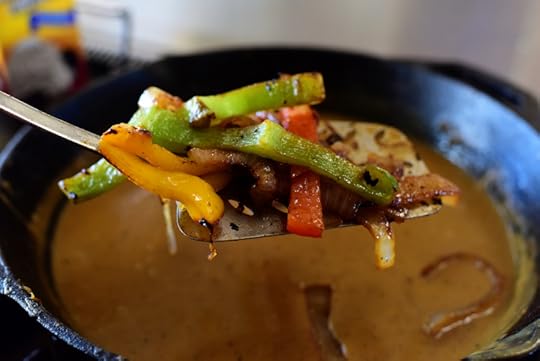
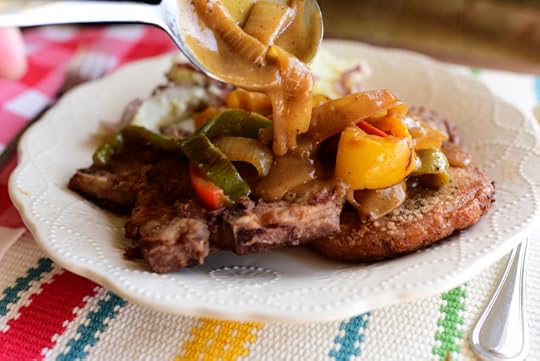 Spoon the sauce over the top.
Ahhhh…
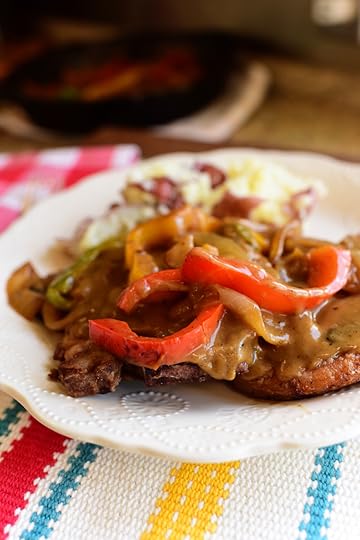 Yes!
Yes!
It isn’t overly fancy. It isn’t frou frou. It isn’t innovative or cutting edge or brilliant.
But to paraphrase Cookie from City Slickers: It’s brown, it’s hot, and there’s plenty of it.
Here’s the handy dandy printable!


February 29, 2016
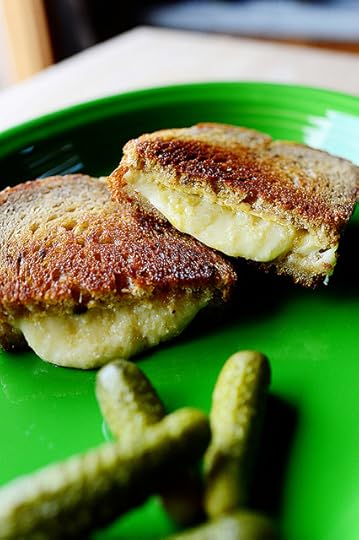
Crispy Grilled Cheese by Ree
 In springtime of last year, I was in Los Angeles with my mother-in-law, my sister, and my daughter Alex. We went all over the place, checking out restaurants and shops and trying bites of delicious food here and there. We also ate at Sur, the restaurant of Real Housewives of Beverly Hills Lisa Vanderpump, but that’s on the long list of Things I’ve Done But Have Forgotten to Write About. I need to start knocking things off on that list before it gets too long!
Anyway, one of the miscellaneous food places we went to was a cool little establishment called Stir Market, and they had this outlandishly preposterous grilled cheese sandwich, which featured buttered bread, cheese inside, outside, over, under, and all around.
Again: It was preposterous.
It’s been on my mind, so I made a replica yesterday…with one important exception! I did not have even a suggestion of good bread in the house…and good bread is absolutely required if you want to make this sandwich. The bread I used was fine, but it was soft and without form and void, and darkness was upon the face of the yeast.
(Sorry. Had a Genesis moment there.)
Anyway, please don’t make this sandwich unless you have a nice, substantial sourdough sandwich bread or some hearty Italian or French bread. One that isn’t soft and that doesn’t easily get soggy.
And make no mistake: my sandwich below turned out just fine! I ate every bite. But to quote the legendary 80’s pop artist Tiffany, “It coulda been so beautiful…”
 First: Usually when you make a grilled cheese, it’s customary to grab…well, some cheese. I used a mix of cheddar…
 And Monterey jack.
 Always grate your own!
 Now, you need some soft, soft butter. This was leftover from some lofty cookie idea I had on Saturday—one, by the way, I got distracted and forgot about. It’s how I roll.
And now I want a cookie.
 Because I used soft, soft bread, I didn’t want it to get soggy, so I just spread on a super thin amount. If you use sourdough or other substantial bread, go ahead and spread on a little more. Just remember that the cheese will produce a little grease as it melts…which is why cheese is so dang good.
 Sprinkle a small amount of cheese on both halves, making sure the cheese sticks to the buttah.
 Turn over one of the slices (yes, butter and cheese side down, but it will be fine!) and put a nice layer of cheese on top. This will actually be the gooey center.
I’m not sure there’s going to be enough cheese in this sandwich.
 Carefully lift the other piece and put it on top of the piece with the filling. Is this the craziest thing you’ve ever seen in your life?
It’s not?
 Okay, fine. Maybe it’s the 17,449th craziest thing in your life.
But at least that’s something!
 Place it in a skillet over medium-low (to medium, depending on how hot your stove gets) heat. I think a nonstick skillet might be the best bet…but I decided to take a walk on the wild side with iron.
 Take a peek every now and then and make sure it isn’t burning…and when it looks nice and golden brown and—yes—crispy (look at that surface!) flip it to the other side. Then just keep on cooking it until the center is melted and gooey. You might need to flip it over another time or two to make sure it doesn’t burn before the cheese is melted. You can always turn the heat down if you feel you need a little more time.
 Ahhh. It’s done! You can see that nice, thin, crispy outer coating. You can also see the softness of the bread. That won’t happen to you because you’re going to use good bread, right?
 Good lands. I don’t say that very often, and when I do, it usually involves melted cheese.
Enjoy every bite! And use whatever melting cheese you want. (Swiss would be astounding.)
And at the risk of sounding like a broken record: Use good, crusty, substantial bread! You won’t be sorry.
Here’s the printable!


Ree Drummond's Blog

- Ree Drummond's profile
- 2016 followers

