
Gesine Bullock-Prado's Blog, page 19
December 10, 2012
Gesine Confectionary Vanilla Tea Cakes...a long awaited recipe

At my pastry shop, Gesine Confectionary, there were quite a few treats that were coveted by our customers. Once I moved shop from storefront to commercial bakery, our beloved customers were left without access to their favorites, so I shared many of the recipes via this blog. There were (and still are) a handful of recipes that took me a while to share, due mainly to their complexity and my need to provide detail by way of a proper cookbook and a professional photographer, Tina Rupp. It's shocking how difficult it is to perform technically intricate pastry moves and simultaneously take a photograph.
There were some recipes that I had to tweak for home baking due to the huge volume my original recipe created.
And then there are recipes that I simply haven't shared because I need continuous reminding to share them.

My tea cakes are the prime example. They were one of our most popular morning pastries. Since our storefront closed, I've been inundated with requests for the recipe and I've conveniently forgotten to post, perhaps due to the fact that I'd bake hundreds of tea cakes a week and while I love them and think them incredibly delicious, you can get tired of baking the same thing in massive quantity every day for years to the point that your brain simply shuts down when the word "tea cake" is uttered.
But a request came through the transom yesterday that actually penetrated my noggin. And I thought, "What's the big hairy deal? Why can't I just bake them, take a picture and share the recipe? It'll take less than an hour!"
So here are the Gesine Confectionary Vanilla Tea Cakes. I use this NordicWare mini bundt pan to bake them, just as I did in my pastry shop. I have a feeling they won't taste the same to my customers unless they come in this very shape.
GESINE CONFECTIONARY VANILLA TEA CAKES

Makes 10 mini Bundts
INGREDIENTS
2 sticks, (or 1/2 a pound) unsalted European butter (slightly cooler than room temperature)
1 1/2 cups granulated sugar
1 tablespoon pure vanilla extract
1 teaspoon vanilla bean paste
5 eggs
2 cups cake flour (I use the spoon and level method of measuring)
1 teaspoon baking powder
1/2 teaspoon sea salt (fine grain)
1/2 cup heavy cream (whipped to soft peaks)
PROCEDURE
•Preheat oven to 350º.
•In the bowl of a stand mixer fit with the paddle attachment, cream the butter until smooth. Add the sugar and continue creaming, scraping down the sides of the bowl every now and again, until the mixture is light and fluffy. This can take 5 - 10 minutes.
•While you're creaming, whisk together the cake flour, salt and baking powder for a few seconds in a large bowl. Sift the mixture onto a piece of parchment. Pour the flour mixture back through the sieve into the large bowl. Set aside.
•In the bowl with the butter and sugar that's been well creamed, add the eggs one at a time, mixing until each egg is completely incorporated. Scrape the bowl down between each addition. Add the vanilla and vanilla bean paste.
•Add the flour and mix until well incorporated.
•Fold the whipped cream into the batter.
•Spray the bundt molds with baking spray (a mixture of non-stick spray and flour). Spray the molds thoroughly.
•Fill each bundt cavity 1/2 full. Bang the bundt pan against the counter a few times to release any big air bubbles. Bake for 20 to 25 minutes, until the tops are golden brown and the cake springs back when gently poked.


December 8, 2012
Dark Chocolate (with Slightly Minty Undertones) Eclairs

Tomorrow is the Coolidge Open House. It's a holiday tradition here in Vermont, where Silent Cal's "Summer White House" welcomes modern merry makers into the arms of a more simple and decidedly quaint Christmas wonderland. And then there's me, with my high tech induction burner, flinging sugar whither and thither.
As is my custom, I demo a pastry or two for the wassailing crowds and sign a few books. It's just lovely.

This year, I'm building a croquembouche for the sweet people of the Green Mountains. But that's tomorrow, TODAY I'm piping out a little bit of choux paste for eclairs so that we may make merry a day early.
Why don't you join us?

DARK CHOCOLATE (with SLIGHTLY MINTY UNDERTONES) ECLAIRS
For the choux paste
1/2 cup milk
1/2 cup water
4 tablespoons butter, unsalted
1 tablespoon sugar
1/4 teaspoon salt
1 cup plus 3 tablespoons bread flour (I use King Arthur flour)
4 eggs (plus one held in reserve)
1 cup of ice cubes
For the pastry cream
1 cup milk
1 cup heavy cream
6 egg yolks
1/4 cup corn starch
1/2 cup sugar
tablespoon vanilla
pinch salt
1/2 cup bittersweet chocolate, finely chopped
2 tablespoons butter, unsalted (cut into small pieces)
For the glaze
1 cup confectioners sugar
1 tablespoon egg white powder
4 tablespoons water
1/4 teaspoon peppermint extract
2 tablespoons cocoa powder
PROCEDURE
For the pastry cream
•In a saucepan, combine the milk and heavy cream. Bring to a simmer.
•In the bowl of a stand mixer fit with the whisk attachment, combine the egg yolks, sugar, corn starch, salt and vanilla. Whisk on high until light and fluffy.
•Turn the mixer speed to medium and carefully pour the hot milk/cream mixture down the sides of the bowl into the egg yolk mixture. Whisk until combined.
•Transfer the custard back to the saucepan, scraping the sides of the bowl to get all the cornstarch into the saucepan. Whisk over medium/low heat until the mixture thickens, to the consistency of mayo.
•Take the pastry cream from the heat and stir in the butter and chocolate. Allow to sit for a minute to allow the chocolate to melt. Whisk again until smooth and transfer to a large bowl. Cover with plastic wrap, making sure that the wrap touches the surface of the cream to keep a skin from forming. Refrigerate until cold, about 2 hours.

For the choux paste
•Preheat your oven to 450º
•In a saucepan, combine the water, milk, butter, salt and sugar. Bring to a simmer.
•Dump all the flour into the saucepan at once and stir with a wooden spoon until the mixture pulls away from the sides of the pot and becomes a smooth mass.
•Transfer the mixture to a mixing bowl fit with the paddle attachment. Mix on low for a minute to expel some heat.
•Whisk the 4 eggs together. Add a little bit of egg at a time, allowing the egg to incorporate into the mixture completely until adding more egg. Once the initial 4 eggs are added, check the consistency of the choux. It should be very thick but soft. You need to be able to pipe the mixture and it keeps its shape but you still want to add as many eggs as possible to give you lift in the mixture.
•If the mixture is VERY thick, whisk the last egg and add just half of it. Mix until smooth. If you feel that the choux won't be too runny by adding the remainder, add the rest!
•Line a half sheet pan with parchment paper.

•Transfer the choux paste to a pastry bag fit with a large star tip. Pipe 4 - 5 inch strips of choux, spacing a few inches apart on the parchment. Take a little choux paste and put it under the edges of the parchment paper.
•Toss the ice cubes into your oven and shut the door for 5 seconds.
•Put the eclairs in the oven and turn the heat to 425º. Bake for 15 minutes.
•Turn the heat down to 350º and bake for 30 minutes more.
•When you take the shells from the oven, make a tiny slit on either end of the shell to expel steam.
For the glaze
•Stir together the confectioner's sugar and egg white powder. Add the peppermint extract and then a tablespoon of water at a time and stir until you have a smooth paste that just holds it's shape when piped. Spoon about a tablespoon over each shell and allow to run down the sides just a bit. Stir the cocoa powder into the remaining bit of glaze and transfer to a pastry bag fit with a small open tip and pipe stripes over the top of each shell.
To finish
•Transfer the pastry cream to a large pastry tip fit with a medium/small open tip. Make a small hole where you made the initial openings in the shell. Insert the pastry tip into the opening and gently pipe the pastry cream into the shell.


December 6, 2012
Happy St. Nikolaus Day!

Dearest Sweet People: I wish you all a Happy St. Nikolaus Day. I send you all the happiness, glee and genuine horror I have felt throughout my childhood years when confronted (and yes, I've been confronted) by the Saint himself and his hench-devil, Krampus. They've always been so kind as to gift me chocolates and sweets and never coal (or kidnapping), so I'm inclined to think they are horribly misunderstood and lovely men/things. So I leave you not with a photo of a dessert and a recipe, but a portrait my fantastically talented husband Ray drew of the duo for my book My Life from Scratch, based on my recollections of encountering them for the first time when I was three.
I also send out props to all you moms and dads who take the time to make this season magical (and sometimes scary as hell) for your children. It's a beautiful thing you do.
And if you want to know if St. Nikolaus visited me today, you can be assured he did. He knows me so well.
 Sometimes the Sainted Man comes dressed in UPS brown to deliver the goodies...and that's fine by me.
December 5, 2012
Edible Freegrace
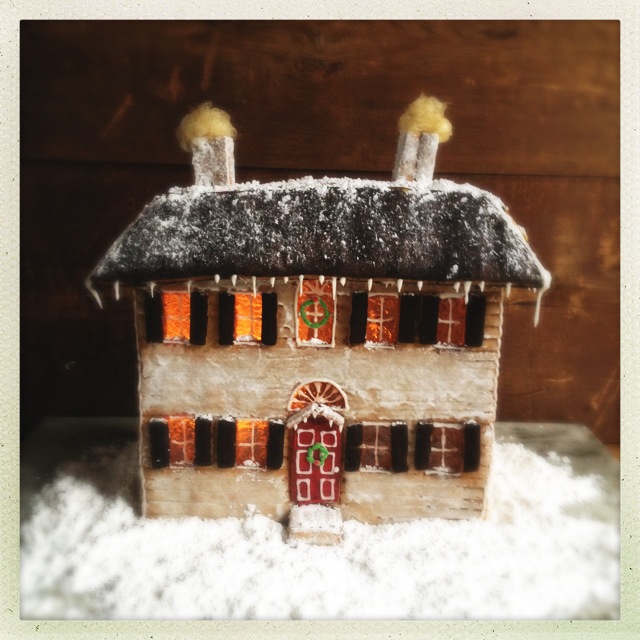
Playing today with gingerbread. Maybe next year I'll make a gingerbread barn, chicken coop and bakery to go along with the house. This year, I'll stick with Freegrace Tavern and enjoy the mild weather while I can.
 Lights on!
EDIBLE FREEGRACE
 Waiting on a few chimneys
 The real deal.
 INGREDIENTS
For the Gingerbread
5 cups all purpose flour
1 cup dark brown sugar
1/2 cup molasses
1 teaspoon salt
1 teaspoon baking powder
2 sticks butter, room temperature
1/2 cup milk.
1 egg
1 tablespoon ginger
1 teaspoon white pepper
1 teaspoon cinnamon
1/2 teaspoon nutmeg
For the windows and glue
2 cups sugar
1/2 cup water
1/2 teaspoon lemon
For the royal icing
1 cup confectioner's sugar
2 tablespoons egg white powder
water
To finish
1/2 cup dark cocoa powder
2 cups confectioner's sugar
PROCEDURE
For the gingerbread
•Cream together the brown sugar, butter and molasses until light and fluffy.
•Add the egg and beat until smooth and combined.
•Whisk together the dry ingredients for a minutes.
•Add half the dry ingredients to the mixing bowl until just combined. Add all the milk and mix until combined and then continue with the remaining dry ingredients and mix until just combined.
•Turn the dough out onto a work space and knead until the flour is complete integrated and the dough is smooth. Cover with plastic wrap and refrigerate for 20 minutes. Prepare 2 to 3 sheet pans lined with parchment and preheat the oven to 375º.
For the windows
•Combine the sugar, water and lemon juice. Stir over low heat until the sugar is completely melted. Stop stirring and turn the heat to medium and attach a candy thermometer. Heat to 250º, making sure not to allow the sugar to caramelize. Keep the sugar pliable enough to spoon portions from the pot.
For the templates:

•For the front and back, I used a standard 8 x 11 sheet of paper and folded it in half to make the sides. I rolled the dough to 1/8 inch thick and carefully cut out the templates. I cut windows and doors according to where they are situated in our own home. I used the cut portions from the standard windows and cut in half lengthwise to use as shutters. Spoon a tablespoon of the hot sugar mixture into the window opening of each window.
•Bake the gingerbread at 375º for 15 to 20 minutes, until golden. Allow to cool completely. I brushed the panels carefully with confectioner's sugar to give the panels a slightly white hue. If you do this, make sure you don't brush confectioner's sugar onto the sugar window panels.
•To assemble, place the hot sugar back onto the stove top, stirring constantly until the sugar becomes a light amber.
•Carefully remove the panels from the sheet pan. Carefully spoon caramel to coat the edges of the panels and hold the panels together for a few minute until the caramel hardens. I use bottles or boxes to use as supports to prop up the panels as they cool and harden.
•While the sides of the house are setting, cut out the roof panels. Roll the dough to 1/8" thick and cut a 5" x 10" panel and place on a parchment lines sheet pan. Cut two 3 inch tall front and back roof panels, the bottom measuring 13" and the top measuring 9 1/2 ". Cut two side roof panels, with the bottom measuring 7 3/4" and the top 4 3/4" (this makes a Federal hip roof). I cut paper templates first and use those to evenly cut out the gingerbread. Cut out eight 2" x 1" panels for the chimneys. You can roll up gingerbread dough scraps and reuse as we aren't all that concerned with overworking construction gingerbread.
• Brush the roof panels with and even layer of cocoa powder. Bake the roof panels and chimney pieces for 15 to 20 minutes, until golden brown.
•Glue the roof panels together, using house hold implements to prop up the roof components as you go along. If the caramel has hardened, heat over low heat until pourable. Allow the roof glue to harden.
For the royal icing
•Stir together the confectioner's sugar and egg white powder. Add just enough milk so that the royal icing is smooth and holds its shape when pipe. Add more confectioner's sugar if the royal icing is too loose and a little more milk if too stiff. Fill a pastry bag fit with a small open top with the royal icing. Outline the windows and pipe window pains with the icing. Dip one side of the shutters in cocoa powder and put a dab of royal icing on the other and attach the shutters to the sides of the windows.
For the chimney and the smoke
•Using the royal icing, glue together the chimney sides and allow to set. Using the remaining caramel, heat it until just thin. Place sheets of parchment on a work space. Dip a for into the caramel and hold it over the pan to test the viscosity of the sugar. If it just drips from the for tines, it's still too hot. Keep dipping the fork into the sugar until the sugar streams from the tines in an even, unbroken stream. Once this happens, quickly swing the fork over the parchment to create sugar strands. Gather the strands together and wrap them around each other gently to create a little smoke plume.
•Gently place the roof on top of the constructed house (you can put an electric candle inside the house so that the windows light up. Don't use a traditional candle as it will melt the caramel, etc. May also burn your house down. Place the chimneys on top of the roof and tuck the sugar "smoke" into the chimney opening.
•Play with the royal icing and decorate willy nilly!
 Night Night!
December 3, 2012
Upper Valley Sourdough Boule: The Ultimate Holiday Starter Gift...Literally

If you have a mother sponge in your life, you spend an inordinate amount of time tending to the living beast. As much time as I enjoy baking with her (every day), it seems I devote just as many hours nurturing her to popping and crackling effervescence. Don't get me wrong, it takes seconds to feed a starter. And the feeding schedules can be quite liberal (once a day! or twice! or three times! you choose!). But when I'm in full bore sourdough mode, I baby my sponge and dissect her bubbles; I note their size and relative activity. I sniff and evaluate. I stir and contemplate.
 My Rye Starter, just fed.
It goes without saying, that if you spend the amount of time that I do tending the beast, you'll have a hard time parting with it. This can lead to big trouble. For the nature of sourdough starter, if properly tended, is to grow. Standard practice is to toss up to half the starter (assuming you're not using it daily and in decent quantity) before feeding. My reticence to just dump my living mass, no matter that it's really just water and flour with a liberal dose of wiggling bacteria (yummy! Really!), has led to my main mother sponge to now weigh in at 57 pounds. I can use a few pounds of her a day but that really does little to trim her fat. And with many feeding schedules calling for you to feed the thing her weight in flour and water, you can double your starter every day. It's shocking that my main lady isn't larger.
 Starter in an antique bell jar and a fresh baked sourdough boule.
Enter the month of December. It's time to gift! And as I'm a baker and pastry chef by trade, I have a few thing of great value that I'm happy to share with the people I really care about and my mother sponge is one of them. Some of my favorite people live right next door. They also happen to be avid bakers. And as they share pretty much the same air as I, my 8 year old starter is already technically their starter. So I baked a sourdough boule and printed up a recipe. I bottled up some starter and packed a bit of semolina. I acquired a lame and some lovely, ashy European flour from King Arthur Flour. And there it is, the gift that keeps on giving (as long as you feed it).

UPPER VALLEY BOULE RECIPEMakes 2 Boules
This takes two whole days …but is worth every minute. And most of it is just resting time, not active time.
INGREDIENTS12 ounces mother sponge/starter2 pounds plus 2 ounces European Flour (you may need more or less)1 pound 2 ounces cold water (you may need more or less)1 tablespoon plus 1 teaspoon sea salt (fine mill)Non-stick cooking spray
PROCEDURE
•Combine all ingredients but the salt in a bowl and stir with a dough whisk or wooden spoon until it just comes together.
 My King Arthur Flour dough whisk is the perfect tool for this part of the process.
•Turn it out onto a work surface and knead the dough until it’s shiny smooth and elastic in texture. You could use your mixer but it’s better to hand knead. This can take up to 12 minutes but it’s pretty hard to overwork by hand (easy to do by mixer AND easy to burn out your mixer’s motor). Keep in mind that the dough is very soft, almost tacky. This is right. If it’s soggy, add more flour. If it’s stiff, add more water.
 When the dough just comes together in the bowl, turn it out for kneading.
•Stop kneading and cover with a barely damp kitchen towel and allow to rest 20 minutes.
•Sprinkle the salt over the dough and knead again. The dough will become stiffer very quickly. Knead by hand for about 8 to 10 minutes.
•Place the dough in a large bowl sprayed with non stick cooking spray. Turn the dough over a few times to coat completely with the oil. Cover with plastic wrap and allow to ferment for 4 hours, it should almost double in volume.
•Divide the dough evenly in half and gently shape into a rough round, tucking the ends under. Cover each with a towel and allow to rest for 20 minutes.
•Prepare a willow basket by liberally coating with flour or rub a kitchen towel with flour to saturate the fabric, line a small round bread basket with the towel and sift an even coating of flour on the towel again.
 Final form and ready for a nap in the fridge.
•Shape the boules by placing your hands on either side of the round and spinning the loaf clock-wise while using your pinkies and ring fingers to gently tuck the dough under to create a tight boule (don't sprinkle your work surface with flour for this, you want the dough to almost grab the surface to create tension on the dough). Gently turn the dough smooth side down into the prepared baskets and pinch the seams together. Cover the dough with a towel and allow to rest at room temperature for an hour.
•Once rested, cover both baskets tightly with plastic wrap (if you got ‘em, use shower caps) and place in the fridge overnight to develop flavor (no more than 24 hours).
•In the morning, take the dough out and place a barely moist kitchen towel over both baskets. Allow to proof at room temperature until doubled in size, from 4 to 6 hours. (It really takes this long for sourdough.). To make sure the dough is ready do bake, gently poke the dough. If the indentation stays put, it’s ready, if it springs back, it still needs time. Also feel the temperature of the dough. It should be 62º.
•About an hour before baking, place a baking stone on the bottom rack of the oven and preheat to 500º. Put a shallow pan (a restaurant pan is perfect) on the top rack at the same time. Get a spray bottle ready with warm water.
•When the bread is ready, gently sprinkle the exposed underbelly of dough liberally with semolina. Take a wooden peel ( you can use a bread peel but I use a large cheese board) and place on top of the bowl and turn it over so that the dough gently falls onto the paddle. Gently remove the towel (if the towel sticks, spray the top of the towel with water a bit at a time to gently remove it without deflating the boule.º.
•Using a lame, slash the boule in a cross (or in a decorative manner) at a 45º angle and about ¼” to 1/2 “ into the dough. This is more than decorative, it allows the dough to rise properly without busting at the bottom and cracking unattractively.
•Carefully but quickly pour warm water into the shallow pan in the oven (wear gloves and keep your face away from the oven to avoid steaming your face off). Spray the sides of the oven with your spray bottle (avoid the bulbs, they may burst), and close the oven door for a few seconds. Open the door and gently slip the bread from the wooden peel onto the baking stone and quickly spritz the sides of the oven again. Close the doors immediately. Within the first 5 minutes of baking, spray the sides of the oven 2 more times with water, making sure not to hit the bread. After those 5 minutes, turn the oven down to 450º. Bake for 20 minutes. Don’t open the oven during this time. After 20 minutes, rotate your loaf (put on your oven mitts to do this) and bake for 10 to 20 minutes more. The loaf should be deeply brown and when you knock on the bottom of the loaf, should sound hollow.
•Allow to cool completely before eating.
***NOTE***In the event you don't have a starter ready to go, start one now! Go to this link for instructions.

December 2, 2012
Starfish Challah

I set out to make a braided Hanukkah Challah, a show stopping holiday bread to post today, giving you enough time to practice the braid before the Festival of Lights officially begins. And while this is a challah I love to make and fairly often, it wasn't until I posted a picture of "challah in progress" on Instagram that I came to see what everyone else was seeing. Here's a perfect example from Leigh Anne Touhy: "Girl, I need that for my Starfish story."
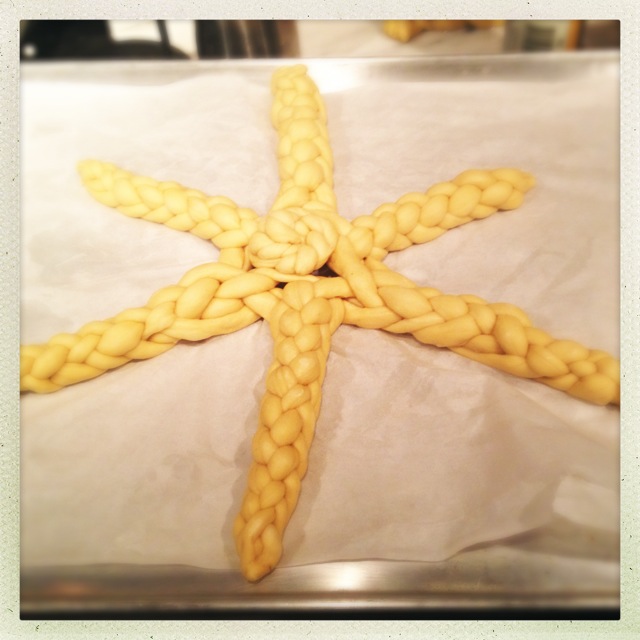 Challah in progress. I was lamenting that this wasn't my best work. Others saw starfish.
What's it about me and my inability to look beyond the actual pastry and see that I'm the professional baker equivalent of a balloon animal clown? My banana layer cake is a prime example. I see a cake with bruléed banana and caramel, everyone else sees an angry muppet. Sigh.
The starfish is growing on me though. Sad thing is, when you cut off a leg of starfish challah, another doesn't grow back in its place. I'm working on that.
STARFISH CHALLAH

This bread doesn't contain a ton of yeast, making it a bit easier to handle for braiding. It does get a lovely rise and is very delicious, though.
INGREDIENTS
2 pounds King Arthur Flour all purpose flour (don't have that? Use bread flour and not a bleached AP flour)
4 tablespoons honey
4 egg yolks
2 large whole eggs
3 ounces canola oil
1 1/2 cups cool water
1 tablespoon salt
1 package instant yeast (I use Red Star Platinum Yeast)
non-stick cooking spray
PROCEDURE
•In the bowl of a stand mixer fit with the paddle attachment, combine the yolks, eggs, water, honey and oil and whisk until combined.
•Add half the flour to the bowl. Sprinkle with the salt. Add the remaining flour and sprinkle that with the yeast.
•Mix on low for 3 minutes.
***NOTE: I don't recommend doing the full knead in your mixer. This is a large amount of dough and quite heavy and likely to burn out your motor. It's great to get your initial mix in the bowl since it's quite messy but after it just starts to come together, knead by hand.***
•Transfer the dough to a lightly floured work surface and knead by hand for 10 minutes or until a very shiny, pliable dough forms and passes the window test (you should be able to take a small piece of dough and stretch it so that you can almost see through it without the dough looking shaggy or breaking).
•Transfer the dough to a large mixing bowl sprayed with non-stick cooking spray. Coat the entire dough ball with spray and cover the bowl with plastic wrap. Allow to bulk ferment at room temperature until doubled, about 1 1/2 to 2 hours.
(at this point, you can get some yarn and practice braiding to get used to the pattern)
 Get some yarn or twine. You can number the strands so you can keep track of where everything is going.
•Divide the dough as follows (you'll need a scale): Eighteen 2 ounces pieces and two 1 ounce pieces. As you cut the pieces, try your very best to eyeball what 2 ounces looks like so you can get close to cutting off the pieces accurately. Dough balls are more unstable the more independent pieces are added to make weight. Form the pieces into rough small "batards" or oval shapes. You aren't forming the pieces, just giving them an initial shape. Allow to rest for 20 minutes covered with plastic wrap. You'll have dough left over. You can use this to practice braiding.
For the braid:
•Take six 2 ounce balls (keep the remaining pieces covered with plastic wrap) and using your open palms on your work surface, roll reach piece into a 18 inch strand with the ends slightly tapering.
•Pinch the strands together at the top and space out the strands:
 This is my practice dough so I didn't take much care in rolling out the strands. This way you can work quickly just to get the pattern. Speed is key. I always time myself and limit myself to 5 minutes for rolling out each strand and braiding.
•Take the far right strand and move it over across all the strands to the left:
 Gently moving the far left strand over the remaining strands.
 Take what was once the farthest left strand and pull it over the strands on the right.
 The two strands, pulled out to either side. The strand to the far left was the first strand we pulled over. The far right strand was the second strand we pulled over. Keep the middle four strands nicely spaced at all times.
 Take the farthest left strand and bring it to the middle of the four middle strands.
 Placing the farthest left strand in the middle of the 4 center strands.
 Now take the second farthest strand to the RIGHT and cross it over the center four strands to the left. Take the farthest right strand and place it in the middle of the center 4 strands. Follow this pattern from side to side to make a 6 strand loaf.

 Practice strand done.
•When making a starfish, you will be only braid to the middle of the loaf and carefully transfer your half braided challah to a sheet pan, one facing 12 o'clock, 4 o'clock and 8 o'clock. I have a very large wall oven that fits a whole sheet pan (it's not a commercial oven). Your oven may not accommodate such a big challah, so make the strands shorter.
•Take the two remaining 1 ounce strands and cross at the middle. Twist them together. Pinch at one end. Roll the twist into a little bun, starting at the pinched end tuck the ends neatly under. Gently nestle the bun in the open space at the middle of the starfish.


 My original half braided strands are at 12 o'clock, 4 o'clock and 8 o'clock. The unbraided strands are positioned as above and then braided in the same pattern (the difference is that the pieces aren't pinched on top).
•At the end of the braid, gently pinch the ends and tuck under.
•Cover the challah with plastic wrap and allow to proof for 1 1/2 hours. Preheat the oven to 375º.
•Whisk together 1 whole egg and 2 tablespoons water. Brush the challah with the egg wash just before putting in the oven. Bake for a 1/2 hour or until deeply golden brown.

December 1, 2012
Torte Reform

The Sachertorte has been the subject of controversy and legal wrangling for decades. Nay, CENTURIES! Two venerable Viennese establishments, Demel and Hotel Sacher, claim to have been the birthplace of the chocolate cake. Hotel Sacher has the legal right to call their version, a cake with two layers of a chocolate sponge hybrid cake layered in apricot preserves and topped with shiny glaze, the ORIGINAL Sacher. Demel, with their single layer of cake and single coating of apricot preserves all topped with the same chocolate glaze, must identify their cake as the Demel Sacher.
 Yes, I make pilgrimages of cake.
 Get in mah belly!
I love both versions. I'm not choosing sides. I'm also not courting their legal ire so instead of sharing MY Sacher recipe, I'm going to give you a variation I've created on the cake that utilizes hazelnut flour and Nutella to add a lovely toasted and smooth flavor to the cake batter while keeping the shiny glaze that makes the Sacher so beautiful (and delicious). I've also stuck with Demel's single layer, just to keep things simple.
REFORMED SACHER TORTE
INGREDIENTS
For the cake
1.5 ounces King Arthur All Purpose Flour (if you can't get KAF, use standard bread flour)
.5 ounces dark cocoa powder (I use KAF Black)
5 ounces hazelnut flour (chopped hazelnuts, lightly toasted, cooled and ground until very very fine)
5 eggs, separated and brought to room temperature
1 whole egg, room temperature
5 ounces unsalted butter, slightly cooler than room temperature
5 ounces confectioner's sugar, divided
7 ounces Nutella
1/2 teaspoon cream of tartar
1/2 teaspoon salt
For the glaze
1 cup sugar
6 ounces bittersweet chocolate
1/2 cup water
1 ounce unsalted butter
pinch salt

To finish
2 tablespoons smooth fig preserves
sweetened whipped cream
PROCEDURE
For the cake
•Preheat oven to 375º. Line the bottom of a 10" cake pan or springform with parchment and spray with non-stick cooking spray. Set aside.
•In the bowl of a food processor fit with the blade attachment, combine the hazelnut flour, AP flour and cocoa. Pulse until combined. Set aside
•In the bowl of a stand mixer fit with the paddle attachment, cream together the butter and half the confectioner's sugar until light and fluffy, about 5 minutes.
 For things like checking the temperature of eggs for a stable foam, I really like to use a laser thermometer. You don't have to but it's very handy for quick reads. Put it on your christmas list and have fun! Check out the latest issue of Cooking Light for my laser thermometer recommendation and other chef gadget loves that are worth hinting to Santa about.•Combine the egg yolks and whole egg in a heat proof bowl and whisk over a bain marie until the mixture reaches 84º.
 •Slowly add the eggs to the creamed mixture until entirely combined. Add the Nutella and mix until combined.
***NOTE: This method of mixing is called a combination method. It employs both creaming AND a foam method, hence...combination. You get the aeration of the creaming and the aeration in the stable meringue foam. ***
•Transfer this batter to a clean bowl and wash the mixer bowl very well. Dry completely. Combine the egg whites, salt and cream of tartar in the bowl and whisk on medium with the whisk attachment until white and foamy. Slowly add the remaining confectioner's sugar and continue whisking on medium high until medium stiff, white peaks form.
•Add 1/3 of the egg white mixture to the batter to lighten (you needn't be overly gentle). Add the remaining egg whites and gently fold into the batter. Fold in the dry ingredients. Immediately spread the batter in the prepared pan and bake for 45 minutes or until the cake feels firm in the middle.
•Allow to rest for 5 minutes.
To assemble
•While the cake is still warm, take a paring knife and run along the edge of the cake pan to release. Turn the cake out onto a cardboard round the exact size of the cake or a little smaller and remove the parchment, keeping the top side down. Spread the fig preserves over the top (once the bottom) of the cake and along the sides, removing any large chunks of fruit.
•Place the cake on a stable jar that's smaller than the cake but still large enough to provide a stable foundation for the cake. Place over a parchment lined sheet pan.
For the glaze
•Combine all ingredients in a heavy sauce pan and stir until the sugar, chocolate and butter have completely melted. Attach a candy thermometer and heat to soft ball (234º). Allow the bubbles to subside and carefully pour the glaze over the top of the cake. DO NOT TOUCH THE GLAZE. DO NOT TRY TO SPREAD THE GLAZE. Let gravity do its job and DO NOT SCRAPE THE PAN! This is going to sound strange but spray a pair of scissors with non-stick cooking spray and cut where the glaze is dangling. Eat the trimmings.
•Allow the cake to sit at room temperature to set, about an hour. You can place the cake in a large Tupperware with secure lid, making sure nothing touches the glaze, and refrigerate up to a week. Serve with lightly sweetened whipped cream. I cut the cake with a very hot knife to keep the edges of the glaze clean.

November 20, 2012
My Morning Puff!

You've no doubt made your quick puff pastry by now, right? It's resting in the fridge, awaiting the artful press and roll of your pin. The fillings are giddy with anticipation of being paired with such a magnificently flaky beast.
You have made it, haven't you? I mean, you at least have the ingredients ready. It is quick, so it's not as if you have to make it this very second. It's not like you'll hurt my feelings or anything if you haven't or if you don't. Ahem.

Let's assume that you hadn't planned on making my quick puff for Thanksgiving (just thinking that you won't makes my heart hurt). Perhaps you're traveling; you don't have the comfort of your kitchen wares to give you great confidence in some foreign culinary arena.
This is exactly why you need this stuff in your life! It's the great "on the move" pastry (it's also what I like to call the "gateway" pastry, leading you to the harder stuff like traditional puff, croissant, danish. Oh my!).
 Just look at that puff! That flake! How can you deny it?
Here's why: You can make it in any old large bowl. You don't need any special equipment, not even a measuring cup or scale (although, I despair for you if you're staying in an abode that doesn't have a measuring cup).
Here's what you'll need:
•1 large mixing bowl
•1 (2 pound bag) of all purpose flour. See! You just buy a 2 pound bag. No weighing. No measuring.
.JPG)
•2 pounds of unsalted butter, cold and cut into large cubes. 2 pounds of butter = 8 sticks = 32 ounces or 2 of those handy dandy boxes of butter. Again, easy peasy.
•1 tablespoon salt. Grab a spoon. Put salt in it. Put it in your large bowl with the flour and butter chunks. voila! Salt.
•The last thing you'll need is 1 1/4 cups water. But you've just told me you are holed up in the hinterland, that cold and dark place that doesn't contain a single measuring implement. Don't fret! Look down at what you're holding in your hand. That's right! That Solo cup filled to the brim with vodka is going to get you through this. Transfer the contents of your beverage to another vessel. Take a look at the side of the cup. Check the pic below. That 5 ounce mark is what we're aiming for. There are 8 ounces in 1 cup of water. 10 ounces in 1 1/4 cups water. So fill that Solo cup with icy cold water to that 5 ounce mark twice.

Now you can make pie. AND you you'll have plenty of puff left over so you can make breakfast treats to pair with your tumbler of vodka. You can make so many darn things with quick puff and now you have absolutely NO excuse not to make it.
You're welcome.
MORNING PUFF
(makes 6 pastries)
INGREDIENTS
Approximately 1/3 of a block of quick puff. Click this link for my pumpkin pie and you find full instructions. Scroll down a bit (you can also MAKE this pie, if you like) and you'll see a super duper photo demo.
4 ounces (1/2 block) cream cheese, room temperature
3 tablespoons confectioner's sugar
1 egg, beaten
pinch salt
1/4 teaspoon lemon extract or almond extract or vanilla bean paste (all optional)
A few tablespoons Sugar in the Raw
Jam and berries for assembly
PROCEDURE
•Preheat oven to 375º.
•Roll out the puff into a rectangle about 1/8 of an inch thick.

•Cut the dough into 6 squares.
 Cut along the perimeter but don't cut all the way around.
 •Cut the squares along the sides as indicated in the photo.
 Bend one side over...
 One side bent. Now grab the other side and pull it over. Press very gently along the edges to adhere
•Pull on end over and press gently (see pic)
•Pull the other end over brush some beaten egg on top of the pastry and press along the edges VERY gently. Sprinkle with Sugar in the Raw.
•Stir the remaining beaten egg, the cream cheese, confectioner's sugar, salt and extract (if using) in a small bowl with a wooden spoon until smooth.
•Place a hefty tablespoon of filling inside the little dam you've created in the middle of the pastry.
•Bake for 20 to 25 minutes or until the pastry is beautifully puffed and golden brown. Place a dollop of jam of your choice (I used lingonberry) and top with a few berries.
 Fresh out of the oven.
HAPPY THANKSGIVING!

November 19, 2012
Little Nims: Marshmallow/ Fleur de Sel Caramel Bites

Oh, the holidays. They have arrived, haven't they?
I'd like to give you an early gift, my thanks to you, for being such sweet people. My present to you:

Little Nims
Bite sized, chewy, buttery, slightly salty, utterly delicious nubs of caramel and marshmallow goodness.
I'm thinking of all of you when I share this recipe, of the constant, low grade stress coursing through your nervous systems just as mid November arrives. Little Nims will help you get through it all. Consider them your little (legal and non-alcoholic) holiday helper.
What this little treat will do for you is two fold:
(1) It's a sweet piece of succor for you to enjoy when you feel that the season of jolly is anything but.

(2) It doubles as a hostess gift: wrap just a few Nims in candy paper or parchment. Drop them into an antique Bell jar, tie a ribbon around it and you're finished. There will be plenty left over for you to enjoy. I've made sure of it.
 Nim, clearly wanting a treat from his human mama.
Wondering why these are called "Little Nims"? While I was making them, my snow gander, Nim, started honking for me outside the kitchen door. He clearly had a hankering for a tasty tidbit!
LITTLE NIMS
***Both recipes, any many more holiday gift giving recipes, can be found in my book Sugar Baby
(Makes 96 Nims)

INGREDIENTS
For the Caramel
1 1/2 cups heavy cream
2 cups sugar
1 cup corn syrup
1/4 cup unsalted butter, cold and cut into pieces
1 teaspoon vanilla bean paste
1 teaspoon sea salt
For the Marshmallow
2 tablespoons gelatin
1/3 cup water
1/2 teaspoon vanilla
pinch salt
2 cups sugar
1/2 cup corn syrup
1/2 cup water
squirt of lemon
To finish
1 tablespoon course sea salt
PROCEDURE
For the caramel
•Line a half sheet pan with parchment and spray with non-stick cooking spray.
•In a heavy saucepan, combine the cream, sugar, corn syrup and salt. Stir over medium heat until the sugar has melted. Attach a candy thermometer and allow the caramel to reach 254º. Take from the heat and stir in the butter and vanilla.
 Getting there!
•Immediately pour the caramel into the prepared pan. Tip the pan from side to side gently so that the caramel is evenly distributed.

•Allow the caramel to cool. Using a bench scraper or sharp knife sprayed with nonstick cooking spray. Cut the caramel into 2" wide strips. Make the marshmallow.

 Caramel when cooled should be bendy and sturdy!
For the marshmallow
•Fit a large pastry bag with a medium sized open tip. Spray the inside of the bag with non-stick cooking spray. Set aside.
•In the bowl of a stand mixer fit with the whisk attachment, pour in the gelatin and then pour the 1/3 cup of water over the gelatin, making sure to cover every little crystal so that it becomes completely saturated.
•Combined the sugar, corn syrup, vanilla, salt, 1/2 cup water and squirt of lemon in a heavy saucepan. Stir over low heat until the sugar has completely melted. Stop stirring, attach a candy thermometer and bring the temperature to 245º.
•Start the mixer running on medium low and slowly pour the sugar syrup down the SIDE of the bowl so that it doesn't scorch the gelatin and ruin its efficacy. Don't pour the sugar into the bowl while the mixer is on high, the hot sugar will fly!
•Whisk on high until the mixture is light and slightly fluffy and the bowl is no longer hot to the touch.
•Spray a rubber spatula or bowl scraper with non stick cooking spray and use it to scoop the marshmallow into the pastry bag. The marshmallow should still be slightly warm.
•Pipe a stripe of marshallow down the middle of each caramel strip. Use a pair of kitchen scissors, sprayed with non-stick cooking spray, to cut the stream of marshmallow neatly. It helps to keep your hands slightly wet in case you need to manhandle the marshmallow in any way. This keeps it from sticking all over your digits.

•Gently bend the caramel over the marshmallow to form a tube. Gently pinch the seam together. Place the caramel tube seam side down and using a bench scraper or sharp knife sprayed with nonstick spray, cut 1" pieces of candy from the tube. Continue until you've cut all the candy and sprinkle a few granules of sea salt atop each candy. Wrap in candy wrappers (you can find a nice selection at www.nashvillewraps.com).
 Bending the caramel over the marshmallow!
 Add caption
November 18, 2012
Sunday Reflections: We Opened a Pastry Shop and So Can You...
 As the shop appeared when we first bought it and began to tear down walls...
 August 2, 2005: Ray and I opened a pastry shop.
We were splendidly clueless. We hadn't even hired staff.
Wait, I hired an assistant to join me for the first morning bake. We called her Cool Whip. She found me. I hadn't advertised for kitchen help. She was a line cook at the Wayside Diner, a Vermont institution, and a recent graduate of Cordon Bleu. She wanted to bake, not fling hash. She'd read an article on our pastry shop opening in Montpelier. She knocked on the back door while I was noodling around, perfecting a new flavor of macaron in anticipation of our opening. I laughed when she suggested I'd need reinforcements. But I humored her, said she could pop in on opening morning and scoop some dough.
 Can you see me? With a dog on my lap and a notebook in my hand...making my plans for a life and a pastry shop. "All this must go!"
 I can tell you exactly what Miss April's thinking: "Just look at my mama. She's so clueless."
Because I had a plan! I wrote it down on paper! By HAND!
In my delusion, when I sat in a romantic baker's haze before we opened for business, I'd scribble down recipes for fantasy pastries to fill the case. I fashioned schedules for myself to optimize time on my new venture:
Wake at 3:30.
Finish bake by 11am.
Write until 3pm.
Run!
Start prep by 5pm and be at the shop to clean up and shut down. Relax. Have a glass of wine.
Enjoy Vermont!
 I DID get to use my fishing togs...to wash dishes.
Not written but simply implied on my list is that I'd man the front of the store when Ray wasn't about. And for this task, I'd even compiled a bucket list of novels I wanted to read. My vision included lovely lapses in business where I'd kick back and savor the written word to be gently stirred from literary reverie by a patron who'd announce themselves with the civilized jingle of the antique bell we'd fasten to our front door.
 The weekend Pastry Warrior in LA with her handy helper, HRH the Dowager Empress Pandora.
I was living my dream. I'd chosen, quite bravely I thought, to up and grab the reigns of my small existence and honor my TRUE SELF (Carpe ME-em). Where I was once a weekend pastry warrior, working my way to mastering Viennoiserie, the slow art of sourdough, the fine details of sponge & butter cakes, the quick whisk of an anglaise & custards; fantasizing my way through corporate Monday - Friday about what I'd create in sugar, butter and flour on the weekend while lamenting my unhappiness when I wasn't in close proximity to a mixer and oven, I was now a full time PASTRY CHEF! I'd declared to the College of the Known Universe (my friends, family and colleagues) that my major was Pastry (with a double minor in strong coffee and fine wines at a reasonable price).
 A most beloved customer at the counter, Larry, celebrating our 1 year anniversary.
Ergo, the hard part was behind me. We had left a corporate life for a buttery existence. The universe was backing me: I was accepted for an advanced degree in pastry arts at NECI; they'd agreed that I was a skilled baker and could forgo the introductory pastry classes. And then my rustic French macarons took off, a little side business I'd started to make some extra dough (heh), and I was left without time to go to school. I was already baking 24/7 to keep up with the demand of a real live baking business! Again, the universe was speaking to me: "Gesine," the Universe said, "who needs an education in running a large scale pastry operation? Read the vague, utterly ludicrous 'signs' I'm allegedly sending you. You are meant to dive right into a major baking operation with bubkis for experience!"
 Who needs experience when you have a dream??? AND A SIGN!!!
Based on this specious omen, it was a no-brainer that Ray and I should buy a retail space. On a run, Ray had noticed a boarded up commercial building just outside town. It was a mess. It had changed ownership 4 times in under a year. There was an antique enamaled meat display that had been renovated by local vermin into an all inclusive resort. Business loans were being handed out fast and loose! IT WAS A SIGN!
 Prior to our storefront opening, I sold small pastries from a farmer's market booth. This was the first and last time I ever manned a counter.
Of course, we had a deluded confidence that we could restore it (I think it goes without saying that we had deluded confidence, period). We'd already turned our lives upside down, how hard could sanding some floors and putting in new ovens be? Let these photos do the talking:
 At first, Ray and I took on the demolition ourselves. A bonding, new life DIY project! But wait, what's that? Rotten floor boards?
 The entire expanse of the shop, gutted from tip to tail. With professionals doing the work. "But can't we save what's left of the wood flooring The tin ceiling? ANYTHING?"
 So this is where I want my super sized 3 bay sink! Once we have a floor and a few finished walls, that is. What's that? How much will replacing the joists cost? Well then, This is where I want my econo sized, super saver 3 bay sink!
 Ultimately, this is what my schedule really looked like.
Wake at 3:30.
Bake. All morning. All day. Part of the evening.
Bed by 8:30pm.
I not only hired Cool Whip to help in the morning bake, she quit her job as a line cook and joined me full time. By the end of week one, we had 5 full time people on staff. It was glorious. It was busy. It was messy. It was sweet. It was exhilarating and life affirming. It was bloody exhausting.
 Beginning transformations: Big windows in the front to replace the old, pokey ones.
 Add a bit of color and gold leaf!
 Voila! Not so instant pastry shop!
.jpeg) Still happy after your first week open has kicked you in the tush? Absolutely!
Still happy after your first week open has kicked you in the tush? Absolutely!
 This is the front of the shop where we managed to salvage 1/4 of the original hardwood floors and the tin ceiling. We put in a wall to separate the store front from the bakery and installed a two-way mirror so I could see out into the shop from my floury perch and the customers could fix their hair.
 Ovens, fridge and freezer. Industrial lighting. Health code friendly floors. It's a happy pastry space. (I painted the trim!)
Seven years ago, at 9:30 am on a Sunday morning much like today's in its frisky briskness, I'd have been in my bakery for five hours by now. This morning I woke at 7:45am.
 Letting my hair down to savor a few hours away from the ovens.Here's a video of the shop in action after the early morning rush. Warning: There's music with the video. Mute if you tend towards spit takes of coffee when you're startled by unexpected tunes.
 Now I write baking cookbooks. I teach. I run. I write. I spend time guiding home bakers who remind me of me...before I was the Real Baker Me!, lovely people who aren't afraid of trying scary things like "lamination", "bulk fermentation", "hard crack caramelization", "mastering the creation of 'pied' on finicky Parisian macaron", "sponge cake surgery"...the list of pastry they're eager to tackle is without end and I'm here to teach them.
 My last class. Look at those attentive and zealous pilgrims of pastry! (pic taken by Elaine McCabe)
 Teaching and talking, mixing and imparting sweet wisdom...(pic taken by Bill Stahr)
 and making sure I get a few laughs along the way. (pic taken by Elaine McCabe)
The only difference being that they're smart enough to seek baking counsel from a professional before they dump their livelihoods for full-time pastry bliss.
There are times when I miss our retail shop. The volume of dough. The local patrons who transform into true friends. The very fine forearm muscles I developed from daily workouts with large batch croissant dough. The family that develops from working with sweet people from 3am to 7pm. The silky quiet of a small Vermont town, dark as pitch and fast asleep as I whisked, caramelized and laminated to nourish my neighbors. These were golden moments. I still bake every day. I also sleep. I write. I run. I can visit with friends and family a few times a year. I can travel to promote books. But best of all, I teach. I get to be the guide I never had starting out as a starry eyed baker and I wrote a memoir about the journey for those who want to learn even more.
Bottom line (or bottom crust?) is I made the right decision. I was born a baker. I get giddy when I hand knead a dough, when I watch the alchemy of buttercream transforming from a mess of hot sugar, egg whites and butter into a fluffy luxury. If you're still reading this, you feel the same way too. I'm here to tell you it's a beautiful life. If I opened a pastry shop so can you...and you have my journey to consult to keep you from doing the dumb stuff.

Gesine Bullock-Prado's Blog

- Gesine Bullock-Prado's profile
- 69 followers
Gesine Bullock-Prado isn't a Goodreads Author
(yet),
but they
do have a blog,
so here are some recent posts imported from
their feed.

