
Gesine Bullock-Prado's Blog, page 17
February 26, 2013
Baba au Limoncello
 An aprés ski treat.
I lent a neighbor my New England style hot dog bun mold. A few days later it was returned to my doorstep in the same "Lebanon Feed Store" bag in which I'd originally placed it. But inside was more than the bun mold. A beautiful bottle full of sunshine sat nestled in one of the bun nooks. Homemade Limoncello.

I love limoncello. It's a beautiful closer to any meal, coating your taste buds with bright citrus and coaxing a full belly into believing that there might be room found for a morsel of dessert.
 Norm's Limoncello. Perfect.
It's also the perfect soaking syrup for liquored up cakes. And right now, with winter scheming to overstay his welcome, a cake that manages to both keep you toasty and give you a sweet taste of spring is a must on every menu.

BABA AU LIMONCELLO
This is a riff off of baba au rhum, a rum soaked yeast cake that's topped with chantilly cream and fruit. One thing to note before you dive in is that, unlike almost every other yeasted preparation, a Baba is more a BATTER than a dough. You can also bake it in two different kinds of molds: a savarin mold or a dariole mold. Savarin molds come in individual sizes or in large sizes, like mine. You will adjust baking time for each type of mold.
 Two Savarin molds.
INGREDIENTS
Makes 2 large Savarin sized cakes
for the Baba
2 1/2 cups AP flour, I use King Arthur
1/2 cup granulated sugar
1 packet instant yeast, I use Red Star Platinum yeast
1/2 teaspoon salt
5 eggs
1/2 cup milk
8 tablespoons (1 stick) unsalted butter
zest of two Mandarins. Strips of rind taken from 2 more mandarins for decor
for soak and assembly
2 cups Limoncello
2 cups heavy cream
1/2 cup creme fraiche (I use Vermont Creamery vanilla bean creme fraiche)
1/4 cup confectioner's sugar
PROCEDURE
for the Baba
•In the bowl of a stand mixer fit with the paddle attachment, stir together the flour, sugar, yeast and salt.
•In a small sauce pan, bring the milk to a simmer. Take from the heat and add the butter and zest. Allow to sit until the butter is completely melted. Stir and test the temperature of the mixture to make sure that it's not too hot, luke warm is perfect.
•In another small bowl, whisk the eggs until completely broken apart and slowly pour the milk/butter mixture into the eggs, whisking constantly.
•Add the egg/milk mixture to the flour and mix until the batter is smooth and shiny, about 5 to 10 minutes.
•Place a moist kitchen towel over the bowl and place in a warm spot in your kitchen to rest for 1/2 hour. If your kitchen is as cold as mine, it may need an hour of rest.
•Spray the savarin molds with non-stick spray or coat with butter. I've used both to great success on my non-stick savarin molds.
 Just filled. One coated with cooking spray and one with butter.
•Transfer the batter to a large pastry bag (you don't need a tip attached, just a large opening) and pipe the batter evenly among the molds. Spray the exposed batter with a thin layer of non-stick cooking spray and allow to rest in a warm area of your kitchen until almost doubled in size. In the meantime, preheat your oven to 350º.
 Rising!
•Bake for 30 minutes or until the tops of the cakes are golden brown.
 Cake's out. Limoncello's in.
•Immediately flip the cakes out of molds and pour 1/2 cup of Limoncello into each of the cavities. Put the cakes back into the molds to soak up the Limoncello. Pour the remaining Limoncello over the tops of both the cakes. Allow to soak for at least 20 minutes or until cool.
 Soaked in sunshine.
To finish
•Whisk together the cream, creme fraiche and confectioner's sugar until stiff peaks form. Pipe the cream in the middle of the cake and top with mandarin slices and zest twirls.
•Can keep, covered, for several days up to a week.


February 21, 2013
Making Helgasteine on the Today Show!
Gesine Makes her HELGASTEINE - Bake It Like You Mean It from Raymond Prado on Vimeo.
 Here are all the treats I made from Bake It Like You Mean It for the Today Show Segment. From the top left, clockwise: Helgasteine, Mandelkraenzchen, Coffee/walnut torte and Krapfen (or Berliners or filled donuts)
February 19, 2013
Bake It Like You Mean It Giveaway!

My latest cookbook, Bake It Like You Mean It, is my third (not including my memoir My Life From Scratch which wasn't a cookbook but did have recipes as "plot points").
And like all the books before, I'm proud of my baby. It's also, I believe, the most representative of my life as a pastry chef. It covers the broad spectrum of my baking existence, from meringues to yeasted doughs. I approach each category as I approach my pastry life, baking it like I mean it.
 The Wall: during the course of the photo shoot for each book, Tina tapes polaroids of our finished portraits on the door of the studio, aka my living room.For the third time, Tina Rupp joined me to photograph the pastries in the book. Unlike the books past, we have double the amount of photos, each as gorgeous as the last.
  Clockwise from the top left: The cover, the back cover, an image from the mousse section and last, the centerfold: the croissants. Tina swears my croissants are the best she's ever had. Now you too can make the best with my super duper recipe!With the release date of March 5th fast approaching, I wanted to get started on a giveaway of the book. I also wanted to add something else, a piece of my baking "me." In my pastry kitchen, I'm rarely without my favorite apron. While writing and testing all my books, I have it on. During photo shoots, I wrap it around me like a security blanket. I wear it to demos and appearances and I'm always asked, "Where'd you get that?"
  From a photo demo inside
Bake It
, the apron.
From a photo demo inside
Bake It
, the apron.
 From the feature on me in November 2012's Better Homes and Gardens, the apron!Why is it so special? It's beautifully crafted, it's sturdy as hell and it's the perfect length. It's also cool. And you can't just get it at any old chef wear depot because it comes straight for the talented designer, Shannon Reed. So if you win this giveaway, you not only get a signed copy of Bake It Like You Mean It, you get a hand crafted black denim Shannon Reed utility apron, just like the one I wear every day. Rest assured, yours will be brand spankin' new. I'm not handing off my beloved and well worn flour catcher. It's also unisex, so anyone can enjoy the bounty!
 Please check out her website, www.shannonreed.com. Shannon is truly a boon to a culinary field that was bereft of beautiful working togs until she came around.
 Shannon also made my chef's jacket. This isn't a part of the giveaway but I love it as much as my apron. And Tina Rupp also took this photo!
Here are the rules of the game: Leave a comment on this post, only one per person, by March 5th. It takes a while for comments to post, so don't worry if you don't see it right away.You must be a US resident. I repeat, you must be a US resident. Along with your comment, give me your name. You needn't give me your full name and anonymous doesn't count. Don't give me any other information, we'll get to that once I randomly pick a winner and then and only then will you need to send me your address, etc.
And feel free to pre-order the book as well. I won't stop you.
February 17, 2013
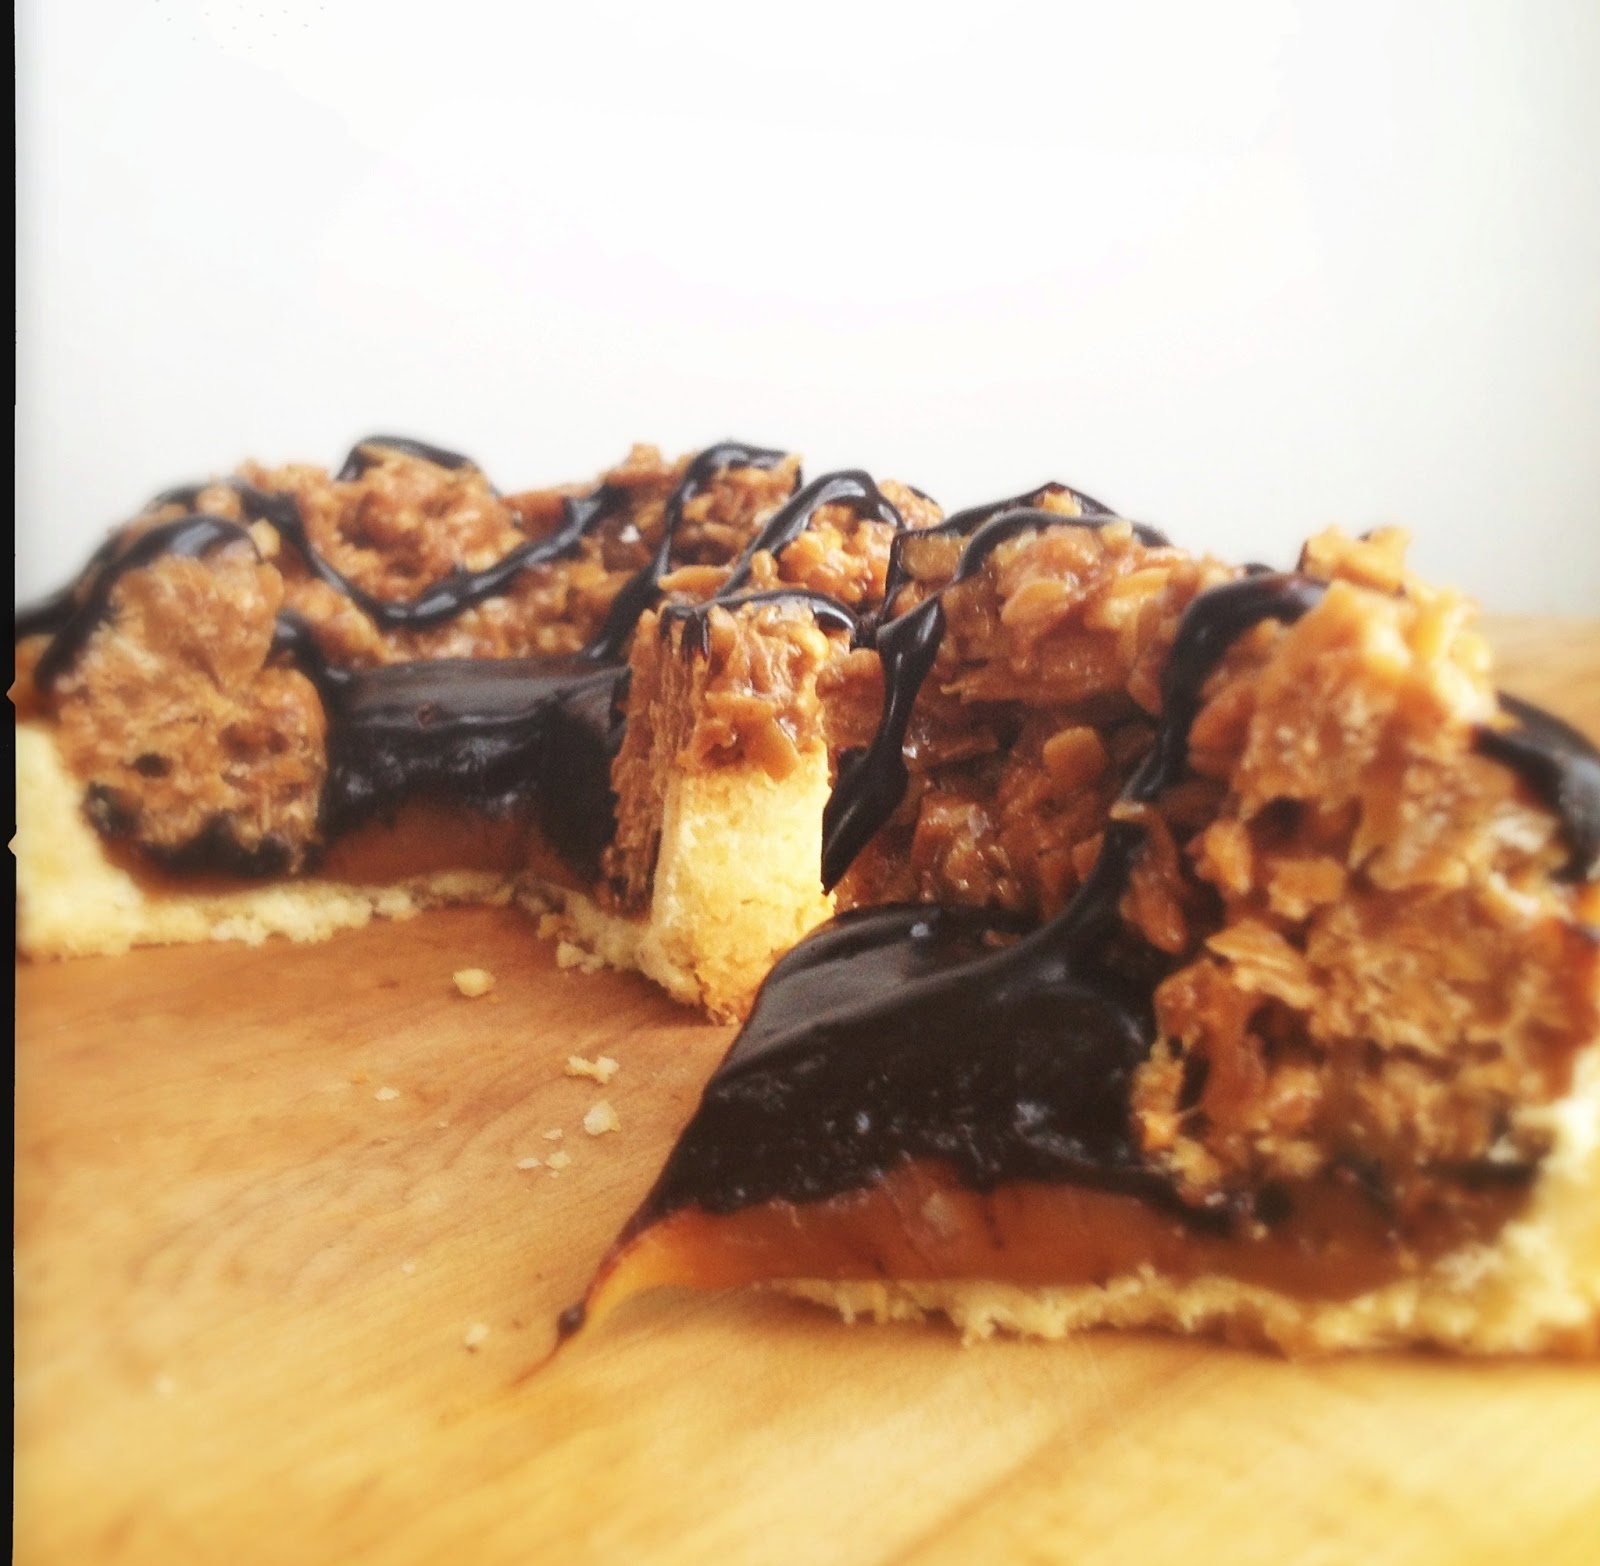
Samoas...The Tart
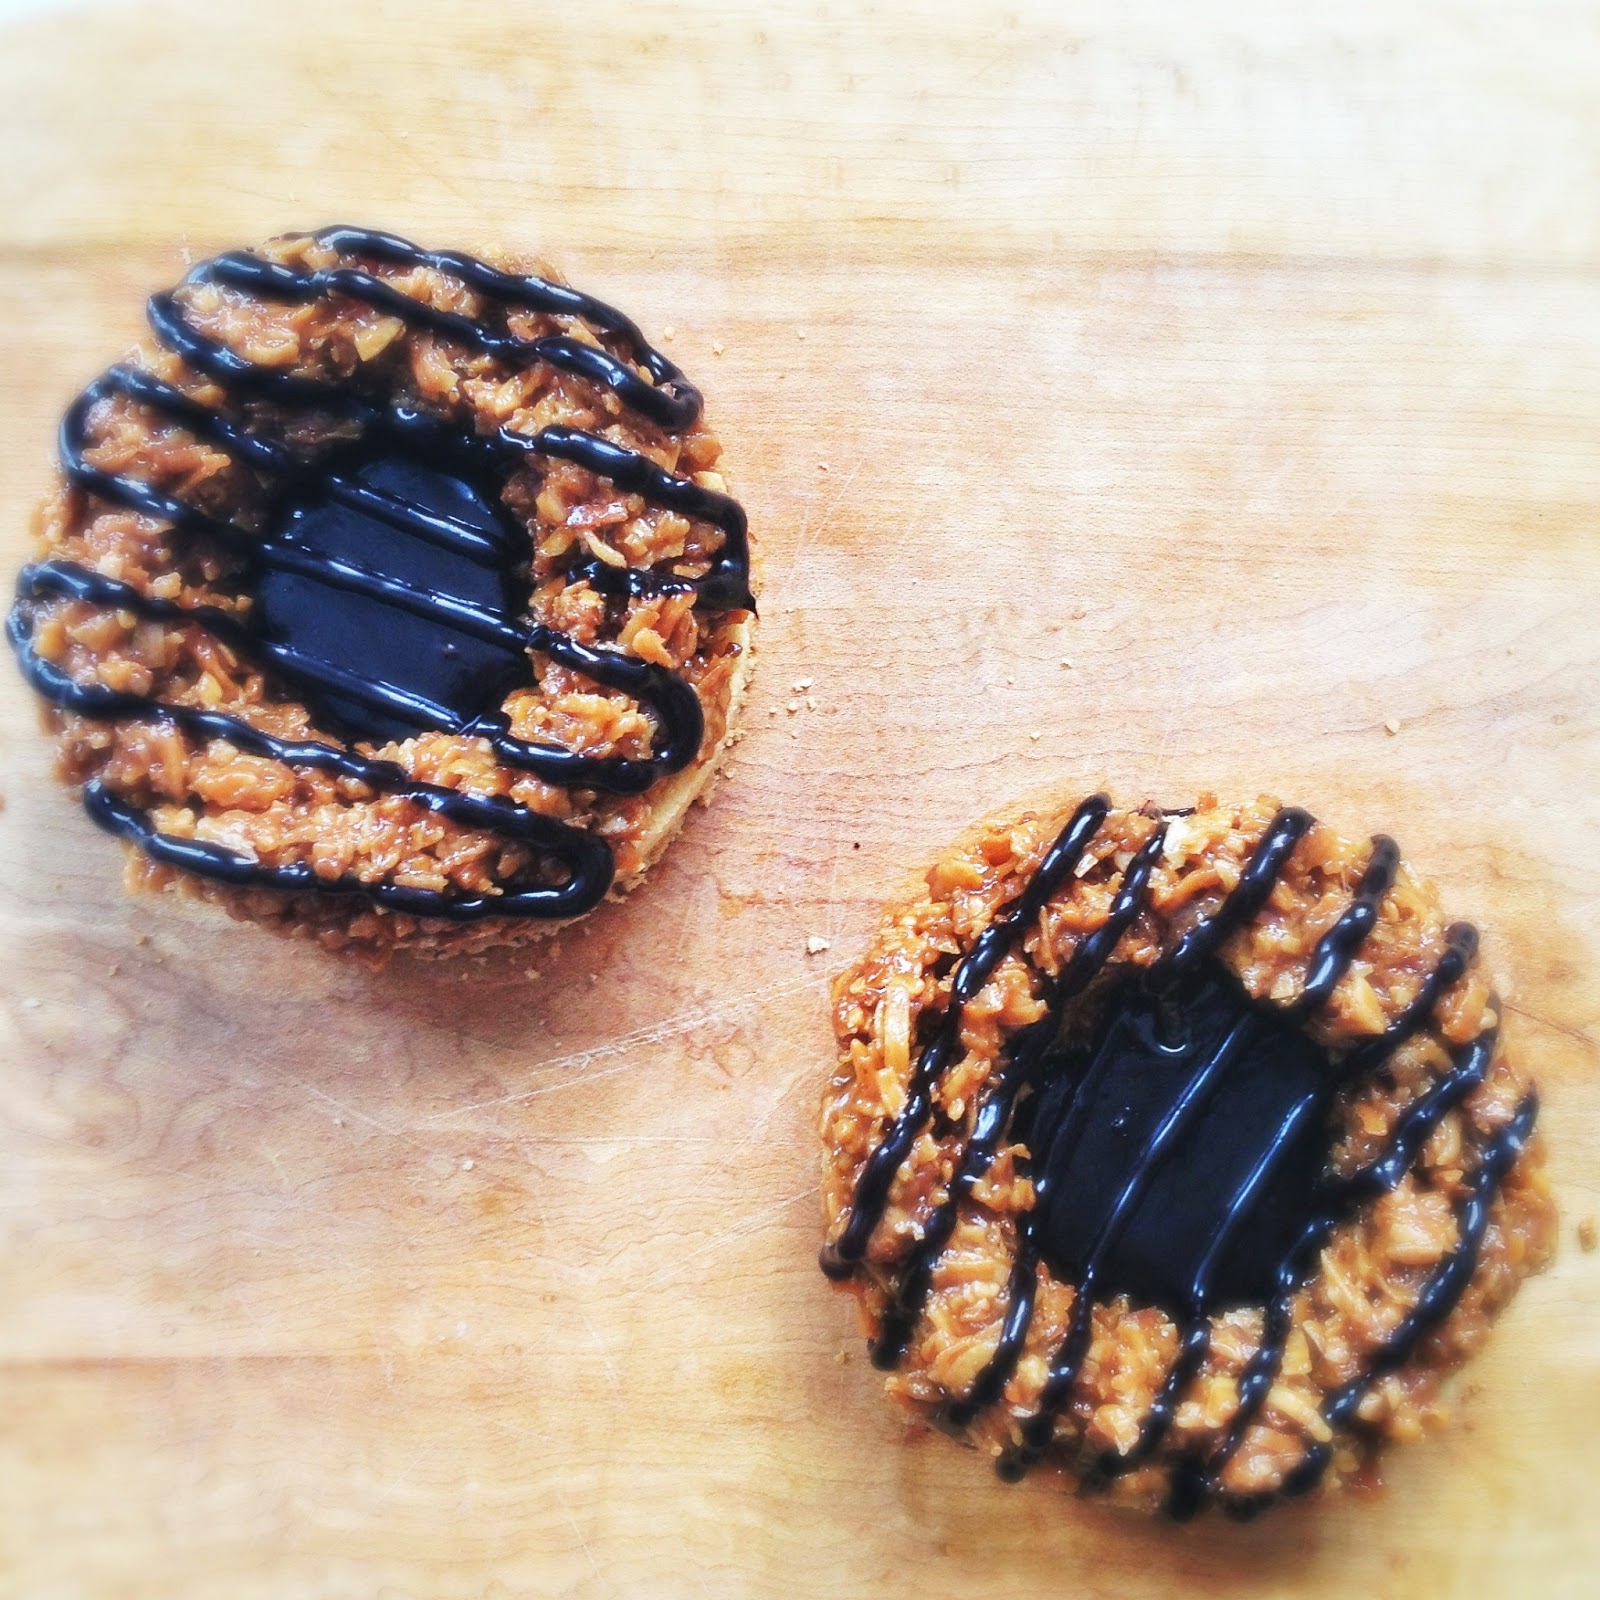
Please don't tell the Girl Scouts I've done this. It might just put them out of business and lead to my untimely demise.
But I couldn't help myself.

SAMOAS...THE TART
INGREDIENTS
For the coconut sablé
1 cup all purpose flour, I use King Arthur
1/2 cup coconut flour
1/2 cup desiccated, sweetened coconut
1/2 teaspoon salt
1 cup unsalted butter, very cold, cut into small pieces
1 large egg
1 tablespoon sweetened condensed milk
1 teaspoon vanilla bean paste

For the caramel/coconut mixture
1 cup packed dark brown sugar
1 cup granulated sugar
1/2 cup light corn syrup
1 teaspoon salt
1 tablespoon vanilla bean paste
1/4 cup sweetened condensed milk
1 stick unsalted butter, cut into very small pieces
1 teaspoon vanilla bean paste
3 cups sweetened, desiccated coconut toasted to a golden brown (instructions to follow)
For the chocolate drizzle
1/2 cup sugar
2 tablespoons unsalted butter
2 tablespoons corn syrup
1/2 teaspoon espresso powder
1/4 teaspoon salt
1/2 cup Dutched cocoa powder, I use Callebaut/Cacao Barry Extra Brute
PROCEDURE
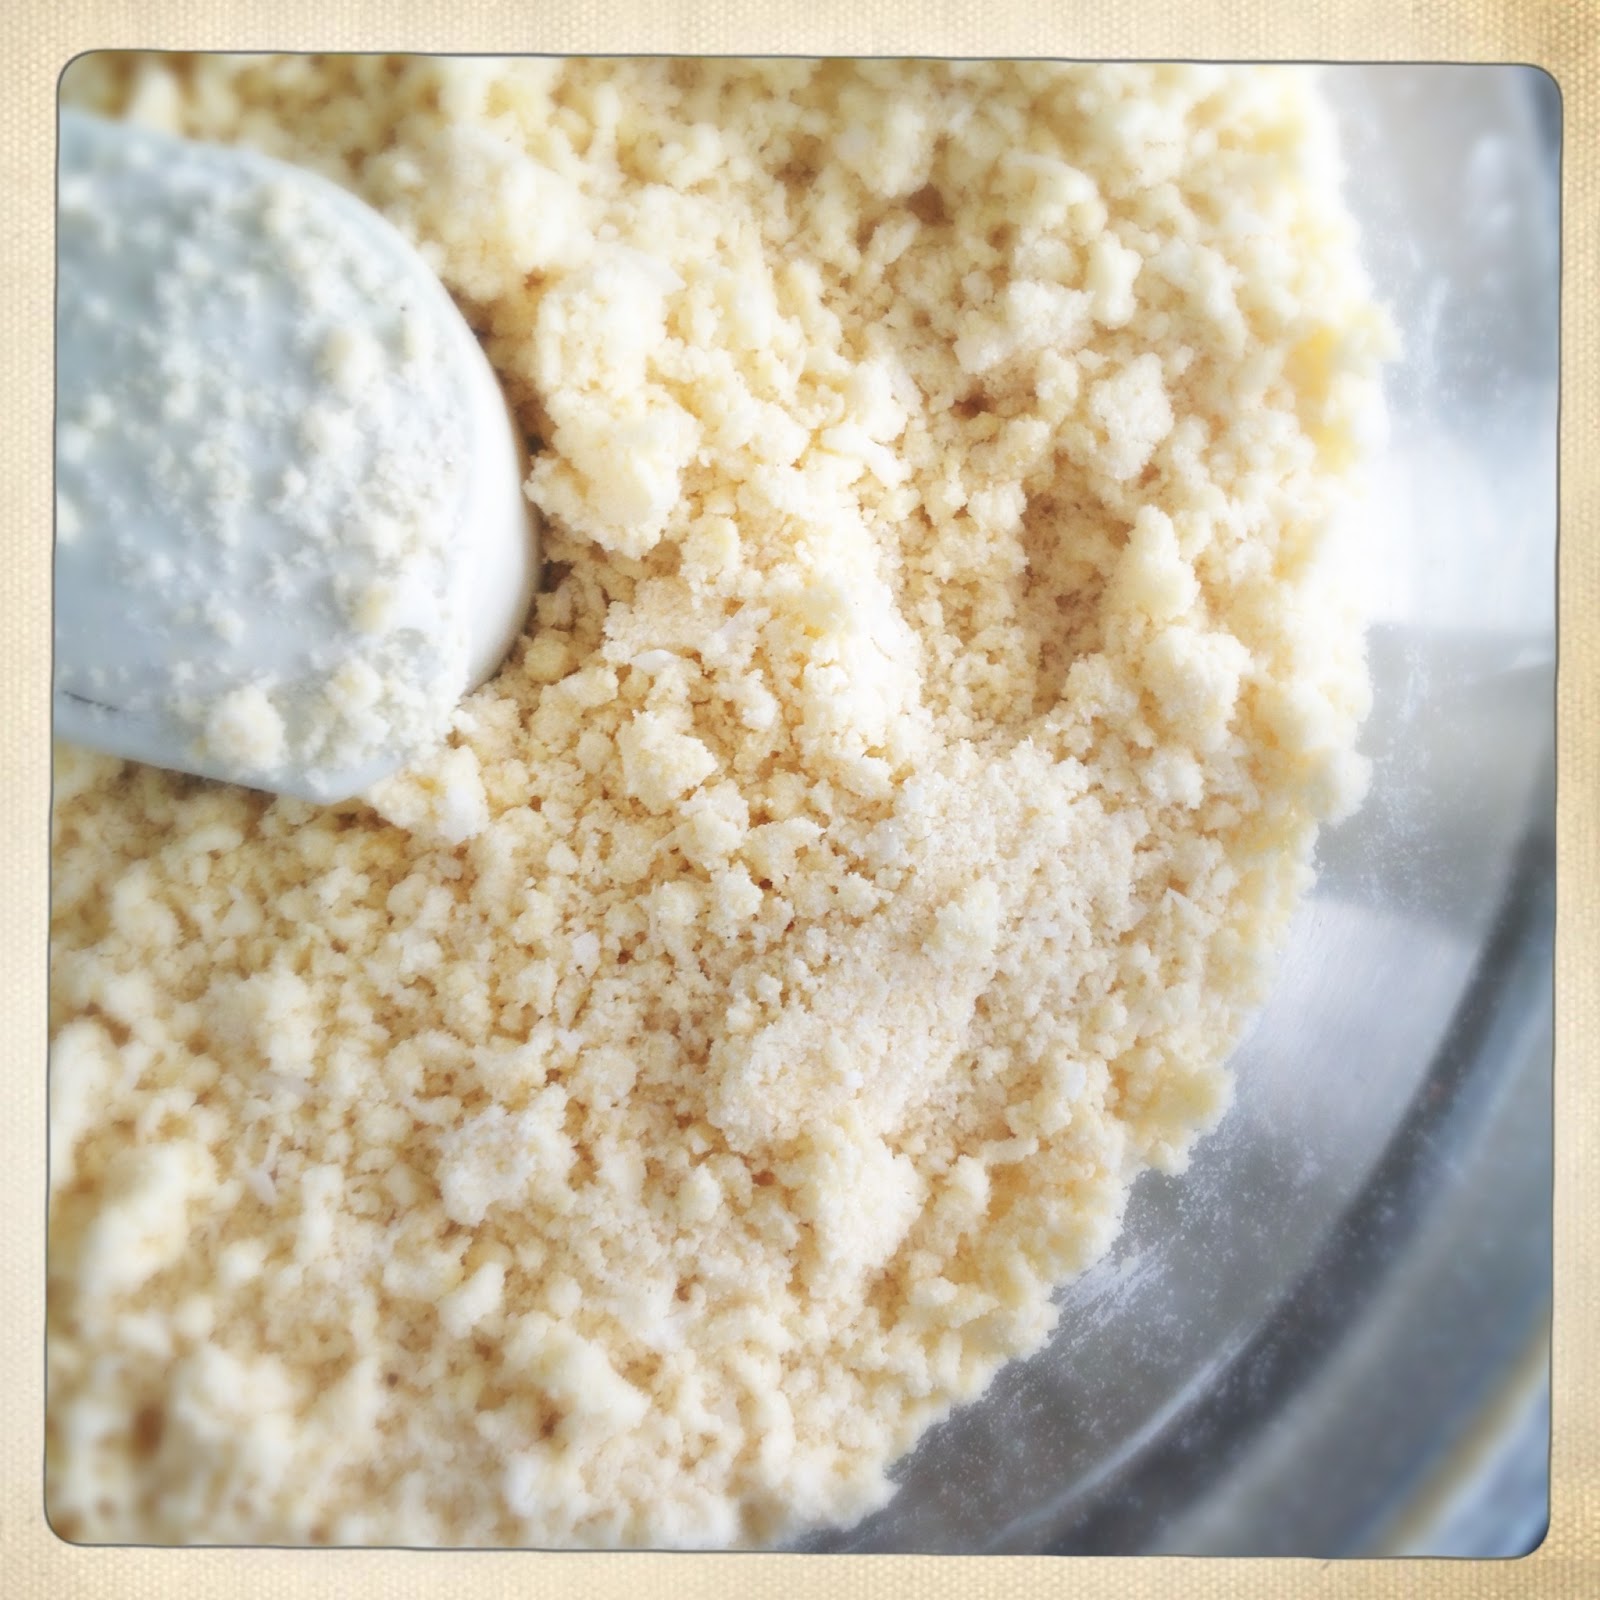
For the coconut sablé
***NOTE*** If you are familiar with my book Pie It Forward, this recipe may look vaguely familiar to you. I use my sablé recipe as my sweet dough for some tarts. This is a coconut riff off of my base vanilla sablé recipe.
•In the bowl of a food processor fit with the blade attachment, combine the AP flour, coconut flour, desiccated coconut and the salt. Pulse a few times to combine. Add the cold pieces of butter and pulse again until the mixture resembles coarse cornmeal.
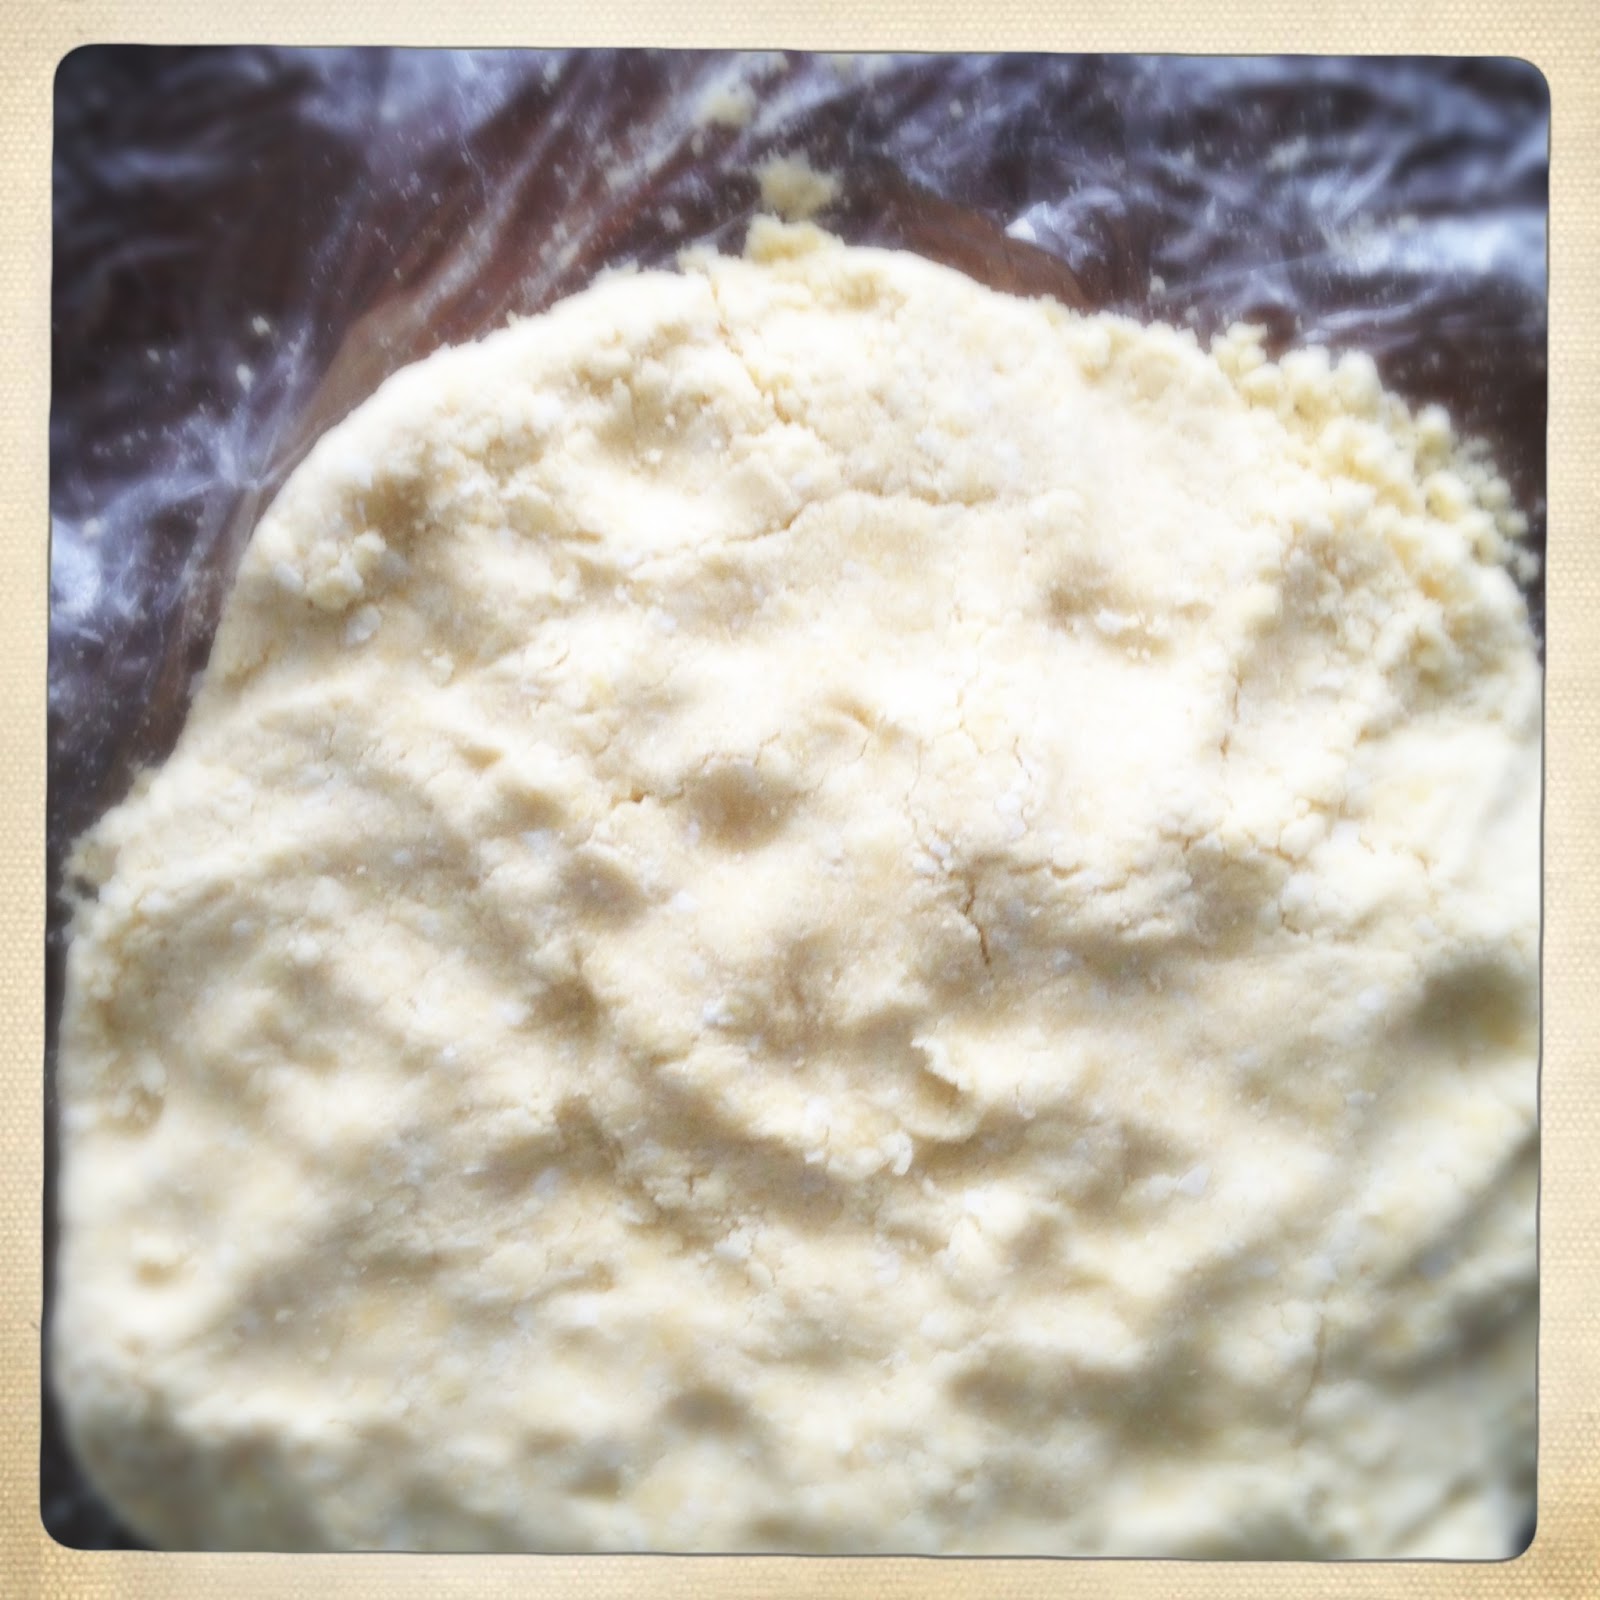
 Coarse Cornmeal
•In a small bowl, whisk together the egg, sweetened condensed milk and vanilla. Continue pulsing the the mixture in the processor while adding the egg mixture. Continue pulsing until the mixture looks uniformly damp but doesn't come together as a dough.
 Looking slightly damp
•Transfer the sablé dough to large piece of plastic wrap. Press the dough into a round and cover. Refrigerate for at least 20 minutes.
 Pressed together into a round.
•Preheat your oven to 325º.
•Using six 4" flan rings, spray the rings and crumble a thing layer of sablé in the ring and press to create a base. Once a smooth base is made, press sablé dough along the sides. Refrigerate for 10 minutes.
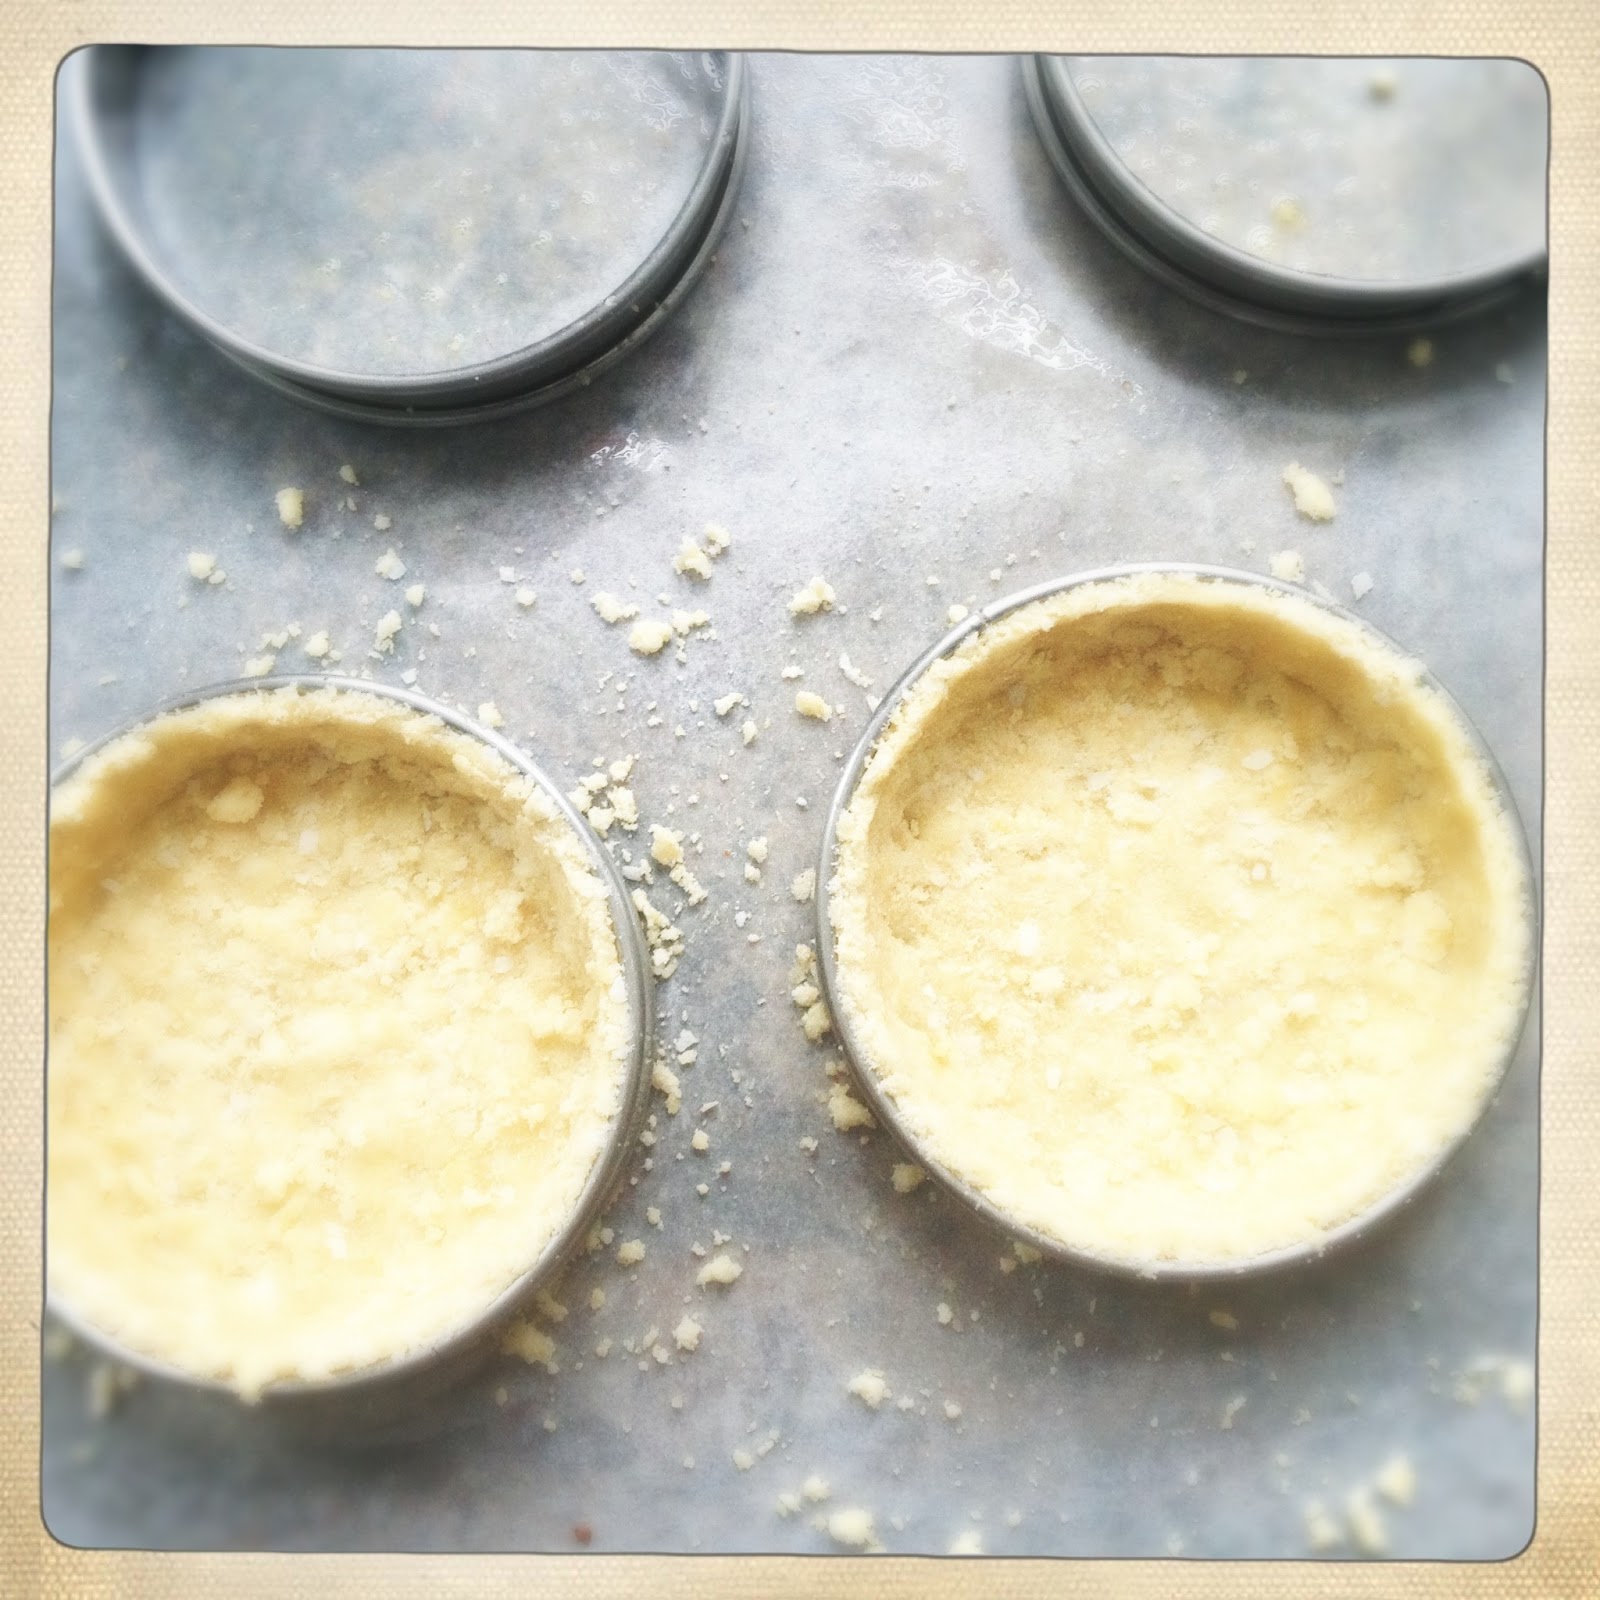 Line the rings.
•Line the tart dough with parchment and fill with pie weights. Bake for 10 minutes.
•Remove the parchment and pie weights and bake for 5 to 10 minutes, or until the tart dough is baked through and is very lightly golden brown. Set aside to cool.
For the caramel/coconut mixture
•First, to toast the coconut, spread the 3 cups in an even layer over a parchment lined sheetpan. Place in a 300º oven to brown for a few minutes. Stir the coconut and continue baking and stirring until the coconut flakes are medium/dark golden brown. Be "Johnny on the Spot" with the coconut as it burns quite easily. Transfer the coconut to a large mixing bowl.
•In a heavy saucepan, combine all caramel ingredients and stir with a wooden spoon constantly over medium heat until the sugar is completely melted. Attach a candy thermometer and continue stirring until the caramel reaches 245º.
•Remove the caramel from the heat and add a hefty tablespoon of caramel to each of the tarts. Refrigerate to firm.
 Add the caramel to the coconut.
•Pour the remaining caramel into the bowl of coconut and stir unti well coated. Set aside.
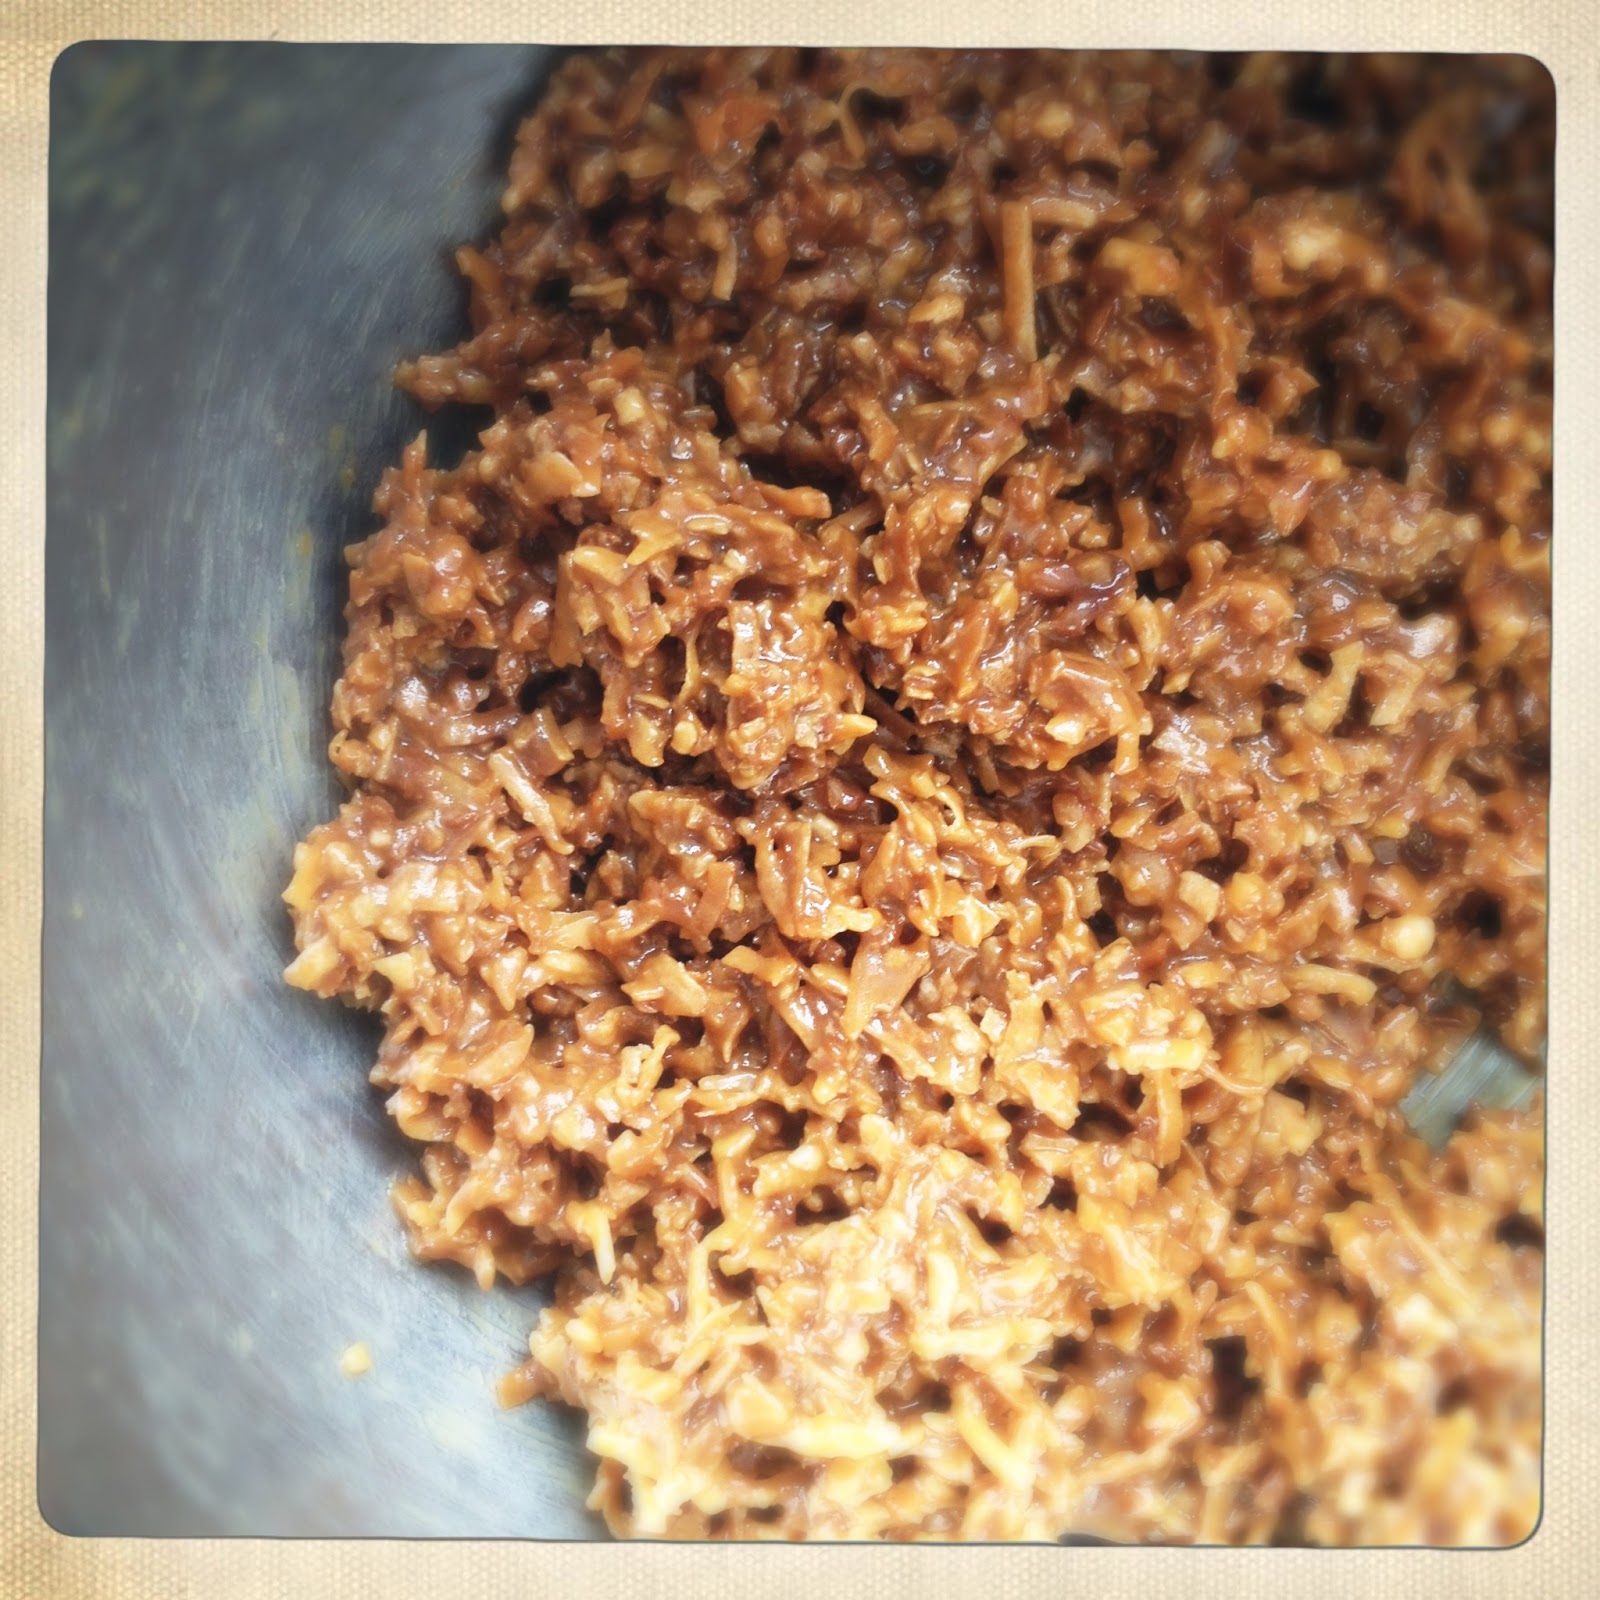 Caramel and coconut mixed.
 For the chocolate drizzle
•Combine the sugar, corn syrup, salt, espresso powder and butter in a heavy saucepan and stir over medium heat until the sugar is completely melted.
•Sift the cocoa powder the mixture and whisk the cocoa powder into the sauce until smooth.
•Strain the drizzle through a very fine sieve into a large bowl.
•Spoon a scant tablespoon over the cooled caramel in the tarts. Refrigerate for about 15 minutes to firm the chocolate.
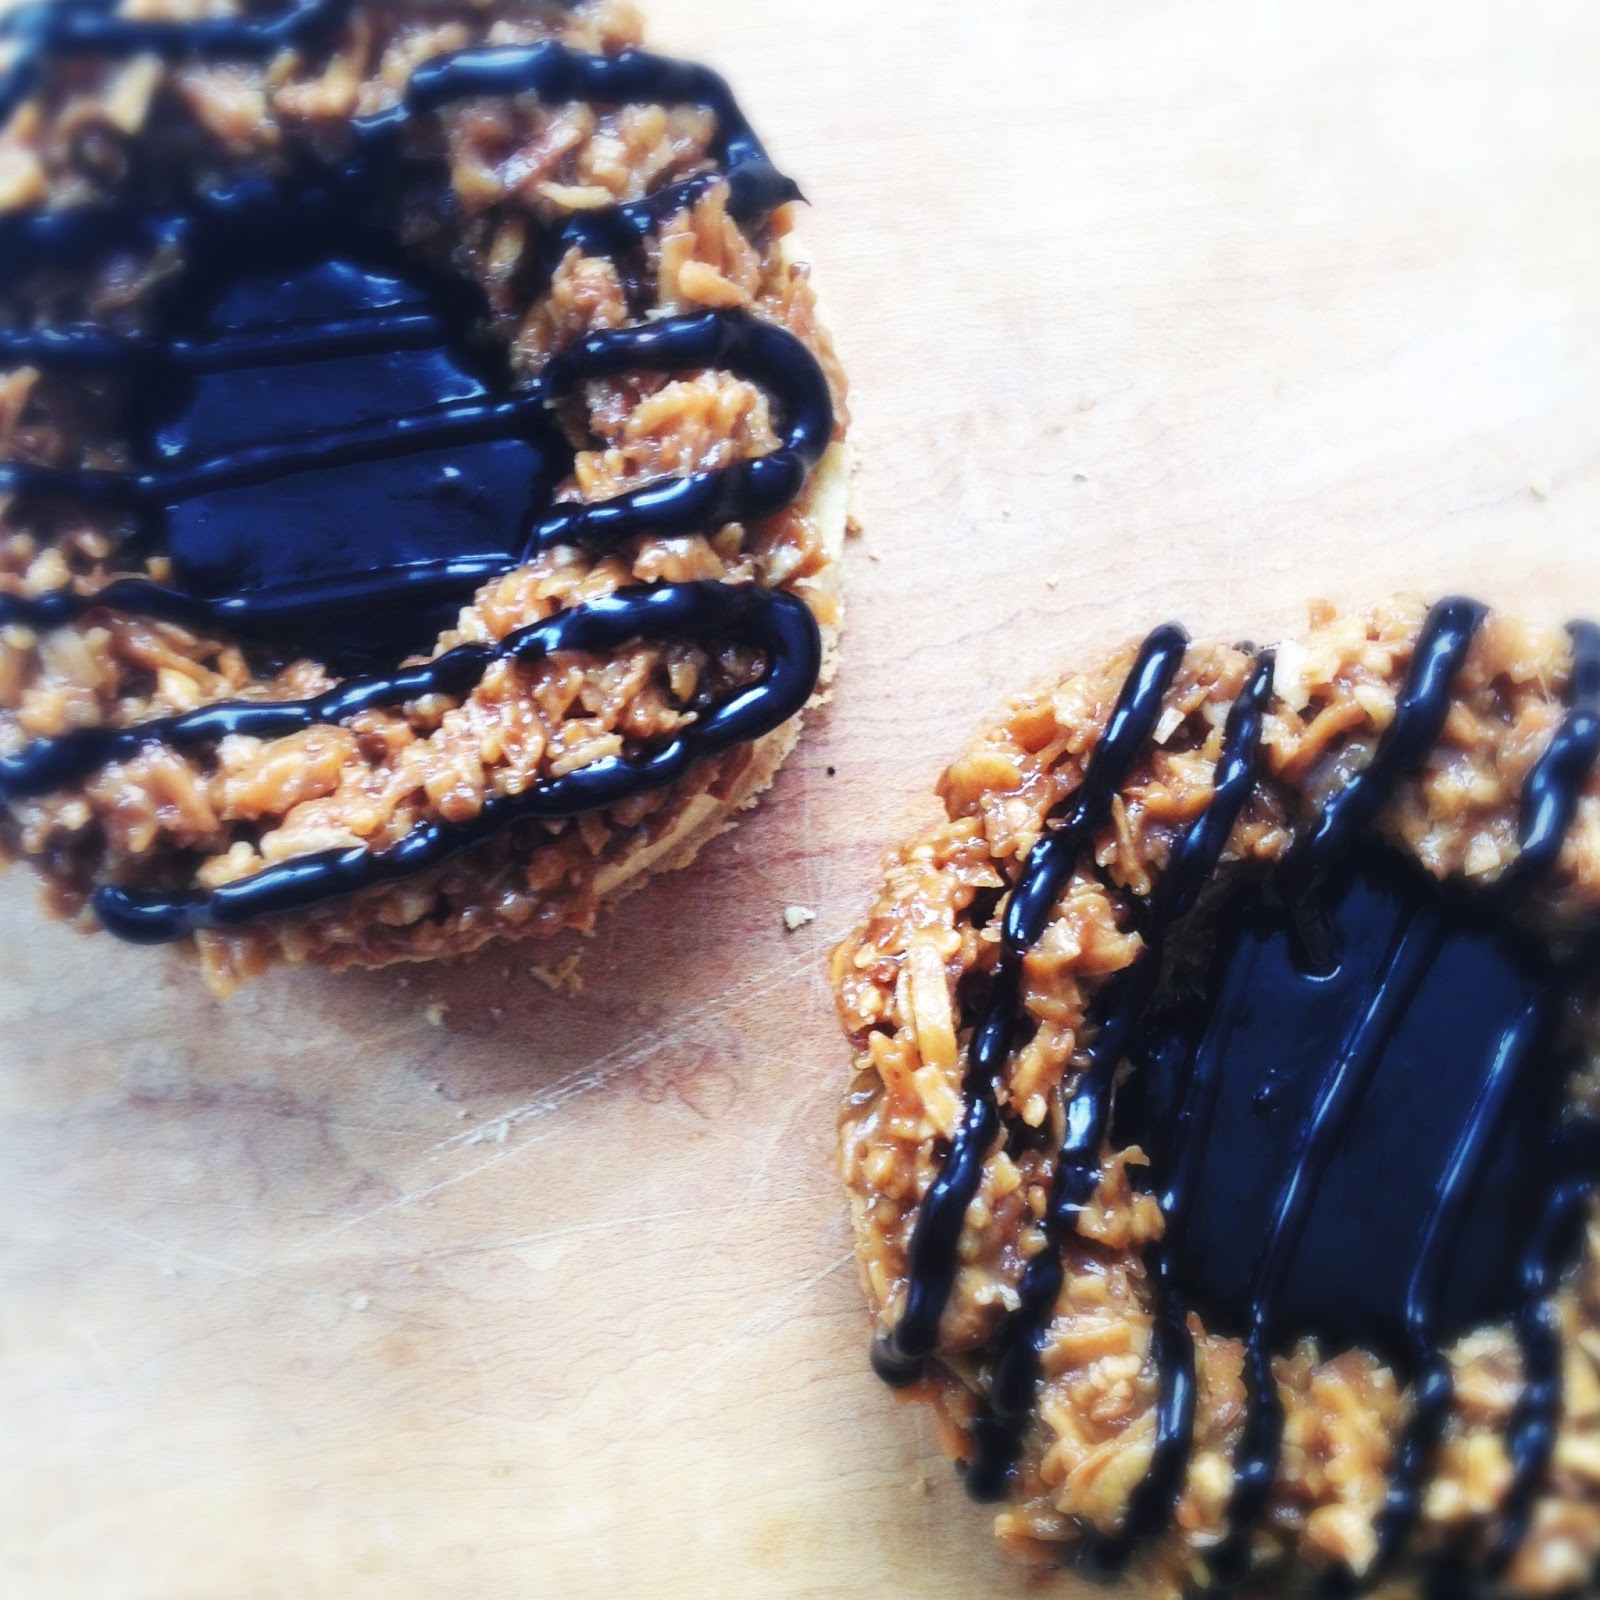
To assemble
•Take about 1/4 cup of the caramel/coconut mixture and, using your delicate fairy fingers, form the mixture into a ring that lines the outside perimeter of the tart. Using a teaspoon, drizzle chocolate over the assembled tarts.
Serve immediately or refrigerate up to 2 days.
February 14, 2013
Rounding Up A Little Love
Here are a few of my posts to get your heart racing...
.JPG) Puffy Hearts with Passionfruit Chiboust.
Puffy Hearts with Passionfruit Chiboust.
 Deep Fried Love.
 Breakfast Napoleon for Two!
  My newest cookbook, Bake It Like You Mean It coming soon!
 Easy Love. An eclair recipe.
 McLovin' Muffin. An English Muffin recipe you're gonna love.
 Cocoa Crepe Cake
 A Slice of Love.
February 13, 2013
McLovin' Muffin

English Muffins and eggs: a perfect love match. I like to add caramelized onions, apples and garlic with a touch of maple and a hit of heat. Melting cheese on top of the egg is also very encouraged in our household. And I won't make a move on my breakfast treat until I top it with at least 2 crispy slices of Applegate Sunday bacon.
And let me assure you, not only is making a completely from scratch McLovin' Muffin for Valentine's breakfast easy, it's pure love.

McLovin' Muffin
INGREDIENTS
For the English Muffin
(makes 10 muffins, seal those you don't use in a tightly sealed plastic bag and freeze)
3 cups all purpose flour, I use King Arthur
1 1/2 cups luke warm water
1/2 cup whole milk
1 tablespoon maple syrup
1 teaspoon salt
1 package instant yeast, I use Red Star's platinum yeast
To assemble
1 small yellow onion, halved and thinly sliced
2 cloves garlic, thinly sliced
1 small firm, tart apple, cored and thinly sliced
1 teaspoon maple syrup
chili flakes, to taste
1 tablespoon olive oil
1 tablespoon unsalted butter
Sharp cheddar cheese
Eggs, cooked sunny side up in a heart ring mold
Bacon, crisped to your liking. I use Applegate's Sunday Bacon
salt and pepper to taste
Procedure
For the English Muffins
•Preheat oven to 350º.
•In a large bowl, combine all the ingredients and stir with a wooden spoon until the batter is smooth and no lumps of flour remain. Remember, this is a high hydration dough, it's more a batter than a dough. It shouldn't hold it's shape and should be relatively spreadable (you're developing gluten, so it will still have some resistance but will be sticky and gloppy).
•Cover the bowl with a damp towel and allow to rest for 30 to 40 minutes.
•When the resting period is up, heat a large, heavy skillet or stovetop griddle and spray lightly with non-stick cooking spray. Place as many heart molds as you can fit on the griddle and spray them with non-stick cooking spray. Fill the molds half way using a cookie scoop and with damp fingertips, VERY GENTLY spread the dough to completely cover contours of the mold (you can also use traditional muffin molds, you can use tuna cans that have had their tops and bottoms removed and clean). Don't press too aggressively on the dough as you want to maintain all the air bubbles in the batter for those gorgeous nooks and crannies.
•Place a sheet pan on top of the cooking muffins and "bake" over a medium-low flame for about 10 to 15 minutes. Carefully put a spatula underneath the mold, making sure that it remains around the cooking muffin, and flip the muffin to bake on the other side for another 10 to 15 minutes. Both sides should be golden brown. Remove the rings with tongs and check the sides of the muffin. If they appear slightly moist on the sides, place on a parchment lined sheet pan and bake in the oven for 10 minutes.
For the onions, etc:
•In a skillet, warm the olive oil and butter until the butter is melted. Add the onions and garlic and sauté over medium-low heat until the onions are translucent. Add the apples and chili flakes and continue to sauté until the apples soften. Salt and pepper to taste.

•Thoroughly clean the heart rings and spray with non-stick cooking spray and place on the griddle again and crack an egg inside the mold. A bit of albumen may escape but leave it be. You can cut it off easily before you remove the ring. Cook until set (if you like over easy, place a baking sheet over the eggs to steam the tops during the cooking time.
 When you flip the muffin, be careful to keep the muffin in the mold so that it holds its shape.
•I assemble the McLovins by first "slicing" the muffins in half using a fork to poke all long the perimeter and then gently pulling the halves apart. Make sure that the muffins have completely cooled otherwise the interior won't be fully set and you won't see all those lovely nooks and crannies.
•Place a few tablespoons of the caramelized onion mixture on top of one muffin half. Carefully transfer a warm egg atop the onions and then top with cheese. Season with salt and pepper, top with bacon and finish off with the remaining muffin half.
For the sourdough version, click here.
February 11, 2013
Easy Love.

Sometimes love can be easy, it can happen in an instant. It will come together with little obstacle and can satisfy with luscious sweetness. The love I speak of, of course, is that of a pastry loving Homo Sapien for an eclair.
For those who wish to celebrate Valentine's Day with a minimum of fuss (i.e., a drama free evening for two: a woman or man and a pastry), look no further than this recipe.

Easy Love
INGREDIENTS
For the choux
1 cup flour
1/2 cup water
1/2 cup milk
2 tablespoons sugar
1 stick unsalted butter, cut into small pieces
1/2 teaspoon salt
6 - 7 eggs
For the filling
1 cup vanilla bean mascarpone, Vermont Creamery
1 cup heavy cream
1/2 cup smooth raspberry jam
2-3 tablespoons confectioner's sugar
For the glaze
2 cups confectioner's sugar
1 tablespoon dry egg white powder
2 - 4 tablespoons water
hot pink food coloring

PROCEDURE
For the choux
•Preheat oven to 400º.
•Combine the water, milk, sugar, salt and butter in a large saucepan and heat over medium until the mixture simmers and the butter completely melts.
•Dump the flour in the mixture all at once and stir with a wooden spoon until the paste pulls away from the sides of the bowl and is very smooth, this should take a few minutes.
•Transfer the mixture to the bowl of a stand mixer fit with the paddle attachment. Mix on low for a minute to release some steam and to cool down a bit.
•Add eggs, one at a time until the choux paste slow drops from the raised paddle. Make sure that it's not so stuff that it just sits on the paddle and not so viscous that it immediately streams from the lifted paddle. You may not need all the eggs. You might need more. If you feel you're close but not quite there, add one extra egg yolk and mix completely.
•Transfer the choux paste to a large pastry bag fit with a medium star tip. Pipe 4" long strips of choux on a parchment lined sheet pan. Bake at 400º for 10 minutes are reduce the heat to 350º and bake for 20 to 30 minutes more, until the choux is deeply golden brown. Allow to cool completely.

For the filling
•Combine all ingredients and whisk on high until the mixture is stiff and peaks. Check for sweetness. Add a few tablespoons of confectioner's sugar if it's not sweet enough. Transfer the mixture to a large pastry bag fit with a medium/small open tip. Poke three holes along the bottom of the choux shell and insert the tip into each hole and gently fill.

For the glaze
OPTION #1
•Combine the confectioner's sugar and powdered egg white. Add water, a tablespoon at a time, until you've created a spreadable glaze that flows slowly.
•Remove about 1/4 of the glaze and transfer to a piping bag fit with a small open tip.
•Place the remaining glaze in a large bowl, large enough to hold an eclair, and stir in the dye. Dip the top of the eclairs in the glaze. Pipe stripes over the top of the eclair.
•Make more glaze as needed. Cover with plastic wrap if you're going to walk away for a few minutes, making sure that the wrap touches the surface of the glaze so it doesn't form a skin.
OPTION #2
If you have rolling fondant on hand, add about a cup to a saucepan and 3 tablespoons of water and a teaspoon of sugar. Stir over low heat until smooth. Transfer 1/4 of the mixture to a piping bag with a small open tip. Set aside. Keep the rest in the saucepan and stir in dye. Dip the tops of the eclairs in the glaze and immediately pipe the white fondant over the eclair in stripes.
February 10, 2013
Breakfast Napoleon for Two: It's What's for Valentine's Dinner

Breakfast for dinner. That's what I want for our Valentine's evening meal. Perhaps with a little bubbly. But I'm not one to do anything without a little pastry twist, so I've decided to put my ever present block of puff pastry to use to create an American Breakfast Napoleon that will stop cupid in his tracks.

You'll need 1/3 of your batch of puff pastry (follow this link for my recipe). Roll it out a little thicker than 1/8 inch thick and a bit smaller than size of a 1/2 sheet pan. Allow to rest for 20 minutes and then use your lattice roller to cut along the entire length of the puff. Transfer to a parchment lined sheet pan and pull apart the latticed puff to pull apart the lattice work. Refrigerate, covered, for 20 minutes.
 Puff ready to bake.
 Lattice roller, ready for a rest.
 Puff baked.
Bake at 375º with a piece of parchment placed over the top of the lattice puff and then place another sheet pan atop the puff to weigh it down a bit, this keeps the shape of the puff during the initial bake. Bake for 10 minutes. After 10 minutes, take away the top sheet pan and parchment and bake for 20 more minutes or until uniformly deep golden brown.
While warm, carefully stamp three 6" circles from your puff. Allow to cool.
 Hash browns...browning.
I then take a very small pan with 1 tablespoon of butter and 2 tablespoons of olive oil sizzling away and grate a medium sized potato straight into the pan. Even out the shreds a bit with a spatula and brown on both sides over medium heat, about 10 minutes each side. Transfer to a paper towel.

Cook up two eggs in the same pan and crisp a few strips of bacon (I use Applegate's Sunday Bacon).
To assemble the napoleon, place the hashbrowns on the bottom and top with a puff round. Layer the puff round with bacon and place another puff round atop the bacon. Gently transfer the eggs to the 2nd puff round and season with salt and pepper. Very gently transfer the last puff round atop the eggs.

Happy Valentine's Day!
February 8, 2013
Where does it go? The evolution of a recipe.
 Testing for the 5th book today. This is sloppy assembly but it's the start of something good.
I'm asked, daily, "What happens to all the pastries/bread in the pictures you post?" This wasn't a question I entertained when I had my pastry shop, Gesine Confectionary. Recipes I posted on the blog or that appeared in my baking memoir Confections of a Closet Master Baker/My Life from Scratch were a natural byproduct of what I made and sold. I tested all those things but the bulk flew out the door of our popular bakery.
 First element of today's test. Flakey, crunchy, sweet. A little salty. Nutty and aromatic. But it needs something to pull it together.
 So I tried a few things. I like it. I'll wrap it and try again tomorrow. Once I have some sense of how long it keeps, I'll work on perfecting the recipe. Which leads to more tasting....
Unless I was having one of "those" days. I think Agnes witnessed one of "those" days. She was working the La Marzocco and manning the pastry counter in front. She came into the pastry kitchen to check on the ETA of the palmier only to find me shoveling said flaky, buttery, caramelized gloriousness into my very own pie hole. I can share this now that we no longer have the shop because it's against code to shovel sweet puff pastry bits straight from the speed rack into a proprietresses' open maw. But in case you were curious (and angry) about that time you came into the shop expecting palmier, I was having one of "those" days.
 Some days I post pictures of my cakes that are intended for an event...and to be eaten by all and sundry!
 And then they are eaten.
Now that I develop recipes for books in my commercial bakery, it's natural for the curious and hungry to ask, "Where the hell do all the goodies go?" because I'm no longer selling the actual product to the public. I perform an act that in professional cookbook author's parlance is called "recipe testing." I develop a treat on paper. I look through the formula, making sure the ratios make sense. I then translate the numbers and ratios (what the permanently befloured call "baker's formula") into the standard language of cookbooks: cups and tablespoons. I then take the butter, sugar and flour for a test drive. And then I taste it.
My little babies, how can I not give them treats from my kitchen? And why do you think they actually come running when I call? They're fed pastry on a regular basis.
If I don't like what I've tasted, I either toss it (sorry) or if it's poultry friendly, I feed it to my feathered flocks.
 I made this for my neighbors because I love them. But I took this baking opportunity to work on a formula I've been perfecting.
If I like what I've tasted, I dissect a portion of it for visual consistency. How's the crumb? The color of the crumb? If an artisan bread, do I have lovely translucent pockets randomly pocking each slice and has the bread developed enough flavor or did I jump the gun and bake too soon? Is it overly acidic, meaning have I overproofed? If a cake sponge, is it springy and consistent without any gaping holes? If it's a layer cake or entremet, I check for visual consistency of layers. Does the pastry look appealing and visually balanced? Does it slice beautifully?
 This was a test for a choux with sable. The Birdies got the extras.
 This was a test cake. We ate it.
 I share with others in close proximity. I then take a bit and wrap it in cellophane to keep at room temperature and test the next day. I wrap another bit to refrigerate to test over the course of a week. I wrap another bit and freeze it to test in the distance future. In other words, if I'm pleased with my concoction, I EAT IT! This is why, at the end of a cookbook journey, I'm usually 10 to 20 pounds heavier than my standard resting weight. The tragic part is that this timing usually coincides with the photo shoot for the book I've just finished testing my way through. The happy part is that I have an excuse to wear draw string pajama bottoms to the grocery store because none of my pants fit.
So as you see my feed and posts, you'll know that there is a home for each treat. Usually that home is my tummy.
February 7, 2013
Puffy Hearts: Passionfruit Chiboust Puff Pastry Hearts
.JPG)
I like big puff and I cannot lie.You other bakers can't deny.
 PUFFED! Traditionally, as in most pâte feuilletée applications, the puff is weighed down evenly while baking so that it doesn't expand to it's full height. However, I chose to let my puff pastry freak flag fly and I let her grow unimpeded.
 That's all the Sir Mix-a-Lot that I'm going to channel in the pastry kitchen today. I promise.
In my defense, the lyrics speak to my one great pastry love: traditional puff pastry. All laminated
doughs, really. I love to make it. I love to teach it. I love to eat it. I love rap about it.
The puff based pastry that brings the flaky goodness of pâte feuilletée to its most beautiful heights is Gateau St. Honoré, a confection invented to honor the patron saint of pastry chefs. It's composed of a round base of puff pastry upon which you pipe rings of choux paste. You bake the two together. Traditionally, you bake small cream puffs that are filled and then attached to the edge of the puffy delight with caramel. The interior is filled with chiboust cream and in a very specific manne: with a St. Honoré tip.
 Individual St. Swanaré
.JPG) Large St. Swanaré
Large St. SwanaréI riff off this grandmama of baked goods infinitely. One that I teach and have served at events is what I've dubbed the "Gateau St. Swanaré," replacing the simple cream puffs with swans, using maple/sea salt butter from Vermont Creamery in my puff butter block and filling the finished pastry with a maple based lightened pastry cream.

But as it's Valentine's Day, I'm mining my great flaky love for a more passionate take on my favorite. And this time, I'm filling the pastry with the filling originally called for in the dessert: chiboust. Don't let the name scare you. If you can make pastry cream and an Italian meringue, you can make chiboust.
PUFFY PASSIONFRUIT CHIBOUST HEARTS

INGREDIENTS
For the Puff Pastry
Click this link for my recipe and a photo demo of the process. You'll have more than you need but this is a very good thing. Puff freezes beautifully and its applications are endless.

For the Chiboust
6 eggs, separated
1/3 cup passionfruit purée
1 cup sugar, divided
1/4 cup corn starch
1/2 teaspoon vanilla bean paste
1 cup whole milk
1 cup heavy cream
2 tablespoons unsalted butter at room temperature
1 teaspoon powdered gelatin
squirt of lemon juice
pinch salt

For the choux paste
Again, you'll have extra choux with this recipe. I suggest you pipe it out on a separate sheet pan as small cream puffs and fill with the extra chiboust cream.
1 ¼ cups water
1 ½ sticks butter (unsalted) in pieces
½ teaspoon salt
½ teaspoon sugar
1 ½ cups unbleached flour
6 eggs
To finish
Fresh rasberries
Confectioner's sugar
PROCEDURE
For the puff
•Once the finished puff has rested, cut about 1/4 off the puff block and roll out into a large, rough square, a little thinner than 1/4 inch thick. Allow the rolled puff to rest at LEAST 20 minutes before proceeding.
•Cut a large 12" heart from a piece of parchment. Lay the heart on top of the puff and, using a VERY SHARP knife, cut the heart shape from the puff. Reserve the puff scraps to make palmiers or something else nummy.
•Transfer the puff heat to a parchment lined sheet pan and put in the refrigerator.
For the chiboust
•In a small bowl, sprinkle the gelatin evenly over 1/8 cup of warm water. Allow to sit until completely saturated so that it looks like wet sand.
•In the bowl of a stand mixer fit with the whisk attachment, combine the egg yolks, 1/2 cup of sugar, 1/4 cup of corn starch, 1/3 cup of passionfruit and vanilla bean paste. Whisk until smooth.
•In a heavy saucepan, bring the milk and heavy cream to a simmer. Slowly pour the milk mixture down the sides of the mixing bowl with the mixer running to temper the eggs. Continue whisking until completely incorporated.
•Transfer the mixture back into the saucepan, making sure the scrape the bottom of the bowl.
•Whisk over low heat until the cream thickens to the consistency of mayo. Immediately add the bloomed gelatin and the butter. Stir until both have melted completely into the pastry cream. Transfer the cream to a large bowl and cover the top of the cream with plastic wrap to keep a skin from forming. Refrigerate until completely cool, about 2 hours.
***DO NOT CONTINUE TO THE NEXT PHASE UNTIL THE PUFF BASE OF THE PASTRY IS BAKED AND COMPLETELY COOL***
•Once the base cream is completely cool, place the egg whites in the bowl of a stand mixer fit with the whisk attachment along with a pinch of salt. Whisk until just foamy. At the same time, combine the remaining 1/2 cup of sugar and a few tablespoons of water and the squirt of lemon in a heavy saucepan. Stir the mixture over low heat until the sugar has completely melted. Attach a sugar thermometer and heat to 240º. Slowly pour the hot sugar mixture into the whisking egg whites, making sure to pour the hot sugar down the side of the bowl otherwise you'll scramble the eggs. Whisk on high until you achieve stiff, shiny white peaks and the bowl is cool to the touch.
•Transfer 1/3 of the egg whites to the cooled cream and gently stir into the cream to lighten. Transfer the remaining egg whites to the cream and gently fold with a large rubber spatula until no white streaks remain.
For the choux
•Preheat the oven to 375º.
•Combine the water, salt, sugar and butter in a large saucepan and allow to simmer over medium heat until the butter is completely melted and the water is just beginning to visibly simmer.
•Add the flour all at once and then stir quickly with a wooden spoon continuously until the mixture thickens, becomes smooth and pulls away from the side of the pan.
•Transfer the paste to the bowl of a stand mixer fit with a paddle attachment. Mix on low for a few minutes to allow the paste to cool.
•Add eggs, one at a time, to the paste mixture until the mixture is smooth and flows slowly from the paddle when it's lifted. You may not need all the eggs...you may need one more.
•Remove the puff heart from the fridge and transfer the choux to a large pastry bag fit with a small star tip. Pipe a choux paste heart an inch inside the edge of the puff pastry.
•Immediately bake until the puff is puffed and deeply golden brown. Allow to cool completely.
To finish
•Line the outside of the heart with raspberries. Sift confectioner's sugar over the raspberries.
•Fill a large pastry bag fit with a St. Honoré tip with the chiboust cream. Pipe ribbons of chiboust inside the raspberry perimeter. I pipe two layers of cream to make it extra creamy.
Gesine Bullock-Prado's Blog

- Gesine Bullock-Prado's profile
- 69 followers
Gesine Bullock-Prado isn't a Goodreads Author
(yet),
but they
do have a blog,
so here are some recent posts imported from
their feed.

