
Gesine Bullock-Prado's Blog, page 14
July 13, 2013
Team Kea
Today was the first long run for my next race, October's Marine Corp Marathon. It's not newsworthy. As far as long runs go, this one was short. 5 miles. But this was my first run as a member of a team. I usually train and fundraise for marathons alone. Today, although I ran solo, there are a few others in different parts of the world who are training with me in spirit because we all heard the same news, we all felt helpless and we all want to do something about it.

I feel like it all happened on the same day, getting word that our High School reunion was nigh and that our classmate Kea had died. It couldn’t have. The Facebook posts are dated on completely different days, maybe weeks apart. But in my mind, they happened simultaneously.
I wasn’t close with Kea in school. She was bubbly and beautiful. Kind and vivacious. I was not, as cranky teenage introverts tend to be just the opposite. But it was clear to me that she was a one of those rare, undoubtably good souls who you can't help but like.
As it happens when we grow older and less curmudgeonly, we open ourselves to relationships once impossible as young ones. We have Facebook. We get to see pictures of each other without actually interacting while somehow feeling we've connected. I came to know that Kea now had a gorgeous family. She lived in Greece. She was still equally blonde and beautiful. Her smile promised that all the good-natured sweetness she possessed at Washington-Lee High School had relocated with her from the Atlantic to the Aegean Sea.
I barely knew this woman but the shock and sadness of her loss gutted me. I didn’t have to imagine how it affected those who were closest to her because their grief was pouring onto our shared timeline on Facebook. Memories and photos. Evidence that what I had perceived, that Kea was indeed pretty damn great, was piling up post after post
. What really hit home was that we had a reunion coming up and that girl who graduated 20+ years ago, with that sunshine smile and generous spirit, she couldn’t have imagined that she’d never see her 25th high school reunion. Her children, who lost their mother so damn young, not only will they have to grow up without her, but that very thought, that their genetic map might shorten an otherwise happy life will likely cloud most visions of their future. This in particular really pissed me off.
I run marathons in memory of my mother who was taken by cancer too young. But I was a grown woman, married and settled into a busy life all my own when I sat on the edge of her bed while she slipped away. I’m so damn angry about Kea, that she died of breast cancer at 42. I’m filled with rage for her young family and her friends.
So my classmate and fellow marathoner, Rebecca Pettinelli and I banded together to form Team Kea to raise money for cancer research in her memory. Our fundraising page is brand spanking new and bare bones. Since there are so many of you who loved her, I’m leaving it to you guys who knew her best to saturate the page with pictures and memories. If you’re running the Marine Marathon this October and would like to join Team Kea to help us raise money, give me a shout and I’ll add you to the team roster. Even if you aren’t running but you loved Kea, I encourage you to join the team and help spread the word.
For the rest of you, if you can, I ask that you donate in memory of Kea. Click HERE to make a secure donation to Cancer Research Institute.


July 12, 2013
FREEGRACE FRIDAYS! Nature's Magic

I've been a little out of pocket as of late. But there are lots of magical things brewing in the universe.
On the baking side, I've been working on the next book AND inventing lovely holiday treats for Better Homes and Garden's December issue.
On the Freegrace front, nature's magic is showing herself around every corner.
 What are these hot pink orbs doing poking out of my maple?
I'd noticed a few months ago that there was something growing from our ancient maple in front of the house. It occurred to me that perhaps I should take a ladder to the tree and pull it out but on the other hand, I'd have to pull out the ladder. I'd also surmised that what I was seeing was a berry bramble in the making. There was a time that I fought the onslaught of prickly buggers popping up everywhere on our property. The birds go into our back acreage and gorge on berries and leave little deposits closer to the house the end up bearing fruit. Literally. To make it simple: Bird eats berry. Bird flies into the hole in the maple. Bird poops. Voila! Berry bush.

Yesterday, during a break in the relentless rain, I took a trip out front and bright pops of hot pink drew me to our 100+ year old beauty. And there they were, plump raspberries cascading from our maple. Raspberries so wonderful I planted myself at the foot of the tree and ate every ripe berry I could find (I shared with Ray. Promise). Whether the berries were made particularly sweet from an infusion of maple or they're simply good because they'd been left to grow wild and ripen in their own time without human intervention really doesn't matter. What matters is that these berries were sunshine and sweetness in a single bite. I shall forever more encourage birdies to eat berries as they find them and carry their bounty wherever they like if this is what we end up with: magic raspberry-maple trees.

In other breaking news, the ducklings are no longer ducklings. They are now officially ducks. All but a few pin feathers are in. Mama is still enjoying their company but she's jealous when I spend too much time admiring them. She's meant to be my favorite (and she is) and she'll have none of my preening over the babies, as evidenced by her constant photo-bombing when I take the time to snap away at the ducks.
I hope you're enjoy the magic of nature as much as I have been this summer.
July 6, 2013
FREEGRACE FRIDAYS! Lazy Summer Days...

It's Saturday. Not Friday. But while this post is a day late to qualify as "Freegrace Friday," I'm following our trash collector's lead: they call the day before a holiday to inform us that due to the national day of hijinks scheduled during a weekday, they're going to come a day later than usual.
Fun Rural Fact: We don't have municipal garbage pick-up in the boonies. We have to pay someone to trundle themselves to our version of Mayberry to come get our junk.
 Crawling out of the berry brambles off the side of the property near the ancient milk shed, Ray and I looked up to see our house serene and welcoming. A wonderful sight when you're sweaty and beaten from berry picking.
 She looks pretty darn good for having celebrated 220 Independence Days!
This week has been all about the berry bounty. First came the strawberries. They've begun to taper off, although the Alpine strawberries will produce little red nubbins all summer long.

 4th of July berry pie! With berries and a buttery crust this good, it's not going to last long. The raspberries and black raspberries have taken up the slack and are coming in gang busters. The cherries are starting to shift their pigment production into high gear and the black & red currants and gooseberries bushes are threatening to bloom, just in time for late summer treats.
Tallulah and Ruthie decided that they'd help with the berry picking. I'd always accused the goldfinches of pilfering all the best berries. I've come to realize that the damn dogs are pretty efficient at picking out the sweetest morsels and snacking away on our brambles.
Speaking of pilfering, the ducklings, who've grown to be young ladies, have been making a feast of the tadpoles in the pond. They dive down, their little tushies bobbing up out of the water, their feet wiggling in the air. Where we once had thousands of baby amphibians we now have none. None that we can see, anyway. Now we know how to get bright shiny feathers, a diet rich in baby toad. :(
I hope you all are having a sweet and wonderful summer weekend (or winter weekend on the flip side of the world).
.JPG) Our backyard cherries, as captured by Ray.
Our backyard cherries, as captured by Ray.
July 4, 2013
Happy 4th of July!

Here's a short and sweet round-up of July 4th treats to get you in the spirit.
 For the Red White & Blue Cheesecake recipe, click HERE
 The WE THE PEOPLE cake. For the recipe click HERE
 Celebrate Independence Day with the Best Pie Crust EVER! Click HERE for the recipe.
 REVOLUTIONARY STACKED PIE! Click HERE for the recipe.
 For the Flag Cake recipe, click HERE!
 Key Lime Fruit Tart. For the recipe click HERE.
 And of course, let's not forget that it's not ALL about dessert. Click HERE for the yummy 4th of July Picnic recipes.
July 3, 2013
An All American Meal to Celebrate the 4th! Fried Chicken, Potato Salad, Slaw and Buttermilk Biscuits

I've already eaten half the potato salad. There. I said it.
It's not an American recipe. It's a riff off my German mother's recipe. It's so damn good.
And yes, I fried off a few pieces of chicken. Obviously I did. There's a picture of it right there on your screen. The rest of the chicken is still marinating in the buttermilk. But I needed to share the recipe today if you want to make this tomorrow. That means I had to make some. But only two pieces.

And notice how well I'm spelling today? Not a single slip on the keyboard. You know why? That chicken, while fried to a crispy deliciousness, it isn't at all greasy. Just tender and crispy.
And I had to bake off a biscuit. A plate isn't a plate without the biscuit. And then the coleslaw? It's always better the day after making it. So is the potato salad for that matter. And they all have to be present for picture day.
And there you have it. An exact replica TODAY of what I'm eating tomorrow (again).
Happy 4th of July! I wish you all a beautiful and tasty day.
4th of July Fried Chicken and Fixins
INGREDIENTS
FOR THE CHICKEN
This recipe is for 8-10 breasts, 6 wings and 4 thighs. This amount is the perfect amount to fit in my biggest metal bowl AND accomodate the marinade.
the marinade
1 quart buttermilk
Juice and zest of 1 lemon
1/4 cup maple syrup
1 packet Bearitos taco seasoning
1 teaspoon cayenne pepper
•In a large metal bowl, whisk together the buttermilk, lemon juice and zest, maple syrup, seasoning and cayenne pepper. Add the chicken and whirl around to make sure that every piece of chicken is coated.
•Cover with plastic wrap and refrigerate overnight.
the coating
4 cups all purpose flour
2 teaspoons baking powder
1 teaspoon salt
1/4 teaspoon cayenne pepper
1 beer
2 eggs
(have extra on hand in the event you don't have enough for all the chicken)
Enough oil to fill a large stockpot at least 4 inches deep
•Take the chicken out of the fridge but leave it in the buttermilk. Allow to come to room temperature.
•Preheat oven to 350º
•Heat oil to 360º
•Whisk together the flour, baking powder, salt and cayenne pepper in a large bowl.
•Whisk the beer and eggs together in a pie dish.
•Dredge the buttermilk soaked chicken in the flour mixture.
•Dredge the chicken in the beer mixture and then dredge again in the flour mixture.
•Fry until deeply golden brown. Transfer the chicken to a paper towel to allow the oil to drain. Transfer the pieces to a parchment lined sheet pan and place in the oven. Bake until the chicken's internal temperature reads 165º.
•Once the chicken reaches temperature, immediately transfer the chicken to a paper bag. This keeps the chicken nice and crispy.
FOR THE POTATO SALAD
3 pounds new potatoes (I dug mine up from my Yukon gold plants. If you are growing potatoes yourself, you can harvest the small/new potatoes from the plants without tearing the plant out of the ground completely so that it will continue growing more potatoes. You just have to gently dig around the roots and gently pluck the little ones out. The plant is hardy as heck and will continue to produce for you).
 A tub of potatoes, just waiting to become potato salad.
1/2 Vidalia onion, finely chopped
1/2 cup canola oil
1/2 cup apple cider vinegar
1/2 cup mayo (I use Hellman's olive oil mayo)
10 cornichons, finely chopped (I use Maille)
1/4 + 2 tablespoons of the Cornichon pickle juice
6 dashes of Maggi (liquid) Seasoning (important addition. Can't make this without it)
1/2 cup of fresh English Peas, shelled (optional. again, had them in the garden begging to be eaten)
.JPG) Peas!
Peas!Salt and pepper to taste
2 scapes, finely chopped as garnish (optional)
•Boil the potatoes whole, with the skins on until just fork tender.
•Don't allow the potatoes to cool completely, start peeling them the second you can handle holding them.
•Slice the potatoes as thinly as you can while still keeping their shape. Transfer them to a large serving bowl.
•Whisk together the oil, vinegar, cornichon juice and Maggi. Pour the mixture over the potatoes and stir gently to coat the potatoes.
•Gently stir in the mayo and then the onions and cornichon.
•Bring a few cups of salted water to a boil. Blanch the peas in the water for 30 seconds and then drain.
 Add to the potato salad. Salt and pepper to taste.
FOR THE SLAW
1 head green cabbage, grated or thinly chopped
1 head red cabbage, grated or thinly chopped
1 red pepper, thinly sliced
1/2 Vidalia onion, minced
1 carrot, grated
1/4 cup pickled jalapeno peppers, chopped
1/4 cup mayo
1/4 cup apple cider vinegar
1/4 cup canola oil
2 tablespoons jalapeno pickling juice
salt and pepper to taste
•Mix everything together. Add more vinegar and oil if the slaw is too dry.
BUTTERMILK BISCUITS
(makes 8 biscuits)
2 cups all purpose flour
2 teaspoons baking powder
1/2 cup unsalted butter, ice cold
1 teaspoon salt
1/2 cup buttermilk
1 egg
1 tablespoon maple syrup
egg wash (1 egg whisked together with 2 tablespoons water)
•Preheat oven to 350º
•Whisk together the flour, baking powder and salt in a large bowl
•Using a cheese grater, grate the butter into the flour. Whirl around with your fingers to evenly coat the butter with the flour.
•In a small bowl, whisk together the buttermilk, egg and maple syrup. Stir the wet ingredients into the dry. Switch to your hands and gently knead the dough until it's well combined.
•Roll the dough out onto a well floured surface to about 1/2 inch thick. Stamp out rounds with a biscuit cutter and transfer to a parchment lined sheet pan.
•Brush the tops of the biscuits with egg wash.
•Bake until well risen and the tops are golden brown, about 15 to 20 minutes.
July 2, 2013
Happy Fourth of July! A Patriotic Cheesecake
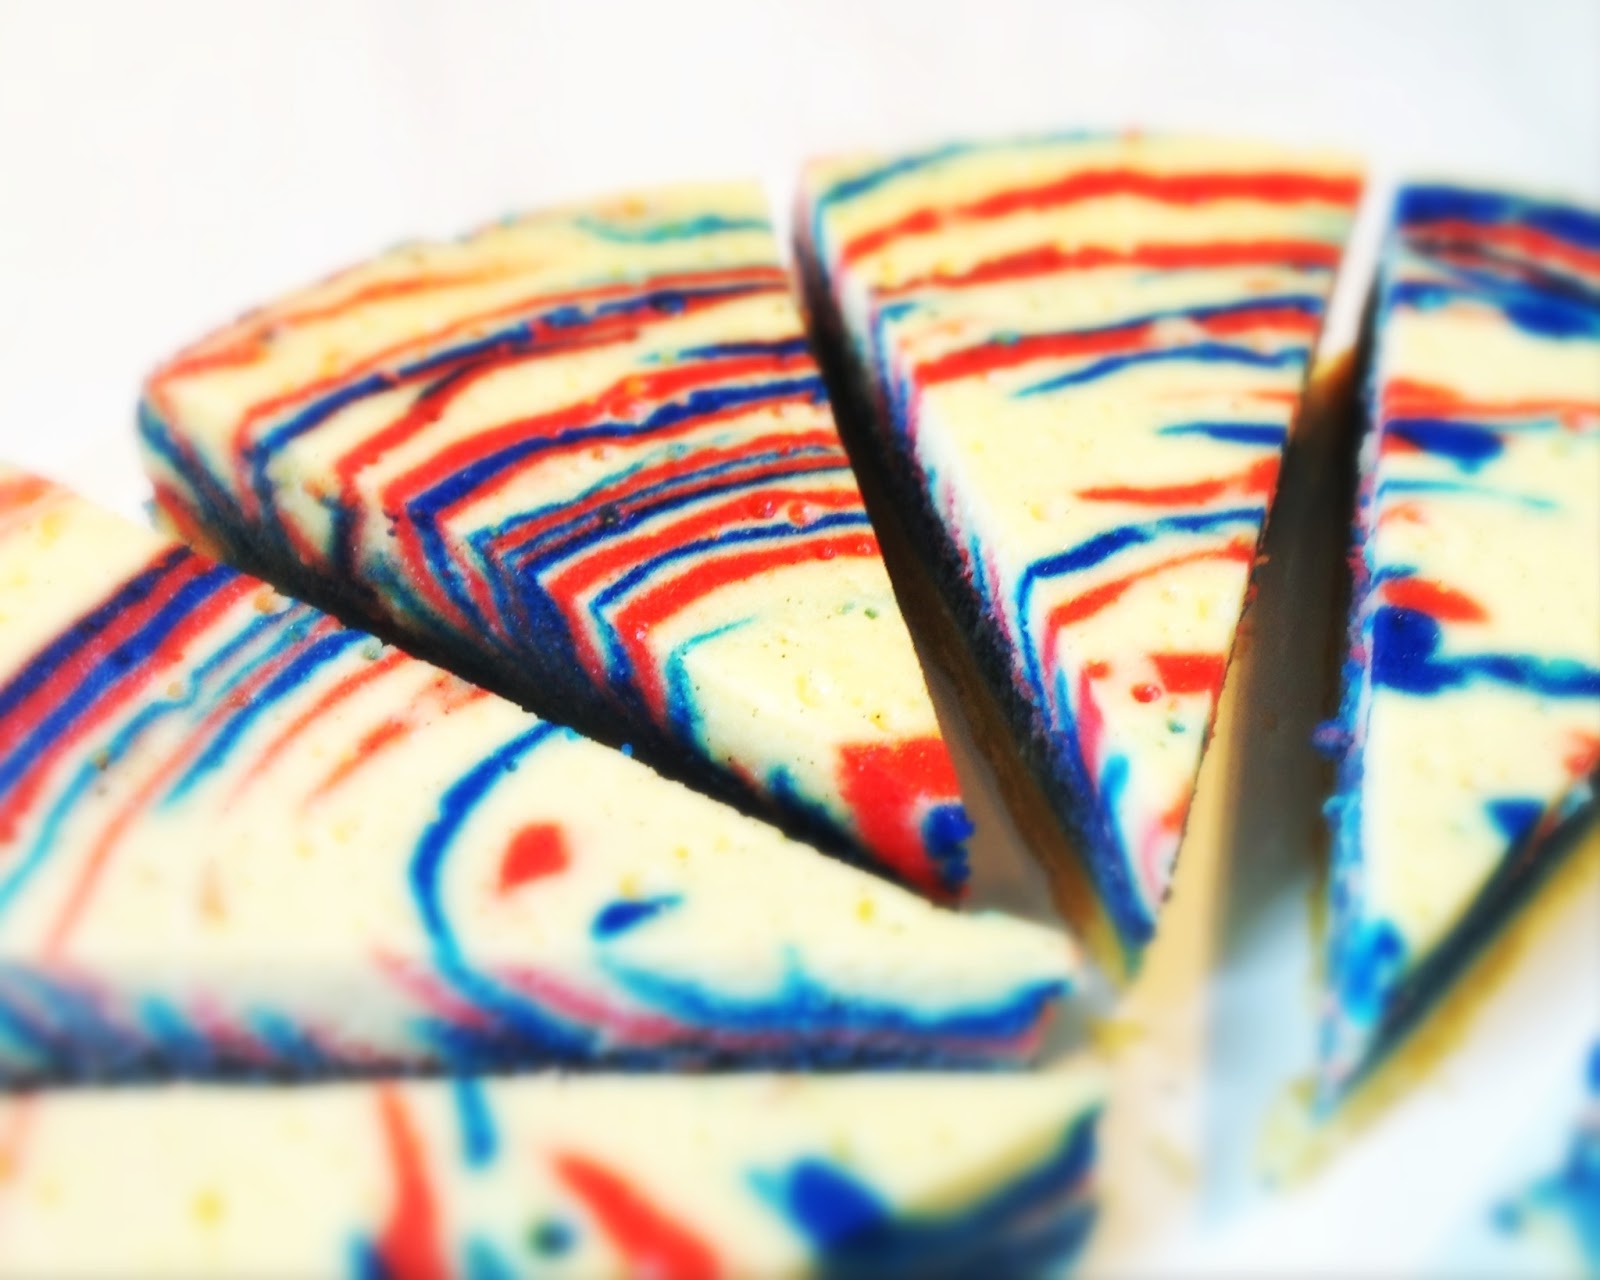
It's not officially my favorite national holiday until my digits are permanently infused with patriotic hues. I'm not kidding. No amount of acetone can get this dye out from under my fingernails. I guess I just have to waggle my pastry nubbins with pride. Hell, they're more colorful than sparklers.

Here's a recipe that will get you caught up with my present state of red, white and blue jazz hands. It's an all American cheesecake infused with a heavy dose of French zing in honor of Marquis de Lafayette, General Washington's great friend, compatriot and a major-general in Washington's continental army.

Crème Fraîche Cheesecake
(Makes one 9" cheesecake)
INGREDIENTS
For the crust
1 stick unsalted butter, room temperature
1/2 cup confectioner's sugar
1 cup all purpose flour
1 egg yolk
pinch salt
For the filling
1- 8 ounce package cream cheese at room temperature
3- 8 ounce packages crème fraîche (I use Vermont Creamery's Madagascar Vanilla CF)
3/4 cup granulated sugar
3 eggs
1/2 cup all purpose flour
zest of one lemon
pinch salt
(If you can't find the Vermont Creamery crème fraîche, add a teaspoon of vanilla as well)
Red gel food coloring (I use Americolor)
Blue gel food coloring
PROCEDURE
For the crust
•Preheat your oven to 325º.
•In the bowl of a stand mixer fitted with the paddle attachment, cream the butter and sugar until light and fluffy. Scrape the mixture from the sides of the bowl.
•Add the egg yolk and mix until just combined.
•Add the flour and salt and continue mixing until the mixture comes together.
•Transfer the dough to a large piece of plastic, wrap it up and refrigerate for 10 to 20 minutes.
•Line a 9" cake pan ( a traditional pan, not one with a removable bottom) with parchment and spray with non-stick cooking spray.
•Crumble the crust evenly into the cake pan and press evenly onto the bottom with your fingers.
•Refrigerate the crust for 10 minutes and then bake for 15 minutes, until the edges just begin to brown. Allow to cool COMPLETELY.
For the filling
•In the bowl of a stand mixer fitted with the paddle attachment, cream together the cream cheese, crème fraîche and the sugar until smooth.
•Crack the eggs into a small bowl and very gently break them apart a bit.
•With the mixer on LOW, add the eggs a little at a time, scraping down the bowl every now and again. (If you're too exuberant about adding the eggs, doing it on high speed and beating air into the mixture, the cheesecake can collapse and crack while baking). Add the zest.
•Add the flour and salt on low and mix until combined.
•Transfer one cup of the batter to a small bowl and color with 2 to 3 drops of red food coloring.
•Transfer another cup of batter to another small bowl and color with 2 to 3 drops of blue food coloring.
•Spoon about three tablespoons of plain batter onto the middle of the cooled crust. Spoon one tablespoon of red batter onto the middle of the plain batter. Just plop it down. Don't spread it. Don't worry about it being perfect. Plop another 3 tablespoons of plain batter atop the red batter and then plop a tablespoon of blue batter atop the plain. Continue like this, making sure not to shimmy the pan but instead let gravity and the weight of each successive spoon of batter do its work. If you start to "spread" the batter and put weight on the layers, you'll smoosh the colors together.

•Once you've finished up with all the batter, place a hotel pan or roasting pan in the oven and fill it a few inches high with hot water, just enough that the water will reach half way up the cake pan. Place the cake pan very carefully into the water bath in the oven and bake for 1 hour to 1 1/2 hours, until the middle of the cheesecake gently shimmies.
•Turn the oven off and open the door a bit. Keep the cheesecake in the oven in the water bath.
•Once the cake pan is cool enough to handle, carefully remove it from the water bath and allow to continue cooling on your counter top. Transfer to the fridge to chill completely. The cake will last up to a week in the fridge.
June 28, 2013
FREEGRACE FRIDAYS: Brewing Mad Myrtle IPA!

Freegrace was built as a tavern, an inn, a stagecoach stop and a farm. It served as the county clerk's office and a local watering hole. It was the stop to get a drink on the way back from a tough day at court in Woodstock. And it was a warm respite during a break in the 5 hour, unheated church services during the dead of winter.
 The beer has been in this car boy for 2 weeks. Before that, it was in another holding tank for 3 weeks.
 Not surprisingly, the tavern was also a potato whiskey distillery during the War of 1812, making Freegrace Leavitt a very rich man for the duration of the war despite the fact that President Jefferson laid a heavy excise tax on the good stuff to finance the war.
 Ray, lifting the car boy high so that gravity takes the beer low.
 Gravity doing it's work.
We've taken the history of this place to heart, at least on the farming and booze brewing front (no stagecoaches or innkeeping for us). Unlike Mr. Leavitt, we make beer, not whiskey. And we don't make a dime off of it (yet) but we sure throw great parties when the beer is done.
 Bottling!
Our latest batch is our triple hopped summer IPA and should be ready in time for July 4th celebrations. I've named it "Mad Myrtle IPA" in honor of the sweet little chickadee I helped raise and recently released back into the wild.
 A sampling from the last dredges from botting. You can see sediment on the bottom, which won't be in the finished bottles but at least we see some gorgeous, unfiltered color. And the aroma? Unbelievable.
We've seen her fluttering around, hopping from limb to limb in the company of her siblings. I miss her but we have the growing ducklings and Mama Goose to keep us occupied.
 Label in progress. Need to work on giving Mad Myrtle some eye balls.
The babies have started using the pond with Mama Goose nervously supervising. Mama hasn't utilized the pond since she's been the lone goose on the farm. Swimming for water fowl is a social thing and she's been so lonely that she's been bathing in a bright red "crab" kiddy pool instead of taking lone swims in the big pond.
 Mama wants the ducklings to come out and play.
Watching the frisky ducklings paddling away has given her a reason to enjoy a swim. I caught her first foray back into the drink on film. It was short but incredibly sweet.
Have a wonderful 4th of July!
.JPG)
Click HERE to learn how to make my We The People cake.
.JPG)
June 27, 2013
We The People

The 4th of July has always been one of my favorite holidays. I spend weeks dreaming up treats to celebrate the birth of our nation. I can't deny that living in a house that was built in 1794, not too long after the end of the revolution, brings a deeper connection to all things 1776.

During my weeks of confectionary contemplation, the words "We the People" and it's commensurate ornate script against yellowed parchment from the Constitution's preamble kept appearing before my eyes. I'd be lying if I didn't admit that after a few days, the 12 year old boy in me corrupted the phrase to "We the Peephole."
That's as good a sign as any to get off my duff and start baking in earnest.
I wish you all a glorious 4th of July celebration!
WE THE PEOPLE CAKE
This cake takes a few techniques from a few of my books and mashes them up into one cake. The first you'll work on is the joconde decor sides. In February 2010, I shared this technique with you for the first time. Since then, it's become a popular baking subject online for adventurous bakers and I know that includes you. I'll refer you to that original post for the directions with this one change: use sliced almonds with the skins still attached instead of traditional almond flour, which is made from blanched almonds with the skins off. The skins provide a lovely flecked color, not disimilar to aged parchment. It's also quite a bit easier to find sliced almonds than it is blanched almond powder. Click HERE for the technique and recipe. You can use either cocoa or black food coloring to dye the piping paste.

In order to get the words to look just right, I did a Google Image search for "We the People." I pasted the image into Preview and flipped the image so that it appeared backwards and placed that underneath my parchment to use as a piping guide.
 For the cake
1 1/2 pounds unsalted butter, room temperature (6 sticks)
6 cups sugar
9 cups flour
3 tablespoons baking powder
2 teaspoons salt
3 1/2 cups buttermilk
2 tablespoons vanilla
15 eggs
red and blue food coloring
(this is a very large batch. If you don't have a large enough mixer, simply cut it in half and make it twice).
•Preheat oven to 325º.
•Cream together the butter and sugar until light and fluffy.
•Add the eggs, one at a time, scraping the sides of the bowl between each addition. Add the vanilla.
•In a large bowl, whisk together the dry ingredients for at least 45 seconds.
•Add the flour and buttermilk in alternating additions, mix on medium speed until smooth.
•Line a quarter sheet pan (9" x 13") with parchment paper. Spray with non-stick spray. Spread about 3 cups of batter evenly into the prepared pan and bake until just set but not fully baked, about 15 to 20 minutes. Allow to cool. This will be the layer from which you stamp out the stars.
•Prepare four 9" cake rounds by lining with parchment and spraying with non-stick cooking spray. Spread 1 1/2 cups of plain batter evenly into each of the prepared pans. Bake until the cake just springs back, 15 to 20 minutes. Carefully release the cakes from the pans onto a cooling rack and allow to cool completely. Clean the pans and line with parchment and spray with non-stick spray again.
•Place 6 cups from the remaining plain batter into a large bowl and add about 6 drops of red food (add more if you want a deeper red). Place 1 1/2 cups of red batter into each of the four prepared pans and bake until the cake just springs back, about 15 to 20 minutes.
•Stir about 4 to 5 drops of deep blue food coloring into the remaining batter. Prepare a 6" cake round by lining the bottom with parchment and spraying with non-stick spray. Spread half the blue batter into the 6" cake pan.
•Using a small star cookie cutter (mine's about 1 1/2 inches tall), stamp out stars from the quarter sheet pan of plain, barely baked, cake. Nestle the stars firmly into the batter.
 Stars stuck into the batter.•Pipe the remaining blue batter in between and over the stars. Smooth out with a small offset spatula.
 •Bake the blue/star batter cake for 45 minutes to an hour or until the middle of the cake springs back when gently poked. Allow to cool completely. Release from the pan and carefully level the top of the cake with a serrated knife.
For the filling
1 stick unsalted butter, room temperature
2 (8 ounces) packages of Philadelphia cream cheese, at room temperature
4 cups of confectioner's sugar
1 tablespoon egg white powder (optional)
•Place all the ingredients into a stand mixer fit with the paddle attachment and mix until smooth.

To assemble
•Place a plain round of cake onto a cardboard cake round. Spread a very thin layer of filling on top of the cake, just enough to create and adhesive. You should be able to see the cake underneath the filling.
•Continue by placing a red layer on top of the plain and spreading a small amount of filling on top of that. Continue until you have 6 alternating layers or red and white layers. Freeze until set, about 1 hour.
•Measure the height of your blue, star filled layer, I make a line on a sharp knife with a Sharpie to mark the height of the blue layer. Cut a 6"round from the center of your red and white layers, cutting as deeply as the mark on your knife. Carefully pull out the center 6" layers and replace them with the blue layer. Press firmly.
•Spread another very thin layer of filling on top of the cake and place the remaining plain layer on top. Spread another thin layer of filling and top with the last red layer.
•Using the remaining filling, spread an even layer along the sides and top of the cake. Measure the height of the cake and carefully trim the joconde sides. Carefully press the joconde sides onto the cake. Place the cake in the freezer to set, about 2 hours.
•Break up the remaining pieces of joconde sides and place on a parchment lined sheet pan. Place in a 200 degree oven for 20 minutes to dry out the cake. Allow to cool and pulverize in a food processor until you get a fine powder. Sprinkle the cake powder on top of the finished cake.
June 19, 2013
Key Lime Fruit Tart with Graham Pate Brisee

There's no reason that a key lime pie can't be something more.

Something more beautiful.

Something more delicious.

Something more fruity.

Instead of slathering the top of the pie with whipped cream, bedazzle the tart with fruits in season.
You can still serve it with whipped cream on the side. A win-win for you and the key lime.
KEY LIME FRUIT TART with GRAHAM PATE BRISEE
(makes one 13 3/4' x 4 1/2" rectangular tart)
INGREDIENTS
For the crust
1/2 cup graham flour
3/4 cup all purpose flour
2 tablespoons sugar
1/2 cup cold butter, cut into small pieces (1 stick)
1 tablespoon sweetened condensed milk
1 egg yolk
1 teaspoon vanilla extract
1/4 teaspoon fine sea salt
For the filling
1 can sweetened condensed milk (minus 1 tablespoon that you used in the crust)
1/2 cup Madagascar vanilla creme fraiche from Vermont Creamery (can substitute regular creme fraiche but this stuff is FANTASTIC and a wonderful accompaniment to the key lime juice)
1/2 cup key lime juice
5 egg yolks
For the topping
1 pint blueberries
1 pint blackberries
1 pint strawberries
1 pint raspberries
1 kiwi
1 pomegranate
To finish
strawberry preserves
PROCEDURE
For the crust
•Preheat the oven to 325ºF.
•In the bowl of a food processor fit with the blade attachment, combine the flours, sugar and salt. Pulse a few times.
•Add the butter and continue pulsing until the mixture resembles coarse corn meal.
•In a small bowl, whisk together the sweetened condensed milk, egg yolk and vanilla. Continue pulsing and add the egg yolk mixture to the processor and pulse until the mixture just starts to come together.
•Turn the dough out onto a large piece of plastic wrap. Turn the dough over a few times to insure that there are no dry clumps of flour remaining. Cover the dough and refrigerate for 20 minutes.
•Press the dough evenly into the tart pan. Freeze for 20 minutes. Blind bake the crust for 20 minutes.
For the filling
•Whisk all the ingredients together until smooth. Pour the filling into the pie crust and return to the oven. Bake for 25 - 30 minutes or until the filling is set (it should barely jiggle in the very center).
•Allow to cool completely.

To finish
•Arrange the fruits geometrically on the tart. Using a pastry brush, brush strawberry preserves onto the fruit to give them lasting sheen. Can refrigerate up to a day before serving.
June 18, 2013
Raspberry-Lime Danish Coffee Cake

Got Danish dough in the fridge? You've got coffee cake.

RASPBERRY-LIME DANISH COFFEE CAKE
INGREDIENTS
For the dough
1/4 piece of Danish Dough. Click HERE for the recipe.
For the filling
1 8-ounce package of Philadelphia Cream Cheese, room temperature
1/2 cup confectioner's sugar
1 teaspoon lime powder (optional)
1 egg yolk
1 tablespoon all purpose flour
zest of 1 lime
1 cup fresh or frozen raspberries
To finish
egg wash (1 egg whisked together with 2 tablespoons water)
1 pint fresh raspberries
2 tablespoons confectioner's sugar
zest of half a lime
PROCEDURE
•Preheat the oven to 375º.
•Roll out the Danish dough into a rough 8" x 16" rectangle.
•Along the long side, cut 1 1/2" - 2" strips along either side of the rectangle, about 1 inch apart.
•Place all the filling ingredients in a stand mixer fit with the paddle attachment. Mix until smooth.
•Spoon the filling onto the middle of the danish and spread evenly. Place the frozen raspberries on top top of the filling. Fold the strips over, across the filling, pressing gently (It's ok if the strips overlap, they'll still open a bit in the oven). Brush the dough with egg wash.

•Cover the Danish with plastic wrap and proof for 1 hour on your kitchen counter. Egg wash again before baking.
•Bake for half an hour to 45 minutes or until the outside of the Danish is golden brown.
•Allow the Danish to cool and place fresh raspberries along the open center of the Danish.
•Sift confectioner's sugar over the coffee cake. Lightly zest a lime over the finished coffee cake.
Gesine Bullock-Prado's Blog

- Gesine Bullock-Prado's profile
- 69 followers
Gesine Bullock-Prado isn't a Goodreads Author
(yet),
but they
do have a blog,
so here are some recent posts imported from
their feed.

