
Jordan Castillo Price's Blog, page 40
November 23, 2012
Photoshop Friday - gradient goodness
The quick tip is about how to get more than one gradient on a page.

Let's say you want to achieve the effect above, but without taking the time to create a three-part gradient that goes from black to white to black again. So you load up a black-to-white gradient and hit the top of the page.

Then you go to add the bottom gradient, and you get...this, below. The top gradient is gone. What gives?

because your gradient was black to WHITE, the white part of the gradient painted over the top part, so the whole gradient will appear to be entirely redrawing every time you click on the canvas. To put more than one gradient on a page, you need to have it set with CLEAR as one of the stops. Then you can keep popping gradients on there to your heart's content.
So how would I use this in practice? Well, that simple top-and-bottom gradient would probably look pretty good as a layer on an ebook cover.

Here's a gradient layer from the current cover I'm working on. I think it's actually two gradients, some painting and some masking/erasing that follows the conours of light/shadow on the model's face. This is the layer where I'm trying to make sure my subject looks like he's actually IN his environment and not just pasted on top.

And here's the lovely Dallas model, without the gradient layer, looking neutrally-lit.

Now I've turned the gradient layer on, and set its mode to "color" in the layers panel. (Other modes may work better for you depending on the effect you're looking for.) The green hitting his cheek and forehead highlights is really key on selling him in this environment, because he's going to get a big green flare on his shoulder, and the aircraft ceiling is lit the trademark teal color of the series covers.
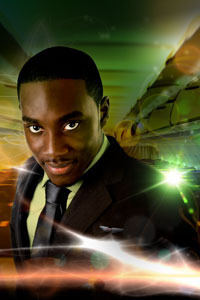
And now here he is, beautifully integrated into both his foreground and background, all thanks to gradients.
Let's say you want to achieve the effect above, but without taking the time to create a three-part gradient that goes from black to white to black again. So you load up a black-to-white gradient and hit the top of the page.
Then you go to add the bottom gradient, and you get...this, below. The top gradient is gone. What gives?
because your gradient was black to WHITE, the white part of the gradient painted over the top part, so the whole gradient will appear to be entirely redrawing every time you click on the canvas. To put more than one gradient on a page, you need to have it set with CLEAR as one of the stops. Then you can keep popping gradients on there to your heart's content.
So how would I use this in practice? Well, that simple top-and-bottom gradient would probably look pretty good as a layer on an ebook cover.
Here's a gradient layer from the current cover I'm working on. I think it's actually two gradients, some painting and some masking/erasing that follows the conours of light/shadow on the model's face. This is the layer where I'm trying to make sure my subject looks like he's actually IN his environment and not just pasted on top.
And here's the lovely Dallas model, without the gradient layer, looking neutrally-lit.
Now I've turned the gradient layer on, and set its mode to "color" in the layers panel. (Other modes may work better for you depending on the effect you're looking for.) The green hitting his cheek and forehead highlights is really key on selling him in this environment, because he's going to get a big green flare on his shoulder, and the aircraft ceiling is lit the trademark teal color of the series covers.
And now here he is, beautifully integrated into both his foreground and background, all thanks to gradients.


November 21, 2012
So it's the day before Thanksgiving...
...and I opt to return the electric kettle I bought a few weeks ago which stopped working two days ago. YES, the kettle I recommended in my newsletter! I bought it at Target. Not the best time of the year to brave Target, but my thought is, less nightmarish now than it will be after Thanksgiving when the American people-trampling shopping frenzy begins in earnest. So I go.
Bonus points for Target. I had a receipt AND a box, and the only question they had for me was whether I wanted an exchange or a refund. I opted for a refund since I no longer trusted that brand, having crapped out on me in six weeks. The man next to me was having a fit trying to insist that his receipt was correct even tough it did not match his product, so I seemed very with-it in comparison, with my correct receipt.
I found a different kettle for ten dollars less. Then I found Puffy's food on sale.
Good job, Target, for taking my return. The cashier also pointed out that I could get 5% off and free shipping online with my Redcard. Oh really? Amazon may have some competition for my mundane needs, in that case.
November 18, 2012
November 16, 2012
Photoshop Friday - brush size
I was gonna call it Photoshop Phriday but that was waaaay too cutsey...
Anyhow, in an effort to aid my own recall, I plan to post a quick tip every Friday--either one that I find indispensable, or one that I've been meaning to add to my repertoire.
This week's tip, which I've been meaning to start using, is changing the brush size without moving your cursor from its spot on the screen. You must be IN THE BRUSH TOOL for this to work. Press control-op (nothing happens). Then click, and you get this odd thing.
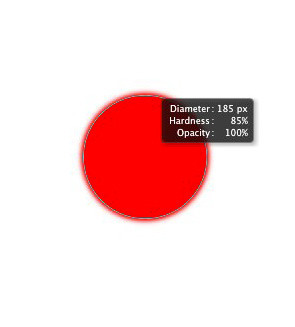
Even if your brush is not round, this red symbol will still be round, rather than the shape of your brush.
Keeping your control keys held down, when you move the cursor right to left, and you can very quickly increase or decrease the size of your brush.
Move the cursor up and down, and you will increase or decrease the hardness.
This works with both a Wacom tablet and a mouse.
Anyhow, in an effort to aid my own recall, I plan to post a quick tip every Friday--either one that I find indispensable, or one that I've been meaning to add to my repertoire.
This week's tip, which I've been meaning to start using, is changing the brush size without moving your cursor from its spot on the screen. You must be IN THE BRUSH TOOL for this to work. Press control-op (nothing happens). Then click, and you get this odd thing.
Even if your brush is not round, this red symbol will still be round, rather than the shape of your brush.
Keeping your control keys held down, when you move the cursor right to left, and you can very quickly increase or decrease the size of your brush.
Move the cursor up and down, and you will increase or decrease the hardness.
This works with both a Wacom tablet and a mouse.
November 14, 2012
Tutorial revew: Enhancing and Environmental Portrait with Photoshop
One of the ways in which I keep my Adobe training current is by subscribing to Lynda.com, which has more insanely useful tutorials than you could ever watch in your life. I’ve decided it would be fun to post reviews of the tutorials, plus it might help with my retention.
Chris Orwig’s tutorials often focus on photo retouching, which plays a very useful role in cover design. This short tutorial (just over an hour) covers a full color portrait converted to a distressed sepia-tone image. Not with the click of a one-size-fits-all button, but with complete, discerning control every step of the way.
My favorite tutorial highlights:
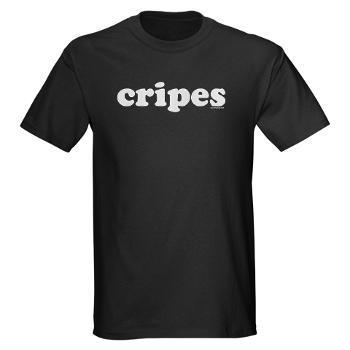
-Using the Photoshop CS6 content-aware patch tool for removing a distracting logo from a t-shirt
-Removing a distracting element from the background of the composition
-Adding film grain with a mask made from the red channel’s luminosity so it looks more integrated than adding it in a solid field
-Leading the viewer’s eye around the composition by use of light and dark. (I think many cover designers could learn a lot from this!)
You can watch a few of the segments, such as the patch tool, even if you're not a member, at the Lynda.com website.
Chris Orwig’s tutorials often focus on photo retouching, which plays a very useful role in cover design. This short tutorial (just over an hour) covers a full color portrait converted to a distressed sepia-tone image. Not with the click of a one-size-fits-all button, but with complete, discerning control every step of the way.
My favorite tutorial highlights:
-Using the Photoshop CS6 content-aware patch tool for removing a distracting logo from a t-shirt
-Removing a distracting element from the background of the composition
-Adding film grain with a mask made from the red channel’s luminosity so it looks more integrated than adding it in a solid field
-Leading the viewer’s eye around the composition by use of light and dark. (I think many cover designers could learn a lot from this!)
You can watch a few of the segments, such as the patch tool, even if you're not a member, at the Lynda.com website.
Notion Potion #7: Dodging the Wall
Creative blocks--going over, under, around through. It can be done!
Come read this month's Notion Potion column :D
Come read this month's Notion Potion column :D
November 11, 2012
Brain Pickin' - self publishing
Who's up for a brain pickin'? I'm trying to think of reasons why people might self publish...but these reasons turn out to be myths. For instance, it's easier (holy hell, no, it's ten times the work, easily...)
Any ideas?
Any ideas?
November 8, 2012
Comments go users-only
Okay, I've had it with the spam. I've made comments users-only but removed the captcha which didn't seem to be helping anyway.
I'm bummed because some of my regular commenters don't have LJ accounts, but the spam was pulling me out of my productivity zone too often to ignore :(
ETA: from idamus
: If those anon friends want an LJ for commenting, they can lock the accounts down to 100% private, then only their chosen user name shows, anything else can be hidden from other users/search engines in the settings
idamus
: If those anon friends want an LJ for commenting, they can lock the accounts down to 100% private, then only their chosen user name shows, anything else can be hidden from other users/search engines in the settings
I'm bummed because some of my regular commenters don't have LJ accounts, but the spam was pulling me out of my productivity zone too often to ignore :(
ETA: from
idamus
: If those anon friends want an LJ for commenting, they can lock the accounts down to 100% private, then only their chosen user name shows, anything else can be hidden from other users/search engines in the settings
Orange, Green, Peach, Aqua, Gold
So I was catching up on my Pirates of the Caribbean last night, and I realized....
The color palate of the film (the scenes on Blackbeard's ship, specifically) were the same color palate as my Turbulence covers.
November 7, 2012
Spam-splosion
The spam on my LJ is really out of control, despite me locking it all down and requiring a captcha, which I know is a pain in the ass to my legitimate commenters. I realized that there are a handful of old posts they seem to be focusing on and I finally got the idea to lock down the comments on those...is there anything else I can be doing?
(I love my new icon...it makes it seem like I'm annoyed with everything.)
(I love my new icon...it makes it seem like I'm annoyed with everything.)


