
Rachael Ray's Blog, page 83
September 18, 2012
Dust Mites: Do you know who you’re sleeping with?
As autumn settles in so do our allergies, and though closing our windows and taking our fave allergy meds may help, they’re probably not the only reason for our sneezing, wheezing and teary eyes. Nope, it’s whom we’re sleeping with regardless if it’s Brad Pitt (I wish!), Ryan Gosling, your child’s pet, or for you gents reading this: Megan Fox. Each night and day we’re getting comfy with 1000’s of microscopic bugs known as dust mites and their doo. But fear not, here are simple ways to help save your family’s health and go back to dreaming about Brad, Ryan or Megan.
THE POOP ON THESE PRE-HISTORIC POOPERS

Courtesy of www.zonavip.net
They’ve been sleeping with us for more than 23 million years
They like dark, warm and humid places, which is why they love sleeping with us since we spend 1/3 or our lives in our beds! Other fave hangouts are:
Stuffed animals/soft toys
Upholstered furniture
Carpet and Drapes
Piles of clothing
Their fave foods are dead human and pet skin cells i.e. ‘dander’ (which is where the word ‘dandruff’ has its roots.) and their doo…YUK!
One mite poops about 20 times a day and it is their doo that causes allergy problems. And, in case you’re wondering, your mattress can have 100,000 to 10 million mites inside of it…You doo the math!!
TIPS TO SMITE THE MITE:
Ok enough with grossing you out! Here are easy ways to minimize thy mites:
o BI-WEEKLY (Weekly be best but if you have the time!)
o SHEETS AND PILLOWCASES:
§ HOT WASH: Use hottest cycle care label allows
§ COOL WASH: Add a teaspoon of eucalyptus or tree oil to your wash, which is a natural way to kill dust mites found at your local health food store
o STUFFED ANIMALS/SOFT TOYS
Non-washable
FREEZE ‘EM: put in plastic zip lock bag and freeze for 24-48 hours
SHAKE ‘N BAKE: Put them in a plastic bag with a cup of baking soda and shake well then rub with a towel and vac
WASHABLE (if torn or ripped throw them out since they will never dry thoroughly and mold can form)
Put in a zippered pillowcase or tie an end so it is sealed
Remove all batteries
Dry with ole pair of sneaks to stomp out moisture
o UPHOLSTERED FURNITURE, DECORATIVE PILLOWS, CARPETING (you can also do this on your mattress and bed pillows)
§ VAC N SPRAY AWAY:
1. Vac everything: Only use a vacuum that has a true HEPA filtration system which can trap these mighty mini mites.
2. Spray everything lightly (only want to get things damp) with a 4:1 mix of distilled water and eucalyptus oil and let dry.
Eco-ternative: STEAM AWAY every 4-6 weeks. FYI Dust mite eggs can lay dormant for a month in carpeting!
o MONTHLY:
o WASH AND DRY MATTRESS COVERS, BLANKETS, BED SKIRTS, ETC ON HOTTEST CYCLE your care label allows
o VACUUM EVERYTHING:
§ Be sure to lift and vac under your mattresses and in all the corners of your bed, baseboards, skirts, etc.
o ALL YEAR LONG:
o ENCASE THY CHAMBER! Buy dust mite proof encasings for your pillow, mattresses and box springs. Look for those with zippers that have a plastic lock to insure no mites nor bed bugs can enter!
o REPLACE MAJOR DUST COLLECTORS/DUST MITE HOUSING:
FEATHER PILLOWS/DOWN COMFORTERS with synthetic bed pillows and cotton or nylon bedding
PLUSH CARPET with low pile carpet, machine washable area rugs or better yet hard flooring (wood, tile, stone, laminate etc),
CURTAINS with roll up or vertical blinds
DECORATIVE FABRIC PILLOWS with smooth, vinyl, leather or washable decorative ones
o MOVE TO ARIZONA: Or invest in a dehumidifier
If you’re not grossed out enough or would like more info visit www.natlallergy.com or simply google the words “DUST MITES”. And please visit my website www.juliestips.com if you have any tips, questions on cleaning, organinzing, home repair, mani-friendly decorationg or wallet sized pictures of whom you’re sleeping with particularly if it’s Brad, Ryan or whomever your bed-time wanna-be mate is please leave your comments here!


September 17, 2012
My Juice Cleanse experiment
Today I am eating, or I should say drinking “Mellow Love”, Organic Avenue’s juice bottle #2 on day two of my 3-day cleanse. Mellow Love is the juice extracted from cukes, celery, lettuce, spinach and parsley. The guy in the office next to me is downing a burger and fries. If I have ever said I didn’t have will power, this puts that theory to the test.
Three months ago I was diagnosed with Hypothyroidism, basically my thyroid went kaput some time last year. I didn’t know what was wrong with me but over time I noticed I was gaining weight and was extremely tired all the time, even after a good night’s sleep. On top of that I was incredibly depressed. I felt like my heart was melting inside my chest. Luckily I switched to a new general practitioner who suggested running some blood tests which led us to find some answers-my thyroid was not very active at all which is the cause of the malaise I was feeling and the fatigue. It is a hugely important driver of the metabolism so if it ain’t working, many other things are not working. My dr also saw vitamin D and B12 deficiencies in my blood so she suggested I take those along with an antioxidant, plus a thyroid medicine.I immediately felt better, thank God. I mean, really better, like back to normal better. I bet many people go undiagnosed with this same problem so ask your dr to test you for thyroid issues if you are suspicious.
None of this helped my weight loss, so I decided to call for drastic measures and go on a diet, kicking it off with a three day cleanse, just to feel better.As it turns out, these are all the rage. I found so many options and so many stores that make their own fresh veggie and fruit juices, I was amazed. I had already gotten into green juices and other kinds as a supplement to my diet, but this time I wanted to go for a serious juice diet and give my system a break from digestion. I chose to go for the “Deep Love” cleanse offered by Organic Avenue. Each day I got a box of juices they have freshly pressed. They range from straight fruit, like watermelon or pear, straight veg like cucumber, tonics like lemon/lime/ginger and finally a nut “milk” like cashew or coconut.
Here are my post cleanse conclusions:
This was one of the hardest things I have ever done, so in that sense it was a cool mental challenge.
This is not a weight loss plan, although you will drop some bloat
The juices tasted delicious
I was starving some of the time, but getting over that was an accomplishment, and learning not to eat every five minutes like I used to was a great adjustment.
My skin totally cleared up and I looked younger.
I didn’t feel at all “amazing” like everyone said I would, but maybe I would after 5 days. What I did feel was nothing. No bloat, no gas, no aches, no fatigue. I felt how I probably should feel all of the time if I weren’t eating junk.
If you have a juice machine, you could do this at home. Otherwise I am sure you could find a local juice place. The best thing I got out of it was it made me just pause and think about what goes into my body and it did inspire me to eat better for the future.
Let’s see how long this lasts…
Rosemary Maggiore is our Last Minute Lady. A single mom of two kids plus a full time job (she runs this website!) keep her busy and usually pushing things to the last minute. Somehow she manages to keep her cool and her sanity while she enjoys good food, wine, friends and most importantly, family.
For more Ro, see:
Follow me on Twitter at @lastminutelady

Corn Pudding with Poblano
It’s getting chilly here in NJ but my CSA is still sending me lots of ears of fresh corn. Last week I shared my Zucchini Ribbon and Corn Frittata recipe with you and yep, you guessed it, I’m still cooking with corn! At least I’m being seasonal, people!
Reluctantly the cooler weather has me thinking Fall food and flavors but my CSA keeps pulling me back into Summer with all of its wonderful goodies. It really is enough to drive a girl mad, but rather than lose my mind, or worse, allow the corn to go uneaten, I decided to try my hand at corn pudding. I mean hey, when life hands you corn, why not make some pudding?
Believe it or not, before this weekend I never made corn pudding before and thanks to the surplus of corn and some awesome poblano peppers I had lying around, I had the perfect excuse to whip some up. I did some research on basic corn pudding recipes and decided that the method was simple enough to just wing it and go for a version all my own. I felt that studding the corn pudding with poblanos would create a nice balance of sweet and slightly spicy. Turns out the flavor balance was perfect and the green flecks against the creamy pale yellow pudding was definitely a feast for the eyes. My guests were crazy impressed and it was so easy, I’ll definitely be making it again.
I divided the mixture amongst two 9-inch pie plates, but you can certainly make it in an 8×8 baking dish for a deeper pudding. It’s all up to you. If you are a little intimidated about shaving the ears off of the corn cobs, follow the tip I learned from Rachael below. Her double bowl technique makes quick and clean work of it and OMG, so genius! Thanks, RR!
I loved this recipe so much I’m already thinking of other variations. Next time I think I’ll add in some crispy bacon and diced tomato so see how that shapes up. I bet it will be divine. Except, I might have to wait until next Summer to try that out. Me thinks the corn well is quickly gonna run dry.
Corn Pudding with Poblano
Serves 6-8
Ingredients:
4 tablespoons unsalted butter, melted, plus extra for greasing
6 ears of corn, husked (depending on size)
1/4 cup granulated sugar
1/2 cup milk
1/4 cup flour
1 teaspoon salt
5 large eggs, beaten
1 poblano, seeds and ribs removed and diced small
1/3 cup parmesan cheese
Instructions:
1. Preheat the oven to 350 degrees F. Grease two 9-inch glass pie plates or for a deeper pie, one 8×8 baking dish.

2. To easily remove the kernels from the cob place a damp paper towel at the bottom of a large bowl and nestle a small bowl upside down inside a larger bowl. Make sure the smaller bowl doesn’t have space to slide around. Stand each cob of cork on its stem resting it on the smaller bowl. Using a sharp knife, shave the kernels off the cob and they will fall into the larger bowl. No muss, no fuss.
3. Combine the corn kernels, sugar, cream or milk, flour, butter and salt in a large mixing bowl. Lightly beat the five eggs and add to the mixture. Stir in poblano pepper. Pour corn mixture into prepared pie plates or baking dish and top with parmesan cheese. Place in oven and bake for 45 minutes if using two 9-inch pie plates or 60 minutes if using an 8×8 baking dish. Cool slightly, cut into wedges and serve.
Christina Stanley-Salerno is a mama, recipe developer, food stylist, photographer and blogger atTakeBackYourTable.com. She loves cooking for and with her family. Life is hectic, but Christina is passionate about mealtime because she believes that family meals are the glue that holds everyone together. Creating simple, quick and healthy meals is her specialty and her trick to keeping the family meal a reality, even on busy weeknights.
Follow her on Twitter @TakeBackTables
Cinnamon Swirl Coffee Cake
My kids were dying for doughnuts this weekend and I just couldn’t do it. Trust me, I love doughnuts and have a framed photo in my house of a now-defunct doughnut shop in my town - “Freddie’s Doughnuts” - that I remember going to with my father many Sunday mornings when I was little. My favorite doughnut was a peanut stick and I could easily put down three of them in a sitting. Talk about a stomach ache. My high school even had a fund raiser where we sold boxes of Freddie’s doughnuts - similar to the Girl Scout cookie sale. I would never sell any and on the day order forms were due my mom and grandmother would order a dozen boxes, which we would freeze and I would have an endless supply of peanut sticks. (Hmm. Lots of doughnuts = not so many dates. But a lot of friends with whom to share all of the doughnuts in the freezer.)
My kids have doughnuts probably a little too often so I will sometimes make a coffee cake or muffins instead to satisfy their sweet breakfast cravings. I threw together this coffee cake this weekend and it was on the table in under 45 minutes. It’s no Freddie’s but still delicious.
Cinnamon Swirl Coffee Cake (click here for printable recipe)
(adapted from joyofbaking.com recipe)
Ingredients
For the crumb topping:
1/2 cup brown sugar
1/4 - 1/2 cup chocolate chips
3/4 teaspoon ground cinnamon
1 tablespoon flour
A pinch of salt
For the coffee cake:
1 2/3 cups flour
1 teaspoon baking powder
1/2 teaspoon baking soda
1/2 teaspoon salt
1/2 cup unsalted butter, softened
3/4 cup sugar
2 eggs
1 teaspoon vanilla
3/4 cup plain or Greek-style yogurt (I used nonfat)
Directions
Pre-heat the oven to 350°F. Spray a 9-inch pan with nonstick vegetable spray.
Make the crumb topping: In a small bowl, stir together the brown sugar, chocolate chips, ground cinnamon and flour. Set aside.
Make the coffee cake: In a separate bowl, whisk together the flour, baking powder, baking soda and salt. In the bowl of your electric mixer, beat the butter until softened (about 1 minute). Gradually add the sugar and continue to beat until light and fluffy (about 3-4 minutes). Add the eggs, one at a time, beating well after each addition. Scrape down the sides of the bowl as needed. Beat in the vanilla. With the mixer on low, add the flour mixture (in three additions) and yogurt (in two additions) alternately, starting and ending with the flour. Mix only until combined.
Spoon half of the batter into the prepared pan, smoothing the top with an offset spatula (it will be thin). Sprinkle about half of the crumb topping on top of the batter. Cover with the remaining batter and spread so the batter is even. Sprinkle with the remaining crumb topping. Bake for 30-40 minutes, or until a toothpick inserted into the middle of the cake comes out clean. Serve warm or at room temperature.
September 15, 2012
How to Nail Brunch in 1 Easy Step
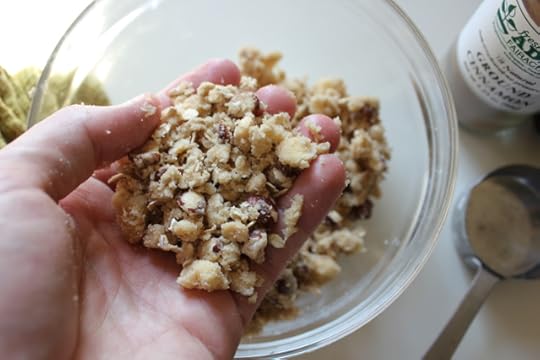
Just put streusel on it. Seriously, thats the secret. Doesn’t sound complicated does it? That’s because it’s not. Streusel is one of those amazing “quick fix” ingredients that I always have on hand for occasions where a little but of nutty crunch is just the gilding that lily needs. Plus, let’s be honest, who doesn’t love streusel?
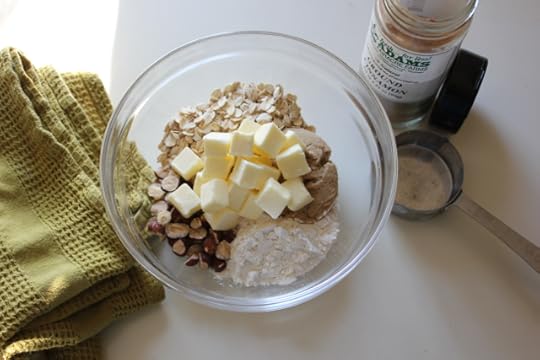
Making your own streusel is a no-brainier and it keeps for months in the freezer. Just combine 1/4 cup each of flour, light brown sugar, rolled oats, and chopped nuts (I like hazelnuts but you can use whatever you like). Toss in a dash of cinnamon and 1/2 stick of cubed cold butter and “rub” the ingredients between your fingers to break the butter up into pea-sized pieces. Less than five minutes later, the crumbly streusel is ready to be baked off or stored in an airtight container in the freezer for up to three months (makes about 2 cups).
“So I’ve got this streusel - now what?” you may be asking. Use these easy ideas to put some rockstar shine onto your next brunch spread:
BAKED FRUIT CRISP

Hearty enough for dessert or light enough for a brunch side, a baked fruit crisp is quite possibly one of the most stunning, low maintenance sweets you could dream up. With fall’s bounty filling our markets with fresh peaches, nectarines, pears, and apples, toss some of these fruits with a little sugar, flour, and lemon juice and spread them out into a baking dish. Top the dish with streusel (right from the freezer) and bake at 375ºF for about 30 minutes until the fruit is tender and streusl is golden brown. I’d also be hard pressed to say “no” if you topped it with a little whipped cream or ice cream…just saying.
CRUNCHY TOPPING

I think this name speaks for itself. Who doesn’t want “crunchy topping” on absolutely everything they eat? Line a baking sheet with parchment paper or aluminum foil and spread on a layer of streusel; bake at 375ºF for about 15 minutes until golden brown and let it cool completely. Crumble the resulting crunchy topping over yogurt parfaits and no one will miss the granola - guaranteed.
STREUSEL-TOPPED MUFFINS

Not only is this trick delicious, it makes your muffins look “bakery shop beautiful”. Prepare your favorite muffin batter (I’m a sucker for classic blueberry) and sprinkle a couple of tablespoons of streusel (you guessed it - right out from the freezer) over each muffin before baking. An artful display in a napkin-lined basket later and you’ll be giving that fancy French bakery down the street a run for their money.
Patrick W. Decker’s life revolves around food. Always has. Probably always will. As a graduate of The Culinary Institute of America and past member of the culinary team on Rachael’s daytime talk show, he now works as a food stylist and producer in NYC by day, and a food writer and recipe developer at his home in New York’s Hudson Valley by night. You can see what he’s up to by following his latest twEATs on Twitter at @ patrickwdecker or visiting his website at patrickwdecker.com .
September 12, 2012
How to Prep Whole Artichokes
If you’ve ever bypassed artichokes at the grocery store or the farmer’s market because they seem intimidating, well, your instincts are right. These tough, prickly vegetables do take time to prepare, but the results are so tasty that once you know how to render the flesh tender and rich, you won’t mind the work so much. Artichokes are still in season, so now is a great time to cook with them.
Here are instructions with photos describing how to prepare whole artichokes so that they have a smooth, round hole in the center that can be filled with anything from salad to melted cheese. Prepping them this way means that when you finish eating the leaves and get to the center, you don’t have to spend time scraping out the choke, because it’s already been done ahead of time.
Recipe: Steamed Whole Artichokes
Serves 2
Ingredients
2 lemons
2 globe artichokes
Step 1: Fill a large bowl halfway full of cold water. Cut the lemons in half and set one half aside. Squeeze the juice of the remaining 3 lemon halves into the water, and throw in their rinds.
Step 2: Hold one of the artichokes on its side. Using a serrated knife, slice off the top third of the artichoke. Turn it around and slice off the stem, so that the artichoke has a flat, steady base. Stand the artichoke up and pull off the small, tough leaves around the bottom. Using scissors, snip the sharp tips of the remaining leaves. Take the reserved lemon half and rub it all over the cut surfaces of the artichoke to prevent browning.
Step 3: Stretch open the artichoke by putting your thumbs in the center and pulling outward. You will see a circle of small yellow leaves surrounding the fibrous purple choke in the center. Yank on the yellow leaves and pull most of them out. This will require some elbow grease. You can use a pair of tongs to help grip them before pulling.
Step 4: Now, pull out the purple choke in the center. You can use a melon baller, a grapefruit spoon, or even a regular spoon. Keep scraping the bowl-shaped cavity where the choke is buried until you get out all of the fine, fuzzy hairs underneath. Scrape until the cavity is smooth, then place the artichoke in the bowl of lemon water. Repeat with the remaining artichoke.
Step 5: Steam the artichokes in a tightly covered pot for 30 to 40 minutes, until the outer leaves pull off easily and the flesh is very tender.
Now, you can whisk together a simple dipping sauce of EVOO, minced garlic, and lemon juice. You can also chill the artichokes and fill them with either a leafy arugula salad or a creamy chicken or egg salad. Even more deliciously, you can roast the artichokes: put a spoonful of cheese such as crumbled gorgonzola, or grated provolone or mozzarella in the centers, and sprinkle cheese over the tops to cover. Drizzle generously with EVOO, and roast the artichokes at 425°F for 15 minutes, or until the cheese is gooey.
Warm Lentil Salad
This week, I looked at how many different ways I could use lentils. Of course, I put them to use in several stews and soups. I soaked them until the little beads softened and then added them to a potato croquette for a little bite (recipe to follow in the coming weeks). Finally, I ended my kitchen-periment at a lentil salad.
Firstly, my fascination with lentils is that I am actively incorporating more plant-based proteins in to my diet. Secondly, it is high in soluble fiber and protects the heart. Thirdly, they are great binders for vegetarian meals, such as veggie loaves and burgers. Lastly, they are cheap and store well in a dark and dry place (covering my bases in the next home stranding snow storm). For today’s recipe, I used the yellow lentils that I already had in my pantry from the post I did on the lentil soup.
The lentil salad was quick and simple. The lentils I chose did not require soaking overnight and only needing to be brought to a boil and then strained. I then tossed them gently with my favorite salad ingredients and brought them together in a warm and spiced yoghurt dressing. It left my tongue humming. Why use a warm dressing might you ask? Warm dressings make ingredients open up. It fully coaxes the flavors of everything party to the dish and there is something far more appealing about a salad without ‘chill’ in the cooler months, and its certainly time to trade in edgy textures for textures more gentle and forgiving.
The salad will provide a nice alternative to your habitual salad choices. The yellow lentils are light and mild with an earthy flavor and are perfectly coated with a warm and spicy lemon yoghurt dressing to round out all flavors. As for the traditional salad components, this is the perfect time to pull all all the lone rangers from the refrigerator. Here is your chance to pull of the foil veils and put those half cut tomatoes, cukes, onions and boiled potatoes to use.

Tossing the lentil salad and dressing
Lentil Salad
Ingredients
For the Salad
1 cup dried yellow lentils
½ tsp. black pepper
¼ cup of small-diced cucumber
¼ cup of diced tomatoes
¼ cup of diced boiled potatoes
¼ cup of steamed fava beans
¼ cup of lightly steamed carrots
Handful of walnuts
Handful of cilantro
Handful of any lettuce, shredded
4 tbsp. olive oil
Juice of 1 lemon
¼ tsp. salt
For the Dressing
1 tbsp. grapeseed oil
1/2 teaspoon mustard seeds
1 large dried red chili
1 tsp. minced ginger
1 tsp. minced garlic
1 shallot, finely diced
½ cup of plain low fat yoghurt
Juice of 1 lemon
Salt to taste
Method
Lentils
1) Wash and drain the lentils 3 times. Place in saucepan filled with cold water. Bring to a boil and cook just before they get tender (careful here or they may get mushy)
2) Shock with cold water, drain well, set aside to stop them from cooking further
3) Add remaining salad ingredients and toss gently to avoid breaking the lentils
Dressing
1) Heat the oil in a frying pan
2) Add the mustard seeds and dry chili. When the seeds start popping, add ginger and garlic and sauté for 1 minute (to lose raw flavor)
3) Add the onions and cook until they are translucent. Add the yoghurt to heat through, season with salt and pepper
4) Give it a final whisk. Pour over the salad and toss well. Allow to stand for 5 minutes
Saira Malhotra, is of British –Indian descent and is a chef, food writer and cooking instructor based in New York City. Raised in Hounslow, U.K, or rather ‘Little India’, where the air is aromatic with roasted spices, little did Saira know these moments would follow her from being a student in France and Italy to residing in NYC with her husband and kids and parlay themselves unexpectedly in to a culinary career. She is a graduate of the International Culinary Center in New York City. Come visit her at her food blog: Passport Pantry, where she shares approachable and international recipes.
The end of an era - goodbye sweet boy.
We knew the day would come when we had to say goodbye to our dear, sweet, loving 14-year old lab, and even though we had been preparing for the past year, when the day actually came, it still seemed sudden. Talk about the long goodbye, we thought Biko wouldn’t make it to last Christmas, yet he made it to the next Labor Day. The boy would not give up. Despite a bad leg, little to no hearing, bad vision and a major elimination problem (I won’t go into details to save him some dignity), he wagged his tail madly and eagerly accepted pets and love until his last moments. Truly a dog with a huge heart.
I actually have a blog drafted with the title “When is it time to say good bye,” and I never published it because I didn’t know the answer. Now I know - when it’s time, it’s time. When Biko’s quality of life was so bad - he hadn’t left the first floor of our house, beyond hobbling to the back yard, in nine months - I knew it was time. He was sticking around for the kids and me. I think this picture - taken on his last day - shows he knew it was time.
This dog had a good life. Biko was a true “Marley and Me” dog - in looks and behavior (unfortunately). The best student in his puppy behavior class (he was all about the food reward/incentive), when we got home it was all forgotten. He jumped on our neighbors, had no grasp of the difference between the street and sidewalk, ate anything and everything - edible or not, and would often make a break for it, only to be returned by a neighbor. Our kids learned to walk while blinking their eyes as Biko’s tail was at eye level and always wagging. They were forced to guard their food, as anything was free game. He gained 10 pounds, mainly from grilled cheese sandwiches, when our kids were little. A professional vacuum cleaner, we used to bring Biko to friends’ houses after parties just for clean up.
Biko’s most famous incident was when he was about 7 and my husband was home manning the fort while I was out with friends. I got a frantic call and I immediately thought something happened to one of the kids who were probably about 2, 4 and 6 years old at the time. No, it was Biko. He had eaten a double order of chicken wings, bones, skin and all. Miraculously, he survived unscathed and no worse for the wear. He also consumed multiple Easter baskets, Christmas stocking candy contents, and Halloween candy that would have taken another dog down.
In his later years, our crazy dog finally calmed down, and I have to say I missed the old Biko. We adopted a 3-year old lab about a year ago and Chloe is a calm, sweet wonderful dog, but is so well behaved we almost don’t know what to do. She misses her friend and after Biko was gone, lied by the door for about a week, waiting for his return.
Biko never met a person, dog, or cat, he didn’t love. He brought us so much joy - it was an honor to have him in our family. Goodbye sweet boy.
A friend shared this poem with us - anyone who has lost a pet will appreciate it:
The Rainbow Bridge
There is a bridge connecting Heaven and Earth. It is called the Rainbow Bridge because of its many colors. Just this side of the Rainbow Bridge there is a land of meadows, hills and valleys with lush green grass.
When a beloved pet dies, the pet goes to this place. There is always food and water and warm spring weather. All the animals who have been ill and old are restored to health and vigor; those who were hurt or maimed are made whole and strong again, just as we remember them in our dreams of days and times gone by.
The animals are happy and content, except for one small thing; they each miss someone very special to them, who had to be left behind. They all run and play together, but the day comes when one suddenly stops and looks into the distance. Her bright eyes are intent; her eager body begins to quiver. Suddenly she begins to run from the group, flying over the green grass, her legs carrying her faster and faster. You have been spotted, and when you and your special friend finally meet, you cling together in joyous reunion. The happy kisses rain upon your face; your hands again caress the beloved head, and you look once more into the trusting eyes of your pet, so long gone from your life but never absent from your heart.
Then you cross the Rainbow Bridge together, never again to be separated.
Anonymous
The end of an era - good bye sweet boy.
We knew the day would come when we had to say goodbye to our dear, sweet, loving 14-year old lab, and even though we had been preparing for the past year, when the day actually came, it still seemed sudden. Talk about the long goodbye, we thought Biko wouldn’t make it to last Christmas, yet he made it to the next Labor Day. The boy would not give up. Despite a bad leg, little to no hearing, bad vision and a major elimination problem (I won’t go into details so save him some dignity), he wagged his tail madly and eagerly accepted pets and love until his last moments. Truly a dog with a huge heart.
I actually have a blog drafted with the title “When is it time to say good bye,” and I never published it because I didn’t know the answer. Now I know - when it’s time, it’s time. When Biko’s quality of life was so bad - he hadn’t left the first floor of our house, beyond hobbling to the back yard - in nine months, I knew it was time. He was sticking around for the kids and me. I think this picture - taken on his last day - shows he knew it was time.
This dog had a good life. Biko was a true “Marley and Me” dog - in looks and behavior (unfortunately). The best student in his puppy behavior class (he was all about the food reward/incentive), when we got home it was all forgotten. He jumped on our neighbors, had no grasp of the difference between the street and sidewalk, ate anything and everything - edible or not, and would often make a break for it, only to be returned by a neighbor. Our kids learned to walk while blinking their eyes as Biko’s tail was at eye level and always wagging. They were forced to guard their food, as anything was free game. He gained 10 pounds, mainly from grilled cheese sandwiches, when our kids were little. A professional vacuum cleaner, we used to bring Biko to friends’ houses after parties just for clean up.
Biko’s most famous incident was when he was about 7 and my husband was home manning the fort while I was out with friends. I got a frantic call and I immediately thought something happened to one of the kids who were probably about 2, 4 and 6 years old at the time. No, it was Biko. He had eaten a double order of chicken wings, bones, skin and all. Miraculously, he survived unscathed and no worse for the wear. He also consumed multiple Easter baskets, Christmas stocking candy contents, and Halloween candy that would have taken another dog down.
In his later years, our crazy dog finally calmed down, and I have to say I missed the old Biko. We adopted a 3-year old lab about a year ago and Chloe is a calm, sweet wonderful dog, but is so well behaved we almost don’t know what to do. She misses her friend and after Biko was gone, lied by the door for about a week, waiting for his return.
Biko never met a person, dog, or cat, he didn’t love. He brought us so much joy - it was an honor to have him in our family. Goodbye sweet boy.
A friend shared this poem with us - anyone who has lost a pet will appreciate it:
The Rainbow Bridge
There is a bridge connecting Heaven and Earth. It is called the Rainbow Bridge because of its many colors. Just this side of the Rainbow Bridge there is a land of meadows, hills and valleys with lush green grass.
When a beloved pet dies, the pet goes to this place. There is always food and water and warm spring weather. All the animals who have been ill and old are restored to health and vigor; those who were hurt or maimed are made whole and strong again, just as we remember them in our dreams of days and times gone by.
The animals are happy and content, except for one small thing; they each miss someone very special to them, who had to be left behind. They all run and play together, but the day comes when one suddenly stops and looks into the distance. Her bright eyes are intent; her eager body begins to quiver. Suddenly she begins to run from the group, flying over the green grass, her legs carrying her faster and faster. You have been spotted, and when you and your special friend finally meet, you cling together in joyous reunion. The happy kisses rain upon your face; your hands again caress the beloved head, and you look once more into the trusting eyes of your pet, so long gone from your life but never absent from your heart.
Then you cross the Rainbow Bridge together, never again to be separated.
Anonymous
September 11, 2012
End Of Summer Zucchini Ribbon and Corn Frittata
Summer is coming to an end. I’m definitely digging my heals in deep and grasping at the last days by cooking with as much of the summer produce that’s left as possible. While I love Fall, there’s just something special about Summer and all it’s farmers market bounty.
Corn is still alive and kicking at my farmers market so i’m using it up like mad befor it’s all gone. One of my favorite pairings with corn is zucchini. I just love the way the sweetness of corn elevates the mild, delicateness of the zucchini. With the start of school and all of the chaos it brings, I’ve been keeping our dinners light and simple and usually turn to eggs at least once a week for dinner. We love frittatas around here because not only are they simple and delicious, they are supper budget friendly. Cook on up quick, serve alongside a salad and you got yourself one quick weeknight meal.
For this frittata I decided to cut my zucchini into “ribbons” using a mandolin. I love how thinly slicing the zucchini makes it cook up faster and gives it an even more delicate texture. A mandolin is a handy tool to have in the kitchen to help you thinly slice fruits and veggies. You don’t need a fancy one, I actually bought a cheap-o one at TJ-Maxx for like $20 bucks and it works great! If you don’t have one, you can easily cut the zucchini by hand using a sharp knife but I would not try to cut it lengthwise using this method for fear of cutting oneself. If you end up doing it with a knife, just cut the zucchini very thinly in rounds. it will be much easier to handle this way.

Zucchini Ribbon and Corn Frittata
Serves 4
Ingredients:
2 tablespoons olive oil
2 small zucchini’s thinly sliced lengthwise into “ribbons”
1 small onion, thinly sliced
1 ear of corn, shaved off the cob
1/2 teaspoon fresh thyme, removed from stems and chopped
6 large eggs, beaten
1/2 teaspoon salt
1/2 teaspoon black pepper
Instructions:
1. Set oven to broiler setting.

2. Heat olive oil in a medium over safe skillet over medium heat. Add in zucchini, onions, corn and thyme. Cook until vegetables begin to soften about, about 5 minutes. Pour in eggs and season with salt and pepper. Using a rubber spatula, gently move around the eggs to start the cooking process. After about 2 minutes, place the entire pan under the broiler until the top of the frittata is set, about 1-2 minutes more. Using an oven-mit, remove pan from the oven and allow the frittata to cool for about 2 minutes before trying to remove from pan. Loosen around the edges of the frittata with your rubber spatula and gently coax it from the pan. Cut into 4 edges and serve alongside a salad.
Christina Stanley-Salerno is a mama, recipe developer, food stylist, photographer and blogger atTakeBackYourTable.com. She loves cooking for and with her family. Life is hectic, but Christina is passionate about mealtime because she believes that family meals are the glue that holds everyone together. Creating simple, quick and healthy meals is her specialty and her trick to keeping the family meal a reality, even on busy weeknights.
Follow her on Twitter @TakeBackTables
Rachael Ray's Blog

- Rachael Ray's profile
- 296 followers


![[image error]](http://www.rachaelray.com/blogs/wp-content/uploads/2012/09/cin-coffee-cake1.jpg)
![[image error]](http://www.rachaelray.com/blogs/wp-content/uploads/2012/08/7883168692_a0e5fa62b3_z.jpg)
![[image error]](http://www.rachaelray.com/blogs/wp-content/uploads/2012/08/7883166356_726e89f03b_z.jpg)
![[image error]](http://www.rachaelray.com/blogs/wp-content/uploads/2012/08/7883164144_ac9d19d662_z.jpg)
![[image error]](http://www.rachaelray.com/blogs/wp-content/uploads/2012/08/7883161564_1380da4b43_z.jpg)
![[image error]](http://www.rachaelray.com/blogs/wp-content/uploads/2012/08/7883158612_d020c6cb0c_z.jpg)
![[image error]](http://www.rachaelray.com/blogs/wp-content/uploads/2012/08/7883156042_80b5fca466_c.jpg)