Rachael Ray's Blog, page 79
November 16, 2012
Forget the Canned Pumpkin: Roast Your Own Winter Squash
Whatever you’re cooking this year for your Thanksgiving meal, there is probably a winter squash involved somewhere, like in pumpkin pie. If you usually use canned pumpkin, why not try roasting your own pumpkin or other winter squash this year?
If you’ve ever gone to a pick-your-own pumpkin farm, or to the farmer’s market around Thanksgiving, then you’ve probably seen all the beautiful colors and shapes that winter squash come in. It’s fun to try different varieties, because you may discover one that you love. Also, it’s more economical to buy a squash and roast it. A single pumpkin or other variety of squash will yield several times the amount you get in a can, and it’s just as tasty and even more fresh and nutritious.
Just as importantly, roasting squash couldn’t be easier. You put it in the oven, set a timer, and forget about it. I’ll take you through the steps of roasting squash below.
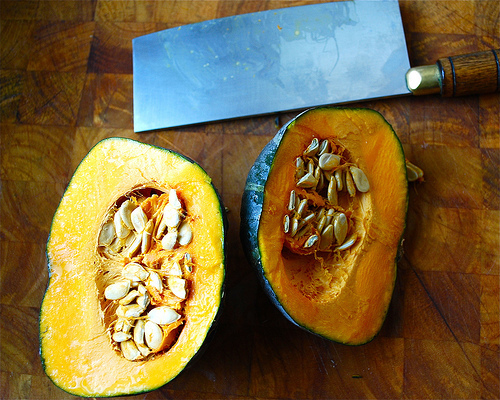
I chose a buttercup squash for roasting, because it has a thick, buttery flesh, as opposed to other varieties like acorn squash, which are lighter and more watery. Second, my father-in-law, Roger, who is the best baker I know, always uses buttercup for his pumpkin pies. Other good choices would be sugar pumpkins, butternut, Hubbard, Long Island cheese, or long neck squash varieties. This page shows many different varieties of winter squash, and what dishes they’re good for.
Once you have your cooked squash, you can use it in any number of recipes. Here are a few suggestions:
Roasted Tomato and Butternut Squash Rigatoni
Roasted Squash, Kale, and Tomato
Healthy Squash Bread
Sweet Potato Pie with Ginger (use squash in place of the sweet potatoes)
Harvest Pumpkin Scones
Pumpkin Chocolate Chip Cookies
Instructions for roasting squash
Step 1: Preheat the oven to 400°F. Lightly grease a baking sheet with no-taste oil.
Step 2: Set the squash on a cutting board, lift a cleaver or other heavy knife high in the air with both hands, and do a walloping karate chop down the center of the squash, or as close to the center as you can get. If the halves are very large, and seem like they will take a long time to cook through, cut them in half again, like I did. If you’re using a butternut, just cut off the round bottom from the long neck, and then cut both pieces in half down the middle. The most important thing is to keep your fingers far away from where the blade of the knife comes down.
Step 3: Scoop out the squash seeds. If they’re good for eating, like butternut squash seeds, clean them off and roast them separately.
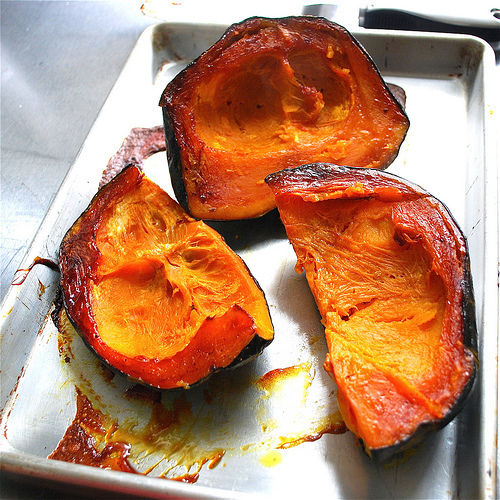
Step 4: Place the squash flesh side down on the baking sheet. Bake for 45 minutes. At this point, the skin should be soft enough that you can poke several holes in it with a fork, which will help it to cook the rest of the way. Continue roasting for another fifteen minutes, or until the flesh is very tender.
Step 5: Let the squash cool to room temperature.
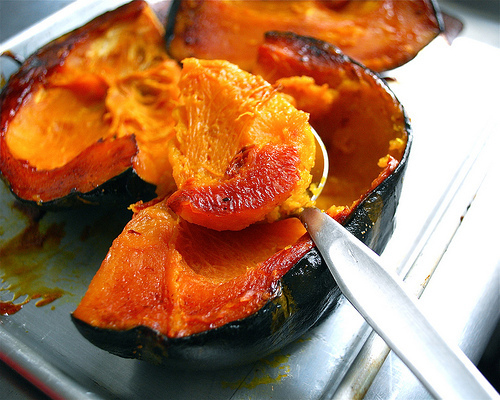
Step 6: Scoop out the flesh. Discard the skin.
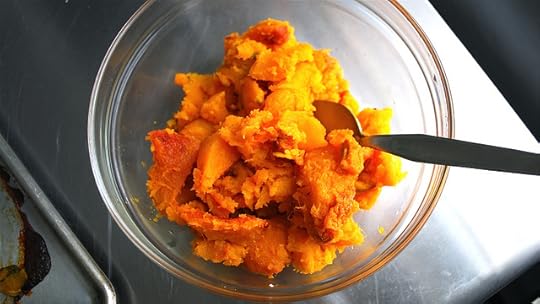
Step 7: Cook the squash into your favorite dish. If you’re using the cooked squash to make pumpkin pie, you can put it in a food processor and whiz it around several times to make the flesh very smooth and creamy.
A Man Reduced To Using Vinegar and Water
I know that the phrase “vinegar and water” has an unappetizing connotation, especially for those of us of a certain age. Still, I could resist the title, because I had an edifying sauce experience this week. As you know, I cook a lot of meat. Especially these days, what with having gotten fat again and all, I find myself subsisting largely on steaks, pork chops, and chickens - and their leftovers. I lust for hash browns, big sandwiches, endless bowls of spaghetti, and the like. We’ve all been there. But in the meantime, I have to get by entirely on meat. It’s not as if I’m going to start eating vegetables. So I needed to find ways to make meat better, and without a lot of ingredients. (Post-Sandy, our refrigerator holds exactly five items, and two of them are butter.)
So I’ve been trying to make pan sauces for my steak.
I don’t know why I have so seldom done this before. Maybe it was just that I liked seared, salty meat enough to eat it unadorned. But having taught myself the art of making classic french pan sauces, I have started to make them whenever I cook anything not named hambuger. So: having acquired some boneless short rib from Whole Foods (the best beef for the money I know of), I took it upon myself to salt and sear some up in a mix of butter and grapeseed oil (the butter for flavor and milk, the oil to keep it from burning.) I sliced up the short ribs, let them sear on one side until the kitchen was uncomfortably smoky, and then removed them. I looked around for some wine or beer to deglaze the pan with. After all, the best part of the meat was the brown bits stuck to the bottom of the pan! So without anything else at hand, I reached for some Greenhouse Tavern rose vinegar, and deglazed with that, thrown a chunk of Kate’s Creamery butter in to thicken it as it reduced. There was nothing to add, of course, and it was way too vinegary (I put in too much) but it was the sauce all the same!
Unfortunately I used up all the vinegar in that lunch. And the next day, with more short rib to cook up, I still hadn’t thought to buy any wine or beer or vinegar or stock or any of the other things you are supposed to deglaze with. So I said, the hell with it. I’ll use water. How bad can it be? I can always not use it. But you know what? It was delicious. Yes, there was no special flavor to it other than beef, and no acid to cut all that fat, but so what? It tasted like roast beef jus, only thicker and more buttery. And it was a sauce. If I were a thinner or more patient man, I might have made some minute rice or couscous to absorb it and had a nice meal for myself. But that would have been too much work. What an awful man I am! But at least I know how to make sauce.
November 14, 2012
My Santa Barbara Picks
Half the fun of discovering a new restaurant is sharing it with people you know will enjoy it. As Rachael Ray’s resident restaurant guru, here’s an inside look at what I report back to Rach about some of my favorite restaurant finds and food experiences!
From: Kappy
To: RR
Sent: Wednesday, November 14, 2012 3:22pm
Subject: My Santa Barbara Picks
Hi Rachael -
I thought I’d send some recs your way for Santa Barbara. I’m lucky because Katy’s dad lives there, so whenever I’m in the L.A. area, I always try and detour for a couple days for a visit. Santa Barbara is beautiful and has a casual, laid-back food scene with great fresh seafood.
Starting with dessert first, we picked up some pies from Simply Pies. It’s a cute little shop that sources mostly local, uses organic ingredients when possible and, in doing so, supports Santa Barbara County farmers. We were picking the pies up for Katy’s dad’s birthday, so we got his faves, a Pecan Pie and a Coconut Cream Pie. Santa Barbara doesn’t have a ton of bakery options, but with Simply Pies in town, it doesn’t need another option!
Another locals’ favorite right in town is Opal. It’s a small, cozy place that headlines its eclectic California cuisine. When I was there, I was picking up a lot of Italian influences, but it was really good nonetheless. We tried their Shredded Phyllo-Wrapped Prawn appetizer served with a coconut curry dipping sauce and added a Bacon-Wrapped Shrimp app as well. For my entrée, I ordered Bouillabaisse with shrimp and scallops in a tomato-herb garlic broth with chiles. [image error] Turning down the heat from the chiles, we all picked at some mango, blood orange and peach sorbets for dessert.
For Katy’s dad’s birthday lunch, we hit up The Hungry Cat, an outpost of Suzanne Goin and husband David Lentz’s L.A. spot. I split the Crab Cake Benedict, Fish Tacos and the Peel n’ Eat Shrimp. Everything was solid all around. [image error] [image error] I’m a fan of all of her and her husband’s restaurants in L.A. so I knew this would be a good meal. But what blew us away was the amazing Meyer Lemon Parfait for dessert!
One afternoon we were taking a walk along the water and walked by the Sugar & Salt Creamery truck. You know I wasn’t passing this one up! I tried the Maple Bacon Ice Cream, which tasted like, yep, you guessed it… Maple…and Bacon. Perfect. [image error]
On the way back to the house one night before dinner we made a little pit stop at La Super-Rica Taqueria. [image error] We brought back some tacos and tamales. I think they had been closed for a while, because they were slammed with locals getting their taco fix and people were all saying how they missed them when they were gone. I tried a Pork Taco and a Tamale - if you go, definitely don’t miss the tamales. [image error]
While we didn’t stop in this trip, I’m throwing in a bonus recommendation: Cava. Located in downtown Montecito, it features a mix of Mexican and Spanish food. Everything is creative and tasty and with everything on the menu ranging from steak to fish to tacos and rellenos, you’ll be sure to find something you’re in the mood for. It’s at the bottom of this email, but put it at the top of your list! Wait… one more… if you plan to cook seafood at home, don’t miss the Santa Barbara Fish Market right on the water. [image error]
And that’s what’s on my plate!
~ Kappy
Simply Pies
5392 Hollister Avenue
Goleta, CA 93111
(805) 845-2200
www.simplypiessb.com
Opal
1325 State Street
Santa Barbara, CA 93101
(805) 966-9676
www.opalrestaurantandbar.com
The Hungry Cat Restaurant
1134 Chapala Street
Santa Barbara, CA 93101
(805) 884-4701
www.thehungrycat.com
Sugar and Salt Creamery (Truck)
Santa Barbara, CA 93103
www.sugarandsaltcreamery.com
La Super-Rica Taqueria
622 North Milpas Street
Santa Barbara, CA 93103
(805) 963-4940
Cava
1212 Coast Village Road
Montecito, CA 93108
(805) 969-8500
www.cavarestaurant.com
Andrew “Kappy” Kaplan loves food. A professionally trained chef, by day he runs Yum-o!, Rachael Ray’s charity focused on kids and cooking, and keeps special projects running smoothly for her. By night he hops course to course, place to place, all across the country. He’s Rach’s own personal dining guide! You can also follow Kappy on Twitter to see what’s On Kappy’s Plate in real-time!
Wing Madness
I am from Buffalo, NY, home of the infamous Buffalo Chicken Wing, so as you can imagine, I have a strong opinion about wings in general. We all have our preferences-drummers vs the two-boned wing, meaty vs thin, crispy skin or juicy and moist, hot and spicy vs mild, and on and on. So when my boyfriend asked me to try making wings at home, I at first thought this would be an insurmountable task, one that can only be performed by the famed wing fryers in Buffalo that I knew so fondly growing up. The truth is, they are easy to make at home and there are so many recipes that are completely different from the classic Buffalo hot wing, that you can have fun creating all sorts of variations.
A few things I discovered while making our now Sunday football-watching staple:
Bell and Evans makes a pack of wings specifically called “Buffalo Wings”, which is air-chilled chicken and the package is air-tight so they are nice and fresh and trimmed specifically for the kind of wing eating we’re talking about here.
Fry vs bake-I have tried both and while I feel better about baking the wings, my boyfriend insists on the fry way. The baked version just doesn’t give the wings that crispy skin that you get from deep frying them. But if you are intimidated by deep-frying or want to try to make them slightly healthier (is it possible?), then the baked route is a fine way to go.
Basic Buffalo Wings
recipe courtesy of Franks REDHOT sauce, my personal favorite
Servings: 6 to 8 servings
Prep Time: 10
Cook Time: 20
INGREDIENTS:
2 1/2 lbs. chicken wing pieces (1.25 kg)
1/2 cup (125 mL) FRANK’S® REDHOT® Sauce
1/3 cup (75 mL) melted butter for the Wings Sauce
DIRECTIONS:
Deep-fry at 375°F (190°C) for 10 min. or bake at 400°F for 10 minutes.
TOSS wings in sauce to coat.
Rachael’s Sticky Asian Plum Wings
Ingredients
3-4 pounds chicken wings, split, then tips removed, or drummers
For the sticky Asian plum glaze:
1 1/2 cups plum preserves
Zest and juice of 1 orange
1/3 cup Tamari (dark soy sauce)
1 tablespoon sesame oil
1 2-inch piece of fresh ginger root, peeled and grated
A pinch of salt
5-6 scallions, whites and greens, thinly sliced on a bias
3 tablespoons sesame seeds, toasted
1 lime, cut into wedges
Serves 6-8 as a snack
Preparation
Pre-heat the oven to 450ºF.
Bring a large pot of water up to a bubble and par-cook the chicken for about 5 minutes. Drain and pat dry.
Whisk together the preserves, orange juice and zest, Tamari, sesame oil, ginger and salt in a medium size saucepan. Bring to a boil over high heat and cook until reduced into a syrupy glaze, about 7-8 minutes. Remove from the heat.
Place the wings onto a baking pan and roast for 15-20 minutes, or until golden brown and crispy.
Transfer the wings to a large bowl, then pour the sauce over top and toss.
Sprinkle the coated wings with scallions and sesame seed for garnish. Serve with lime wedges.
November 13, 2012
Whole-Wheat Pennsylvania Dutch Sweet Potato Cinnamon Sugar Doughnut
My house was without power for ten days following hurricane Sandy. We really were very lucky that everyone was safe and that power was all we lost. Still, learning to manage without heat and electricity was definitely a challenge with two little ones to care for given the low temperatures. I have to say we fared pretty well and luckily my gas stove-top was able to be used with the simple light of the pilot using a match.
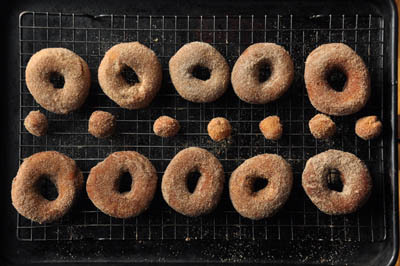
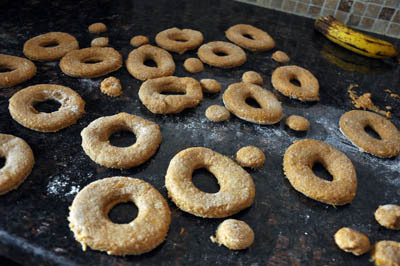
Cooking meals with just a the stove top wasn’t at all difficult since there are many things you can prepare but dessert was another story. Sure you can prepared puddings and such but my family isn’t all that into pudding so I pretty much avoided homemade desserts altogether. That is, until I realized I could make homemade donuts on the stovetop. The funny thing is, I had only made donuts once in my life before this occasion, and out lack of electricity was the perfect excuse to whip up a batch with my 4 year old as sous chef. Activity+delicious dessert =’s WIN! WIN! in the mommy department. He loved helping me measure and mix the ingredients and managed to do all of the donut cutting all on his own. We even used the scraps from the center of the donuts to make donut holes which he went bananas for!
Homemade donuts really are very simple to make and seem like a lot more work than they really are. I chose to make a Pennsylvania Dutch style donut which are made using potato as one of the ingredients. Since Thanksgiving is fast approaching I decided to use sweet potato and while they were fresh from the oil and still piping hot, I rolled them in cinnamon sugar—heaven! I was all out of white flour so i decided to take a risk and make these using one hundred percent whole wheat flour. I have to admit, I never use all whole wheat flour in a baking recipe and often do a 50/50 split between white and whole wheat flour to keep things light. But this time I decided to give it a try and I was so happy that I did. The earthiness of the whole wheat flour was just the right compliment to the cinnamon sugar outer coating. This donut is the perfect fall breakfast treat alongside a steaming cup of coffee and it was anything but heavy thanks to the moistness imparted by the sweet potato.
Pennsylvania Dutch Sweet Potato Cinnamon Sugar Doughnuts
Makes approx
Ingredients:
Cinnamon Sugar Coating:
3/4 cup granulated sugar
2 tablespoons ground cinnamon
Doughnut Ingredients:
1 1/2 cups mashed sweet potato (without any seasonings added)
3/4 cup milk
2 eggs, lightly beaten
2 tablespoon unsalted butter, melted
1 1/4 cup granulated sugar
2 tablespoons baking powder
5 cups whole-wheat flour
Canola oil for frying
Instructions:
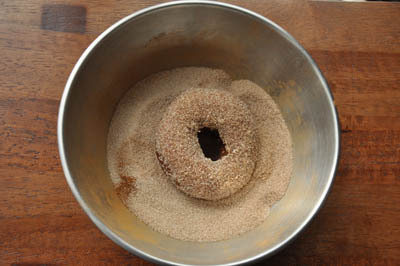
1. Make cinnamon sugar coating: Whisk together cinnamon and sugar and set aside.
2. In a large bowl, combine potatoes, milk, eggs and butter. In another bowl, combine sugar, baking powder and 2 cups of flour, stir into potato mixture. Add enough remaining flour to form a soft dough that is not too stick. Note: gradually add the dough until the dough is manageable but not stiff. Avoid adding too much flour, only use what you need. I ended up only needing 4 cups of the flour. It depends on the weather as to how much you need. you just want to add enough flour so that the dough isn’t very sticky. Divide dough in half.
3. Turn dough out onto a lightly floured surface and roll each half to 1/2-inch in thickness. Cut with a 2-3 inch doughnut cutter or use the rim of a glass. Note: I used the rim of a glass dipped in flour to prevent sticking. I also used a seltzer bottle cap to cut out the center hole of the doughnut. It worked perfectly and made adorable little doughnut holes.
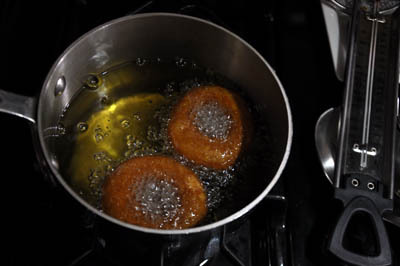
4. Heat oil in a dutch oven or any high sided heavy pan or a deep fat fryer until oil reaches 375 degrees. Fry donuts, a few at a time, until golden on both sides, about 2-3 minutes. Drain on paper towels and toss in cinnamon sugar. Serve warm. Donuts are best eaten the day they are prepared.
The Curry Club Goes Live - Shrimp Curry
This month, I hijacked 4 popular dishes from the Union Jack, bundled them together, christened it ‘The Curry Club’ and launched it at The Jones Wood Foundry in New York.
Yes, Great Britain may be known for it’s tweed and plaid, but there is a culture of gold paisleys that weaves through it; Indian. Since the 1950s, people from countries like India that were under the commonwealth rule, began migrating to the U.K. They formed large communities and now over 60 years later, they are very much within the fabric of the British culture.
‘Afternoon Tea’, suggestive of a hot pot of tea with finger sandwiches and scones may include a more than appropriate warm triangular pastry filled with lightly spiced potatoes ‘samosa’, music drawing from Bollywood beats. But for most, the best is the ritual of ‘beer and a curry’.
For many Brits today, the origins of their curry flavored chips may be blurry as the 2 cultures continue melt in to each other. When I met Brit expat, Chef Jason Hicks (remember, his yummy rissoles a few months back)?, he told me that he has always wanted to put a curry amongst his carefully selected menu items out here in New York. For him, this was not just a British mainstay but also a cultural evolution that deserved to be there as much as fish and chips.
But what does curry mean for the Brits? Something with flavors that round out more delicately, a little sweet, a little tart, a little chewy through dried fruit and a little crunchy through toasted nuts. Other expats were on the same page as Jason. They wanted cold crisp beer, curries fusing the best of British ingredients and technique to Indian spices and a quaint setting with rugs and mahogany tables. I realized that something needed to be done here. When expats couldn’t get to Britain, it was time to bring Britain to them. The Curry Club was born!
I designed four popular dishes for the Curry Club series that is being offered in collaboration with Chef Jason Hicks at The Jones Wood Foundry each Monday for the month of November. Last week, we offered creamy shrimp curry topped with buttered fava beans. A popular dish on the Indian menu with a British seasonal vegetable. If the word on the street is to be believed, its is said that patrons did a double take to make sure that they were in fact in New York and not a pub in Nottinghill.
Recipe for Creamy Shrimp Curry and Fava Beans
Ingredients
400g shrimp (deshell and reserve shells, devein and keep tails on)
Shrimp stock
2 TBSP. Oil
400g Shrimp Shells
1 TSP. Garlic, minced
¾ Tsp. Salt
1 cup white wine
8 Cilantro stems
Pinch of saffron
2 bay leaves
4 peppercorns
Shrimp Curry
1 ½ TSP. mustard seeds
24 curry leaves
2 whole dried chilies
1 ½ medium onion
¾ TBSP. Ginger, minced
¾ TBSP. Garlic, minced
2 cans unsweetened coconut milk (13.5 oz can each)
Serving
Butter runner beans, ½ a cup, boiled, shocked and skins removed (with a gentle rub, they slip right off)
A few sprigs of cilantro
Method
Stock
1) Heat oil, sweat garlic until soft, add shrimp shells and sauté until they turn red. Add wine and remaining ingredients and reduce until it is like syrup. Add 4 cups of water and reduce by half. Strain and reserve stock
Curry
1) Make wet paste of the ginger, onion, garlic
2) Heat oil, add the mustard seeds, when they start sputtering, add curry leaves and red dried chilies
3) Add wet paste, fry over moderate heat to cook out raw taste
4) Add coconut milk and reduce until it coats back of a spoon (like green curry),
5) Add shrimp stock and reduce until it lightly coats the back of a spoon (like a Thai green curry)
Serving
Toss the butter beans in butter and a pinch of salt. Chop the cilantro and use both as a topping for the curry
Saira Malhotra, is of British –Indian descent and is a chef, food writer and cooking instructor based in New York City. Raised in Hounslow, U.K, or rather ‘Little India’, where the air is aromatic with roasted spices, little did Saira know these moments would follow her from being a student in France and Italy to residing in NYC with her husband and kids and parlay themselves unexpectedly in to a culinary career. She is a graduate of the International Culinary Center in New York City. Come visit her at her food blog: www.passportpantry.com where she shares approachable and international recipes
November 9, 2012
Rodney Cutler for ULTA Fall/Winter Hair Collection
It’s a common expectation at our salon to request a cut that has multiple options in terms of styling. This seasons Fall 2012 collection that I created for ULTA is all about transformation and styling alternatives. These looks are all very quick and easy to achieve even for a non-professional.
Style 1- (bottom/left) Center Part with Ribbon Curls- On damp hair apply preferred styling product and comb through with a wide toothed comb for even distribution. Using a blow dryer with a nozzle and a flat boar bristle brush, smooth the hair section by section wrapping it around the curvature of the head in all directions to create movement. Be sure that the air from the nozzle of the blow dryer is following the same direction of the brush down the hair shaft to ensure smoothing of the cuticle. Finish, with the cool air shot on your blow dryer to seal the shine into the hair. To create ribbon curls, rotate your flat iron a half turn until it’s parallel to the hair. Using, light pressure slide down the strand of hair as if you were curling a ribbon.
Style 2- (bottom/right) Updo- Take each ribbon curl and pull it apart separating the strands. Lightly back brush at the roots. Create a pony tail at the occipital bone and lightly pull hair up at the crown to emphasize the height. Create a deep side part, lightly back brush the front hair and twist into the ponytail, spray a light hair spray to blend the twist into the back section. Finish, by gently backcombing the ponytail and using your fingers to pull/separate the top layer of hair at the crown ensuring a deconstructed texture.
Look 1 (left)- Apply a blow dry lotion to damp hair. Use hands to tousle dry the hair, be sure to follow the form of the hair cut with the blow dryer. Finish with a light wax or shine spray.
Look 2 (right)- Apply a texture spray evenly throughout dry hair, using the nozzle of your blow dryer direct the hair on top to create texture. Finish with a styling pomade accentuating the texture of the hair cut.
[image error]
Look 1 (top/left) Smooth Curls- Evenly distribute a styling mousse throughout damp hair. Use a blow dryer with a nozzle and concentrate the airflow at the scalp and mid lengths. Smooth the hair, section by section using a flat brush. Once the scalp area is dry swith to a round brush and wrap mid-lengths to ends around the brush to create a curl. Apply a finishing product leaving the curl in its original state.
Look 2 (bottom/left)- Airy Curls- After blowdrying, aerate throughout the hair separating the curls. Use a large barrel curling iron on small sections from mid-lengths to ends for a more defined curl. Switch your blow dryer to the cool setting and a low speed, blow dry through the curls for volume and separation. Lightly back brush the curls to create an airy texture. Gently brush the front perimeter for a soft side sweep. Finish, with a light hold hair spray, Redken Fashion Works 12.
Look 3 (right) Side Sweep- Create a deep side part. Take the hair from the left side and brush it back smoothing the hair around the back of the head, behind the ear. Secure the hair at the lower nape on the opposite side with bobby pins. Rake through the curls with your fingers to give more separation.
November 6, 2012
Oatmeal peanut butter chocolate chip scones
I think scones get a bad rap. I have had my fair share of dry, crumbly scones that are less than satisfying. But they don’t need to be that way - oh no. They can be moist and delicious and give muffins a run for their money. These scones pack three of my favorite ingredients - oatmeal, crunchy peanut butter, and yes, chocolate chips, and come together in no time. Mind you, like most scones, these are not overly sweet, in a good way. These are a great breakfast or snack and my kids love them. I feel good because of the oatmeal - definitely a better choice for a quick breakfast than a doughnut. A batch of these as a gift would be a great way to show someone you love them.
Oatmeal Peanut Butter Chocolate Chip Scones (adapted from a recipe from Baked Elements by Matt Lewis and Renato Poliafito) (click here for printable recipe)
Ingredients
2 cups flour
1/3 cup packed brown sugar
1 teaspoon baking soda
1 teaspoon baking powder
1/2 teaspoon salt
1 cup oats
3/4 stick (3 ounces) cold butter, cut into 1/2 inch cubes
3/4 cup buttermilk (note: to make buttermilk substitute, place 1 tablespoon lemon juice in a measuring cup and fill up to the 1 cup line with milk. Let stand at room temp for a few minutes, shake up or stir vigorously before using)
1 egg, separated
1/2 cup crunchy peanut butter (not natural style)
1 teaspoon vanilla
1 cup chocolate chips
Directions
Preheat the oven to 400 degrees F. Line a baking sheet with parchment paper. In a large bowl whisk together flour, brown sugar, baking soda, baking powder, salt and oats. Add the cold butter and use your fingers to rub the butter into the mixture until the butter is pea-size.
Whisk together the buttermilk, vanilla and egg yolk in a small bowl until combined. Make a well in the flour mixture and pour buttermilk mixture into the center. Add peanut butter. Using lightly floured hands, gently mix and knead the dough in the bowl until it starts to come together. Add the chocolate chips and knead until just incorporated. Do not over mix.
Turn the dough onto the parchment lined baking sheet and shape into a disk 8 inches in diameter and about 1 1/2 inches high. Beat the egg white and use to brush the top of the dough. Cut the dough into 8 wedges - but do not separate the wedges - bake for 18-22 minutes until the scones start to brown. A toothpick inserted in a scone should come out clean. Let cool for five minutes and separate scones. Best served warm.
FALL INTO 7 Time n Money Saving Tips To Minimize Outdoor Clean-up
Hopefully, the remains of Hurricane Sandy’s wrath have left you and your loved ones safe and with nothing more then your lawns blanketed in leaves, gutters stuffed to the gills and your windows covered in yuk. So for those who now are ready to tackle this season’s outdoor clean-up here are several tips and tools that will help you minimize the time spent doing it and which won’t break the bank nor a nail. BTW if you have a child of age 5 or older this is a terrific family activity. If you have no children, ask your BFF or a neighbor who has since they will probably not mind sharing theirs so they can enjoy a ‘break’ of their own!
And, for those of you whom prefer to watch vs. read or both here I am on TODAY SHOW with Kathie Lee n’ Hoda showing them how to rake, scoop and get their leaves n’ minds out of the gutter!
1. PROTECT YOUR MANI N’ PEDICURE
No need to ruin your manicure or pedicure nor leave yourself open to getting some nasty blisters. Check out these fashionable and functional gloves that have extra-long cuffs to minimize scratches and all natural rubber boots from Garden Girl USA. They’ll almost make you want to do out-door cleaning on a regular basis!
2. KNOW WHEN TO RAKE ‘EM
Unless you enjoy raking on an ongoing basis there’s no need to rake more then 3-5 times a season and when you do keep these things in mind:
There’s no need to rake if your grass is still being mowed since the lawnmower naturally mulches leaves
Rake on calm, sunny days vs. windy, post rainy days which makes forming piles easier and reduces them re-distributing themselves on your lawn
Focus on wide-open areas, near your foundation and pathways vs. under trees and bushes since leaves will natural compost.
Enlist your children to help with raking and have them use child-sized rakes so they can do an effective job and not get hurt.
We adults should use rakes that have wide comfort grip handles since they’ll minimize slipping and those yucky painful blisters (along with those fab gloves above). I like the Tru-tempor clog free ones but my bud Marla prefers the wet-dry varietal (sounds a bit like a fine red wine!) Either way you can pick one up for less then $16.00
3. SCOOP ‘N SAVE TIME
Once the leaves are in piles and after our children have had their fun jumping in them, it’s time to ‘scoop’ them up. The easiest way is to use these leaf scoops, which are comfy, and you wear on each hand like a mitten (you can also use them as cymbals; an accompaniment to dancing ‘la cockoracha’, body armor or use your imagination and find other creative uses!) Kidding aside, I love them because I don’t have to use my hands and they can ‘scoop’ up 10x as many as mine could. They’re also not cumbersome to load and life as with a rake, and their bright yellow color makes them easy to spot and not ‘accidentally’ run over. PLUS at $6.99 a pair it’s a mani-friendly no-brainer …and it’s another terrific activity for kid’s to partake!
4. BAG AS YOU GO
As you scoop it’s best to bag as you go to minimize leaves blowing away. Instead of using paper bags that I find can easily get wet and cause the debris to rot, I recently found and love these dsolv mesh bags. They’re made of compostable corn based resin and since they’re mesh it allows the yuk to breathe and dry out. They also hold 50% more then paper, are easy to fill since the pop up sleeve protects the mesh as we’re filling and has a handy dandy handle to drag it to the curb.
5. CLEAN YOUR GUTTERS
If your gutters were clean before Sandy likelihood is they’re filled to the gills again. And, with ole man winter breathing down our necks it’s important to clean them to prevent ice dams from forming and moisture damage to our roofs. You can get on a ladder; spray, blow or hire a guy for several hundred dollars but I found this really cool tool for only $59.95 called the Gutter Clutter Buster. All you do is attach it to a 2.5″ wet/dry vac and let it suck away. It comes with a 5-foot tool that looks like a candy cane (Hmmm perhaps you can use it for that later in the season or pretend you’re a giant ‘lil bo peep!) and two attachments that give you 14 feet worth of height and viola leaves be gone and your gutters are clear.
6. SEAL CRACKS IN WINDOWS AND DOORS
Cracks and gaps in your window and door frames can cost you mucho money on your energy bills since they allow air in or to escape not to mention dirt and noise. So seal the deal for less the $3.00 a tube with DuPont AirTite . All you do is snip the tip, pipe out the caulk to seal gaps; smooth with a damp cloth and let dry for one hour. Painting is optional! Sooo simple even this accidental housewife could do it!
7.CLEAN WINDOWS ON A CLOUDY DAY
I know it may seem odd but the best time to clean your windows is on a cloudy, mild day vs. a hot, sunny day since the heat and sun dry the water/cleaning solution fast and cause streaks. And, though it may seem like a duh! always work from the top down to avoid drips and doing double work. You can use a squeegee but I found this Bonaire Wash ‘n Rinse Spray Gun at Lowe’s does an amazing job. As for the cleaning solution I put 100% white vinegar in the receptacle since vinegar is a natural disinfectant and cleaner. I’ve also put in a 50/50 mix of vodka and water but why waste it! To dry, use a dry squeegee, old newspapers or coffee filters which will leave no lint!
For more tips from The Accidental Housewife visit julies tips
What I Learned in Hurricane Sandy
When, on the eve of Sandy, I, somewhat prematurely in restrospect, announced in TIME that comfy New Yorkers like myself, snug in our soundproof apartments, were far too sheltered for our own good. “New Yorkers [aren't] interested so much in stocking up against disaster,” I blithely wrote, “as having a staycation. Kitchen libertines all, they wanted nothing so much as an excuse to lock the door, turn on the TV (until the power went out) and eat Heath bars until they ran out.” I accused myself, and everybody like me, of seeing the storm as mere spectacle, and pigging out, oblivious to the plight of the less fortunate.
Which was funny, given what happened right after that.
As I noted last week, my wife and I live in an evacuation zone, and we really did plan on riding out the storm in high style. But when chest deep water started rushing down our street, and the giant Con Ed power plant a few hundred feet away blew up in a giant flash of white light, the plan no longer seemed that great. We were, in fact, driven out of the house and made to couch-surf separately for nearly a week. And all of a sudden, the way I felt about food changed. “More than what we say,” I had written, “more than what we think, more, I think, even than what we feel, our true attitude toward the storm is told by the way we eat.”
What I didn’t realize was that the reverse was true as well. Once I was living in other people’s homes, eating furtive take out meals so as not to impact their kitchens, and sleeping in all my clothes every night - because, really, who wants to run into an unclothed Ozersky in the middle of the night? - I found that I was feeling very differently about food. For one thing, I wasn’t hungry; at least not in a good way. A healthy, conscious hunger is a kind of culinary aphrodisiac; it makes anything three times better than it is. I was run-down, stressed-out, lonely, and nervous. I was too dirty to go into real restaurants, and so I took all my meals from take-out Chinese joints and delis. But I rarely finished anything, and eating over garbage cans or at fast-food Manhattan fast food restaurants. (There is nothing more cramped, dirty, or vile than a Manhattan fast food restaurant. They make the ones in rest stops look luxurious.)
As a result of eating sporadically, poorly, and in a stressed state, I found myself without much energy - which, of course, only depressed me, and my appetite, more. The thought of how blithely I had opined about my immunity to the storm was vaguely amusing to me, but only in the way that you remember what your wrote in your high-school yearbook. Which is to say, with a black embarrassment redeemed only by unalloyed self-loathing. Still, I was only being honest. Like so many other New Yorkers, I never really believed that I was in any personal danger. And my attitude toward food, which quickly veered from recreational addiction to neglibible inconvenience, demonstrated that.
Here’s another thing I learned about having irregular eating habits. When you eat badly, and in weird ways, it makes you fat. The one thing I thought would be a consolation from this displacement and dejection was, at least, losing a few pounds. After all, I was taking a break from the round-the-clock hamburger research that my vocation requires of me. Plus I was spending a lot of time walking around aimlessly, so as not to inflict myself on my hosts during the day. And my reward was gaining weight.
It’s funny, or rather not so funny, that I needed to go through this myself to find out about it. Like so many of the confident assertions made about obesity, poverty, “food deserts,” and the like by ideologues on both sides of the food debate, I had only a passing knowledge of what these things actually meant. Scratch that. I now have only a passing knowledge; a week ago I had no direct knowledge at all. I have new respect for people like Barbara Ehrenreich or Tracie McMillan
Mike Stobe, Getty Images
, writers who actually left their apartments and went out into the world, and who only wrote about it when they got back. Like them, the best I can do is to represent what vague awakenings came my way during what was, let’s face it, a very minor disruption in the big scheme of things. I still think we all lived altogether too much in a bubble before Sandy. And I’m sure we will again. But now, I’m less sure of everything, including my own attitudes toward the thing I thought I know best, my own feelings toward food. The weird thing was that Sandy to flood my own bubble with reality.
Rachael Ray's Blog
- Rachael Ray's profile
- 296 followers


