Rachael Ray's Blog, page 81
October 19, 2012
Supermarket Score: Ramen Noodles
“Supermarket Score!” is all about taking a look at the great deals and delicious meals that are hidden in commonly found supermarket items.
I can remember, clear as day, being a kid at my babysitter Kimmy’s house and watching one of the boys across the table from me eat raw ramen noodles with his lunch. Horror. Or so I thought with the worldliness of a five year old.
How behind the curve I was on the universal glory of ramen noodles.
Being a college student at culinary school has a way of necessitating some fascinating dorm room inventions, often times with the most classic of college foods – ramen noodles – at the core of it all. Taking a bit of that alma mater inspiration, check out these four fab ideas to give new life to an old dorm room staple.
COCKTAIL PARTY SNACK MIX

Party mix is one of those funny things that everyone seems to have their own personal spin on. Some are die-hard “from scratch” people while others are bagged mix all the way. Whichever way you swing, try adding some crushed up raw ramen noodles to the fold. They’re tender but provide a great satisfying crunch. Want to make my version? Toss together 1 cup corn chips, 1/2 cup raw almonds, 1/2 teaspoon smoked paprika, and 1 tablespoon olive oil. Bake the mixture for 10 minutes at 400ºF and then toss in 1/2 cup wasabi peas; let cool and party on (makes about 3 cups).
TUSCAN-STYLE RAMEN WITH KALE

I’d be hard pressed to find anyone who can say “I need to eat less kale”. It’s just so good (and good for you)! Sneak in a bit more by making up a Tuscan-style ramen soup. Saute 1/2 small onion, 1 clove garlic, and 1 teaspoon fresh rosemary in 2 teaspoons EVOO. Add in the water and ramen spice packet and finishing preparing per package directions. Remember – you can always start off with only half of the spice packet and add more as desired. They tend to be very high in sodium and/or MSG, so feel free to adjust the seasoning to what your palate likes.
PEANUT NOODLES

My husband is obsessed with peanut butter, so peanut noodles are a frequent occurrence at our dinner table. Next time you’re whipping up your favorite recipe (or taking a little inspiration from Rach) and you find you’re short on noodles, reach for the ramen. Not only is the texture a blast to eat, they soak up a ton of the flavor and trap all of that delicious sauce in all their nooks & crannies.
LUNCHBOX COMPANION

Coming full circle on all those fated lunch hours at the babysitter’s table, I can finally now see the beauty in the raw ramen noodle. They’re tender, crunchy, and just plain fun – nothing wrong with having something a little different now & again, right? Pack a container of crushed up ramen and enjoy them sprinkled over your next lunchbox salad or soup.
Patrick W. Decker’s life revolves around food. Always has. Probably always will. As a graduate of The Culinary Institute of America and past member of the culinary team on Rachael’s daytime talk show, he now works as a food stylist and producer in NYC by day, and a food writer and recipe developer at his home in New York’s Hudson Valley by night. You can see what he’s up to by following his latest twEATs on Twitter at @patrickwdecker or visiting his website at patrickwdecker.com.
October 17, 2012
How to Halloween Candy Table!
I love to shop at Goodwill; I never know what I’m going to find, I get to reuse something that might have otherwise been thrown away, and the prices can’t be beat. Recently, I went on a little shopping spree in order to create the perfect Halloween candy table. I can’t believe the treasures I found: vintage lamps, a red and black tablecloth, candle sticks, glass cylinders and jar, a gothic mirror and frames. I even found a jack-o-lantern candy bucket, a plastic skull, and four decorative crows!
Once I did the shopping, I put this table together in an afternoon, so it doesn’t take a lot of time (or money) to have a Happy Halloween.
I even bought this beautiful buffet table that will be the perfect surface.
I found these inexpensive lenticular photos with friendly looking people at one angle, and creepy looking monsters at another. They came in plastic frames that I didn’t care for, so I cut those off.
I used the frames I found at Goodwill to give them a more formal look. I thought they might look like family photos at one glance, and give people a fright at another.
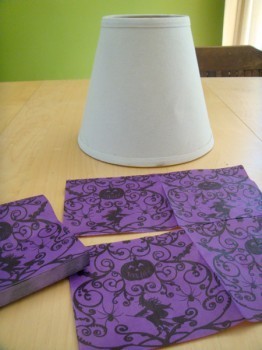
My vintage lamp needed a little touch of Halloween, so I decided to decoupage the lampshade with napkins.
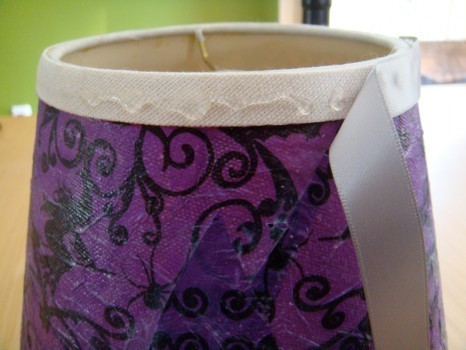
Tack the napkin on with a little glue on the shade, and then paint over with more glue.
Hot glue a ribbon to finish off the edges.
I like the subtlety of the design on the napkin: it’s Halloween themed, but not so much that I couldn’t display my lamp year-round. Of course, I could always use a different shade, and bring this one out for the holiday.
For my next project, roll some plain, white paper into the glass cylinders and trim off the excess.
Then, draw spooky creatures like ghosts using a permanent marker (put a piece of newspaper under the paper, so the marker doesn’t bleed through onto the table).
Use a battery operated candle inside to light up the drawings.
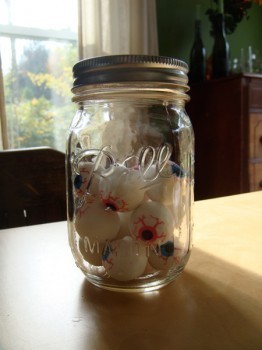
Fill a Mason jar (or any glass container) with fake eyeballs. These eyeballs happen to be bouncy balls, so I can hand them out with the candy.
My favorite project is not for the timid. Use a plastic container this this jack-o-lantern, or a plastic cauldron, and an old glove.
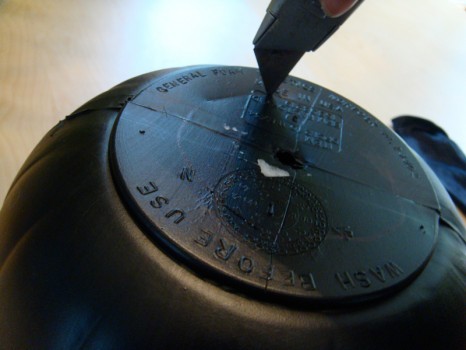
Using a utility knife, cut a hole large enough for a hand to fit through the bottom of the container.
When you’re handing out candy to trick-or-treaters, have your hand buried in candy in the jack-o-lantern. Reach out and scare the unsuspecting visitors while they’re reaching for their favorite treats.
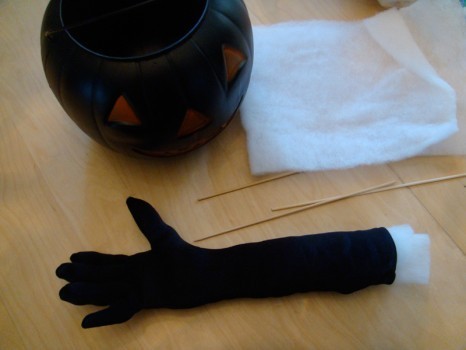
If you want to take a more passive approach, stuff the glove using bamboo skewers to get the stuffing into the fingers, and have the glove sticking out from the candy in the bucket.
Use the other Goodwill finds to fill-out the table for the perfect trick-or-treat experience—and don’t forget the candy!
Check out Goodwill for great costumes in addition to Halloween decorating ideas. You can feel good about shopping at Goodwill because its employment programs promote independence and dignity for people who need support to provide for themselves and their families.
October 16, 2012
THE NEW VINTAGE COLOR TREND FOR FALL
Which do you prefer - a beautiful vintage Chanel cocktail dress, a 1960 vintage Mercedes or the perfect vintage Gucci handbag? Very hard to choose. All conjure feelings of lived-in classics looking better with age, not over-done, or over styled and almost sexier lived-in with stories to tell. Enter New Vintage hair color - a perfected twist on low-maintenance, lived-in looks seen now strolling out of Cutler salons.
Color expert David Stanko of Cutler Salon and Redken hair color consultant offers up this Fall’s best hair color trend – and tips on how to help your stylist get the best results for giving your tresses our New Vintage look by Cutler.
Often used to relate primarily to a superior collection of wine, our New Vintage hair color technique is close to a singular shade, but it organically morphs into subtly different tones and expresses itself through a soft interplay of dimension – not your typical “I just got my highlights done, color job.” New Vintage color should never be showy that it screams you just came from the salon. It’s relaxed, natural color at it’s prime. Just like a fine wine with the perfect blend of exploding hidden flavors.
New Vintage color expresses itself in particular ways for different hair colors. There are your Marilyn Merlots, Penelope Pinots, Cindy Crawford Chardonnay and Sparkling Sophia Loren’s – all with unexpected looks and highlights. By taking brunettes away from the expected blonde highlights, and moving blondes into the “born with it” realm, we create hair color with a history.
[image error] [image error] [image error]
Many brunettes benefit from strategically placed low-lights or mid-lights, which can look more natural then blonde highlights. Ask your stylist to add some dept, in foils about 1-2 levels deeper then your base formula. For blondes, deeper roots and lighter ends mimic how nature treats blonde, but the effect is not as obvious as Ombre, or as structured as traditional highlights. The advantage is a a look that’s worn, not weathered, which grows out with greater ease. And that’s what makes it fresh for this season.
A few examples that you can discuss with your hairdresser, no matter where you live, is: adding 10 - 15 highlights while your single process (touch-up) is processing. Simply, apply the single color to your roots, wait 10 minutes, then add a few bleach lightener highlights in the fringe, sides, top; you know the most visual part of your ‘do (the part YOU see in the rear view mirror or at home in the bathroom). Lastly, request a “glaze” of demi-permanent color be applied between all the foils to refresh and richen the rest of your hair.
The result? Having your roots covered, new fresh and lively highlights gently starting a ½ - inch or so from your roots, that makes it more lived in (and no it won’t look tacky like you “ didn’t get close enough to the scalp.” Remember this is a “New Vintage” trend.) My clients love it and the grow out is easier because you didn’t go all the way to the roots. Many of our modern day celeb beauties are sporting this modern twist to highlights.
[image error] [image error]
Another variation to request is gently lightening some of the ends of your hair. It goes like this: you have your root color applied (no root color - easier yet). Your hairdresser should mix a thick cream lightener, and half way through your root color timing, select ¼-inch strands, around the face or the long layers on the sides and back. And hand-paint these pieces, from the middle of strand to the ends. Just keep an eye out to make sure the blending at the middle part of the hair is impeccable. By monitoring the blending, you’re guaranteed a seamless blonde strand that happily marries with the rest of your hair.
[image error]
In the end, the New Vintage hair color trend is for the polished woman who doesn’t want to appear too overdone; for the low-maintenance mom who regularly visits the salon and wants to try something new – and last but not least the classic beauty who wants only her hairdresser knowing that she REALLY does highlight her hair after all.
October 15, 2012
Veggie Sloppy Joe(Pav Bhaji) - Ain’t No Ordinary Joe
My refrigerator this morning was full of half-filled containers. How uninspiring! Nothing but leftover cooked vegetables that never quite made it to anyone’s plate this weekend. There were a few issues here-1) I couldn’t do more grocery shopping thanks to the lack of refrigeration real estate 2) None of the leftovers were substantial enough to serve to a family of 4 and 3) I am on a sustainability rampage with my kids teaching them about not wasting paper, food, blah blah blah – now, how could I contradict myself and toss them in the trash! Besides, the food was perfectly edible. I just had to find some way to re-purpose them.
Photo by Marcus Jr. Roberts
I then remembered Mumbai’s famed ‘Pav Bhaji’ – yum, the ultimate in street food. Pav means bread roll and bhaji means spiced vegetable (spicy but not necessarily chili). The dish is made from unused cooked vegetables, but you need not turn up your nose, it is here that lies the strength of the dish. The Bhaji got a head start with the cooked vegetables. It is full of flavor already and tender vegetables are cooked further in fragrant tomato gravy, it is then lightly mashed together and generously heaped on to a soft bread-buttered roll. Sprinkle some fresh diced onions for a little crunch, a hit of fresh lime juice for zing and a knob of butter for that added luxury and then sit back and sink your teeth in to the most exotic Sloppy Joe ever.
Photo by Gsz
Recipe for Veggie Sloppy Joe
For this dish, feel free to swap out the cauliflower for any other cooked veggie on hand (mushrooms, turnips, spinach, corn) – just remember to cook any uncooked produce first.
Ingredients
2 tbsp. cooking oil
1 onion, finely diced
1 tbsp. ginger and garlic paste
1 tsp. cumin seeds
Salt to taste (about ¾ tsp.)
½ tsp. turmeric
1 tsp. coriander powder
½ tsp. cayenne
½ an eggplant, cut in small cubes and sprinkled with salt
2 large tomatoes, finely diced
½ head of cauliflower, broken in to smaller florets/ cabbage, shredded
1 carrot, finely diced
1 red bell pepper, finely diced
¼ cup peas/ ¼ cup string beans
1 large russet potato, boiled and grated
Serving
Seedless burger buns , butter (for rolls), fresh limes, 1 tsp. of diced onions per roll
Method
1) Heat oil, add cumin. When it turns 2 shades darker, add onions and sauté until they begin browning
2) Add the ginger and garlic and cook for a minute to lose raw taste
3) Wash and strain the eggplant and add to the onions, cook until the purple skin looks shiny black. Add the turmeric, salt and cayenne. Add the tomatoes and cook for a couple minutes. Add the cauliflower and carrots and cook until tender
4) Add the red bell pepper and peas/ beans. Once all vegetables are soft and have lost their raw taste, grind to a mash with a hand blender. Add the boiled and grated potatoes. Check for seasoning and adjust accordingly
Serving
Spread butter on the insides of the buns and place on a hot frying pan with the buttered side facing down. When it has a golden crust, remove and heap on the veggie Joe, sprinkle with onions and squeeze a few drops of lime juice.
Saira Malhotra, is of British –Indian descent and is a chef, food writer and cooking instructor based in New York City. Raised in Hounslow, U.K, or rather ‘Little India’, where the air is aromatic with roasted spices, little did Saira know these moments would follow her from being a student in France and Italy to residing in NYC with her husband and kids and parlay themselves unexpectedly in to a culinary career. She is a graduate of the International Culinary Center in New York City. Come visit her at her food blog: www.passportpantry.com where she shares approachable and international recipes
My kids’ “Swear Jar” helps my husband curb %$#$%#$^
My husband swears somewhat frequently (maybe he doesn’t necessarily think so but the rest of the family does). He inadvertently peppers his everyday conversation with off-color language, and will come out with an expletive if he is cut off in the car, he drops something, etc. I rarely if ever swear and have through the years consistently shushed him when he swears in front of our kids. He doesn’t even know he’s doing it. The good news is that from what I can tell, my kids don’t swear - I haven’t caught them using this language when talking with their friends or thinking it’s cool in any way. (I was telling this story to a friend recently and he said his father - who was extremely well spoken - said people who chose to swear were “lazy.” So true.)
I think it might be a similar situation to my friends who forbid their kids from watching TV. When the kids come to my house where there are no real TV limits, (I love TV and my kids do too - if it seems like it’s been on too long, I turn it off and send my kids outside - I never get any complaints) the forbidden-TV kids are complete zombies if the television is on. They are literally in a trance, transfixed by Good Luck Charlie. Just like TV, my kids are so used to the swearing, it has lost its cache. No real excitement there.
My kids are old enough now (8, 10 and 12) that they even call my husband on it on it when he swears and a few weeks ago they made him a swear jar. They decided he needs to put a dollar in it every time he slips. I was no part of this whatsoever and couldn’t believe a) they came up with it, and b) my husband went along with it. He said it has helped him to be more cognizant of his language in front of the kids and has gotten better. He will put a few dollars in the jar on Sundays before he watches football - we have $12 dollars so far and I told the kids once we get a substantial amount of cash, we can go out for pizza or ice cream. But who knows, their swear jar has been so effective in curbing their father’s %^&$%&, we might not ever get there!
Thanksgiving Dessert Planning. Already? Sweet Potato, Pecan Crostata
We are at the beginning of sweet potato season and I’ve been really busy working on delicious desserts featuring one of my favorite veggies. If you think about it, Thanksgiving isn’t really that far away and I like to give new desserts a dry run before the big day to make sure I have the recipe down. I know Halloween hasn’t even come yet but these things take time and honestly, sweet potato deserts are delicious in October and early November too!
If I’m hosting a big holiday at my house, I like to offer a few different types of desserts. Since hosting a large event can me loads of cooking, I try and keep most of my desserts simple as possible. My goal for the dessert portion of the meal is always, tasty but not uncomplicated. I generally make cookies, a pie and something else which I change up every year. This year I think I’m going with a Crostata. It’s basically a free form pie. Crostata’s are great because they have all the deliciousness of pie (filling and crust) but require none of the work or time it takes to make a proper pie. This recipe is so easy to make, I actually made it as a breakfast treat for my family this morning. If you buy pre-prepared pie dough and roast your sweet potato ahead of time, this dessert comes together in flash.
This is definitely a lighter dessert, making it the perfect ending to a gut busting meal like Thanksgiving. The flavor delicate and not at all cloyingly sweet because the sweetness mainly comes from the potato itself. In fact, this recipe lends itself perfectly to any breakfast or brunch buffet but is also elegant enough to serve to guests on a fancy holiday like Thanksgiving.
Sweet Potato, Pecan Crostata
Serves 4-6
Ingredients:
1 large sweet potato, scrubbed with a potato brush
3 tablespoons heavy cream or milk, plus 2 teaspoons extra for brushing the crust
1 tablespoon sugar, plus a teaspoon extra for dusting over the crust
1/2 teaspoon pumpkin pie spice
1 (9-inch) store bought pie crust
Toasted pecans (optional)
Instructions:
1. Preheat oven to 400 degrees. Scrub the sweet potato clean, dry and wrap in aluminum foil. Using a fork poke a few holes through the foil all the way around the potato to allow steam to escape. Place potato onto a baking sheet and bake for 50-60 minutes. Allow to cool before removing the skin with a fork.
2. Keep oven on 400 degree setting and line a baking sheet with parchment paper or a reusable silicone liner.
3. Roll out the store bought dough into a 9-inch circle on a lightly floured surface, then place it onto prepared baking sheet.
4. Place sweet potato, heavy cream, sugar and pumpkin pie spice into a food processor and process until smooth, about 3 minutes.
5. Spread the sweet potato mixture onto the dough leaving about a 1 1/2-inch border. Fold over the edges of the dough until it covers about 1-inch of the filling. Brush the edges of the dough with a little heavy cream and sprinkle lightly with sugar and pecans if you wish. Bake in the oven for 20-25 minutes or until the crust is light golden brown. Serve.
Christina Stanley-Salerno is a mama, recipe developer, food stylist, photographer and blogger atTakeBackYourTable.com. She loves cooking for and with her family. Life is hectic, but Christina is passionate about mealtime because she believes that family meals are the glue that holds everyone together. Creating simple, quick and healthy meals is her specialty and her trick to keeping the family meal a reality, even on busy weeknights.
Follow her on Twitter @TakeBackTables
October 12, 2012
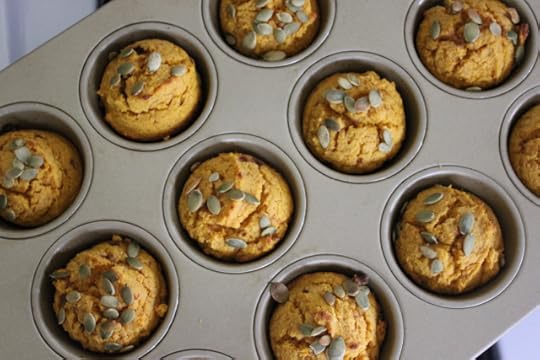
Pumpkin Corn Muffins (From Scratch Style)
So last week’s “Supermarket Score: Pumpkin” post garnered quite a few comments (much to my appreciative surprise). I heard from many a die-hard baker out there that could appreciate the suggestion of a Pumpkin Corn Muffin, but didn’t want to go the boxed mix route. They wanted to go old school and make them from scratch.
So this week’s post is all about you, at-home-bakers! A Pumpkin Corn Muffin to call your very own (and kudos to you for shirking off a boxed mix in pursuit of getting your hands a bit dirty)! What I particularly enjoy about this recipe is the amount of salt in it. While it does have some brown sugar to help bring out the sweetness in the pumpkin and corn, it’s most definitely a muffin erring more on the side of “savory” than “sweet”. Perfect, in my opinion, to enjoy over a cup of coffee in the morning or pass around the dinner table at night.
Give it a go and feel free to experiment with some of your favorite variations. Want to top it with chopped nuts or streusel? Go right ahead. Hankering to fold in 1 cup of shredded dry jack or sharp cheddar cheese? Brilliant!
PUMPKIN CORN MUFFINS
by Patrick Decker
Yield: 12 muffins
Ingredients
1 cup prepared pumpkin
3 tablespoons sour cream or Greek yogurt
2 large eggs
8 tablespoons (1 stick) unsalted butter, melted and cooled
1 cup fine ground cornmeal or instant polenta
1 cup flour
1 1/2 teaspoons baking powder
1 1/2 teaspoons salt
1/2 cup dark brown sugar, packed
3 tablespoons pumpkin seeds, optional
Instructions
Preheat the oven to 400 degrees. Grease the cups of a 12-cup muffin pan with softened butter or nonstick cooking spray.
In a small mixing bowl whisk together the pumpkin, sour cream (or Greek yogurt), eggs, and butter. Set aside.

In a large mixing bowl whisk together the remaining dry ingredients except the seeds. Add the wet ingredients to the dry ingredients and stir just to combine. Divide the batter between the cups and top each with the pumpkin seeds (if using).

Bake the muffins until they’re pale golden brown and a toothpick inserted into the center comes out clean, 18 to 20 minutes. Let the muffins cool in the pan for 10 minutes and then transfer to a wire rack to finish cooling.
[I recommend serving the muffins warm. If you’re baking them ahead of time, reheat them in a 250 degree oven for about 10 minutes.]
Patrick W. Decker’s life revolves around food. Always has. Probably always will. As a graduate of The Culinary Institute of America and past member of the culinary team on Rachael’s daytime talk show, he now works as a food stylist and producer in NYC by day, and a food writer and recipe developer at his home in New York’s Hudson Valley by night. You can see what he’s up to by following his latest twEATs on Twitter at @ patrickwdecker or visiting his website at patrickwdecker.com .
THIS WEEK’S FAVE MULTITASKER: CARVIN’ 5 UNUSUAL USES FOR PUMPKINS
Once upon a time there was a pumpkin that turned into a coach but that, my friends, is the wonderful stuff fairytales are made of. And, though I wish I had a magic wand and fairy godmother to turn pumpkins into coaches (and my dollar bills into hundreds) alas all I have is a creative imagination which is how I came up with the following ways to use our season’s favorite fruit…Yes fruit! Pumpkins are fruits not veggies and fact be known, they’re berries… albeit ones that seem to have been on steroids. And, their close cousins include cucumbers, melons, gourds and squash-whodathunk!
PLEASE NOTE: All of these ideas are great activities to do with you child under adult supervision including the Exfoliating Mask. Just ‘carve out’ an area indoors or outside and cover a table or floor with paper bags and use one for all the goop to avoid a gigunda mess!
1. VASE OR PLANTER:
o Carefully cut off the top (don’t want you to be a truly accidental housewife J) and scoop out the center. Save the seeds if you wish to make a tasty snack (see below).
o Place a square of floral foam in the center. Moisten the square and ‘plant’ your fresh flowers. You can also use it for dried flowers but don’t wet the foam!
If you’d rather transplant a plant without replanting it (have I confused you yet!) simply scoop out the center and place the plant in its original pot directly into the center. It will look pretty and there’s little muss or fuss. Love that!
Of course if you like getting a bit dirty take the plant out of it’s original plastic pot and plant it directly into the pumpkin. Then ‘plant the pumpkin’ with your plant remaining above ground. The pumpkin will turn to compost and help fertilize your plant!
2. CANDLE HOLDER
o Pick smaller pumpkins to fit the candles you wish to use
o Cut off top and scoop out all the yuk to approximate
o Place candle directly in the center
3. NATURAL PUMP-POURI
o Cut the top off carefully and keep it on the side.
o Hollow out ye ole pumpkin and save the seeds for a tasty snack (recipe below.
o Depending on your artsy side either carve out a jack-o-lantern face or 4-6 circular holes around the width of the pumpkin using an apple corer or clay cutter which you can get on line http://www.amazon.com/Four-Clay-Tools-Hole-Cutters/dp/B000Y8W71I
o Rub some cinnamon, nutmeg and/or pumpkin spice into the bottom of the lid and insert a few whole cloves
o Place a tea light inside
o The scent should last 6-8 hours in total when lit. Yum!
4. WINE/CHAMPAGNE ICE BUCKET:
o Pick a large wide pumpkin
o Cut off top 1/3rd and scoop out yuk
o If you like to use it as a wine or champagne bucket carve out one-two openings as in the picture for the top/neck of the bottle
o Coat inside with Vaseline and plastic wrap to avoid ‘bloating’ the pumpkin from the ice/water that melts
o You can also use a glass or plastic bowl (I generally don’t since post use I can just toss the ‘bucket’ out but that’s your choice)
o Fill with wine, champagne, beer or other single serving libations of your choice. Cheers!
5. EXFOLIATING MASK- You could use all the goop (sans seeds) to make your own puree but that would be more a Martha like task, which as noted is not my style. Instead I purchase a can of pumpkin puree from my local supermarket to whip up this simple home-made mask in less then a minute:
1. Combine
§ 5 tsps. pumpkin puree
§ 3 tsps. brown sugar
§ Splash of whole milk
Optional: add a teaspoon of honey and/or replace milk with olive oil (you know how O-live olive oil J)
2. Apply to your mug and neck in circular motions avoiding your eye area
3. Chill with it on for about 20 minutes (avoid family members whom may think you’ve contracted some horrible skin disease or are turning into a pumpkin)
4. Rinse off with lukewarm water and a clean washcloth….and enjoy your fresh new glow J
A FEW FYIS:
Pumpkins make a terrific facial mask because they’re bursting with vitamins A, C and E and zinc.
Brown sugar is your natural exfoliator
Milk has fat/cream (duh!), which is a natural softener and hydrator; lactic acid which helps cleanse your skin and alpha hydroxy which is a natural exfolient.
Honey is a natural anti-oxidant and anti-microbial
BONUS: YUM PUM SEED SNACK:
o Clean seeds thoroughly
o Preheat oven to 350
o Place in a single layer on sheet of tin foil or a baking sheet
o Drizzle with olive oil or melted butter.
o Add any of the following seasonings to taste, individually or in combo:
o Salt
o Brown sugar and cinnamon
o Curry
o Cayenne pepper or hot sauce
o Bake for 45 minutes or until golden brown-stir occasionally so they brown evenly
For more tips from The Accidental Housewife, visit juliestips.com
Nuts about spiced nuts - The conscious snack
Certain weeks feel like they spiral out of control! Running to school events, meetings, deadlines, dashing home to make dinner, watching piled-up paperwork self-generate, finally returning the phone call of the friend who left 7 voice-mails (the last of which was passively threatening) - is it an wonder that the gym and healthy eating get thrown on to the back burner?
With so much on my plate, it wasn’t worth adding the guilt of unhealthy eating to it! Instead of reaching for a handful of chips, I would reach for a handful of nuts. Nuts are packed with fiber, vitamins, lowers cholesterol, rich in antioxidants and a serotonin booster. Great, but what did that mean for me? It meant that I would look radiant, less bloated and may be even lose weight. What a winner, if I could do this, I was sure everything else would fall in to place.
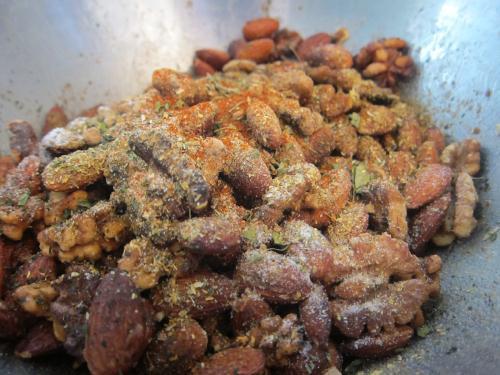
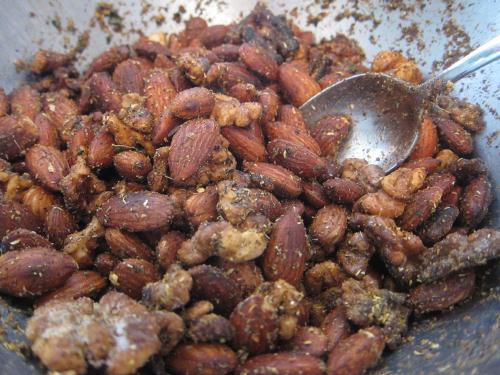
Since nuts can be mundane, I decided to spice them up by toasting and then tossing in a dry spice mix of cayenne, smoked paprika, cumin powder, salt, a touch of sugar and a hit of mango powder for a light zing.
Adding dry spices to roasted nuts
When nuts taste this great, the hand grabs without any convincing and reminders of its health perks. Yes, I do add a touch of butter, but given the amount of nuts it coats; it is by no means excessive. I made a batch of them for snacking purposes but with the holidays around the corner, I made an extra set and filled them in little mason jars to distribute to friends and family. Though everybody liked them, surprisingly, my son was the biggest fan and was caught in action as he smuggled away a handful.
thief-in-the-background
Recipe for Spiced Nuts
Ingredients
1 tsp. coriander seed
1 tsp. black pepper1/4 heaping tsp. cumin seed
1 tsp. coarse kosher salt
½ tsp. cayenne pepper
1/4 tsp. smoked paprika
1 tsp. mango powder or sumac
1.2 tsp. sugar
1 cup raw almonds
1 cup raw pecans
2 tbsp. melted butter
Method
Heat the oven to 400 degrees. Combine all the spices and set aside. Coat the raw nuts in the melted butter, place on a baking tray and place in the oven for about 15 minutes, until they turn golden. Pour in to a mixing bowl whilst hot and coat with the dry spice mix. Lay nuts out on a tray to allow to completely cool. Store in an airtight container.
Spiced nut mix
Saira Malhotra, is of British –Indian descent and is a chef, food writer and cooking instructor based in New York City. Raised in Hounslow, U.K, or rather ‘Little India’, where the air is aromatic with roasted spices, little did Saira know these moments would follow her from being a student in France and Italy to residing in NYC with her husband and kids and parlay themselves unexpectedly in to a culinary career. She is a graduate of the International Culinary Center in New York City. Come visit her at her food blog: Passport Pantry, where she shares approachable and international recipes.
October 10, 2012
Keep Your Head in the Zone! The Trifold Path to Cooking Zen
Cooking is something of a zen state. I know that Rachael can do it while she is talking. She’s so good at it that I believe she could do it while sleeping. But for me, cooking requires concentration, a kind of trance-like state. I need to pay attention, especially given the kind of high-heat, short-time intuitive cooking I like to do. You can’t walk away from a sizzling hamburger, after all. But sometimes, when there is a lot of cooking to do, and it isn’t fast and furious, I need ways to keep my head in the game. Here are a few of them.
– Music. I have the luxury of cooking mostly when nobody is around. So I have the freedom to play music, via a small ipod speaker in the kitchen. For long, repetive tasks like folding tortellini, or rolling flat pasta, pitting cherries (ew), or removing the silverskin from a high pile of flank or skirt steaks, you would go nuts without something to occupy your mind. Spotify is invaluable here. I sometimes go with spoken word; but then, I’m a freak. I can’t imagine that anybody else would listen to The Rubiyat of Omar Khayam, read by Alfred Drake, and become so absorbed by it that the minutes flew by. Whole albums that have a full narrative cycle are good, because when else can you really pay attention to them. I just figured out that Ziggy Stardust had a plot. In any case a perfect cooking album has to be lively but mellow, I think. Sparklehorse’s It’s a Wonderful Life or Marvin Gaye’s Here, My Dear work for me.
– Movies. One of the most challenging things for is me is making things that require long periods of uninterrupted cook time. I am basically ADD, and the second a walk away from a slow-simmering corned beef or some oven-braised veal ribs, I’ve basically forgotten they exist. So I sometimes use a familiar movie as a guide. (I realize I could just buy a time with a bell.) I find that Caddyshack is the perfect length for low roasting a big lamb leg. Other dishes require multiple stages: When cooking a big chicken, for example, I will watch Conan the Barbarian. The bird starts off at high heat, and when Conan is put onto the Wheel of Pain, I turn it down. When the Cimmerian warrior ascends the Mountain of Power in an easy-to-spot priestly disguise, The breast come out. The horrifying “orgy” scene, with its green stew of hands and heads, tells me that it’s time for the dark meat to come out. I add some wine and stock to the browned, stuck-on vegetables at the bottom, turn down the heat, and wait for Conan to chop off Thulsa Doom’s head before assembling and plating the whole chicken. Any movie you know well will work: it kills the time and keeps you in a long-established rhythm.
– Multitasking. This is one Rachael is especially a master of. If you have enough things to do, you can really stay in the zone, entering what athletes sometimes call “the zone.” I made Thanksgiving dinner last year in three hours, producing eight dishes including a large turkey. The key was to plan everything ahead of time, and to figure on making so much that every second you would be occupied. Four burners were going, two big spaghetti squashes were in the oven, the turkey was getting basted, biscuit dough was being prepped — and of course, I was eating the whole time. Everything came out great, because I never stopped paying attention.
And attention, of course, is the one ingredient no recipe can be without. Did anybody ever say that before?
Rachael Ray's Blog
- Rachael Ray's profile
- 296 followers


