Rachael Ray's Blog, page 82
October 10, 2012
Don’t Miss Out On Fig Season!
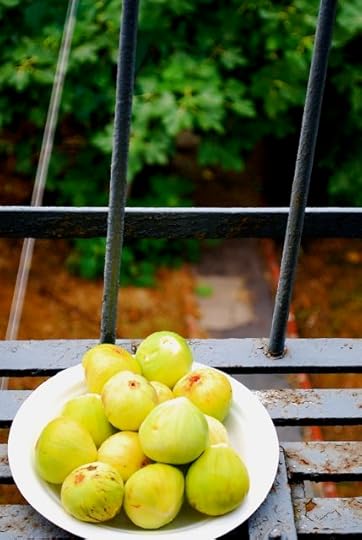
Fall is fig season, and these luscious treats don’t last long. Look for fresh figs at gourmet markets, farmer’s markets - maybe even your own backyard!
Ever since I’ve lived in my very Italian neighborhood in Brooklyn, I’ve looked forward to fall because that’s when my landlord, Frank, harvests figs from the tree in the backyard of our building. His family planted it there decades ago, like so many other Italian families in the neighborhood. In fact, when you look out the window of my kitchen facing onto the backyard, you can see several of the neighboring yards, and most of them have fig trees!
This year, for some reason, the birds got to the figs first! They pecked little holes in them and then the fruit went bad. Bummer! Well, the following week I went to Italy, and you know what? It’s fig season there, too, and I had the best figs I’ve ever tasted in my life! In Italy, they have a variety of figs called fiche nero, or black figs, that are the size of a small apple and taste like fig jam. They are so sweet and intensely flavored, like honey and Mediterranean sunshine packed into a deep purple orb with a bright red center.
I also tried some green figs, like the ones we have in our backyard, but they were nowhere near as distinct or sweet. That’s probably why Rome’s most renowned gelateria, San Crispino, makes fiche nero gelato, which I also enjoyed immensely.
It’s starting to get cold, and fig season is almost up, so take advantage! Rachael has some great ideas for what to do with figs, including this recipe for Vanilla Ice Cream with Balsamic Fig Sauce. Make this recipe with fresh or dried figs, whichever you can find. Aside from eating them plain, here are some other ideas for what to do with fresh figs:
-Freeze whole, ripe figs. Cut in quarters and eat as a dessert, like chunks of sorbet.
-Make roasted figs. Cut figs in half, drizzle with balsamic vinegar, and roast on a parchment-lined baking sheet at 350°F until the figs are soft and fragrant, about 10-15 minutes.
-Slice thinly and use as a pizza topping.
-Scoop out the flesh and mash with honey and a pinch of salt to make a no-cook fig jam.
-Make sandwiches with grilled figs, grilled sausage, pickled red onions, and arugula.
-Make a salad with sliced figs, crispy bacon, bitter radicchio, and balsamic dressing.
October 9, 2012
Supermarket Score: Pumpkin
“Supermarket Score!” is all about taking a look at the great deals and delicious meals that are hidden in commonly found supermarket items.
It’s that blissful time of year where pumpkin starts emerging in all forms from muffins and martinis, to lattes and lobster rolls (well, maybe not so much the latter). The point is, now is our chance to savor as much pumpkin as possible - and with good cause! Pumpkin has a low glycemic index and is a great source of fiber and vitamin A. Plus it’s readily available (en masse especially this time of year) in the supermarket baking aisle
But what to do with it beyond quick breads and pies? Check out these four great ideas for making seasonal (and even year-long) use of this harvest favorite.
PUMPKIN BROWNIES

By now I’m sure we’ve all heard the ‘ol calorie cutting diet trick about swapping apple sauce for some of the fat in baked goods, right? Pumpkin serves the same purpose and, in my opinion, is even better. Canned pumpkin has less water than applesauce and, I feel, keeps baked goods even more moist after baking. Plus it’s earthy flavor and reduced levels of natural sugar pair well with deep flavors like chocolate without making them overly sweet. Try using an equal amount of canned pumpkin for the oil in your next batch of brownies and see if you can tell the difference.
PUMPKIN CREAM CHEESE

Having written this post a couple of days before posting it, I was thrilled to see that fellow RR blogger, Christina, had posted a blog with the same delicious idea in mind. While she kicks it up a few tasty notches with the addition of sugar, pecans, and spices, I like to keep mine old school by mixing together 1/4 cup of pumpkin with 1/2 cup whipped cream cheese. The clincher here is to not go too heavy on the pumpkin, as your spread will be too watery. Serving it on top of whole wheat or multigrain bread will also help to bring out more of the pumpkiny flavor. With either version, you’re surely in for a delicious morning.
WARM PUMPKIN CIDER

I have to make a confession: I don’t love hot apple cider. I know it’s a nearly punishable offense, being a kid from northern New York and all, but I just prefer it cold. Many of my friends and family, however, love it, so I gladly oblige when they come over. Last fall, seeing the need to use up some leftover pumpkin that was in the refrigerator, a harvest classic was born. For each serving, warm up 1/4 cup pumpkin with 3/4 cup apple cider. Grate in a little nutmeg, spike it with a shot of spiced rum or vanilla-flavored vodka, and let your cozy evening on the couch begin.
HARVEST CORN MUFFINS

I was a baking & pastry major in culinary school and love taking the time to craft a beautiful loaf of bread or batch of muffins. I also have the softest spot in my tummy for corn muffins made from a boxed mix. There’s just something so comforting about passing them around at the dinner table. Next time you’re whipping up a batch, try this harvest-inspired variation: Use 1 small box of mix, 1 egg, 1/4 cup milk, and 1/4 cup pumpkin. Garnish them with 1/2 cup chopped hazelnuts or pumpkin seeds and bake according to package directions. (In thinking about it, they’d even be delicious topped with a little bit of streusel and served for breakfast…).
Patrick W. Decker’s life revolves around food. Always has. Probably always will. As a graduate of The Culinary Institute of America and past member of the culinary team on Rachael’s daytime talk show, he now works as a food stylist and producer in NYC by day, and a food writer and recipe developer at his home in New York’s Hudson Valley by night. You can see what he’s up to by following his latest twEATs on Twitter at @ patrickwdecker or visiting his website at patrickwdecker.com .
September 25, 2012
Fall is perfect for Kite Flying!
There’s something really soothing about flying a kite. It takes a little effort—and a little wind—to get it flying, but once it’s up there it can be smooth sailing for a while.
Materials:
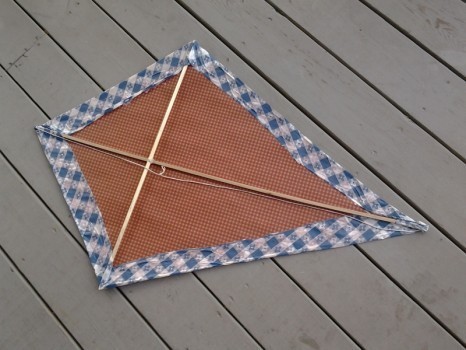
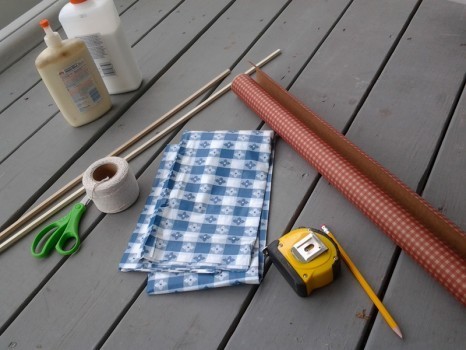
This handmade kite is pretty easy to make, and can be made out of anything that can be cut with scissors: paper, plastic, or fabric. For a really durable kite, use rip-stop nylon. I used what I had on hand: a very cheap plastic tablecloth, some patterned brown craft paper and masking tape.
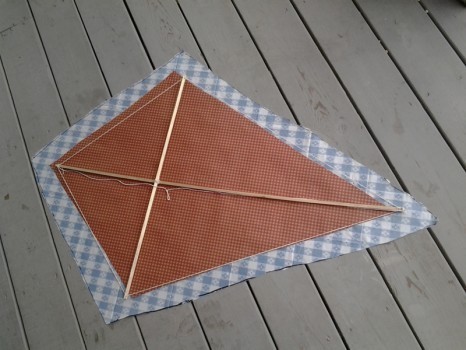
The kite frame is made of two 36″ dowels, 5/16″ thick, cotton twine and wood glue.
Assembly:
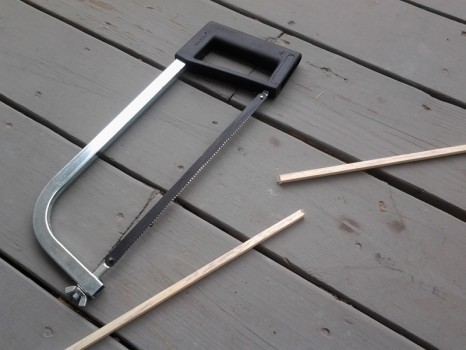
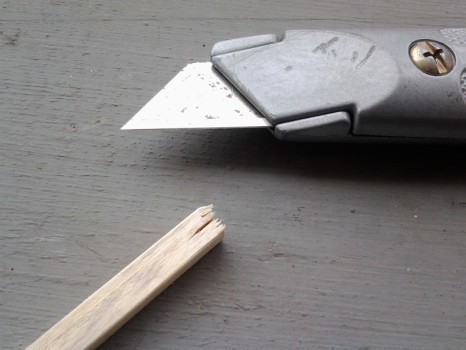
Cut a foot off one of the dowels so it’s 24″ long. Reserve the cut end.
Cut a 1/4″ notch into the end of each dowel.
Measure a foot down on the longer dowel and mark it with a pencil. Using wood glue, glue the shorter dowel in the center at the mark, and then secure it by wrapping the cotton twine around a few times.
Cut a piece of cotton twine long enough to run around the perimeter of the kite. Tie a knot in one end and wedge it into the bottom notch of the kite frame.
Run the twine around the kite, wedging the twine into each notch. Make the kite’s bridle—the thing you will tie your kite string to—by wedging another piece of twine into the top and bottom of the kite frame. Tie a loop near the center of the bridle.
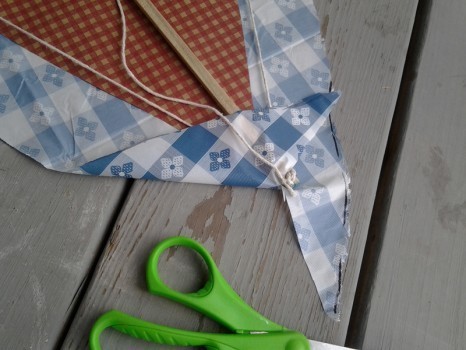
Use the kite frame as a guide to cut the material for the kite. Since I’m using two different materials, I made the plastic tablecloth a couple inches larger than the kite frame, so I have excess to wrap around the edges.
When wrapping the edges, make sure you make a slit in the top and bottom so the bridle will move freely.
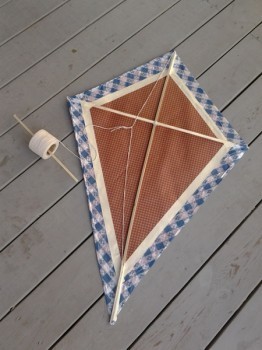
Glue the wrapped material to secure. To further strengthen the kite, and to make it look a little neater, add a strip of masking tape. Tie a kite string, or the remaining cotton twine to the kite. Use the reserved dowel piece as a handle for the twine.
How to fly the kite:
A kite needs at least a 5mph wind to stay up—look for blowing tree branches. If wind is more than 25mph, you may want to avoid flying a paper or thin plastic kite because it may get damaged. However, a kite made from the rip-stop nylon will probably be fine, but it will be challenging to keep it from dipping and crashing.
Have your back to the wind. Hold your kite at the bridle point and let the line out. If the wind is just right, your kite should start to rise. Sometimes, the kite needs a little help, so you may need to jump start it by running with it behind you.
Let the kite fly away a little by letting out some of the kite string. Keep letting out the string to let the kite fly higher and higher.
Make sure you fly your kite in a clear area away from trees and power lines.
If the kite begins to dip, tug on the string or run a little to stabilize.
When finished flying the kite, slowly start to pull it in by wrapping the string around the spool. It helps to have a friend catch the kite, so it doesn’t crash to the ground.
Have fun flying your kite!
Find me on Facebook!
Make Your OWN Household Cleaners
When the bathroom gets really gross, or the kitchen is covered in greasy grime, it can be comforting to use a harsh chemical to get rid of the mess. We’ve been conditioned to think the more toxic the chemical, the better it will clean.
However, harsh chemicals can be bad for the air inside the home. Studies have shown links between stay-at-home moms and higher cancer rates due to inhalation of toxic chemicals (http://www.non-toxic.info/Health_Stat...). Also, dumping all those chemicals down the drain is terrible for the water supply. The toxic substances found in many household cleaners are not adequately removed by sewage treatment plants. Once the water leaves the plants, it is returned to the water supply.
All good reasons to ditch those chemicals, and start cleaning our homes like our grandmothers did. They really do work, and I promise your house will smell fresh and clean.
As with any cleaner, if something is precious to you, test a small spot before cleaning, so you don’t ruin you favorite things.
One more thing. Go buy yourself a stack of bar rags, or cut up some old clothes or tablecloths, and get rid of those paper towels. There’s really no need for them. A lot of natural resources goes into making those towels, and they don’t work any better than a plain old rag. When the rag gets gross, just throw it in the wash with the rest of the laundry. Not only will you be saving trees, you’ll be saving money too.
Four an all-purpose household cleaner, try one of these:
In a spray bottle add:
1 cup white vinegar
1 cup water
Just spray and wipe clean
For a more heavy duty cleaner:
2 tsp. Borax (found in the laundry detergent isle)
4 tbsp. white vinegar
1/4 tsp castile soap
3 cups hot water
Surface Cleaner:
1 1/2 cup baking soda
1/2 water
Mix in a jar to create a paste. Spread over the desired surface and clean with a sponge.
Disinfecting cutting boards
Rub a half lemon on the surface. For tough stains let the lemon juice sit for a while, or rub in a little salt.
Bathroom Mold Remover
1 part hydrogen peroxide
Two parts water
Spray on mold. Wait at least an hour before rinsing.
Laundry:
1 cup peroxide in the wash instead of bleach.
Fabric Softener: 1 cup vinegar to the laundry. Just add to rinse cycle, or in the fabric softener compartment.
Window Cleaners:
In a spray bottle add:
1 tbsp. lemon juice
2 cups water
Or 1/4 cup white vinegar
2 cups water
For an extra strength glass cleaner:
1 cup rubbing alcohol
1 cup water
1 tbsp ammonia (non-sudsing)
Wipe with a rag like you would for a store bought cleaner.
Floor cleaners
Vinyl and linoleum:
1 cup vinegar
A few drops baby oil
1 gallon warm water
Wood:
Equal parts water and vinegar plus 15 drops pure peppermint oil.
Wood floor polish:
1 part vegetable oil
1 part vinegar
Rub in well
Brick and stone:
1 cup vinegar
1 gallon water
After washing rinse with water
Carpet cleaners
Use equal parts vinegar and water. Spray on the stain and let sit several minutes. Clean with brush or sponge and soapy water.
For greasy spots:
Sprinkle corn starch onto grease. Wait 15-30 minutes. Then vacuum.
For tough stains:
1/4 cup salt
1/4 cup borax
1/4 cup vinegar
Rub paste into carpet and leave for a few hours. Then vacuum.
Furniture polish
1 cup olive oil
1/2 cup lemon juice
Shake well. Apply with a flannel rag. Spread evenly. Polish with a dry cloth.
Metal Polish
Aluminum: using a soft cloth, clean with a solution of cream of tartar and water.
Brass or bronze: polish with a soft cloth dipped in lemon and baking-soda solution, or vinegar and salt solution. Use a drop of ketchup on tarnished spots.
Chrome: polish with baby oil or vinegar.
Copper: soak a cotton rag in a pot of boiling water with 1 tablespoon salt and 1 cup white vinegar. Apply to copper while hot; let cool, then wipe clean. For tougher jobs, sprinkle baking soda or lemon juice on a soft cloth, then wipe. You could also apply a little ketchup on a soft cloth and rub over tarnished spots.
Silver: line a pan with aluminum foil. Add two tablespoons baking soda. Place silver in pan and fill with hot water. Let sit. For really tarnished pieces, buff with a cloth.
Remember cleanliness is next to godliness, or something like that…
Find me on Facebook!
September 24, 2012
Double Chocolate Brownies
My brownie quest continues and while I came closer to a go-to brownie this week, still no home run. (Maybe I’m never satisfied because I don’t love brownies? Impossible.) It is amazing that such a simple dessert can have so many options when it comes to recipes- and so many are not that good. I have made cakey brownies, chalky brownies, brownies that weren’t chocolaty enough and too sweet, brownies that were not sweet enough and almost bitter, the list goes on.
I ran out of unsweetened chocolate so I trolled the Internet for a brownie recipe that didn’t call for it. I came across this recipe and it was enjoyed all. These brownies were chocolaty and light in texture, with the papery top a la Duncan Heinz. Chewy brownies are my all time favorite so I will keep looking but these were still delicious.
Double Chocolate Brownies
(adapted from a recipe from www.browneyedbaker.com)
Ingredients
1/2 cup all-purpose flour
1/2 teaspoon salt
1/4 cup cocoa powder
1 1/2 sticks (12 tablespoons; 6 ounces) butter
1 cup chocolate chips
3 large eggs
1 cup sugar
Directions
Preheat the oven to 300°F. Line an 8-inch square baking pan with foil, butter the foil, and set aside.
Whisk together the flour, salt and cocoa. Melt the chocolate and the butter in the microwave, checking and stirring frequesntly to avoid scorching. Using an electric mixer, beat the eggs and sugar until they are thick and pale, about 2 minutes. Lower the mixer speed and pour in the chocolate-butter, mixing only until it is incorporated. Add the dry ingredients and mix at low speed for about 30 seconds until just mixed. Finish folding in the dry ingredients by hand with a rubber spatula. Scrape the batter into the pan and bake 45 to 60 minutes, or until the top is dry and crackled and a knife inserted into the center of the cake comes out almost clean. Transfer the pan to a rack and allow the brownies to cool to warm or room temperature.
Plan B Mom is a mostly-stay-at-home mom of 3 who works from home but sees her main job as managing her family. When she is not taking care of her 12-year old and 10-year old girls, 8- year old son, yellow lab, and husband - she is baking, running, carpooling, or helping with homework. She tries to stay organized to keep life running smoothly - or at least catastrophies at bay. Follow her on Twitter at @PlanBMom.
September 21, 2012
Supermarket Score! Apples
“Supermarket Score!” is all about taking a look at the great deals and delicious meals that are hidden in commonly found supermarket items.
Fall is – hands down- my favorite of the four seasons. Living in New York’s Hudson Valley means a corner cannot be turned without a picturesque view of colored leaves, pumpkins, cider doughnuts, and apple orchards. It’s the last of those that especially takes over this time of year.
The bucolic dream of a fresh haul of locally-grown and hand-picked apples means that a box of fruit landing close to my body weight in size inevitably nests itself on my kitchen counter each and every fall. About five minutes in - when the dream has worn off – it actually becomes game time as I then need to find a use for a crop that brings delicious to the table in very sizeable abundance.
Fear not, lovers of the Macintosh, Gala, Empire, and beyond! Check out these delicious and crazy simple “fruit of the fall” ideas to see some light at the end of that crate.
APPLESAUCE

I know it sounds like a no-brainer, but applesauce is such a nostalgic part of fall for me. As a kid, my mom would always ring in the fall season by making her own homemade applesauce. The smell of simmering fruit with a touch of cinnamon always meant it was time to watch the leaves change color. Making your own is seriously as simple as peeling and coring the fruit and placing it in a lidded pot over medium-low heat (reach for a softer bodied apple here, such as a Macintosh, as they’ll break down better during cooking). Add any spices you may like, such as cinnamon or nutmeg, and cook it down, stirring occasionally, until it’s as smooth or chunky as you like. Taste the finished sauce and adjust the sweetness with some sugar as needed, just remember that fresh fruit is quite sweet on its own and rarely needs any added sugar.
ROASTED APPLES AND FENNEL

Use the sweetness of apples to balance out the savory side of dinner by roasting them with your dinner vegetables. While I happen to love fennel, you could also serve them alongside roasted onions, squash, or carrots. Use a firmer bodied apple, such as Granny Smith or Empire, and watch your kitchen timer – they only need about 15 minutes to roast, so throw them in towards the end of cooking.
FALL COLE SLAW

Give summer’s favorite side dish a few more evenings at the dinner table with a hearty fall cole slaw. While you can certainly use whatever slaw recipe you love, I like to make mine up with a mix of shredded green and red cabbage tossed with some peeled and grated apple and a simple red wine vinaigrette. A firmer-bodied apple will again do you well here (I love the tartness of a Granny Smith) as it’ll add to the crunch factor of your slaw.
Patrick W. Decker’s life revolves around food. Always has. Probably always will. As a graduate of The Culinary Institute of America and past member of the culinary team on Rachael’s daytime talk show, he now works as a food stylist and producer in NYC by day, and a food writer and recipe developer at his home in New York’s Hudson Valley by night. You can see what he’s up to by following his latest twEATs on Twitter at @ patrickwdecker or visiting his website at patrickwdecker.com .
September 20, 2012
Truly Tasty Tofu Burgers
Truly Tasty Tofu Burgers
I’m always in search of a good veggie burger that’s firm and chewy, with lots of flavor, and I like this recipe because the texture of the burgers is very, well, burger-like! It’s also really easy, and there’s lots of room for variation.
To make the burgers, you’ll need to start with some cooked rice. Rice is important because it’s part of what holds the burgers together. It’s nice and starchy, so when it gets whirled in the food processor, it turns into a kind of glue. Try this recipe if you have leftover rice on hand, it’s a good way to use it up.
Once you have your rice, turn your attention to the tofu. You want to select “firm” tofu, because it has a texture not unlike ground beef when it’s ground in the food processor. To drain the tofu, take it out of the box and put it on a clean plate. Put another plate on top, and something heavy like a bottle of juice or more plates. You may want to lean your leaning tower of Pisa against a wall so it doesn’t crash and fall over. After 30 minutes, take off the weight and pour off the extra water.
The recipe calls for parsley, but you can throw in dill, basil, arugula, or even fresh mint. If you like beans, use 1/4 cup less tofu and add 1/4 cup of cooked beans. You can always make these burgers more rich by topping them with cheese a few minutes before they’re done cooking in the oven. I like to slather these burgers with Dijon mustard. For a light snack, serve the burgers on crisp red cabbage leaves or lettuce leaves instead of burger buns.
Tofu Burgers
Makes 6 burgers
Ingredients
1 cup cooked rice, white or brown
1 cup diced firm tofu, well drained
2 cloves garlic, crushed
3 scallions, chopped
1/2 cup coarsely chopped parsley
1 teaspoon paprika
Salt and freshly ground black pepper
1 large egg, whisked
Cooking oil
Instructions
Preheat oven to 350°F. Line a baking sheet with parchment paper.
Combine the rice, tofu, garlic, scallions, parsley, and paprika in a food processor and pulse until coarsely ground. Taste and season with salt and pepper until the mixture has a lot of flavor. Transfer to a bowl and stir in the whisked egg to form a thick dough. Shape the dough into 6 patties.
Heat a skillet over medium-high heat and add just enough oil to coat the bottom. Cook the burgers on the first side for 3 to 4 minutes, until golden, then gently flip and cook on the second side for 5 minutes. Transfer the burgers to the baking sheet and cook for 30 minutes, or until they’re firm and cooked through on the inside.
Serve hot on buns, cabbage leaves, or lettuce leaves, and top with your favorite condiments.
September 19, 2012
Masala Fried Chicken
A night out on the town for hubby and me is a place to grab some crisp fried chicken and a beer. Can it be more ‘no-nonsense’ than that! In New York, Fried chicken has many faces, such as the unanimous Southern Fried Chicken, soy glazed Korean Fried Chicken (a bit more wings focused), Thai fried - lollipop chicken with hints of lemon grass and Japanese fried chicken also known as chicken Karaage.
All the flavors inspired me to rummage through my pantry and come up with a Desi (Indian) spice Fried Chicken using some of the spices I used in my chicken curry previously. My findings were that the Indian spices and fried chicken combination was like ‘duck to water’. The combination of the crunch followed by the interesting assortment of spices made the fried chicken pop in my mouth. As for the chicken, it was a lovely breaded cracking only to reveal sheer succulence on the inside that tore apart with the faintest tug. Not surprised? After all, it’s what one expects from a fried chicken. Well, this chicken is not fried. Read on to see what I did and believe me, no one would ever suspect!
Ingredients
Chicken seasoning
Make a dry mixture combining:
1 tsp. garam masala
1 tsp. chat masala
¾ tsp. red chili powder
1 tsp. black pepper
1 tsp. salt
· Reserve a pinch for serving
Crust
8oz semolina
8oz breadcrumbs combined with a pinch of thyme, black pepper and chili flakes
2 eggs, combined with a fork
¼ cup of oil
Method
Heat the oven to 450 degrees.
Rub the dry chicken seasoning over the chicken and set aside for as long as you can (at least 1 hour)
Heat a wide sauté pan with ½ the oil
Set out three plates in front of you (preferably near the sauté pan) in the following sequence: Plate 1 with the semolina flour, plate 2 with the 2 eggs for the egg wash and plate 3 with breadcrumbs
Dip the chicken in the semolina flour, lightly pressing it down, then dip in to the egg wash and finally dip and press in to the breadcrumbs
Adding no more than 2 thighs at a time, add to the hot frying pan and let it develop a golden crust on each side. Set aside, and repeat with the last 2 thighs
Place on a baking tray lined with parchment paper and cook with a piece of foil placed loosely on top (to avoid the crust from burning). Cook for another 20 minutes and check that the chicken is done by inserting a knife at the thickest part near the bone – if the juices run clear, remove from the oven
Give the chicken a final sprinkle of the reserved chicken seasoning and serve hot
Saira Malhotra, is of British –Indian descent and is a chef, food writer and cooking instructor based in New York City. Raised in Hounslow, U.K, or rather ‘Little India’, where the air is aromatic with roasted spices, little did Saira know these moments would follow her from being a student in France and Italy to residing in NYC with her husband and kids and parlay themselves unexpectedly in to a culinary career. She is a graduate of the International Culinary Center in New York City. Come visit her at her food blog: Passport Pantry, where she shares approachable and international recipes.
Fashion Week Recap!
Fashion week really explored the color wheel this season! We saw splashes of color from head to toe coupled with strong elements of design and texture; Spring 2013 was definitely one of the most vibrant seasons to date!
Christine Alcalay
Inspiration: Our hair needed reflected simply a child’s innocents coupled with the feeling of wisdom that comes when a girl has to endure life’s challenges. She may look similar as she becomes a young woman but emotionally, spiritually and physically she has forever changed. We have coupled loose, random texture within a tight, restricted silhouette in tribute.
How to Achieve the Look: On dry hair, section out the nape, from ear to ear. Clip away the hair at the top and sides. Apply Redken Guts 10 to the nape section and tightly braid that hair close to the head. Pull down the rest of the hair and create a heavy rough side part that sweeps across the face and behind the ear. Next, back comb the crown for volume. Spray Redken Forceful 23 at the nape then take a piece of cord like a shoe lace and place it around the neck, holding the two ends in front of the chin in one hand. Blow dry heat into the hair at the nape and remove the cord delivering a strong indentation. Spray Redken Shine Flash 02 at the nape emphasizing the indentation and then Redken Powder Fresh 15 on the rest of the hair for an airy texture.
Gregory Parkinson
Inspiration: All the dresses were made from 40 different French laces, with bursts of color and lots of layering. There was a very country garden party feeling and we wanted to compliment the dresses without over doing the hair. We used a lot of texture for a fresh youthful feel with an edge of sophistication.
How to Achieve the Look: Using a combination of Cutler Volumizing Spray and Redken Powder Refresh, blow dry into the hair with your hands directing the hair away from the scalp to create root lift. Lightly backcomb the hair with a paddle brush and pull everything to the center of the head. Secure with French pins and release some of the hair by pulling pieces out in between the pins. Randomly spray the hair using a temporary colored spray, accentuating that runway drama. Finish with Redken Fashion Works 12 hairspray.
Vivienne Tam
Inspiration: Vivienne’s collection was inspired by Chinese cosmology such as water, fire, and earth, and many of her pieces featured classic silhouettes and colorful styles. I wanted to complement her clothes with a modern flair, so I created a traditional Chinese bun with a little punch.
How to Achieve the Look: Start by parting the hair in the middle. Apply a drop of Redken Clear Moisture Instant Polishing Prep to hair. Blow hair straight and finish using a straightening iron if needed. Tie the hair back into a low ponytail. Twist hair up into a bun and secure with pins, letting the ends stick out and up. Spray Fashion Work 12 Versatile Working Spray all over. Finish with a pop of color using a temporary hair color spray just at the part.
[image error] [image error] [image error]
Tribune Standard
Inspiration: North African royalty and we complimented the rope detail in the collection. We kept the hair very polished, tight and close to the head. A low sitting chignon with a tribal rope braid detailed with a gold temporary spray at the top.
How to Achieve the Look: Begin by creating a center part. Next, take a 1” section on both sides of the part from the hair line to the crown and section it off. Take the rest of the hair into a smooth low ponytail and secure at the nape. Go back to your original section and take one of the two sections created from the center part and split it into two. Twist one section over the top of the other and continue until you get to the crown, creating a rope effect. Repeat this process (picking up small pieces of hair at a time and twisting the pieces into themselves). You have now created two rope braids at the top of the head. Take these two and twist them together to form a single two-strand rope braid down the back of the head and tie it into the ponytail. Split the ponytail in half, the top half split again and create another rope braid. Do the same with the bottom half of the ponytail and twist them up, around and together to form a chignon. Finish with Cutler Shine Tattoo and Redken Fashion Works 12 hair spray.
Okra Leaves, BBQ, and Football: The Des Moines Saturday Farmer’s Market
The great agricultural state of Iowa is the country’s top producer of corn and soybeans, but a growing number of small farmers are adding color to the cornfields by raising fruit and vegetable crops, and their efforts are on glorious display at the 37-year-old Saturday farmer’s market in downtown Des Moines. Oh, and if you want a pulled pork sandwich to go with your fresh produce, they’ve got that, too.
Coming from New York City to Des Moines for a friend’s wedding, I was excited to check out the local food scene, but I never dreamed that their farmer’s market would be much larger than our biggest market, and with a diverse array of ready-to-eat delicacies. My short jaunt to the market became an odyssey of several hours where I tried everything from fresh raspberries to locally brewed root beer to black walnuts.
Carolyn Wallace of Thill Produce sells shelled black walnuts that she collects, shells, and washes herself. When she told me that this may be her last year selling them, I had to buy a bag. At $12.50 for just over a pound it was a good buy, and these nuts are sweeter than any others that I’ve tasted, maybe because of the extra step of washing.
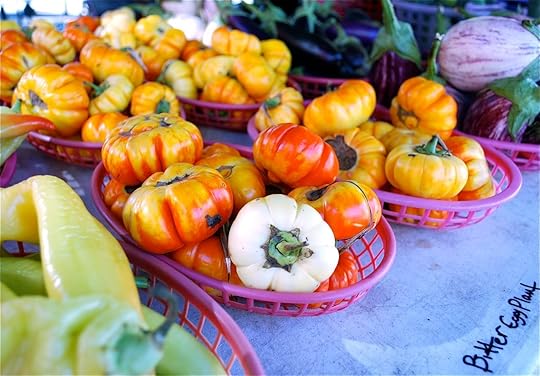
I saw lots of vegetables I didn’t recognize, especially at the stalls of the Hmong, a people from Southeast Asia who settled in the Midwest after fleeing persecution in their home countries. The Hmong sell bright orange “bitter eggplant,” along with gourds, loofah, and bitter melons, which all look to be in the cucumber family, and okra leaves, which are cooked just like spinach. I love discovering new vegetables!
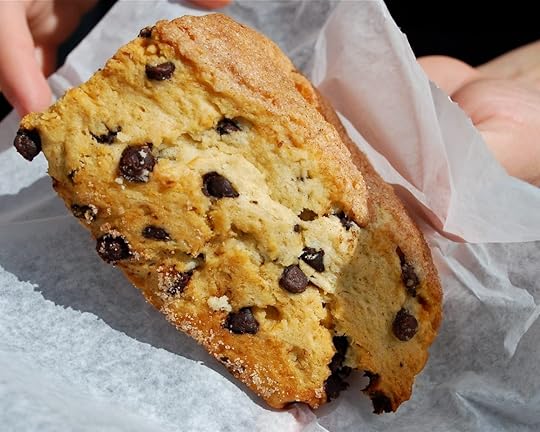
After exploring the market for a while, I had worked up an appetite. I opted for grilled pupusas from Pupusas El Salvador, full of cheese and beans, and a choice of spinach, zucchini, or squash blossoms. Court Avenue Brewing Co.’s local root beer quenched my thirst, and beloved French bakery La Mie satisfied my carb cravings with a chocolate chip scone.
This being meat country, I had enjoyed steak the night before, so it was easy to walk by Three Blind Pigs’ slow smoked pulled pork sandwiches, StrudlHaus German sausage, and Master Griller’s smoked ribs. Just as I was wondering how Iowans could put away food this rich before noon, I found the awesome medical students from Des Moines University who run Food Is Medicine, a stand where shoppers can ask med students about nutrition, fitness, and healthy eating. Here are three tips from Food is Medicine on preventing disease:
1) Control portions
2) Eat more fruits and vegetables
3) Eat more fish than red meat
On the day I visited the market, there was a football game between the Iowa State Cyclones and the University of Iowa Hawkeyes. Iowans are proud football fans, and the market was a catwalk of football fashion. Here’s a sampling of some of the best looks:
Saturday Des Moines Farmer’s Market
Des Moines Historic Court District
May 5-October 27, 7 am-noon
Louisa Shafia is a cook with a passion for healthy eating. She recently penned Lucid Food: Cooking for an Eco-Conscious Life, a collection of seasonal recipes and eco-friendly advice on food. To watch her cooking videos, see her recipes, and find out about her cooking classes, go to lucidfood.com.
Rachael Ray's Blog
- Rachael Ray's profile
- 296 followers


