Rachael Ray's Blog, page 77
December 10, 2012
Pelmeni Party!
One of the weirdest, worst, and most enjoyable dinner parties I ever went to was held about 15 years ago, in South Bend, Indiana, and involved a large group of drunken Russians. The Russians were grad students at Notre Dame, where I was in graduate school. A chummy group of chemical engineers, they liked me and invited me to dinner at one of their homes. When I got there, I looked around the kitchen I saw what were to be the sole elements of the dinner: a giant bag of pelmeni and four comically oversized bottles of vodka. The entire night consisted of endless bowls of pelmeni and endless shots of icy-thick vodka.
Pelmeni, I found out to be delight, are essentially Siberian tortellini. They’re filled with meat, but unlike in Italy, they aren’t served in brodo, or in a savory rabbit ragu. They aren’t, in fact, served in anything. They’re served in bowls. They are tossed with some butter and fresh dill, and if you’re lucky you might have a little bottle of vinegar to throw on them Or not. Pelmeni are what you might call a minimalist food. I asked one of the Russians why they were so popular.
“In north,” he said, “at start of winter, the mother, father, children, all sit around table, making pelmeni.” (He pronunced it “pel-myen-i”). “The make many, many, pelmeni. It’s fun, you know? Then they take trays of pelmeni and put them outside. They freeze and stay good all winter. When mother wants to make pelmeni, she takes some and boils them. That’s what Siberian people eat in winter, in old times.” It was an inspiring story indeed, and it was obvious to me that we were clearly going to reenact it. And we did. It was pelmeni, pelmeni, and pelmeni. But the dill made it light and fragrant, and the butter made it rich. The dough made it filling and the ground pork, beef, and veal had a pleasing umami quality, although any juice had been freeze dried out of it.
In the years since I have tried to always have a bag of pelmeni in the freezer. I get it at my local Russian grocery and you should do, if you have one nearby. Otherwise, here’s a recipe. Like the Siberian families of old, I reach in and take a few out whenever I am hungry, and boil them up in an a couple of inches of salted water. (Because why wait longer than you have to?) One advantage I have over the Russians, however, is that I have the option of serving the pelmeni in a lot of different ways, although I will be the first to admit that butter and dill is the best. You can also deep-fry them, which is of course even better.
Or you can do them in the style of sichuan wontons in hot oil!
Pelmeni With Hot Chili Oil
1 cup pelmeni
¼ cup Calabrian chilis in oil
1 tbsp scallions, chopped fine
salt and pepper to taste
Boil the water. Add the pelmeni.
Chop the peppers taking care to preserve the seeds.
Boil the pelmeni for four or five minutes max. They will float when they are ready.
Add the pelmeni to a bowl, add the peppers and pour a liberal amount of chili oil over. The pelmeni should still have some water clinging to them. If not add a teaspoon of water. Mix well.
Scatter scallions on top. Eat. Repeat as needed
December 5, 2012
Lunchtime in Los Angeles
Half the fun of discovering a new restaurant is sharing it with people you know will enjoy it. As Rachael Ray’s resident restaurant guru, here’s an inside look at what I report back to Rach about some of my favorite restaurant finds and food experiences!
From: Kappy
To: RR
Sent: Wednesday, December 5, 2012 2:46pm
Subject: My L.A. Lunches
Hey RR -
As you know, I’m usually in and out of L.A. when you’re on book tour or making an appearance on a show. But this time I was thankfully there for a week and a half, so I didn’t have to jam all of the places I wanted to go to into one or two nights. Although we were busy shooting your next season of Rachael vs. Guy: Celebrity Cook-Off and I don’t want you to think that I had that much free time, when I did, I hopped to it. I’m splitting this posting up into a lunch-based post and a dinner one that will come next.
When I landed, I went straight to Joan’s on Third - with my luggage and all! - love that place. It’s never easy to decide what to get there, although the Chinese Chicken Salad is pretty on point. I wound up ordering a side of Golden Beets with Goat Cheese and Apples (looked too good to resist), and the Short Rib Sandwich with Pickled Red Onions and Cheese, or, a grilled cheese with short rib…however you want to look at it (pictured above). Either way, it was pretty darn good. Seriously, check out Joan’s On Third if you’ve never been.
I was also happy to make it to one of Michael Voltaggio’s places, although it was his super casual sandwich place called Ink Sack. The sandwiches are pretty small, which is cool, so you can try a couple if you so please - and you know I so pleased. I tried the Cold Fried Chicken  with House-Made Ranch Cheese along with The Jose Andrés (aka The Spanish Godfather) Sandwich, which had serrano, chorizo, lomo, and Manchego. Voltaggio used to work for Jose Andrés, so he was paying homage to him with the latter.
I popped over to Fonuts because I’d heard a lot about it. Serving up ‘baked” donuts, they have a bunch of really tempting flavors, so this was not an easy decision. I’m pretty sure they change up the flavors often, but out of the more than six flavors I tried (gulp!), the standouts were Vanilla Latte and the Blueberry Earl Grey. 
Upon recommendation of a friend and fabulous Chicago chef, Bill Kim, I drove over to the Grand Central Market in downtown L.A. It’s a pretty badass Latin market, but he specifically directed me to Sarita’s Pupuseria. A pupusa is essentially a thick corn tortilla, but it is filled/stuffed with different ingredients such as beans, chicken, pork, cheese, etc. I got one with beans, cheese and pork and it definitely hit the spot. 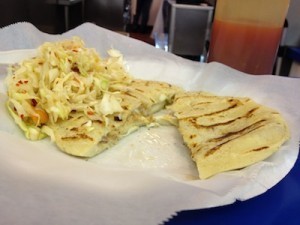
And for the grand finale? MY GOSH… I’m not really sure how I’ve never been to Roscoe’s considering that I lived in L.A and am still a regular visitor. So I finally made it a point to go to Roscoe’s House of Chicken and Waffles this time around. Honestly, done right, a chicken and waffle will be good, but it’s crispy fried chicken and a waffle, nothing special other than being a unique combo. But let me tell you something, this chicken and waffle was something else - f’in good fried chicken and an f’in really good waffle as well…WITH…syrup and hot sauce. I was all over it and really dug it. I’m a fan. 
And that’s what’s on my plate!
~ Kappy
Joan’s on Third
8350 West 3rd Street
Los Angeles, CA 90048
(323) 655-2285
www.joansonthird.com
Ink Sack
8360 Melrose Avenue
Los Angeles, CA 90069
(323) 655-7225
www.MVink.com
Fonuts
8104 West 3rd Street
Los Angeles, CA 90048
(323) 592-3075
www.fonuts.com
Sarita’s Pupuseria (Grand Central Market)
317 South Broadway
Los Angeles, CA 90013
(213) 626-6320
Roscoe’s
1514 North Gower Street
Los Angeles, CA 90028
(323) 466-7453
www.roscoeschickenandwaffles.com
Andrew “Kappy” Kaplan loves food. A professionally trained chef, by day he runs Yum-o!, Rachael Ray’s charity focused on kids and cooking, and keeps special projects running smoothly for her. By night he hops course to course, place to place, all across the country. He’s Rach’s own personal dining guide! You can also follow Kappy on Twitter to see what’s On Kappy’s Plate in real-time!
The Ultimate Modern Restaurant Menu — Or Why You Should Be Cooking at Home
I eat out a lot, being a pro food writer and all, but I enjoy cooking at home a lot more, even if I do usually eat at the sink. What I don’t like is having to cook a party, especially one for other food writers. I do like a good challenge, though, so when some friends asked me to create and cook a “menu of the moment” I sat down to dope it out.
And here’s what I came up with. There isn’t just one menu of the moment; there are two. One would be seasonal, localist food of the kind celebrated in the book. (Amazingly, even New York has fallen into a pastoral, or rather gastoral, mood.) A second would be the ever-zanier, ever more hyperbolic forms of institutional comfort food that has become the dominant mode of American restaurant cooking outside of food cities. Personally, I would rather just cook, and eat, diner food, but that stuff has a timeless quality that transcends all trends. I ended up just making meat sauce, of course, but if I had the time and resources, this is the menu of the moment, circa 2012, with one dish each for the chain restaurant and trendy downtown bistro.
Appetizers
Mass Market: Seared Ahi Tuna Spring Roll
Downtown: Pork Rillettes with Prune Jam
Mass Market: Bacon Cheese Puffs
Downtown: Bacon Gougeres
Mass-market restaurant food gets leaner all the time (at least it sounds leaner; it really isn’t.) High-end food meanwhile continues to revel ever more orgiastically in pork fat. When it comes to bacon though, every American is on the same train, even if the cars have different names.
First Course
Mass Market: Bacon, Egg and Cheese Pasta
Downtown: Carbonara Canneloni
Mass Market: Spicy Tuna Potato Skins
Downtown: Oxtail, Purslane, Quinoa
Both of the bacon dishes look vaguely novel, but in fact they are going back to the well of what everyone likes. High or low, restaurants need to play it safe whenever they can. In the first kind of restaurant that means things that nobody objects to because they don’t taste like anything; in the second kind it’s things that sound exotic but which taste familiar and keep food costs way down (not that you would know it from the bill.)
Second Course
Miso Glazed Snapper with Soy
Scallops, Yuzu-Jalapeno Gelee
The Miso Snapper is a knockoff of a super trendy dish that’s now almost twenty years old. The scallops with the yuzu gelee are the current version; expect to see them on chain menus five years from now.
Jamaican Jerk-Spiced Grilled Chicken
Berkshire Pork Trio: Belly Confit a la Plancha, Poached Sirloin, Trotter and Jowl “Pot Pie”
This menu brackets out the cheapest and most expensive forms of dining in America: fast food and modernist cuisine, respectively. (Although you could make a case for pre-fixe tasting menus being tweezer food’s answer to the Value Meal.)
Mass Market: Chocolate Pudding with Whipped Cream
Downtown: Deconstructed Sundae with Durian Flan
Nobody wants to eat the downtown dessert. Of course, no one really wants to eat any of this stuff. Meat sauce, rainbow sherbert, and an occasional roasting pan of some tolerable vegetable, of the kind Last Minute Lady makes so well, is all anyone really needs for human happiness. Well, that and a sink.
December 4, 2012
Farewell Curry Club With Chicken Tikka Masala
Last week was the final installment of The Curry Club Series 1. Since this marked the finish line, it made sense to do it strong with the U.K’s national pride ‘ Chicken Tikka Masala’.
Exceptional Chicken Tikka Masala is an off-shoot of India’s classic dish ‘butter chicken’. Butter chicken rightfully get’s its name from it’s key ingredient ‘butter’. Pieces of chicken are marinated in spices and lots of butter, rendering it tender and moist. The chicken is BBQ’d in a clay oven, being constantly basted in jus de love (yes, more butter) and then finished in a delicately spiced creamy tomato sauce. This dish made its way to the British stomach through migration (Brits in India and the Indians in Great Britain). The main difference is in its name change and consistency because as we know, we Brits love our gravy.
Whilst the ingredient list may appear long, do muster up the courage as this is one of the easier curries to make. I assure you that if you stick with me, we will use various elements of this dish over and over again, besides, you could always throw in a dash of ‘this and that’ in to your soups, pastas and casseroles.
A bowl of Chicken Tikka Masala with a buttery sauce that clings to every nook and cranny of chicken will kick the blues out of any rainy day. Sit back and relax with your pint of beer because this experience will be ‘jolly good’.
RECIPE FOR CHICKEN TIKKA MASALA:
Ingredients
2 lb. Chicken Skinless Thighs
Marinade
1 TBSP. ginger, minced
1 TSP. garlic, minced
¾ Tsp. Salt
½ TSP. chili powder or cayenne pepper
½ TSP. Garam Masala
½ TSP Pepper
1 TSP. smoked paprika
1 TSP. ground cumin
1 TSP. roasted and ground coriander seeds
2 TBSP. lemon Juice
1 cup Greek yogurt
½ cup sour cream
2 TBSP. clarified butter
Sauce
1 TBSP. cooking oil
1 tsp. cumin seeds
1 heaped TSP. Kasturi Methi (crushed by hand)
½ TSP. turmeric
2 TSP. ginger
1 TSP. garlic
1 TBSP. roasted, skinned and de-seeded red bell pepper puree
¾ of a can (14 oz) tomato sauce
½ TSP. black pepper
1 TBSP. lemon juice
¾ TSP. sugar
1 quart heavy cream
4 oz piece of butter (cold to swirl at the end)
Garnish: cilantro
Instructions
Marinade
1) Place chicken in mixing bowl with salt, pepper, ginger, garlic, lemon juice and spices for 6-12 hours
2) Remove from refrigeration and marinate in sour cream and clarified butter. Marinade for at least 4 hours
3) Remove from refrigeration and allow meat to lose it’s chill. Thread through skewers and broil/ grill on high heat basting with marinade sauce frequently throughout. Cook through completely – Cool on wire racks. Remove thigh bone
Sauce
4) Set aside a sauce pan and reduce heavy cream to half
5) Heat oil in a pan, fry cumin seeds, as they turn dark red, add turmeric and crumble in the kasturi methi. Saute for 40 seconds until aroma essential oils release and a strong maple smell emerges
6) Add the ginger and garlic and allow to golden
7) Add red bell pepper paste and cook out excess moisture
 Add tomatoes and cook until oil separates, then add pepper, coriander powder and garam masala and sugar
9) Add lemon juice, mix in, add the reduced cream, remove from heat and swirl in cold cubes of butter. Butter should have totally melted and sauce should be smooth
Saira Malhotra, is of British–Indian descent and is a chef, food writer and cooking instructor based in New York City. Raised in Hounslow, U.K, or rather ‘Little India’, where the air is aromatic with roasted spices, little did Saira know these moments would follow her from being a student in France and Italy to residing in NYC with her husband and kids and parlay themselves unexpectedly in to a culinary career. She is a graduate of the International Culinary Center in New York City. Come visit her at her food blog: www.passportpantry.com where she shares approachable and international recipes
December 3, 2012
THIS MONTH’S FAVE MULTI-TASKER: VINEGAR 5 WAYS TO USE ITS VIRTUES THIS HOLIDAY
Not only is white vinegar a natural sanitizer and terrific way to kill mold, bacteria and germs ’cause of it’s acidity, it’s also a money and mani-friendly, way to deal with some holiday tasks. AND, this ‘wine gone bad’ home-sweet-home staple also may be just what the doctor ordered!
1. MANI-FRIENDLY LABEL REMOVER: I ‘accidentally’ and routinely break wine glasses. And during the holidays I don’t want to break my bank replacing them when my guests follow suit. So I’ve opted for those new cheap (or rather inexpensive) 8 glasses for $14.99 I found at Walmart. Problem is, those sticky labels are not good for my manicure. Here’s a solution that will save our mani and not leave any of that residue so our guests think we didn’t wash them well! Simply fill a microwaveable bowl with enough white vinegar to cover the area where the label is (stem or glass area). Heat the vinegar in the microwave. Place the area where the label is in the bowl. Let sit for minute and remove with a paper towel. Viola! No yuk, no muss, no chipped manicure.
2. FUNKY DISHWASHER SMELLS: Guests coming over and your nose notices that eau du funk scent coming from your manicure’s best friend? No problemo! Fill the dishwasher dispenser with vinegar and run on short cycle…no dishes please! And, BTW that funky smell is from the gunk and soap build-up that accumulates from our dirty dishes over time so it’s good to do this monthly.
3. STUFFED SINKS and DRAINS: Whether it’s due to excess hair going down the drain courtesy of your significant others male-pattern balding or crud from washing dishes in your kitchen sink this simple solution will clear the way. Pour a cup of baking soda down the sink or drain, follow with a cup of white vinegar. The interaction will cause it to bubble. Let it do it’s thing until the mix stops bubbling (BTW-this is also a good way to know if your baking soda has expired since the mix won’t bubble if it has). Finish by pouring down a kettle of boiling water or if you’re too lazy to do that flush thoroughly with hot water from the tap. Repeat if necessary.
4. POLISH PATENT-That lil’ black dress looks just right with that black patent bag n’ those dull patent stilettos…did I say dull! Bring back their shine by placing some vinegar on a clean micro-fiber cloth and rubbing. Buff/wipe dry with another clean cloth.
5. SORE THROAT SOOTHER-After a night of partying and thinking you can sing holiday tunes like Adele all night long you may awake with a sore throat. Dull the pain by mixing equal parts of white vinegar with water. Swig some and gargle being sure you get it as far back in your throat as can tolerate. Repeat. In case it lingers, keep some in a spray bottle and use throughout day. Vodka also will work but that’s another day’s blog.
Happy holidays!
For more tips from The Accidental Housewife visit julie’s tips
Rodney Cutler for ULTA Fall/Winter Hair Collection Part 2
Here are a few more looks that I created for ULTA’s Fall/Winter Collection featuring styling alternatives for both long and short hair. These styles can easily transition from a day at work to an evening out or holiday party. Enjoy!
Look 1 and 2(Top Left and Bottom Left): Rough dry hair with a nozzled blow dryer and your fingers until about 85% dry. Take a flat brush to the bang section and start drying the bangs, moving your brush back and forth and up and down concentrating the air at the roots until dry. This will ensure a natural fall of the bangs allowing you to go from look two to look one easily.
Starting at the nape of the neck, take 2” horizontal sections and dry each section with a large boar bristle round brush. Use the brush to control each section by working from the roots outward making a C-motion with your arm and the brush as opposed to rolling the hair onto the brush. Make sure to increase the elevation of each section as you work up the head. Once the back is complete work the sides in the same manner with 2”-3” horizontal sections until complete. Take a small amount of texturizing cream emulsify into the palms of your hands and rake through ends with your fingers. Finish, by misting the hair with a light holding hair spray.
Look 3 (Bottom Middle): Sprinkle a generous amount of Redken Powder Grip 03 powder into already dried hair. Next, using a flat boar bristle brush, cushion the hair thoroughly. Then, gather the hair into a loose high ponytail at the crown of the head. Twist the tail of the hair around and tuck it inside and secure with hair pins. Complete the look by molding and shaping the hair with your fingers leaving an airy texture to the final shape.
Look 4 (Right Side): Smooth all the hair into a low side ponytail just behind the ear and fasten with an elastic band. Braid the hair from the elastic band to the ends of the hair and secure with a sturdy elastic band. Next snip the top elastic band out of the hair (be careful not to cut any hair out in the process). Once the upper band has been removed grab a few strands from the tip of the braid and hold them taught, use your other hand to push the braid upward against the strands your holding (with your other hand) creating a blousing effect. Using your fingers and Redken Fashion Works 12 gently ruffle the braid to give it a soft modern end result.
While short hair is more consistent you tend to be limited in styling variations. Here are some versatile options.
Look 1 (Top and Bottom Left): Rough dry the hair up to 50% dry. Then, use a Mason Pearson paddle brush and in a wrapping motion brush the hair around the head as to not pull out all the curl but refine the texture from roots to ends. Dab a small amount of Redken Argon Oil into your hands and ruffle through the hair for shine followed by a small amount of Redken Tousle Whip for a piecey textured finish.
Look 2 (Top and Bottom Right): Defuse hair until dry. Take a 1” curling iron and pick up each curl as it naturally falls and wrap it around the curling iron for a few seconds, let the curl drop and repeat until entire head is curled for a defined finish. Next, emulsify a small amount of Redken Curvaceous Ringlet into your hands and scrunch into hair for separation and shine. Finish with a light holding spray, Redken Fashion Works 12.
November 30, 2012
It Takes Heart (and Hard Work) to Win this Challenge
Woo hoo! I am thrilled to announce the results are in for the 2012 ASPCA Rachael Ray $100K Challenge. This year’s challenge shelters saved 56,232 dogs and cats across the country! That’s an increase of 14,376 more lives saved than last year. The first place winner, City of San Antonio Animal Care Services, saved a total of 4,054 lives during the course of the challenge. Check out the entire list of winners at www.aspca.org/100K.
What truly makes this challenge a success are the stories of dogs and cats that found their perfect families. Like Maggie, who arrived at the City of Bloomington Animal Care & Control this summer. She was incredibly thin, pregnant and in pretty rough shape. After giving birth and weaning her pups, she was spayed and adopted by the Hickoks family during the $100K Challenge. Like many of the dogs and cats adopted during the challenge, Maggie found her new loving home. She fit in instantly with her new family. They reported that her happy and persistent nature refuses to believe that the cats will not play with her. Her kisses are delivered frequently, at lightning speed to the kids while playing “Chase-Me-Around-The-Yard!”. Maggie’s story reminds us why the Challenge is so important.
Congratulations to all of the winners and a giant round of applause to all the staff and volunteers at the 50 contestant shelters who worked tirelessly to help more than 56,000 animals and their new families.
Bert Troughton
Vice President
ASPCA
www.aspca.org
Pumpkin Chocolate Chip Cookies
These cookies are a combination of everything delicious about seasonal holiday desserts, including chocolate, cinnamon, brown sugar, and pumpkin.
The cookies are very easy to make. They are classic chocolate chip cookies with a twist, namely, pumpkin pie spices and squash puree. They have a subtle orange hue, a mild pumpkin taste, and a hearty texture that’s both crunchy and bready.
Last week, I blogged about roasting winter squash, and all the wonderful things you can do with this flavorful autumnal ingredient. One idea is to use roasted squash - in place of canned pumpkin - in this recipe. Choose a squash variety that has a dry flesh like kabocha, buttercup, Hubbard, red kuri, or turban. Varieties like acorn, pumpkin, and butternut are too watery, and will make the cookies fluffy. All you need to do is roast your squash until it’s tender, cool and scoop out the flesh, and puree it in a food processor until smooth.
Whether you use roasted squash or canned pumpkin, you’ll beat the puree into the butter, sugar, and eggs, making a colorful - and delicious - cookie dough.
Besides adding pumpkin, I like to add cinnamon, allspice, and nutmeg to these cookies. If you have a jar of “pumpkin pie spice” in your cupboard, use two to three teaspoons of that in place of the spices called for in the recipe. Top the cookies with a few grains of coarse salt, which helps all the flavors burst into life, especially the chocolate.
Enjoy these cookies with a mug of hot cider or hot cocoa, or a tall, cool glass of milk.
Pumpkin Chocolate Chip Cookies
Makes 4 dozen cookies
Ingredients
2 cups all-purpose flour
1/2 teaspoon baking soda
1/2 teaspoon sea salt
1 scant teaspoon cinnamon
1 scant teaspoon allspice
1/4 teaspoon nutmeg
3/4 cup unsalted butter, softened
1 cup packed brown sugar
1/2 cup white sugar
1 tablespoon vanilla extract
1 cup roasted squash puree, or 1 cup canned pumpkin
1 egg
1 1/2 cups semisweet chocolate chips
1 cup chopped walnuts
Coarse salt, such as sel de mer, gray sea salt, or kosher salt
Instructions
Preheat the oven to 350°F and line 4 baking sheets with parchment paper.
Whisk together the flour, baking soda, salt, cinnamon, allspice, and nutmeg, and set aside.
Beat the butter and sugars until light and creamy. Add the vanilla, squash puree or canned pumpkin, and the egg, and beat until smooth. Add the flour mixture in two batches, and mix until it’s just barely incorporated. Fold in the chocolate chips and walnuts.
Drop the cookie dough onto the prepared baking sheets by the tablespoon, 3 inches apart. Press them down with the side of your palm until they are roughly 1/4 inch thick. Sprinkle each cookie with a few grains of coarse salt.
Bake the cookies for about 20 minutes, until the edges are crisp and the bottoms are golden. Cool on a rack, and store in an airtight container for up to 5 days.
November 29, 2012
Homemade Ideas for Foodies
Now that the holiday season is upon us, weekends will be packed with holiday parties. Throwing a party can involve a lot of time, planning and expense, so it’s nice to show the host or hostess some gratitude with a simple gift. It doesn’t have to be expensive, or elaborate. For the host that loves to cook, here are three budget-friendly, easy gift ideas that anyone can master.
Infused Olive Oil
Ingredients & materials:
Bottle with stopper
Funnel
Extra virgin olive oil
Fresh herbs
2 cloves garlic
Tag and cardstock or paper
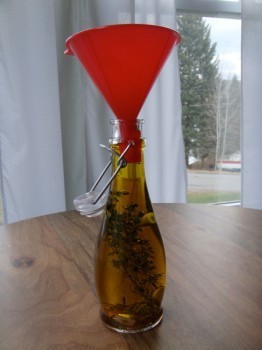
This is such a great gift because it looks beautiful, is so tasty, and it’s so easy to put together. Chances are, you already have the ingredients on hand too. The fancy bottle can be found at discount department stores, housewares stores or even some hardware and craft stores, and can cost around $5 or less.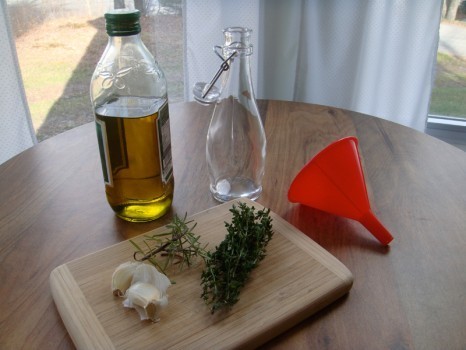
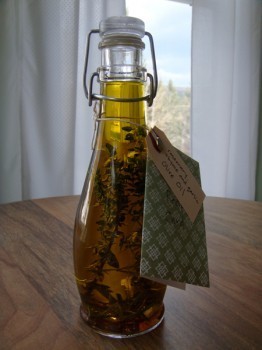
Simply place a couple garlic cloves cut in half, and a few sprigs of fresh herbs in the bottle. I used rosemary and thyme, but you could use just about any hearty herb such as oregano or marjoram. More delicate herbs like basil might blacken over time, so if you want to add that flavor, it may be best to use the dried variety.
After adding the garlic and herbs, fill the bottle with a good extra virgin olive oil. Make sure the funnel you use is one reserved for food items only.
Add a nice tag that explains the bottle’s contents. I also think it’s nice to add a little recipe card too. That way, the host will know what to do with this delicious oil. My card had suggestions like:
• Use as a dip baguette dip
• Mix with vinegar or lemon juice for a salad dressing
• Pour over roasted vegetables such as acorn squash or potatoes
• Cook with poultry or white fish for added flavor
The longer the oil and herbs sit, the more flavorful the oil becomes, so it’s best to put this gift together at least a few days in advance.
Oven Mitt Gift Bag
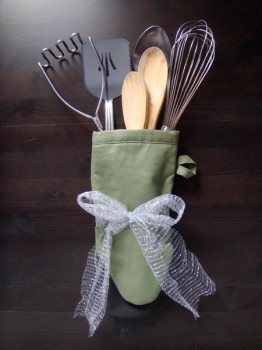
If you shop at discount department stores or housewares stores, you can find high quality items for this gift that don’t cost a fortune. This is a great gift for someone who has just moved into a new place, someone who needs to upgrade their kitchen items, or newlyweds who may need a few essentials.
Simply place a few kitchen utensils in an oven mitt such as a spatula, wire whisk, wooden spoons, potato masher, serving spoon, or even a meat thermometer, vegetable peeler, ladle; just about any kitchen tool will do. Then tie a nice ribbon around the oven mitt, and you have an instant gift.
Homemade Recipe Book
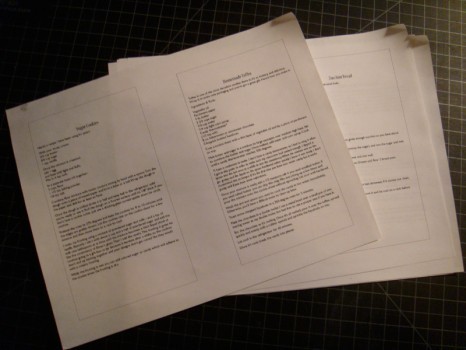
I love to have friends over for homemade meals, and often get asked for the recipes. I always say I’ll email them, but time goes by, and then I forget. If you’re like me, this is a great gift for those people who have asked for recipes over the years, or for that person who would like a little more guidance in the kitchen.
Materials
9 typed and printed recipes
3 sheets cardstock
Bone folder
Awl (or thumbtack)
Embroidery thread or jute
Tapestry needle
Hole punch
Fasteners
Glue, stickers, fancy paper for decorating
First, type up 9 of your favorite recipes. If you’re using 8 1/2 x 11 cardstock for your pages, when you print the recipes make sure they will fit on each page. I made mine fit in a 4″ x 7″ space, leaving 3/4″ empty space on the top, so there would be enough room for the fastener. I also drew a box around the type so I would know where to trim the page. If you’re using software like Microsoft Word, this can be done by making a text box. Otherwise, this can be done using most of the design software by Adobe.
If you’re not computer savvy, you may need someone to give you a little guidance. You could also use 11″ x 17″ cardstock which will give you enough room for a standard size piece of paper, or you could hand-write, or type the recipes on an old fashioned typewriter.
Use a bone folder to fold the cardstock pages in half one at a time. You can do this without the bone folder, but you won’t get a nice, clean edge.
Stack the three sheets of cardstock together.
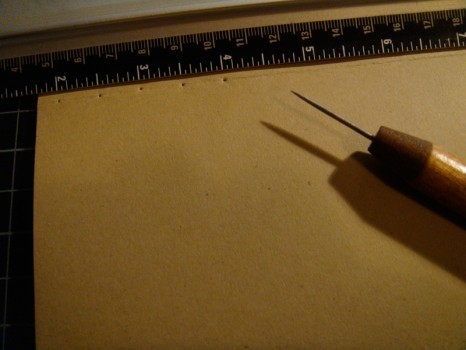
Unfold the cardstock and punch holes with an awl (or thumbtack) a half inch apart.
Sew the pages together using embroidery thread or jute, and a tapestry needle.
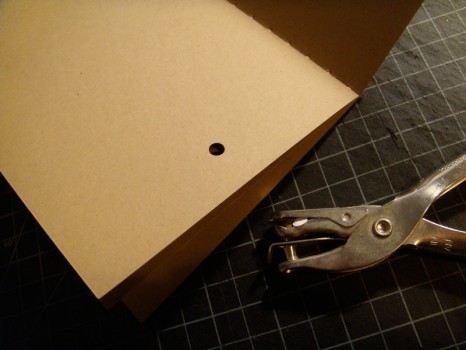
You won’t want a hole in your front cover, so open the booklet and punch a hole in the top of the first right-hand page. Use this hole as a guide for the following pages.
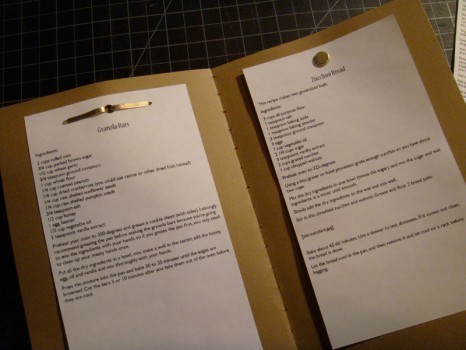
Trim the recipe pages, and punch a hole in the top of each one—I like to stack mine a few pages thick, so I don’t have to do them one at a time. Using the fasteners, attach the recipes to the cardstock.
Use both sides of the pages by attaching one recipe to the front of the cardstock and one on the back.
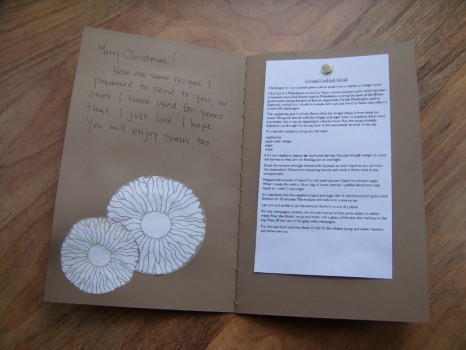
Decorate the cover with stickers or fancy paper.
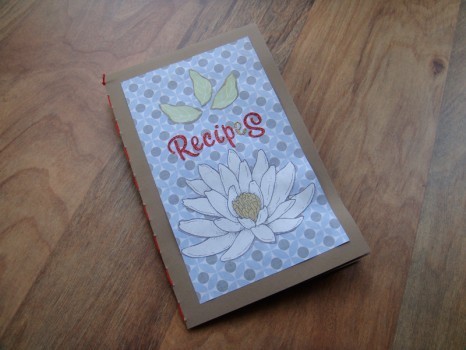
Since there will be space on the inside front cover, it’s the perfect place for a little note.
I Heart Buffalo Wings!
Half the fun of discovering a new restaurant is sharing it with people you know will enjoy it. As Rachael Ray’s resident restaurant guru, here’s an inside look at what I report back to Rach about some of my favorite restaurant finds and food experiences!
From: Kappy
To: Rachael
Sent: Wednesday, November 28, 2012 10:25pm
Subject: Buffalo Wings? ‘Nuff Said
Hi Rach -
Soooooo, I think that by now you know this about me, but I’m a Buffalo wing fanatic. Well, make that anything Buffalo-style for that matter. To this day, when someone asks me my favorite food, Buffalo wings is still the first thing that comes to mind. No joke, when I was in culinary school and was taking a menu writing class, one whole section of my menu project was a “Buffalo-Style” section. My mouth waters when I see them being tossed with sauce in the bowl, the smell, the crisp wing, the spicy sauce, dipping it in ranch or blue cheese… I love the whole experience.
My #1 wing place of all-time, hands down, is Buffalo Joe’s in Evanston, IL. The first time I had their wings was actually as leftovers my brother had brought home when I was about 10 or 11 years old. I loved them leftover and cold, and I hadn’t even had them fresh at the place yet.
Anyway, I digress. I had a slight craving for wings around lunchtime the other day and a friend had told me about a place in Palatine, which is a good 30-40 minute drive from where I live in Chicago. I was willing to make the drive with a buddy of mine, but decided to give them a call first. Luckily we did, because they weren’t opening until 4pm that day. We now gave ourselves three options:
1. Go to Buffalo Joe’s.
2. Think: Is there another place I’ve been hearing about and need to try?
3. Buy raw wings at the grocery store and go to my brother’s restaurant and make them myself .
I called my brother to tell him the place we wanted to go was closed, to which he replied, “Why don’t you go buy wings, bring them here and make them?” Decision made - it was Option 3.
We got in the car and bought about 50 raw wings, along with some carrots and celery and ranch, and headed up to the ‘burbs to my brother’s place. I arrived and, without wasting any time, got to work. I cut the whole wings into a wing and a leg (I prefer the wing) and dropped them into the fryer: 10-12 minutes at about 350°F and they were done (a couple more minutes if you like them REAL crispy). While they were in the fryer, I prepared my Buffalo wing sauce. I was in a little bit of a hurry since it was nearing lunchtime at the restaurant and I didn’t want to get in the way, so I used some ingredients I had on site for the salt.
If your mouth is watering by now, you’ll be glad to know that my wing recipe is below. It’s pretty basic, but there is nothing wrong with a good, basic wing, done right. Feel free to add your favorite spices or use your favorite hot sauce as a base. I happened to use Louisiana hot sauce this day, but I am a Frank’s RedHot loyalist. And oh yes, I prefer small wings over large wings. Why? Good question. Because I like when they get really crispy and crunchy and the fat renders out yet the meat stays juicy. I don’t enjoy biting big chunks of fat on the larger wings. That’s just me, though, so don’t hate. I’ll still respect you if you like oversized jumbo wings (I just won’t eat them).
Kappy’s Standard Buffalo Wings
8 whole chicken wings, separated into wing and leg, or 16 pieces
Oil, for frying
1/2 - 3/4 cup Frank’s RedHot sauce
4-5 tablespoons butter, cut in chunks
A pinch of celery salt (optional)
1-2 teaspoons white vinegar (optional - most hot sauces already have vinegar in them, but if you want a little zip, add a touch)
Carrots and/or celery sticks, to serve alongside
Ranch or blue cheese dressing, for dipping
If you are using a tabletop fryer, set the temperature to 350°F.
If you are using a pot, use a large, heavy-bottommed pot and do not add oil more than halfway. Bring the oil up to temperature, about 350°F . Add the wings, a few at a time, making sure the oil doesn’t bubble up too much. Leave them for about 10-20 seconds, then give them a gentle stir, then leave them for another minute. Give them another gentle stir so that they don’t all clump together. Let cook until golden brown and crisp and cooked through, about 10-12 minutes. If you like your wings exceptionally crisp like I do, you can give them another 1-2 minutes in the fryer. Remove and let drain briefly.
While the wings are frying, place a small skillet or sauce pot over medium heat and add the hot sauce. When it starts to steam, turn the heat to low and whisk in a chunk of butter. Once it is fully melted, you can now start adding the other chunks, a little at a time, until fully melted. Turn off the heat and add your celery salt and vinegar, if using.
Place the wings in a large mixing bowl. Pour the sauce over the top and gently toss, trying not to splatter too much sauce on your shirt. Place in a serving dish alongside some carrot and celery sticks and your choice of ranch or blue cheese dressing.
And that’s what’s on my plate!
~ Kappy
P.S. If you’re interested in a non-deep fried wing, I have a version that will suit this craving. Just leave a comment below and I’ll be sure to do a follow-up.
Andrew “Kappy” Kaplan loves food. A professionally trained chef, by day he runs Yum-o!, Rachael Ray’s charity focused on kids and cooking, and keeps special projects running smoothly for her. By night he hops course to course, place to place, all across the country. He’s Rach’s own personal dining guide! You can also follow Kappy on Twitter to see what’s On Kappy’s Plate in real-time!
Rachael Ray's Blog
- Rachael Ray's profile
- 296 followers


