
Rachael Ray's Blog, page 74
January 11, 2013
Krazy Glue saves the day

When I think of Krazy Glue I think of commercials from the 70’s and 80’s. It was everywhere, and I vaguely remember some kind of catchy jingle. I always thought of it as some kind of gimmick and had basically forgotten about it until recently when I broke one of my kitchen blinds. I have faux wood blinds and was vigorously cleaning them when the end of one slat broke completely off. I envisioned ordering a new slat, waiting weeks for the manufacturer to ship it, then bungling replacement with the complicated cord system. I happened to mention the situation to my dad who without missing a beat suggested Krazy Glue. Worked ike a charm, and you can barely see the repair unless you look very closely.
So three cheers for Krazy Glue - here are some other uses (from krazyglue.com):
Repair broken sunglasses
Repair the grips on your bat, racket or club
Build plastic models
Fix toys
Create holiday ornaments
Repair plastic paper trays
Repair presentation binders
Repair broken vases, statues, brass fixtures or antique glassware
Restore loose floor tile, linoleum or cracked porcelain
Repair broken flower pots
Re-adhere carpeting
Reattach wood or vinyl molding
I have heard many people use Krazy Glue to seal minor cuts or cracks in the skin. This is not on the website so I can’t endorse it, but I have heard many success stories.


Mean mom and proud
I am a mean mom because I love my kids. I respect my kids. I expect a lot from my kids. Now, they might not realize this now, but they will some day. When they question my punishments, I always tell them, if I didn’t care about them, I would let them act in any they wanted, but it’s because I care that we have rules that should be followed to be a part of our family, and there are consequences if they break these rules. My older daughter thinks my husband and I are so mean that she doesn’t like to have friends over - we are “always yelling,” according to her. I told a friend of mine this conversation and she told me I must be doing something right - wise friend.
I had an episode just this morning with said 12 year old daughter who is self conscious by nature, exacerbated by the fact that she is 12. She has a cold, she woke up late, it was spirit day at school but she kind of forgot and didn’t dress accordingly, she was generally out of sorts (not an atypical school morning). She complained about a sore throat, I gave her 2 advil and sent her on her way. No fever, plus she has a cough half the winter anyway. She was dragging her heels all morning and I was waiting in the driveway with the car running with her sister and brother in the car, when she rushed out of the house, late, barely holding it together. She told me she wanted to stay home - she didn’t feel well. I told her fine but in bed all day, no tv, no computer, and no skiing tomorrow. She balked, at which point I told her if she felt well enough to go skiing, she was well enough for school. We drove to school (a less than 5 minute drive), and as we pulled up, her eyes filled with tears. This is not an isolated occurrence, by the way. I told her - nicely mind you - to take a deep breath and pull herself together - she could do it - and to call me if she didn’t feel better by her second class.
Now that was not easy to do. I hated to see her upset, and what I really wanted to do was give her a big hug, go through a Starbucks drive through and get her a hot chocolate, and give her a personal day on our couch under a fluffy blanket. However, that would be doing her a disservice. I want to teach her to cope, to manage life on an an off day, and most importantly that she is strong enough to do it. I truly believe some day she will thank me for being a mean mom. Or at least I can hope.
January 8, 2013
The HankyBook
I’m always on the lookout for ways to cut waste around the house, so when I was at my favorite spa, this adorable packet of hankies for sale near the register caught my eye.

Yep, that’s right, hankies. Those things that your parent’s or grandparent’s generation used to blow their nose before the advent of disposable paper tissues in the 1920’s. It may seem strange now, but it used to be a given that this item would get washed and reused, the same as rags before paper towels were invented.

Well, the HankyBook may just bring hankies back into fashion. It’s a rather hip-looking booklet made of snuggly-soft, organic cotton, and when you need to sneeze or blow your nose, you just open it to a fresh page. Toss it in the laundry along with your clothes, and it’s ready to reuse, minus the cold germs. Each packet contains three booklets in pretty, colorful designs, and the fabric is softer against your skin than paper.
There are some good reasons to choose reusable fabric over paper, as the HankyBook folks point out on their website. Hankies are cheaper in the long run than disposable tissues, they’re made in the United States following fair labor practice guidelines, and they don’t leave you with “rednose” syndrome from blowing your nose too often. Perhaps most importantly, reusable hankies save trees. According to Hanky Book,
“If every household in the United States replaced just one box of virgin fiber facial tissues (175 sheets) with 100% recycled ones (or a reusable alternative like HankyBooks), we could save 163,000 trees. (Source : NDRC.org)”
You can find HankyBook at select stores, or online at their website. They might be just the ticket to help you get through this year’s cold and flu season.
Skip the vacations, pricey lessons and over-the-top gifts. What kids really remember.

Even though I swore I never would be “that mother,” I have to admit I have evolved into the parent who makes sure my kids get an equal number of gifts to open on Christmas morning. I didn’t start out that way, as I told myself that my family would be different and my kids would just have to learn that that was life, and sometimes things would be seemingly unequal. Be grateful for what you have and remember how lucky you are. (My poor children. I tend to go on. And on.)
Year after year, after gifts were distributed, and turns were taken opening one gift at a time, there was always one kid who had nothing left to open and they would frantically search all around the tree (and the room) for the rest of their gifts (of which there were none). I decided to make life easier for me and now everyone gets the same number of parcels to open - even if someone is opening some kind of pricey electronic while the other child is opening a pair of socks.
This year for some reason my son had a gang-buster Christmas while my two daughters had a relatively low key holiday (socks, socks, more socks). My middle daughter’s top gift request was a new gaming system that I made very clear she would not be getting, yet she held false hopes throughout the day and her mood got darker and darker as the gift failed to materialize. My older daughter cracked later in the afternoon as my son opened his last gift - an iPod Touch - and she burst into tears as she ran out of the room. I pulled out the gratitude lecture, but shortened it in honor of Christmas. Someone is always in tears/time out on Christmas in my house.
My husband raised a red flag when I reviewed the Christmas gift plan (already executed) a few days before the holiday that although the numbers were equal, the gifts were not. I told him no one would remember the day after Christmas, and everyone has their year - this year happened to be our son’s. Parents (myself included) lose perspective on this holiday and place way too much emphasis on gift giving when kids barely remember the next year even their favorite gift from the year prior. They don’t remember the big gifts, or the lavish birthday parties, or pricey lessons and activities. They remember time together - most likely at home, hanging out as a family.
I was proven correct that very day (I love when that happens because it’s not very often) as we opened our son’s Christmas gift to us that he had made at school - a mini bulletin board with a handmade card and letter. Here is what it said:
“Dear Mom and Dad,
Thank you so much for loving me and taking care of me. I love you so much. I love when we all play the Scrambled States of America game together. I also love when we all watch Jeopardy together at dinner or watch Modern Family or The Middle in your bed. I love you so much and you guys are the best Mom and Dad ever.”
After I wanted to die a little as I thought about what my son had shared with his third grade teacher (we have the TV on during dinner sometimes and we all lie in bed and watch inappropriate sitcoms), I teared up. We are a cozy, (TV) loving family and my son loves it. Forget the Christmas gifts, the trips to amusement parks, the lacrosse/soccer/skiing/tennis lessons, the laser tag birthday parties. Kids just want time with their families. That’s it. So simple, now why as a parent is it so hard to remember?
January 7, 2013
Why Meat Acts the Way It Does, and Why That Matters
Food geeks, at least of the kind I count myself, have - for the most part - had almost no effect on American home cooking. Which is fine. I understand. Not everybody is going to sit around thinking of sixteen different ways to use leftover animal fat. But I think more home cooks are thinking about “why” as to opposed to “how.” Which I think will be a king change in how we all approach home cooking.
This hopeful notion struck me over the holiday, when I was in my usual mouthbreating recumbant position on a friend’s couch. I had over the previous 24 hours engaged in a marathon flurry of debate between myself, barbecue oracle Craig “Meathead” Goldwyn, the blogger Kenji Lopez-Alt of Serious Eats, and the chef Adam Perry Lang on the subject of resting meat. (No, I don’t have a great social life. Thank you for asking.) I was watching a Kojak marathon when I looked down and there saw Cooks Illustrated The Science of Good Cooking sitting there under a coaster. I picked it up and found a detailed, empirically provable, and exact explanation of how resting works. This is no esoteric reference work, either; it’s the #57th best selling book on Amazon right now. That’s not the 57th selling cookbook; that’s the 57th selling book! It’s currently outselling John Grisham and A Song of Ice and Fire. What is going on here?
It’s not a one-time phenomenon, either. This past fall saw the release of the Modernist Cooking at Home, a more user-friendly version of Nathan Myrhvold’s back-breaking grimoire, as well as brisk sales of seminal food scientist Harold McGee’s books. This spring will see the release of Taste: Surprising Stories and Science about Why Food Tastes Good, as well the usual flurry of craft coffee and beer books, guaranteed as always to bore the tears out of non-fetishists. The print books are hardly the point, though: you really see the new empiricism on the blogs.
Two of the four people in my meat synod were known to be primarily from online columns: Lopez-Alt is the resident food wonk at Serious Eats, and has over the last few years created an impressive body of work asking questions like “why should hamburgers be smashed?” and “what really happens when you cook french fries twice?” (In fact, the column consists largely of beautifully thought-out recipes, but those are the pieces I like best.) Meathead, meanwhile, is probably doing the most consistently thoughtful, incisive, and thorough meat writing on the web these days - which is not to say that he’s always right. Adam doesn’t write a blog, but he knows more about meat than the rest of us put together, and he was willing to engage privately in a really enlightening way. I think all four of us learned a lot. I used to think that internet was primarily a place for reading Gilmore Girls slash fiction. But now I’ve learned otherwise.
So what I’m going to try to live up to what these guys are doing, and try to bring some science into what has been, let’s just say, a pretty eccentric perspective on home cooking. A person who depended on this column to find recipes for dinner would go crazy from frustration. I try to write about how I think about cooking, and how my dim and twisted understanding of food expresses itself in my cooking. I’m like Rachael, only unlikable and a bad cook. That said, I think what I’ve been doing matters. But starting next week I’m going to try to build some objective science into this. Next week is the subject of the meat synod: the enigma of resting. Write in if you have questions and I’ll try to get them answered intelligently.
Supermarket Score! White Beans
“Supermarket Score!” is all about taking a look at the great deals and delicious meals that are hidden in commonly found supermarket items.
So I know what you’re thinking and I agree: nothing says “bring it on” like a post that has white beans in the title. But seriously, I know I don’t have to sell you on the merits of the great & mighty bean!
This member of the legume family manages to find its way onto my table at least once (and often more) a week. When I’ve got the time I cook them from scratch, but the prepared canned varieties are a great way to add fiber and protein to a meal that either contains no meat or could use a bit of a nutritional boost.
When shopping for canned beans, I prefer to pick up a variety with “No Salt Added”. I like to control the amount of salt in my food as I’m preparing it. When working with dried beans, be sure to give them a quick picking through as bags can sometimes contain small pebbles that evade sifting during harvest (not fun to bite down on).
To prepare dried beans from scratch they need to be soaked before cooking. The soaking tenderizes them while also helping to extract many of the compounds that could later leave you feeling gassy and bloated after eating them. Cover the beans by about 2-inches with cold water and let them sit at room temperature overnight. If you’re in a pinch, cover the beans with boiling water and let them sit for one hour (it’s not as effective as the overnight soak but it gets the job done). Drain off the soaking water, cover the beans with fresh water, and simmer them until they’re tender, about an hour.
But why stop at just plain ‘ol simmered beans? Check out these three other amazing uses for white beans:
PIE WEIGHTS
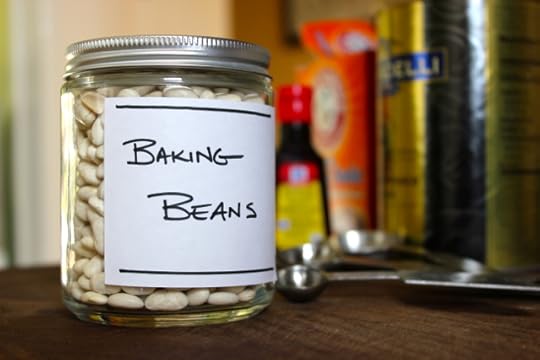
For all my baking fans out there, pie weights are used to “weigh down” a crust when blind baking it before later topping it off with a filling. While you can certainly buy fancy metal or ceramic pie weights if you want, I take a bit of inspiration from the other household name for them: baking beans. Save yourself a little scratch and use dried beans next time – they’re even reusable for several rounds of baking.
WHITE BEAN HUMMUS

There’s no denying the delicious and versatile appeal of hummus. It’s great as a dip, filling, sandwich spread, and so much more. While traditional recipes call for chick peas when making hummus, switch up your routine a bit and swap in white beans. They’re a bit creamier and play just was well with traditional flavorings like roasted garlic, lemon, and herbs. Not sure where to begin? Try out this Greek Hummus recipe from Rachael.
PROTEIN-PACKED POTATOES
 We all want to keep an eye on eating a bit better, especially just after the New Year. While potatoes are certainly a good carbohydrate to have in your diet, give them a protein boost with white beans. Add a handful of drained canned beans to a boiling pot of potatoes during their last few minutes of cooking and then mash them up with the spuds. Your family won’t even know they’re there and you’ll be swapping simple carbs for filling protein.
Patrick W. Decker’s life revolves around food. Always has. Probably always will. As a graduate of The Culinary Institute of America and past member of the culinary team on Rachael’s daytime talk show, he now works as a food stylist and producer in NYC by day, and a food writer and recipe developer at his home in New York’s Hudson Valley by night. You can see what he’s up to by following his latest twEATs on Twitter at @patrickwdecker or visiting his website at patrickwdecker.com.
Tangerine Cake with Pistachio slivers – FAT FREE AND GLUTEN FREE
My cousin Shalina always inspires me to try out new things. In London this Christmas, she made the family a tangerine cake. I am a fan of desserts and chocolates that incorporate fresh fruits for flavor – it adds brightness and compliments the sweetness. However, the biggest selling factors for me was that the cake is FAT FREE, GLUTEN FREE AND FAIL FREE (very important for less competent bakers like myself).
The cake could not have been easier. Just one pot needed for simmering the clementine and a mixing bowl needed to combine the ingredients. No creaming until butter and sugar are pale (because there is no butter), no whisking eggs to soft peaks, no folding the flour. How could a cake be so forgiving?
What I love about this gluten and fat free cake is that you don’t miss either. In fact the almond flour lends itself to a more gourmet taste and texture, something that one would find at a French patisserie. The absence of fat in this recipe also busts the myth: that fat is required in cakes to hold the cake together, keep it moist and give it that golden color. This cake can certainly hold its own and is stunningly golden.
This tangerine cake is soft and moist and gets better with age – I am not kidding. Unlike most cakes that are at their prime when they come out of the oven and then start dehydrating a few hours later, this cake remains soft (as if it has been drenched in some kind of orange liqueur) and aromatic for almost a week. Simply eat as is or serve with crème fraiche and some grated pistachios.
Recipe For Fat And Gluten Free Tangerine Cake With Pistachio Slivers
Ingredients
13oz clementine
6 eggs
8oz demerera sugar
9oz almond flour
1 tsp. baking powder
1 tsp. vanilla essence
2 tbsp. slivered pistachios
Honey to drizzle
Springform pan/ Cake tin
Method
1) Set oven to 350 degrees F
2) Set the tangerines to boil for 2 hours with skin on. Strain and slice in half and remove seeds. Blend into a pulp. Set aside to cool
3) In a separate bowl, with a fork, beat six eggs until yellow and whites are well combined and the sugar. Add the ground almond flour and baking powder followed by the cooled tangerine pulp. Mix well
4) Pour in to a greased springform pan and bake for 40 minutes. Cover the cake with foil and bake for another 10-15 minutes to avoid burning
5) Drizzle with honey and sprinkle with pistachios when the cake cools down
Saira Malhotra, is of British–Indian descent and is a chef, food writer and cooking instructor based in New York City. Raised in Hounslow, U.K, or rather ‘Little India’, where the air is aromatic with roasted spices, little did Saira know these moments would follow her from being a student in France and Italy to residing in NYC with her husband and kids and parlay themselves unexpectedly in to a culinary career. She is a graduate of the International Culinary Center in New York City. Come visit her at her food blog: www.passportpantry.com where she shares approachable and international recipes.
Freezer Friendly Spinach and Artichoke Stuffed Shells
I never really got into freezing meals. I’m not sure why. Strange way to start a post about freezer-friendly meals, eh? Stick with me. I’m going somewhere, I promise! I guess I never really grew up in a house where meals were prepared in advance and frozen. I was raised by a working mother who was also a single parent so I bet it would have been a great thing for her. And the more I think about it, it seems crazy to me to not have been taking advantage of double batch cooking and freezing given my own lifestyle.
I do a lot of cooking both for my family and for work purposes so there’s always freshly prepared food in the house, but that doesn’t mean I don’t sometimes find myself scrambling for a dinner idea at 5:00 because the day has gotten away from me. All parents go though this and whether you work inside the home or out, I think we can all agree, there is never enough time in the day. I’m a work-at-home-mom with two boys (ages 22 months and 4 years) and my life seems to get crazier every day. I know you can relate, which is exactly why I find myself searching for ways to gain extra time in my day. Freezing meals has definitely become one of my new favorite time savers.
Making a double batch of something that freezes and reheats beautifully is really a game changer. No more panicking if i’m running late. Those take-out menus stay in the drawer. These days if I’m frantic about what to make for dinner, I quickly remember to check my freezer to see what’s stashed and begging to be eaten. It literally feels like Christmas morning when I open the foil and see that my hard work has paid off in spades.
The flavor of these shells are creamy and delicious and are a veggie filled take on the classic stuffed shells recipe thanks to the addition of spinach and artichoke. Think: spinach and artichoke dip stuffed into pasta shells—OMG! Spinach and Artichoke Stuffed Shells are hearty and well balanced vegetarian fare. Pair this dish with a wonderful side salad and you have yourself one fantastic make-ahead, freezer friendly meal.
Freezer Friendly Spinach and Artichoke Stuffed Shells
Makes 2 batches of stuffed shells (enough for 8 people or two dinners for 4 people if freezing one batch)
Ingredients:
1 box large pasta shells
1 large clove garlic
1 1/2 cups ricotta cheese
1/4 cup parmigiano cheese, plus extra for topping
2 eggs
1/2 teaspoon salt
1/4 teaspoon black pepper
1/4 teaspoon nutmeg
1 box of frozen chopped spinach, thawed and throughly squeezed dry
1 (15 ounce) can of artichokes packed in water, drained
1 (28 ounce) can crushed tomatoes
Instructions:
1. Preheat oven to 400 degrees F.
2. Cook shells according to packaged directions for al dente. Drain and place onto a paper towel to dry while you make the filling.
3. Place garlic into the bowl of a food processor and process until finely minced. Add ricotta, parmigiano cheese, eggs, salt, pepper and nutmeg and process until mixture is well blended, about 30 seconds. Add in well drained spinach and drained artichokes and pulse mixture until spinach and artichokes are broken down but not pureed, about 20-25 pulses, total.
4. Spread approximately 1/3 cup of crushed tomatoes onto the bottoms of two 9×9 freezer friendly, oven safe, baking dishes (I actually used 10-inch pie plates and as able to fit 16 shells in each). Note: use a bigger cooking vessel if you need one large batch and aren’t planning on freezing any for a later date—a 9×13-inch pan should work perfectly.
5. Fill each shell with approximately two heaping teaspoons of the spinach/artichoke mixture and place side by side into prepared baking dishes. Nestle them closely to each other until each of the to baking dishes are filled. Top the shells in each baking dish with remaining sauce and extra parmigiano cheese. Cover the one you plan on baking right away tightly with a piece of aluminum foil. Freeze the other batch according to instructions below.
[image error]
To Freeze: Cover the batch you plan to freeze tightly with a layer or wax paper, then plastic wrap and finally a layer of heavy duty foil ( i like extra freezer burn insurance so i triple up!). Label the dish with a piece of making tape and marker and don’t forget to include the date! This particular dish can be frozen for up to one month. Don’t forget to remove the waxed paper and plastic wrap and reseal wit foil before placing into preheated oven. If baking shells from a frozen state, allow 60 minutes total cooking time.
[image error]
[image error]
Christina Stanley-Salerno is a mama, recipe developer, food stylist, photographer and blogger atTakeBackYourTable.com. She loves cooking for and with her family. Life is hectic, but Christina is passionate about mealtime because she believes that family meals are the glue that holds everyone together. Creating simple, quick and healthy meals is her specialty and her trick to keeping the family meal a reality, even on busy weeknights.
Follow her on Twitter @TakeBackTables
January 5, 2013
La Befana, a good witch
Recently my son had to do a school project where he chose a holiday that had some relevance to him, from anywhere around the globe. Being that his mother is of Sicilian descent, he chose Christmas in Italy. The most interesting thing to him was when he learned that Italian children do not expect a visit from Santa on Christmas day, instead that day is reserved for the celebration of Christ’s birth. During this season, Italian kids do something I find to be rather touching-they write a letter to their parents, thanking them for all they have. What a nice tradition to uphold-it gives children a chance, before the gift-giving and receiving (it’s coming) to reflect and pay homage to those who have given them the life they know.
A typical nativity scene
The nativity scene is important in Italy, as it is here, as are lights, but you won’t see all of the crazy lawn decorations and inflatables (think Clark Griswold) that we cherish here in America (at least in my town, including my house), and the spirit is not about amassing as many Christmas gifts as possible. On Christmas Eve, Christians in Italy, specifically southern Italy and Sicily, prefer to eat no meat. In fact, in my family, we carried a tradition over from our past generations called the “feast of seven fishes” where at least seven different kinds of fish dishes are served. In fact, my ancestors never ate meat on Fridays period. I do not know why or how this tradition started, but in general, we Italians see going meat-free as a form of fasting, which we do until Christmas day, which kicks off after midnight mass.

Feast of the Seven Fishes at saveur.com
Back to the presents, legend has it that when the three kings were heading to see the baby Jesus, a good witch came around looking for the newborn. She never found him and still to this day she searches for him. On January 6th, the day before the Epiphany, Italian children are visited by La Befana who drops presents off for all of the good children, because although she hasn’t found Him, Jesus can be found in all children. With her broom she will sweep the floor near the children’s gifts, left in stockings, as she was known as a good housekeeper as well.
Hanging dolls depict La Befana, a lovable old witch
Tomorrow is January 6th, 3 Kings Day and the day of La Befana!
January 3, 2013
Home-Made Yogurt - Made Oh So Easy!!
When I got married – 13 years ago and counting, I remember having a meal cooked by my mother-in-law. On any given night in my home, there was always a container of plain yogurt on the table to be eaten along side the meal. On that particular night, after we were done with dinner, my mother-in-law asked us dubiously if we had liked the yogurt. What was not to like, it came out of a Dannon container. She then confessed that the yogurt was homemade and poured it into the container to set. Why did my husband and I feel so short changed and cheated by this confession? Did we really prize something bought from the store over its homemade alternative?
My poor mother-in-law never ‘went there’ again. That was until last week when we were visiting her in Florida. She realized at night that there was just a couple of tablespoons of yogurt left in the container, so she resourcefully added warm milk to it and by the following morning, it had set in to a wonderfully creamy yogurt. Thankfully, I have matured somewhat in the last 13 years and not only enjoyed the yogurt but celebrated the fact that it was homemade. In today’s vocabulary, it could be considered artisanal, but the reality was that it was very simple to make and cost effective too.
When I came home, I was excited to make my first batch. It was like a science experiment seeing something made with a benign set of ingredients morph in to a creamy mousse within a few hours.

Unlike many other recipes for home-made yogurt, this one is as ‘brick and mortar’ as they come. No need for special equipment and tutorials. All you need is a little left over yogurt, a container to set it in, some milk, a touch of sugar (to enhance the creaminess, esp. if using low fat milk) and finally, a towel to swaddle and nurture the process.
Whilst many people like to snack on yogurt in a sweet light, I am a fan of a more savory serving..switch out a sprinkle of berries and nuts with a dash of cayenne, black pepper, salt.
Low Fat Home Made Yogurt
Ingredients
4 TBSP. yogurt (with live cultures, such as, Dannon and Stonyfield Farm)
500 ml of low fat milk (5 cups)
1 TSP. Sugar
Utensils
A whisk
A container (glass/ steel)
1 towel to wrap container in
Method
1) Bring milk to a boil and allow to cool just enough to be able to dip your finger in without it scorching you (130 degrees for those who like precision)
2) Whisk the yoghurt in the container you will set the mixture in and pour in the milk in four installments, whisking well each time to fully incorporate the yoghurt.
3) Cover the container with plastic wrap poked with a couple of holes for aeration. Place in a warm place near a heater or in an oven with the light on). Between 6-8 hours, the yoghurt will thicken. Place in refrigerator until chilled – this will thicken the yoghurt further.
Saira Malhotra, is of British–Indian descent and is a chef, food writer and cooking instructor based in New York City. Raised in Hounslow, U.K, or rather ‘Little India’, where the air is aromatic with roasted spices, little did Saira know these moments would follow her from being a student in France and Italy to residing in NYC with her husband and kids and parlay themselves unexpectedly in to a culinary career. She is a graduate of the International Culinary Center in New York City. Come visit her at her food blog: www.passportpantry.com where she shares approachable and international recipes
Rachael Ray's Blog

- Rachael Ray's profile
- 296 followers


![[image error]](http://www.rachaelray.com/blogs/wp-content/uploads/2013/01/dsc_0553.jpg)
![[image error]](http://www.rachaelray.com/blogs/wp-content/uploads/2013/01/dsc_0551.jpg)
![[image error]](http://www.rachaelray.com/blogs/wp-content/uploads/2013/01/dsc_0559.jpg)
![[image error]](http://www.rachaelray.com/blogs/wp-content/uploads/2013/01/dsc_0554.jpg)
![[image error]](http://www.rachaelray.com/blogs/wp-content/uploads/2013/01/dsc_0555.jpg)
![[image error]](http://www.rachaelray.com/blogs/wp-content/uploads/2013/01/nativity-scene-sonja-anderson.jpg)
![[image error]](http://www.rachaelray.com/blogs/wp-content/uploads/2013/01/300px-befane.jpg)