
Max Griffin's Blog, page 2
May 19, 2024
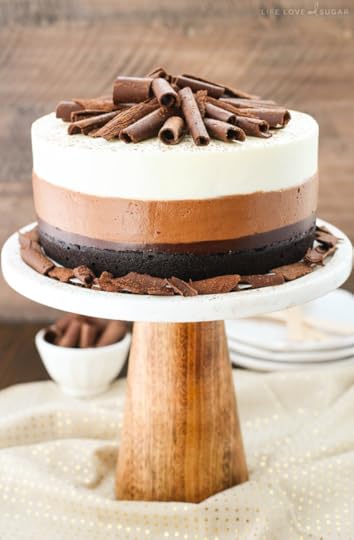
Chocolate Raspberry Mousse Cake
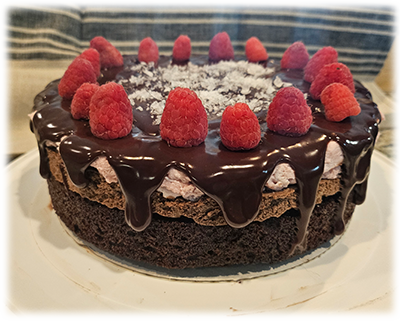
I made this cake over the span of three days for my contribution to a dinner party with some friends. We take turns hosting, with the guest providing the dessert and the host providing the main course. This dessert was a hit, both in appearance and in taste.
This dessert starts with a base layer of cake, then a layer of chocolate mousse, followed by a layer of raspberry mousse. It’s topped with a chocolate ganache that drips down the sides and a garnish of fresh raspberries and flake salt. I’ve put each of the four recipes–cake, two mousses, ganache–in separate files linked below.
The reason it took three days to prepare is because I wanted to fully chill each layer before applying the next one. So, day one was for the cake base, day two was for the chocolate mousse layer, and day three was for the raspberry mousse layer. I let that chill until late afternoon, when I applied the ganache and garnishes before taking it to the dinner. Each layer took perhaps an hour total to make, and the drip topping about the same, so the actual time in the kitchen wasn’t that great.
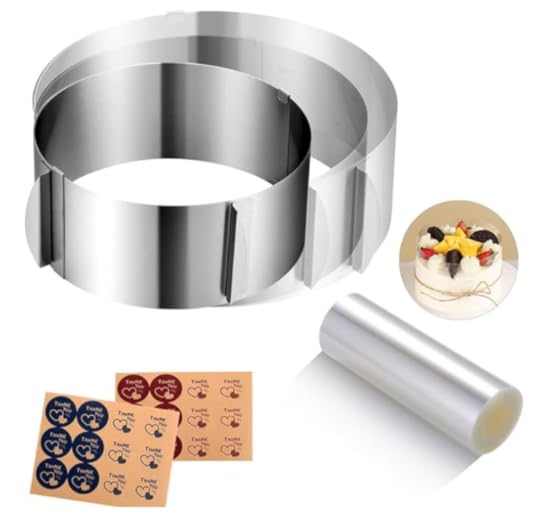
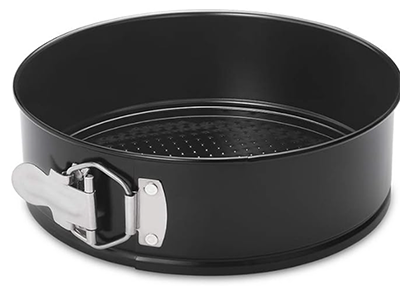
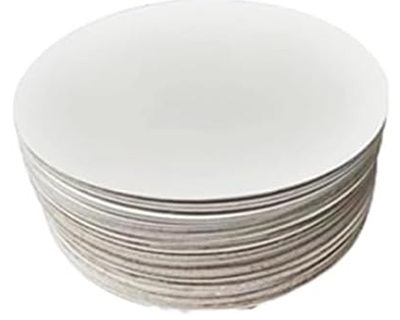
To do a cake with mousse layers, you need a cake mold and acetate liner. I also used an 8-inch spring-form pan to bake the cake layer and 8-inch cake rounds. I got all of these on Amazon–links are below.
The cake looks pretty good, but would look better if the mousse layers were taller. I’ve doubled the recipes in the links below for the two mousse layers, so if you use these recipes, you’ll get more mousse and a better looking dessert.
The mousse layers are are extra thick, in the viscuous sense rather than height, because I wanted to be sure they were stable enough to support the structure of the dessert. I used gelatin as thickener, something you would neither need nor want if you were just making mousse for a dessert cup, partait, or pie. The ganache recipe below is also specialized to create the drip effect and is non-standard in that it uses a higher ratio of chocolate.
There are links to the four recipes below, followed by instructions on assembling the various parts into the dessert in the picture.
Chocolate Brownie Cake
Chocolate Mousse
Raspberry Mousse
Chocolate Ganache for Drip ToppingAssembling the Layers
The method to assemble the parts is pretty straight-forward.
bake the chocolate brownie cake in an 8-inch round cake pan–I used a spring-form pan–, place it on an 8-inch cake round or serving platter, and chill it overnight in the refrigerator or freezer. I like using cardboard cake rounds sized to match the cake so the invevitable ganache drips don’t show on the resulting base.Cut a 3″ tall sheet of acetate that’s long enough to go around your cake–that’s at least 24.3 inches for an 8″ round if you’re wondering.Put your adjustable cake mold around the cake and, before tightening it, put the acetate sheet between the mold and the cake.Tighten the mold so that both it and the acetate fit snugly against the cake. It’s going to stay there until the the rapspberry mousse is in place and has set up. Put the cake back in the refrigerator or freezer while you make and chilll the chocoloate mousse.Make the chocolate mouse, chill it, and spread it on top of the cake. Level it as best you can. Make sure that if goes all the way to the acetate and there are no bubbles or gaps.Pop the whole thing back in the refrigerator or freezer and wait a few hours or overnight.Make the raspberry mousse. Wait a couple of hours or overnight, and then place it on top of the chocolate mousse. Back in the refrigerator or freezer for a few hours.Now you can remove the mold and acetate. This is one place where you’ll get a difference in appearance between using the refrigerator or freezer. If the dessert has just been sitting in the refrigerator, bits of both mousses will cling to the mold and you won’t have a perfectly smooth surface. But if it’s been in the freezer, the acetate shouldn’t stick to the mousse, and it will be perfectly smooth, or at least smoother. I never have room for a cake in my freezer, so in my case this is moot.Anyway, once it’s safe to unmold the dessert, do so. But put it back in the refrigerator or freezer until your done making the ganache and waiting for it to cool. You want the dessert as cold as you can get it before applying the ganache in order to get the drip effect.The ganache recipe above describes the techniques for creating the drip effect.For the garnishes–fresh raspberries and flake salt in the picture–let the ganache set up in the refrigerator for at least an hour before applying them.That’s it! None of the steps are really hard, and I think the result is both impressive-looking and tastes great.
The post Chocolate Raspberry Mousse Cake first appeared on Max Griffin.


Raspberry Mousse
Traditional mousse uses whipped, uncooked egg whites to give the mousse its signature, airy texture. This is not a traditional mousse recipe, or at least not exactly.
There are lots of mousse recipes online that use just whipped cream and flavoring–melted chocolate, pureed fruit, even peanut butter. These are all pretty easy and taste great, but they don’t generally provide the stability you need for a mousse layer in a cake. That’s the purpose of this recipe, which gives an extra-thick and stable mousse.
This recipe users rasbperries, but you could also use strawberries or blackberries for this recipe. This has extra gelatin in it to help stabalize it for a layer in a mousse cake. If you are making it for use in desert cups or parfaits, reduce or omit the gelatin. The chocolate mousse uses eggs in the form of Creme Anglaise to help thicken the mousse. We don’t need eggs for the raspberry mousse since the berries contain natural pectin. I’ve adjusted this recipe from the original to give about a one-inch layer in an eight inch round mousse cake.
PrintRaspberry MousseThis recipe is based on one I found at Love and Olive Oil.Prep Time 15 minutes minutesResting time 2 hours hoursIngredients2 tsp unflavored gelatin2 tbsp water8 oz white chocolate. DO NOT USE white chocolate chips230 g raspberries (about 1.5 pints or 8 oz). Fresh is better, but frozen works1 tbsp lemon juice1 tbsp granulated sugar2 C heavy whipping creamInstructionsPlace a mixing bowl and your mixer's whisk or beaters in the refrigerator to chilldisolve the gelatin in the 2 tbsp of room-temperature water and set aside while it bloomsFinely chop the white chocolate and place it in a large mixing bowl (about 2 quart).Puree the raspberries in a blender or food processorStrain the pureed berries through a fine mish sieve to get rid of the seeds. You'll have to push the pureed mixture against the sieve to squeeze out as mucn of the juice as possible. It's ok if a few seeds leak through, too. Note the recipes quantities are before the seeds are squeezed out; you'll wind up with a bit less raspberry for the actual ingredient.Place the raspberries, sugar, and lemon juice in a small saucepan and bring to a gentle simmer while whisking. Let simmer about five minutes–this releases the natural pectins in the berries. Remove the berries from the burner and add the now-bloomed gelatin to the berries and whisk until disolved and thorougly mixed. The heat from the berries will help disolve the gelatin. Pour the still-hot raspberry mixture over the white chocolate. Make sure the berry mixture covers the chocolate. Let it sit for a minute or two while the white chocolate softens, then whisk the mixture until completely blended. Don't let this sit for more than five minutes or so before you begin to blend it with the whipped cream, or the gelatin will start to set up and interfere with the blending. Next, put the heavy cream in the bowl that's been chilling in the refrigerator and beat it to soft peaks. This takes roughly than two minutes with my Kitchenaide stand mixer and the whisk. Do not beat to hard peaks. Put about a third of the whipped cream in the bowl with the berry/white chocolate mixture and fold them together. This will both cool the mixture and prime it for folding the remaining cream.Finally, add the rest of the whipped cream into the bowl and gently fold the mixture together until there are no white streaks. Well, it's ok if there are a few white streaks–they can even add to the appearance.Cover with plastic wrap and refrigeratorate for at least two hours and preferably overnight.The post Raspberry Mousse first appeared on Max Griffin.
Chocolate Mousse
Traditional mousse uses whipped, uncooked egg whites to give the mousse its signature, airy texture. This is not a traditional mousse recipe, or at least not exactly.
There are lots of recipes for mousse that use just whipped cream for the airy texture, and they are both easy and taste wonderful. Straight from the refrigerator, they can have a mousse-like solidity to them, but they get squishy and more pudding-like after just a few minutes. Squishy doesn’t work for a cake layer.
Another traditional way to make a mousse uses whipped cream to add air to the mousse but stabalizes the mixture with egg yolks. This involves cooking the yokes to make a kind of thin custard called Creme Anglaise. That’s what this recipe does. For additional stablity, we add gelatin to the mix. Once chilled, it’s thick enough to give a cake with a mousse layer stability while still having a good mouth feel.
If I were making a parfait that used chocolate mousse, I’d probably use one of the easier recipes that just consist of chocolate and heavy cream, but this is the one for a mousse layer in a cake.
PrintChocolate MousseI based this recipe on one I found at HidaMari Cooking. The video is in Japanese, but the recipe ingredients are in English, and there are English subtitles at the critical steps in making the mousse.IngredientsFor the Creme Anglaise3 tsp unflavored gelatin powder3 tbps whole milk2 yokes large egg yokes2 tbsp granulated sugar1/2 C whole milk2/3 C Heavy whipping creamFor the Mousse360 grams bittersweet chocolate (12.75 oz)1 3/4 C Heavy whipping cream1 tbsp powdered sugar1 tbsp corn starch (optional)InstructionsMake the Creme AnglaiseDissolve the gelatin in the 2 tbsp of milk and set asideplace the chopped chocolate (or chocolate chips) in a small bowl and set aside.Chill a large mixing bowl and the whisk or beaters for your mixer in the refrigerator while you make the Creme Anglaiseadd the egg yolks and the sugar to a sauce pan and beat until combinedadd the 1/2 C milk and 2/3 C whipping cream to the pan and bring to a simmer over low heat while whisking the mixture. DO NOT BOIL. Let the mixture simmer while whisking until it thickens and covers the back of a wooden spoon–about 4 minutes. That's your Creme Anglaise. We're going to add the gelatin for extra stability, so remove the egg/milk mixture from heat and whisk in the gelatin. If the gelatin has solidified, melt melt in the microwave for a few seconds. Make sure all of the gelatin disolves in the egg mixture. Making the MousseWhile it's still hot, pour the Creme Anglaise/gelatin mixture over the chocolate and cover the bowl with a dish to hold the heat. Wait at least 45 seconds (or longer) for the chocolate to soften. If you're not sure you've completely dissolved the gelatin or if you've (heaven forbid!) partially cooked the eggs, you can strain the mixture as you pour it in. Starting in the middle with a whisk, swirl the chocolate and egg/milk/gelatin mixture. At first it will look like chocolate milk, but in no time you'll have a silky ganache.Retreive your mixing bowl and whisk from the refrigerator and add the 1.75 C of cold heavy cream to the bowl along with the powdered sugar and corn starch (if using)Whip the cream to SOFT peaks. Do not over-mix. Soft peaks means that they form and instantly slump when you pull the whisk from the mixture. At medium-high speed on stand mixer, this shouldn't take more than two minutes and probably less. By this time the temperature of the chocolate mixture should have reduced to roughly body temperature. It's ok for it to be warm, but if you let it cool too long or let the gelatin set up, it won't mix properly. If necessary, you can warm it for a few seconds in the microwave. Add one third of the whipped cream to the chocolate mixture and gently fold it in.Add the resulting cream/chocolate mixture to the big bowl with the rest of the whipped cream and gently fold it in until no streaks show. Be gentle–don't collapse the air you just whipped into the cream!You're not done yet! It will have a pudding-like texture at this point, and it needs to chill at least an hour or, preferably, overnight, in the refrigerator before you can use it on your cake. (If you're not making a cake but, say, a Parfait, then you can spoon it into molds or cups at this point, but the texture won't be mousse-like until it cools.The post Chocolate Mousse first appeared on Max Griffin.
Chocolate Brownie Cake
This makes an awesome confection that’s halfway between a brownie and a cake. It’s the perfect choice for the layer(s) of a cake that includes mousse layers.
This recipe calls for dark chocolate and Dutch-process cocoa butter. I can’t argue with those recommendations, but I’ve made it with semi-sweet chocolate chips and Hersheys’ cocoa powder and still tasted good.
PrintChocolate Brownie CakeI found this awesome recipe on Love and Olive Oil. Prep Time 30 minutes minutesCook Time 30 minutes minutesEquipment8-inch round spring-form cake pan.8-inch cake roundparchment paperIngredients3.5 oz Finely chopped dark chocolate1/3 C cocoa powder (preferably Dutch-processed)2 TBSP unsalted butter, cut into small cubes1/2 C hot expresso 3/4 C all-purpose flour3/4 C granulated sugar1/2 tsp baking soda1/4 tsp salt6 tbsp sour cream (90 g)1 egg large or jumbo1 egg yolk from a large or jumbo egg2 tbsp vegetable oilCooking sprayInstructionsPreheat oven to 350 FLine the bottom of an 8-inch spring-form pan with parchment paper. Spray the sides with cooking sprayPut the chopped chocolate and cubed butter in a bowl and pour the hot exrpesso over it. Let sit for 30 seconds or so, then stir until the chocolate and butter are melted and mixed with the coffee. In another bowl, whisk together the dry ingredients. Going back to the bowl with the chocolate/butter/coffee mixture, whisk in the egg, the egg yool, the sour cream, and the oil until smooth. Pour the resulting mixture into the bowl with the dry ingredients and mix with a wooden spoon until no streaks of dry ingredients remain. Pour into the prepared spring-form pan and bake for 28-30 minutes or until a toothpick inserted in the center comes out with no gooey batter still attached (a few crumbs are ok). Let the cake cool on a wire rack for about five minutes before removing the spring-form ring. Let it continue to cool for about another 30 minutes on a wire rack before transferring to an 8-inch round. Once fully cooled, cover and refrigerate (or freeze) untl ready to use.The post Chocolate Brownie Cake first appeared on Max Griffin.
Chocolate Ganache for Drip Topping
The basic idea for a ganache is to combine equal quantities by weight of chocolate and heavy cream. The better quality chocolate you use, the better the result will taste. So, you can go from plain-old grocery store semi-sweet chocolate chips to Ghiradelli Dark Chocolate or Valrhona dark chocolate baking disks. Whatever chocolate you use, you must use heavy whipping cream with at least 36% fat. Milk or half-and-half or ordinary cream won’t do.
There’s only two ingredients, so they are important. The the ratios are also important, so white chocolate, for example, requires different ratios. If using chips, the only reliable way to determine the amount is by weight, not volume. Thus, you must have a reliable kitchen scale to make mousse.
If you vary the ratios in your ganache, you’ll get a different texture. Adding chocolate, for example, gives you a thicker ganache. I’ve opted for a thicker ganache recipe for a drip topping since the conventional ratios tended to run all the way down the cake rather than stopping mid-way. You can scale the recipes by just adjusting the cream and chocolate, keeping the weight ratios constant. The ratios I’ve used are for semi-sweet chocolate chips. They will be different if using dark chocolate or white chocolate, for example.
The are multiple techniques to create the drips. Most often these involve a squeeze bottle, which has NEVER worked for me. I just get a sloppy mess to clean up. The spoon technique is easy and gives me better control. Maybe you’ll be more adept with the squeeze bottle than I was.
There are many good sources for information on making and using ganache. Sally’s Baking Recipes has many tips, a reliable recipe, and includes advice on what to do in the unlikely event something goes wrong. I took the recipe below from Love, Life, and Sugar, which includes how-to-photos of both the squeeze bottle and spoon method for applying the ganache to create a drip cake.
PrintChocolate Ganache Drip ToppingThere are many sources for this recipe; this one, one is from Love, Life, and Sugar, and includes a photos on applying the ganache to create a drip cake. Prep Time 5 minutes minutesCook Time 5 minutes minutesResting time 15 minutes minutesIngredients1/2 C heavy whipping cream (about 120 g)169 g semi-sweet chocolate chips (6 oz)InstructionsIf you're planning to make a drip topping, put your cake into the refrigerator or freezer now if it's not already there. If you have room, the freezer is better. Of course, if your presentation includes buttercream or other frosting on the cake, it needs to be already on the cake before applying the ganache drip. (!) It's better if you chill your cake at least an hour before applying the drip. Place the chocolate chips in a small, heat-proof bowl.Place the cream in a small sauce pan and just bring to a simmer. DO NOT BOIL. Bubbles should be just starting to form. You could do this in the microwave too, but microwaves vary substantially in power, and it's easy to to boil the cream by accident and have it bubble over and make a mess. The sauce pan is safer since you can watch it.Pour the hot cream over the chocolate. Tip the bowl if needed to be sure that the cream covers the chocolate, but don't stir it yet. Cover the bowl with a saucer to trap the heat and WAIT 5 MINUTES.After five minutes, starting in the center, swirl the chocolate into the cream. At first it will look like chocolate milk, but in less than a minute you'll start seeing the chocolate shine through, and shortly you'll have the chocolate and cream completely mixed into a glossy ganache.now WAIT at least 15 minutes. The ganache needs to cool before you can use it. The spoon techniique involves using a tablespoon (not a soup spoon) to place a spoonful of ganache near the edge of the cake and then nudging a bit of it to drool down the side. If the ganache isn't too warm and the cake is cold enough, it will stop halfway down, like magic, and you've got the drip effect. TEST to see if your ganache drips the way you want. The ganache should still be warm enough that it drips down the side, and the cake should be cold enough that it chills the ganache and stops the drip midway. If the ganache is too cool and won't drip, you can easily warm it in the microwave (in 5-10 second increments) until it's the proper consistency. If the drip satisfies you, continue around the edge of the cake, getting drips all the way around.When you're done, the middle of the cake still won't have any ganache on it. Just use the spoon to apply the ganache to the top of the cake, being careful to not create more uncontrolled drips in the process. You can smooth the top out with a swirl of the spoon or an offset icing knife.
The post Chocolate Ganache for Drip Topping first appeared on Max Griffin.
May 11, 2024
Four Layer Brownies
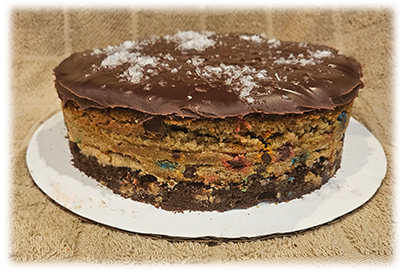
Well, only two layers are brownies. One layer is frosting and another is ganache, so that gets you to four layers. But that means there are four recipes to make this dessert.
This is also an unconventional presentation of brownies: they are baked in a round, spring-form pan instead of a square one. The inspiration for this is a layered cake where each layer is exposed and visible, and often one layer is a mousse. This entails using some special equipment.
As a consequence, this post is divided into sections.
Remarks and HintsThe EquipmentThe RecipesBrown Sugar BrowniesPeanut Butter FrostingPeanut Butter BrowniesChocolate ganacheThe PresentationRemarks and HintsI’ll start with a few hints.
First, the recipes call for room temperature butter. This means you need to pull the butter from the refrigerator and let it sit on the counter for at least an hour before using it. It does not mean “nuke it in the microwave. ” The microwave will turn the outside to soup and the inside will still be hard. The butter should soft when a finger pressed into leaves an indentation.
The reason room temperature butter is important is because when you whip it with the sugars, you are not only making batter, but you are adding air to the result as well. This makes for lighter cakes and brownies that rise better.
Don’t use melted butter unless the recipe specifically calls for it. Melted butter won’t hold the air, nor will hard-as-a-rock butter fresh from the refrigerator.
Speaking of adding air, that’s why you should also sift your powdered ingredients. Sifting the dry ingredients not only mixes them but adds volume, i.e., air, usually about 20% more volume. Again, the result is lighter cakes and brownies that rise better.
If you don’t have a sifter–I didn’t have one for ages–you probably do have a whisk. If you do, use it to mix the dry ingredients. It’s not as good as sifting them, but it’s better than just stirring with a mixing spoon.
Adding air is one reason why you add eggs one at a time to the batter. Not deflating the air is also why you add the dry ingredients in batches instead of all of all at once.
The original idea was to produce brownies where one layer was a conventional brownie and another was like a brownie, but made with peanut butter instead of chocolate. So, layers made me think of layer cakes, which made me think of presentation. That led to this amazing cake on Lindsay’s website.I hope I to make this cake eventually. Maybe even next week.
Anyway, I wondered how she did that, and that led me to discover cake molds and acetate. So I bought a kit and tried it out with a the brown sugar brownies on this page and a recipe for peanut butter mousse I’d found online. It worked pretty well, except that the mousse wasn’t especially stable and didn’t hold up well after removing the layered result from the refrigerator, but the tools were exactly what I needed for this dessert.
That segues to the equipment…
The EquipmentI used spring-form pans to make the brownie layers. I suppose you could use conventional cake pans, but spring-form pans make it much easier to extract the cake layer from the pan.
For the presentation, though, you need some specialized tools. In particular, you need an expandable cake mold and acetate sheets. I bought the kit pictured below from Amazon.
The two main elements are the mold, which is adjustable from six to twelve inches, and the acetate roll which you place between the mold and the cake layers. This one was only $14 and worked really well. There’s enough acetate in the kit to make at least a dozen cakes.
As I mentioned in the hints above, I now own a sifter. I bought this one from Amazon. I confess, though, I still usually just whisk the dry ingredients, especially when I’m making Mr. Gene’s cookies.
The Recipes PrintBottom layer: Brown Sugar BrowniesA chewy recipe based on Patti's at https://hearthandvine.com/Course DessertPrep Time 10 minutes minutesCook Time 20 minutes minutesServings 16 2″x2″ browniesCalories 132kcalIngredients1/2 C Flour1/2 tsp salt1/2 C unsweetened cocoa powder1/2 tsp baking powder1/2 C butter at room temperature1 C light brown sugar1 tsp ground cinnimon1 tsp vanilla extract1/2 tsp Almond extract (optional)2 eggs Large or Jumbo1/2 C Reese's Pieces or chopped nuts (optional)InstructionsPreheat oven to 350FCut parchment paper to fit the bottom of a 9-inch spring-form pan and spray the sides with a non-stick spray such as Baker's Joy with flour.Mix dry ingredients in a bowlIn a separate bowl, cream the butter and brown sugar until fluffyAdd eggs to butter/sugar mixture one at a time and mix until blendedAdd vanilla and almond extract, continuing to mix until blended. Don't over-do the almond extract! It can be overwhelming, but a small amount adds a nice undertone.Add half the dry ingredients to the butter/sugar/egg mixture and blend until combined, then add the second half and continue until well-mixedFinally, add the Reese's pieces (or nuts, if using…) and blend on low speedPlace the batter in the prepared baking pan and cook for twenty minutes. A toothpick should come out clean when the brownies are done.Cool for about ten minutes before removing from the panNotesOf course, it’s more conventional to fix these in an 8×8 baking pan, in which case you can either omit the parchment paper or, instead, line the pan with parchment paper, making for easier clean-up. If you line the pan, you can just lift the brownies out of the pan before cutting them. Here’s a video on how to line a baking pan with parchment paper. PrintPeanut Butter FrostingJust enough frosting to separate the layers of the browniesCourse DessertPrep Time 10 minutes minutesCook Time 6 hours hours 10 minutes minutesCalories 104kcalIngredients1/2 C Creamy peanut butter1/4 C Butter at room temperature1 C Confectioner's sugar1.5 tbsp milk. Amount is "more or less" depending on consistency you need. 1 tsp Vanilla extract (optional) Instructionsbeat peanut butter and butter in bowl until well-combined. It's important that the butter be at room temperature.Blend in the sugar, a quarter cup at a time, until well mixedBlend in the vanilla extract, if using.Add the milk, 1/2 tbsp at a time, until the frosting is spreadable. Don't add too much, since you don't want the frosting oozing out between the layers. NotesThis is more or less a standard recipe for butter cream frosting, but with peanut butter replacing some of the butter. PrintThird Layer–Peanut Butter BrowniesCourse DessertPrep Time 10 minutes minutesCook Time 30 minutes minutesServings 16 2″ x 2″ browniesCalories 117kcalIngredients1/2 C creamy peanut butter1/3 C butter, at room temperature2/3 C granulated sugar1/2 C light brown sugar2 eggs Large or Jumbo1 tsp vanilla extract1 C flour1 tsp baking powder1/4 tsp salt1/2 C Mini M&Ms (optional)InstructionsPreheat oven to 350FCut parchment paper to fit the bottom of a 9-inch, spring-form pan. Spray the sides and bottom of the pan, the put the parchment paper inside. Spraying the bottom helps the parchment paper adhere to the pan. Mix the dry ingredients in a bowlIn a separate bowl, cream together the butter and peanut butterAdd the eggs one at a time, mixing thoroughly after each additionAdd the sugars in 3-4 increments, mixing thoroughly after each addtion.Add half the flour mixture and mix at medium to low speedAdd the remaining flour mixture and continue mixingAdd the M&MsPlace in prepared pan and bake for 30-35 minutes. A toothpick will come out clean when the brownies are done.Let cool at least ten minutes before removing from panNotesOf course, you can make these in a conventional 8×8 baking pan, in which case you can either omit the parchment paper or use it to line the entire pan. See the above brownie recipe for comments. PrintChocolate GanacheThis is so easy to make and tastes so good! Course DessertPrep Time 5 minutes minutesCook Time 20 minutes minutesIngredients130 g chocolate chips (about 1 1/3 C)1 C heavy whipping creamInstructionsMeasure out chips into small mixing bowlHeat the cream in a sauce pan until it just starts to simmer–bubbles should be just beginning to form at the edges of the pan.Pour the cream over the chips. DO NOT STIR YET. If needed, you can shake the bowl to be sure the cream covers all the chips.Cover the bowl with a plate and WAIT FIVE MINUTES. Time how long you wait. Too long or too short and the ganache will fail.After five minutes, remove the plate and, starting in the middle, beging stirring the cream and chips mixture. At first it will be a kind of thin, milk chocolate, but it quickly begins to assume a darker color and a thicker texture. Continue mixing until there are no light swirls left.WAIT ANOTHER FIFTEEN MINUTES before using. It takes a bit for it to thicken up. Fifteen minutes is just right for the desert in this blog. Waiting longer gives a thicker ganache, which would be fine for this dessert, too, but waiting thirty minutes or longer might make it harder to get a glossy shine to the finished product. NotesThis recipe is from Natasha’s Kitchen, where you can find more notes and uses for your ganache.The Presentation PrintFour Layer BrowniesAssembling the layersCourse DessertCook Time 20 minutes minutesEquipment1 Adjustable cake ring mold, with collar and acetate sheetIngredients1 Brown sugar brownies, cooled1 small bowl Peanut butter frosting1 Peanut butter brownies, cooled1 bowl Chocolate Ganache (prepared during this step)Flake salt for garnish (optional)InstructionsDon't fix the chocolate ganache until you've done the first seven steps.Place the brown sugar brownies on a ten-inch, round cake board or on a round serving platter.Frost the top only of the brownies, leaving about a quarter inch at the edge unfrosted.Center the peanut butter brownies on top of the frosted brown sugar brownies layer.Adjust your cake mold so it's about 8.5" in diameter. You're going to use the mold to cut through the two brownie layers and trim off the edges where the heat from the pan has browned them. This will expose the cake-like brownie underneath.Center the mold on top of the brownies. Be sure it's centered! Gently press down, cutting through the brownie layers. If the edge of the brownies are too crisp to cut through, adjust your mold's diameter. You can also use a paring knife to help make the cut. You want to cleanly cut through the browies without collapsing them, so slow and gentle is the way to go. Discard the edge browned edge portions that you just cut off–or save them. They make delicious toppings for ice cream!Now you're ready to make the ganache. …ten minutes later…OK, you're ganache is now mixed and resting for fifteen minutes, so go back to the brownies. Expand the mold and lift it off the layers. You'll see the two brownie layers nicely displayed. We're going to want to preserve that for the presentation, so the next step is to trim a sheet of acetate so it will wrap around the brownie layers with an inch or two of overlap.Put the trimmed lucite inside the expanded mold and slip both over the brownie layers. Once in place, tighten the mold back up. The acetate won't stick to the layers, but it will keep the ganache from leaking and covering up the layers that we just exposed.You've probably still got ten minutes of wait time on the ganache at this point, so have a cup of coffee. In any case, once the ganache is sufficiently set up. pour it on top of the peanut butter brownie layer. If needed, smooth it out with a spatula.Now place the whole assembly in the refrigerator for at least thirty minutes–an hour is better. You want the ganache to set up, so when you remove the mold, it doesn't drip down the sides.I sprinkled flake salt on the ganache at this point. It gives it a nice look, and the extra salt adds some flavor. I suppose you could dust if with coconut flakes, too, if you like those dreadful things. The taste and texture of coconut makes me gag.…thirty minutes later…Expand the mold and lift it off the serving platter, then peal the acetate away from the brownies and ganache. If you've waited long enough, the ganache will have a nice edge and consitute a visible top layer to your desert.NotesThis is the process that produced the dessert in the picture. You can see the Reese’s Pieces and M&Ms showing in the layers. I liked the idea of putting peanut butter flavor in the brownie layer and chocolate in the peanut butter layer, but didn’t like the way the candies got exposed–I thought it detracted from the overall effect.In retrospect, I think I might have used peanuts instead of candy in the brownie layer and chocolate chips in the peanut butter layer for a better visual effect.
 The post Four Layer Brownies first appeared on Max Griffin.
April 21, 2024
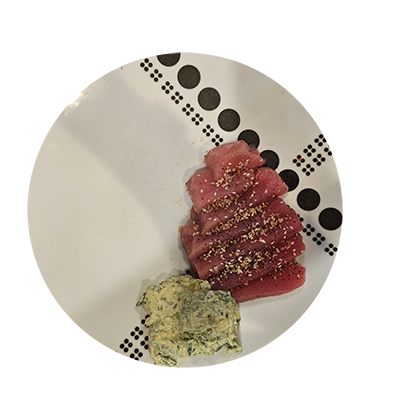
Tuna Sashimi with cilantro lime dip
I love sushi and sashimi and have the good fortune to have sushi-grade tuna available, even in Oklahoma. I get it shipped to me monthly, along with other seafood, frozen and packed in dry ice, from Sizzlefish at a reasonable price. My shipment also includes red snapper, salmon, scallops and, when available, Chilean sea bass. It’s all sustainably caught and flash-frozen before shipping, preserving freshness.
Most often, I pan-fry the fish, using a bit of avocado oil in my AnolonX cookware, which minimzes the oil needed and does an awesome job, but sometimes I use other methods. I even baked the sea bass last night, using a sweet cilantro, lime, and soy sauce that turned out really well.
I also use the sushi-grade tuna for my own version of ceviche, which involves “cooking” the tuna in lime juice for a few hours, and then mixing it with shrimp, avocado, cilantro, and diced mango, celery, cucumber, and poblano peppers.
I posted the cevice recipe earlier, so tonight I’m going to post sashimi tuna (no cooking) with a creamy lime cilantro dipping sauce. I served this with steamed brocollini, and it was quite tasty. This recipe makes a lot of sauce–the picture is about a third of the sauce. Mr. Gene used the remainder as a dip for corn chips, kind of like a fusion of Asian and Mexican guacamole. About half the listed calories are from the tuna, so you can adjust according to how much dip you use.
There are some tools that are helpful, even with a recipe this simple.
Garlic press. This one is awesome, but so is this microplane mincer/slicer.Ginger mincer. The one I use is no longer available, but this zester works, too.Herb scissorsPrep bowls. Alas, the ones I use are no longer available.Juicer (This is a hand juicer. If I’m juicing several lemons or limes, for example when making cevice, I use a juicing attachment for my mixer.)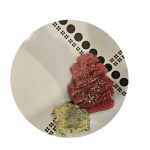 PrintSashimi Tuna with Lime Cilantro SauceCalories 397kcalEquipment1 Garlic press or microplane mincer1 Ginger mincer1 Herb scissors1 Zester for lime1 JuicerIngredients1 4 oz sushi-grade tuna steak1 TBSP Lime Zest2 TBSP Lime juice. One large or two small limes.4 TBSP Lite sour cream (Daisy brand)2 TBSP chopped cilantro1 TBSP Diced red onion1 clove garlic clove, minced1 TSP minced fresh gingerSalt 1/4 tsp to tastePepper 1/4 tsp to taste2 oz avocado (about 1/2 small avocado) (optional)1 packet Splenda (optional) (or 1 tsp sugar)Sesame seeds (optional)InstructionsSeason the tuna with salt and pepper. I use smoked salt and smoked pepper for extra flavorSlice the tuna against the grain into thin strips, about a quarter inch thickMeasure out the sour cream in a small prep bowlZest the lime and add zest to the prep bowl.Cut the lime in half and extract the juice. It helps to roll the lime on the counter with the palm of your hand. You might need two limes to obtain 2TBSP of juice. I've seen TV chefs just squeeze lemons and limes with their fists to extract juice, but this never works for me. I have a simple, plastic juicer that does a great job of extracting all the juice. Mash about 1/2 small avocado into prep bowl (if using)Put the diced onion and minced garlic and ginger into the prep bowlPut the chopped cilantro into the prep bowlLightly season with salt and pepper to taste. I don't measure, but instead use a few twists of my salt and pepper mill. Add sweetener if using.Mix the ingredients together and let sit for at least five minutes. If you prepare ahead of time, store covered in the refrigerator for up to four days. Dust with sesame seeds (optional) I used "tuxedo" seeds, a mix of regular and black sesame seeds. Recipe-Calorie-and-Nutrition-Calculator-1
The post Tuna Sashimi with cilantro lime dip first appeared on Max Griffin.
December 13, 2023
What’s For Dinner–12/12/2023
Today’s recipe is the fruit salad I mentioned in yesterday’s post. With my new Cuisinart food processor that dices stuff, it’s really easy. We’ve had a variation on this every night for the last month, ever since I got the dicing gizmo.
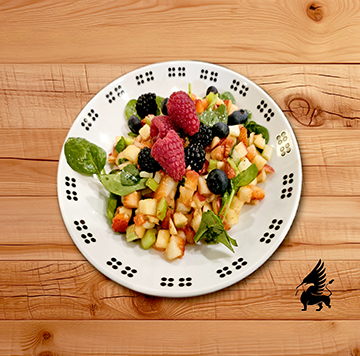
We almost always make this with diced apples, strawberries, and celery. When I have left-over papaya, as I do when I make the civiche in yesterday’s post, I add papaya to this salad and cut back on the strawberries. Baby spinach or arugula adds greens to the salad. If I have some, I’ll julienne some mint to put in, too. I usually top it with an assortment of berries and–sometimes–feta.
In addition to subsituting papaya for strawberries, you could substitute a pear for the apple, or fresh fennel for the celery. During the summer when the garden produces copious amounts of cucumbers and tomatoes, we make a variation of this salad with those instead of apples and strawberries.
I also make a low-calorie dressing for this salad. I use a tiny bit of olive oil in it, but add a dash of xanthan gum to thicken it. I use stone ground Boetje’s mustard made in Rock Island, Illinois. I grew up with this awesome mustard–I despise the yellow glop people slather on hamburgers. I was delighted to find it on Amazon.
You can probably find xanthan gum at your grocery store, but it’s on Amazon, too. I bought my Red Mill bag of the stuff five years ago, and still have half of it left–you only use tiny amounts at a time.
A hand immersion blender is a really handy tool to have, especially for making sauces and dressings. Indeed, it’s almost essential for things like vichysoisse or bisque.
Finally, you need a grinder for the spices. I have a mortar and pestel, but it just doesn’t grind them fine enough, so I finally broke down and bought one that works…adequately.
I’ll do the salad recipe first, then the dressing.
 PrintFruit SaladCourse SaladPrep Time 15 minutes minutesServings 2 peopleIngredients1 apple, cored and diced6-10 strawberries, diced2 stalks celery, diced1 c Baby spinach1 tbsp Dressing (see below)1/8 C Splenda3 Raspberries3 Blackberries6 BlueberriesInstructionsDice the apple, strawberries,, and celery to 1/4 inch cubes and place in a bowlAdd splenda to taste to the bowl and toss to mixShred the spinach and add it to the bowladd about 1 TBSP of the dressing to the bowl. Don't over do it. A little dressing goes a long way.Toss again until well mixed and the dressing coats the ingredients. The xanthan gum helps the dressing cling to the salad, especially after the dressing has chilled in the refrigerator.Plate the salad on salad plates or bowls, and dress with the berries.NotesNutrition information is for the salad only and does NOT include the dressing.salad PrintDressingLow-cal, low-fat dressing for fruit saladCourse SaladPrep Time 10 minutes minutesServings 8 salads…approximatelyEquipmentA hand infuser or blender is helpfulIngredients2 tbsp white wine (I use Riesling)2 tbsp Juice and zest of one lemon1 tbsp Brandy (I used E&J VS)1 tbsp Balsamic Vinegar (I use a pear-infused Balsamic)1 tbsp stone-ground mustard1 tbsp olive oil (I used a garlic-infused oil)1/4 tsp xanthan gum1 tbsp ground fennel seeds1 tbsp ground anise seeds1/8 C Splenda (or 2 TBSP honey, but I wanted low calorie)InstructionsAdd all the ingredients except the xanthan gum and Splenda to the cup that came with your immerision blender (or to your blender).If using an immersion blender, have it ready. Sprinkle the splenda on top of the liquid, then the xanthan gum. Immediately use the immersion blender to mix the ingredients, moving it up and down so the ingredients circulate.The reason for "immediately" is because the xanthan gum tends to clump if you let it sit, and then won't mix. Remember, a little bit goes a long way! Too much, and you'll wind up with Jello-like consistency instead of dressing. Ordinarily, this volume of salad dressing would be half oil and have three times the calories.NotesNutrition information is for approximately 1 TBSP of the dressing. Half the calories are from the olive oil. dressing
The post What’s For Dinner–12/12/2023 first appeared on Max Griffin.
December 12, 2023
Cevice–What’s For Dinner–12/11/2023
It’s been a while since I posted a recipe. Since June, I’ve been paying attention to calories other aspects of nutrition, so my relationships with food and kitchen experiments have been…well…different. Tonight’s an example. I had seafood civiche and a fruit salad for dinner tonight. Turns out that’s a lot of fruit and and very vew calories, so yay for my diet. I’ll post the civiche recipe here, and the fruit salad another day.
 Tuna and Shrimp Civiche
No one is ever interested in the details of another person’s diet, and at best only marginally interested in the results. Still, I’m pleased to report that I’ve lost 45 pounds since June. My goal is to lose about ten to fifteen more, and then I’ll be at the weight I was when I was 40 and in the best shape of my life.
On to more interesting topics. Of course, I’m all about kitchen gizmos. About a month ago, I bough a new Cuisinart food processor that has an attachment that dices fruit and vegetables. At least, that was the claim, and I was willing to try it out. My knife skills in the kitchen usually involve cut fingers, despite wearing kevlar gloves, so I was willing to try anything to stop the flow of blood.
It turns out that the claim it dices vegetables is right! The thing is amazing. Put celery, apple quarters, strawberries, cucumbers, carrots, whatever into the chute, and out comes litttle quarter-inch cubes in the bowl. I works like a magic. There’s almost no food caught in the blade or the machine, and what little there is you can readily recover. Clean-up is easy, too.
The other gizmo I’ve been using lately is a masticating juicer. It’s an after-market add-on designed to use with a KitchenAide stand mixer. As with the Cuisinart, you shove the fruit into the juicer, turn on the mixer, and out squirts juice. The juicer extrudes the pulp in a separate, snake-like stream. As before, the clean-up isn’t bad either. There’s one piece–a wire mesh–that I soak in dishwashing detergent for a couple minutes before scrubbing it, and comes clean.
I’ve used the Cuisinart every night since I bought it, and the juicer two or three times a week. I’ve posted Amazon links below.
Juicer. (Alas, the particular one I own is no longer available. Any similar one that “masticates” would probably work equally well.)Food processor with dicing and spiralizing attachments. Both work well. Variations on Civiche recipeThere are almost infinite variations to the basic concept, which is seafood “cooked” in a citrus bath and then combined with a combination of diced fruits and vegetables.
If using raw seafood, it’s important that the it be fresh–you don’t cook it in a conventional fashion. You soak it in lime juice instead of applying heat to cook it. The acetic juice “cooks” the seafood, killing any residual bacteria. Tuna changes from bright pink to almost white after ten minutes soaking in the lime juice, so you can see it happening.
I already mentioned I used already-cooked shrimp. I still soaked it in lime juice, since the citrus flavor is a major part of the flavor combination. I imagine you could do the same with already cooked crab or lobster. Instead of tuna, almost any seafood would work. I’ve used red snapper, for example, and Chilean sea bass.
I got my tuna from Sizzlefish. Their seafood is flash frozen within a couple of days of being caught and filleted, and they deliver it to you packed in dry ice. If you live in Oklahoma, it’s as close to fresh seafood as you can get. Of course, I thawed it out overnight in my refrigerator first.
The recipe below calls for tropical fruit–mangos and papaya–but I’ve seen recipes that use fennel and apples instead. Sounds yummy, but I’ve not tried it. I have subsituted cucumber when I couldn’t get papaya.
Finally, you could use a combination of different citrus juices to “cook” the seafood. Lemon juice would add some tang, and orange juice some sweetness, for example. You could even substitute vinegar, but not apple juice because it’s not acetic. I added a touch of Mirin a couple of weeks ago, and it was okay, but not enough to notice.
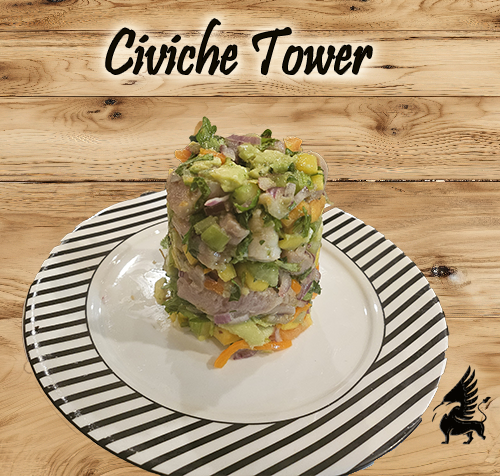
While I divide this in half and use it as two main courses, you could divide it in fourths and use it as an appetizer. A local restaurant does something similar, and forms the civiche into a cylindrical stack using a mold. If you refrigerator it for a couple of hours and drain the juice before adding the avocado, it’s solid enough to keep the shape. I tried this, stuffing the civiche into a plastic juice glass, putting a salad plate on top, then inverted it. It worked! A great presentation for .your civiche. Of course, it fell apart as soon as I started to eat it.
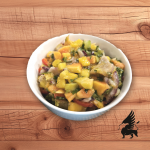 PrintTuna and Shrimp CivicheVariation on the Peruvian classicCourse Main CourseCuisine PeruvianPrep Time 30 minutes minutesCook Time 10 minutes minutesMarinating time 15 minutes minutesServings 2 peopleIngredients2-4 limes–enough for one cup of juice. It migh take as many as four small limes4 oz Sushi-grade tuna4 oz shrimp1 TSP sea salt1 Mango, diced1/2 Papaya, diced2 stalks celery, diced1 Sweet Pepper, or 6 small, sweet mini-peppers1/2 Red onion, diced1 Avocado1 Cup Chopped cilantro, or more to tasteInstructionsZest one of the limes, then juice both limes. You need at least a cup of lime juice, so if your limes are small, it might take three or even four.Put the lime juice in a non-reactive bowl. The bowl needs to be deep enough to completely submerge the seafood.Slice the tuna into thin strips, cutting against the grain. Cut the strips to about one inch in length. Salt liberally, then place into the bowl with the lime juice.If the shrimps aren't already pealed, peal them and remove the tails. Cut the shrimp into bite-sized chunks and place them into the lime juice with the tuna.Cover the bowl with plasic wrap and refrigerate for a minimum of fifteen minutes and for as long as four hours. The acetic lime juice "cooks" the fish, and the pink salmon will turn white. It's important that the lime juice completely cover the uncooked seafood, since this is what killed any residual bacteria and cooks the fish.While the seafood marinates, chop the celery. Peal the papaya and the mango, and then chop the fruit into quarter-inch dice. Dice the peppers, onion, and celery. Chop the cilantro. I like lots of cilantro; you might want more or less. Once the seafood has marinated for fifteen minutes, add the diced fruit and vegetables to the lime juice marinade. Stir to mix well, again being sure that the seafood is submerged. After another fifteen minutes, peal and dice the avocado. Gently toss it with the seafood mixture. Serve in a small bowl. Garnish with extra cilantro or parsley.NotesThis recipe easily makes enough for two people, but the nutrition information below is for the entire preparation. Divide the nutrition information according to how you apportion this.Civiche
The post Cevice–What’s For Dinner–12/11/2023 first appeared on Max Griffin.
What’s For Dinner–12/11/2023
It’s been a while since I posted a recipe. Since June, I’ve been paying attention to calories other aspects of nutrition, so my relationships with food and kitchen experiments have been…well…different. Tonight’s an example. I had seafood civiche and a fruit salad for dinner tonight. Turns out that’s a lot of fruit and and very vew calories, so yay for my diet. I’ll post the civiche recipe here, and the fruit salad another day.
 Tuna and Shrimp Civiche
No one is ever interested in the details of another person’s diet, and at best only marginally interested in the results. Still, I’m pleased to report that I’ve lost 45 pounds since June. My goal is to lose about ten to fifteen more, and then I’ll be at the weight I was when I was 40 and in the best shape of my life.
On to more interesting topics. Of course, I’m all about kitchen gizmos. About a month ago, I bough a new Cuisinart food processor that has an attachment that dices fruit and vegetables. At least, that was the claim, and I was willing to try it out. My knife skills in the kitchen usually involve cut fingers, despite wearing kevlar gloves, so I was willing to try anything to stop the flow of blood.
It turns out that the claim it dices vegetables is right! The thing is amazing. Put celery, apple quarters, strawberries, cucumbers, carrots, whatever into the chute, and out comes litttle quarter-inch cubes in the bowl. I works like a magic. There’s almost no food caught in the blade or the machine, and what little there is you can readily recover. Clean-up is easy, too.
The other gizmo I’ve been using lately is a masticating juicer. It’s an after-market add-on designed to use with a KitchenAide stand mixer. As with the Cuisinart, you shove the fruit into the juicer, turn on the mixer, and out squirts juice. The juicer extrudes the pulp in a separate, snake-like stream. As before, the clean-up isn’t bad either. There’s one piece–a wire mesh–that I soak in dishwashing detergent for a couple minutes before scrubbing it, and comes clean.
I’ve used the Cuisinart every night since I bought it, and the juicer two or three times a week. I’ve posted Amazon links below.
Variations on Civiche recipeThere are almost infinite variations to the basic concept, which is seafood “cooked” in a citrus bath and then combined with a combination of diced fruits and vegetables.
If using raw seafood, it’s important that the it be fresh–you don’t cook it in a conventional fashion. You soak it in lime juice instead of applying heat to cook it. The acetic juice “cooks” the seafood, killing any residual bacteria. Tuna changes from bright pink to almost white after ten minutes soaking in the lime juice, so you can see it happening.
I already mentioned I used already-cooked shrimp. I still soaked it in lime juice, since the citrus flavor is a major part of the flavor combination. I imagine you could do the same with already cooked crab or lobster. Instead of tuna, almost any seafood would work. I’ve used red snapper, for example, and Chilean sea bass.
I got my tuna from Sizzlefish. Their seafood is flash frozen within a couple of days of being caught and filleted, and they deliver it to you packed in dry ice. If you live in Oklahoma, it’s as close to fresh seafood as you can get. Of course, I thawed it out overnight in my refrigerator first.
The recipe below calls for tropical fruit–mangos and papaya–but I’ve seen recipes that use fennel and apples instead. Sounds yummy, but I’ve not tried it. I have subsituted cucumber when I couldn’t get papaya.
Finally, you could use a combination of different citrus juices to “cook” the seafood. Lemon juice would add some tang, and orange juice some sweetness, for example. You could even substitute vinegar, but not apple juice because it’s not acetic. I added a touch of Mirin a couple of weeks ago, and it was okay, but not enough to notice.
While I divide this in half and use it as two main courses, you could divide it in fourths and use it as an appetizer. A local restaurant does something similar, and forms the civiche into a cylindrical stack using a mold. If you refrigerator it for a couple of hours and drain the juice before adding the avocado, it should be solid enough to keep the shape. I’ll try this soon and update this blog on the results. You can certainly keep this overnight in the refrigerator.
PrintTuna and Shrimp CivicheVariation on the Peruvian classicCourse Main CourseCuisine PeruvianPrep Time 30 minutes minutesCook Time 10 minutes minutesMarinating time 15 minutes minutesServings 2 peopleIngredients2-4 limes–enough for one cup of juice. It migh take as many as four small limes4 oz Sushi-grade tuna4 oz shrimp1 TSP sea salt1 Mango, diced1/2 Papaya, diced2 stalks celery, diced1 Sweet Pepper, or 6 small, sweet mini-peppers1/2 Red onion, diced1 Avocado1 Cup Chopped cilantro, or more to tasteInstructionsZest one of the limes, then juice both limes. You need at least a cup of lime juice, so if your limes are small, it might take three or even four.Put the lime juice in a non-reactive bowl. The bowl needs to be deep enough to completely submerge the seafood.Slice the tuna into thin strips, cutting against the grain. Cut the strips to about one inch in length. Salt liberally, then place into the bowl with the lime juice.If the shrimps aren't already pealed, peal them and remove the tails. Cut the shrimp into bite-sized chunks and place them into the lime juice with the tuna.Cover the bowl with plasic wrap and refrigerate for a minimum of fifteen minutes and for as long as four hours. The acetic lime juice "cooks" the fish, and the pink salmon will turn white. It's important that the lime juice completely cover the uncooked seafood, since this is what killed any residual bacteria and cooks the fish.While the seafood marinates, chop the celery. Peal the papaya and the mango, and then chop the fruit into quarter-inch dice. Dice the peppers, onion, and celery. Chop the cilantro. I like lots of cilantro; you might want more or less. Once the seafood has marinated for fifteen minutes, add the diced fruit and vegetables to the lime juice marinade. Stir to mix well, again being sure that the seafood is submerged. After another fifteen minutes, peal and dice the avocado. Gently toss it with the seafood mixture. Serve in a small bowl. Garnish with extra cilantro or parsley.NotesThis recipe easily makes enough for two people, but the nutrition information below is for the entire preparation. Divide the nutrition information according to how you apportion this.CivicheThe post What’s For Dinner–12/11/2023 first appeared on Max Griffin.


