
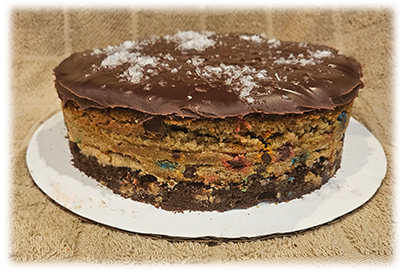
Four Layer Brownies
Well, only two layers are brownies. One layer is frosting and another is ganache, so that gets you to four layers. But that means there are four recipes to make this dessert.
This is also an unconventional presentation of brownies: they are baked in a round, spring-form pan instead of a square one. The inspiration for this is a layered cake where each layer is exposed and visible, and often one layer is a mousse. This entails using some special equipment.
As a consequence, this post is divided into sections.
Remarks and HintsThe EquipmentThe RecipesBrown Sugar BrowniesPeanut Butter FrostingPeanut Butter BrowniesChocolate ganacheThe PresentationRemarks and HintsI’ll start with a few hints.
First, the recipes call for room temperature butter. This means you need to pull the butter from the refrigerator and let it sit on the counter for at least an hour before using it. It does not mean “nuke it in the microwave. ” The microwave will turn the outside to soup and the inside will still be hard. The butter should soft when a finger pressed into leaves an indentation.
The reason room temperature butter is important is because when you whip it with the sugars, you are not only making batter, but you are adding air to the result as well. This makes for lighter cakes and brownies that rise better.
Don’t use melted butter unless the recipe specifically calls for it. Melted butter won’t hold the air, nor will hard-as-a-rock butter fresh from the refrigerator.
Speaking of adding air, that’s why you should also sift your powdered ingredients. Sifting the dry ingredients not only mixes them but adds volume, i.e., air, usually about 20% more volume. Again, the result is lighter cakes and brownies that rise better.
If you don’t have a sifter–I didn’t have one for ages–you probably do have a whisk. If you do, use it to mix the dry ingredients. It’s not as good as sifting them, but it’s better than just stirring with a mixing spoon.
Adding air is one reason why you add eggs one at a time to the batter. Not deflating the air is also why you add the dry ingredients in batches instead of all of all at once.
The original idea was to produce brownies where one layer was a conventional brownie and another was like a brownie, but made with peanut butter instead of chocolate. So, layers made me think of layer cakes, which made me think of presentation. That led to this amazing cake on Lindsay’s website.I hope I to make this cake eventually. Maybe even next week.
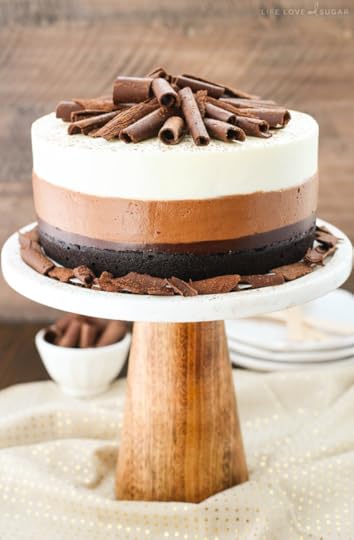
Anyway, I wondered how she did that, and that led me to discover cake molds and acetate. So I bought a kit and tried it out with a the brown sugar brownies on this page and a recipe for peanut butter mousse I’d found online. It worked pretty well, except that the mousse wasn’t especially stable and didn’t hold up well after removing the layered result from the refrigerator, but the tools were exactly what I needed for this dessert.
That segues to the equipment…
The EquipmentI used spring-form pans to make the brownie layers. I suppose you could use conventional cake pans, but spring-form pans make it much easier to extract the cake layer from the pan.
For the presentation, though, you need some specialized tools. In particular, you need an expandable cake mold and acetate sheets. I bought the kit pictured below from Amazon.
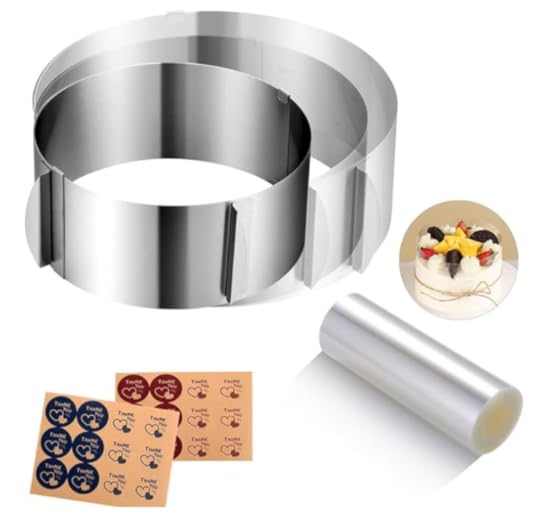
The two main elements are the mold, which is adjustable from six to twelve inches, and the acetate roll which you place between the mold and the cake layers. This one was only $14 and worked really well. There’s enough acetate in the kit to make at least a dozen cakes.
As I mentioned in the hints above, I now own a sifter. I bought this one from Amazon. I confess, though, I still usually just whisk the dry ingredients, especially when I’m making Mr. Gene’s cookies.
The Recipes PrintBottom layer: Brown Sugar BrowniesA chewy recipe based on Patti's at https://hearthandvine.com/Course DessertPrep Time 10 minutes minutesCook Time 20 minutes minutesServings 16 2″x2″ browniesCalories 132kcalIngredients1/2 C Flour1/2 tsp salt1/2 C unsweetened cocoa powder1/2 tsp baking powder1/2 C butter at room temperature1 C light brown sugar1 tsp ground cinnimon1 tsp vanilla extract1/2 tsp Almond extract (optional)2 eggs Large or Jumbo1/2 C Reese's Pieces or chopped nuts (optional)InstructionsPreheat oven to 350FCut parchment paper to fit the bottom of a 9-inch spring-form pan and spray the sides with a non-stick spray such as Baker's Joy with flour.Mix dry ingredients in a bowlIn a separate bowl, cream the butter and brown sugar until fluffyAdd eggs to butter/sugar mixture one at a time and mix until blendedAdd vanilla and almond extract, continuing to mix until blended. Don't over-do the almond extract! It can be overwhelming, but a small amount adds a nice undertone.Add half the dry ingredients to the butter/sugar/egg mixture and blend until combined, then add the second half and continue until well-mixedFinally, add the Reese's pieces (or nuts, if using…) and blend on low speedPlace the batter in the prepared baking pan and cook for twenty minutes. A toothpick should come out clean when the brownies are done.Cool for about ten minutes before removing from the panNotesOf course, it’s more conventional to fix these in an 8×8 baking pan, in which case you can either omit the parchment paper or, instead, line the pan with parchment paper, making for easier clean-up. If you line the pan, you can just lift the brownies out of the pan before cutting them. Here’s a video on how to line a baking pan with parchment paper. PrintPeanut Butter FrostingJust enough frosting to separate the layers of the browniesCourse DessertPrep Time 10 minutes minutesCook Time 6 hours hours 10 minutes minutesCalories 104kcalIngredients1/2 C Creamy peanut butter1/4 C Butter at room temperature1 C Confectioner's sugar1.5 tbsp milk. Amount is "more or less" depending on consistency you need. 1 tsp Vanilla extract (optional) Instructionsbeat peanut butter and butter in bowl until well-combined. It's important that the butter be at room temperature.Blend in the sugar, a quarter cup at a time, until well mixedBlend in the vanilla extract, if using.Add the milk, 1/2 tbsp at a time, until the frosting is spreadable. Don't add too much, since you don't want the frosting oozing out between the layers. NotesThis is more or less a standard recipe for butter cream frosting, but with peanut butter replacing some of the butter. PrintThird Layer–Peanut Butter BrowniesCourse DessertPrep Time 10 minutes minutesCook Time 30 minutes minutesServings 16 2″ x 2″ browniesCalories 117kcalIngredients1/2 C creamy peanut butter1/3 C butter, at room temperature2/3 C granulated sugar1/2 C light brown sugar2 eggs Large or Jumbo1 tsp vanilla extract1 C flour1 tsp baking powder1/4 tsp salt1/2 C Mini M&Ms (optional)InstructionsPreheat oven to 350FCut parchment paper to fit the bottom of a 9-inch, spring-form pan. Spray the sides and bottom of the pan, the put the parchment paper inside. Spraying the bottom helps the parchment paper adhere to the pan. Mix the dry ingredients in a bowlIn a separate bowl, cream together the butter and peanut butterAdd the eggs one at a time, mixing thoroughly after each additionAdd the sugars in 3-4 increments, mixing thoroughly after each addtion.Add half the flour mixture and mix at medium to low speedAdd the remaining flour mixture and continue mixingAdd the M&MsPlace in prepared pan and bake for 30-35 minutes. A toothpick will come out clean when the brownies are done.Let cool at least ten minutes before removing from panNotesOf course, you can make these in a conventional 8×8 baking pan, in which case you can either omit the parchment paper or use it to line the entire pan. See the above brownie recipe for comments. PrintChocolate GanacheThis is so easy to make and tastes so good! Course DessertPrep Time 5 minutes minutesCook Time 20 minutes minutesIngredients130 g chocolate chips (about 1 1/3 C)1 C heavy whipping creamInstructionsMeasure out chips into small mixing bowlHeat the cream in a sauce pan until it just starts to simmer–bubbles should be just beginning to form at the edges of the pan.Pour the cream over the chips. DO NOT STIR YET. If needed, you can shake the bowl to be sure the cream covers all the chips.Cover the bowl with a plate and WAIT FIVE MINUTES. Time how long you wait. Too long or too short and the ganache will fail.After five minutes, remove the plate and, starting in the middle, beging stirring the cream and chips mixture. At first it will be a kind of thin, milk chocolate, but it quickly begins to assume a darker color and a thicker texture. Continue mixing until there are no light swirls left.WAIT ANOTHER FIFTEEN MINUTES before using. It takes a bit for it to thicken up. Fifteen minutes is just right for the desert in this blog. Waiting longer gives a thicker ganache, which would be fine for this dessert, too, but waiting thirty minutes or longer might make it harder to get a glossy shine to the finished product. NotesThis recipe is from Natasha’s Kitchen, where you can find more notes and uses for your ganache.The Presentation PrintFour Layer BrowniesAssembling the layersCourse DessertCook Time 20 minutes minutesEquipment1 Adjustable cake ring mold, with collar and acetate sheetIngredients1 Brown sugar brownies, cooled1 small bowl Peanut butter frosting1 Peanut butter brownies, cooled1 bowl Chocolate Ganache (prepared during this step)Flake salt for garnish (optional)InstructionsDon't fix the chocolate ganache until you've done the first seven steps.Place the brown sugar brownies on a ten-inch, round cake board or on a round serving platter.Frost the top only of the brownies, leaving about a quarter inch at the edge unfrosted.Center the peanut butter brownies on top of the frosted brown sugar brownies layer.Adjust your cake mold so it's about 8.5" in diameter. You're going to use the mold to cut through the two brownie layers and trim off the edges where the heat from the pan has browned them. This will expose the cake-like brownie underneath.Center the mold on top of the brownies. Be sure it's centered! Gently press down, cutting through the brownie layers. If the edge of the brownies are too crisp to cut through, adjust your mold's diameter. You can also use a paring knife to help make the cut. You want to cleanly cut through the browies without collapsing them, so slow and gentle is the way to go. Discard the edge browned edge portions that you just cut off–or save them. They make delicious toppings for ice cream!Now you're ready to make the ganache. …ten minutes later…OK, you're ganache is now mixed and resting for fifteen minutes, so go back to the brownies. Expand the mold and lift it off the layers. You'll see the two brownie layers nicely displayed. We're going to want to preserve that for the presentation, so the next step is to trim a sheet of acetate so it will wrap around the brownie layers with an inch or two of overlap.Put the trimmed lucite inside the expanded mold and slip both over the brownie layers. Once in place, tighten the mold back up. The acetate won't stick to the layers, but it will keep the ganache from leaking and covering up the layers that we just exposed.You've probably still got ten minutes of wait time on the ganache at this point, so have a cup of coffee. In any case, once the ganache is sufficiently set up. pour it on top of the peanut butter brownie layer. If needed, smooth it out with a spatula.Now place the whole assembly in the refrigerator for at least thirty minutes–an hour is better. You want the ganache to set up, so when you remove the mold, it doesn't drip down the sides.I sprinkled flake salt on the ganache at this point. It gives it a nice look, and the extra salt adds some flavor. I suppose you could dust if with coconut flakes, too, if you like those dreadful things. The taste and texture of coconut makes me gag.…thirty minutes later…Expand the mold and lift it off the serving platter, then peal the acetate away from the brownies and ganache. If you've waited long enough, the ganache will have a nice edge and consitute a visible top layer to your desert.NotesThis is the process that produced the dessert in the picture. You can see the Reese’s Pieces and M&Ms showing in the layers. I liked the idea of putting peanut butter flavor in the brownie layer and chocolate in the peanut butter layer, but didn’t like the way the candies got exposed–I thought it detracted from the overall effect.In retrospect, I think I might have used peanuts instead of candy in the brownie layer and chocolate chips in the peanut butter layer for a better visual effect.
 The post Four Layer Brownies first appeared on Max Griffin.


