
Emily Henderson's Blog, page 158
August 31, 2021
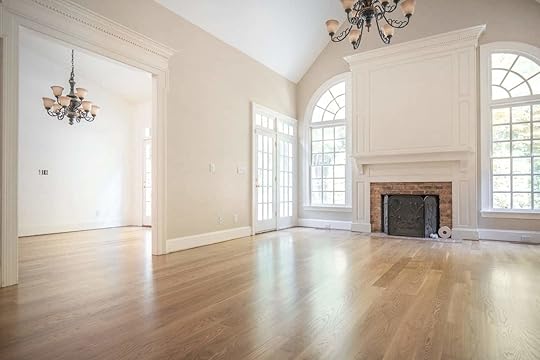
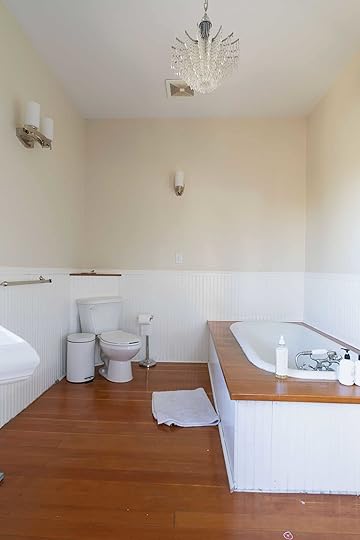
Malcolm’s Bathroom Reveal – The Power Of Pivoting, Intentional Design, And A DIY That Will Have You Digging Into Your Walls

When I was a kid, I ALWAYS felt pulled to check out the design of the restroom of whatever establishment my family happened to be visiting—from restaurants and coffee shops to hotels and stores. I adopted a mindset at a fairly young age that if a space had a thoughtfully designed bathroom, that the relevant establishment really had their sh** together. I understood—though subliminally at the time—that if someone displayed a significant amount of intentionality to what is [ironically] both a hugely personal and often-shared space, that props deserved to be given.
Things haven’t changed very much now that I’m in my 30s. The only difference now is that I’ve grown to understand these concepts a lot more deeply and mindfully, which makes me hyper-critical of the decisions I make when I’m designing a bathroom, and made designing my own bathroom both a thrilling and mildly nerve-wracking experience. I’m nothing if not a walking catch-22!
In my introductory post about this bathroom remodel, I talked about three main goals and very typical-for-me introspective thoughts surrounding the renovation: maintaining the character of the rest of the home, continuing to perpetuate therapeutic routines by way of the renovated space, and pivoting my renovation timeline to meet changing requirements (read: the immediate need to fix a leaky situation). However, this bathroom has become the culmination of several pretty significant pivots in my life that I wasn’t even fully aware of until this gem of a space was complete.
PIVOTING MINDSETS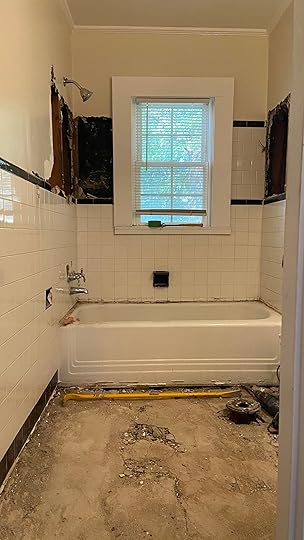
Making the decision to completely overhaul this bathroom wasn’t an easy one. While I was lucky enough to have the budget to handle it, I certainly wasn’t in the frame of mind to completely gut the space. However, a leak needed to be fixed, and ultimately, it made more sense to spend the money to make the room exactly what I wanted than it did to spend a slightly smaller amount of money to put a bandaid on the root problem.

The scope creep in this bathroom was REAL, y’all. What started out as a week-long project turned into a month-long extravaganza that ended up costing a lot more money than originally planned. My contractors had problems demolishing the existing tile (more on that later), my very detailed plan for the floor tiling was more than they bargained for (also more on that later), and my dedication to my design plan caused significant delays. However, this highlighted a fairly significant shift in my mindset. You see–I’m a NOTORIOUS people pleaser… To the extent that I usually sabotage my own equities to please other people. A past version of myself would have been passive about certain aspects of this renovation to avoid confrontation with the contractors (as silly as that sounds), but TODAY’S version of myself stood confidently in the design decisions that I planned. For that, I’m proud of myself (and not at all surprised that yet another renovation has highlighted a deeply introspective and positive shift in my character).

Additionally, this bathroom renovation was an exercise in iterative design and consistent conceptualization. I’m proud of the pre-planning that went into this space, but when things didn’t turn out quite as expected, I had to make quick decisions that felt right for the home. The challenge here? Making the bathroom feel both brand new and 90 years old at the exact same time. Why do I torture myself with these contradictions? Because it’s fun! *eye twitches*
MAINTAINING THE CHARACTER OF THE HOME AND PAYING RESPECT TO HISTORY
Toilet | Toilet Lever | Toilet Paper Holder | Bud Vase | Pedestal Sink

Bath Towel | Hand Towel | Towel Bar
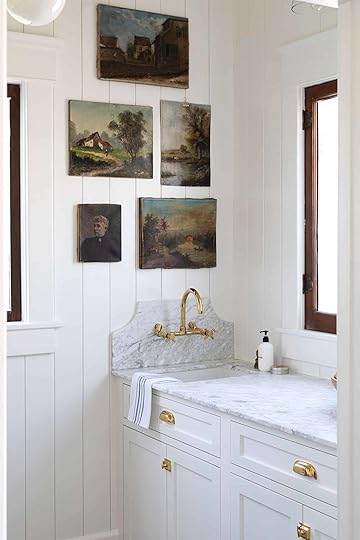
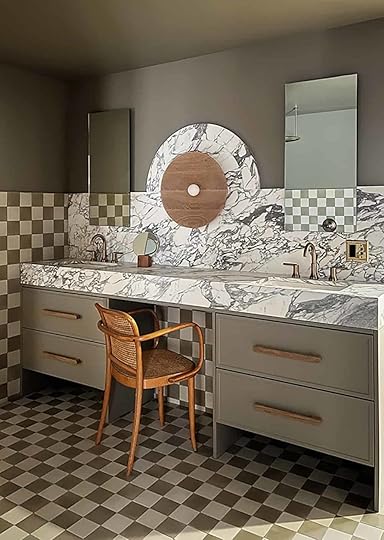
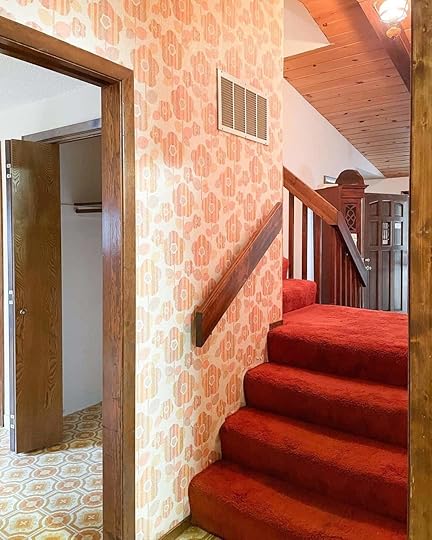
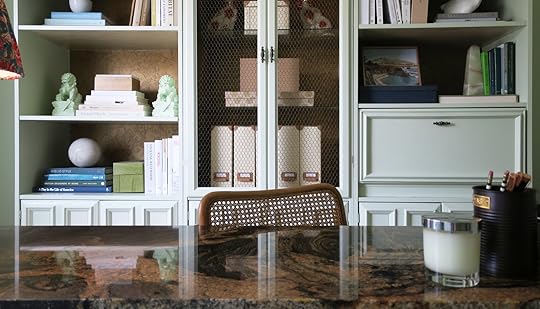
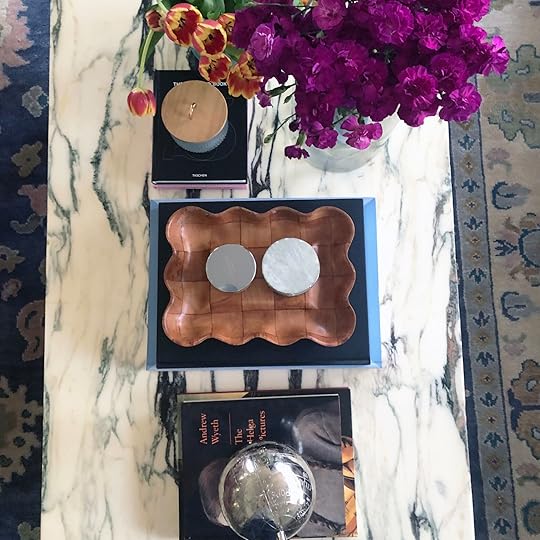
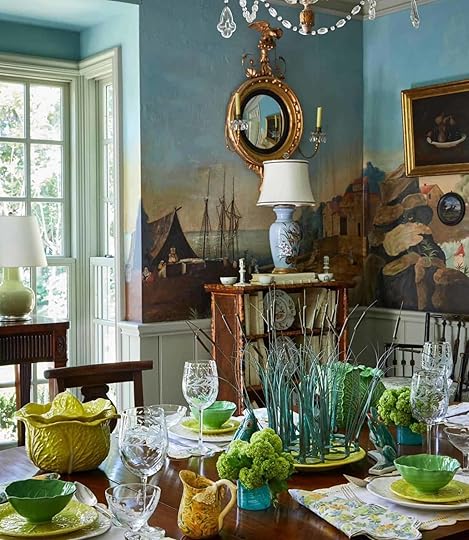
AND THAT BRINGS US TO THIS TILE THAT I LOVE SO MUCH.
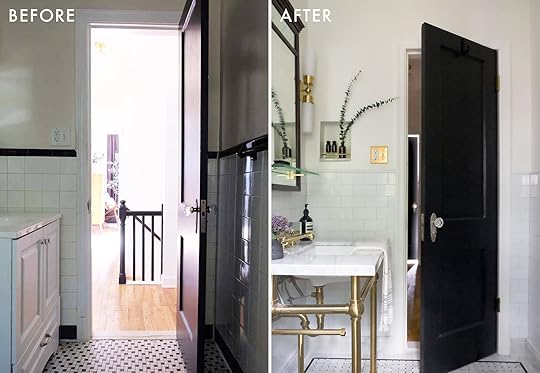
I’ve always loved the look of a custom marble floor, and I knew from the beginning that’s how I wanted to handle the tile in this bathroom (much to my contractor’s chagrin). There is something wildly authentic and genuine about a marble floor—particularly a marble floor with a custom pattern. It feels quintessentially traditional. Luxurious, yet approachable. Tailored in the most “me” way possible. From the beginning, I knew that I wanted to treat this floor in a way that felt both new and old… like it was freshly installed, but freshly installed in 1929, when this house was built. I’m proud to say that I think I’ve succeeded! I chatted with Emily about this tile plan pretty early in the process, and she agreed that there’s something super classic and timeless about a floor border! I used a basket weave tile for most of the floor, a black marble tile for the border, and a mini brick pattern for the outer edge.

Marble Baseboard | Subway Tile | Basket Weave Floor Tile | Mini Brick Floor Tile | Black Marble Border Tile
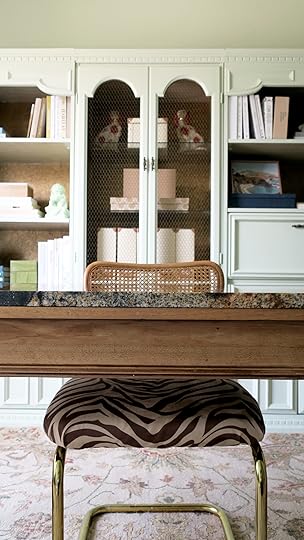
OK BUT GET INTO THIS MARBLE BASEBOARD AND PERFECT SUBWAY TILE MOMENT WITH ME, PLEASE. Ironically, the room is actually a bit smaller than it was previously! My contractor wasn’t able to remove all of the old tile from the walls, so we ended up having to install the new tile over the old tile. This was a tough decision to make, to be sure, but in hindsight, I actually like knowing that remnants of the old space still remain. As I mentioned in my introductory article about this remodel, I really did like the old tile, and there is something comforting about knowing that the original tile is now fossilized behind the new wall. Either that or I’m trying hard to come to grips with the fact that the bathroom is smaller than it was to begin with.

I turned to The Tile Shop to source all of the tile for this space, and I was immensely pleased with their wide selection (check me out on Instagram to see an in-depth video about my tile selection process–from a showroom walkthrough to tile unboxing)! All tile, grout, and caulking in this space are from The Tile Shop. A true one-stop-shop.

Despite the room being slightly smaller than it was before the remodel, I actually think that this beautiful pedestal sink from Kingston Brass makes the space feel larger! This vanity was actually the very first thing that I purchased after I closed on my home back in April 2020. Effectively, it became the lynchpin that held the design of the entire space together. The brass legs and marble top feel like they belong in the room, in this house, and in my life. Admittedly, the sink is a bit lower than I’d like it to be, but despite that, I love how the open space underneath makes the bathroom feel a bit more open and well-considered. I store all of my cleaning supplies and other rarely-used bathroom items in my hallway linen closet, so I’m not missing any vanity storage!

Faucet and Knobs | Under-Sink Plumbing Supply Kit | Hand Soap
I’ve used brass for all of the plumbing fixtures in this space–all of which are also from Kingston Brass! The classic nature of the polished brass really makes the space feel warm and luxe, and if you know me, you know I LOVE A BRASSY MOMENT (and that I use that catchphrase far too often). The vintage shape of the knobs, traditional form of the faucets, and classic typographic letterforms used on the fixtures all lend themselves perfectly to the age of the home and the perpetual vibe I strive for: classic, collected, and tailored. I carried the brass aesthetic into most of the accessories in the bathroom–including a switchplate, wall sconces, and a towel rod from Rejuvenation.

In the midst of planning how I’d style this bathroom, I had a random dream that I was living in early America. In this dream, I was living as a slave and trying to fight for my freedom. Frederick Douglass was a big part of that dream, for whatever cosmic reason. After I woke up, I was inspired to do a bit of research about Douglass. I learned that on top of escaping slavery and becoming a national leader in the abolitionist movement, he was the most photographed man of the 19th century. He wanted to ensure a humanizing and accurate portrayal of Black Americans during a pivotal time in American history.

According to John Stauffer, an African-American Studies professor at Harvard University, “the look of [Douglass’s] public persona was crucial to him because he wanted to enter into the public sphere with an equal voice and equal image and have the same rights as any other citizen.” Something feels fitting about displaying his portrait in the same space in which I look at myself every day, so I decided to put him on display here. I’m a deeply feeling person, and I tend to let feelings, dreams, and history dictate many of my personal design choices and philosophies.
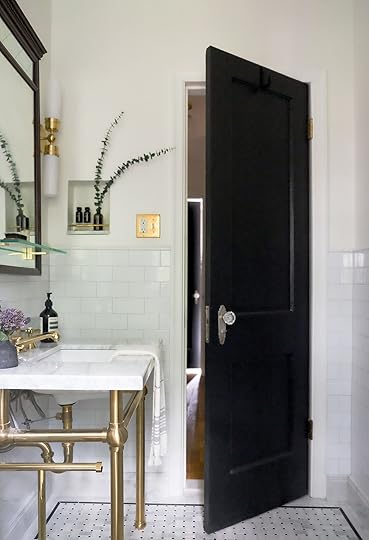
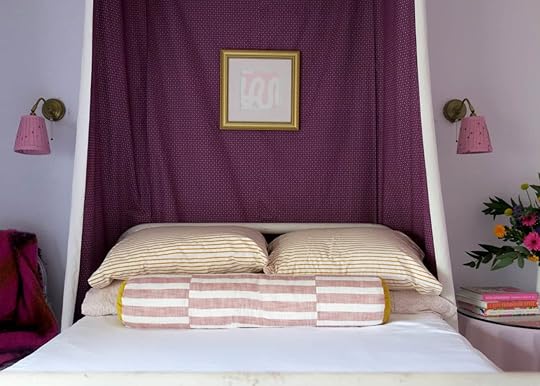
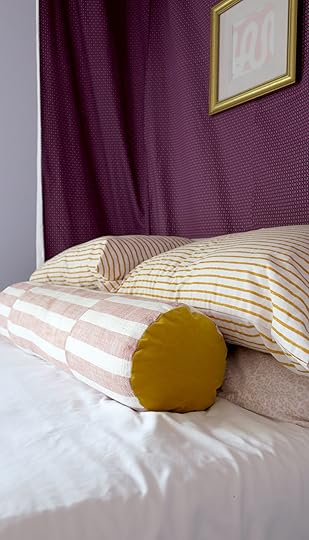
If you’ve been following along with my home renovation, you’ll know that I have quite a loving relationship with the black doors throughout my house. I’ve maintained that color consistency here in the bathroom, and alongside the vintage glass doorknob, it feels right at home in this space. The door is painted Black Magic by Valspar, the walls in this space are painted Swiss Coffee by Benjamin Moore, and the trim and ceiling are painted Simply White by Benjamin Moore (the same color story used in every other room in my house so far), Additionally, the DIY nook next to the door maintains some consistency with the DIY headboard in my bedroom, which makes this bathroom feel much more conversational with other rooms in my house. Yay for consistent design and obsessive planning!
UNDERSCORING ROUTINE-BUILDING BEHAVIORS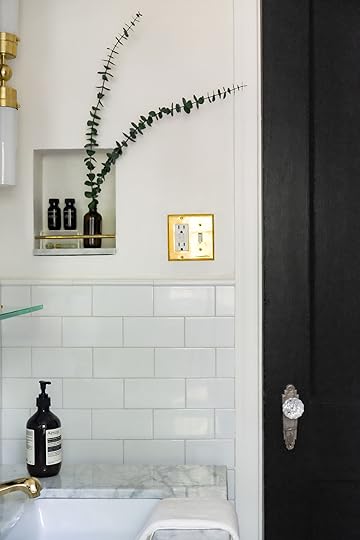
SPEAKING OF THIS NOOK. I’m not going to lie… I’m proud of myself for this one.
I originally intended to use a medicine cabinet in this space, but sadly, the placement of the studs in the wall behind the vanity made those dreams quite impossible. Consequently, I had to rethink some things, because even though I don’t have tons of bathroom toiletries, I do need surface space for the things that I use every day. After much deliberation and mild stress, I decided that a small nook should do the trick.

I taught myself how to cut a hole in the wall, frame the nook, and drywall the space so that it looked as seamless as possible. The addition of the brass shelf (cut down from an old shelf I had laying around) and the brass rod give the nook the perfect amount of tailoring that makes it feel like an intentional and functional design detail. Is the craftsmanship perfect? Absolutely not! However, I’m proud of myself for crafting it on my own and making something that facilitates my daily pampering routine. This element also speaks to my DIY headboard solution in my bedroom. Consistent synergy for the win.

As far back as I can remember, I’ve been HEAVILY inspired by hospitality design. The intentional comfort, consistent branding, and bespoke design elements all work together to speak poetry to my little designer heart. When I think about my favorite hotel spaces, they often feature vintage details that make the space feel warm and lived-in. Since I wasn’t able to incorporate a medicine cabinet into the bathroom, I decided that a vintage mirror was the way to go to provide that warm touch. I scoured vintage stores and antique shops in search of the perfect mirror, and I finally stumbled across this beauty at Community Forklift in Maryland.


I promptly took her home (for $25?!), cleaned her up, and laid her against the wall in the newly-tiled bathroom. I’m a firm believer that visceral reactions should define how we approach design solutions, and let me tell you… I had the MOST visceral reaction to seeing this mirror in the room. The traditional lines were perfect, the detailing at the top of the mirror added just the right amount of character, and the dramatic height of the mirror felt appropriately proportional to the height of the ceiling. Upon close inspection and research, I learned that the mirror was made in Galax, Virginia in 1947, and it feels meaningful to add a vintage piece to the space after tearing out so much of its original character. She was mine and I was hers.

To add more surface space, I mounted this glass shelf from Rejuvenation onto the mirror itself. Mounting the shelf to the mirror–instead of on the wall below it–feels like an authentic and original touch that I don’t often see in bathrooms. And it just looks so cool, right!? I used a carbide-tipped drill bit to drill holes through the mirror so that I could mount the shelf to it, and voila! This was a…very…slow…process, but it was totally worth the time and patience it took. Another truly tailored detail that adds counter space where there wasn’t much of it previously. The shelf is perfect for lining up my daily grooming products, and I’m finding that I don’t miss a medicine cabinet at all! Huzzah!

Shower Fixtures | Shower Curtain (custom)
Ok. Let’s pivot to the real star of the show. Can you believe that my immensely talented boyfriend sewed this shower curtain by HAND?! I wanted a custom-length curtain that felt tailor-made for this space. I was inspired to mimic the pleating of the Everhem curtains I used in my bedroom makeover, so we made the shower curtain roughly the same height— but used this beautiful, velvety, sumptuous, handsome, luxurious, green fabric that finishes off the bathroom in the most perfectly custom way. The pleating adds the right amount of soft, visual texture to the room and the height of the curtain adds necessary color to an otherwise fairly neutral space. Tending to my nighttime routine is made much more comfortable with the addition of this curtain, and I think it really speaks to the positive power of incorporating meaningful, personal pieces into every room of your home.

I installed these simple fabric hooks on the backside of the curtain and used leftover curtain hoops from Everhem to hang them up! I’m not sure if you can buy these curtain hoops a-la-carte from Everhem, but here is something similar on Amazon!

I love how the softness of the curtain balances out some of the harder and colder elements in the bathroom. The marble surfaces, shiny brass components, and dark wood tones all feel more well-considered with the addition of the complimentary curtain. It actually feels like a feature wall–a focal point in the room that draws you in, makes you feel welcome, and begs you to touch it. I used a simple tension rod from Bed Bath and Beyond to hang the curtain as high as possible, which accentuates the height of the room and makes it feel more spacious than it actually is. Is anyone interested in my boyfriend making a guest appearance here on Emily’s blog to show you the nitty, gritty details about how he masterfully made this curtain? Let me know!

Dry Brush (similar) | Beard Wash | Candle
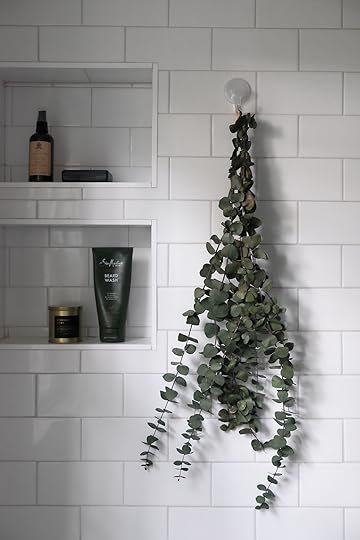
I made a game-time decision to add these two nooks into the shower, and I can’t believe I almost didn’t include them in this makeover. Gone are the days of a clunky, metal, wall-mounted shower caddy that gets rusty and dusty in a matter of weeks. These nooks provide more than enough space for me to store all of the shower things, and I love that they reflect the DIY nook I installed by the sink! We stan a good conversation between design elements.

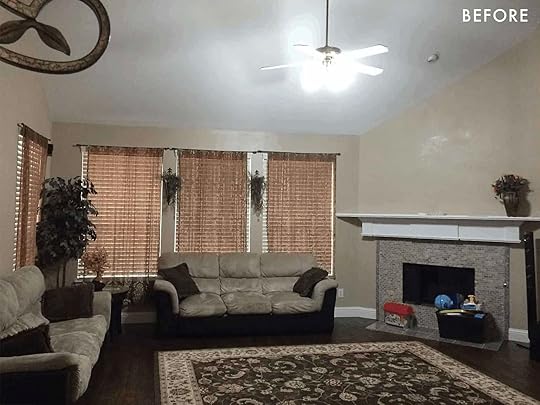
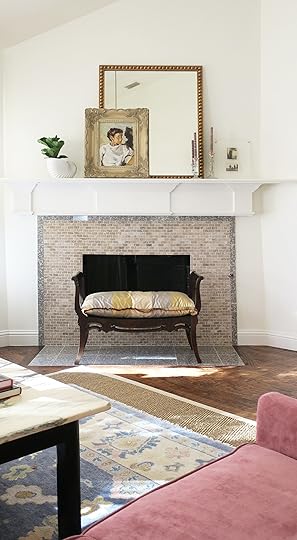
Before and afters, anyone??


What a satisfying journey this has been–from problematic leak to perfectly tailored bathroom! What’s your favorite part of this makeover? Are you Interested in any dedicated DIY tutorials about any element in this bathroom? Let me knowww in the comments down belowww. In the meantime, I’m going to finally get that hole in my kitchen ceiling repaired.*
*If you’d like to follow along in real-time while I’m working on projects, be sure to follow me on Instagram!
*Design and Photos by Malcolm Simmons
The post Malcolm’s Bathroom Reveal – The Power Of Pivoting, Intentional Design, And A DIY That Will Have You Digging Into Your Walls appeared first on Emily Henderson.


August 30, 2021
All The Design Content Creator Projects We Are Following Closely… Because They Are VERY Exciting To Watch

Is there anything more exciting than living vicariously through someone else’s design project?? It’s all the fun with none of the stress (unless you are HIGHLY invested and the person you are watching through your phone is going through a reno hardship). So we thought it would be fun to let you in on which projects, from some of our favorite design content creators, that we are keeping a very close eye on. I mean at our core we are design lovers, so it’s incredibly fun and inspiring to see what is up on the design/reno project scene. Now, this probably isn’t everyone (and doesn’t include our incredible contributors or alum) but these are the creators that popped up in our little ole brains first. Also, if you don’t follow ALL of these super-talented people I highly highly recommend you do. Your feed and eyes will thank you.
Now let’s start with an EHD all-time favorite…
Justina Blakeney’s New House from: jungalow by the mountain
When I first saw that Justina bought a new home my heart jumped out of my chest. She is such an inspiring designer to me because A. She’s insanely talented and B. Our styles are pretty different thus expanding my brain. Very important if you ask me. So with every new house photo she posts, I (and the whole team) just soak it all up. If you haven’t seen or had a chance to check out her beautiful new home here is a post she wrote on it.
 from: jungalow by the mountain
It’s so beautiful and going to be even more so as she continues to chip away. But one space she renovated immediately (as would I) was the pool. Following it on social was so fun and seemed like it took a second (clearly it didn’t). But it felt like all of a sudden she was swimming in it with truly the most joyous smile. We are SO happy for her and her family.
Here she is and here is the post about it!
 from: jungalow by the mountain pool renovation
Very Jungalicious and we want in:) Can’t wait for more and follow Justina on her blog here and her Instagram here.
Wit and Delight’s House
 from: how i mixed colors in the kids’ room to create a bold, cheerful space
If you don’t know about Kate Arends’ home then you are in for a TREAT! It’s a wildly colorful, fun home that has a ton of very special classic elements that are to die for. Truly a designer’s playground and we love watching every second of it. And more recent exciting news! They are very close to finishing construction on their kitchen renovation!
 from: we’re a month away from being back in our kitchen! here’s a remodel update
We always love a kitchen renovation story as per our 1 million posts on the subject. We can’t wait to see it in all of this glory.
Here are some more photos of her home so you can clearly see why we are so excited and riveted…
 from: 5 rooms in our house that look like film sets
Those shutters! They came with the home but we are so happy she kept them but spruced up the rest. Emily wrote a whole post about interior shutters so we are very down.
 from: 5 rooms in our house that look like film sets
And this is the cutest library we’ve ever seen. The blue built-ins, the quiet but super fun wallpaper, the boucle (?) sofa! O and hello cabana striped folding screen. We are big fans of those too All of it is just joyful. Actually, that’s exactly how I would describe this home, joyful.
Follow Kate here on her blog and here on her Instagram.
Chris Loves Julia source
From one beautiful home in Idaho to another in North Carolina that is going to be better and healthier for the Chris Loves Julia family! I mean after seeing the work they did on their last home I think it would be impossible to not be excited to see what they do next.
 from: the stain we decided on for our white oak floors
To be honest, after hearing about their moving horror story, we are beyond impressed how they have kept moving forward design-wise. Look at those beautiful new, lighter floors!
 from: painting the floors and setting up the guest house!
And for their guest house, Julia took matters into her own hands and painted those floors white on her own and they look great. We all can’t wait to see how this home unfolds and all the beautiful things they are going to do to it. To follow along head to their blog here and their Instagram here.
The Grit And Polish Main Bathroom
 left from: our farmhouse kitchen reveal | right from: farmhouse butler’s pantry reveal
Emily (and the whole team) have been pouring over The Grit and Polish’s (Cathy and Garrett) home reno process. Fun fact! Their backyard was featured in our first #ShowEmYourDIY Backyard post. And while their backyard is beautiful, it was really only a taster of their extreme talent. They are DIYers which if you read my balcony post you know I GREATLY admire DIYers. Especially ones that actually do high-quality work. Next on their project list is their bathroom. Here’s a sneak peek…

 from: eek! we started the primary bathroom remodel
Ah, we are EXCITED to see it all completed as I’m sure they are too. Because if it’s anything like the rest of their home it’s going to be stunning and very in line with a particular EHD farmhouse:) To follow along in their reno journey head here to their blog and here to their Instagram.
Shavonda Gardner’s Kitchen
 left: source | right: source
Who isn’t excited about Shavonda’s new kitchen?!?! It was pretty before but now it has that beautiful punch of color, glorious wallpaper, and the copper pot collection one could only dream of. It’s been so thrilling to follow along and we can’t wait till we get the official reveal.
 source
Also if you haven’t seen Shavonda’s new sofa above is a teaser. Ugh, it’s beautiful and was co-designed with the one and only Rose Beltran of Clad Home! The best part is that you can have it too if your heart so desires…which it likely will because baby it’s a beaut (and sustainably made and super fairly priced!). So aside from all of that excited Shavonda is also putting in a pool. Another incredibly exciting project to follow along with both here on her blog and here on her Instagram.
Joy’s House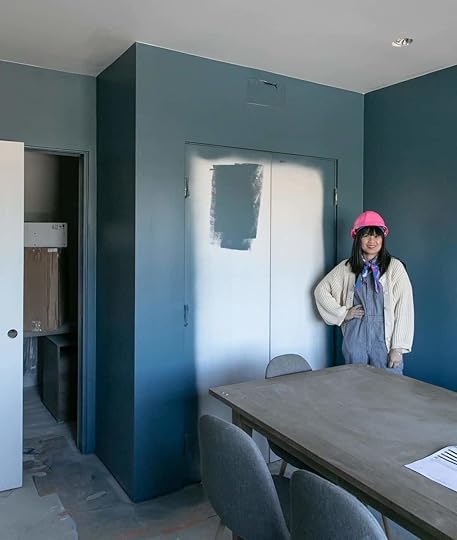
 source | left: design by cleo murnane and joy cho, styled by scott horne, photo by bethany nauert
Ok so technically Joy is on the other side of her HUGE reno journey but we are still getting the full deets on some of the spaces we haven’t fully indulged into yet like the guest bedroom post above or the guest house entry below. It’s all SO GOOD and fun and beautiful.
 from: oh joy studio reveal: the entryway | design by cleo murnane and joy cho, styled by cleo murnane and jonas bergkvist, photos by bethany nauert
Plus, there really is so much to dig into and this house took so many years to be fully realized that we love continuing to take it in. This is one for the books. To make sure you are fully in the know head here to Joy’s blog and here to her Instagram.
Daniel Kanter’s Home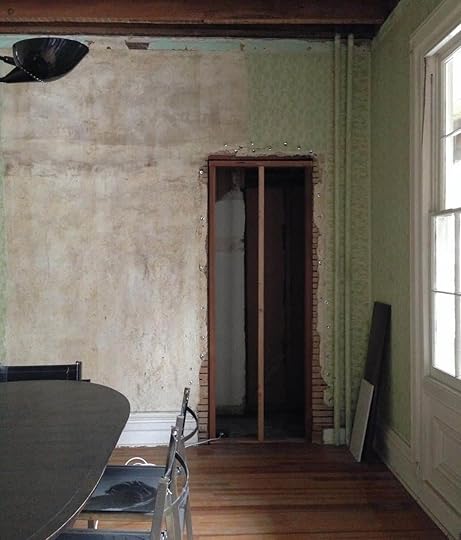
 source
I was turned onto Daniel by Emily and am so happy she did. His work is soulful, eclectic, but more on the minimal side which I love. When he first bought his 1865 Greek Revival home it had been divided into two apartments so he’s been restoring it to a single-family home slowly but beautifully and surely. Look at these before and afters!!
 from: bluestone cottage kitchen: the big reveal!
He’s self-taught and completely nailing it so follow along here on his blog and here on his Instagram.
Sarah Sherman Samuel’s New Build render from: sss new build!
I know! A true SSS original is upon us and we can’t wait to see what Sarah does. What we love about Sarah is that she creates such fun, elevated, and super unique spaces. So to get to see a home that is coming 100% from her design brain is SO AWESOME.
 from: our guest bathroom
For example this bathroom! It’s on the trend-heavy side while still being totally unique so that it won’t be outdated. It will be cool forever. I mean that sconce?? Stop it.
 from: our guest bathroom
And this door kills me. SO GOOD. Plus I’m a real sucker for a checkered pattern.. still:)
Follow Sarah here on her blog and here on her Instagram so you don’t miss any of the likely out-of-this-world stunning details.
Valeria Joacob’s Kitchen
 source
I really just love Valeria. Her designs are warm and layered (and DIY’d) and her content is super creative and fun. A total win! So when she announced that her kitchen was next up on the project list I was thrilled. I can only imagine how daunting and excited it must be to DIY a kitchen but as proven by the next two spaces I’m going to show you, no one over here is worried for them:)
 from: guest bathroom and laundry room renovation
See what I mean?! So inviting, approachable, and beautiful. I really love the floors and the wooden beam but it’s all great.

 from: one day family room makeover
And here’s a family room that she designed for a friend and I don’t know about you but I would happily lounge in that cozy yet calm space.
You can catch all of Valeria on her blog here and her Instagram here.
Hilton Carter’s House source
When I say “OOOOO Baby” I’m not just talking about Hilton and wife, Fiona’s, new nursery (which I talked about in this post too). Watching them build and design their dream home has just been amazing. So many special details and cool ideas. Here’s a little taste…
 source
They decided that they wanted to change their floorplan a bit and switched the location of the kitchen and dining room (hence why the “befores” look incorrectly placed:)) And I know you can’t tell from this photo (go to his Instagram) but those “dots” on the wall are beautiful ceramic (?) wall art pieces. I have been toying with doing some 3-D wall art in my living room and this makes me absolutely want to go for it. O and did you notice the curved entry??? I’m telling you, it’s all awesome.
 source
This brings me to their kitchen – modern, warm, and that hood! Basically, this home renovation is a total thrill ride to watch so if you aren’t following Hilton WHAT ARE YOU DOING?!?!
Banyan Bridge’s New Home
 from: one room challenge: week 8 – reveal
The whole team is a fan of Rachael Jackson. The murals are incredible and her designs are fun and bold, with a lot of warmth. You might remember her basement kitchen from our ORC post. How cool and awesome was it??? Here’s another little sampling…
 source
See what I mean by fun?? This brings me to the project we are VERY excited about which is her new home (before photos below). It’s vintage, PATTERENED, and we can wait to see what she has in store for it.
 source
To also follow along, head here for her blog and here for her Instagram.
These creators truly give us so much inspiration and we hope you also give them the love they deserve by also following along. And like I said at the beginning of the post, these aren’t the only designers/creators we are excited about but these were some of the ones that are super top of mind. Hope you are inspired too! But also drop any design content creators that have awesome projects going on! We wanna know about them all. Happy Monday.
Love you, mean it.
Opening Image Credits: Design and Photo by Cathy and Garrett of The Grit and Polish
The post All The Design Content Creator Projects We Are Following Closely… Because They Are VERY Exciting To Watch appeared first on Emily Henderson.
August 29, 2021
The Link Up: The Well-Reviewed Backpacks Emily Bought for Her Kids, Mallory’s $25 Athletic Shorts, and A Trendy Pair Of Pants We’re Wearing Right Now
Hello all! In case you missed it here’s a little housekeeping…it’s finally happened: Emily made the big Portland move (ah)! We’re all very excited for her & the entire Henderson family. With Brian, Emily, Charlie, and Birdie (and ARCIFORM) up there, you can expect lots more fun farm content coming your way very soon (also ah)! But before all that, let’s focus on today. We’ve got a great link up for you so let’s get right on to it.
This week’s home tour is Jessica Hart’s fun, whimsy LA home (don’t skip this one btw). She called on her friend and designer Carlos Mota to make her dream home come together in a colorful, yet elegant way. Every room has something special in this house, and if you were wondering how to do cabana stripes well, this home tour will teach you.
From Emily: In hopes of not having a janky backpack that falls apart, I read a bunch of reviews (for the first time probably ever), and the clear kids backpack winners are LL Bean and Pottery Barn Kids. The kids were not impressed with LL Bean’s designs as much, so we went with Pottery Barn Kids…they had a million to choose from and after 45 min of passionate debate Bird went with a bunny and floral motif (shocker) and Charlie with a glow in the dark shark backpack both of which Brian and I actually really like. PLUS you get to monogram for free, and they’re very high quality. We love both backpacks equally
From Caitlin: I know I’m talking about Megababe ALL THE TIME (you’ve seen me link up all their products at this point) but AHH. Please let me sing the praises of their recently released Smoothie Deodorant!!! It’s WAY different from any natural deodorant I’ve tried – the formula is even different from Megababe’s other offerings and it’s way more “standard” feeling, like white and substantial instead of liquid-y, if that makes sense – and it’s UNREAL. I don’t know WHAT is in the “fruit enzymes” or how it “balances pH” but it’s awesome. It almost like…resets my armpits? And it kind of smells like a lemon bar or like sunscreen and fruity pebbles, but in a really nice way where people have asked me what I’m wearing and I’ve been like “GIRL, it’s DEODORANT!!!” I just hit bottom on my first tube and happily reordered. A BILLION STARS.
Also From Caitlin: Grab your coffee and settle in for this uber-long read (like, 20-30 minutes) about a string of museum robberies, a billion-dollar jewel heist, and some modern-day European outlaws. It’s a true story that reads like the plot of a Dan Brown novel – catchy and connected and unbelievable – and you’ll learn a ton along the way. If you loved that Netflix documentary about the theft at the Gardner museum, this will be right up your alley.
From Ajai: I keep going back to look at this wall-hanging (I’ve put it in my cart about twenty times). I can’t decide if I need a pair or just one. I love the attention to detail on this piece, and how it feels calming yet commands attention, it’s a conversational piece indeed.
From Mallory: I live in workout shorts so whenever I find an affordable and comfy pair I snag it FAST. I think you can guess where this is going but I was in Target the other day and found these baddies for only $25. The fabric is VERY soft and thin and they don’t have the stupid built-in underwear that most workout shorts have. I sized down on these (usually I’m a small but I had to exchange them for an XS) and I got mine in navy (although the black is nice too). I’m a big fan!!
Also From Mallory: I’m in the market for a new curling iron and I’ve always loved the wand but mine has a tapered end and it looks dumb on my now shorter hair. My sister has a 1-inch wand that doesn’t taper and I love it…just wondering: is there a difference between the cheap and expensive ones?? For example, is this $17 curling iron going to do worse things to my hair than this $60 curling iron or this even more expensive $160 curling iron? At the end of the day, you’re heating and frying your hair so what’s the point of spending a lot of money on a curling iron???
From Jess: I’ve always stayed away from printed pants because I of course had the dumb idea in my head that they wouldn’t be “flattering” on my body type. But then I tried on these green check wide leg ones and I couldn’t love them more! It’s my ideal pattern in a fun but still neutral-ish color, and they are SO COMFORTABLE. Light as a feather and stretchy. If you are someone that is more of an in-between size, the sales gal recommended sizing down. Since they are stretchy, they apparently will loosen more as you wear them. Also at 5’4″ they are ever so slightly cropped. So if you want them actually cropped (and are a shorty like me) you’ll need to get them hemmed. Story of my life. But I actually really like the length so to each their own!
Anyway, that’s all the time we have this beautiful Sunday, so we’re gonna wrap it up and chat next week!! This time next Sunday work for you guys? Great. See you then xx
Opening Image Credit: Design by Carlos Mota | Photo by Douglas Freidman| via Architectural Digest
The post The Link Up: The Well-Reviewed Backpacks Emily Bought for Her Kids, Mallory’s $25 Athletic Shorts, and A Trendy Pair Of Pants We’re Wearing Right Now appeared first on Emily Henderson.
August 28, 2021
Kid Mask Review – Our Kid’s Three Favorites (And 20 That We Crowdsourced From Real Parents That Fit Well And Their Kids Actually Wear)


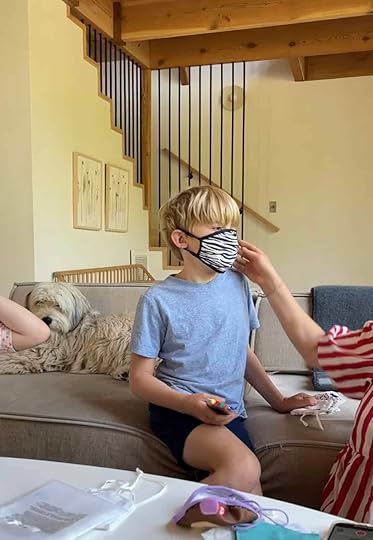
We’ve been way behind on the mask game for the kids, solely because we lived in the mountains, surrounded by nature, with few friends and homeschooling. Basically: we weren’t seeing a lot of people or leaving the house much, and certainly not for long periods of time. They have had some masks, of course, for the few times they’ve gone to the dentist or inside the bathroom at Skypark, but we were very unprepared for next week when Charlie starts school and will have to wear a mask for 6 hours a day. So, I thought it would be fun to order a bunch and see which ones are the best and then share our findings with you guys.
Just to be clear, in case you didn’t know, I am not a doctor, scientist, or any kind of covid expert. Just a mom trying and asking other parents what is working for them in terms of kid masks. All we want is for our kids to be as safe as possible and feel as comfortable as possible in their masks, right?
Caitlin sourced a bunch of these masks, I got the kids to try them on by bribing them with a quarter per mask they try on. Then they negotiated ice cream into the deal which felt fair. Toward the end, we were starting to lose them for sure, but we were still able to collect the data we needed from these children. So, let’s begin with our top 3:
First Place: ODD Facemasks – The Clear Winner (But Expensive)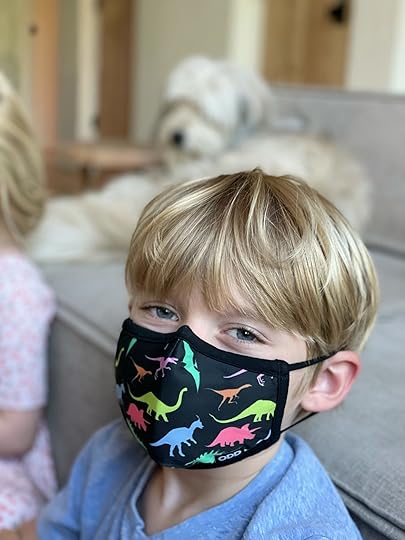

These are hands down our favorite. They fit REALLY well — you can actually see their eyes but it also covers their noses completely (and has an adjustable nose clamp thing so it grips). Breathable, but it still feels thick. They have a bunch of different styles that are all very fun for kids, too. The only con is that these are very expensive for a mask ($12 per mask), but I guess you get what you pay for and these certainly seem like they will last a while. They’re a really great material, even I would wear these…and I do. Birdie said it smelled bad when she put it on but we’re 90% sure it was just her breath. Anyway, these get a 10/10 in our book.
Second Place: Crayola Crayon Face Masks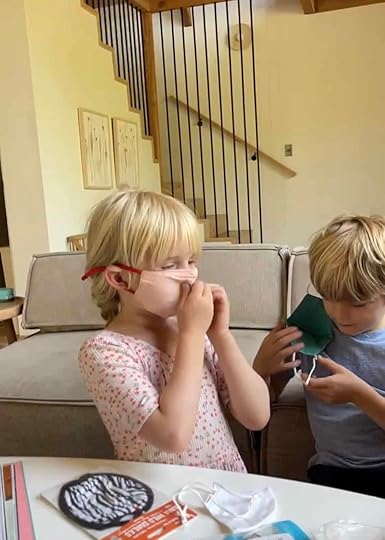
These fit great and have a better price point than the ODD masks. They’re adjustable on the ears and have the nose clasp to make sure they stay on & tight. The Crayola ones came very very well-reviewed by your guys too, so I highly recommend these masks.
Third Place: Grove Collaborative Kids Face Masks
The photo on the right is me asking “why am I the same size as Charlie???” Very breathable and adjustable on the ears. Big yes. These are for big kids (5-10) so these fit well on Charlie (7), but not as well on Birdie, so they’re much better for bigger kids (like me and Charlie). I guess I have a small face?? Not sure how that worked out.
Other Masks We TriedCapelli Smooth Fit Facemask
These were OK in our opinion…no metal nose clamp/adjuster, not very breathable, but very protective (so that’s good). Charlie liked the leopard Capelli one a lot but Brian and I both thought it looked a little too big.
Kids Care Cover Protective Mask (Birdie’s Mask)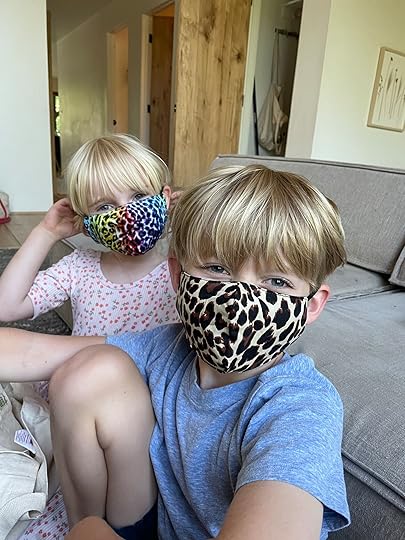
Birdie wears this one all the time and really likes it (I mean it’s rainbow leopard, how could you not?). It’s really nice that it’s adjustable on the ears (huge plus) but it can have some gapping on the sides which is why we like the ODD ones better for her.
Old Navy Critter Face Masks
Okay as far as design goes, these are SUPER CUTE. Very breathable, the kids really liked the fun animal faces and it made them very excited. They’re highly kid-approved but Brian and I thought they looked slightly too big for them and there was some gapping.
Beanie Baby TY Face Masks (Elliot)
This was probably our least favorite. Way too big of a gap between the nose and it had a very awkward shape. Both us parents and the kids all agreed they don’t fit well & aren’t very comfortable. Even on the website it looks like it doesn’t fit the kid’s face that’s modeling the mask (what the heck). Cute idea, but a big no for us.
Wild Republic Zebra Mask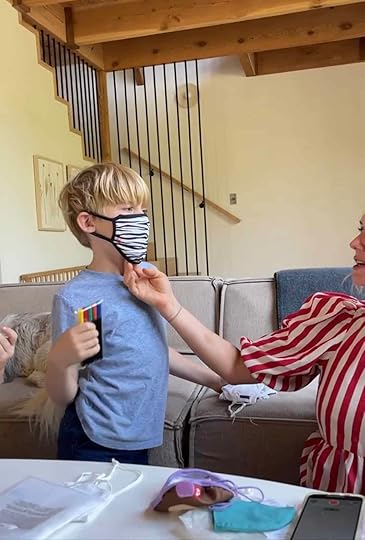
This mask was cute but was just too big. As Charlie put it: BIG FAIL. They do have some cute styles so I was bummed this one didn’t work out very well.
Colorable Kids Masks

These are a VERY cool concept and the kids thought they were awesome but it might be one of those things that’s cuter in theory?? The kids started coloring them IMMEDIATELY which was very fun, but they make me nervous about going in the wash. Charlie tried on 3 at a time (right photo) so if you’re a double (or triple) masker, you could totally do that with these. All in all a decent fit and super breathable, nothing bad to say about it.
Gap Kids Masks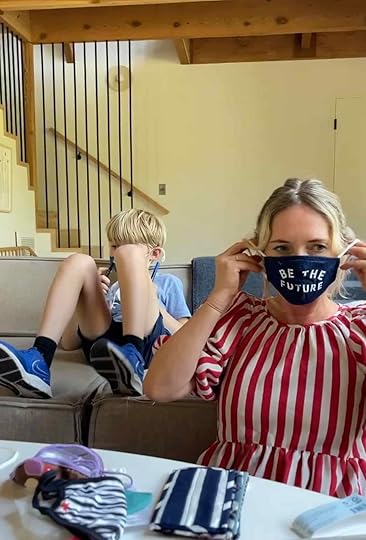

This was the point where my kids were starting to lose it so they didn’t try it on, but since my face is a similar size to Charlie’s, apparently, I thought I would give it a go. Here’s my review: I would totally wear this. Love the style & it’s all in all really great. Some of the facemasks (more of the accordion-style ones) gapped a little on Charlie and Elliot but if you’re an adult looking for a facemask I really liked it hahah.
Now a bunch of you guys submitted your favorite kid masks (with photos!). THANK YOU!! We had some clear winners that everyone seemed to suggest, and then a bunch of other cute masks we’ve included at the end. Let’s do it:
First Place – Happy Masks
From Jennifer: My kids and I have been wearing the Happy Mask for over a year now. The best and most comfortable mask we have tried. The parrot beak shape keeps it off your mouth so that you can breathe more freely, and (bonus as a teacher) it doesn’t muffle your voice! Super cute patterns, or plain colors. Now that the whole world has discovered them, get on the restock list ASAP!!
From Laurie: I have three kids and they have a strong preference for Happy Masks and I’ve spent more than I would like to acknowledge on masks for my kids. As a parent, they are also my favorite for filtration. The downfall is hand washing but we all make sacrifices.
From Carly: Vog Masks and Happy Masks both fit kids amazingly and are comfortable, won’t send my kids to school without filters! But they are $$. Other friends love Baggu masks.
From Emily: Hi! Happy Masks are expensive but totally worth it. Great fit, and super safe. Cute enough prints. Don’t need to wash them between every wear. Highly recommend!
From Erin: The best mask we’ve found for our 2.5-year-old is the Happy Mask Pro Series in the Kids (S) size.
Pros: It’s super breathable and lightweight with a rigid, beak-shaped middle so it can’t be sucked in when she’s breathing and doesn’t compress her nose. It fits her little face really well but has plenty of room to fit her as she gets older (if masks are still needed). It has adjustable ear straps and a nose wire. Several fun designs and it shipped really quickly. It’s the only mask she’ll wear for more than a few minutes at a time.Cons: Pricey ($24 each) and it has to be washed by hand to keep the rigid shape and filtering capabilities.Second Place – Baggu
From Grace: They are expensive but high quality and didn’t immediately get soaked (as all kid masks seem to do). They also have wire but still washed well- some of the ones with wire get all twisted and need to be hand washed and who has time for that? Plus she was really feeling herself in it if you can’t tell These fit my 2.5-year-old pictured and my 4.5-year-old both very well. We also loved the adjustable Old Navy ones but they’ve been discontinued. Stride Rite has some decent ones but they do fit quite tightly and thus get wet right away (IDK what kids do behind there but their masks are always soaked). If you can’t tell I’ve spent SOME TIME on this and have bought like 8 different brands to try. So far Baggu is the best but waiting on some others to arrive.
From Emily: They have a metal strip on the top to bend for comfy nose fittings and adjustable ear straps—also best patterns and solid colors for the win. My boys love them.
From Jennifer: Best ones…. And we’ve been through A LOT!! (Jennifer’s kids also love Rothy’s)
From Erin: Baggu is our jam!
Third Place – School Mask Pack: Crayola
From Kirsten: The Crayola mask packs are the best we have found so far and have great deals! They have adjustable straps and both of our kids love them. They won’t wear any other ones I have tried! The picture is of my son Oliver who is only 4 and puts it on before we leave home!
From Alexina: Hands-down amazing fit in the age 2-5 category: Crayola Kids Mask Set, Size Small. Very affordable. Comes in a pack of 5. Fits PERFECTLY. Does not ever slip below the nose. The ears have adjusters so that you can get the perfect comfy + snug fit. Fits PERFECTLY.
This year, I also bought patches from an Etsy shop and ironed them on for a fun twist! The Etsy shop I purchased from is Honey & Apple. The other Crayola masks that are sold have designs on them, and they are…. Not cute. But buy the solid colors, and add your own sparkle, if you want!
From Amanda: Yes! The Crayola 5 pack for back to school. One for every day and the kids get to pick their color. Comes with a mesh bag for washing. My kids are PICKY, and said it’s breathable and comfortable (adjustable nose and ear grip) and it’s the best one we’ve had! I’ve bought them tons of all varieties so I’m shocked and really happy they love them. Going to get more for sure.
Honorable MentionsLUCIFER KF94 Kids Face Mask
From Katie: These are the best ones for little faces


From Zoe: We love the Vistaprint masks because they come in so many cute patterns, are very comfortable, adjustable with a nose piece, don’t move around when you talk, fit tightly to face, and have a pocket for a disposable filter which they also sell. We just went back to school mask shopping on their website! My kids actually get excited to pick out their daily mask and then forget they are wearing it. And nope, I don’t even work for this company. Just love it and want to share
From Oona: We love the VistaPrint masks- they have a wire over the nose (non-negotiable in a good mask), adjustable ear loops, and fit really snugly on the face. Plus a pocket for filters, which they sell as well. Highly recommend! Here are both my kids wearing them.
Athletica

From Skye: My 10 & 13-year-old both wear Athleta Women’s sized masks. Our whole family uses them exclusively. My 13-year-old has a slimmer face than our 10 year old and they fit her well too due to the pleats, nose wire, and adjustable straps. Hands down best mask out there.
From Kristina: Hi! Athleta youth masks are the very best. Our son has worn them for a year and a half now. He’s almost 4.5 now, they grow with kids because they are adjustable straps around the ears. He actually wears it “upside down” with the little cup that is intended for the chin as a better notch on the nose. It never falls down and that makes it the best kid mask ever.
Joah Love


From Allyson: Hello! We just got these from Joah Love and LOVE them. Aven calls them the comfy masks. They have some with lanyards (not the right name) already attached. We only got three and I wish we’d gotten more. They are just a little pricey. I also ordered some Henry masks, but still waiting for those to arrive.
From Lauren: Can’t recommend the Joah Love masks enough! They are soft, cinch on the ears to get a comfortable, custom fit (no gaping) and have washed and worn beautifully over & over again throughout the pandemic. My kids wear them without ever complaining! Kids ages 4-5 and 7-8 both have a great fit in the kids 2-6 size. I also wear these and have ordered them for other adult family members – so good & universally beloved by all who’ve tried them.
Henry Mask

From Tiffany: I absolutely swear by these masks. My kids loooooove them. Even with school starting, they say how comfortable they are to wear all day. They are called Henry Mask. It’s a black-owned company. There’s a monthly subscription and each month you select different colors/patterns of masks. Either two or four. You can always pause the subscription if you like. They sell adult masks as well. These masks have a unique shape so they do not touch your mouth or nose. There’s also two different ways to wear the mask. Around your ears or behind your head. The best part is the masks are also washable and they are perfect for glasses, you don’t have to worry about them fogging up. Although the subscription is a better deal they do have their masks on Amazon. The choices are more selective.
More Great Options That Came RecommendedRothy’sOld NavyVog MaskCasupoSock FancyTargetCubcoatsAmazon (this one and this one)CaraaMy Shield USAWell BeforeBeego HandmadeOk, that’s it! I hope this is helpful. I know this is all my friends and I have been talking about so figured I would do a little extra legwork to help you in case you needed it. Also THANK YOU again to all the parents that submitted. I really appreciate you. xx
The post Kid Mask Review – Our Kid’s Three Favorites (And 20 That We Crowdsourced From Real Parents That Fit Well And Their Kids Actually Wear) appeared first on Emily Henderson.
August 27, 2021
A “White Box” Rental That Was Turned Into A Stunning Eclectic Home Via Very Budget-Friendly Buys (Like A $7 Dresser)
OH BOY, BUCKLE UP. Today’s post is one for the books. We have a renter-friendly design! We have $7 pieces of vintage furniture! We have pieces pulled straight from the neighbor’s trash pile! We have Facebook Marketplace scores! We have DIYs (all worthwhile, albeit some more carpal tunnel-inducing than others)! And more importantly, we have a TON of knowledge from a gal who combined ALL these things to make her home look like a million bucks.
Here’s the deal: longtime reader Liberty Riggs spent a decade working as a creative director in advertising before taking the leap and partnering with her husband to open her eponymous interior design firm, Studio Riggs, during the pandemic. “My husband used to work in construction as a CFO/project manager, and we really loved the idea of creating a family business that we can build together and (hopefully!) bring our kids into one day,” Liberty said. (If that wasn’t cute enough, do you see how sweet that website is??? You can tell that she was a branding pro, right?)
ANYWAY. Liberty sent me an email earlier this month while we were on our team retreat with a few teaser shots and EHD collectively lost our minds (in the positive way) – we were so excited to see someone who could make fun, eclectic style work in a bright, fresh, and affordable way (AND in a rental, no less!). I ended up sending her ~1 million questions about her thought process and can’t wait to share her wisdom with y’all, so let’s take a peek inside Liberty’s house while we get to know her a little bit better, yeah?
Footed Bowl (similar) | Basket
It only makes sense to kick it off with the entryway, you know? We’ll go from the ground up. Yes, that is stone inlaid with hardwood – “honestly, the only little bit of character this house had when we moved in,” Liberty told me – but MY OH MY, I lost my mind over this vintage chest paired with the bust, modern art, and graphic bowl.
The kicker? “I made the art in the entryway with some extra Farrow & Ball sample tins I had sitting around. The bust and dresser were both thrift finds. I literally paid $7 for the dresser in college and have moved it with me to three different states!” She’s talented AND a gifted vintage shopper, guys. We’re going to keep it moving by touring her daughter’s room next…
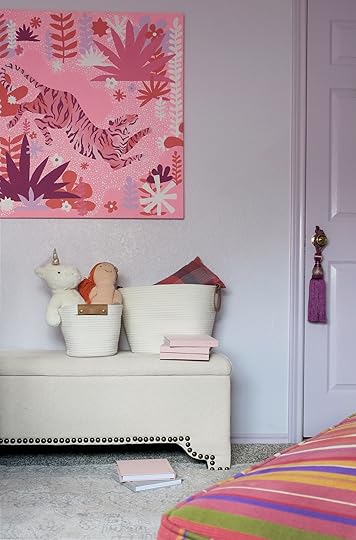

Small Bin | Large Bin | Unicorn
I teased the canopy a little bit with that opener photo above, but we’re starting this room off by taking a peek at Liberty’s jumping-off point: this awesome wall art. “I made the tiger painting in my daughter’s room for her very first nursery and it gave me carpal tunnel so now she has to live with it forever, so I based the color scheme off of that. Originally I just painted the walls but it felt unfinished. A lot of historic homes that I looked at had contrast trim, so I just went with it.“
I love the scale of this bench between the two doors, but I also love that this is such a lovely and bright and happy room for a 3-year-old that doesn’t necessarily scream “a toddler lives here!!” Liberty’s done such a good job of making a space that her daughter can grow into, you know?

Y’all know how I feel about a canopy (spoiler: I love them), so I was so taken by the combo of the patina on this gorgeous bed combined with the sweet and happy scalloped half-tester. “The canopy is a DIY. I screwed the corners in the ceiling and literally staple-gunned the sides up. When we take it down I’ll just have to spackle the little staple holes.” Phew. She makes it sound so easy!
I also had to ask Liberty if she had any tips about layering rugs over carpeting, and she came through. “These rug pads for carpet are MAGIC!” Thanks for sharing, pal

Sconce (sans cute fabric)
Next up, I adored how she carried the scallop motif over to the skirted bedside table. When I asked her about the choice to go with a table instead of a more traditional nightstand, she said “Since she’s only 3 she doesn’t have a lot of needs in terms of nightstand storage, so a skirted table made sense.”
I had also assumed the sconces were vintage and was SHOCKED to find out that they were a DIY – “The sconces are actually IKEA! But I got on a bit of a lampshade-making kick recently and made the pleated shades for them.” (Please leave a note if you also think we should have Liberty back for an instructional lampshade post. They look so high-end and totally transform the sconce, right?)
Swoon – a pattern mixer-and-matcher after my own heart. I recognized that Target x Jungalow bolster right away, but begged for the sources of everything and was SO JAZZED to learn that they were also more affordable options. “The lumbar and striped pillowcases are from Target, and the rest of the bedding I just picked up at Tuesday Morning.”
I’ve been such a huge fan of the purple and mustard combo since seeing how Julie pulled it off in her bathroom last year, but it’s just so masterful and restful in this space. Big color, big pattern, still calm. 10/10! When I asked about her inspiration, Liberty said, “I’m so inspired by a lot of the English designers right now – Studio Ashby, Louise Roe, Beata Heuman. But I’m also a former art history major, so that’s a big influence as well.” I don’t know about y’all, but I think we can all tell that she probably aced color theory

Ceiling Medallion (similar)
I couldn’t leave this room without calling out the lighting update. “In every room we’ve been adding ceiling medallions as we swap out light fixtures. It’s just a really cheap, easy way to make the house feel less like an early 2000s box.” And for anyone who was curious – I obviously was – Liberty got the blessing from her landlord before making changes. “We asked permission to paint – everything else I just plan on reversing before we move out. I don’t mind the expense because we plan to be here for a while.”
Next up, we’re moving into the office…

OH MY. The built-ins (that are not actually built-ins)! And THAT DESK (that I soon learned wasn’t a desk!) “The desk is a vintage console made by the Mt. Airy Chair Company that I had a stone top cut for,” she told me. I love how Liberty took a vintage piece and made it work for the space and function she needed – it’s a great lesson in sustainable shopping, too. She gets a one-of-a-kind show-stopping piece and we get to ogle it on the internet. Everyone wins!


“We snagged some vintage bookcases off Facebook Marketplace, trimmed them out a bit, and painted them the same color as the walls. The office is the one space I don’t have to share with anyone else in the family, so I hoarded all of my favorite things to fill these shelves.” And what a lovely payoff, right? There’s such a nice color scheme here and it’s the perfect amount of “collected” without feeling “cluttered.” ::chef’s kiss::
Just wanted to include the pulled-back shot for full effect. WHY ISN’T THIS MY ZOOM BACKGROUND? I wish I worked here. (PS. You can see a glimpse of another handmade lampshade on the left – we gotta get a tutorial, right?!)

Last but not least, I just love the mix of styles here – the cabriole legs, the stone top, the animal print seat (truly, Liberty’s a girl after my own heart). If there was any doubt, when I asked about the chair, she said this: “I embarrassed my mother by pulling the cesca chair off her neighbor’s curb on bulky trash day!” We love a furniture-saving hero!!!
We’re going to move into the family room now but before I show you the after on this fireplace, let me give you some context: “We started looking for a rental in January, and it was insanity! I think so many people sold their houses and were having a hard time finding a new one that the market was much more competitive than it had been previously. This house was actually the 5th house we had applied for, and definitely not our first pick (it was very boxy and beige when we toured it). But as a designer, I love a creative challenge and knew I could make some lemonade out of this lemon.“
And get this – “We actually just moved in this April! I still have about half the house left to finish, but we are taking a gradual approach to make my husband happy (he’s an accountant – lol). Eventually, we want to build our dream home, but as big believers in the concept of a ‘forever house’, we made the decision to wait until the housing market calms down a little and we have the resources to really do it right.” In the interim, though, some paint and a touch of thoughtful styling made a HUGE difference in the way this room looks and feels…
“My first thought when tackling the living room was ‘what the hell do I do with this bizarre fireplace?!’ Painting the walls a soft white really minimized the visual impact of the mantle.” AGREED. It truly looks like a different home, and you can definitely see Liberty’s modern-traditional style elevating this formerly-beige space.


Had to come in hot with a little zoom on those mantle details. The art is so good, but how special are those uber-modern striped candles paired with those classic crystal holders?


But this sofa is what really took my breath away, and Liberty stunned me with the source – “I had the sofa made without the fringe by Monarch Sofas back in 2016. It was still in great shape when we moved into this house but it felt a little too MCM for what I was doing. The bullion fringe came from eBay and I applied it myself! Now I’m in love with this sofa all over again.”
Can you believe??? That fringe totally transformed the shape – it’s such a classic style now and I never would have thought that it had lived a prior life as a mid-century-inspired piece. (BRB, running around my house and seeing if I can switch up any pieces by adding some thoughtful trim, see you in a second!)
And of course, I have to show y’all Liberty’s coffee table – how good is that tray? Her styling advice: “Just go big with your accessories and books. Like absurdly big. I would rather have one giant, gorgeous thing on a coffee table than a bunch of tiny things. And for me, it’s just more practical with two small kids (less stuff they can walk off with). For any vignette it’s always good to add something crystal or metallic to bounce the light around.”
WOW. Can you believe how productive she’s been in four months? I’ve been in my apartment for two years and am almost finally ready to show off some tiny spaces – I so admire her decisiveness and her innate style.
More than anything, though, I love how cohesive this home feels despite not being too matchy-matchy – when I asked for advice (very selfishly, TBH), Liberty said, “I made a moodboard for the whole house before we moved in and just try to keep that as my ‘North Star.’ I also decided that the palette was going to be all garden-inspired hues, which gives a lot of flexibility while still feeling related.” It definitely paid off, right?

That’s all for today, but I just wanted to say THANK YOU to Liberty for taking the leap and sharing with all of us and THANK YOU to you, the readers, for joining us on this little tour of her house. If you’d like to stay up-to-date with her future projects (and you should – if the renderings on her website are any indication, they’re going to be SO GOOD), you can follow her on Instagram right here at @studioriggs.
Let’s all leave her some well-earned props in the comments, yeah? Hope this got your weekend off to a great (and inspired!) start – we’ll chat more with you down there. xx
*Design and Photos by Liberty Riggs
The post A “White Box” Rental That Was Turned Into A Stunning Eclectic Home Via Very Budget-Friendly Buys (Like A $7 Dresser) appeared first on Emily Henderson.
August 25, 2021
“Have I Lost My Actual Mind?” Exploring The Return Of Real Whimsy

Have you ever looked at a pile of your recent purchases and been like, “uh…wait…am I okay?” Because that’s been my internal monologue recently, and I’d like to talk about it. Historically, I’ve been a little early to new trends, but this one may just be a little too left field (even for me). We photoshopped a few of my latest vintage buys together – maybe you can take a peek and then hit me with your diagnosis, yeah?

Because guys, here’s my initial diagnosis: I’VE LOST IT. The past year and a half has broken me, and now the only thing that can make me feel joy are 1950s lamps shaped like poodles made out of broccoli and 1960s soup tureens shaped like rabbits made out of cabbage. Do I need to drink out of a glass shaped like a waffle cone? Apparently, the answer is ABSOLUTELY. And like…who wouldn’t enjoy using Pierre the Sommelier to open up a bottle of wine? (Please don’t actually answer that if you hate him – my ego is fragile. I’m feeling vulnerable!!!)
See, I’ve been lusting after true antique furniture pieces lately – please throw all your tiger oak and marquetry and cabriole legs my way – but the vintage decor pieces I’ve actually been buying exist in a WHOOOLE other kitschy, fun, whimsy universe. But this whole identity crisis really got me thinking about something Erik said in his dining room reveal about a year ago: “Dressing the table is my love language and it really shows who you are dining with how important that time together is. If you come over for dinner at my place and there are paper napkins and no candlelight, you better eat and run because clearly I’m not your fan. Take the time, especially for supper, and dust off your grandmother’s china and use the nice crystal serving ware. Life is too short to not use your very best stuff. You are worth it.”
And not to get too sentimental over my new/old bowls shaped like cabbage leaves and a cookie jar that looks like a lamb – I know they’re no grandmother’s china or crystal dinnerware – but I think there’s really something here, you know? After all this time dining by myself, I’m SO looking forward to delivering a fun experience for the folks who visit my home. (Even if that experience is them driving home being like, “woah, why is every surface in her home covered in vintage painted ceramics? She does know that she can just buy a regular pitcher, right?”)
As it turns out, though…I don’t actually think it’s just me. See, a lot of these things never actually went out of style – lettuceware, majolica, and ceramic dinnerware are classics for a reason – but I really feel like they’re picking up steam in a way that we haven’t seen before. WHIMSY IS IN THE ZEITGEIST, FOLKS. I’m willing to take a huge risk to prove it: go open Chairish, and check out the New Arrivals page. I guarantee you’ll see at least a few bowls shaped like not-bowls or plates shaped like not-plates. (And BOY, will I feel dumb if you don’t. I’m really gambling here, friends!) Since my word can only go so far, let’s look at some inspo, yeah?
 photos by david land | via one kings lane
These Bordallo Pinheiro plates are a welcome surprise when you approach the table – they’re perfect for a party but casual enough for daily use, too. I love how lettuceware looks when it’s layered with these more simple pink and white plates, too – it keeps it from feeling too campy. This is definitely the vibe I’m going for in my own home. (And can we talk about the way it echoes the color scheme of the art in the back??? DREAMY.)
 via @mumlittleloves
Speaking of color schemes – you can’t go wrong with pink, blue, green, and white. While this definitely skews more traditional with the scalloped placemats and matching napkins, I really like how the playful dinnerware means that the rest of the tablescape can be kept nice and simple. Like a breath of fresh air, yeah?

 design by cassandra lavalle | photos by meghan klein | via coco kelley
You may recognize Cassandra from her recent kitchen reveal here on EHD, but I’m obsessed with this bright and happy dinner table she designed. As an additional bonus, this is my actual dining table – it’s this one from CB2 in case anyone is interested and I *love* it – so it’s really helpful seeing how vintage pieces can shine on a glossy, modern surface. It’s a mix that still looks really natural, which makes me feel like I’ll be able to pull it off in my own home, too.

 via vamos receber
Switching it up a little and breaking out a new shape: the flower!!! I wrote about the Italian plates I grabbed on our last EHD team trip here, but I’m excited to try layering them on top of a complimentary plate like I showed ya in the first photo. But the real reason I wanted to highlight this one – how sweet are those little tiny ceramic vegetables decorating the table? There’s a tiny radish on the left above the napkin, a tiny eggplant near the top right, and I’m like 60% sure that’s a pickle directly above the knife. Beyond that, how special are the engraved wine glasses? They really do add a little something special.

 via quintessence
GAH. LOVE. So maximalist, so fun. I know it may be a little much for every day, but wouldn’t it be a treat to eat here with friends? Again, the layering of the plates is just sublime and it’s SO CREATIVE to use a few table runners across the length of the table instead of the width of the table. Put that tip in your back pocket for Thanksgiving if you have a huge family, yeah?
 design by christopher spitzmiller | photo by william waldron | via architectural digest
What an impactful collection – it’s clean without feeling cluttered. MY ACTUAL DREAM – bumping up the impact while limiting the amount of dusting needed. Even though there’s a shelf in front of the window, the lettuce ware really brightens up the whole area, right??
 photos by brian woodcock | via country living
So sweet, so fun. This is ~technically~ an Easter setup, but swapping out that tablecloth would make it work for any holiday. I also love the look of using your decorative plates on the bottom – it feels really clean and thoughtful, despite being pretty easy to achieve at home. Plus, why NOT try dipping a toe in the majolica waters with some sweet little asparagus salt and pepper shakers?? They’ll be sure to bring a smile to all your guest’s faces
 photo by erik kvalsvik | via d. porthault: the art of luxury linens
The marble fireplace surround, hand-painted wallpaper, super gorgeous moulding, and dark wood marquetry dining table could make this space feel super formal, but the bright green dinnerware REALLY brightens it up and makes it feel much less precious, right? With fine china, I’d be terrified of spilling or breaking something in this room. But when the plates made outta fake lettuce? I’m ready for a fun brunch with pals!
 photo by marty baldwin | via better homes & gardens
Again, nothing more classic than pink and blue (and catch that green glass in the upper right!). The bowl is such a happy and bright touch and it’s SO easy to mix and match with your existing dinner sets.
 design by cathy kincaid | photo by miguel flores-vianna
You see that wall? It’s not wallpaper – it’s a mural that was hand-painted in the 1930s. This is another case of the table settings really brightening up the space – nothing says “come relax for a while” like a big cabbage-shaped tureen filled with soup/mac and cheese/other foods you put in a tureen.

 via nell hills
I had to drop these two in here for some holiday inspiration. Like, nothing says “ready for summer” like a whole buncha lemons, right? And I love how the lettuce plates on INSTANTLY holiday-appropriate when paired with red and tartan plaid. Am I winning you over yet? They feel a little less niche to me, and hopefully to you, too

 via vamos receber
Just had to do ONE more lemon tablescape for you – that ceramic napkin ring is so simple but so graphic, especially when mixed with those sweet clippings in a variety of glass vases. It’s like dining on the surface of the sun, but in a nice and happy way. So much life and cheer!!!
 design by caroline gidiere | photo by david hillegas
Please look back and take a note on HOW MUCH MIXING is going on here. We see the rug, the seat cushion, the tablecloth, the charger, the lettuce ware plate, the dinner plate, the salad plate, the napkin…and almost ALL of them are different colors. Let this be a lesson (mainly to me, TBH) that when you mix what you love, it’ll always turn out.

 via tory burch
And I had to close with these shots from Tory Burch – she launched a line in conjunction with Dodie Thayer, the potter who originated the Palm Beach lettuceware trend in the 60s after being inspired by 18th century majolica pieces – and man, aren’t they just stunning? I’m a vintage gal at heart – I love the hunt – but if you’re the type to prefer your dinnerware new, you can’t go wrong with any of these pieces.
But I actually *did* want to pull a few of my favorites for y’all, straight off my own Etsy and Chairish favorites. These are the pieces I’m dreaming about adding to my collection – do any strike your fancy?
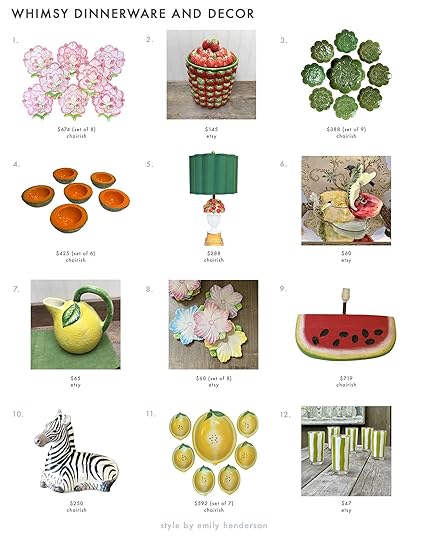
1 Strawberry Majolica Plates | 2. Vintage Strawberry Jar | 3. Geranium Plates | 4. Ed Langbein Melon Bowls | 5. Italian Cherry Topiary Lamp | 6. Italian Rabbit Tureen | 7. Italian Lemon Pitcher | 8. Vintage Flower Plates | 9. Watermelon Slice Lamp |10. Italian Zebra Covered Dish | 11. Italian Lemon Bowls | 12. Mid-Century Glassware
Fun fact: that’s the cabbage version of #6 up at the top of this post – I actually found mine after favoriting this one on Etsy, which made my in-person purchase feel even more special. For what it’s worth, these are all a little pricey, but I SUPER encourage poking around Etsy for a second – maybe search for “(your favorite food) + (dish/bowl/pitcher/jar)” or just “vintage dinnerware” or “vintage barware.” There are a TON of affordable options out there – these are just the ones that I’m obsessed with right now, ya know?
So now, I rest my case. What say you – have I lost my marbles, or are you hopping on the whimsy train with me??? LET’S DISCUSS, PLEASE.
Opening Image Credits: Design by Christopher Spitzmiller | Photo by William Waldron | via Architectural Digest
The post “Have I Lost My Actual Mind?” Exploring The Return Of Real Whimsy appeared first on Emily Henderson.
August 24, 2021
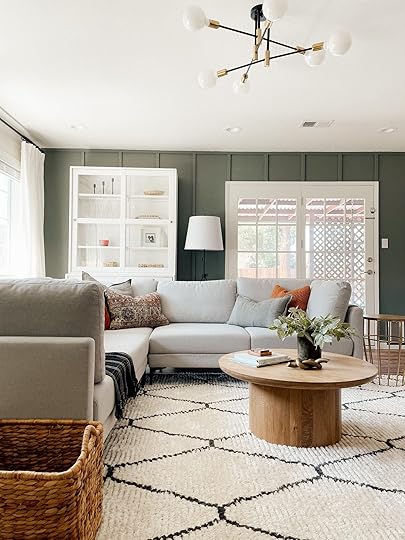
How To Choose The Right Rug Size For Your Living Room – 5 Formulas Guaranteed to Work (+ 36 Shoppable Picks)
We’re back AGAIN with one of our favorite topics: rugs. It’s one of our most requested topics in both “how” and “which one”. And we get it! It’s a BIG piece that isn’t cheap so you want to get it right the first because also, who wants to return a rug?? No one. So, if you are now in the market for a living room rug, or just want to spice things up, we hope these formulas will help you find the one. There are a bunch of new rugs that we have sourced too. Enjoy:)
One of the biggest mistakes we see (as we’ve pointed out before) is the “too small rug.” However, today I’m going to walk you through how to not only pick the right size but show you how to lay it out. It’s easy to say “don’t buy too small” but around here we like to be a little more thorough than that. So, we have formulas, rules, and general “no no’s” that can help (oh and some shoppable picks). Let the (fun) rug inquiry begin…
 photo by sara ligorria-tramp | my friend’s kid and pet-friendly family room reveal
I know from personal experience how daunting it can be to find THE rug for your living room. Not many are affordable (we found some, don’t worry), and returning them is a pain. But it’s a main piece in your living room so it needs to look right. So first let’s into the nitty-gritty of the rules for each of the EHD approved layout options…
General Rules: Typical living room rug sizes are 8’x10′ and 9’x12′.Make sure your rug is at least 6″ wider (8″ is ideal) than your sofa on both sides.Typically run the rug the length of the sofa.Give 30″ to 36″ of a walkway between large furniture pieces (if your living room allows for it) if not then at least 18″-24″. That will help to inform your rug size. Hot TipMeasure out your desired rug size with painter's tape to get a sense of how it will feel. We promise it's a lifesaver.
All Legs On Board photo by sara ligorria-tramp | from: in defense of the comfy sectional—a friend’s almost-finished family room
If you have a large enough room and want all of your conversational pieces on your rug (i.e. sofa, accent chairs, coffee table, etc.) then make sure you give yourself around 8″ from the edge of your furniture to the edge of your rug. This way your furniture won’t look like it’s a child getting dangerously close to the edge of the subway platform. Consider the 8″ point your official yellow line. DON’T GO OVER IT OR ELSE.
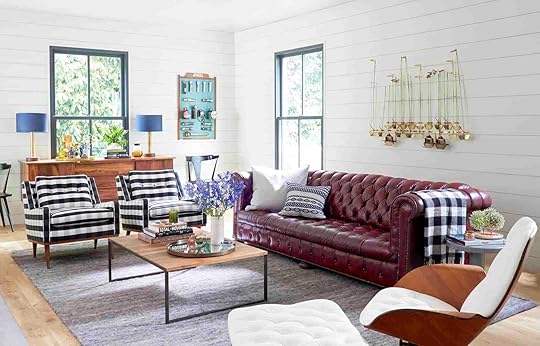 photo by david tsay for styled: secrets for arranging rooms, from tabletops to bookshelves
Then give yourself around 10″ to 18″ from rug to wall (and maybe even 24″ if you have the space). If you go too much closer your rug going to overwhelm your space and look like awkward “almost” wall to wall carpet.
 design by flack studio | photo by anson smart | via the design files
The main exception to these rules is if your sofa is up against a wall (or our recommended few inches off as not to crowd the wall). Your rug can get a little closer so you don’t waste valuable common area real estate.
Front Legs Only (The EHD Go-To) photo by sara ligorria-tramp | from: how target’s fall threshold collection nails the “updated classic” trend
This layout is probably THE go-to around these parts (and likely the world). All of your furniture pieces get “to play” but get to have the space to be individuals. Isn’t that what we want for all of our carefully selected furniture??
 photo by erin francois | from: tour a stylist’s mid-century-meets-traditional “farmhouse” full of thrifted treasures
With this one, you want the front legs of the sofa and all chairs to rest on top of it. Here you aren’t playing “furniture lava” where the rug is the only safe zone. Let those back legs hang off and take up space.
 photo by sara ligorria-tramp | from: a light, bright, & luxe lighting room makeover
This layout is going to make your room feel spacious even if it’s not. The rule here is to have the rug go under each piece about 1/3 of the piece’s width.
For example: If your chair is 21″, make sure your rug is at about 7 inches under it (give or take).
Back in the day, Emily and Orlando made a video on how to select the perfect sized rug and if you are a visual person (like me) it’ll help you see why these rules are going to help you find your match made in heaven:
The Too Small, But Make It Work photo by david tsay | from: a spanish living room
“But EHD, I have a 5’x8′ vintage rug that goes PERFECTLY with my room. Can I really not use it?” Fear not made up reader! You can layer that beautiful vintage rug on top of a larger rug. Yep, it’s totally legal and can look awesome if you find the right pairing.
 design by jenni kayne | photos by tessa neustadt | via remodelista
The nearly no-fail way to attempt this is by choosing a natural jute-like rug as the large base and then layer a smaller rug (with a different color and material) on top. You can take a cue from Emily and Jenny Kayne from the photos above and place your smaller rug in the middle of the larger piece. But if you want to go even more rogue, you can off-center them as long as the front legs of your seating are on one of them.
The Float (The Rule Breaker) photo by david tsay | from: rustic modern house tour
This layout is one that can look cool but you have to be careful. First, what does a “float” mean? Well, it means your rug is under your coffee table, but not your seating. I know, SHOCKING.
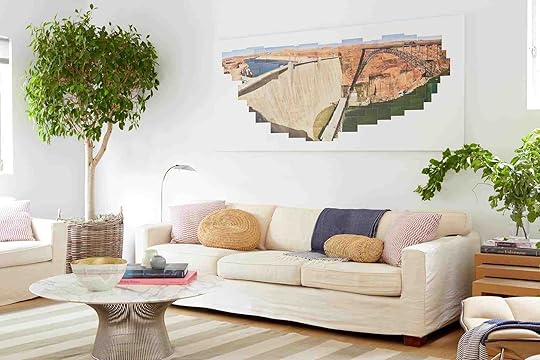 photo by david tsay for styled: secrets for arranging rooms, from tabletops to bookshelves
Here’s the thing. If you have a truly great rug that only misses your sofa and chairs by a few inches then you won’t find us calling the rug police. We do recommend not letting the gap from your sofa to your rug be larger than 5″. Any more and it will really look too small and probably make you sad.
The Sculptural Or Amorphous Float photo by sara ligorria-tramp | from: mountain house reveal: our light-filled neutral textural living room
Let’s get weird…with rug shapes. There are more options than just the classic rectangle. These types of rugs are great for awkwardly shaped rooms (like if you have a corner fireplace) and are easy to float and layer like Emily did in the mountain house living room.
Hot TipLayering a Cowhide or Sherpa Rug is a fun way to make a conversation area bigger.
 photo by teri lyn fisher | from: style evolution, where it’s going, and a big return to og ehd
But there are no real rules for this one except make sure to buy proportionate to your sofa and have at least the majority of your seating’s legs on top of a part of the rug.
So there you have it for our living room rug intensive. We, of course, wouldn’t leave you without giving you the proper materials to take with you. So below we have a little visual cheat sheet to help you decipher between all 5 of your options and then we have some shopping to do:)

We know that large rugs can be expensive so we did a deep dive into finding the best of the best on the internet in three different price ranges. Happy shopping!
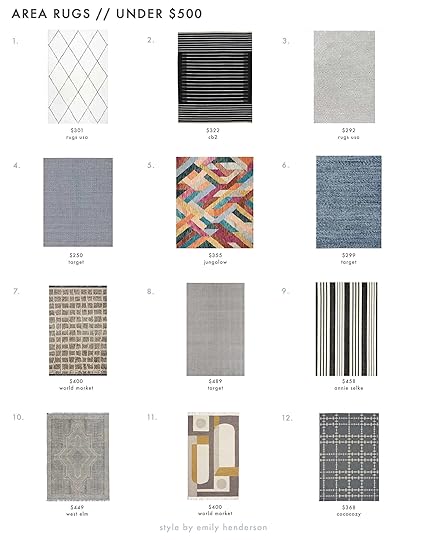
1. Natural Moroccan Shag 9′ x 12′ Area Rug | 2. Black With White Stripe Rug 8’X10′ | 3. Ivory Paddle 9′ x 12′ Area Rug | 4. Ramona Geometric Flatweave Tufted Accent Rug 8′ x 10′ | 5. Hallu Fiesta Rug by Justina Blakeney® X Loloi 7’9″ x 9’9″ | 6. Chunky Knit Wool Woven Rug | 7. Black And Natural Grid Axel Area Rug | 8. NuLOOM Cotton Hand Loomed Herringbone Cotton Rug 9′ x 12′ | 9. Birmingham Black Woven Cotton Rug 8′ x 10′ | 10. Indra Rug 8′ x 10′ | 11. Ivory And Gray Wool Kilim Reversible Soho Area Rug | 12. Finesse Tower Court Rug 7’10” x 11′

1. Jamila Spice Rug by Justina Blakeney® X Loloi 7’9″ x 9’9″| 2. Souk Wool Rug 9′ x 12′ | 3. Jonathan Adler Inkdrop Slate Blue Rug 8’X10′ | 4. Plus Black/Cream Rug 8′ x 10′| 5. Zion Ivory Handwoven Rug 9’x12′ | 6. Guilford Navy Woven Cotton Rug 9′ x 12′ | 7. Aspen Rug 8’×10‘ | 8. Solana Navy Woven Cotton Rug 9′ x 12′ | 9. Topanga Teal Moroccan Rug 8’x10′ | 10. Hira Rug 8′ x 10′ | 11. Floral Blue Rug | 12. Casablanca Rug 9′ x 12′

1. Earth Maze Moroccan Shag Rug 8’X10′ | 2. Amber Lewis for Anthropologie Hand-Knotted Sarina Rug 8’X10′ | 3. Serpentine Rug Wool 9’X12′ | 4. Winn Hand-Knotted Rug 8′ x 10′ | 5. Echo Rug 8′ x 10′ | 6. Huxley Rug 8′X10′ | 7. Large Moroccan Checkered Area Rug 9’X12′ | 8. Handwoven Priya Rug 8’X10′ | 9. Stripe Break Rug 9’X12′ | 10. Noma Indigo Woven Wool Rug 8’X10′ | 11. Tres Rug 7’10” x 5’7″ | 12. Dusk 8’X10′
Ok, that’s the real end. I hope you are now extremely confident and well equipped to pick out your dream rug and have it look exactly how you want it to. Let us know if you have any more questions in the comments.
Love you, mean it.
Opening Photo Credits: Design Sam Gluck | Photo by Alison Bernier | From: A Warm Scandi-Inspired Home
The post How To Choose The Right Rug Size For Your Living Room – 5 Formulas Guaranteed to Work (+ 36 Shoppable Picks) appeared first on Emily Henderson.
Should We Be Floating All Of Our Furniture??? A Potential Trend We Think Is On The Rise

What I love most about design (aside from the fact that it’s a literal joy for my eyeballs daily) is that there are so many moments that catch me off guard (in a good way). The antenna goes up if you will. That doesn’t mean that it’s always something brand new but instead, maybe it’s something I hadn’t noticed or fully considered before. Maybe it’s because it’s kinda a design rule that’s been broken which leads me to today’s topic: Floating Furniture That Normally Doesn’t Float (ie Cabinets and Beds). Yep. Off the wall and sometimes fully in the middle of the room.
It was this Barcelona apartment tour that really shook me up! To be fair the apartment is a loft with high ceilings, large open spaces, and a ton of natural light. But the architect, Benedetta Tagliabue, very cleverly sectioned off parts of her home with cabinets floating off of the walls and even in the middle of the room as you can see below.
 design by benedetta tagliabue | photo by gunnar knechtel | via dwell
 design by benedetta tagliabue | photo by gunnar knechtel | via dwell
Her home is full of so much personality, pattern, and texture that you don’t feel like you are in a museum or art gallery-like home, just a really thoughtful and exciting one.
 design by cristina celestino | photo by davide lovatti | via elle decoration uk
But then again maybe we don’t knock the museum-esque look? I mean check out that glass cabinet above. It really helps to separate this very open concept space into a couple of lovely zones which was the designer’s goal. Also, I’m pretty in love with those curtains and the half solid and full sheer double look. But back to the cabinet. Would this delicate cabinet be ideal in a house with children, a rambunctious pet, and/or a terribly clumsy adult? No. BUT it’s a pretty cool and interesting idea that I’m inspired by.
 design by hearth studio | photo by sean fennessy | via jacky winter gardens
Not to mention that the HOT design question of 2020 was asking if the open concept home was done. Personally, I don’t think it will ever be gone, gone but adding in a large cabinet like the one about that gives the illusion of a private space, but the airiness of an open concept is kinda a great idea, right? It also looks like the far side of the cabinet opens up to both sides. Also, great!
 design by hannes peer architecture | photo by helenio barbetta | via ad spain
Now the photos above and below fall more in the “half float” category for me since they are touch two surfaces but I love them just the same. Open shelving is such a great way to create a design moment with books and objects but using it as a “room divider” in the middle of the floor is extremely cool. Again, creating “zones” that still make a space feel connected and light.
 design by foomann | styled by esme parker | photo by willem-dirk du toit
See it’s a half wall that doesn’t cut off the space but makes it a little cozier.
 design by ezequiel adelmo manasseri and maría sol depetris | photo by javier agustín rojas | via dwell
But I also love how ezequiel and maría just put this free-standing cobalt freaking blue shelving until in the middle of the floor. It makes a very cool statement, draws your eye up, and there’s something interesting to look at from every side.
So that’s my “hey if you have the space, float a cabinet off of your wall as a zone creator and design rule breaker. It might be really awesome.”
But now we move onto the other unlikely floated furniture piece…the bed. Can you imagine??? Well, Hilton Carter’s incredible nursery for his baby girl was the second *ding* in my “are people floating all of their furniture now” thought. Also, yes that is a custom handpainted mural with a unicorn and dinosaur… this little lady is SO lucky because her parents are extremely cool.
 design by hilton carter
And maybe I’m wrong but I feel like I haven’t seen a ton of “crib in the middle of the room” designs but I LOVE it. A tiny baby that can’t yet walk doesn’t actually need open play space. I’ve also done a lot of babysitting in my years and they are either in your arms, in some kind of chair, or just in the living room on the floor. So why not just do something cool and put that crib in the middle of the room? But this look isn’t just for babies with rad parents! It’s for rad parents and any other person with a large enough room too.
 via gerosa design
This is a catalog shot but tell me this isn’t cool?! It feels so wild but all you are doing is moving your bed a few feet from the wall. So it’s a free idea that might make you the coolest kid in town.
But I know what you’re thinking. What about an outlet for side table lamps and phone chargers. Well, it’s basically the same as when you float a sofa. Either you get real fancy and put an outlet on the floor which will cost you. OR you can cut a little slit in your rug and run in under there to the wall. Problem solved.
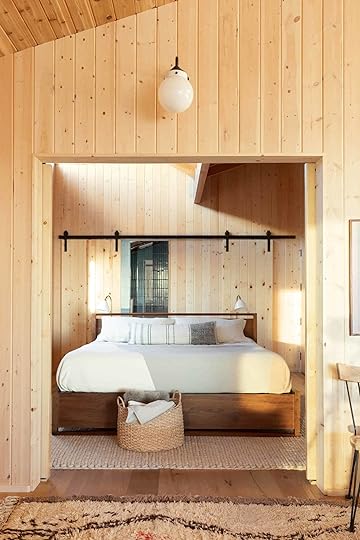 deign by max humphrey | photo by christopher dibble
Our design bud, Max Humphrey, was an already established cool kid but now it’s officially confirmed with this floating bed in this beach house he designed for one of Emily’s best friends! I know it’s hard to tell that it’s floating but Emily stayed there, so we definitely know. Minimal, chic and perfect for a vacation home.
 design by sharon mrozinski | photo by marta xochilt perez | via cup of jo
What I love about this version is that the bed is super tall! At first, I was of the opinion that low beds were the kind that only really worked with this look but I was wrong. This four-poster bed is awesome and I dream of waking up in it and looking at what is likely a very stunning view.
 design by amber interiors | photo by shade degges | via all sorts of
Here’s another catalog shot but really who cares if it’s inspiring. Pluuuus it’s from Amber Lewis’ new line at Anthropologie! I personally LOVE this chandelier, these wine glasses, this chair, and this piece of art. But there really is something airy and wonderful about this bed floating in the middle of room. Gimme all that breathiness.
 design by nate berkus | photo by christopher dibble
Now, if Nate Berkus is down for the float I think that REALLY says something. It’s also a great way to add some unexpected storage. Nate did under the bed drawers AND has some storage on the other side of the headboard. Cool, no?
 design by hess hoen | via vouge living
Then we have another huge bed (did you ready Caitlin’s canopy post?) where this look is perfect. This room also looks like it has a ton of doors and windows so floating might have really been the only option. That’s definitely an option if you also struggle with too many doors and windows (and have a large enough space). Now, are you ready for the even cooler part?…
 design by hess hoen | via vouge living
LOOK AT THOSE shelves! And the curves! And the feet!! It’s such a cool design that’s super functional too. Doing this might also make you feel a little less like you’re floating in space if that’s a concern:)
Ok, so what do you think. Are you into the idea that any piece of furniture can float?? Do you like this idea/trend? Hate it? Let’s chat!
Love you, mean it.
Opening Image Credits: Design by Amber Interiors | Photo by Shade Degges | via All Sorts Of
The post Should We Be Floating All Of Our Furniture??? A Potential Trend We Think Is On The Rise appeared first on Emily Henderson.
August 23, 2021
My Four Cents On Starting A Successful Creative Career

This last year made a lot of people I know reevaluate their jobs. There seems to be this collective urge to actually enjoy some of the 40-50 hours a week we spent at work. Many were laid off, many had to quit or scale back to be with kids when they weren’t in school, and for some more privileged it’s just an existential shift. I’ve had this massive influx of people asking me lately about how to get started in a creative career. Five years ago I wrote the below post based on a couple of keynote speaking engagements that I had just given and after rereading it I figured with some updates it’s actually still very applicable. So if you are toying with starting a creative career, if you secretly really want to take the risk but you are scared or you are having trouble pulling the trigger, this post could be helpful.

Now I’m not a professional motivational speaker; furthermore, I’m actually someone who has made 1 million mistakes in my business, but as far as putting myself out there? I did that and I continue to do that which I think is one of the reasons for the success of my company.
But those of you who are hesitant are certainly not alone. I find this especially among my generation. Millennials are much more entrepreneurial and confident than those of us who went to college in the 90s likely because we were raised pre-internet and didn’t see firsthand how you could actually make a living being an artist. What I see most in people that aren’t fulfilled creatively or career-wise is the inability to pull the creative career trigger – to put themselves, their service, or their product out into the world. This inability holds them back, keeps them unfulfilled, and deprives them of much-needed creative expression. And it’s such a cycle – the longer you wait, the less confidence you have, right? Because you see all these other people starting all over the place and you think, gah, I’ll never catch up!! It’s sucks, I get it. But why?
My theory is that this lack of “starting” is attributed to two stupid things: perfectionism and fear.
Perfectionism is a dangerous demon, and trying to capture it in any facet of your life (career, relationship, or even design of your new English cottage kitchen, for instance) is a fool’s errand that will cause you so much stress, make you less happy and no matter how hard you try, you will still fail to be perfect. So stop trying!!! Sure, I believe in being detail-oriented and having a high level of quality in both styling/photography and my design work. However, as everyone who works for me or knows me knows, I’m truly not a perfectionist and I think this is one of the keys to creative success – especially in the digital age. I believe producing something good is more important than perfecting something ’til death. I know that it’s hard if you ARE a perfectionist, and I’m not a psychologist but it seems to me that perfectionism was touted as some sort of good quality – like being a workaholic – so many people identify with it (by the way it is an actual disorder for some people) but ask yourself if you are truly a perfectionist or is it just an excuse because you are scared.
What I hear the most is that someone’s product or service isn’t quite ready to be put out there. Maybe it’s that their font isn’t flushed out on their site yet, or their portfolio isn’t robust enough, or perhaps their product needs a few tweaks. But this tweaking/obsessing/flushing out process can go on for years. YEARS of you not starting and therefore not feeling fulfilled.
 photo by stephanie todaro | from: how to create a design planFear Is Even Worse.
 I get it. I’m held hostage way more by fear than perfectionism. I’ve told you over and over that there are some posts of which I’m terrified to push publish. Fear of criticism, backlash, or negativity is something I still battle a bit on personal posts and I have to really force myself to be brave and power through (luckily most of you are really nice).
But I see what fear does to people – it totally paralyzes them and stops them before they ever start. Just remind yourself what I tell myself all the time – the worst thing that can happen is you fail, and failure doesn’t actually kill anybody. No one will die if I blow this speaking engagement. No one will die if I reveal a project that I, too, fear is sub-par. No one will die if I start a design series for the blog that you guys all think is insane. I’ll simply adjust and move on. In the digital era, people forget so much faster than they used to and I promise you, you have many chances at a first impression.
So here’s my advice to “getting started”:
1. Focus On QUANTITY Over Quality For A While.This is KEY and opposite of what we have always been told. When I started the blog it looked like this.

It was barely above average at best and I knew it but I had put off starting the blog for over a year at that point and one day I just needed to push publish (I have hasty little sausage fingers that often just press send when my brain is busy trying to deal with fear – thank god my fingers are much smarter than my brain). The inspirational photos were pretty but not perfect, the copy was personable but not even that professional, and the site itself was absolutely mediocre at best. I had built it by myself on Blogspot with zero photoshopping skills and a serious frustration towards choosing fonts (which I still have – I’m strangely bad at 2-dimensional design).

But I started.
Sure, this was in a time when there weren’t that many blogs and the content was mostly inspirational photos scanned from magazines or DIY projects with bad cameras and even worse lighting. As I started to create content in my home I didn’t obsess on perfection either and instead created cute vignettes that had personality and partnered with up-and-coming photographers who needed to practice their craft, too, to shoot random stuff in my house. This is how I created a portfolio and a blog and while neither were perfect, I did it. I started.
2. Create A Website With Your Company’s Name That Says “Coming Soon!”Add your contact/social media handle – then get on social media instead while you “tweak” your site (you could tweak your site for a year, meanwhile “not starting”). It’s so easy. People accept a “coming soon” website for months, I promise.
3. Start Posting On SocialIf you want to be a potter but are intimidated by creating so much social media content or Instagrams every day then simply find photos of pottery that inspire you and post them, obviously crediting the artist. Say something like “So inspired by @BenMendansky’s work – I love how graphic his mugs are and it’s making me get back into the studio this morning. Just add coffee.” Then tag him (which will get his attention). You don’t have to create all your own original social media, you just need to CREATE SOMETHING and then remind people that you, too, are creating something. Pretty photos = likes, and likes = more followers. I used to only put original photography on social media but since I’ve been promoting other people’s work I’ve seen a huge amount of success as they feel flattered and followers love the inspiration. (2021 update: I’m currently on the fence about posting a lot of other people’s work that work in your field as many people don’t read the captions so they can easily just think it’s yours. However, it’s more important to create the account which allows people to tag you. So many times I’ll be at a store and see something that I love and want to tag it, knowing that my follower count is super high and could definitely lead to them having more business, so when they don’t even have an account I get so bummed for them). Put their work on insta-story and tag them there – it’s a more appropriate place to show who inspires you and looks less like YOUR portfolio.
4. Use Your Facebook/Instagram Friends As Your Focus Group.These are people who probably care about you and want you to succeed so ask their opinion so they will help you promote and might give you the feedback/encouragement you need.
Over the weekend I was talking to Maxwell (founder of Apartment Therapy), Justina (Jungalow), and Jaymie Derringer (founder of DesignMilk) and all of us chatted about our lack of perfectionism and our instinct to just “create and present” rather than “create and obsess.” I was glad it wasn’t just me – they absolutely ditto’d this theory. Done is better than perfect.
 photo by veronica crawford | from: our first ever reader event at the mountain house—a recapWhat Happens When You Finally Start? These Four Things:
 1. You practice your craft and get better. For me, it was writing, styling, and posting to social media. I had a moderately distinct voice when I started but I’ve certainly honed in on it over the years by writing every. single. day. Like an athlete with a muscle, just exercising guarantees progress if not success. You have to practice your art whether it’s making pottery, interior design, writing, etc and by putting it out there you are forced to practice again and again and again and every day you’ll get better and better.
2. You receive feedback. The internet is one big free focus group – AT YOUR FINGERTIPS!! Companies used to (and some still do) pay so much money to show a product to a group of randomly selected people to get their arbitrary base thoughts. Now you can ask your friends/followers on social media and you will know how people feel about your product immediately. Yes, this is terrifying. One time somebody told me that my designs looked like a child had smeared shit all over their walls. He apparently really, really didn’t like my work and my decorating style apparently angered him A LOT. But most of the time that feedback is absolutely helpful. A few years ago I was getting a lot of feedback that my work was starting to look all the same and as I looked at it, like an objective reader I realized they were right and I started to diversify. If you want faster results and more engagement then ask a question. You can say something like “Excited to finally start showing off my work, but I need feedback – should this mantel have more personality or is it already full enough?” Or if you are a maker you could say, “Thinking about opening an Etsy store (coming soon!) and wondering what price point you would spend on one of my hand-thrown pots?” If you don’t have a social following then ask your Facebook friends. If you aren’t on FB, then get on Facebook (and Instagram).
You don’t need to make a huge announcement that is like “HEY WORLD, I’M NOW GOING TO CALL MYSELF AN ARTIST AND HERE ARE 147 PAINTINGS FOR YOU TO PURCHASE.” No. Baby steps are good! Create one product or publish one project, and ask for feedback – honestly, this will probably make you feel really good. As you get feedback you can tweak your product or service and make it better. Maybe everyone overwhelmingly says that things feel too busy, or that you need more color – then you know what the market is feeling and if you want to listen (p.s. you should) then you will probably create a product that will be more successful.
3. The third thing that could happen if you put your work out there is that you just. might. succeed. No one can buy a product they don’t know exists and no one will hire you for a skill that they don’t know you have. What if you start creating, putting it out there and it turns into your dream job?!
You simply won’t know until you start.
That’s my Monday morning wanna-be-Ted-talk for you. Maybe an Em-talk? Charlie just slapped me (deservedly) for writing that – he’s very sensitive to self-righteous know-it-all advice-givers. But here’s the part where I encourage you to START and I selfishly want to be part of the process. So if this motivates you at all, please post on social and tag me in your project/art/creation by using this hashtag #EHDjuststart.
Our web-based world is always ready for more makers, creators, and artists. And with the internet being such an easy and accessible platform for all services and products, you, my friends are in the perfect time/era to put away that “How to obsess over everything and make sure it’s perfect” self-help book and instead, JUST START.
Opening Image Credits: Photo by Stephanie Todaro | From: How To Create A Design Plan
The post My Four Cents On Starting A Successful Creative Career appeared first on Emily Henderson.
August 22, 2021
The Link Up: How Caitlin Makes Her Hair Silky/Bouncy/Smooth, Emily’s Favorite Kid Craft Book, And Some Ways We Can Help Those Who Need It Most Right Now

It’s hard to know what to write when there’s so much tragedy and hardship going on in the world. We don’t want to ignore but also know that a momentary pause, like a link up, is also needed. So please give your loved ones an extra hug, enjoy some fun things we are loving, click on the links to help those in need, and have a good rest of your Sunday<3
This week’s house tour might be the coziest modern cabin we’ve seen in a minute. It’s textured, warm but with just the right amount of soulful contrast. And if you are in Australia you can rent it!
From Emily: At the beginning of the pandemic I ordered 10 different activity books for the kids since we were homeschooling. Everything from science experiments, cookbooks, cooking + science, craft books, and activity books and this was by far the most popular for the whole family. All of the crafts are from recycled materials that you likely go through (cans, egg crates, yogurt cups, bubble wrap, cardboard) so we started washing and collecting them in the garage in a big tub so that when we wanted to do a craft we wouldn’t have to actually buy more supplies. The book is super well shot, the crafts are clever, easy, fun and doing them with the kids was something that I equally enjoyed doing (spoiler – I love to craft). So while school is ramping up and you might not need the extra entertainment I highly recommend this book for rainy weekends or if you want to do something to engage with your kids after school that you might actually enjoy, too.
Another “home tour” this week is the beautiful La Bionda Hotel in Begur, Spain. The design is by Quintana Partners and has an old-world flare with whimsical detailing. Every inch of this property is absolutely STUNNING, and it’s now on our bucket list of well-designed hotels to stay in. Oh, and the bright red lobby desk is holding onto our hearts tight. Check it out, you won’t be disappointed.
From Ajai: I like to make any space I design feel grounded, so incorporating pots and plants is a good way to do that. I love these clay vessels because of their distressing, giving them an antiqued feel.
From Mallory: I don’t know why it took me forever to order this for my apartment, but after a year of living here I FINALLY DID IT and life is good. Yes, they’re door stops. The doors to our apartment are very heavy & shut behind you, but we like to keep them open to get a cross breeze while we cook so we don’t set our smoke alarms off. We used to drag an extremely heavy chair across the entire place just to keep the door open, but now that I finally got some door stops, there will be no more chair dragging and it’s much better for everyone (especially our neighbor under us). Plus I like these because they have a cute little leather tab that adds a nice touch. Best $10 (for a 2 pack) I’ve ever spent.
Also from Mallory: I just stumbled upon these extremely cute Etsy lights and I want them all so bad.
From Jess: If you haven’t watched Bake Squad I HIGHLY recommend it. It’s fun, uplighting, and just full of an insane amount of creativity from professional bakers.
Also From Jess: Ok I know it’s not fall yet and crowding around the fire is NOT top of mind but I picked up this very good log holder from Target. It’s perfectly simple and modern AND has a removable base plate to easily clean up messes. I’m planning to use it in a slightly unconventional way so it can be used in more ways than one!
From Caitlin: Greetings from Vermont! I’m doing MOH duty in my childhood best friend’s wedding this week – over two decades of friendship!!! – but I GOTTA show y’all something one of the other bridesmaids turned me on to: this volumizing round brush blow dryer. Guys, this thing is AMAZING at getting you some blowout-style hair without the hassle of juggling a brush AND dryer separately. She let me borrow it on our very cold, very damp bachelorette trip to upstate NY and I used it again this week in a super-rainy and uber-humid climate – and y’all, I’m just BLOWN AWAY (pun UNintended but very appropriate) by the difference it makes in how smooth and shiny and bouncy my hair looks and feels without any additional hot tools. Highly recommended!!!
We all know this has been a very hard week. Emily wrote this post about the ways we can all help the Afghan people and the refugees that are here and coming. But we can’t forget about Haiti and the horrible earthquake that has devasted it. Here’s a great article from NPR that gives a bunch of ways to help and/or get involved.
That’s all for this week folks!! Thanks for tuning in
Opening Image Credit: Design by Emma O’Meara | Photoy by Nikole Ramsay | via The Design Files
The post The Link Up: How Caitlin Makes Her Hair Silky/Bouncy/Smooth, Emily’s Favorite Kid Craft Book, And Some Ways We Can Help Those Who Need It Most Right Now appeared first on Emily Henderson.
Emily Henderson's Blog

- Emily Henderson's profile
- 10 followers

