
Melissa Coleman's Blog, page 14
September 6, 2018
Motherhood: A Complicated Order
Women, you can have it all, they say. And you can. Well, everything you can carry in two arms, a piggyback ride, a Mary Poppins bag, and a frazzled mom-brain, sandwiched between the sun’s coming and going, between breakfast and dinner time, between deadlines and surprise sick days. Motherhood and working through it (having it all) is a complicated order.


This post is sponsored by American Express. Thank you for supporting the companies that support me.
You can work from home with a four-year-old on your back (me). You’ll save on childcare, but it’ll take 6 times as long to get your work done. Though, can you call anything done anymore? And since you work from home, you can work, play with your tiny human, and cook dinner all at the same time. You can have it all, all at once. Heh.
You can work outside the home. You’ll spend a little (a lot) more on childcare, but you’ll get your work done in a reasonable amount of time. But because you work outside the home, you miss play time, breakfast time, and dinner barely makes it on the table. You spend your life torn between wanting to be home with your tiny humans and getting lost in that project at work that makes you come alive.
You can quit work to stay home with your tiny humans. It’ll be easier, less stressful. But because you’re home all day, the messes are bigger, the showers are longer apart, and dinnertime is still dinnertime. You’re the mother, the maid, the referee, and the cook, spending your days making sure everyone knows you’re something more too. They’re 3 and 6, so of course they don’t get it and probably won’t until they’re 36.
Motherhood is both/and. It’s both impossible and beautiful. It’s the most complicated order that you just keep on ordering. This is why I love simplicity. Because some things will always be complex, like motherhood. It’s in the DNA. So, simplify the things you can control—like your pantry and credit card.
Oh, and of course you’re more than a mother, maid, referee, and cook. But those are pretty worthwhile things.
Here’s what’s not complicated—the new American Express Cash Magnet Card. I’ve been using it for the last two months. As promised, my experience so far has been so straightforward. First of all, I’ve been loving the American Express app, which is super easy to use. And even more than that, the Cash Magnet Card keeps it simple. Unlimited 1.5% Cash Back with no caps, no categories, and no annual fees. I’ve been looking for a Card that makes spending and saving intuitive. Terms apply, learn more here.
The Details:
Unlimited 1.5% Cash Back on your purchases, earned in Reward Dollars that can be easily redeemed for statement credits, gift cards, and merchandise. No more point system.
Heaven forbid the dishwasher going out in the same month you get new tires. Enter the Pay It Plan It feature, which helps give you more control over how and when you pay for your purchases.
Terms apply, learn more here.
Head this way to find more about the Card.
The post Motherhood: A Complicated Order appeared first on The Fauxmartha.


August 30, 2018
Mirrors and Piña Coladas
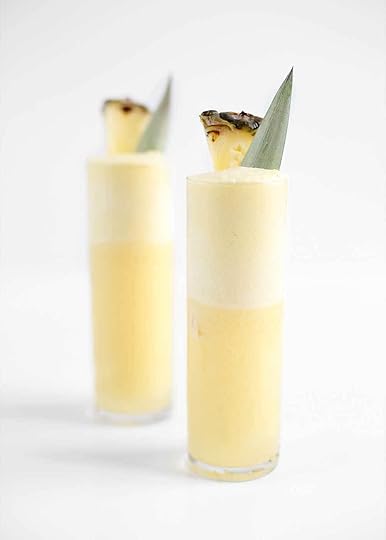
Mirrors. They’re in the strawberries and the Piña Coladas. They’re in the lesson on gratitude to a crying 4-year-old in the Target parking lot. They’re in the garden, and in the new strands of color in my hair, too. Mirrors—they’re everywhere.

This post is a four part series sponsored by Vitamix and The FeedFeed. I’ve been using a Vitamix my entire adult life and have been known to travel with my Vitamix by car. I use my Vitamix as a blender, food processor, and sometimes a mixer. Thank you for supporting the brands that I support.
I’m late. To dropping Hal off at preschool. To my book launch party. To strawberry season and summer in general. It’s days before September, and I’ve just nestled my beach chair into the sand of summer. The strawberry bushes have long been vacant, I’ve just made my first batch of cold brew, and the Minnesota pools are set to close in a couple days. Wait summer, I just got here. At my speed, I’ll probably be sipping Piña Coladas in a jacket around a bonfire next month. How did we get to the end of summer already?
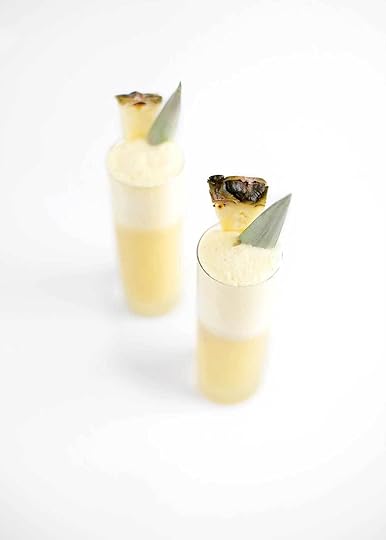
The mirror is in the strawberry bush and the Piña Coladas (recipe below).

She leaves Target in tears. Again. It’s hard when you’re 4, and you don’t get to buy something every trip like mom. “Be grateful for what you have,” I remind her. What a mom thing to say. And then I remember the stack of thank-you notes still sitting on my desk from May. May! If there’s one thing I’ve learned from parenting, modeling is the best teacher. And I’m not sure that I’ve modeled a quickness towards gratitude.
The mirror is in the tears at Target.
The first year they sleep, the next year they creep, and the third year they leap. That’s what my wise gardening friends remind me of as we struggle to keep our backyard garden alive. We’re in year 1 and 2. Half of our garden popped back up and the other half was replanted. I promised a backyard update this summer, but the space is still heavily a work in progress. I’ve been transplanting plants from one spot of the yard to another to make them happier; I’m trying to keep the squirrels from continually exposing the roots of our stressed out rhododendron; I’m scratching my head at how to best care for the once leafy plant that’s become food for a wiggly creature; and I’m experimenting with a low-maintenance, hardy, drought tolerant, no-mow grass. Too good to be true? Growing a mature garden, like most things in life, takes a lot time and a lot of care.
The mirror is in the garden, too.

My hair is greying at a noticeable rate. I have a post-baby, 30-something reorganized body. Months before the book launched, I stood in the mirror wondering what to do with this pervasive new color taking over my dark head of hair (you can read more about it here), wondering what to wear in public besides my usual yoga pants. I was hung up on my appearance. But really, I was nervous about what you’d think of the book. About what you’d think of me and my family, who often get wrapped up into my work.
The mirror is in the grey strands of my hair. (Update on that front coming soon.) It’s in the empty strawberry bush and the Piña Colada. It’s in the garden and the tears at Target. It’s in the yoga pants and the pile of unsent notecards. There are little mirrors everywhere.

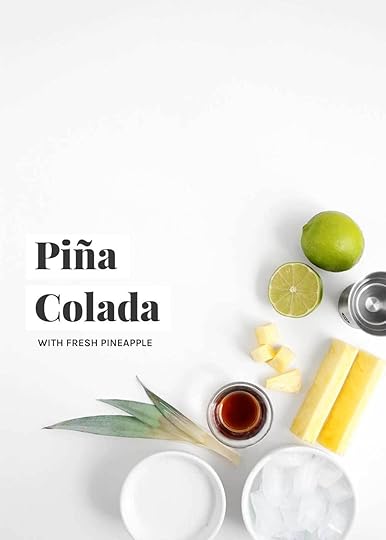
Piña Colada
shopping list
Prep Time
5 mins
Yield
2
adjust servings
This is a non-traditional Piña Colada, in that it uses fresh pineapple instead of juice and canned coconut milk from your pantry instead of the hard-to-track-down coconut cream, plus a squeeze of lime. It's light, bright, and refreshing. Start with juicy, sweet pineapple for the happiest results.
Ingredients
Cocktail
3/4
c. fresh cut, ripe pineapple, packed
1/4
c. + 2 tbsp. coconut milk (see notes)
1/4
c. white rum
1
heaping tbsp. agave nectar, plus more to taste
1
tbsp. fresh lime juice
1
c. ice cubes
Garnish
pineapple leaf
pineapple wedge with peel intact
Instructions
Make the cocktail. Add all the cocktail ingredients into the The Fauxmartha.
August 23, 2018
Weekend Laundry Room Makeover
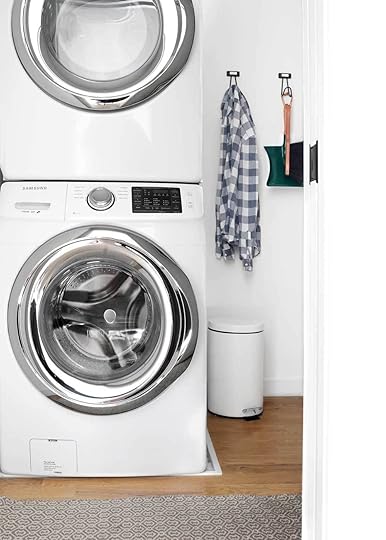
The laundry room was just a square of a room with a stacked washer and dryer when we moved in. We were fresh out of budget for any kind of shelving by the end of the building process, so we threw an extra shelf in the room that we had on hand and called it good enough. We hung clothes on the metal stair rail to air dry and used the guest bed as a folding counter. The laundry room was basically an empty room, and all of its contents were spilling out into the upstairs. It was time to make this room functional.
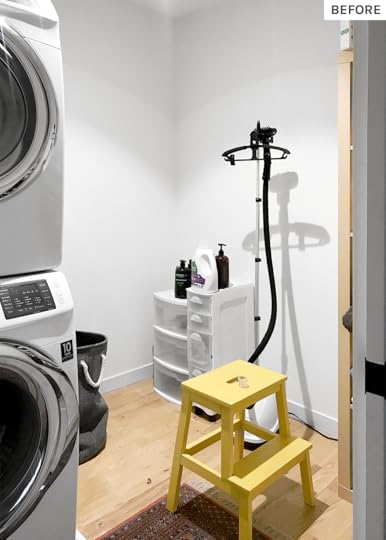
Here’s the before picture taken in the worst light for the most dramatic before and after ever (as Chris Harrison would say).
We drafted a couple stipulations before starting on the laundry room. 1—It had to be affordable. If there’s one house chore I hate most, it’s laundry. It doesn’t matter how beautiful the room is, it will not entice me to wash clothes before they all run out. For that reason, we wanted to save our pennies on this room. For that reason also, Kev does most of the laundry around these parts. 2—It had to be DIYable by me. No extra costs from hiring out. 3—The makeover needed to be quick, so that I could finish it in a weekend. Because time is money. 4—We needed to create space to both air dry and fold clothes.

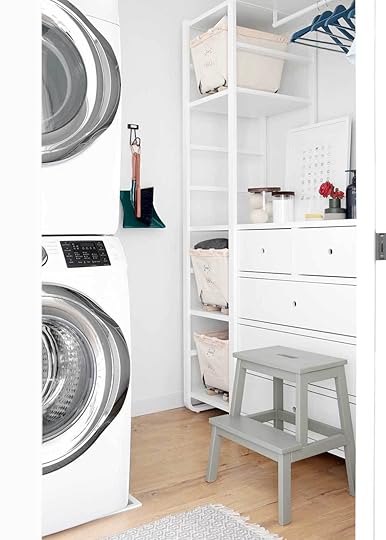
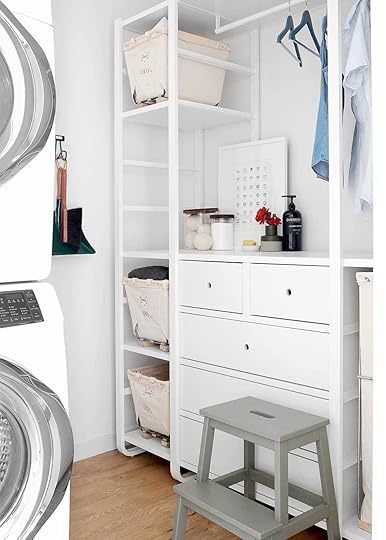
Since I love putting together Ikea (really, I do), I turned to them for shelving. We went with their Elvari system. Ikea has a super cool design program on their site that allows you to customize and configure these systems. No fancy skills needed. Above is the configuration I landed on, with baskets and a caddy added in photoshop.
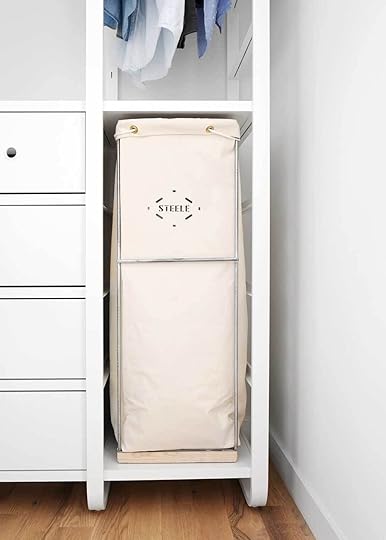
Speaking of, the baskets were actually the inspiration for this room. (Tip: when designing a space, always start with an anchor inspiration piece—whether it’s a basket, a painting, a color, etc.) We have a Steele Canvas clothes basket in our bathroom, and fell in love with the industrial elegance and functionality of it. The laundry room needed a dose of that. (See below for a discount and giveaway.)
So, one rainy weekend of assembly, a couple sore thumbs and palms later, plus some design time before and after assembly, the laundry room makeover was quick and affordable. Though, affordable is such a loose term. We set a budget of $1000 and stayed pretty close to it. See the breakdown and source list below.
Something to note: I hacked the Elvari system slightly by not installing all of the horizontal bars in the middle tower. I wanted to keep the counter space open and functional. To see what I’m talking about, compare the first image with the rendering. The rendering has a stream of horizontal bars running all the way down. Because we have a shelf running across the top and heavy drawers anchoring the bottom, it’s plenty sturdy. You can also anchor this system to the wall.
Laundry Room Breakdown
Elvari Shelving $685 + $29 delivery fee
3 Steele Canvas Small Baskets with vegetable tanned leather $88.75 each*
Steele Canvas Caddy $87.95*
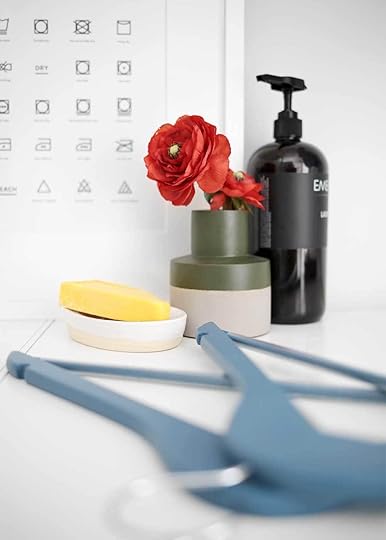
2 sets of Blue Wooden Hangers $22.99 each
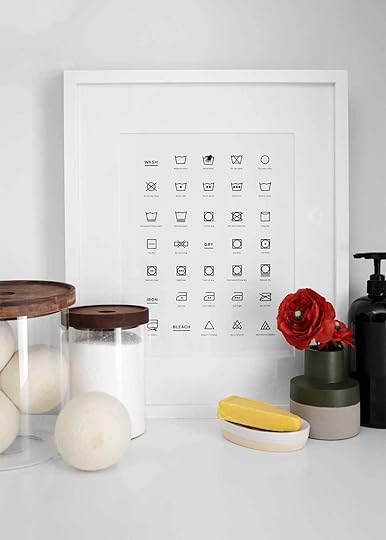
Wash Dry Iron Bleach: Laundry Print $10
Large Glass Canister $11.99
Small Glass Canister $10.99
Soap Dish $9.99
Target Cement Vase $4.99
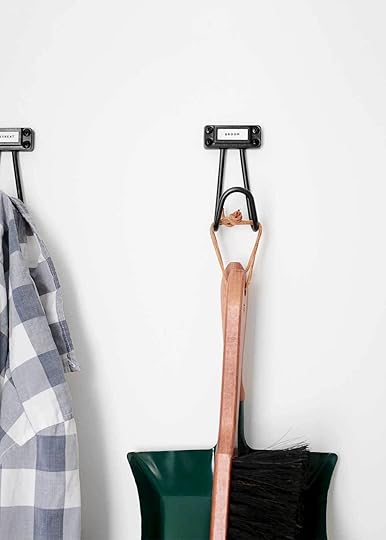
2 Wall Hooks $6.99 each
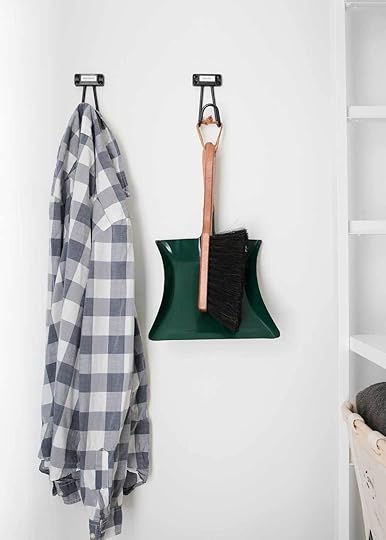
Enamel Dust Pan and Broom (no longer available)
Step Stool $19.99 + paint
Grey 2’x3′ Rug $39.99
Total: $1,229.11
*Steele Canvas sent us these baskets. See giveaway below to win a set.
Budget Tip
I must sound like a broken record, but when designing a room on a budget (aren’t we all on some sort of budget?) choose a couple high-priced pieces to elevate the lower-priced pieces. I’ve taken this approach in every room in the house, and it makes a huge difference without a huge price tag.
Laundry Art
Oh ya, when looking for artwork for the laundry room, I couldn’t find exactly what I was looking for. So I made my own. If you find yourself in the market for laundry room art, I’ve added this print to my digital print shop.
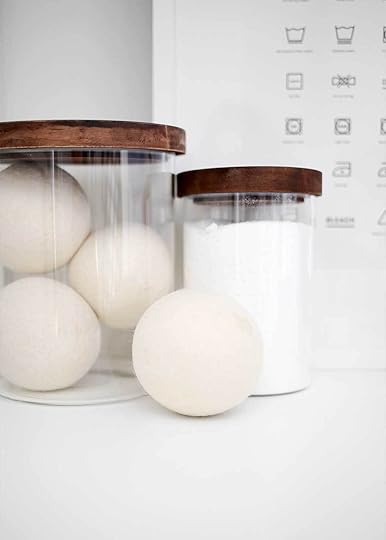
Decorate with what’s around you
I don’t like to decorate for the sake of decorating. Instead, I try to decorate with functional items. I put the wool dryer balls and the Borax on display in glass canisters. I added the Fels Naptha Bar, a stain fighting magician, to a soap dish. I displayed the beautiful dust pan and broom (that we actually use) on a hook. And I found blue wooden hangers to add a pop of color to the room.
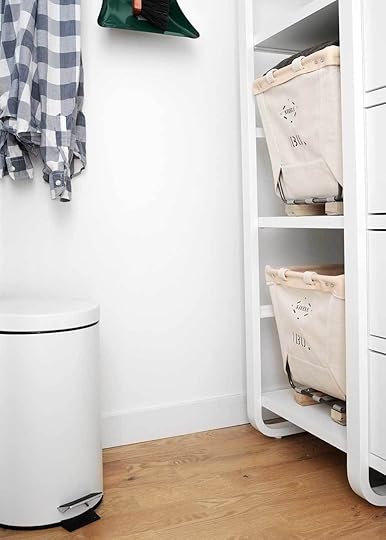
About those baskets
I love the way the Steele Canvas Baskets look. They’re super sturdy, made-to-order, and well built. They also hide the disorderly. The top basket houses cleaning supplies (up high so Hal can’t get to it). The bottom two baskets house towels—beach towels in one and everyday towels in the other. And the large caddy on the right houses dirty towels and sheets. I added round felt pads to the bottom for easy sliding.
Giveaway
Lucky for you—Steele Canvas is giving away a set of the baskets from the laundry room makeover! The set includes 3 baskets and 1 caddy. To enter, leave a comment telling me your least favorite house chore. (You know mine. I also loathe cleaning the kitchen sink.) Open to US readers only. Giveaway ends August 30, 2018 at 10am CST. Head over to Instagram for another chance to win a set. For 10% off steelecanvas.com, use the code “FAUXMARTHA” until August 29, 2018.
Another room done, and I’m feeling so bittersweet. What will I do when I’m all out of rooms to design?!
SEE ALL FAUXHOUSE POSTS>
The post Weekend Laundry Room Makeover appeared first on The Fauxmartha.
August 16, 2018
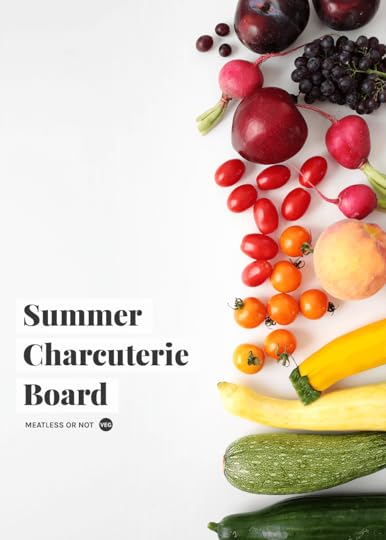
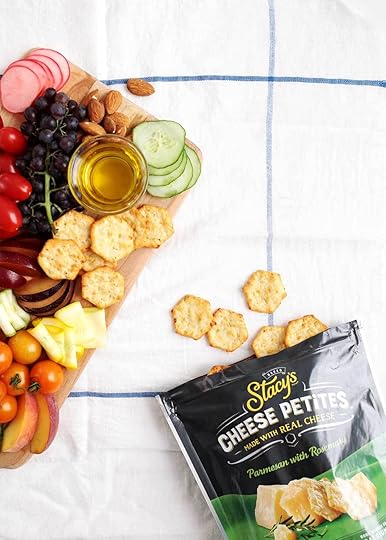
Summer Charcuterie Board
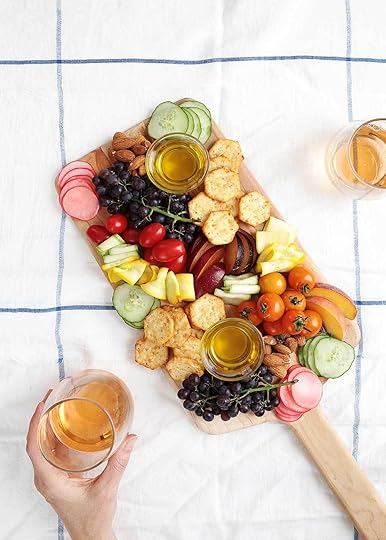
Can you call it a charcuterie board if there’s no meat on the board? If the cheese on the board is baked into crunchy, delicious bites? If it’s made up mostly of summer’s bounty? I’m claiming the faux on this one and calling it a Summer Charcuterie Board, whether I should or not. Because it’s easy like summer and pretty like a charcuterie board.
 This post is sponsored by Stacy’s new line of Cheese Petites, made with real cheese. It’s the first ingredient. We’ve been buying Stacy’s pita chips for years and are totally smitten with these Cheese Petites. Thank you for supporting the brands that I support.
When it comes to hosting, I’m not all that great at feeding people before dinner time. Nor am I all that great at making sure water glasses stay full. Help yourself? There is no recipe for the water situation. But there is a very simple recipe for the pre-dinner feeding. If you can even call it a recipe. Sliced, ribboned, and whole summer bounty on a board. Plus a dip for the veggies. And a couple sorts of crunchy for variety. Skip preparing a dinner salad, and make a Summer Charcuterie Board. Let’s throw this together real quick.
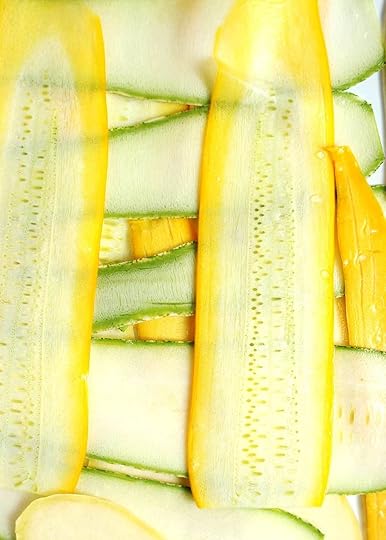
Add plenty of vegetables and fruit
Some vegetables are great right off the plant. And others need a tiny bit of blush to brighten things up. Take squash, for example. Cut it into thin ribbons and sprinkle with a tiny bit of kosher salt. (This is my favorite, efficient vegetable slicing tool.) Let sit for 5-10 minutes before serving, until the salt as been absorbed. Or radishes. Thinly slice and quick pickle. This can be done in advance. Ripe fruit is perfect on its own. Just slice. Or, in the case of champagne grapes, just place on the board.
Add a Dip or two
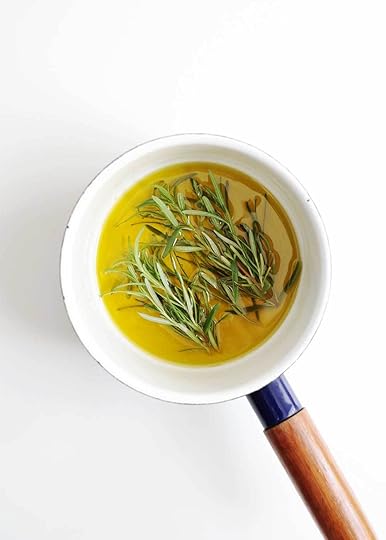
You’ve brightened up your veggies as needed. Now add a dip or two for added flavor. Try an herb infused olive oil (basil or rosemary), reduced balsamic vinegar, or a dressing.
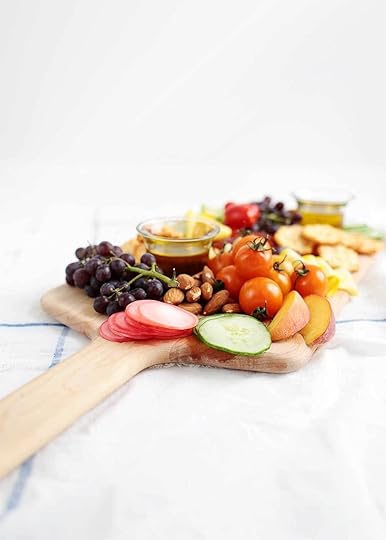
Something Crunchy
Vary colors, size, and flavors on the board. And don’t forget to vary texture, too. Add something crunchy, like nuts or Stacy’s Cheese Petites. Parmesan with Rosemary is my favorite flavor. It’s herby and light and made with real cheese (it’s the first ingredient). On vacation recently, we bought a bag of the Romano with Garlic & Pepper. They’re sharp, peppery, and delicious and lasted about as long as a game of Nertz (not very long at all). Maybe get an extra bag while you’re at it? Head over to stacyssnacks.com if you’re in to deals. They have a discount code on these gems.
Now back to figuring out how to be a good host, keep water glasses full, and get dinner on the table. Maybe one day I’ll be able to call Nertz on that game. Probably not.
The post Summer Charcuterie Board appeared first on The Fauxmartha.
August 14, 2018
Minimal Menu Boards for the Home
The rhythm of the school year is about to play again. The rhythm that keeps us slightly more confined than the loose beat of summer. And with that change comes a tighter deadline on dinner. It requires a bit more forethought and planning, too—some of my least favorite tasks. Even still, meal planning seems to be the only thing that makes dinner time work well in our house. To that end, we installed a 90lb. vintage chalkboard on the dining room wall to keep a record of the weekly meal plan. I’m a visual processor, so a plan only works when seen. If you too are like me, here’s a couple beautiful, doable ideas for adding a menu board to your home. Insider tip: Look for inspiration at cafés.
Go Small
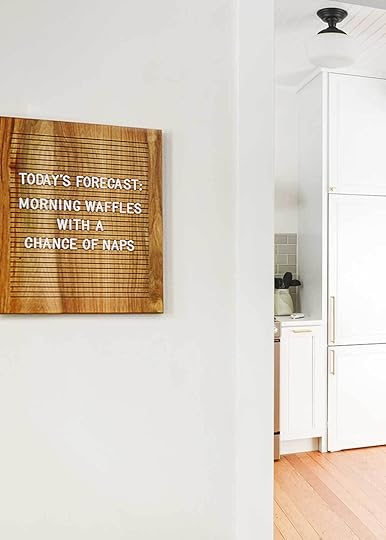
Not every home has wall space for a huge menu board. And even if you do, maybe that’s not your thing. There are plenty of beautiful small boards out there. I love the modern, simple look of this wooden peg board as seen in Kim’s Tree House over on Yellow Brick Home. Here’s a couple more small impact ideas.
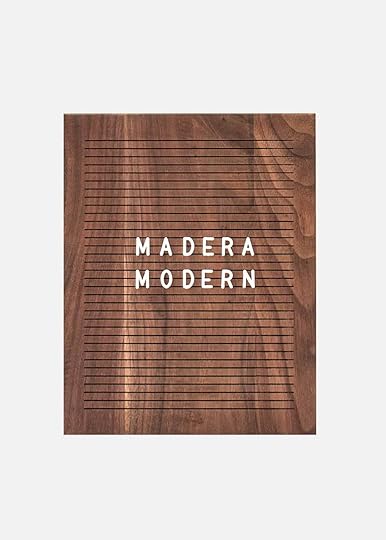
Madera Modern, $50-$100
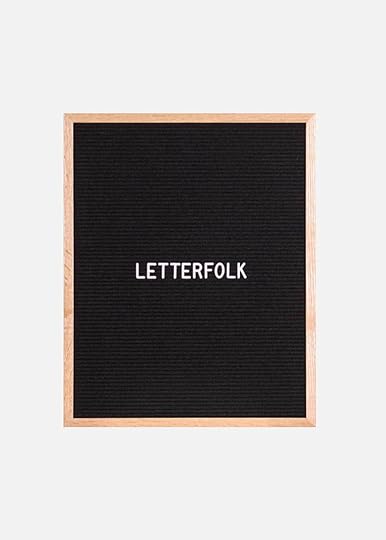
Letterfolk, $125

Urban Outfitters, $24

12″x18″ Felt Board Stand, $89.99
Or, if you’re lacking wall space all together, consider a stand, like this felt board stand. I love this gold stand, too. Try turning this stand into a menu board by painting one of the sign inserts with chalk paint.
Go Big
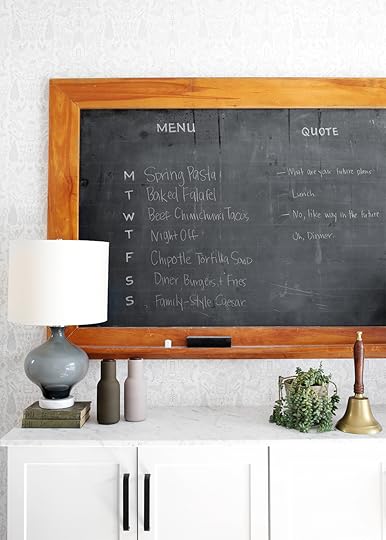
Then again, maybe you do have the space for it. Go big. Real big. This method requires a little more handiwork and investment. Our chalkboard is a large piece of vintage slate with a frame made from reclaimed wood, mimicking its former life as schoolhouse chalkboard. If you’re looking to buy one near the Twin Cities, get in touch with Find Furnish, where we bought ours. Hang using a wall cleat. Here’s a couple more large impact ideas.
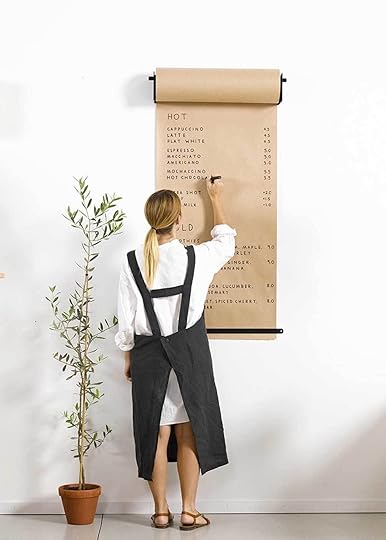
George & Willy 18″ Studio Roller, $202
Or hack this Melissa & Doug 12″ Wooden Paper Roll and hang on the wall, $16.99
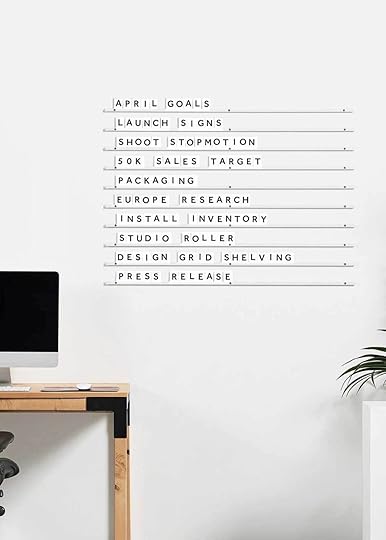
George & Willy Letter Display, $330
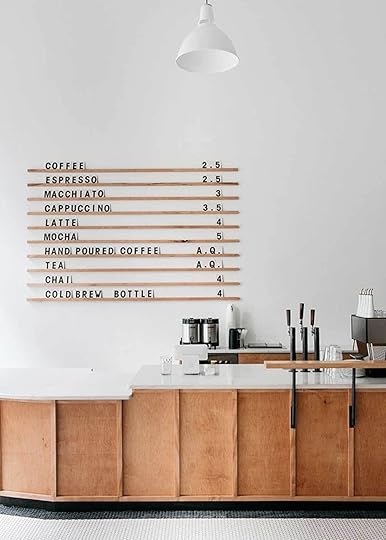
Or, DIY something similar to this menu board at Passenger Coffee. Hang at least 7 narrow wooden ledges for setting letters on. Check the trim aisle at the hardware store for something minimal and stainable. Hang over a buffet or on a wall in need of a little art.
The post Minimal Menu Boards for the Home appeared first on The Fauxmartha.
July 31, 2018
DIY Wedding Cake

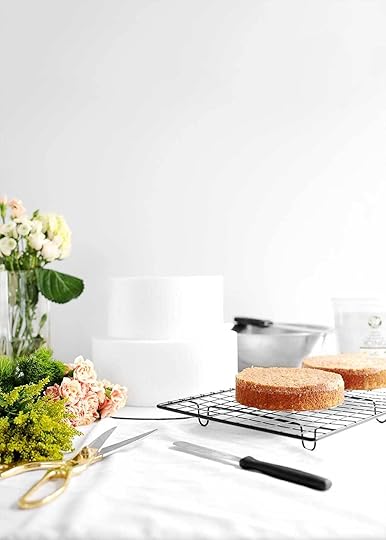
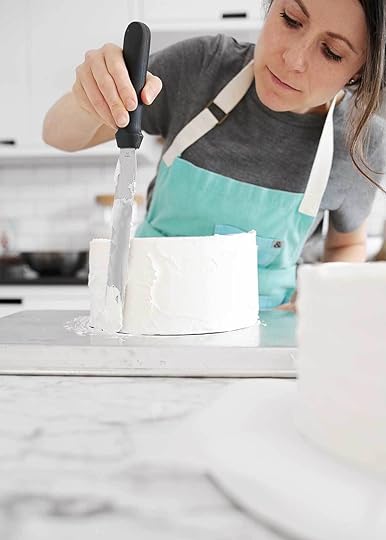
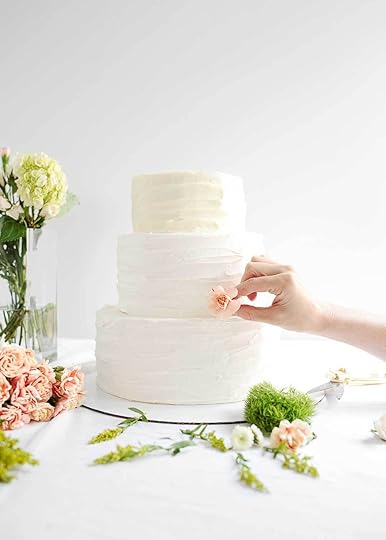
Two years ago, almost to the day, my sister and I made my brother’s wedding cake for over 200 people. We said I do to making cake for over 200 people. It’s as crazy and foolish as it sounds. However, we built in some fool proof buffers to keep the catastrophes at bay, which is why I’m sharing this DIY Wedding Cake with you—in case you too find yourself saying I do foolishly. Practice safe wedding cake making, friends.
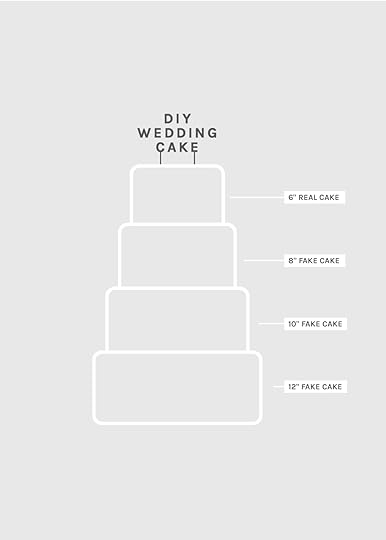
Despite my blog name, I like to keep it real when it comes to food—real ingredients, no faux anything. But when it comes to wedding cakes, I broke my rules to make it doable and fool proof. Because making a structurally sound wedding cake crafted entirely from real cake requires a degree in cake architecture or hours and hours of practice and recipe testing, neither of which I had. So we opted to build the cake out of styrofoam (I know, worst material ever). Three layers of stacked and frosted styrofoam, topped with a tiny real cake for the happy couple to cut, smash, and eat as they wish.
If you fall in the inexperienced wedding cake maker camp like me, I recommend this approach for a couple reasons—the cake was easy to assemble on site. It was also light to transfer (unlike the very large groom’s cake we made, weighing as much as a small child). And it didn’t disappear for the rest of the night. A typical wedding cake sits on a table in all its glory for mere minutes before getting wheeled away, surgically deconstructed, cut, and served. Not this cake. It stands beautifully all night.

Maybe the best news of all, if you want to serve a moist cake (I said it) without worrying about the structural integrity, you can! My sister-in-law wanted Italian Cream Cake. But it’s so moist and dense, which is also what makes it so good, it likely would have collapsed in on itself or leaned further right than the Tower of Pisa had we built it entirely out of cake.
So, what cake did we serve the guests? We had a lot of 9″ square Italian Cream Cakes for cutting and serving in the back. The cake layers were made in advance, wrapped and frozen, and assembled on site, the day of. No traveling conundrums to lose sleep over.
Ok, now that you’ve got the basic backstory, let’s distill this process down to doable. Below are the tools needed, a basic schedule to follow, and wedding cake assembly instructions.
DIY Wedding Cake Tools
4″ Tall Styrofoam Cakes
(8″, 10″, 12″) I’ve been able to find these at specialty kitchen or craft stores. If you’re on a time crunch, Amazon might be your best bet. Or call around to stores before driving all over town. Time is of the essence.
14″ White Drum or Cakeboard
This is the visible base of the cake. For a more formal presentation, opt for the drum, which is what we used at the wedding. For this post, I used a cakeboard, which is basically cardboard. You can also find these at specialty kitchen or craft stores.
6″ Cake Pans
These pans are for the edible top layer. Actually, this is my favorite sized cake to make, no matter the occasion. Most times, you can half an 8″ or 9″ recipe, to create a taller 2-layer cake or thinner 3-layer cake. For 2-layers, add a couple more minutes to the baking time for the taller cake height. For 3-layers, decrease the baking time.
Sturdy Icing (not for eating)
Don’t waste your time and money on coating the styrofoam cake layers in high quality, edible icing. This is the perfect time to cheat. It also adheres really well to the styrofoam layers. Note, when choosing this icing, try to match the color of the icing used on the top layer as close as possible. You can see in the pictures, my top layer was creamier in color. I used this Sturdy Cream Cheese Frosting and made the mistake of using organic heavy cream, which I usually use. Organic is creamier in color compared to conventional. In this case, I should have gone conventional to color match.
Offset Spatulas
You’ll want a small and a large offset spatula at minimum for frosting the cakes. You’ll also want sturdy metal spatulas (burger turners) for transporting cake layers on top of each other.
Turntable (optional)
I didn’t have a turntable, but wish I had borrowed or purchased one. When you’re making this many cakes in a short amount of time, every second counts.
Flowers
Ask the bride to reserve a couple large blooms for you. When choosing additional flowers, vary scale and texture to add interest. Be mindful of when you buy your flowers. Do you want them tight or in full bloom? If tight, use right away. If in bloom, purchase a couple days in advance before using, and allow them to open. Trader Joe’s has super affordable flowers, which I used for this post, however you have to be open to whatever they’re selling that day.
DIY Wedding Cake Schedule
Your schedule will vary based on the number of slices needed (# of guests), the amount of help you have, your proximity to the venue, fridge and freezer storage space, and the time of the reception. Here’s a brief summary of our schedule.
My sister and I came in from out of town a couple days early and started baking the cakes for serving, wrapping each cooled layer in plastic wrap and foil, before stacking in the the freezer until assembly. My brother’s wedding started at 6pm. We arrived at the venue at 9am. During that time, my sister and I made the frosting to frost and assemble all the serving cakes; we frosted, assembled, and added flowers to the wedding cake; ran to the closest store in the middle of no where to buy a knife to cut the cakes (panic); ordered fries and the largest water possible in a drive thru; and got ready for the wedding in the venue bathroom just moments before the pictures started. Some may say we barely pulled it off. I like to think that we planned it just right. Either way, liberally estimate the time it will take you to pull this off, and then add some more time.
2 months out
Test recipes for the 6″ cake and the serving cakes, if different. You’ll want the final frosted cake topper to measure 4″ tall, like the styrofoam layers. As you test your recipe, try a 2- or a 3-layered cake to meet that height requirement.
Test frosting recipe. Can it be made in advance? If so, does it need to be stored in the fridge? If yes, will you have space to store it?
Practice frosting technique. Note: A smooth cake is hard to pull off. Read more below for our fool-proof technique.
Look up inspiration for florals and floral applications. Confirm with bride. Here’s a couple I pulled.
1 month out
Confirm guest count and determine number of cake slices needed.
Scale recipe(s) and calculate ingredient totals.
Make a grocery list and purchase non-perishable ingredients.
Make a supply list and purchase as much as possible in advance. Don’t forget the plastic wrap and foil.
Confirm kitchen space(s) to make cakes.
Create a basic cake baking and assembly schedule. Start with the end and work backwards. Consider cake transportation. Will you be able to safely transport the frosted cakes or is it best to frost on site?
Week of Wedding
Confirm and adjust final cake baking and assembly schedule.
Purchase remaining perishable ingredients.
Make serving cake layers as well as the top layer of the wedding cake. Wrap layers individually in plastic wrap and then foil. This can be done further in advance, about 1 month. However, consider freezer space and freezer burn.
Day before/day of Wedding
Transport cakes, frosting, tools, and flowers to venue. Assemble serving cakes and wedding cake.
About 1 hour before the wedding, add fresh flowers to the cake.

DIY Wedding Cake Assembly
Prepare the edible top layer cake and frosting. Set aside.
Place a couple swipes of store-bought frosting on the cake drum or board to act as glue for the base layer.
Place the largest styrofoam layer on the board and press firmly to “glue” to the board. Add strips of parchment paper underneath the base cake to keep the board clean.
Frost the base layer using the store-bought frosting, including the top of the cake. Smooth and add texture in as desired. We pulled a spoon in horizontal layers around the cake to create a rustic finish (and also to hide imperfections). Carefully removed parchment scraps.
Frost all additional styrofoam layers individually.
Assemble and frost the edible top layer with the homemade frosting. Spend a little extra time here to make sure this cake is ultra symmetrical, leveling off the cake layers if needed. If cake transportation isn’t an issue, assemble this a day before the wedding for easy on-site assembly.
Using a couple sturdy spatulas (and an extra person if you can), pick up the cakes and slowly center and layer.
Clean up any mishaps. Carefully seal the seems of the cakes together by running a tiny spoon or piping beads between the layers.
About 1 hour before the ceremony, add flowers to the cake. Adding flowers in between layers helps to also cover the seems and make the bottom layers cohesive with the edible top layer. Try an asymmetrical flowers application to create interest and balance.
The post DIY Wedding Cake appeared first on The Fauxmartha.
July 25, 2018
Gary, The Dirt, and A Delicious Ending

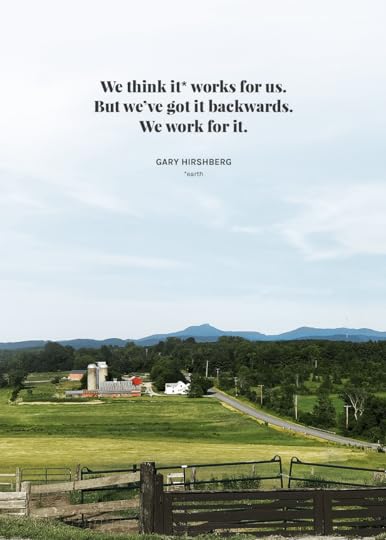
I’m going to start this post with a cliché, a big no no. But clichés are clichés for a reason. At the end of July, I went on the Stonyfield Farm Tour. It was life changing. (There’s the cliché.) If life were a video game or card table with a 500 piece puzzle on it, I feel like I just collected a couple important puzzle pieces to move on to the next level. Do you have those times in your life? When you’re waiting on something, not exactly sure what. And when you find it, or in this case, experience it, you know it’s going to be life-bending.

This post is sponsored by Stonyfield and Blue Apron. As always, these are my opinions and experiences. Thank you for supporting the brands that I support.
This trip was that for me. I hope you’ll stick with me on this one. It’s a long one, and I’m not sure how to tell it another way. This post is not about the yogurt, though we’ve been buying their whole milk plain yogurt for 4.5 years (ever since Hal was 6 months old), after trying every one in the cooler. This is a story about Gary, an organic evangelist. It’s a story about the dirt and our future. Oh, and it has a delicious ending—Homemade Yogurt Ricotta, a recipe from Blue Apron (see discount code at the end of the post).

This is Gary.
You might have heard him on Guy Raz’s podcast, How I Built This. If you haven’t, I highly recommend the episode. It’s the same story I was able to hear on this trip, a story about the very humble beginnings of Stonyfield, founded by two guys named Samuel and Gary (above) who found their way into the organic yogurt business by trying to protect the environment. Gary rode the bus with us backwards, ate with us, and stood with us in the pastures while getting over jet lag. He’d just flown in from New Zealand, where he’s helping the organic movement move. He’s not what you’d expect from a co-founder of an extremely successful company, but what you’d hope for—down to earth, relatable, passionate, and really smart. Over a couple days, he told us countless stories about the word organic and what it can do for our earth. I’ll retell them in my own words below.
Side note: as a designer, I now understand why “organic” is just as large as their name in their logo. Scale communicates meaning. I’m pretty sure they’re trying to communicate something.
This is the part about the dirt and the future.
First, let’s start with the word organic. What is organic? It’s what you’d think—an organic strawberry or carrot. That’s the end product. But an organic strawberry begins in the dirt. To be honest, I never even considered the dirt before. Organic dirt grows organic things, like organic grass that feeds the cows. It is free of synthetic, genetically modified (GMOs), toxic persistent pesticides, and fertilizers and full of the naturally occurring real stuff.
The earth came with its own set of rules, and I think we’re learning this ancient set of rules the hard way right now, not unlike the way I’ve learned most things in life. Applying synthetic “food” to the earth’s skin has made it sick. We can see it in the temperatures around the globe, in the health of the cows, our children, and on the surface of our lakes.
Brent, a dairy farmer who slowly converted his land to organic, saw the spring on his land, once covered in algae from pesticide runoff, clear up. He watched his cows, who were previously treated with antibiotics to maintain health, no longer need them when fed a diverse, organic, grass fed diet.

The use of toxic synthetics doesn’t end over the corn field. The earth is big and huge. But our ecosystem is small and efficient. It recycles like I do every Tuesday morning. What we put into the earth not only nourishes and grows our food, but it provides rain puddles for Hal to splash in and a snow hill for her to speed down come winter. Organic is more than a strawberry. It’s an ecosystem.
Mother Earth. We call her Mother for a reason. She cares for us in a thousand ways we don’t realize. She lets her kids make poor decisions, sometimes with big consequences. She trusts the process of learning. And, like a mother she is forgiving. Gary says organic is not only preventative medicine to our bodies, but it can heal global warming to the point of forgiveness.
I know, I know. This is a lot of information, and it’s only the tip of the iceberg (another cliché, but gosh is it fitting). To read more about this topic, read through Organic 101 on Stonyfield’s site and watch this video about organic soil. It’s quite amazing.
Now on to the delicious ending.
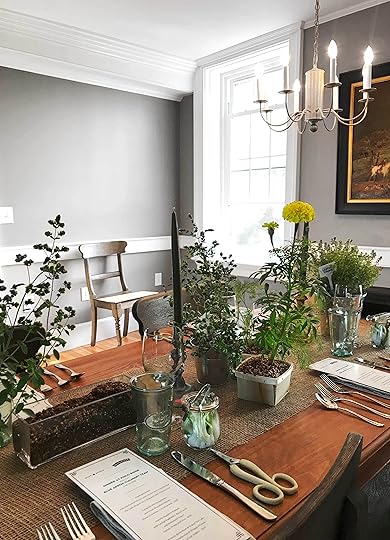
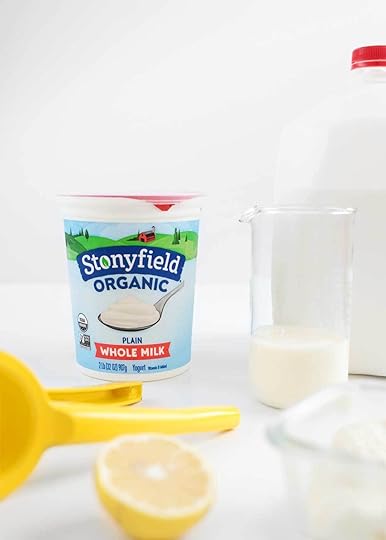
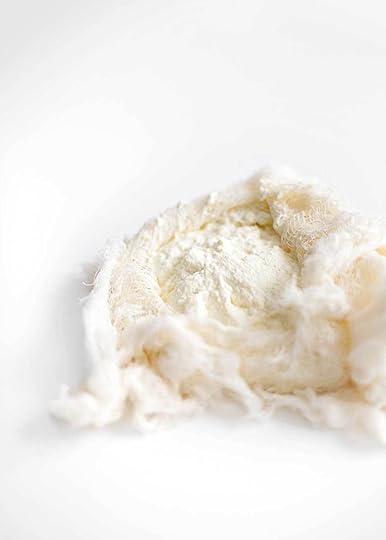
We spent our last night of the trip enjoying dinner hosted by Blue Apron’s Culinary Team in a beautiful home on Philo Ridge Farm. The farmhouse had been recently preserved, upholding its original design with a modern tone, a reflection of the organic conversation. The food was delicious, thoughtfully prepared, and locally sourced alongside some of Blue Apron’s favorite suppliers. For the main course, they served hand rolled cavatelli covered in pesto, dotted with a yogurt ricotta made right in front of us. Making ricotta is a patient, magic process of coagulation (say it out loud with me: co-ag-you-lation), where the pale whey separates slowly from the dense, milky curds, until you’re left with fresh yogurt ricotta.
It’s made from the simplest of ingredients—milk, cream, yogurt, lemon, salt, and patience. Blue Apron let me share their recipe with you. Try it on a weekend when you have a little time to slow down. Serve it savory, dotted atop a pasta dish or sweetened with honey beneath a pile of peaches and a sprig of mint.
PS—Blue Apron is offering $60 off the first 3 boxes for new customers. Redeem with this special code. Head over to instagram for a chance to win free 3 months of free Stonyfield yogurt!
Yogurt Ricotta by Blue Apron
shopping list
Prep Time
40 mins
Yields
2 cups
adjust servings
This Yogurt Ricotta recipe is from the Blue Apron Culinary Team. It's light, creamy, and delicious, unlike anything at the grocery store. Special equipment needed: Cheese cloth, Thermometer, Ladle (or large spoon).
Ingredients
8
c. organic whole milk
1
c. organic heavy cream
1
tsp. kosher salt
1/2
cup Stonyfield Organic Plain Greek Yogurt*
2
tbsp. lemon juice
Instructions
Line a large colander with cheesecloth set over a large pot. In a large, heavy bottomed pot, combine the milk, heavy cream, and salt. Heat to 185°F on medium, stirring occasionally to prevent the bottom from scorching.
Add the yogurt and lemon juice. Reduce the heat to low and cook, stirring slowly and constantly until curds begin to form, then stop stirring.
Once the surface is covered with curds (about 5 minutes), carefully ladle most of the curds into the cheesecloth-lined colander (this allows for the larger curds to remain intact). Pour the remaining mixture through the strainer into the pot.
Let the curds drain for 15 minutes. Transfer to a bowl and season with salt and pepper to taste. The strained liquid (or whey) can be discarded or saved for later use.*
The ricotta is ready to be enjoyed warm. Alternatively, store in the refrigerator in an airtight container for up to two days (the ricotta can be also enjoyed cold).
Notes
*I used Stonyfield's Plain Whole Milk Yogurt in place of Greek with great results.
Blue Apron Test Kitchen Tip: We like to use whey in place of buttermilk in pancakes and biscuits, or as a braising liquid for meat and vegetables.
The post Gary, The Dirt, and A Delicious Ending appeared first on The Fauxmartha.
July 18, 2018
Tex-Mex Side Salad
When your work revolves around cooking, you have the ability to look at holes in your own dinner menu and develop a recipe to fill that need. One of those holes on my list—a light Tex-Mex Side Salad. Because most nights I’m like, “Should we have Tex-Mex or Tex-Mex?”

I grew up eating Tex-Mex weekly from 4th-12th grade while living in Texas. It’s still my favorite type of food, mostly because it’s an easy vehicle for consuming a lot of vegetables in delicious ways beyond a stand alone side on the dinner plate. In fact, this way of eating pulled the dividers right off my dinner plate, changing the way I composed meals too. (See meal composition post here.)
Here’s what also changed my approach to food. If you’ve been around here long enough, you know that weight was an issue following me into my early 20s. You can see it in the snapshot at age 4, smiley me in a too-tiny hand-me-down bikini from my older cousin, to the snapshot of me wearing the pale blue pants in college—not-so-smiley with an exponential pant size increase after my second knee surgery (soccer injury). I went through a lot of diet iterations, beginning in high school. None of those diets lasted, of course, but many of them taught me valuable lessons that shape the way I eat today—like portion control (my biggest problem) and eating more vegetables.
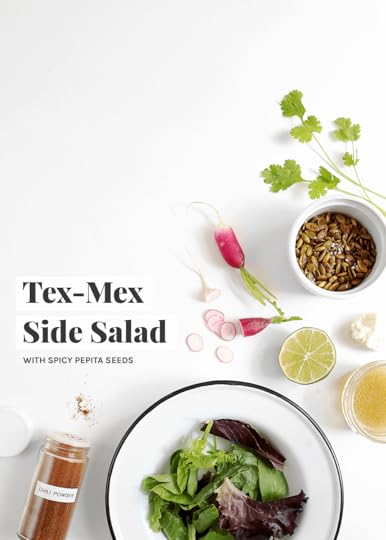
At one point, I had a long list of things I wouldn’t eat, like pizza. Pizza! I don’t have a list of bad foods anymore. We eat pretty much everything. Everything in moderation. And, as you know, make it all from scratch, so that I can control the ingredients used. I start most dinners with a side salad now, something I learned from Bringing up Bébé I think. Or was it a documentary that touched on the way children eat in Europe? Either way, we begin dinner by filling up on the best stuff before switching over to smaller portions of the heartier stuff, like enchiladas or pasta. And now, I have a Tex-Mex Side Salad for the every other night Tex-Mex dinner. This light, bright Tex-Mex vinaigrette and toasted spicy pepitas can be made well in advance for quick weeknight assembly. Just add lettuce (and whatever else is lying around in the fridge).
Tips for Tucking More Vegetables into your life
Sauté or roast vegetables at the start of the week. Save them and throw into your morning eggs throughout the week.
Skip baby carrots. They take forever to chew and made me fall out of love with carrots for many years. Buy whole carrots, chop into sticks at the beginning of the week, and store in an airtight container with a little water to keep from drying out.
Roast veggies in a sauce or viniagrette, like this cauliflower recipe.
Sandwich lover? Sandwiches are the perfect medium for layering on tons of vegetables. I have a couple recipes in my book around this idea.
Try my Mom Lunches during the week. I eat the salad bowl most days for lunch.
Shop the farmer’s market to get inspired. The market I attend often has recipes and samples, which inspires my vegetable eating. Check out this post if the market feels intimidating.
I think slaws are about to make a major comeback. They are brilliant in that they can be prepped ahead, eaten raw, and last all week in the fridge. Look for a recipe soon.
Speaking of slaws, consider a Grate and Slice for super efficient vegetable prep. This is one of my all-time favorite tools in the kitchen.
Top your pastas or pizzas with greens (spring mix, arugula, microgreens, etc) for added texture and nutrients.
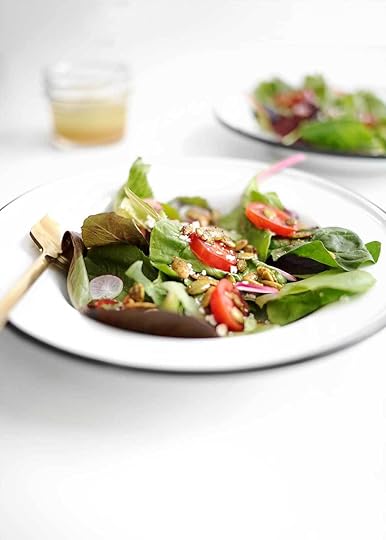
Tex-Mex Side Salad
shopping list
Prep Time
15 mins
This light and bright Tex-Mex Side Salad is meant to be made in advance for whenever you need a quick salad with dinner. The spicy pepitas and vinaigrette call for similar ingredients. For efficiency sake, prepare in the same sitting. Just add lettuce (and whatever else is lying around in the fridge).
Ingredients
Spicy Toasted Pepitas
1/2
c. raw pepita seeds
1
tsp. olive oil
drizzle or squeeze of honey (optional)
1/2
tsp. chili powder
1/4
tsp. cumin
heaping 1/8 tsp. kosher salt
dash of cayenne for heat (optional)
zest of half a lime
1/2
tsp. lime juice
Tex-Mex Vinaigrette
1
tbsp. lime juice
1
tbsp. white wine vinegar
generous drizzle or squeeze of honey
1/8
tsp. kosher salt
1/8
tsp. cumin
1/8
tsp. coriander
1/4
c. neutral tasting oil
Salad
Greens
Cherry Tomatoes
Radishes
Sprinkle of cotija
Instructions
Make the pepitas. In a small skillet, toast the pepita seeds over medium heat until lightly golden, about 3-4 minutes. Turn off heat and add in the remaining pepita ingredients. Stir to coat for about 1 minute more. The leftover heat from the pan will continue toasting the seeds. Allow to cool before storing in an airtight container for 1+ month. (yield: 1/2 cup)
Make the vinaigrette. In a bowl, whisk together all the vinaigrette ingredients, except for the oil, until evenly combined. Slowly pour in the oil, whisking to emulsify (the vinegar and oil become one and turn a pale yellow). This can be made 3 weeks in advance and stored in a container in the fridge. Shake to re-emulsify before serving. (yield: 1/3 cup)
Prepare the side salad. Add greens to individual plates or a large communal bowl. Toss in additional toppings as desired, spicy pepitas, and the Tex-Mex vinaigrette to lightly coat. Serve.
The post Tex-Mex Side Salad appeared first on The Fauxmartha.
July 10, 2018
Reusable Food Storage
There’s a couple rules of the trail. One of them—leave no trace. I know this from Kev, who likes to backpack. There’s a deep respect of the land when you get that high up, that somehow loses its translation this low down. It’s convenient down here. Maybe too convenient? We never meant to build that trash heap. But like the sci-fi landscape in WALL-E or the ominous pages of May’s National Geographic, we seem to have built a mighty large heap. I know this from personal experience. Tuesday’s. Trash day. My trail—where I roll the recycling, organics, and trash bin from the garage to the end of the driveway.
Over the last year, I’ve been tackling the waste issue in our kitchen. I started by composting through the city. Now, I’ve moved on to disposables. Six months in, and it feels like we’ve only just started. Because whenever you try something new or makeover an area of life, it’s impossible to get it right right away. It’s impossible to see how deep the root goes until you start digging. And digging. Change takes time, too, especially sustainable change, even in the confines your Ziploc baggie drawer. The good news, though—there are some really great products on the market that don’t sacrifice design or convenience. My favorites are below. Have you had success with something? Share in the comments!
If satire is your jam, check out this article from The Onion: ‘How Bad For The Environment Can Throwing Away One Plastic Bottle Be?’ 30 Million People Wonder.
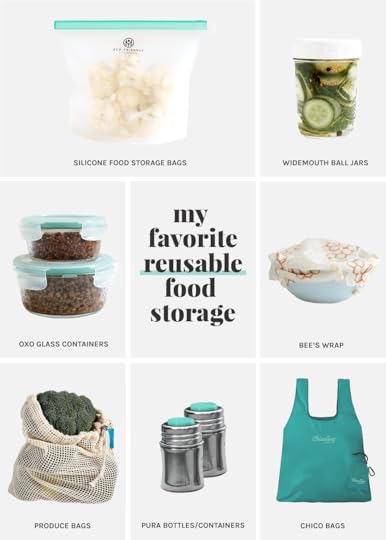
My Favorite Reusable Food Storage
Silicone Food Storage Bags
I researched for a long time before landing on these bags. They were new, like so many reusable items on the market, without many reviews, and expensive. But the handful of reviews were glowing. I added mine too. I love these bags. They wash well—by hand or by dishwasher. They are easy to seal and leak-proof! They don’t stain or hold on to odors. They also do a great job keeping cheese fresh. Cheese doesn’t like a tight hug. Moisture gets trapped between its surface and the hug, producing mold more quickly. These bags give a nice, loose, awkward hug–just the way cheese likes it. Note: I don’t store raw meat in these bags for fear of contamination.
Widemouth Ball Jars
I store all things liquid (like pickled vegetables, dressings, sauces, etc) in these jars. I’ve swapped all the 2-piece metal lids with the BPA-free plastic lids. I know, plastic. But I’ll be using these lids for a lifetime based on their performance these last couple of years.
OXO Glass Containers
I store all leftovers and prepared food in these containers. They are leak-proof, so very airtight, and stack nicely. Visually, I love the color of these lids in the fridge. It looks so clean and fresh. Freezer and dishwasher safe.
Bee’s Wrap
Everyone got Bee’s Wrap in their stocking at Christmas last year. Gosh, I wonder who Santa is? These wax coated wraps are reusable for up to a year, depending on use. They shape to a bowl with the warmth of your hands. Note: clean with cold water only to keep the wax coating intact, and skip using on meat. These can stain with colorful cut vegetables, like red peppers.
Produce Bags
Reusable produce bags took some major getting used to. I’m on my second batch of bag trials, but these bags have super high ratings. I like that you can see the produce though the bag, something my old bags lacked. Dirty bags can go straight in the washing machine. They also list the weight of the bag on the side, to be deducted at the register. Note: To be completely honest, the green produce bags from the store keep fragile produce fresh the longest, especially with greens or herbs. However, I try to mostly use reusable bags at the store, and place the produce in my OXO GreenSavers, as seen in this post, as soon as I get home. This has also helped to cut down purchasing produce sold in plastic containers, like lettuce.
Pura Bottles
These bottles have been with us since the beginning of Hal’s life. They grow with you—from bottle to sippy cup to snack container. The silicone insert converts the bottle to a container. We keep ours full of homemade trail mix, and carry it everywhere and all the time.
Chico Bags
I love these reusable bags for two reasons—they’re sturdy and fold up into a small pouch. I keep two in my purse, where I also store the produce bags. Speaking of, my purse doubles as a shopping bag. I keep very little in it, so there’s plenty of room to hold groceries. See purse here.
Important Note:
I haven’t figured out how to get rid of all disposable plastics. So I keep things around for occasional use, like Ziploc Freezer bags (for marinating or pounding a chicken breast flat), sandwich bags (sending Hal off with something I may never see again), and plastic wrap (when I need an airtight seal on a cut avocado, for example). We’re trying out compostable straws currently. I’ll report back.
The post Reusable Food Storage appeared first on The Fauxmartha.
June 28, 2018
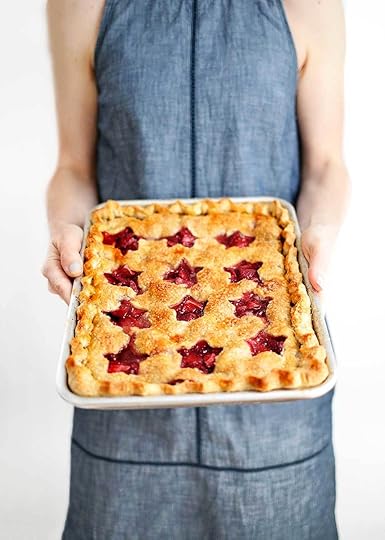
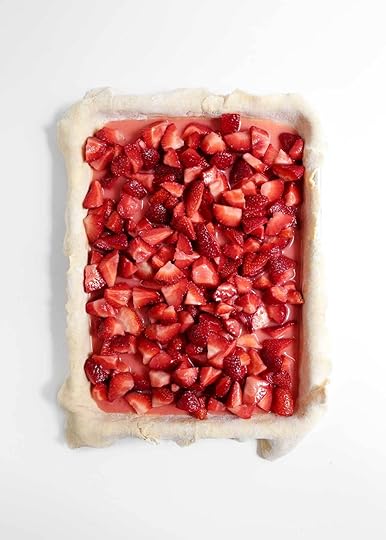
4th of July Strawberry Slab Pie
This is an ode to Martha Stewart who taught us that stamping patterns in your pie is a very good thing. I fell in love with her in high school. I was well before my time. And by well before my time, I mean, I was interested in domestic things like kneading rolls and making banana bread long before domestication (adulthood). My friends never really called me cool, but they often called me Martha or Betty Crocker.
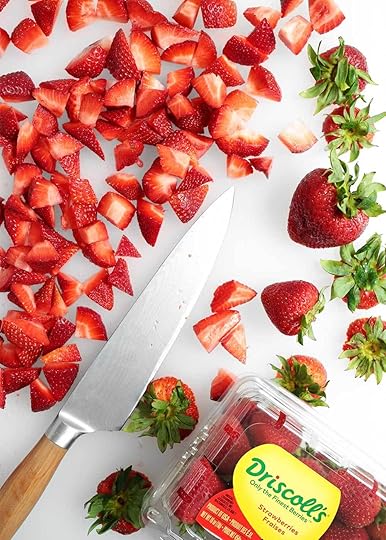
 This post is sponsored by Driscoll’s and The FeedFeed. Here’s the secret to why Driscoll’s berries are always so flavorful? Each berry begins with natural breeding through cross-pollination, a technique that has been used for thousands of years by breeders worldwide. Then, they pick out the elite parent plants and match the best berries to create even better offspring. To learn more about Driscoll’s #BerryTogether campaign, head this way. Thank you for supporting the companies that support me.
In college, I’d watch her show on mornings when I didn’t have class or an assignment due. I also cooked my own dinners and breakfasts, and sometimes lunches when the cafeteria was particularly awful. Who does that? I went to a really small school, where they said “ring by spring or your money back.” It was one of those truths disguised as a joke. I guess you could say I peaked late in life, because as a senior in college, I was considered cool, maybe even a domestic goddess (because I watched Martha Stewart and knew how to cook.) In actuality, I barely knew how to cook, but I cooked and cooked for friends. This was just the ring insurance half the school was looking for.
After college, I moved home for a year to save a little money. I taped The Martha Stewart show on my parent’s DVR and worked out to it every evening after work. Me, my resistance bands, Martha, and sometimes Jennifer Garner, my favorite guest, in my parents living room. Happy hour. My coolness was short lived.
Traveling around for the book tour, Martha often came up often in conversations. We’d laugh that I named my blog after her and go on to talk about how she taught us to make the everyday beautiful. To a generation of women often in charge of the domestic duties of the home, she added so much value to the everyday.
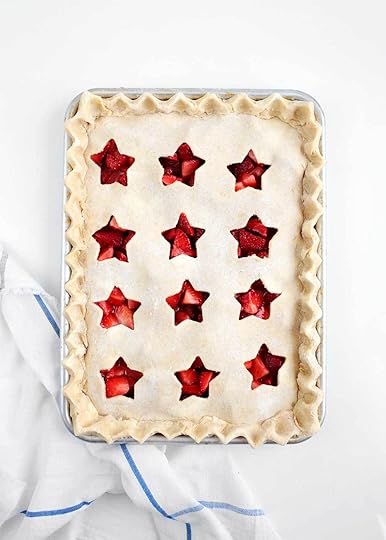
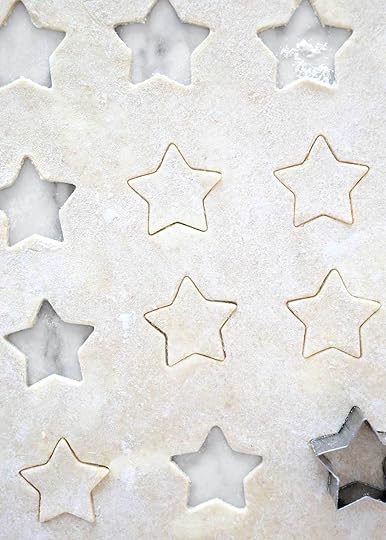
She taught us how to fold a fitted sheet and how to crimp a beautiful pie edge. She taught us to scrape every last bit of batter from the bowl and use the very best ingredients in recipes, like Driscoll’s Strawberries. She also taught us how to make beautiful food and bring people around the table. That it’s worthwhile, meaningful work. So to Martha, thank you for teaching us to never be above stamping stars into our 4th of July Strawberry Slab Pie. Happy 4th friends. This pie will make you look cool, promise. (I do not promise.)
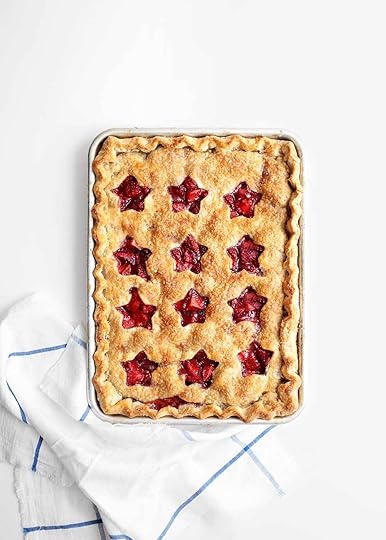
Strawberry Slab Pie
.
shopping list
Prep Time
50 mins
Cook Time
35 mins
Yield
12
adjust servings

This slab pie is made on a quarter sheet pan, about 12 x 16-inches. If the crust sticks while rolling, add more flour. It should always be able to move during the rolling process. Fold into quarters and place in the quarter sheet pan. Unfold and evenly center within the pan. Place in the freezer while rolling out the top crust to a 9.5 x 12.5-inch rectangle. Cut out 12 evenly-spaced Baking Steel, The Fauxmartha.
Melissa Coleman's Blog

- Melissa Coleman's profile
- 4 followers

