
Melissa Coleman's Blog, page 13
November 13, 2018
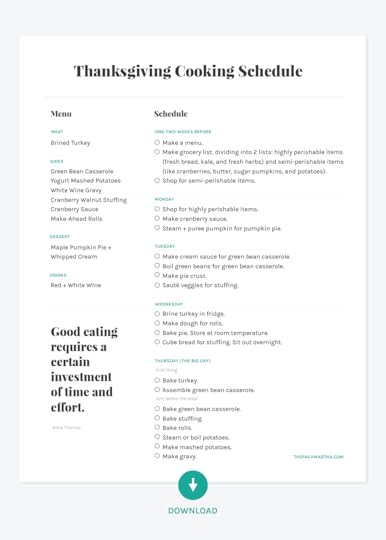
Thanksgiving Cooking Schedule
My love language is cooking, cooking an entire Thanksgiving dinner from scratch. Well, outside the fried onions for the top of the green bean casserole, which I still buy. I don’t care to speed up the process up or cut corners. I want this meal to be made with so much love you can taste it. Thanksgiving is my Christmas and my Super Bowl. However, cooking a whole Thanksgiving from scratch can feel overwhelming. Over the years, I’ve broken down the meal into several days of prep to make it mentally and physically manageable. I have a pennant on my wall that says—good things take time. When it comes to Thanksgiving, good things take time and a bit of planning. So I made you (and myself) a Thanksgiving Cooking Schedule.
Being able to confidently break apart components of a recipe to prep in advance will make you an efficient cook on more days than just Thanksgiving. This schedule will teach you how to do that for the big day and for the everyday. It’s my secret weapon to getting dinner on the table during the week. (You can cook to that same rhythm using my book.) Below is the menu I’ll be making this year. Use this schedule as a guide to create your Thanksgiving Cooking Schedule. More often than not, sautés, chopping, and some sauces can be prepped in advance.
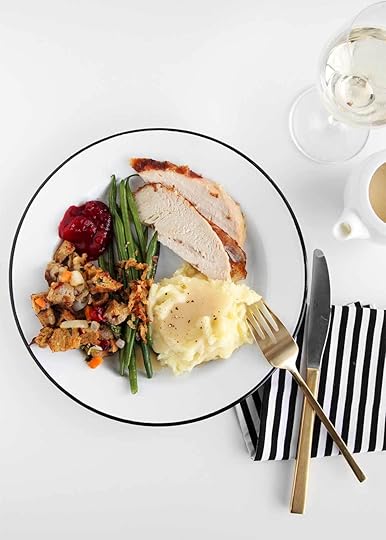
Thanksgiving Menu
Meat
Sides
Green Bean Casserole
Yogurt Mashed Potatoes
White Wine Gravy
Cranberry Walnut Stuffing
Cranberry Sauce
Make-Ahead Rolls from The Minimalist Kitchen
Dessert
Maple Pumpkin Pie + Whipped Cream

Thanksgiving Cooking Schedule
ONE-TWO WEEKS BEFORE
Make a menu.
Make grocery list, dividing into 2 lists: highly perishable items (fresh bread, kale, and fresh herbs) and semi-perishable items (like cranberries, butter, sugar pumpkins, and potatoes).
Shop for semi-perishable items.
MONDAY
Shop for highly perishable items.
Make cranberry sauce.
Steam + puree pumpkin for pumpkin pie.
TUESDAY
Make cream sauce for green bean casserole.
Boil green beans for green bean casserole.
Make pie crust.
Sauté veggies for stuffing.
WEDNESDAY
Brine turkey.
Make rolls.
Bake pie.
Cube bread for stuffing.
THURSDAY (THE BIG DAY)
First thing:
Bake turkey.
Assemble green bean casserole.
Just before the meal:
Bake green bean casserole.
Bake stuffing.
Bake rolls.
Steam or boil potatoes.
Make mashed potatoes.
Make gravy.
The post Thanksgiving Cooking Schedule appeared first on The Faux Martha.


November 6, 2018
An Edible Thanksgiving Table

If we could redesign the calendar, I’d advocate to spread out all the holidays crammed into the last 2 months of the year. (I’d also advocate to move the weekend, Saturday and Sunday, right next to each other on the calendar and decrease the traditional 8-hour work day. But that’s beside the point.) The end of the year is loaded with the biggest, most anxiety-provoking holidays. I always get twitchy this time of year, the most wonderful time of the year. With only two full weeks until Thanksgiving, the twitch is extra twitchy. And then I remind myself again of the US Navy principle—KISS.
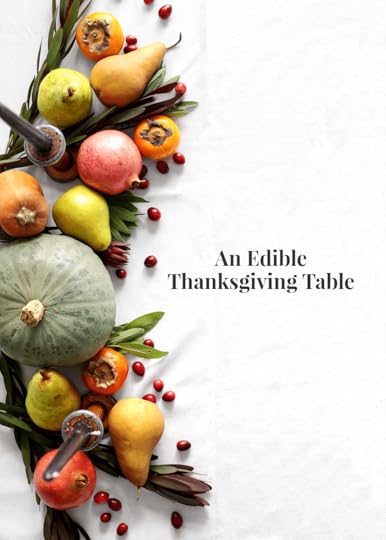
KISS stands for keep it simple, stupid. Delete the last S from the acronym if needed. I say it to myself all the time. Because despite how everything looks around here, I have a tendency to get wrapped up in the more, more, more. Achieving simplicity is always harder than it looks. With that said, I don’t want to add yet another thing to your to-do list. But, if you want to make your Thanksgiving table beautiful, simple, and affordable, here’s a KISS idea—an edible Thanksgiving table.
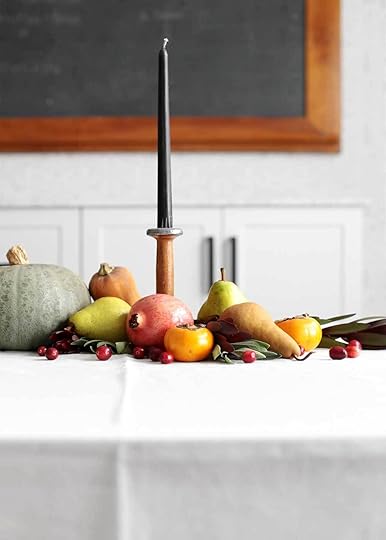
How to create an edible Thanksgiving table
Keep KISS as your guiding principle. Simple is both beautiful, functional, and affordable.
While you’re at the grocery store, shop the produce aisle for your centerpiece. No special shopping trip needed.
Allow fall produce to be your color palette. I went with a mixed muted jewel tone palette of muted oranges (persimmons and honey squash), yellowy greens (Anjou pears), matte ochres (Bosc pears), shades of red (cranberries and pomegranates), and pale greens (winter sweet squash and sage). Consider doing a monochromatic palette of reds or purples or greens.
Vary sizes and textures. Use both large and small produce. Matte and shiny. Smooth and bumpy.
Slip in a couple herbs or a flower stems to fill in gaps and add dimension.
Add something tall and slender to draw your eye up without blocking the conversation view. I shopped my house for candle sticks.
Skip storing your centerpiece, and eat it post-Thanksgiving.
Finally, if decorating your table feels like added stress, then it’s added stress. Skip it.
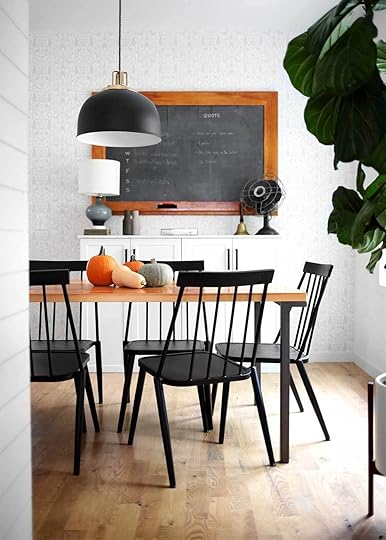
For my favorite Thanksgiving recipes, head this way>
The post An Edible Thanksgiving Table appeared first on The Faux Martha.
November 1, 2018
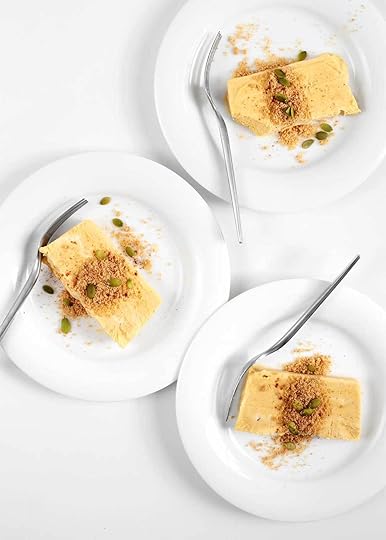
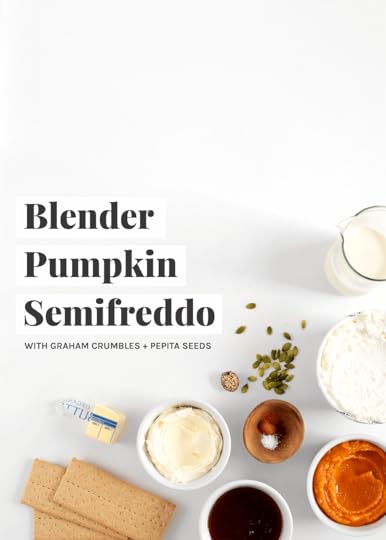
Blender Pumpkin Semifreddo
This is not news. The oven has a strict Thanksgiving schedule, especially if you only have one oven like we do. Between the turkey and the green bean casserole, the rolls and the sweet potato casserole, and the stuffing that’s not really stuffing (I prefer to bake it outside the bird), the oven is full. One thing comes out and another goes in. I like to imagine myself as a synchronized swimmer, long arms pointed and outstretched, a flat back, grabbing the uncooked dish on top of the stove with one hand and removing the heavy golden casserole with the other. Without looking, of course. I just hope I have the oven mitt on the right hand.

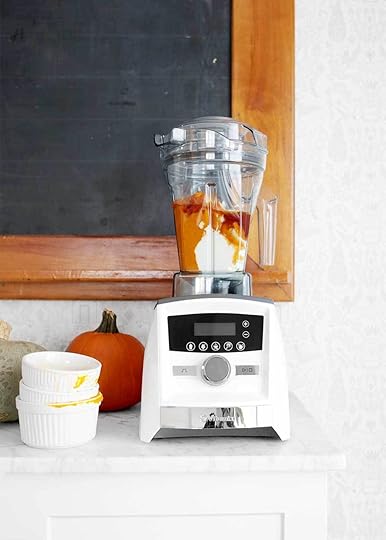
This post is a four part series sponsored by Vitamix and The FeedFeed. I’ve been using a Vitamix my entire adult life and have been known to travel with my Vitamix by car. I use my Vitamix as a blender, food processor, and sometimes a mixer. Thank you for supporting a brand that makes my kitchen run more smoothly.
But the pie. The pumpkin pie! How will I fit it into the schedule? A day dream realized. Because I’m neither graceful nor organized when it comes to scheduling. My arms—they’re short. And the mitts—of course I’ll have them as mixed up as I’ve had my right from my left my entire life.
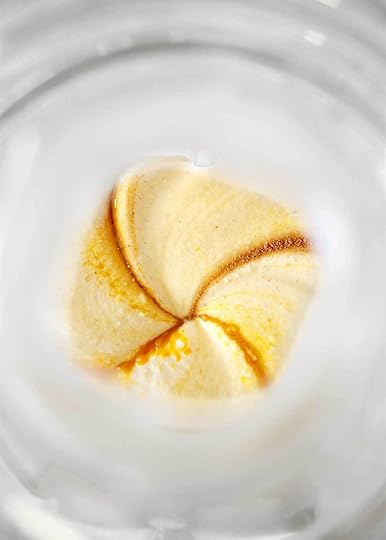
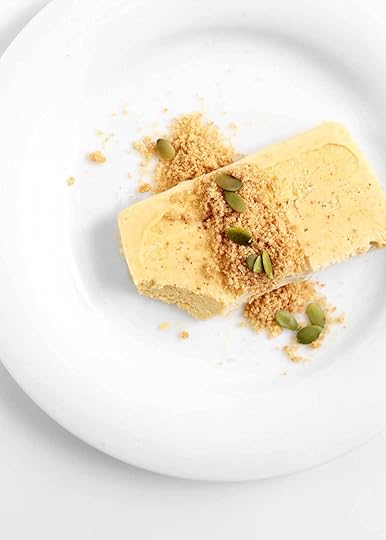
Which is why I’ve worked on a Blender Pumpkin Semifreddo recipe for the big day. It can be made a couple weeks in advance, in the space of 5 minutes and a blender. Yes, a blender. It tastes like a slice of creamy pumpkin mousse or cheesecake. A cool ending to a warm meal.
But what is a semifreddo? It’s as it sounds, a semi frozen dessert, typically a custard base thickened by cooked yolks. I’ve cut corners using the same simple, no-cook base from the Honeyed Ricotta Semifreddo in my book, The Minimalist Kitchen, swapping in pumpkin, maple syrup, and the usual pumpkin pie spices.
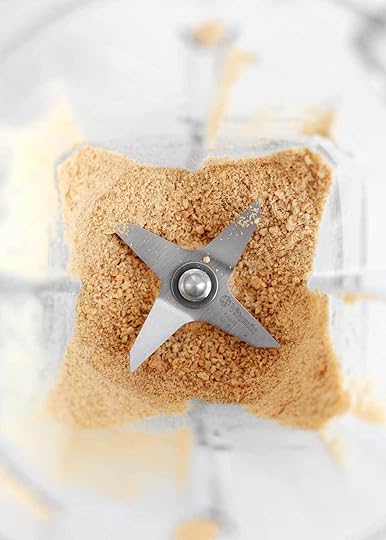
The crunchy graham cracker crumble also comes together in the blender. Some people swear by their instant pots. I swear by my Vitamix Blender, the tool I used to make every component of this recipe, from the creamy pumpkin Italian cheese base to the whipped cream to the graham cracker crumble topping. With a little warm water and soap, the basin cleans itself too. Basically, you can practice your synchronized Thanksgiving oven routine while this make-ahead dessert makes itself. But you only have 5 minutes. Hurry!
Side note: If you asked me—Melissa, if you could only pick one, what small kitchen appliance would you recommend? I’d tell you to save up for this, a Vitamix. Skip the immersion blender and the food processor (I don’t own either), and invest in this machine. We use ours daily. They have several types of high powered blenders. We have the Ascent Series in white, pictured above. It’s smart in that the machine adjusts speeds based on the basin. It also has the ability to pulse and make an entire dessert.
Blender Pumpkin Semifreddo
shopping list
Prep Time
10 mins
Inactive Time
4 hrs
Yield
8
adjust servings
A simple, make-ahead dessert. It's a cross between frozen pumpkin mousse and cheesecake. A cool ending to a warm meal. Each component of this recipe can be made in the space of 5 minutes and a Vitamix Blender.
Ingredients
Semifreddo
1
c. heavy cream
1
(16 oz.) container of whole milk ricotta
1/2
c. pureed pumpkin (canned or steamed)
1/2
c. mascarpone
1/2
c. pure maple syrup
1 1/2
tsp. pure vanilla extract
1/2
tsp. cinnamon
1/4
tsp. grated nutmeg
dash of cloves
1/8
tsp. kosher salt
Graham Cracker Crumble
4
graham crackers*
1 1/2
tbsp. salted butter, melted
Garnish
sprinkle of pepita seeds
dash of cloves
Instructions
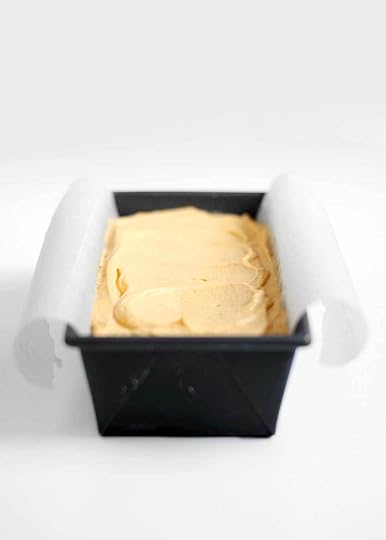
Make the semifreddo at least 4 hours before serving and up to 2 weeks. Line the width of a 9 x 5-inch loaf pan with parchment paper. Set aside.
In a high-powered blender, add the cream, and slowly turn up the speed to medium until stiff peaks form. (Alternatively, using a stand mixer with the whisk attachment, beat the heavy cream on high until stiff peaks form.) Remove cream and place in a mixing bowl. Meanwhile, place all the remaining semifreddo ingredients in the blender basin (don't worry about cleaning it), and process just until incorporated, no longer.
Pour the pumpkin mixture into the whipped cream in four increments, folding vigorously to incorporate with a spatula. Mixture will be lush and fluffy. Pour into prepared loaf pan and smooth top. Cover with plastic wrap, and freeze at least 4 hours or until set.
Make the graham cracker crumble. In a small saucepan, melt the butter. Meanwhile, add graham crackers into the The Faux Martha.
October 30, 2018
Scout Cookies and Magic Lessons
Last year, my sister got Hal a faux red rose from Ikea and placed it in a glass jar, also from Ikea, that looked nearly identical to the one from Beauty and the Beast. “Mom it needs sparkles,” she said. While she was sleeping, I painted the edges of each petal with glittered nail polish before returning it to its glass dome. She woke up the next morning to exclaim, “Mom, you have magic! Will you teach me?”
How could I tell her no? She confirmed what I’d always hoped to be true of myself. That I had magic. On a whim, I promised her that I’d teach her my magic. That by the time she left home, she’d have all of it. So, I began teaching her magic lessons, feeling more like a fraudulent Elizabeth Gilbert or Hermione Granger than myself.
Magic lesson #1. It’s under your nose. It’s all around you, magic that is. You just have to look for it. But take note—it’s so unassuming you might overlook it. Like finding glittered nail polish in the junk drawer just when you need it.

Magic lesson #2. Surround yourself with good people. I had to pull this lesson out without much notice. Hal found herself with another red rose while visiting family in Tulsa. A real rose. Of course, it needed to glisten like the other one. “Mom, will you add your magic?” she said just before going to bed. Like the tooth fairy subdued by a margarita, I missed my appointment and fell asleep on the couch. The next morning, we both woke up to a sparkly red rose.
It had to be real magic because it wasn’t me. My mother-in-law swooped in and scraped glitter off a Christmas card she’d saved, saving me, too. “Surround yourself with great people, Hal. Because sometimes they’ll be able to do things for you that you can’t do for yourself.”
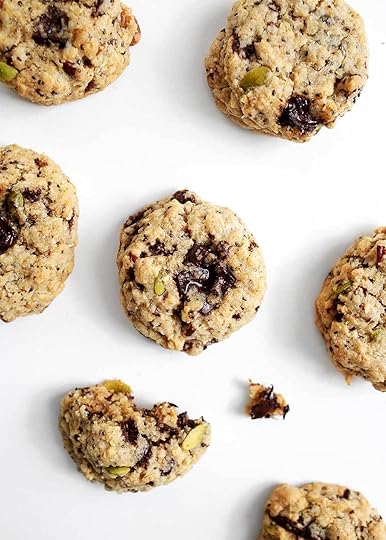
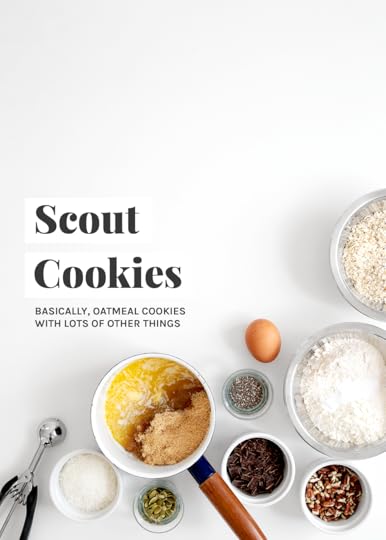
Magic lesson #3. Life is poetic. She waits for lightening bolts to zoom out of my fingers or my Harry Potter wand (more like spatula) to appear on this lesson. On most lessons. What Hal doesn’t realize yet, is that I have ordinary, everyday magic. She’s looking for something more grand to come out of me. Aren’t we all? That’s a longer lesson for another day, years from now. This one, too, is probably taught out of order, too soon. But life is poetic and round and circular. I’ve been working on this cookie recipe for weeks. It’s an oatmeal/trail mix cookie with just about every staple from the left side of our pantry. I’ll tell you more about it in a second.
Kev named this cookie Scout after the second batch—like a cookie you should take on a hike. My parents, who live in Texas, got a new pup this weekend. And would you guess his name. “Mom, his name is Scout like the cookies!” Life is kind like that. Poetic like that. Welcome to the family Scout! I guess we’ve been making you some cookies.
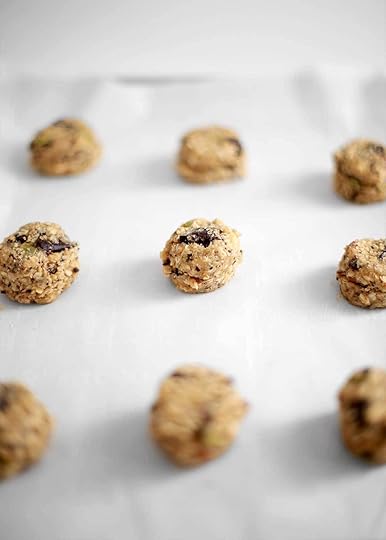
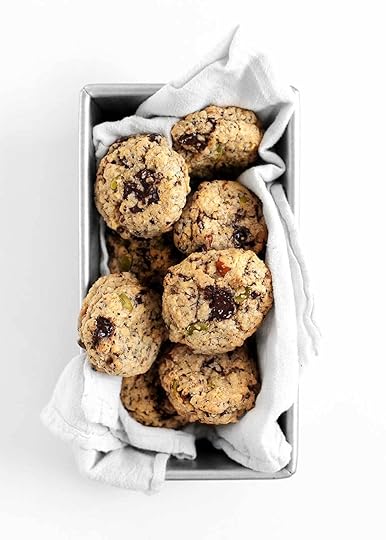
These Scout Cookies are inspired by a trail mix cookie from Northern Coffeeworks that I can’t not order when I go. It’s an oatmeal cookie with lots of other things like: unsweetened coconut, bittersweet chocolate, pepita seeds, chia seeds, and pecans. It’s just sweet enough, a touch salty, and packed with flavor. Like most things in life, they’re best with a rest (Magic Lesson #256). So make them in advance if you can.
Scout Cookies
shopping list
Prep Time
20 mins
Cook Time
12 mins
Yields
18 cookies
adjust servings
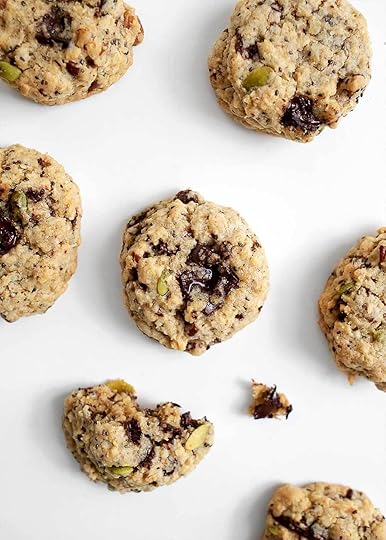
The Scout Cookie is an oatmeal cookie with a lot of other things like: unsweetened coconut, bittersweet chocolate, pepita seeds, chia seeds, and pecans. It’s just sweet enough, a touch salty, and packed with flavor. It's a cookie you'd take on a hike, or not. I prefer these cookies best after an overnight rest.
Ingredients
Wet
1
stick (1/2 c.) unsalted butter
1/2
c. packed brown sugar
1/4
c. turbinado (coarse sugar)
1
large egg, room temperature
1
teaspoon vanilla extract
Dry
3/4
c. quick-cooking oats*
1/2
c. unbleached all-purpose flour
1/2
c. wheat pastry flour
1/4
c. + 2 tbsp. unsweetened coconut shreds
scant 1/4 c. finely chopped pecans
2
tbsp. pepita seeds
2
tbsp. chia seeds
3/4
tsp. kosher salt
1/4
tsp. baking soda
1/4
c. chopped bittersweet chocolate
Instructions
Preheat the oven to 350°F. Line a baking sheet with parchment paper or a Silpat and set aside.
Begin preparing the wet ingredients. In a small saucepan, melt butter on low until half melted. Set aside to continue melting and cooling.
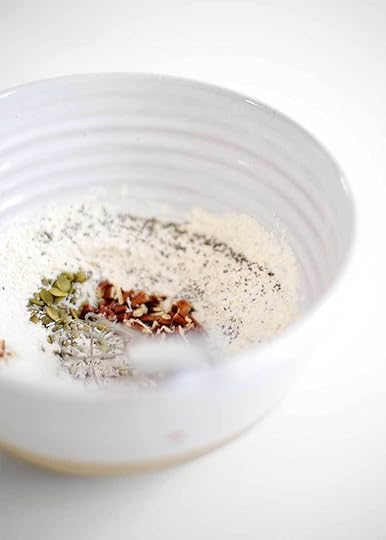
Prepare the dry ingredients. Stir together all the dry ingredients, except for the chocolate, in a large mixing bowl.
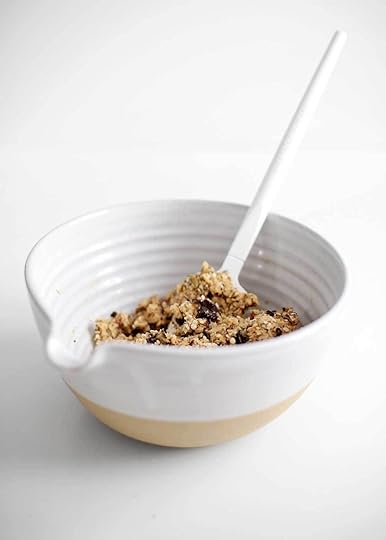
Into the cooled butter mixture, stir in all the remaining wet ingredients until evenly combined. Pour wet mixture into dry mixture, and stir until just combined. Fold in chocolate. Dough will be fairly dense.
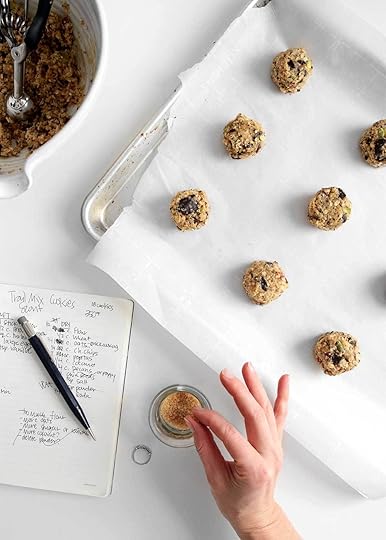
Scoop cookies using a 2 teaspoon-sized spring-release scoop (.3-ounce scoop/#60 scoop). For every cookie, scoop two balls and roll together. (Each cookie is about 4 teaspoons or heaping 1 tablespoon.) Bake for 11 to 12 minutes. They will appear slightly soft, but will harden up as they cool. Let cool on pan for 1 minute before carefully removing to a cooling rack to cool completely. Once cooled, store in an airtight container for up to 5 days or in the freezer for a month.
Notes
*I prefer quick-cooking oats to old-fashioned oats here for their size and overall texture of the cookie. If you don't stock quick-cooking oats, try barely pulsing the oats in a high-powered blender or food processor to decrease the size of the grain.
The post Scout Cookies and Magic Lessons appeared first on The Faux Martha.
October 18, 2018
Beet Red Boo-levardier

If this post seems silly, nonsensical, or dippy, it’s all of those things. It’s also a very good reflection of how I’m feeling these days. A little lighter. Not taking myself so seriously. Back to trying to infuse the everyday with a little smile. Somedays, we have important matters to talk through, chew through, and think through. But today, it’s time for spooky, or not so spooky, Beet Red Boo-levardiers. Nonsensical, necessary, and hauntingly good.
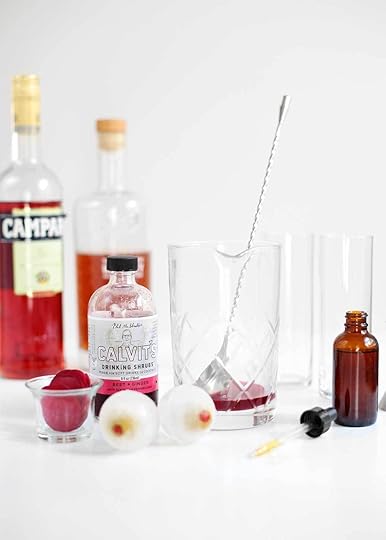
First things first, a Boulevardier (bul-leh-var-dee-ay) is a classic drink, a riff off the Negroni but less bitter. It’s made with Whiskey/Bourbon, Sweet Vermouth, Campari, and a peel of orange. And then you have the Boo-levardier made with frozen glassy eyeballs, Beet Drinking Shrub (procured from the farmers market but sold on Amazon), Sugar Bush Whiskey, Compari, and extra drops of bitters. It’s best served around Halloween with friends who like to laugh or just need a good laugh.
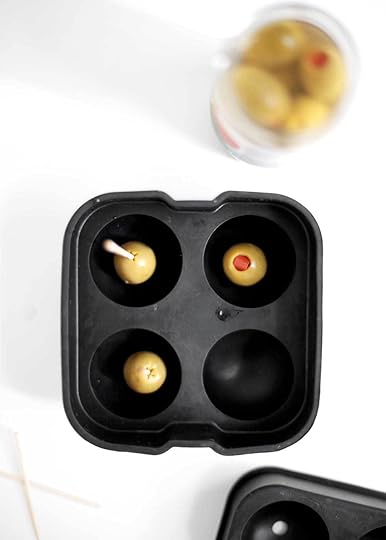
To make the frozen eyeballs, you’ll need a silicone cylindrical mold, toothpicks, and olives stuffed with peppers. Place a toothpick in the asterisk* of the olive, and place the red pepper side down. Cover, carefully wiggling the toothpicks through the holes of the mold. Fill with water and freeze for at least 8 hours. Once frozen, peel away the mold and break off the remainder of the tooth pick.
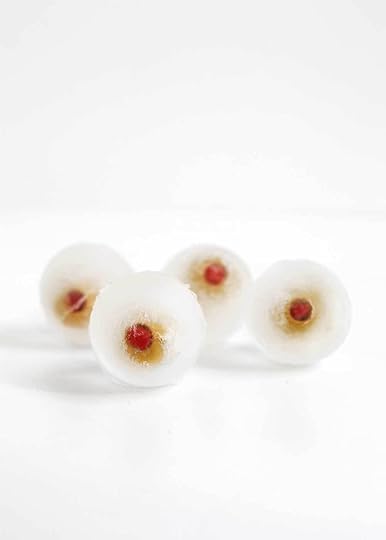
And viola! So spooky. And edible. And they add a welcomed salty note to the drink.
I should mention, I don’t care for the flavor of beets, not one bit. It tastes like dirt in my mouth. However, I love this drink. I sampled this shrub variety at our farmers market last weekend, and next thing you know, it was in my bag. If you’re not in Minneapolis, you can purchase Calvit’s Shrubs from Amazon. They are not overly potent in the vinegar department. It’s more like a reduction of delicious flavors to add to a cocktail or soda. A little goes a long way.

Beet Red Boo-levardier
shopping list
Prep Time
5 mins
Inactive Time
8 hrs
Yields
1 drink
adjust servings
[image error]
[image error]
This spooky, Halloween-y cocktail is a riff off the classic Boulevardier, made with Whiskey or Bourbon, Compari, and Sweet Red Vermouth. I've swapped the Vermouth with a Beet Red Shrub mix. You'll find this cocktail to be slightly bitter from the Compari, woody from the Whiskey, and earthy from the beet shrub. It's hauntingly good. Note: this recipe is an easy 2:1 ratio, so scale as needed. See notes below for recipe alterations.
Ingredients
Frozen Eyeballs
Green Olives stuffed with red pepper
Drinking water
Boo-levardier
1 1/2
oz. Sugar Bush Whiskey
3/4
oz. Compari
3/4
oz. Beet Shrub Mix
3
drops of Angostura Bitters (optional)
Instructions
At least 8 hours before serving, make the eyeballs using a Easy and Company, and I made my own. It's a great present, but needs a little time, like 4 weeks. So start your present-making now. Finally, those olive, eyeball ice rounds add a delicious salty note to this drink. It's nearly unnoticeable, but highly noticeable without. If skipping the spooky cubes, add a tiny spoon of olive juice into the mix. Either way, don't skip adding ice. The larger the cube the better and the slower the melt. Dig back into the math lesson on surface area here. Smaller cubes have a higher surface area ratio and will melt faster, diluting your drink.
The post Beet Red Boo-levardier appeared first on The Faux Martha.
October 11, 2018
Winter Squash: To Roast or To Steam?
There are several different methods for preparing winter squash to be puréed. You can cut it in half, place skin side up on a baking sheet, and roast for 40+ minutes. You can place a whole squash, with knife-pierced slits, in a baking dish filled with water, and bake for a similar amount of time. Or you can steam the squash on the stovetop in 20 minutes. I’ve tried them all, and I keep going back to the same method—the stovetop steam.
It’s a bit more work on the front end, peeling, deseeding, and cubing. But overall, it’s quicker, produces far less mess, and there’s zero chance of burning your finger tips. Basically, the beauty of this method is that you don’t have to wait for the squash to cool in order to handle it, like the other methods. You’ll find this same trusted method in my book, The Minimalist Kitchen. Let’s break it down into 5 simple steps below.
1. Peel the Winter Squash
Using a vegetable peeler, remove the skin from the squash. Note: This method works best for smooth-sided squash like sugar pumpkins, butternut squash, kabocha squash, and blue hokkaido pumpkins. Rippled squash, like acorn squash, can be difficult to peel. Doable, but more difficult.
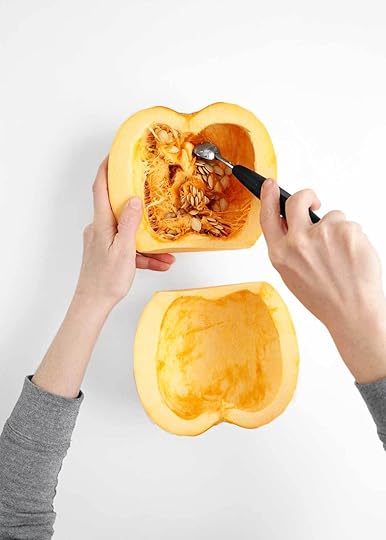
2. Remove the seeds
Trim the top and bottom off of the squash, then cut in half. Using a spoon or a melon baller, scoop the seeds out. Discard or save for toasting. I find scooping the seeds out while the squash is raw to be easier and less messy.
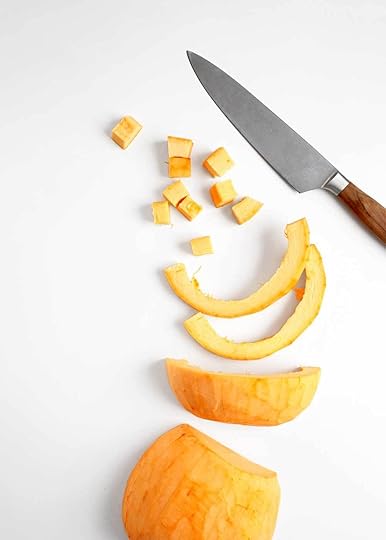
3. Cube the Winter Squash
Dice the squash meat into 1″ cubes. Note: larger cubes will take longer to steam and smaller cubes will take less time to steam. Either way, be sure to cut similar sized cubes for even cooking.

4. Steam the Winter Squash
In a Dutch Oven or large sauce pan fitted with a steamer basket, add just enough water to fill the pot without touching the base of the basket, about 1″ high of water. Add the squash. Cover and cook over medium-high heat for 15 minutes. Turn off the heat, keep covered, and allow to continue steaming for 5 minutes more. The squash is ready when easily pierced with a fork or a knife.
Note: steamer baskets are an inexpensive tool and a great way to cook vegetables that do best with a hit of hydration (steam) first, like root vegetables, winter squash, and cruciferous vegetables like cauliflower. They store neatly upside down in your colander. Steaming is also a great cooking method for nutrient preservation. You can read more about that here. Vegetables cook fast this way. Fast! So don’t overdo it, or you’ll end up with mush. Try out this method on the Blistered Peppadew Cauliflower, the Curried Cauliflower on page 181 of The Minimalist Kitchen, or the Caramelized Roasted Carrots on page 178.
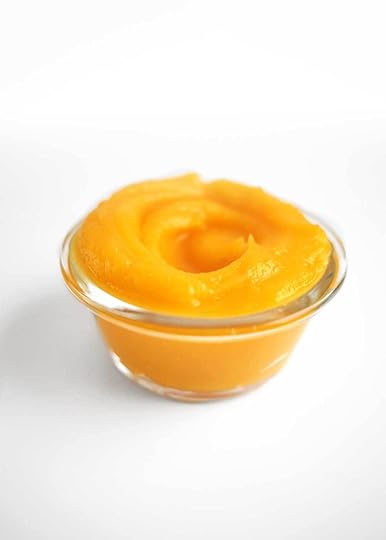
5. Purée the Winter Squash
Using a large spoon, transfer the roasted squash to a high powered blender, like a Vitamix. Cover and purée until smooth, using a tamper to press down the squash or stopping the blender to stir. If using within the week, store in an airtight container in the fridge. If later, divide squash into pre-measured portions (like 1 cup) and store in a freezer safe bag or container for up 2-3 months. Try using your purée to make Browned Butter Pumpkin Bread, Maple Pumpkin Latte Syrup, Maple Pumpkin Pie, Baked Pumpkin Donuts, Butternut Squash Soup, Chipotle Butternut Taco Sauce, Enchilada Sauce (swap in squash of your choice), or Butternut Pasta on page 98 of The Minimalist Kitchen.
The post Winter Squash: To Roast or To Steam? appeared first on The Faux Martha.
October 9, 2018
Don’t Blink: Fall Bucket List
“Hal, don’t blink or you’ll miss it.”
“Mom, how long do I have to keep my eyes open for?”
“Just a little longer, girlie.” Fall is a wing season in Minnesota, flanking our two longest seasons—winter and summer. If you blink, you just might miss it.
Last year, 4 years into parenting and too many years into adulthood, I decided it was time to start keeping a calendar. We were missing the best chunks of the year, like Fall, from poor planning. So I designed my own calendar, started the week with Monday because Saturday and Sunday belong together, and added a spot at the top of the calendar to keep track of a monthly bucket list. You can get yours here.

A bucket list doesn’t have to be all that extravagant or costly. It’s just a reminder not to miss the best things of the month. It’s also a reminder of how to fill those precious two days at the end of the week when your brain is fried and can’t muster up another idea. It’s like meal-planning for your weekends. Because if you blink, you’ll miss it. Or, in my case, if you don’t write it down, it will never happen.

Here’s a couple glimpses of our Fall Bucket List in action with a full list below, you know, for me to reference next year. I hope your fall is warm and cozy with shades of orange, red, and yellow, and sips of spiced pumpkin.
Fall Bucket List
Go on a fall walk. Fill a bag with leaves. Find all colors of the rainbow. (Hal’s stipulation).
Make a wreath with the leaves. (The back of a paper plate + a hot glue gun works best.)
Drink a pumpkin latte.
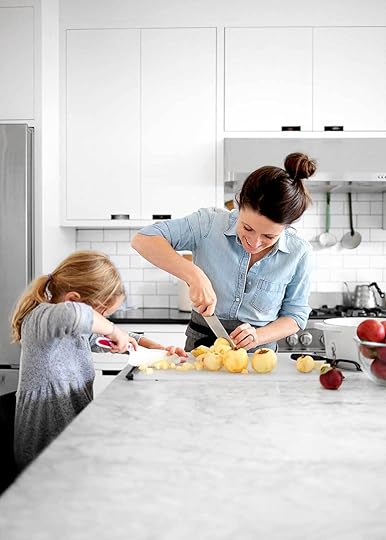
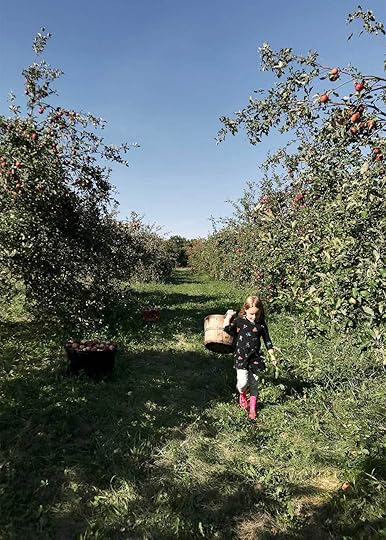
Go apple picking. (And then make applesauce.)
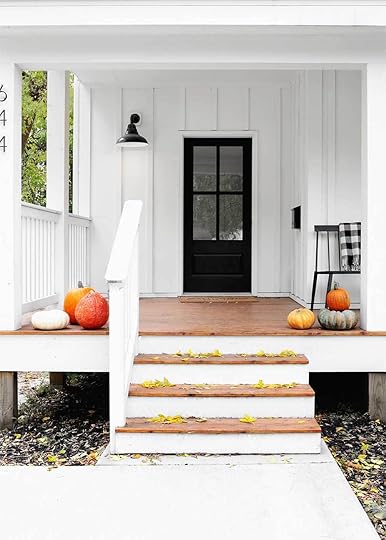
Buy pumpkins and decorate the front porch. (We skip the pumpkin patch and shop for the best prices and colors around town. Costco for XL pumpkins and Trader Joe’s for colorful/fairytale pumpkins. If squirrels are a problem where you live too, try spraying the pumpkins with cooking oil and sprinkling with cayenne pepper. Knock on wood, it’s working so far this year.)
Buy beautiful, edible winter squash to decorate the table. (When the time is right, turn squash into dinner.)
Carve a pumpkin just before Halloween.
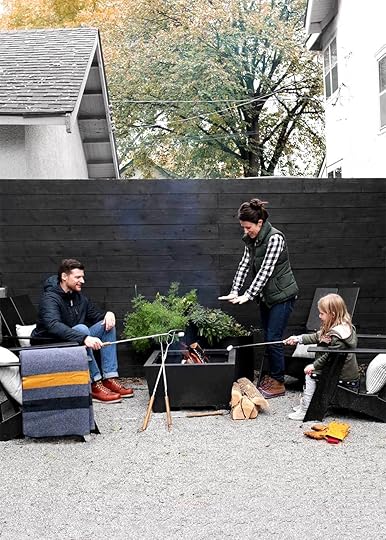
Have a bonfire in the backyard, or 10. Roast marshmallows. (We like this brand, sold at Whole Foods.) And tell ghost stories. (Kev tells communal ghost stories, where someone starts the story and passes it on. Somehow our stories always end with a fluffy kitten.)
Make baked apple cider donuts.
Jump in a pile of leaves. (To offset the endless leaf raking.)
Host an outdoor fall party (that we’ve yet to plan).
SOURCES
Dining Room | Backyard | Wool Blanket | Roasting Sticks | Fire-proof Gloves | Similar Fire Pit (Out of Stock) | Front Porch Bench (Out of Stock) | Front Porch Blanket | House Numbers
The post Don’t Blink: Fall Bucket List appeared first on The Faux Martha.
October 2, 2018
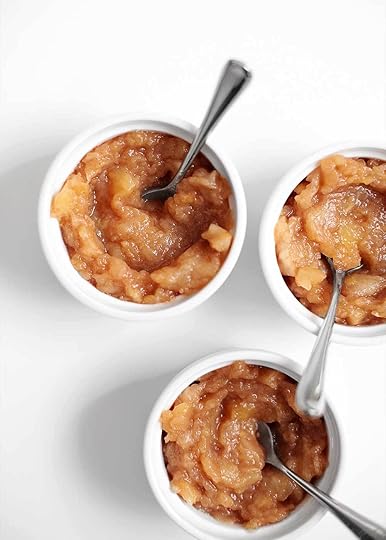
Homemade Applesauce
I hope you never forget the sound of the leaves breaking beneath your feet. The thrill of seeing a tree lit with ruby red bulbs. The piercing crunch of the first bite. The sticky, sweet juice at the crease of your lips. And the hum of the flies feasting on the leftovers. I hope you never forget the magic of sideways sun beating through the columns. The weight of too many to hold. The dreams of what they might become. Apple pie. Applesauce. Apple Muffins. Or maybe just a snack on the way home.
I hope you never forget the magic of the ordinary, everyday things. The things you’ll never be able to find or buy online.

But here’s the thing. You’ll promise yourself that you wont forget—the magic of it all. But time, self-doubt, and good intentioned elders will try to shatter your optimism.
Look to the apple tree, tiny one. She’s sturdy and resilient. Fall will take away her leaves. And winter will bury her in snow. But spring will bring the rain to melt the snow. And summer will bring the warmth to make her grow. Soon enough, she’ll be coated in ruby red lights again.
When you forget, because you will, look up. There are little reminders of magic everywhere. Right now, they’re hanging from the apple tree.
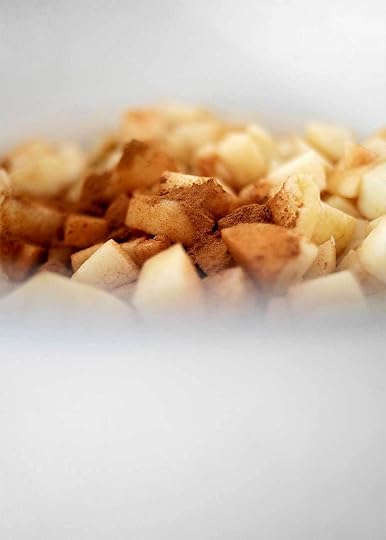
In the past week, we’ve eaten fist fulls of apples, made the apple galette from The Minimalist Kitchen, and revamped our applesauce recipe. The dent in our stash is nearly unrecognizable. I’m going to try my hand at pickling apples this week. I’ll report back. About that applesauce. I’ve pulled out the brown sugar and added in a touch of maple syrup for sweetness. Start with apples of the sweeter variety. The cinnamon, salt, and nutmeg will help to naturally enhance the sweetness levels. Add a little vinegar to bring the flavors together and preserve the life of the sauce. If ordinary magic had a flavor, it’d taste a whole lot like Homemade Applesauce.
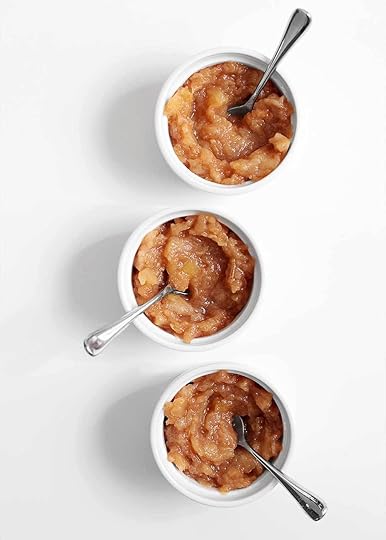
Homemade Applesauce sweetened with Maple Syrup
shopping list
Prep Time
20 mins
Cook Time
30 mins
Yields
3 cups
adjust servings
A simple homemade applesauce sweetened with a touch of maple syrup. To heighten the sweetness naturally, add cinnamon, nutmeg, and salt. Note: this recipe cooks down to less than half (8 cups of diced apples = 3 cups applesauce), so go big here!
Ingredients
8
c. roughly diced apples, peeled and cored
3/4
c. water
3
tbsp. pure maple syrup
1
tsp. cinnamon
1
tsp. apple cider vinegar
1/4
tsp. kosher salt
a couple grates of nutmeg
Instructions
Peel and core the apples. Roughly chop the apples, measuring 8 cups worth. This is a perfect time for tiny humans to practice their chopping. We use Vitamix and pulse until desired consistency is reached. Applesauce will last a couple weeks in the fridge or a couple months in the freezer.
Notes
• Apple Cider Vinegar can be equally substituted with fresh lemon juice, if desired. The vinegar will act as a preservative, slightly prolonging its fridge life, while also adding nice flavor.
• For more information on apple varieties, check out The Faux Martha.
September 20, 2018
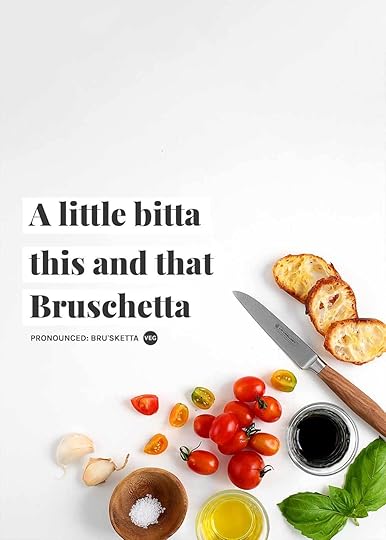
A Little Bitta This and That Bruschetta
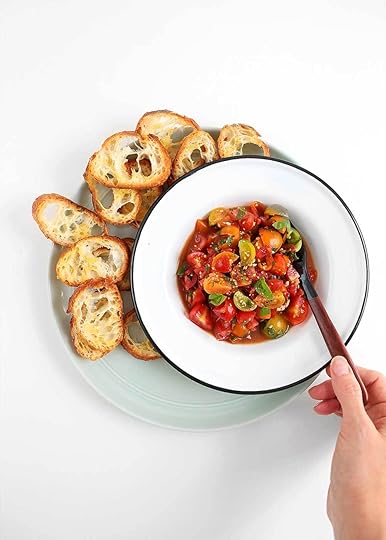
As of last week, when I made this Bruschetta, when I hosted a happy hour, when I blew the leaves out of the backyard, when I turned on the twinkly lights and the tiny speaker, it was still as hot as summer. I cancelled the cozy and the bonfire and called on the tomatoes—summers finest offspring. They did not disappoint.
I think this is the part in our programming when I should be massaging golden squashy pumpkin into every nook and cranny. But since I’m always late, and it seems to be also true of fall this year, we’re back on summer programming. Our co-op is still lined with beautifully sweet tomatoes, assuring me this is a perfectly acceptable recipe to post. And I’m sure if I could successfully grow a garden, it would be nodding its head in agreement too, glistening with tiny red jewels. (After a costly and lackluster try a couple years ago, I’ve decided to outsource the vegetable growing part of life to the farmers. For now at least.)
Here’s the thing about cooking with tomatoes. And cooking in general, if you ask me. You have to taste as you go, and add a little bitta this and that. Because maybe the tomatoes are extra sweet. Or maybe they’re really acidic. Or maybe they’re just a little flat all together. You’ll want to balance those flavors with their opposite, much like complimentary colors on the color wheel for optimal flavor harmony.
If they’re sweet, add a little extra vinegar (acid) to accentuate the sweetness. Then, taste again. If they’re extra acidic, scale back on the vinegar. Try adding a touch of honey. If they’re a little flat, be liberal whe n sprinkling that flaky, coarse kosher salt. But whatever you do, always go heavy-handed on the fresh basil and garlic. It’s the crux of a really good bruschetta. Wait, it’s pronounced bru’sketta. Bru’sketta, bru’sketta, bru’sketta. Maybe if I say it enough, it wont sound so funny coming out of my mouth.
Oh look, here comes fall. Now back to our regularly scheduled programming.
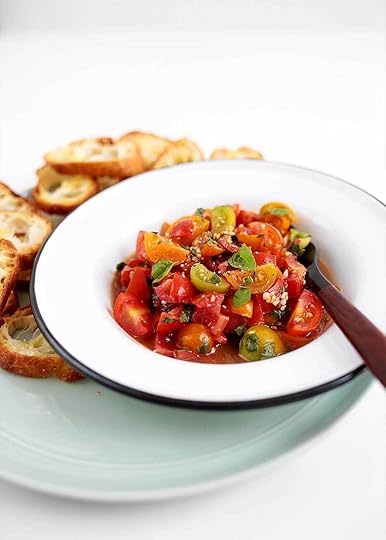
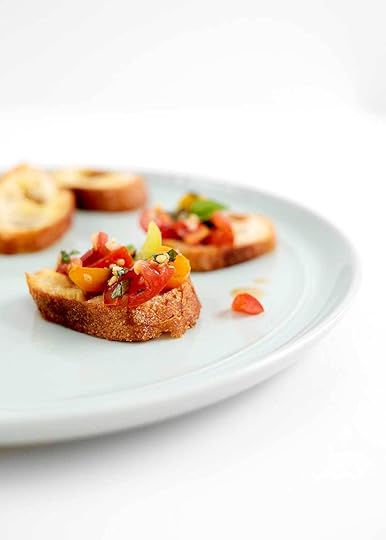
A Little Bitta This and That Bruschetta
shopping list
Prep Time
15 mins
Inactive Time
1 hr
You're going to need to add a little bitta this and that to get your bruschetta in the realm of perfect. Tomatoes vary in flavor. It's not you, it's them. So trust your gut and add a little extra vinegar (acid), honey, salt, and garlic as needed. This is my kind of invigorating.
Ingredients
Tomato Base
5
c. finely diced, in-season cherry tomatoes
1
c. lightly packed fresh basil, chopped
1
tbsp. balsamic vinegar
1
tbsp. good-quality olive oil, plus more for the bread
3
large cloves garlic, finely minced
1
tsp. coarse kosher salt
freshly cracked pepper, to taste
(optional) drizzle of honey, if needed
Bread
1-2
fresh baguettes
Instructions
Make the bruschetta at least 1 hour in advance. Add all the prepared tomato base ingredients into a large bowl. Stir together and taste. Too acidic? Add a little honey. A little flat? Add a little salt. Too sweet? Add an extra glug of vinegar. Not punchy enough? More garlic. Allow the flavors to mingle and deepen for about 1 hour before serving.
Prepare the bread. Preheat the oven to 400°F. Slice the bread at an angle, about 1/2" thick. Place in a single layer on a baking sheet (or two). Drizzle liberally with olive oil. Bake for about 10 minutes or until lightly golden, turning halfway through.
Serve. Best served same day.
Notes
Leftover bruschetta is delicious served over pasta or in a chicken parmesan dish.
The post A Little Bitta This and That Bruschetta appeared first on The Faux Martha.
September 12, 2018
Cozy, Collected Guest Room

The Inn at The Fauxhouse is now open for guests. Well, it’s been sleeping guests for 3+ years, but I’m finally done tinkering with the room. And when you come to stay, I wont corner you as I tell you about all the unfinished parts. (Can you hear Kev cheering in the background?) Let’s just call this the official grand opening of The Cozy, Collected Guest Room. Somebody cut the ribbon already.

The aesthetic of this room was heavily inspired by the Palihouse Hotel. I fell in love with they way they used pops of color to add personality and wallpaper to frame their beds, the focal point of the room. I’ve been searching for the perfect paper for this room for well over a year. When I saw the new Chasing Paper x Graduate Hotels wallpaper collab, I knew I had found my Neo, my needle in the haystack, the one with a playful pop of red. Even better news, the wallpaper is removable, which means I didn’t have to hire this job out. And when you only have one wall to paper, it only takes an afternoon. Praise be.

This room is a slow collection of both vintage and new items, heavy on the vintage. I can account for every item in the room. Like the time I swerved off the side of the road after seeing the schoolhouse desk sitting outside a shop. My sister, fresh from the airport, and her luggage were also in the car. Or the time I stood in a long line at a vintage sale and ran to claim those chairs I could barely hold with two hands. Or the time Susan let me peek in the back closet of her shop. That’s where I saw Grandma and Grandpa now hanging on the wall. Oh, and then there’s that enamel yellow light without a price tag that I couldn’t get out of my head. Months after seeing it, I asked if they would sell it to me. They said yes, and I couldn’t say no. And then there’s the other time, right before we moved in, that we made the decision to invest in lighting and a duvet that felt too expensive, but also felt like a long-lasting investment. (See source list below.)

Just before we said I do, a mentor and friend of Kev’s warned him that one day I’d start bringing home a bunch of junk. “Not Mel,” he said. I’m mostly a minimalist, except when it comes to a really good vintage find. Sorry Kev. But the miracles of all miracles—this pile of slowly acquired “junk” has turned into a cozy, collected guest room. And with that, I’m done thrifting. Until I have a new room to design.

Welcome. I hope your stay is sweet.

Sources
Around Campus Removeable Wallpaper from Chasing Paper* | Federal Eagle Mirror (sprayed in matte black) | Otis Light Fixture in Natural Brass with similar shade | Grey Metal Queen Bed | Striped Duvet | Red Herringbone Pillows | Plaid Wool Blanket | Side table/box (vintage) | Yellow Clock and Silver Clock (out of stock) | Yellow Light (vintage) | Green USB Power Strip | Paddle | Wooden Paddle Holder | Dollop Rug in Natural (purchased at outlet) | Chairs (vintage) | Red “X” Pillow (similar color) | Desk (vintage) | Wooden Milk Crate | Vornado Standing Fan | Grandparent Art (vintage) | Map Art and Frame (out of stock) | Tuft & Needle Mattress
*Chasing Paper donated this wallpaper.
SEE ALL FAUXHOUSE POSTS>
The post Cozy, Collected Guest Room appeared first on The Fauxmartha.
Melissa Coleman's Blog

- Melissa Coleman's profile
- 4 followers

