
Sam Turnbull's Blog, page 51
September 17, 2017
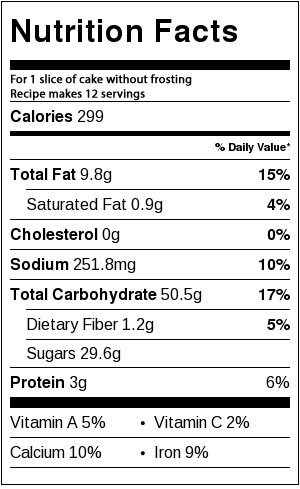
Vegan Pumpkin Spice Cake
I admit it, I have a slight addiction to all things pumpkin spice. Call me a millennial (I am one), call me a sucker for marketing (I am totally a sucker for marketing), call me a lover of this fall tradition (I totally love this tradition). Seriously, what’s not to like about Vegan Pumpkin Spice Cake!? You better believe that’s a fluffy spiced frosting on there too. Initiate drooling sequence.

Reasons why I love this Vegan Pumpkin Spice Cake:
PUMPKIN SPICE!!!!!! (Duh).
The pumpkin in the recipe makes this cake super moist, not too sweet, and it’s balanced with the perfect amount of party in your mouth pumpkin pie spice goodness.
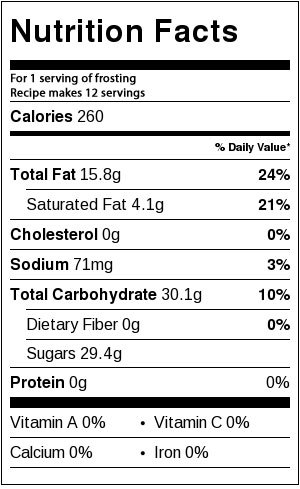
If you’re not the frosting type of person (who are you!?), it’s great without as well and pairs marvellously with coffee if I do say so myself.
I cut the sweetness of the frosting ever so slightly by adding a touch of apple cider vinegar. WAIT! Don’t run away. I promise this is a brilliant addition that sounds all sorts of weird but tastes amazing. It gives it a slight cream cheese frosting feel. Sam cooking hack 101. Don’t do it if you don’t want to (but you’ll want to).
This is the perfect cake for Thanksgiving, tea time, to celebrate autumn, or just as an excuse to eat more pumpkin spice. …As if you even need an excuse!

Every visitor I’ve had this week has happily walked away with a cake to take home. While my first test run of this cake was pretty great, I ended baking up 6 whole cakes. YES, 6! My house smells like pumpkin spice permanently I’m pretty sure (and I’m not mad about it).
Call me nitpicky but I test my recipes multiple times before posting them on It Doesn’t Taste Like Chicken so that I know they will work perfectly for you. With this cake, it was a little tricky figuring out the perfect ratios of pumpkin but I finally nailed it. Woohoo!

To make Vegan Pumpkin Spice Cake: in a large bowl, whisk the dry ingredients together. Then in a medium bowl, mix the wet ingredients together.

Pour the wet ingredients into the dry and mix until the batter just comes together, don’t over mix.

Divide the batter among the cake pans and give the pans a little wiggle to help flatten the batter. Bake for about 40 minutes until a toothpick inserted in the center comes out clean. Let cool completely before frosting.

To make the frosting, mix all the ingredients together with a hand or stand mixer until fluffy.

Frost your cake as desired. This time I kept it a little rustic by exposing the cake layers, but there is enough frosting to cover the whole cake if you prefer. I then added a little extra pizazz by grating a bit of fresh nutmeg on top.

Vegan Pumpkin Spice Cake

This easy to make, super moist cake is the perfect dessert for Thanksgiving or to welcome the autumn season. Spread with fluffy pumpkin spice frosting or serve without.
Dry Ingredients:
2 1/2 cups all-purpose flour
1 3/4 cup white sugar
1 1/2 tablespoons pumpkin pie spice
1 teaspoon baking soda
1 teaspoon baking powder
1 teaspoon salt
Wet Ingredients:
1 1/2 cup non-dairy milk ((such as soy or almond))
1 cup pumpkin puree ((not pumpkin pie filling))
1/2 cup light oil ((such as canola or vegetable))
2 tablespoons apple cider vinegar
1 teaspoons vanilla extract
Frosting:
3 cups powdered sugar
1/2 cup vegetable shortening
1/2 cup vegan butter
2 teaspoon apple cider vinegar
1 1/2 teaspoon pumpkin pie spice
1/2 teaspoons vanilla extract
1 – 2 tablespoons non-dairy milk ((such as soy or almond))
Preheat your oven to 350 F (180C). Lightly grease two 8″ round cake pans.
In a large bowl, whisk the dry ingredients together.
In a medium bowl, mix the wet ingredients together. Pour the wet ingredients into the dry and mix until the batter just comes together, don’t over mix. Divide the batter among the cake pans and give the pans a little wiggle to help flatten the batter. Bake for about 40 minutes until a toothpick inserted in the center comes out clean. Let cool completely before frosting.
To make the frosting, mix all the ingredients together with a hand or stand mixer until fluffy, adding 1 – 2 tablespoons non-dairy milk to reach desired consistency. Frost your cake as desired. This time I kept it a little rustic by exposing the cake layers, but there is enough frosting to cover the whole cake if you prefer. I then added a little extra pizazz by grating a bit of fresh nutmeg on top.
Bon appegetan!
Sam.


This post Vegan Pumpkin Spice Cake appeared first on it doesn't taste like chicken


September 13, 2017
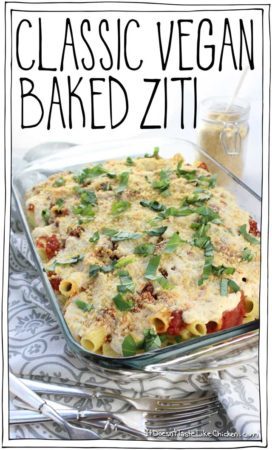
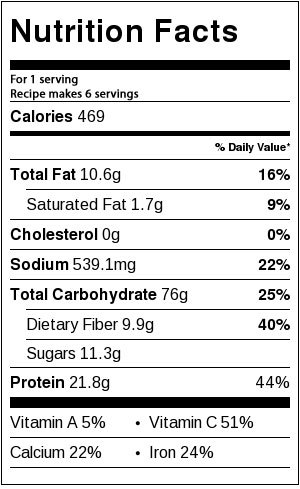
Classic Vegan Baked Ziti
This recipe for Classic Vegan Baked Ziti is sponsored by Muir Glen who I love for their organic canned tomatoes that taste delicious straight out of the can. Seriously!

Oh hello, did you want me to introduce you to my soulmate? It’s called Classic Vegan Baked Ziti, but I like to call it my one true love, for short. Oh yeah, I’m feeling sassy about this recipe as it’s just the perfect baked pasta dish you ever did see, and more importantly taste!!
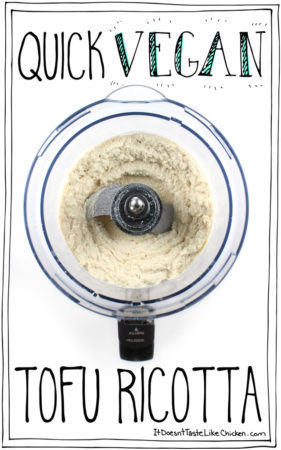
Ziti pasta is layered with a simple homemade tomato sauce and my Quick Vegan Tofu Ricotta. Sprinkled with Parmegan and fresh basil. It’s simple, delicious, classic, hearty, amazing, and you’ll be going back for seconds… and thirds.

There are a few layers to this dish, but both the tomato sauce and tofu ricotta can be made ahead of time to make assembly quick and easy. This is the perfect pasta bake for a dinner party, special Sunday dinner, potluck, or just a night when you feel like you need to good ol’ fashioned home cooking. A good pasta dish always tastes like home to me.

I grew up in a family where having cans of tomatoes in the cupboards was an absolute staple as you never know when a craving for pasta would strike (which was most nights, because, pasta). So I have tasted a lot of tinned tomatoes in my life. Once cooked, the tomatoes taste fine, but usually when you taste the tomatoes straight from the can they have an odd tinned tomato taste. Does anyone know what I am talking about here?
But I had a magical moment when I was cooking up this dish. I opened a can of the Muir Glen diced tomatoes and tasted them as I taste everything I cook with, and oh my… they were delicious! Straight out of the can. I was so surprised that I actually had a second and third taste. And this is coming from a girl that doesn’t even really like raw tomatoes that much. Yeah, they’re good.
I definitely recommend taste testing some Muir Glen tomatoes for yourself. Find Muir Glen products in the natural foods section at all Sobeys, Whole Foods and most Loblaws stores.

Now onto the pasta bake!
To make Classic Vegan Baked Ziti: start by making the tomato sauce. Heat the olive oil in a large skillet over medium-high heat. When hot, add the onions and garlic and sauté for about 5 minutes until the onions turn translucent and just begin to brown. Add the diced tomatoes, crushed tomatoes, parsley, basil, oregano, salt and pepper. Bring to a simmer and let the sauce cook, stirring occasionally for about 20 minutes until the sauce has thickened and the tomatoes are cooked.

In the meantime prepare the tofu ricotta (if not prepared ahead of time) and cook the pasta according to the package directions until al dente.

To assemble the Classic Vegan Baked Ziti, add half of the cooked pasta to the bottom of a 9″ x 13″ baking dish.

Pour over half of the tomato sauce.

Then dollop on half of the tofu ricotta.

Repeat with the remaining pasta and tomato sauce. Stir 3 – 4 tablespoons of water into the remaining ricotta to make it easier to spread and smooth it over the pasta and tomato sauce. Top with the Parmegan. Bake covered with foil for 15 minutes, remove foil and cook another 5 – 10 minutes until lightly browned and hot all the way through.

Garnish with fresh basil before serving if desired. SO PRETTY, SO SCRUMPTIOUS!

Classic Vegan Baked Ziti
This delicious pasta bake is layered with a simple homemade tomato sauce and my an easy vegan ricotta recipe. Perfect for a dinner party, special Sunday dinner, potluck, or just a night when you feel like you need to good ol’ fashioned home cooking.
For the tomato sauce:
1 tablespoons olive oil
1 yellow onion, (chopped)
3 cloves garlic (minced)
1 28oz can Muir Glen Diced Tomatoes
1 1/2 cups Muir Glen Crushed with Basil Tomatoes ((half of a 28oz can))
1 teaspoon dried parsley
1 teaspoon dried basil
1 teaspoon dried oregano
1/4 teaspoon salt
1/4 teaspoon black pepper
For the pasta bake:
1 454g ziti, penne, or rigatoni ((gluten-free if preferred) )
1 recipe Quick Easy Tofu Ricotta
3 – 4 tablespoons water
3 tablespoons Parmegan
1 handful fresh basil leaves, (chopped (optional for garnish))
To make the tomato sauce: Heat the olive oil in a large skillet over medium-high heat. When hot, add the onions and garlic and sauté for about 5 minutes until the onions turn translucent and just begin to brown. Add the diced tomatoes, crushed tomatoes, parsley, basil, oregano, salt and pepper. Bring to a simmer and let the sauce cook, stirring occasionally for about 20 minutes until the sauce has thickened and the tomatoes are cooked.
To cook the pasta: bring a large pot of water to a boil and cook the pasta according to the package directions until al dente.
To assemble the pasta bake: Preheat your oven to 375F (190C).
Add half of the cooked pasta to the bottom of a 9″ x 13″ baking dish. Pour over half of the tomato sauce, and then dollop on half of the tofu ricotta. Repeat with the remaining pasta and tomato sauce. Stir 3 – 4 tablespoons of water into the remaining ricotta to make it easier to spread and smooth it over the pasta and tomato sauce. Top with the Parmegan. Bake covered with foil for 15 minutes, remove foil and cook another 5 – 10 minutes until lightly browned and hot all the way through. Garnish with fresh basil before serving if desired.
Bon appetegan!
Sam

This post Classic Vegan Baked Ziti appeared first on it doesn't taste like chicken
September 10, 2017
DIY Pumpkin Pie Spice
When I posted my recipe for Easy Vegan Pumpkin Pie a couple of years ago (which by the way is one of my most popular recipes), I soon found out that pumpkin pie spice isn’t available in all countries. Why did I wait two whole years to post this homemade recipe? I have no idea. But it’s finally here, my DIY Pumpkin Pie Spice!
Not only is this handy for the people who don’t have pumpkin pie spice available in their country, but around Thanksgiving it always seems to be sold out at the grocery store, and it’s often pricey.

If you are new to pumpkin pie spice, it’s just a combination of spices used to make pumpkin pie. I know, it’s pretty much as obvious as it can be. The beauty of it is, that when you have it on hand, it makes whipping up a pumpkin pie super duper easy.
But there’s more! (Do I sound like an infomercial yet)? You can use pumpkin pie spice all over the place. I use it in my Vegan Pumpkin Spice Oatmeal, my 4 Ingredient Pumpkin Pie Spice Syrup, but you could also sprinkle it into a smoothie, stir it into Vegan Coconut Whipped Cream, add some to my Perfect Vegan Sugar Cookies, or sprinkle it over popcorn with a little sugar. Having a little jar on hand makes autumn feel extra special.

To develop my recipe, I just looked at the ingredient list on the pumpkin pie spice I had on hand.

Which were cinnamon, ginger, ground nutmeg, all spice, and cloves. So I experimented until I got what looked and smelled like the same ratios as the store-bought spice. But better! (Infomercial alert). I don’t know why but my homemade spice is way more fragrant than the store-bought spice, and it tastes better too!

To make DIY Pumpkin Pie Spice: simply add all of the spices to a small jar, and shake, shake, shake until it’s evenly mixed! Done. Sprinkle away, my friends.

DIY Pumpkin Pie Spice
So easy to make, just add the 5 ingredients to a jar, shake, and you’re done! This homemade recipe is perfect for when you run out, or when the store is sold out. Bonus points: it’s even better than the store-bought spice.
6 teaspoon cinnamon
1 1/2 teaspoon powdered ginger
1 1/2 teaspoon ground nutmeg
1 1/2 teaspoon all spice
3/4 teaspoon ground cloves
Add all the spices to a small jar and shake until mixed well. Store with all of your other spices and use as needed.
Bon appetegan!
Sam.


This post DIY Pumpkin Pie Spice appeared first on it doesn't taste like chicken
September 6, 2017
Scrumptious Vegan Chex Mix
Oh, it’s scrumptious alright! I had a sudden craving for kid birthday party food. Maybe it’s because it’s back to school time and I am seeing all these little kiddos headed off with their oversized backpacks. But chex mix, or perhaps you called it party mix. That crispy, crunchy, addictive snack was just screaming my name this week.
If you are new to chex mix, It’s basically just cereals, pretzels, and nuts seasoned with butter and Worcestershire sauce. Which of course, makes it not vegan. Not only because traditional butter isn’t vegan, but Worcestershire sauce contains fish. Yeah, I know, yucky!

While you can purchase vegan Worcestershire sauce, I’ve never seen it in my grocery store (and you know how I feel about hard to find ingredients)… not my fave. So I drummed up this recipe to have all the classic flavours of the original buttery Worcestershire sauce coating, but of course, totally vegan, and totally easy to prepare.

And let me tell you, this stuff is addictive. Crunchy, munchy, savoury, umami, and all things snackable. While every piece is delicious, I ended up digging around the bowl looking for the extra dark pieces that had more sauce on them, just like you look for those extra buttery pieces of popcorn. It ends up being the worst game because before you know it, you’ve eaten half the bowl. Scrumptious Vegan Chex Mix for the win!

To make Scrumptious Vegan Chex Mix: Add all the seasoning ingredients to a small pot and melt over medium heat. It won’t really mix together too well, and that’s just fine., don’t worry about it.

Add the cereals, pretzels, and nuts to a large bowl. Pour the melted seasoning sauce over the chex mixture while stirring to evenly coat.

Spread the mixture onto a large rimmed baking sheet. My baking sheet was a little crowded, but it all worked out fine. If your sheet is smaller you may want to spread the mix across two baking sheets. Bake for 60 minutes, stirring every 15 minutes until the mix has crisped up and become evenly golden. Let cool before serving or storing in an air-tight container. Snack away my friends!

Scrumptious Vegan Chex Mix

This easy recipe gets all the same flavours as original chex mix without the Worcestershire sauce (which contains fish)! Kid-friendly, perfect for parties.
For the seasoning:
1 tablespoon nutritional yeast
1 tablespoon apple cider vinegar
1 tablespoon soy sauce
1/2 teaspoon onion powder
1/2 teaspoon garlic powder
1/4 cup vegan butter ((such as Earth Balance))
For the chex mix:
4 cups Chex* or similar cereal ((see notes))
2 cups Cheerios or similar cereal
2 cup mini pretzels
3/4 cup roasted almonds
3/4 cup roasted cashews
Preheat your oven to 250F (130C).
Add all the seasoning ingredients to a small pot and melt over medium heat.
Add the cereals, pretzels, and nuts to a large bowl. Pour the melted seasoning sauce over the chex mixture while stirring to evenly coat. Spread the mixture onto a large rimmed baking sheet. Bake for 60 minutes, stirring every 15 minutes until the mix has crisped up and become evenly golden. Let cool before serving or storing in an air-tight container.
In Canada, Chex cereals do not contain vitamin D3, but it has been brought to my attention that in the US Chex cereals do contain vitamin D3. D3 is usually made from lanolin and therefore is not vegan. So if you are in the US, look for a similar cereal that is vegan-friendly.
Bon appetegan!
Sam.


This post Scrumptious Vegan Chex Mix appeared first on it doesn't taste like chicken
September 3, 2017
Crispy Vegan Lemon Tofu
To fu, or not to fu, that is the question. The answer is and the answer always will be, to fu! (or tofu rather).
Alright, alright, Sam is having one of her loopy rambling words days. I still can’t believe I’m a “professional” writer. Seriously, how did that happen?
Back to tofu. I love me some tofu. Yep, vegan stereotype or not, I just love the stuff and it’s one of my favourite foods to play with in the kitchen as it has endless possibilities of what it can do. Tofu, you are one mighty fine food.

Today I have decided to share with you my Crispy Vegan Lemon Tofu. How do I love thee? Let me count the ways.
The tofu is marinated in a simple lemon garlic sauce, and you can have it sitting in your fridge for up to three days! Meaning deliciously lemony tofu is waiting for your hunger to strike. The longer you leave it, the more awesome it becomes. Make ahead easiness, check.
You can decide whether to bake or fry the crispy vegan lemon tofu. Meaning you get to choose how healthy you want to be for this particular meal. Both ways come out crispy and delicious. Healthiness option, check.
Not only is the tofu marinated in lemon garlic sauce, but it is dredged in flour and then dipped back into the lemon marinade to infuse it with maximum lemon garlicky goodness! Who needs eggs for a breaded coating when you can double infuse with flavour instead? Then coat it in seasoned panko for maximum crunch. Vegan recipe for the win, check!

And there you have it crispy vegan lemon tofu. Crunchy on the outside, lemon garlic on the inside. Serve with a side of mashed potatoes, and a green salad or cooked green like asparagus or broccoli. Yum!

To make Crispy Vegan Lemon Tofu: In a large resealable bag or medium dish, mix together all of the marinade ingredients. Add in the slices of tofu and toss lightly to coat. Seal or cover and put in the fridge to marinate for a minimum of 30 minutes, but you can let marinate in the fridge for up to 3 days. The longer it marinates the more flavour infused it will become.

Take three small bowls. Add flour to one. Pour off the leftover lemon marinade into the second, leaving the tofu behind. Mix together the panko, nutritional yeast, dried parsley, and garlic powder in the third.
Take a slice of the marinated tofu and toss it into the flour to coat, then dip the tofu into the leftover marinate, and finally coat in the panko mixture. Repeat with all the tofu slices. You can bake or fry the tofu depending on your preference.

To bake the tofu: Preheat your oven to 400F (200C). Line a baking sheet with parchment paper. Lay the panko coated tofu in a single layer and bake for 18 to 23 minutes until lightly golden.
OR
To fry the tofu: heat a large skillet over medium-high heat with enough oil to coat the bottom of the pan. When hot, carefully fry the tofu pieces until they are golden brown on both sides, and heated through. About 3 to 6 minutes per side. The panko coating can be a little fragile and falls off easily, so I found the best technique was to use a large spatula (and not tongs) for flipping. Just be gentle when handling the tofu.
Garnish with extra lemon slices and fresh parsley if desired. Boom!

Crispy Vegan Lemon Tofu

Marinate the tofu in a lemon garlic sauce for up to three days for an easy make ahead meal. Then bake or fry in a crispy panko coating.
For the lemon marinated tofu
2 lemons, (zested and juiced)
1/4 cup water
3 cloves garlic, (minced)
2 teaspoons agave or maple syrup
1/4 teaspoon salt
1/4 teaspoon black pepper
1 block extra-firm or firm tofu, (drained, pressed, and sliced into 8 pieces (see notes))
For the panko coating:
1/3 cup flour
1/2 cup panko crumbs
2 tablespoons nutritional yeast
1/2 teaspoon dried parsley
1/4 teaspoon garlic powder
Marinate the tofu: In a large resealable bag or medium dish, mix together all of the marinade ingredients. Add in the slices of tofu and toss lightly to coat. Seal or cover and put in the fridge to marinate for a minimum of 30 minutes, but you can let marinate in the fridge for up to 3 days.
Panko coat the tofu: Take three small bowls. Add the flour to one. Pour off the leftover lemon marinade into the second, leaving the tofu behind. Mix together the panko, nutritional yeast, dried parsley, and garlic powder in the third.
Take a slice of the marinated tofu and toss it into the flour to coat, then dip the tofu into the leftover marinate, and finally coat in the panko mixture. Repeat with all the tofu slices. You can bake or fry the tofu depending on your preference.
To bake the tofu: Preheat your oven to 400F (200C). Line a baking sheet with parchment paper. Lay the panko coated tofu in a single layer and bake for 18 to 23 minutes until lightly golden.
To fry the tofu: heat a large skillet over medium-high heat with enough oil to coat the bottom of the pan. When hot, carefully fry the tofu pieces until they are golden brown on both sides, and heated through. About 3 to 6 minutes per side. The panko coating can be a little fragile and falls off easily, so I found the best technique was to use a large spatula (and not tongs) for flipping. Just be gentle when handling the tofu.
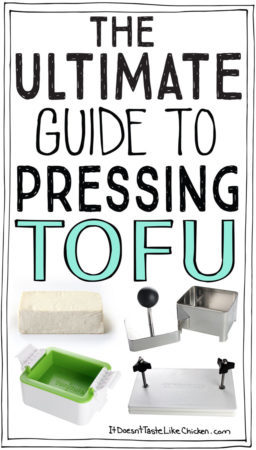
If you’re new to pressing tofu, check out The Ultimate Guide to Pressing Tofu to find out how (it’s easy peasy)!
Bon appetegan!
Sam.


This post Crispy Vegan Lemon Tofu appeared first on it doesn't taste like chicken
August 30, 2017
Garlic Lemon Broccoli Pasta
This post is sponsored by Barilla the masters of pasta, who I love for their super yummy pasta including their gluten free line which I used in my recipe that is made from corn and rice flour. Yummy!

This Garlic Lemon Broccoli Pasta is a one-pot, gluten-free meal that takes just 20 minutes to make! How amazing is that? Yeah, I think that’s pretty amazing too. Now that the weather is cooling down again, I’m starting to crave hot meals, and pasta has always been and always will be one of my most favourite meals.

Super easy to make, endless flavour possibilities, pasta is the perfect lazy night, pantry staple, people pleaser.
This garlic lemon broccoli pasta is so simple to make and totally scrumptious! Bursting with garlic, zesty lemon, fresh broccoli, crispy almond slices, and spicy crushed red pepper flakes. This simple pasta recipe is a new favourite in my kitchen. It’s perfect for an easy weeknight meal or to carb up after a good workout.

Speaking of working out, during the winter I love hitting the gym and lifting weights… well “love” is a loose term here, it’s more like, I begrudgingly do it because I like to be fit and healthy. Ha. But this summer the idea of going to a windowless gym is so unappealing, that I would much rather get out into the sunshine and go for a long run.

On the days that I don’t go running with a friend, I’ve been training Chickpea dog to run along my side, which makes the run really fun! I mean she is just so cute and excited, how could I not get amped up?
At the beginning of the run, Chickpea is racing ahead and bouncing around with excitement, but I think speed is Chickpeas skill, and not endurance because by the end of my run she will suddenly decide she is done and lay down in the grass, and so we slowly walk home. After a long run I’m usually starving and tired, so a quick pasta dish is my go to. (Well, for me anyways, Chickpea gets kibble).

To make Garlic Lemon Broccoli Pasta: bring a large pot of water to a boil and cook the Barilla Gluten Free Penne according to the directions. I enjoyed tasting this corn and rice flour pasta for a change, but can always use a Barilla wheat pasta if you prefer.

In the last 3 minutes of cooking, add the broccoli so it will cook along with the pasta. Drain the pasta and broccoli.

Return the pot to medium-high heat and melt the vegan butter. Add in the garlic and cook for a minute just until garlic begins to brown. Remove from heat and stir in the lemon zest, lemon juice, salt, and crushed red pepper flakes. Add the pasta and broccoli back into the pot and toss well to combine. Garnish with slivered almonds and parmegan to serve.
For more scrumptious pasta recipes visit Barilla.ca.

Garlic Lemon Broccoli Pasta

One pot, 20 minutes to make, gluten-free, vegan, Garlic Lemon Broccoli Pasta! This super quick and easy meal is perfect for a busy weeknight or to carb up after a long run.
2 1/2 cups Barilla Gluten Free Penne, (about 1/2 the box, (or a wheat-based pasta if preferred))
1 head broccoli, (cut into florets)
2 tablespoon vegan butter or olive oil
4 cloves garlic, (minced)
1 lemon, (zested)
2 tablespoon lemon juice
1 teaspoon salt
1/2 teaspoon crushed red pepper flakes
3 tablespoons sliced or slivered almonds
2 tablespoons Parmegan (or nutritional yeast)
Bring a large pot of water to a boil and cook the penne according to the directions. In the last 3 minutes of cooking, add the broccoli so it will cook along with the pasta. Drain the pasta and broccoli.
Return the pot to medium-high heat and melt the vegan butter. Add in the garlic and cook for a minute just until garlic begins to brown. Remove from heat and stir in the lemon zest, lemon juice, salt, and crushed red pepper flakes. Add the pasta and broccoli back into the pot and toss well to combine. Garnish with slivered almonds and parmegan to serve.
Bon appetegan!
Sam.


This post Garlic Lemon Broccoli Pasta appeared first on it doesn't taste like chicken
August 27, 2017
Vegan Grilled Veggie Gyros
I’m squishing in that last bit of summer and getting those veggies on the grill while I still can! …Who am I kidding, I don’t even have a real grill, I just have a little grill pan, so I could technically make these Vegan Grilled Veggie Gyros anytime of the year. And you know what, I’m so going to do that, because oh my are these gyros so get-in-my-mouth delicious!

I admit, the ingredient list for this recipe is longer than my usual short list style, but it’s really just a recipe for a marinade and a bunch of veg for the grill when you look at it, so don’t get worried. These Vegan Grilled Veggie Gyros are so super duper easy to make in true Sam cooking style.
Just whip up the marinade, pour over sliced veggies, then start your grilling. The tzatziki can be made ahead of time, so then all you have to do is assemble your sandwiches to taste. See? Told ya, easy peasy.

And how does it taste? Well, let me tell you. Layers of smoky garlic grilled Greek style veggies, with fresh tomato, a sprinkle of black olives, topped on a fluffy grilled flatbread, with a big dollop of creamy vegan tzatziki. There’s a reason why I have been eating this for lunch and dinner the last few days in a row, I just can’t get enough!

To make Vegan Grilled Veggie Gyros: sliced up your veggies. I used zucchini, portobellos, peppers, and a red onion, but you could also try eggplant, tomatoes, or carrots.

Mix all the marinade ingredients together in a small bowl.

Put the sliced veggies in a large dish and pour the marinade over top. Toss the vegetables to coat. You can let them rest for 1/2 an hour or start grilling right away.

Heat your grill or grill pan over medium heat. Add the veggies and grill a couple of minutes per side until grill marks are formed and the veggies are tender all the way through. As you grill brush on the leftover marinade.
Depending on the size of your grill you may need to do this in batches. You can heat your oven to 250F (130C) with a large baking tray inside to keep the grilled veggies hot while you cook the remaining veg.
Lastly, toss the flatbreads on the grill and warm the bread just before assembling the sandwiches.

To assemble the gyros take a warmed flatbread and top it with the grilled veggies, a big dollop of Easy Vegan Tzatziki, a couple slices of tomato, and a sprinkle of black olives. Repeat to make 6 sandwiches.
This is amazing served hot, but leftover cold veggies also make for a great sandwich topper.

Vegan Grilled Veggie Gyros
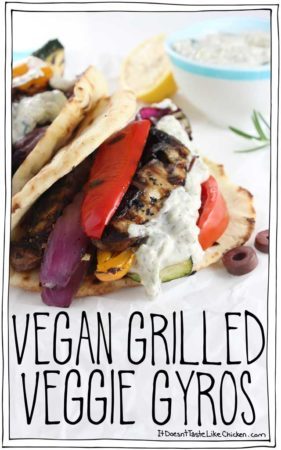
Easy recipe for Greek styled dinner. Just marinate vegetables, grill, and assemble the sandwiches to taste.
For the marinade:
2 tablespoon lemon juice
2 tablespoon olive oil
2 tablespoons water
3 cloves garlic, (minced)
2 teaspoon fresh rosemary, (finely chopped)
2 teaspoon dried oregano
1/4 teaspoon salt
1/4 teaspoon black pepper
For the grilled veggies:
2 zucchinis, (sliced thickly lengthwise)
1 red onion, (cut into thick wedges)
2 portobello mushrooms, (sliced thickly)
2 bell peppers (red, orange, or yellow), (sliced thickly)
To serve:
6 flatbread or pitas
1 recipe Easy Vegan Tzatziki
1 large tomato, (sliced)
1/4 cup sliced black olives
Prepare the marinade: mix everything together in a small bowl. Put the sliced veggies in a large dish and pour the marinade over top. Toss the vegetables to coat. You can let them rest for 1/2 an hour or start grilling right away.
Grill the veggies: Heat your grill or grill pan over medium heat. Add the veggies and grill a couple of minutes per size until grill marks are formed and the veggies are tender all the way through. As you grill brush on the leftover marinade. Depending on the side of your grill you may need to do this in batches. You can heat your oven to 250F (130C) with a large baking tray inside to keep the grilled veggies hot while you cook the remaining veg. Lastly, toss the flatbreads on the grill and warm the bread just before assembling the sandwiches.
Assemble the gyros: take a warmed flatbread and top it with the grilled veggies, a big dollop of Easy Vegan Tzatziki, a couple slices of tomato, and a sprinkle of black olives. Repeat to make 6 sandwiches.
Bon appetegan!
Sam.


This post Vegan Grilled Veggie Gyros appeared first on it doesn't taste like chicken
August 23, 2017
Easy Vegan Tzatziki
Friends! Guess what happened in my kitchen the other day? You guessed it already didn’t you… you clever minx you.
August 20, 2017
20 Minute Teriyaki Black Bean Tacos
20 Minute Teriyaki Black Bean Tacos ← this.
Super quick to make (cooking the rice is the longest part), instant sweet, sour, and tangy flavour, hearty black beans, on a fire toasted tortilla (if you are into that kind of thing… and you should be into that kinda thing), topped with crispy red pepper, sweet pineapple, spicy red onion, and fresh cilantro. Yup. It’s happening.

See, it happened. And it happened good. It happened real good.

Quick and easy meals are my favourite. Especially when they end up looking as gorgeously colourful and as deliciously scrumptious as this one!
This is the perfect recipe for a busy weeknight or for enjoying these last precious days of summer. Get in and then get out of the kitchen as quickly as possible so you can get back to your fun filled or Netflix filled day (hey, I don’t judge)!

To make 20 Minute Teriyaki Black Bean Tacos: prep your fruit and veggies, and prepare the rice according to package directions.

Add the black beans and teriyaki sauce to a medium pan, and put over medium-low heat. Cook for about 5 minutes until the beans are heated through.
Make sure you use one of the thicker teriyaki sauces (and not a thin marinade). I used Kikkoman teriyaki baste and glaze but any other similar sauce will work just fine.

I love to warm the tortillas for added yum. If you have a gas stove, use tongs to hold a tortilla over a flame for about 20 seconds per side to warm them. If you do not have a gas stove, warm the tortillas, by preheating the oven to 350F (180C), wrapping the tortillas in foil, and baking for 10 to 15 minutes until warmed throughout.
Assemble the tacos by taking a tortilla and adding a scoop of the cooked rice. Add a scoop of the teriyaki black beans, and then top with red pepper, pineapple bits, red onion, and cilantro. Enjoy!

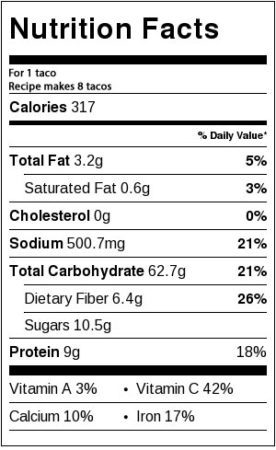
20 Minute Teriyaki Black Bean Tacos
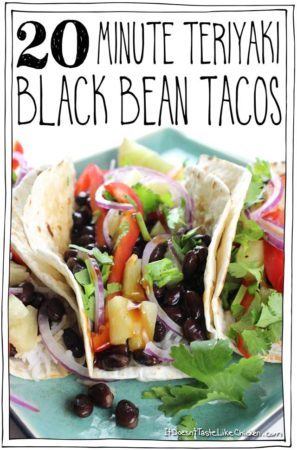
Super quick to make vegan tacos, perfect for a weeknight. Sweet, sour, and tangy flavour, hearty black beans, on a fire toasted tortilla topped with crispy red pepper, sweet pineapple, spicy red onion, and fresh cilantro.
1 cup white rice
1 19oz can black beans (2 cups), (drained and rinsed)
1/4 cup teriyaki sauce, ((make sure it is the thicker sauce and not a thin marinade))
8 small flour or corn tortillas
1 red pepper, (thinly sliced)
1 14oz can pineapple tidbits ((or 1 1/2 cups fresh pineapple, chopped))
1/2 red onion, (thinly sliced)
1 handful cilantro, (roughly chopped)
Cook the rice: prepare your rice according to package directions.
Heat the beans: add the black beans and teriyaki sauce to a medium pan, and put over medium-low heat. Cook for about 5 minutes until the beans are heated through.
Warm the tortillas (optional): on a gas stove, use tongs to hold a tortilla over a flame for about 20 seconds per side to warm them. If you do not have a gas stove, warm the tortillas, by preheating the oven to 350F (180C), wrapping the tortillas in foil, and baking for 10 to 15 minutes until warmed throughout.
Assemble the tacos: take a tortilla and add a scoop of the cooked rice, a scoop of the teriyaki black beans, and then top with red pepper, pineapple bits, red onion, and cilantro. Enjoy!
Bon appetegan!
Sam.
If you liked this recipe you might also enjoy:


This post 20 Minute Teriyaki Black Bean Tacos appeared first on it doesn't taste like chicken
August 16, 2017
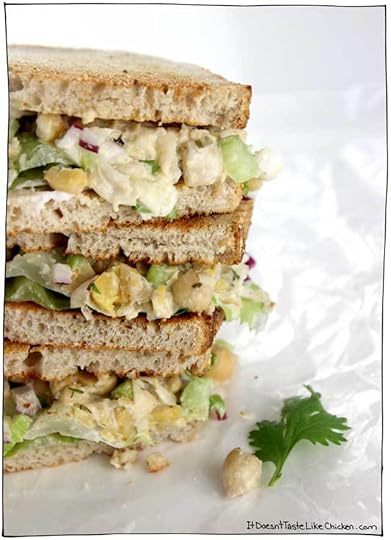
Vegan Ranch Chickpea Sandwich
I love a good chickpea salad sandwich. It’s one of my favourite, easy-to-make, lasts-in-the-fridge, lunchbox-friendly, hungry-but-all-I-have-is-a-can-of-chickpeas sandwiches. I make chickpea sandwiches a LOT, so this time, I decided to experiment a little and I’m sure glad I did! I just took it up a notch from amazingly classic, to a creamy flavour-packed Vegan Ranch Chickpea Sandwich. Yeah, I know, I’m excited too.
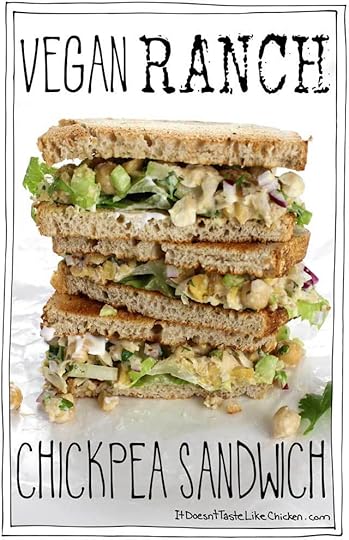
I wish I could hand you half of a sandwich through the screen because I’m sure I just made you very hungry with that photo, but unfortunately, you’re going to have to make it yourself.
The good news is that this vegan ranch chickpea sandwich is super easy to make! It’s got more spices than the classic sandwich, and I know you guys don’t love long ingredient lists, but it’s soooo worth it to make the creamy, zesty ranch dressing every bit as delicious as it should be.

Once you have the dressing, just add the chickpeas for that hearty base, a little celery, red onion, and cilantro, for the fresh crisp bites. Stack that on a good slice of bread and oh baby, sandwiches on point! This is also great served in a wrap, or on a lettuce leaf as a kind of lettuce taco. Yum!
Leftover filling? Just pop it in an air-tight container in the fridge. It will last 2 – 3 days, which makes it perfect for prepping ahead of time for work or school.

To make Vegan Ranch Chickpea Sandwiches: Add all of the ranch dressing ingredients to a medium bowl and mix together.

Now add the chickpeas and use a potato masher or fork to mash to preferred texture. I like about 1/2 the chickpeas mashed and leave the other 1/2 whole.

Add in the celery, red onion and cilantro, and stir to combine. Layer onto bread or into a wrap with lettuce.
The chickpea filling stores well in an air-tight container in the fridge for up to 2 – 3 days. Enjoy!
Vegan Ranch Chickpea Sandwich

Creamy, zesty easy-to-make vegan ranch dressing takes this sandwich to the next level!
For the ranch dressing:
1/4 cup vegan mayonnaise
2 teaspoons apple cider vinegar
1/2 teaspoons dried parsley
1/2 teaspoon dried chives
1/2 teaspoon salt
1/4 teaspoon dried dill
1/4 teaspoon onion powder
1/4 teaspoon garlic powder
for the sandwiches:
1 19oz can chickpeas, (drained and rinsed)
2 ribs celery, (chopped)
1/4 cup red onion, (chopped)
2 tablespoons cilantro, (chopped (optional))
4 romaine lettuce leaves
8 slices bread of choice ((or 4 wraps))
Add all of the ranch dressing ingredients to a medium bowl and mix together.
Now add the chickpeas and use a potato masher or fork to mash to preferred texture. I like about 1/2 the chickpeas mashed and leave the other 1/2 whole. Add in the celery, red onion and cilantro, and stir to combine. Layer onto bread with lettuce. Enjoy!
The chickpea filling stores well in an air-tight container in the fridge for up to 2 – 3 days.

Bon appetegan!
Sam.
If you enjoyed this recipe you might also like:


This post Vegan Ranch Chickpea Sandwich appeared first on it doesn't taste like chicken
Sam Turnbull's Blog

- Sam Turnbull's profile
- 35 followers


!%20Kid-friendly%2C%20perfect%20for%20parties.%20%23itdoesnttastelikechicken)