
Sam Turnbull's Blog, page 53
July 9, 2017
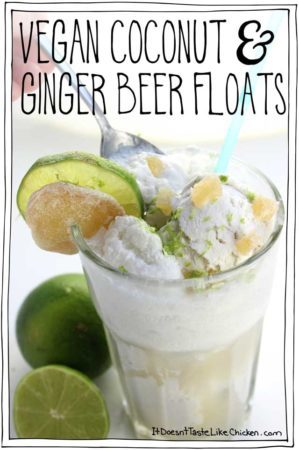
Vegan Coconut & Ginger Beer Floats + Video
You put the lime in the coconut and drink it all up! Er… and ginger beer. That too.
Did you ever make ice cream floats as a kid? How amazing were they!? There is truly something so magical about combining ice cream with pop (as we call it in Canada, soda as it’s called in the US).
I thought it was time to bring this treat back, but I’m not talking about vanilla ice cream and root beer (although that is delicious), I wanted to try a really interesting flavour combo. Oh boy, am I glad I did. I made Vegan Coconut & Ginger Beer Floats, and this treat alone, totally made my day and it made my friend, Abbey, neigh like a horse… more on that later.

Rich, creamy, vegan coconut ice cream, topped with spicy, fizzy, ginger beer, garnished with sweet and spicy candied ginger, and a zing of lime zest.
Yes, it really is as magical tasting as it sounds.

Guess what else is fun? I filmed making this float with my friend Abbey Sharp from Abbey’s Kitchen. (This is where the neighing comes in). So watch that madness here. ↓
Aren’t we the cutest? Who else used to make swamp water as a kid?

I made my floats with Coconut Bliss Naked Coconut ice cream (which is one of my faves), but any vegan coconut ice cream will do. Just make sure it’s coconut flavoured, and not vanilla flavoured, as you want that coconut taste!
Then top it with ginger beer of choice. This time I went with Grace Island Soda ginger beer, but a boozy ginger beer would be awesome too!
Garnish with candied ginger and lime zest, because yum, and dive in!

Vegan Coconut & Ginger Beer Floats
This tropical treat is the perfect quick and easy summer dessert. Amp it up by using a boozy ginger beer!
4 – 6 scoops vegan coconut ice cream
1 335ml bottle ginger beer ((regular or alcoholic))
2 tablespoons chopped candied ginger
1 teaspoon lime zest
For garnish (optional):
2 round slices lime, (with slits cut to fit on the glass)
2 rounds candied ginger, (with slits cut to fit on the glass)
Fill two tall glasses with 2 – 3 scoops of coconut ice cream each. Divide the ginger beer among the glasses pouring it over the ice cream. Top with candied ginger pieces and lime zest. Add the rounds of lime and candied ginger on the side of the glass for garnish.
Bon appetegan!
Sam.
If you liked this recipe you might also enjoy:

This post Vegan Coconut & Ginger Beer Floats + Video appeared first on it doesn't taste like chicken


July 5, 2017
The Easiest Way to Make Perfect Sushi Rice
In Japan, it can take as long as 20 years to become a sushi chef (called an itamae). You first start on cleaning duty and very slowly work your way up the ladder. It takes 5 years or so of training before you are promoted to the level where you being to make sushi rice. Then that will be your job for however long it takes to perfect the rice before you may get promoted to the next level. Thats the most difficult way to make perfect sushi rice.
Now, I can pretty much guarantee you that the sushi rice a proper sushi chef makes, is going to be far superior to mine, and I don’t even want to try and compete. But since I’m never going to train to be a pro, and I want to eat sushi rice… like, today, this whole 5 years of training thing is just not gonna happen for me!
So, I’m sharing with you my cheater method to making sushi rice, no years of training needed. This is The Easiest Way to Make Perfect Sushi Rice. And by perfect, I mean perfect for us at home, non-professional sushi makers.

My technique for sushi rice, I’m sure, is all sorts of wrong according to an itamae, but for my at home sushi making, I just LOVE it. It’s sticky, has that vinegar tang, a hint of sweetness, works like a dream for making any type of roll, and only requires 3 ingredients! Sushi rice, seasoned rice vinegar, and water. Boom!
Easy peasy is the name of the game here on It Doesn’t Taste Like Chicken.
Oh, and if you are wondering what that pink stuff is on my sushi, you’re just going to have to wait until next week 
July 1, 2017
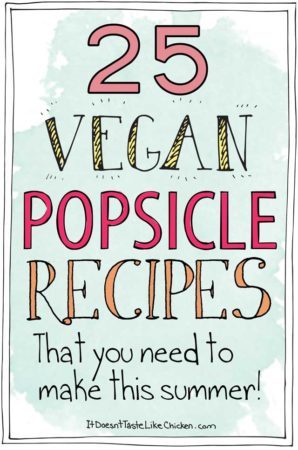
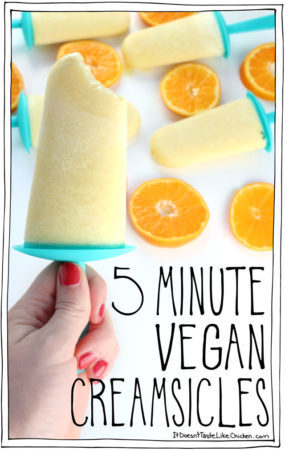
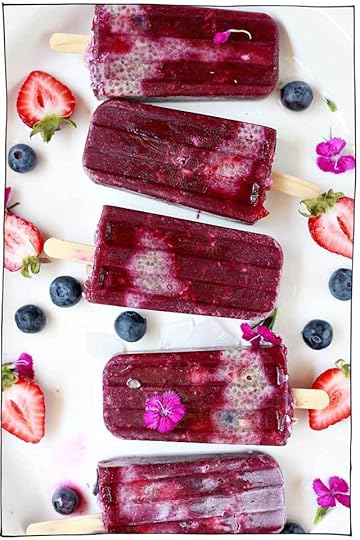
25 Vegan Popsicle Recipes That You Need to Make This Summer
I LOVE making a good vegan popsicle, but I learned the hard way what makes for a delicious popsicle, and what makes a lame sad little treat on a stick.
As a kid, I thought I was pretty much genius when I poured orange juice into a popsicle mold. The result was frozen orange juice… yay? I learned that just because it’s frozen does not mean it’s going to taste magically awesome. But if you make something with a little more thought, and a little more creativity, it can go from a lame treat to a magical frozen explosion of deliciousness!
My fudgesicles and creamsicles are two of my favourite vegan popsicles, but not everything has to be an “siscle”. There are so many more delicious vegan popsicles to be had. Creamy, fruity, chocolatey, layered, swirled, prizes inside, this collection has got it all.

I’ve gathered vegan popsicle recipes from my blogging friends across the net and rounded up 25 GORGEOUS vegan popsicles that you need to put on your summer bucket list.
Just click on the photo or title of the popsicle to take you straight to the recipe.

Vegetarian Gastronomy: Chocolate Covered Strawberry Cream Pops

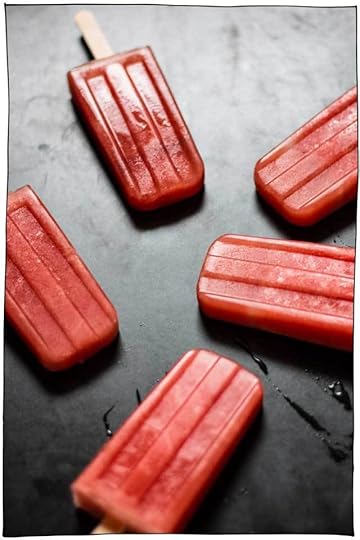
The Pretty Bee: Watermelon Kiwi Popsicles

Vegan Yack Attack: Blackberry Cheesecake Popsicles

Abra’s Kitchen: Anti-Inflammatory Tropical Tumeric Popsicles
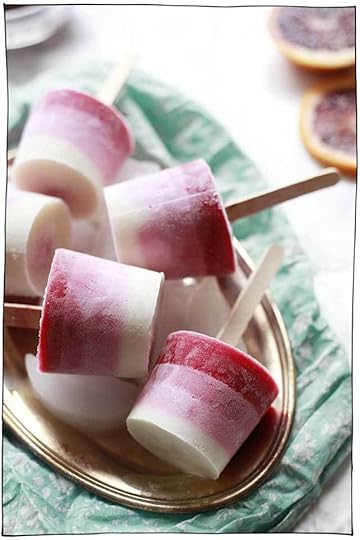
Yummy Mummy Kitchen: Ombre Berry Yogurt Ice Pops

It Doesn’t Taste Like Chicken (that’s me!): The Creamiest Vegan Fudgesicles

A Million Miles: Super Easy Rainbow Fruit Popsicles

A Million Miles: Tropical Popsicles with Pineapple, Passionfruit, and Coconut

Veggies Don’t Bite: Blueberry Mango Banana Breakfast Pops

My Plant-Based Family: Mango Lime Ice Pops
The Nut-Free Vegan: Agave Watermelon Popsicles
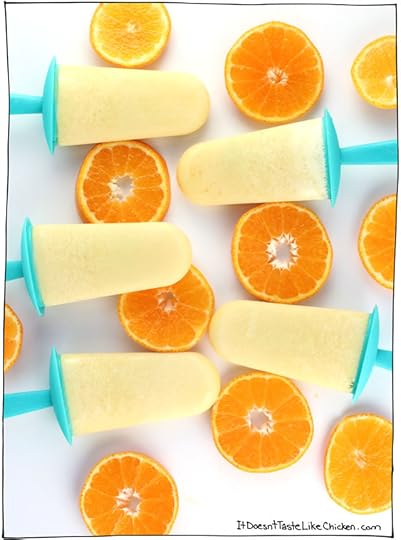
It Doesn’t Taste Like Chicken (that’s me!): 5 Minute Vegan Creamsicles

Veggie Inspired: Watermelon Popsicles with Cucumber and Lime

Unconventional Baker: Blueberry Tahini Pops

Feasting on Fruit: Banoffee Ice Cream Pops

Vegan Heaven: Healthy Popsicles with Kiwi and Pineapple

Vegan Huggs: Strawberry Shortcake Ice Cream Bars
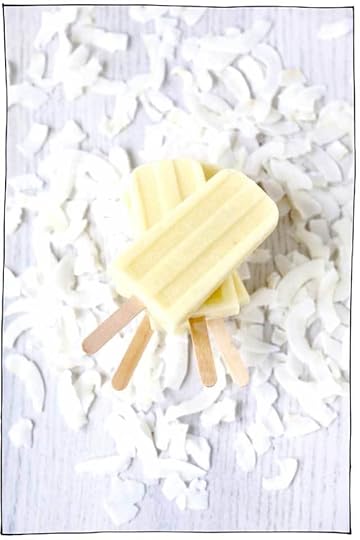
Triad to Wellness: Pineapple Coconut Ice Pops

Healthy & Psyched: Matcha Coconut Ice Lollys with Berries
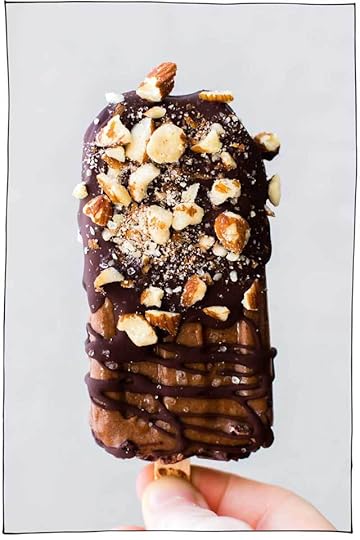
Feasting on Fruit: Chocolate Almond Sea Salt Ice Cream Pops

May I Have That Recipe: Blueberries and Cream Popsicles
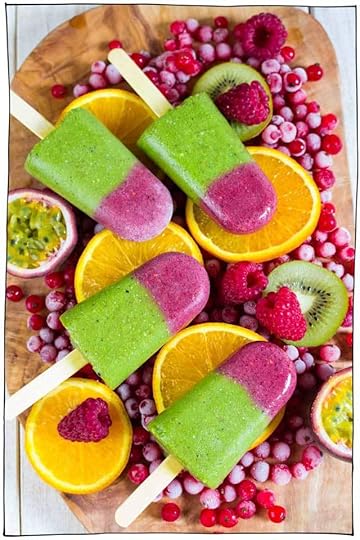
Vegan Heaven: Green Smoothie Popsicle
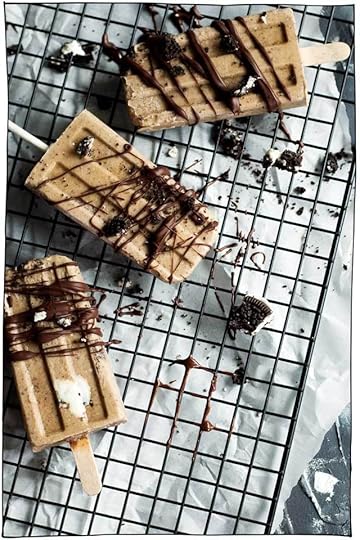
Love Me, Feed Me: Mocha Cookies and Cream Popsicles
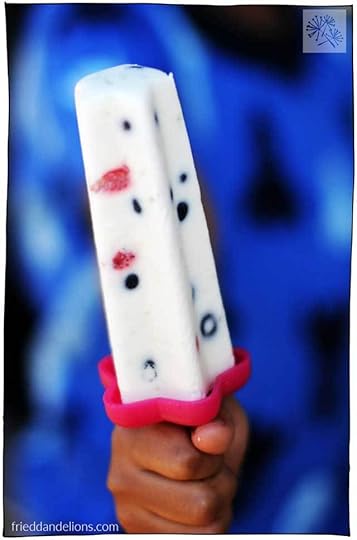
Fried Dandelions: Firecracker Popsicles
Yummy Mummy Kitchen: Acai Bowl Breakfast Popsicles
Bon appetegan!
Sam.
This post 25 Vegan Popsicle Recipes That You Need to Make This Summer appeared first on it doesn't taste like chicken
June 28, 2017
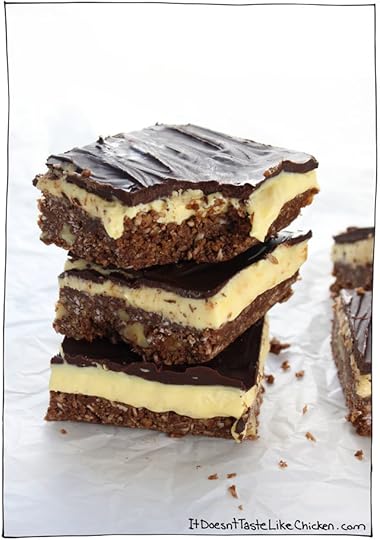
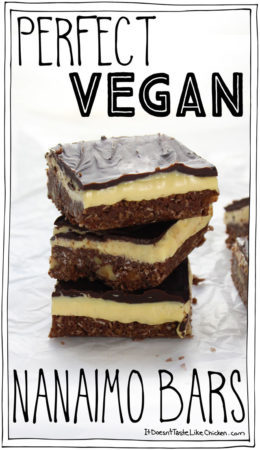
Perfect Vegan Nanaimo Bars
After making The Ultimate Vegan Poutine, I wanted to share another Canadian classic recipe, but this time dessert! So here we go: Perfect Vegan Nanaimo Bars! Omnomnom. If you’re new to the world of a Nanaimo bar, let me explain this deliciousness.
3 layers of sweet no-bake awesomeness…

Layer 1: graham cracker, coconut, nuts, and chocolate make up this cookie base. Yes, all of those delicious flavours packed into one awesome crunchy layer.
Layer 2: sweet and sticky, vanilla custard layer, which tastes similar to the inside of a creme egg. Omnomnom.
Layer 3: more chocolate. Because chocolate.

Yes, they really are every bit as amazing dessert goodness that they sound like.
If you have a serious sweet tooth, these will hit the spot for you! I love to keep mine stored in the fridge so the custard and chocolate stays firm, then you get the treat of a real melt in your mouth experience paired with crispy cookie crust. Drool.

To make Perfect Vegan Nanaimo Bars: in a medium sauce pan, add the chocolate chips and vegan butter. Melt over low heat, remove from the heat just as there are few chocolate chips left, to ensure you don’t burn the chocolate, and stir in to finish melting. You could alternatively do this in a double boiler.

Add in the graham cracker crumbs, coconut, nuts (if using), and vanilla and stir to combine.

Pour into the bottom of the lined pan and press down firmly. Pop it in the fridge to chill while you are preparing the next layer.

To make the custard layer: add all of the ingredients to a medium bowl and use a mixer to blend well.
After my expert recipe testers (aka friends) tasted these, I was told that this middle layer is sometimes soft and gooey (like I enjoy), but sometimes it’s a bit more firm. So you can add more or less non-dairy milk to reach your preferred consistency, keeping in mind it firms up more when refrigerated.
Fun side note: the standard custard powder used in Nanaimo bars happens to be vegan!

Pour the custard filling on top of the cooled bottom layer. Spread it out so it evenly covers and then pop in the freezer for 15 minutes.
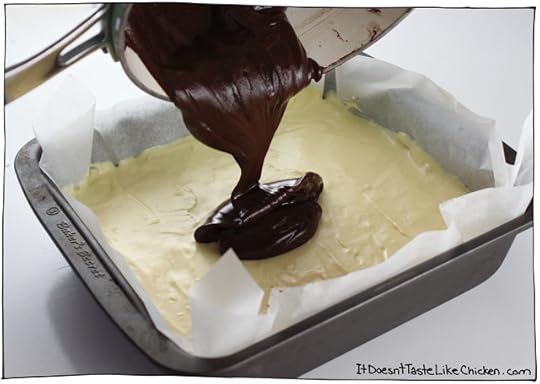
To finish the bars, add the chocolate and vegan butter to a small sauce pan and put over low heat. Melt the chocolate until just a few chips remain then remove from heat to avoid burning the chocolate. Stir to finish melting the chocolate. Alternatively, you could do this in a double boiler. Pour over the custard layer, and spread to evenly coat.
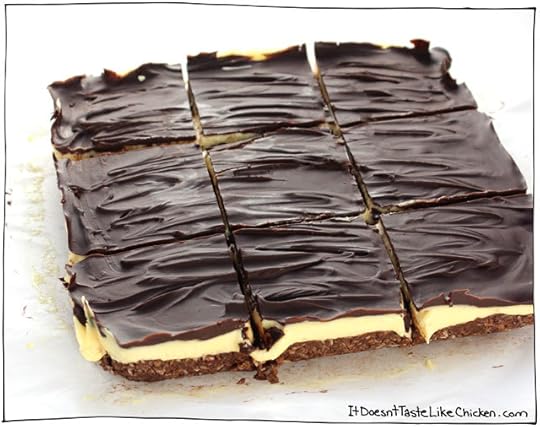
Cool in the fridge for a couple of hours or overnight before slicing. For perfect slices, heat a large knife in hot water, dry off completely then use the hot knife to cut the bars. This will help cut through the chocolate layer, and not cause cracking. Store the bars in the fridge in an air-tight container. So much yum!
Perfect Vegan Nanaimo Bars
This Canadian classic dessert is made up of a coconut and chocolate cookie base, a creamy custard layer, all topped with chocolate.
For the bottom cookie layer:
1/2 cup vegan chocolate chips
1/2 cup vegan butter ((such as Earth Balance))
2 cups vegan graham cracker crumbs ((or other hard vegan cookie crumbs, see notes))
1 cup unsweetened coconut flakes
1/2 cup chopped almonds or walnuts ((optional))
1 teaspoon vanilla extract
For the middle custard layer:
2 cups powdered sugar
1/4 cup vegan butter ((such as Earth Balance))
1 – 3 tablespoons non-dairy milk ((such as soy or almond milk))
2 tablespoons vegan custard powder
For the top chocolate layer:
2/3 cup vegan chocolate chips
2 tablespoon vegan butter ((such as Earth Balance))
Line a 8″ x 8″ pan with parchment paper or foil.
To make the bottom cookie layer: in a medium sauce pan, add the chocolate chips and vegan butter. Melt over low heat, remove from the heat just as there are few chocolate chips left, to ensure you don’t burn the chocolate, and stir in to finish melting. You could alternatively do this in a double boiler.
Add in the graham cracker crumbs, coconut, nuts (if using), and vanilla and stir to combine. Pour into the bottom of the lined pan and press down firmly. Pop it in the fridge to chill while you prepare the next layer.
To make the custard layer: add all of the ingredients to a medium bowl and use a mixer to blend well. For a soft and gooey custard use 3 tablespoons of non-dairy milk, for a firmer filing, reduce the non-dairy milk to 1-2 tablespoons. Pour on top of the cooled bottom layer, spread evenly, and pop in the freezer to set for 15 minutes.
To make the top chocolate layer: add the chocolate and vegan butter to a small sauce pan and put over low heat. Melt the chocolate until just a few chips remain then remove from heat to avoid burning the chocolate. Stir to finish melting the chocolate. Alternatively, you could do this in a double boiler. Pour over the custard layer, and spread to evenly coat.
Cool in the fridge for a couple of hours or overnight before slicing. For perfect slices, heat a large knife in hot water, dry off completely then use the hot knife to cut the bars. This will help cut through the chocolate layer, and not cause cracking. Store the bars in an air-tight container in the fridge.
Bon appetegan!
Sam.
If you liked this recipe you might also enjoy:

This post Perfect Vegan Nanaimo Bars appeared first on it doesn't taste like chicken
June 25, 2017
The Ultimate Vegan Poutine
Did you know that July 1st is Canada’s 150th birthday? Geeze, Canada, you’re getting up there in the years, eh? Don’t worry, you look great for your age! In celebration of my county’s b-day I thought it would be fun to share a few classic Canadian recipes (veganized, of course). First off, The Ultimate Vegan Poutine!
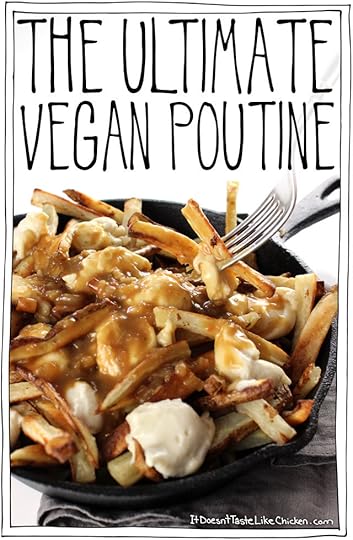
Yep, it’s every bit of comfort food amazingness that it looks like. If you’re Canadian, you’re likely drooling right now. If you’re not Canadian, you may be saying “huh”?
Poutine, is 3 total comfort foods smashed together in one rich dish. That is French fries, topped with cheese curds, and then doused in hot gravy. Yeah, I know, delicious gluttony at it’s finest.
Some of the French fries are crispy, and others soak up the gravy. The fries and gravy are hot, so the cheese curds get melty and gooey. And you eat it all with a fork, because Canadians are classy with our comfort food… or really you HAVE to eat it with a fork otherwise you fingers will sizzle off.
Canadian readers have been requesting this recipe for awhile now, so I am so happy to deliver! And it’s a fairly easy recipe too, just takes a bit of time, but every step is easy peasy. The gravy, cheese curds, and potato soaking can all be prepped ahead of time, so all you have to do is bake the fries, heat up the gravy and assemble. Gooey, saucy, crispy, salty, goodness.

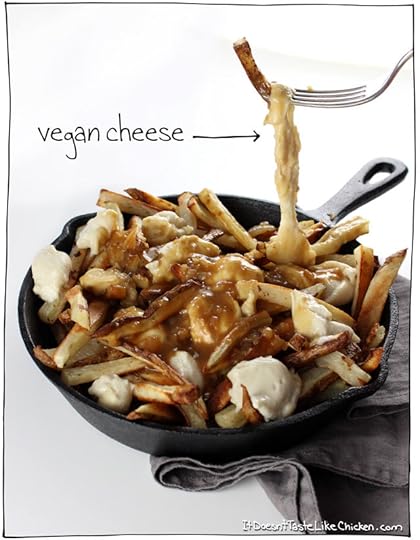
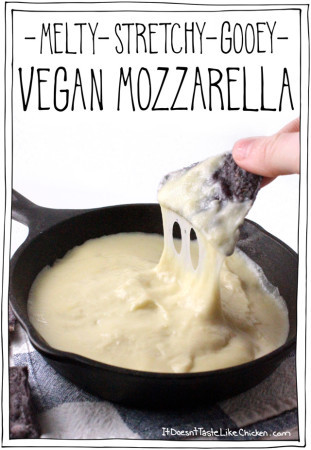
To make The Ultimate Vegan Poutine: make a batch of my Melty Strechy Gooey Vegan Mozzarella and then pop it in the fridge to cool for at least 15 minutes or overnight. Cooling the cheese, takes it from melty, to a slightly firmer texture that works perfectly for scooping into little blobs providing a cheese curd like effect. Pre-tay cool.
You only need about 1/3 of the cheese, but I just made the whole batch so I could cheese to taste.

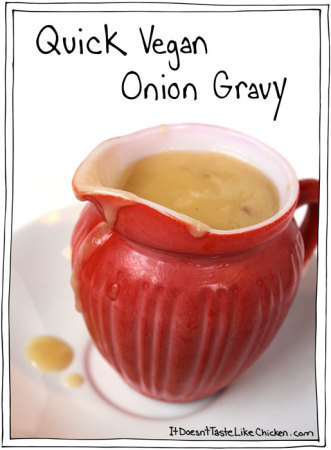
Next, whip up a batch of my Quick Vegan Onion Gravy. I recommend using a low-sodium vegetable broth this time, because the fries are also salty. Then taste the gravy and add soy sauce or tamari to taste if needed. This controls the salt flavour and the soy sauce or tamari also help make the gravy a little richer brown in colour. Ooh so rich.

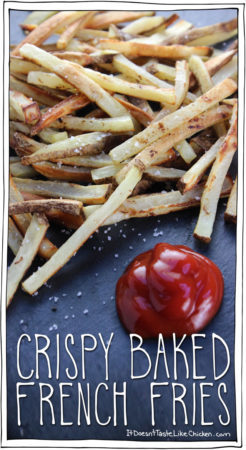
Now just whip up a batch of my Crispy Baked French Fries. Again, I would choose to keep the salt low here so you don’t over salt yourself, so I went with 1/2 teaspoon of salt. Perfection.
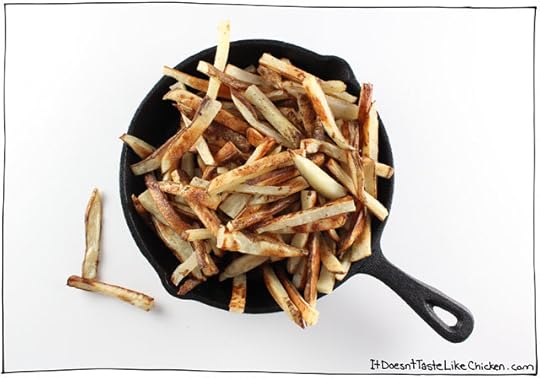
To assemble the vegan poutine: fill a dish of choice with the fries. I chose this small cast iron skillet, because it looks all hipster cool, but poutine often comes on a plate or in a paper box… this ain’t a fancy food.
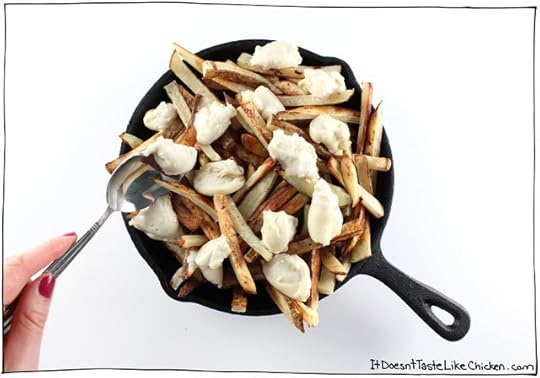
Then use a spoon to scoop small blobs of the chilled mozzarella. Ta-dah! Perfect cheese curd blobs. So cool.

And finally spoon over the hot gravy to taste. Pass the forks and dig in! Hello Canadian comfort food. Omnomnom.
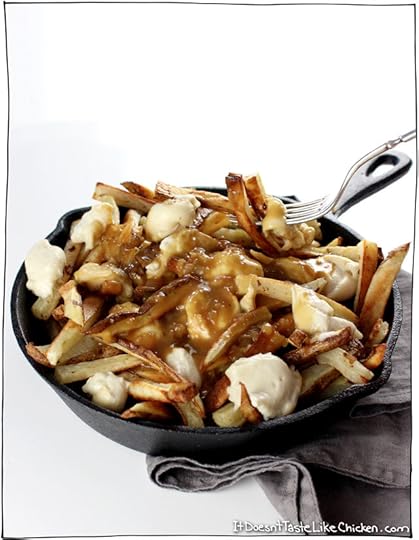
The Ultimate Vegan Poutine
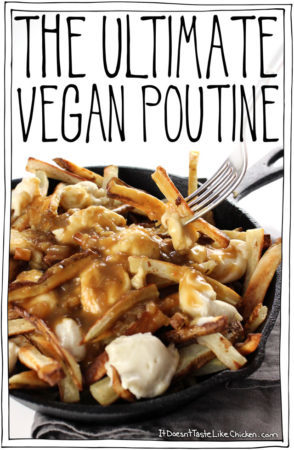
Classic Canadian comfort food: Baked crispy French fries, topped with quick and easy dairy-free cheese curds, smothered in rich onion gravy.
1/3 recipe Melty Stretchy Gooey Vegan Mozzarella, (chilled for 30 minutes or overnight)
1/4 recipe Quick Vegan Onion Gravy ((use low-sodium broth, and add soy sauce or tamari to taste if needed))
1 recipe Crispy Baked French Fries ((use 1/2 teaspoon of salt))
To make The Ultimate Vegan Poutine: prepare the mozzarella according to directions, then chill in the fridge for a least 15 minutes, or overnight. Prepare the gravy according to direction, using a low-sodium vegetable broth. You can add more salt to taste by splashing in soy sauce or tamari which will also make the colour a richer brown. Prepare the French fries according to directions, using 1/2 teaspoon of salt. *Because all three recipes require salt, you do not want to over salt anything, you can always add more salt later!
To assemble the vegan poutine: fill a dish with the french fries. Use a spoon to scoop small blobs of cheese onto the cheese. You can use as much or as little cheese as you like, but I found about 1/3 of the recipe was a good amount. Finish by spooning over the hot gravy to taste. Pass out the forks and dig in!
You may make the mozzarella, gravy, and soak the potatoes ahead of time if you like, so that to assemble, all you have to do is bake the fries and heat up the gravy.
Bon appetegan!
Sam.
If you enjoyed this recipe you might also like:
This post The Ultimate Vegan Poutine appeared first on it doesn't taste like chicken
June 21, 2017
Healthy Vegan Breakfast Cookies
This post for Healthy Vegan Breakfast Cookies is sponsored by iHerb (a Google trusted store), who I love for their amazing selection of vegan snacks! They carry over 5,000 grocery items that can be shipped to over 160 countries. Their customer service team provides support in 10 different languages!

If a granola bar and a cookie had a baby… that would be bizarre, and probably not vegan… but if they did, it would be this cookie! Lightly sweet, chewy, lots of nut crunch, bursts of cranberry, and notes of peanut butter. The perfect rushing out the door breakfast. Omnomnom!

I always recommend that vegans (especially new vegans), carry snacks with them when they leave the house, as it may be a challenge to find vegan treats when hunger pangs strike. Vending machines or convenience stores often don’t have much of an exciting vegan selection.
So, this past weekend I went on a bit of a road trip with friends, and I stocked my car with yummy snacks from iHerb. I tried Vegan Jerky (yum!), mini Lara Bars, Hippeas vegan white cheddar (a new fave), and Wholesome organic fruit chews (which taste just like Starbursts), and made a batch of these Healthy Vegan Breakfast Cookies. Road snacks on point!
Check out my iHerb snack shopping cart here.

Back to cookies. These easy to make, one bowl cookies are made with only the good ingredients, whole grains, no oil, no refined sugar, the best way to start the day. One bowl, easy to whip up cookies are great for the on-the-go treat to make breakfast easy peasy. Well, good morning to you too, Cookie.
June 18, 2017
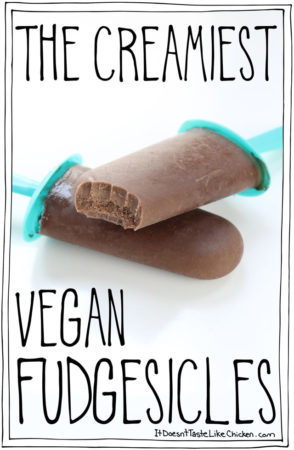
The Creamiest Vegan Fudgesicles
Reason why my job is weird: I had to take a well placed bite out of a vegan fudgesicle first thing in the morning because the lighting was right for photography.
Reason why my job is awesome: I had to take a well placed bite out of a vegan fudgesicle first thing in the morning because the lighting was right for photography.
I mean really, what other excuse could I muster up for having a fudgesicle for breakfast? This was the perfect one!
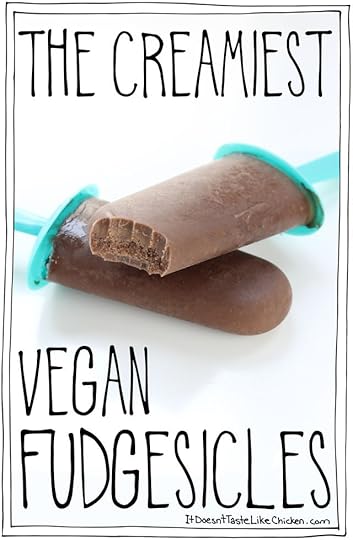
You know how those traditional store-bought fudgesicles are unique in the popsicle world, as they have that amazing frozen creamy chewy fudge texture to them? Well I figured out exactly what the key is to get that unique texture: cornstarch.
What’s that now? Yes, the key to the creamiest vegan fudgesicles with that classic bite, is to basically make chocolate milk, but then cornstarch is added to the mix which thickens the milk into a fudge sauce. When frozen, it doesn’t freeze completely hard like a fruit juice popsicle would, but it instead has this amazing chewy creamy fudgeiness that will make you fall in love with every single delicious bite… even first thing in the morning.
Welcome to my new favourite treat of the summer!

To make The Creamiest Vegan Fudgesicles: in a medium sauce pan, whisk together the non-dairy milk, coconut milk, sugar, cocoa powder, and cornstarch over medium heat. The powders might float on top like this, but will come together as it heats up.

Bring to a simmer whisking often, and cook for 3 – 5 minutes until the sugar has dissolved, and the mixture thickened into a fudge sauce. Remove from heat and whisk in the vanilla extract.
Look at that fudgey deliciousness!!

Pour the fudge sauce into the molds and freeze overnight. I used a mold similar to this one, but any popsicle mold will do.
As with any homemade popsicle, if they are difficult to remove from the mold, you can run the mold under warm water for a minute to help release the fudgesicles.
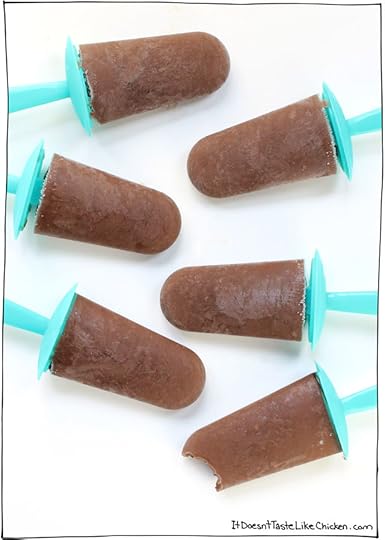
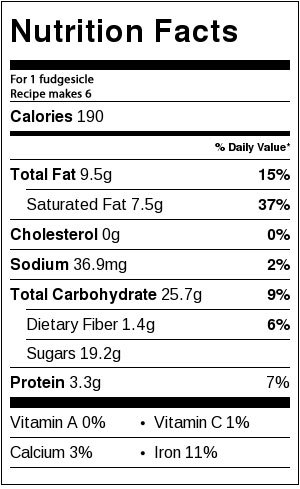
The Creamiest Vegan Fudgesicles
These vegan fudgesicles have that amazing frozen creamy chewy fudge texture to them, just like the store-bought ones… but better!
1 1/2 cup non-dairy milk ((such as soy or almond milk))
1 cup full-fat coconut milk ((the kind in a can))
1/2 cup white sugar
3 tablespoons cocoa powder
2 tablespoons cornstarch
1 teaspoon vanilla extract
In a medium sauce pan, whisk together the non-dairy milk, coconut milk, sugar, cocoa powder, and cornstarch over medium heat. It will come together as it heats up. Bring to a simmer whisking often, and cook for about 3 minutes until the sugar has dissolved, and the mixture thickened into a fudge sauce. Remove from heat and whisk in the vanilla extract.
Pour the fudge sauce into the molds and freeze overnight.
Bon appetegan!
Sam.
If you liked this recipe you might also enjoy:
This post The Creamiest Vegan Fudgesicles appeared first on it doesn't taste like chicken
June 14, 2017
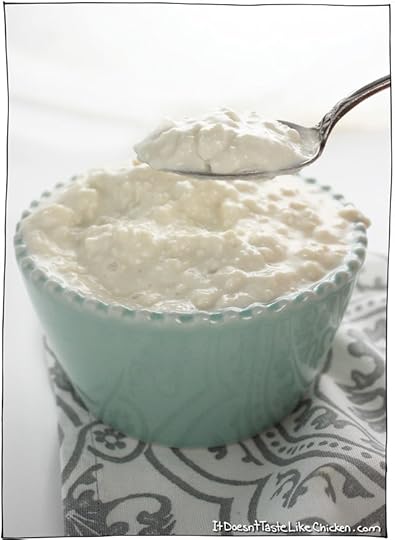
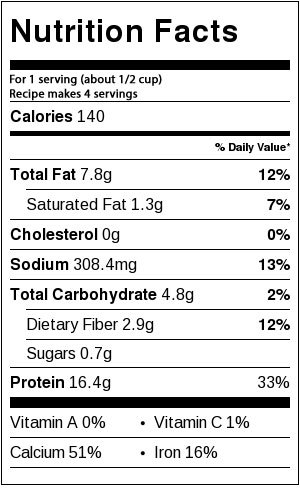
Quick & Easy Vegan Cottage Cheese
You asked and I delivered. I recently posted a reader question on my Facebook page “What recipe/product/dish do you wish was vegan?” There were all sorts of requests, some of the requests I had already posted on the blog, some recipes are waiting for you in my cookbook (can’t wait!), but there were some that I didn’t have an answer for…yet. The dish that had the most votes was for vegan cottage cheese. Who knew!?
I had a Google around, and you guys were totally right. I didn’t find any store-bought brands. There were a couple of recipes, but they either used too weird of ingredients, or seemed too complicated for such a simple food. So, I rolled up my sleeves… well I didn’t, I was wearing a tank top… but I got to work either way and taste tested my way to my new Quick & Easy Vegan Cottage Cheese. Boom!

Pret-tay cool right? And it’s totally healthy too!
So what is this madness made out of? Our fine friend tofu! I used a silken tofu for the liquid-y part, which I blended and seasoned just so. (I think I’ve gotten pretty good at recreating dairy flavours if I do say so myself). Then I crumbled in firm tofu for the texture. My parents happened to be stopping by, so I was able to get them to taste test it for me, and they agreed, it is pretty dang close to traditional cottage cheese. Woot woot!

Did anyone else ever used to eat cottage cheese out of a cantaloupe, or was that just a me thing?
So here you go my friends, vegan cottage cheese. I’m always eager to make vegan cooking your favourite thing, so if you have any more recipe requests, drop them in the comments below.

To make Quick & Easy Vegan Cottage Cheese: Add the silken tofu to a blender along with the spices and mix until everything is completely smooth.
Now, this saucy part is slightly more on the creamy-yellow side of the white scale due to the nutritional yeast, but that hardly seems like a big deal to me when the flavour friends are are all there. It does whiten up when the firm tofu is added, but still isn’t bright white. Just a heads up.

Now take the firm tofu and crumble it into the silken tofu mixture.

Stir to combine. See, I told you that was a quick & easy vegan cottage cheese recipe!
Enjoy as is or it should work almost anywhere you would use traditional cottage cheese.
Quick & Easy Vegan Cottage Cheese
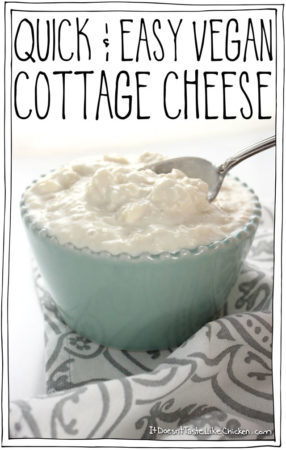
Takes less than 10 minutes to make and only 6 ingredients for this healthy, dairy-free recipe.
1 300g block soft or silken tofu (about 1 1/3 cups)
1 tablespoon nutritional yeast
1 teaspoon apple cider vinegar
1 teaspoon lemon juice
1/2 teaspoon salt
1/2 of a 420g block firm tofu (210g or about 1 1/2 cups) (crumbled)
Add the soft or silken tofu to a blender along with the nutritional yeast, apple cider vinegar, lemon juice, and salt. Mix until everything is completely smooth, stopping to scrape the sides as needed.
Pour the soft tofu mixture into a medium bowl. Crumble the firm tofu into the silken tofu mixture. Mix to combine.
Bon appetegan!
Sam.
If you enjoyed this recipe you might also like:


This post Quick & Easy Vegan Cottage Cheese appeared first on it doesn't taste like chicken
June 11, 2017
Vegan Spinach & Ricotta Cannelloni
Before we get to talking about Vegan Spinach & Ricotta Cannelloni, I have to celebrate a little. You see, it’s my blog’s Birthday!! 4 Years ago I posted my very first recipe on It Doesn’t Taste Like Chicken. Woot woot! I remember getting 3 views that day, which were all from my family. My blog now receives 10,000+ views daily.
I posted my dinner, which was spaghetti with tomato sauce, and jotted down the recipe which was written in no particular order, without any ingredient quantities, completely vague, and the photos were taken with my geezer of an iPhone at night under kitchen lighting, just before eating my meal.
Now, I’m completely nit picky about measurements and instructions, I write all my recipes during the day, test them multiple times, use natural lighting as well as professional photography lighting, a proper DSLR camera, and my food is always cold by the time I get to actually eating it.

I was working at a job I hated, was nervous about informing people I went vegan and hoped I could avoid the subject all together, and felt a little directionless in life. Who knew that in just 4 years I would be working full-time as a food blogger, that I would have finished writing and photographing my first cookbook, am the loudest and proudest vegan I know, and truly feel like I have my dream job that I didn’t even know I was dreaming about. My oh my what a lot has happened in 4 years!
I feel like the luckiest person in the whole wide world and it’s all thanks to YOU. Without you, my blog would have never grown, my recipes never made, and my dream job never found. So thank YOU for sharing this journey with me.

In celebration of 4 years, I thought I should make a pasta recipe, since that’s how this whole journey started. Vegan Spinach & Ricotta Cannelloni for the win!
Fresh spinach and basil mixed with creamy dreamy easy to whip up ricotta, stuffed into cannelloni pasta, and coated in tomato sauce. Oooeee! What can be more delicious than that? This is one of those recipes that you could serve to anyone and they would never know it was vegan. It’s just all sorts of delicious, and that’s just the way I like it. Perfect for a fancy occasion, but so yummy, you’ll probably want to make this Vegan Spinach & Ricotta Cannelloni more often than that!

To make Vegan Spinach & Ricotta Cannelloni: heat the oil in a skillet over medium-high heat. When hot, add in the onion and garlic, sauté until the onion begins to soften but doesn’t yet brown, about 4 minutes. Reduce the heat to low, add in the spinach and cover. Check and stir the spinach every minute until the spinach has wilted, about 4 more minutes.

Add the cooked spinach and onions to the food processor with the ricotta. Add in the basil, reserving some basil leaves for garnish.
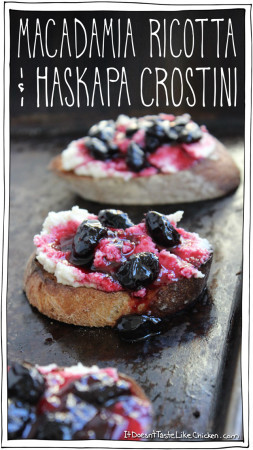
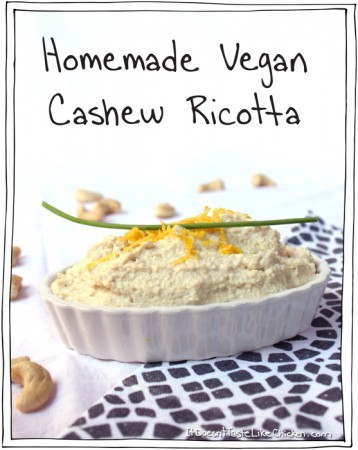
*I love my Quick Vegan Tofu Ricotta in this recipe but my Vegan Cashew Ricotta or Macadamia Ricotta would both work wonderfully as well.

Pulse a couple of times, stopping to scrape the sides as needed until the ricotta is spotted with green throughout.

Scoop the ricotta mixture into a large sealable bag and cut off the corner. Alternatively, use a pastry bag. Fill the cannelloni noodles by squeezing some of the ricotta into one end of a noodle, flipping the noodle over and filling from the other side. Don’t worry about these being perfect, they are going to get smothered in tomato sauce anyways, so any messes will be hidden.

Lay the noodle in the baking dish with the sauce in a single layer. Repeat with the remaining noodles until the dish is full and the ricotta is used up.

Cover with the remaining tomato sauce making sure each noodle is coated in sauce.
Bake until the cannelloni are tender and the sauce is hot. Remove from oven and garnish with basil leaves. Omnomnom!

Vegan Spinach & Ricotta Cannelloni
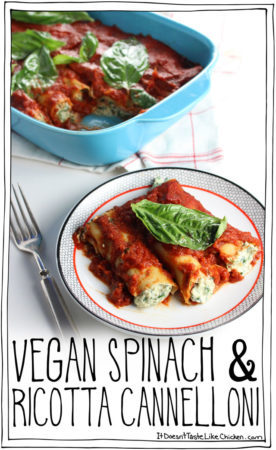
Fresh spinach and basil mixed with easy to whip up dairy-free ricotta, stuffed into cannelloni pasta, and coated in tomato sauce. So delicious no one will even know it’s vegan!
1 batch Quick Vegan Tofu Ricotta, ((cashew or macadamia ricotta, see notes))
3 cups prepared tomato sauce ((one 700ml jar))
1 tablespoon olive oil
1/2 yellow onion, (chopped)
2 cloves garlic, (minced)
4 big handfuls fresh spinach ((about 5 oz))
1 small bunch fresh basil leaves, ((about 20g))
18 cannelloni noodles ((maybe a couple more or less depending on the size of your noodles))
Preheat your oven to 350F (180C).
Heat the oil in a skillet over medium-high heat. When hot, add in the onion and garlic, sauté until the onion begins to soften but doesn’t yet brown, about 4 minutes. Reduce the heat to low, add in the spinach and cover. Check and stir the spinach every minute until the spinach has wilted, about 4 more minutes.
Add the cooked spinach and onions to the food processor with the ricotta. Add in the basil, reserving some basil leaves for garnish. Pulse a couple of times, stopping to scrape the sides as needed until the ricotta is spotted with green throughout.
Prepare the cannelloni noodles according to package directions. Mine were the oven ready type, so there was no preparation needed. Spread about 1/4 of the tomato sauce in the bottom of a 9″ x 13″ pan.
Scoop the ricotta mixture into a large sealable bag and cut off the corner. Alternatively, use a pastry bag. Fill the cannelloni noodles by squeezing some of the ricotta into one end of a noodle, flipping the noodle over and filling from the other side. Lay the noodle in the baking dish with the sauce in a single layer. Repeat with the remaining noodles until the dish is full and the ricotta is used up. Don’t worry about these being perfect, they are going to get smothered in tomato sauce anyways, so any messes will be hidden. Cover with the remaining tomato sauce making sure each noodle is coated in sauce.
Bake 30 to 35 minutes until the cannelloni are tender and the sauce is hot. (Alternatively, follow the baking directions on your pasta package, it may vary). Remove from oven and garnish with basil leaves.
I love my Quick Vegan Tofu Ricotta in this recipe but my Vegan Cashew Ricotta or Macadamia Ricotta would both work wonderfully as well.
Bon appetegan!
Sam.
If you liked this recipe you might also enjoy:
This post Vegan Spinach & Ricotta Cannelloni appeared first on it doesn't taste like chicken
June 7, 2017
Quick Vegan Tofu Ricotta
I was visiting my parents the other day and my mom asked if I could make a vegan ricotta recipe to go with dinner.
“Sure!” I said. I have a cashew or a macadamia nut ricotta recipe already on the blog. But alas, the nut situation in mom’s cupboard was a little grim. My vegan cooking brain started assessing the situation and I found a block of tofu, and told her I can make ricotta with that. Go vegan cooking brain!
“Great, how long will that take?” She asked.
I drummed my head and said “er…..11 minutes.”
“Oh, hahaha, ok, well I can wait for that then.” said mom.

When will she learn that my laziness in the kitchen means I want to get in and outta there as quickly as possible? My foodie mom not-so-secretly wishes I would take my blog from fuss-free vegan to fussy vegan. Not gonna happen, mom, not gonna happen. I’m a proud lazy cook!
Back to my Quick Vegan Tofu Ricotta. This is an easy peasy lemon sneezy kinda recipe. Just the way I like ’em! I’m constantly blown away by the wonders of tofu. If you are afraid this is gonna be all weird and whatnot, never fear! When my parents tasted it, their eyebrows shot up in shock at it’s perfect ricotta deliciousness. Creamy, mild, garlic, onion, and lemon zing. YES!

So now I have THREE ricotta recipes on my blog. I think it’s fair to say I like vegan ricottas! See, isn’t vegan cooking so much cooler? Instead of one boring store-bought product you can customize to your own taste preferences and ingredients. I believe the score is vegan: 18,392 to non-vegan: 0. (I’m not biased at all).
Use this Quick Vegan Tofu Ricotta anywhere you would use traditional ricotta. Serve as a snack with crackers, dollop onto pasta with tomato sauce, layer into lasagna, the possibilities are endless!

To make Quick Vegan Tofu Ricotta: Sauté up the onion and garlic until the onions have turned translucent and begin to brown.

Break the tofu into four pieces, and add it to a food processor or blender. Add in the onions and garlic, and all of the remaining seasonings. Blend until smooth and creamy stopping to scrape the sides as needed.

Quick Vegan Tofu Ricotta
11 minute, creamy, dairy-free, nut-free, cheesy perfection. Quick Vegan Tofu Ricotta can be used anywhere traditional ricotta is used!
1 tablespoon olive oil
1 yellow onion, (chopped)
2 cloves garlic, (minced)
1 block extra-firm tofu, (drained)
1/4 cup lemon juice
2 tablespoons nutritional yeast
1 tablespoon white miso paste
1/2 teaspoon salt
Heat the oil in a skillet or frying pan over medium-high heat. When hot, add in the onion and garlic and sauté until the onions turn translucent and begin to brown.
Break the tofu into four pieces and add it to a food processor (recommended) or blender. Add the sauté onions and garlic, along with all of the remaining seasonings. Blend until smooth and creamy stopping to scrape the sides as needed. If your ricotta is too thick, add 1 – 2 tablespoons as needed to reach desired consistency.
Bon appetegan!
Sam.
If you enjoyed this recipe you might also like:
This post Quick Vegan Tofu Ricotta appeared first on it doesn't taste like chicken
Sam Turnbull's Blog

- Sam Turnbull's profile
- 35 followers

