
Sam Turnbull's Blog, page 52
August 13, 2017
How to Eat Vegan at the Movies
I LOVE going to the movies! Like, I really love it. I get giddy as if I was going on a roller coaster… but I actually hate roller coasters as I feel like I am strapped to a death chair, so maybe that’s why I love the movies so much. Just safe, cushy, entertainment and the best part is that going to the movies comes with the built-in excuse to eat truckloads of popcorn. My fave.

When I first went vegan, I was worried that I was going to have to be that person who brought veggies and hummus to the movies. I mean, if you are that person, kudos to you, but personally, eating junk food is part of the fun of going to the movies for me.
I’ve got excellent news for you, your local movie theatre may have more vegan options that you realize INCLUDING the popcorn! Yes, really. So I wanted to share with you my guide on How to Eat Vegan at the Movies.
Popcorn
Beleive it or not, a lot of movie theatre popcorn is vegan-friendly. Even though it’s yellow, that’s often a result of the oil they pop the corn in or whatever seasoning chemicals they use. Mmmm… vegan chemicals. I reached out to several popular movie theater chains to see what they said about their popcorn.
Cineplex:
The popcorn is vegan! While the popcorn is vegan, they did warn me the popcorn is prepared in a facility where animal products are used so there may be cross contamination if you are worried about that.
Regal:
The popcorn is vegan! I thought that both the popcorn and buttery topping at Regal were vegan after seeing this article from PETA, but I decided to do my own research to be sure and contacted the company directly. While the popcorn is vegan, they said the popcorn butter is not, so there must have been a change in the recipe since PETA wrote that article in 2014. Regal did say to check with your local theatre to see if there are any differences in your specific location.
Landmark Theatres:
Most likely vegan. Landmark told me that the butter supplier differs at each location, but for the most part, the popcorn is vegan-friendly. So just to be sure, you might want to double check with your local theater.
AMC Theatres:
The popcorn seasoning isn’t vegan, but AMC told me that they are always happy to make a fresh batch without the seasoning upon request. So just arrive at the theater a little early and request a seasoning free fresh batch of popcorn. If you are shy about asking for this, I say just go for it! Maybe even try calling ahead. The more people requesting vegan-friendly popcorn, the better!
How to check with your local theater:
If your local movie theater isn’t listed here, or you just want to be extra sure, you should contact your theatre directly. I found it easiest to contact the theatre ahead of time as the server at the popcorn counter might not know off hand, and they will likely be pretty busy and stressed trying to decipher nutrition information. I had the best luck by reaching out to theatres Facebook page since you can see if they respond to messages and how quickly you will likely get a response, or you can give them a call.
More munchies:
Perhaps your theater doesn’t offer vegan-friendly popcorn, or perhaps popcorn just isn’t your jive (I don’t understand you if that’s the case). Depending on the theatre there are plenty more vegan options that you can indulge in.
Candy:
Some candies are accidentally (or on purpose) vegan. Common ones that can be found at the movies are Sour Patch Kids, Fuzzy Peaches, Swedish Berries, Swedish Fish, Sweet Tarts, Twizzlers, Red Vines, and Skittles. Yep, they are all vegan! You can see a list I made here of all the vegan gummy candies I have found.
Other snacks:
Other than popcorn and candies, lots of movie theaters offer more snackage. Soda, slushies, soft pretzels, and french fries are usually vegan-friendly. Landmark theater told me that many of their locations offer vegan cookies and edamame. I have seen larger movie theaters selling pizza from popular chains that now offer dairy-free cheese. Some theaters offer up Starbucks so you can order a fancy vegan fappucino or latte. And if you aren’t sure, just ask! I suggest asking ahead of time so that you can relax and enjoy your time there.
Bring your own:
Shhhhhhh…. you didn’t hear it from me ~looks shifty eyed~ but sneaking in your own snacks to a theater is super easy. Just grab a big purse or bag and fill it up! Hey, if they don’t offer vegan popcorn, I think it’s fair game. You can bring in whatever your favourite vegan treats are, or even a shaker of nutritional yeast for your popcorn, because, yeah, I’m that kind of vegan nerd.
Bon appetegan!
Sam.
If you liked this post you might also enjoy:


This post How to Eat Vegan at the Movies appeared first on it doesn't taste like chicken


August 9, 2017
How to Make an at Home Salad Bar
This post for How to Make an at Home Salad Bar is sponsored by Grocery Gateway by Longo’s who I love for their amazingly quick and easy to use grocery delivery!

Vegans like salad, I admit it. But I mean really everyone should like salad. We all know it’s good for us, but what if one person only likes romaine lettuce, where as someone else demands nothing but spinach. What if one person detests raw onions and the other says that salad isn’t complete without raw onions (I vote for raw onions).
What if one person is having a BBQ or dinner party and they need to serve everyone salad but they have no idea what kind of salad anyone attending likes. The answer, you guessed it, this guide is for you: How to Make an at Home Salad Bar. All the options, that will make everyone happy!

To prep for my salad bar party, I order all of my groceries online from Grocery Gateway, which is an online grocery store that’s been around for 20 years!
I’ve never ordered groceries online before, and I was super impressed at how easy and convenient it was. I already had my grocery list at the ready so I just searched and found everything on the site and then ordered it. No different than ordering yoga pants online (and Sam loves to order yoga pants online). I got to choose a delivery date and time, and before I knew it, a knock was on the door, and there were two boxes full of goodies. Chickpea dog was just as excited for the unboxing as I was.
If you want to try delivery groceries, Grocery Gateway was kind enough to offer all my readers $15 off your order. For both new or existing customers, just use this one-time case sensitive code by entering: GGSam2017 at checkout (expires October 1, 2017).

I must admit, I was a little worried that whoever was picking my produce wouldn’t put the care into it that I normally do and would choose lettuce that was old, or a red pepper that had a squishy spot, but I was delighted to find that everything was fresh and perfect. They even deliver beer and wine! Pre-tay cool, this (secretly lazy) chick approves.
August 6, 2017
Vegan Mint Chocolate Chip Popsicles
I don’t know what it is lately but I have been addicted to making popsicles. Wait… I know exactly what it is. It’s the sticky hot, sweaty, no air conditioning, who cares what my frizzy hair looks like, hot summer weather we’ve been getting. THAT’S why I have been craving nothing but sweet, delicious, cool popsicles.
I love Creamsicles, and Fudgesicles because popsicles that taste like ice cream are
August 2, 2017
25 Vegan Cold Summer Meals (That require very little to no cooking)
Are you pro or anti air conditioning? I’m anti, but there are those days that it’s sweating all day long, drink icy things, just want to be lying in a puddle of water all day. If I can take time off, these are the best days of summer ever! If I have to work, I start to wish for air conditioning (just a little).
The last thing I want to do is spend all day making hot food in the kitchen. My go-to every time company stops by is to whip up a quick vegan snack board, which is the perfect way to eat a light summer dinner. Just stock up on veggies, fruit, bread, crackers, dips, and pickled things and it’s just a matter of displaying it on a cutting board. Boom! Impressive hosting skills in the bag.
When I’m in the mood for more of a full meal, I still want as little effort as possible with as little cooking as possible, so today I’m sharing a collection of vegan cold summer meals that are perfect for these hot hot summer days. These recipes require very little to no cooking making sure you can be in and out of the kitchen in no time (but still get to feast on vegan deliciousness).

These vegan cold summer meals are collected from my blogging friends across the net, so simply click on the photo or title of the dish to take you to the full recipe.

Veggies Don’t Bite: Vegan Fish Taco Bowl from Vegan Bowl Attack

It Doesn’t Taste Like Chicken (that’s me!): Cold Noodle Bowl with Sriracha Peanut Crumble

Glue & Glitter: Watermelon Fennel Gaspacho

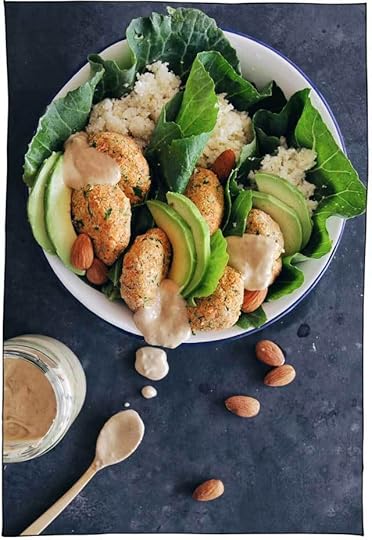
Cotter Crunch: Thai Carrot Cauliflower Rice Salad with Avocado Cream Dressing

Plant Based Cooking: Mexican Rice Salad

E. A. Stewart: Sunrise Nori Wraps with Spicy Tahini Drizzle

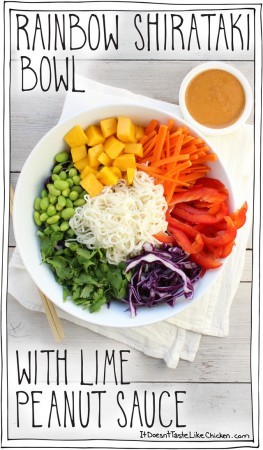
It Doesn’t Taste Like Chicken (that’s me!): Rainbow Shirataki Bowl with Peanut Lime Sauce

Savory Tooth: Cold Peanut Noodle Salad

Valises & Gourmandises: Summer Buddha Bowls 2 Ways

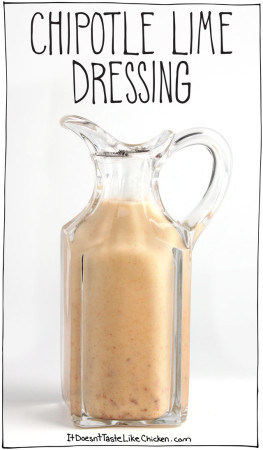
It Doesn’t Taste Like Chicken (that’s me!): Creamy Chipotle Lime Bean Salad
Veggies Don’t Bite: Healthy Vegan Macaroni Salad
VNutrition: Healthy Vegan Ramen Noodle Salad

Emilie Eats: Chickpea Caesar Pasta Salad

Rainbow Nourishment: Summery Soba Noodles
Black White Vivid: Raw Falafel Wraps with Apricot Tahini Sauce
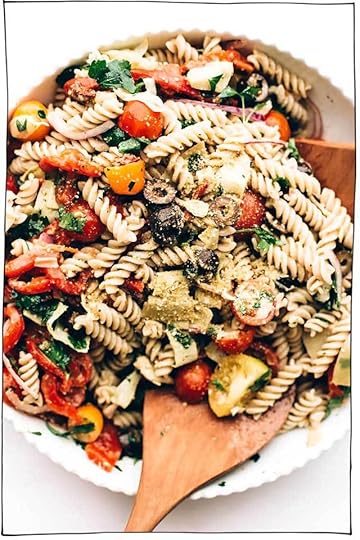
Blissful Basil: Easy Vegan Italian Pasta Salad

May I Have That Recipe: Authentic Spanish Gazpacho

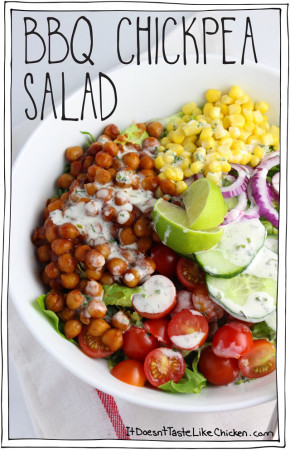
It Doesn’t Taste Like Chicken (that’s me): BBQ Chickpea Salad

Vanilla and Bean: Thai Lentil Lettuce Wraps with Miso Sriracha Peanut Sauce

Cotter Crunch: Green Goddess Fig Nourish Bowls

Vanilla and Bean: Black Bean Sweet Potato Quinoa Salad with Smoky Pepitas and Roasted Jalapeno Lime Dressing

Karl Cooks: Vegan Cobb Salad with Green Tahini Dressing

The Mostly Vegan: Summer Corn, Tomato & White Bean Salad

Veganosity: Raw Super Sprouts Pad Thai with Spicy Peanut Sauce

My Darling Vegan: Asian Vermicelli Noodle Salad
I hope you loved this collection of vegan cold summer meals!
Bon appetegan!
Sam.
This post 25 Vegan Cold Summer Meals (That require very little to no cooking) appeared first on it doesn't taste like chicken
July 30, 2017
Creamy Chipotle Lime Bean Salad
You’re headed to a pot luck, you’re super lazy (no judgement), not a skilled chef, or you just don’t really wanna put a huge amount of time into cooking. BUT you MUST wow the crowd with amazing, delicious, awesome, veganess (because one must alway woo with delicious, awesome, veganess).
Solution:
Creamy Chipotle Lime Bean Salad. 15 minutes to make, just add beans, some chopped veg, and whip up a super easy mind-blowingly scrumptious dressing. Toss well. Serve. Prepare to get asked for the recipe at least 19 times. Proudly declare the recipe can be found on It Doesn’t Taste Like Chicken, the fuss-free vegan blog. BOOM! Mic drop. Party complete. Success. Celebrate. Dance. Devour.
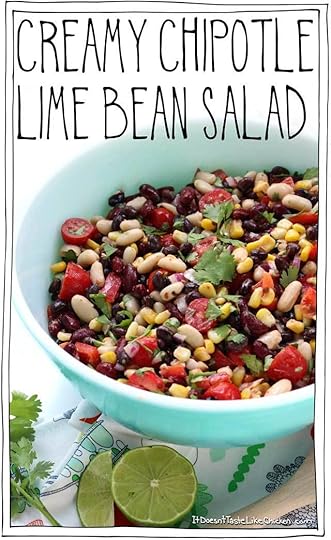
True story. Probably. I mean, I can see it happening because this Creamy Chipotle Lime Bean Salad is the perfect potluck party pleaser recipe. Gorgeously creamy, warm smoky chipotle spice, fresh zesty lime, hearty beans, pops of sweet corn and cherry tomatoes, it’s just a fiesta in your mouth.
Gorgeously creamy, warm smoky chipotle spice, fresh zesty lime, hearty beans, pops of sweet corn and cherry tomatoes, it’s just a fiesta in your mouth.
Super easy to whip up in a rush, but this can also be made ahead of time and gets even more flavourful as it sits. Just give it a toss again before serving, and you’re good to go.

To make Creamy Chipotle Lime Bean Salad: Drain and rinse your cans of beans. I toss them all together in a strainer along with the frozen corn which will muti-task the rinsing and thawing.

Add the beans and corn to a very large bowl along with all of the remaining veg.

Whip up a batch of Chipotle Lime Dressing. I made a double batch and found 1 batch of dressing will lightly dress the salad, where as 1 1/2 will have more punch. (I preferred the more punch version).
If not serving right away, cover the bean salad and pop it in the fridge for 1 – 2 days. Then just toss well before serving.

Creamy Chipotle Lime Bean Salad

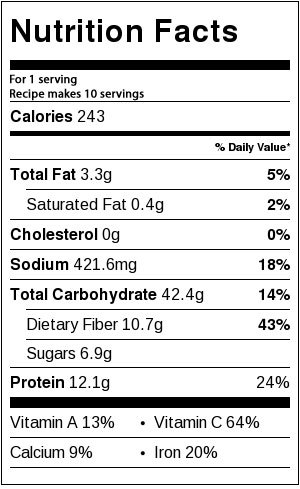
This flavor-packed vegan dish takes just 15 minutes to make and can be made ahead of time. Perfect for potlucks and parties!
1 19oz can black beans, (drained and rinsed)
1 19oz can kidney beans, (drained and rinsed)
1 19oz can white kidney or cannellini beans, (drained and rinsed)
2 cups corn kernels, (fresh or frozen and thawed)
2 cups cherry tomatoes, (halved)
1 large red bell pepper, (chopped)
1 big handful cilantro (about 1/2 cup)
1/4 red onion (about 1/2 cup), (chopped)
1 – 1 1/2 batch of chipotle lime dressing
Add everything to a very large bowl, adding the chipotle lime dressing to taste. 1 batch of dressing will lightly dress the salad, where as 1 1/2 will have more punch. Toss well to combine. If making ahead of time, cover and store in the fridge for 1 – 2 days, and toss well before serving as the dressing will settle to the bottom.
Bon appetegan!
Sam.
If you enjoyed this recipe you might also like:
This post Creamy Chipotle Lime Bean Salad appeared first on it doesn't taste like chicken
July 26, 2017
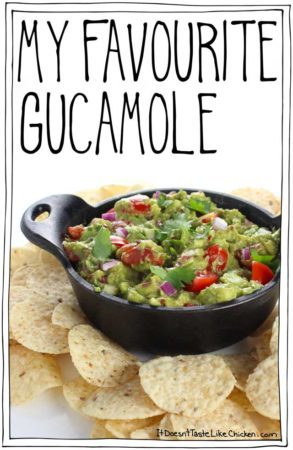
My Favourite Guacamole
About 8 years ago I lived in California while I was studying my Masters of Fine Arts at CalArts. Now if you have ever been to California, you might have noticed that there is a huge amount of totally to die for scrumptious Mexican food. Seriously, this Canadian chick didn’t even realise how magical burritos were until she lived there.

But a funny thing happened. Even though there was this huge Mexican culture, it was this Canadian chicks guacamole recipe that was requested at every party. Whenever there was any kind of dinner, pot luck, or dominoes playing event, my friends would request my favourite guacamole recipe every time. Flattery beyond belief!

If you’ve been following me for a while, you’ve probably picked up on that I love to figure out little tricks to take my recipes to the next level. There are 3 guacamole hacks that make this my favourite guacamole recipe ever:
Use cherry or grape tomatoes instead or Roma or other tomatoes. Cherry and grape tomatoes are sweeter and less juicy. This makes for little pops of sweetness throughout and you don’t run the risk of watering down your guacamole with tomato juices.
Chipotle peppers in adobo sauce are a must! Whether you use a lot for spicy guacamole, or just a small amount, these peppers add a hint of spice with a gorgeous smoky note.
Lastly, when making the guacamole, don’t over mash it! Soupy guacamole is a no-no. Leave some avocado chunks for texture. You won’t regret it.

To make My Favourite Guacamole: prep all your ingredients.
You will have chipotle peppers leftover, but I find when stored in an air-tight container in the fridge they seem to last forever. You can use the leftovers to make my Chipotle Black Bean Kale Salad, my Chipotle Lime Dressing… or more guacamole!

Add all of the ingredients to a medium size bowl.

And mash together with a fork. Don’t over mix it here, you want some of that avocado to have texture.
For presentation bonus points, you can add a couple extra pieces of tomato, red onion, and cilantro on top which will just give it that final va-va-voom. Yep, I’m giving away my food photography secrets.
Serve with tortilla chips or use in a burrito, on tacos, or just about anywhere and everywhere.

My Favourite Gucamole
This is my favourite guacamole recipe ever! There are 3 hacks (including a secret ingredient), that take this guacamole to the next level!
2 avocados, (pitted and flesh scooped out)
1/2 cup cherry tomatoes, (chopped)
1/3 cup red onion, (finely chopped)
1/4 cup cilantro, (chopped)
1 tablespoon lime juice
1 – 3 teaspoons chipotle peppers in adobo sauce, (minced)
1/4 teaspoon salt
Add all of the ingredients to a medium bowl, and use a fork to mash everything together. Don’t over mash, leave some texture. When serving you can make it look even prettier by garnishing with a few fresh pieces of tomato, red onion, and cilantro. Enjoy with tortilla chips or anywhere else you like.
Bon appetegan!
Sam.
If you enjoyed this recipe you might also like:
This post My Favourite Guacamole appeared first on it doesn't taste like chicken
July 23, 2017
Cold Noodle Bowl with Sriracha Peanut Crumble
It’s getting to be that point of the summer where the heat means the idea of turning on the oven is just about the most unpleasant thing possible. I’ve been craving nothing but cold dinners recently, but cold doesn’t have to mean boring. Introducing my new favourite invention: Cold Noodle Bowl with Sriracha Peanut Crumble. Uh, yes please, I’ll take 12.
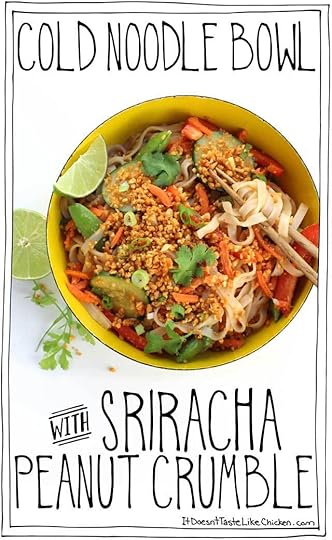
The only cooking needed for this dish is to boil some water to cook the noodles which takes about 3 minutes. Then just chop up the veggies, stir up a little sauce, and blend up a Sriracha peanut crumble. Wait, did you hear me? I said SRIRACHA PEANUT CRUMBLE! Yes, it really is as addictively scrumptious as it sounds, crunchy, salty, spicy peanuts on top of fresh crunchy veggies, with sweet and sour hoisin and lime noodles. ALL THE YUM!!!

Not only is the scrumptiousness of this cold noodle bowl perfect for a hot summer night dinner, but this recipe works wonderfully stored as leftovers. I was only feeding myself when I made this, so I divided the recipe among four containers, and then I had lunch ready to go for the next four days in a row. And I didn’t get bored of it either. When the four days ended I actually made it all over again because I missed my noodly lunch!
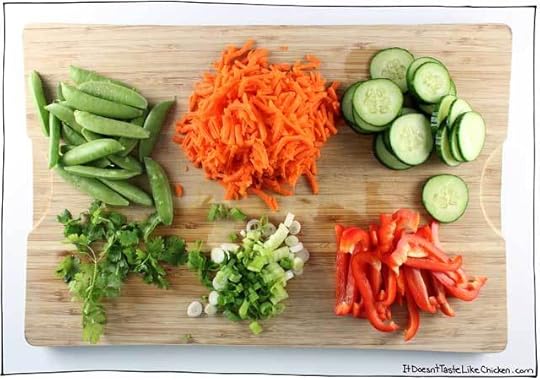
To make a Cold Noodle Bowl with Sriracha Peanut Crumble: cook the noodles according to package directions. This time I used a wider noodle, but the first time I used a vermicelli rice noodle which I also loved. Once cooked, drain and rinse the noodles well with cold water. Prep all of the veggies.
I love the varying tastes and textures of the vegetables I choose, but if you have something else you want to toss in, I’m sure it would be great. Anything fresh and crunchy would work well such as radishes, celery, or broccoli.
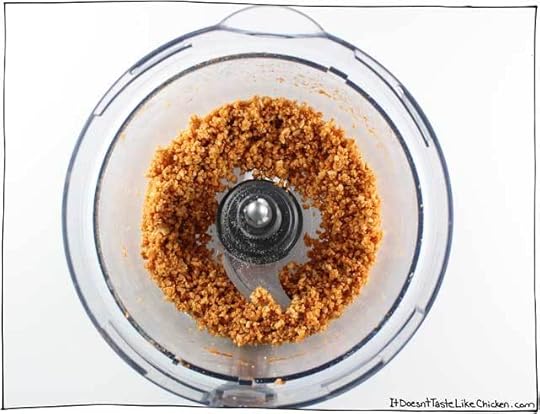
To make the Sriracha peanut crumble, add all of the peanut crumble ingredients to a food processor and pulse until the peanuts are broken down to a crumble.
If you don’t have a food processor, you could finely chop the peanuts with a knife and then add them to a bowl along with the seasonings to mix.

To make the hoisin lime dressing, simply add all of the ingredients to a small bowl and stir to combine.

In a large bowl add the cold rice noodles. If they are a bit stuck together, give them a final rinse right before adding them to the bowl so they are slippery and easy to toss. Along with the noodles add in all of the vegetables, half of the peanut crumble, and half of the sauce. Toss well to combine.
Taste, and if needed add more sauce. I like to use just half the sauce on the noodles and then serve the remaining sauce on the side so it can be added as desired according to personal preference. Divide the noodles among four bowls and add the rest of the peanut crumble to top each bowl.

Cold Noodle Bowl with Sriracha Peanut Crumble
For the cold noodle bowl:
200g rice noodles (vermicelli or a wider noodle, both work well)
1 cup cucumber, (sliced into rounds)
2 medium carrots, (peeled and grated)
1 cup snap peas
1 red bell pepper, (thinly sliced)
1 small handful cilantro, (chopped)
2 green onions (chopped)
For the Sriracha peanut crumble:
1 cup roasted salted peanuts ((you could alternatively substitute roasted salted cashews))
1 tablespoon Sriracha, (substitute water for a non-spicy version)
1/2 teaspoon onion powder
1/2 teaspoon ground ginger
1/2 teaspoon sesame oil
1/4 teaspoon garlic powder
For the hoisin lime dressing:
1/4 cup lime juice
1/4 cup hoisin sauce
1 1/2 tablespoons Sriracha ((optional))
2 clove garlic, (finely minced)
1 teaspoon sesame oil
For the noodles: cook the noodles according to package directions. This time I used a wider noodle, but the first time I used a vermicelli rice noodle which I also loved. Once cooked, drain and rinse the noodles well with cold water. Prep all of the veggies.
For the Sriracha Peanut Crumble: Add all of the peanut crumble ingredients to a food processor and pulse until the peanuts are broken down to a crumble. If you don’t have a food processor, you could finely chop the peanuts with a knife and then add them to a bowl along with the seasonings to mix.
For the hoisin lime dressing: add all of the ingredients to a small bowl and stir to combine.
To assemble the cold bowls: in a large bowl add the cold rice noodles. If they are a bit stuck together, give them a final rinse right before adding them to the bowl so they are slippery and easy to toss. Along with the noodles add in all of the vegetables, half of the peanut crumble, and half of the sauce. Toss well to combine.
Taste, and if needed add more sauce. I like to use just half the sauce on the noodles and then serve the remaining sauce on the side so it can be added as desired according to personal preference. Divide the noodles among four bowls and add the rest of the peanut crumble to top each bowl.
If you don’t have a food processor, you could finely chop the peanuts with a knife and then add them to a bowl along with the seasonings to mix.
Bon appetegan!
Sam.
If you liked this recipe you might also enjoy:

This post Cold Noodle Bowl with Sriracha Peanut Crumble appeared first on it doesn't taste like chicken
July 19, 2017
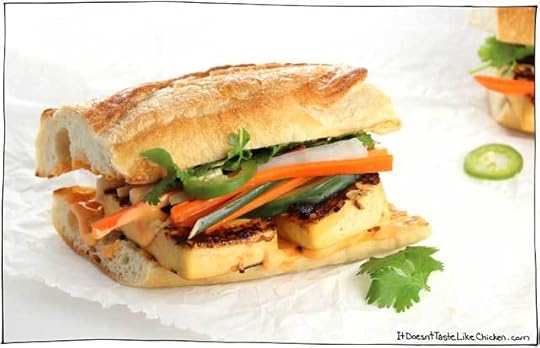
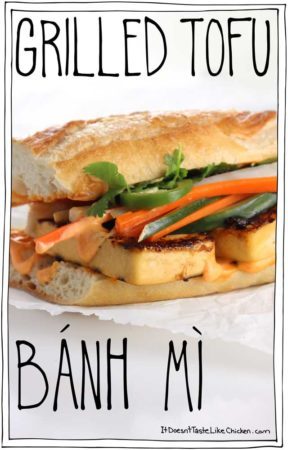
Grilled Tofu Banh Mi
Layers of seasoned grilled tofu, a creamy spicy spread of homemade Sriracha mayonnaise, sweet salty and crunchy pickled veggies piled high, garnished with fresh cilantro and jalapeno, all on top of a soft chewy baguette. ← THIS is the king of sandwiches, and it’s called Grilled Tofu Banh Mi.

If you are new to Banh mi, welcome my friends, come this way, take a seat, get your napkins ready. Banh mi is actually the word for a Vietnamese bread, but don’t worry, I’m not going to make you hunt down this particular bread. Luckily, banh mi bread is fairly similar to a soft baguette, so we can still get all that sandwich yum without the grocery store stress. (Grocery store stress is totally a thing, who’s with me?)

Once you have a fluffy baguette it’s all about layering sweet and salty pickled veggies, and (in this recipe) glorious grilled tofu, with a hearty smear of Sriracha mayonnaise. I mean, what more could you ask for in a sandwich? THIS is my new favourite sandwich for the summer with its explosions flavours and textures. I just can’t get enough!

To make Grilled Tofu Bánh Mì: start by draining and pressing the tofu for at least 15 minutes. Then toss the tofu in a bag or a covered dish with the marinade ingredients. You can let this marinate for 15 mintues, or toss it in the fridge to marinate for up to 3 days. I love this because if I don’t use all the tofu in one go, I have tofu in the fridge at the ready!

Once marinated, grill the tofu a couple minutes per side until it’s browned and even lightly charred on some bits. For added flavour, as it’s cooking brush on a leftover marinade.
I used a grill pan for my tofu, but you could also use your barbeque. If you don’t have either of those just fry the tofu in a skillet with a bit of oil. I also like to toast my bread by throwing it on the grill for a few minutes.

Make the Sriracha mayonnaise by simply mixing together vegan mayonnaise with the sriracha. Sometimes delicious things are just so very easy! If you aren’t a fan of spice, just skip the Sriracha and use plain vegan mayonnaise.

Now assemble your grilled tofu banh mi. Spread on a thick layer of Sriracha mayo, top that with the grilled tofu, add a big pile of pickled veggies, and garnish with cilantro and jalapeno. Napkins at the ready? Dive in!
Grilled Tofu Bánh Mì
Layers of seasoned grilled tofu, a creamy spicy spread of homemade Sriracha mayonnaise, sweet salty and crunchy pickled veggies piled high, garnished with fresh cilantro and jalapeno, all on top of a soft chewy baguette. ← THIS is the king of sandwiches, and it’s called Grilled Tofu Banh Mi.
For the grilled tofu:
1 block extra-firm tofu, (drained, pressed, and sliced into 8 pieces)
3 tablespoons lime juice
2 tablespoons soy sauce
2 tablespoons agave or maple syrup
1 clove garlic, (minced)
For the Sriracha mayonnaise:
1/4 cup vegan mayonnaise
2 teaspoons Sriracha ((or to taste))
For the sandwiches:
1 soft baguette cut into 4, or 4 bread rolls
1 recipe Quick and Easy Pickled Sandwich Veggies
1 handful cilantro, (chopped)
1 jalapeno, (sliced (optional))
For the tofu:
Drain and press the tofu for at least 15 minutes. You can follow the ultimate guide for pressing tofu here. Cut the tofu into 8 slices, then toss the tofu in a bag or a covered dish with the all marinade ingredients, the lime juice, soy sauce, agave, and garlic. You can let this marinate for 15 mintues, or toss it in the fridge to marinate for up to 3 days. I love this because if I don’t use all the tofu in one go, I have tofu in the fridge at the ready!
Once marinated, grill the tofu a couple minutes per side until it’s browned and even lightly charred on some bits. For added flavour, as it’s cooking brush on a leftover marinade. I used a grill pan for my tofu, but you could also use a BBQ. If you don’t have either you can fry the tofu in a skillet with a bit of oil. I also like to toast my bread a bit by throwing it on the grill for a few minutes.
For the Sriracha Mayo:
Make the Sriracha mayonnaise by simply mixing together vegan mayonnaise with the Sriracha in a small bowl. If you aren’t a fan of spice, just skip the Sriracha and use plain vegan mayonnaise.
To assemble the sandwiches:
Spread a thick layer of Sriracha mayo, top that with the grilled tofu, add a big pile of pickled veggies, and garnish with cilantro and jalapeno.
Bon appetegan!
Sam.


This post Grilled Tofu Banh Mi appeared first on it doesn't taste like chicken
July 16, 2017
Quick and Easy Pickled Sandwich Veggies
It’s time that I give you the tools to take your sandwich game to the next level. And that level is pickled sandwich veggies. Inspired by Vietnamese pickles often used in banh mi sandwiches (hint hint to what’s coming next). These sweet and salty veggies are so tasty I have been slapping them on every sandwich, veggie dog, veggie burger, and salad!

The best part is that you don’t need canning skills or even to plan ahead like you would with regular pickled things. These pickled sandwich veggies take only 15 minutes to whip up, and they are ready to eat almost instantly! No really, it’s true! They taste deliciously pickled in just 15 minutes of soaking, or you can let them happily hang out in your fridge for over a week. Hello, convenient flavour booster!
Pickled sandwich veggies are sweet, salty, sour, crunchy, and spicy (if you like spicy). These aren’t sour and bold like dill pickles, these are the friendliest little pickles ever with their tiny size and sweet taste. Can pickles be friendly?

To make quick and easy pickled sandwich veggies: matchstick all the veggies and thinly slice the jalapeno (if using). I doubled the recipe so I could make one spicy jar and one non-spicy jar. ~Pat self on back~
I used cucumber, peeled carrots, and peeled daikon radish. If you can’t find daikon radish, thin slices of cherry belle radishes (the regular round red ones) will work instead. You could also keep it really simple and do just carrots, or just cucumber, or just radish, but I think this trio of flavours and textures is what really makes your sandwich game strong!

Shove all those veggies into a 500ml (16oz) jar. Mix together the pickling liquid and fill the jar to the top. Let your veggies pickle for at least 15 minutes before enjoying. Yep, they really will taste pickle-y already! Or you can store them covered in the fridge for over a week.

Quick and Easy Pickled Sandwich Veggies
Ready in just 15 minutes, these Quick and Easy Pickled Sandwich Veggies are perfect for layering into banh mi sandwiches, any savoury sandwich, on veggie dogs, veggie burgers or salads!
For the veggies
1 medium carrot (about 1/2 cup), (peeled and matchsticked)
1/2 diakon radish (about 1/2 cup), (peeled and matchsticked)
1/4 medium cucumber (about 1/2 cup), (matchsticked)
1/2 – 1 jalapeno, (thinly sliced (option for a spicy pickle))
For the pickling liquid:
1 cup warm water
1/2 cup rice vinegar
2 tablespoons white sugar
2 teaspoons salt
Pack the carrots, daikon radish, cucumber, and jalapeno (if using) into a 500ml (16oz) jar. If you have more room in your jar, just matchstick up a bit more veg and add it to the jar so that it is full.
Stir all the pickling liquid ingredients together in a measuring cup or (another vessel that is easy to pour from) until the sugar and salt are dissolved. Pour over the veggies until the jar is filled to the top. If you have leftover pickling liquid, just discard it. Let the veggies pickle for as little as 15 minutes before using, or store covered in the fridge for over a week.
Bon appetegan!
Sam.
This post Quick and Easy Pickled Sandwich Veggies appeared first on it doesn't taste like chicken
July 12, 2017
Spicy Watermelon Vegan Sushi
I went to Planta the other day, which is a scrumptious vegan restaurant in Toronto, (I highly recommend it) and one of my favourite dishes that I tried was a watermelon poke. Poke is traditionally a fish dish, but here they used watermelon in a savoury way with umami flavours. The love was real, and the love was deep. I knew I had to create my own savoury watermelon dish, and that dish had to be sushi. Spicy watermelon vegan sushi to be exact.
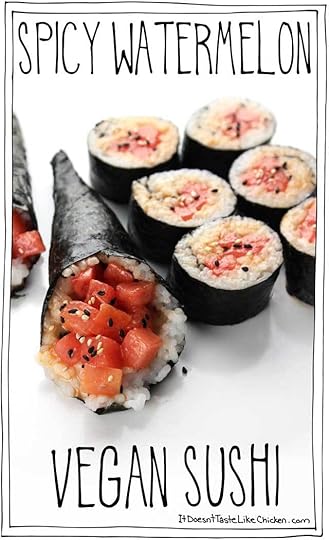
I love me some veggie sushi but most restaurants only have cucumber or avocado sushi, and that get’s boring real fast. Spicy tuna roll used to be one of my favourites, so seeing watermelon in a savoury way, it clicked immediately for me!
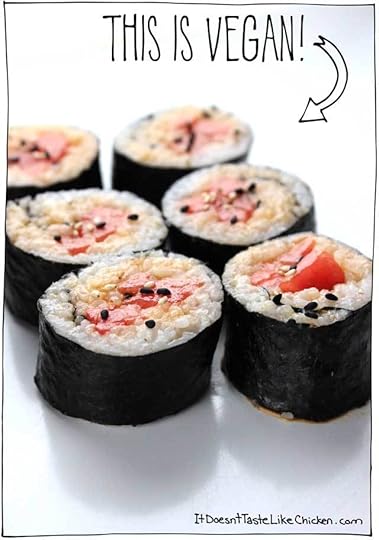
I whipped up a 5 second sauce, dipped in a cube of watermelon and proceeded to devour the whole bowl. YUM. This spicy watermelon vegan sushi is lightly sweet, with a crisp juicy bite. Covered in a creamy, spicy, umami sauce, sprinkled with toasted sesame seeds… um yes please, more please, now please.

To make Spicy Watermelon Vegan Sushi: finely chop the watermelon. This isn’t large watermelon cubes that you would normally munch on, you want these to get all saucy delicious and fit into a sushi roll so keep the chop small.

Mix together the spicy watermelon vegan sushi sauce. Omnomnom. If you like it really spicy, add more sriracha to taste.

At the last minute before rolling your sushi add in the watermelon and toss to combine. The first time I made this I thought it would be a good idea to let the watermelon marinate in the sauce. Wrong. When you let the watermelon sit in the sauce it gets all watery, so toss the watermelon with the sauce just before using in sushi.

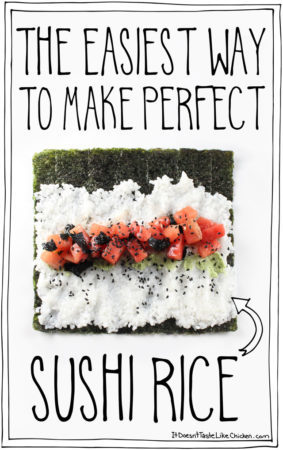
To make a sushi roll, with wet hands, thinly spread prepared sushi rice on a sheet of nori, leaving about 2 inches of exposed nori at the top. Fill with watermelon and a sprinkle of sesame seeds. I used both black and white sesame seeds but you can use whatever kind you like.

Carefully roll the sushi up, and when you reach the top, lightly wet the exposed nori with water to help glue the roll closed, then finish rolling. Wet a sharp knife and cut into sushi rounds. If any watermelon falls out, simply push it back in.

To make a hand roll, cut a sheet of nori in half. Cover half of the nori rectangle in a thin layer of prepared sushi rice. Put a small amount of watermelon on an angle on top of the rice. Take the bottom corner of the nori and bring it to the top and roll up. Lightly wet the edge of the nori to help glue to roll closed.

I also love this spicy watermelon vegan sushi served Buddha bowl style. On top of a bed of rice, with a few sheets of nori seaweed snack, some slices of avocado, green onions, and cucumber slices. So fresh and lovely!

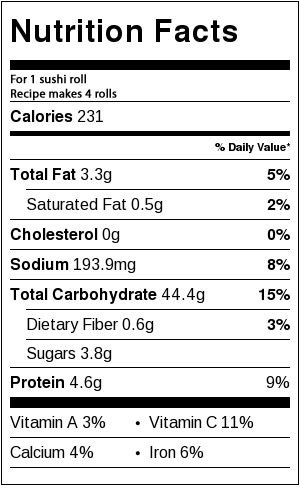
Spicy Watermelon Vegan Sushi
That isn’t spicy tuna, it’s watermelon!! This spicy watermelon vegan sushi is the perfect combo of sweet and savoury. Quick and easy to make.
For the spicy watermelon:
1 tablespoon vegan mayonnaise
1 teaspoon Sriracha
1 teaspoon soy sauce
1 teaspoon white miso paste
1/2 teaspoon sesame oil
1 1/2 cups watermelon, (finely chopped)
To make sushi rolls:
4 nori sheets ((or more if needed))
1 recipe prepared sushi rice
sesame seeds, (for garnish)
In a medium bowl, mix together the vegan mayonnaise, Sriracha, soy sauce, white miso paste, and sesame oil until smooth. At the last minute before rolling your sushi add in the watermelon and toss to combine. The first time I made this I thought it would be a good idea to let the watermelon marinate in the sauce. Wrong. When you do that the watermelon gets all watery making a saucy mess, so toss the watermelon with the sauce just before using in sushi.
To make a sushi roll, with wet hands, thinly spread prepared sushi rice on a sheet of nori, leaving about 2 inches of exposed nori at the top. Fill with watermelon and a sprinkle of sesame seeds. I used both black and white sesame seeds but you can use whatever kind you like. Carefully roll the sushi up, and when you reach the top, lightly wet the exposed nori with water to help glue the roll closed, then finish rolling. Wet a sharp knife and cut into sushi rounds. If any watermelon falls out, simply push it back in.
I also love this spicy watermelon vegan sushi served Buddha bowl style. On top of a bed of rice, with a few sheets of nori seaweed snack, some slices of avocado, green onions, and cucumber slices. So fresh and lovely!
Bon appetegan!
Sam.
If you liked this recipe you might also enjoy:


This post Spicy Watermelon Vegan Sushi appeared first on it doesn't taste like chicken
Sam Turnbull's Blog

- Sam Turnbull's profile
- 35 followers


.%20Perfect%20for%20those%20hot%20summer%20days%20when%20you%20want%20to%20spend%20as%20little%20time%20in%20the%20kitchen%20as%20possible!%20%23itdoesnttastelikechicken)
%2C%20that%20take%20this%20guacamole%20to%20the%20next%20level!%20%23itdoesnttastelikechicken)