
Mike Elliott's Blog, page 3
January 27, 2025
How to Repair Cracked Ribs in a Wood-Canvas Canoe
by Mike Elliott, Kettle River Canoes
email: artisan@canoeshop.ca

Sometimes, in the course of your restoration, you may discover a cracked rib in your canoe. The damage may not warrant replacement of the entire rib or you may want to strengthen the rib while preserving as much of the original canoe as possible. In this case, a back side rib repair is your best option.

Start by removing the planks to expose the area on the rib to be repaired.

With a permanent ink marker, draw the boundaries of the repair and the shape of the “dish” that will be carved out on the back side of the rib.


Use a belt sander to dish out the back side of the rib around the crack.

Shape a new piece of cedar that is slightly longer than the repair area. I don’t have a disc sander, so I use my belt sander turned upside-down.

Work in small stages, checking regularly, until the convex profile of the new cedar matches the concave profile dished out on the original rib.

I find polyurethane glue creates a very strong, waterproof bond. Wet the new cedar as well as the dished out area on the original rib. Apply glue to both surfaces.

Clamp the new cedar to the original rib and let it cure overnight.


The next day, use a random-orbital sander to shape the repair until the new cedar has the same profile as the original rib before the repair.


When the crack is on a curved section of a rib, the back side of the rib is sanded flat with a random-orbital sander to remove the curved portion of the original rib around the crack.


When shaping the new piece of cedar, the glued surface is flat while the top surface is curved to replicate the original rib section.

The new cedar is then glued and clamped as before.

Once the glue has cured overnight, the repair is sanded and shaped to replicate the shape of the original rib.

A back side rib repair employs a methodology similar to that used in a rib top repair. Once the new wood is stained to match the original wood, the repair is all but invisible.
All of this (and much more) is described in my book – This Fancy Old Canoe: A Comprehensive Guide to Restoring Antique Canoes.
If you live in Canada, CLICK HERE to buy the book.
If you live in the USA, CLICK HERE to buy the book.
If you live in the UK, CLICK HERE to buy the book.
Si vous habitez en France, CLIQUEZ ICI acheter le livre.


January 20, 2025
How To Weave the Stern Seat in a Rushton Indian Girl Wood-Canvas Canoe
by Mike Elliott, Kettle River Canoes
email: artisan@canoeshop.ca

While restoring a 1905 J.H. Rushton Indian Girl canoe, I made new seat frames and wove natural cane (rattan) in a standard 6-stage warp-and-weft pattern. What makes these seats special is the trapezoidal stern seat. Weaving this seat has a number of unique challenges.

The Rushton seats are made of cherry stock 3/4″ thick and 1¾” wide. The holes are set ½” from the inside edge of the frame and are drilled with a 13/64″ bit. The holes on the top and bottom rails are approximately ¾” centre-to-centre while the holes in the side rails are set at 7/8″ intervals.

In my book, This Old Canoe: How To Restore Your Wood-Canvas Canoe, I describe the full process of preparing the seat frames, preparing the cane and handling the cane during the weaving process.

In last week’s blog article – September 08, 2017, I gave instructions on how to weave the standard 6-stage warp-and-weft pattern used in Rushton canoe seats (as well as many other builders in the USA).

First Stage ̶ Begin by lacing vertical strands into each side portion of the seat. Anchor one end of the strand in R08 with a caning peg. Be sure to leave 4″ (10cm) of cane extending out of the bottom of the hole. Set a vertical strand from R08 to B15. Lace the strand up through B14 to R04 and anchor the strand with a caning peg. Again, be sure to leave 4″ (10cm) of cane out of the bottom of the hole.


Next, anchor a new strand at T10 and create a set of vertical strands ̶ T10-B13, B12-T09, T08-B11, B10-T07, T06-B09, B08-T05, T04-B07, B06-T03, T02-B05, B04-T01. Complete the first stage by running vertical strands from L08 to B02 and from B03 to L04. Again, be sure to leave 4″ of cane extending out of the bottom of L08 and L04.

Second Stage ̶ Horizontal strands laid on top of the first stage strands. Once these strands are in, tie off the strands left from the first stage.

Third Stage ̶ Repeat the first stage and set these strands next to the first strands. As mentioned in the previous blog, this creates the “warp” in the weaving pattern.

Fourth Stage ̶ Weave these strands next to the second stage strands as per the instructions in the previous blog. This creates the “weft” in the pattern.

Weave through three or four pairs of vertical strands, then pull the entire strand through (firmly but not tight).

Continue until all of the side holes have two strands of cane woven from side to side.

Fifth Stage ̶ Beginning in T10, weave under the vertical pairs and over the horizontal pairs until you reach L11.

Then, weave from L10 to T09 and from T08 to L09.

Skip L08 and weave from L07 to T07, T06 to L06 and L05 to T05.

Continue by weaving from T04 to L03 (skipping L04), L02 to T03 and from T02 to L01.


Starting again at T10, weave over the horizontal pairs and under the vertical pairs until you reach B02 (skipping B01). The next diagonal woven strands in the fifth stage are as follows: B03-R01, R02-B04 and B05-R03.


Next, weave from R03 to B06 (two diagonal strands in R03), then: B07-R04, R05-B08, B09-R06, R07-B10, and B11-R07 (two diagonal strands in R07).

Continue the pattern as follows: R08-B12, B13-R09, R10-B14 and B15-R11. Skipping some holes in the side rails of the seat frame and doubling up in others, allows the fifth stage weaving to work out evenly through the trapezoidal frame.


Sixth Stage ̶ This stage is the same as the fifth stage except the weaving goes over the vertical pairs and under the horizontal pairs. Starting at T01, the pattern is: T01-R11, R10-T02, T03-R09, R07-T04 (skipping R08), T05-R06, R05-T06, T07-R03 (skipping R04), R02-T08, T09-R01.

Starting again at T01, the pattern is: T01-B15 (skipping B16), B14-L01, L02-B13, B12-L03, L03-B11 (two diagonal strands in L03), B10-L04, L05-B09, B08-L06, L07-B07, B06-L07 (two diagonal strands in L07), L08-B05, B04-L09, L10-B03, B02-L11.


The border cane is set around the frame as usual with couching loops of cane in every second hole. Note that both the top and bottom rails have even numbers of holes. Therefore, I set loops of couching cane in T02, T04, T05, T07 and T09. In the bottom rail, I couched the cane in B02, B04, B06, B08, B09, B011, B13, and B15. Many of the original canoe builders (including Rushton) couched their seats in every hole, so the choice is yours.
All of this (and much more) is described in my book – This Fancy Old Canoe: A Comprehensive Guide to Restoring Antique Canoes.
If you live in Canada, CLICK HERE to buy the book.
If you live in the USA, CLICK HERE to buy the book.
If you live in the UK, CLICK HERE to buy the book.
Si vous habitez en France, CLIQUEZ ICI acheter le livre.
January 15, 2025
How To Weave a Standard 6-Stage Pattern for Caned Canoe Seats (Old Town, Carleton, Rushton, Morris, etc.)
by Mike Elliott, Kettle River Canoes
email: artisan@canoeshop.ca

In my book, This Old Canoe: How To Restore Your Wood-Canvas Canoe, I describe how to weave natural cane (rattan) in Chestnut canoe seats. However, most canoe builders used their own weaving pattern for their canoe seats.

Many of the original canoe builders in the USA (Old Town, Carleton, Rushton, Morris, White ̶ to name a few) used a standard 6-stage warp-and-weft pattern in their seats. Here are instructions on how to weave this pattern. For this demonstration, I made new cherry seat frames for a 1905 J.H. Rushton Indian Girl.
In my book, I describe the full process of preparing the seat frames, preparing the cane and handling the cane during the weaving process. Here I will present the basic look of each stage and give details that apply to the warp-and-weft pattern.

First Stage ̶ Vertical strands

Second Stage ̶ Horizontal strands strung across the strands of the first stage

Third Stage ̶ A second set of vertical strands set next to the first set. These vertical strands create what weavers refer to as the “warp”. To this point, each set of strands is set on top of the previous set without any weaving.

Fourth Stage ̶ A second set of horizontal strands woven next to the first set. In this example, start on the right side rail. You will notice, moving from right to left, the first horizontal strand passes under the first vertical strand and over the second. In order to lock all four strands in a woven pattern, the second horizontal strand is woven over the first vertical strand and under the second. This creates what weavers refer to as the “weft”. Weave the strand over and under three or four pairs of vertical stands. Then, pull the entire strand through. Pull the strand firmly but not tight. Make sure that the strand is woven with the shiny side up and is free of twists. This process is hard on the cane. The tight bends required to weave this stage causes the cane to crack or even break on a regular basis. Be prepared to redo a strand if it breaks.

Continue weaving small sections of the first strand until you get to the left side rail. Pass the strand down through the hole to the underside and come up through the next hole in the left side rail and hold it in place with a caning peg. Now, continue the pattern by weaving from left to right.

This process is very slow. As you get more strands woven in the fourth stage of the pattern, use your fingernails to adjust the positions of the various strands until they are arranged more or less evenly.

Fifth stage – Diagonal strand woven under the vertical strands and over the horizontal strands. In this example, I started in the top right-hand corner and wove the strand under the first set of verticals and over the first set of horizontals. The pattern continues moving from right to left and from top to bottom. As with all weaving in these patterns, work in small sections of three or four strands before pulling the entire strand through. Check your work frequently in order to catch mistakes before you get too far into the pattern.

As you continue this diagonal stage, weave two strands into the corner hole.

Continue the pattern, until you have a complete set of diagonal (/) strands.
Sixth stage – Begin this stage in the empty corner on the transverse rail of the seat. In this example, it is the top left-hand corner. Trim the working-end of the cane strand to create a sharp point. This makes weaving easier. Make sure the shiny side of the strand faces up and start the weaving pattern by going under the diagonal strand next to the corner hole on the transverse rail of the seat. Then, weave over the first set of vertical strands in the pattern and under the first horizontal strands. Continue in this way (over the second set of vertical strands and under the second horizontal strands) until you reach the opposite transverse rail.

Continue with this pattern for each diagonal () strand .

The final step in the seat weaving is to do the usual “couching” to cover the holes in the seat frame. The couching is held in place with loops of cane in every second hole around the seat frame. I have seen some of these original seats couched at every hole, so the choice is yours.
All of this (and much more) is described in my book – This Fancy Old Canoe: A Comprehensive Guide to Restoring Antique Canoes.
If you live in Canada, CLICK HERE to buy the book.
If you live in the USA, CLICK HERE to buy the book.
If you live in the UK, CLICK HERE to buy the book.
Si vous habitez en France, CLIQUEZ ICI acheter le livre.
December 9, 2024
How To Repair Highly Curved Ends on a Wood and Canvas Canoe
by Mike Elliott, Kettle River Canoes
email: artisan@canoeshop.ca

Many fancy canoes have “pretty” end profiles. Canoes such as the Old Town HW, Yankee, Charles River and Otca models are familiar examples along with those made by Kennebec, B.N. Morris and J.R. Robertson (to name a few) all sport distinctive characteristics. The stems curve back in a semi-circle or extend forward to produce a long “torpedo” shape. The sheer line curves to produce high ends in the canoe. This high sheer line means that the solid wood in the decks must be bent to follow the curve. Also, the ends of the inwales and outwales must also be bent to match the sheer line curve.

Restoring canoes with high sheer lines can be very challenging. I replaced the outwales in a Chestnut Indian Maiden. The extreme bend required to follow the sheer line necessitated building a custom bending mold for the outwales.

When forcing such a large bend in outwales, they have a tendency to twist or collapse. To avoid this, prepare a support batten that fits in the outwale rabbet. Make the bending form wide enough to accommodate both outwale-ends at the same time. You have an “outwale sandwich” with the support battens in the middle. The bending form must allow have enough “over-bend” to allow for some “spring-back” when the wood is released from the form.

Follow the instructions for making and bending outwales that are presented in my book. Soak the wood (usually ash, white oak or mahogany) for three days — this includes the support battens as well as the outwales. Clamp the outwale sandwich into the curved end of the form. Then, pour boiling water over the soaked wood and bend the outwale sandwich onto the form. Firm, steady pressure brings the wood into place on the form. Allow the wood to dry for about a week before releasing it from the form.

Attaching new planks to the ends of the canoe requires two people. I had an assistant hold a small axe-head against the ribs on the inside of the canoe at the ends while I hammered the tacks. The axe-head is an improvised clinching iron that can fit into the narrow ends of the canoe.

Fit the newly bent outwales onto the canoe and sand them smooth. This makes sure the edges of the outwales fit exactly with the curve of the inwales and decks. Remove the outwales and apply stain, shellac and varnish as per the instructions in my book. Once completed, your fancy wood-canvas canoe is a delight to behold.
All of this (and much more) is described in my book – This Fancy Old Canoe: A Comprehensive Guide to Restoring Antique Canoes.
If you live in Canada, CLICK HERE to buy the book.
If you live in the USA, CLICK HERE to buy the book.
If you live in the UK, CLICK HERE to buy the book.
Si vous habitez en France, CLIQUEZ ICI acheter le livre.
December 2, 2024
How to Rebuild Solid-Wood Long Decks in Fancy Antique Canoes
by Mike Elliott, Kettle River Canoes
email: artisan@canoeshop.ca

Many “fancy” antique wooden canoes have beautiful up-swept sheer lines at the ends. The curved end profile in many canoes built by canoe companies such as Old Town, Kennebec, Robertson, Monohon, Canadian, Lakefield and Peterborough elicit gasps of admiration from passersby and groans of despair from would-be canoe restorers. Let’s look at the Model 44 all-wood cedar-strip canoe built by the Peterborough Canoe Company (1879-1961).

Generally speaking, long decks are comprised of several distinct components. In addition to the deck itself, there is a king plank which covers a central joint and a coaming which covers the end grain of the deck components. Some of these decks are built around a frame which is then covered with a thin veneer. In the case of Peterborough and other companies based in Ontario, the deck is built with solid wood.

When I started restoring this canoe, it looked fairly good considering that it was 87 years old. However, I had my doubts about the integrity of the decks and suspected to discover some issues there.

Sure enough, the decks were full of rot and had to be replaced. Each deck was comprised of two pieces of butternut (white walnut). They were braced together from below by two pieces of hardwood. The joint between the deck pieces was covered by a cap of white oak and the end grain was covered by a white oak coaming. When disassembling the deck system, make notes and diagrams of every component and screw. Make sure you know exactly what every part is and where it fits in the system. Many of the original screws are impossible to source now, so keep them, clean them and reuse them.

The original butternut sections were bent to fit the up-turned profile of each end. Sourcing four-quarters (4/4) butternut in boards 8″ (20 cm) wide is a challenge. I was able to locate a supplier in Pennsylvania. The inside edge of each half of the deck had an 8° angle to create a gentle arch to the entire deck. The first step in the construction was to cut that angle into the new butternut planks. It is absolutely essential that the camber be cut before anything else is done.

Now, build solid wood forms for steam-bending the butternut. Each half of the deck requires both a top and a bottom form of solid wood. The new wood is soaked and steamed before it is placed between the two halves of the bending form. The forms are them pressed together and held there until the newly bent wood dries. To build the forms, transfer the curve of the deck directly from each half of the deck onto ¾” plywood. Add a bit more curve to the forms (about 1/2″ or 13 mm) to compensate for spring-back in the wood when it is released from the bending press. Cut the shape of the bending forms from pieces of plywood. Laminate a number of identical pieces together until you create a solid form that is wide enough to accommodate the new wood. In this case, I created top and bottom forms for each side of the deck — four components all together — each 7½“ wide.

Construct a press to hold the bending forms. In this case, I made the press out of 2×6 lumber and used a scissor jack from my car to generate the pressure required in the press. The top and bottom beams were comprised of three 2×6’s and a piece of ¾” plywood. The entire press was glued and screwed together for maximum strength. This system only allowed one half of one deck to be done at a time. Each piece of new butternut was soaked for two days, steamed for an hour and then placed in the press for two days. It took almost two weeks to bend all four deck pieces.
Once you have the new wood bent and the curve matches the curve in the original deck pieces. Matching the curve in the new deck pieces to the curve in the original decks may take a number of attempts (with adjustments to the curve in the bending forms). Don’t expect the curves to match the originals after the first attempt. Once the new wood matches the original curved pieces, draw reference grid lines at 2” (5 cm) intervals onto each piece of the original decks. Measure the distance from the center line of the deck piece along each reference line to the outer edge of the deck. Transfer these measurements onto the new deck pieces. Next, cut the outside edge of each piece on a band saw. In this case, the outside edge was also angled. It is important to copy that angle from the original deck pieces onto the new wood. Cut just outside the line to allow for final fitting in the canoe.

Assemble the two halves of each deck with the original brace pieces on the underside of each deck. If the brace pieces are weak, make exact replicas with the originals as templates. Jointing the two halves of each deck takes a great deal of careful shaping and fitting to create a surface on the underside which is an exact copy of the original. In this case, I ended up making both decks twice. During my first attempt, I rushed into shaping the top surface of the decks without checking the underside surface against the original deck pieces. I discovered – too late – that both the top and bottom surfaces of the decks are shaped in very precise and complex ways.

With the underside shaped and braced, dry fit the decks into the canoe. In the Model 44 Peterborough, the end of each deck fits into a notch in the inner stem. Make that notch as the first step in fitting the deck. In the Model 44 Peterborough, three ribs fit into notches in the underside of each deck on each side. Line up these notches and cut notches in the new decks using a dovetail saw, a chisel and a mallet. The final assembly of each deck includes a coaming that covers the end-grain of deck at a precise location in the canoe. Mark this position and draw the curve of the deck onto the new wood using the original coaming as a template.

Cut the curve of the deck on the band saw. In the Model 44 Peterborough, there is an angle to the curved face of the deck which must be copied from the original.

While the decks are being assembled, prepare the coaming pieces as well as the king planks. Cut new wood for these pieces and plane them to the thickness of the originals. Then build steam-bending forms for the coaming pieces. Next, soak and steam-bend the new wood. In this case, the original coaming pieces were white oak. In early (circa 1900) canoes, the coamings and deck-caps were mahogany. Make sure there is extra height and length in the coaming pieces to ensure that a perfect fit can be achieved in the final assembly.

Fit the deck components through a long and painstaking process of shaping and dry-fitting until everything comes together with precision.

Now, clamp the deck in place and secure it with the original fasteners.

Begin shaping and sanding the top surface of the deck by making a flat surface for the deck-cap that will cover the center-line joint.

Shape and sand the deck into the graceful curves of the canoe. Use a random-orbital sander in progressions from 60-grit sandpaper to 120-grit and then 220-grit. Wet the top surface of the deck with water to raise the grain of the new wood. Once dry, use hand-sanding in progressions from 320-grit to 400-grit and finally 600-gir to polish the wood satin smooth. I complete the sanding by using a piece of paper from a brown-paper bag to get a delicious, glossy finish. The craft paper in a brown-paper bag is the equivalent of 1200-grit sandpaper. Next, stain the new wood to match the color of the original wood in the rest of the canoe.

Attach the coaming pieces with 1.25″ (32 mm) #8 silicon-bronze round-head slot wood screws. Attach the deck-cap with ¾” 16-gauge silicon-bronze ring nails or copper canoe nails.

The final finishing is the usual process I have described in previous blog articles as well as my book.
All of this (and much more) is described in my book – This Fancy Old Canoe: A Comprehensive Guide to Restoring Antique Canoes.
If you live in Canada, CLICK HERE to buy the book.
If you live in the USA, CLICK HERE to buy the book.
If you live in the UK, CLICK HERE to buy the book.
Si vous habitez en France, CLIQUEZ ICI acheter le livre.
November 25, 2024
How to Get Information About Your Old Wooden Canoe
by Mike Elliott, Kettle River Canoes
email: artisan@canoeshop.ca
Fundamental to any canoe restoration is understanding what you are dealing with. This blog examines a number of ways to answer some basic questions:
1) Who built my canoe?
2) When was it built?
3) How was it built?
4) What supplies and materials were used?
5) What did it look like originally?

Mike Wootton asked the WCHA about his Old Town canoe. It was built in 1937 and was shipped to Portland, Maine. The decks, thwarts and seats are oak, the gunwales are spruce and the canvas was painted dark green. He added the Old Town design number 1 as a finishing touch. He then showed it off at the 2016 spring meet of the Northwest Chapter of the WCHA.
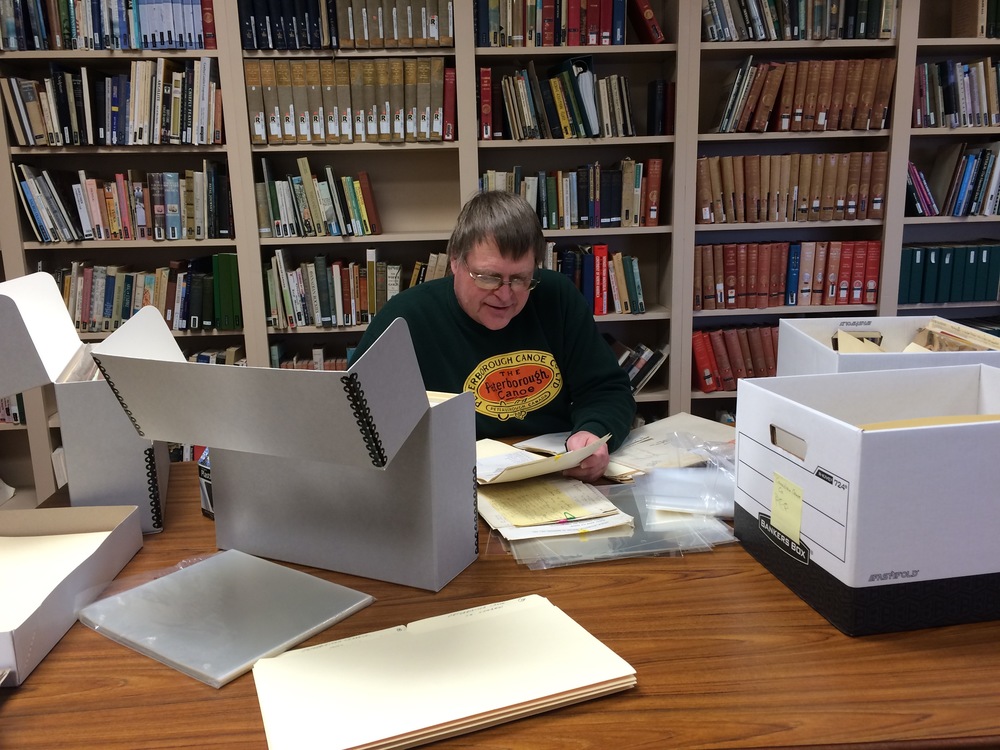
WCHA – The first place I go for information about a new restoration project is the Wooden Canoe Heritage Association. They are an amazing resource. One of the things they do is to host an on-line forum. When you ask a question, there are often several people quick to respond with help, advise, guidance and historical information.
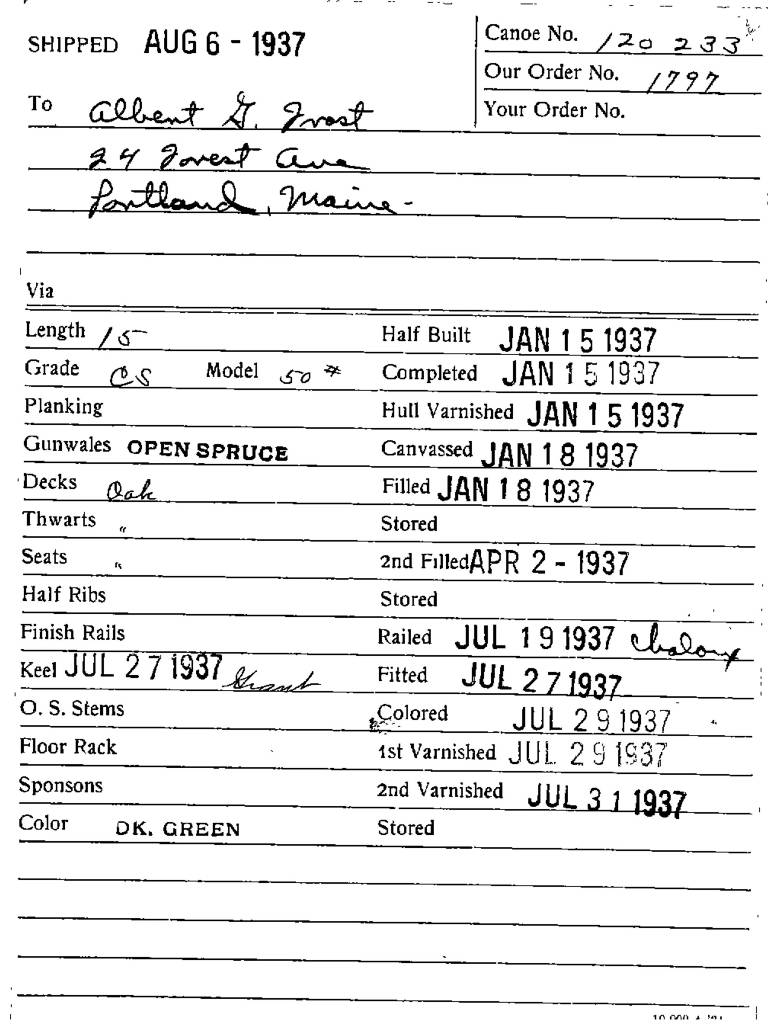
Mike Wootton asked the WCHA about his Old Town canoe (serial number 120233). They sent him a scan of the original build record. He used the information to complete the restoration.
Part of the forum is a build record search. They have archived a complete collection of Old Town, Carleton and Kennebec canoe company build records. If you have the serial number from your canoe, they will send you a scan documenting when it was build, the model, colour and style as well as to whom it was shipped.
(Photo by the Canadian Canoe Museum.)
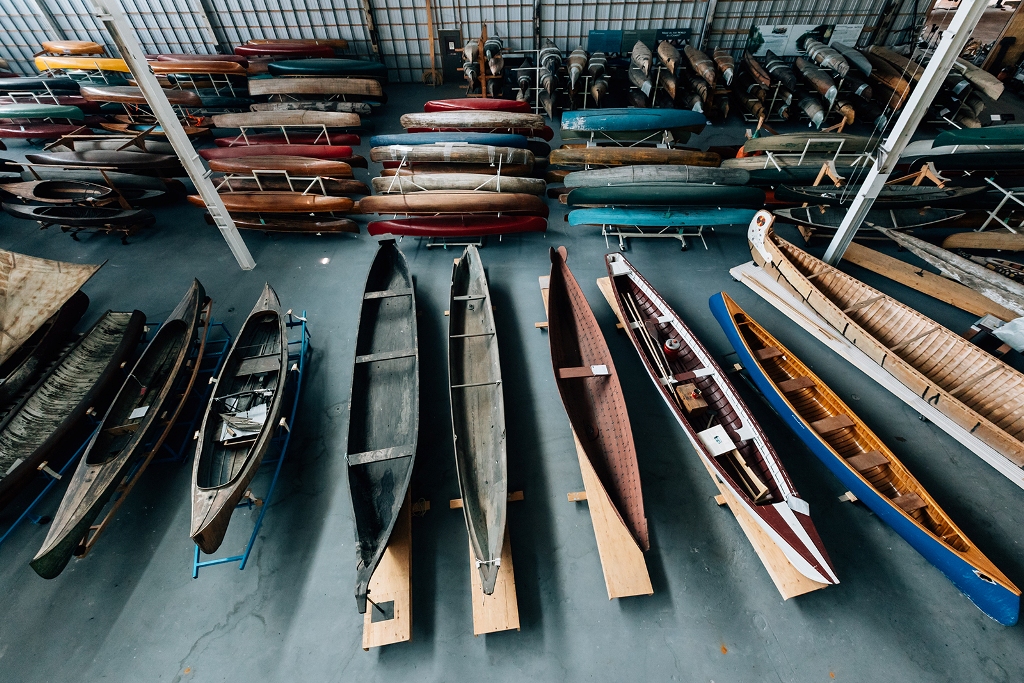
Canoe Museums – The Canadian Canoe Museum in Peterborough, Ontario houses a collection over 600 vintage canoes and kayaks from around the world.
(Photo by the Canadian Canoe Museum.)
In addition, they house a large archive of canoe-related documents. It is worth becoming a member and spending the time to dig through their collections for the information you are looking for.
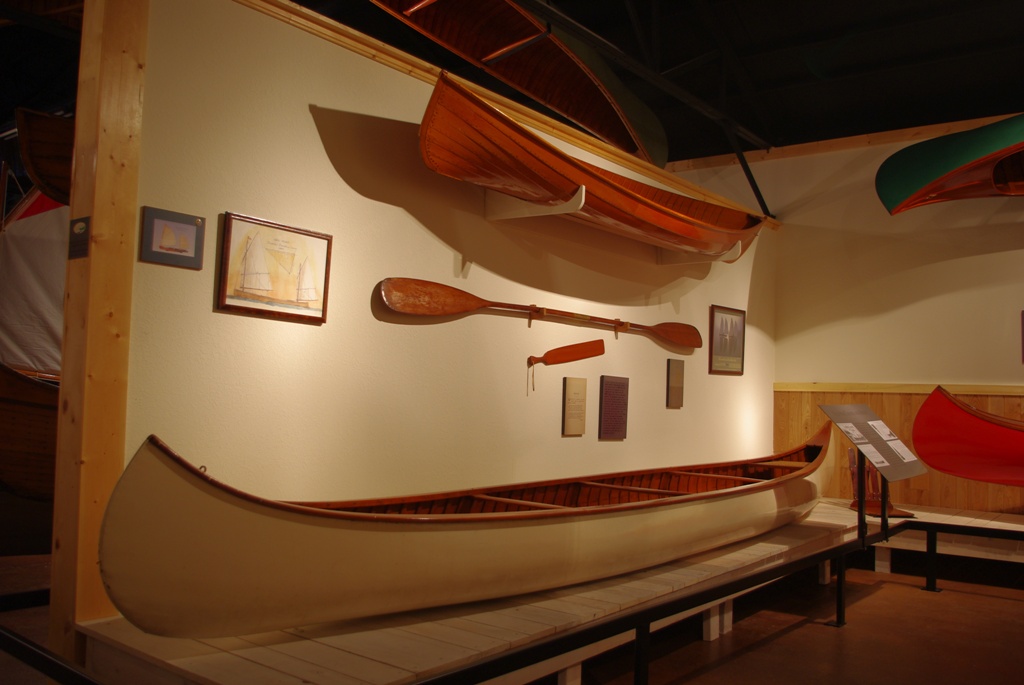
(Photo by Jamie Dunn.)
Another source of information is the Wisconsin Canoe Heritage Museum in Spooner. It has a small, yet comprehensive collection of primarily American-built antique canoes.
(Photo by the Canadian Canoe Museum.)
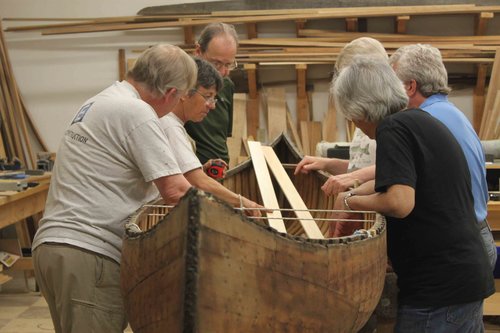
Both of these museums include workshop facilities and run regular classes teaching canoe restoration techniques. They can also connect you with canoe restorers who have experience dealing with specific types of antique canoe.
It is also worthwhile to venture into every small museum and gallery you come across in your travels. Old canoes often create a focal point in community collections. When you find a canoe you are looking for, ask the curator for permission to measure the canoe and take notes on its construction.
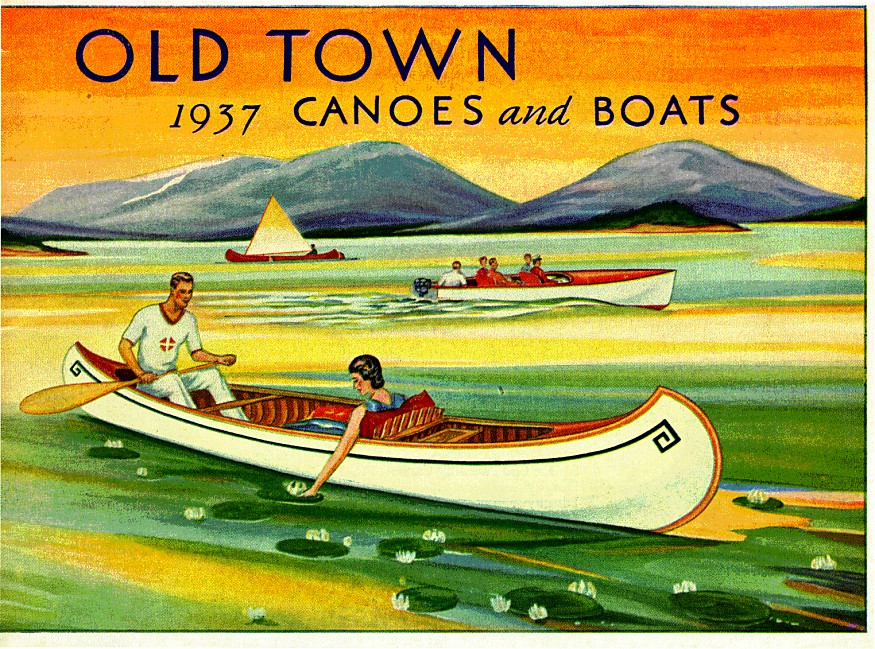
Old canoe company catalogues are sold regularly on eBay and other online sites.
Online Searches – Once you know the make and model of your canoe, it is often helpful to enter those words into online search engines. You never know what may happen to be available for a week or two. Written articles, blog posts and images from boat shows (to name a few) will be available online for a limited time. Check on a regular basis to see what is newly posted. Also, see what is being sold on eBay. There may be a listing for exactly the same canoe you are working on. Canoe catalogues are also sold regularly on eBay. If your canoe is an Old Town, and you known the year it was built, it is possible that the catalogue for that year is being sold online.

Catalogues – As you begin to plan your restoration, the canoe catalogue for your make, model and year can often provide a wealth of specific information about how your canoe was constructed, the woods used for the various components and perhaps examples of decorative designs painted on the canvas.
The WCHA has developed an impressive collection of historic canoe company catalogues for sale. From their online store, you can buy reprints of a wide variety of vintage canoe company.

The front cover of the 1978 catalogue for the Chestnut Canoe Company. My client designed the catalogue which turned out to be one of the last canoes produced by the company.
The Last Chestnut (How research helped bring a canoe back to life) – In 2006, a client came to me with his Chestnut canoe which was in desperate need of restoration. He designed the 1978 catalogue for the company. When they asked him what he wanted in exchange for his work, he requested an Indian Maiden canoe.
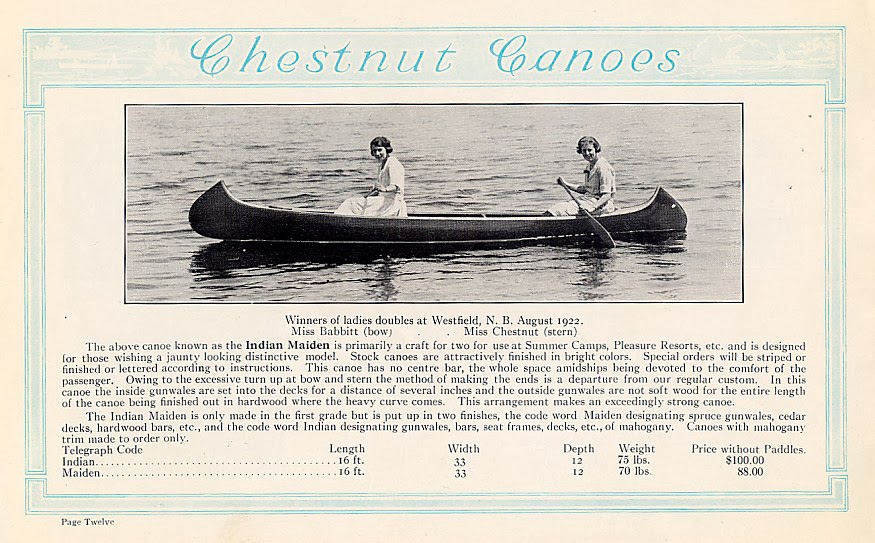
It had been almost 20 years since they last built that model. They found the building form buried in mud behind the factory. They rebuild it and decided to build a special edition series of 300 canoes. They worked out the process by building a prototype and then built the canoe for my client (a brass plaque on the bow identifies it as #001 of 300). He took possession of the canoe directly from the factory in December 1978 and they closed the doors behind him. They were out of business.
When the canoe arrived in my shop, many components were missing and I had never seen another like it. In an on-line search, I found an article from the University of New Brunswick talking about a canoe that had been hidden away in the basement of a building on campus. The article identified it as a Chestnut Indian Maiden built in 1978. The university had just donated the canoe to the Wild Salmon Nature Centre in Chamcook, New Brunswick.
My sister and her husband live in Maine about two hours drive from Chamcook. I told them about my project and asked them to collect dimensions for a number of components on the canoe. They readily agreed and took on the research project as only two wildlife management PhDs can. A couple of weeks later, I received a package full of photos, measurements, drawings and notes.
My restoration concluded successfully thanks to lots of research.

After publishing the story, I received emails from two other people who own Chestnut Indian Maiden Special Edition canoes. A brass plaque on each canoe identified them as #002 and #003 of 300, respectively. To my knowledge, these are among the last canoes ever built at the Chestnut Canoe Company factory.
All of this (and much more) is described in my book – This Fancy Old Canoe: A Comprehensive Guide to Restoring Antique Canoes.
If you live in Canada, CLICK HERE to buy the book.
If you live in the USA, CLICK HERE to buy the book.
If you live in the UK, CLICK HERE to buy the book.
Si vous habitez en France, CLIQUEZ ICI acheter le livre.
November 11, 2024
The Evolution of Factory-Built Wooden Canoes (1859-1906)
by Mike Elliott, Kettle River Canoes
email: artisan@canoeshop.ca

(Photo by Nick Dennis.)
Fundamental to any canoe restoration is understanding what you are dealing with. The scope of this blog is limited to factory-built wooden canoes held together with metal fasteners. More recent types of wooden canoe construction employing materials such as glue, fiberglass, resin, etc. will not be included. This article presents a rough guide to the form and structure of factory-built wooden canoes and the ways in which they developed and diversified over time.
Dubbed Copper Nail Construction
In Ontario, Canada in the mid-1800’s, a number of boat builders in the region in and around Peterborough were experimenting with canoe construction methods. Their ideas were influenced by the dugout canoes in the region. They built their canoes over a solid wood form (perhaps using a dugout canoe as the basic shape). They employed many building techniques borrowed from European boatbuilding traditions to create all-wood canoes with no exterior waterproof cover.


Rib-and-Batten – By 1859, John Stephenson and Tom Gordon were producing canoes using a ‘rib-and-batten’ method. A keelson (usually made of white oak) is set into the form. Notches are cut along the length of the keelson (at 4½” or 11.4 cm centres) into which half-round rock elm ribs (about 5/8″ or 16mm wide) are set and steam-bent over the form. Wide-board planks (made of basswood or Spanish cedar) are bent over the form on top of the ribs and are held in place with 16-gauge copper nails. Pilot holes are drilled through the planks and ribs. Then, the nails are driven straight into the solid wood form. Once this is done for the entire canoe, it is pulled off the form and turned right-side up. A chunk of iron shaped specifically for the purpose (called a dubbing iron) is used to bend the nails along each rib with the points oriented toward the keelson in a process called ‘dubbing over’. The dubbing iron is then used as backing against each rib while each nail is hammered flat into the wood with a cobblers hammer. The wide-board planks run longitudinally the length of the canoe and are placed against each other with butt joints. These joints are covered with battens on the interior which are also attached with dubbed copper nails. ‘Labour-intensive’ is a mild way of describing this process. A 16′ (4.9 meter) canoe is held together with approximately 4,000 nails.


Cedar Rib – In 1879, John Stephenson patented the ‘cedar-rib’ canoe construction method. White cedar ribs are steam-bent over a solid wood form and are fitted tightly together with tongue-and-groove joints. Once completed, the canoe is disassembled in order to remove it from the form. It is then reassembled and held together with a number of stringers running longitudinally. The stringers are attached to the ribs with copper nails which are dubbed over and flattened in the usual fashion. As we looked at one of these canoes at the Canadian Canoe Museum, Jeremy Ward, the museum curator, said, “I want to build one of these just to prove it can’t be done.”


Longitudinal Strip – John Stephenson continued his design efforts with a third construction method patented in 1883. This method starts by bending the half-round rock elm ribs over the solid wood form at 3″ (76 mm) centres (notched into the keelson). Then, longitudinal strips of edge-grain white cedar are placed on top of the ribs and are fitted together with shiplap joints. These strips are 2″ (51 mm) wide in the centre of the canoe and are tapered by hand to about 1¼” (32 mm) at the ends. Again, dubbed copper nails are used to hold the entire canoe together. Over time, this method emerged as the standard for what became known as the “Peterborough” canoe.


Flush Batten – The rib-and-batten method was refined by William English with the introduction of his patented ‘flush batten’ construction method in 1888. His method begins in the usual way with half-round rock elm ribs steam-bent over a solid wood form (notched into the keelson at 4½” or 11.4 cm centres). Wide, white cedar planks with rabbeted (rebated) edges run longitudinally on top of the ribs. Thin rock elm battens are set into the channels formed by the rabbeted edges. These battens sit flush with the interior edges of the planks. As usual, the entire canoe is held together with dubbed copper nails. This construction method was widely used in racing canoes.
**************

(Photo by Nick Dennis.)
All of these construction methods rely on expert craftsmanship and tight joints to produce watertight canoes. Once it has been sitting in water for a day or two, the wood in the canoe swells and the joints become very tight indeed. That said, a large sponge is a standard piece of equipment in these canoes.
Clinched Tack Construction


Double-Plank – Dan Herald was another of the inventive canoe builders in the Peterborough region of Ontario. He patented his ‘double-plank’ construction method in 1871. This method employs a solid wood form sheathed with metal. White cedar planks are steam-bent transversely (from one side of the canoe to the other) and are fitted together with butt joints. Next, cotton muslin or canvas soaked in pine tar is laid on top of the first layer of planks. The treated cloth helps waterproof the canoe. The next step in this method is to place a second layer of thin, white cedar planks onto the form. These planks run longitudinally and are attached to the first layer of planks with small, thin copper tacks (later simply referred to as ‘canoe tacks’). The tacks are driven into the wood with a cobblers hammer. They hit the metal sheathing on the form and curl back on themselves to clinch the wood together.


Capped Gunwale – A number of salmon fishing guides and canoe builders lived and worked along the Penobscot River in Maine in the late 1800’s. They worked with and often built birch bark canoes. They had become used to using canvas (waterproofed and painted) to cover their canoes and keep them watertight. It appears they heard about Dan Herald’s double-plank construction method in the mid- to late 1870’s and started adapting his ideas to create canoes emulating the birch bark canoes in their region. They began building their canoes over solid wood forms sheathed with strips of metal. White cedar ribs (about 2″ or 51 mm wide and 5/16″ or 8 mm thick) are steam-bent over the metal strips on the form. No keelson is used since birch bark canoes do not employ this feature. White cedar planks run longitudinally on top of the ribs and are fitted together with butt joints. The planks and ribs are held together with copper canoe tacks that clinch when they hit the metal strips upon which each rib is bent. The ends of the ribs are attached to hardwood (usually ash) inwales – another feature of birch bark canoes. To emulate the look of bark canoes, the ends of the ribs are either tapered and attached against a chamfered edge of the inwale or they are set into pockets carved into the inwale (usually with a Forstner bit). Once most of the canoe is completed, it is removed from the form and turned right-side up. Then, the stems and decks are installed and the hull construction is completed. Canvas is then stretched over the hull and held in place with canoe tacks. Next, the canvas is waterproofed with a canvas filler and trimmed along the sheer-line. The look of a bark canoe is completed with the attachment of thin hardwood caps on top of the inwales and thin hardwood outwales used to cover the top edge of the canvas. Evan H. Gerrish has been acknowledged as the first canoe builder in Maine to use this method. Others quickly followed. Among them were Edward M. White, Bert N. Morris and Guy Carleton.


Double Gunwale – By the 1890’s, the look of the gunwales was refined with the development of the ‘double gunwale’ system. The tops of the ribs are still set into pockets in the inwales but the gunwale-cap is no longer used. Instead, the outwales are widened to look very much like those found on canoes built in Ontario. This results in a very elegant look to the gunwales.


Open Gunwale – Bark canoes are held together with tension as the ribs are hammered into place thus wedging the rib-tops between the inwales and outwales. Each fall, the ribs are hammered out of position and the canoe is stored away for the winter. In factory-built canvas-covered canoes, the rib-tops are held permanently inside pockets cut in the inwales. Over time, water is held in the pockets and the moist environment is perfect for the growth of the fungi that cause wood rot. Around 1906, builders developed the ‘open gunwale’ system. This allows water to drain quickly from the canoe and keep the rib-tops rot-free for a longer time. By the mid-19-teens, the entire canvas-covered canoe industry had adopted this system.
All of this (and much more) is described in my book – This Fancy Old Canoe: A Comprehensive Guide to Restoring Antique Canoes.
If you live in Canada, CLICK HERE to buy the book.
If you live in the USA, CLICK HERE to buy the book.
If you live in the UK, CLICK HERE to buy the book.
Si vous habitez en France, CLIQUEZ ICI acheter le livre.
October 28, 2024
A Restorers’ Guide to a Thompson Brothers Ranger Wood-Canvas Canoe

Peter and Christ Thompson built wood-canvas canoes in Peshtigo, Wisconsin (about 50 miles north of Green Bay) as the Thompson Brothers Boat Manufacturing Company. The company built canoes from 1904 until 1962.

The specifications I present here are for the Ranger model ̶ a 16′ canoe designed for general recreational use. As in all of my blog articles presenting specifications for canoes, I do not present the lines for the hull.

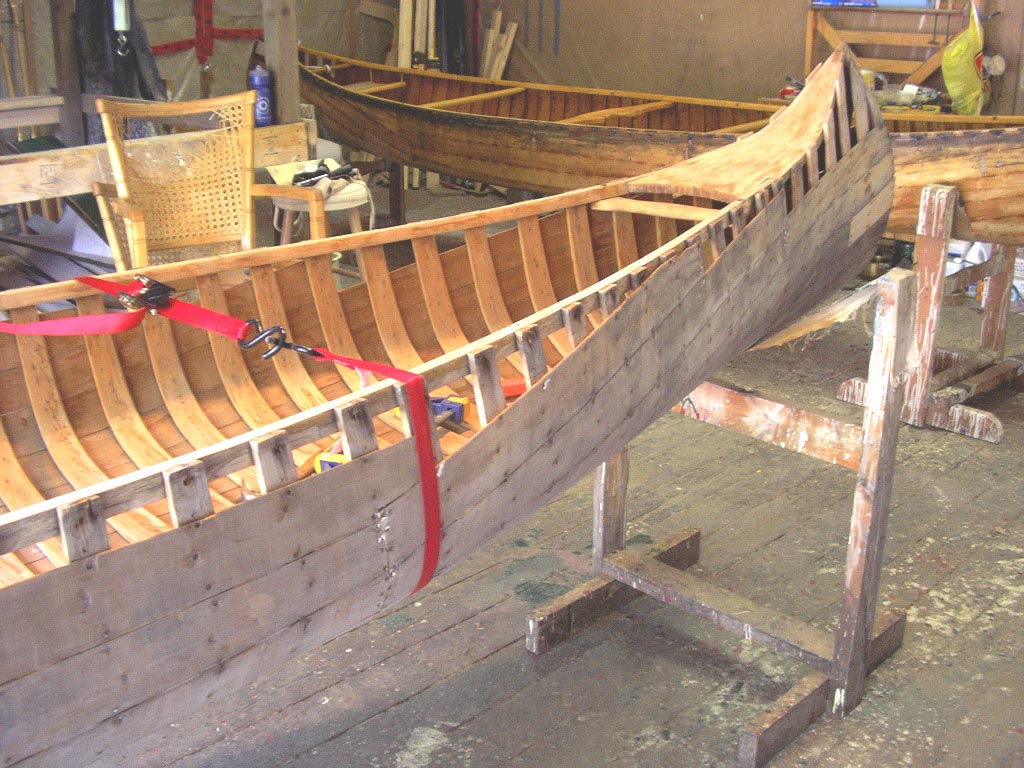
That said, the hull has a shallow-arch bottom with lots of tumblehome through the full length of the canoe. The ends have very little rocker and are quite full. I am presenting specifications of component parts for anyone faced with the restoration of a Thompson Bros. canoe. As such, it is not a builder’s guide but rather a restorer’s guide. The specifications for various components changed over the years, so if possible, base your dimensions on those of the original piece from your canoe.
One little note here: I am listing all of the dimensions in inches. I apologize to all of you who are working in metric. The canoes were originally built with imperial measurements, so I find it easier and more accurate to stick with the original measurements.

One more note: You may notice that some of the canoes featured in this article do not have external stems. Although they came into the shop with external stems, the clients did not want the keel re-installed. Without a keel, the external stem is out-of-place.

Inwales – Thompson Ranger inwales are made of mahogany with chamfered edges. The ends are tapered to ½”. The sheer line of the Ranger is flat with no rise at the ends. Therefore, the gunwales do not require any pre-bending.

Outwales – The outwales are also mahogany and are well rounded making for a comfortable and good-looking rail on the canoe.

Decks – Thompson Bros. decks were originally made of softwood (probably spruce) with a metal strap secured across the underside for extra stability. When faced with the task of replacing the decks, I chose to use maple which foregoes the need for a metal strap.

Stem Top – It is unlikely you will ever have to replace the entire stem. However, I rarely see an original stem top that is not partially or completely rotted away. The top of the stem profile is straight thereby making the repair fairly straight-forward. The end assembly is held together with a 1½” #8 bronze wood screw. The external stem is attached with the same 1½” #8 bronze wood screws.

Keel – If you want to keep the keel as part of the canoe, it is a simple piece to make. Use a piece of hardwood (originally white oak) and taper each end gradually to join smoothly with the external stem. Since the external stem protects the canvas seam at the ends, there is no need for brass stem-bands.
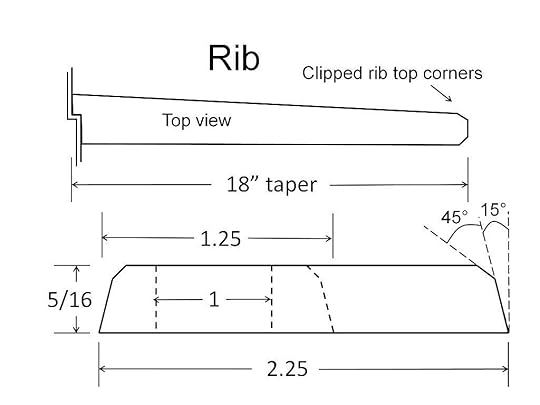
Ribs – The ribs are 5/16” thick and 2¼” wide. The edges are chamfered 15° on both sides with the top corners rounded off slightly. The ribs are tapered to 1¼” wide at the tops. One distinctive feature of Thompson Bros. canoes is clipped corners on the rib-tops.

Planking – The planking is another distinctive feature of Thompson Bros. canoes. The boards are usually 3¾” wide, 3/16” thick and beveled to make for a very tight fit.

The planking pattern also identifies Thompson Bros. canoes. The sheer planks run straight from end-to-end. The bottom planks run up to the sheer planks and are cut to form a sharp point near the ends of the canoe.


Seats – The Ranger was built either with hand-woven cane in white oak frames or with extra thwarts placed where the front edge of the seats would normally be located. If present, the seats are woven with standard warp and weft weaving in the six-stage pattern. The bow seat is hung from the inwales with 10-24 carriage bolts and solid blocks of mahogany as spacers. The front edge of the stern seat is attached directly under the inwales while the back edge has ¾” hardwood dowels as spacers.

Thwarts – The thwarts are made of 7/8” white oak that is 2-1/8” wide. They are shaped with tapers for hand-grips and are nicely rounded but not elegant. Canoes built for use at summer camps were set up with four thwarts and no seats. Presumably, this avoided the need to repair or replace seats two or three times a season due to the inevitably heavy wear-and-tear from hundreds of kids at the camps.
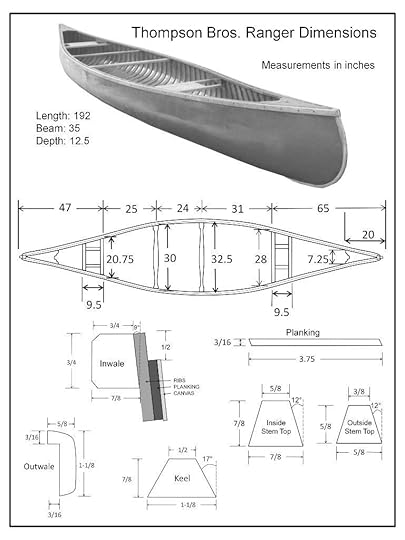
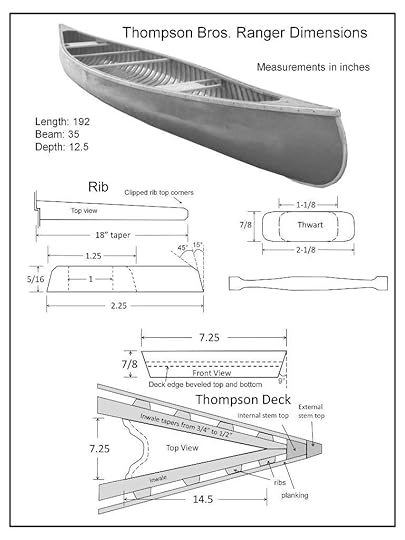
Here are specification sheets with most of the components presented together for easy reference.
All of this (and much more) is described in my book – This Fancy Old Canoe: A Comprehensive Guide to Restoring Antique Canoes.
If you live in Canada, CLICK HERE to buy the book.
If you live in the USA, CLICK HERE to buy the book.
If you live in the UK, CLICK HERE to buy the book.
Si vous habitez en France, CLIQUEZ ICI acheter le livre.
October 21, 2024
How to Make Wide Outwales for an Antique Wooden Canoe
by Mike Elliott, Kettle River Canoes
email: artisan@canoeshop.ca
The outwales found in early versions of production canoes (both all-wood and canvas-covered canoes) built in the late 1800s and early 1900s have a number of distinguishing characteristics:

Wide Profile – They are approximately 50% wider than they are deep. In the cross section diagram, W ≈ 1.5 x H.

Cross-section diagram of the gunwale system in a 1905 J.H. Rushton Indian Girl canoe.
No Rabbet– The inside surface is flat without a rabbet (called a rebate everywhere except North America, it is a recess cut into the inside edge). That is, they do not cover the top edge of the planks at the sheer line (unless it is part of a double-gunwale system).
Matches Tumblehome – The inside surface is angled to conform with the tumblehome angle in the hull. In the cross section diagram, TH° = Tumblehome angle of the hull at the sheer line which is generally about 8°.
Shaped Top – The top surface is gracefully rounded to taper the top edge from a thick inside edge to a narrow outside edge. In the cross section diagram, TE° ≈ 15°.

Pre-Bent Ends – The sheer line of the canoe often has graceful upswept ends. The outwales must be pre-bent to follow this curve (refer to the side-view diagram).

Tapered Ends – They are tapered gradually at the ends both in width and height (over a distance of at least 24″ or 60cm). While the width is tapered approximately 50% (We ≈ 0.5 x W in the top view diagram), the height is normally tapered about 25% (He ≈ 0.75 x H in the side view diagram).
Attached from the Inside – The main body of the outwale is attached (either with brass screws or copper nails) from the inside. At the ends, the last five fasteners (brass screws) are driven in from the outside (pre-drilled and countersunk).
For this blog, I describe the steps involved in making new outwales for a 1905 J.H. Rushton Indian Girl canoe (wood-canvas).

Cut the new cherry stock to rough dimensions on the table saw and cut the tumblehome angle (TH°). Each of the four pieces is at least 9′ (275cm) long. Decide which pieces will be joined together to make full-length outwales for each side of the canoe. Mark them with a permanent ink marker to identify each outwale and mark which end will be soaked and pre-bent. Soak the new cherry for three days. Then, pour boiling water over the pieces and bend them onto the gunwale bending form (no backing strip is necessary). Allow them to dry for a week before removing them from the form.

Once bent, cut a scarf joint angle into the non-bent end of one of the two pieces for each outwale. Attach the new cherry pieces to the canoe. Position the pieces so the bend in each matches the curve in the sheer-line of the canoe. Mark the position of the matching scarf joint angle.

Cut the second scarf joint angle and use polyurethane glue to splice the pieces together into full length outwales. Allow the glue to dry overnight.

Sand the joints smooth. Then, use a spring clamp at every second rib to hold one of the new outwales in place on the canoe. In this particular canoe, new cherry thwarts have yet to be installed. I used ratchet straps to draw the hull into its correct shape.

Sometimes the wood bends too much at the ends. If so, wrap rags around the ends of the outwales and keep them soaked for about three days. The wood will relax and come into its correct position.

Mark the width taper into each end of the new outwale.

Cut the width taper with a saber saw.

Use a random-orbital sander and 60-grit sandpaper to smooth the cut and even out the width taper at each end.

Start attaching the outwale to the canoe at the centre and work to each end. Make sure the top-edge of the outwale is flush to the top edge of the inwale. Pre-drill and counter-sink holes for 1½” #8 bronze flat-head wood screws which are driven from the inside through the inwale into the outwale. Originally, they placed a screw between each rib in the canoe. I replicated their process, but I see no reason why you couldn’t use a screw between every second rib.

The last five screws at each end are driven from the outside through the outwale into the inwale. Position the outwale a little high at each end. As the final sanding is done, each end will be tapered (He ≈ 0.75 x H).

Each end of the outwale is trimmed flush to the end of the stem.

Install the second outwale in the same manner. Be sure the height taper and final height of both outwales are the same at each end and on both sides of the canoe. Then, use an angle grinder set up with a 24-grit sanding disk to carve the top edge angle into the outwales all around the canoe (TE° ≈ 15°). Be sure to leave enough material in the top edge to allow for final shaping and sanding.

Sand and shape the outwales with a random-orbital sander. Start with 60-grit sandpaper and work progressively down to 220-grit. The final shaping is done more-or-less by eye until a pleasing shape is achieved. Wet down the outwales and decks with water and allow them to dry. This will raise the grain of the new wood.

Use dry sandpaper for hand-sanding in progressions from 320-grit to 600-grit until the wood is polished.

Stain all of the new wood to match the original. Remove the new outwales and apply final finishing with shellac and varnish on all of the surfaces. In this canoe, the outwales will be installed after the canoe is canvassed, filled and painted.
All of this (and much more) is described in my book – This Fancy Old Canoe: A Comprehensive Guide to Restoring Antique Canoes.
If you live in Canada, CLICK HERE to buy the book.
If you live in the USA, CLICK HERE to buy the book.
If you live in the UK, CLICK HERE to buy the book.
Si vous habitez en France, CLIQUEZ ICI acheter le livre.
October 16, 2024
How to Make and Install Half-Ribs in a Wood-Canvas Canoe
by Mike Elliott, Kettle River Canoes
email: artisan@canoeshop.ca

photo from “Tales from Misery Ridge: One Man’s Adventures in the Great Outdoors” by Paul J. Fournier. (Island Port Press, 2011)
About 140 years ago, fishing guides on the east coast of North America (most notably in Maine, New Brunswick and Quebec) started building wood-canvas canoes that they could use in order to take their clients up and down the shallow, rapid salmon rivers in the region. They used the local birch bark canoes as templates. The guides would be standing up all day in the canoe as they poled it upstream and down or held the canoe in place while the client fished for salmon. The canoes needed to be stable and rugged with a strong, comfortable floor. They designed canoes that had wide, flat bottoms which made them stable with a very shallow draft. To strengthen the hull against the inevitable encounters with rocks, they did one of two things:

a) Build the canoe with lots of ribs (3″ or 76 mm wide) spaced very close together (0.5″ or 13 mm apart).

b) Space the ribs normally (1.5″ to 2.0″ – 38 mm to 50 mm apart) and insert extra ribs between them that extended across the bottom of the canoe. These “half ribs” created a strong, comfortable floor in the canoe.
At my canoe restoration shop, a client sometimes asks me to insert half ribs into their canoe in order to create a stronger bottom. Unfortunately, if you simply pressed shorter ribs into the bottom of the canoe between the regular ribs, the hull would become misshapen – especially if the bottom was not entirely flat. Therefore, retro-fitting half ribs into a wood canvas canoe is done in the following way. Note, that this is done while the old canvas is off – before a new canvas is stretched on.

1) Cut and shape the new rib material from clear, straight-grained cedar. The half ribs are about 1″ (25 mm) wide and the same thickness as the original ribs in the canoe. The sides of the half-ribs are chamfered about 10°. Sand the top edges lightly to round them off a little. Soak the new half ribs for 48 to 72 hours. Then, steam them for about 50 to 60 minutes and bend them over the outside of the hull between the regular ribs. Allow the new ribs to dry for at least 48 hours. Just as when creating an exact replica for a broken rib in the canoe, the half ribs are bent in a location so that the shape of the rib on the outside of the hull is the same as the dimensions required on the inside. The taper of the hull is such that the inside dimensions are achieved by bending the rib one station closer to the near-end of the canoe. Precision is not as critical for half ribs as would normally be required since the ribs will not be curving around the chine of the canoe. Use a pencil to mark the centerline on each new rib.

2) Remove the new ribs from the outside of the canoe and place them in the required positions between the regular ribs. Make sure the centerline on each new rib is lined up with the centerline of the canoe. Hold the new ribs in place with spring clamps on the inwales.

3) The length of each half rib will vary so that they match the taper of the hull dimensions. The actual length of each rib is entirely up to you. Use a straight edge to help determine the length of each rib and use a pencil to mark both ends.

4) One at a time, cut each half rib to length.

5) Use a random-orbital sander and 80-grit paper to chamfer the ends of the rib.

6) Place the half rib back into the desired location and secure it with one tack about halfway between the centerline and one end of the rib. Make sure the rib is centered between two original ribs. Repeat this procedure on the other side of the rib making sure that the half rib is centered between the original ribs. This can be done by one person, but is much easier when one person holds the half rib and clinching iron while a second person drives the tacks with a cobbler’s hammer.
7) Once the half-rib is centered and straight, secure it with a full complement of tacks.

8) Repeat steps 4 to 7 for each half rib in turn.
All of this (and much more) is described in my book – This Fancy Old Canoe: A Comprehensive Guide to Restoring Antique Canoes.
If you live in Canada, CLICK HERE to buy the book.
If you live in the USA, CLICK HERE to buy the book.
If you live in the UK, CLICK HERE to buy the book.
Si vous habitez en France, CLIQUEZ ICI acheter le livre.


