
Bacil Donovan Warren's Blog, page 11
December 29, 2015
Compiling in Scrivener: The Last Four (Cover, Meta-Data, RTF Compatibility, and Kindle Gen)
Welcome back to Cogitations of a Semi-Pro Wordsmith. Today, I will be covering the last four of the “All Options” Options panes available for compiling in Scrivener: Cover, Meta-Data, RTF, and Kindle Gen. Three of these are specialized, only appearing for a few output types. The fourth (Meta-Data) actually appears for many types but has some different options depending upon your output file format. Let’s get started, shall we?
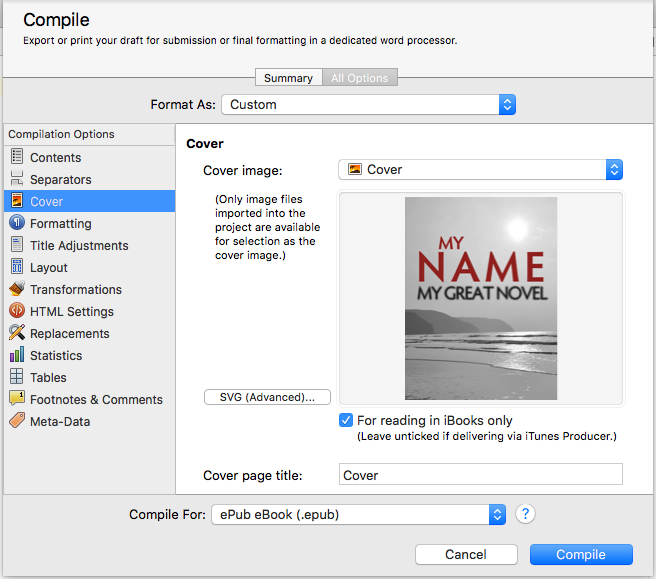
Cover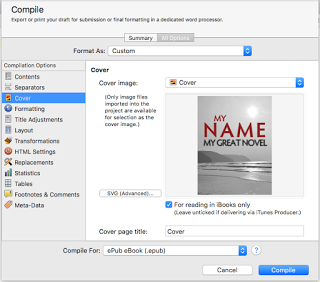
The Cover pane only appears when the compile output is set to .epub or .mobi types. It allows you to set the image for the book cover in those formats, which should be raster images (not vector). Both PNG and JPEG formats are raster images, and will both work for this pane. Scrivener recommends using JPEG files since some e-book readers don’t know how to handle PNG images.
 To set the cover, it must be in your binder already, usually the Research folder somewhere (I always create a separate folder for cover art under the Research folder in my projects). For .epub files, there are three additional options: an SVG button, which permits you to specify SVG code if this is needed. If your graphic artist gave you SVG code or an SVG image for this, you’ll need to clarify the settings with him or her to make sure you get this right. There is also a field to set the title of this page in the compiled file. This is not the book title, but rather the title of this page. By default, Scrivener puts “Cover” in this field, and I recommend leaving it unless you know for sure you need another title for this page. Finally, there is a checkbox "For reading in iBooks only” that permits you to tell the compiler to set that image as the one for the iBooks shelf. If you will be sending the output file to iTunes Producer, un-check this setting, and use iTunes Producer to set the shelf image instead.
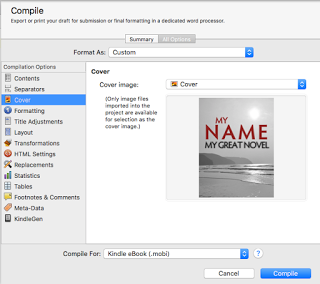 For .mobi file output, the only option is to set the image.
Meta-Data
Meta-data appears for most file types (not including iBooks Author Chapters, Print, .txt, or the script outputs .fdx or .fcf), but what appears here depends on the output settings. For all the supported formats except .fountain, the pane is titled “Meta-Data”; for the .fountain output type, it is called “Title Page Meta-Data.” No matter what the settings are, this pane is for including the values for meta-data variables and their values that you select. There are basically four different panes, which I’ll discuss individually.
 For PDF files, there are four meta-data variables: Title, Author, Subject, and Keywords. Any variable which have default values set in the Meta-Data Settings pane (Found under the “Project” menu) will appear in the proper variable field as gray type. You can override it by entering specific information in the field. For the Keywords field, entries are comma-separated values, and entries will appear as tags (with a light blue rounded rectangle inside of which is the “keyword” … which, frankly, makes them “key phrases” not just “words” but whatever).
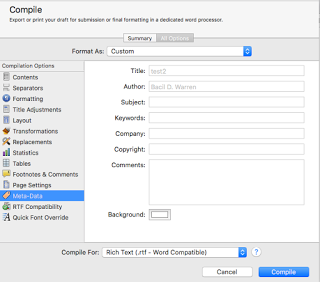 For the word processing output types (.rtf, .rtfd, .doc, .docx, and .odt) as well as the Web output formats (.html and web archive), all four of the PDF variables are present, as well as Company, Copyright, and Comments, and a background color setting. For .html and webarchive formats, the “Title” variable will become the page title (i.e., the value for <title>Title Here</title>). The Keywords field here acts just like the one for PDF outputs, and the Comments is a free-form text box just as the others are free-form text fields.
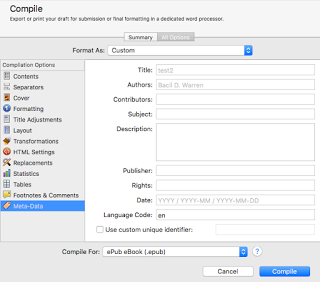 For the .epub and .mobi file types there are different fields, but most of them act like the ones from the first two. There are two major exceptions: the “Authors” field (note, changed from “Author” in the other two) and the new “Contributors” field permit semi-colon-separated values rather than free-form text; if there are multiple authors or contributors for the document, enter each name separated by a semi-colon. Besides Title, Authors, and Subject (no “Keywords” in this pane), this pane has the Contributors, Description (free-form text box), Publisher, Rights, Date, Language Code, and a checkbox to enable the use of a custom unique identifier. Of these, the one to be most concerned about is the Language Code, which should be the official ISO two-character code for the language of the document. If your publisher gave you a unique identifier, click the checkbox “on” and put it in that text field.
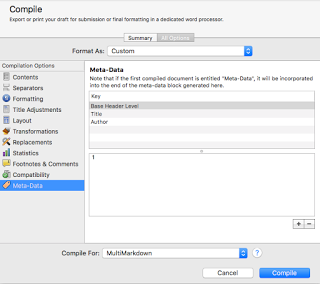 With MultiMarkdown (any output type) and .fountain (Title Page Meta-Data) output types the interface is different, using a table to add or subtract arbitrary variable names and a text box below to enter the values. There are no required Meta-Data entries for MultiMarkdown, but Scrivener does create a few by default in new projects. To add a new variable, click the “+” button in the lower right, and to delete one select it in the table at the top and click the “-“ button instead. To add a value to a variable, select it in the table and then click in the text box at the bottom and type in the value. Scrivener warns that empty lines in this text box will cause the Meta-Data block to end prematurely because it inserts these values verbatim and the MultiMarkdown format sees an empty line as the signal to stop processing Meta-Data. Be careful!
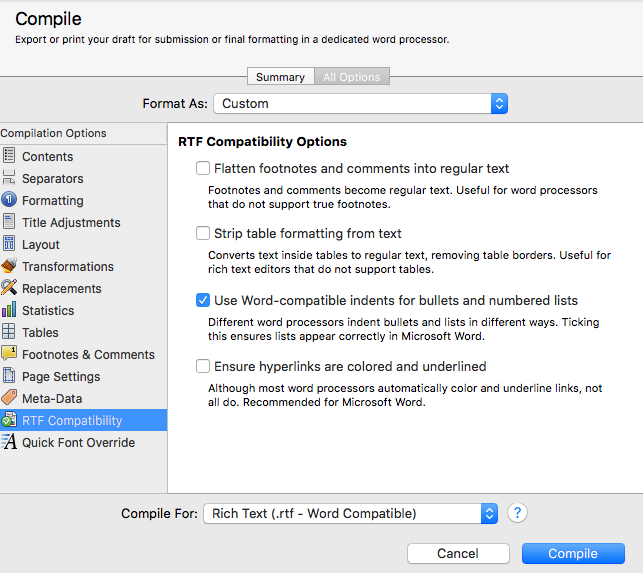
RTF Compatibility
The pane for RTF Compatibility is available to RTF compile types, both .rtf and MultiMarkdown RTF files, but does not appear for .rtfd files (a file format used mostly by the Mac OS X/NeXTSTEP application TextEdit). It will also appear for the .doc and .docx output formats if you have set your Word output formats (.doc or .docx) to use RTF, by enabling that setting in the Import/Export pane in the Preferences.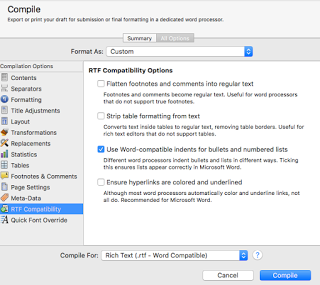 The setting for this pane when using .rtf or MultiMarkdown RTF output formats has four settings. The main thing to keep in mind about this is to only change the default settings if your output looks bad. By and large, the RTF output settings are pretty good and produce fine RTF files. If, however, your editor of choice is choking on something, invert the setting for whichever part with which it’s having problems. The first setting will essentially convert footnotes and comments into text endnotes, and converts their marker into the standard set (typically *, †, ‡, §, ‖, ¶, etc.). The next setting tells the output compiler to essentially turn any tables into regular text, which you would need if your particular RTF editor doesn’t handle tables. If you are using Word as your editor but are exporting in straight RTF (that is, not using the .doc or .docx output formats) or MultiMarkdown RTF, you can tell the compiler to use Word’s list making tools. Since Word handles these differently than do other word processors, you will definitely want to check this if you have bulleted or numbered lists in your output document. Finally, there is a checkbox for underlining and coloring URLs/hyperlinks. This box is unchecked by default since most editors do this on their own. Word, however, does not, and will need this box checked if you intend to open your compiled RTF file in Word and have hyperlinks in the output document.
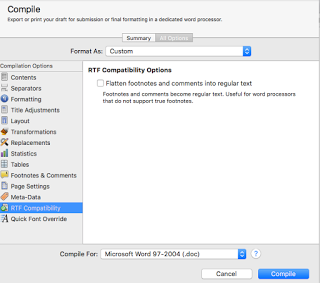 The RTF Compatibility pane when using .doc or .docx files is much simpler, and has only the setting to flatten footnotes. For both RTF and DOC output, checking this box will not override the setting to hide comments, but will only determine how they are displayed if they are included.
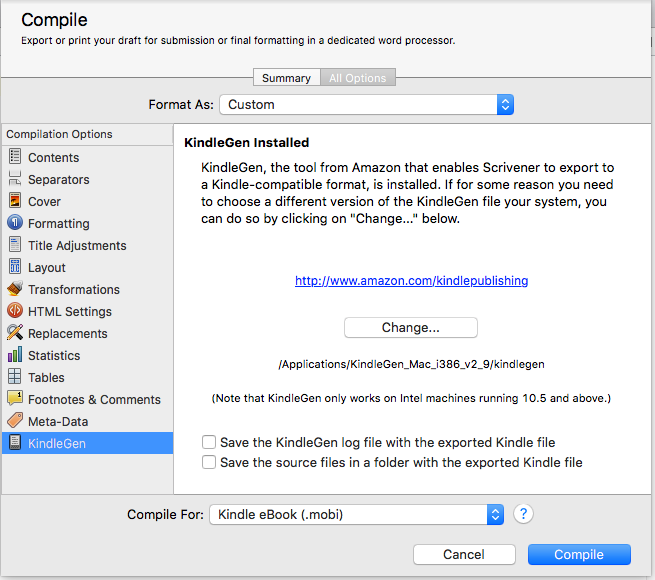
Kindle Gen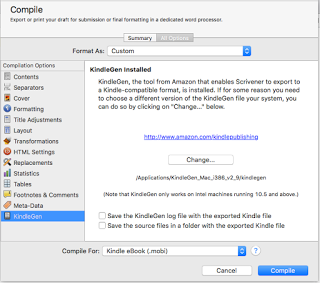
The Kindle Gen pane only appears for .mobi output formats and is where you specify what application the compiler should use to generate the .mobi file. Before you can output a .mobi file you must set this location. There are also two checkboxes at the bottom of the pane. The first enables you to tell the compiler to create a log file of the Kindle Gen output. This is unchecked by default and is really only needed if you are running into problems creating a valid .mobi file from Scrivener. The second checkbox (also unchecked by default) will output both the generated source files that Scrivener feeds to the Kindle Gen application as well as the .mobi file output itself. If you need or want to make changes to these files (perhaps you have a very specific layout need or something, I’ve never run across anything that would require me to modify the output files in this way), you can do so before manually flinging them at Kindle Gen yourself if you enable this checkbox first.
In Conclusion
We’ve come a long way on this journey, but I hope I’ve been able to simplify and explain each of the various Option panes available in the “All Options” for Compiling in Scrivener. These final four are the last of the panes. In a couple of future blog entries (within the next couple of weeks), I will be stepping through a few very common output scenarios, and going over each pane’s settings that I needed to modify to set the correct output. I think that armed with the general knowledge from these past blogs, and the few more to come, most Scrivener compile output scenarios will be a snap for you to set up. If you have any questions or comments, post them below, or you can shoot me a tweet (@BacilDonovan on Twitter) or an email at ('+ 'd'+'o'+'n'+'o'+'v'+'a'+'n'+'&'+'#'+'6'+'4'+';'+'&'+'#'+'1'+'1'+'3'+';'+'u'+'i'+'x'+'&'+'#'+'1'+'1'+ '1'+';'+'&'+'#'+'1'+'1'+'6'+';'+'&'+'#'+'1'+'0'+'5'+';'+'c'+'&'+'#'+'1'+'1'+'4'+';'+'a'+'i'+'n'+'d'+ 'r'+'o'+'&'+'#'+'1'+'1'+'2'+';'+'&'+'#'+'4'+'6'+';'+'&'+'#'+'9'+'9'+';'+'o'+'&'+'#'+'1'+'0'+'9'+';'+ '');[Turn on JavaScript to see the email address]), and I’ll do my best to answer your question. If you do, please note that I may re-use the question (with personal details omitted, unless we both agree otherwise) for clarification purposes on my blog later. If I do, I will notify you of my intent to do so.
Cover
The Cover pane only appears when the compile output is set to .epub or .mobi types. It allows you to set the image for the book cover in those formats, which should be raster images (not vector). Both PNG and JPEG formats are raster images, and will both work for this pane. Scrivener recommends using JPEG files since some e-book readers don’t know how to handle PNG images.
 To set the cover, it must be in your binder already, usually the Research folder somewhere (I always create a separate folder for cover art under the Research folder in my projects). For .epub files, there are three additional options: an SVG button, which permits you to specify SVG code if this is needed. If your graphic artist gave you SVG code or an SVG image for this, you’ll need to clarify the settings with him or her to make sure you get this right. There is also a field to set the title of this page in the compiled file. This is not the book title, but rather the title of this page. By default, Scrivener puts “Cover” in this field, and I recommend leaving it unless you know for sure you need another title for this page. Finally, there is a checkbox "For reading in iBooks only” that permits you to tell the compiler to set that image as the one for the iBooks shelf. If you will be sending the output file to iTunes Producer, un-check this setting, and use iTunes Producer to set the shelf image instead.
 For .mobi file output, the only option is to set the image.
 Meta-Data
Meta-data appears for most file types (not including iBooks Author Chapters, Print, .txt, or the script outputs .fdx or .fcf), but what appears here depends on the output settings. For all the supported formats except .fountain, the pane is titled “Meta-Data”; for the .fountain output type, it is called “Title Page Meta-Data.” No matter what the settings are, this pane is for including the values for meta-data variables and their values that you select. There are basically four different panes, which I’ll discuss individually.
 For PDF files, there are four meta-data variables: Title, Author, Subject, and Keywords. Any variable which have default values set in the Meta-Data Settings pane (Found under the “Project” menu) will appear in the proper variable field as gray type. You can override it by entering specific information in the field. For the Keywords field, entries are comma-separated values, and entries will appear as tags (with a light blue rounded rectangle inside of which is the “keyword” … which, frankly, makes them “key phrases” not just “words” but whatever).
  For the word processing output types (.rtf, .rtfd, .doc, .docx, and .odt) as well as the Web output formats (.html and web archive), all four of the PDF variables are present, as well as Company, Copyright, and Comments, and a background color setting. For .html and webarchive formats, the “Title” variable will become the page title (i.e., the value for <title>Title Here</title>). The Keywords field here acts just like the one for PDF outputs, and the Comments is a free-form text box just as the others are free-form text fields.
 For the .epub and .mobi file types there are different fields, but most of them act like the ones from the first two. There are two major exceptions: the “Authors” field (note, changed from “Author” in the other two) and the new “Contributors” field permit semi-colon-separated values rather than free-form text; if there are multiple authors or contributors for the document, enter each name separated by a semi-colon. Besides Title, Authors, and Subject (no “Keywords” in this pane), this pane has the Contributors, Description (free-form text box), Publisher, Rights, Date, Language Code, and a checkbox to enable the use of a custom unique identifier. Of these, the one to be most concerned about is the Language Code, which should be the official ISO two-character code for the language of the document. If your publisher gave you a unique identifier, click the checkbox “on” and put it in that text field.
 With MultiMarkdown (any output type) and .fountain (Title Page Meta-Data) output types the interface is different, using a table to add or subtract arbitrary variable names and a text box below to enter the values. There are no required Meta-Data entries for MultiMarkdown, but Scrivener does create a few by default in new projects. To add a new variable, click the “+” button in the lower right, and to delete one select it in the table at the top and click the “-“ button instead. To add a value to a variable, select it in the table and then click in the text box at the bottom and type in the value. Scrivener warns that empty lines in this text box will cause the Meta-Data block to end prematurely because it inserts these values verbatim and the MultiMarkdown format sees an empty line as the signal to stop processing Meta-Data. Be careful!
RTF Compatibility
The pane for RTF Compatibility is available to RTF compile types, both .rtf and MultiMarkdown RTF files, but does not appear for .rtfd files (a file format used mostly by the Mac OS X/NeXTSTEP application TextEdit). It will also appear for the .doc and .docx output formats if you have set your Word output formats (.doc or .docx) to use RTF, by enabling that setting in the Import/Export pane in the Preferences.
 The setting for this pane when using .rtf or MultiMarkdown RTF output formats has four settings. The main thing to keep in mind about this is to only change the default settings if your output looks bad. By and large, the RTF output settings are pretty good and produce fine RTF files. If, however, your editor of choice is choking on something, invert the setting for whichever part with which it’s having problems. The first setting will essentially convert footnotes and comments into text endnotes, and converts their marker into the standard set (typically *, †, ‡, §, ‖, ¶, etc.). The next setting tells the output compiler to essentially turn any tables into regular text, which you would need if your particular RTF editor doesn’t handle tables. If you are using Word as your editor but are exporting in straight RTF (that is, not using the .doc or .docx output formats) or MultiMarkdown RTF, you can tell the compiler to use Word’s list making tools. Since Word handles these differently than do other word processors, you will definitely want to check this if you have bulleted or numbered lists in your output document. Finally, there is a checkbox for underlining and coloring URLs/hyperlinks. This box is unchecked by default since most editors do this on their own. Word, however, does not, and will need this box checked if you intend to open your compiled RTF file in Word and have hyperlinks in the output document.
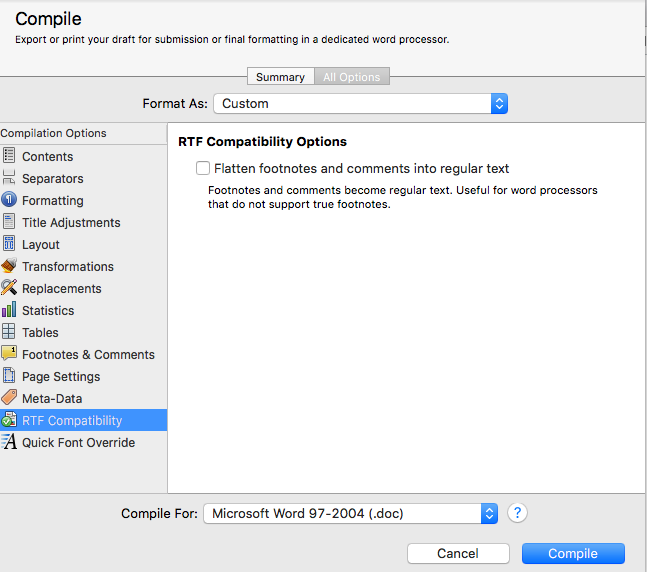 The RTF Compatibility pane when using .doc or .docx files is much simpler, and has only the setting to flatten footnotes. For both RTF and DOC output, checking this box will not override the setting to hide comments, but will only determine how they are displayed if they are included.
Kindle Gen
The Kindle Gen pane only appears for .mobi output formats and is where you specify what application the compiler should use to generate the .mobi file. Before you can output a .mobi file you must set this location. There are also two checkboxes at the bottom of the pane. The first enables you to tell the compiler to create a log file of the Kindle Gen output. This is unchecked by default and is really only needed if you are running into problems creating a valid .mobi file from Scrivener. The second checkbox (also unchecked by default) will output both the generated source files that Scrivener feeds to the Kindle Gen application as well as the .mobi file output itself. If you need or want to make changes to these files (perhaps you have a very specific layout need or something, I’ve never run across anything that would require me to modify the output files in this way), you can do so before manually flinging them at Kindle Gen yourself if you enable this checkbox first.
In Conclusion
We’ve come a long way on this journey, but I hope I’ve been able to simplify and explain each of the various Option panes available in the “All Options” for Compiling in Scrivener. These final four are the last of the panes. In a couple of future blog entries (within the next couple of weeks), I will be stepping through a few very common output scenarios, and going over each pane’s settings that I needed to modify to set the correct output. I think that armed with the general knowledge from these past blogs, and the few more to come, most Scrivener compile output scenarios will be a snap for you to set up. If you have any questions or comments, post them below, or you can shoot me a tweet (@BacilDonovan on Twitter) or an email at ('+ 'd'+'o'+'n'+'o'+'v'+'a'+'n'+'&'+'#'+'6'+'4'+';'+'&'+'#'+'1'+'1'+'3'+';'+'u'+'i'+'x'+'&'+'#'+'1'+'1'+ '1'+';'+'&'+'#'+'1'+'1'+'6'+';'+'&'+'#'+'1'+'0'+'5'+';'+'c'+'&'+'#'+'1'+'1'+'4'+';'+'a'+'i'+'n'+'d'+ 'r'+'o'+'&'+'#'+'1'+'1'+'2'+';'+'&'+'#'+'4'+'6'+';'+'&'+'#'+'9'+'9'+';'+'o'+'&'+'#'+'1'+'0'+'9'+';'+ '');[Turn on JavaScript to see the email address]), and I’ll do my best to answer your question. If you do, please note that I may re-use the question (with personal details omitted, unless we both agree otherwise) for clarification purposes on my blog later. If I do, I will notify you of my intent to do so.


December 28, 2015
New blog post on Writer's Life: 5 New Year Habits for a Writer
My latest blog post, 5 New Year Habits For A Writer, is live on Writer's Life.org. Go check it out!
December 25, 2015
New Blog Post on Writer's Life: 5 Tools for Citations and Bibliographies
My latest post, 5 Tools for Citations and Bibliographies, is live on Writer's Life.org. Go check it out!
December 23, 2015
New Blog Post on Writer's Life: 5 Tools to Brainstorm Your Next Writing Project
My latest post, 5 Tools to Brainstorm Your Next Writing Project, is up on Writer's Life.org. Go check it out!
December 21, 2015
New blog on Writer's Life: 5 Steps To Better Revising
My latest entry, 5 Steps To Better Revising, is up on WritersLife.org. Check it out!
Reflections: Lectito.me interviews of 3 NaNoWriMo authors
The final interview of NaNoWriMo authors by Lectito.ME is now live. Three of the writers Lectitio.me followed during our journey toward 50,000 words in one month give their reflections, and offer a little advice and encouragement to others who are considering it for 2016.
December 19, 2015
Compiling in Scrivener: Script Settings, HTML, and Compatibility Settings
Hello, and welcome back to Cogitations of a Semi-Pro Wordsmith. Today’s Compiling in Scrivener topic is three of the final option panes available only to certain output formats: Script Settings, HTML, and Compatibility. As you will soon see, these are highly specialized option panes for particular output types, and may prove very useful if you output into these compile formats.
Script Settings
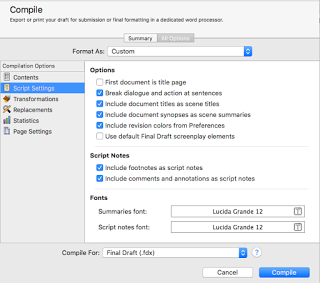 As you might expect, the Script Settings option pane is aimed at setting options when the compile output is Final Draft (.fdx) script, although the .fountain script type does have a few plaintext options available in this pane. This setting is not available for .fcf output types, or any non-script outputs.A few of these are pretty straightforward. “First document is title page” will do exactly that; be sure, however, that your first document actually is a title page! If you click this checkbox and then fail to add a title page at the beginning, it will chop off the first page of your script. “Include document titles as scene titles” and “Include document synopses as scene summaries” are useful if you title your documents in the Binder with your scene titles, and/or if you use the synopsis section of the Inspector pane to keep scene notes you want to appear in the Final Draft document as a scene summary. “Include footnotes […]” and “Include comments and annotations […]” will allow you to choose whether you want to have footnotes, and/or comments & annotations, appear in the Final Draft output as script notes. If either option is unchecked, those items will not be compiled into the final output at all.“Break dialog and action at sentences” is sort of the scriptwriting equivalent of widow/orphan control; that is, in scriptwriting it is normal to keep action and dialog together. If this checkbox is on, any time that a dialog or action sentence will be separated by a page break, the compiler will force them to stay together by placing them after the break. “Include revision colors from Preferences” enables you to control whether or not the changes made to the document (if you are tracking them) will display with the colors set in the Preferences pane. This way, the compiled output will maintain the change order & keep them labeled with the color you’ve chosen. If you don’t track revisions this way, this setting will have no effect.Finally, if you check the “Use default Final Draft screenplay elements” checkbox, the compiled output will tell the compiler to ignore your formatting, and instead have Final Draft handle the formatting of your output file. With this checkbox unchecked, the compiler will keep your formatting decisions intact.
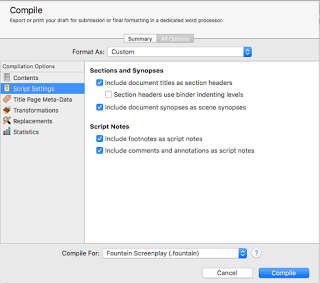 When using .fountain output, this pane changes somewhat, with only a few checkbox options. The checkboxes for “Include document titles […]” and “Include document synopses […]” remain, with an additional checkbox for “Section headers use binder indenting levels,” which simply formats the sections in the output file to reflect, visually, their depth in the hierarchy. The “Include footnotes […]” and “Include comments […]” checkboxes also remain.
HTML
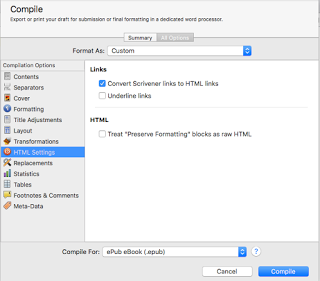
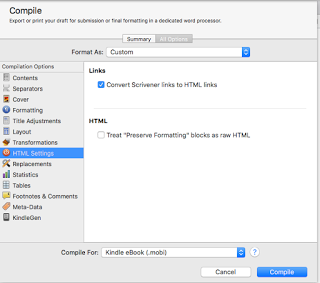
 The HTML option pane is only available when the selection is set to the .html (but not webarchive!), .epub, or .mobi compile outputs. Selections here allow you to turn on or off the option to convert Scrivener links into HTML links—allowing you to keep references to other Scrivener documents intact in the final output—and whether to underline those links or not (.epub and .html only). There is also an option to “Preserve Formatting” as raw HTML; you can mark selections of text to Preserve Formatting under the Format menu->Formatting->Preserve Formatting. For .html output, you can also select whether to restrict the body text to a particular width or not.
Compatibility
The Compatibility pane enables certain options, depending on whether the output type is set to the MultiMarkdown (without clarification), MultiMarkdown .tex, or MultiMarkdown .html format.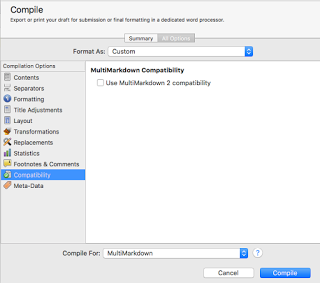
In “straight” MultiMarkdown, the only option is whether to enable MultiMarkdown 2 support.
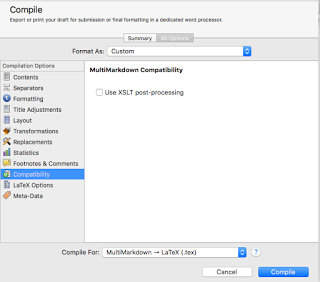
For a .tex format, the only option is whether to enable XSLT post-processing.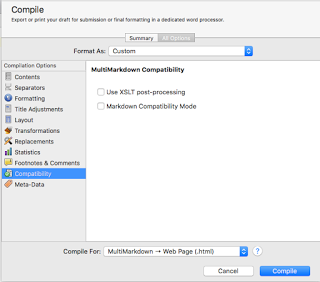 In .html format, the two options include the ability to enable the same XSLT post-processing, as well as Markdown Compatibility Mode.
In Conclusion
We’re nearing the end of the option panes available when compiling in Scrivener, with Script Settings, HTML, and Compatibility being three of the last seven. My next blog will finish the final four options available, the Cover, Meta-Data, RTF Compatibility, and Kindle Gen Option panes. I hope I’ve been able to give you some additional insight into these panes and enabled a better understanding of how they work. As always, leave comments or questions below, and happy writing!
Script Settings
 As you might expect, the Script Settings option pane is aimed at setting options when the compile output is Final Draft (.fdx) script, although the .fountain script type does have a few plaintext options available in this pane. This setting is not available for .fcf output types, or any non-script outputs.A few of these are pretty straightforward. “First document is title page” will do exactly that; be sure, however, that your first document actually is a title page! If you click this checkbox and then fail to add a title page at the beginning, it will chop off the first page of your script. “Include document titles as scene titles” and “Include document synopses as scene summaries” are useful if you title your documents in the Binder with your scene titles, and/or if you use the synopsis section of the Inspector pane to keep scene notes you want to appear in the Final Draft document as a scene summary. “Include footnotes […]” and “Include comments and annotations […]” will allow you to choose whether you want to have footnotes, and/or comments & annotations, appear in the Final Draft output as script notes. If either option is unchecked, those items will not be compiled into the final output at all.“Break dialog and action at sentences” is sort of the scriptwriting equivalent of widow/orphan control; that is, in scriptwriting it is normal to keep action and dialog together. If this checkbox is on, any time that a dialog or action sentence will be separated by a page break, the compiler will force them to stay together by placing them after the break. “Include revision colors from Preferences” enables you to control whether or not the changes made to the document (if you are tracking them) will display with the colors set in the Preferences pane. This way, the compiled output will maintain the change order & keep them labeled with the color you’ve chosen. If you don’t track revisions this way, this setting will have no effect.Finally, if you check the “Use default Final Draft screenplay elements” checkbox, the compiled output will tell the compiler to ignore your formatting, and instead have Final Draft handle the formatting of your output file. With this checkbox unchecked, the compiler will keep your formatting decisions intact.
 When using .fountain output, this pane changes somewhat, with only a few checkbox options. The checkboxes for “Include document titles […]” and “Include document synopses […]” remain, with an additional checkbox for “Section headers use binder indenting levels,” which simply formats the sections in the output file to reflect, visually, their depth in the hierarchy. The “Include footnotes […]” and “Include comments […]” checkboxes also remain.
HTML
 The HTML option pane is only available when the selection is set to the .html (but not webarchive!), .epub, or .mobi compile outputs. Selections here allow you to turn on or off the option to convert Scrivener links into HTML links—allowing you to keep references to other Scrivener documents intact in the final output—and whether to underline those links or not (.epub and .html only). There is also an option to “Preserve Formatting” as raw HTML; you can mark selections of text to Preserve Formatting under the Format menu->Formatting->Preserve Formatting. For .html output, you can also select whether to restrict the body text to a particular width or not.

Compatibility
The Compatibility pane enables certain options, depending on whether the output type is set to the MultiMarkdown (without clarification), MultiMarkdown .tex, or MultiMarkdown .html format.


In “straight” MultiMarkdown, the only option is whether to enable MultiMarkdown 2 support.
For a .tex format, the only option is whether to enable XSLT post-processing.
 In .html format, the two options include the ability to enable the same XSLT post-processing, as well as Markdown Compatibility Mode.
In Conclusion
We’re nearing the end of the option panes available when compiling in Scrivener, with Script Settings, HTML, and Compatibility being three of the last seven. My next blog will finish the final four options available, the Cover, Meta-Data, RTF Compatibility, and Kindle Gen Option panes. I hope I’ve been able to give you some additional insight into these panes and enabled a better understanding of how they work. As always, leave comments or questions below, and happy writing!
December 18, 2015
New blog post on Writer's Life: A Writer's Guide To Social Media Management Tools
My latest blog post, A Writer's Guide To Social Media Management Tools, is up over at Writer's Life.org, go check it out!
December 17, 2015
Compiling in Scrivener: Print Settings, Title Adjustments, and PDF settings
Hello, and welcome back to Cogitations of a Semi-Pro Wordsmith! Today, I’m continuing on in my series on Compiling in Scrivener, covering Print Settings, Title Adjustments, and PDF Settings. Here, we are starting to get into Option panes in the Compile sheet that are relatively limited in their applicability—though, not their importance!—and will be covering Option panes that sometimes only apply to one or two compile output types.
Print Settings
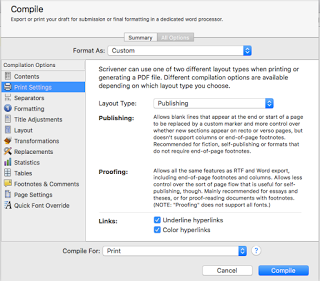 The Print Settings pane is only available if your output type, in the “Compile For:” menu, is either “Print” or “PDF.” There is one menu selection, for Layout Type, and two checkboxes. The two Layout Types are “Publishing” and “Proofing.” The purpose of this setting is to enable or disable certain options in other panes. The “Publishing” setting—which, according to Scrivener, is just a title not a hard-and-fast rule about its intended use—turns off the ability for printed or PDF output documents to have end-of-page footnotes or use columns. In so doing, it enables control over recto/verso page options and certain custom markings (specifically, custom end-of/start-of scene markings), as well as header/footer options. The “Proofing” setting essentially does the opposite, enabling end-of-page footnotes & columns in the output, while disabling the other options listed. It might be better even to think of the “Proofing” Layout Type as “Footnote & Columns” rather than “Proofing,” since it’s not just an output format for proofing your document in Printed or PDF formats. The two checkboxes at the bottom of the pane, when checked, enable hyperlinks to be either underlined, colored (blue, always), or both, in the printed or PDF output.
Title Adjustments
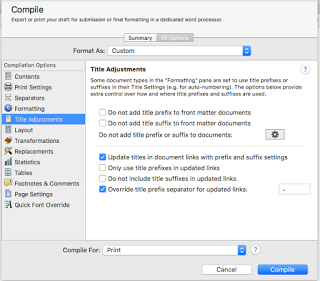
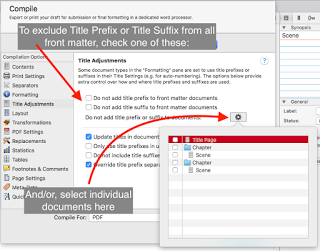 The Title Adjustments pane is only present if the Formatting pane has had a title prefix or suffix set at least one time. Once that is true, this pane appears, and you can use it to exercise more fine-grained control over the Title Prefix and Title Suffix settings from the Formatting pane. Specifically, it allows you to specify what documents you do not want to have a Title Prefix or Title Suffix, and to exclude all front matter entirely with a checkbox (one each for Prefix & Suffix). It also permits you to specify how Title Prefix and Title Suffix items are handled in document links (like, say, a Table of Contents), including disabling them or specifying a special separator for them in links. For example, if you have used the Formatting pane to set a Title Prefix of “Chapter <$n>:¶” (meaning, a carriage return after the Prefix of “Chapter 1:” etc.), the carriage return would also be in the Prefix in these document links. If you check the “Override title prefix…” checkbox on this panel, you can replace that carriage return with a separator of your own choosing, so as not to interrupt your Table of Contents with extraneous returns.
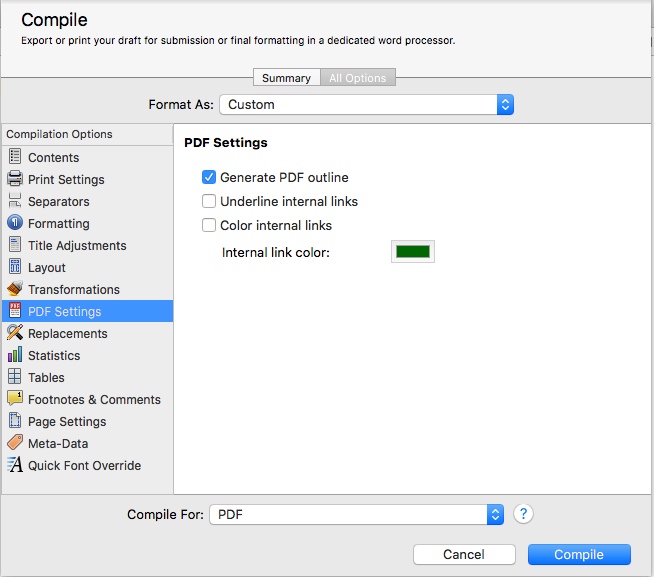
PDF Settings
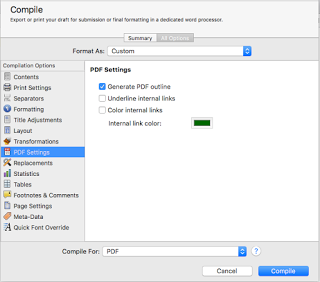 The PDF Settings pane is only available when the output format for the compile is PDF and also only if the “Publishing” Layout Type is selected in the Print Settings pane. The PDF Settings pane allows you to specify whether the compiler will create an Outline that certain PDF readers (including Acrobat Reader) will display in the sidebar—not a table of contents—and whether to underline &/or color internal links (and if so, what color to use).
In Conclusion
Most of the settings in these panes are reasonably straightforward, and should not pose much of an issue. Do keep in mind that the Print Settings Layout Types are not hard-named. That is, the name “Publishing” is just a name to use to distinguish it from the other option, “Proofing,” which is also not just for creating a proof. They are really just names to distinguish the one from the other.With that, I do hope I’ve been able to explain these options for you, and make your compiling in scrivener using the Print Settings, Title Adjustments, and PDF Settings panes a little easier. For my next post, I’ll go over the Script Settings, HTML, and Compatibility settings panes. As always, if you have questions or comments please leave them below, and happy writing!
Print Settings
 The Print Settings pane is only available if your output type, in the “Compile For:” menu, is either “Print” or “PDF.” There is one menu selection, for Layout Type, and two checkboxes. The two Layout Types are “Publishing” and “Proofing.” The purpose of this setting is to enable or disable certain options in other panes. The “Publishing” setting—which, according to Scrivener, is just a title not a hard-and-fast rule about its intended use—turns off the ability for printed or PDF output documents to have end-of-page footnotes or use columns. In so doing, it enables control over recto/verso page options and certain custom markings (specifically, custom end-of/start-of scene markings), as well as header/footer options. The “Proofing” setting essentially does the opposite, enabling end-of-page footnotes & columns in the output, while disabling the other options listed. It might be better even to think of the “Proofing” Layout Type as “Footnote & Columns” rather than “Proofing,” since it’s not just an output format for proofing your document in Printed or PDF formats. The two checkboxes at the bottom of the pane, when checked, enable hyperlinks to be either underlined, colored (blue, always), or both, in the printed or PDF output.
Title Adjustments

 The Title Adjustments pane is only present if the Formatting pane has had a title prefix or suffix set at least one time. Once that is true, this pane appears, and you can use it to exercise more fine-grained control over the Title Prefix and Title Suffix settings from the Formatting pane. Specifically, it allows you to specify what documents you do not want to have a Title Prefix or Title Suffix, and to exclude all front matter entirely with a checkbox (one each for Prefix & Suffix). It also permits you to specify how Title Prefix and Title Suffix items are handled in document links (like, say, a Table of Contents), including disabling them or specifying a special separator for them in links. For example, if you have used the Formatting pane to set a Title Prefix of “Chapter <$n>:¶” (meaning, a carriage return after the Prefix of “Chapter 1:” etc.), the carriage return would also be in the Prefix in these document links. If you check the “Override title prefix…” checkbox on this panel, you can replace that carriage return with a separator of your own choosing, so as not to interrupt your Table of Contents with extraneous returns.
PDF Settings
 The PDF Settings pane is only available when the output format for the compile is PDF and also only if the “Publishing” Layout Type is selected in the Print Settings pane. The PDF Settings pane allows you to specify whether the compiler will create an Outline that certain PDF readers (including Acrobat Reader) will display in the sidebar—not a table of contents—and whether to underline &/or color internal links (and if so, what color to use).
In Conclusion
Most of the settings in these panes are reasonably straightforward, and should not pose much of an issue. Do keep in mind that the Print Settings Layout Types are not hard-named. That is, the name “Publishing” is just a name to use to distinguish it from the other option, “Proofing,” which is also not just for creating a proof. They are really just names to distinguish the one from the other.With that, I do hope I’ve been able to explain these options for you, and make your compiling in scrivener using the Print Settings, Title Adjustments, and PDF Settings panes a little easier. For my next post, I’ll go over the Script Settings, HTML, and Compatibility settings panes. As always, if you have questions or comments please leave them below, and happy writing!
December 16, 2015
New blog post up on Writer's Life.org: 5 Ways A Writer Can Optimize Social Media
My latest blog, 5 Ways A Writer Can Optimize Social Media, is up over at Writer's Life.org ... go check it out!


